

Page 1

QUICK START GUIDE
Model: S3820w-C0NA
VIZIO
Page 2
• Do not overload power strips and extension cords. Overloading can result in fire or electric
shock.
• The wall socket should be located near your Unit and be easily accessible
• Keep your Unit away from moisture. Do not expose your Unit to rain or moisture. If water penetrates into your Unit,
unplug the power cord and contact your dealer. Continuous use in this case may result in fire or electric shock.
• Do not use your Unit if any abnormality occurs. If any smoke or odor becomes apparent, unplug the power cord
and contact your dealer immediately. Do not try to repair your Unit yourself.
• Avoid using dropped or damaged appliances. If your Unit is dropped and the housing is damaged, the internal
components may function abnormally. Unplug the power cord immediately and contact your dealer for repair.
Continued use of your Unit may cause fire or electric shock.
• Do not install your Unit in an area with heavy dust or high humidity. Operating your Unit in environments with
heavy dust or high humidity may cause fire or electric shock.
• Ensure that the power cord and any other cables are unplugged before moving your Unit.
• When unplugging your Unit, hold the power plug, not the cord. Pulling on the power cord may damage the wires
inside the cord and cause fire or electric shock. When your Unit will not be used for an extended period of time,
unplug the power cord.
• To reduce risk of electric shock, do not touch the connector with wet hands.
• Insert the remote control batteries in accordance with instructions. Incorrect polarity may cause the battery to
leak which can damage the remote control or injure the operator.
• See the important note and rating located on the back of the unit.
• WARNING - This equipment is not waterproof. To prevent a fire or shock hazard, do not place any container filled
with liquid near the equipment (such as a vase or flower pot) or expose it to dripping, splashing, rain, or moisture.
• CAUTION - Danger of explosion or fire if batteries are mistreated. Replace only with the same or specified type.
• Do not leave the batteries exposed to direct sunlight for a long period of time with doors and windows closed.
Do not disassemble the batteries or dispose of it in fire.
WARNING: To reduce the risk of fire or electric shock, do not expose this apparatus to rain or moisture.
Explanation of WARNING symbols:
The lighting flash with arrowhead symbol within an equilateral triangle is intended to alert the user to
the presence of not isolated dangerous voltage within the product that may be sufficient magnitude to
constitute a risk of shock to persons.
The exclamation point within an equilateral triangle is intended to alert the user to the presence of
important operating and servicing instructions in the literature accompanying the appliance.
Your Unit is designed and manufactured to operate within defined design limits, and misuse may result in electric
shock or fire. To prevent your Unit from being damaged, the following rules should be observed for its installation, use,
and maintenance. Please read the following safety instructions before operating your Unit. Keep these instructions
in a safe place for future reference.
• Read these instructions.
• Keep these instructions.
• Heed all warnings.
• Follow all instructions.
• Do not use this apparatus near water.
• Clean only with a dry cloth.
• Do not block any ventilation openings. Install in accordance with the manufacturer’s instructions.
• Do not install near any heat sources such as radiators, heat registers, stoves, or other apparatus (including
amplifiers) that produce heat.
• Do not defeat the safety purpose of the polarized or grounding-type plug. A polarized plug has two blades with
one wider than the other. A grounding type plug has two blades and a third grounding prong. The wide blade or
the third prong are provided for your safety. If the provided plug does not fit into your outlet, consult an electrician
for replacement of the obsolete outlet.
• Protect the power cord from being walked on or pinched, particularly at plugs, convenience receptacles, and
the point where they exit from the apparatus.
• Only use attachments/accessories specified by the manufacturer.
• Use only with the cart, stand, tripod, bracket, or table specified by the manufacturer, or
sold with the apparatus. When a cart is used, use caution when moving the cart/apparatus
combination to avoid injury from tip-over.
• Unplug this apparatus during lightning storms or when unused for long periods of time.
• Refer all servicing to qualified service personnel. Servicing is required when the apparatus has been damaged
in any way, such as when the power supply cord or plug is damaged, liquid has been spilled or objects have
fallen into the apparatus, the apparatus has been exposed to rain or moisture, does not operate normally, or has
been dropped.
• To reduce the risk of electric shock or component damage, switch off the power before connecting other
components to your Unit.
• Unplug the power cord before cleaning your Unit. A damp cloth is sufficient for cleaning. Do not use a liquid or a
spray cleaner on your Unit. Do not use abrasive cleaners.
• Always use the accessories recommended by the manufacturer to insure compatibility.
• When moving your Unit from an area of low temperature to an area of high temperature, condensation may
form in the housing. Wait before turning on your Unit to avoid causing fire, electric shock, or component damage.
• Slots and openings in the back and bottom of the cabinet are provided for ventilation. To ensure reliable
operation of your Unit and to protect it from overheating, be sure these openings are not blocked or covered. Do
not place your Unit in a bookcase or cabinet unless proper ventilation is provided.
• Never push any object into the slots and openings on your Unit enclosure. Do not place any objects on the
top of your Unit. Doing so could short circuit parts causing a fire or electric shock. Never spill liquids on your Unit.
• When connected to a power outlet, power is always flowing into your Unit. To totally disconnect power, unplug
the power cord.
IMPORTANT SAFETY INSTRUCTIONS
CAUTION
RISK OF ELECTRIC SHOCK
DO NOT OPEN
Page 3
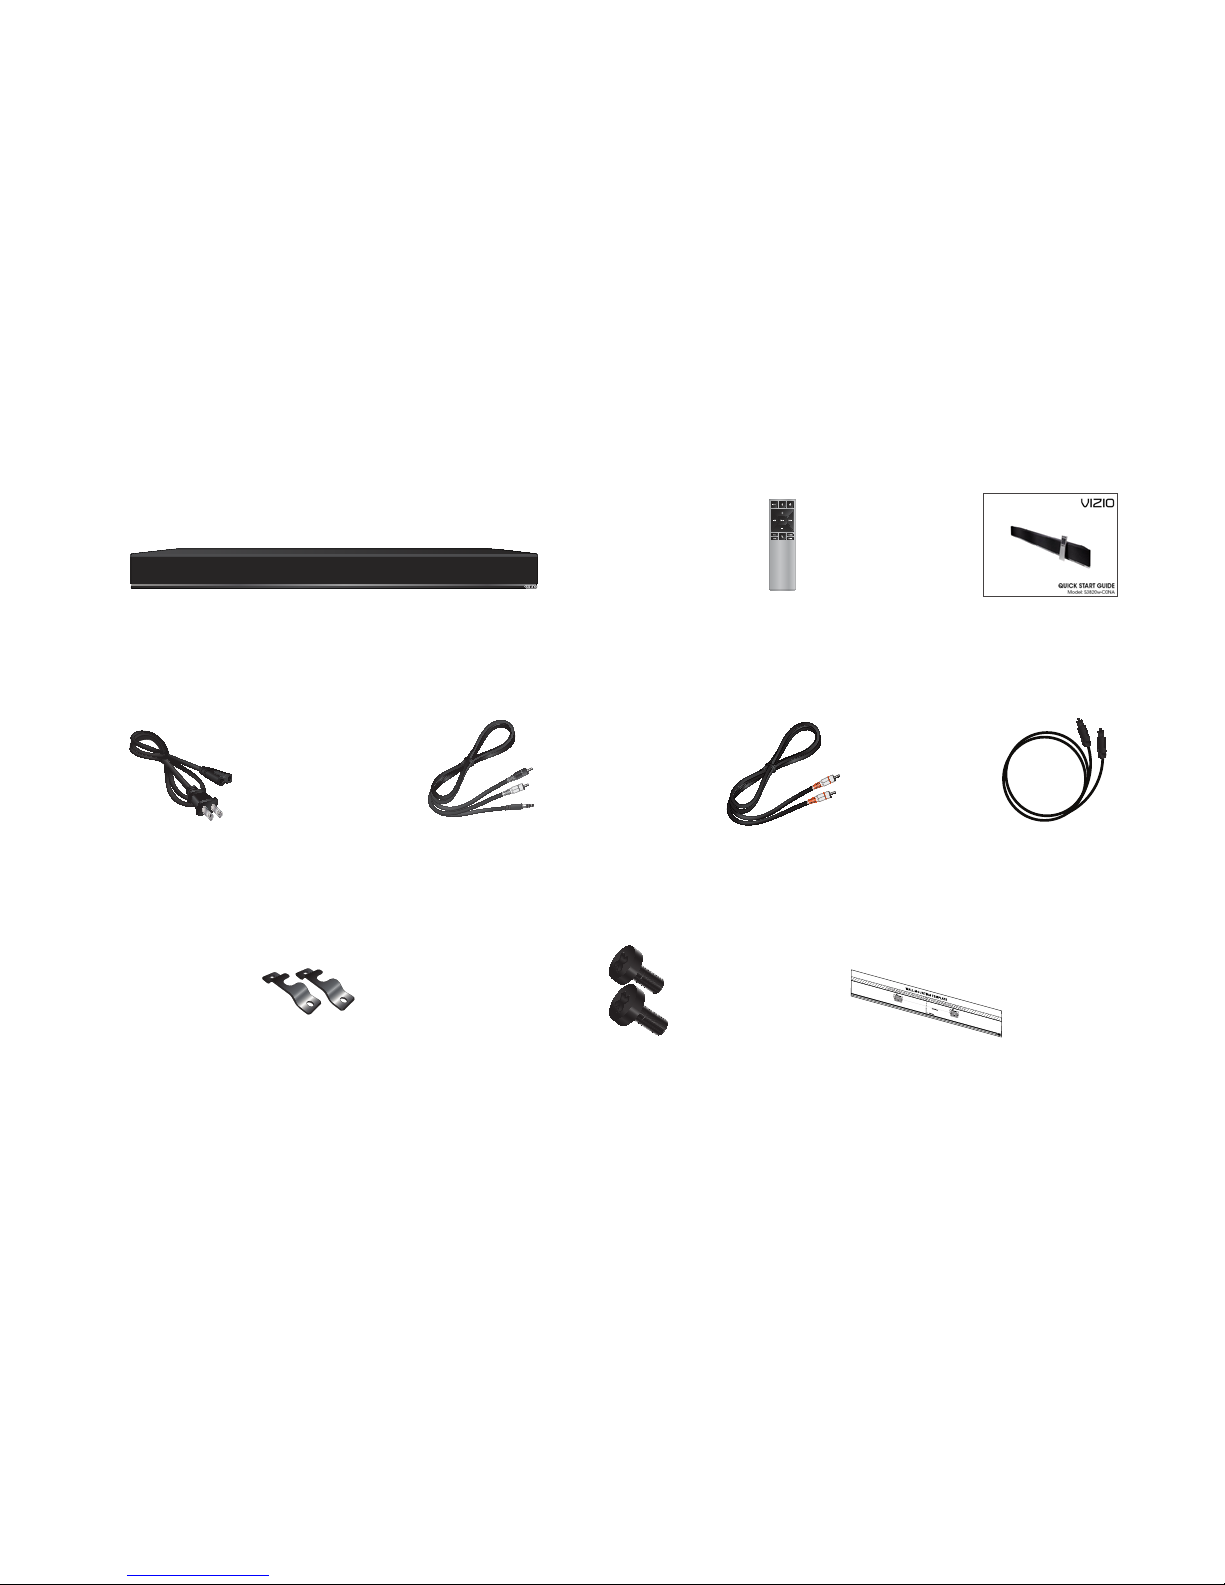
PACKAGE CONTENTS
This Quick
Start Guide
Remote Control
with Batteries
High Definition Sound Bar
Digital Optical
Cable
Stereo RCA to 3.5mm
Audio Cable
Coaxial Audio
Cable
Power Cable
2 x Sound Bar Wall
Mount Brackets
Wall Mount
Template
2 x Wall
Mount Screws
(Size: M4 x 10)
Page 4

CONTROLS & CONNECTIONS
Back of Sound Bar
Power Port
SUB OUT
Subwoofer Out
OPTICAL (4)
Digital Optical Audio In
DIGITAL (3)
Coaxial In
AUX (1)
Analog Audio In
AUX (2)
Analog Audio In
Service Port
Page 5
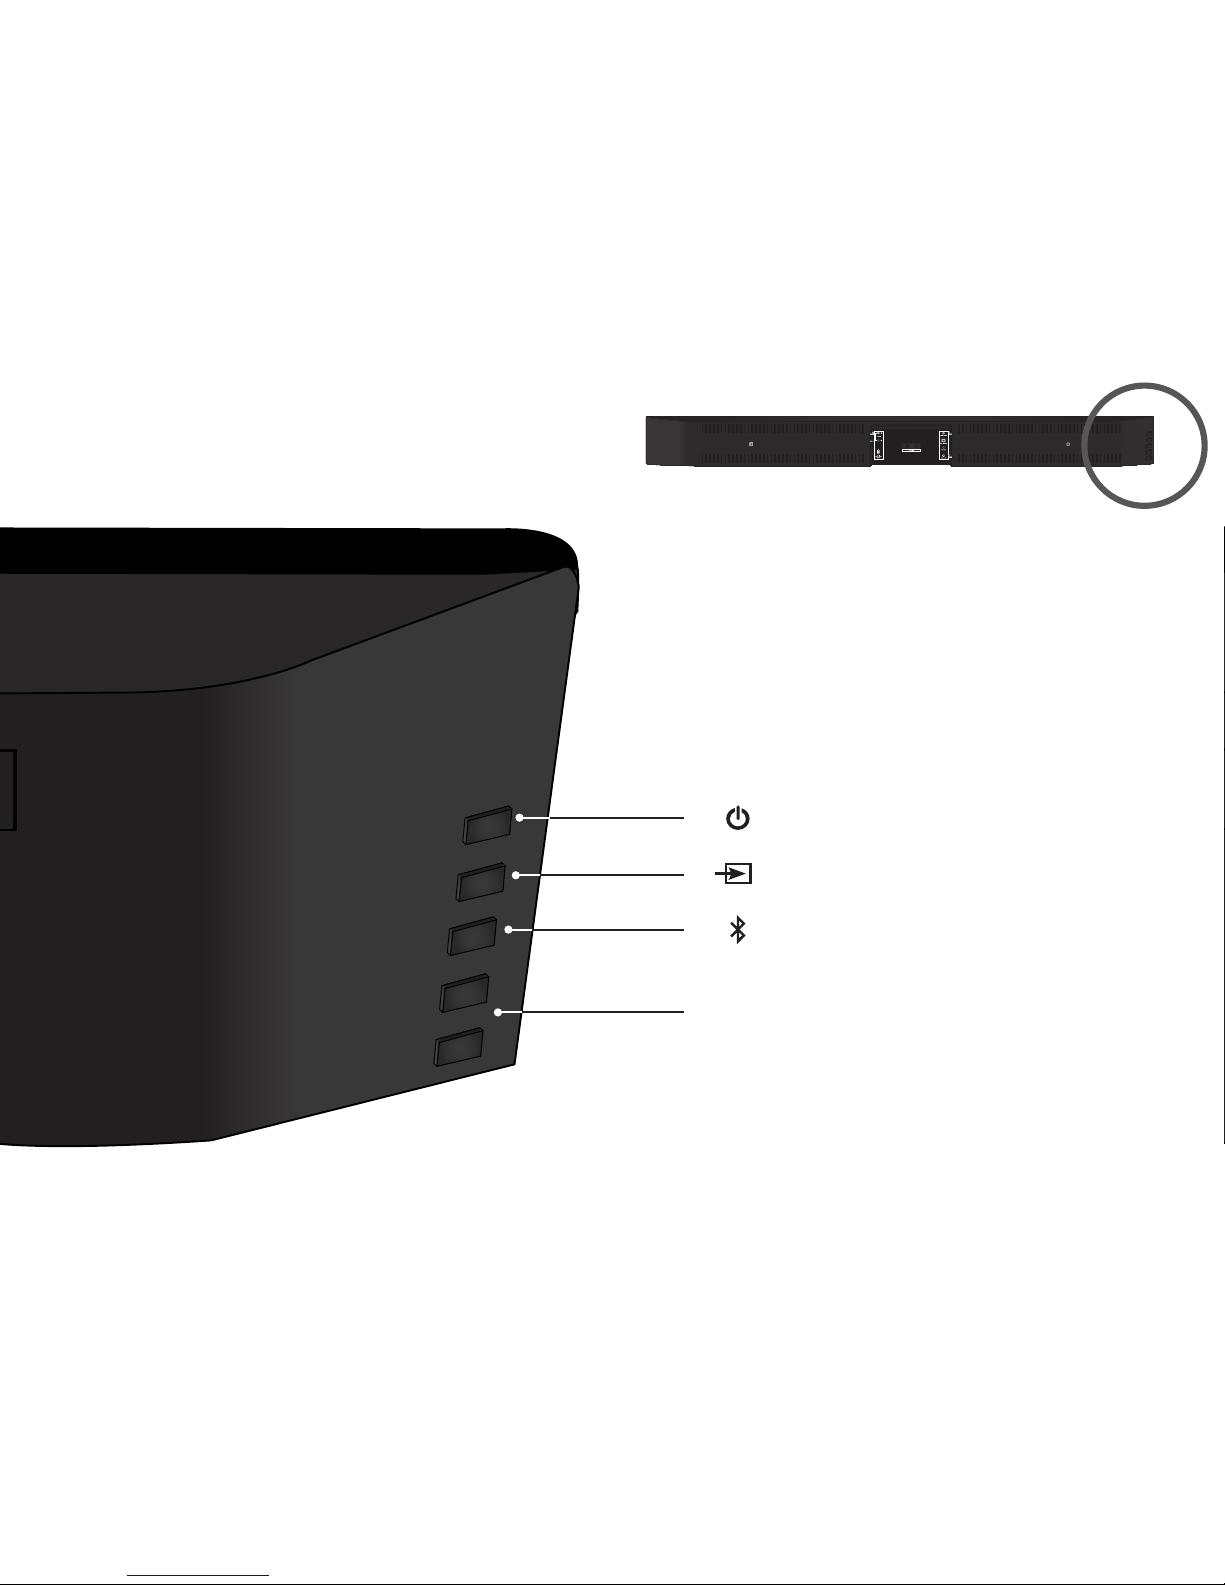
Control Buttons are located here:
Back of Sound Bar
Input
Power
Volume
+
-
Bluetooth Input
(Hold to force pair, See ‘Bluetooth Pairing’ for more information.)
Page 6
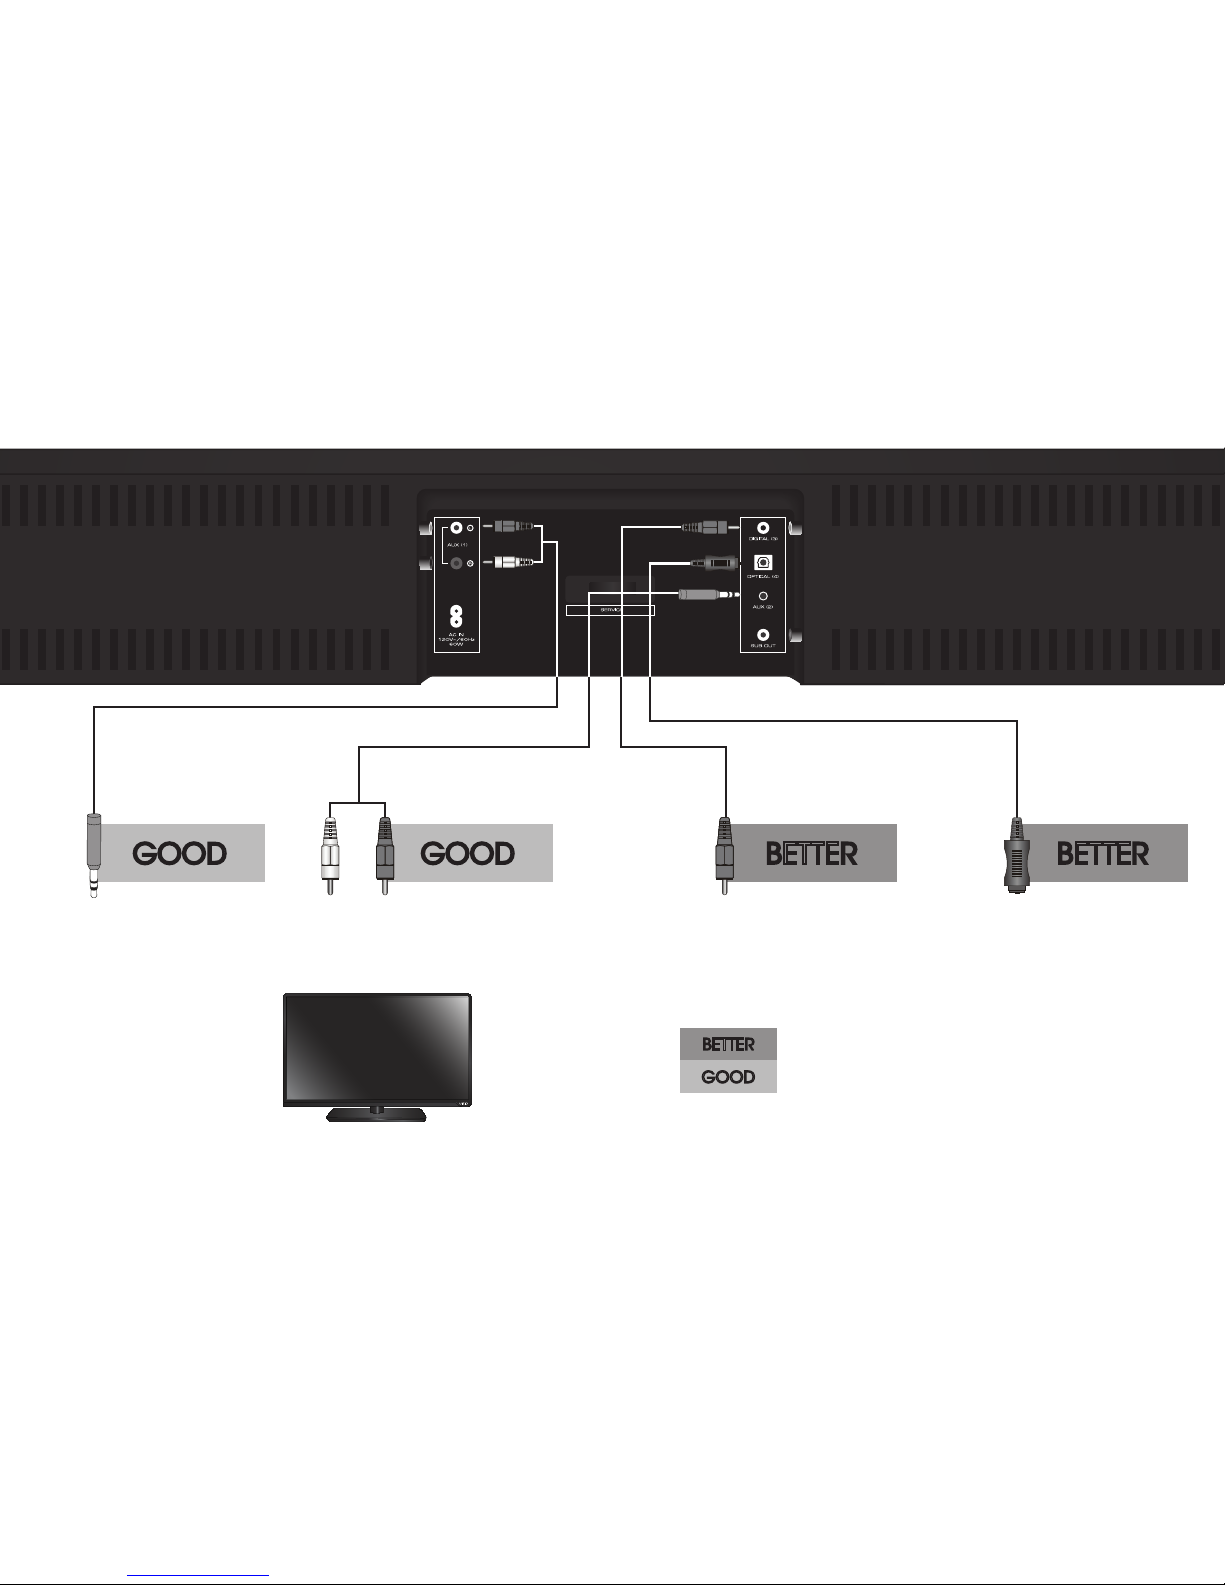
FIRST-TIME SETUP
*Not all TVs have the audio outputs shown above. To connect the Sound Bar directly
to your other devices (Blu-ray player, game system, etc) see your device’s user manual.
1
AND CONNECT IT TO YOUR TV
CHOOSE ONE CABLE:
BETTER
GOOD
GOOD GOOD
BETTERBETTER
3.5MM TO
RCA CABLE
3.5MM TO
RCA CABLE
DIGITAL COAXIAL
CABLE**
DIGITAL OPTICAL
CABLE**
**When using either of the Digital Inputs, if there is no audio: (A) try setting the TV
output to PCM or (B) Connect directly to your Blu-ray/other source, some TVs do not
pass through digital audio.
Back of Sound Bar
Page 7
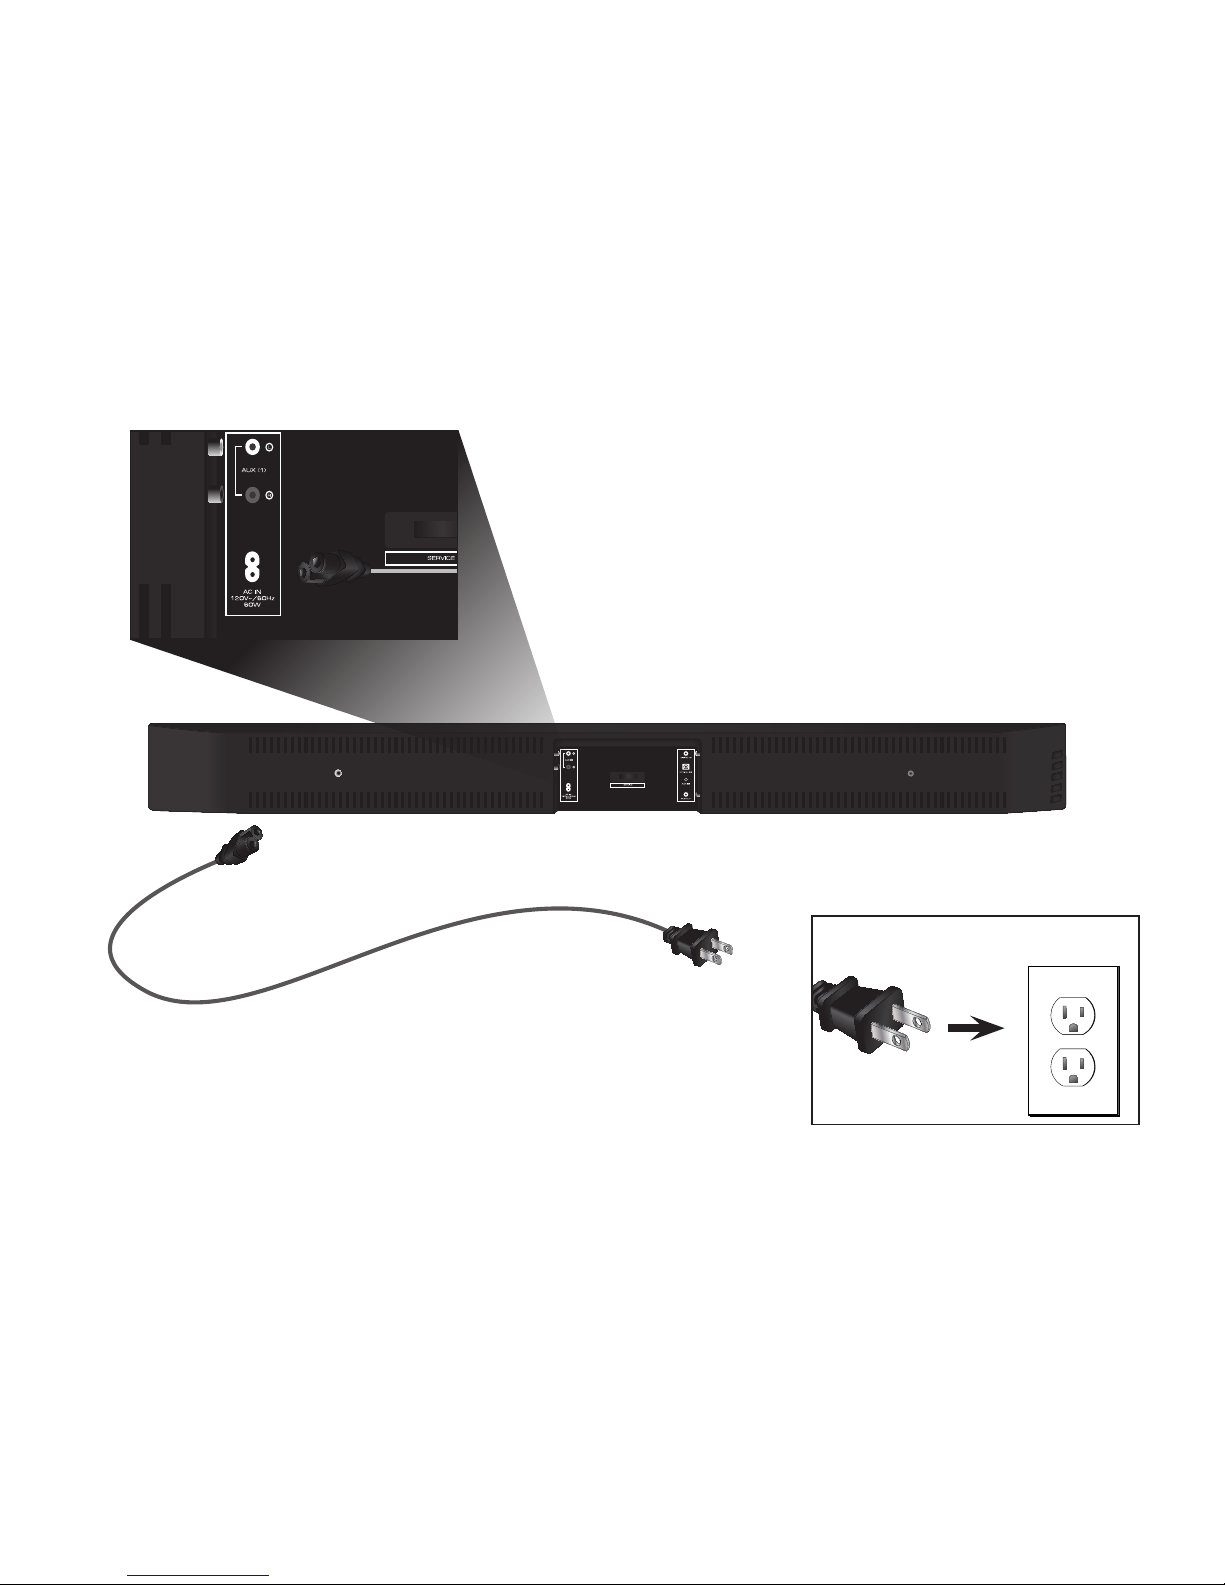
3
Connect the Power Cable to
the Sound Bar.
Plug the Power Cable into
a power outlet.
2
Page 8
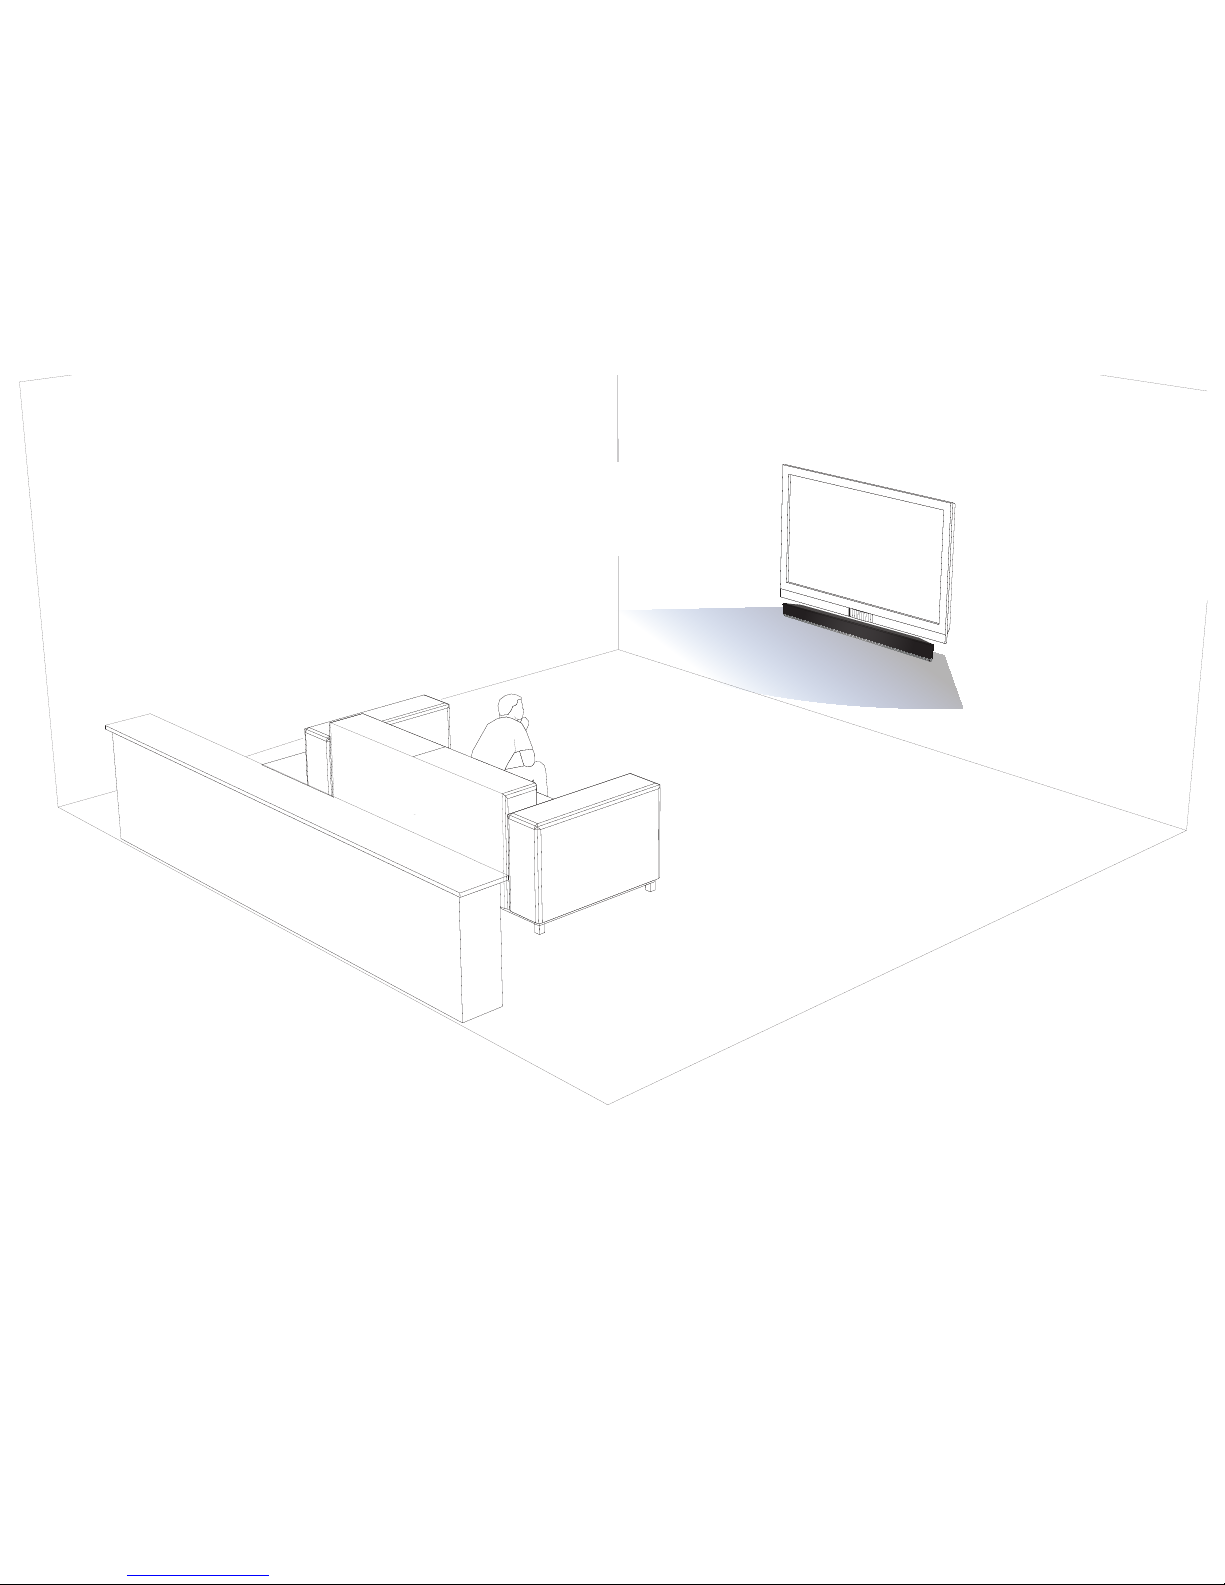
For the best surround sound experience, position the Sound Bar as shown.
The Sound Bar should be close to ear level.
Sound Bar is centered
below the TV.
4
Page 9
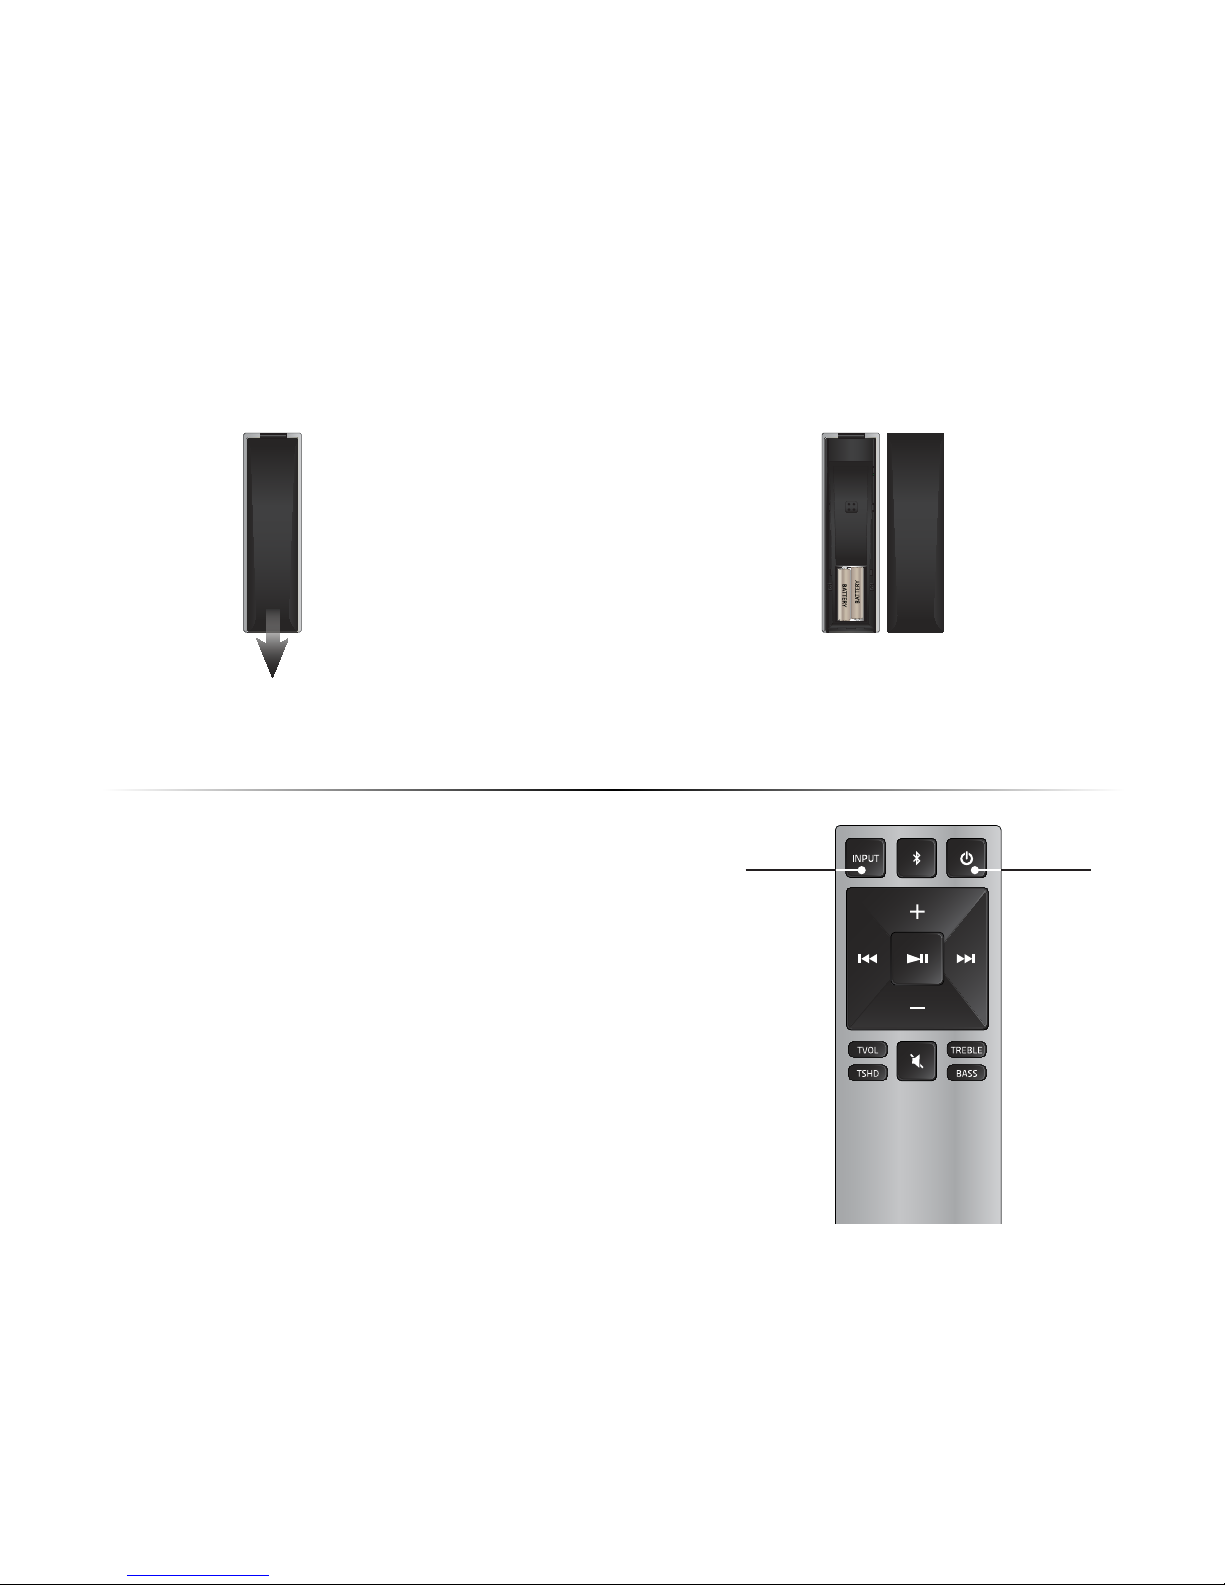
9
Remove the battery cover
by gently sliding it away
from the remote.
10
Insert the included batteries
and gently slide the battery
cover back into place.
11
Turn your TV on, then press the Power button
on the remote to turn the Sound Bar on.
Press the Input button to switch between
audio sources. For example, if you
connected your TV to Input 1, set the Sound
Bar to Input 1.
Hardware setup is complete.
Power
Input
Top Top
Page 10
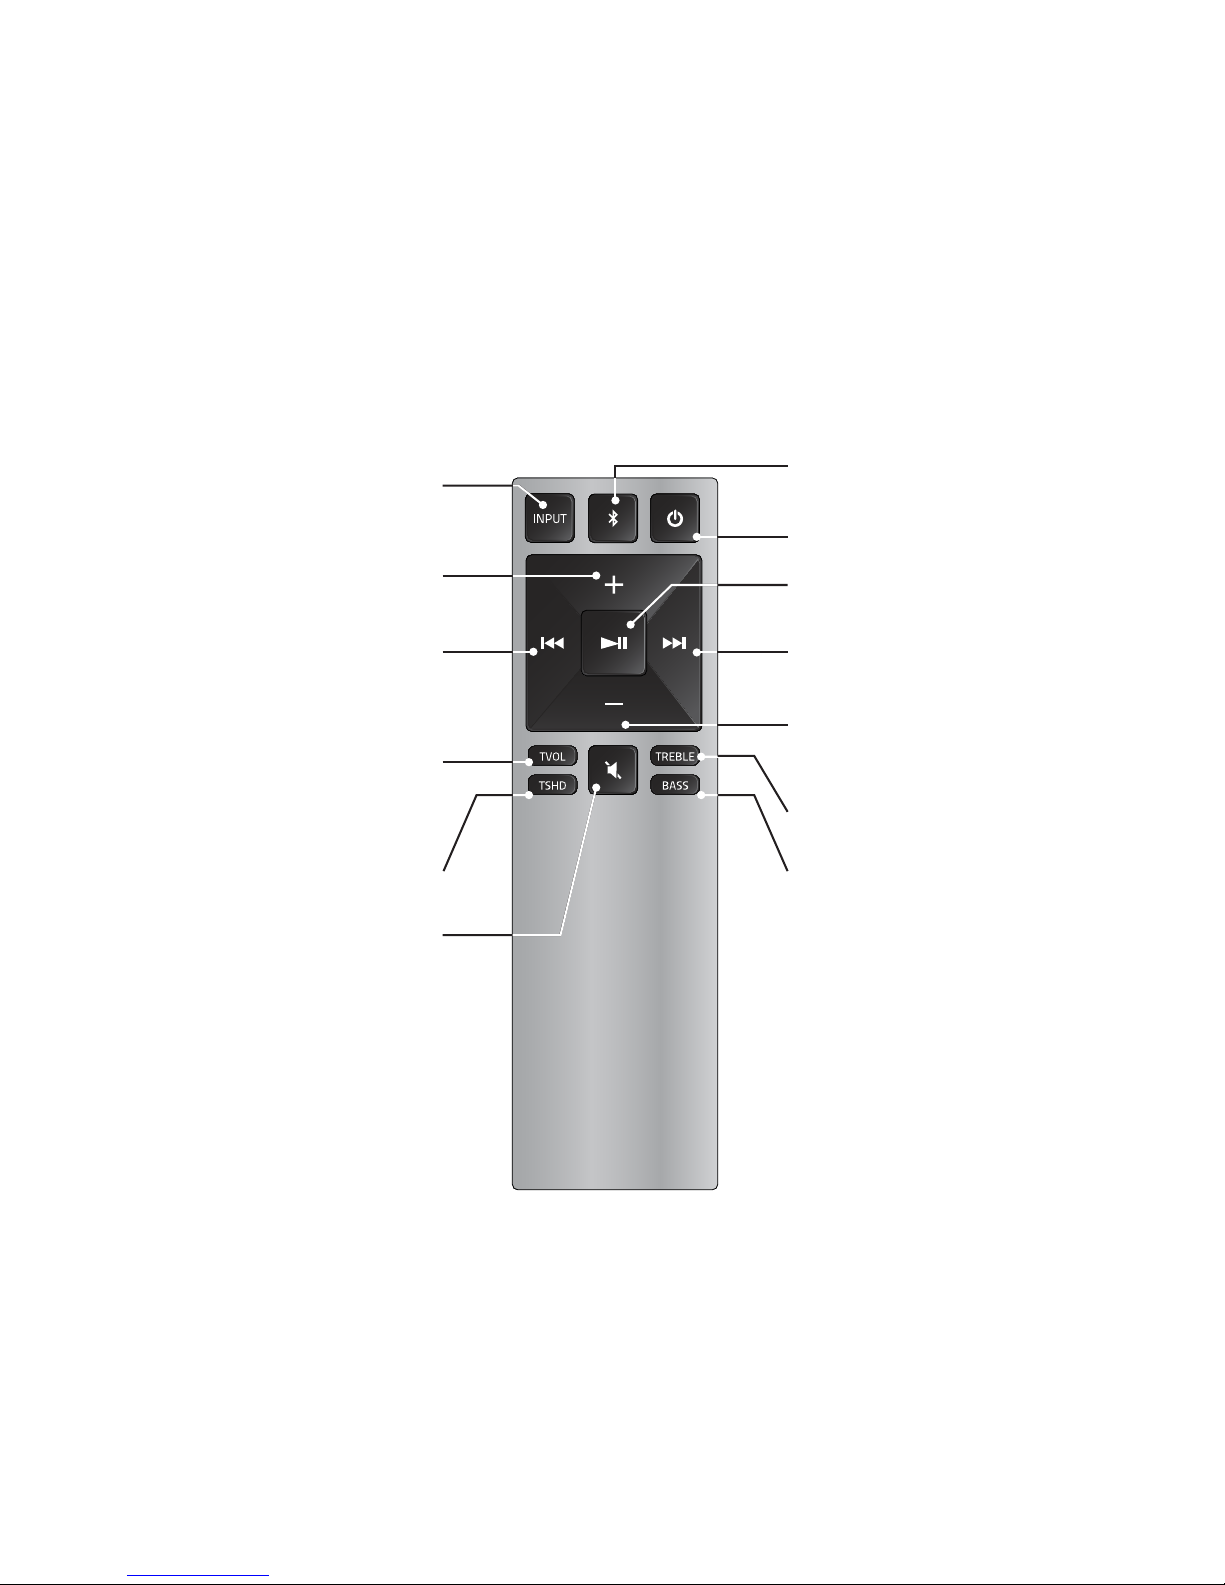
Volume +
Press to increase volume.
Volume –
Press to decrease volume.
USING THE REMOTE
Previous
Press to return to previous track.
(Changes Treble and Bass levels)
Power
Press to turn on or off.
Mute
Press to mute/unmute.
Input
Press to change input source.
Enter/Play/Pause
Press to select an option.
Press to play or pause.
Next
Press to skip to the next track.
(Changes Treble and Bass levels)
Treble
Press to enter treble adjustment mode.
Bass
Press to enter bass adjustment mode.
TruVolume
Press to enable/disable TruVolume.
TruSurround HD
Press to enable/disable TruSurround HD.
Bluetooth
Press to enter Bluetooth input.
(To enter force pair mode, press and hold for 5 seconds)
Page 11
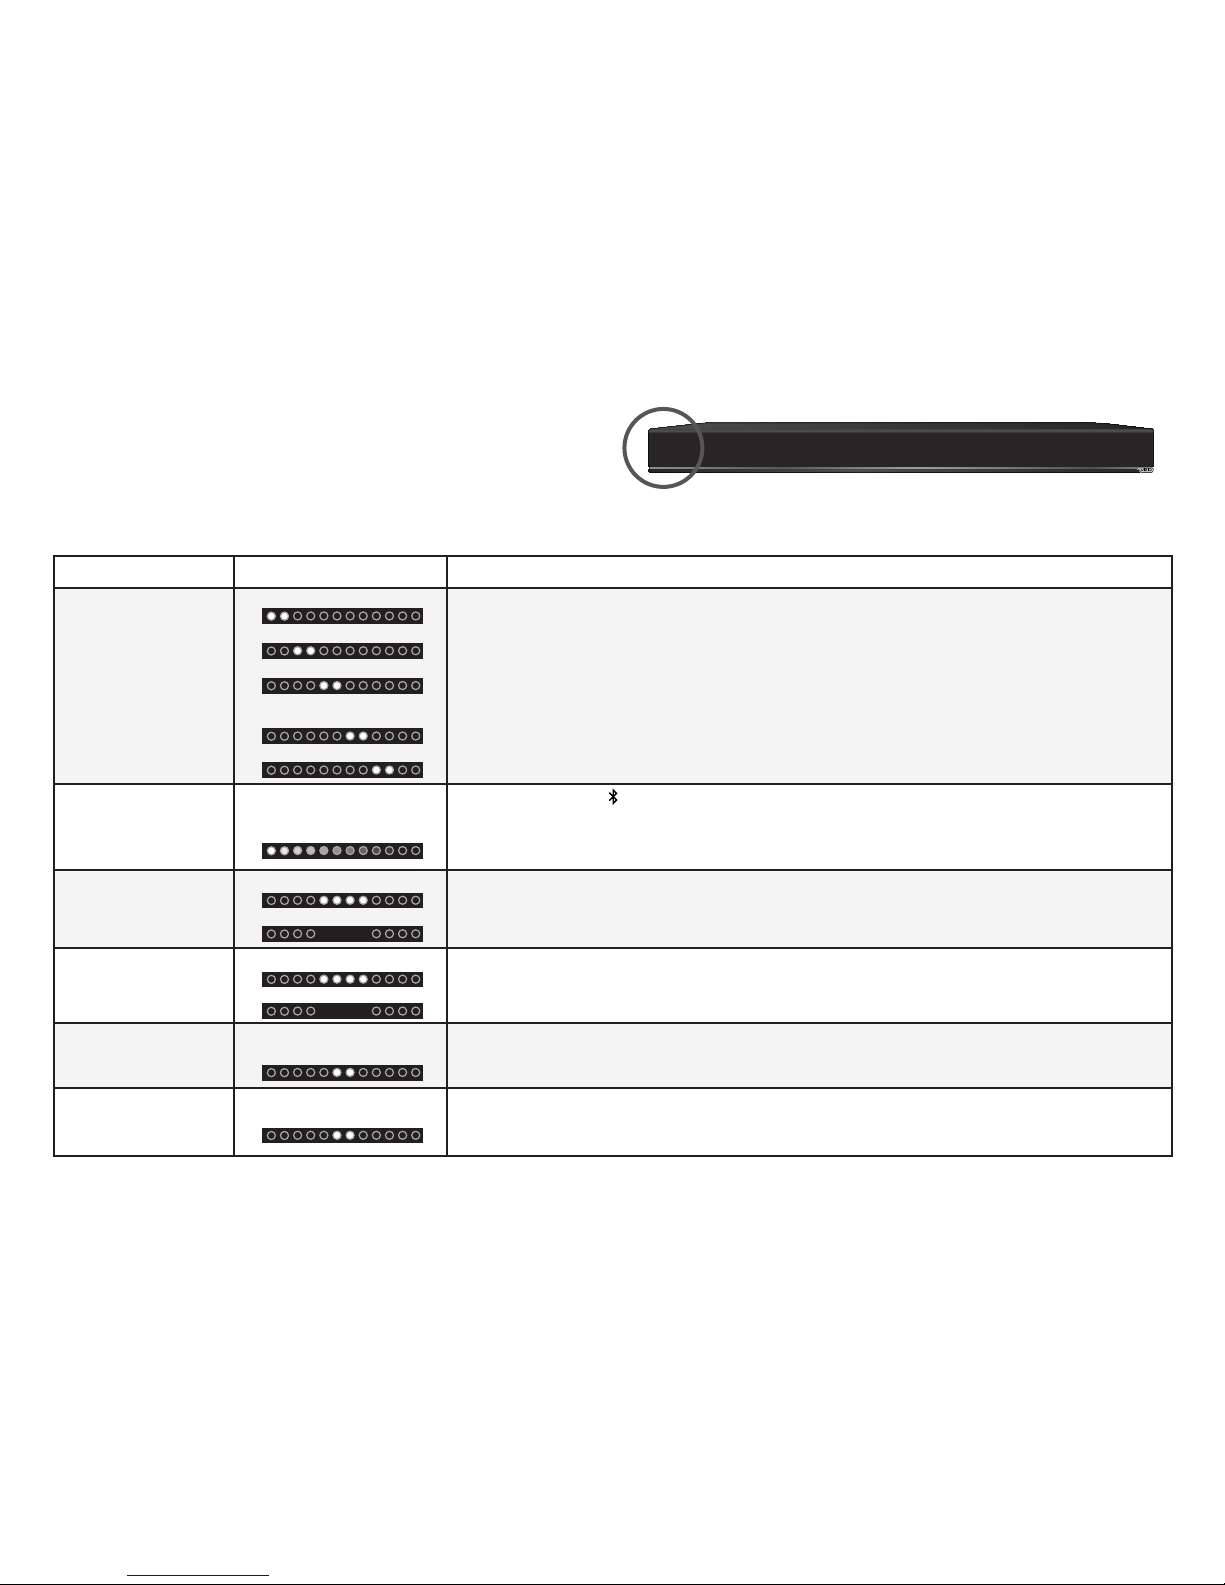
LED Indicators are located here:
The LED Indicators will behave differently with each button on the remote control.
Function LED Behavior Description
Input
Press the INPUT button on the remote to cycle through each available input:
• Analog Audio In - AUX (1)
• Analog Audio In - AUX (2)
• Coaxial In- Digital (3)
• Digital Optical Audio In - Optical (4)
• Bluetooth
Bluetooth Pairing
(When searching for device)
Flash from Left to Right
and back continuously.
Press and hold the button on the remote. The Sound Bar will be discoverable for 15
minutes. You can now search for the Sound Bar (VIZIO S3820w) using your Bluetooth Device.
The sound bar will power down if no device is found.
Note: Set your Bluetooth device into pairing mode prior to the Sound Bar.
DTS TruVolume
On/Off
TruVolume On:
TruVolume Off:
Press the TVOL button to enable/disable TruVolume. When enabled (On), TruVolume
provides a consistent and comfortable volume level for a more enjoyable listening
experience.
DTS TruSurround
On/Off
TruSurround On:
TruSurround Off:
Press the TSHD button to enable/disable DTS TruSurround. When enabled (On), all inputs will
produce virtual surround sound. When disabled (Off), all sources will playback in stereo.
Treble Levels
Two center LEDs indicate
Treble level 0.
Press the TREBLE button then press the Next/Previous button to increase/decrease the
treble level. The LED indicators will move to the right with increasing levels and to the left with
decreasing levels.
Bass Levels
Two center LEDs indicate
Bass level 0.
Press the BASS button then press the Next/Previous button to increase/decrease the bass
level. The LED indicators will move to the right with increasing levels and to the left with
decreasing levels.
Analog Audio In - AUX (1)
Analog Audio In - AUX (2)
Coaxial In - Digital (3)
Digital Optical Audio In -
Optical (4)
Bluetooth
LED INDICATORS
Page 12
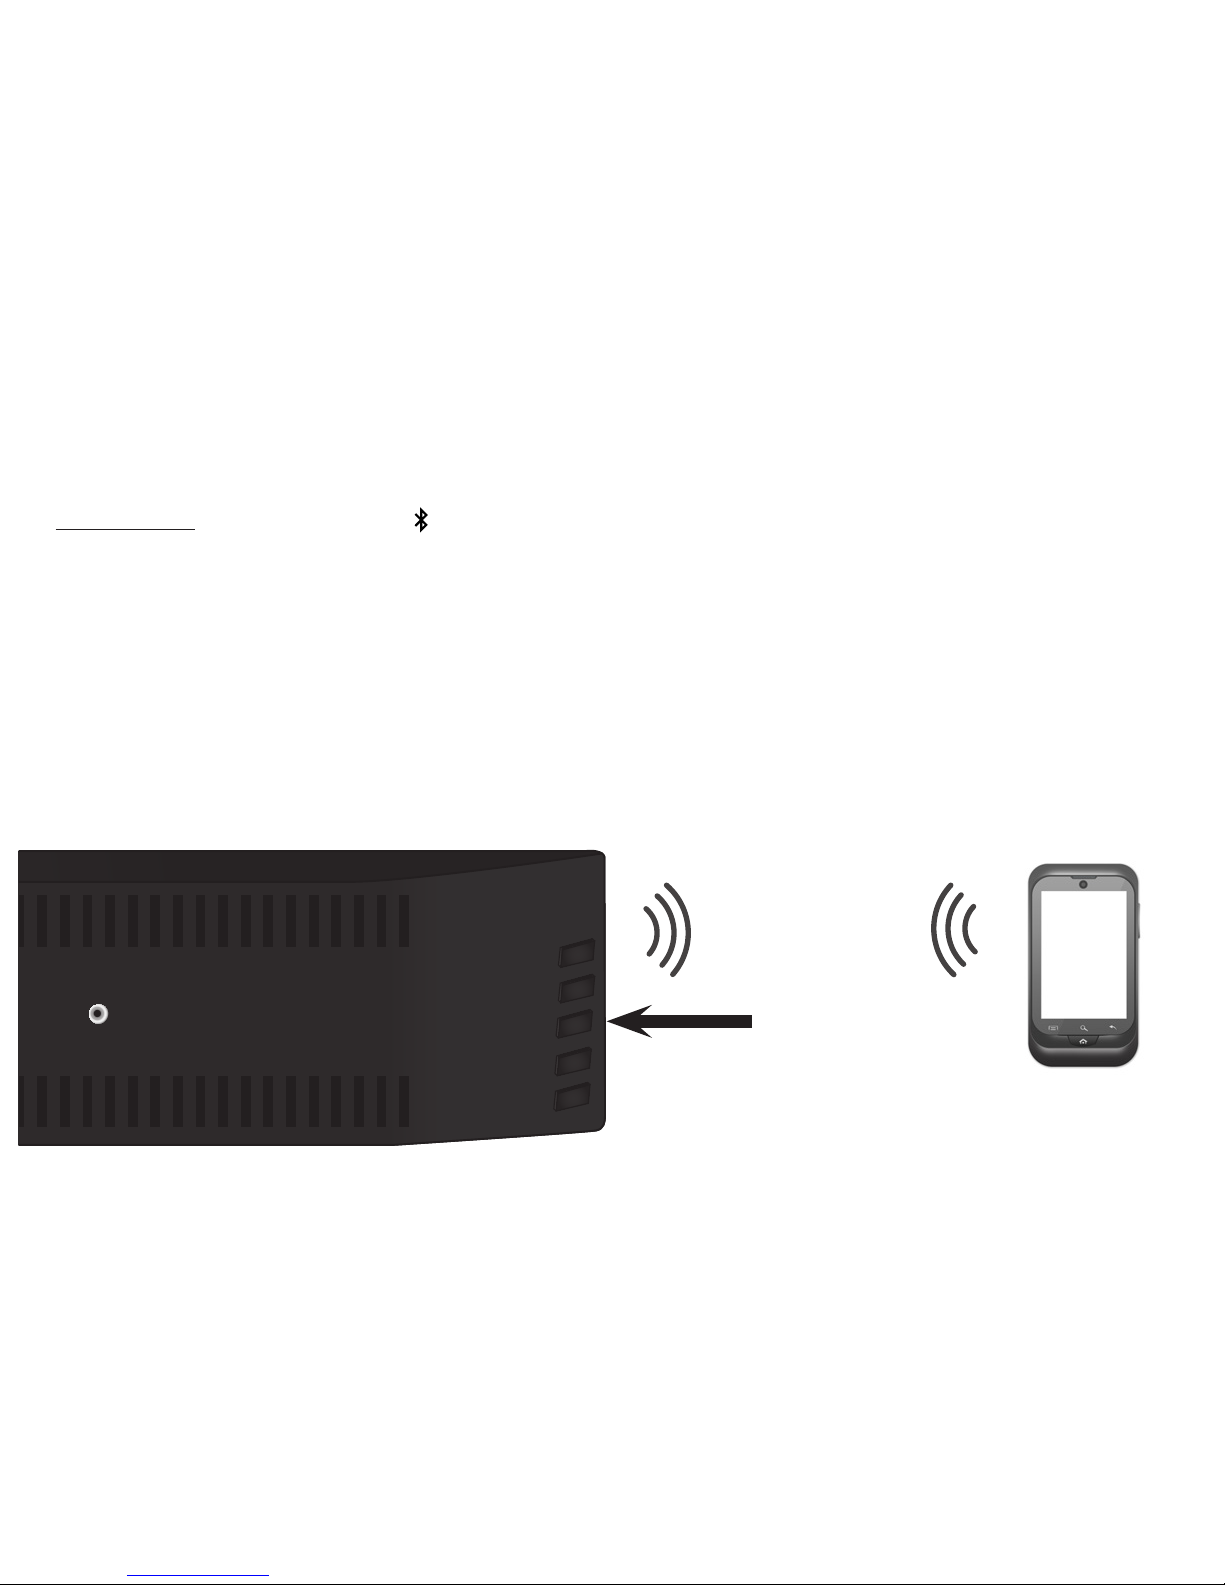
BLUETOOTH PAIRING
Back of Sound Bar
To pair the Sound Bar with a Bluetooth device:
1. Press and hold the Bluetooth button on the Sound Bar or the Bluetooth button on the remote for five (5) seconds.
When the Sound Bar is in Bluetooth Pairing Mode, the LED Indicators on the Display Panel on the front of the Sound Bar
will light sequentially from left to right and back again.
Once the device is paired, the LED Indicators will stop flashing.
2. You can now search for the Sound Bar (VIZIO S3820w) using your Bluetooth device. For more information, see the
documentation that came with your device.
3. Play audio from your Bluetooth device. Volume can be controlled on your source device and
the Sound Bar.
Page 13
USING BLUETOOTH MODE
Your Sound Bar supports music streaming from smartphones, tablets, and computers with Bluetooth capability.
Device compatibility will vary, see your device’s documentation for more information. Once you have paired your
source device to the Sound Bar, as long as you stay within range of the Sound Bar, your device should remain
paired, even if you change the input on the Sound Bar.
Maximizing Signal
A Bluetooth signal has a range of up to 30 feet. Keep in mind that Bluetooth is a compressed audio format, so
streamed music may lose some integrity when compared to a wired connection.
Try the following if your sound quality is less than optimal:
• If you hear any break-up or disconnect while streaming music from your device, move the source device
closer to the Sound Bar.
• Be sure that there are no solid obstructions in the line-of-sight between the Sound Bar and the source
device.
• Other wireless devices can affect Bluetooth range, including wireless security cameras, wireless video
baby monitors, cordless phones, and microwave ovens. Turning off or moving these devices may improve
Bluetooth range.
Your Sound Bar is not equipped with a microphone, so it cannot operate as a hands-free
device for a smartphone.
Reduce the volume levels on your device and on the Sound Bar before pressing Play. High volume
levels can damage your hearing.
Page 14

ADVANCED SETUP
DIGITAL OPTICAL
CABLE
Connect up to four (4) different devices
to the Sound Bar (devices shown are
examples you can use any device).
To listen to a device, change the input
source on the Sound Bar.
Optical, Coaxial, and 3.5mm cables
transmit audio only. If connecting a
video device, you will need a separate
video connection from the device to
your TV.
Game Console Network Media Player Tablet/MP3 Player/Laptop
3.5mm AUDIO
CABLE
DIGITAL COAXIAL
CABLE
RCA AUDIO
CABLE
Back of Sound Bar
Page 15

CONNECTING A SUBWOOFER
Back of Sound Bar
For best results setting up an optional subwoofer, VIZIO suggests
the following procedure:
1. Press the BASS button on the remote control to enter bass
adjustment mode.
2. Use the Previous/Next buttons to adjust the bass level to
the center position.
3. Power Off the Sound Bar and Subwoofer. Connect an
RCA cable from the Sound Bar to the Subwoofer.
4. Power On the Sound Bar and Subwoofer.
5. Manually adjust the SUB gain (Volume) and phase to
your preference. See your subwoofer’s user manual for
more information.
6. Use the BASS button on the remote control to adjust the
subwoofer’s output.
Optional Subwoofer*
RCA Subwoofer Cable*
*RCA subwoofer cable and subwoofer not included.
Page 16

WALL MOUNTING THE SOUND BAR
Back of Sound Bar
Wall-Mount
Screw Holes
Insert and tighten two Wall-Mount Screws with a Phillips-head
screwdriver into the Wall-Mount Screw Holes.
1
2
Place the included wall mounting template against the wall
under your TV. Mark the four bracket holes using a pencil.
Page 17

Be sure your screws are attached
to wood studs or drywall anchors
(for drywall) or concrete anchors
(for brick/concrete walls). Wall
mounting hardware is not included.
If you are unfamiliar with power tools or the layout of
electrical wiring in the walls of your home, consult a
professional installer.
22.5 in
(571.5 mm)
Wall Mount Screw
Screw Size: M4 x 10
3
Page 18

There is no power.
• Press the POWER button on the remote control or on the top of your Sound Bar.
• Ensure the power cord is securely connected.
• Plug a different device into the electrical outlet to verify that the outlet is working correctly.
There is no sound.
• Increase the volume. Press Volume Up on the remote control or on the top of your Sound Bar.
• Press MUTE on the remote to ensure the Sound Bar is not muted.
• Press INPUT on the remote or on the top of your Sound Bar to select a different input source.
• When using either of the Digital Inputs, if there is no audio: (A) Try setting the TV output to PCM or (B) Connect directly to
your Blu-ray/other source, some TVs do not pass through digital audio.
• On digital inputs, the input LEDs will flash rapidly if an unsupported format is present. Set the source to output PCM.
• Your TV may be set to variable audio output. Confirm that the audio output setting is set to FIXED or STANDARD, not
VARIABLE. Consult your TV’s user manual for more detailed information.
• If using Bluetooth, ensure that the volume on your source device is turned up and that the device is not muted.
I hear buzzing or
humming.
• Ensure all cables and wires are securely connected.
• Connect a different source device (TV, Blu-ray player, etc) to see if the buzzing persists. If it does not, the problem may
be with the original device.
• Connect your device to a different input on the Sound Bar.
The remote
isn’t working.
• Replace the remote batteries with new ones.
• Point the remote directly at the center of the Sound Bar when pressing a button.
• If using a Bluetooth connection, some of the buttons on the remote may not be supported by the streaming
application. (e.g., Pandora doesn’t support the Back button.)
HELP & TROUBLESHOOTING
Page 19

DO YOU HAVE QUESTIONS?
LET US HELP!
YOUR PRODUCT INCLUDES FREE LIFETIME TECH SUPPORT
Phone:
Email:
Web:
(877) 878-4946 (TOLL-FREE)
techsupport@VIZIO.com
http://store.VIZIO.com/support
Hours of operation:
Monday - Friday: 5 am TO 9 pm (pST)
Saturday - Sunday: 8 am TO 4 pm (pST)
The VIZIO support team is highly
trained and is based in the
United States.
We can help with:
• New Product Setup
• Connecting Your Devices
• Technical Problems
• And More
We speak English • Se habla Español • Nous parlons Français
Page 20

Available at www.VIZIO.com
This Product Sold Separately
Introducing the new E-series slim frame design. The VIZIO E-series LED TV is shattering the mold in a
way only VIZIO can, with high-quality design and picture at the best value. With a stunningly slim outer
frame design – and LED with 1080p Full HD for rich colors and vivid details, this HDTV gives you the best
picture at the best value.
VIZIO RECOMMENDS
Page 21

ON PARTS AND LABOR
Covers units purchased as new in United States and Puerto Rico Only
VIZIO provides a warranty to the original purchaser of a new Product against defects in materials and workmanship for a period of one year of non-commercial usage and ninety (90)
days of commercial use. If a Product covered by this warranty is determined to be defective within the warranty period, VIZIO will either repair or replace the Product at its sole option
and discretion.
To obtain warranty service, contact VIZIO Technical Support via email: TechSupport@VIZIO.com or via phone at 877 MY VIZIO (877.698.4946) from 5:00AM to 9:00PM Monday through
Friday and 8:00AM to 4:00PM Saturday and Sunday, Pacific Time, or visit www.VIZIO.com. PRE-AUTHORIZATION MUST BE OBTAINED BEFORE SENDING ANY PRODUCT TO A VIZIO SERVICE
CENTER. Proof of purchase in the form of a purchase receipt or copy thereof is required to show that a Product is within the warranty period.
Parts and Labor
There will be no charge for parts or labor during the warranty period. Replacement parts and Products may be new or recertified at VIZIO’s option and sole discretion. Replacement parts
and Products are warranted for the remaining portion of the original warranty or for ninety (90) days from warranty service or replacement, whichever is greater.
Type of Service
Defective Products must be sent to a VIZIO service center to obtain warranty service. VIZIO is not responsible for transportation costs to the service center, but VIZIO will cover return
shipping to the customer. PRE-AUTHORIZATION IS REQUIRED BEFORE SENDING ANY PRODUCT TO A VIZIO SERVICE CENTER FOR WARRANTY SERVICE.
Product returns to VIZIO’s service centers must utilize either the original carton box and shipping material or packaging that affords an equal degree of protection. VIZIO Technical Support
will provide instructions for packing and shipping the covered Product to the VIZIO service center.
Limitations and Exclusions
VIZIO’s one-year limited warranty only covers defects in materials and workmanship. This warranty does not cover, for example: cosmetic damage, normal wear and tear, improper
operation, improper voltage supply or power surges, signal issues, damages from shipping, acts of God, any type of customer misuse, modifications or adjustments, as well as installation
and set-up issues or any repairs attempted by anyone other than by a VIZIO authorized service center. Products with unreadable or removed serial numbers, or requiring routine
maintenance are not covered. This one year limited warranty does not cover Products sold “AS IS”, “FACTORY RECERTIFIED”, or by a non-authorized reseller.
THERE ARE NO EXPRESS WARRANTIES OTHER THAN THOSE LISTED OR DESCRIBED ABOVE. ANY IMPLIED WARRANTIES, INCLUDING ANY IMPLIED WARRANTY OF MERCHANTABILITY AND FITNESS FOR A PARTICULAR PURPOSE, SHALL BE LIMITED IN DURATION TO THE PERIOD OF TIME SET FORTH ABOVE. VIZIO’S TOTAL LIABILITY FOR ANY AND ALL LOSSES AND
DAMAGES RESULTING FROM ANY CAUSE WHATSOEVER INCLUDING VIZIO’S NEGLIGENCE, ALLEGED DAMAGE, OR DEFECTIVE GOODS, WHETHER SUCH DEFECTS ARE DISCOVERABLE
OR LATENT, SHALL IN NO EVENT EXCEED THE PURCHASE PRICE OF THE PRODUCT. VIZIO SHALL NOT BE RESPONSIBLE FOR LOSS OF USE, LOSS OF INFORMATION OR DATA, COMMERCIAL
LOSS, LOST REVENUE OR LOST PROFITS, OR OTHER INCIDENTAL OR CONSEQUENTIAL DAMAGES. SOME STATES DO NOT ALLOW LIMITATIONS ON HOW LONG AN IMPLIED
WARRANTY LASTS OR THE EXCLUSION OF INCIDENTAL OR CONSEQUENTIAL DAMAGES, SO THE ABOVE LIMITATIONS OR EXCLUSIONS MAY NOT APPLY TO YOU. THIS WARRANTY
GIVES YOU SPECIFIC LEGAL RIGHTS, AND YOU MAY ALSO HAVE OTHER RIGHTS, WHICH VARY FROM STATE TO STATE. THIS WARRANTY IS SUBJECT TO CHANGE WITHOUT NOTICE.
CHECK www.VIZIO.com FOR THE MOST CURRENT VERSION.
ONE-YEAR LIMITED WARRANTY
Sound Bar: Two 3” High-Efficiency Full-Range Transducers
Two 2” x 4” Bass Radiators
Inputs: One 3.5mm Stereo Audio
One RCA Stereo Audio
One Optical (Toslink)
One Digital Coaxial Audio
Bluetooth (Wireless)
Sound Pressure Level (System): 98 dB
Frequency Response (System): 70 Hz - 19 KHz
Voltage: 120 VAC, 60 Hz
Compliances: UL, C-UL, FCC
SPECIFICATIONS
Page 22

FCC Class B Radio Interference Statement
NOTE: This equipment has been tested and found to comply with the limits for a Class B digital device, pursuant to Part 15 of the FCC Rules. These limits are designed to provide
reasonable protection against harmful interference in a residential installation. This equipment generates, uses and can radiate radio frequency energy, and if not installed
and used in accordance with the instructions, may cause harmful interference to radio communications. However, there is no guarantee that interference will not occur in a
particular installation. If this equipment does cause harmful interference to radio or television reception, which can be determined by turning the equipment off and on, the
user is encouraged to try to correct the interference by one or more of the following measures:
1. Reorient or relocate the receiving antenna.
2. Increase the separation between the equipment and receiver.
3. Connect the equipment into an outlet on a circuit different from that to which the receiver is connected.
4. Consult the dealer or an experienced radio/TV technician for help.
This device complies with Part 15 of the FCC Rules. Operation is subject to the following two conditions: (1) this device may not cause harmful interference, and (2) this device
must accept any interference received, including interference that may cause undesired operation.
Notice:
1. The changes or modifications not expressly approved by the party responsible for compliance could void the user’s authority to operate the equipment.
2. Shielded interface cables and AC power cord, if any, must be used in order to comply with the emission limits.
3. The manufacturer is not responsible for any radio or TV interference caused by unauthorized modification to this equipment. It is the responsibilities of the user to correct
such interference.
RF Exposure Information
This device meets the government’s requirements for exposure to radio waves. This device is designed and manufactured not to exceed the emission limits for exposure to
radio frequency (RF) energy set by the Federal Communications Commission of the U.S. Government. This device complies with FCC radiation exposure limits set forth for an
uncontrolled environment.
IC Statement
Operation is subject to the following two conditions:
1. This device may not cause interference, and
2. This device must accept any interference, including interference that may cause undesired
operation of the device.
IC Radiation Exposure Statement
This equipment complies with IC RSS-102 radiation exposure limits set forth for an uncontrolled
environment. This equipment should be installed and operated with minimum distance 20cm
between the radiator & your body.
Disposal and Recycling
You must dispose of this product properly, according to local laws and regulations. Because this
product contains electronic components and a battery, it must be disposed of separately from
household waste. Contact local authorities to learn about disposal and recycling options.
Other:
Image(s) used under license from Shutterstock.com
LEGAL & COMPLIANCE
Manufactured under license from Dolby Laboratories.
Dolby and the double-D symbol are trademarks of Dolby
Laboratories.
For DTS patents, see http://patents.dts.com. Manufactured
under license from DTS Licensing Limited. DTS, the Symbol,
& DTS and the Symbol together are registered trademarks,
and DTS TruSurround is a trademark of DTS, Inc. DTS, Inc. All
Rights Reserved.
For DTS patents, see http://patents.dts.com. Manufactured
under license from DTS Licensing Limited. DTS, the Symbol,
& DTS and the Symbol together are registered trademarks,
and DTS TruVolume is a trademark of DTS, Inc. © DTS, Inc.
All Rights Reserved.
This product qualifies for ENERGY STAR in the “factory
default” setting and this is the setting in which power
savings will be achieved. Changing the factory default
settings or enabling other features will increase power
consumption that could exceed the limits necessary to
qualify for ENERGY STAR rating.
We want to help you save energy.
Page 23

GUIDE DE DÉMARRAGE RAPIDE
Modèle : S3820w-C0NA
VIZIO
Page 24

• Ne pas surcharger les barres d’alimentation et les cordons d’extension. Un surchargement peut provoquer un
incendie ou un choc électrique.
• La prise murale doit être située près de votre unité et être facilement accessible.
• Garder l'unité loin de l'humidité. Ne pas exposer l'unité à la pluie ou à l'humidité. Si de l'eau pénètre dans l'unité,
débrancher le cordon d'alimentation et contacter votre vendeur. Dans ce cas, une utilisation continue pourrait
causer un incendie ou un choc électrique.
• Ne pas utiliser l'unité si une anomalie survient. Si une fumée ou une odeur apparaît, débrancher le cordon
d’alimentation et contacter votre vendeur immédiatement. Ne pas tenter de réparer vous-même l'unité.
• Éviter d’utiliser des appareils endommagés ou laissés tomber. Si l'unité est laissée tomber par terre et que la
structure est endommagée, les composants internes fonctionneront peut-être anormalement. Débrancher le
cordon d’alimentation immédiatement et contacter votre vendeur pour une réparation. L'emploi continu de
votre unité peut engendrer un incendie ou un choc électrique.
• Ne pas installer l'unité dans un lieu contenant beaucoup de poussière ou une grande humidité. Le
fonctionnement de l'unité dans de tels environnements peut provoquer un incendie ou un choc électrique.
• Assurez-vous que le cordon d'alimentation et tout autre câble sont débranchés avant de déplacer votre unité.
• Lorsque vous débranchez votre unité, tenez la prise d'alimentation et pas le cordon. Tirer sur le cordon
d’alimentation peut endommager les fils à l’intérieur du cordon et provoquer un incendie ou un choc électrique.
Lorsque l'unité ne servira pas pendant une longue période de temps, débrancher le cordon d'alimentation.
• Pour réduire le risque de choc électrique, ne pas toucher le connecteur avec des mains humides.
• Insérer les piles de la télécommande en suivant les instructions. Une mauvaise polarité peut causer une fuite de
la pile, endommageant peut-être la télécommande ou blessant l’utilisateur.
• Un avis important sur la classification se trouve à l'arrière de l'unité.
• AVERTISSEMENT - cet équipement n'est pas imperméable. Afin de prévenir tout risque d'incendie ou
d'électrocution, ne placez pas de conteneur rempli de liquide près de l'équipement (tels qu'un vase ou un pot
à fleurs) et n'exposez pas l'équipement près des égouttements, des éclaboussures, de la pluie ou de l'humidité.
• ATTENTION : risque d'explosion ou d'incendie si les piles ne sont pas utilisées correctement. Remplacer les piles
avec le même type ou un type spécifié.
• Ne pas laisser les piles exposées au soleil direct pour une période prolongée avec les portes et fenêtres fermées.
Ne pas démonter les piles ou les éliminer dans le feu.
AVERTISSEMENT : Pour réduire le risque d'incendie ou de choc électrique, n'exposez pas cet appareil à la
pluie ou à l'humidité.
Explication des symboles d'AVERTISSEMENT :
Le symbole de l'éclair fléché à l'intérieur d'un triangle équilatéral a pour but d'avertir l'utilisateur de
la présence d'une tension dangereuse non isolée dans le produit, qui peut être d'une magnitude
suffisante pour constituer un risque de choc électrique aux personnes.
Le point d’exclamation à l’intérieur d’un triangle équilatéral a pour objectif d’avertir l’utilisateur que des
instructions importantes sur l’utilisation et l’entretien se trouvent dans les documents de votre appareil.
Votre unité est conçue et fabriquée pour fonctionner dans les limites de conception définies, et une mauvaise
utilisation peut entraîner un choc électrique ou un incendie. Pour éviter d'endommager votre unité, vous devez
respecter les règles suivantes pour l'installation, l'utilisation et l'entretien. Veuillez lire les instructions de sécurité suivantes
avant de faire fonctionner votre unité. Conservez ces instructions dans un lieu sûr en vue d’une future référence.
• Lire ces instructions.
• Conserver ces instructions.
• Tenir compte de toutes les mises en garde.
• Observer toutes les instructions.
• Ne pas utiliser cet appareil près de l'eau.
• Nettoyer à l'aide d'un chiffon sec seulement.
• Ne pas bloquer aucun orifice d'aération. Installer conformément aux instructions du fabricant.
• Ne pas installer près d'une source de chaleur, notamment un radiateur, une bouche de chaleur, un poêle, ou
tout autre appareil (incluant les amplificateurs) produisant de la chaleur.
• Ne pas aller à l'encontre du but de sécurité de la prise mise à la terre ou de la fiche polarisée. Une prise polarisée
est composée de deux fiches don’t l'une est plus large que l'autre. Une fiche de terre comporte deux lames et
une troisième broche de mise à la terre. La lame large ou la troisième broche sont fournies pour votre sécurité.
Si la fiche ne correspond pas à votre prise de courant, consultez un électricien pour qu'il remplace la prise de
courant désuete.
• Protéger le cordon d'alimentation afin qu'on ne marche pas dessus ou qu'on ne le compresse pas,
particulièrement près des prises de courant et de l'endroit d'où elle sort de l'appareil.
• Utiliser seulement du matériel ou des accessoires spécifiés par le fabricant.
• Faire seulement usage du chariot, du support, du trépied, de la fixation ou de la table
indiqué par le fabricant, ou vendu avec l'appareil. Lorsqu'un chariot est utilisé, faire
attention en déplaçant le chariot et l'appareil ensemble afin d'éviter les blessures
causées par un basculement.
• Débrancher l'appareil en cas d'orage électrique ou quand il n'est pas utilisé pendant de longues périodes de
temps.
• Consulter un technicien qualifié pour tout entretien. Un entretien courant est nécessaire lorsque l'appareil
a été endommagé de quelque façon que ce soit, notamment lorsque le cordon d'alimentation ou la fiche
d'alimentation est endommagé, lorsque du liquide a été renversé dans l'appareil ou des objets sont tombés
dedans, lorsque l'appareil a été exposé à la pluie ou à l'humidité, lorsque qu'il ne fontionne pas normalement
ou qu'il a été échappé.
• Pour réduire le risque de choc électrique ou de dommage à une composante, fermer l'alimentation avant de
connecter d'autres composants à votre unité.
• Débrancher le cordon d'alimentation avant de nettoyer votre unité. Un linge humide suffit pour le nettoyage.
N'utilisez pas de nettoyants liquides ou en aérosol sur votre unité. Ne pas utiliser de nettoyants abrasifs.
• Toujours se servir des accessoires recommandés par le fabricant pour garantir la compatibilité.
• Lors du déplacement de votre unité depuis un lieu à basse température vers un lieu à haute température, de
la condensation peut se former dans la structure. Attendre avant d'allumer l'unité pour éviter de causer un
incendie, un choc électrique ou un dommage aux composants.
• Les fentes et les ouvertures au dos et au bas du caisson sont destinées à la ventilation. Pour garantir un
fonctionnement fiable de votre unité et pour la protéger d'un surchauffement, s'assurer que ces ouvertures ne
sont ni bloquées, ni couvertes. Ne pas placer l'unité dans une bibliothèque ou une armoire à moins qu'il y ait
une ventilation adéquate.
• Ne poussez jamais d'objets dans les fentes et les ouvertures de la structure de votre unité. Ne placez pas d'objets
sur le dessus de votre unité. Cela pourrait provoquer un court-circuit des pièces, engendrant ainsi un incendie
ou un choc électrique. Ne jamais renverser de liquide sur votre unité.
• Une fois branchée sur une prise d'alimentation, l'alimentation circule toujours vers votre unité. Pour déconnecter
entièrement l’alimentation, débrancher le cordon d’alimentation.
INSTRUCTIONS DE SÉCURITÉ IMPORTANTES
MISE EN GARDE
RISQUE DE CHOC ÉLECTRIQUE
NE PAS OUVRIR
Page 25

CONTENU DU PAQUET
Ce guide de
démarrage rapide
Télécommande
avec piles
Barre de son haute définition
Câble optique
numérique
Câble audio stéréo RCA
pour prise de 3,5 mm
Câble audio
coaxial
Câble
d'alimentation
2 supports pour
montage mural de
la barre de son
Modèle de
support mural
2 vis pour
montage mural
(taille : M4 x 10)
Page 26

COMMANDES ET CONNEXIONS
Arrière de la barre de son
Port d'alimentation
SORTIE DU CAISSON
Sortie du caisson de basse
OPTIQUE (4)
Entrée audio numérique
optique
NUMÉRIQUE (3)
Entrée coaxiale
AUX (1)
Entrée audio analogue
AUX (2)
Entrée audio analogue
Port de service
Page 27

Les boutons de commande sont situés ici :
Arrière de la barre de son
Entrée
Alimentation
Volume
+
-
Entrée Bluetooth
(Tenir pour forcer l'appariement, consultez l'Appariement Bluetooth
pour plus d'informations.)
Page 28

PREMIÈRE INSTALLATIONI
*Tous les téléviseurs n'ont pas les sorties audio affichées ci-dessus. Pour connecter la
barre de son directement à vos autres appareils (lecteur Blu-ray, console de jeu, etc.),
consultez le manuel de l'utilisateur de votre produit.
1
ET BRANCHEZ-LA À VOTRE TÉLÉVISEUR
CHOISISSEZ UN CÂBLE :
MEILLEUR
BON
BON BON
MEILLEURMEILLEUR
3,5 MM AU
CÂBLE RCA
3,5 MM AU
CÂBLE RCA
CÂBLE COAXIAL
NUMÉRIQUE**
CÂBLE OPTIQUE
NUMÉRIQUE**
**S'il n'y a pas d'audio lorsque vous utilisez un des deux Entrées numériques : (A) essayer
de régler la sortie du téléviseur à PCM ou (B) branchez le téléviseur directement au
Blu-ray/à une autre source, car certains téléviseurs ne passent pas par l'audio numérique.
Arrière de la barre de son
Page 29

3
Brancher le câble d'alimentation
à la barre de son.
Brancher le câble d'alimentation
dans une prise murale.
2
Page 30

Pour une meilleure expérience de son ambiophonique, placez la barre de son comme il est indiqué.
Labarrede son devrait se trouver au niveau de l'oreille.
La barre de son
est placée sous le
téléviseur, au milieu.
4
Page 31

9
Enlever le couvercle de la pile
en le faisant glisser doucement
dans le sens opposé de la
télécommande.
10
Insérer les piles incluses et
faire glisser le couvercle
doucement à sa place.
11
Allumez votre téléviseur, puis appuyez sur le
bouton Alimentation de la télécommande
pour mettre en marche la barre de son.
Appuyer sur le bouton Entrée pour basculer
entre les sources audio. Par exemple, si vous
avez connecté votre téléviseur sur l'Entrée 1,
réglez la barre de son sur l'Entrée 1.
L'installation du matériel est complétée.
Alimentation
Entrée
Haut Haut
Page 32

Volume +
Appuyez pour augmenter le volume.
Volume -
Appuyez pour diminuer le volume.
UTILISATION DE LA TÉLÉCOMMANDE
Précédent
Appuyez pour retourner à la
piste précédente.
(Change les niveaux des aigus et des basses)
Alimentation
Appuyez pour allumer ou éteindre.
Muet
Appuyez pour activer/
désactiver le mode muet.
Entrée
Appuyez pour changer
la source d'entrée.
Entrée/Jouer/Pause
Appuyez pour sélectionner une option.
Appuyez pour lire ou mettre en pause.
Suivant
Appuyez pour passer à la piste suivante.
(Change les niveaux des aigus et des basses)
Aigu
Appuyez pour entrer en mode
d'ajustement des aigus.
Basse
Appuyez pour entrer en mode
d'ajustement des basses.
TruVolume
Appuyez pour activer/
désactiver TruVolume.
TruSurround HD
Appuyez pour activer/
désactiver TruSurround HD.
Bluetooth
Appuyer pour entrer les informations Bluetooth.
(Pour accéder au mode forcer l'appariement, appuyer et tenir
pendans 5 secondes)
Page 33

Voyants DEL sont situés ici :
Les indicateurs DEL réagiront différemment avec chaque bouton sur la télécommande.
Fonction Comportement DEL Description
Entrée
Appuyer sur le bouton ENTRÉE sur la télécommande pour passer les entrées disponibles :
• Entrée audio analogue - AUX (1)
• Entrée audio analogue - AUX (2)
• Entrée coaxiale - numérique (3)
• Entrée audio numérique optique - optique (4)
• Bluetooth
Appariement
Bluetooth
(Lorsque vous recherchez un
appareil) passez de gauche
à droite et recommencez de
façon continuelle.
Appuyer et tenir le bouton sur la télécommande. La barre de son sera découvrable
pendant 15 minutes. Vous pouvez maintenant rechercher la barre de son (VIZIO S3820w)
à l'aide de votre appareil Bluetooth. La barre de son se fermera si aucun appareil n'est
trouvé.
Remarque : Réglez votre appareil Bluetooth au mode d'appariement avant la barre de son.
DTS TruVolume
Allumé/éteint)
TruVolume activé :
TruVolume désactivé :
Appuyer sur le bouton TVOL pour activer/désactiver TruVolume. Lorsque TruVolume est
activé (On), il fourni un niveau de volume uniforme et confortable pour une expérience
d'écoute des plus agréable.
DTS TruSurround
Allumé/éteint)
TruSurround activé :
TruSurround désactivé :
Appuyer sur le bouton TSHD pour activer/désactiver le DTS TruSurround. Lorsque
TruSurround est activé (On), toutes les entrées produiront un son ambiophonique virtuel.
Lorsqu'il est désactivé (Off), toutes les entrées produiront une lecture en stéréo.
Niveaux des basses
Deux voyants DEL centraux
indiquent le niveau des
basses 0.
Appuyer sur le bouton BASSES et ensuite appuyer sur Suivant/Précédent pour
augmenter/réduire le niveau des basses. Les indicateurs DEL se déplaceront vers la droite
en augmentant les niveaux et vers la gauche en réduisant les niveaux.
Niveaux des basses.
Deux voyants DEL centraux
indiquent le niveau des
aigus 0.
Appuyer sur le bouton BASSE et ensuite appuyer sur Suivant/Précédent pour augmenter/
réduire le niveau des aigus. Les indicateurs DEL se déplaceront vers la droite en
augmentant les niveaux et vers la gauche en réduisant les niveaux.
Entrée audio analogue - AUX (1)
Entrée audio analogue - AUX (2)
Entrée coaxiale - numérique (3)
Entrée audio numérique
optique - optique (4)
Bluetooth
INDICATEURS DEL
Page 34

APPARIEMENT BLUETOOTH
Arrière de la barre de son
Pour apparier la barre de son avec un appareil Bluetooth :
1. Appuyer et tenir pendant cinq (5) secondes le bouton Bluetooth sur la barre de son ou le bouton Bluetooth sur la
télécommande. Lorsque la barre de son est en mode d'appariement Bluetooth, les indicateurs DEL sur le panneau
avant de la barre de son s'allumeront en séquence de gauche à droite et de nouveau.
Une fois l'appareil apparié, les indicateurs DEL arrêteront de clignoter.
2. Vous pouvez maintenant rechercher la barre de son (VIZIO S3820w) à l'aide de votre appareil Bluetooth. Pour plus
d'informations, consultez la documentation sur votre appareil.
3. Lecture audio depuis votre appareil Bluetooth. Le volume peut être contrôlé sur votre appareil source et la barre
deson.
Page 35

UTILISER LE MODE BLUETOOTH.
Votre barre de son supporte la lecture de musique en temps réel depuis les téléphone intelligents, les tablettes
et les ordinateurs adaptés à la technologie Bluetooth. La compatibilité des appareils varieront donc consultez la
documentation de votre appareil pour plus d'informations. Une fois que vous aurez apparié l'appareil source à
la barre de son, pour aussi longtemps que vous êtes à l'Intérieure de la portée de la barre de son, votre appareil
devrait demeurer apparié, même si vous changez l'entrée sur la barre de son.
Maximiser le signal
Un signal Bluetooth est d'une portée de jusqu'à 9 mètres (30 pieds). Rappelez-vous que Bluetooth est un format
audio compressé, donc la musique en temps réel peut perdre de la qualité comparé à une connexion avec fils.
Si la qualité n'est pas optimale essayer ce qui suit :
• Si vous la musique est interrompue ou la connexion est perdue lorsque vous écoutez de la musique en
temps réel sur votre appareil, déplacer l'appareil source plus près de la barre de son.
• Assurez-vous qu'il n'y a pas d'obstructions solides dans la ligne de vision entre la barre de son et l'appareil
source.
• D'autres appareils sans fils peuvent affecter la portée du Bluetooth, incluant les caméras de sécurité sans
fils, les moniteurs vidéo sans fils pour bébé, les téléphones sans fils et les fours à micro-ondes. Fermer ou
déplacer ces appareils peuvent améliorer la portée du Bluetooth.
Votre barre de son ne comprend pas de microphone, donc il ne peut pas fonctionner comme un appareil
mains libres pour le téléphone intelligent.
Réduire les niveaux de volume sur votre appareil et sur la barre de son avant d'appuyer sur Lecture.
Des hauts niveaux de volume peuvent endommager votre audition.
Page 36

CONFIGURATION AVANCÉE
CÂBLE OPTIQUE
NUMÉRIQUE
Branchez jusqu'à quatre (4) appareils
différents à la barre de son (les appareils
illustrés sont des exemples seulement, vous
pouvez utiliser plusieurs autres appareils).
Pour écouter un appareil, changer l'entrée
source de la barre de son.
Les câbles optique, coaxial et 3,5 mm
transmettent l'audio seulement. Si vous
branchez un appareil vidéo, il vous faudra
une connexioin vidéo séparée entre votre
appareil et votre téléviseur.
Console de jeu Lecteur de médias
en réseau
Tablette/lecteur MP3/portable
CÂBLE AUDIO
3,5 MM
CÂBLE COAXIAL
NUMÉRIQUE
CÂBLE
AUDIO RCA
Arrière de la barre de son
Page 37

BRANCHEMENT D'UN CAISSON DE BASSES
Arrière de la barre de son
Pour des résultats optimaux lors de l'installation d'un caisson de
basses en option, VIZIO recommande de suivre la procédure
suivante :
1. Appuyer sur le bouton BASSE sur la télécommande pour
accéder au mode d'ajustement des basses.
2. Utiliser les boutons Précédent/Suivant pour ajuster les
niveaux des basses à la position centrale.
3. Fermer la barre de son et le caisson de basses. Brancher
un câble RCA entre la barre de son et le caisson de basses.
4. Allumer la barre de son et le caisson de basses.
5. Ajuster manuellement le gain (volume) du CAISSON
et modifier selon vos préférences. Consulter le manuel
d'utilisateur de votre caisson de basses pour plus
d'informations.
6. Utiliser le bouton AIGU sur la télécommande pour ajuster la
sortie du caisson de basses.
Caisson de basses optionnel*
Câble RCA du caisson de basses*
*Le câble RCA du caisson de basses et le caisson de basses non inclus.
Page 38

SUPPORT MURAL DE LA BARRE DE SON
Arrière de la
barre de son
Trous de vis pour
montage mural
Insérer et serrer les deux vis de montage mural à l'aide d'un tournevis
à vis cruciforme dans les trous des vis pour montage mural.
1
MARQUEZ ICI MARQUEZ ICI
MARQUEZ ICI
Ligne centrale
MARQUEZ ICI
LAISSEZ CET ESPACE ENTRE LA BARRE DE SON ET VOTRE TÉLÉVISEUR
Modèle de support mural
22,5"/571,5 mm
2
Placez le modèle du support mural sur le mur sous votre téléviseur. Marquez
les emplacements des 4 trous des supports avec un crayon.
MARQUEZ ICI MARQUEZ ICI
MARQUEZ ICI
Ligne centrale
Modèle de support mural
22,5"/571,5 mm
Page 39

Assurez-vous d'attacher vos vis à des
goujons en bois, des ancrages pour
cloison sèche (pour les cloisons
sèches) ou des ancrages pour
béton (pour les murs en briques/
béton). Le matériel nécessaire pour
le montage mural n'est pas inclus.
Si vous n'êtes pas familier avec les outils électriques
ou l'agencement des câbles électriques se trouvant
dans les murs de votre maison, consultez un installateur
professionnel.
571,5 mm
(22,5 po)
Vis de montage mural
(Taille de la vis : M4 x 10)
3
Page 40

Il n'y a pas
d'alimentation.
• Appuyez sur le bouton « POWER » (ALIMENTATION) se trouvant sur la télécommande ou sur le dessus de votre barre
de son.
• Assurez-vous que le cordon d'alimentation est bien connecté.
• Branchez un appareil différent dans la prise électrique afin de vérifier que la prise fonctionne bien.
Il n'y a pas de son.
• Augmentez le volume. Appuyez sur le bouton d'augmentation du volume de la télécommande ou sur le dessus de
votre barre de son.
• Appuyez sur MUTE sur la télécommande pour s'assurer que la barre de son n'est pas en mode muet.
• Appuyer sur ENTRÉE sur votre télécommande ou sur le dessus de votre barre de son pour sélectionner une source
d'entrée différente.
• S'il n'y a pas d'audio lorsque vous utilisez un des deux Entrées numériques : (A) essayer de régler la sortie du téléviseur
à PCM ou (B) branchez le téléviseur directement au Blu-ray/à une autre source, car certains téléviseurs ne passent pas
par l'audio numérique.
• Pour les entrées numériques, les voyants DEL d'entrée clignoteront rapidement si un format non compatible est présent.
Régler la source à la sortie PCM.
• Votre téléviseur peut être réglé sur une sortie audio variable. Vérifiez que la sortie audio est réglée sur « FIXED » (FIXE)
ou STANDARD, et non VARIABLE. Consultez le manuel de l'utilisateur de votre téléviseur pour obtenir de plus amples
informations.
• Si vous utilisez le Bluetooth, assurez-vous que le volume sur votre appareil source est assez fort et que l'appareil n'est pas
en mode muet.
J'entends une
vibration ou un
sifflement.
• Vérifiez que tous les câbles et les fils sont bien branchés.
• Connectez un appareil différent (téléviseur, lecteur Blu-ray, etc.) pour voir si la vibration persiste. Si ce n'est pas le cas,
le problème peut être l'appareil d'origine.
• Connectez votre appareil sur une autre entrée de la barre de son.
La télécommande
ne fonctionne pas.
• Remplacez les piles de la télécommande par de nouvelles piles.
• Pointez la télécommande directement vers le centre de la barre de son lorsque vous appuyez sur un bouton.
• Si vous utilisez le Bluetooth, il est possible que certains boutons sur la télécommande ne soient pas compatibles
avec l'application de lecture en continu. (par exemple, Pandora n'est pas compatible avec le bouton Retour.)
AIDE ET DÉPANNAGE
Page 41

VOUS AVEZ DES QUESTIONS?
LAISSEZ-NOUS VOUS AIDER!
VOTRE PRODUIT COMPREND LE SOUTIEN TECHNIQUE À VIE GRATUIT
Téléphone :
Courriel :
Web :
(877) 878-4946 (SANS FRAIS)
techsupport@VIZIO.com
http://store.VIZIO.com/support
Heures d’ouverture:
DU Lundi AU Vendredi : 5 h à 21 h (hNP)
samedi ET dimanche : De 8 h à 16 h (hNP)
L'équipe de soutienVIZIO a une
grande expérience et est basée
auxÉtats-Unis.
Nous pouvons vous aider avec :
• Installation du nouveau produit
• Raccordement de vos périphériques
• Problèmes techniques
• Et encore plus
We speak English • Se habla Español • Nous parlons Français
Page 42

SUR LES PIÈCES ET LA MAIN-D'ŒUVRE
Couvre les unités achetées neuves aux États-Unis et à Puerto Rico uniquement
VIZIO offre à l’acheteur original une garantie sur un nouveau produit contre les défauts de matériaux et de fabrication pour un usage non commercial d’un an et un usage commercial de
quatre-vingt dix (90) jours. Si un produit couvert par cette garantie est trouvé défectueux au cours de la période de garantie, VIZIO le réparera ou remplacera à sa seul option et discrétion.
Pour obtenir un service garanti, contactez le soutien technique de VIZIO par courriel : TechSupport@VIZIO.com ou par téléphone au 877-MY-VIZIO (877-698-4946) de 5 heures : à 21heures,
du lundi au vendredi, et de 8 heuresà 16 heures, le samedi et dimanche (HNP), ou visitez www.VIZIO.com. UNE AUTORISATION PRÉALABLE DOIT ËTRE OBTENUE AVANT D’ENVOYER TOUT
PRODUIT À UN CENTRE DE SERVICE VIZIO. Une preuve d’achat sous forme du reçu d’achat ou d’une copie correspondante, est obligatoire pour montrer qu’un produit se trouve toujours
dans la période de garantie.
Pièces et main-d'œuvre
Aucuns frais ne seront chargés pour les pièces et la main-d’œuvre au cours de la période de garantie. Les pièces et les produits de remplacement peuvent être neuves ou certifiées à
nouveau à la seule option et discrétion de VIZIO. Les pièces et les produits de remplacement sont garanties pour la période restante de la garantie originale ou pour quatre-vingt-dix
(90) jours après le service ou remplacement garanti, selon la plus tardive de ces périodes.
Type de service
Les produits défectueux peuvent être envoyés au centre de service VIZIO pour recevoir un service garanti. VIZIO n’est par responsable des frais de transport vers le centre de service,
mais couvrira les frais d’expédition du renvoi au client. UNE AUTORISATION PRÉALABLE EST REQUISE AVANT D'ENVOYER TOUT PRODUIT À UN CENTRE DE SERVICE VIZIO POUR BÉNÉFICIER DU
SERVICE DE GARANTIE.
Pour les retours de produits au centre de service VIZIO, il faut utiliser la boîte en carton et le matériel d’expédition d’origine ou un matériel d’emballage offrant un niveau équivalent de
protection. Le soutien technique de VIZIO donnera des instructions pour l’emballage et l’expédition du produit couvert au centre de service VIZIO.
Limites et exclusions
La garantie d’un an de VIZIO couvre uniquement les défauts de matériaux et de fabrication. Cette garantie ne couvre pas par exemple : les dommages superficiels, l'usure normale,
la mauvaise utilisation, l'alimentation inappropriée de la tension ou les sautes de puissance, les problèmes de signal, les dommages causés par la livraison, les actes de la nature, tout
type de mésusage, modifications ou ajustements faits par le consommateur, ainsi que les problèmes d'installation et de réglage ou toute réparation faite par qui que ce soit d'autre
qu'un centre de service VIZIO autorisé. Les produits, qui sont dotés de numéros de série illisibles ou retirés, ou qui demandent une maintenance systématique, ne sont pas couverts. Cette
garantie d’un an ne couvre pas les produits vendus « TEL QUEL », « CERTIFIÉ EN USINE » ou par un revendeur non autorisé.
AUCUNE AUTRE GARANTIE EXPRESSE N'EXISTE EN DEHORS DE CELLE ÉNUMÉRÉE OU DÉCRITE CI-DESSUS. TOUTE GARANTIE IMPLICITE, Y COMPRIS LES GARANTIES IMPLICITES DE QUALITÉ
MARCHANDE ET L’APTITUDE POUR UN BUT PRÉCIS, SERA LIMITÉE SELON LA PÉRIODE DE TEMPS DÉTERMINÉE CI-DESSUS. LA RESPONSABILITÉ TOTALE DE VIZIO CONCERNANT L’ENSEMBLE DES
PERTES ET DES DOMMAGES OCCASIONNÉS PAR UNE CAUSE QUELLE QU’ELLE SOIT, Y COMPRIS LA NÉGLIGENCE DE VIZIO, LES DOMMAGES ALLÉGUÉS OU LES PRODUITS DÉFECTUEUX, QUE CES
DÉFAUTS SOIENT DÉCOUVRABLES OU LATENTS, NE DÉPASSERA EN AUCUN CAS LE PRIX D’ACHAT DU PRODUIT COUVERT. VIZIO N'EST PAS RESPONSABLE DE LA PERTE DE JOUISSANCE, LA PERTE
DE RENSEIGNEMENTS OU DE DONNÉES, LA PERTE COMMERCIALE, LA PERTE DE REVENU OU LES PROFITS MANQUÉS, OU TOUT AUTRE DOMMAGES ACCESSOIRES OU INDIRECTS. CERTAINS ÉTATS
N’AUTORISENT PAS LES LIMITES SUR LA DURÉE D'UNE GARANTIE IMPLICITE OU L'EXCLUSION DE DOMMAGES IMPRÉVUS OU CORRÉLATIFS, AUSSI LES LIMITES ET EXCLUSIONS CI-DESSUS PEUVENT
NE PAS S'APPLIQUER À VOUS. CETTE GARANTIE VOUS DONNE DES DROITS LÉGAUX SPÉCIFIQUES ET IL EST POSSIBLE QUE VOUS AYEZ D'AUTRES DROITS, QUI VARIENT D'UN ÉTAT À L'AUTRE. CETTE
GARANTIE EST SOUMISE À DES MODIFICATIONS SANS PRÉAVIS. CONSULTEZ www.VIZIO.com POUR OBTENIR LA PLUS RÉCENTE VERSION.
GARANTIE LIMITEE D'UN AN
Barre de son: Deux transducteurs de 7,6 cm (3 po) pleine portée
haute efficacité
Deux radiateurs de basses 5 x 10 cm (2 x 4 po)
Entrées : Une entrée audio stéréo 3,5 mm
Une entrée audio stéréo RCA
Une entrée optique (Toslink)
Une entrée audio coaxiale numérique
Bluetooth (sans fils)
Niveau de pression du son (système) : 98 dB
Réponse de fréquence (système) : 70 Hz - 19 KHz
Tension : 120 V.c.a., 60 Hz
Conformités : UL, C-UL, FCC
SPÉCIFICATIONS
Page 43

Énoncé concernant l’interférence radio de la norme FCC Class B
Remarque : Cet équipement a été testé et trouvé conforme selon les limites d’un appareil numérique de Classe B, conformément à la partie 15 des normes FCC. Ces limites
sont conçues pour fournir une protection raisonnable contre une interférence nuisible dans une installation résidentielle. Cet équipement génère, utilise et peut émettre une
énergie des fréquences radio et peut causer une interférence nuisible aux communications radio s'il n'est pas installé et utilisé selon les instructions. Toutefois, il n’y a aucune
garantie que des interférences n’auront pas lieu dans une installation particulière. Si cet équipement génère une interférence nuisible à la réception radio et télévisée,
déterminée en allumant et éteignant l’appareil, nous encourageons l'utilisateur à corriger l'interférence à l'aide des mesures suivantes :
1. Rediriger ou relocaliser l'antenne récepteur.
2. Augmenter la séparation entre l'équipement et le récepteur.
3. Brancher l'équipement sur une prise d'un circuit différent de celui du récepteur.
4. Consulter le vendeur ou un technicien expérimenté en radio/TV pour obtenir de l'aide.
Cet appareil est conforme à la partie 15 des normes FCC. L'utilisation est soumise aux deux conditions suivantes : (1) Cet appareil ne génère peut-être pas d’interférence
nuisible et (2) il doit accepter toute interférence reçue, y compris celle pouvant causer une utilisation non voulue.
Attention:
1. The modifications, qui ne sont pas expressément approuvées par la partie responsable de la conformité, pourraient annuler l'autorité de l'utilisateur à utiliser l'équipement.
2. Il faut utiliser des câbles d'interface et un cordon d'alimentation en c.a. blindés, le cas échéant, afin d'observer les limites d'émission.
3. Le fabricant n'est pas responsable des interférences radio ou télévisées causées par une modification non autorisée sur l'équipement. L'utilisateur a la responsabilité de
corriger une telle interférence.
Informations concernant l'exposition aux radiofréquences
Cet appareil répond aux exigences du gouvernement concernant l'exposition aux ondes radio. Cet appareil est conçu et fabriqué pour ne pas dépasser les limites d'émission
concernant l'exposition aux radiofréquences (RF) déterminées par la Federal Communications Commission (FCC) du gouvernement américain. Cet appareil est conforme
aux limites FCC sur l'exposition aux radiations qui sont déterminées pour un environnement non contrôlé.
Énoncé IC
L'utilisation est soumise aux deux conditions suivantes :
1. Cet appareil ne génère peut-être pas d'interférence nuisible et
2. il doit accepter toute interférence reçue, y compris celle pouvant causer une utilisation non
voulue de l'appareil.
Énoncé IC concernant l'exposition aux radiations
Cet équipement est conforme aux limites d'IC RSS-102 sur l'exposition aux radiations qui sont
déterminées pour un environnement non contrôlé. Cet équipement doit être installé et utilisé avec
une distance minimum de 20 cm entre le radiateur et votre corps.
Élimination et recyclage
Vous devez éliminer ce produit correctement, selon les lois et les règlements locaux. Puisque ce
produit contient des composants électroniques et une batterie, il est être éliminé séparément
des déchets domestiques. Contactez les autorités locales pour en apprendre plus sur les
options d'élimination et de recyclage.
Autre :
Images utilisées avec l'autorisation de Shutterstock.com
ON ET CONFORMITÉ
Fabriqué sous licence par Dolby Laboratories. Dolby et le
symbole double D sont des marques de commerce de
Dolby Laboratories.
Pour les brevets DTS, consultez http://patents.dts.com
Fabriqué sous licence par DTS Licensing Limited. DTS, le
Symbol, & DTS et le Symbol ensemble sont des marques
déposées, et DTS TruSurround est une marque de
commerce de DTS, Inc. DTS, Inc. Tous droits réservés.
Pour les brevets DTS, consultez http://patents.dts.com
Fabriqué sous licence par DTS Licensing Limited. DTS, le
Symbol, & DTS et le Symbol ensemble sont des marques
déposées, et DTS TruSurround est une marque de
commerce de DTS, Inc. DTS, Inc. Tous droits réservés.
Ce produit répond aux normes ENERGY STAR lorsqu'il est
réglé selon la configuration d'usine par défaut et cette
configuration vous permettra d'obtenir une économie
d'énergie. Modifier les réglages d'usine par défaut de
l'image ou activer d'autres caractéristiques augmentera
la consommation d'énergie, laquelle pourrait dépasser
les limites de certification ENERGY STAR.
Nous voulons vous aider à économiser de l'énergie.
Page 44

© 2013 VIZIO INC. ALL RIGHTS RESERVED.
© 2013 VIZIO INC. TOUS DROITS RÉSERVÉS.
130510OC-NC
 Loading...