

Page 1
USB 2.0 DOCKING STATION
NBK DOCK U2 / 14378
Bedienungsanleitung 3
User´s manual 11
Nitice d´emploi 19
Instrucciones de uso 27
Istruzioni per I´uso 35
Gebruiksaanwijzing 43
Instru
ções de uso 51
1
Page 2

USB 2.0 DOCKING STATION
CE - Certificate
This equipment is in compliance with the requirements of the following regulations:
EN 55 022: CLASS B
FCC Conditions
This equipment has been tested and found to comply with Part 15 of the FCC Rules.
Operation is subject to the following two conditions:
(1) This device may not cause harmful interference
(2) This device must accept any interference received. Including interference that may
cause undesired operation.
Disclaimer
Information in this document is subject to change without notice. The manufacturer does not make any
representations or warranties (implied or otherwise) regarding the a ccuracy and completeness of this
document and shall in no event be liable for any loss of profit or any commercial damage, including but not
limited to special, incidental, consequential, or other damage.
May 2005, Rev2.0
2
Page 3

USB 2.0 DOCKING STATION
Bedienungsanleitung
Sicherheitshinweise
Lesen Sie die Sicherheitshinweise stets
sorgfältig durch
- Bewahren Sie diese Bedienungsanleitungen für
zukünftige Verwendung auf
- Schützen Sie dieses Gerät vor Feuchtigkeit
- Legen Sie das Gerät auf einer zuverlässigen,
flachen Oberfläche aus, bevor Sie es installieren
- Wenn eine der folgenden Situationen eintritt, lassen
Sie das Gerät von einem Servicetechniker
untersuchen:
- Das Gerät wurde Feuchtigkeit ausgesetzt.
- Das Gerät wurde fallen gelassen und beschädigt.
- Das Gerät weist offensichtliche Bruchspuren auf.
- Das Gerät funktioniert nicht ordnungsgemäß oder
Sie können es anhand der Bedienungsanleitung
nicht zum Laufen bekommen.
Inhaltsverzeichnis
1. Einleitung 03
2. Installation 05
3. Betriebshinweise für die Ports 09
4. Spezifikation 10
1. Einleitung
Diese USB 2.0 Docking Station ist ein einzigartiges Erweiterungsgerät, das speziell für den Gebrauch mit
Notebooks oder Desktop PCs mit zusätzlichen Konnektivitätsanforderungen e ntworfen wurde.
Mit nur einem einzigen erforderli chen USB 2.0 Port können S ie von einem Noteboo k oder Deskto p PC aus nicht
nur auf USB-, sondern auch auf konventionelle PIO-, SIO-, LAN- und PS/2-Peripheriegeräte frei zugreifen.
Über die USB 2.0 Docking Station können Sie mehrere USB 2.0-Hochleistungsperipheriegeräte mit ihrem
PC verbinden. Darüber hinaus ist dieses Produkt vollständig rückwärts kompatibel mit Produkten der USB
Revision 1.1. Dies bedeutet, dass Ihre bisherigen USB 1.1-Geräte auch weiterhin funktionieren werden. Sie
können außerdem zusätzliche Hubs, sowie bis zu 12 7 weitere Geräte hinzufügen.
Zur Nutzung von Peripheriegeräten müssen Sie nun nicht mehr ihren PC oder Ihr Notebook auf links drehen,
um die Hardwareeinrichtung durchzuführen. Komplexe Softwareinstallationen gehören ebenfalls der
Vergangenheit an. Mit der Docking Station können Sie ganz einfach alle Arten von USB- oder
konventionellen Peripheriegeräten über „Plug and Play“ gleichzeitig anschließ en, ohne dass Sie sich über
die Verfügbarkeit von Ports Gedanken machen oder Ihr Notebook/Ihren PC neu starten müssen.
3
Page 4

USB 2.0 DOCKING STATION
Merkmale
Lieferumfang
Überprüfen Sie bitte vor Installation die Inhalte des Pakets. Das Paket sollte die folgenden Artikel enthalten:
USB 2.0 Docking Station x1
Netzadapter x1
USB 2.0-Kabel x1
Treiber-CD x1
Diese Bedienungsanleitung x1
• Großartige Erweiterungseinheit für Notebooks und anderer Geräte
• Erfüllt USB 1.1/2.0-Spezifikationen.
• Maximale Transferrate von 480 Mbps.
• Unterstützt PS/2-Tastatur/Maus, IEEE-1284 Paralleldrucker, serielle Geräte und 10/100 Mbps LAN-
Verbindungen
• Zwei nachgelagerte USB 2.0 Ports.
• Erfüllt sämtliche Kriterien für „Plug & Play“ und „Hot Swapping“
• Unterstützt Eigenstrom- und Bus-Stromversorgungsmodus.
Systemanforderungen
• Pentium-kompatibler PC bzw. Notebook
• Windows® 2000 oder XP
• USB Port
• CD-ROM-Laufwerk (für Treiberinstallation)
4
Page 5
USB 2.0 DOCKING STATION
Status-LED
LED
Strom Rot Leuchtet auf, wenn die Docking Station eingeschaltet ist.
USB Hub
(1-2)
LAN 10/100 Grün Leuchtet auf, wenn die Geschwindigkeit des LANs 100 Mpbs
Link Grün LAN-Aktivität. Blinkt, wenn Daten zwischen dem LAN und dem
Farbe Beschreibung
Grün Leuchtet auf, wenn das Gerät für eine Verbindung zu
einem USB-Gerät bereit ist.
beträgt.
Wenn ausgeschaltet, beträgt die Geschwindigkeit des LANs 10
Mpbs, bzw. es konnte kein e Verbindung hergestellt werden.
Hostcomputer übertragen werden.
2. Installation
Installationsprogramm ausführen
Bevor Sie die Docking Station mit Ihrem Computer verbinden, führen Sie das Installationsprogramm bitte
folgendermaßen aus:
1. Legen Sie die bereitgestellte Treiber-CD in das CD-Rom Laufwerk ein.
Das Installationsprogramm wird automatisch gestartet, und der untenstehende Bildschirm erscheint.
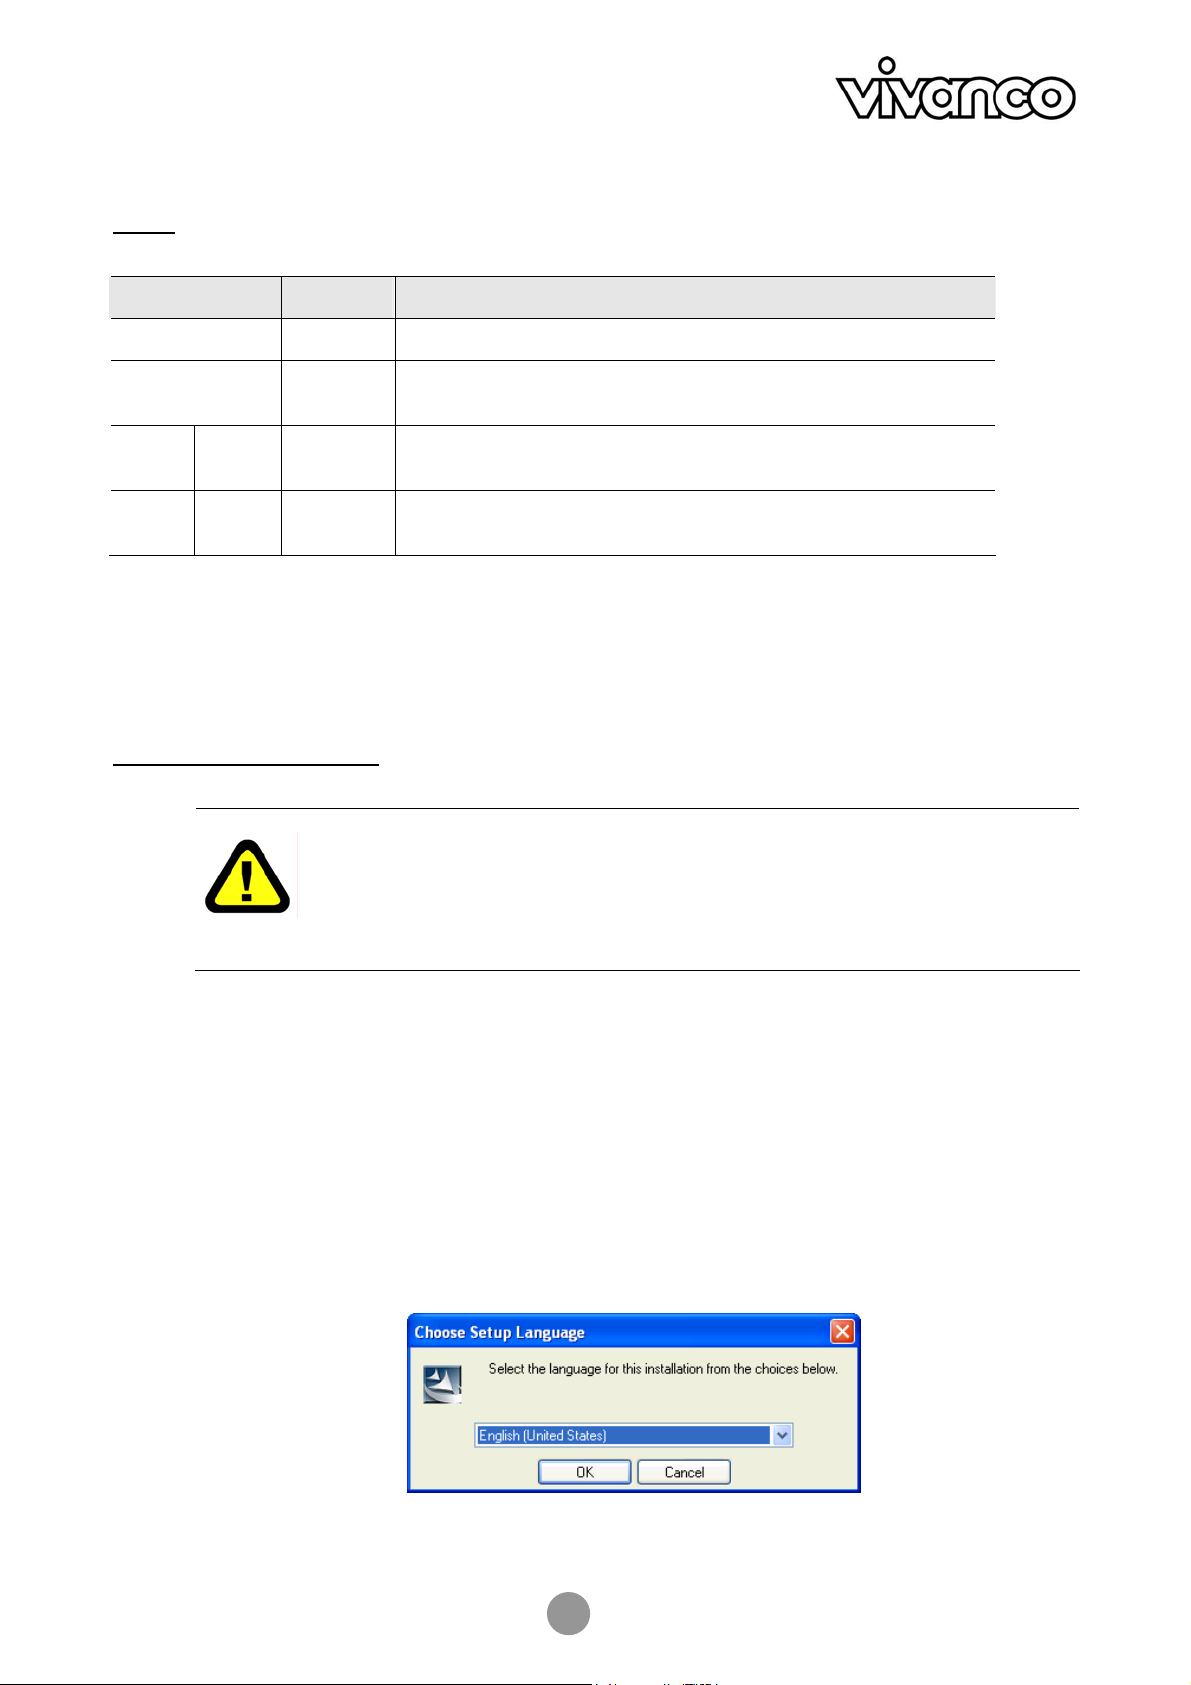
Wählen Sie eine Sprache für die Installation aus und klicken Sie auf OK.
Sollte der Installationsbildschirm nicht erscheinen, suchen Sie die Datei Setup.exe im Stammverzeichnis der
CD und klicken Sie diese doppelt an.
Verbinden Sie die Docking Station NICHT mit Ihrem Computer, bis Sie die Software
von der mitgelieferten CD aus installiert haben.
Falls Sie versehentlich vorher die Verbindung zur Docking Station herstellen,
erscheinen mehrere Fenster mit der Anzeige Neue Hardware Gefunden.
Klicken Sie auf Abbrechen, um die Meldungen zu übergehen.
5
Page 6
USB 2.0 DOCKING STATION
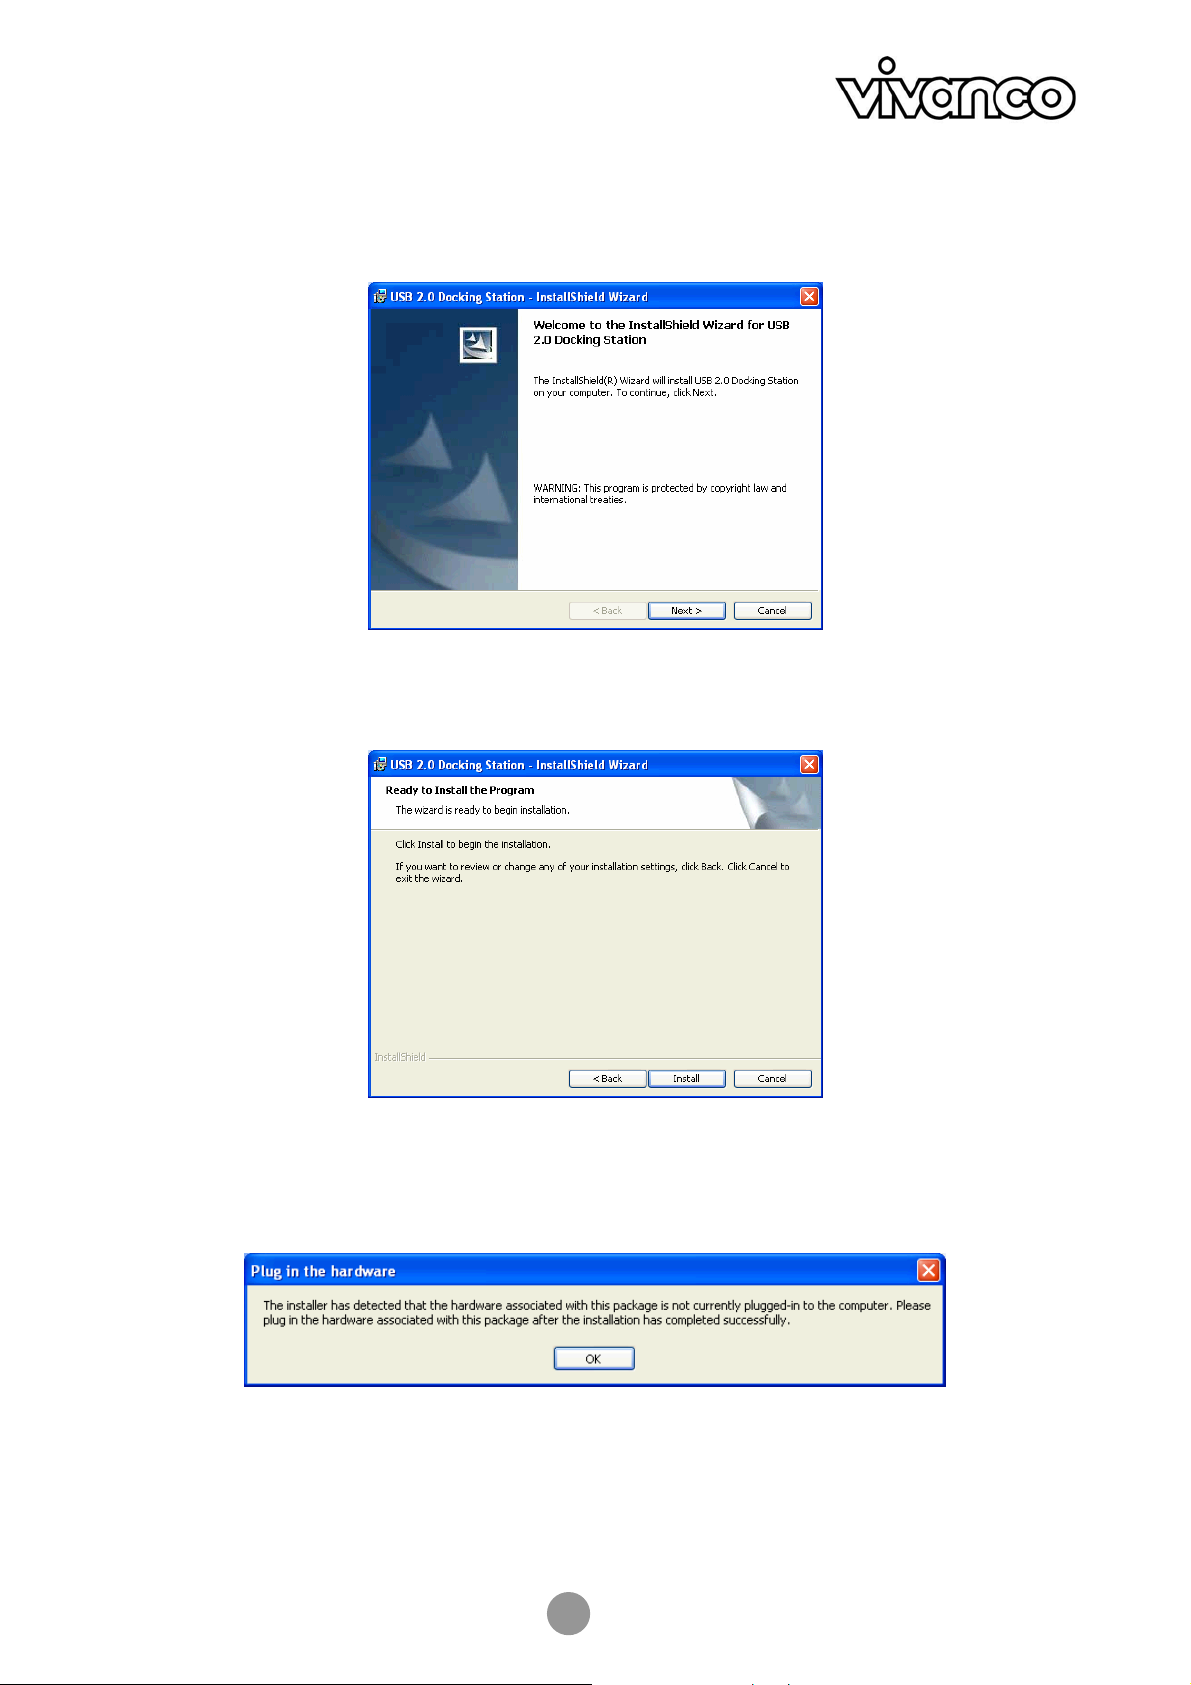
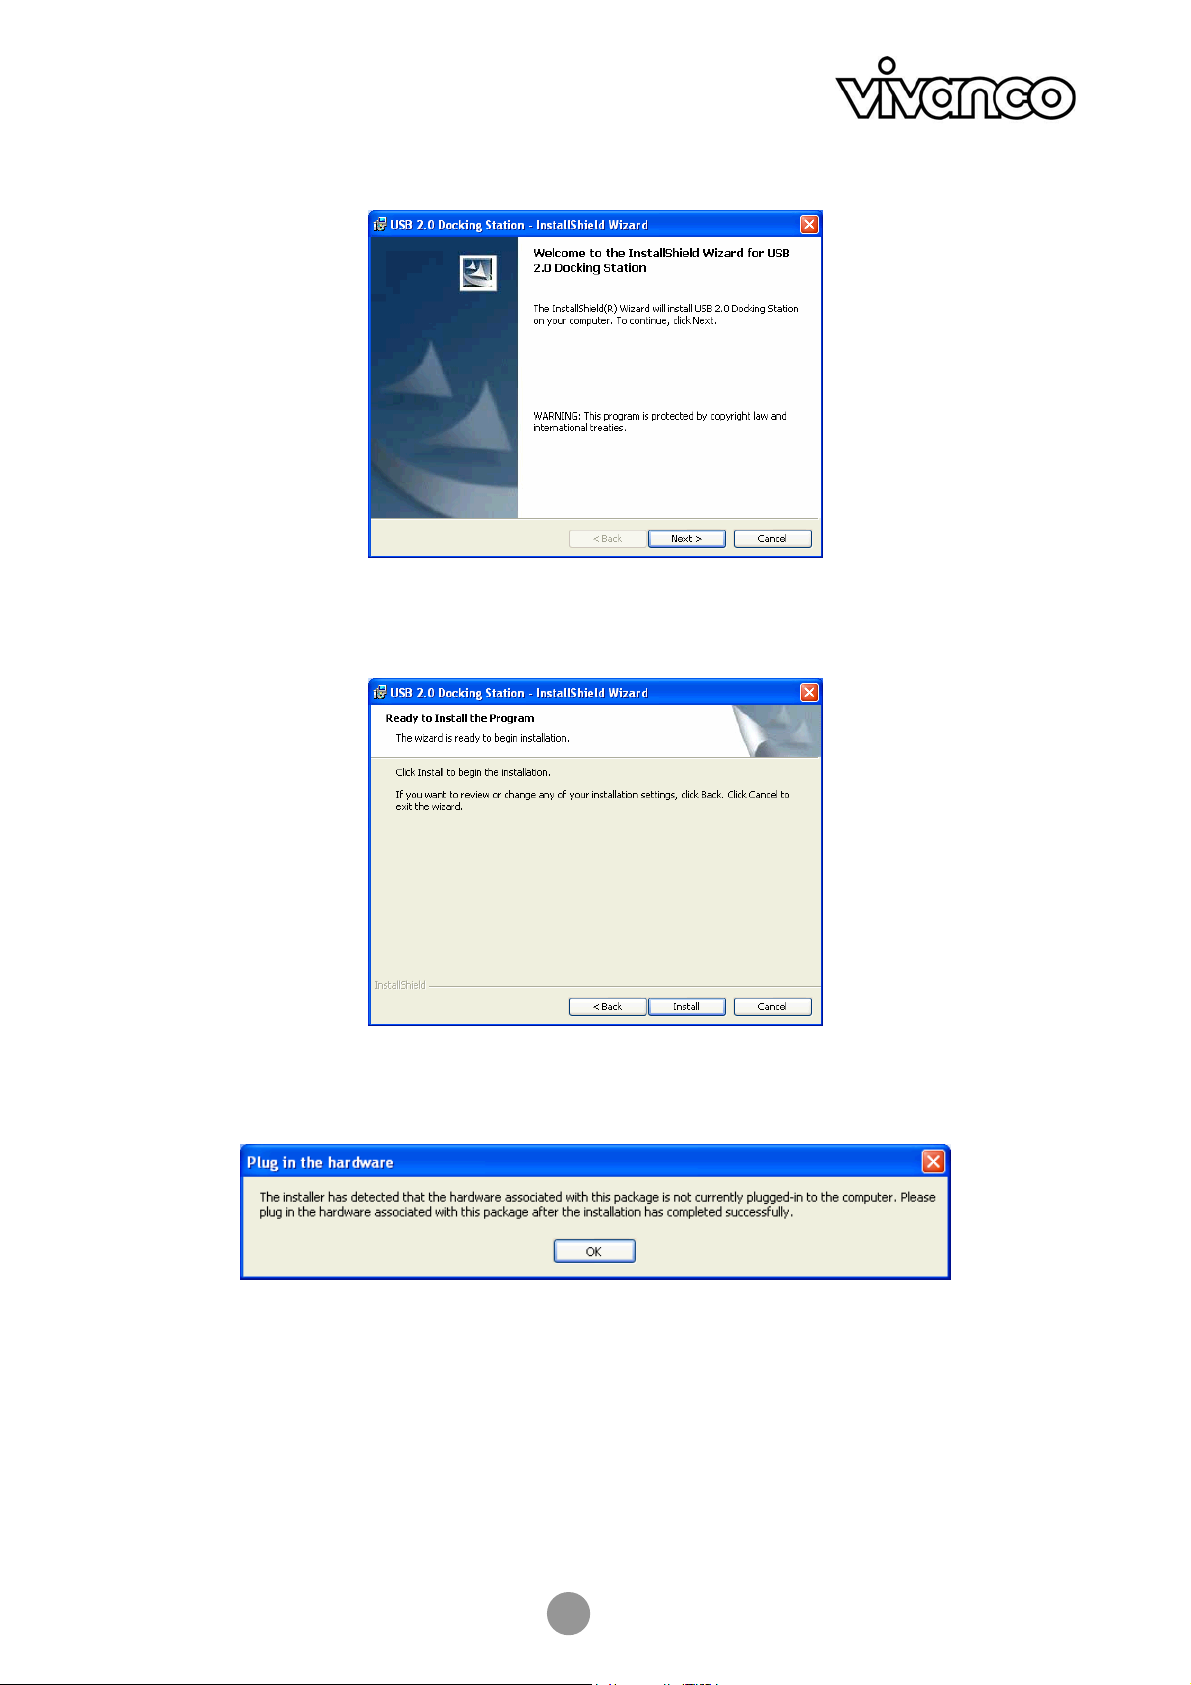
2. Klicken Sie im Willkommensbildschirm auf Weiter.
3. Klicken Sie auf Installieren, um mit der Installation zu beginnen.
4. Wenn Sie aufgefordert werden, die Hardware zu verbinden, klicken Sie einfach nur auf OK.
Verbinden Sie das Gerät zu diesem Zeitpunkt NOCH NICHT.
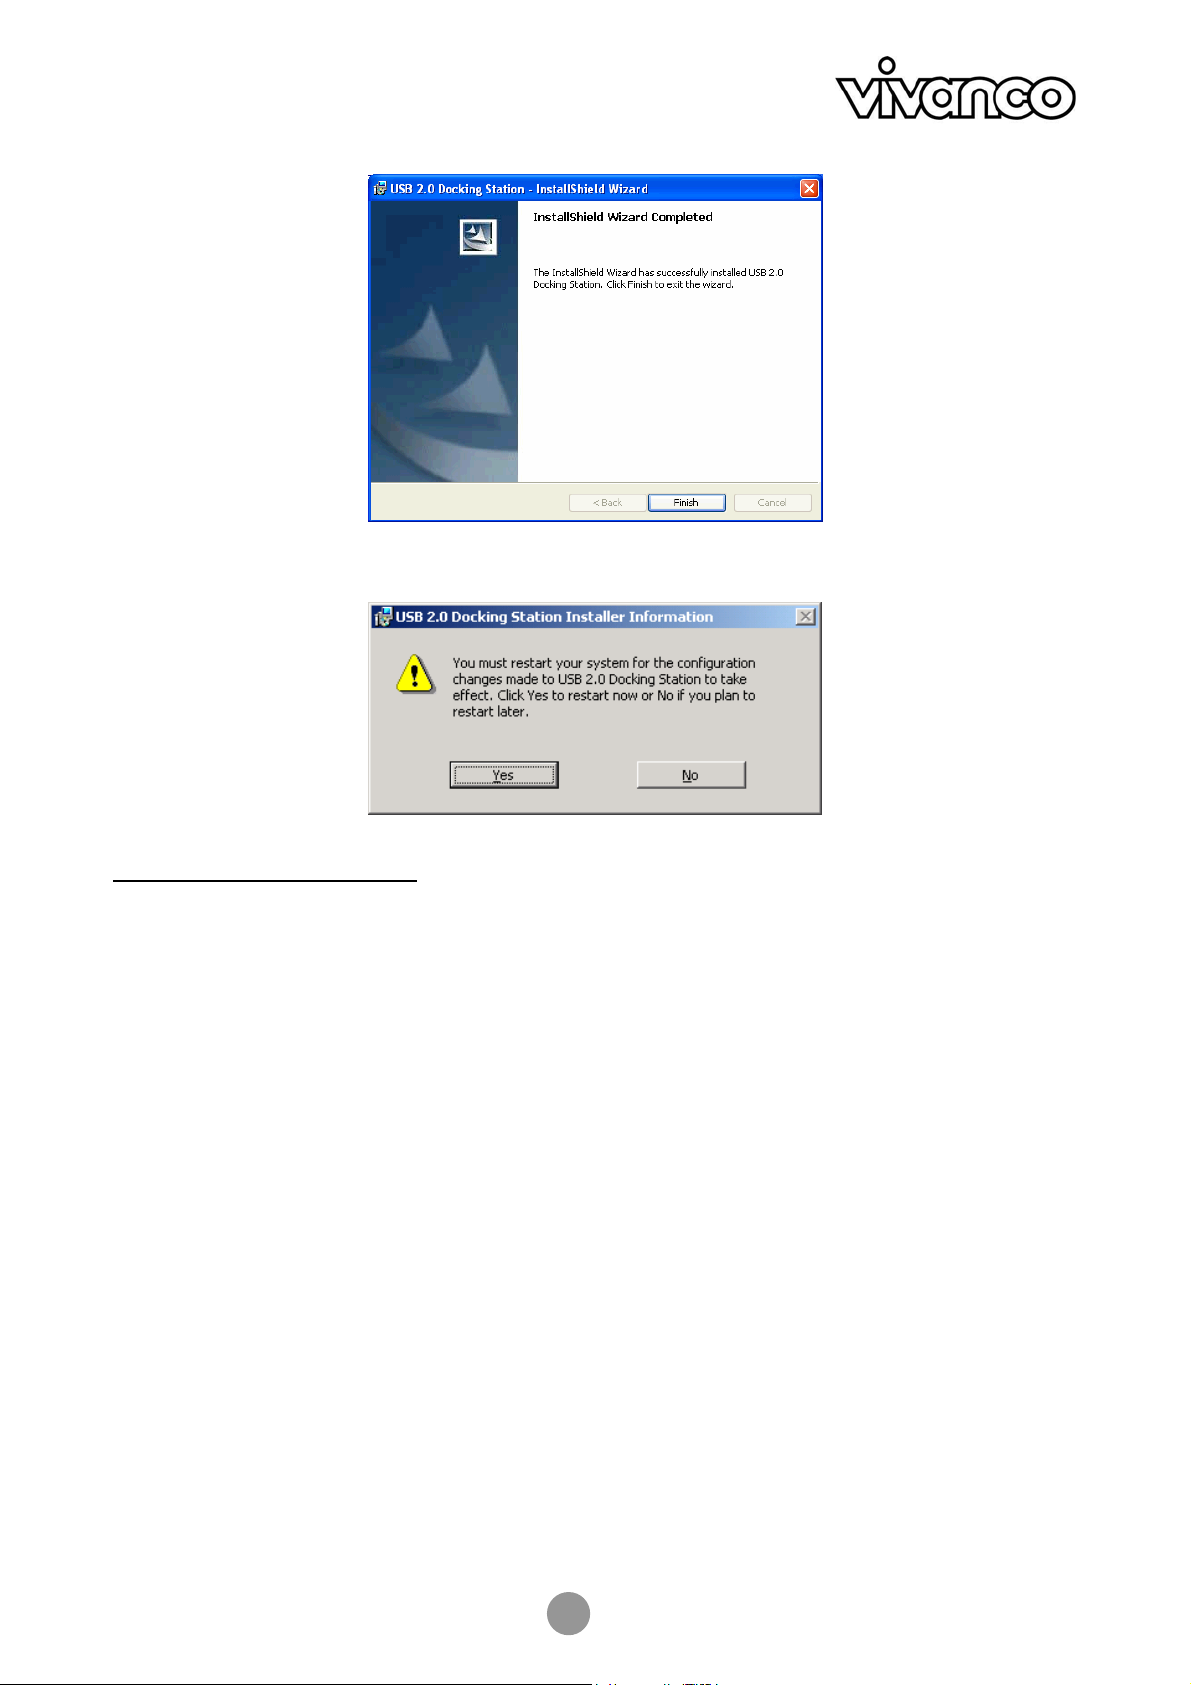
5. Klicken Sie auf Fertigstellen, um die Installation abzuschließen.
6
Page 7

USB 2.0 DOCKING STATION
6. Wenn Sie aufgefordert werden, Ihren Computer erneut zu starten, klicken Sie auf Ja.
Docking Station anschließen
Nachdem Sie die Software installiert haben, gehen Sie folgendermaßen vor, um das Gerät an zuschließen:
1. Stecken Sie das quadratische Ende (Stecker Typ B) des USB-Kabels
in den vorgelagerten USB-Konnektor auf der Seite der Docking Station.
2. Stecken Sie das flache Ende (Stecker Typ A) des USB-Kabels
in einen freien USB-Port an Ihrem Computer.
3. (Optional) Stecken Sie den Netzadapter in eine Steckdose und stecken Sie
den Gleichstromstecker in die Gleichstrombuchse auf der Seite der Docking Station.
*Die Docking Station unterstützt sowohl einen Eigenstromversorgungsmodus als au ch einen BusStromversorgungsmodus.
Weitere Details hierzu finden Sie im Abschnitt „Eigenstromversorgungsmodus gegenüber Bus-
Stromversorgungsmodus“.
Ihre Installation ist nun abgeschlossen.
Sie können Ihre Peripheriegeräte nun mit der Docking Station verbinden.
7
Page 8
USB 2.0 DOCKING STATION
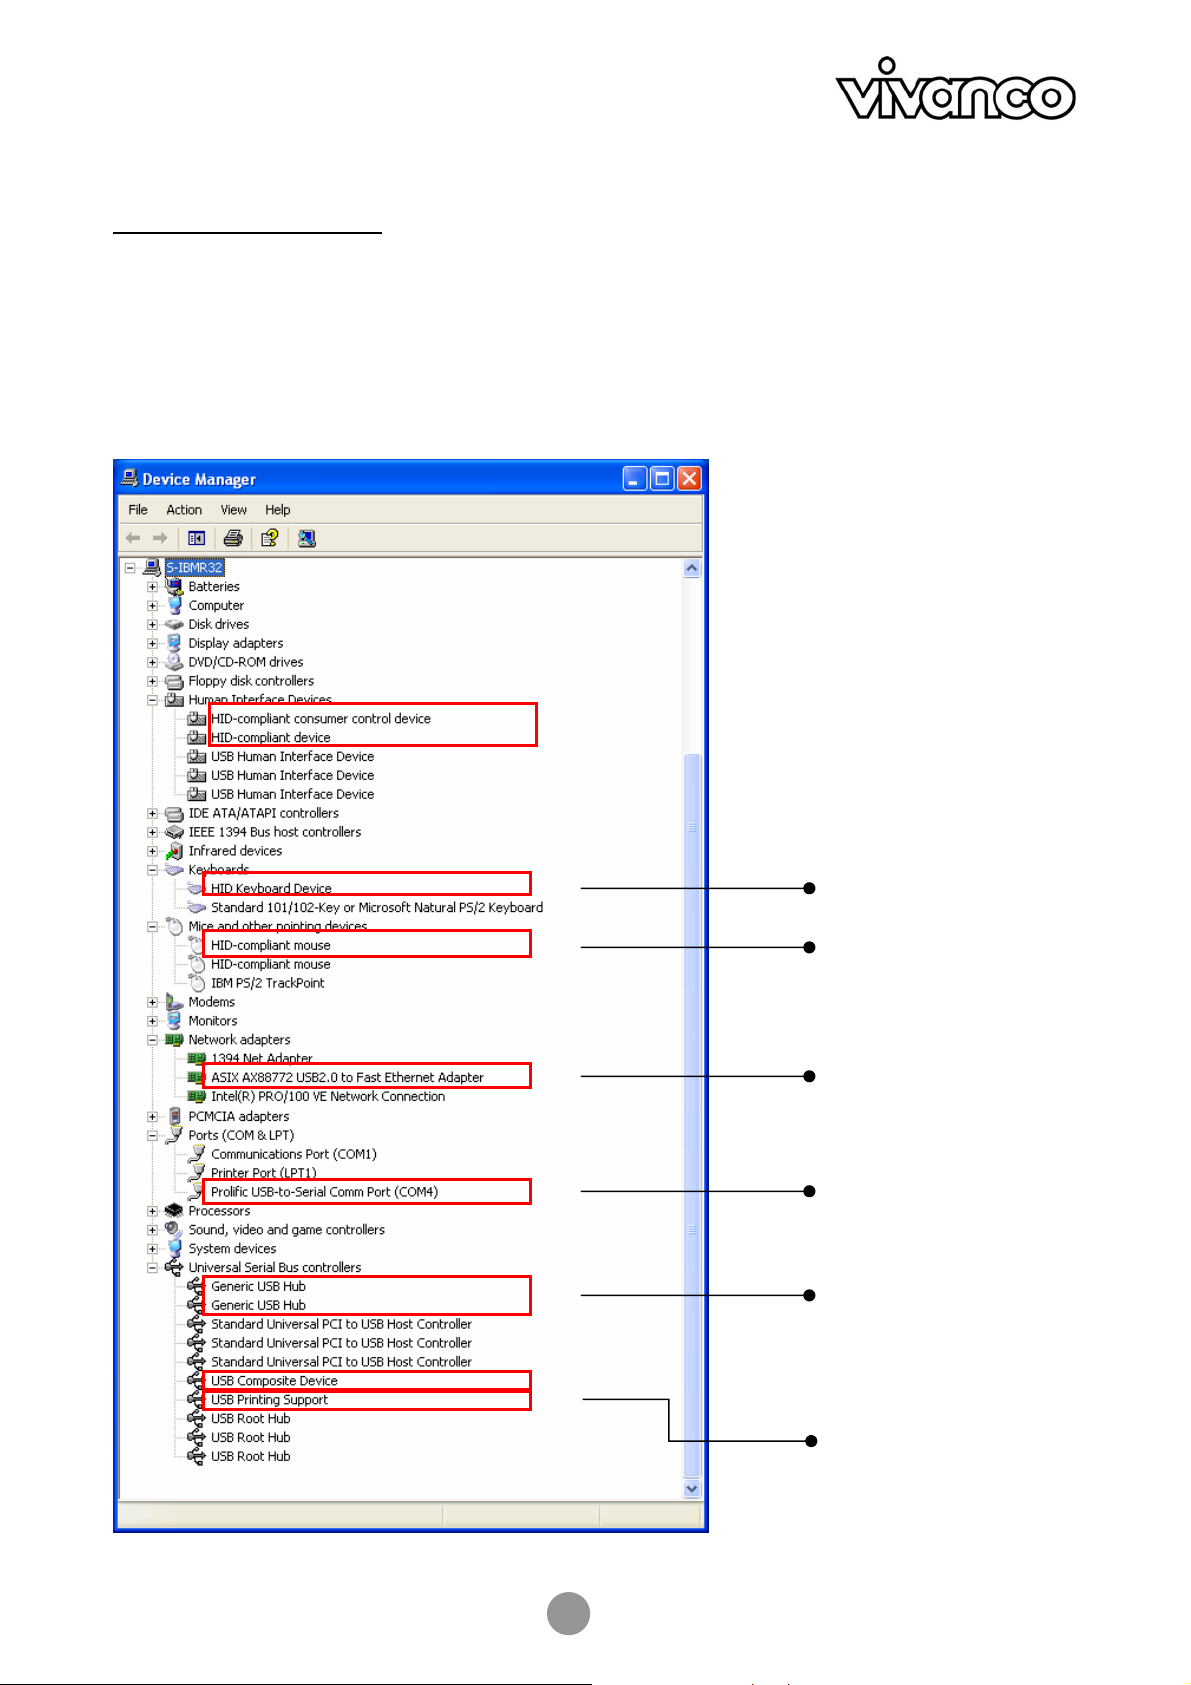
Gerätinstallation überprüfen
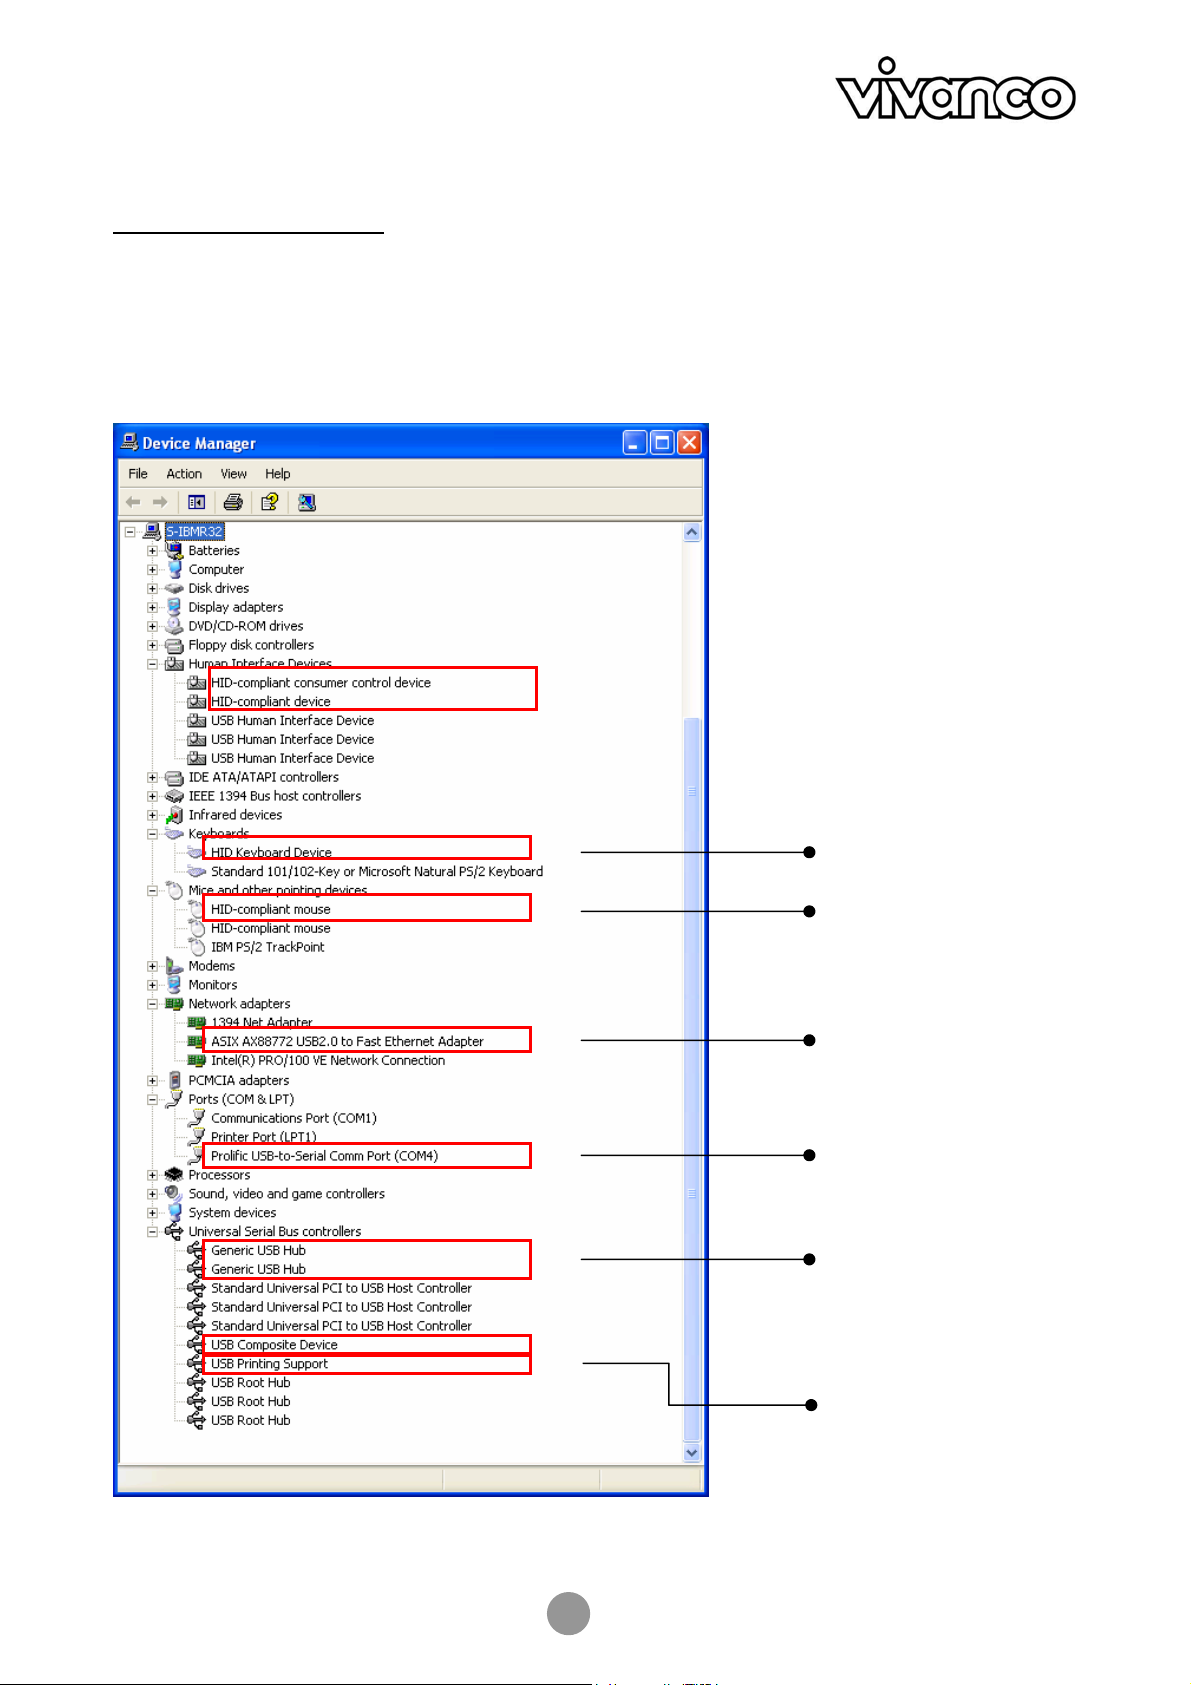
Nachdem Sie die Installation beendet haben, können Sie den Windows Gerätemanager öffnen
(über Arbeitsplatz > Eigenschaften > Hardware), um zu überprüfen, ob Ihre Docking Station mit allen
bereitgestellten Funktionen ordnungsgemäß installiert wurde. In der Liste der Ge räte sollten, wie unten
dargestellt, mehrere neue Gerätseinträge erscheinen:
Tastatur
Maus
LAN Port
Serieller Port
USB hub
IEEE-1284
Paralleldrucker
8
Page 9

USB 2.0 DOCKING STATION
Eigenstromversorgungsmodus gegenüber Bus-Stromversorgungsmodus
Beachten Sie bitte, dass es zwei Möglichkeiten gibt, USB-Peripheriegeräte mit Strom zu versorgen: den
Eigenstromversorgungsmodus und den Bus-Stromversorgungsmodus. Der Eigenstromve rsorgungsmodus
bedeutet, dass das Peripheriegerät für den Betrieb über einen eigenen Netzadapter verfügt. BusStromversorgungsmodus bedeutet, dass das Peripheriegerät den Strom vom vorgeschalteten Port bezieht,
mit dem es verbunden ist.
Die USB 2.0 Docking Station kann sowohl im Eigenstromversorgungsmodus als auch im BusStromversorgungsmodus laufen. Im Bus-Stromversorgungsmodus können die einzelnen nachgeschalteten
Ports der Docking Station jedoch nur eine Stromstärke von maximal 100 mA bieten. Daher werden Geräte
mit höheren Stromanforderungen (z.B. USB-Scanner oder Multifunktionsperipheriegeräte, MFP) nicht
funktionieren. In dieser Situation wird empfohlen, die Docking Station immer, wenn es möglich ist, im
Eigenstromversorgungsmodus zu betreiben. Der Bus-Stromversorgungsmodus ist nur für Geräte mit
niedrigem Stromverbrauch geeignet.
3. Betriebshinweise für die Ports
Beachten Sie beim Anschluss von Peripheriegeräten an die Docking Station die folgenden Hinweise:
USB-Hub-Ports:
Wenn Sie ein USB-Gerät mit einem der nachgelagerten USB-Ports der Docking Station verbinden, stellen Sie
sicher, dass Sie das diesem USB-Gerät beiliegende Softwareinstallationshandbuch (falls vorhanden) befolgen.
PS/2-Ports (Tastatur- und Mausport):
Aufgrund der locker spezifizierten PS/2-Protokolle und der riesigen Anzahl existierender Marken/Modelle
kann es gelegentlich zu Kompatibilitätsproblemen kommen. Wenn die PS/2-Tastatur bzw. Maus jedoch IBM
PC-kompatibel ist, so sollte sie mit der Docking Station ordnungsgemäß funktionieren.
Serieller Port :
Beachten Sie, dass der serielle Port keine Plug-and-Play-Schnittstelle darstellt. Wenn Sie ein Gerät (z.B. ein
Modem) über den seriellen Port mit der Docking Station verbinden und die Docki ng Station bereits mit einem
PC verbunden ist, so müssen Sie in der Systemsteuerung die Funktion Neue Hard ware Hinzufügen
ausführen, oder die Docking Station vom PC trennen und dann erneut einstecken, damit der PC das Gerät
findet und die Funktion ausführt.
USB-zu-Seriell-Schnittstelle:
Die Schnittstelle wurde für den Einsat z mit Modems ode r anderen seri ellen Gerät en entworfe n, die über Treibe r
verfügen, die einen „VIRTUELLEN PORT“ verwe nden können. Se rielle Mäuse sin d alte Geräte, und v iele ihrer
Treiber erkennen nur physische serielle Ports. Daher kann die Kompatibilität der USB-zu-Seriell-Schnittstelle und
der seriellen Maus keineswegs gewährleistet werden. Es gibt ein paar seltene Fälle, in denen dies funktioni eren
kann, aber die Mehrheit der seriellen Mäuse ist mit der USB-zu-Seriell-Schnittstelle nicht komp atibel.
LAN-Port :
Dieser Port unterstützt die Funktion Ethernet 10/100 Mbps.
9
Page 10

USB 2.0 DOCKING STATION
4. Spezifikation
Modell 2-Port-Hub-Modell
Vorgelagerter Port für Computerseite (Buchse für Stecker Typ B) 1
Nachgelagerte Ports für USB-Hub (Buchse für Stecker Typ A)
PS/2-Tastaturport (Mini Din 6-Pin)
PS/2-Mausport (Mini Din 6-Pin)
Serieller Port (DB 9-Pin-Stecker) 1
Parallelport (DB 25-Pin-Buchse)
10/100M LAN-Port (8P8C RJ 45 abgeschirmt)
Strom-LED (rot) 1
USB-Hub-Port-LED (grün) 2
LAN-Port-LED (grün) 2
Stromversorgungsmodus Busversorgung und Eigenversorgung
Elektromagnetische Emission CE, FCC
Stromversorgung Wechselstromeingang 100 V~240V
2
1
1
1
1
Gleichstromausgang 5V, 2,5A
Umgebungen Betriebstemperatur: 0° C~40° C
Lagertemperatur: -10° C~80~° C
Feuchtigkeit: 90% RH (Keine
Kondensierung)
Gewicht 148 (g)
Abmessungen 178 x 58,6 x28,7 (mm)
* Spezifikationen können sich ohne Vorankündigung ändern.
10
Page 11

USB 2.0 DOCKING STATION
User manual
Safety Instructions
Always read the safety instructions carefully
- Keep this User Manual for future reference
- Keep this equipment away from humidity
- Lay this equipment out on a reliable flat surface
before setting it up
- If any of the following situations arise,
have the equipment checked by a service technician:
- The equipment has been exposed to moisture.
- The equipment has been dropped and damaged.
- The equipment has obvious sign of breakage.
- The equipment has not been working well or you
cannot get it work according to User Manual.
1. Introduction
This USB 2.0 Docking Station is a unique expansion unit specifically designed to accompany notebooks or
Table of Contents
1. Introduction 11
2. Installation 13
3. Operation notes about the ports 17
4. Specification 18
desktop PCs with additional connectivity requirements.
With only one USB 2.0 port required from a notebook/desktop PC, not only USB but also conventional PIO,
SIO, LAN, and PS/2 peripheral devices can be accessed freely.
The USB 2.0 Docking Station allows you to add multiple high-performance USB 2.0 peripheral devices to
your PC. Moreover, this product is fully backwards compatible with the USB Revision 1.1 products, which
means that your previous USB 1.1 devices can continue to function as well. You also can add additional
hubs and up to 127 devices.
No longer will you have to turn PC or notebook inside out for hardware setup or go through complex software
installations in order to utilize peripherals. With the docking station, simply plug and play all types of
USB/conventional peripherals simultaneously without having to worry about the availability of ports or the
need to re-boot your notebook/PC.
Features
• Great expansion unit for notebook to other devices
• Compliant with USB 1.1/2.0 specifications.
• Maximum transfer rate of 480 Mbps.
• Supports PS/2 keyboard/mouse, IEEE-1284 parallel printer, serial device, and 10/100Mbps LAN
connection.
• Two USB 2.0 downstream ports.
• Fully compliant with plug & play and hot swapping.
• Supports self-power and bus-power mode.
11
Page 12

USB 2.0 DOCKING STATION
Package Contents
Before installation, please check the contents of the package. The package should contain the following items:
USB 2.0 Docking Station x1
Power Adapter x1
USB 2.0 Cable x1
Driver CD x1
This manual x1
System Requirements
• Pentium compatible PC or notebook
• Windows® 2000 or XP
• USB port
• CD-ROM drive (for driver installation)
12
Page 13
USB 2.0 DOCKING STATION
Status
LED Color Description
Power Red Lights up when the docking station i s powered on.
USB Hub
(1-2)
LAN 10/100 Green Lights up if the spe ed of LAN is 100Mbps.
Link Green LAN activity. Blinks when there is a data flow between the LAN
Green Lights up when ready to connect to a USB device.
Off if the speed of LAN is 10Mbps or not connected.
and the host computer .
2. Installation
Running the Setup Program
Do NOT connect the docking station to your computer before installing the software
from the provided CD.
If you accidentally plug in the docking station first, a couple of New Hardware Found
Wizard screens will pop up.
Click Cancel to bypass the screens.
Before you connect the docking station to your computer for the first time, please run the setup program as
follows:
1. Insert the provided driver CD into your CD-ROM drive.
The setup program starts automatically and pops up the screen below. Select a language for the
installation and click OK.
If the setup screen doesn’t appear, locate and double-click the Setup.exe file under the root directory of the CD.
13
Page 14
USB 2.0 DOCKING STATION
2. When the welcome screen appears, click Next.
3. Click Install to begin the installation.
4. When prompted to plug in the hardware, just click OK. DO NOT plug in the device at this point.
5. Click Finish to complete the installation.
14
Page 15
USB 2.0 DOCKING STATION
6. If prompted to restart your computer, click Yes.
Connecting the Docking Station
After installing the software, proceed as follows to connect the device:
1. Plug the square end (Type B male receptacle) of the USB cable
into the USB upstream connector located on the side of docking station.
2. Plug the flat end (Type A male receptacle) of the USB cable
into a free USB port on your computer.
3. (Optional) Plug the power adapter to a household AC outlet and
plug the adapter’s DC jack into the DC socket on the side of docking station.
*The docking station supports both self-power mode and bus-power mode.
Refer to the section “Self-Power Mode vs. Bus-Power Mode” for details.
Your installation is now complete.
You can now connect your peripherals to the docking station.
15
Page 16
USB 2.0 DOCKING STATION
Checking Device Installation
Once you finish the installation, you can open the Windows Device Manager
(via My Computer > Properties > Hardware) to verify that your docking station is properly installed with all
the provided functions. There should be a couple of device entries added to the device list as shown below:
Keyboard
Mouse
LAN port
Serial port
USB hub
IEEE-1284 parallel
printer
16
Page 17

USB 2.0 DOCKING STATION
Self-Power Mode vs Bus-Power Mode
Note that there are two modes of powering USB peripherals, self-power mode a nd bus-power mode. The
self-power mode means the peripheral has its own power adapter for ope ration. Bus-power mode means the
peripheral operates under the power from the upstream port that it is connected to.
The USB 2.0 docking station can operate under both USB bus-power and self-power mode. However, under
bus-power mode, the individual downstream facing ports of the docking station cannot supply current for more
than 100mA. Therefore, devices (e.g. USB scanner or multi-function peripheral, MFP) with power requirements
higher than this value will not work. In this situation, it is recommended to operate the docking station in the
self-power mode whenever possible. USB bus-power mode is only for devices with low power consumption .
3. Operation Notes About the Ports
When connecting peripheral devices to the docking station, pay attention to the following notes:
USB Hub Ports:
When connecting a USB device to one of the downstream USB ports of the docking station, make sure to
follow the software installation manual accompanied (if any) with this USB device.
PS/2 Ports (Keyboard and mouse port):
Some compatibility issue may occur due to the loosely specified PS/2 protocols and the sheer number of
existing brands/models. However, if the PS/2 keyboard or mouse is IBM PC compatible, then it should be
able to work with the docking station properly.
Serial Port:
Note that serial port is not a plug and play interface. If you connect a serial port device (e.g. a modem) to the
docking station and the docking station is already connected to a PC, you need to perform the Add New
Hardware function from the Control Panel or remove and re-plug the docking station to the PC to find the
device and perform the function.
USB-to-serial interface:
The interface was designed to work with modems or any serial device that has drivers capable of handling
“VIRTUAL PORT”. Serial mice are old devices, and most of their drivers recognize physi cal serial ports only.
Thus, the compatibility of the USB-to-serial interface and the serial mouse is not guaranteed at all. There are
a few rare cases where it can work, but the majority of the serial mice is not compatible with the USB-toserial interface.
LAN Port:
This port supports Ethernet 10/100 Mbps function.
17
Page 18

USB 2.0 DOCKING STATION
4. Specification
Model 2-Port Hub Model
Upstream port for computer side (Type B receptacle) 1
Downstream ports for USB hub (Type A receptacle)
PS/2 keyboard port (Mini Din 6 pin)
PS/2 mouse port (Mini Din 6 pin)
Serial port (DB 9 pin male)
Parallel port (DB 25 pin female)
10/100M LAN port (8P8C RJ 45 shielding)
Power LED (Red) 1
USB Hub Port LED (Green) 2
LAN Port LED (Green) 2
Power Mode Bus-powered and Self-powered
Emission CE, FCC
Power AC Input 100 V~240V
2
1
1
1
1
1
DC Output 5V, 2.5A
Environments Operating temperature: 0°C~40°C
Storage temperature: -10°C~80~°C
Humidity: 90% RH (No condensing)
Weight 148 (g)
Dimensions 178 x 58.6 x28.7 (mm)
* Specification is subject to change without notice.
18
Page 19

USB 2.0 DOCKING STATION
Nitice d´emploi
Consignes de sécurité
Veuillez toujours lire les instructions de sécurité
avec attention
- Conserver le présent manuel utilisateur pour des
consultations ultérieures.
- Conserver cet appareil à l’abri de l’humidité.
- Poser cet appareil sur une surface plate et stable avant
la mise en route.
- Veuillez faire voir l’appareil par un technicien de
maintenance dans l’éventualité d’un des cas suivants :
- L’appareil a été exposé à l’humidité.
- L’appareil est tombé et est endommagé.
- L’appareil présente des signes de casse apparents.
- L’appareil ne fonctionne pas correctement ou ne se
comporte pas comme décrit dans le manuel utilisateur.
1. Introduction
Table des matières
1. Introduction 19
2. Installation 21
3. Notes sur le fonctionnement des ports 25
4. Spécification 26
Cette Docking Station USB 2.0 est une extension unique spécialement conçue pour accompagner les
notebook ou les ordinateurs PC qui ont des besoins de connexion spécifiques.
A partir d’un port USB 2.0 sur un notebook ou un PC, il est non seulement possible d’accéder librement à
des périphériques USB, mais aussi à des périphériques conventionnels PIO, SIO, LAN et PS/2.
Cette Docking Station USB 2.0 vous permet d’ajouter de nombreux périphériques haute performance USB
2.0 à votre PC. Cet appareil est de plus entièrement compatible avec les appareils USB 1.1, ce qui signifie
que les appareils USB 1.1 continuent de fonctionner. Il est possible d’ajouter jusqu’à 127 hubs et appareils.
Il est maintenant possible d’utiliser des périphériques sans avoir à démonter le PC pour modifier le matériel
et sans installations logicielles fastidieuses ; avec la docking station il est possible de connecter
automatiquement tout type de périphérique conventionnel ou USB sans avoir à prendre en compte la
disponibilité des ports ni redémarrer le PC.
Caractéristiques :
• Grande unité d’extension pour des notebook ou autres appareils
• Compatible avec les spécifications USB 1.1/2.0.
• Taux de transfert maxi de 480 Mbps.
• Compatible avec les claviers/souris PS/2, imprimantes parallèles IEEE-1284, les appareils
de série et les connexions LAN 10/100 Mbps.
• Deux ports descendants USB 2.0.
• Totalement compatible avec les appareils prêts à fonctionner et le remplacement à chaud.
• Fonctionne en auto-alimentation et en alimentation par bus.
19
Page 20

USB 2.0 DOCKING STATION
Périmètre de livraison
Avant l’installation, vérifier la présence de tous les éléments dans l’emballage. Les éléments suivants
doivent s’y trouver :
Docking Station USB 2.0 x1
Adaptateur d’alimentation x1
Câble USB 2.0 x1
Cd-rom avec pilote x1
Le présent manuel x1
Configuration requise :
• PC compatible Pentium ou notebook
• Windows® 2000 ou XP
• Port USB
• Lecteur Cd-rom (pour l’installation du pilote)
20
Page 21

USB 2.0 DOCKING STATION
Etat des LED
LED Couleur
Alimentation Rouge S’allume quand la docking station est mise en route.
Hub USB
(1-2)
LAN
Description
Vert S’allume à la connexion à un appareil USB.
Vert
10/100
Lien
Vert Activité LAN. Clignote lors d’un transfert de données
S’allume si le débit du LAN est de 100 Mbps.
S’éteint si le LAN est à 10 Mbps ou s’il n’est pas connecté.
entre le LAN et le PC hôte.
2. Installation
Exécution du programme d’installation
NE PAS connecter le docking station à votre ordinateur avant d’installer le logiciel
fourni avec le Cd-rom.
En cas de connexion accidentelle, deux fenêtres de gestion de Nouveau matériel
détecté apparaissent.
Cliquer sur Annuler pour faire disparaître ces fenêtres.
Avant de connecter la docking station à votre ordinateur pour la première fois, exécuter le programme
d’installation comme suit :
1. Insérer le Cd-rom de pilote dans le lecteur.
Le programme d’installation démarre automatiquement et ouvre la fenêtre ci-dessous. Sélectionner
une langue et cliquer sur OK.
Si l’écran d’installation n’apparaît pas, localiser le fichier Setup.exe sur le répertoire racine du Cd-rom et
double-cliquer dessus.
21
Page 22

USB 2.0 DOCKING STATION
2. Une fois que l’écran d’accueil apparaît, cliquer sur Suite.
3. Cliquer sur Installer pour commencer l’installation.
4. A la demande de connecter le matériel, cliquer uniquement sur OK. NE PAS connecter l’appareil à
ce moment-là.
5. Cliquer sur Terminer pour terminer l’installation.
22
Page 23

USB 2.0 DOCKING STATION
6. A la demande de redémarrer l’ordinateur, cliquer sur Oui.
Connexion de la docking station.
Une fois le logiciel installé, procéder de la manière suivante pour connecter l’appareil.
1. Brancher l’extrémité carrée du câble USB (type B mâle)
dans le raccordement USB montant se trouvant sur le côté de la docking station.
2. Brancher l’extrémité plate du câble USB (type A mâle)
dans un port USB libre de votre PC.
3. (En option) Brancher l’adaptateur d’alimentation au secteur et
la fiche de l’adaptateur dans la prise DC sur le côté de la docking station.
* La docking station fonctionne en auto-alimentation et en alimentation par bus.
Consulter le paragraphe ‘Mode auto-alimentation / mode alimentation par bus’ pour de plus amples
détails.
L’installation est maintenant terminée.
Vous pouvez raccorder vos périphériques à votre docking station.
23
Page 24

USB 2.0 DOCKING STATION
Vérification de l’installation de l’appareil
Une fois l’installation terminée, il est possible d’ouvrir le Gestionnaire de Périphériques de Windows.
(via Mon ordinateur > Propriétés > Matériel) pour vérifier que la docking station est corre ctement installée
avec toutes les fonctions. On trouvera quelques entrées d’appareil ajoutées à la liste comme indiqué cidessous :
Clavier
Souris
Port LAN
Port série
Hub USB
Imprimante parallèle
IEEE-1284
24
Page 25

USB 2.0 DOCKING STATION
Mode auto-alimentation / mode alimentation par bus
Il existe deux modes d’alimentation des périphériques USB, le mode auto-alimentation et le mode
alimentation par bus. Le mode auto-alimentation signifie que le périphérique possède son propre adaptateur
d’alimentation. Le mode alimentation par bus signifie que le périphérique fonctionne avec l’alimentation
provenant du port montant auquel il est connecté.
La docking station USB 2.0 peut fonctionner soit en mode auto-alimentation, soit en mode alimentation par
bus USB. Toutefois, en mode alimentation par bus, chaque port descendant de la docking station ne peut
fournir de courant de plus de 100 mA. C’est pourquoi des appareils avec un besoin en courant supérieur
(p.ex. numériseur USB, ou périphérique multifonctionnel) ne peuvent fonctionner de cette manière. Dans ce
cas, il est recommandé de faire fonctionner la docking station en mode auto-alimentation. Le mode
alimentation par bus USB n’est donc recommandé que pour les appareils à faible co nsommation électrique.
3. Notes sur le fonctionnement des ports
Lors du raccordement des périphériques à la docking station, bien veiller aux points suivants :
Ports hub USB :
Lors de la connexion d’un appareil USB à un port USB descendant de la docking station, il est nécessaire de
suivre les instructions du manuel d’installation logiciel accompagnant (si tel est l e cas) l’appareil USB.
Ports PS/2 (ports clavier et souris) :
Certains problèmes de compatibilité peuvent apparaître avec des protocoles PS/2 insuffisamment spécifiés
et certains modèles/marques de clavier. Si le clavier ou la souris PS/2 sont toutefois compatibles IBM PC, ils
devraient pouvoir travailler correctement avec la docking station.
Port série :
Attention, le port série n’est pas une interface prête à fonctionner. Si vous connectez un appareil port série
(p.ex. un modem) à la docking station, et que la docking station est déjà connectée au PC, il faut exécuter le
fonction Ajout de matériel sur le Panneau de configuration ou retirer et reconnecter la docking station au
PC pour trouver à nouveau l’appareil et assurer le fonctionnement.
Interface USB vers série :
L’interface a été désignée pour fonctionner avec des modems ou tout appareil d e série capable de
manipuler un ‘PORT VIRTUEL'. Les souris de type série sont des appareils anciens et la plu part de leurs
pilotes ne reconnaissent que les ports de série physiques. C’est pourquoi la compatibilité entre l’interface
USB vers série et une souris en série n’est absolument pas garantie. Il existe quelques ca s où cela peut
fonctionner mais la majorité des souris ne sont pas compatibles avec les interfaces USB vers série.
Port LAN :
Ce port est compatible avec Ethernet 10/100 Mbps.
25
Page 26

USB 2.0 DOCKING STATION
4. Spécification
Modèle Modèle hub 2 ports
Port montant pour le côté PC (prise type B) 1
Ports descendants pour le hub USB (prise type A)
Port clavier PS/2 (mini D 6 broches)
Port souris PS/2 (mini D 6 broches) 1
Port série (DB 9 broches mâle) 1
Port parallèle (DB 25 broches femelle)
Port LAN 10/100 Mbps (8P8C RJ 45 blindée)
LED de service (rouge) 1
LED port hub USB (verte) 2
LED port LAN (rouge) 2
Mode alimentation Auto-alimentation et alimentation par bus
Emission CE, FCC
Alimentation
2
1
1
1
Entrée AC 100 V~240 V
Sortie DC 5 V, 2.5 A
Environnements
Poids 148 g
Cotes 178 x 58.6 x28.7 mm
Température de service : 0°C~40°C
Température de stockage : -10°C~80~°C
Humidité : 90% HR (Pas de condensation)
* Les spécifications sont susceptibles de changer sans notification préalable.
26
Page 27

USB 2.0 DOCKING STATION
Instrucciones de uso
Instrucciones de seguridad
Lea siempre detalladamente las instrucciones
de seguridad
- Guarde este manual de usuario como referencia
para el futuro
- Mantenga este equipo alejado de la humedad
- Coloque este equipo sobre una superficie plana y
fiable antes de instalarlo
- El equipo ha de verificarse por un técnico de
mantenimiento si surge alguno de los
siguientes casos:
- El equipo se ha expuesto a la humedad.
- El equipo se ha caído y ha sufrido daños.
- El equipo tiene señales inequívocas de rotura.
- El equipo no ha estado funcionando correctamente o
usted no puede usarlo conforme al manual de usuario.
Índice
1. Introducción 27
2. Instalación 29
3. Notas de funcionamiento de los puertos 33
4. Especificaciones 34
1. Introducción
Esta estación Docking USB 2.0 es una unidad de expansión única, diseñada e spe cialmente para funcionar
con un ordenador portátil o PC de escritorio con demandas adicionales de conectividad.
La estación sólo requiere un puerto USB 2.0 de un ordenador portátil/PC de escritorio, y permite el libre
acceso de aparatos periféricos USB y también aparatos PIO, SIO, LAN, y PS/2 convencionales.
La estación Docking USB 2.0 le permite incorporar a su PC múltiples aparatos periféricos USB 2.0 de altas
prestaciones. Este equipo es además perfectamente compatible con versione s anteriores de los productos
USB Revision 1.1, lo cual significa que sus aparatos USB 1.1 previos también pueden seguir funcionando.
También puede añadir hasta 127 hubs y aparatos adicionales.
La estación docking es adecuada para utilizar aparatos periféricos sin necesidad de darle la vuelta al PC u
ordenador portátil para instalar el hardware y no requiere ninguna instalación compleja de software; usted
puede enchufar y arrancar todo tipo de aparatos periféricos USB/convencionales al mismo tiempo sin
preocuparse de la disponibilidad de puertos o la necesidad de reiniciar el ordenador po rtátil/PC.
27
Page 28

USB 2.0 DOCKING STATION
Características
• Unidad de amplia expansión para uso entre ordenadores portátiles y otros aparatos
• Acorde con las especificaciones USB 1.1/2.0.
• Máximo ratio de transmisión: 480Mbps.
• Compatible con teclados/ratones PS/2, impresora paralela IEEE-1284, equipo serie y
conexión LAN a 10/100Mbps.
• Dos puertos USB 2.0 en la línea de salida.
• Totalmente conforme con plug & play y hot swapping (conectar y arrancar, y
transferencia en caliente).
• Compatible con modo de autoalimentación y alimentación por bus.
Contenido de la caja
Inspeccione por favor los artículos de la caja antes de realizar la instalació n. La caja debería contener los
siguientes artículos:
Estación Docking USB 2.0 x1
Adaptador de alimentación x1
Cable USB 2.0 x1
Controlador de CD x1
Este manual x1
Requirimientos de sistema
• PC u ordenador portátil compatible con Pentium
• Windows® 2000 o XP
• Puerto USB
• Unidad CD-ROM (para la instalación de controladores)
28
Page 29

USB 2.0 DOCKING STATION
Estado de LEDs
LED Color
Alimentación Rojo Luce cuando se conecta la estación docking.
Hub USB
(1-2)
LAN
Enlace Verde Actividad de LAN. Parpadea cuando existe un flujo de datos
10/100
Descripción
Verde Luce cuando la estación está preparada para conectarse a
un aparato USB.
Verde
Luce cuando la velocidad de LAN es de 100Mbps.
Está apagado cuando la velocidad de LAN es de 10Mbps o el
equipo no se halla conectado.
entre LAN y el ordenador anfitrión.
2. Instalación
Funcionamiento del programa de instalación
Antes de conectar por primera vez la estación docking a su orde nador, ejecute por favor el programa de
instalación de la siguiente forma:
1. Inserte el controlador suministrado de CD en su unidad CD-ROM.
El programa de instalación arranca automáticamente y visualiza la pantalla de abajo. Seleccione un
idioma para la instalación y haga clic en OK.
Si no aparece la pantalla de instalación, localice y haga doble clic en el fichero Setup.exe situado en el
directorio raíz del CD.
NO conecte la estación docking a su ordenador antes de instalar el software
del CD suministrado.
Si enchufa primero la estación docking involuntariamente, emergerán un
par de pantallas de Nuevo asistente de hardware encontrado.
Haga clic en Cancelar para obviar las pantallas.
29
Page 30

USB 2.0 DOCKING STATION
2. Haga clic en Next cuando aparezca la pantalla de bienvenida.
3. Haga clic en Install para iniciar la instalación.
4. Haga clic en OK cuando se le pida conectar el hardware. NO conecte el aparato en este momento.
5. Haga clic en Finish (finalizar) para completar la instalación.
30
Page 31

USB 2.0 DOCKING STATION
6. Haga clic en Yes si se le pide reiniciar su ordenador.
Conectar la estación Docking
Una vez instalado el software, proceda de la siguiente forma para conectar el aparato:
1. Enchufe el extremo cuadrado (receptáculo macho tipo B) del cable USB
en el conector USB de entrada situado en la parte lateral de la estación docking.
2. Enchufe el extremo plano (receptáculo macho tipo A) del cable USB
en el puerto USB libre de su ordenador.
3. (Opcional) Conecte el adaptador de alimentación a una toma de corriente doméstica de AC y
enchufe el
conector jack del adaptador de DC en el conector hembra de DC de la parte lateral de la estación
docking.
*La estación docking es compatible con los modos de autoalimentación y alimentación por bus.
Véase el apartado “Self-Power Mode vs Bus-Power Mode” para más detalles.
Su instalación se habrá completado.
Ahora puede conectar sus aparatos periféricos a la estación docking.
31
Page 32

USB 2.0 DOCKING STATION
Comprobar la instalación de aparatos
Una vez finalizada la instalación, usted puede abrir Windows Administrador de dispositivos
(a través de Mi PC > Propiedades > Hardware) para verificar si su estación docking está instalada
adecuadamente con todas las funciones suministradas. Deberían haberse añadido un par de entradas de
aparatos a la lista de los mismos, tal y como se muestra abajo:
Teclado
Ratón
Puerto LAN
Puerto serie
Hub USB
Impresora paralela
IEEE-1284
32
Page 33

USB 2.0 DOCKING STATION
Modos de autoalimentación y alimentación por bus
Sepa que existen dos modos para alimentar aparatos periféricos USB, el modo de autoalimentación y el de
alimentación por bus. El modo de autoalimentación significa que los aparatos periféricos tienen su propio
adaptador de alimentación para el funcionamiento. El modo de alimentación por bus significa que los
aparatos periféricos funcionan alimentados por el puerto de entrada al que se encuentran conectados.
Las estación docking USB 2.0 puede funcionar tanto en el modo de alimentación por bus USB como en el
modo de autoalimentación. Sin embargo, en el modo de alimentación por bus, cada línea de salida
orientada al puerto de la estación docking no puede suministrar una corriente mayor de 10 0mA. Por esta
razón no pueden funcionar los aparatos con mayor demanda de potencia (p. ej. escáne r USB o equipos
periféricos multifuncionales, MFP). En esta situación se recomienda que la estación docking funcione en el
modo de autoalimentación siempre que sea posible. El modo de alimentación por bus USB sólo está
concebido para aparatos de bajo consumo de potencia.
3. Notas de funcionamiento de los puertos
Cuando conecte aparatos periféricos a la estación docking, preste atenci ón a las siguientes notas:
Puertos Hub USB:
Cuando conecte un aparato USB a uno de los puertos USB de entrada d e la estación docking, procure
seguir el manual de instalación de software que se adjunta (si es el caso) a este aparato USB.
Puertos PS/2 (puerto de teclado y ratón):
Puede existir incompatibilidad debido a protocolos PS/2 de especificación imprecisa y a marcas/modelos de
extremada transparencia. No obstante, el teclado PS/2 y el ratón deberían funcionar correctamente en la
estación docking si son compatibles con IBM PC.
Puerto serie
Tenga en cuenta que el puerto serie no e s una interfa z plug and play (conectar y arrancar). Si conecta usted un
aparato de puerto serie (p. ej. un módem) a la estación docking y la misma ya está conectada al PC, necesitará
ejecutar la función Add New Hardware (añadir nuevo hardware) en el Control Panel (panel de control) o
desconectar y conectar de nuevo la estación do cking al PC para encont rar el aparat o y ejecutar la función.
Interfaz USB - puerto serie:
La interfaz se ha diseñado para trabajar con módems o cualquie r a parato en serie con controladores
capaces de manejar “VIRTUAL PORT” (puertos virtuales). Los ratones de tipo serie son aparatos antiguos y
la mayoría de sus controladores sólo reconocen puertos serie físicos. De e ste modo no se garantiza en
ningún caso la compatibilidad de la interfaz USB - puerto serie y el ratón de conexión a puerto serie. Es raro
que ello pueda funcionar, pues la mayoría de los ratones conectados a puertos serie no con compatibles
con la interfaz USB - puerto serie.
Puerto LAN:
Este puerto es compatible con la función Ethernet de 10/100 Mbps.
33
Page 34

USB 2.0 DOCKING STATION
4. Especificaciones
Modelo Modelo de 2 puertos Hub
Puerto de entrada para el lado del ordenador (receptáculo tipo B) 1
Puertos de salida para el hub USB (receptáculo tipo A)
Puerto de teclado PS/2 (Mini Din de 6 pines)
Puerto de ratón PS/2 (Mini Din de 6 pines)
Puerto serie (DB macho de 9 pines)
Puerto paralelo (DB hembra de 25 pines)
Puerto LAN 10/100M (protección 8P8C RJ 45)
LED de alimentación (rojo) 1
Puerto Hub USB LED (verde) 2
LED de puerto LAN (verde) 2
Modo de alimentación Alimentación por bus y autoalimentación
Emisión CE, FCC
Alimentación Entrada AC de 100 V~240V
2
1
1
1
1
1
Salida DC de 5V, 2,5A
Características ambientales Temperatura de funcionamiento: 0~40°C
Temperatura de almacenamiento: 10~80°C
Humedad: 90% RH (no condensable)
Peso 148 (g)
Dimensiones 178 x 58,6 x 28,7 (mm)
* Las especificaciones están sujetas a cambios sin previo aviso.
34
Page 35

DOCKING STATION USB 2.0
Istruzioni per I´uso
Norme di sicurezza
Leggere sempre attentamente le norme di sicurezza.
- Conservare questo manuale per future consultazioni.
- Tenere il dispositivo lontano dall'umidità.
- Collocare il dispositivo su una superficie
d'appoggio in piano e stabile prima di
procedere alla sua configurazione.
- Qualora dovesse verificarsi una delle seguenti
situazioni, far controllare il dispositivo da un tecnico
del Servizio Assistenza:
- Il dispositivo è stato esposto all'umidità.
- Il dispositivo è caduto e si è danneggiato.
- Il dispositivo presenta danni evidenti.
- Il dispositivo non funziona bene o risulta impossibile farlo
funzionare così come descritto nelle istruzioni per l'uso.
1. Introduzione
Sommario
1. Introduzione 35
2. Installazione 37
3. Note sul funzionamento delle porte 41
4. Specifiche 42
La Docking Station USB 2.0 è un'unità di espansione destinata specificamente all'uso con un notebook o un
PC di cui si desideri aumentare la capacità di connessione.
Attraverso una sola porta USB 2.0 del notebook o PC sarà possibile accedere liberamente a periferiche non
soltanto di tipo USB, ma anche di tipo convenzionale PIO, SIO, LAN e PS/2.
La Docking Station USB 2.0 consente di collegare al proprio PC varie periferiche ad alte prestazioni USB
2.0. Questo prodotto è inoltre perfettamente compatibile a ritroso con eventuali prodotti USB versione 1.1, i
quali continueranno quindi a funzionare perfettamente. L'utente può aggiungere hub e dispositivi
supplementari fino ad un massimo di 127 unità.
La Docking Station permette di utilizzare le periferiche senza dover eseguire complicate installazioni
software o dover aprire il PC o il notebook per configurare l'hardware; è infatti sufficiente collegare e attivare
qualsiasi periferica USB/convenzionale senza doversi preoccupare in merito alla disponibilità delle porte e
senza bisogno di riavviare il notebook/PC.
Caratteristiche
• Grande unità di espansione per il collegamento di un notebook con altri dispositivi.
• Conformità alle specifiche USB 1.1/2.0.
• Velocità massima di trasferimento dati di 480Mbps.
• Supporta tastiere/mouse PS/2, stampanti parallele IEEE-1284, dispositivi seriali e
connessioni LAN 10/100Mbps.
• Due porte USB 2.0 downstream.
• Completamente compatibile con gli standard plug & play e hot swapping.
• Supporta le modalità di alimentazione Self Power e Bus Power.
35
Page 36

DOCKING STATION USB 2.0
Contenuto della confezione
Prima dell'installazione controllare che la confezione contenga quanto segue:
Docking Station USB 2.0 x1
Trasformatore x1
Cavo USB 2.0 x1
CD dei driver x1
Questo manuale x1
Requisiti del sistema
• PC o notebook Pentium compatibile
• Windows® 2000 o XP
• Porta USB
• Lettore di CD-ROM (per l'installazione dei driver)
36
Page 37

DOCKING STATION USB 2.0
Stato dei LED
LED
Power Rosso Si illumina all'accensione della Docking Station.
USB Hub
(1-2)
LAN 10/100 Verde Si illumina quando la velocità LAN è 100Mbp s.
Link Verde Attività su LAN. Lampeggia durante la trasmissione di
Colore Descrizione
Verde Si illumina quando la Docking Station è pronta a
connettersi con un dispositivo USB.
È spento quando la velocità LAN è 10Mbps o in assenza di
connessione.
dati tra LAN e host computer.
2. Installazione
Avvio del programma di installazione
Prima di collegare la Docking Station al computer per la prima volta, avviare il programma di installazione
come segue:
1. Inserire il CD dei driver in dotazione nel lettore di CD-ROM.
Il programma di installazione si avvierà automaticamente e apparirà la schermata seguente.
Selezionare una lingua per l'installazione e fare clic su OK.
Se la schermata di installazione non compare, cercare il file Setup.exe nella directory radice del CD e fare
doppio clic su di esso.
NON collegare la Docking Station al computer prima di installare il software contenuto
nel CD in dotazione.
Se accidentalmente si collega la Docking Station prima di installare il software, sullo
schermo appariranno due finestre Installazione guidata nuovo hardware.
Fare clic su Annulla per chiudere queste finestre.
37
Page 38

DOCKING STATION USB 2.0
2. Quando compare la schermata di benvenuto, fare clic su Next.
3. Fare clic su Install per iniziare l'installazione.
4. Quando appare la finestra "Plug in the hardware", fare clic su OK. NON collegare ancora il dispositivo.
5. Fare clic su Finish per terminare l'installazione.
38
Page 39

DOCKING STATION USB 2.0
6. Se a video compare la richiesta di riavviare il computer, fare clic su Yes.
Collegamento della Docking Station
Dopo aver installato il software, collegare il dispositivo come segue:
1. Collegare il terminale quadrato (connettore maschio Tipo B) del cavo USB
al connettore USB upstream sul fianco della Docking Station.
2. Collegare il terminale piatto (connettore maschio Tipo A) del cavo USB
a una porta USB libera del computer.
3. (Facoltativo) Collegare il trasformatore a una presa di corrente alternata e quindi collegare
la spina DC del trasformatore alla presa DC sul fianco della Docking Station.
*La Docking Station supporta entrambe le modalità di alimentazione Self Power e Bus Power.
Per maggiori informazioni fare riferimento al capitolo “Modalità Self Power e Bus Power”.
A questo punto l'installazione è terminata.
Sarà quindi possibile collegare le periferiche alla Docking Station.
39
Page 40

DOCKING STATION USB 2.0
Controllo dell'installazione del dispositivo
Terminata l'installazione, aprire Gestione periferiche di Windows
(da Risorse del computer > Proprietà > Hardware) per verificare che la Docking Station sia stata installata
correttamente con tutte le funzioni previste. La lista dei dispositivi deve contenere alcune voci nuove come di
seguito illustrato:
Tastiera
Mouse
Porta LAN
Porta seriale
USB hub
Stampante parallela
IEEE-1284
40
Page 41

DOCKING STATION USB 2.0
Modalità Self Power e Bus Power
Esistono due diverse modalità di alimentazione delle periferiche USB: Self Power e Bus Power. In modalità
Self Power la periferica dispone di un proprio trasformatore di alimentazione. In modalità Bus Power la
periferica è alimentata dalla porta upstream a cui essa è collegata.
La Docking Station USB 2.0 supporta entrambe le modalità USB Bus Power e Self Power. Tuttavia in
modalità Bus Power le porte downstream della Docking Station non sono in grado di erogare una corrente di
alimentazione superiore a 100mA. Pertanto i dispositivi che necessitano di una corrente di alimentazione
superiore (ad es. scanner USB o periferiche multifunzione, MFP), non funzionano in questa modalità. In tal
caso si consiglia, se possibile, di utilizzare la Docking Station in modalità Self Power. La modalità USB Bus
Power può essere utilizzata soltanto per dispositivi a basso consumo di corrente.
3. Note sul funzionamento delle porte
Per il collegamento delle periferiche alla Docking Station prestare attenzione ai seguenti punti:
Porte USB Hub:
Per il collegamento di un dispositivo USB a una delle porte USB downstream della Docking Station,
rispettare le istruzioni contenute nel manuale di installazione del dispositivo US B (se disponibile).
Porte PS/2 (tastiera e mouse):
A causa della scarsa definizione dei protocolli PS/2 e dell'ampia gamma di marchi/modelli esistenti
potrebbero verificarsi problemi di compatibilità. Tuttavia, se la tastiera o il mouse PS/2 sono IBM PC
compatibili, dovrebbero essere in grado di funzionare regolarmente con la Docking Station.
Porta seriale:
La porta seriale non è un'interfaccia plug and play. Se si collega un dispositivo seriale (ad es. un modem)
alla Docking Station quando quest'ultima è già collegata al PC, sarà necessario eseguire la funzione Nuovo
Hardware dal Pannello di controllo oppure scollegare e ricollegare la Docking Station al PC affinché
quest'ultimo possa individuare il nuovo dispositivo e installarlo.
Interfaccia USB/seriale:
Questa interfaccia è destinata ai modem o a qualsiasi dispositivo seriale in possesso di driver in grado di
gestire una “PORTA VIRTUALE”. I mouse seriali sono dispositivi di vecchia concezione e la maggior parte
dei loro driver riconosce soltanto le porte seriali fisiche. Pertanto la compatibilità tra l'interfaccia USB/seriale
e un mouse seriale non è garantita. In alcuni rari casi l'interfaccia funziona, ma la maggior parte dei mouse
seriali non è compatibile con l'interfaccia USB/seriale.
Porta LAN:
Questa porta supporta la funzione Ethernet 10/100 Mbps.
41
Page 42

DOCKING STATION USB 2.0
4. Specifiche
Modello Modello con 2 porte Hub
Porta upstream per computer (connettore Tipo B) 1
Porte downstream per hub USB (connettore Tipo A)
Porta per tastiera PS/2 (Mini Din a 6 pin)
Porta per mouse PS/2 (Mini Din a 6 pin)
Porta seriale (connettore maschio DB a 9 pin)
Porta parallela (connettore femmina DB a 25 pin)
Porta LAN 10/100M (connettore schermato 8P8C RJ 45)
LED Power (rosso) 1
LED porta USB Hub (verde) 2
LED porta LAN (verde) 2
Modalità di alimentazione Bus Power e Self Power
Emissioni CE, FCC
Alimentazione Ingresso AC 100 V~240V
2
1
1
1
1
1
Uscita DC 5V, 2.5A
Condizioni ambientali Temperatura di esercizio: 0°C~40°C
Temperatura di conservazione: -10°C~80°C
Umidità: 90% RH (senza condensa)
Peso 148 (g)
Dimensioni 178 x 58,6 x28,7 (mm)
* Le specifiche sono suscettibili di modifiche senza obbligo di preavviso.
42
Page 43

USB 2.0 DOCKING STATION
Gebruiksaanwijzing
Veiligheidsinstructies
Lees de veiligheidsinstructies zorgvuldig door.
- Bewaar deze handleiding voor toekomstig gebruik.
- Bescherm de apparatuur tegen vocht.
- Plaats dit apparaat op een stevige, vlakke
ondergrond, voordat u het instelt.
- Wanneer zich een van de volgende situaties
voordoet, moet u het apparaat door een
servicemonteur laten nakijken:
- De apparatuur is blootgesteld aan vocht.
- De apparatuur is gevallen en beschadigd.
- De apparatuur vertoont duidelijke tekenen
van een defect.
- De apparatuur werkt niet goed of u krijgt het met de
handleiding niet op gang.
1. Inleiding
inhoudsopgave
1. Inleiding 43
2. Installatie 45
3. Bedieningsaanwijzingen poorten 49
4. Specificatie 50
Deze USB 2.0 dockingunit is een unieke uitbreidingseenheid die specifie k ontworpen is als accessoire voor
notebooks of desktop PC’s, waarbij er sprake is van extra behoeften met betrekking tot
aansluitmogelijkheden.
Terwijl er slechts één USB 2.0 poort vereist is bij de notebook/desktop PC, zijn niet alleen USB, maar ook
conventionele PIO, SIO, LAN en PS/2 apparaten vrij toegankelijk.
Het USB 2.0 Docking Station stelt u in staat om meerdere soorten high performance USB 2.0
randapparatuur op uw PC aan te sluiten. Bovendien is dit product volledig compatibel met de USB versie 1.1
producten, wat inhoudt dat u uw eerdere USB 1.1 apparaten eveneens kunt blijven gebruiken. U kunt
additionele hubs en apparaten aansluiten met een maximum van 127 apparaten.
Om randapparatuur te kunnen gebruiken zonder de noodzaak om de PC of notebook binnenste buiten te
draaien voor de installatie van de hardware en zonder complexe software-installatie, kunt u bij het plug &
play dockingstation alleen alle soorten USB/conventionele randapparatuur ineens aansluiten zonder u
zorgen te hoeven maken over de beschikbaarheid van poorten en zonder noodzaak om de notebook/PC
opnieuw op te starten.
43
Page 44

USB 2.0 DOCKING STATION
Mogelijkheden
• Geweldige uitbreidingseenheid om andere apparaten op notebooks aan te sluiten
• Voldoet aan de USB 1.1/2.0 specificaties.
• Maximale transfersnelheid van 480 Mbps.
• Ondesteunt PS/2 toetsenbord/muis, IEEE-1284 parallelle printer, seriële apparatuur
en 10/100Mbps LAN verbindingen.
• Twee USB 2.0 downstream poorten.
• Volledig geschikt voor plug & play en hot swapping.
• Ondersteunt apparaten met eigen voeding en apparaten die via de aansluiting worden gevoed.
Inhoud van de verpakking
Controleer vóór de installatie de artikelen in de verpakking. De doos moet de volgende artikelen bevatten:
USB 2.0 Docking Station x1
Stroomadapter x1
USB 2.0 kabel x1
CD met stuurprogramma x1
Deze handleiding x1
Systeemvereisten
• Pentium compatibele PC of notebook
• Windows® 2000 of XP
• USB poort
• CD-ROM drive (voor installatie van het stuurprogramma)
44
Page 45

USB 2.0 DOCKING STATION
Status LED
LED Kleur
Voeding Rood Brandt wanneer het dockingstation ingeschakeld is.
USB Hub
(1-2)
LAN 10/100 Groen Brandt wanneer de LAN-snelheid 100 Mbps bedraagt.
Link Groen LAN activiteit. Knippert wanneer er dataverkeer tussen het LAN en de
Beschrijving
Groen Brandt indien gereed om een USB-apparaat aan te sluiten.
Uit wanneer de LAN-snelheid 10 Mbps bedraagt of wanneer er geen
verbinding is.
hostcomputer is.
2. Installatie
het installatieprogramma uitvoeren
Voordat u het dockingstation voor het eerst aansluit op uw computer, dient u het installatieprogramma als
volgt uit te voeren:
1. Plaats de meegeleverde CD met stuurprogramma in uw CD-ROM station.
Het installatieprogramma start automatisch en opent het onderstaande scherm. Selecteer een taal
voor de installatie en klik op OK.
Wanneer het installatiescherm niet wordt geopend, lokaliseert u het bestand Setup.exe in de directory van
de CD en vervolgens dubbelklikt u daarop.
Sluit het dockingstation niet aan op uw computer, vóórdat de software op de
meegeleverde CD geïnstalleerd is.
Wanneer u per ongeluk eerst het dockingstation aansluit, wordt een tweetal
wizardschermen voor gedetecteerde nieuwe hardware geopend.
Klik op Cancel (annuleren) om deze schermen over te slaan.
45
Page 46

USB 2.0 DOCKING STATION
2. Wanneer het welkomstscherm wordt geopend, klikt u op Next.
3. Klik op Install om te beginnen met de installatie.
4. Wanneer u wordt gevraagd om de hardware in te pluggen, hoeft u alleen op OK te klikken. Plug op
dit moment NOG NIET het apparaat in.
5. Klik op "Finish" om de installatie af te ronden.
46
Page 47

USB 2.0 DOCKING STATION
6. Wanneer u wordt gevraagd om de computer opnieuw op te start, klikt u op Yes.
Aansluiting van het dockingstation
Na de installatie van de software gaat u als volgt te werk om het apparaat aan te sluiten:
1. Plug het vierkante einde (type B mannetje aansluiting) van de USB-kabel aan op de USB upstream
aansluiting aan de zijkant van het dockingstation.
2. Plug het platte einde (type A mannetje aansluiting) van de USB-kabel in een vrije USB-poort op uw
computer.
3. (Optioneel) Plug de stekker van de voedingsadapter in een stopcontact en plug de DC-aansluiting
van de adapter in het DC-contact aan de zijkant van het dockingstation.
*Het dockingstation ondersteunt de self-power modus en de bus-powe r modus.
Raadpleeg het gedeelte “Self-Power Modus versus Bus-Power Modus” voor nadere details.
Uw installatie is nu afgerond.
U kunt nu uw randapparatuur op het dockingstation aansluiten.
47
Page 48

USB 2.0 DOCKING STATION
Controle van de apparaatinstallatie
Zodra uw klaar bent met de installatie, kunt u het apparaatbeheer van Windows openen. Er moet een
tweetal apparaatvermeldingen toegevoegd zijn aan de apparatenlijst zoals onderstaa nd weergegeven.
Toetsenbord
Muis
LAN-poort
Seriële poort
USB hub
IEEE-1284 parallelle
printer
48
Page 49

USB 2.0 DOCKING STATION
Self-Power Modus versus Bus-Power Modus
Er zijn twee manieren om USB-randapparatuur te voeden: de apparaateigen voeding (self-power) en de
voeding via de USB-aansluiting (bus-power). De self-power modus houdt in dat het randapparaat zijn eigen
voeding heeft. De bus-power modus houdt in dat het randapparaat gevoed wordt via de USB-poort waarop
het aangesloten is.
Het USB 2.0 dockingstation kan werken op USB stroom en via de eigen voeding. Onder de bus-power
modus kan een uitgaande poort van het dockingstation echter geen grotere stroo msterkte leveren dan 100
mA. Om die reden kunnen apparaten (bijv. een USB-scanner of multifunctionele randapparatuur) met een
hogere stroombehoefte niet functioneren in deze configuratie. In deze situatie raden wij u aan om dit
dockingstation zoveel mogelijk in te zetten met gebruikmaking van de eigen voeding van het apparaat. De
USB bus-power modus is alleen bedoeld voor apparaten met een laag stroomverbruik.
3. Bedieningsaanwijzingen poorten
Wanneer randapparatuur wordt aangesloten op het dockingstation, dient u aandacht te besteden aan de
volgende aanwijzingen:
Poorten USB-hub:
Wanneer u een USB-apparaat aansluit op een van de downstream USB-poorten van het docki ngstation,
dient u de handleiding voor de software-installatie van de USB-apparaat (indien aanwezig) op te volgen.
PS/2 poorten (toetsenbord en muis):
Er kunnen zich compatibiliteitsproblemen voordoen vanwege de niet strikt geformuleerde PS/2 protocollen
de grote aantallen bestaande merken/modellen. Wanneer het PS/2 toetsenbord of de muis echter IBMcompatibel zijn, zouden zij correct moeten functioneren via het dockingstation.
Seriële poort:
De seriële poort is geen plug & play interface. Wanneer u een apparaat voor een seriële poort aansluit (bijv.
een modem) op het dockingstation, terwijl het dockingstation al op een PC aangesloten is, moet u de functie
Nieuwe hardware toevoegen in het configuratiescherm uitvoeren of u moet het dockingstation uitpluggen
en opnieuw inpluggen bij de PC om het apparaat te vinden en de functie uit de voeren.
USB-naar-seriële interface:
De interface werd ontworpen om met modems te werken of alle seriële apparaten met stuurprogramma’s die
met een “VIRTUELE POORT” kunnen werken. De muizen van het seriële type zijn oude apparaten en de
meest van hun stuurprogramma’s herkennen alleen fysieke seriële poorten. Zodoende is de compatibiliteit
van de USB-naar-serieel interface en de seriële muis niet gegarandeerd. Er zijn enkele zeldzame gevallen
waarin het zou werken, maar bij de meerderheid van de seriële muizen is er geen sprake van compatibiliteit
met de USB-naar-serieel interface.
LAN-poort:
Deze ondersteunt de Ethernet 10/100 Mbps functie.
49
Page 50

USB 2.0 DOCKING STATION
4. Specificatie
Model 2-poorts hubmodel
Upstreampoort voor computerzijde (Type B aansluiting) 1
Downstream poorten voor USB hub (Type A aansluiting)
PS/2 toetsenbordpoort (Mini Din 6-pins)
PS/2 muispoort (Mini Din 6-pins)
Seriële poort (DB 9-pins mannetje)
Parallelle poort (DB 25-pins vrouwtje)
10/100M LAN poort (8P8C RJ 45 afscherming)
Voedings-LED (rood) 1
Poort-LED USB-hub (groen) 2
LED LSN-poort (groen) 2
Voedingsmodus Bus-powered en Self-powered
Emissie CE, FCC
Voeding AC input 100 V~240V
2
1
1
1
1
1
DC output 5V, 2,5A
Bedrijfsomstandigheden Bedrijfstemperaturen: 0°C~40°C
Opslagtemperatuur: -10°C~80~°C
Relatieve luchtvochtigheid: 90% RL (Niet
condenserend)
Gewicht 148 (g)
Afmetingen: 178 x 58,6 x28,7 (mm)
* Specificatie kan zonder voorafgaande aankondiging worden gewijzigd.
50
Page 51

DOCKING STATION USB 2.0
Instruções de uso
Instruções de segurança
Leia sempre as instruções de segurança com atenção
- Guarde o presente manual para consultas futuras
- Mantenha este equipamento fora de locais húmidos
- Coloque este equipamento sobre uma superfície
estável e plana antes de o colocar em funcionamento
- Caso suceda uma das seguintes situações,
consulte um técnico de assistência para
inspeccionar o equipamento:
- O equipamento foi exposto a humidade.
- O equipamento caiu e sofreu danos.
- O equipamento apresenta sinais óbvios
de degradação.
- O equipamento não está a trabalhar correctamente
ou não é possível colocá-lo em funcionamento
seguindo as instruções do manual.
1. Introdução
Índice
1. Introdução 51
2. Instalação 53
3. Notas sobre a operacionalidade das portas 57
4. Especificações 58
A Docking Station USB 2 (estação de ancoragem) é uma unidade de expansão única, especialmente
concebida para acompanhar PC portáteis e de secretária, para os quais sej am necessárias condições de
conectividade extra.
Uma porta USB 2.0 no PC portátil ou de secretária é o suficiente para se poder aceder livremente a
dispositivos periféricos USB e a quaisquer outros mais comuns do tipo PIO, SIO, LAN, e PS/2.
A Docking Station USB 2.0 permite-lhe ligar diversos dispositivos periféricos USB 2.0 de alta performance
ao PC. Além disso, é totalmente compatível com versões anteriores dos produtos USB Revision 1.1, o que
significa que os dispositivos USB 1.1 mais antigos continuam a poder ser utilizados. Tem ainda a
possibilidade de ligar hubs e dispositivos adicionais até um total de 127 dispositivos.
Para poder utilizar periféricos sem ter de configurar o PC ou o portátil em termos de hardware ou ter de
realizar instalações complexas de software, recorra à docking station. Com a tecnologia “plug and play”, tem
a possibilidade utilizar todo o tipo de periféricos USB / convencionais sem ter de se preocupar com a
disponibilidade das portas ou com a reiniciação do portátil ou do PC.
51
Page 52

DOCKING STATION USB 2.0
Características
• Unidade de expansão potente para PC portáteis em relação a outros dispositivos
• Compatível com as especificações USB 1.1/2.0.
• Taxa de transferência máxima de 480Mbps.
• Suporta teclado / rato PS/2, impressoras de porta paralela IEEE-1284, dispositivos
de série e ligações 10/100Mbps LAN.
• Duas portas downstream USB 2.0
• Completamente compatível com a funcionalidade “plug & play” e “hot swapping”
• Suporta o modo de alimentação self-power e bus-power.
Conteúdo da embalagem
Antes de iniciar a instalação, verifique primeiro os itens contidos na embalagem. A embalagem deverá
conter os seguintes itens:
Docking Station USB 2.0 x1
Adaptador de alimentação x1
Cabo USB 2.0 x1
CD do controlador x1
- O presente manual x1
Requisitos do sistema
• PC ou portátil Pentium
• Windows® 2000 ou XP
• Porta USB
• Unidade de CD-ROM (para instalação do controlador)
52
Page 53

DOCKING STATION USB 2.0
10/100
Descrição
Verde Acende quando fica pronta para se ligar um dispositivo USB
Verde
Acende se a velocidade LAN for de 100Mbps.
Desliga se a velocidade LAN é de 10 Mpbs ou não estiver activada.
computador anfitrião.
LED de estado
LED Cor
Alimentação Vermelho Acende quando a docking station está ligada.
Hub USB
(1-2)
LAN
Link Verde Actividade LAN. Pisca durante a transferência de dados entre a LAN e o
2. Instalação
Correr o programa de configuração
NÃO ligue a docking station ao seu computador antes de instalar o software do CD.
Se ligar acidentalmente a docking station em primeiro lugar, abrir-se-ão várias janelas
com a indicação Found New Hardware (novo hardware encontrado).
Clique Cancel para fechar as janelas.
Antes de ligar pela primeira vez a docking station ao seu computador, deve correr o programa de
configuração conforme indicado a seguir:
1. Insira o CD do controlador na unidade de CD-ROM.
O programa de configuração arranca automaticamente e abre a janela em baixo: Seleccione a
língua para a instalação e clique em OK.
Se a janela de configuração não aparecer, localize e clique duas vezes sobre o ficheiro Setup.exe no
directório raiz do CD.
53
Page 54

DOCKING STATION USB 2.0
2. Quando aparecer a janela de boas vindas, clique em Next.
3. Clique em Install para iniciar a instalação.
4. Quando for consultado para ligar o harware, clique OK. NÃO ligue o dispositivo nesta fase.
5. Clique em Finish (Concluir) para concluir a instalação.
54
Page 55

DOCKING STATION USB 2.0
6. Quando lhe for pedido para reiniciar o computador, clique Yes.
Ligar a Docking Station
Depois de instalar o software, proceda da seguinte forma para ligar o dispositivo:
1. Insira a extremidade quadrada (conector macho tipo B) do cabo USB
no conector USB upstream localizado na docking st ation.
2. Insira a extremidade plana (conector fêmea tipo A) do cabo USB
na porta USB livre do seu computador.
3. (Opcional) ligue o adaptador a uma tomada de alimentação CA e
ligue o conector jack CC do adaptador a uma tomada CC na docking station.
*A docking station suporta os modos de alimentação self-power e bus-power.
Consulte a secção sobre o “modo de alimentação Self-Power ou Bus-Power”.
A sua instalação foi concluída.
Agora já pode ligar os seus periféricos à docking station.
55
Page 56

DOCKING STATION USB 2.0
Controlar a instalação dos dispositivos
Uma vez terminada a instalação, pode abrir o Device Manager (gestor de dispositivos) do Windows
(através de My Computer (Meu computador) > Properties (Propriedades) > Hardware) para verificar se a
docking station foi bem instalada com todas as funções disponíveis. Deverá apare ce r uma série de e ntradas
adicionais na lista de dispositivos, conforme indicado em baixo:
Teclado
Rato
Porta LAN
Porta de série
Hub USB
Impressora de porta
paralela IEEE-1284
56
Page 57

DOCKING STATION USB 2.0
Modo de alimentação Self-Power ou Bus-Power
Há duas maneiras de alimentar os periféricos USB: em modo self-power e bus-power. Em modo self-power,
o periférico dispõe do seu próprio adaptador de alimentação para poder funciona r. Em modo bus-power, o
periférico é alimentado através da porta upstream à qual está ligado.
A docking station USB 2.0 funciona em ambos os modos. No entanto, quando ligada em modo bus-po we r,
cada porta upstream da docking station não consegue fornecer uma corrente superior a 100 mA. Assim, os
dispositivos (p. ex., scanner ou equipamento multi-funções), cujo consumo de energia é superior ao valor
indicado, não funcionam. Nestas situações, recomenda-se, sempre que possível, a operaçã o da docking
station em modo self-power. O modo bus-power USB só é indicado para dispositivos de baixo consumo
de energia.
3. Notas sobre a operacionalidade das portas
Ao ligar dispositivos periféricos à docking station, preste atenção aos se guintes aspectos:
Portas Hub USB
Quando ligar um dispositivo USB a uma das portas downstream da dockin g station, certifique-se de que
foram respeitadas as instruções para a instalação do software (no caso de existirem) do dispositivo em
questão.
Portas PS/2 (porta para o teclado e rato):
Poderão ocorrer problemas de compatibilidade devido à inexactidão dos protocolos PS/2 e à vasta gama de
marcas e modelos existentes. Porém, se o teclado ou rato PS/2 for compatível com PC IBM, também
funcionará correctamente com a docking station.
Porta de série:
Note-se que a porta de série não é uma interface com funcionalidade plug-and-play. Se ligar um dispositivo
de porta de série (p. ex. um modem) à estação docking e esta já está ligada a um PC, terá de executar a
função Add New Hardware (adicionar novo hardware) do Control Panel (painel de controlo) ou então
desligue e volte a ligar a docking station ao PC para detectar o dispositivo e executar a função.
USB para interface de série:
A interface foi concebida para funcionar com modems ou quaisquer outros dispositivos de série com
controladores compatíveis com uma “VIRTUAL PORT” (porta virtual). Os ratos de série são dispositivos
desactualizados e a maioria dos seus controladores só reconhecem portas de série físicas. Neste caso, a
compatibilidade entre a USB para interface de série e o rato de série não está, de modo algu m, garantida.
Embora existam alguns casos raros em que essa combinação possa funci onar, a maioria dos ratos de série
não se pode adaptar à USB para interface de série.
Porta LAN:
Esta porta suporta a função Ethernet 10/100 Mbps.
57
Page 58

DOCKING STATION USB 2.0
4. Especificações
Modelo Modelo Hub de 2 portas
Porta upstream para o computador (conector tipo B) 1
Portas downstream para hub USB (conector tipo A)
Porta PS/2 para teclado (mini Din de 6 pinos)
Porta PS/2 para rato (mini Din de 6 pinos)
Porta de série (conector DB de 9 pinos, macho) 1
Porta paralela (conector DB de 25 pinos, fêmea)
Porta 10/100M LAN (8P8C RJ 45 blindado)
LED de alimentação (vermelho) 1
LED porta Hub USB (verde) 2
LED porta LAN (verde) 2
Modo de alimentação Bus-power e self-p ower
Emissão CE, FCC
Alimentação Entrada de CA 100 V~240V
2
1
1
1
1
Saída de CC 5V, 2.5A
Ambientes Temperatura de serviço: 0°C~40°C
Temperatura de armazenamento: -
10°C~80~°C
Humidade: 90% RH (sem condensação)
Peso 148 (g)
Dimensões 178 x 58.6 x28.7 (mm)
* Reservamo-nos o direito a efectuar alterações às especificações sem aviso prévio.
58
Page 59

DOCKING STATION USB 2.0
NOTES
59
Page 60

Hotline:
D Tel.: 0180-5 40 49 10
Mail: hotline@vivanco.de
GB Mail: consumer@vivanco.co.uk
F Mail: hotline@vivanco-france.fr
E Mail: vivanco@vivanco.es
I Web: http://www.vivanco.it
NL Mail: info@vivanco.nl
Vivanco GmbH
Ewige Weide 15
D-22926 Ahrensburg / Germany
Phone +49 (0) 4102 / 231 – 0
Fax +49 (0) 4102 / 231 – 160 08/05
Internet: www.vivanco.de
Designs and specifications are subject to change without notice !
All brandnames are registered trademarks of their respective owner.
 Loading...