

Page 1
Vivanco GmbH, Ewige Weide 15, D-22926 Ahrensburg, hotline@viv anco.de
1
HDX 4.1 auto 1.3 II Automatic HDMI Switching Unit
(GB) Operating Instructions -> 2
( D ) Bedienungsanleitung -> 3
( F ) Notice d'emploi -> 4
( E ) Instrucciones de uso -> 4
( I ) Istruzioni per l’uso -> 5
(NL) Gebruiksaanwijzing -> 6
(PL) Instrukcja obsługi -> 7
(P) Manual de instruções -> 8
(DK) Betjeningsvejledning -> 9
( S ) Bruksanvisningar -> 10
(FIN) Käyttöohje -> 11
(RUS) Руководство по эксплуатации -> 11
(H) Használati utasítás -> 12
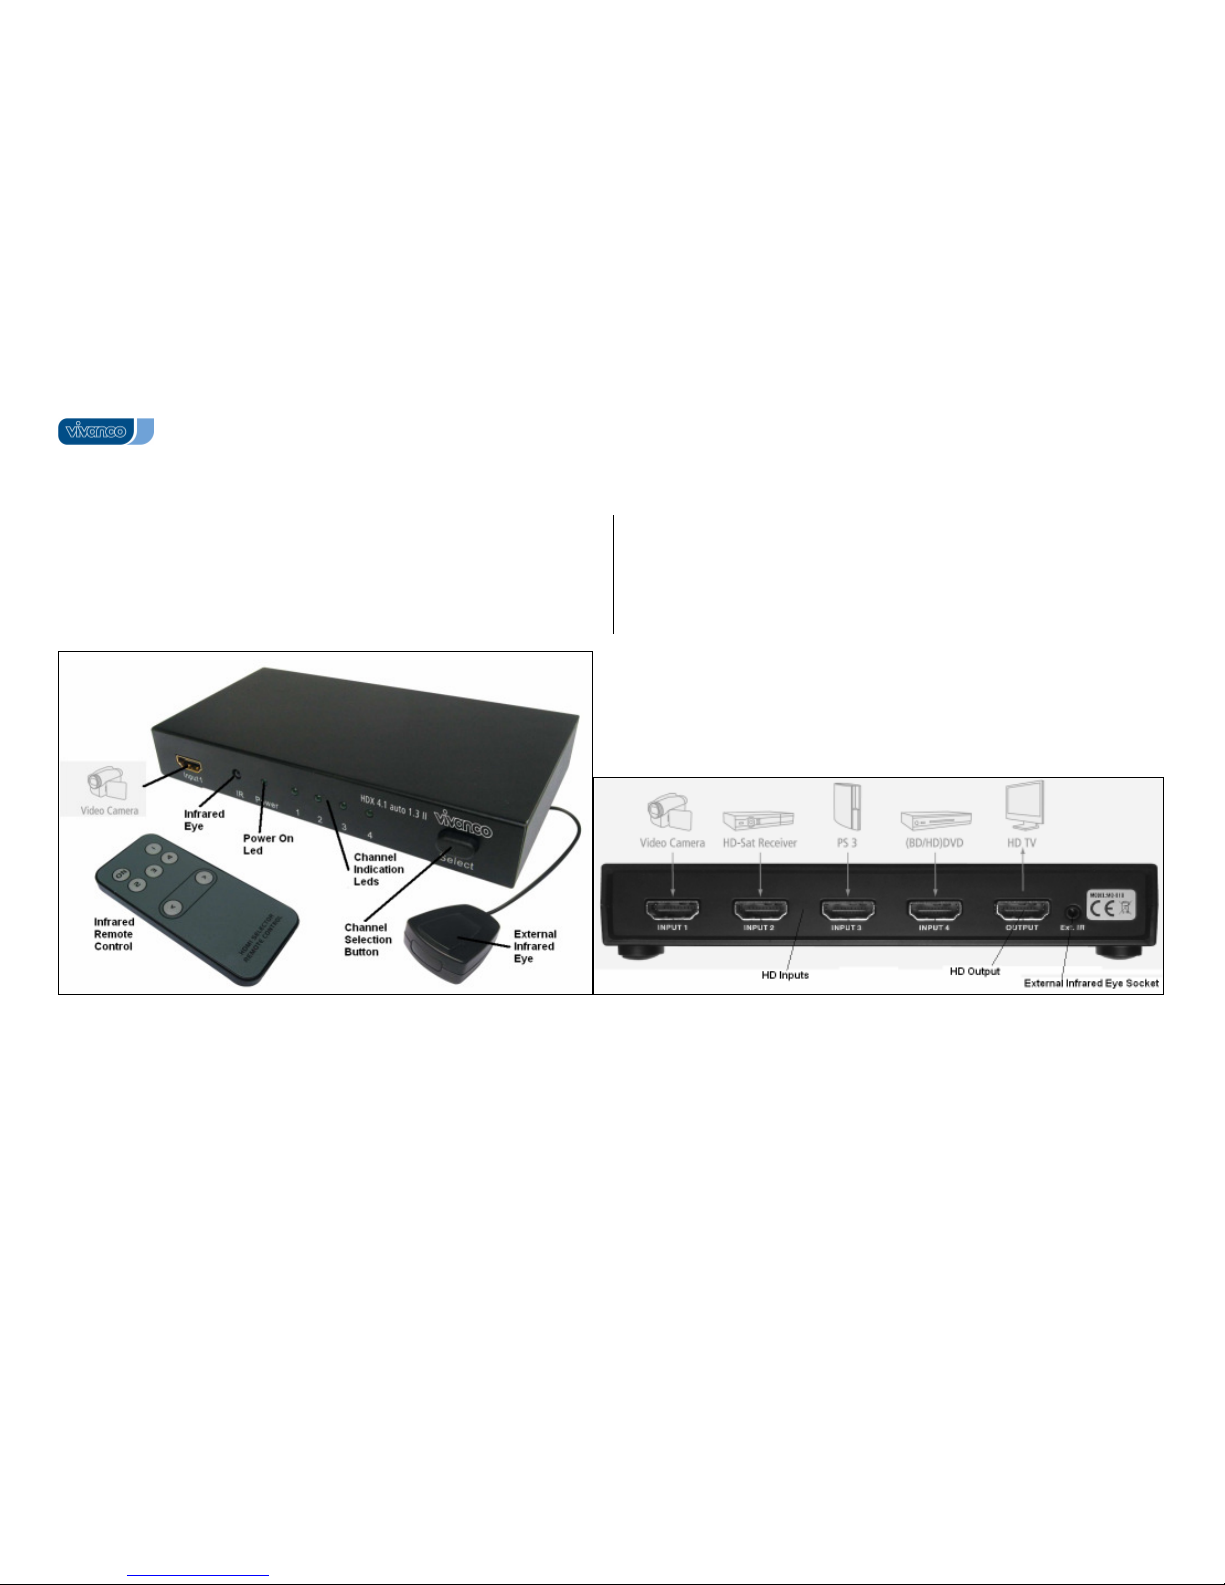
Front Panel Operation Rear Connections
Page 2
Vivanco GmbH, Ewige Weide 15, D-22926 Ahrensburg, hotline@viv anco.de
2
Technical data
Technical Data
Inputs: 4 x HDMI Output: 1 x HDMI
Single Link Range: 480i / 480p / 720i / 720p / 1080i / 1080p
HDMI 1.3 compliant, HDCP copy protection
Bandwidth: up to 10,2 Gbps/400 MHz
HDMI sockets: gold plated
Power: powerd by HDMI source
Remote Control
(GB) Operating Instructions
The HDX 4.1 auto 1.3 HDMI Switching Unit allows multiple HDMI device access ,
such as DVD players, recorders, HD games consoles and satellite, cable tuner and
other set-top boxes to one HDMI (HD ready) display (LCD/Plasma TV, Beamer).
Safety precautions:
Please ensure sufficient ventilation. Ensure that ventilation is not impeded by
covering the ventilation openings at the bottom with items, such as newspapers,
table-cloths, curtains, etc..
Please don´t use apparatus at higher temperatures than: 50° C.
Please don´t expose apparatus to dripping or splashing and don´t place objects
filled with liquids, such as vases, onto the apparatus.
Please take attention to the environmental aspects of battery disposal: use your
national battery recycling system.
Lithium Battery: Caution: Danger of explosion if battery is incorrectly
replaced. Replace only with the same or equivalent type recommended by the
manufacturer. Dispose of used batteries according to the manufacturer’s instructions.
Don´t use unit outdoors
In the event of malfunction, have the device repaired by a specialist.
Installation and Operation
1. Switch off all HDMI source devices and the HDMI display device (TV). Use
standard HDMI leads in order to connect HDMI outputs of your audio video
sources to the switching unit´s HDMI inputs and the unit´s HDMI OUTPUT to
the displays HDMI input. See fig. Connections.
2. Turn on the TV display.
3. Turn on the audio video sources
4. Press the Power On/Off Button , see fig. Front Panel Operation, for switching
unit on or off.
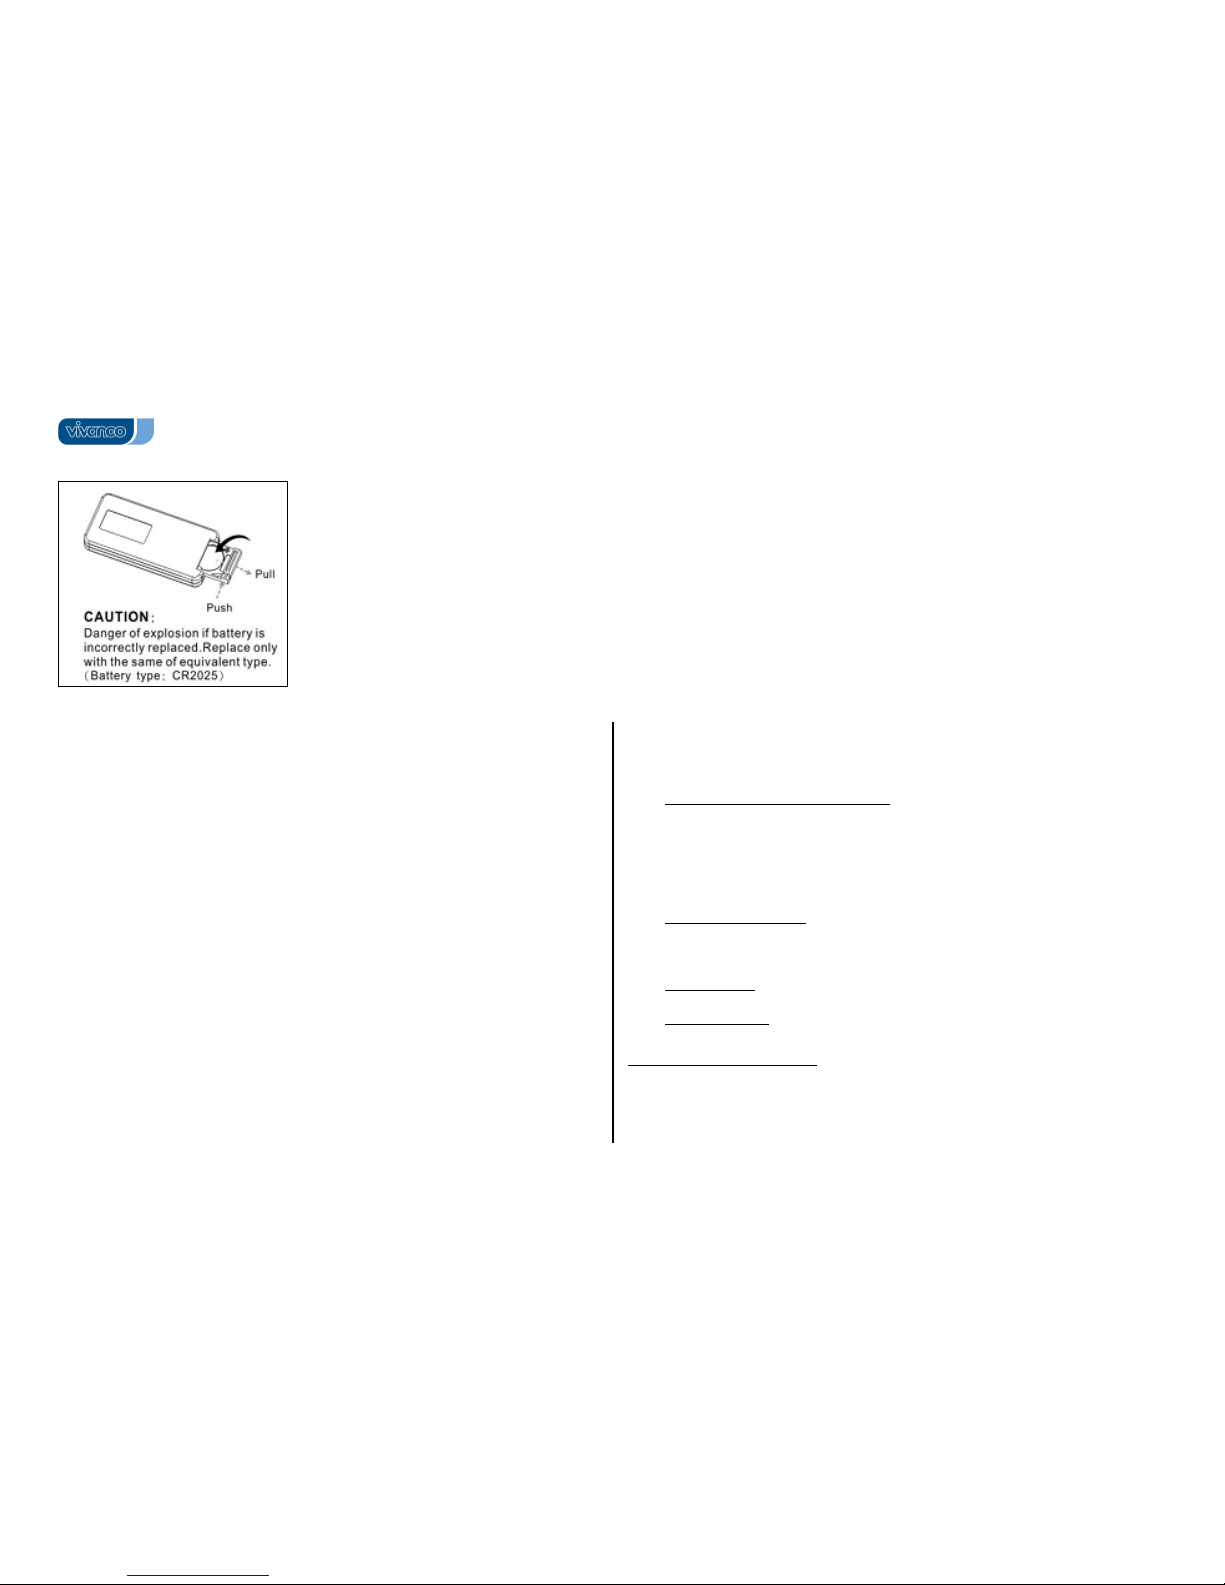
5. Remote control battery insertion: Open the battery compartment on the
underside of the controller, see fig.. Then insert lithium battery type CR 2025.
Make sure that the polarity is correct: the "+" and "-" markings on the battery
and in the compartment must match. To check functionality, press Power
ON/Button on Remote Control, while directing the remote control towards the
Infrared Eye of the switching unit, see fig Front Panel Operation. If everything
is correct the Power Led on switching unit will light up.
6. External Infrared Eye: For remote control operation the whole switching unit can
be mounted in a hidden place. Just the External Infrared Eye must be
mounted visible e.g. on the TV set. Please plug-in the cable plug of the eye into
the External Infrared Eye socket at the rear side, see Fig. Rear Connections.
7. Manual Mode: To select manual mode press any CHANNEL Selection Button
on the remote control or on the front panel of the HDMI switching unit.
8. Automatic Mode: The unit will automatically detect and select the most recent
input source.
Frequently asked Questions
• Switch box will not operate: Make sure that a powered HDMI source and
power LED is on.
• No picture/signal or poor picture: 1. Make sure that video display is HDCP
compliant. 2. Ensure HDMI leads lentghts: max 1,8 m or use of EQ leads. 3.
Page 3
Vivanco GmbH, Ewige Weide 15, D-22926 Ahrensburg, hotline@viv anco.de
3
Ensure HDMI plugs tightly secured. 4. Turn-off all devices and then switch them
on again.
• The switching from one source to another takes several seconds until hailf a
minute: The HDCP (copy protection) authentification process per connected
device needs some time and is always repeated, when a new source is
selected. The total switching time is very much depending on the connected
devices.
• IR Controller will not work: Replace battery.
Hotline
If you any questions regarding the HDX 4.1 auto 1.3, please call the Vivanco UK
Hotline: tel: Tel. 01442 246088. Or send an e-mail to: consumer@vivanco.co.uk
(D) Bedienungsanleitung
Die HDX 4.1 auto 1.3 HDMI Umschaltbox erlaubt den Anschluß von bis zu 4 HDMIGeräten, wie DVD Player, Rekorder, HD Spielekonsolen, HD Satelliten-Receiver und
andere SetTopBoxen usw. an ein HDMI (HD ready) hochauflösendes Anzeigegerät
(LCD/Plasma TV, Beamer).
Sicherheitshinweise:
Bitte für ausreichende Belüftung sorgen. Belüftungsschlitze an Geräteunterseite
nicht durch Gegenstände, wie Tischdecken, Zeitungen, Vorhänge usw. behindern.
Bitte Gerät nicht bei Temperaturen über 50° C betreiben.
Bitte Gerät vor Feuchtigkeit schützen, z.B. keine Behälter mit Flüssigkeiten
(Vasen) auf das Gerät stellen.
Bitte schützen Sie die Umwelt und nutzen Sie Ihr lokales
Batterieentsorgungssystem zum Aufarbeiten leerer Batterien.
Lithiumbatterie: VORSICHT: Explosionsgefahr bei unsachgemäßem
Auswechseln der Batterie! Batterie nur mit einem vom Hersteller empfohlenen
gleichwertigen Typ ersetzen. Entsorgung muß nach Anweisungen des Herstellers
erfolgen.
Benutzen Sie das Gerät nicht im Freien.
Bei eventuell auftretenden Störungen lassen Sie das Gerät bitte vom
Fachmann reparieren.
Anschließen und Bedienen
1. Bitte alle HDMI Geräte ausschalten. Dann verbinden Sie mittels
standardmäßiger HDMI-Kabel die HDMI-Buchsen der AV-Quellen mit den
HDMI Buchsen der Box und die HDMI OUTPUT-Buchse der Box mit dem
HDMI-Eingang Ihres Anzeigegerätes (TV). Siehe auch Abb. Connections
(=Verbindungen).
2. Schalten sie das HDMI-Anzeigegerät (TV-Gerät) ein.
3. Schalten Sie die angeschlossenen AV Geräte ein.
4. Drücken Sie die Ein/Aus-Taste (Power On/Off) der Umschaltbox, s. Abb.
Front Panel Operation (= Bedienfeldfunktionen) zum Ein- bzw. Ausschalten
des Gerätes.
5. Batterie der Fernbedienung einsetzen: Öffnen Sie das Batteriefach an der
Unterseite der Fernbedienung, s. Fig Remote Control (=Fernbedienung). und
setzen Sie eine neue Lithium-Batterie, Typ CR2025; ein. Bitte überprüfen Sie
die richtige Polarität: die „+“ und „-„ Markierungen der Batterie und des Faches
müssen übereinstimmen. Drücken Sie zur Überprüfung der korrekten Funktion
die Ein/Aus-Taste (Power ON) der Fernbedienung, während Sie mit der
Fernbedienung auf das IR-Empfangsfenster (Infrared Eye), s. Abb Front
Panel Operation (= Bedienfeldfunktionen) der Box zielen. Wenn alles korrekt
ist, geht eine LED-Lampe (Power Led) beim Drücken an.
6. Externer Infrarot Empfänger: Die HDMI-Umschaltbox kann versteckt installiert
werden. Nur der externe Infrarotempfänger (External Infrared Eye) muss
sichtbar aufgestellt werden, Bitte den Stecker des IR-Empfängers in die Buchse
Ext. IR, Geräterückseite, s. Abb. Rear Connections, stecken.
7. Manuelle Umschaltung: Zum manuellen Umschalten drücken Sie irgendeine
Kanalauswahltaste (<, >, CHANNEL Selection Button) der Fernbedienung
oder am Bedienfeld der HDMI-Umschaltbox.
8. Automatische Umschaltung: Die Umschaltbox erkennt automatisch das zuletzt
eingeschaltete HDMI-Signal und schaltet auf diese Quelle durch.
Häufig gestellte Fragen
• Die Box arbeitet nicht: Stellen Sie sicher, dass eine eingeschaltete HDMI-
Signalquelle, z.B. Receiver, richtig angeschlossen ist und eine Lampe brennt.
• Kein oder schlechtes Bildsignal: 1. Stellen Sie sicher, dass das
angeschlossene HD-TV-Gerät kompatibel zum HDCP Kopierschutz ist. 2.
Verwenden Sie nur HDMI Kabel bis zu ca. 1,8 m Länge oder EQ Kable. 3.
Stellen Sie sicher, dass die HDMI alle fest eingesteckt sind.
• Das Umschalten von einer zur anderen HDMI-Quelle dauert etliche Sekunden
bis zu einer halben Minute: Aufgrund von Kopierschutzvorschriften (HDCP)
muss die Berechtigung zur Weitergabe bzw. zum Empfang von HDMI-Signalen
bei jedem Umschalten überprüft werden. Das geht je nach den
angeschlossenen Geräten mal schneller oder auch mal langsamer.
• Fernbedienung arbeitet nicht: Bitte Batterie wechseln.
Hotline
Wenn Sie irgendeine Frage zum HDX 4.1 auto 1.3 haben, rufen Sie bitte die Vivanco
Hotline an: Tel: +49(0)4102 231235. Alternativ schicken Sie bitte eine E-Mail an:
hotline@vivanco.de
Page 4
Vivanco GmbH, Ewige Weide 15, D-22926 Ahrensburg, hotline@viv anco.de
4
(F) Notice d'emploi
Le boîtier commutateur HDMI HDX 4.1 auto 1.3 permet le raccordement de jusqu'à 4
périphériques HDMI tels que lecteur DVD, appareil d'enregistrement, consoles de jeu
HD, récepteur satellite HD et autres SetTopBox, etc., à un dispositif de visualisation
HDMI (HD ready) à haute résolution (téléviseur LCD/plasma, projecteur vidéo).
Consignes de sécurité
Veillez à aérer suffisamment. Ne pas obstruer les bouches d'aération de la
partie inférieure de l'appareil par des objets, comme des nappes, des journaux, des
rideaux, etc.
Veuillez ne pas faire fonctionner l'appareil à des températures supérieures à
50°C.
Veuillez protéger l'appareil contre l'humidité, par exemple ne pas placer de
récipient contenant des liquides (vases) sur l'appareil.
Veuillez protéger l'environnement et utilisez votre système local d'évacuation
de batteries pour recycler les batteries vides.
Batterie au lithium : ATTENTION : Danger d'explosion si la batterie est
incorrectement remplacée. Ne remplacez la batterie qu'avec le même modèle, ou
avec un modèle recommandé par le constructeur. Traitez les batteries usagées selon
les instructions du fabricant.
N'utilisez pas l'appareil en plein air.
En cas de panne, veuillez faire réparer l'appareil par un professionnel.
Raccordement et utilisation
1. Eteignez tous les périphériques HDMI. Raccordez ensuite, à l'aide des câbles
HDMI standard, les prises HDMI des sources AV aux prises d'entrée HDMI du
boîtier, ainsi que les prises de sortie HDMI du boîtier à l'entrée HDMI de votre
dispositif de visualisation (TV). Voir aussi fig. Connections (= connexions).
2. Mettez en marche le dispositif de visualisation HDMI (téléviseur).
3. Mettez en marche les appareils AV raccordés.
4. Pressez la touche Marche/Arrêt (Power On/Off) du boîtier commutateur, v. fig.
Front Panel Operation (= fonctions du panneau de commande) pour mettre en
marche ou éteindre l'appareil.
5. Mise en place de la batterie de la télécommande : Ouvrez le compartiment des
batteries situé dans la partie inférieure de la télécommande, v. fig. Remote
Control (= télécommande), puis mettez en place une nouvelle batterie au
lithium du type CR2025. Veillez à respecter la polarité. Les repères « + » et
« - » de la batterie doivent coïncider avec ceux du compartiment. Pour vous
assurer du bon fonctionnement, pressez la touche Marche/Arrêt (Power ON)
de la télécommande pointée vers la fenêtre de réception IR (Infrared Eye), v.
fig. Front Panel Operation (= fonctions du panneau de commande) du boîtier.
Si tout est correct, un voyant DEL (Power Led) s'allume lorsque vous appuyez
sur la touche.
6. Récepteur à infrarouge externe : Vous pouvez installer le boîtier commutateur
des sources HDMI dans un endroit invisible. Seul le récepteur à infrarouge
externe (External Infrared Eye) doit rester visible. Veuillez brancher le
connecteur du récepteur à infrarouge (IR) dans la prise Ext. IR sur la face
arrière de l’appareil, voir la Figure Rear Connections (connecteurs situés à
l’arrière de l’appareil).
7. Commutation manuelle : Pour changer manuellement de source vidéo, pressez
n’importe quelle touche de sélection de chaîne (<, >, CHANNEL Selection
Button) de la télécommande ou sur le panneau de commande du boîtier
commutateur des sources HDMI.
8. Commutation automatique : Le boîtier commutateur reconnaît le dernier signal
HDMI actif et se commute sur cette source.
Questions fréquemment posées
• Le boîtier ne fonctionne pas : Assurez-vous qu’une source HDMI allumée, p.
ex. Votre tuner / receiver, est bien branchée, que le branchement est
correctement réalisé et qu’un voyant (DEL) est allumé.
• Signal vidéo absent ou mauvais : 1. Assurez-vous que le téléviseur HD
raccordé est compatible avec la protection anti-copie HDCP. 2. N'utilisez que
des câbles HDMI avec longueur maximale de 1,8 m env., ou des câbles EQ. 3.
Assurez-vous que tous les HDMI sont bien branchés.
• La commutation d'un signal HDMI à un autre dure de plusieurs secondes à une
demi-minute : La procédure d'authentification HDCP (protection anti-copie)
pour la retransmission et la réception des signaux HDMI demande un certain
temps et est répétée à chaque commutation. La durée de commutation varie
suivant l'appareil raccordé.
• La télécommande ne fonctionne pas : Remplacez la batterie.
Hotline
Pour toute question sur le HDX 4.1 auto 1.3, appelez la hotline Vivanco : Tél. : 04
70431516. Ou envoyez un courrier électronique à : hotline@vivanco.fr
(E) Instrucciones de uso
La caja de conmutación HDMI HDX 4.1 auto 1.3 permite la conexión de hasta 4
dispositivos HDMI, como reproductores DVD, grabadoras, consolas de juego de alta
definición, receptores satélite de alta definición y otros SetTopBox, etc., a un monitor
de alta resolución HDMI (preparado para alta definición) (TV LCD/plasma, proyector).
Page 5

Vivanco GmbH, Ewige Weide 15, D-22926 Ahrensburg, hotline@viv anco.de
5
Indicaciones de seguridad:
Procure que haya siempre una ventilación suficiente. No tape ni obstruya las
ranuras de ventilación situadas en la parte inferior de la unidad con objetos como
manteles, periódicos, cortinas, etc.
No opere la unidad a temperaturas superiores a 50° C.
Proteja la unidad contra la humedad, no coloque por ejemplo recipientes con
líquido (floreros) sobre la unidad.
Contribuya a proteger el medio ambiente y utilice el sistema de eliminación de
pilas de su localidad para reciclar las pilas gastadas.
Pila de litio: PRECAUCIÓN: Peligro de explosión si se reemplaza
incorrectamente la pila. Sustituya la pila solamente con una equivalente
recomendada por el fabricante. Deseche las pilas usadas de acuerdo con las
instrucciones del fabricante.
No use el aparato al aire libre.
En caso de avería, encargue a un técnico la reparación del aparato.
Conexión y manejo
1. Desconecte todos los dispositivos HDMI. Utilice luego un cable estándar HDMI
para conectar las tomas HDMI de las fuentes AV con las tomas de entrada
HDMI de la caja y la salida HDMI de la caja con la entrada HDMI de su monitor
(TV). Vea también fig. Connections (=Conexiones).
2. Encienda el monitor HDMI (TV).
3. Encienda los aparatos AV conectados.
4. Para encender o apagar el aparato pulse el botón de encendido/apagado
(Power On/Off) de la caja de conmutación, véase la ilustración Front Panel
Operation (= funciones del panel frontal).
5. Colocar la pila del mando a distancia: Abra el compartimento de la pila que
está en la parte inferior del mando a distancia, véase la ilustración Remote
Control (=mando a distancia) e introduzca una nueva pila de litio, de tipo
CR2025. Compruebe que la polaridad sea correcta: deben coincidir las marcas
«+» y «-» de la pila y del compartimento. Para comprobar que funciona
correctamente, pulse el botón de encendido/apagado (Power ON) del mando a
distancia mientras que apunta con el mando a la ventana de recepción de
infrarrojos (Infrared Eye) de la caja, véase la ilustración Front Panel
Operation (= funciones del panel frontal). Si todo está correcto al pulsar se
enciende un piloto LED (Power Led).
6. Receptor de infrarrojos externo: La caja de conmutación HDMI puede
instalarse de forma oculta. Sólo el receptor de infrarrojos externo (External
Infrared Eye) tiene que ser colocado de forma visible, conecte el enchufe del
receptor IR en el casquillo Ext. IR, parte posterior del aparato, ver fig. Rear
Connections, conectar.
7. Conmutación manual: Para la conmutación manual pulse cualquier tecla de
selección de canal (<, >, CHANNEL Selection Button) del mando a distancia
o en el panel de servicio en la caja de conmutación del HDMI.
8. Conmutación automática: La caja de conmutación reconoce automáticamente
la última señal de HDMI conectada y se conecta a esta fuente.
Preguntas planteadas con frecuencia
• La
caja no funciona: asegúrese de que la fuente de señal de conexión
HDMI, p. ej. el receptor, está conectada correctamente y que se ilumina una
luz.
•
Señal de imagen inexistente o deficiente: 1. Asegúrese de que el aparato
HD-TV conectado es compatible con la protección de copia HDCP. 2. Utilice
sólo un cable HDMI de hasta aprox. 1,8 m de longitud o un cable EQ. 3.
Asegúrese de que todos los HDMI están bien enchufados.
• La conmutación entre fuentes HDMI dura algunos segundos, incluso medio
minuto: Debido a las disposiciones de protección de copia (HDCP) cada vez
que se conmuta debe comprobarse la autorización para la transmisión o
recepción de señales HDMI. Dependiendo de los aparatos conectados este
proceso es a veces más rápido y a veces más lento.
• El mando a distancia no funciona: Cambie la pila
Línea directa
En el caso de que tenga preguntas respecto a la HDX 4.1 auto 1.3, llame a la línea
directa de Vivanco al tel.: +93 572 1525 o mande un mensaje electrónico a
vivanco@vivanco.es.
( I ) Istruzioni per l’uso
Lo switch HDMI HDX 4.1 auto 1.3 consente di collegare massimo 4 periferiche
HDMI, quali ad es. lettore DVD, recorder, console di gioco HD, receiver satellitare HD
ed altri SetTopBox ecc., ad un visualizzatore HDMI (HD ready) ad alta risoluzione
(televisore LCD/plasma, videoproiettore).
Avvertenze di sicurezza
Si raccomanda di garantire un’adeguata ventilazione, evitando di ostruire le
fessure di ventilazione poste nella parte inferiore dell’apparecchio con oggetti quali
tovaglie, giornali, tende ecc.
Non azionare l’apparecchio con temperature superiori a 50° C.
Proteggere l’apparecchio dall’umidità, evitando ad esempio di disporvi sopra
contenitori con liquidi (quali vasi).
Page 6

Vivanco GmbH, Ewige Weide 15, D-22926 Ahrensburg, hotline@viv anco.de
6
Proteggiamo l’ambiente: i sistemi locali di smaltimento batterie vanno sfruttati
per riciclare le batterie scariche.
Batteria al litio: ATTENZIONE: l’errata sostituzione della batteria può causare
pericolo di esplosioni! Sostituirla solamente con una dello stesso tipo o equivalente
raccomandato dal produttore. Eliminare le batterie usate secondo le istruzioni del
produttore.
Non utilizzare questo apparecchio all’aperto.
In caso di guasto, far riparare l’apparecchio da un esperto.
Collegare e utilizzare
1. Spegnere tutte le periferiche HDMI. In seguito, utilizzando cavi HDMI standard,
collegare le prese HDMI delle sorgenti AV alle prese di ingresso HDMI dello
switch, e le prese di uscita HDMI dello switch all’ingresso HDMI del
visualizzatore (TV). Vedere anche la fig. Connections (= collegamenti).
2. Accendere il visualizzatore HDMI (televisore).
3. Accendere gli apparecchi AV collegati.
4. Premere il tasto On/Off (Power On/Off) dello switch, v. fig. Front Panel
Operation (= funzioni del pannello di controllo) per accendere o spegnere
l’apparecchio.
5. Sostituire la batteria del telecomando: aprire il vano batterie posto nella parte
inferiore del telecomando, v. fig. Remote Control (= telecomando). Inserire
una nuova batteria al litio di tipo CR2025. Verificare che la polarità sia giusta: i
segni “+” e “-” sulla batteria e nel vano devono coincidere. Per accertarsi che il
funzionamento sia corretto, premere il tasto On/Off (Power ON) del
telecomando puntato in direzione della finestrella di ricezione IR (Infrared Eye),
v. fig. Front Panel Operation (= funzioni del pannello di controllo) dello switch.
Se premendo il tasto, una spia LED (Power Led) si accende, vuol dire che tutto
è a posto.
6. Ricevitore esterno a infrarossi: lo switch HDMI può essere installato in
posizione nascosta. Solo il ricevitore esterno a infrarossi (External Infrared
Eye) deve essere collocato in posizione visibile, Inserire il connettore del
ricevitore IR nella presa Ext. IR, sul retro dell’apparecchio, vedi immag. Rear
Connections.
7. Switch manuale: per la conversione manuale premere un tasto qualsiasi di
selezione canali (<, >, CHANNEL Selection Button) del telecomando o dello
switch HDMI.
8. Switch automatico: lo switch riconosce automaticamente il segnale HDMI
attivato e passa alla sorgente corrispondente.
Domande frequenti
•
Lo switch non funziona: assicurarsi che la sorgente del segnale HDMI, ad
es. receiver, è correttamente collegata e che la spia di funzionamento è
accesa.
• Segnale video assente o di cattiva qualità: 1. Accertarsi che il televisore HD
collegato sia compatibile con la protezione anticopia HDCP. 2. Utilizzare
esclusivamente cavi HDMI con lunghezza massima di ca. 1,8 m, oppure cavi
EQ. 3. Accertarsi che tutti gli HDMI siano ben allacciati.
• La commutazione da un segnale HDMI ad un altro può durare da più secondi a
mezzo minuto: la procedura di autenticazione HDCP (protezione anticopia)
per la ritrasmissione e la ricezione di segnali HDMI richiede un certo tempo ed
è ripetuta ad ogni commutazione. La durata di commutazione varia a seconda
dell’apparecchio collegato.
• Il telecomando non funziona: sostituire la batteria.
Hot-line
Per eventuali domande sull’ HDX 4.1 auto 1.3 contattare la hot-line Vivanco: tel.:
039/24 95 009. Oppure inviare un messaggio e-mail a: vivanco@galactica.it
(NL) Gebruiksaanwijzing
De HDX 4.1 auto 1.3 HDMI-schakeldoos maakt de aansluiting van max. 4 HDMIapparaten, zoals dvd-spelers, dvd-recorders, HD-spelconsoles, HDsatellietontvangers en andere set-top boxes op een HDMI-scherm (HD ready), zoals
een lcd- of plasmascherm, beamer enz.
Veiligheidsinstructies
A.u.b. voor voldoende ventilatie zorgen. Ventilatiesleuven aan de onderkant
van het apparaat niet door voorwerpen zoals tafelkleden, kranten, gordijnen enz.
verstoppen.
Het apparaat a.u.b. niet bij een temperatuur boven 50 °C gebruiken.
Het apparaat a.u.b. tegen vocht beschermen; bijv. geen voorwerpen die een
vloeistof bevatten (vazen) op het apparaat plaatsen.
Bescherm a.u.b. het milieu en benut uw plaatselijke systeem voor de
verwijdering en recycling van lege batterijen.
Lithiumbatterij: OPGELET: Gevaar voor ontploffing indien de batterij verkeerd
wordt vergangen! Alleen vervangen door een gelijkwaardig, door de fabrikant
aanbevolen type. De verwijdering dient volgens de instructies van de fabrikant te
gebeuren.
Gebruik het apparaat niet in open lucht.
Bij eventuele storingen dient u het apparaat door een vakman te laten
repareren.
Page 7

Vivanco GmbH, Ewige Weide 15, D-22926 Ahrensburg, hotline@viv anco.de
7
Aansluiten en bedienen
1. Schakel alle HDMI-apparaten uit. Verbind vervolgens met standaard-HDMIkabels de HDMI-uitgangen van de AV-bronnen met de HDMI-ingangen van de
schakeldoos, en de HDMI-uitgang (OUTPUT) van de schakeldoos met de
HDMI-ingang van uw scherm (televisie). Zie ook afb. Connections
(verbindingen).
2. Schakel het HDMI-scherm (tv-toestel) in.
3. Schakel de aangesloten AV-apparaten in.
4. Druk op de aan-uittoets (Power On/Off) van de schakeldoos, zie afb. Front
Panel Operation (functies bedieningspaneel) om het apparaat in of uit te
schakelen.
5. Batterij van de afstandsbediening vervangen: Open het batterijvak aan de
onderzijde van de afstandsbediening, zie afb. Remote Control
(afstandsbediening), en breng een nieuwe lithiumbatterij aan van het type
CR2025. Let a.u.b. op de juiste polariteit: de markeringen "+" en "-" op de
batterij en in het vak moeten overeenstemmen. Om de correcte werking te
controleren, drukt u nu op de aan-uittoets (Power ON) van de
afstandsbediening, terwijl u de afstandsbediening naar de IR-ontvanger
(Infrared Eye) van de schakeldoos richt, zie afb. Front Panel Operation
(functies bedieningspaneel). Als alles correct is, gaat bij een druk op de toets
een led (Power LED) aan.
6. Externe infrarood-ontvanger. De HDMI-schakeldoos kan verborgen worden
opgesteld. Alleen de externe infraroodontvanger (External Infrared Eye) moet
zichtbaar zijn opgesteld. Steek de stekker van de IR-ontvanger in de
aansluiting Ext. IR, achterkant apparaat zie afb. Rear Connections,.
7. Handmatige omschakeling: Druk voor de handmatige omschakeling op een
willekeurige toets voor kanaalkeuze (<, >, CHANNEL Selection Button) van
de afstandsbediening of op het bedieningspaneel van de HDI-schakelkast.
8. Automatische omschakeling: De schakeldoos herkent automatisch het laatst
ingeschakelde HDMI-signaal en schakelt op deze bron om.
Veelgestelde vragen
• De schakeldoos werkt niet Controleer of een ingeschakelde HDMI-
signaalbron, bijvoorbeeld een receiver, correct is aangesloten en of een lampje
brandt.
• Geen of slecht beeldsignaal 1. Verzeker u ervan dat het aangesloten HD-
televisietoestel compatibel is met de HDCP-kopieerbeveiliging. 2. Gebruik
alleen HDMI-kabels met een lengte van maximaal ca. 1,8 m of EQ-kabels. 3.
Verzeker u ervan dat alle HDMI-plugs goed zijn ingestoken.
• Het omschakelen van de ene naar de andere HDMI-bron duurt meerdere
seconden tot een halve minuut op basis van de kopieerbeveiligingsvoorschriften (HDCP) moet de autorisatie voor het doorgeven resp. ontvangen
van HDMI-signalen bij elke omschakeling worden gecontroleerd. Dit gaat al
naargelang de aangesloten apparaten vrij snel of soms ook wat langzamer.
• De afstandsbediening werkt niet Vervang de batterij.
Hotline
Hebt u vragen over de HDX 4.1 auto 1.3, bel dan met de Vivanco-hotline: tel.: (+31)
306 007 050. U kunt ook een e-mail sturen aan: info@vivanco.nl.
(PL) Instrukcja obsługi
Urządzenie przełączające HDX 4.1 auto 1.3 HDMI umoŜliwia przyłączanie
maksymalnie 4 urządzeń pracujących w technologii HDMI, takich jak odtwarzacze
DVD, nagrywarki, konsole gier HD, odbiorniki satelitarne HD oraz SetTopBoxy i inne
do jednego urządzenia wyświetlającego o wysokiej rozdzielczości w technologii HDMI
(HD ready) – np. telewizor LCD/plazmowy, bimer.
Wskazówki dotyczące bezpieczeństwa:
NaleŜy zadbać o wystarczającą wentylację. Nie utrudniać przepływu powietrza
przez szczeliny wentylacyjne od spodu urządzenia,np. obrusem, gazetą, zasłoną itd.
Nie uŜywać urządzenia w temperaturze powyŜej 50° C.
Chronić urządzenie przed wilgocią, np. nie ustawiać na nim pojemników z
cieczami (wazonów).
Prosimy dbać o środowisko naturalne i korzystać z lokalnego systemu odbioru
zuŜytych baterii do regeneracji.
Bateria litowa: OSTROśNIE: Niebezpieczeństwo wybuchu przy nieumiejętnej
wymianie baterii! Przy wymianie stosować tylko zalecane przez producenta baterie
tego samego typu i o tej samej jakości. Baterie naleŜy usuwać do odpadów zgodnie
ze wskazówkami producenta.
Nie uŜywać urządzenia na otwartej przestrzeni.
W przypadku występujących ewentualnie usterek zlecić naprawę specjaliście.
Podłączanie i obsługa
1. Proszę wyłączyć wszystkie urządzenia HDMI. Następnie za pomocą
standardowych przewodów do urządzeń HDMI połączyć gniazda HDMI źródeł
sygnału AV z gniazdami HDMI urządzenia, zaś gniazdo wyjściowe HDMI
OUTPUT urządzenia połączyć z wejściem HDMI urządzenia wyświetlającego
(TV). Patrz równieŜ rys. Connections (= połączenia).
2. Włączyć urządzenie wyświetlające HDMI (odbiornik TV).
3. Włączyć podłączone urządzenia AV.
Page 8

Vivanco GmbH, Ewige Weide 15, D-22926 Ahrensburg, hotline@viv anco.de
8
4. Nacisnąć przycisk On/Off (Power On/Off) urządzenia przełączającego, patrz
rys. Front Panel Operation (= funkcje panela obsługowego) w celu włączenia
lub wyłączenia urządzenia.
5. Wkładanie baterii do pilota: Otworzyć schowek baterii od spodu pilota, patrz
rys. Remote Control (= pilot) i włoŜyć nową baterię litową typu CR2025.
Sprawdzić prawidłowość podłączenia biegunów: symbole „+“ oraz „-“ na baterii i
w schowku muszą się zgadzać. W celu sprawdzenia prawidłowości działania
nacisnąć przycisk On/Off (Power ON) na pilocie, kierując go w stronę okienka z
czujnikiem podczerwieni (Infrared Eye), patrz Front Panel Operation (=
funkcje panela obsługowego) urządzenia. Jeśli wszystko działa prawidłowo, po
naciśnięciu tego przycisku zaświeci się dioda LED (Power Led).
6. Zewnętrzny odbiornik podczerwieni: skrzynka przełącznikowa HDMI moŜe
zostać zainstalowana w sposób niewidoczny. Jedynie zewnętrzny odbiornik
podczerwieni (External Infrared Eye) naleŜy postawić w miejscu widocznym.
Prosimy wetknąć wtyczkę odbiornika podczerwieni wsadzić do gniazdka
znajdującego się z tyłu urządzenia Ext. IR, patrz ilustracja Rear Connections,
7. Przełączanie ręczne: Celem przełączania ręcznego naleŜy nacisnąć jakikolwiek
przycisk wyboru kanału (<, >, CHANNEL Selection Button) pilota sterowania
zdalnego lub na pulpicie obsługi skrzynki przełączeniowej HDMI.
8. Przełączanie automatyczne: Skrzynka przełączeniowa rozpoznaje
automatycznie ostatnio włączony sygnał HDMI i przełącza się na to źródło.
Często zadawane pytania
• Urządzenie nie pracuje: NaleŜy zapewnić, aby włączone źródło sygnałów
HDMI, np. Receiver był właściwie podłączony i aby paliła się lampka.
• Brak lub zły sygnał wizji: 1. Upewnić się, czy podłączone urządzenie HD-TV
jest kompatybilne z systemem zabezpieczającym HDCP. 2. Stosować tylko
przewody HDMI o maksymalnej długości do ok. 1,8 m lub przewody EQ. 3.
Upewnić się, czy wszystkie wtyki HDMI są prawidłowo wetknięte.
• Przełączanie z jednego źródła sygnału HDMI na drugie moŜe trwać kilkanaście
sekund do pół minuty: Ze względu na przepisy związane z ochroną przed
kopiowaniem (HDCP) przy kaŜdym przełączaniu musi odbywać się
sprawdzanie uprawnień do przekazywania lub odbioru sygnałów HDMI. W
zaleŜności od podłączonych urządzeń trwa to raz krócej, raz dłuŜej.
• JeŜeli pilot nie działa: Proszę wymienić baterię.
Hotline
Jeśli macie Państwo jakiekolwiek pytania dotyczące HDX 4.1 auto 1.3, prosimy
dzwonić na gorącą linię Vivanco: tel.: (+48) 22 723 0745. Alternatywnie moŜna wysłać
do nas e-mail pod adres: info@vivanco.pl
(P) Manual de instruções
A caixa de comutação HDX 4.1 auto 1.3 HDMI, permite a ligação até 4 aparelhos
HDM, como um leitor de DVD, gravador, consolas HD, receptor de satélite HD e
outras caixas SetTop etc., a um dispositivo de visualização HDMI (HD ready) de alta
definição (LCD/Plasma TV, Beamer).
Indicações de segurança:
Ter em atenção para que haja ventilação suficiente. Não tapar as ranhuras de
ventilação na parte inferior do aparelho com objectos como por exemplo toalhas de
mesa, jornais, cortinas, etc.
Não operar o aparelho com temperaturas superiores a 50° C.
Proteger o aparelho da humidade, por ex. não colocar recipientes com líquidos
(jarras) sobre o aparelho.
Proteja o ambiente utilizando o sistema de eliminação de pilhas da sua área
para eliminar as pilhas gastas.
Pilha de lítio: ATENÇÃO: Perigo de explosão ao mudar de forma incorrecta a
pilha! Substituir a pilha apenas por um tipo igual ao aconselhado pelo fabricante. A
eliminação deve decorrer segundo as indicações do fabricante.
Não usar o aparelho ao ar livre.
No caso de surgirem avarias, o aparelho deve ser reparado por um
especialista.
Ligar e manusear
1. Desligar todos os aparelhos HDMI. Depois conecte, através dos respectivos
cabos HDMI, as tomadas HDMI das fontes AV com as tomadas HDMI da caixa
e a tomada HDMI OUTPUT da caixa com a entrada HDMI do seu aparelho de
visualização (TV). Ver também fig. Connections (=Conexões).
2. Ligue o aparelho de visualização HDMI (aparelho de TV).
3. Ligue os aparelhos AV conectados.
4. Prima a tecla Ligar/Desligar (Power On/Off) da caixa de comutação, v. fig.
Front Panel Operation (= funções do painel de controlo) para ligar ou desligar
o aparelho.
5. Colocar pilhas no telecomando: Abra o compartimento das pilhas na parte
inferior do telecomando, v. fig. Remote Control (= telecomando) e introduza
uma pilha de lítio nova tipo CR2025. Tenha atenção quanto à polaridade: as
marcas “+“ e “-“ da pilha devem corresponder às marcas no compartimento das
mesmas. Prima, para a verificação da função correcta, o botão Ligar/Desligar
(Power ON) enquanto aponta com o telecomando para a janela de recepção
de IV da caixa (Infrared Eye), v. fig Front Panel Operation (= funções do
painel de controlo). Caso tudo esteja a funcionar devidamente, a luz LED
(Power Led) acende ao premir.
Page 9

Vivanco GmbH, Ewige Weide 15, D-22926 Ahrensburg, hotline@viv anco.de
9
6. Receptor externo de infravermelhos: a caixa de comutação HDMI pode ser
instalada escondida. Só o receptor externo de infravermelhos (External
Infrared Eye) tem que ser instalado visivelmente. Por favor insira a ficha do
receptor IR na tomada Ext. IR, na traseira do aparelho, v. fig. Rear
Connections.
7. Comutação manual: para comutar manualmente, carregue numa tecla
qualquer de selecção de canal (<, >, CHANNEL Selection Button) do
telecomando ou do campo de comando da caixa de comutação HDMI.
8. Comutação automática: a caixa de comutação detecta automaticamente o
sinal HDMI por último activado e comuta directamente para esta fonte.
Perguntas mais frequentes
• A caixa não funciona: Certifique-se de que uma fonte de sinal HDMI
activada, p. ex. receptor, está correctamente conectada e uma luz está acesa.
• Sem sinal ou mau sinal de imagem: 1. Certifique-se que o aparelho HD-TV
é compatível com a protecção de cópia HDCP. 2. Utilize apenas cabos HDMI
com um comprimento até aprox. 1,8 m ou cabos EQ. 3. Verifique que todos os
HDMI estão bem inseridos.
• A mudança de uma fonte HDMI para outra demora alguns segundos, chegando
mesmo a demorar meio minuto: Devido às regras de protecção de cópia
(HDCP), é necessário confirmar a autorização para a transmissão ou recepção
de sinais HDMI, cada vez que muda de fonte. Isso depende do aparelho ligado:
umas vezes processa-se de forma mais rápida outras vezes mais lenta.
• O telecomando não funciona: Substitua a pilha.
Hotline
Se tiver alguma questão sobre o HDX 4.1 auto 1.3, ligue para a hotline da Vivanco,
através do número: Tel: (+351) 219 838 944. Alternativamente, envie um e-mail para:
info@esoterico.pt
(DK) Betjeningsvejledning
HDX 4.1 auto 1.3 HDMI-switchboxen skaber mulighed for tilslutning af indtil 4 HDMI-
apparater (f.eks. DVD-afspiller, recorder, HD-spillekonsoller, HD-satellitmodtagere og
andre set-top boxe) til en HDMI (HD ready) højtopløsende displayenhed
(LCD/plasmafjernsyn, beamer).
Sikkerhedshenvisninger:
Sørg for god ventilation. Ventilationsåbningerne på bagsiden af apparatet må
ikke være dækket til af f.eks. bordduge, aviser, forhæng o. lign.
Driftstemperaturen må ikke overstige 50° C.
Apparatet beskyttes mod fugtighed. Stil f.eks. aldrig beholdere med væske
(vaser) på selve apparatet.
Værn om miljøet og aflevér brugte batterier på en af de lokale
genbrugsstationer.
Lithiumbatteri: PAS PÅ: Fare for eksplosion, hvis batteriet ikke udskiftes
korrekt! Det nye batteri skal være af tilnærmelsesvist samme type som det gamle (se
fabrikantens anbefaling). Ved bortskaffelse af batterier følges fabrikantens
anvisninger.
Apparatet er uegnet til udendørs brug.
Få en fagmand til at se på apparatet i tilfælde af driftsforstyrrelser.
Tilslutning og betjening
1. Sluk alle HDMI-apparater. Ved hjælp af et standard HDMI-kabel, sluttes AVkildernes HDMI-bøsninger til boxens HDMI bøsninger, og boxens HDMI
OUTPUT-bøsning forbindes med displayenhedens (TV) HDMI-indgang. Se
også fig. Connections (=forbindelser).
2. Tænd HDMI-displayenheden (TV).
3. Tænd de tilsluttede AV-enheder.
4. Tryk på On/Off-knappen (Power On/Off) på switchboxen, se fig. Front Panel
Operation (= betjeningsfeltfunktioner), for at tænde eller slukke.
5. Isætning af batteri til fjernbetjening: Batterirummet på bagsiden af
fjernbetjeningen åbnes, se fig. Remote Control (= fjernbetjening), og et nyt
lithiumbatteri (type CR2025) sættes i. Tjek at “+“ og “-“ tegnene på hhv.
batteriet og i batterirummet vender den rigtige vej. Foretag funktionstjek ved at
trykke på fjernbetjeningens On/Off-knap (Power ON) samtidigt med at du retter
fjernbetjeningen mod boxens IR-modtagevindue (Infrared Eye), se fig. Front
Panel Operation (= betjeningsfeltfunktioner). Hvis alt er, som det skal være,
lyser en af LED-lamperne (Power Led), når der trykkes.
6. Ekstern infrarød modtager: HDMI-switchboxen kan installeres skjult. Kun den
eksterne infrarødmodtager (External Infrared Eye) skal opstilles synligt, Sæt
IR-modtagerens stik i Ext. IR bøsningen på apparatets bagside, se fig. Rear
Connections.
7. Manuel omskiftning: Til manuel omskiftning trykker du på en vilkårlig
kanaludvalgsknap (<, >, CHANNEL Selection Button) på fjernbetjeningen
eller på betjeningsfeltet på HDMI-switchboxen.
8. Automatisk omskiftning: HDMI-switchboxen erkender automatisk det sidst
aktiverede HDMI-signal og indstiller på denne kilde.
Hyppigt stillede spørgsmål
• Boxen fungerer ikke: Sørg for, at en tændt HDMI-signalkilde, fx receiver, er
rigtigt tilsluttet og, at en lampe lyser.
• Ingen eller dårligt billedsignal: 1. Forvis dig om, at det tilsluttede HD-fjernsyn
er kompatibelt med HDCP-kopibeskyttelsen. 2. Benyt kun HDMI-kabler med en
Page 10

Vivanco GmbH, Ewige Weide 15, D-22926 Ahrensburg, hotline@viv anco.de
10
max. længde på ca. 1,8 m eller EQ-kabler. 3. Se efter, om alle HDMI´er er
sluttet rigtigt til.
• Omstilling fra en HDMI-kilde til en anden varer som regel mellem nogle
sekunder og et halvt minut: På grund af kopibeskyttelsesreglerne (HDCP)
skal det hver gang tjekkes, at der er givet autorisation til videresendelse eller
modtagelse af HDMI-signaler. Derfor kan tiden variere alt efter, hvilke typer
enheder der benyttes.
• Fjernbetjeningen fungerer ikke: Batteri udskiftes.
Hotline
Hvis du har spørgsmål til HDX 4.1 auto 1.3, kan du ringe til Vivancos Hotline på +
0045-4434-0811, eller du kan sende en mail til fovitech@fovitech.dk
( S ) Bruksanvisningar
Med den automatiska HDX 4.1 HDMI multikontaktenheten kan du koppla ett flertal
HDMI-apparater såsom Blu-ray/HD-DVD, HD-spelkonsoler, satellit-och
kabelmottagare till en och samma HDMI (HD-ready) display (LCD/Plasma TV,
projektor) med HDMI ingång.
Säkerhetsföreskrifter:
• Säkerställ lagom ventilation. Se till att enhetens ventilationsöppningar inte täcks
av tidningar, bordsdukar gardiner eller dylika föremål.
• Använd icke enheten i utrymmen där temperaturen överskrider +50° C.
• Utsätt icke enheten för fukt. Ställ aldrig föremål fyllda med vätska såsom
blomvaser på apparaten eller ovanför den.
• Observera föreskrifterna gällande miljövård när du kasserar gamla apparater
och batterier: kontakta dina lokala myndigheter för korrekt
avfallshantering.
• Litium batteri: Varning: Inkorrekt utbyte av batteri kan skapa risk för
explosion. Använd alltid ett likadant batteri eller en motsvarande typ som
rekommenderas av tillverkaren. Kassera gamla batterier enligt tillverkarens
föreskrifter.
• Använd icke enheten utomhus
• I fall av felfunktion, anlita alltid en auktoriserad servicetekniker.
Installation och bruk
1. Koppla av strömmen i alla HDMI programkällor och i HDMI displayn (TV).
Använd standard HDMI kablar när du kopplar HDMI-uttagen av dina
audio/video programkällor till ingångarna på HDMI multikontakten och dess
uttag (OUTPUT) till ingången på HDMI displayn. Se bild ANSLUTNINGAR
(Connections).
2. Koppla på strömmen till TV:n eller displayn.
3. Koppla på strömmen till dina audio/video programkällor
4. Koppla på strömmen i enheten med att trycka på knappen On/Off (Power
On/Off), se bild FRONTPANELENS FUNKTIONER (Front Panel Operation).
5. Att lägga in batteriet i fjärrkontrollen: Öppna batteriluckan som sitter på nedre
sidan av fjärrkontrollen se bild. Lägg in litium batteriet typ CR 2025. Säkerställ
rätt polaritet: batteriets märkning "+" och "-" skall passa ihop med märkningen i
batteriluckan. Kontrollera fjärrkontrollens funktionsduglighet med att trycka på
knappen On/Off (Power On/Off) se bild FJÄRRKONTROLL (Remote Control)
och rikta fjärrkontrollen mot multikontaktens IR sensor (Infrared Eye) se bild
FRONTPANELENS FUNKTIONER. Om allt fungerar normalt, lyser enhetens
LED indikator (Power Led) upp.
6. Extern infraröd-mottagare HDMI-omkopplingsboxen kan installeras dolt. Endast
den externa infraröd-mottagaren (External Infrared Eye) måste installeras väl
synligt. Anslut IR-mottagarens stickkontakt till anslutning EXT. IR på baksidan,
se bild, Rear Connections.
7. Manuell omkoppling: För att koppla om manuellt trycker du på en valfri
kanalvalsknapp (<, >, CHANNEL Selection Button) på fjärrkontrollen eller på
HDMI-omkopplingsboxens manöverpanel.
8. Automatisk omkoppling: Omkopplingsboxen identifierar automatiskt den sist
inkopplade HDMI-signalen och kopplar igenom till denna källa.
Frågor och svar
• Multikontakten fungerar ej:
Se till att den inkopplade HDMI-signalkällan, t.ex.
receiver, är korrekt ansluten och att en lampa lyser.
• Ingen bild/signal eller dålig bild: 1. säkerställ att din videodisplay är kompatibel
med HDCP-systemet för kopieringsskydd. 2. Kontrollera att dina HDMI-kablar inte är
längre än 1,8 m, eller använd vid behov EQ-kablar. 3. Säkerställ att HDMIkontakterna sitter ordentligt fastspända. 4. Koppla bort strömmen i alla apparater och
koppla på igen.
• Omkopplingen mellan programkällorna tar från flera sekunder till en halv minut:
Processen (HDCP kopieringsskydd), som säkerställer, att signalen är
autentisk kräver en viss tid och upprepas varje gång vid programomkoppling.
Totaltiden av omkopplingen beror i hög grad på anslutna apparater.
• IR-fjärrkontrollen fungerar ej: Byt batterierna.
Hotline
Om du har frågor gällande HDX 4.1 auto 1.3, vänligen kontakta importören: AVKomponentti Oy, tel. (+358) 986 7802-0, Info@avkomponentti.fi och Sound & Vision
Support AB, tel. (+46) 8 446 0590, svs.ab@telia.com
Page 11

Vivanco GmbH, Ewige Weide 15, D-22926 Ahrensburg, hotline@viv anco.de
11
(FIN) Käyttöohje
Automaattinen HDX 4.1 HDMI-kytkentäyksikkö mahdollistaa useiden HDMI-
liitännällä varustettujen laitteiden (Blu-ray/HD-DVD, Set-Top-Boxit, HDkaapelisovittimet, pelikonsolit ym.) samanaikaisen liittämisen HD-valmiudella
varustettuun televisioon tai vastaavaan näyttölaitteeseen, jossa on HDMI-tuloliitäntä.
Varotoimenpiteet:
• Huolehdi laitteen riittävästä jäähdytyksestä. Varmista, että ilmankierto on
esteetön poistamalla liinat, sanomalehdet, verhot ym. esineet tuuletusaukkojen
edestä.
• Älä käytä laitetta yli +50 °C lämpötilassa.
• Älä altista laitetta kosteudelle. Älä aseta laitteen päälle tai yläpuolelle esineitä
kuten kukkamaljakoita, joista voi tippua nestettä.
• Huolehdi ympäristösi hyvinvoinnista. Älä hävitä vanhoja käytöstä poistettuja
paristoja talousjätteen seassa, vaan toimita ne asianmukaiseen
keräyspisteeseen.
• Litium-paristo: Varoitus: Virheellinen paristonvaihto voi aiheuttaa
räjähdysvaaran. Käytä aina samanlaista tai vastaavaa, valmistajan
suosittelemaa tyyppiä. Hävitä käytetyt paristot valmistajan ohjeiden mukaisesti.
• Älä käytä laitetta ulkotiloissa.
• Vikatapauksen sattuessa käänny aina valtuutetun ammattikorjaajan puoleen
Asennus ja toiminnot
1. Katkaise virta kaikista HDMI-ohjelmalähteistä sekä HDMI-näyttölaitteesta
(TV:stä). Käytä aina asianmukaisia vakio HDMI-kaapeleita, kun kytket AVlaitteidesi HDMI-lähtöliitännät HDMI-kytkentäyksikön tuloliitäntöihin, sekä
yhdistäessäsi kytkentäyksikön HDMI-lähdön (OUTPUT) näyttölaitteesi HDMItuloon. Ks.kuva LIITÄNNÄT (Connections).
2. Kytke virta TV-näyttöön.
3. Kytke virta AV-ohjelmalähteisiin
4. Kytke laitteeseen virta päälle painamalla virtapainiketta On/Off (Power On/Off),
ks. kuvaa ETUPANEELIN TOIMINNOT
5. Kaukosäätimen pariston asettaminen: Avaa kaukosäätimen alapuolella
sijaitsevan paristolokeron kansi, ks. kuva.. Aseta sen jälkeen paristolokeroon
litium-paristo tyyppi CR 2025. Varmista oikea napaisuus: merkintöjen "+" ja "-"
pitää täsmätä paristossa ja lokerossa. Toimivuden tarkistamiseksi paina
kaukosäätimen painiketta On/Off (Power ON), ks. kuva KAUKOSÄÄDIN, ja
kohdista säädin kytkentäyksikön IR-vastaanottimeen (Infrared Eye), ks. kuva
ETUPANEELIN TOIMINNOT. Mikäli kaikki toimii normaalisti, kytkentäyksikön
LED ilmaisin (Power Led) syttyy.
6. Ulkoinen infrapunavastaanotin: HDMI-kytkintäyksikön voi asentaa piilotettuna.
Ainoastaan ulkoisen infrapunavastaanottimen (External Infrared Eye) on
oltava näkyvissä. Työnnä IR-vastaanottimen pistoke siihen liittimeen laitteen
takana, jossa lukee Ext. IR,, ks. kuva Rear Connections.
7. Manuaalinen kytkentä: kun haluat kytkeä laitteita käsin, paina mitä tahansa
kaukosäätimen tai HDMI-kytkintäyksikön käyttökentän kanavanvalintapainiketta
(<, >, CHANNEL Selection Button).
8. Automaattinen kytkentä: kytkentäyksikkö tunnistaa automaattisesti viimeksi
kytketyn HDMI-signaalilähteen ja yhdistää tähän lähteeseen.
Usein esitettyjä kysymyksiä
• Kytkentäyksikkö ei toimi: Varmista, että yksi HDMI-signaalilähde, esim.
digisovitin, on päällä ja oikein kytkettynä ja sen merkkivalo palaa.
• Ei kuvaa/signaalia tai huono kuva: 1. Varmista, että näyttölaite (TV) tukee
HDCP-kopionsuojausjärjestelmää. 2. Varmista HDMI-kaapeleiden pituudet:
enint. 1,8 m tai käytä EQ-kaapeleita. 3. Varmista HDMI-liittimien kiinnitys. 4.
Katkaise virrat kaikista laitteista ja kytke ne uudelleen päälle.
• Kytkennän vaihtuminen laitteelta toiselle kestää useasta sekunnista puoleen
minuuttiin: Laitekohtainen HDCP- (kopiosuoja) tunnistusprosessi vaatii
hieman aikaa ja toistuu joka kerralla, kun ohjelmalähde vaihtuu. Kytkennän
kokonaisaika riippuu suuresti liitetyistä laitteista.
• IR –kaukosäädin ei toimi: Vaihda uudet paristot.
Hotline
Mikäli sinulla on kysyttävää koskien kytkentäyksikköä HDX 4.1 auto 1.3, ota yhteys
maahantuojaan: AV-Komponentti Oy, tel. (+358) 986 7802-0, Info@avkomponentti.fi
(RUS) Руководство по эксплуатации
HDMI коммутационный блок HDX 4.1 auto 1.3 позволяет подключать до 4 HDMIустройств, таких как DVD проигрыватель, рекордер, игровая консоль с
поддержкой HD, приемник спутниковой связи с поддержкой HD и другие
телевизионные приставки и т.д., к отображающему устройству HDMI с высокой
разрешающей способностью (с маркировкой HD ready) (жидкокристаллический,
плазменный или проекционный телевизор).
Правила техники безопасности:
Следует обеспечить достаточную вентиляцию. Запрещается закрывать
прорези для вентиляции на нижней стенке прибора какими-либо предметами,
например, скатертями, газетами, занавесями и т.д..
Запрещается эксплуатировать прибор при температуре выше 50° C.
Следует защитить прибор от попадания внутрь воды, например,
запрещается ставить на него сосуды с жидкостью (вазы).
Page 12

Vivanco GmbH, Ewige Weide 15, D-22926 Ahrensburg, hotline@viv anco.de
12
Для защиты окружающей среды следует сдавать использованные
батарейки в местную службу утилизации для переработки.
Литиевая батарейка: ВНИМАНИЕ: в случае неправильных действий при
замене батарейки существует опасность взрыва! В качестве замены следует
использовать только батарейку рекомендованного производителем типа.
Утилизировать батарейки следует в соответствии с рекомендациями
производителя.
Запрещено эксплуатировать прибор на открытом воздухе.
При возникновении сбоев в работе прибора его следует отдать в
специализированую ремонтную мастерскую.
Подключение и работа
1. Выключите все HDMI-приборы. При помощи стандартного HDMI-кабеля
соедините HDMI-гнезда AV-источников с HDMI-гнездами прибора, а HDMIгнездо ВЫХОД прибора с HDMI-входом Вашего отображающего
устройства (TV). См. также рис. Connections (Соединения).
2. Включите отображающее устройство HDMI (телевизор).
3. Включите присоединенные AV-устройства.
4. Прибор включается и выключается при нажатии кнопки вкл/выкл (Power
On/Off) прибора, см. рис. Front Panel Operation (Функции панели
управления).
5. Установка батарейки в пульт дистанционного управления: откройте отсек
для батареек в нижней части ПДУ, см. рис. Remote Control (ПДУ) и
вставьте новую литиевую батарейку, тип CR2025. Проверьте полярность:
маркировки „+“ и „-" на батарейке и отсеке должны совпадать. Для
проверки нажмите кнопку вкл/выкл (Power ON) на ПДУ, направив ПДУ на
инфракрасный приемник (Infrared Eye) прибора, см. рис. Front Panel
Operation (Функции панели управления). Если пульт работает нормально,
при нажатии загорится светодиодная лампочка (Power Led).
6. Внешний инфракрасный приёмник: HDMI-переключающий бокс может
быть установлен скрыто. Только внешний инфракрасный приёмник
(External Infrared Eye) должен быть размещён так, чтобы был видимым.
Вилочную часть инфракрасного приёмника вставьте в гнездо Ext. IR, на
обратной стороне прибора, см. рисунок Rear Connections (задние
соединения).
7. Переключение вручную: Для переключения вручную нажмите любую
кнопку по выбору канала (<, >, CHANNEL Selection Button) на
дистанционном управлениии или на пульте HDMI-переключающего бокса.
8. Автоматическое переключение: Переключающий бокс автоматически
распознаёт включённый в последний раз HDMI-сигнал и проключает на
этот источник.
Часто задаваемые вопросы
• Коммутационный блок не работает: Следует обеспечить, чтобы один
HDMI-сгнальный источник, например, приёмник, был подключён
надлежащим образом и горела одна лампочка.
• Видеоизображение плохого качества или отсутствует: 1. Убедитесь, что
подключенный телевизор совместим с технологией защиты видео HDCP.
2. Используйте только HDMI-кабель длиной до 1,8 м или EQ кабель. 3.
Проверьте плотность присоединения всех HDMI-кабелей.
• Переключение с одного HDMI-источника на другой длится от нескольких
секунд до половины минуты: Из-за использования технологии защиты
видео (HDCP) право на передачу или прием HDMI-сигналов проверяется
при каждом переключении. Этот процесс может проходить быстрее или
медленнее в зависимости от подключенных приборов.
• Не работает пульт дистанционного управления: Замените батарейку.
Горячая линия
Если у Вас возникнут какие-либо вопросы относительно прибора HDX 4.1 auto
1.3, Вы можете позвонить по номеру горячей линии Vivanco: тел: (+7) 495 124
630 1. Вы также можете отправить письмо по электронной почте на адрес:
Unibat@mail.ru
(H) Használati utasítás
A HDX 4.1 automata 1.3 HDMI elosztó egység lehetıvé teszi több HDMI csatlakozós
készülék (pl. DVD lejátszók, magnók, HD játék konzolok, mőholdak és egyéb set-top
dobozok) csatlakoztatását egy HDMI (HD kész) készülékhez való csatlakoztatást
(LCD/Plazma TV, kivetítı).
Biztonsági elıírások:
Kérjük, gondoskodjon a megfelelı szellıztetésrıl. Gondoskodjon róla, hogy a
szellızést semmi ne akadályozza, a szellızınyílás ne legyen letakarva (pl.
bármilyen tárggyal, újságpapírral, asztalterítıvel, függönnyel, stb.)
Ne használjon berendezést, ami melegebb, mint 50°C.
Ne érje nedvesség a készüléket, így ne tartson a közelében olyan tárgyat,
amiben folyadék van (pl. váza)
Kérjük ügyeljen a környezetvédelemre, amikor eltávolítja a régi elemeket.
Lítium elem: Figyelmeztetés: az elemek helytelen használata veszélyes lehet.
Elemcserénél használjon ugyanolyan elemet, mint amilyen a készülékben volt
vagy helyettesítse olyannal, amilyet a gyártó is ajánl.
Page 13

Vivanco GmbH, Ewige Weide 15, D-22926 Ahrensburg, hotline@viv anco.de
13
Ne használja az egységet szabadban.
Meghibásodás esetén szakemberrel javítassa meg.
Szerelés és mőködtetés
1. Kapcsoljon ki minden HDMI berendezést. Használjon standard HDMI
vezetéket, hogy csatlakoztassa a HDMI audio videó kimeneti egységét az
elosztó egység HDMI bemenetébe és az egység HDMI kimenetét
csatlakoztassa a kijelzı HDMI bemenetébe. Nézze meg a „Connections”
ábrát.
2. Kapcsolja be a TV-t
3. Kapcsolja be az audió videó egységeket.
4. Nyomja meg a Be/Ki gombot. Az egység be és ki kapcsolásához nézze
meg a „Front Panel Operation” ábrát.
5. Távirányítóba való elem behelyezése: nyissa ki az elemtartó részt,
amelyet a távirányító alján talál (lásd a képen). Helyezze be a CR 2025
típusú lítium elemeket. Gyızıdjön meg róla, hogy a polaritás megfelelı
legyen: „+” és „-” az elemen és a távirányítón egyezı helyen van e. A
funkciók teszteléséhez nyomja meg a bekapcsoló gombot a távirányítón,
úgy, hogy a távirányítót a televízión található infrára irányította (lásd „Front
Panel Operation”). Ha minden megfelelıen mőködik, akkor a lámpa az
elosztó egységen világítani fog.
6. Infra: a távirányító mőködéséhez akár az egész készüléket elrejthetjük,
mindössze az infrának kell láthatónak maradnia. Kérjük, csatlakoztassa a
kábelt az infra csatlakozójába, amelyet hátul talál meg (lásd „Rear
Connection” ábrán).
7. Kézi üzemeltetéshez nyomjon meg bármilyen csatorna választó gombot a
távirányítón vagy a HDMI elosztó készülék elején.
8. Automata mód esetén a készülék automatikusan észleli és kiválasztja a
legújabb meneti egységeket.
Gyakran ismételt kérdések:
• Az elosztó nem mőködik: Gyızıdjön meg róla, hogy a HDMI készülék be
van kapcsolva és a LED világít.
• Nincs kép/jel vagy gyenge a kép: 1. Gyızıdjön meg róla, hogy a videó
HDCP alkalmas. 2. Ellenırizze a HDMI kábelek hosszát: max. 1,8m vagy EQ
vezetıt. 3. Gyızıdjön meg róla, hogy a HDMI csatlakozó megfelelıen rögzítve
van. 4. Kapcsoljon ki minden berendezést, majd kapcsolja be ıket újra.
• Egyik forrásról másikra való átváltás több másodpercet vehet igénybe vagy
akár fél percet is: A HDCP (másolás védelem) hitelesített folyamat
berendezések csatlakoztatása esetén idıt vesz igénybe és mindig megismétli
ezt, amikor új forrást választ ki. A teljes elosztási idı sokban számít a
csatlakoztatott berendezésektıl.
• IR vezérlı nem mőködik: Cseréljen elemet.
Ügyfélszolgálat
Ha bármilyen kérdése merülne fel a HDX 4.1 automata 1.3 elosztóval kapcsolatban,
kérjük hívja a Vivanco magyarországi irodáját a 34/316-348 telefonszámon vagy írjon
e-mait a vivanco@t-online.hu címre.
 Loading...