

Page 1

DVD/MPEG4/DivX PLAYER
MODEL VT4015 GY
www.vitekaus.com
2
15
INSTRUCTION MANUAL
4015.qxd 14.06.2005 9:54 Page 1
Page 2

PRECAUTIONS
SAFETY PRECAUTIONS
• To prevent fire or shock hazard, do not expose this appliance
to rain or moisture.
• This appliance is a Class I laser product. Direct exposure to
beam may cause eyes injury.
• Do not open the cabinet by yourself and leave all servicing
to qualified service personnel.
• Power requirement for this appliance is AC 110~240V,
50/60 Hz, please ensure the power supply is in the range
before turning on.
OPERATION PRECAUTIONS
• Please use the original packing case and materials when
transporting this DVD player, and pack the appliance in the
original factory packing style for better protection.
• The temperature of the upper cover board and the rear
panel of the player may be high after a long period of time of
playing. This is not a problem but a normal phenomenon.
• When the player is not to be used, please remove the disc
and turn the power off.
• Malfunction may be caused when the player is not used for
too long, so please turn it on occasionally for better mainte
nance.
• Some kinds of discs may cause the appliance to hang,
please restart the appliance when this occurs.
• Interval of restarting should be longer than 10 seconds,
which can help to extend the life expectancy of the appli
ance. This appliance had better be unplugged after using
each time for better protection.
LOCATION
• The moving pictures and played sound may be affected
when the DVD player is placed close to TV set, radio or VCR,
so please keep them further away.
ACQUIRING CLEAR PICTURES
• This DVD player is a device of high technology and high pre
cision. The image quality may be impaired when the laser
head or the disc driving parts are dirty or damaged.
CONDENSATION PRECAUTIONS
Condensation may cause certain kinds of damage to the player.
It may form because
• The player is moved from cold to warm surroundings;
• The player is placed inside a room where the heater is just
on or exposed to the ventilation hole of an airconditioner;
• The player is moved out from an airconditioned room to a
place of high temperature and humidity in summer time.
• The player is being used in a surrounding of high humidity.
Do not use the player where condensationmay be form easily,
otherwise damage may be caused to the disc and inner parts of
the player. Please take the disc out, plug the power cord into a
wall outlet and turn the player on. The moisture will disappear
whenthe temperature rises two or three hours later.
CLEANING PRECAUTIONS
• Use a soft and dry cloth for cleaning.
• For the stains that cannot be removed easily, apply some
diluted neutral detergent to a cloth, wring the cloth dry and
wipe the stains away, then use a dry cloth to clean. Do not
use any solvents such as thinner or benzine; otherwise the
surface of the player may be damaged.
• When using duster cloth with chemical substance for clean
ing, please refer to the using procedures the product
requires.
Manufactured under license from Dolby Laboratories.
“Dolby” and the doubleD symbol are tademarks of Dolby
Laboratories.
ENGLISH
2
4015.qxd 14.06.2005 9:54 Page 2
Page 3

DISC CARE
Differences in disc composition
DVD
All discs are divided up into smaller, more manageable sections
so that you can find specific content more easily. DVD discs are
divided into one or more titles. Each title may be further divided
into several chapters. Occasionally, a chapter may contain index
points, effectively dividing the chapter up into several parts, too.
MULTIANGLE
You can view scenes from different camera angles when watch
ing movies or other media with multiple angle playback avail
able.
MULTIPLE LANGUAGES
You can select the expected language on when watching
movies or discs that have multiple languages and/or
audio soundtracks recorded on them.
MULTILANGUAGE SUBTITLES
You can select the expected subtitle language or turn subtitles
off when watching movies
or discs that have multilanguage subtitles recorded on them.
SVCD/VCD/CD
SVCD/VCD/CD are divided into a number of tracks. A track may
contain a number of index points occasionally, which effectively
divides the track up into several parts.
MP3 /JPEG
MP3 is a compressed audio file format. Files are recognized by
their file extension ".mp3" or ".MP3". JPEG is a compressed
image file format. Files are recognized by their file extension
".jpg" or ".JPG".
MP EG4
MPEG4, an extension of MPEG2 technology, is a format with
high image quality and low data transmission rate. With the sup
port of MPEG4 technology, the image quality of video files on a
CDROM, whose capacity is only 700 MB, can reach or approach
the image quality of DVD. The player identifies this type of file by
judging whether the file extension is ".AVI" or ".avi".
OPERATION GUIDE
INTRODUCTION OF PRODUCT FUNCTIONS
This appliance adopts Taiwan SunPlus latest DVD decoder chip
that integrates functions of decoder and servo. It supports full
functional DVD playback modes including 8 languages,
32 subtitles and 9 angels. The appliance can play DVD, super
VCD, VCD, DVCD, CD and CDR discs. In addition, MP3 and
Picture CD are also playable.
The player has the following features:
• The latest ultraslim DVD.
• Supports MPEG4/DivX Technology.
• Builtin DOLBY DIGITAL with 6channel audio output.
• 10bit/27MHz60Mhz video D/A converter with up to 500
line horizontal resolution.
• 24bit/192KHz audio D/A converter with highquality DVD
audio output.
• 3D virtual surround sound effect and 6 reverb modes.•
• Coaxial digital audio out jack, standard 6channel audio out
jack.
• Standard video out (AV), Svideo out, component video out
(Y, Pb, Pr) and VGA video out.
• 16:9 and 4:3 TV screen aspect ratio support.
• Playback functions including Repeat, Fast Forward/Reverse,
Zoom In/Out, JPEG,etc.
• Parental Lock Level control system.
• Highreliability power supply switch and wide power require
ment range (AC 110240V, 50/60Hz).
• Screensaver program for screen protection.
• Auto STANDBY function for automatic electricity saving.
• Super search function, supporting various search modes.
INTELLIGENT UPGRADE
• Load the upgrade disc, the player will upgrade its software
automatically.
• The player will enter standby status after the upgrading
process is finished.
Caution: Do not turn the power off during upgrading. If acci
dents such as power failure result in upgrading failure,
please refer servicing to the maintenance center.
ENGLISH
3
4015.qxd 14.06.2005 9:54 Page 3
Page 4

NAMES AND FUNCTIONS
FRONT PANEL
REAR PANEL
ENGLISH
4
1. POWER button
Press to alternate the player between ON and OFF.
2. Disc tray
When loading a disc, place disc in the disc tray with the label side
facing up.
3. Display window
Displays current disc information.
4. Remote sensor
Point the remote control toward the remote sensor to operate the
player.
5. (EJECT) button
Press to open and close the disc tray.
6.
(PLAY/PAUSE) button
Press for the first time to stop playback, Press for the second time
to resume playback from the pause point.
7. (STOP) button
During DVD playback, press once to stop and then press PLAY but
ton to resume playback from the stop point; press this button twice
causes the disc to return to the beginning of the disc if playback
starts again.
8.
(PREV) button
Press to go back to previous chapters/track.
9.
(NEXT) button
Press to advance to next chapter/track.
10. MIC input jack
Use to connect to a microphone to the player to use the Karaoke
function.
11. VOL control knob
Turn to adjust the volume of microphone input.
1. AC IN power cord connection terminal
Use to connect the power cord to the wall outlet.
2. CVBS / SVIDEO OUT jack
Connect to the video input on a TV, monitor, AV amplifier or receiver
with video input capability.
3. COMPONENT/COAXIAL
COMPONENT VIDEO OUT jacks
If your projective monitor or projector or other similar devices has
component video inputs, you can produce a higher quality picture
on it by connecting its component video cable to the YCbCr jack on
this unit.
4. COAXIAL DIGITAL AUDIO OUT jack
Use to output digital audio recorded on discs by connecting to the
coaxial digital audio input on an AV amplifier or receiver with digital
audio input capability, but you first need to change the setting to
digital audio output on the SETUP MENU.
5. 5.1CH AUDIO OUT jack
Use to output decoded 5.1ch audio to multichannel receiver or
amplifier. FL and FR jacks are connected to the stereo input of a
pro logic of stereo 2 channel amplifier or receiver.
6. SCART jack
Connect to the SCART input on a TV or other devices with SCART
input capability.
4015.qxd 14.06.2005 9:54 Page 4
Page 5

ENGLISH
5
1. REMOTE SIGNAL EMITTER
2. STANDBY
3. ZOOM
4. BROWSE
5. NUMBER
6. PREVIOUS
7. NEXT
8. MUTE
9. STEP
10. SETUP
11. PLAY/ PAUSE
12. OK
13. UP/DOWN
14. LEFT/ FAST REVERSE
15. MENU
16. TITLE
17. ANGLE
18. AUDIO
19. CHANNEL
20. SOUND
21. EJECT
22. REPEAT
23. SEARCH
24. VOLUME
25.STOP
26. RIGHT/ FAST FORWARD
27. OSD
28. SUBTITLE
29. 3D
REMOTE CONTROL
4015.qxd 14.06.2005 9:54 Page 5
Page 6

1. REMOTE SIGNAL EMITTER
Point the remote control to the remote sensor on the front
panel.
Effective distance: less than 6 meters.
Effective angle: (H/V) ±30°C
2. STANDBY
Press this button to turn on or turn off this unit.
3. ZOOM
Press this button to zoom in or zoom out the current picture.
There are three zooming modes.
4. BROWSE
For SVCD and VCD discs, when the playback is stopped,
press this button to browse tracks on the disc in a 9small
picture screen. Each track will be played for 3 seconds. The
PBC will be automatically turned off after the browsing start
ed if it was turned on before browsing. Press PREVIOUS and
NEXT buttons to turn pages on the screen. Press PLAY/PAUSE
to resume disc playing.
5. NUMBER
Press number buttons to play relevant chapter/track.
6. PREVIOUS
Press this button to go to previous title/chapter/track. For
SVCD and VCD discs. when the PBC is OFF, if the playing
track is the first track, press this button will stop the play
back; and if the playback is stopped, press this button will
take no effects.
7. NEXT
Press this button to skip to next title/chapter/track. For
SVCD and VCD, when the PBC is OFF, if the playing track is
the last track, press this button will stop the playback.
8. MUTE
Press this button to turn off the sound. The "Mute" signal will
be displayed on the screen. Press MUTE again or press the
"Vol +" or "Vol " button to resume the sound.
Remarks:
The microphone will output no sound in the mute status.
9. STEP
Each pressing the button advance the disc a frame ahead.
Press the PLAY button to resume normal playback.
10. SETUP
Press this button to access the setup menu.
11. PLAY/PAUSE
Press this button to toggle between the PLAY and PAUSE
statuses.
12. OK
Press this button to confirm current operation.
13. UP/DOWN
Press to move the cursor to make choice.
14. LEFT/FAST REVERSE
Press this button to toggle between the following modes:
F.R. 2>F.R. 4>F.R. 8>F.R. 20>PLAY. For DVD discs, press
this button will fast reverse to the beginning of previous
chapter/title to start playback. For SVCD and VCD discs, if
the PBC is ON, press this button will fast reverse to the
beginning of previous track to start playback.
15. MENU
For VCD 2.0 and above versions, . The initial status is PBC
ON. For DVD disc, select the item with the CURSOR buttons
then press OK to start playback.
16. TITLE
Press TITLE button to access the title menu of the disc.
Select the item with the CURSOR buttons then press OK to
start playback.
Remarks: Only for DVD discs.
17. ANGLE
Press for the first time to play the current camera angle. For
DVD discs that contains scenes recorded in multiple camera
angles, press to switch the camera angle during playback.
18. AUDIO
For DVD discs, press this button to toggle between different
audio modes. The selected audio mode will be displayed on
the screen. For stereo discs, Remarks: For bilingual edition
VCD discs, press the CHANNEL button to select your
desired language.
19. CHANNEL
Press this button to toggle between different channels.
Note: Only for VCD discs.
When the disc tray is opened, press this button will toggle
betweendifferent video output modes.
20. SOUND
Press this button to toggle between different sound effects.
21. EJECT
Press this button to open/close the disc tray.
22. REPEAT
For DVD discs, press this button to toggle between CHAP
TER, TITLE and ALL DISC modes. For other discs, press to
toggle between TRACK and ALL DISC modes.
23. SEARCH
This function allows the user to start playback from a desig
nated point. Press the SEARCH button to display the search
menu on the TV screen, then use the CURSOR buttons and
the NUMBER buttons to input the desired title/chapter/track
number or the specific time.
At last, press OK to confirm and start playback from the des
ignated point. This function is not available for MP3 discs.
24. VOLUME
Press VOL+ to increase the volume and press VOL to
decrease the volume. When audio out is set to SPDIF/RAW
for DVD discs, the VOL+/ buttons are invalid.
25. STOP
Press once to stop and then press PLAY/PAUSE button to
resume playback from the stop point; press this button twice
causes the disc to return to the beginning of the disc if play
back starts again.
Note: For VCD 2.0 and SVCD discs, with the PBC on, press
this button will return to the parent menu.
26. RIGHT/FAST FORWARD
Press this button to toggle between 4 different playback
speeds.
27. OSD
Press to display the current disc information including title
information, chapter information, time information, etc.
28. SUBTITLE
For DVD and SVCD discs record multi subtitle information,
press this button to select your desired subtitle.
29. 3D
Press for the first time to display the surround sound setup
menu on the TV screen, Then use CURSOR buttons to make
settings; press SOUND again to remove the setup menu. In
the menu, you can set the surround sound mode (SRND) to
OFF, CONCERT, CHURCH, PASSIVE, WIDE or LIVE; you can
set the equalization mode (EQ) to STANDARD, CLASSIC,
ROCK, JAZZ, POP or USER. When choosing USER, you can
use LEFT/RIGHT button to move the red highlight to choose
ENGLISH
6
4015.qxd 14.06.2005 9:54 Page 6
Page 7

a frequency, then use UP/DOWN button to increase/ decrease the frequency intensity.
Remarks:
When setting SRND, the default setting is OFF.
When setting EQ, the default setting is STANDARD.
MPEG4/MP 3/JPEG PLAYBACK
Load a MP3/JPEG/MPEG4 disc, the appliance will automatically search the folders on the disc, and automatically enter the first
MP3 folder (for folders that contain files in different formats, the first folder that contains files in the same format will be entered)
and playback the first MP3 file in that folder (the highlight will stop on "01:", as illustrated below.)
When playing a JPEG picture disc, you can press CURSOR buttons to toggle between picture slideshowing modes.
When playing a picture, use CURSOR buttons to flip or rotate the picture:
UP button: each pressing flips the picture vertically.
DOWN button: each pressing flips the picture horizontally.
LEFT button: each pressing rotates picture by 90 degrees anticlockwise.
RIGHT button: each pressing rotates picture by 90 degrees clockwise.
ENGLISH
7
4015.qxd 14.06.2005 9:54 Page 7
Page 8

CONNECTIONS
CONNECTING TO A TV
Notes:
• If the TV has a SVIDEO IN jack, connects it to the SVIDEO OUT jack on the player.
• If the TV has a VGA IN jack, connects it to the VGA OUT jack on the player.
• If the TV has COMPONENT VIDEO IN jacks (Y, Cb/Pb, Cr/Pr), connects them to the corresponding Y Cb/Pb Cr/Pr OUT jacks.
• If you'd like to output the audio to the TV, please connect the Left/Right channel output jack on the player to the corresponding
channel input jack on the TV by matching the color of the plugs with the color of the jacks (red for right channel and white for
left).
CONNECTING TO A 2CH AMPLIFIER
You can enjoy the stereo audio effect by connecting the player to a twochannel amplifierandspeakers system.
Please ensure the audio output of the player is set to STEREO.
ENGLISH
8
4015.qxd 14.06.2005 9:54 Page 8
Page 9
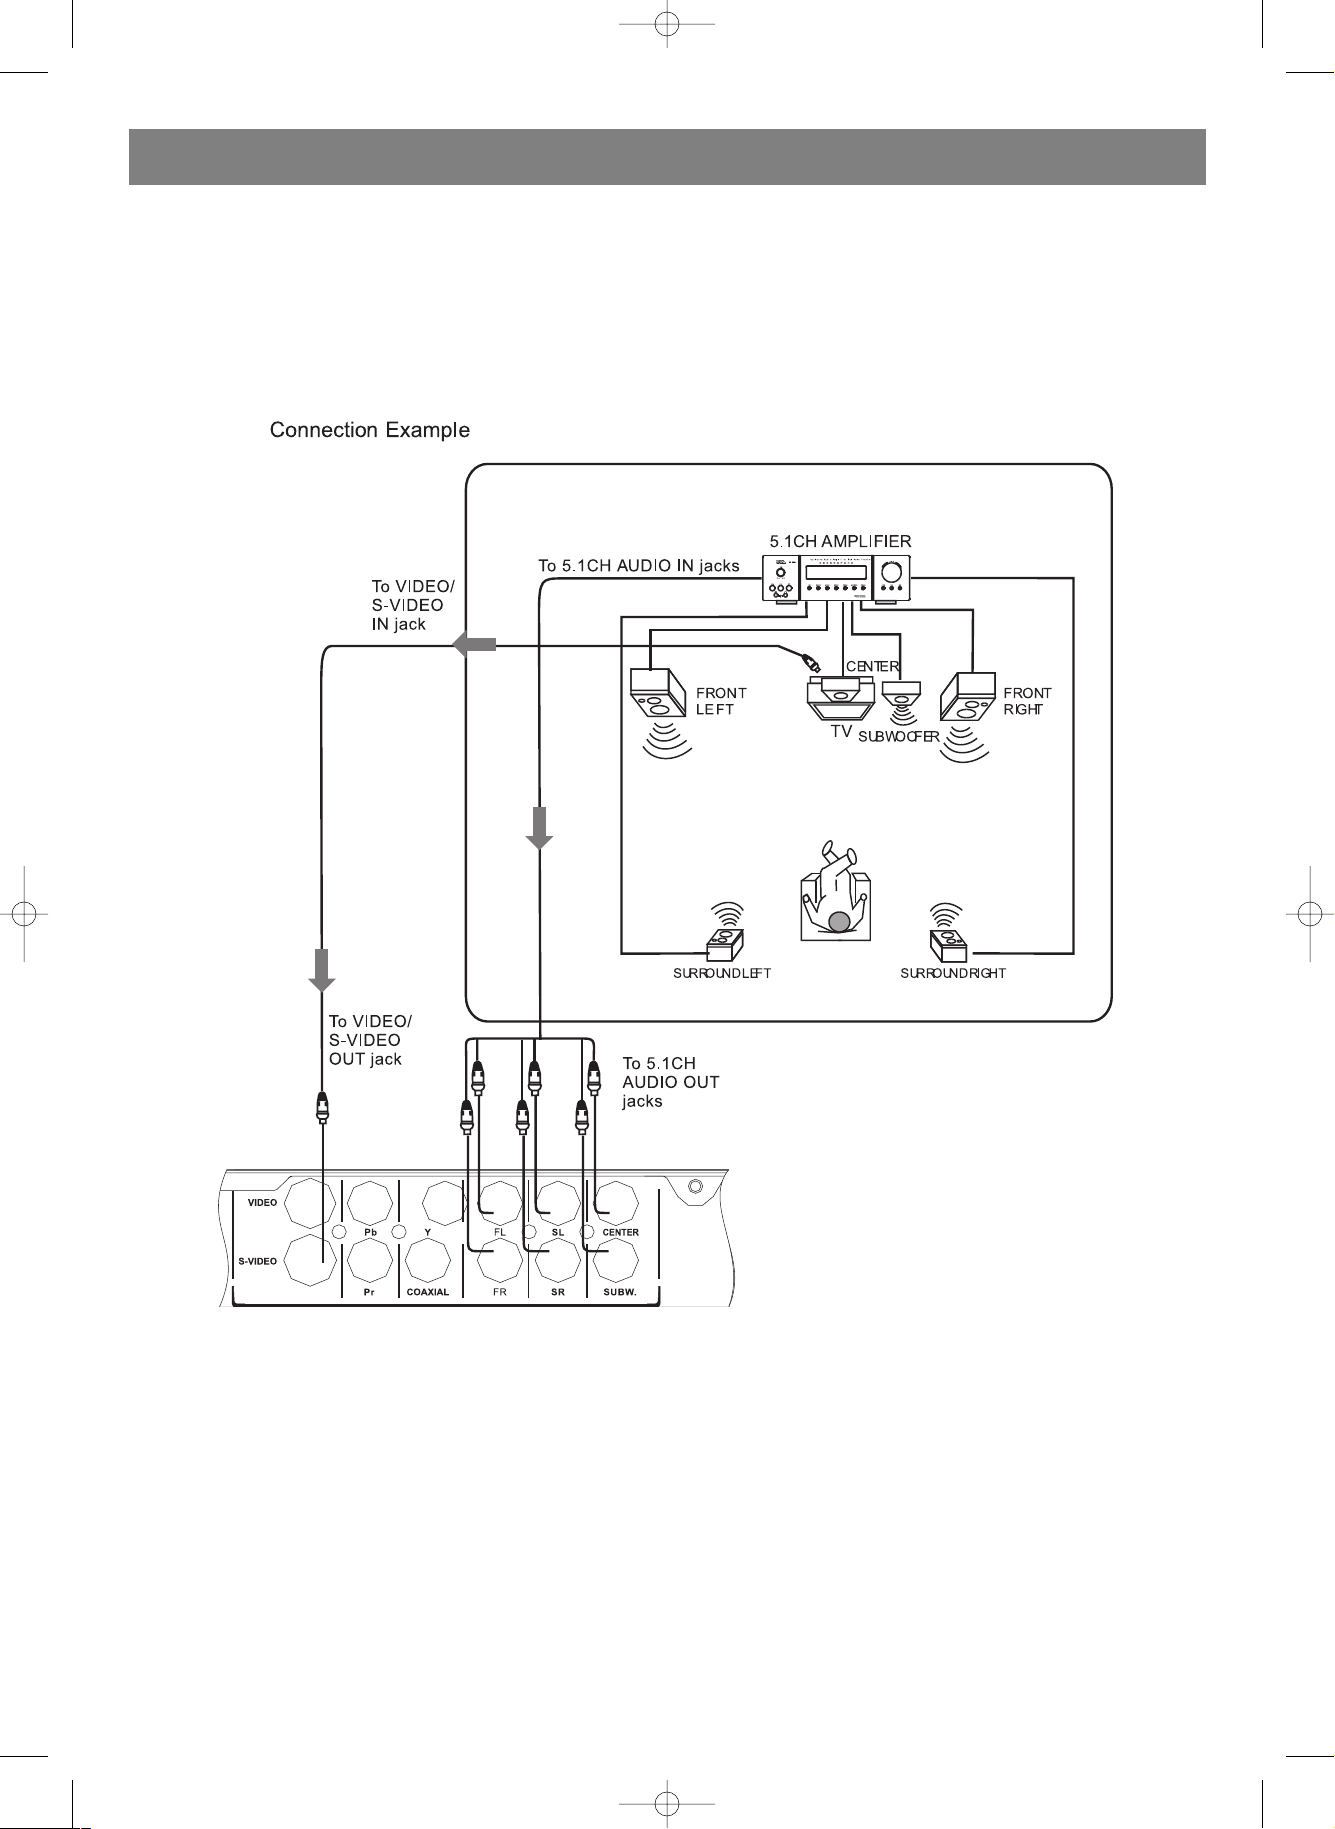
CONNECTING TO AN AMPLIFIER WITH 5.1CH AUDIO INPUT
You can enjoy the real 5.1channel Dolby Digital Audio effect by connecting the player to an amplifierandspeakers system with
5.1ch capability. Please ensure DOWNMIX MODE is set to OFF.
ENGLISH
9
4015.qxd 14.06.2005 9:54 Page 9
Page 10

CONNECTING TO AN AMPLIFIER WITH DOLBY PRO LOGIC DECODER
You can enjoy the Dolby Surround audio effect by connecting the player to an amplifierandspeakers system with Dolby Pro Logic
decoder. Please ensure the audio output of the player is set to LT/RT.
CONNECTING TO AN AMPLIFIER WITH DOLBY DIGITAL DECODER
You can enjoy the completelyreproduced 5.1channel Digital Theatre Systems audio effect by connecting the player to an amplifi
erandspeakers system with Dolby Digital decoder via a coaxial or optical cable. Please ensure the audio output of the player is
set to SPDIF RAW or SPDIF/PCM.
ENGLISH
10
4015.qxd 14.06.2005 9:54 Page 10
Page 11

BASIC SETTING
SETUP MENU
To achieve the best effect of the DVD player, you may
need to perform initial setting according to the content of
the disc and peripheral equipment. Details of all the
adjustable functions will be described later in this chapter,
and this section introduce the SETUP MENU.
1. Press the SETUP button to display the main menu on the TV
screen. When the setup menu is shown, the playback will be
automatically paused.
• Press the SETUP button again to remove the setup menu
from the screen.
• Press OK and the new setting will be saved in memory. The
setting will be effective you switch on the appliance again.
SYSTEM SETUP
TV SYSTEM
According to the color system of the TV the appliance is con
nected to, select the corresponding
TV system for the appliance including AUTO, NTSC, and PAL.
SCREEN SAVER
ON: When this unit is in idle status, such as disc playback is
stopped or paused, or the unit is
waiting for input from the user, and this idle status lasts for 5
minutes, a moving screen saver
logo will appear on the screen for protection.
OFF: Turn off the TV screen protection function.
VIDEO
Select the corresponding video output mode according to what
cables are used to connect the
appliance to the TV set:
SVIDEO: use an svideo cable to connect the appliance to the
TV set.
YPbPr: use component video cables (Y/Pb/Pr) to connect the
appliance to the TV set, and the TV set is set to progressive
scan.
VGA: use a VGA cable to connect the appliance to the TV set or
a computer monitor, and the
TV set is set to progressive scan.
Remarks:
When selecting SVIDEO, you can connect the TV set via the
SVIDEO out jacks on the DVD player.
If the TV set has progressive scan function, use Y/Pb/Pr
mode. The default setting is SVIDEO.
TV TYPE
16:9 (wide screen): select this when connecting to a wide
screen TV set.
4:3LB (letterbox): select this when connecting to a conven
tional TV set. When
playing widescreen picture, a black bar will be placed on top
and bottom portion of the TV screen.
4:3PS (pan & scan): select this when connecting to a conven
tional TV set.
When playing widescreen picture, the left and wide side of the
picture will be cropped to suit the screen.
The default setting is 4:3PS(pan & scan).
Remarks:
The playback effect is related to the disc content, so some
discs may not be played according to your setting.
For 4:3 movie disc, the aspect ratio will be always 4:3
regardless of the setting.
The screen aspect ratio should be related to the TV screen
used.
PASSWORD
The default setting is password locked and the RATING setting
is not available and the password can not be changed. If the
RATING setting needs to be made, you should enter the initial
password:1234 and then press OK. If you need to change the
password, first enter the old password to unlock the password,
and then enter the new one. (The effective password has 4 digits.)
Remaks: The disc tray must be opened to modify the password
or RATING settings.
RATING
When playing a disc with RATING information, you can select
different RATING
settings according to the disc information and your intention.
Remarks:
The discs must contain the RATING information.
The RATING setting will take no effects if the password is
unlocked.
The RATING setting can not be changed until the password
is unlocked.
DEFAULT
Highlight RESTORE to resume the factory setting.
ENGLISH
11
4015.qxd 14.06.2005 9:54 Page 11
Page 12

LANGUAGE SETUP
Remarks: The disc tray must be opened to change the OSD
Language, audio language or subtitle language.
OSD LANGUAGE
Choose a OnScreen Display language including English and
Russian.
AUDIO LANG
Choose an audio language including CHINESE, ENGLISH, JAPAN
ESE, FRENCH, SPANISH, PORTUGUESE, LATIN, GERMAN.
SUBTITLE LANG
Choose a subtitle language including CHINESE, ENGLISH,
JAPANESE, FRENCH, SPANISH, PORTUGUESE, GERMAN and
OFF.
MENU LANG
Choose an menu language including CHINESE, ENGLISH,
JAPANESE, FRENCH, SPANISH, PORTUGUESE, GERMAN and
LATIN.
Remarks:
If the DVD disc does not contain the language you selected,
the appliance will automatically select the default language
of the disc.
To change the AUDIO LANG or SUBTITLE LANG, the unit
must be in stop status.
The default setting of all items in LANGUAGE SETUP is ENG
LISH.
AUDIO SETUP
AUDIO OUT
Select an audio output mode:
SPDIF/OFF: output analog audio, no digital audio will be output
from the coaxial out jack or the optical out jack.
SPDIF/RAW: Select this when the DVD player is connected to
the amplifier through the coaxial or the optical out jack.
When playing a disc that is recorded in Dolby Digital, DTS
and MPEG audio system, the DVD player will output the orig
inal digital signal from the coaxial or the optical out jack.
The amplifier should has Dolby Digital decoding function.
SPDIF/PCM: Select this when the DVD player is connected to a
twochannel stereo digital amplifier. When playing a disc that
is recorded in Dolby Digital, DTS and MPEG audio system,
the DVD player will convert the digital audio into twochannel
PCM format and output through the coaxial or the optical
out jack.
MIC SETUP
ON: The unit will detect the microphone automatically.
OFF: The unit will not detect the microphone.
ECHO
Use cursor buttons (
) to select a proper echo mode.
KEY
Use cursor buttons (
) to move the slider to adjust the
key.
Remarks: The Karaoke functions are only available for Asia
Pacific version.
DOWN SAMPLE
All of these items have two options: 48k and 96k.
VIDEO SETUP
BRIGHTNESS
Use cursor buttons (
) to move the slider to adjust the
brightness of the video output.
CONTRAST
Use cursor buttons (
) to move the slider to adjust the
contrast of the video output.
HUE
Use cursor buttons (
) to move the slider to adjust the
hue of the
video output.
SATURATION
Use cursor buttons (
) to move the slider to adjust the
saturation of the video output.
SPEAKER SETUP
DOWNMIX
LT/RT: select this when the disc contains audio encoded in Pro
Logic system. Such audio signal will be decoded by the DVD
player and regenerate vivid home theater audio effect.
STEREO: for 5.1ch audio, only signals of left channel and right
channel are output; for 2ch audio, normal stereo signals are
output.
VSS: for disc with 5.1ch audio, virtual surround sound is output
through the main channels.
OFF: select this when output 5.1ch audio.
Remarks: Please set DOWNMIX to OFF or use AUDIO MENU to
make the relevant setting when connecting the player to a
5.1CH amplifier.
SUBWOOFER
ON: the appliance automatically detect if there is subwoofer sig
nal, if yes, then output it.
OFF: the appliance will not output subwoofer signal.
BASS MODE
Select your favourite the bass mode including ALL LG SPK, ALL
SM SPK and MIXED SPK.
CENTER DELAY
Adjust the delay time of the center speaker.
REAR DELAY
Adjust the delay time of the rear (surround) speakers.
ENGLISH
12
4015.qxd 14.06.2005 9:54 Page 12
Page 13

DOLBY DIGITAL SETUP
OP MODE
LINE OUT: This mode will output a bigger sound, which suits the
daytime.
RF REMOD: The output will be linear compressed and has a
smaller volume, which suits the quiet night.
DYNAMIC
In Dolby Digital mode, dynamic range compression can reduce
suddenvolume changes by letting you adjust the difference
between soft and loud sounds. With this function, you can enjoy
the surround sound effect while viewing discs in midnight with
out disturbing others.
Ratio of dynamic range compression includes FULL, 6/8, 4/8,
2/4 and OFF.
DUAL MONO
Different setting can be applied to the left and right channel
when audio
output is only twochannel.
STEREO: output left channel audio to left channel and right to
right.
MONOL: output left channel audio to both channels.
MONOR: output right channel audio to both channels.
MIX MONO: mixed left and right channel audio and output to
both channels.
Note: only for discs recorded in Dolby MONO format.
PLAYABLE DISC TYPES/SPECIFICATIONS
Above disc type mark can be found on disc labels or disc jack
ets. CDR and CDRW discs recorded in CD Audio or Video CD
format, or with MP3 audio files, are also playable.
Caution!
• CDR/RW discs recorded using a personal computer may
not play if the disc is damaged or dirty, or if there is dirt or
condensation on the player's lens.
• If you record a disc using a personal computer, there are
cases in which it may not play because of the settings of the
application software used to create the disc. (Check with the
software publisher for more detailed information.)
SPECIFICATIONS
Environment:
working temperature : 0 ~ 40°C
working humidity : 10% ~ 80%
Video:
Color system : PAL/NTSC
DVD horizontal resolution : 500 line
SVCD horizontal resolution : 350 line
VCD horizontal resolution : 250 line
Audio:
Signal to noise : 90 dB
Frequency response : 20 Hz ~ 20 KHz +1 dB
Distortion and noise : 70dB
Dynamic range : > 80dB
Crosstalk : 80dB
Output:
Video output level : 1.0 0.2 Vpp
Audio basic output level : 1.8V
Remotecontrol
effective distance: not less than 6m;
angle : (horizontal/vertical) ±30°C
Power requirement: AC 110240V 50Hz/60Hz
Power consumption: 15W
Dimensions: 430mmx260mmx38mm
Weight: approximately 2.5 kg
ACCESSORIES
Remote control 1
Audio / Video cable 3
AAA dry cell batteries 2
User,s manual 1
ENGLISH
13
4015.qxd 14.06.2005 9:54 Page 13
Page 14

TROUBLESHOOTING
Service life – no less than 7 years.
Guarantee
Details regarding guarantee conditions can be obtained from the dealer from whom the appliance was purchased. The bill of sale
or receipt must be produced when making any claim under the terms of this guarantee.
This product conforms to the EMCRequirements as laid down by the Council Directive 89/336/EEC and to the Low Voltage
Regulation (23/73 EEC)
ENGLISH
14
4015.qxd 14.06.2005 9:54 Page 14
Page 15

DVD проигрыватель
Перед использованием проигрывателя внимательно
прочтите данную инструкцию и сохраните ее для
дальнейшего пользования.
Меры предосторожности
по безопасности
• Во избежание поражения огнем или электрическим
током, не допускайте попадания капель дождя или
жидкости в устройство.
• Данное устройство является лазерным изделием класса
1. Прямое попадание лазерного луча может стать
причиной поражения глаза человека.
• Не открывайте корпус самостоятельно, для сервисного
обслуживания обращайтесь к квалифицированному
персоналу.
• Перед первым включением плеера убедитесь в
соответствии напряжения в электросети: 110240 В,
50/60 Гц.
• При перевозке плеера используйте оригинальную
упаковку производителя.
• В течение длительного времени работы плеера,
температура верхней крышки и задней панели может
существенно нагреваться. Это не является проблемой,
это обычное явление.
• Если Вы не используете плеер, пожалуйста, извлеките
диск и выключите устройство.
• Некоторые виды дисков могут вызвать не стабильную
работу плеера. Если это произойдет, перезагрузите
устройство путем отключения сетевого шнура плеера в
течение нескольких минут.
• Всегда выключайте устройство после каждого
использования.
• Не располагайте DVD плеер вблизи электронных
устройств (телевизора, радио, и т.д.) для избежания
помех влияющих на качество воспроизведения плеера.
• Конденсат может стать причиной повреждения плеера.
Конденсат возникает в следующих случаях:
• Плеер был перенесен из холодных в теплые
условия
• Плеер был помещен в комнату, где работает
отопление или подвергся воздействию работы
кондиционера.
• Плеер был перенесен из комнаты с работающим
кондиционером в комнату с высокой температурой и
влажностью.
• Плеер эксплуатировался в среде с повышенной
влажностью.
• Не используйте плеер в условиях, где образуется
конденсат, поскольку это может вызвать повреждение
внутренних частей плеера.
• Для чистки плеера используйте мягкую сухую ткань.
• Для того, чтобы удалить трудно выводимые пятна с
поверхностей плеера используйте нейтральное
чистящее средство. Смочите ткань, хорошо ее выжмите
и удалите пятна. Не используйте растворители,
содержащие разбавитель или бензин, поскольку это
может стать причиной повреждения плеера.
Изготовлено по лицензии компании Dolby Laboratories.
Символ "Dolby" и двойной символ "D" являются
товарными знаками компании Dolby Laboratories.
Работа с дисками
Разница в формате записи
DVD
Для облегчения управления воспроизведением,
большинство DVD дисков состоит из нескольких частей.
DVD диски обычно делятся на один или несколько
разделов, которые в свою очередь делятся на один или
несколько эпизодов.
Режим выбора альтернативного ракурса изображения.
При просмотре некоторых дисков возможен выбор
альтернативного ракурса изображения сцены (при условии
наличия данной функции на диске).
Многоязыковая поддержка
При просмотре диска возможен выбор языка
воспроизведения (при условии наличия данной функции на
диске).
Выбор языка субтитров
При просмотре диска возможен выбор языка субтитров
(при условии наличия данной функции на диске).
SVCD/VCD/CD
Большинство SVCD/VCD/CD дисков содержит несколько
эпизодов / треков.
MP3/JPEG
MP3 представляет собой сжатый аудио файл с
расширением "*.mp3" или "*.MP3".
JPEG представляет собой сжатый файл изображения с
расширением "*.jpg" или "*.JPEG ".
РУССКИЙ
15
4015.qxd 14.06.2005 9:54 Page 15
Page 16

MPEG4
MPEG4, продолжение технологии MPEG2, является форматом высококачественного изображения с низкой частотой
передачи данных. При поддержке плеером воспроизведения файлов формата MPEG4, качество изображения видео
файлов может приближаться к качеству изображения DVD дисков. Плеер идентифицирует этот тип файлов по
расширению "*.AVI" или "*.avi".
Основные функции
Введение в основные функции плеера.
Данный плеер оснащен новейшим чипомдекодером, который объединяет в одно целое функции видео/аудио
декодирования и системы автоматического управления механизмом. DVD плеер поддерживает многофункциональные
режимы воспроизведения, включая 8 языков звукового сопровождения, 32 языка субтитров и 9 ракурсов камеры.
Устройство совместимо с дисками DVDR/RW, CDR/RW, а также форматами записи данных MPEG1/2/4, DivX, MP3, CD
audio и JPEG.
Плеер имеет следующие характеристики:
• Компактный дизайн
• Поддержка формата MPEG4/DivX
• Встроенный декодер Dolby Digital с шести канальным аудиовыходом
• Цифровой видеодекодер 10 бит/27 МГц 60 МГц с разрешением по горизонтали до 500 линий
• Цифроаналоговый аудиопреобразователь 24 бит/192 Кгц с высококачественным DVD аудиовыходом
• 3D эффект формата Dolby Surround с поддержкой 6ти каналов
• Коаксиальный цифровой аудиовыход, стандартный 6канальный аудиовыход
• Видео разъемы: композитный (RCA), Sвидео, компонентный (Y, Pb, Pr)
• SCART выход
• Функция выбора формата изображения 16:9 и 4:3
• Режимы воспроизведения: повторное, ускоренное воспроизведение вперед/ускоренное воспроизведение назад,
изображение крупным планом/изображение мелким планом, JPEG и другие
• Родительский контроль
• Широкий диапазон допустимых напряжений для питания устройства (110240В, 50/60 Гц)
• Функция "заставка экрана"
• Различные функции поиска аудио, видеофрагментов
РУССКИЙ
16
4015.qxd 14.06.2005 9:54 Page 16
Page 17

Названия и функции
Передняя панель
Задняя панель
РУССКИЙ
17
1. Кнопка включения (POWER).
Нажмите для того, чтобы включить или выключить питание
плеера.
2. Лоток для диска
При загрузке диска, положите диск в лоток стороной
этикеткой вверх.
3. Дисплей
Отражает текущую информацию воспроизведения.
4. Датчик дистанционного управления (ДУ)
Для управления плеером с помощью пульта ДУ, направьте
пульт в сторону датчика.
5. Кнопка извлечения диска (EJECT)
Нажмите для того, чтобы открыть или закрыть лоток для диска.
6. Кнопка воспроизведения/паузы (PLAY/PAUSE)
Нажмите один раз для остановки воспроизведения, нажмите
во второй раз для продолжения воспроизведения
7. Кнопка остановки воспроизведения (STOP)
Во время воспроизведения DVD, нажмите один раз, чтобы
остановить воспроизведение, затем нажмите кнопку
воспроизведения (PLAY/PAUSE)
, чтобы вознобновить
воспроизведение.
8. Кнопка перехода к предыдущему эпизоду/треку (PREV)
9. Кнопка перехода к следующему эпизоду/треку (NEXT)
10. Разъем для подключения микрофона
Используйте для того, чтобы подключить микрофон в режиме
Караоке.
11. Ручка установки громкости микрофона
Поверните, чтобы увеличить/уменьшить уровень громкости
микрофона.
1. Разъем для подключения сетевого шнура
Используется для подключения плеера к сетевой розетке.
2. Композитный видеовыход/ SVideo
Используется для подключения к композитному видеовходу /
SVideo входу телевизора, монитора.
3. Компонентный видеовыход (Y/Pb/Pr)
Используется для получения высококачественного
изображения. Подключите компонентный видеовыход плеера
к компонентному видеовходу телевизора или монитора.
4. Коаксиальный цифровой аудиовыход
Используется для подключения к A/V усилителю или A/V
ресиверу со встроенным декодером. Для этого подключения
необходимо изменить настройки для цифрового аудиовыхода
в МЕНЮ НАСТРОЕК.
5. 5.1CH аудиовыход
Используется для подключения декодированного аудио 5.1 CH
к многоканальному A/V ресиверу или усилителю. Разъемы FL и
FR подключаются к стереовходу двухканального стерео
усилителя с или ресивера.
6. Разъем SCART
Используется для подключения к входному разъему SCART
телевизора.
4015.qxd 14.06.2005 9:54 Page 17
Page 18

Пульт дистанционного управления
РУССКИЙ
18
1. Датчик дистанционного управления
2. Кнопка включения / выключения
3. Кнопка масштабирования изображения (ZOOM)
4. Кнопка просмотра (BROWSE)
5. Кнопки набора цифр
6. Кнопка перехода к предыдущему эпизоду / треку (PREV)
7. Кнопка перехода к следующему эпизоду / треку (NEXT)
8. Кнопка выключения звука (MUTE)
9. Кнопка покадрового воспроизведения (STEP)
10. Кнопка вызова меню настроек плеера (SETUP)
11. Кнопка Воспроизведение / Пауза (PLAY/PAUSE)
12. Кнопка подтверждения ввода (OK)
13. Кнопки перемещения вверх/вниз (UP/DOWN)
14. Кнопка перемещения влево / ускоренное
воспроизведение назад (F.R.)
15. Кнопка вызова меню (MENU)
16.Кнопка выбора раздела диска (TITLE)
17. Кнопка переключения угла ракурса изображения (ANGLE)
18.Кнопка переключения звуковых каналов (AUDIO)
19. Кнопка канала (CHANNEL)
20.Кнопка настройки звука (SOUND)
21. Кнопка открыть / закрыть лоток диска (EJECT)
22.Кнопка повтора воспроизведения (REPEAT)
23.Кнопка поиска (SEARCH)
24.Кнопки установки уровня громкости (VOLUME + )
25.Кнопка остановки воспроизведения (STOP)
26.Кнопка перемещения вправо / ускоренное
воспроизведение вперед (F.F.)
27.Кнопка отображения информации о воспроизведении на
экране ТВ (OSD)
28.Кнопка выбора языка субтитров (SUBTITLE)
29. Кнопка звукового режима 3D
4015.qxd 14.06.2005 9:54 Page 18
Page 19

1. Датчик дистанционного управления
Направьте пульт ДУ в сторону передней панели плеера.
Радиус действия: не более 6 метров. Угол действия:
±30°C .
2. Кнопка включения / выключения
Нажмите кнопку включения / выключения питания
плеера.
3. Кнопка масштабирования изображения (ZOOM)
Нажмите кнопку, чтобы увеличить или уменьшить
размер изображения (3 режима масштабирования).
4. Кнопка просмотра (BROWSE)
Для SVCD и VCD дисков, после остановки
воспроизведения, нажмите кнопку, чтобы просмотреть
содержание диска на экране, состоящем из 9 картинок.
Каждая картинка эпизода будет воспроизводиться в
течение 3 секунд. Нажмите кнопку PREV или NEXT для
перехода к картинке следующего эпизода. Нажмите
кнопку PLAY/PAUSE для начала воспроизведения
выбранного эпизода.
5. Кнопки набора цифр
С помощью кнопок наберите порядковый номер эпизода
/ трека для начала его воспроизведения.
6. Кнопка перехода к предыдущему эпизоду / треку (PREV)
Нажмите кнопку для перехода воспроизведения к
предыдущему эпизоду / треку.
7. Кнопка перехода к следующему эпизоду / треку (NEXT)
Нажмите кнопку для перехода воспроизведения к
следующему эпизоду / треку.
8. Кнопка выключения звука (MUTE)
Нажмите эту кнопку для отключения звука. Символ
отключения звука появится на экране ТВ. Для включения
звука еще раз нажмите кнопку MUTE или одну из кнопок
регулировки уровня громкости VOLUME.
9. Кнопка покадрового воспроизведения (STEP)
Очередное нажатие этой кнопки перемещает
изображение на кадр вперед.
10. Вызов меню настроек плеера (SETUP)
Нажмите кнопку, чтобы получить доступ в меню.
11. Воспроизведение / Пауза (PLAY/PAUSE)
Нажмите кнопку для переключения между режимами
воспроизведения и паузы.
12. Кнопка подтверждения ввода (OK)
Нажмите кнопку, чтобы подтвердить текущую операцию.
13. Кнопки перемещения курсора вверх / вниз (UP/DOWN)
Нажмите кнопку для перемещения курсора вверх / вниз.
14. Кнопка перемещения курсора влево / ускоренное
воспроизведение назад (F.R.)
Нажмите кнопку для перемещения курсора влево /
включения ускоренного воспроизведения назад.
15. Кнопка вызова меню (MENU)
Для дисков VCD 2.0 и более поздних версий, нажмите
кнопку, чтобы включить/выключить управление
воспроизведением. При воспроизведении DVD дисков,
нажмите кнопку для вывода на экран ТВ главного меню
диска.
16.Выбор раздела диска (TITLE)
Для выбора раздела диска нажмите кнопку для вызова
на экран ТВ список разделов диска. Выберите нужный
раздел с помощью кнопок курсора, после чего нажмите
кнопку подтверждения ввода ОК.
Примечание: Данная функция возможна только при
воспроизведении DVD дисков.
17. Выбор альтернативного ракурса изображения (ANGLE)
Нажмите один раз для воспроизведения в текущем
режиме угла ракурса изображения. При
воспроизведении DVD дисков, которые записаны с
различными углами ракурса изображения, нажмите эту
кнопку для переключения различных ракурсов
изображения в течение воспроизведения.
18.Переключение звуковых режимов (AUDIO)
При воспроизведении DVD дисков нажмите кнопку для
выбора режима аудио воспроизведения. Выбранный
аудио режим будет отображен на экране ТВ. При
воспроизведении CD/MP3 дисков, нажатием данной
кнопки выберите один из аудио каналов.
Примечание: При воспроизведении VCD дисков
содержащих два или более языков звукового
сопровождения выберите нужный язык нажатием
данной кнопки.
19. Канал (CHANNEL)
Нажмите эту кнопку для переключения между
различными каналами выхода аудио.
Примечание: Только для VCD дисков. Когда лоток для
дисков открыт, нажатие этой кнопки приведет к
переключению между различными режимами видео
выхода.
20.Звук (SOUND)
Нажмите эту кнопку для выбора звуковых эффектов.
21. Открыть / закрыть лоток диска (EJECT)
Нажмите эту кнопку, чтобы открыть или закрыть лоток
для диска.
22.Повтор воспроизведения (REPEAT)
Для DVD дисков, нажмите эту кнопку для выбора
повтора воспроизведения раздела / эпизода.
Для всех остальных дисков, нажмите кнопку для выбора
повтора воспроизведения трека / диска.
23.Поиск (SEARCH)
Эта функция позволяет начать воспроизведение с
желаемого момента воспроизведения диска. Нажмите
кнопку SEARCH для отображения меню поиска на экране
ТВ. С помощью кнопок курсора или кнопок набора цифр
выберите нужный номер раздела / эпизода / трека или
временную отметку на диске. Для подтверждения
выбора нажмите кнопку OK.
Примечание: Данная функция невозможна при
воспроизведении дисков формата MP3.
24.Уровень громкости (VOLUME)
Нажмите кнопку VOL+ для увеличения уровня громкости
или нажмите кнопку VOL для понижения уровня
громкости. При воспроизведении DVD дисков, в случае
установки аудио выхода в режиме SPDIF/RAW, кнопки
регулировки уровня громкости (VOL+/) не работают.
25.Кнопка остановки воспроизведения (STOP)
Нажмите кнопку один раз, после чего нажмите кнопку
PLAY/PAUSE для возобновления воспроизведения с
момента остановки. Если нажать эту кнопку дважды
воспроизведение начнется с начала диска.
Примечание: При воспроизведении VCD 2.0 и SVCD
дисков, с включенным управлением воспроизведения,
нажатие этой кнопки вернет в исходное меню диска.
26.Кнопка перемещения курсора вправо / ускоренное
воспроизведение вперед (F.F.)
Нажмите кнопку для перемещения курсора вправо /
ускоренного воспроизведения вперед.
РУССКИЙ
19
4015.qxd 14.06.2005 9:54 Page 19
Page 20

27.Кнопка отображения информации о воспроизведении на экране ТВ (OSD)
Нажмите, чтобы узнать текущую информацию о воспроизведении диска, включая информацию о разделе / эпизоде /
треке.
28.Кнопка выбора языка субтитров (SUBTITLE)
Для DVD и SVCD дисков, на которых записана информация по субтитрам, нажмите эту кнопку, чтобы выбрать
желаемый язык субтитров.
29. Кнопка звукового режима 3D
Нажмите кнопку для появления меню настройки звука объемного звучания Dolby Surround после чего, используя
кнопки курсора, установите желаемый эффект звучания. Еще раз нажмите кнопку 3D для удаления с экрана ТВ меню
настройки.
Воспроизведение файлов MPEG4/DivX/MP3/JPEG
Установите диск с файлами в формате MPEG4/ DivX/MP3/JPEG, устройство автоматически найдет содержимое диска и
отобразит список файлов, как показано на рисунке.
При воспроизведении диска с картинками в формате JPEG нажимайте кнопки курсора для переключения между
различными режимами показа изображения:
Кнопка курсора вверх при каждом нажатии переходите к изображению очередной картинки в вертикальном направлении
Кнопка курсора вниз при каждом нажатии переходите к изображению очередной картинки в горизонтальном
направлении
Кнопка влево каждое нажатие кнопки переворачивает картинку на 90° против часовой стрелки
Кнопка вправо каждое нажатие кнопки переворачивает картинку на 90° по часовой стрелке.
РУССКИЙ
20
4015.qxd 14.06.2005 9:54 Page 20
Page 21

Подключение плеера
Подключение к телевизору
Примечание:
• Если в Вашем телевизоре есть разъем SVideo входа, подключите его к разъему Sвидео выхода плеера с помощью
специального кабеля
• Если в Вашем телевизоре есть разъем SCART, подключите его к разъему SCART плеера с помощью специального
кабеля
• Если в Вашем телевизоре есть разъем компонентного видео входа, подключите его к разъему Y, Cb/Pb, Cr/Pr видео
выхода плеера с помощью специального кабеля
• При подключении аудио к телевизору / усилителю, соедините разъемы левого / правого каналов аудио выхода плеера
с соответствующими разъемами аудио входов телевизора соблюдая цвет штекера кабеля с цветом входных разъемов
устройства (красный для правого канала, белый для левого канала)
Подключение к 2канальному усилителю.
При подключении к 2канальному аудио усилителю убедитесь в том, что настройки аудио выхода плеера находятся в
режиме СТЕРЕО (STEREO).
РУССКИЙ
21
4015.qxd 14.06.2005 9:54 Page 21
Page 22

Подключение к усилителю с 5.1 канальным аудио входом
При подключении к 6канальному (5.1) аудио усилителю убедитесь в том, что в настройках аудио выхода отключен режим
МИКШИРОВАНИЯ (DOWNMIX).
РУССКИЙ
22
4015.qxd 14.06.2005 9:54 Page 22
Page 23

Подключение к аудио усилителю с декодером Dolby Pro Logic
При подключении к 2канальному аудио усилителю с декодером Dolby Pro Logic убедитесь в том, что настройки аудио
выхода плеера находятся в режиме LT/RT.
Подключение к усилителю с декодером Dolby Digital
При подключении плеера к 6канальному (5.1 CH.) к аудио усилителю со встроенным декодером Dolby Digital через
коаксиальный кабель убедитесь в том, что в настройках аудио включен режим цифрового аудио выхода SPDIF/RAW или
SPDIF/PCM.
РУССКИЙ
23
4015.qxd 14.06.2005 9:54 Page 23
Page 24

Основные настройки
Меню настроек
Для наилучшей работы плеера необходимо настроить
первоначальные установки в соответствии с
содержимым диска, а также в соответствии с
характеристиками периферийных устройств. Детали
всех настраиваемых функций будут описаны ниже в
этой главе.
1. Нажмите кнопку меню настроек SETUP, на экране
телевизора появится основное меню настроек плеера.
• Нажмите кнопку ОК для сохранения выбранных
настроек.
• Нажмите кнопку SETUP для удаления меню настроек с
экрана телевизора.
ОБЩИЕ НАСТРОЙКИ
Тип ТВ
В соответствии с системой телевизора, к которому
подключен плеер, выберите соответствующую систему
видео выхода плеера (AUTO, NTSC или PAL).
Заставка экрана
Включена: Когда плеер находится в режиме ожидания,
например, воспроизведение с диска остановлено или
нажата пауза, по истечении 5 минут, то для защиты экрана
телевизора, на экране появится движущаяся заставка с
логотипом.
Выключена: Выключена функция заставки экрана.
Видео выход
Выберите соответствующий режим видео выхода плеера в
зависимости от способа подключения к телевизору /
монитору:
Sвидео: используйте SVideo кабель для подключения
плеера к телевизору.
Видео выход YPbPr: используйте компонентные видео
кабели (Y/Pb/Pr) для подключения плеера к телевизору /
монитору в режиме чересстрочной или прогрессивной
развертки.
Формат экрана
16:9 (широкоформатный экран): Выберите этот режим при
подключении к телевизору с соотношением сторон
экрана 16:9.
4:3 LB: Выберите этот режим при подключении к
телевизору с соотношением сторон экрана 4:3. При
воспроизведении широкоформатных фильмов, на
экране сверху и снизу появятся черные поля.
4:3 PS: Выберите этот режим при подключении к
телевизору с соотношением сторон экрана 4:3. При
воспроизведении широкоформатных фильмов стороны
изображения будут соответствовать соотношению
сторон экрана телевизора.
Пароль
По умолчанию функция пароля блокирована, настройка
параметров не доступна, и пароль не может быть изменен.
Если Вам необходимо изменить параметры настроек
следует ввести пароль (заводская установка): 1234, и
нажать кнопку ОК. Если Вам необходимо изменить пароль,
сначала введите старый пароль для получения доступа к
изменению пароля, после чего введите новый пароль (не
менее 4 цифр).
Примечание: Лоток для диска должен быть открытым при
изменении пароля или установки настроек.
Родительский контроль воспроизведения диска:
Перед воспроизведением диска с информацией о
возрастной категории зрителя, установите
соответствующую возрастную категорию. Диски с
возрастной категорией превышающей выше установленную
категорию воспроизводиться не будут.
Заводские настройки
Выбор восстановления заводских установок плеера.
ВЫБОР ЯЗЫКА
Примечание: Для выбора языка меню, языка звукового
сопровождения и языка субтитров лоток для диска должен
быть в открытом состоянии.
Язык меню
Выберите язык меню (русский, английский и т.д.).
Язык звукового сопровождения
Выберите язык звукового сопровождения (русский,
английский и т.д.).
Язык субтитров
Выберите язык субтитров (русский, английский и т.д.).
Язык меню настроек
Выберите язык меню настроек (русский, английский и т.д.).
Примечание:
Если DVD диск не содержит выбранный Вами язык, то
устройство автоматически выберет основной язык
звукового сопровождения диска.
Для выбора языка звукового сопровождения или языка
субтитров устройство должно находиться в режиме
ожидания / остановки.
РУССКИЙ
24
4015.qxd 14.06.2005 9:54 Page 24
Page 25

НАСТРОЙКА АУДИО
Аудио выход
Выберите режим работы аудио выхода.
SPDIF/OFF: Аналоговый аудио выход, цифровой звук не
подается на разъем коаксиального выхода.
SPDIF/RAW: Выберите данный режим для подключения
плеера к усилителю или ресиверу через коаксиальный
цифровой аудио выход. При воспроизведении диска с
аудио в формате Dolby Digital / DTS плеер конвертирует
цифровой многоканальный аудио выход в формат
потока данных RAW с выходом на коаксиальный разъем.
Декодер усилителя должен поддерживать функцию
декодирования звукового формата Dolby Digital / DTS.
SPDIF/PCM: Выберите данный режим при подключении
плеера к двух канальному усилителю или ресиверу
через коаксиальный аудио выход. При воспроизведении
диска с аудио в формате Dolby Digital / DTS, плеер
конвертирует цифровой аудио выход в двухканальный
формат потока данных PCM с выходом на коаксиальный
разъем.
Настройка микрофона
ON: Плеер автоматически определит подключение
микрофона.
OFF: Плеер не определит подключение микрофона.
Функция звучания микрофона "Эхо"
Используя кнопки курсора вверх/вниз выберите "эхо"
эффект звучания микрофона.
Функция изменения тона музыкального
сопровождения
Используя кнопки перемещения курсора вверх / вниз
измените тон музыкального сопровождения.
Частота дискретизации выхода аудио
Используя кнопки перемещения курсора вверх / вниз
выберите частоту дискретизации аудио выхода (48К или
96К).
НАСТРОЙКА ВИДЕО
Настройка яркости изображения
Используя кнопки перемещения курсора вверх/вниз,
выберите желаемую яркость изображения.
Настройка контрастности изображения
Используя кнопки перемещения курсора вверх/вниз,
выберите желаемый контраст изображения.
Настройка цветового баланса изображения
Используя кнопки перемещения курсора вверх/вниз,
выберите желаемый цветовой баланс изображения.
Настройка насыщенности изображения
Используя кнопки перемещения курсора вверх/вниз,
выберите желаемую насыщенность изображения.
НАСТРОЙКА КОЛОНОК
Микширование
Левый / Правый (LT/RT) аудио каналы: Выберите этот
режим при подключении к аудио усилителю в режиме
объемного звучания Dolby Pro Logic.
Стерео (STEREO): Выберите этот режим при подключении к
аудиоусилителю/телевизору в режиме стерео.
VSS: Выберите этот режим для воспроизведения дисков с
5.1 канальным аудио сопровождением в режиме
виртуального объемного звучания.
ВЫКЛ.: Выберите этот режим при подключении к 5.1
канальному усилителю.
Сабвуфер
ВКЛ.: включение подачи аудио сигнала на сабвуфер.
ВЫКЛ.: выключение подачи аудио сигнала на сабвуфер.
Функция усиления басов
Выберите уровень подачи басов путем выбора размера
используемых колонок усилителя (большие или малые).
Задержка центральной колонки
Установите время звуковой задержки центральной колонки.
Задержка задних колонок
Установите время звуковой задержки задних колонок.
НАСТРОЙКА DOLBY DIGITAL
Режимы воспроизведения (OP Mode)
Линейный выход (Line out): в этом режиме звук выводится
более громко, для прослушивания в дневное время.
RF remod: режим компрессии звукового сигнала для более
низкого уровня громкости, который подойдет для
прослушивания в ночное время.
Регулировка динамического диапазона
В режиме воспроизведения дисков содержащих звуковое
сопровождение в формате Dolby Digital изменение
динамической шкалы сжатия может регулировать резкое
изменение уровня громкости, позволив уменьшить /
увеличить разницу между низким и высоким уровнями
громкости звуковой сцены.
Режим двойное моно
В стерео режиме могут использоваться различные
настройки для левого и правого канала:
СТЕРЕО: выводит сигнал левого аудио канал в левый канал,
а правый в правый.
МОНОлевый: выводит сигнал левого аудиоканала в оба
канала.
МОНОправый: выводит сигнал правого аудиоканала в оба
канала.
Смешанный МОНО: выводит смешанный сигнал левого и
правого аудио каналов в оба канала.
Примечание: Только для дисков записанных в формате
Dolby Digital.
РУССКИЙ
25
4015.qxd 14.06.2005 9:54 Page 25
Page 26

ТИПЫ ВОСПРОИЗВОДИМЫХ ДИСКОВ
Вы можете найти маркировку перечисленных дисков на их упаковке.
Плеер может воспроизводить диски CDR/RW в качестве носителей аудио / видео форматов, включая формат МР3.
Внимание!
• Возможно отсутствие воспроизведения в случае выполнения записи на CDR/ RW диске с использованием
персонального компьютера или в случае попытки воспроизведения поврежденного / загрязненного диска.
• Возможно отсутствие воспроизведения в случае выполнения записи диска при помощи персонального компьютера с
использованием различных установок программного обеспечения.
КОМПЛЕКТ ПОСТАВКИ
• Пульт дистанционного управления 1
• Аудио / видео кабель 1
• Батарейки типа "ААА" 2
• Руководство по эксплуатации 1
Срок службы прибора не менее 7'и лет
РУССКИЙ
26
Виды и маркировка дисков
DVD видео
SVCD
VCD
CD
MP3
MPEG4
DivX
Диметр/стороны воспроизведения
DVD видео
12 см односторонний
1 слой
2 слой
12 см односторонний 1 слой
2 слой
DVD видео
8 см односторонний 1 слой
2 слой
8 см односторонний 1 слой
2 слой
SVCD
12 см односторонний
8 см односторонний
VCD
12 см односторонний
8 см односторонний
CD
12 см односторонний
8 см односторонний
MP3 диски
12 см односторонний
MPEG4
12 см односторонний
DivX
12 см односторонний
Характеристики диска и время
воспроизведения
Цифровой звук, цифровое видео,
MPEG2, видео + звук
135 мин
270 мин
270 мин
540 мин
Цифровой звук, цифровое видео,
MPEG2, видео + звук
45 мин
70 мин
83 мин
152 мин
Цифровой звук, цифровое видео,
MPEG2, 1/2, 2/3, видео + звук
40 мин
10 мин
Цифровой звук, цифровое видео,
MPEG1, видео + звук
74 мин
20 мин
Сжатый цифровой звук
74 мин
20 мин
Сжатый цифровой звук
до 170 песен, 12 часов
Цифровой звук, цифровое видео,
MPEG4, видео + звук
135 мин.
Цифровой звук, цифровое видео,
DivX, видео + звук
более 135 мин.
4015.qxd 14.06.2005 9:54 Page 26
Page 27

РУКОВОДСТВО ПО УСТРАНЕНИЮ НЕИСПРАВНОСТЕЙ
ТЕХНИЧЕСКИЕ ХАРАКТЕРИСТИКИ
Производитель оставляет за собой право изменять характеристики прибора без предварительного
уведомления.
Данное изделие соответствует всем требуемым европейским и российским стандартам безопасности и гигиены.
Производитель: АНДЕР ПРОДАКТС ГмбХ, Австрия
Йеневайнгассе, 10/10, 1210, Вена, Австрия
РУССКИЙ
27
Условия использования:
рабочая температура : 0 ~ 40°C
рабочая влажность помещения: 10% ~ 80%
Видео:
Система цвета : PAL/NTSC
Горизонтальное разрешение DVD: 500 линий
Горизонтальное разрешение SVCD: 350 линий
Горизонтальное разрешение VCD: 250 линий
Аудио:
Соотношение сигнал/шум: 90 дБ
Полоса воспроизводимых частот: 20 Гц ~ 20 кГц +1 дБ
Искажение и шум: 70 дБ
Динамический диапазон: > 80 дБ
Разделение каналов: 80 дБ
Выход:
Уровень видеовыхода: 1.0 0.2 Vpp
Уровень основного аудиовыхода: 1.8 В
Пульт ДУ
зона действия ДУ: не менее 6 м;
угол (горизоньтальн.вертик.): ±30°C
Требования к сети: AC 110240 В
50 Гц/60 Гц
Потребляемая энергия: 15 В т
Размеры: 430x260x38 мм
Вес: около 2.5 кг
4015.qxd 14.06.2005 9:54 Page 27
Page 28

4015.qxd 14.06.2005 9:54 Page 28
 Loading...