

Page 1

CD/MP3 RADIO
CASSETTE RECORDER
MODEL VT-3476
3
16
www.vitek-aus.com
3476.qxd 01.04.2005 22:13 Page 1
Page 2
TOP
ВИД СВЕРХУ
FRONT
ВИД СПЕРЕДИ
REAR
ВИД СЗАДИ
3476.qxd 01.04.2005 22:13 Page 2
Page 3
MP3 CD RADIO CASSETTE RECORDER
MODEL VT-3476
Please read these instructions carefully before
using this product. After you have finished reading these instructions, store this device and the
warranty in an easy to access place.
IMPORTANT NOTES
Save these instructions for future use.
Do not install the device:
• In locations subjected to direct sunlight or near
electric heating devices.
• On sound or video equipment that emit large
amounts of heat.
• In poorly ventilated or dusty rooms.
• In locations with constant vibrations.
• In locations with a tendency for moisture.
Make sure that the ventilation openings are not
blocked by foreign objects.
Use the control buttons and remote control unit
according to the instructions. Before turning the
system on for the first time, make sure that the
power cord is connected according to these
instructions.
Store audiocassettes and compact discs in normal conditions, avoiding excessive heat and
cold.
For safety purposes, do not try to remove the
cover and reach into the device.
Refer to an authorized service center for repair.
There are no user-serviceable parts inside.
In order to avoid the risk of electric shock, do
not place the device near sources of increased
humidity. Place the device in places with good
ventilation.
DANGEROUS VOLTAGE
Dangerous voltage levels in the power cord may
cause electrical shock.
ATTENTION!
RISK OF ELECTRIC SHOCK
ATTENTION: IN ORDER TO AVOID
THE RISK OF ELECTRIC SHOCK,
DO NOT REMOVE THE LID OF REAR
PANEL OF THE SYSTEM.
Attention
User instructions contain important information
regarding the use and care of the device. Refer
to these instructions if you have any questions
regarding the use of the system.
Attention: to avoid sparks or short circuits, do not
place the device in locations where moisture
collects.
WARNING
SHOULD THIS DEVICE OPERATE INCORRECTLY OR MALFUNCTION STOP USE
IMMEDIATELY.
Continuing use in the following circumstances
may cause fire or electric shock. Switch off the
power to the device with the function switch,
unplug the power cord from the wall outlet and
bring the device to the point of purchase for
repairs.
• Smoke, a strange odor or noise is emitted from
the device. (Equipment malfunction)
Check that the smoke has stopped and bring
the device to the point of purchase for repairs.
Do not attempt to do the repairs yourself.
• Water gets into the device.
• A foreign object gets into the device.
• No sound can be heard. (Malfunction)
• You drop the device or crack the case.
• Do not disassemble.
Do not disassemble or alter this device. Fire or
electric shock may result. Ask the dealer where
you purchased the product to inspect, adjust or
repair the interior of this device.
Do not place anything containing water on top of
the device.
Water entering the device may result in fire or
electric shock.
• Do not get the device wet.
Avoid getting the device wet. Fire or electricshock may result.
Do not use the device in or near the bath, near
any water, or in the rain.
• Do not put foreign objects into the device.
Do not insert or force metal or flammable
objects into the vents, disc tray or cassette door.
(Be especially watchful when children are
around the device.) Fire or electric shock may
result.
• Do not damage the power cord.
The power cord may be damaged if not used as
originally intended. Do not do any of the following.
Place heavy objects on top of the power cord.
Modify or extend the power cord.
Forcefully bend the power cord.
Twist or pull the power cord.
Place the power cord near hot objects.
If the power cord is damaged, replace it at
your local dealer. Continuing to use a damaged power cord will result in fire or electric
shock.
• Precautions when connecting the power
cord.
ENGLISH
3
3476.qxd 01.04.2005 22:13 Page 3
Page 4

Always adhere to the below. Misuse of the
power cord can cause it to heat up and cause a
fire.
• Securely connect the power cord to a wall outlet. Do not use the device when the power cord
is not securely connected.
• Do not use the power cord while it is wound.
• Do not use the power cord with other power
cords in a multiple jack outlet.
• Regularly inspect the power cord prongs.
Regularly remove the power cord from the outlet
and wipe any dust or dirt from the prongs.
Accumulated dust can cause an electrical short
or overheating and a fire may result.
• Do not place the device flush against the
wall.
Always place the device at least 10 cm (4 in.)
away from a wall. Additionally, leave some space
between the device and other devices. When
placing the device on a shelf, leave a gap of at
least 10 cm (4 in.) away from the wall or the ceiling. If there is no gap, the interior of the device
will overheat and may result in a fire.
• Do not look at the laser light.
Looking directly into a laser may result in eye
damage
• Do not obstruct the vents.
If you obstruct the vents, the device may overheat and may result in a fire. There are vents on
the back and bottom of the device. Avoid the
following.
Place the device facing upwards, on its side or
upside down.
Place the device in an area with poor air circulation such as in a closet or box.
Place a table cloth, rug or blanket over the
device.
• Use in thunderstorm conditions.
When using the device outside, fold down the
antenna and move to a safe location. A lightening strike may occur otherwise.
• Do not use at any voltage other than 110127V or 220-240 V.
Do not use this device at any voltage other than
the voltage displayed (110-127 V or 220-240 V).
Fire or electric shock may result.
• Do not attempt to charge the batteries.
The batteries may rupture or leak fluid causing
fire, injury or damage.
• Do not use different type of batteries together,
such as alkaline batteries and manganese dry
batteries, or old and new batteries together.
The batteries may rupture or leak fluid causing
fire, injury or damage.
• Do not use the device in the bath or shower.
Do not use the device in highly humid places
such as the bath or shower. Fire or electric
shock may result.
• Caution when unplugging the power cord.
Do not touch the power cord with wet hands.
Electric shock may result.
Always hold the plug when unplugging the
power cord. Pulling the cord itself to unplug the
power cord may damage it and may also result
in fire or electric shock.
• Caution in placing the device.
Do not place the device in a humid or dusty
environment, or in a place where smoke or
steam can enter the device. Fire or electric
shock may result.
Do not leave the device in a car with the windows shut, in direct sunlight or in a place of high
humidity. Fire or malfunction may result.
• Do not place the device in an unsteady
place.
Do not place the device in an unsteady place or
on a high shelf. The device may fall and cause
injury.
Do not place heavy objects on the device.
The object may topple over causing injury.
• Cautions when carrying the device.
Remove the disc. Turn off the power, unplug the
power cord from the outlet, and check that there
are no external connections before carrying.
Damaging the cord may result in fire or electric
shock.
Fold down the rod antenna. Leaving the antenna
extended while carrying may cause it to scratch
or hit someone causing injury.
Do not put your hand in the disc or cassette
entry port.
You may injure yourself. (Be especially watchful
when children are around the machine.)
• Do not use deformed or cracked discs.
Do not use any deformed or cracked discs, or
discs repaired with glue. Discs spin at high
speed inside the device.
Disc fragmentation may cause injury.
Additionally do not use discs with glue remaining
on them from cellophane tape or rental CD
labels.
• Caution with headphone volume.
Avoid raising the volume too much. Listening to
loud sounds for extended periods of time can
damage your hearing.
ENGLISH
4
3476.qxd 01.04.2005 22:13 Page 4
Page 5

Do not hold a credit card close to the speakers.
The speakers produce a strong magnetic field.
Do not place clocks, credit cards, magnetic
commuting passes, cassette tapes and video
tapes near the speakers. The data on such
media may be lost.
CAUTION
• Cautions in maintenance after not using the
device for a long time.
To be safe unplug the power cord from the wall
outlet.
• Cleaning the interior of the device.
Inquire to your local dealer regarding cleaning
the interior of the device. When you allow dust to
collect in the interior of the device for a long
time, fire or malfunction may result.
• Precautions for battery use.
If you misuse the batteries they may rupture or
leak fluid causing fire, injury or damage. Adhere
to the following.
Do not use any battery size other than D-size.
Insert the batteries in the correct direction
according to the diagram on the device.
• Do not use different types of batteries.
Do not use old and new batteries in the device at
the same time.
Do not attempt to charge, heat or disassemble
the batteries. Do not place the batteries in fire or
water. Do not short circuit the battery.
Remove the batteries when not using the device
for one month or longer.
If any fluid leaks from the batteries into the case,
wipe clean before inserting new batteries.
Should you get any fluid on your skin, wash
thoroughly with water.
Always Check!
When recording or playing something important,
always check that you can record and play properly before you start Copyright Issues
Songs, lyrics and tunes broadcast, on CD,
records or other media (cassette tapes, karaoke
tapes) are protected under copyright laws.
Therefore, when selling, distributing, giving or
loaning to another, or using for the purpose of
sales (background music in a store) a tape you
have recorded, the consent of the copyright
holder must first be received.
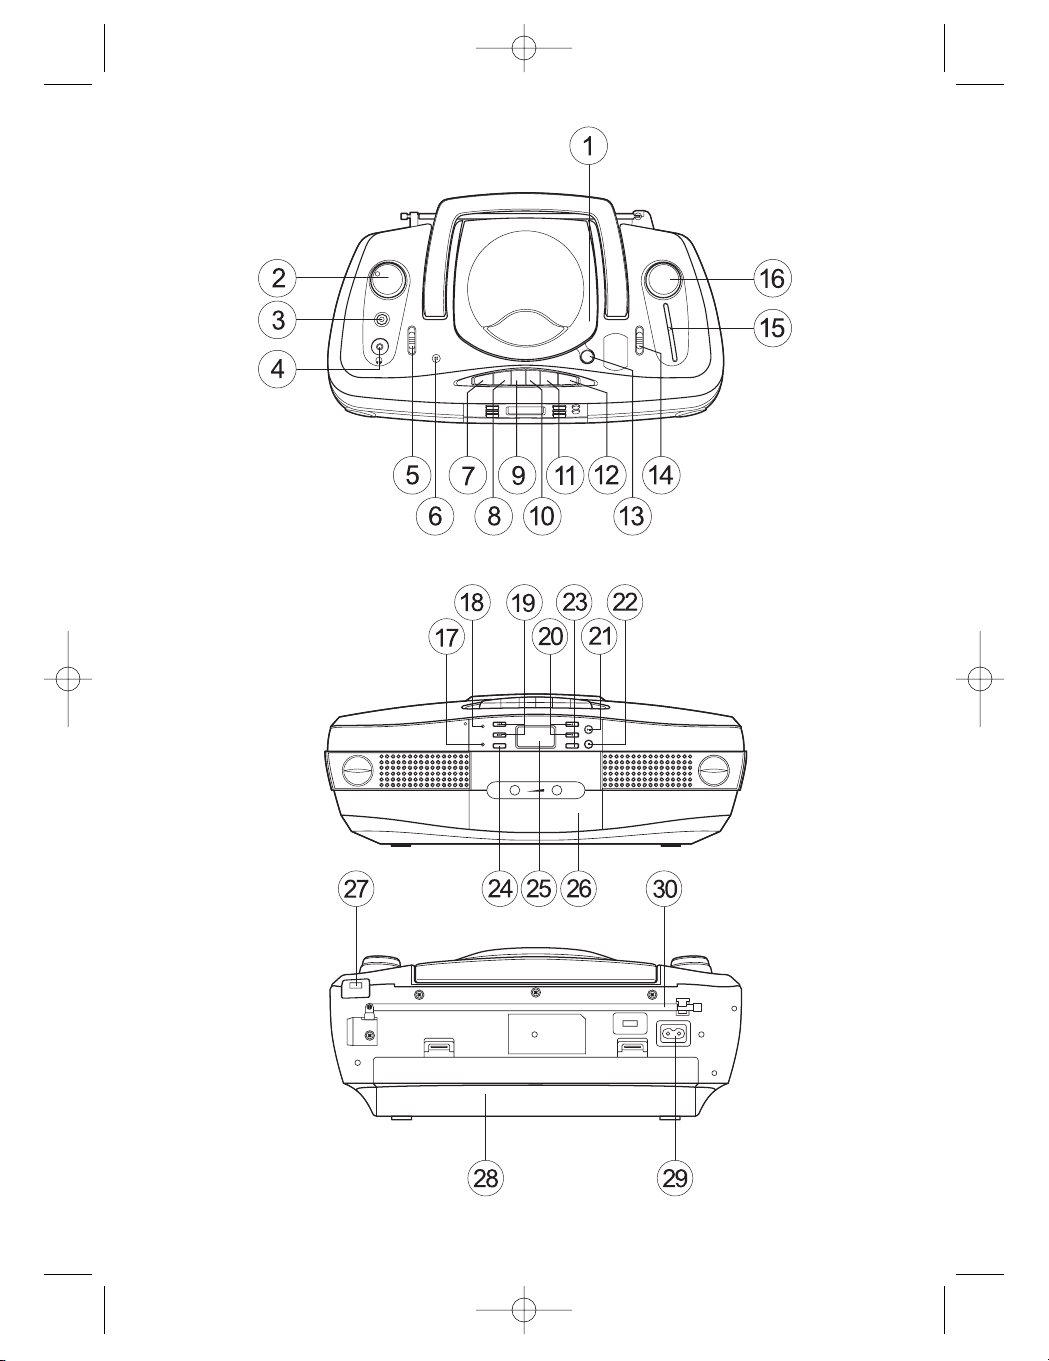
DEVICE DIAGRAM
TOP
1. CD door Push Close
2. VOLUME dial
3. BASS switch
4. Phones jack
5. FUNCTION switch
6. Internal Microphone
7. PAUSE button ( II )
8. STOP/EJECT button (/)
9. F.F button ()
10.REW button ()
11.PLAY button ()
12.RECORD button ()
13.OPEN button
14.BAND switch
15.BAND/FREQUENCY display
16.TUNER dial
FRONT
17.FM STEREO lamp
18.POWER lamp
19.SEARCH/SKIP buttons (/)
20.FOLDER buttons (/)
21.PLAY/PAUSE buttons (/II)
22.STOP button ()
23.REPEAT button
24.PROGRAM button
25.Display
26.Cassette door
• The display screen use here is for example purposes only and may differ from the actual display screen.
REAR
27. BEAT CANCEL switch (1/2, FM ST/MONO)
28. Battery cover
29. AC power input terminal (AC INPUT)
30. Rod antenna
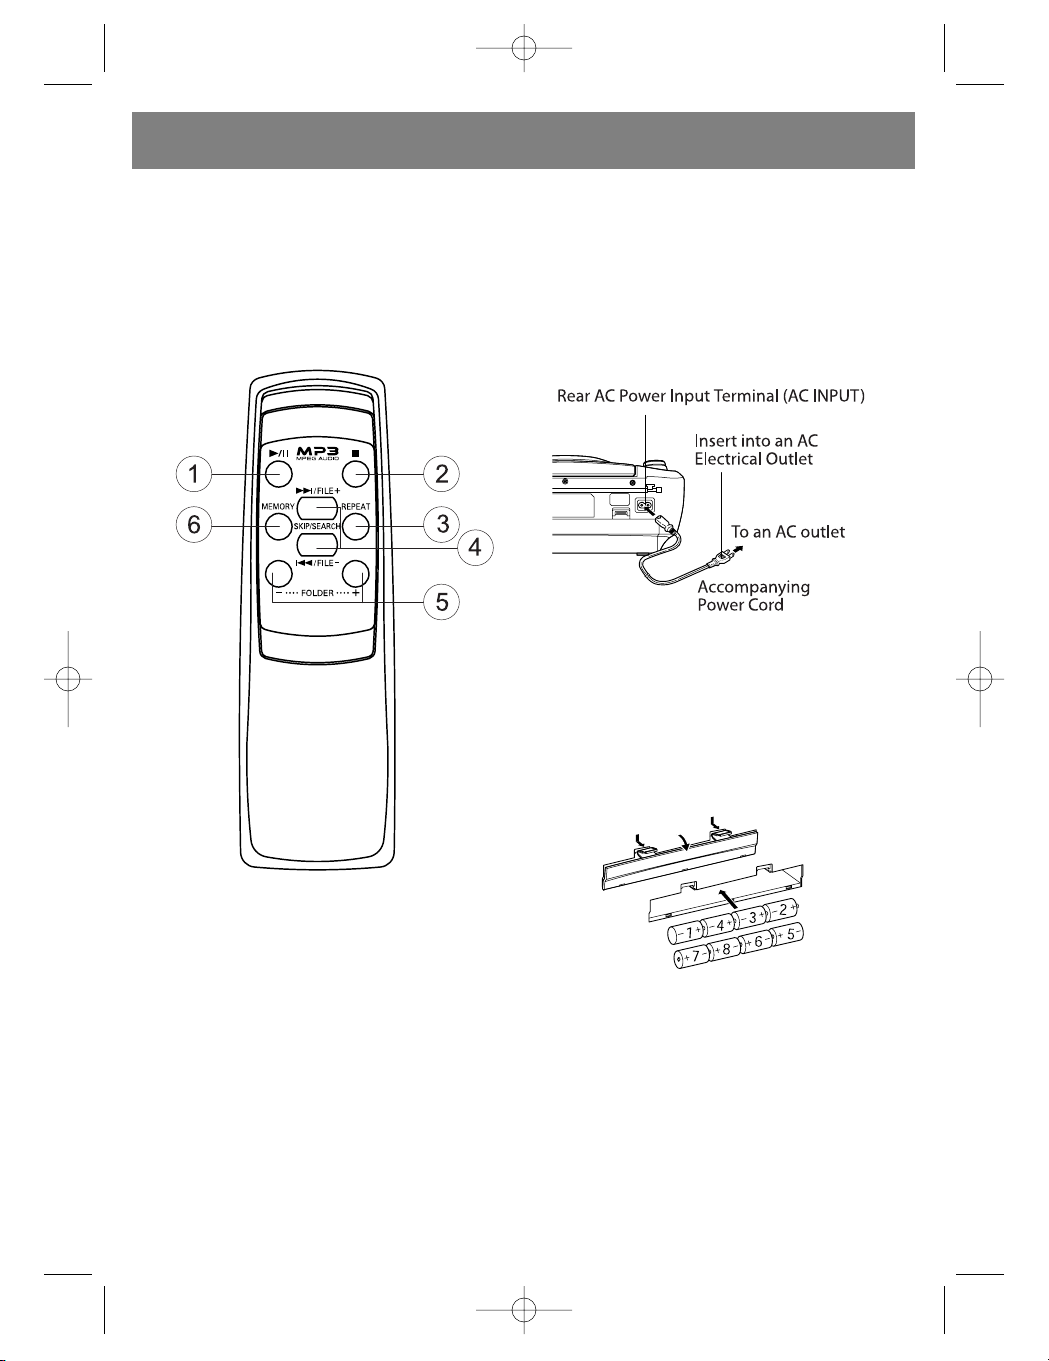
REMOTE CONTROL UNIT
PREPARATION BEFORE USE
• Installing batteries in the
remote control unit
1. Remove the battery cover
from the back of the remote
control unit.
2. Insert two Ò R03 (UM-4)/AAA
(24F)Ó size batteries (not
supplied).
• Insert the batteries with the
and terminals matching the
indication inside the battery
compartment. Insert the
ends first.
3. Replace the cover.
• Battery replacement
When the remote control operation becomes
unstable or the distance from which remote
control is possible becomes shorter, replace the
batteries with new ones.
• Using the remote control unit
To use the remote control unit, point it at the
REMOTE sensor and press the buttons gently
ENGLISH
5
3476.qxd 01.04.2005 22:13 Page 5
Page 6
and firmly. Remote control operation is possible
within about 7 m. However, since the remote
control range is less when the unit is used at an
angle, use directly in front of the REMOTE sensor section, as far much possible.
Do not expose the REMOTE sensor section to
strong light (direct sunlight or artificial lighting)
and make sure that there are no obstacles
between the REMOTE sensor section and the
remote control unit.
1. Play/Pause button (/)
2. Stop button ()
3. Repeat button (REPEAT)
4. Skip/Search/MP3 CD's file select buttons
(/FILE+, /FILE -)
5. MP3 CD's folder select buttons ( FOLDER )
6. Memory button (MEMORY)
POWER SUPPLY AND CONNECTION
POWER SUPPLY
This MP3 CD Radio Cassette Recorder operates
from an AC power source or batteries.
AC POWER
Insert one end of the accompanying power cord
into the AC power input terminal (AC INPUT) on
the rear of this device and the other end into an
AC power outlet.
Caution
1. Use only the power cord provided with this unit
to avoid malfunction or damage to the device.
Remove the batteries from the device when
using the power cord.
2. When not using the device for a long period of
time or when you take the device outside,
remove the power cord.
3. When unplugging or plugging in the power cord
move the function switch to the TAPE/OFF position.
BATTERIES
• Open the battery cover and insert 8 D-size bat-
teries in the direction shown in the illustration
while making sure the poles are pointing in the
right direction.
• When the power cord is inserted into the AC
INPUT terminal, the batteries no longer supply
the power.
Caution
1. When not using the device for one month or
longer, or when using an AC power source,
remove the batteries.
2. You can tell when battery power is low when the
following occur;
• the sound lowers in volume or fluctuates,
• the tape speed slows,
• the radio can be used, but discs and tapes do
not work properly.
3. Using batteries intermittently extends their life.
4. When recording something important or playing
an important disc it is recommended that you
ENGLISH
6
3476.qxd 01.04.2005 22:13 Page 6
Page 7
replace the old batteries with fresh batteries or
use an AC power source.
• Antenna
Because the AM antenna is inside the device,
you can adjust the AM reception by positioning
the device itself. You can adjust FM reception by
extending and rotating the rod antenna on the
rear of the device.
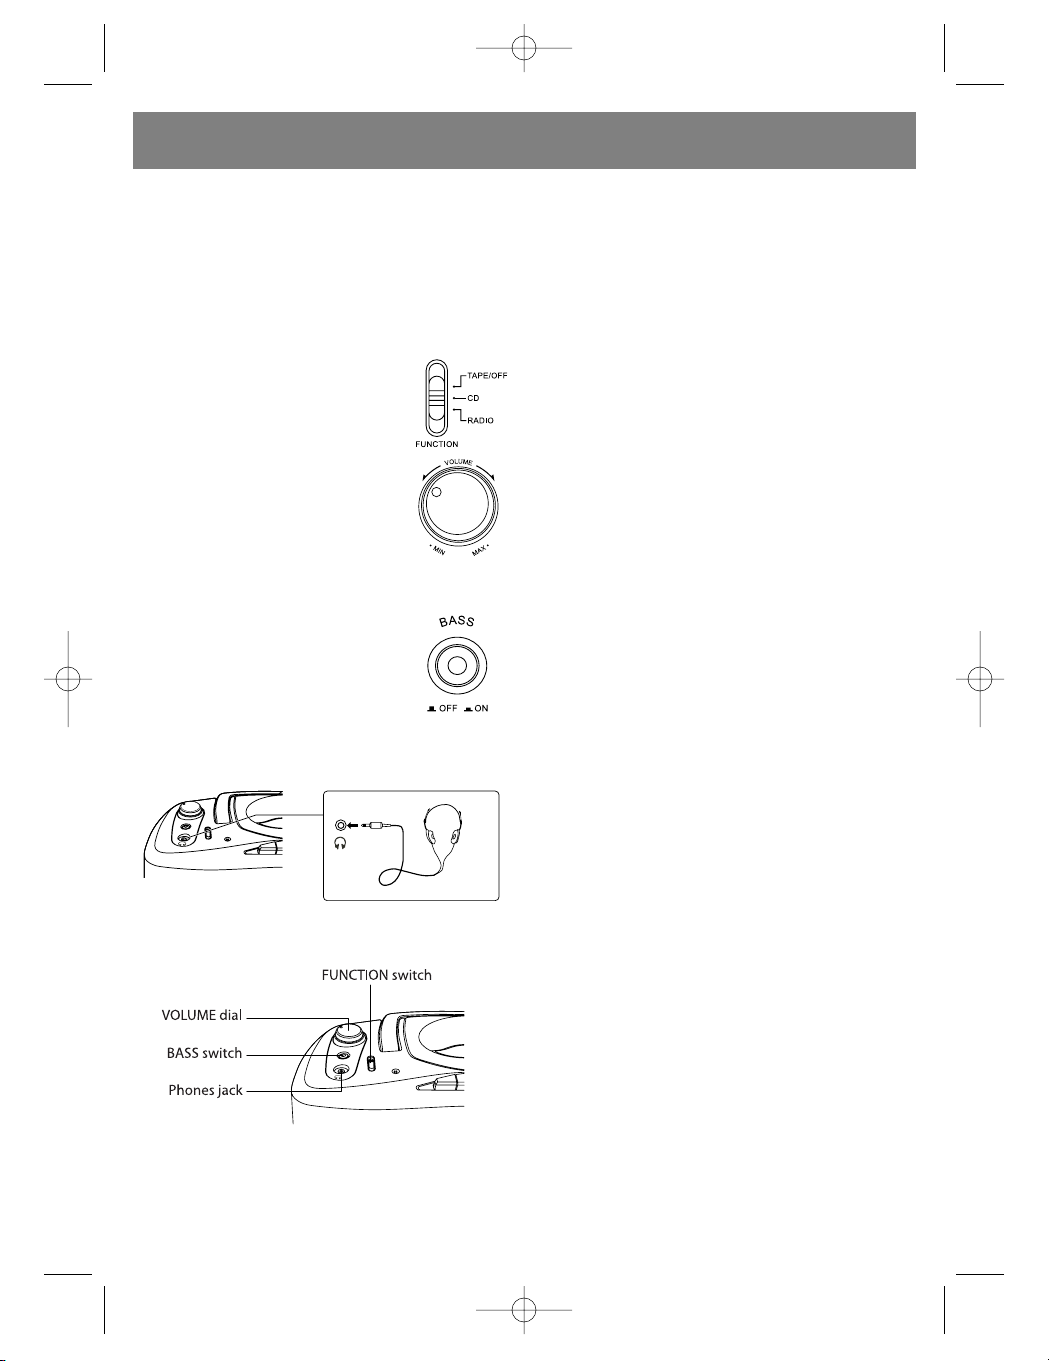
GENERAL CONTROLS
FUNCTION SWITCH
Move the function switch to the
position of the function you want
to use
VOLUME
Turn the volume dial to adjust the
volume.
POWER OFF
Turn the power off to the device
by moving the function switch to TAPE/OFF
while no cassette tape buttons are pressed.
BASS SWITCH
Press to increase the bass.
Press again to make the sound
normal.
HEADPHONES
Connect stereo headphones (not supplied) with
a mini-plug to the phones jack on the top of the
device.
Note: When the headphones are connected
sound no longer comes from the speaker.
Caution
When you move the function switch, a faint popping sound can be heard. This is not a defect.
PLAYABLE DISCS
This device can play the discs below. (Music
CDs, CD-Rs/CD-RWs created in music CD format, or CD-Rs/CD-RWs recorded with data in
MP3 format.)
Important!
Depending on the software used to make the
MP3 format data (encoding software), static
may be heard, some sounds may not be heard
and the data may not play correctly. For information on how to make data or on how to use
the computer see the encoding software
instruction manual.
Only MP3 format data can be played on CDR/CD- RWs (computer data CDs).
Only the MP3 format data of the first session of
a CD recorded in multi-session can be played.
(Windows Media Audio; files with .WMA or .wma
cannot be played.)
A CD-R/CD-RW or HFS format CD-R/CD-RW
recordec with Packet Lite cannot be played.
• Important points when creating a CD-R/CD-RW
to play on this device
When recording data to a CD-R/CD-RW, the
software you use to record will require various
settings. To play music (sound) on this device
select the recording methods that matches the
below settings.
CD Format
Music CD, Computer Data CD (ISO9660 level 1
or level 2, Joliet)
Recording Method
Single Session (All at once), Multi-Session (Only
first session playable)
Format of Music Data to be Recorded Music
CD:
16-bit/44.1 kHz/Stereo PCM Source
Computer Data CD:
MP3 Format (MPEG 1 layer 3 files with .MP3 or
.mp3., 32-320 kbps bit rate and 32 kHz and 44.1
kHz sampling frequencies)
• Number of Displayable Folders: 256
• Number of Displayable Files: 255
Important!
• A CD not placed correctly may be damaged or a
malfunction may occur.
• Placing a CD in upside down will cause [- - -] to
display, and the CD will not be playable.
• Do not touch the play side.
• If the CD is damaged or there are fingerprints or
dust on the surface it may not play.
• Do not stick paper or tape to the play side or the
label side.
CD-R/CD-RW
Though you can play CD-R/CD-RW discs
recorded with music, the discs may not be
playable depending on the content that was
ENGLISH
7
3476.qxd 01.04.2005 22:13 Page 7
Page 8

recorded or the environment that it was recorded in.
Do not insert a blank CD-R/CD-RW disc.
Reading the disc will take time and removing the
disc while it is still spinning may cause damage
to it.
CDs with the mark "SUPER-AUDIO CDs" are not
playable.
• CDs with an imbedded copy control function
may not be playable.
• DVDs, VCDs (video CDs), photo CDs are not
playable.
• WMA format discs are not playable.
• Do not use heart-shaped, octagonal-shaped or
other irregularly shaped CDs. The device may
malfunction.
• Cracked or deformed discs, or discs repaired
with glue or tape are dangerous and should not
be used.
STORING THE DISC
• Always store a disc in its proper case.
• Store out of direct sunlight and away from any
warm place such as near a heater.
DISC MAINTENANCE
Before playing a disc, remove any dust, dirt or
fingerprints from the play side by wiping from
the center outwards with a soft cloth. o Do not
use thinner, benzene, record cleaning agent or
static electricity suppressing agent when cleaning the disc.
Cautions on Condensation
Should the ambient temperature change suddenly, condensation (water droplets) may form
on the internal optic lens. You may not be able to
play a disc normally in this condition. If this
occurs, remove the disc, and allow the device to
sit unused for approximately one hour, then try
again.
LISTENING TO CDS
1. Move the FUNCTION switch to CD.
When no disc is loaded [- - -] appears on the
display panel.
If a CD is loaded the number of tracks on the CD
Is displayed.
2. Loading a CD.
• Press the OPEN button to open the CD door.
• Place the CD so the label faces Is up.
• You cannot load more than one CD at a time.
3. Close the CD door. o Press the CD door until
you hear It click shut.
The number of tracks on the CD is displayed.
4. Press the PLAY/PAUSE button (/II). The CD
plays starting from track 1.
• When the last track is finished the CD automatically stops.
ENGLISH
8
3476.qxd 01.04.2005 22:13 Page 8
Page 9

Stopping the CD
Press the STOP button () while the CD is playing.
Removing the CD
Press the STOP button () and then press the
OPEN button.
Caution
• Do not press the OPEN button while the CD is
playing. The CD could be damaged.
• To remove the CD, confirm that it has stopped
spinning and press the OPEN button.
Pausing during play
Press the PLAY/PAUSE button () while the CD
is playing.
• Press the button again to resume playing the
CD.
Searching for a song
Press the SKIP/SEARCH buttons (or) while
the CD is stopped until the track that you want to
hear is displayed, then press the PLAY/PAUSE
button (/ ).
You can play all tracks starting from that track.
FAST FORWARDING, REWINDING
Hold down the SKIP/SEARCH buttons (or)
during play to find the part of the song that you
want to hear. When you have reach it, release
the button.
PLAYING THE START OF A TRACK
You can play the start of a track while the CD is
stopped or playing.
Go to the start of the next track
Press the SKIP/SEARCH button ( ) once.
Return to the start of the track playing
Press the SKIP/SEARCH button () once.
Return to the start of the previous track
Press the SKIP/SEARCH button () twice while
the CD is playing. Press the SKIP/SEARCH but-
ton () once while the CD is stopped.
REPEAT
This repeats one or all tracks on the CD. This
can also repeat play the tracks you have programmed. Press the REPEAT button to change
the indicator light from REP to and then off.
Repeat only 1 track
Press the REPEAT button to display REP.
Repeat all tracks
Press the REPEAT button to display .
Repeat programmed tracks
After you have finished programming the tracks
you want, press the REPEAT button to display.
To stop repeat
Press the REPEAT button until REP or have
turned off.
Caution
• Opening the CD door while the CD is piaying can
cause damage to the CD. Do not open the CD
door while a disc is playing.
• To remove the CD, confirm that it has stopped
spinning and press the OPEN button.
• Opening the CD door while repeat is set (REP or
is displayed) will cause the repeat function
to stop.
LISTENING TO MP3S
You can use this device to play MP3 format data
recorded on computer data discs.
Additionally, the folder names and files name are
not displayed on this device. Instead, folder
numbers and track numbers are displayed.
When you have saved MP3 format data into
some folders, the data will play in the below
ENGLISH
9
3476.qxd 01.04.2005 22:13 Page 9
Page 10

order.
• Plays starting from session 1.
• Only session 1 is played from multi-session
recording.
• Only MP3 format data on a computer data CD is
displayed as a track.
Caution
• Although this device will play MP3 format data
within the range of 32-320 kbps bit rate and 32
kHz and 44.1 kHz sampling frequencies, we recommend 128 kbps or more at 44.1 kHz.
VIEWING FOLDERS
The folder number displayed represents the
entire disc as folder number 1. With CDs as illustrated above, A.mp3, B.mp3, C.mp3 are all folder number 1. The folders created when recording to the CD will appear as folders 2 and below.
Therefore, A.mp3, B.mp3 and C.mp3 are not in
folders and are not playable. Ex.: K.mp3 is displayed as below.
Folder number 5 is indicated.
When you select a folder, the number of tracks in
the folder is displayed. To display K.mp3, select
track 2.
Caution
• The folder number may not be displayed correctly depending on the MP3 software or the
operating environment.
1. Move the FUNCTION switch to CD.
The display illuminates.
When no disc is loaded [- - -] appears on the
display panel.
If a disc is loaded the number of folders on the
MP3 disc is displayed.
2. Loading a disc.
Press the OPEN button to open the CD door.
• Place the disc so the label faces up.
• You cannot load more than one disc at a time.
3. Close the CD door.
• Press the CD door until you hear it click shut.
The number of folders on the MP3 disc is displayed.
Important!
It takes time to display the number if a disc contains a large volume of data (many tracks).
4. Press the PLAY/PAUSE button (/II ). The disc
plays starting from track 1 in the first folder.
• When the last track is finished the disc automatically stops.
STOPPING THE DISC
Press the STOP button () while the disc is
playing.
REMOVING THE DISC
Press the STOP button () and then press the
OPEN button.
Caution
• Do not press the OPEN button while the disc is
playing. The disc could be damaged.
• To remove the disc, confirm that it has stopped
spinning and press the OPEN button.
ENGLISH
10
3476.qxd 01.04.2005 22:13 Page 10
Page 11

Searching for a song
1. Press the FOLDER buttons (or) and select
the folder you want.
The folder number will flash for two seconds and
then the number of tracks in the folder will be
displayed.
2. Press the SKIP/SEARCH buttons ( or) until
the track number that you want to hear is displayed, then press the PLAY/PAUSE button
(/).
• You can only select tracks within a folder with the
SKIP/SEARCH buttons ( or ).
REPEAT DURING PLAY
This repeats one or all MP3s on the disc. This
can also repeat play all the tracks in a folder.
Press the REPEAT button to change the indicator light from REP to REP + FOLDER to and
then off.
Repeat only 1 track
Press the REPEAT button to display REP.
Repeat tracks in a selected folder
Press the REPEAT button to display REP +
FOLDER.
Repeat all tracks
Press the REPEAT button to display
Repeat programmed tracks
After you have finished programming the tracks
you want (see p. 18), press the REPEAT button
to display
To stop repeat
Press the REPEAT button until REP, REP+ FOLDER or have turned off.
Caution
• Opening the CD door while repeat is set ( REP,
REP + FOLDER or is displayed) will cause
the repeat function to stop.
Important!
Depending on its file structure:
• During playing MP3, moving to the former track
is not allowed.
• Fast forward and reverse speeds for MP3
become slower than that of the normal music
CDs.
PROGRAM PLAY
You can select up to 20 of your favorite tracks to
play in the order you want.
Important!
• If a disc is not loaded, load a disc and close the
CD door.
• Press the STOP () button when the disc is
being played
1. Press the PROGRAM button. PROGRAM and 00
are displayed.
• When a program you set before is still stored,
the first track of that program is displayed
2 Press the SKIP/SEARCH button () repeatedly
until you select track 6.
• With discs containing MP3s, press the FOLDER
buttons (or) to select the folder you want
and then select the track you want.
3. Press the PROGRAM button.
ENGLISH
11
3476.qxd 01.04.2005 22:13 Page 11
Page 12

4. Press the SKIP/SEARCH button () repeatedly
until you select track 2.
5. Press the PROGRAM button.
• After you have programmed 20 tracks, [- -] or
[- - -] will display as the track, and you will not
be able to add any more tracks.
6. Press the PLAY/PAUSE button (/).
The program plays.
PLAY THE SAME PROGRAM
Press the PROGRAM button while stopped, then
press the PLAY/PAUSE button (/).
When you press the PROGRAM button while
stopped, the number of the first track in the
stored program flashes.
DISPLAY THE PROGRAM
Press the PROGRAM button while stopped.
Each time you press this button the tracks of the
program display in order.
CHANGING THE PROGRAM
1. Display the program you want to change.
2. Press the SKIP/SEARCH button ( ) repeatedly, to
display the track you want.
3. Press the PROGRAM button.
ADD A TRACK TO THE END OF PROGRAM
1. Press the PROGRAM button repeatedly to display 00.
2. Press the SKIP/SEARCH button ( ) repeatedly,
to display the track you want.
3. Press the PROGRAM button.
• After you have programmed 20 tracks, [- -] or
[- - -] will display as the track, and you will not
be able to add any more tracks.
DELETE A STORED PROGRAM
Press the PROGRAM button while stopped and
press the STOP button ().
CAUTION: If you open the CD door any stored
program is deleted.
LISTENING TO TAPES
1. Move the FUNCTION switch to TAPE/OFF/
2. Press the STOP/EJECT button () to open the
cassette tape holder and insert a tape.
3. Close the cassette tape holder. Close it until you
hear it click shut.
ENGLISH
12
3476.qxd 01.04.2005 22:13 Page 12
Page 13

4. Press the PLAY button (). The tape starts to
play
Important!
When the tape runs to the end during playing or
recording, any depressed button pops up and
the tape stops.
STOP THE TAPE
Press the STOP/EJECT button (/).
• To remove the tape press the STOP/EJECT button (/) once more.
PAUSE
Press the PAUSE button (II) during playing or
recording.
• Press this button again to resume playing or
recording.
FAST FORWARD, REWIND
Press the FF button () or the REW button ()
while stopped.
• When you have arrived at the place you want,
press the PLAY button ().
Important!
• When the tape runs to the end during fast forward or rewind, any depressed button pops up
and the tape stops.
• This device does not have the song search function (cue/review) in fast forward and rewind.
Cassette Tapes
Use only normal type tapes (type 1). Do not use
high position tapes (type 2) or metal tapes (type
4).
• Do not use endless tapes.
• Tapes 100 minutes or longer are very thin and
stretch easily. The tape can get tangled in the
machine. Do not use these tapes.
• You cannot record on the leader tape portion of
the tape (the translucent portion). Move forward
past this portion when recording.
• When the tape becomes
loose, use a pencil to take
up the excess slack.
• Do not store tapes in the following locations: In dusty
areas Exposed to magnets
High temperature or high humidity areas
Prevent tape erasure
Use a screw driver to remove the tabs on the top
of the tape to prevent accidental tape erasure.
If you mistakenly remove a tab and you would
like to record on the tape, cover the remaining
hole with cellophane tape.
LISTENING TO THE RADIO
1. Move the FUNCTION switch to RADIO.
2. Move the BAND switch to AM or FM.
3. Turn the TUNER dial until you arrive at the station you want to hear.
FM: 88-108 MHz AM: 530-1600kHz
FM STEREO RECEPTION
You can use the BEAT CANCEL switch on the
rear of the device to switch between stereo [FM
ST] and mono [MONO]. When the switch is positioned on FM ST you will automatically hear the
station in stereo when broadcast in stereo.
• When the broadcast is in stereo the FM STEREO
lamp will illuminate.
• When the reception is poor, switch to MONO to
hear the broadcast more clearly.
• This device does not support AM stereo broadcasts.
RECORDING
1. Press the STOP/EJECT button (/) to open
ENGLISH
13
3476.qxd 01.04.2005 22:13 Page 13
Page 14

the cassette tape holder and insert a tape.
• Load the tape with the side you want to record
on facing you.
2. Close the cassette tape holder until you hear it
click shut.
• Stop the tape in the position where you will start
recording.
3. Selecting the recording function (source). When
recording a CD (CD synch record):
Select the track you wish to record from.
• To only record specific tracks, set a program,
To record the radio:
Tune in to the station you want to record.
To record sound from an Internal microphone:
Move the FUNCTION switch to TAPE/OFF.
4. Press the RECORD button (). The PLAY button
() is also depressed at the same time and the
recording starts.
• When recording a CD (CD synch record), the
recording and the CD start at the same time.
• You can start recording from the middle of a
song when you press the RECORD button ()
while the CD is paused.
• When the tape comes to the end, tape recording
automatically stops.
• When in CD synch record, you can pause CD
play by pressing the STOP/EJECT button
(/ ).
Press the PLAY/PAUSE button (/) to continue CD play. Pressing the STOP button () to
stop CD play.
Important!
• CD synch record is the function which starts play
automatically when you press the RECORD button ().
• When you press the RECORD button (), the
play button is also depressed at the same time
which may produce resistance more than normal. This is not a malfunction.
STOP TAPE RECORDING
Press the STOP/EJECT button (/).
• When in CD synch record, you can pause CD
play by pressing the STOP/EJECT button
(/).
WHEN BEATS OCCUR DURING RECORDING
When recording the radio, beats may occur. If
this occurs, move the BEAT CANCEL switch on
the rear of the device to a position in which the
beats cannot be heard (1 or 2).
Note:
• What you have recorded is for your own personal
enjoyment. It is under copyright and cannot be
used for any other purpose without the permission of the copyright holder.
CARE AND MAINTENANCE
Cleaning the tape heads
When you play or record on a tape and;
• the sound has degraded,
• the recording is not clear,
• the tape has not been completely erased,
• the tape gets caught in the device, most likely
dirt has accumulated on the heads, pinch roller
or capstan. Purchase a cleaning kit (or cleaning
tape) and clean the heads. You should clean the
heads once every 10 hours of use.
Press the STOP/EJECT button (/) to open
the cassette tape holder and wipe the area
displayed in the illustration.
• After using the device for an extended period of
time, the heads will magnetize and cause static
or degraded sound. If this occurs, use a commercial demagnetizer to demagnetize the heads
Cleaning the device
Use a soft cloth to lightly wipe dirt from the
device. When the device is extremely dirty, use a
cloth moistened with a diluted neutral cleaning
solution to wipe the dirt away and wipe again
with a dry cloth.
• Do not use benzene or thinner on the device.
Additionally, do not pour volatile chemicals on
the device case such as insecticides.
TROUBLESHOOTING
Confirm the following things before considering
repairs.
No sound
1. The power cord is loose.
2. The batteries are misaligned.
3. The batteries are low.
4. The volume is down.
5. The headphones are in.
1. Securely plug it in.
2. Align them.
3. Replace them.
4. Adjust the volume.
5. Remove them.
CD/MP3 Player
Will not play
1 The disc format is incorrect.
2 The disc is upside down.
3 The disc is dirty.
4 The disc is paused.
5 The function is not correct.
6 The lens is fogged up.
1 Load the correct format disc.
2 Turn label side up.
3 Clean it.
ENGLISH
14
3476.qxd 01.04.2005 22:13 Page 14
Page 15

4 Press the PLAY/PAUSE button (14).
5 Move the FUNCTION switch to CD.
6 Wait one hour.
The sound skips
1 The disc is severely damaged.
2 The device is being moved.
1 Change discs.
2 Stabilize the device.
TAPE RECORDER
Tape does not go in
Tape holder does not shut
The tape is upside down.
Put the tape right side up.
The tape will not play
1. The tape is defective.
2. The PAUSE button (4) is pressed.
3. The batteries are low.
4. The tape has grown slack.
1. Switch tapes.
2. Press the PAUSE button (4) again.
3. Replace them.
4. Use a pencil to take up the slack.
Cannot record
The tabs are removed on the tape.
Switch tapes.
Sound is distorted
Erasure is incomplete
• The heads are dirty.
• You are using a high position, or metal tape.
• Clean them.
• Use a normal tape.
RAIDIO
Too much static
• Receive electrical interference.
• Receiving interference from motors, fluorescent
lights or television.
• Plug in the power cord securely.
• Move the device to a different place.
• Turn off the TV.
• Adjust the antenna.
SPECIFICATION
CD Player
Sampling Frequency Pick-up
44.1 kHz Non-contact optical pick-up (Semiconductor laser)
Radio
Reception Frequency
FM: 88-108 MHz AM: 530-1600 kHz
MP3
File System Compatibility Sampling Frequency
Bit rates
ISO 9660 (level 1), Joliet 32 kHz, 44.1 kHz 32320 kbps
Tape Recorder
Track Motor Heads: 4-track 2-channel stereo
Electronic governor DC motor Magnetic head
for erasure, AC bias for recording
Fast-wind Time: Approx. sec. (C-60 cassette)
Microphone
Omnidirectional microphone
GENERAL
Speakers cm x 2 (4Q)
cm x 2 (8Q)
Max Output 2W + 2W(JEITA/DC)
Output Terminals: Phone jack (Stereo mini jack)
mW (Ohm)
Power Supply: AC 230 V~50Hz
DC 12 V(D-sizex8)
Power Consumption: 15 W
Dimension: 432 (W) x 157 (H) x 231 (D) mm
Technical characteristics may be changed by
the manufacturer without prior notice.
SERVICE LIFE – NO LESS THAN 5 YEARS
GUARANTEE
Details regarding guarantee conditions can be
obtained from the dealer from whom the appliance
was purchased. The bill of sale or receipt must be
produced when making any claim under the terms of
this guarantee.
This product conforms to the EMCRequirements as laid down by the Council
Directive 89/336/EEC and to the Low
Voltage Regulation (23/73 EEC)
ENGLISH
15
3476.qxd 01.04.2005 22:13 Page 15
Page 16

ИНСТРУКЦИЯ ПО ЭКСПЛУАТАЦИИ
1-КАССЕТНАЯ МАГНИТОЛА С
CD/MP3 ПЛЕЕРОМ
МОДЕЛЬ VT-3476
ожалуйста, внимательно прочтите эту
инструкцию перед тем, как начать
эксплуатацию данного аппарата. После того,
как вы ознакомитесь с этой инструкцией,
положите ее в доступное место для того,
чтобы этой инструкцией вы могли всегда
воспользоваться.
Меры по безопасности
ВНИМАНИЕ: ДЛЯ ПРЕДУПРЕЖДЕНИЯ
ВОЗНИКНОВЕНИЯ ПОЖАРА ИЛИ
ПОРАЖЕНИЯ ЭЛЕКТРИЧЕСКИМ ТОКОМ, НЕ
ПОДВЕРГАЙТЕ ДАННОЕ УСТРОЙСТВО
ВОЗДЕЙСТВИЮ ДОЖДЯ И ВЛАГИ.
Объяснение графических символов
Значок стреловидной молнии внутри
равностороннего треугольника используется
для того, чтобы предупредить пользователя о
наличии ”опасного напряжения” внутри
корпуса изделия, которое может быть
достаточно высоким и нести в себе угрозу
поражения электрическим током.
Восклицательный знак внутри
равностороннего треугольника используется
для того, чтобы предупредить о наличии в
литературе, поставляемой вместе с
устройством, важных указаний по работе с
ним и по его обслуживанию.
CLASS 1 LASER PRODUCT
ПРЕДУПРЕЖДЕНИЕ: НЕВИДИМОЕ
ЛАЗЕРНОЕ ИЗЛУЧЕНИЕ ПРИ ОТКРЫТИИ
КРЫШКИ ОТСЕКА CD
Внутри аппарата имеется лазерное
устройство небольшой мощности. Для
безопасной эксплуатации в нормальном
режиме не снимайте кожух и не пытайтесь
проникнуть внутрь аппарата.
ОБСЛУЖИВАНИЕ ДОЛЖНО ПРОВОДИТЬСЯ
КВАЛИФИЦИРОВАННЫМ ПЕРСОНАЛОМ.
ВНИМАНИЕ
В случае возникновения неисправности
сразу же прекратите эксплуатацию
аппарата.
Использование аппарата при следующих
обстоятельствах может стать причиной
пожара или поражения электрическим
током. Отключите питание аппарата с
помощью переключателя FUNCTION, выньте
шнур из сети и отдайте аппарат в
гарантийную мастерскую.
• Дым, странный запах или шум, издаваемый
аппаратом (неправильная работа аппарата).
Убедитесь в том, что дыма больше нет, и
отнесите аппарат в гарантийную мастерскую.
Не пытайтесь отремонтировать аппарат
самостоятельно.
• Вода попала внутрь аппарата.
• Посторонний предмет попадает внутрь
аппарата.
• Нет звука.
• Вы уронили и сломали корпус аппарата.
• Не разбирайте аппарат. В противном случае
существует опасность возникновения пожара
или поражения электрическим током.
• Не повреждайте сетевой шнур.
Сетевой шнур может быть поврежден в
случае его эксплуатации не по назначению.
Не делайте также следующее: Не помещайте
тяжелые предметы на сетевой шнур. Не
гните и не растягивайте сетевой шнур.
Не помещайте сетевой шнур вблизи
нагретых объектов.
• Не ставьте емкостей, наполненных
жидкостью, на поверхность аппарата. Если
вода попадет внутрь аппарата, то это может
стать причиной пожара или поражения
человека электрическим разрядом.
• Если сетевой шнур поврежден, замените его
в авторизованном сервисном центре. В
случае дальнейшей эксплуатации
поврежденного сетевого шнура может
возникнуть опасность возникновения пожара
или поражения электрическим током.
• Избегайте намокания аппарата.
В противном случае может возникнуть
опасность возникновения пожара или
поражения человека электрическим током.
Не используйте аппарат в ванной, вблизи
воды или под дождем.
• Не помещайте внутрь аппарата посторонние
предметы. Не вставляйте в кассетный отсек
металлические и легко воспламеняемые
предметы. Это может стать причиной пожара
или поражения человека электрическим
током.
РУССКИЙ
16
ВНИМАНИЕ:ДЛЯ ПРЕДУПРЕЖДЕНИЯ
ПОРАЖЕНИЯ ЭЛЕКТРОТОКОМ НЕ
СНИМАЙТЕ КРЫШКУ (ИЛИ
ЗАДНЮЮ ПАНЕЛЬ). ВНУТРИ НЕТ
ЧАСТЕЙ, ТРЕБУЮЩИХ ВНИМАНИЯ
ПОЛЬЗОВАТЕЛЯ. ОБСЛУЖИВАНИЕ
ДОЛЖНО ПРОВОДИТЬСЯ
КВАЛИФИЦИРОВАННЫМ
ПЕРСОНАЛОМ.
3476.qxd 01.04.2005 22:13 Page 16
Page 17

Меры предосторожности при подключении
сетевого шнура.
Всегда руководствуйтесь следующим:
Неправильное обращение с сетевым шнуром
может привести к его нагреванию и стать
причиной пожара. Не включайте аппарат в
том случае, если вы неправильно
подключили сетевой шнур. Не используйте
сетевой шнур в случае его повреждения.
• Регулярно проверяйте вилку сетевого шнура
на наличие неисправностей. Регулярно
вынимайте сетевой шнур из розетки и
стирайте пыль с поверхности вилки.
Накопившаяся на поверхности сетевого
шнура пыль может стать причиной пожара
или поражения электрическим током.
• Не помещайте аппарат близко к стене.
Всегда помещайте аппарат как минимум на
10 см от стены. Кроме того, оставьте какоето расстояние между аппаратом и другими
приборами. В противном случае аппарат
нагреется, что может стать причиной пожара.
• Использовать только при напряжении 220240 V. В противном случае может возникнуть
угроза возгорания.
• Не смотрите на лазерный луч, в противном
случае вы можете получить травму глаза.
• Не закрывайте вентиляционные отверстия
аппарата.
В противном случае аппарат может
перегреться, что может привести к пожару.
Вентиляционные отверстия аппарата
расположены внизу и сбоку аппарата.
Избегайте следующего. Не помещайте
аппарат лицевой стороной вверх. Не
помещайте аппарат в места с плохой
циркуляцией воздуха, например, в закрытом
ящике.
• Не пытайтесь заряжать обычные батарейки.
Батареи могут треснуть, электролит из них
вытечет, что может стать причиной пожара
или химического ожога. Не используйте
различные типы батарей вместе, например
щелочные и марганцевые батареи, или
старые батареи с новыми.
• Использование в условиях грозы.
Используя аппарат на улице, поместите его в
безопасное место и сверните антенну.
Однако возможность удара молнии не
исключена.
• Не используйте аппарат в ванной или душе.
Не используйте аппарат в местах с
повышенной влажностью, таких как ванная
комната или душ. В противном случае может
возникнуть угроза пожара или поражения
человека электрическим током.
• Будьте внимательны, вынимая штепсель
сетевого шнура из розетки.
• Не помещайте руку в отсек для кассеты или
компакт-дисков.
• Не касайтесь сетевого шнура влажными
руками. Это может привести к поражению
электрическим током.
• Всегда придерживайте розетку руками,
вынимая шнур из нее. Не выдергивайте шнур
из розетки резкими движениями.
• Не располагайте аппарат во влажных и
пыльных помещениях, а также в местах, где
существует возможность проникновения в
помещение дыма или пара. Это может
привести к пожару или к поражению
электрическим током.
• Не оставляйте аппарат в машине с
закрытыми окнами, в местах с высокой
влажностью или местах прямого попадания
солнечных лучей.
• Не располагайте аппарат в местах с
неровной поверхностью.
• Не располагайте аппарат в местах с
неровной поверхностью или на высокой
полке. Аппарат может упасть или нанести
травму.
• Не ставьте на аппарат тяжелые предметы.
Предмет может повредить аппарат.
Вы можете нанести себе травму. (Будьте
особенно аккуратны в том случае, когда дети
находятся рядом с аппаратом)
• Не используйте деформированные или
треснутые диски.
• Не используйте деформированные или
треснутые диски, а также склеенные диски.
Диски вращаются внутри аппарата с
большой скоростью.
• Поломка диска может стать причиной
травмы. Кроме того, не используйте диски
со следами клея от целлофановых пакетов
или ценников.
• Будьте осторожны с уровнем громкости в
наушниках.
• Избегайте прослушивания на большой
громкости в наушниках. Громкое
прослушивание музыки в наушниках в
течение длительного периода времени
может привести к повреждению слуха.
• Не подносите кредитную карту близко к
громкоговорителям.
Громкоговорители излучают сильное
магнитное поле. Не кладите около
громкоговорителей аппарата часы,
кредитные карты, кассетные пленки и. т.д.
Данные на таких носителях могут быть
потеряны.
• Соблюдайте осторожность, перенося
аппарат.
• Выньте диск. Выключите питание, выньте
сетевой шнур из розетки и проверьте
аппарат на наличие внешних подключений
РУССКИЙ
17
3476.qxd 01.04.2005 22:13 Page 17
Page 18

перед тем, как переносить его. Если вы
повредите сетевой шнур, это может
привести к возгоранию или удару
электрическим током.
• Сверните антенну. В противном случае во
время переноски аппарата его антенна
может быть повреждена.
Предосторожности, связанные с тем, что
аппарат не будет использоваться в течение
долгого времени.
• Рекомендуется отключить аппарат от
сетевого питания.
• Очистка внутренних деталей аппарата.
Проконсультируйтесь у местного дилера
относительно чистки внутренних деталей.
Если пыль будет скапливаться внутри
аппарата в течение долгого времени, может
возникнуть пожар или аппарат будет
некорректно работать.
• Использование батареек.
Если вы неправильно используете батарейки,
они могут треснуть или протечь, что может
привести к пожару, человеческой травме или
повреждению аппарата. Придерживайтесь
следующих инструкций. Используйте
батарейки только D-размера.
• Вставляйте батарейки только в правильном
направлении согласно диаграмме на
устройстве.
• Не используйте разные типы батареек.
• Не используйте одновременно старые и
новые батарейки в аппарате в одно и то же
время. Не пытайтесь заряжать батарейки или
разбирать их. Не помещайте батарейки в
воду. Выньте батарейки в случае, если вы не
будете использовать аппарат в течение
месяца или более долгого срока.
• Если какая-то жидкость вытечет из батареек
в корпус, тщательно протрите его перед тем,
как вставить новые батарейки. Если же
жидкость попадет вам на руки, промойте их
водой.
Всегда проверяйте!
При записи или воспроизведении важного
материала, убедитесь, имеете ли вы на это
лицензионное право.
ОБЩИЙ ВИД (СМ. СХЕМУ)
ВИД СВЕРХУ
1. Крышка отсека CD
2. Ручка регулировки громкости («VOLUME»)
3. Переключатель усиления басов («BASS»)
4. Разъем для наушников
5. Переключатель режимов работы («FUNCTION»)
6. Встроенный микрофон
7. Кнопка паузы («PAUSE II»)
8. Кнопка остановки/открытия отсека («STOP/EJ
/)
9. Кнопка быстрой перемотки вперед («F.F»)
10.Кнопка быстрой перемотки назад («REW »)
11.Кнопка воспроизведения («PLAY »)
12.Кнопка записи («RECORD»)
13.Кнопка открытия отсека CD («OPEN»)
14.Переключатель диапазонов радио («BAND»)
15.Шкала настройки радио
16.Ручка настройки радио («TUNER»)
Передняя панель
17. Индикатор FM STEREO
18. Индикатор подключения к сети («POWER»)
19. Кнопки поиск/перемотка
(«SEARCH/SKIP/»)
20. Кнопки выбора папок («FOLDER/»)
21. Кнопка воспроизведение/пауза
(«PLAY/PAUSE II »)
22. Кнопка остановки («STOP»)
23. Кнопка повтора («REPEAT»)
24. Кнопка программирования («PROGRAM»)
25. ЖК-дисплей
26. Дверца кассетного отсека
ЗАДНЯЯ ПАНЕЛЬ
27.Переключатель BEAT CANCEL (1/2, FM
ST/MONO)
28. Крышка отсека для батареек
29.Разъем для подключения сетевого шнура
(AC INPUT)
30.FM антенна
ПУЛЬТ ДИСТАНЦИОННОГО УПРАВЛЕНИЯ
Подготовка к установке
батареек в ПДУ.
1. Снимите крышку батарейного
отсека с задней панели ПДУ.
2. Вставьте две батарейки
размера R03 (UM-4)/AAA (24F)
(не входят в комплект
поставки).
• Вставьте две батарейки в
отсек, соблюдая при этом
полярность (+ и- ).
3. Вставьте крышку.
R03 (UM-4)/AAA (24F)
Замена батареек
Когда ПДУ начнет работать нестабильно или
сократиться радиус его действия, замените
батарейки новыми.
Использование ПДУ. Чтобы использовать
пульт ДУ, направьте его на датчик
дистанционного управления на передней
панели устройства. Максимальный радиус
действия ПДУ - около 7 м. При этом надо
учесть, что радиус действия ПДУ
РУССКИЙ
18
3476.qxd 01.04.2005 22:13 Page 18
Page 19

уменьшается, если ПДУ находится под углом
по отношению к передней панели
устройства.
Не подвергайте датчик ПДУ воздействию
солнечных лучей или искусственного света и
убедитесь в том, что между ПДУ и датчиком
нет предметов, препятствующих
проникновению инфракрасных лучей.
1. Кнопка воспроизведение/пауза
(«PLAY/PAUSE»)
2. Кнопка остановки воспроизведения (STOP)
3. Кнопка повтора (REPEAT)
4. Кнопка перехода/поиска CD/MP3 треков
SKIP/SEARCH MP3 ( / FILE+, / FILE-)
5. Кнопка выбора папки MP3 (– - - - -FOLDER- -
- -+ )
6. Кнопка запоминания установок («MEMORY»)
ПОДКЛЮЧЕНИЕ К СЕТИ
ПИТАНИЕ УСТРОЙСТВА
Этот аппарат работает от сети переменного
тока или от батареек.
Источник переменного тока
Вставьте один конец сетевого шнура в
сетевую розетку, а другой конец в разъем
для подключения сетевого шнура (AC INPUT),
расположенный на задней панели
устройства.
ВНИМАНИЕ
1. Используйте только сетевой шнур,
поставляемый производителем, чтобы
избежать поломки аппарата. Выньте
батарейки из устройства перед тем, как
использовать сетевой шнур.
2. Если вы не эксплуатируете аппарат в течение
долгого времени, выньте сетевой шнур из
сетевой розетки.
3. Подключая/отключая сетевой шнур от
сетевой розетки, переведите переключатель
Function в позицию TAPE/OFF.
БАТАРЕЙКИ
• Откройте крышку отсека батареек и вставьте
8 батареек размера “D”, так, как это показано
на рисунке, соблюдая при этом полярность.
При подключении сетевого шнура к
устройству питание от батареек
автоматически отключается.
Внимание
1. Если вы не используете аппарат в течение
месяца и более или пользуетесь питанием от
сетевой розетки, выньте батарейки из
батарейного отсека. Вы можете определить
разряженность батареи по следующим
признакам:
• Уровень громкости понижается или
колеблется.
• Падает скорость вращение пленки кассеты.
АНТЕННЫ
Так как AM антенна находится внутри корпуса
устройства, вы можете настроить прием AM
радиостанции, меняя положение корпуса
устройства. Вы можете настроить прием FM
радиостанции путем вытягивания и
вращения антенны расположенной на задней
панели устройства.
РУССКИЙ
19
Разъем подключениясетевого шнура
Сетевой шнур
К электрической
розетке
3476.qxd 01.04.2005 22:13 Page 19
Page 20

ОСНОВНЫЕ ФУНКЦИИ
УПРАВЛЕНИЯ
• Переключатель режимов
работы («Function»)
Установите переключатель в
нужную вам позицию.
• Громкость («VOLUME»)
Поверните ручку.
• Выключение питания («Power
Off»)
Отключите питание аппарата,
установив переключатель FUNCTION в
позицию TAPE/OFF, не активируя кнопок
кассетного механизма.
• Кнопка усиления баса
(«BASS»)
Нажмите для увеличения уровня
басов.
Нажмите еще раз для перевода
басов на нормальный уровень.
НАУШНИКИ
Подключите стереонаушники (не входят в
комплект), вставив штекер наушников в
соответствующий разъем расположенный на
верхней панели устройства.
• При подключении наушников звук в
динамиках автоматически отключается.
Внимание
Когда вы меняете позиции переключателя, в
колонках можно различить слабый
хлопающий звук. Это не является дефектом.
ВОСПРОИЗВОДИМЫЕ ДИСКИ
Данный аппарат может воспроизводить
диски CD, CD-R/RW записанные в форматах
CD и MP3.
Примечание
В зависимости от программного
обеспечения, использованного для создания
файлов в формате MP3 (кодирующей
программы), возможно возникновение
проблем с воспроизведением некоторых
фрагментов или некорректного
воспроизведения всего диска.
• Только файлы формата MP3 могут
воспроизводиться на дисках CD-R/CD-RW.
Файлы мультимедийной библиотеки Windows
Media Audio: невозможно воспроизведение
файлов формата .wma.
Диски CD-R/CD-RW записанные в формате
HFS, созданные с помощью Packet Lite не
могут быть воспроизведены на этом
аппарате.
• Важные замечания касательно создания
дисков CD-R/CD-RW для проигрывания на
этом устройстве.
При записи CD-R/CD-RW программное
обеспечение, с помощью которого вы
записываете данные, потребует различных
настроек.
Для воспроизведения музыки/звука на
этом устройстве выбирайте способы
записи на этом аппарате, которая
удовлетворяет следующим условиям:
• Музыкальные CD, CD с компьютерными
данными (уровень качества ISO9660 1 или
уровень 2, Joliet)
Метод записи
Одна сессия (все сразу), мультисессионные
(проигрывается только первая сессия).
Формат музыкальных данных, записываемых
на музыкальный CD - 16-bit/44.1 КГц/Stereo
PCM Source.
CD с компьютерными данными - MP3 формат
(MPEG 1 layer 3 файлы с расширением .MP3
or .mp3, 32-320 kbps bit rate and 32 kHz and
44.1 kHz частоты)
Кол-во отображаемых папок: 256
Кол-во отображаемых файлов: 255
Важно!
• CD не правильно помещенный в отсек для
проигрывания может быть поврежден.
• При неправильном размещении CD на
дисплее вы увидите значок [- - -], и
воспроизведение диска происходить не
будет.
• Не касайтесь рабочей поверхности диска
руками.
• Если CD поврежден или на нем имеются
следы отпечатков пальцев и пыли, возможно,
что он не будет воспроизводиться.
• Не приклеивайте бумагу или ярлык на
воспроизводимую поверхность диска.
• CD-R/CD-RW
Несмотря на то, что возможно
воспроизведение дисков CD-R/CD-RW ,
качество их воспроизведения будет зависеть
от условий их записи.
Не вставляйте в отсек для компакт-дисков
чистый CD-R/CD-RW диск, так как возможно
повреждение устройства из-за сильного
вращения диска. Компакт-диски с отметкой
“SUPER-AUDIO компакт-диск” не
воспроизводится.
• Могут не проигрываться компакт-диски с
включенной функцией защиты от
копирования.
РУССКИЙ
20
3476.qxd 01.04.2005 22:13 Page 20
Page 21

• Диски DVD, VCD (видео CD), фото CD не
воспроизводятся.
• Диски в формате WMA не воспроизводятся.
• Не используйте диски нестандартной формы.
Они могут неправильно работать.
• Треснутые и деформированные диски, а
также склеенные диски опасны для
использования.
Хранение дисков
• Всегда храните диск в надлежащем месте.
• Храните вне зоны досягаемости прямых
солнечных лучей или местах с повышенной
температурой
Уход за диском
Перед воспроизведением диска удалите с
него пыль, грязь или следы пальцев,
протерев проигрываемую поверхность
диска, делая это мягкой тряпочкой от центра
к краю. Не используйте растворитель или
бензин.
Конденсация
В случае резкого изменения температуры
окружающей среды, на внутренней линзе
считывающей головки может образоваться
конденсат и аппарат не сможет нормально
проигрывать диски. Если это произойдет,
выньте диск и через час попробуйте снова
начать эксплуатацию.
ПРОСЛУШИВАНИЕ
КОМПАКТ -ДИСКОВ
1. Установите переключатель FUNCTION в
положение CD.
Если диск отсутствует или вставлен
неправильно, на дисплее отобразится
индикатор[- - -] .
Если компакт-диск вставлен правильно, на
дисплее будет отображено кол-во треков
диска.
2 Загрузка компакт-диска.
Нажмите кнопку OPEN для открытия крышки
отсека для компакт-дисков.
• Поместите компакт-диск в отсек для
компакт-дисков этикеткой вверх.
• Не помещайте в отсек одновременно
несколько компакт дисков.
3. Закройте крышку отсека.
• Закройте крышку компакт диска.
На дисплее отображается количество треков
на компакт-диске.
4 Нажмите кнопку PLAY/PAUSE (
/II ).
Начнется проигрывание трека 1.
• По окончании воспроизведения последнего
трека, воспроизведение автоматически
останавливается.
Остановка компакт-диска
Нажмите кнопку STOP () во время
проигрывания компакт-диска.
Извлечение компакт - диска
Нажмите кнопку STOP () и затем нажмите
кнопку OPEN.
Внимание
• Не нажимайте кнопку OPEN во время
проигрывания компакт-диска. Это может
повредить компакт-диск.
• Перед извлечением компакт-диска из отсека
убедитесь, что он остановился, после чего
нажмите кнопку OPEN.
РУССКИЙ
21
3476.qxd 01.04.2005 22:13 Page 21
Page 22

Пауза
• Нажмите кнопку PLAY/PAUSE (/II) âî
время проигрывания компакт-диска.
• Нажмите кнопку еще раз для продолжения
воспроизведения компакт-диска.
Поиск треков
Нажмите кнопку SKIP/SEARCH ( èëè) во
время остановки компакт-диска и
удерживайте ее до пор, пока номер
выбранного вами трека не будет отображен
на дисплее, затем нажмите кнопку
PLAY/PAUSE (
/II).
Проигрывание всех треков начнется, начиная
с выбранного трека.
Быстрая перемотка вперед/назад
Удерживайте кнопку SKIP/SEARCH ( or )
во время воспроизведения для того, чтобы
найти часть трека, которую вы хотите
услышать. После этого отпустите кнопку.
Проигрывание начала трека
Вы можете проиграть начало трека во время
остановки или воспроизведения диска.
Переход к началу следующего трека
Нажмите кнопку SKIP/SEARCH () îäèí ðàç.
Возврат к началу проигрываемого трека
Нажмите кнопку SKIP/SEARCH () îäèí ðàç.
Возврат к началу предыдущего трека
Нажмите кнопку SKIP/SEARCH () два раза
во время проигрывания компакт-диска.
Нажмите кнопку SKIP/SEARCH () один раз
в момент остановки проигрывания.
Повтор
Эта функция повторного проигрывания всех
треков компакт-диска. Кнопка также
позволяет повторно проигрывать
запрограммированные вами треки.
Нажмите кнопку REPEAT до появления
индикаторов REP или .
Повторное проигрывание только 1 трека
Нажмите кнопку REPEAT один раз, и на
дисплее появится индикатор REP.
Повторное проигрывание всех треков
Нажмите кнопку REPEAT два раза, и на
дисплее появится индикатор .
Повторное проигрывание
программированных треков
После того, как вы запрограммировали
треки, нажмите кнопку REPEAT два раза и на
дисплее появится индикатор .
Внимание
• Не открывайте крышку отсека для компактдисков во время воспроизведения компактдиска.
• Для извлечения компакт-диска из отсека,
убедитесь, что вращение диска остановлено,
после чего нажмите кнопку OPEN .
• Открытие крышки для компакт-дисков при
включенной функции repeat (на дисплее
отображаются индикаторы REP или отменит
данную функцию.
ПРОСЛУШИВАНИЕ MP3 ДИСКОВ
Вы можете использовать этот аппарат для
проигрывания треков в MP3 формате,
записанных на дисках CD-R/RW.
Названия и мена файлов не отображаются на
дисплее устройства, только номера папок и
треков.
Содержимое MP3 диска будет
воспроизводиться в следующем порядке:
• Воспроизведение, начинающееся с первой
сессии.
• Только 1 сессия воспроизводится из
мультисессионного диска
• Только данные формата MP3 отображаются
на дисплее как один трек.
Внимание
• Несмотря на то, что данный аппарат
воспроизводит данные MP3 формата на
битрейте 32-320 kbps and 32 kHz и частоте
44.1 kHz , мы рекомендуем качество записи
128 kbps или более при 44.1 kHz.
Просмотр папок
Номер папки, отображаемой на дисплее,
показывает весь диск как папку номер 1. В
случае с компакт-дисками как это было
показано выше, файлы A.mp3, B.mp3, C.mp3
–все будут входить в папку 1. Создаваемые
при записи на компакт-диск папки будут
появляться на дисплее в качестве папок 2 и
так далее. Таким образом, файлы A.mp3,
B.mp3 and C.mp3 не будут находиться в
папках, и поэтому воспроизводиться не
будут.
Отображается номер папки 5 .
При выборе папки, отображается количество
треков в папке. Для отображения K.mp3,
РУССКИЙ
22
3476.qxd 01.04.2005 22:13 Page 22
Page 23

выберите трек 2.
• Номер папки может быть отображен неверно
в зависимости от программы MP3 или
программного обеспечения.
Важно!
Перед тем, как кол-во папок отобразиться на
дисплее должно пройти немного времени, в
том случае, если на диске содержится
большой объем данных (много треков).
1. Переведите переключатель FUNCTION в
положение CD.
Дисплей начнет мигать.
Если диск не загружен, то на дисплее
появится индикатор [- - -].
Если диск загружен, то на дисплее
отображается кол-во папок MP3.
2. Загрузка диска.
Нажмите кнопку OPEN для открытия дверцы
CD.
• Поместите CD этикеткой вверх.
• Нельзя помещать в отсек более одного
диска.
3. Закройте крышку CD отсека.
• Закройте дверцу CD .
На дисплее отобразится кол-во MP3 папок.
4. Нажмите кнопку PLAY/PAUSE (
/II).
Начнется воспроизведение диска с 1 трека в
1 папке.
• После окончания воспроизведения 1 трека
диск автоматически останавливается.
Остановка диска
Нажмите кнопку STOP () во время
воспроизведения диска.
Извлечение диска
Нажмите кнопку STOP () и после этого
кнопку OPEN.
Внимание
• Не нажимайте кнопки OPEN во время
воспроизведения диска.
• Для извлечения компакт-диска, убедитесь в
том, что вращение его прекратилось, и
нажмите кнопку OPEN.
• Прослушивание MP3 (продолж.)
Поиск трека
1. Нажмите кнопку FOLDER ( èëè ) и
выберите папку.
Номер папки будет мигать в течение 2
секунд, затем на дисплее отобразится кол-во
треков в папке.
2. Нажмите кнопку SKIP/SEARCH ( èëè ) и
удерживайте ее до тех пор, пока номер
нужного вам трека не появится на дисплее,
РУССКИЙ
23
3476.qxd 01.04.2005 22:13 Page 23
Page 24

затем нажмите кнопку PLAY/PAUSE (/II).
• Вы можете выбирать треки внутри одной
папки с помощью кнопки SKIP/SEARCH
(èëè).
Повтор во время проигрывания
Эта функция повторного воспроизведения
всех или некоторых треков на MP3 диске.
Эта функция также позволяет повторно
проигрывать все треки в папке. Нажмите
кнопку REPEAT и индикатор REP сменится на
индикатор REP + FOLDER, далее , затем
функция отключится.
Повторное воспроизведение 1 трека
Нажмите кнопку REPEAT, и на дисплее
появится индикатор REP.
Повторное воспроизведение треков в
выбранной папке
Нажмите кнопку REPEAT, и на дисплее
появится индикатор REP + FOLDER .
Повторное воспроизведение всех треков
Нажмите кнопку REPEAT, и на дисплее
появится индикатор
Повторное воспроизведение
запрограммированных треков
После того, как вы запрограммировали
нужные вам треки (см. стр. 18), нажмите
кнопку REPEAT и на нем появится индикатор
Для остановки повторного воспроизведения
Нажмите кнопку REPEAT и удерживайте ее до
тех пор, пока индикатор REP, REP+ FOLDER
или не исчезнет с дисплея.
Важно!
В зависимости от файловой структуры:
• Во время проигрывания MP3 переключение
на предыдущий трек не допускается.
• Быстрая перемотка и скорость
воспроизведения файлов MP3 в обратном
порядке медленнее, чем у обычного
компакт-диска.
ПРОГРАММНОЕ ВОСПРОИЗВЕДЕНИЕ
Вы можете выбрать вплоть до 20 любимых
треков для проигрывания в нужном вам
порядке.
Программа: Play Order (Step) Òðåê
Первый #6
Второй #2
Важная информация!
• Если диск не загружен, вставьте диск и
закройте дверцу проигрывателя компактдисков.
• Нажмите кнопку STOP () во время
проигрывания диска.
1. Нажмите кнопку PROGRAM. На дисплее
отобразится индикатор PROGRAM и 00.
• Если в памяти аппарата продолжает
храниться предыдущий набор
запрограммированных треков, на дисплее
отобразится первый трек из этого набора.
2 Нажмите кнопку SKIP/SEARCH () повторно
и удерживайте ее, пока не выберите трек 6.
• Для проигрывания дисков, содержащих
файлы MP3, нажмите кнопку FOLDER (/)
и выберите папку и выберите нужный трек.
3. Нажмите кнопку PROGRAM.
4. Нажмите кнопку SKIP/SEARCH () повторно и
удерживайте ее до тех пор, пока не выберите
трек
5. Нажмите кнопку PROGRAM.
• После того, как вы запрограммируете 20
треков, на дисплее они появятся в виде
одного трека [- -] или [- - -]. В таком случае
РУССКИЙ
24
3476.qxd 01.04.2005 22:13 Page 24
Page 25

не сможете добавить треки дополнительно
6. Нажмите кнопку PLAY/PAUSE ().
Начнется программное воспроизведение.
ВОСПРОИЗВЕДЕНИЕ ТОЙ ЖЕ САМОЙ
ПРОГРАММЫ
Нажмите кнопку PROGRAM при
остановленном воспроизведении, затем
нажмите кнопку PLAY/PAUSE (
/II).
Нажмите кнопку PROGRAM при
остановленном воспроизведении, на
дисплее замигает первый сохраненный в
памяти трек.
ОТОБРАЖЕНИЕ ПРОГРАММЫ НА ДИСПЛЕЕ
Нажмите кнопку PROGRAM при
остановленном воспроизведении.
Каждый раз при нажатии этой кнопки,
запрограммированные треки будут
появляться на дисплее в установленном
порядке.
ИЗМЕНЕНИЕ ЗАПРОГРАМИРОВАННЫХ
ТРЕКОВ
1. Выведите на дисплей ту программу, которую
вы хотите изменить.
2. Нажмите кнопку SKIP/SEARCH () повторно
для того, чтобы вывести на дисплей нужные
вам треки.
3. Нажмите кнопку PROGRAM.
ДОБАВЛЕНИЕ ТРЕКА К КОНЦУ СПИСКА
ЗАПРОГРАМИРОВАННЫХ ТРЕКОВ
1. Нажмите кнопку PROGRAM повторно, и на
дисплее появится индикатор «00».
2. Нажмите кнопку SKIP/SEARCH () повторно,
на дисплее появится нужный вам трек.
3. Нажмите кнопку PROGRAM.
• После того, как вы запрограммировали 20
треков, на дисплее появятся символы [- -]
или [- - -] . В этом случае вы не сможете
больше добавлять треки в программу.
СТИРАНИЕ ПРОГРАММЫ, ХРАНЯЩЕЙСЯ В
ПАМЯТИ
Нажмите кнопку PROGRAM при
остановленном воспроизведении и нажмите
кнопку STOP().
ВНИМАНИЕ
Если вы откроете дверцу компактпроигрывателя, все запрограммированные
треки будут стерты из памяти.
ПРОСЛУШИВАНИЕ КАССЕТНЫХ
ПЛЕНОК
1. Переключите переключатель FUNCTION в
позицию TAPE/OFF.
2. Нажмите кнопку STOP/EJECT и откройте
дверцу кассетного отсека.
3. Закройте кассетный отсек.
4. Нажмите кнопку PLAY . Аппарат начнет
воспроизведение пленки.
• При окончании пленки аппарат
автоматически отключится
РУССКИЙ
25
3476.qxd 01.04.2005 22:13 Page 25
Page 26

ОСТАНОВКА ВОСПРОИЗВЕДЕНИЯ КАССТЫ
Нажмите кнопку STOP/EJECT (/).
• Для извлечения кассеты нажмите кнопку
STOP/EJECT (/) åùå ðàç.
ПАУЗА
Нажмите кнопку PAUSE (II) во время
воспроизведения или записи.
• Нажмите кнопку еще раз, чтобы возобновить
воспроизведение или запись.
БЫСТРАЯ ПЕРЕМОТКА ВПЕРЕД/НАЗАД
Нажмите кнопку быстрой перемотки вперед
FF () или назад REW () при
остановленном воспроизведении.
• Перемотав пленку на нужное вам место,
нажмите кнопку PLAY , чтобы начать
воспроизведение.
• Аппарат не имеет функции авто поиска
начала песни при быстрой перемотке.
Кассетная пленка
Используйте кассетные пленки только типа
NORMAL (type 1). Не используйте пленки
типа (type 2) или металлические пленки (тип
4).
• Не используйте кассеты с бесконечной
магнитной лентой.
• Кассеты продолжительностью 100 или более
минут очень тонкие и легко растягиваются.
Пленка может запутаться в кассетном
механизме. Не используйте такие пленки.
• Вы не можете записывать в самом начале
пленки. Перемотайте вперед.
• Когда пленка становится слабо натянутой,
используйте карандаш для того, чтобы ее
подтянуть.
• Не храните пленки в следующих местах:
местах с повышенной запыленностью,
высокой влажностью и высокой
температурой.
Для предотвращения стирания пленки
• Используйте отвертку для удаления ушек
наверху кассеты для предотвращения
случайного стирания записи.
• Если вы по ошибке удалили ушко и хотели бы
сделать на эту пленку запись, закройте
отверстие скотчем.
ПРОСЛУШИВАНИЕ РАДИО
1. Переместите переключатель FUNCTION в
позицию RADIO.
2. Переместите переключатель BAND в
позицию AM или FM.
3. Настройтесь на нужную радиостанцию с
помощью ручки настройки («TUNER») в
диапазоне FM: 64-108 MHz AM: 530-1600kHz.
Стерео прием FM
Вы можете использовать переключатель
BEAT CANCEL на задней панели аппарата для
смены режимов стерео [FM ST] и
моноприема [MONO]. Если переключатель
установлен в позицию FM ST, ваш аппарат
будет осуществлять трансляцию в стерео
режиме.
• Если станция транслируется в стерео
режиме FM STEREO, на дисплее появится
соответствующий индикатор.
• Если прием плохой, переключитесь в
позицию MONO для того, чтобы улучшить
качество приема сигнала.
• Этот аппарат не поддерживает стерео
вещание AM передач.
ЗАПИСЬ
1. Нажмите кнопку
STOP/EJECT,
чтобы открыть
кассетный отсек и
вставить пленку.
• Загрузите пленку.
2. Закройте
кассетный отсек.
• Остановите
РУССКИЙ
26
3476.qxd 01.04.2005 22:13 Page 26
Page 27

пленку при перемотке в том месте, с
которого вы хотите начать запись.
3. Выбор источника записи.
При синхронной записи с компакт диска
(CD synch record):
Выберите трек, который вы хотите записать.
• Чтобы записать только выбранные вами
отдельные треки, запрограммируйте их
Чтобы осуществить запись с радио:
Настройтесь на радиостанцию, с которой вы
хотите сделать запись, (см. стр. 22)
Для записи звука со встроенного
микрофона:
Установите переключатель FUNCTION в
позицию TAPE/OFF.
4. Нажмите кнопку RECORD ().
При начале записи происходит
автоматическое нажатие кнопки PLAY
• При синхронной записи компакт-диска (CD
synch record), режим записи и
воспроизведение компакт диска начинают
работать одновременно.
• Вы также можете начать запись с середины
трека, если нажмете кнопку RECORD () во
время паузы в воспроизведении CD.
• Когда пленка заканчивается, запись
автоматически останавливается.
• При включенном режиме синхронной записи
с компакт-диска, вы можете временно
остановить проигрывание компакт-диска
нажатием кнопки STOP/EJECT.
Нажмите кнопку PLAY/PAUSE (/II) для
продолжения воспроизведения компактдиска. Нажав кнопку STOP (?) , вы остановите
проигрывание компакт-диска.
Важно!
• Режим синхронной записи CD начинает
работать автоматически при нажатии кнопки
RECORD ().
• При нажатии кнопки RECORD (),
происходит одновременное включение
кнопки PLAY (). При этом может
повыситься сопротивление нажатию кнопки.
Это не является неисправностью.
ОСТАНОВКА ЗАПИСИ ПЛЕНКИ
Нажмите кнопку STOP/EJECT .
• Во время записи в синхронном режиме CD
synch , вы можете остановить проигрывание
компакт-диска нажатием пленки STOP/EJECT
ВО ВРЕМЯ ЗАПИСИ СЛЫШНЫ ШУМЫ
Во время записи с радио, могут быть
слышны шумы. Если это происходит,
установите переключатель BEAT CANCEL
на задней панели аппарата в положение,
при котором шумы исчезнут (1 или 2).
ОБСЛУЖИВАНИЕ И УХОД ЗА
АППАРАТОМ
ОЧИСТКА ГОЛОВОК ПЛЕНКИ
Если во время воспроизведения или записи;
• качество звука ухудшилось,
• запись нечеткая,
• пленка не была полностью стерта,
• пленка застревает в механизме.
Причиной наверняка является накопившаяся
грязь на головках механизма, на валике и
ведущего вала. Приобретите набор
чистящих устройств (или чистящую пленку) и
прочистите головки. Вы должны прочищать
пленку после каждых 10 часов эксплуатации
кассетного механизма.
Нажмите кнопку STOP/EJECT для открытия
кассетного отсека и почистите область,
показанную на иллюстрации.
• После эксплуатации аппарата в течение
долгого периода времени, головки
кассетного механизма намагнитятся, что
приведет к ухудшению качества звука. Если
это произойдет, используйте
размагничивающее устройство, имеющееся
в продаже.
Очистка аппарата
Используйте мягкую тряпочку для того, чтобы
вытереть с линзы пыль. Когда аппарат
сильно загрязнен, протрите его тряпкой,
увлажненной нейтральным моющим
раствором.
• Не используйте бензин или растворитель для
прочистки аппарата.
РЕШЕНИЕ ПРОБЛЕМ, ВОЗНИКАЮЩИХ
ПРИ ЭКСПЛУАТАЦИИ АППАРАТА
Убедитесь в следующем перед тем, как
обращаться в гарантийный сервис.
Нет звука
1. Сетевой шнур отошел от розетки.
2. Батареи вставлены неправильно.
3. Батарейки сели.
4. Понизилась громкость.
5. Вставлены наушники.
1. Вставьте его плотнее.
2. Вставьте правильно.
3. Замените их.
4. Настройка громкости.
5. Отключите наушники.
CD/MP3 ПРОИГРЫВАНИЕ
Воспроизведение CD/MP3 не работает
1. Формат диска неправильный.
2. Диск перевернут.
РУССКИЙ
27
3476.qxd 01.04.2005 22:13 Page 27
Page 28

3. Диск загрязнен.
4 Диск на паузе.
5 Функция неправильна.
6 Линза запотела.
1. Используйте правильный формат диска.
2. Переверните диск.
3. Прочистите диск.
4. Нажмите PLAY/PAUSE (14).
5. Установите переключатель FUNCTION в
позицию CD.
6. Подождите 1 час.
Проскакивает звук
1. Диск серьезно поврежден.
2. Аппарат вибрирует.
1. Поменяйте диск.
2. Установите аппарат в устойчивую позицию
Кассетный отсек
Пленка не устанавливается, кассетный отсек
не закрывается
• Пленка перевернута.
• Переверните ее в нужное положение.
Пленка не проигрывается
1. Пленка повреждена.
2. Нажата кнопка PAUSE (4).
3. Батарейки садятся.
4. Пленка не натянута.
1. Поменяйте пленку.
2. Нажмите кнопку PAUSE (4).
3. Замените их.
4. Используйте карандаш для натяжки.
Запись пленки невозможна
С кассеты удалены ушки
Заклейте скотчем место предохранительных
ушек кассеты
Звук искажен , запись стерта не полностью
1. Головки загрязнены.
2. Вы используете пленку high position или
металлическую пленку.
1. Прочистите их.
2. Используйте пленку normal.
Слишком много статического напряжения
1. Электропомехи.
2. Помехи от работающих моторов,
телевидения.
• Закрепите сетевой шнур в розетке.
• Перенесите аппарат в другое место.
• Выключите телевизор.
• Настройте антенну.
ТЕХНИЧЕСКИЕ ХАРАКТЕРИСТИКИ
Проигрыватель
Частота дискретизац. 44.1 kHz
Лазер: Бесконтакный оптический
лазер (полупроводниковый)
Радио
Прием частот: FM: 64-108 МГц AM: 530-1600
КГц
MP3
Файловая система: ISO 9660 (level 1), Joliet
Частота дискретизации: 32 kHz, 44.1 kHz
Скорость передачи битов: 32-320 kbps
Кассетный отсек
Треки: 4-дорожки 2-канальный стерео
Мотор:Моторный механизм с электронной
регулировкой
Головки: магнитная головка для стирания
записи , AC bias для записи
Микрофон
Всенаправленный микрофон
ОБЩИЕ ХАР-КИ
Maкс. мощность:10 Вт.: 2 х 5Вт. (3Вт. + 2Вт.)
Разъем для наушников (Мини стерео)
Электропитание AC 230 В~ 50 Гц
DC12V(D-sizex8)
Потребляемая мощность 15 Вт
Размеры: 432 (W) x 157 (H) x 231 (D) mm
Из-за постоянных улучшений,
характеристики и дизайн изделия могут
изменяться без предварительного
уведомления.
Срок службы прибора - неменее 5-ти лет
Данное изделие соответствует всем
требуемым европейским и
российским стандартам безопасности
и гигиены.
Производитель: АН-ДЕР ПРОДАКТС ГмбХ, Австрия
Йеневайнгассе, 10/10, 1210, Вена, Австрия
РУССКИЙ
28
3476.qxd 01.04.2005 22:13 Page 28
Page 29

29
ПОЛЯ ДЛЯ ЗАМЕТОК
3476.qxd 01.04.2005 22:13 Page 29
Page 30

ПОЛЯ ДЛЯ ЗАМЕТОК
3476.qxd 01.04.2005 22:13 Page 30
Page 31

3476.qxd 01.04.2005 22:13 Page 31
Page 32

3476.qxd 01.04.2005 22:13 Page 32
 Loading...