Page 1
VIKING
USE AND CARE MANUAL
Outdoor Gas Grills
Page 2
Congratulations...
Your purchase of this product attests to the importance you
place upon the quality and performance of the major appliances you
use. With minimal care, as outlined in this guide, this product is
designed to provide you with years of dependable service. Please
take the few minutes necessary to learn the proper and efficient use
and care of this quality product.
We appreciate your choosing a Viking Range Corporation
product, and hope that you will again select our products for your
other major appliance needs.
Table of Contents
Features of Your Outdoor Gas Grill ....................... 3
Important Safety Instructions ............................ 4
Before Lighting Your Grill .............................. 6
Using the Grill with Outdoor Approved Hoods ............. 6
Lighting the Grill ..................................... 7
Using the Grill ....................................... 9
Using the Smoker Burner and Smoker Box ................. 14
Using the Rotisserie ................................... 15
Cleaning and Maintenance ............................. 17
Battery Replacement .................................. 20
Troubleshooting Guide ................................ 21
Service Information ................................... 22
Warranty ..................................... Rear Cover
If you smell gas:
1. Shut off gas to the appliance.
2. Extinguish any open flames.
3. Open lid.
4. If odor continues, immediately call your gas supplier.
.
Do not store or use gasoline or other flammable vapors and
liquids in the vicinity of this or any other appliance.
2.
Propane/Butane (G31-G30) cylinder not connected for use
shall not be stored in the vicinity of this or any other
appliance.
Page 3
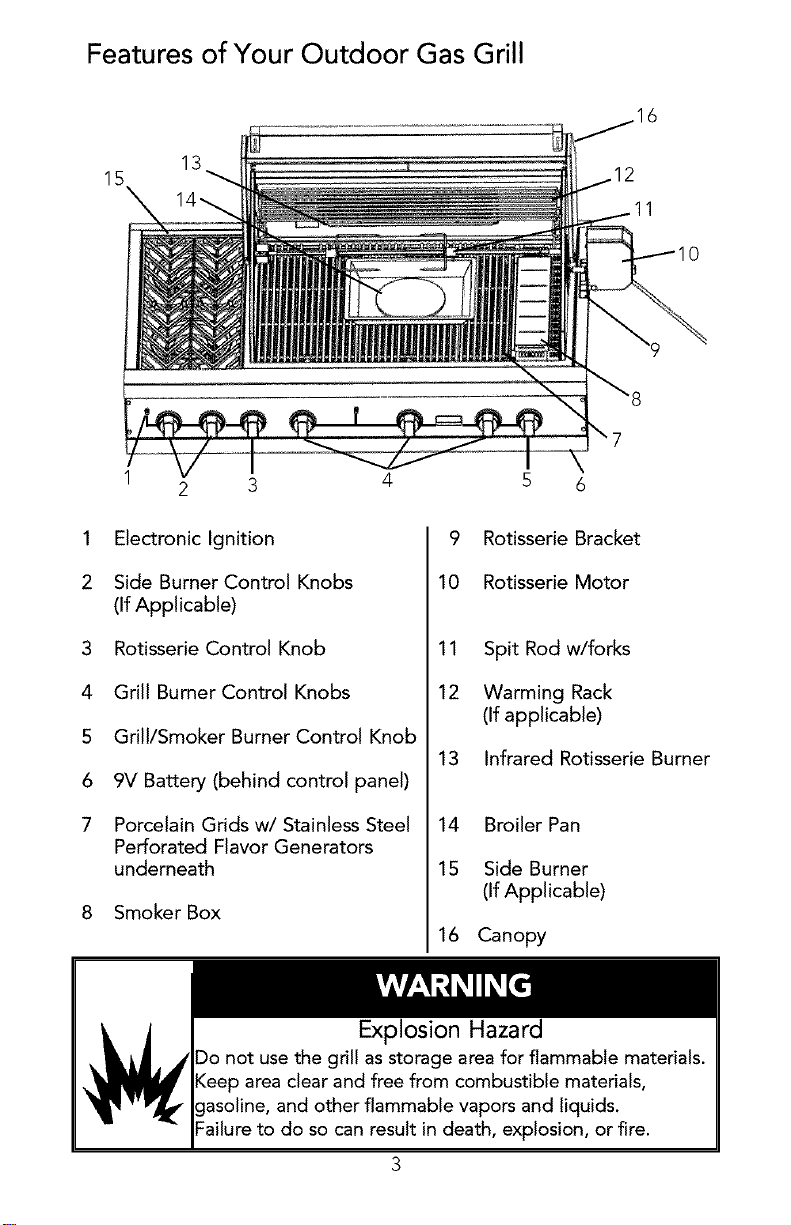
Features of Your Outdoor Gas Grill
1
13
2 3
4
15
1 Electronic Ignition
2 Side Burner Control Knobs
(If Applicable)
3 Rotisserie Control Knob
4 Grill Burner Control Knobs
5 Grill/Smoker Burner Control Knob
6 9V Battery (behind control panel)
7
5 6
9
Rotisserie Bracket
10
Rotisserie Motor
11 Spit Rod w/forks
12 Warming Rack
(If applicable)
13 Infrared Rotisserie Burner
7 Porcelain Grids w/Stainless Steel
Perforated Flavor Generators
underneath
8 Smoker Box
Explosion Hazard
Do not use the grill as storage area for flammable materials.
Keep area clear and free from combustible materials,
asoline, and other flammable vapors and liquids.
Failure to do so can result in death, explosion, or fire.
14 Broiler Pan
15 Side Burner
(If Applicable)
16 Canopy
Page 4
IMPORTANT SAFETY INSTRUCTIONS
_i WARNING - To reduce the risk of fire, electric shock, or injury, read and
follow these basic precautions before operal_ng your gas grill or side burners.
1. Your unit should be properly installed and connected to the gas for which it
was designed. Do not use charcoal, wood chips, or other material in your
grill. The smoker tray is the only area designed to hold wood chips or
other smoke flavor enhancers.
2. Have the technician show you the location of the gas shut-off valve so you
can shut offthe gas supply in an emergency. If you smell gas, the
connections are not properly sealed oryou may have a hole in the gas
supply pipe or hose. Determining where the gas leak is should be left to a
qualified technician. Warranty service must be performed by an authorized
service agency.
3. Children should not be left alone or unattended in an area where the gas
grill is being used. Never allow them to sit, stand or play on or around the
grill at any time. Do not store items of interest to children around the grill.
Never allow children to crawl inside the carl or masonry enclosure.
4. Use a covered hand when opening the hood and do so slowly to allow
heat and steam to escape. To avoid burns when cooking, use long
handled BBQ tools. Never lean over an open grill.
5. Use sturdy, properly insulated gloves or potholders. Dish towels or other
substitutes can become entangled causing burns. Use dry potholders; wet
potholders create steam and cause burns. Keep potholders away from
open flames when lifting or moving utensils. Do not touch portions of the
grill rack or burner grate with potholders until the hot surfaces have cooled.
6. Only certain types of glass, heat-proof glass ceramic, earthenware, or other
glazed utensils are suitable for grill use. Use of these types of materials
may break with sudden temperature changes. Use only on low or medium
heat settings.
7. Select the correct pan size for the burner. Be sure the pan is large enough
to avoid boil-overs or spill-overs. This will both save cleaning, prevent
accumulations of food, heavy splattering or spill-overs that can catch fire.
8. Never leave the grill unattended. High flame and fatty meats will promote
flare ups.
9. This unit is for outdoor use only! Do not operate in enclosed areas. This
could result in carbon monoxide build-up which would result in injury or
death.
10. When using the grill, do not touch the grill grates, open burner grates or
immediate surrounding areas. These surfaces become extremely hot and
could cause burns. Be sure all controls are turned off and the unit has
cooled before touching or cleaning any surfaces.
11. Do not use aluminum foil to line drip pans or grill racks. This can upset
combustion air flow or trap excessive heat in the control area. The result of
this can be melted knobs.
4
Page 5
12. The handle of the utensil should be positioned so that it does not extend
over adjacent surface burners or interfere with closing the canopy. This will
minimize burns, ignition of flammable materials and possible spillage. Let
hot pans cool in a safe place out of childreng reach.
13. _, WARNING: Before lighting the burners inspect the gas supply piping
or hose. If there is evidence of cuts, wear, or abrasion, it must be replaced
prior to use. Always keep your face and body as far away from the grill as
possible when lighting.
14. Never grill without the drip tray in place. Make sure it is pushed all the way
to the back in proper position to catch the drippings. Let the grease cool
before attempting to remove for cleaning or disposal. Do not allow large
amounts of grease to accumulate in the drip tray as they can catch on fire.
15. Before storing, make sure the gas grill is cool. The gas must be turned off
at the supply tank, removed and stored outside in a well ventilated area
out of the reach of children.
16. Keep the rotisserie motor cord away from heated areas of the grill.
17. When cooking in windy conditions, provide a wind break. Locate the unit
with proper clearance from combustible surfaces.
18. Spiders and insects can nest in the burners of the grill and block the gas
and airflow to the burner ports. This may cause a fire from behind the
manifold cover. Inspect and clean the burners periodically.
19. Keep the ventilation openings at the rear of the carl and cylinder enclosure
free and clear to allow proper flow of air. Do not obstruct the flow of
combustion and ventilation air.
20. Clothing fires are potential hazards. Do not wear long flowing sleeves
around the grill. They are easily caught on pan handles or ignited by
burners and are generally in the way. Highly flammable clothing, especially
synthetic fabrics, should not be worn while cooking.
21. Do not heat any unopened glass or metal containers on the grill. Pressure
may build-up and cause the container to burst resulting in serious personal
harm or damage to the grill.
22. Do not move the appliance during its use.
23. Be sure all controls are turned off and the grill is cool before using any type
of aerosol cleaner on or around the grill. The chemical that produces the
spraying action could, in the presence of heat, ignite or cause metal paris
to corrode.
24. Do not remove the plastic cover on the rotisserie motor switch due to
safety consideralJons.
25. If the following instructions are not followed exactly, a fire causing death or
serious injury may occur:
-Do not store a spare gas cylinder under or near this appliance
-Never fill the cylinder beyond 80 percent full.
Page 6
Before Lighting Your Grill
Prior to turning the gas on, inspect the gas supply tubing or hose.
Look for evidence of abrasion, cuts, wear and tear, or other damage which
could require replacement prior to use. Make sure all burner control knobs
are off. Do not attempt to light the burners if the smell of gas is present.
Check the connection with a soap and water solution after attaching
the hose. Make sure there is gas in the tank and the tank is upright.
_, CAUTION: Wait at least 5 minutes before relighting a hot grill to
allow any accumulated gas to dissipate. Keep a spray bottle of soapy water
near the gas supply valve and check the connections for gas leaks before each
use.
To properly install the flavor generator plates:
Place the stainless steel perforated flavor generator plates so that the front and
rear tabs rest on the grill frame. The flash tube must be accessible through the
plates. If the flash tube
is not accessible, the
flavor generator plates
are not properly
installed.
Flash Tube
Using the Grill with Outdoor Approved Hoods
• Outdoor approved hood models should be installed in a covered non-
enclosed area. They should also be protected from natural elements (such as
rain) as much as possible.
• Always turn the outdoor hood on to the HI position before lighting the grill.
• Keep the grill canopy closed as much as possible when cooking so smoke is
exhausted out the back of the grill. This allows for optimum performance of
the hood.
• During breezy conditions, the performance of the outdoor hood may be
compromised.
Ughting the Grill (T-Series Models)
When lighting a burner, always pay close attention to what you are
doing. Be certain you are pressing the battery ignition button (T-Series only)
corresponding to the burner you are lighting.
6
Page 7
Battery Ignitor
(T-Series only)
(line indicates
corresponding
burners)
Side Burner Rotisserie Grill Burner
Control Knob Control Knob Control Knob
To light grill/smoker burner:
Open the hood or remove covers, push and turn the control knob until
the High position on the knob aligns with the indicator line on the control panel
and continue to hold the knob in. Press the electronic ignition button
corresponding to the burner being lit. You will hear a clicking sound. After the
burner lights, hold the control knob in for about 5 seconds longer or until the
burner remains lit. Turn the control knob to the desired setting. Ifthe burner
does not light in 4 seconds, turn the knob to "off" and wait 5 minutes before
trying again. This will allow accumulated gas to dissipate. After several failed
attempts the burner can be lit with a paper book match. (See below).
If you have just attempted to light the burner with the ignitor, allow 5
minutes for any accumulated gas to dissipate. Place the lit match through the
grid next to the flash tube of the burner being lit. Keep your face as far away
from the grill as possible. Make sure the match is adjacent to the flash tube.
Push and turn the control knob until the High position on the knob aligns with
the indicator line on the control panel. Make sure you are turning the control
knob that corresponds with the burner being lit. If the burner does not light in
4 seoonds turn the knob "off", wait 5 minutes and try again. If the burner will
not light after several attempts, see the "Troubleshooting" section.
Flash tube
7
Page 8
To light the side burners:
First remove the burner cover or any cooking utensil from the
burner grate.
_i CAUTION: The side burner cover may be hot if the grill burners
are in operation. Push and turn the control knob until the High
position aligns with the indicator line on the control panel.
Immediately press the electronic ignition button corresponding to the
burners being lit until the burner is lit or until 4 seconds pass. If the
burner does not light after several attempts, wait 5 minutes to allow
any accumulated gas to dissipate. If the burner will not light after
several attempts, then the burner can be match lit by holding a lit
match next to the burner ports. Push and turn the control knob until the
High position on the knob aligns with the indicator line on the control panel.
To light TruSear TM infrared burner (if applicable):
Before lighting the burner, remove the stainless steel cover. Push in, turn the
TruSear TM infrared control knob until the High position on the knob aligns with the indicator line on the control panel and continue to hold the knob in. Press
the electronic ignition button which corresponds to the control knob. You will
hear a clicking sound. After the burner lights, hold the control knob in for
about 5 seconds longer or until the burner remains lit. Once lit, turn the
control knob to the desired setting. If the burner does not light within 4
seconds, release and turn the control knob to "off". Wait 5 minutes for any
accumulated gas to dissipate. After several failed attempts the burner can be
lit with a paper book match.
Ughting the Grill (E-Series Models)
To light the grill / smoker burners:
Make sure the unit is plugged into a properly grounded
receptacle. Turn the appropriate control knob counter clockwise to any
position. This control is both a gas valve and an electric switch.
Burners will ignite at any "on" position with the automatic reignition
system. If the flame goes out for any reason, the burners will
automatically reignite if the gas is still flowing. When gas is permitted
to flow to the burners, the electric igniters start sparking. On all
surface igniters you should hear a "clicking" sound. If you do not, turn
off the control and check that the unit is plugged in and that the fuse
or circuit breaker is not blown or tripped.
Within a few moments, enough gas will have traveled to the
burner to be able to light. When the burner lights, turn the burner
control to any position to adjust the flame size.
Page 9
To light the infrared rotisserie burner (T-Series and E-Series Models)
The location of the infrared burner makes it more susceptible to
strong wind conditions, more so than the protected grill burners. For this
reason you should avoid using it during windy conditions. Open the hood.
Push in, turn the rotisserie control knob until the High position on the knob
aligns with the indicator line on the control panel and continue to hold the
knob in. Press the electronic ignition button which corresponds to the
rotisserie control knob. You will hear a clicking sound. After the burner lights,
hold the rotisserie control knob in for about 5 seconds longer or until the
burner remains lit. Once lit, turn the control knob to the desired setting. If
the burner does not light within 4 seconds, release and turn the control knob to "off". Wait 5 minutes for any accumulated gas to dissipate. If the burner
does not light after several attempts, then the burner can be lit by holding a lit
match to the burner (with the control knob pushed in at the light position).
Push and turn the control knob until the High position on the knob aligns with
the indicator line on the control panel. Make sure you are turning the control
knob that corresponds with the burner being lit. If relighting a hot burner, wait
5 minutes. Never leave the rolJsserie control knob on if rotisserie is not in use.
Using the Grill
• Check to be certain the drip tray is in place.
• Light the grill burners using the lighting instructions.
• Turn the control knob to "HI" and preheat for 5 - 7 minutes.
• Place the food on the grill and cook to the desired doneness.
Adjust heat setting, if necessary. The control knob may be set to
any position between High and Low.
• Allow grill to cool before cleaning. (Drip tray should be cleaned
after each use.)
Canopy Thermometer (If applicable)
Your outdoor grill is equipped with a thermometer on the
canopy. The thermometer is designed to aide in the preheating of
the grill and closed canopy grilling. The estimated cooking
temperatures with the canopy closed are:
WARM- 150°F (65°C)
COLD SMOKE- 150°F- 200°F
(65oc _ 93oc)
SMOKE- 200°F - 300°F
(93°C - 149°C)
GRILL- 300°F - 750°F
(149°C - 399°C)
Page 10
"T" Series Canopy
Thermometer
"E" Series Canopy
Thermometer
Grill Cooking tips
Grilling can be either an open or closed canopy process.
Open canopy grilling is excellent for foods requiring quick searing like
steaks, burgers, chops, and hot dogs. Closed canopy grilling is
similar to roasting in an oven. Food is cooked by heat reflection from
the cover as well as heat from the burners below.
• When grilling chicken, roasts, well done steaks or chops and thick pieces of
meat, sear on High. Then reduce the heat setting to prevent excessive flare-
up. This will allow the food to cook through without burning the outside.
• When grilling large pieces of meat, use a meat thermometer to insure that
meats are either rare, medium and well cooked.
• After steaks, chops, or hamburgers have been allowed to sear for
approximately 1 minute, you may slide a spatula under the meat and turn it
approximately 9@ so that a waffle pattern will be seared onto the food.
• Use a metal spatula or tongs instead of a fork to turn the meat. A fork will
puncture the meat, allowing juices to escape.
• Turn the meat over only once. Juices are lost when steaks, chops, or
hamburgers are turned several times. The best time to turn the meat is after
the juices have begun to bubble to the surface.
• To test for doneness, make a small slash in the center of the meat, not the
edge. This will prevent loss of juices.
• Occasionally there may be flare-upa or flames above the grill due to drops of
fat falling onto the flavor generator plates. It is normal to have some flare-up
during grilling. If necessary, use a long spatula to move food to another area
until the flames subside.
10
Page 11
Grill Cooking Chart*
FOOD WEIGHT OR CONTROL TOTAL SPECIAL
I THICKNESS SEqq-ING SUGGESTED INSTRUCTIONS
Beef MED 8 - 15 minutes
Hamburgers
Steaks
Rib, Club,
Sidoin,
T-Bone,
Porterhouse
Rare
140oF/60oC
Medium
160°F/71 °C
Wdldone
170oF/77oC
Tenderloin
1/2 - 3/4"
13 - 1 9 cm
1' (25 cm)
1-1/2" (38 cm)
1" (25 cm)
1-1/2" (38 cm)
1" (25 cm)
1-1/2" (38 cm)
5 Ibs(23 kg)
MED
MED
MED-HI
COOKING TIME AND TIPS
8-12 minutes
11-16 minutes
10-12 minutes
16-25 minutes
20-30 minutes
25-35 minutes
30-40 minutes
Grill turning once
when juices rise
to the surface
We suggest that
ground chuck be
used for
hamburgers, as it
will give you a
juicier hamburger
Do not leave
hamburgers
unattended since
a flare-up could
occw quickly
Remove excess
fat from edge
Slash remaining
fat at 2 inch
intervals to keep
edges from
curling Grill turning
once
Remove surface
fat and fatty
tissue Fdd over
thin end to form
uniformly thick
piece Bind with
stdng Grill,
turning as needed to
blown evenly Brush
often with melted
margarine or oil
Poultry
Chicken
halves or
quarte_s
Pork
Chops
2 - 3 Ibs
1 9 - 25 cm
1/2" (1 3 cm)
1" (25 cm)
MED-HI
MED
MED
11
1 - lY2 hours
40 - 60 minutes
20-40 minutes
35-60 minutes
Place skin side
up Grill, turning and
brushing frequently
with melted
butter or oil
Remove excess fat
from edge Slash
remaining fat at 2-
inch intervals to
keep edge from
curling Grill,
turning once and
moving if necessary
Page 12
Grill Cooking Chart*
FOOD WEIGHT OR CONTROL TOTAL SPECIAL
THICKNESS SETTING SUGGESTED INSTRUCTIONS
COOKING TIME AND TIPS
Ribs MED 45 - 60 minutes
Ham Steaks
Hot Dogs
1/2" (1 3 cm)
MED
12-15 minutes
5 - 10 minutes
Fish
Steaks
Halibut
Salmon
3/4" - 1"
9 - 1 4 kg
MED-HI
5 - 10 minutes
Swordfish
Whole
Catfish
Trout
4- 8 ounces
110- 230 g
MED-HI
10-12 minutes
Vegetables
Carrots
Onions
Potatoes
Zucchini,
Squash
Whole
Whole
Whole
Sliced (halves or
quarters)
MED - LOW
LOW
LOW
MED
35 - 40 minutes
20 minutes
45- 50 minutes
30 minutes
Grill, turning
occasionally
During last few
minutes, brush with
BBQ sauce, turn
several times
Remove excess fat
from edge Slash
remaining fat at 2-
inch intervals
Grill turning once
Slit skin before
cooking Grill,
turning once
Grill, turning once
Brush with melted
butteB oil, or
marinade to keep
fish moist
Grill, turning once
Brush with melted
butteB oil, or
marinade to keep
fish moist
Scrub, don't peel
Wrap in foil and lay
directly on grill
grate
Butter, wrap in foil
Turn often
Oil, wrap in foil
Turn often
Butter lightly to
prevent sticking
*NOTE: These times are recommendations only. Variations in cuts of
meats and personal taste may alter cooking times. Use your
discretion when grilling.
12
Page 13
TruSear TM Infrared Grilling tips
Infrared grilling produces intense heat which quickly sears the meat.
Searing locks in flavor and juices while allowing the outer surface to absorb
smoke and food aroma that is produced as grease and drippings are vaporized
by the burner. The result is a crisp, flavorful outside with a tender, juicy inside.
As a general rule, foods will cook in about 1/2 the time they would take on an
ordinary grill.
• Preheat the grill.
• Ensure that meat is fully thawed and that all excess fat is trimmed away prior
to grilling.
• Leave the burner set on "HI" when placing food on the grill to sear.
• For thicker cuts of meats, adjust burner to a lower setting and continue
cooking until desired doneness is reached.
NOTE: When the TruSear TM infrared burner is not use, it must be covered with
the provided stainless steel cover for protection from outside elements such as
rain.
TruSear TM Infrared Cooking Chart*
FOOD WEIGHT OR CONTROL
Chicken Breast, Bnls
THICKNESS COOKING TIME SETTING
HI
Reduce to MED
SUGGESTED
2 - 3 mins each
side
Cook 8 - 10 rains
total Turn
occasionally to
prevent burning
outside
Hamburger 1/2 - 3/4" thick HI 2 rains each side to
Steaks, Ribeye 1 1/2 ' thick HI 3 rains each side for
Steaks, Filet 1" thick HI 3 rains each side for
Pork Chops 3/4" thick HI 4 rains each side
sear. Cook 6 - 8
mins total Turn
occasionaNy to
prevent burning
Rare
4 rains each side for
medium
rare to med rare
3 1/2 mins each
side for medium
*NOTE: These times are recommendations only, Variations in cuts of
meats and personal taste may alter cooking times. Use your
discretion when grilling.
13
Page 14
Using the Smoker Burner and Smoker Box
Using the smoker burner intensifies the flavor by adding
smoke to the grilling process. The additional smoke creates a
"cloud" around the food which permeates meats and vegetables
for added smoky flavor. In
order to use the smoker
box, remove the last set of
porcelain grids and flavor
generator plate on the
right hand side of the grill.
Set the smoker box in the
opening so that the front
and rear tabs rest on the
grill frame.
Using Wood Chips in
Smoker Box:
There are many
wood chips available and selection is based on personal taste. The
most common chips used are mesquite or hickory. Always soak the
chips in water prior to putting them into the box. Use the High
position to start the chips smoking, then reduce the heat to a lower
level to prevent them from drying out and flaming. If the wood
chips do flame up, add a small amount of water to extinguish the
flame. Use caution when adding water to a hot box to avoid steam
burns. This tray may also be filled with water to produce steam.
Whether smoking or steaming, the grill should remain closed as
much as possible to maximize the effect.
During extended roasting periods, it is normal to add fresh
wood chips and water to the box several times. Limit the amount
of times the canopy is opened. Each peek adds about 15 minutes
to the cooking time. _1_ CAUTION: Handle the smoker box with
care. The cover becomes extremely hot when being used. Use
sturdy, properly insulated gloves or do/potholders.
,Smoker
Box
14
Page 15
ELECTRICAL SHOCK HAZARD
This unit is equipped with a grounding plug for your
protection against shock hazard and should be plugged
directly into a properly grounded receptacle. Do not cut
or remove the grounding prong from this plug.
Keep the rotisserie motor electric cord away from the
heated surfaces of the grill.
Using the Rotisserie
The rotisserie burner is an infrared burner which provides
intense searing radiant heat. Preferred by professional chefs over
other methods, this intense heat is great for searing in the natural
juices and nutrients found in quality cuts of meat. Once lit, the
rotisserie burner will reach cooking temperatures in about 1 minute.
The red glow will even out in about 5 minutes.
To install the rotisserie motor, align the drive shaft on the
motor with the gear box on the side of the grill. Tighten the thumb
screws on the motor into the mounting brackets on the grill frame.
The skewer for the rotisserie is assembled into the gear box assembly
by placing the pointed end into the gear box and resting the
rounded end on the wheels on the left side of the grill.
Rotisserie
Skewer
Motor
Bracket
15
Page 16
To load the skewer, slide one of the rotisserie forks (prongs
facing away from the end) onto the skewer. Push the skewer through
the center of the food, then slide the second rotisserie fork (prongs
toward the food) onto the skewer. Center the product to be cooked
on the skewer then push the forks firmly toward the food. Tighten
the wing nuts with pliers. It may also be necessary to wrap the food
with butcher's string to secure loose portions. NEVER use nylon or
plastic string. Once the food is secure, insert the skewer into the
motor. To turn on rotisserie motor, flip the ON/OFF switch located on
the rotisserie motor assembly.
If needed, remove the grill grates. Place the basting pan
beneath the food. Keep canopy closed while using the rotisserie.
Each peek acids about 15 minutes to the cooking time. A meat
thermometer should be used when cooking large pieces of meat to
ensure that the meats are rare, medium, and well cooked.
Rotisserie Cooking Chart*
FOOD WEIGHT CONTROL SUGGESTED INTERNAL
SETTING COOKING TEMPERATURE
TIME
Beef Rib Roast 4 - 6 Ibs. MED-HI Rare: 145°F
Bnls Tip Roast 4 - 6 Ibs. MED-HI Rare: 145°F
Bone-in Pork Butt 3 - S Ibs MED - LOW 15 - 18 min/Ib 170°F
Bnls Pork Loin 3 - S Ibs MED 22 - 25 min/Ib 170°F
Smoked Ham Half S- 7 Ibs MED 22 - 25 min/Ib 170°F
Chicken
Whole Fryer 2 - 4 Ibs MED 25 - 30 min/Ib 180°F
Quarters MED-HI 20 - 22 min/Ib 180°F
Turkey
Whole 12 - 14 Ibs MED-HI 16 - 18 min/Ib 180°F
Breast S - 6 Ibs MED-HI 22 - 25 min/Ib 170°F
Cornish Hens 1-1/2 - 2 Ibs. MED 22 - 25 min/Ib 180°F
14 - 16 rnin/Ib
Medium: 160°F
16- 20 min/Ib
20 - 22 min/Ib
Medium: 160°F
23 - 25 min/Ib
*NOTE: The above information is given as a guide only. You may
need to vary the heat settings and times due to factors such as
weather, climate and/or personal requirements.
16
Page 17
Cleaning and Maintenance
Any piece of equipment works better and lasts longer when
maintained properly and kept clean. Grilling equipment is no exception. Your
grill must be kept clean and maintained properly.
Porcelain Grates/Grill Burners
The porcelain grill grates may be cleaned immediately after
cooking is complete and before turning off the flame. Wearing a
barbecue mitt to protect your hand from heat, use a soft bristle
barbecue brush to scrub the porcelain burner grid. Dip the brush
frequently in a bowl of water. Steam is created as the water contacts
the hot grate. The steam assists the cleaning process by softening
the food particles. For thorough cleaning of the grates, allow grates
to cool, then soak 15 to 30 minutes in a hot water and detergent
solution. After soaking, scrub with a teflon scouring pad. DO NOT
USE a steel wool pad, abrasive cleaners or metal brush. They could
damage the porcelain finish.
Before removing the grates and burners, make sure the gas supply is
off and the knobs are in the "off" position. To disassemble the grill
for thorough cleaning, remove parts after they have cooled in the
following order:
1. Porcelain grill grates
2. Flavor generator plates
3. Stainless steel burners
4. Drip guards
Clean greasy parts with a household grease solvent such as
household ammonia and water. _, WARNING: Do not use
flammable cleaning materials. Use a flashlight to inspect the burner
inlet to ensure it is not blocked. If obstructions can be seen, use a
metal wire coat hanger that has been straightened out. Shake out
any debris through the air shutter.
Burner Inlet
17
Page 18
TruSear TM Infrared Grill Burner (If applicable)
When finished cooking, turn the control knob to the "HI"
setting and allow the burner to burn for Five Minutes. This helps to
eliminate any drippings or debris that would otherwise remain on the
burner, degrading the performance and reducing burner life. After
the five minute burn-off time, turn the grill OFF and allow to cool
completely before attempting to clean or move. Wipe excess grease
and food from grill surfaces.
NOTE: When the TruSear TM infrared burner is not use, it must be covered with
the provided stainless steel cover for protection from outside elements such as
rain.
Drip Tray
The drip tray pans should be
removed and cleaned after each use.
Allow the drippings in the the drip
tray pans to cool completely before
removing. To remove the drip tray
pans, simply remove the pans from
the tray. Place the trays in hot, soapy
water to clean. Wipe up any debris
that may have collected in the drip
tray with a hot, soapy towel. Dry and
replace drip tray pans before next
use.
• Do not use a metal knife or any other metal tool to scrape stainless
steel parts.
• Do not permit citrus or tomato juice to remain on stainless steel
surfaces, as citric acid will permanently discolor stainless steel.
Wipe up any spills immediately.
• Do not use abrasive cleaners, steel wool pads, or abrasive cloths on
stainless steel, painted parts or brass parts.
• Do not use brass cleaners on the brass option parts. They are
coated with an epoxy coating.
18
Page 19
Infrared Rotisserie Burner
Special care is not required for the infrared rotisserie burner. It
is designed as a self-contained unit. Do not attempt to clean it. Its
own operation burns off any impurities which may condense on it.
Cleaning Chart
Part What to Use How to Clean
Stainless Steel*
Porcelain Parts
(Grates)
Control Knobs
Painted Parts
(Canopy)
Mild detergent and
warm water or
stainless steel cleaner
Mild detergent and
warm water or non-
abrasive household
cleaners.
Mild detergent and
warm water or non-
abrasive household
cleaners. Do not soak.
Mild detergent and
warm water or non-
abrasive household
cleaners
Wipe with soft cloth
or sponge. Use
stainless steel cleaner
to remove fingerprints
and smudges. Rinse
and dry thoroughly.
Wipe with soft cloth
or sponge. Rinse and
dry thoroughly. For
stubborn spots,
occasionally use a
non-caustic oven
cleaner (fume free)
Wipe with soft cloth
or sponge. Rinse and
dry thoroughly.
Wipe with soft cloth
or sponge. Rinse and
dry thoroughly.
Brass Parts
Mild detergent and
warm water or non-
abrasive household
Wipe with soft cloth
or sponge. Rinse and
dry thoroughly.
cleaners
*Under rare conditions, such as an extremely salty environment, small
amounts of rust may accumulate on stainless steel parts. These small
amounts of surface rust can easily be removed by applying Soft
Scrub@ Get to a damp sponge and wiping with the stainless steel
grain. It is important to make sure you wipe with the grain for the
most efficient removal of surface rust.
19
Page 20
Battery Replacement (T-Series Models)
Each grill is equipped with a battery for the electronic ignition. The
30" W. models only have (1) battery located under the left hand side
of the control panel. All other models have (2) batteries located
under each end of the control panel. The battery locations are shown
on the control panel.
To replace the battery:
1. Slide out drip tray.
2. Locate round black cap which is inside the burner Box under the
battery symbol on the control panel.
3. Unscrew cap. Battery is snapped in the cap.
4. Replace the battery by connecting corresponding post to post
inside burner box.
5.
Snap cap on
battery and
screw back
into slot
underneath
control panel.
@ @.=.
Round black cap which holds battery is
located underneath control panel and
behind drip tray
Repladng Ught Bulbs (E-Series only)
1. Remove screw and light bulb holder
from canopy housing. Metal
1. Unsnap glass light cover at opposite hinc
end from metal hinge.
2. Firmly grasp light bulb and pull out.
3. Replace with a 64405, 120V-25W
bulb.
4. Replace the light cover By first
sliding into metal hinge and then
snapping close on opposite end.
5. Reconnect power at the main fuse or
circuit breaker.
2O
Glass light cover
bulb
screw
Page 21
SPIDER AND INSECT WARNING!!!
Spiders and insects can nest in the burners/venturi tubes of this
or any other grill, and cause the gas to flow from the front of the burner.
This is a very dangerous condition which can cause a fire to occur
behind the valve panel, thereby damaging the grill and making it unsafe
to operate.
When to look for spiders:
You should inspect the burners/venturi tubes at least once a
year or immediately if any of the following conditions occur:
1. The smell of gas along with the burner flames appearing yellow.
2. The grill does not reach the proper temperatures.
3. The grill heats unevenly.
4. The burners makes a popping noise.
Troubleshooting
Problem
Grill won't light when
the ignitor is
pressed.
Burner flame is yellow
or orange and a gas
odor is present.
Low heat with knob
on High
Burner
will not light.
Burner
lights, but will not hold
flame once button is
released
Guide
What to Check
Make sure the control knob is off. (No gas is on.)
Remove the grill rack and the flavor generator
plates. Watch the ignitor tip. You should see a
spark jump from the tip of the ignitor when the
button is pressed. Do the other burners work?
Make sure the ignitor tip is clean and free from
debris. Check battery to electronic ignition.
Check the burner inlet for
obstructions. Check the air shutter for
proper adjustment.
Is the fuel hose bent or kinked?
Is there adequate gas supply available? If it is only
one burner that appears low, does the orifice or
burner need cleaning? Are any other gas
appliances at the location below normal rate? Is
the air shutter too far open or closed? Is the gas
supply or gas pressure low?
Is there a spark at the
thermocouple? Can you match light the burner?
Is the thermocouple kinked or
bent away from the burner?
Readjust to lay flat against burner. Is the safety
valve button being depressed long enough? Hold
button in until burner remains lit. Check for black
spots on the infrared screen.
21
Page 22
Service Information
If your grill rotisserie should fail to operate:
1. is the electrical cord securely inserted in the electrical
outlet?
2. Is the circuit breaker open, or is a fuse blown?
If service is required:
1. Call your dealer or authorized service agency. The name
of the authorized service agency can be obtained from the
dealer or distributor in your area.
2. Have the following information readily available:
a. Model number
b. Serial number
c. Date purchased
d. Name of dealer from whom purchased
3. Clearly describe the problem that you are having.
If you are unable to obtain the name of an authorized service
agency, or if you continue to have service problems, contact Viking
Range Corporation at (888) 845-4641 or write to:
VIKING RANGE CORPORATION
PREFERRED SERVICE
111 Front Street
Greenwood, Mississippi 38930 USA
Record the information indicated below. You will need it if service
is ever required. The model and serial number for your grill is
located on an identification plate located under the drip tray in the
rear left corner next to the inlet pipe.
Model Number Serial Number
Date of Purchase Date Installed
Dealer's Name
Address
If service requires installation of parts, use only authorized parts to
ensure protection under the warranty.
KEEP THIS MANUAL FOR FUTURE REFERENCE
22
Page 23
PROFESSIONAL SERIES
OUTDOOR GAS GRILL WARRANTY
Outdoor gas grills and all of their component parts, except as detailed beEow*, are warranted to be free from
defective materials or workmanship in normaE household use for a period of tweEve (12) months from the date
of originaE retail purchase. Viking Range Corporation, warrantor, agrees to repair or replace, at its option, any
part which fails or is found to be defective during the warranty period
*Painted and decorative items are warranted to be free from defective materials or workmanship for a period of
ninety (90) days from the date of original retail purchase ANY DEFECTS MUST BE REPORTED TO THE
SELLING DEALER WITHIN NINETY (90) DAYS FROM DATE OF ORIGINAL RETAIL PURCHASE.
Viking Range Corporation uses the most up-to-date processes and best rnateriaEs available to produce all color
finishes However, slight color variation may be noticed because of the inherent differences in painted parts
and porcelain parts as well as differences in kitchen lighting, product locations, and other factors.
FIVE YEAR LIMITED WARRANTY
ONE YEAR FULL WARRANTY
Any burner assemblies, TruSea_ TM infrared burner, infrared _tissede burner, or porcelain grill grate which fails
due to defective materials or workmanship in normal household use during the second through fifth year from
the date of original retail purchase will be repaired or replaced, free of charge for the part itself, with the owner
paying all other costs, including labor Corrosion, scratching, and discoloration, which may occur during regular
use of outdoor products is excluded from this warranty
LIFETIME LIMITED WARRANTY
Any stainless steel part or porcelain grill grate, (see 90-day porcelain provision above*), which rusts _ due
to defective materials or workmanship in normal household use during the fifth year through the useful lifetime
of the grill from the date of original retail purchase will be repaired or replaced, free of charge for the part itself,
with the owner paying all other costs, including labor
NINETY (90) DAY RESIDENTIAL PLUS WARRANTY This waiianty app[ies to applications whele use of the product
#xtends b_yond normal residential use Examples a_e, but not Iimit#d to, bed and breakfasts, fir_ stations, pdvat# clubs,
churches, etc This warranty #>dudes all cornrnerYial locations such as restaurants, food service locations and institutional
food sere/ice locations
This warranty extends to the original purchaser of the product warranted hel_under and to each transfel_e
owner of the product during the term of the warranty
This warranty shall apply to products purchased and located in the United States and Canada Products must
be purchased in the country whels service is requested Warranty labor shall be performed by an authorized
Viking Range Corporation service agency or representative. /l_/arranty shall not apply to damage resulting flom
abuse, accident, natural disaster, loss of electrical power to the product for any reason, alteration, improper
installation, improper operation, or repair or service of the product by anyone other than an authorized Viking
Range Corporation service agency or representative. This warranty does not apply to commercial usage
Warrantor is not responsible for consequential or incidental damage whether arising out of breach of warranty,
breach of contract, or otherwise. Some jurisdictions do not allow the exclusion or limitation of incidental or
consequential damages, so the above limitation or exclusion may not apply to you.
Owner shall be responsible for proper installation, providing normal care and maintenance, providing proof of
purchase upon request, and making the appliance reasonably accessible for service Jf the product or one of its
component parts contains a defect or malfunction during the warranty period, after a reasonable number of
attempts by the warrantor to remedy the defects or malfunctions, the owner is entitJed to either a refund or
replacement of the product or its component part or parts. Warrantors Jiability on any claim of any kind, with
respect to the goods or services coveled hereunder, shall in no case exceed the price of the goods or service
or part thereof which gives rise to the claim
WARRANTY SERVICE: Under the terms of this warranty, service must be performed by a factory authorized
Viking Range Corporation service agent or representative Service will be provided during normal business
hours, and labor performed at overtime or premium rates shall not be covel_d by this warranty To obtain
warranty service, contact the dealer from whom the product was purchased, an authorized Viking Range
Corporation service agent, or Viking Range Corporation. Provide model and serial number and date of original
purchase. For the name of your nearest authorized Viking Range Corporation service agency, call the dealer
from whom the product was purchased or Viking Range Corporation IMPORTANT: Retain proof of original
purchase to establish warranty period
The return of the Owner Registration Card is not a condition of warranty coverage You should, however, return
the Owner Registration Card so that Viking Range Corporation can contact you should any question of safety
arise which could affect you
Any implied warranties of merchantability and fitness applicable to the above described burner assemblies,
infrared rotisserie burners, porceJain grill grates, and stainless steel parts are ]imited in duration to the period of
coverage of the applicable express written limited warranties set forth above Some jurisdictions do not allow
limitations on how long an implied warranty lasts so the above limitation may not apply to you This warranty
gives you specific legal rights, and you may also have other rights which may vary from jurisdiction to
jurisdiction
Specifications subject to change without notice.
23
Page 24
F20053H (PS0107VR)


 Loading...