

Page 1

ViewPad 10pi
User Guide
Model No. VS14406
Page 2

Compliance Information
FCC Statement
The following statement applies to all products that have received FCC approval.
Applicable products bear the FCC logo, and/or an FCC ID in the format FCC ID:
GSS-VS14406 on the product label.This device complies with part 15 of the FCC
Rules. Operation is subject to the following two conditions: (1) This device may
not cause harmful interference, and (2) This device must accept any interference
received, including interference that may cause undesired operation. This
mobiledevice has been tested and found to comply with the limits for a Class B
digital device, pursuant to Part 15 of the FCC Rules. These limits are designed
to provide reasonable protection against harmful interference in a residential
installation. This equipment generates, uses and can radiate radio frequencyenergy
and, if not installed and used in accordance with the instructions, may cause
harmful interferenceto radio communications. However, there is no guarantee that
interference will not occur in a particular installation. If this equipment does cause
harmful interference to radio or television reception, which can be determined
by turning the equipment off and on, the user is encouraged to try to correct the
interference by one or more of the following measures
• Reorient or relocate the receiving antenna.
• Increase the separation between the equipment and receiver.
• Connect the equipment into an outlet on a circuit different from that to which the
receiver
is connected.
• Consult the dealer or an experienced radio/TV technician for help.
Changes or modications not expressly approved by the party responsible for
compliance couldvoid theuser’s authority to operate the equipment.The antenna(s)
used for this transmitter must not be colocated or operating in conjunction with any
otherantenna or transmitter.
FCC SAR information
FCC Radiation Exposure Statement
This equipment complies with FCC RF radiation exposure limits set forth an
uncontrolled environment. This transmitter must not be co-located or operating in
conjunction with any other antenna or transmitter.
The device was tested and complies to measurement standards and procedures
specied in FCC OE Bulletin 65, Supplement C.
i
Page 3

Important Safety Instructions
1. DO NOT place objects on top of the ViewPad, as objects may scratch the
screen.
2. DO NOT expose the ViewPad to dirty or dusty environments.
3. DO NOT place the ViewPad on an uneven or unstable surface.
4. DO NOT insert any foreign objects into the ViewPad.
5. DO NOT expose the ViewPad to strong magnetic or electrical eld.
6. DO NOT expose the ViewPad to direct sunlight as it can damage the LCD
Screen.
Keep it away from heat sources.
7. SAFE TEMPERATURE: This ViewPad should only be used in environments
with ambient temperatures between 0°C (32°F) and 40°C(104°F).
8. DO NOT use the ViewPad in the rain.
9. Please check with your Local Authority or retailer for proper disposal of
electronic products.
10. The ViewPad and the adapter may produce some heat during normal operation
or charging. DO NOT leave the ViewPad on your lap to prevent discomfort or
injury from heat exposure.
11. POWER INPUT RATING: Refer to the rating label on the ViewPad and be sure
that the power adapter complies with the rating. Only use accessories specied
by the manufacturer.
12. DO NOT use a pen or any sharp object to tap the screen.
13. Clean the touch screen with a soft cloth. If needed, dampen the cloth slightly
before cleaning. Never use abrasives or cleaning solutions.
14. Always power off the ViewPad to install or remove external devices that do not
support hot-plug.
15. Disconnect the ViewPad from an electrical outlet and power off before cleaning
the ViewPad.
16. DO NOT disassemble the ViewPad, only a certied service technician should
perform repair.
17. The ViewPad has apertures to disperse heat. DO NOT block the ViewPad
ventilation, the ViewPad may become hot and malfunction as a result.
18. Risk of explosion if battery replaced by an incorrect type. Dispose of used
batteries according to the instructions.
19. Users have to use the connection to USB interfaces with USB 2.0 version or
higher.
20. PLUGGABLE EQUIPMENT, the socket-outlet shell be installed near the
equipment and shall be easily accessible.
ii
Page 4

Copyright Information
Copyright © ViewSonic® Corporation, 2011. All rights reserved.
ViewSonic®, the three birds logo, On View®, ViewMatch™, and ViewMeter® are
registered trademarks of ViewSonic® Corporation.
All products use in this device and trademarks mentioned herein are trademarks or
registered trademarks of their respective owners.
Microsoft®, Windows®, Windows NT®, and the Windows® logo are registered
trademarks of Microsoft® Corporation in the United States and other countries.
Intel®, Pentium®, and Atom™ are registered trademarks of Intel Corporation.
Wi-Fi and the Wi-Fi CERTIFIED logo are registered trademarks of the Wireless
Fidelity Alliance.
SD, SDHC are trademarks of SD Card Association.
Bluetooth and the Bluetooth logo are trademarks owned by Bluetooth SIG, Inc.
The prediction engine of the input method is TOUCHPAL, provided by COOTEK.
Disclaimer: ViewSonic Corporation shall not be liable for technical or editorial errors
or omissions contained herein; nor for incidental or consequential damages resulting
from furnishing this material, or the performance or use of this product.
In the interest of continuing product improvement, ViewSonic Corporation reserves
the right to change product specications without notice. Information in this document
may change without notice.
No part of this document may be copied, reproduced, or transmitted by any means,
for any purpose without prior written permission from ViewSonic Corporation.
Product Registration
To meet your future needs, and to receive any additional product information as it
becomes available, please register your product on the Internet at: www.viewsonic.
com.
For Your Records
Product Name:
Model Number:
Document Number:
Serial Number:
Purchase Date:
Product disposal at end of product life
ViewSonic respects the environment and is committed to working and living green. Thank you for
being part of Smarter, Greener Computing. Please visit ViewSonic website to learn more.
USA & Canada: http://www.viewsonic.com/company/green/recycle-program/
Europe: http://www.viewsoniceurope.com/uk/kbase/article.php?id=639
Taiwan: http://recycle.epa.gov.tw/recycle/index2.aspx
ViewPad 10pi
VS14406
ViewPad 10pi_UG_ENG Rev. 1A 09-02-11
_______________________________
_______________________________
iii
Page 5

Table of Contents
Chapter 1: Product Overview --------------------------------------------------- 2
Package Contents -------------------------------------------------------------------------2
Control Buttons and Connectivity ------------------------------------------------------3
Front and Rear --------------------------------------------------------------------------3
Side view ---------------------------------------------------------------------------------4
Navigation, Control Buttons ---------------------------------------------------------4
Indicators ---------------------------------------------------------------------------------5
Chapter 2: Setup -------------------------------------------------------------------- 6
Battery Replacement ------------------------------------------------------------------6
Charging Battery -----------------------------------------------------------------------6
Memory Card ----------------------------------------------------------------------------7
Touch Panel Setup ---------------------------------------------------------------------7
Connect to a wireless networks ----------------------------------------------------8
Bluetooth ---------------------------------------------------------------------------------9
Chapter 3: Cellular Data Network (3G Data) Setup ---------------------11
Starting Wireless Manager -------------------------------------------------------- 11
PIN -------------------------------------------------------------------------------------- 12
PUK ------------------------------------------------------------------------------------- 12
Multiple Proles ---------------------------------------------------------------------- 13
Settings --------------------------------------------------------------------------------- 15
Auto Start ------------------------------------------------------------------------------ 16
SIM -------------------------------------------------------------------------------------- 16
Radio ----------------------------------------------------------------------------------- 17
Networks ------------------------------------------------------------------------------- 21
Connection ---------------------------------------------------------------------------- 23
Wireless Manager menu ----------------------------------------------------------- 25
Exiting Wireless Manager --------------------------------------------------------- 25
Chapter 4 Basic Operation ------------------------------------------------------26
Power up and off ---------------------------------------------------------------------26
Touch Screen Control ---------------------------------------------------------------26
Virtual Keyboard ---------------------------------------------------------------------- 27
ViewScene ----------------------------------------------------------------------------- 27
1
Page 6
Chapter 1: Product Overview
User Guide and
Installation Software
PC System Requirements
Intel® Pentium® processor or
greater running on Windows®
Platform, 4x CD-ROM drive;
64MB or more of available
RAM; 800x600 color display.
Copyright © 2011, ViewSonic Corporation. All rights reserved. All trademarks,
registered or otherwise, are the property of their respective companies. Disclaimer:
ViewSonic Corporation shall not be liable for technical or editorial reeors or
omissions contained herein; nor for incidental or consequential damages resulting
from furnishing this meterial, or the performance or use of this product. In the
interest of continuing product improvement, ViewSonic Corporation reserves the
right to change product specifications without notice. Information in this CD-ROM
may change without notice, No part of this CD-ROM may be copied, reproduced, or
transmitted by any means, for any purpose without prior written permission of
ViewSonic Corporation.
ViewPad Series Tablet
03/14/11 • ViewPad_CD • Made in China
Copyright © 2011, ViewSonic Corporation. All rights reserved. All trademarks,
registered or otherwise, are the property of their respective companies. Disclaimer:
ViewSonic Corporation shall not be liable for technical or editorial reeors or
omissions contained herein; nor for incidental or consequential damages resulting
from furnishing this meterial, or the performance or use of this product. In the
interest of continuing product improvement, ViewSonic Corporation reserves the
right to change product specifications without notice. Information in this CD-ROM
may change without notice, No part of this CD-ROM may be copied, reproduced, or
transmitted by any means, for any purpose without prior written permission of
ViewSonic Corporation.
This disc contains 32-bit software only.
External Recovery Media Disc 1 of 1
For distribution only with
a new ViewSonic
®
PC.
Support for these products
provided by ViewSonic
®
.
For technical support
information, visit
www.viewsonic.com
Portions © 2011 Microsoft
Corporation. All rights reserved.
© 2011 ViewSonic
Part No. 03/14/11_VPD_Ver.1
Microsoft
®
Windows® 7 Professional
03/14/11 • ViewPad_CD • Made in China
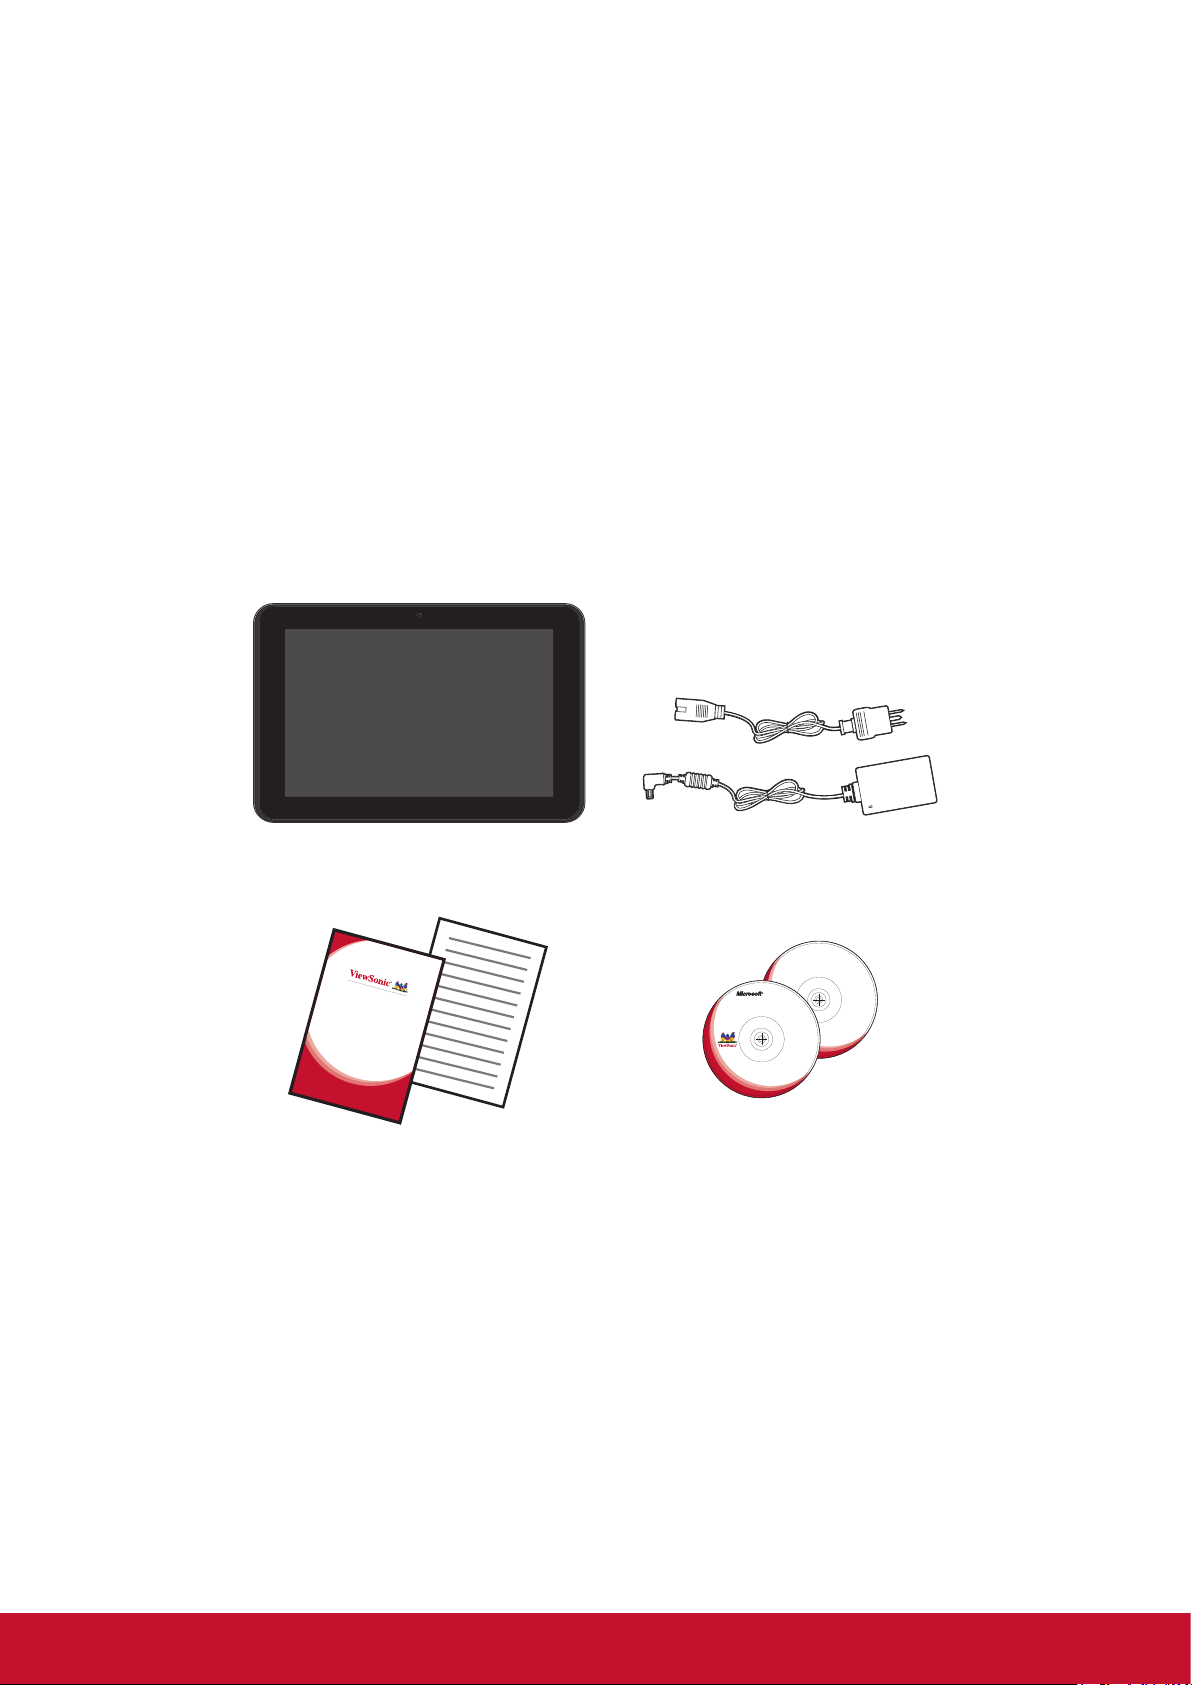
Package Contents
After opening the package, carefully inspect the contents. If any of the items is missing or appear damaged, contact your dealer. The shipping carton should contain the
following:
• A ViewPadpi tablet.
• An AC adapter with power cord
• User Guide and Driver CD
• Quick Start Guide
• An system recovery disk
ViewPad 10pi
Quick Start Guide
2
Page 7
Control Buttons and Connectivity
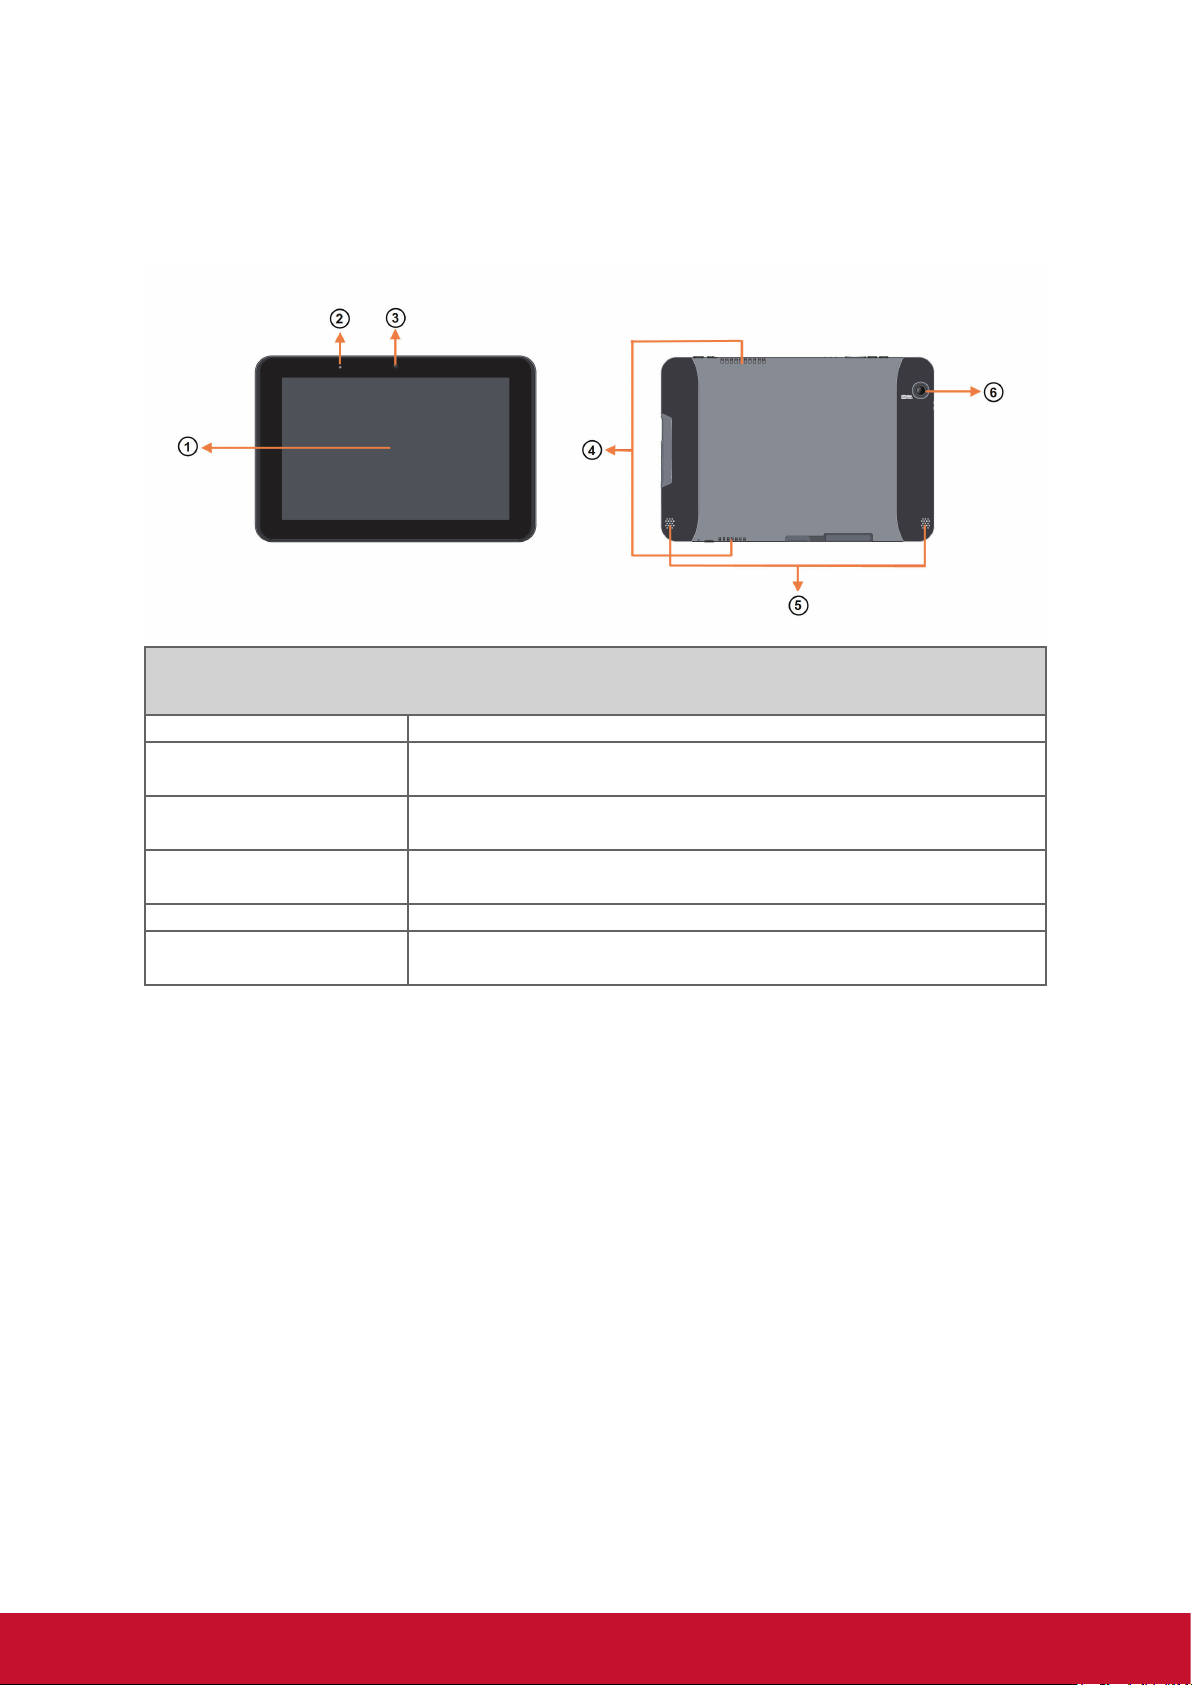
Front and Rear
Front and rear components
1. Touch Screen Use nger to control system & applications.
2. Ambient Light Sensor
3. Webcam
4. Vents
5. Speakers Produces sounds from multimedia les or the operating system.
6. Rear camera(Optional)
Automatically adjust the backlight of panel. Press Menu button
and last for 3 seconds to turn on/off it.
A built-in webcam that allows you to capture images, record
videos, and chat online.
Dissipate heat and keep your ViewPad at an optimal temperature.
You can take photos at resolutions up to 2048 x 1536 pixels and
record videos.
3
Page 8
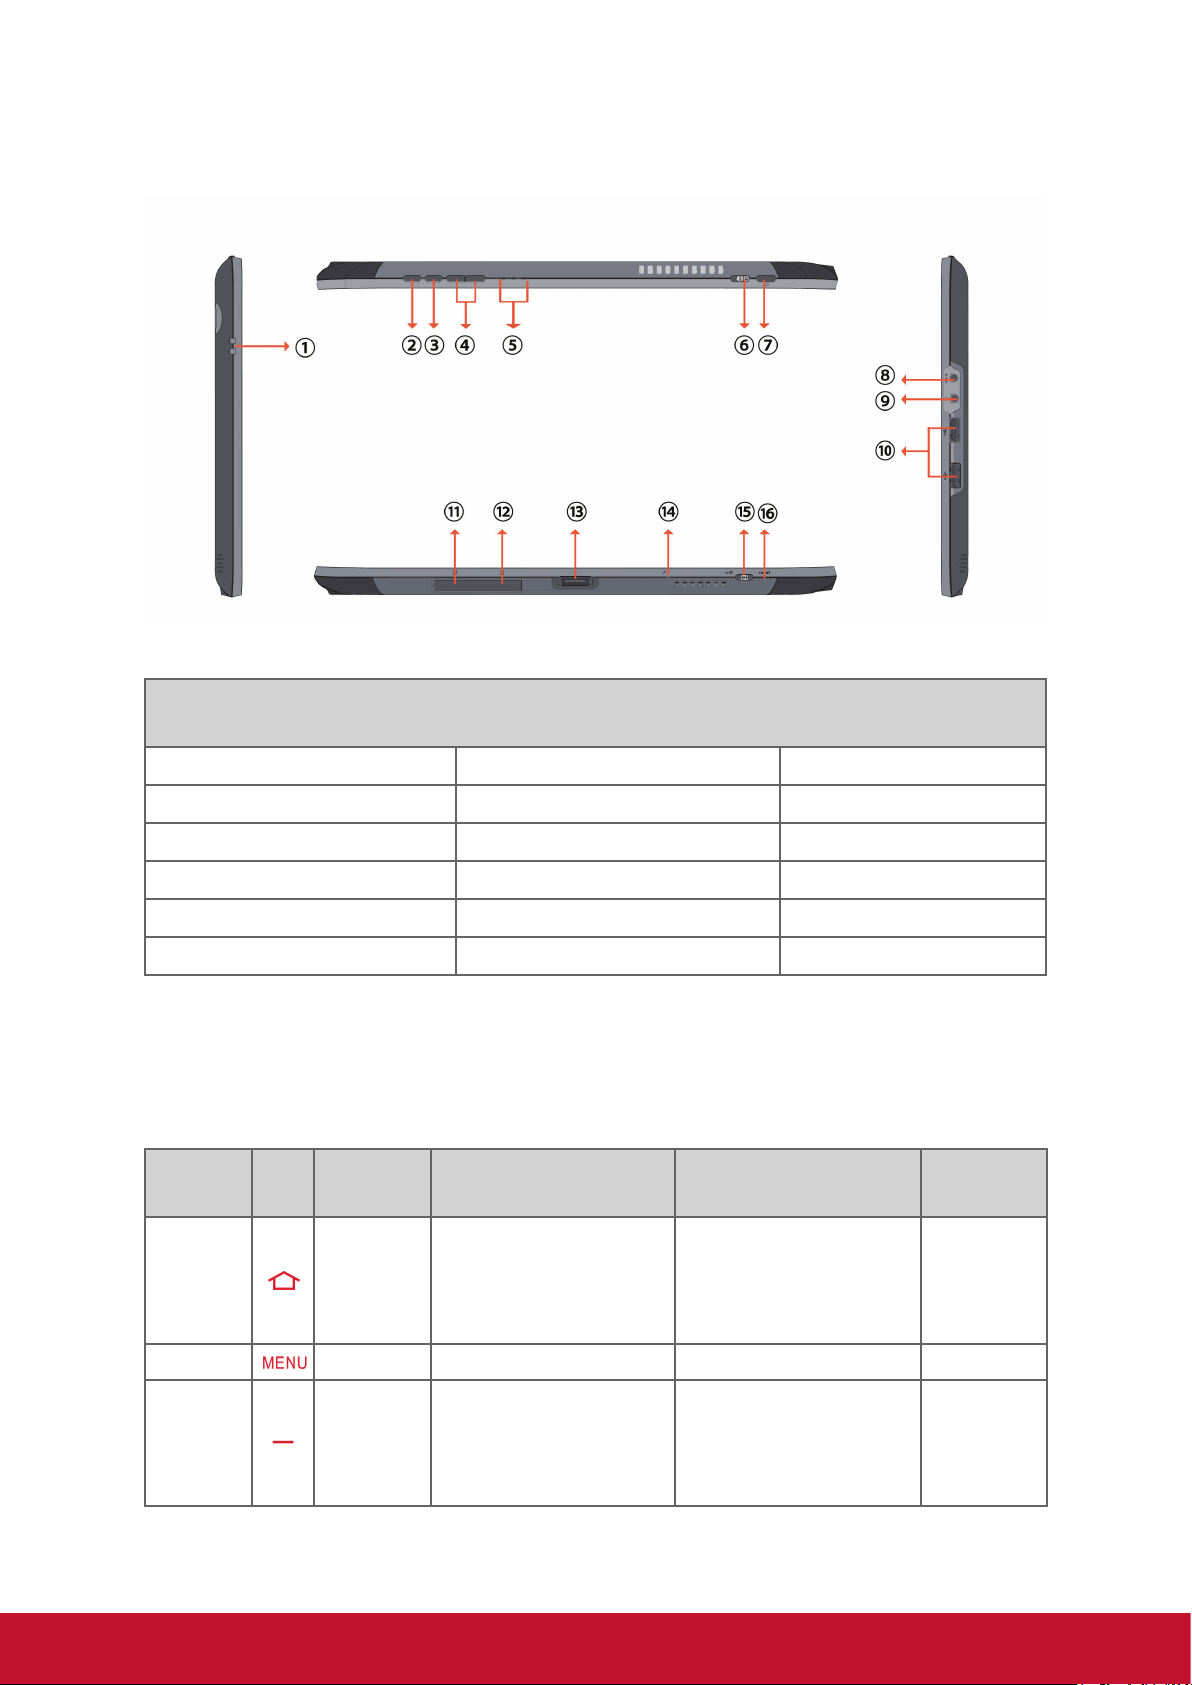
Side view
Side components
1. Lock slot 7. Back button 13. Docking connector
2. Home button 8. Power jack 14. MIC
3. Menu button 9. Audio output jack 15. Lock switch
4. Volume/brightness buttons 10. USB ports 16. Reset eject hole
5. Indicators 11. Memory card slot
6. Power switch 12. 3G SIM card slot(Optional)
Navigation, Control Buttons
The external buttons have different function in different OS.
Button Icon Location Function in Windows ANDR D
Short press:
Go to desktop
Home Top
Menu
Volume-
Top Ctrl+Alt+Delete Open Menu Down Arrow
Top
Press and hold for 3
seconds:
Turn on/off light sensor
Short press:
volume decrease;
Press and hold for 3
seconds:
brightness decrease.
Go to home screen UP Arrow
Short press:
volume decrease
OI
Function
in DOS
Left Arrow
4
Page 9
Volume+ Top
Power
Back
Lock
Reset
Top
Top
Bottom
Bottom Power outage Power outage
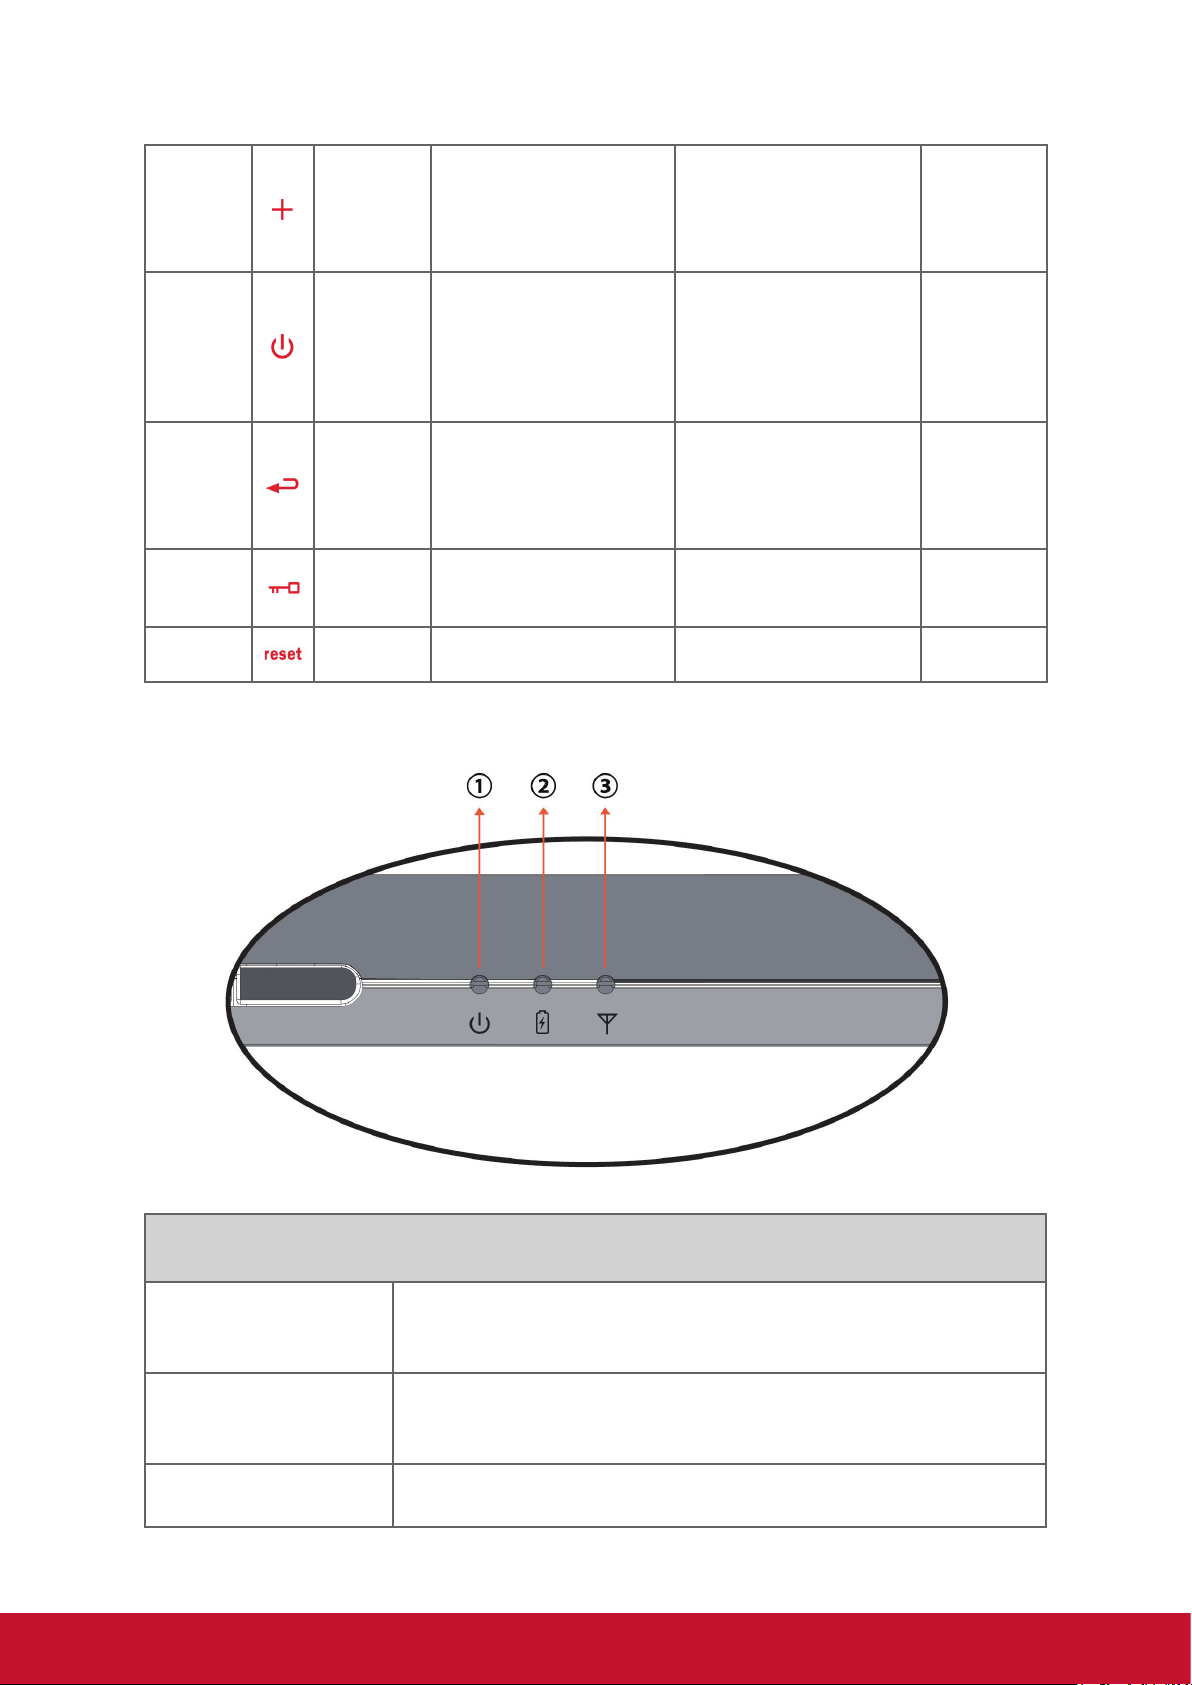
Indicators
Short press:
volume increase;
Press and hold for 3
seconds:
brightness increase.
Short press:
standby/Wake up;
Press and hold for 4
seconds:
Power off
Short press:
ESC Function;
Press and hold for
10 seconds:
Touch panel Calibration
Turn left or right to disable or enable G-sensor
Short press:
volume increase
Short press<2.5s:
sleep/wake up;
Long press 2.5~7s:
pop-up power off dialog;
Long Press>7s:
Power outage.
Back function;
Press 10s to H/W
Calibration
Left to locked G-Sensor ;
Right to unlocked
G-Sensor
Right Arrow
Short press:
Power On/
Off
Enter
No function
Power
outage
Indicators
1. Power indicator When the system is on, it lights up in blue.
When the system is in sleep mode, it ashes in blue.
When the system is off or in Hibernation mode, it goes off.
2. Battery status
indicator
When the battery is in charging, it lights up in red.
When the battery is low, it ashes in red.
When the battery is fully charged, it lights up in blue.
3.Wireless LAN
indicator
When WiFi or 3G is turned on, it lights up in blue.
When WiFi or 3G is turned off, the light goes off.
5
Page 10
Chapter 2: Setup
Battery Replacement
Battery is permanently xed to the device. Battery replacement should be performed
by an authorized ViewSonic service center. Please contact local ViewSonic customer
service for more information.
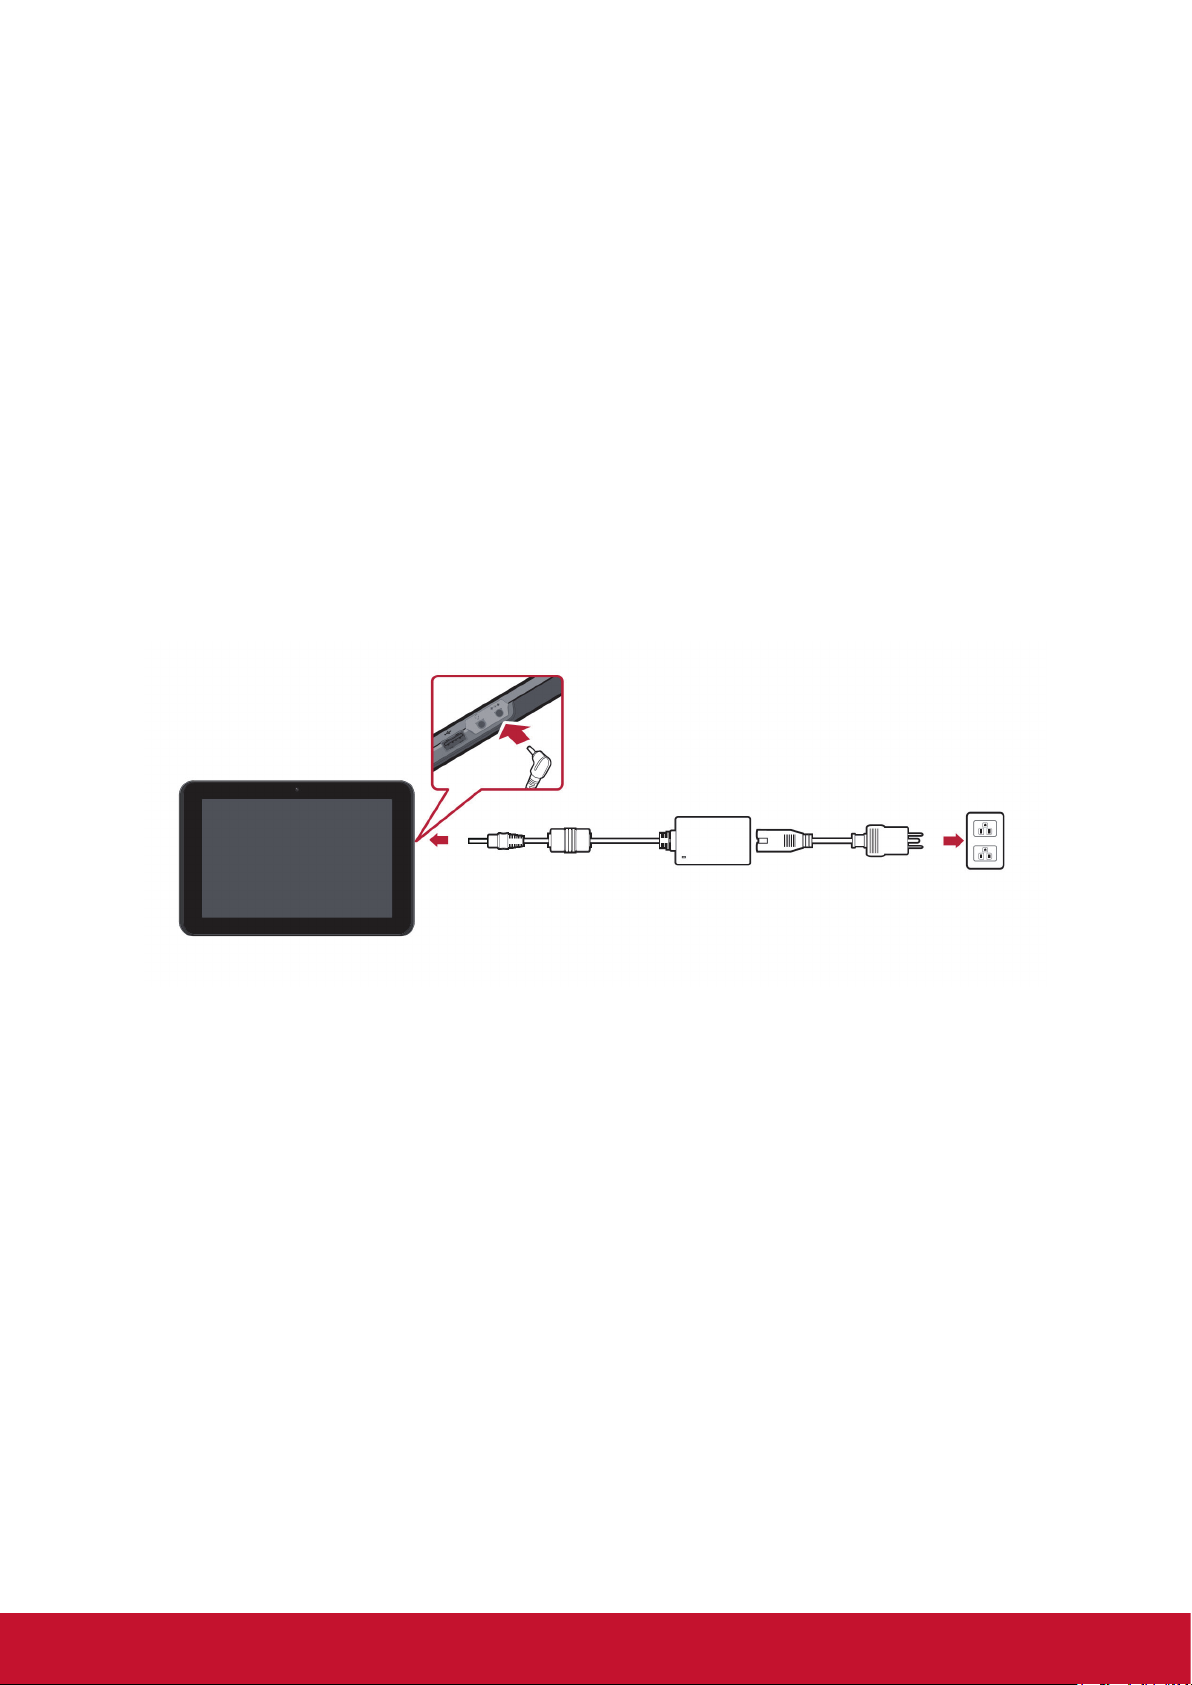
Charging Battery
The new battery is only partially charged out of box. To fully charge the battery,
please follow the below instruction.
1. Connect one end of the AC adapter to the charger jack.
2. Plug the other end of the AC adapter to the wall outlet to start charging.
When the battery is charging, the charge indicator LED will be ashing in amber; the
battery icon is also displayed in the status bar. When battery is fully charged, the
charge indicator LED will change to blue; if device is turned on, the battery icon will
be displayed as fully charged.
Note: Use only the provided AC power adapter for battery charging. The battery life may vary
depending on actual usage.
6
Page 11
Memory Card
SD memory card provides additional data storage space.
To install SD/SDHC card
1. Open card door.
2. Insert SD/SDHC card following the indicative mark.
3. Close the card door.
To remove the SD/SDHC card
1. For safe removal, go to Windows task bar and right mouse click on icon. Select
eject SD card option.
2. After Windows prompts, “The device is now safe to remove” open the card cover.
3. Push to eject the SD card from the slot.
NOTE!
Do not remove the memory card while it’s being accessed. Sudden removal of the memory
card may cause data loss or unpredictable system behavior.
Touch Panel Setup
The touch panel of this device has been factory calibrated. In most cases,
recalibration is not necessary. However, due to the nature of capacitive touch panel,
change of geographical location may require recalibration for the new environment
conditions.
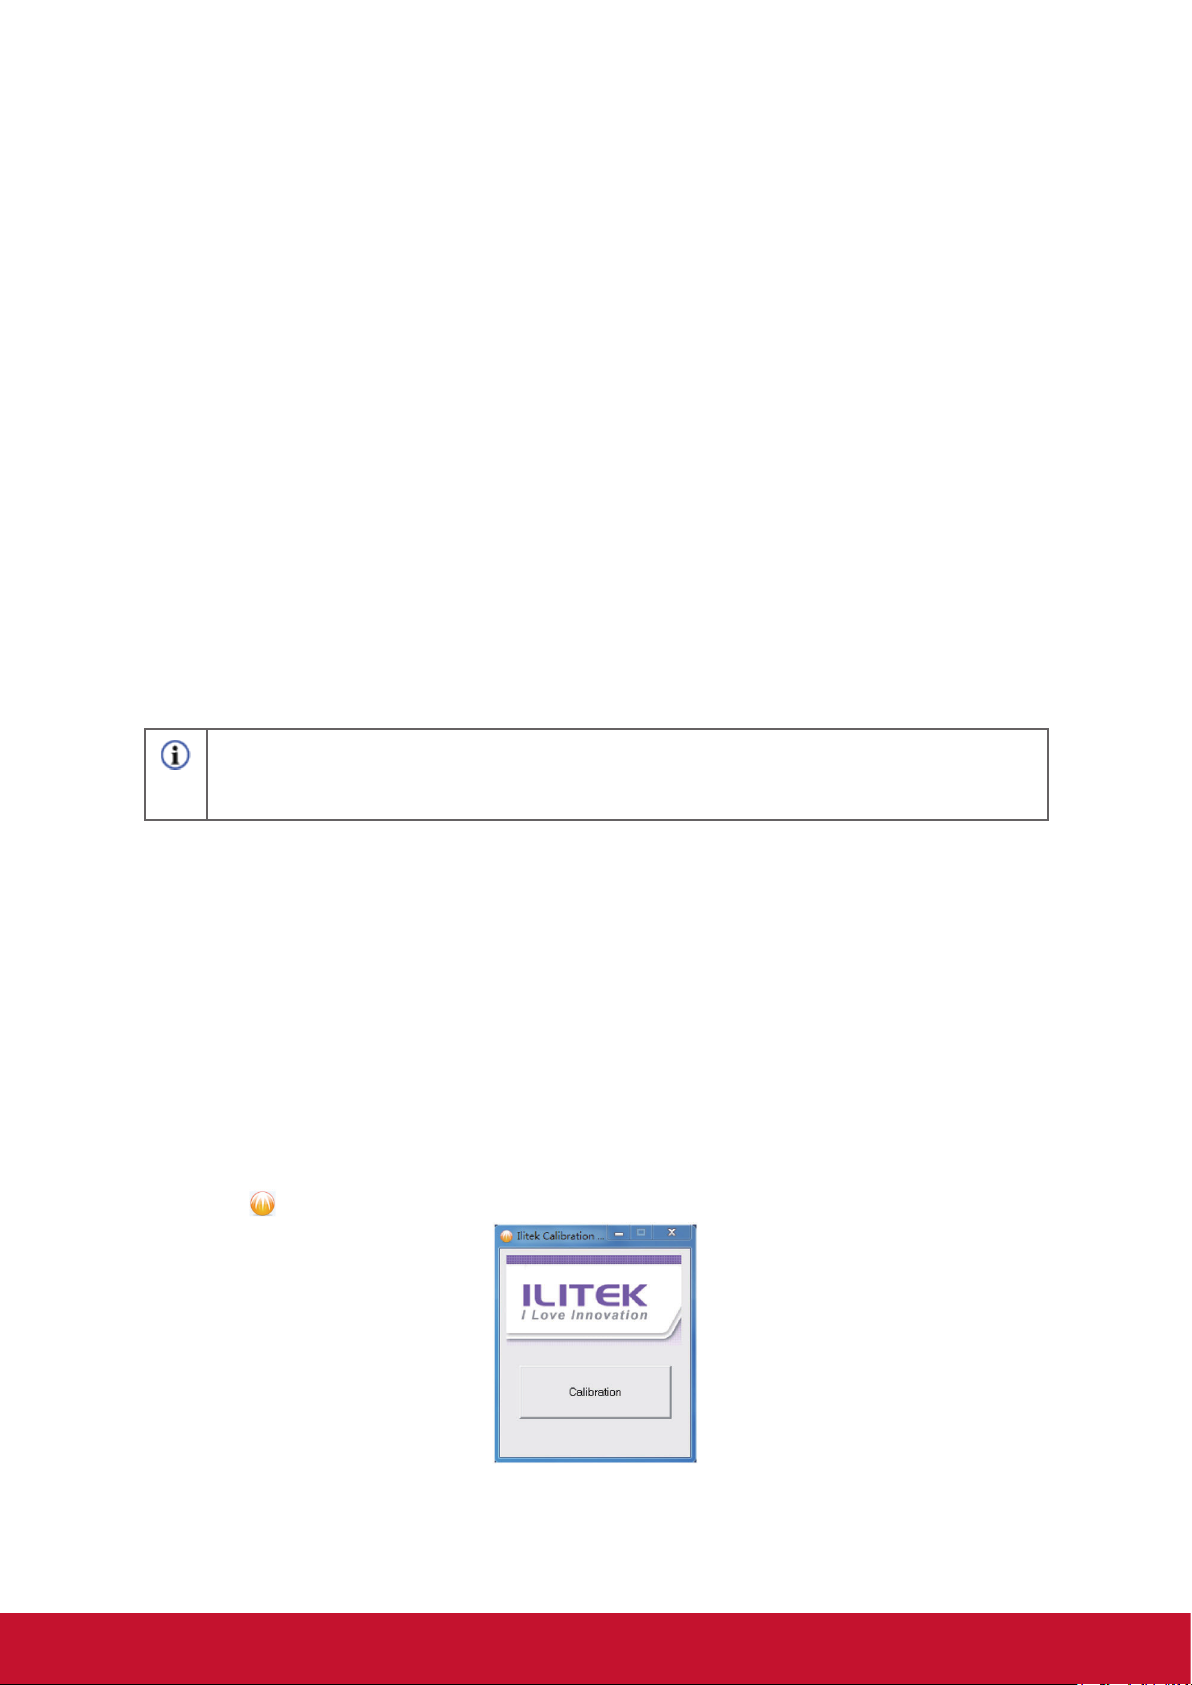
If touch panel is experiencing improper behavior, please perform touch panel
calibration procedure as below.
1. Tap on (ILITEK) icon to open touch panel calibration menu.
2. Place the device on a at table top. Avoid any touch contact to the touch panel
while performing the calibration.
7
Page 12
3. Tap on “Calibration” to start the process.
4. When calibration is completed, message “Calibration OK” will be shown.
Hardware calibration:
You can also calibrate the touch panel by pressing and hold the Back button for 10
seconds until the battery indicator ashes in red.
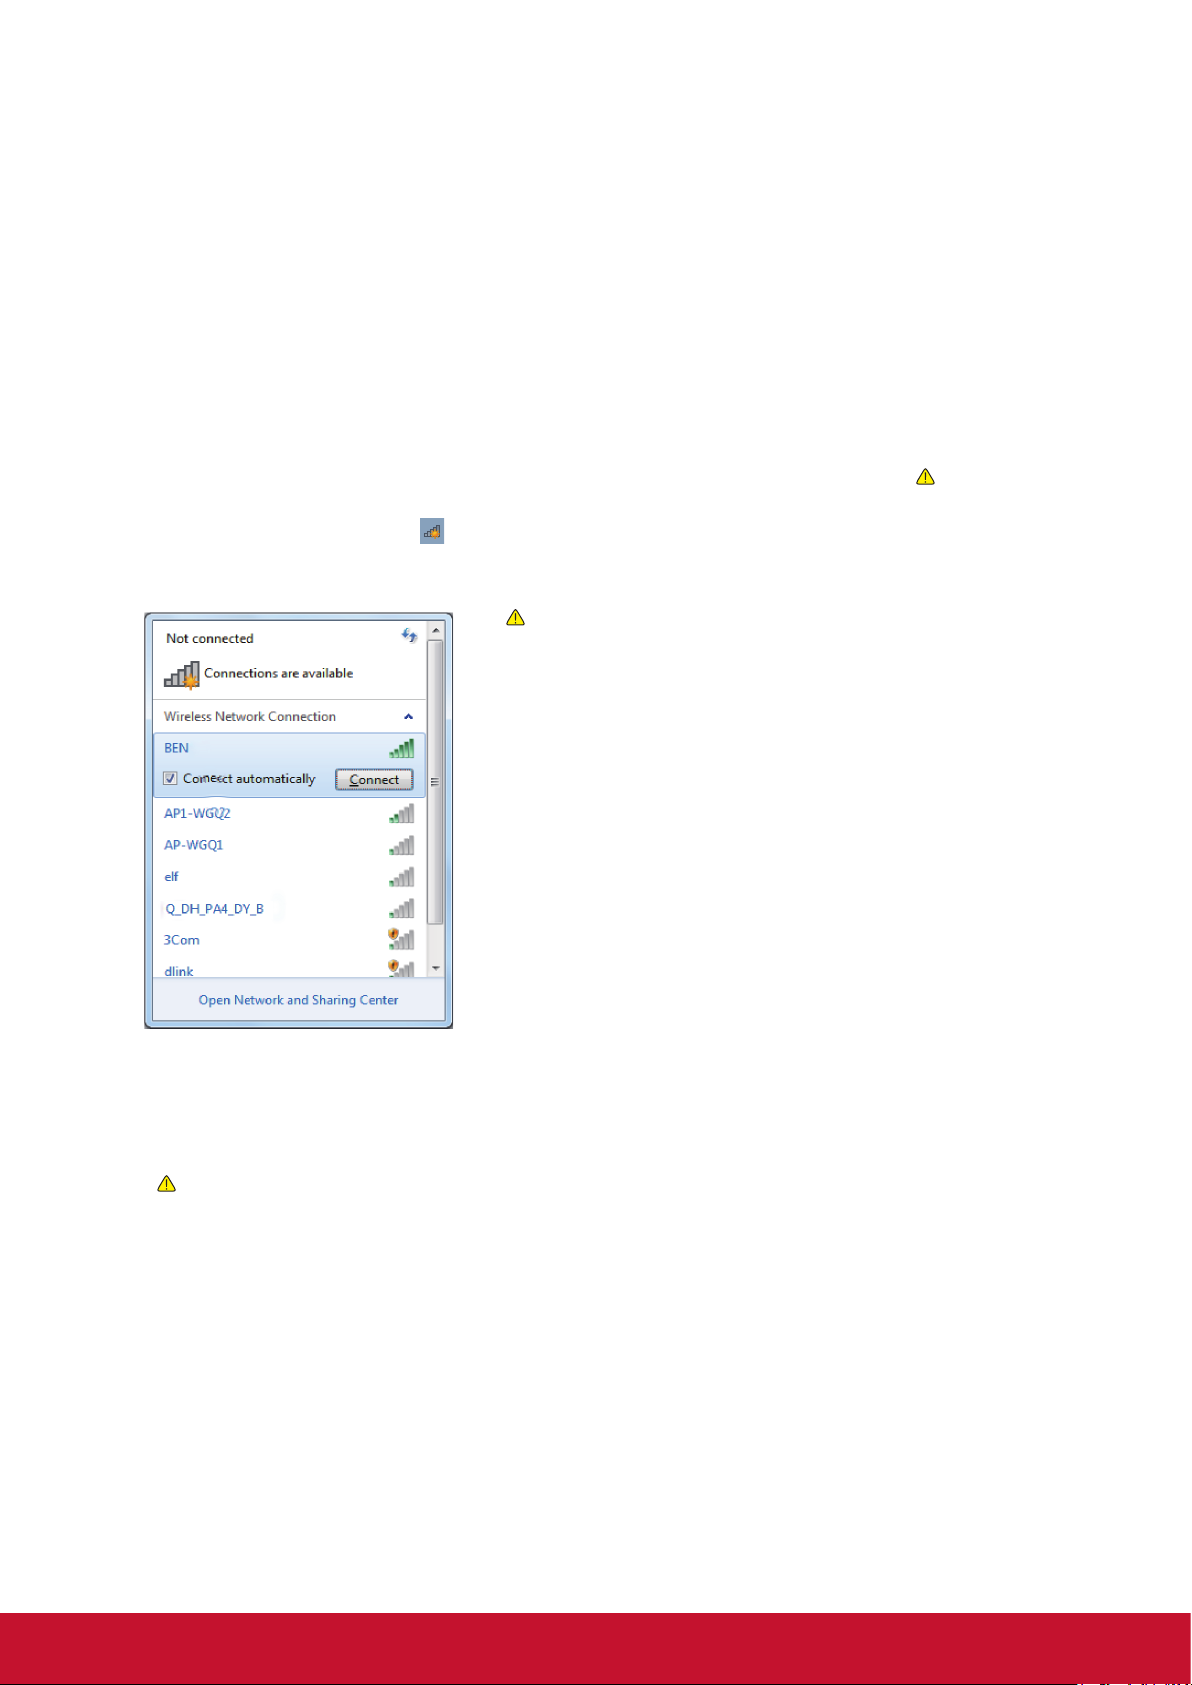
Connect to a wireless networks
1. Make sure you are located within the wireless network service area. Press the
Wi-Fi button to turn on Wi-Fi, and the Wi-Fi indicator light up in blue. (
SIM card, and turn on 3G, you also can conncect to a 3G networks)
2. Click the network icon
networks will be displayed.
in the notication area, a list of available wireless
Wi-Fi hotspots and 3G networks will show up
(
together in the same list. Windows 7 also virtualises
the Wi-Fi card so you can use it twice, for example to
connect WPS device to a non-WPS access point.)
(To connect to some networks that require security
authentication, you may have to undergo another
authorization process and enter username and
password. For details, please consult your network
administrator.)
(For data security, it is strongly recommended
to connect to security-enabled wireless networks
whenever possible.)
(When travelling by air, please be sure to turn o
wireless networking to avoid any possible risks to ight
safety.)
If insert a
3. Choose a network and then click Connect. If security authentication is not
required by the network you are using, there will be a successful message
showing that you have connected to the network.
The congurations may vary depending on the model number. Check the actual
model for specics.
8
Page 13
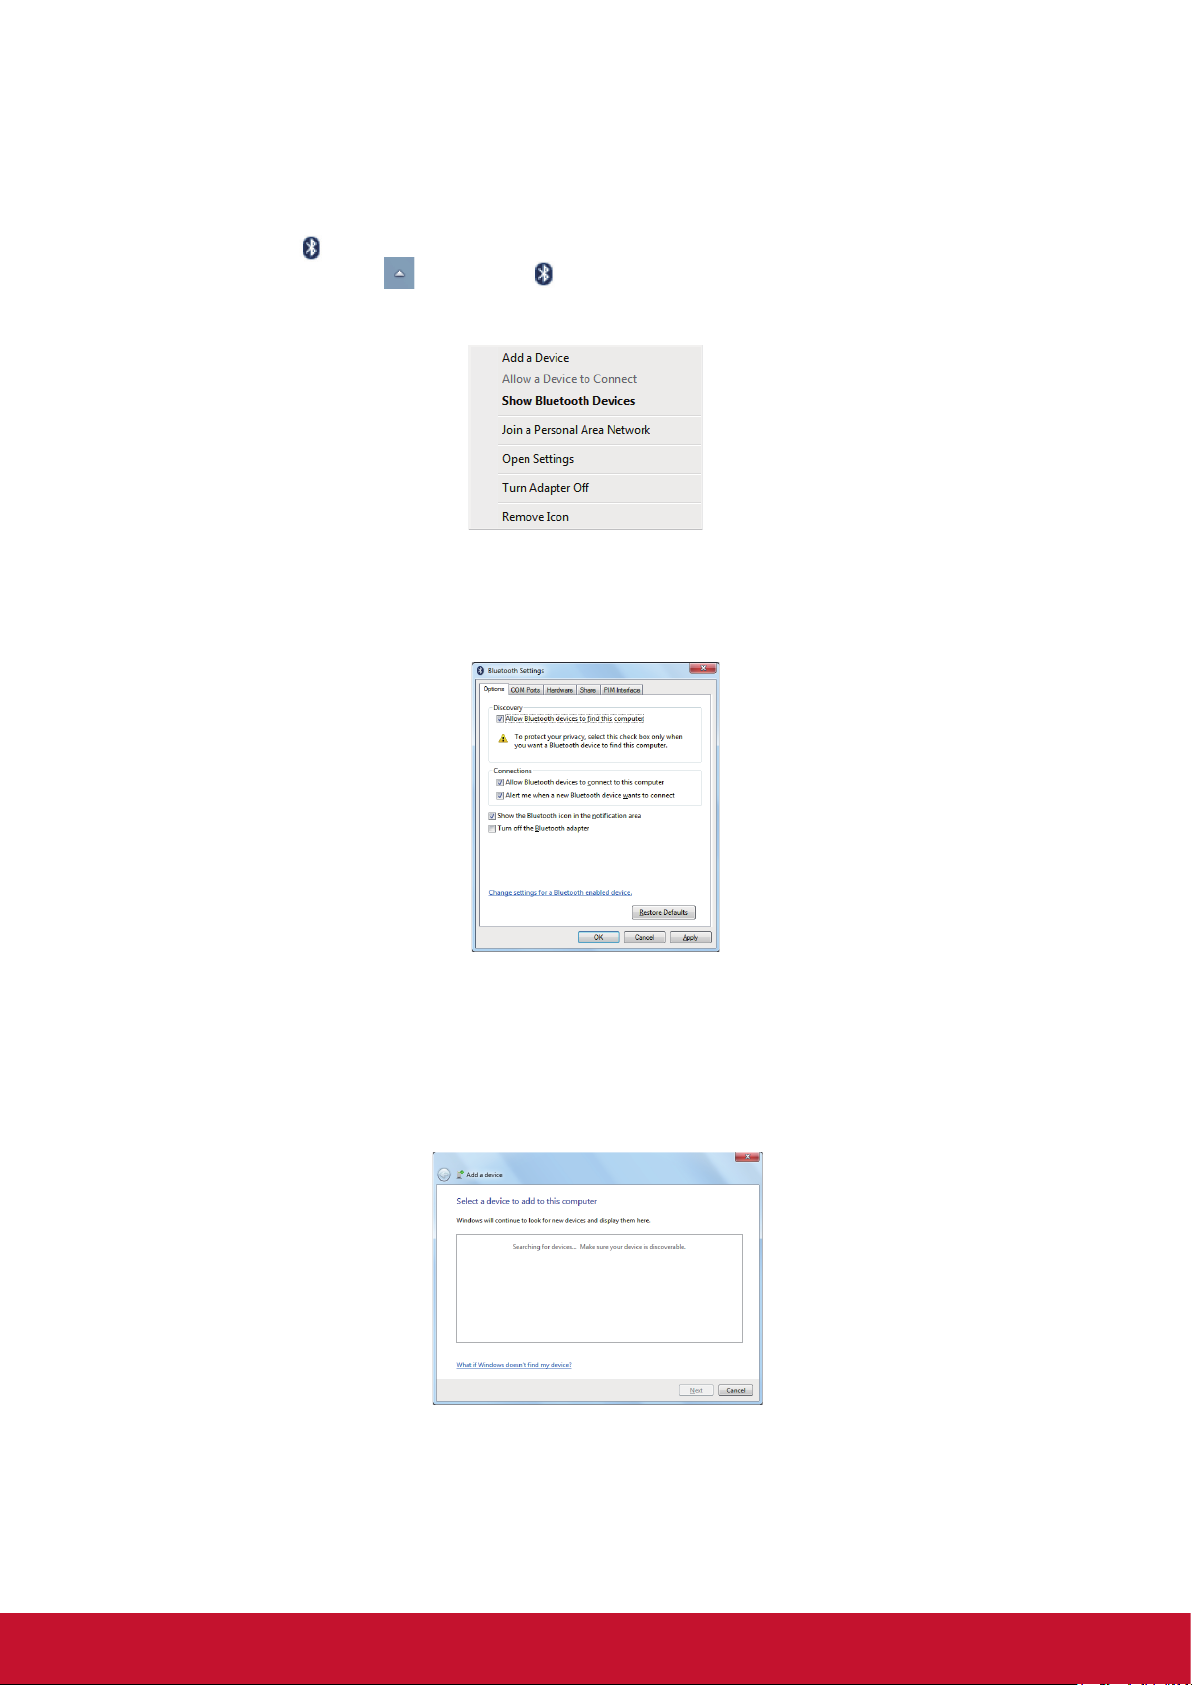
Bluetooth
1. Right-click in the notication area (located at the lowerright corner of the
desktop or clicking
Settings.(If adapter off, please turn on.)
2. In the Options tab, select Allow Bluetooth devices to nd this computer, and click
OK. So, other Bluetooth devices can nd your ViewPad and make the Bluetooth
connection.
to access from the hidden icons) and select Open
(You also need to activate the Bluetooth connection feature of the device that you
want to connect to.)
3. Right-click and select Add a Device. Wait for a while and the found active
Bluetooth devices will show.
(For details about how to activate the device's Bluetooth function, please refer to
its documentation.)
(The maximum effective range of connection between your ViewPad and the
Bluetooth device is about 10 meters.)
9
Page 14
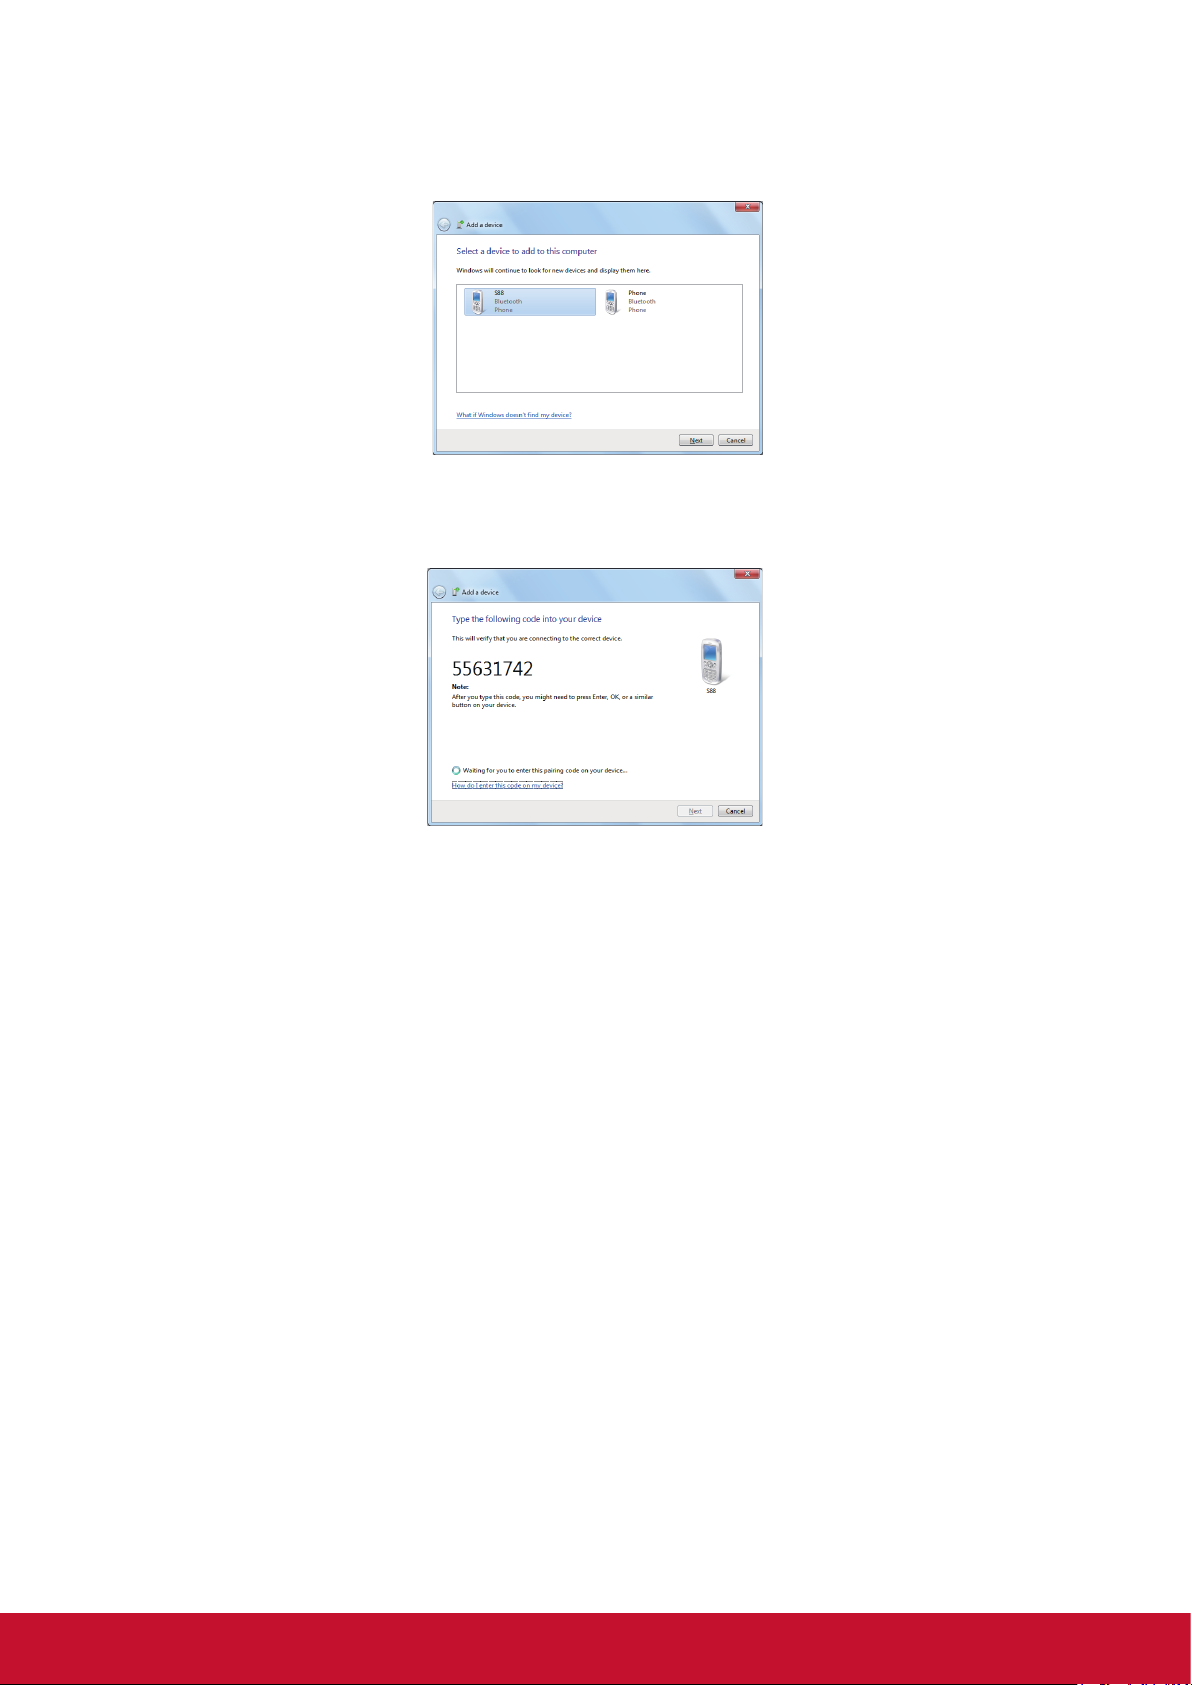
4. Select a Bluetooth device and click Next.
5. Windows generates a random code number shown on the screen. Type in this
code number into the Bluetooth device your ViewPad is trying to connecting to.
10
Page 15
Chapter 3: Cellular Data Network (3G Data) Setup
CAUTION!
The 3G does not support hot-plug detect. Please make sure the device is powered down
when inserting or removing the SIM. Inserting or removing SIM while the device’s power is
ON may cause system shutdown.
NOTE!
Your ViewPadpi may not have an SIM slot. The congurations may vary depending on the
model number. Check the actual model for specics.
To install SIM card, you need to turn off the tablet rst, then insert SIM card following
the indicative mark.
To remove SIM card, you also need to turn off the tablet rst, then push to reject the
SIM card from the slot.
Starting Wireless Manager
Your Mobile Broadband Module is supplied with the Wireless Manager software
application. Wireless Manager provides a set of tools that you can use to congure
and manage mobile broadband connections on your ViewPad. When you open
Wireless Manager, the Wireless Manager main window is displayed. The main
window provides important status information and allows you to connect and
disconnect.
At Windows desktop, tap on icon to open Wireless Manager. If Wireless Manager
is running but no Wireless Manager Window is open, double-click the status icon
in the Windows notication area, or right-click the icon and select Open Wireless
Manager.
11
Page 16
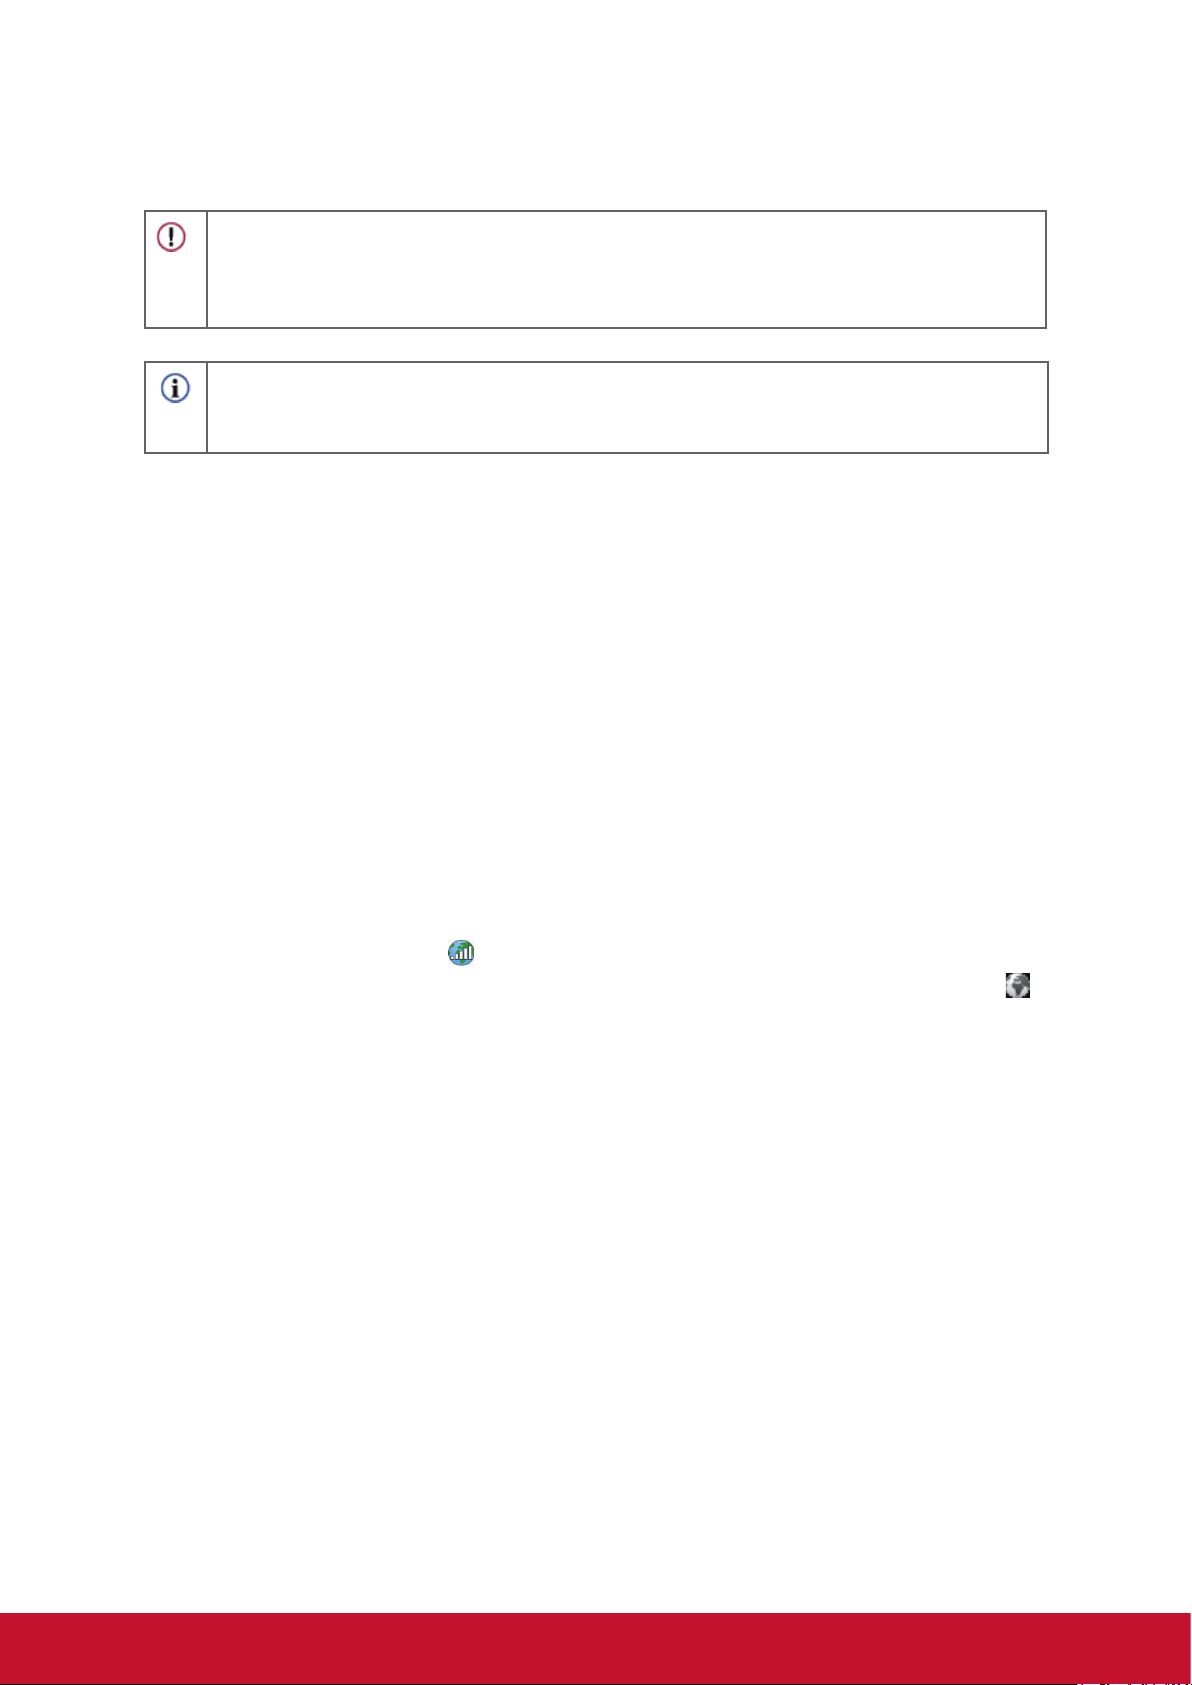
PIN
When starting the Wireless Manager, you may need to enter a PIN for your SIM
card to continue. Enter your PIN in the eld and then click OK. Refer to your network
subscription for PIN information.
PUK
You are allowed a limited numbers of attempts to enter the correct PIN. If you fail to
enter the SIM card’s PIN correctly, you will be locked from accessing the SIM card
and you will need a PUK to unlock the SIM card.
12
Page 17
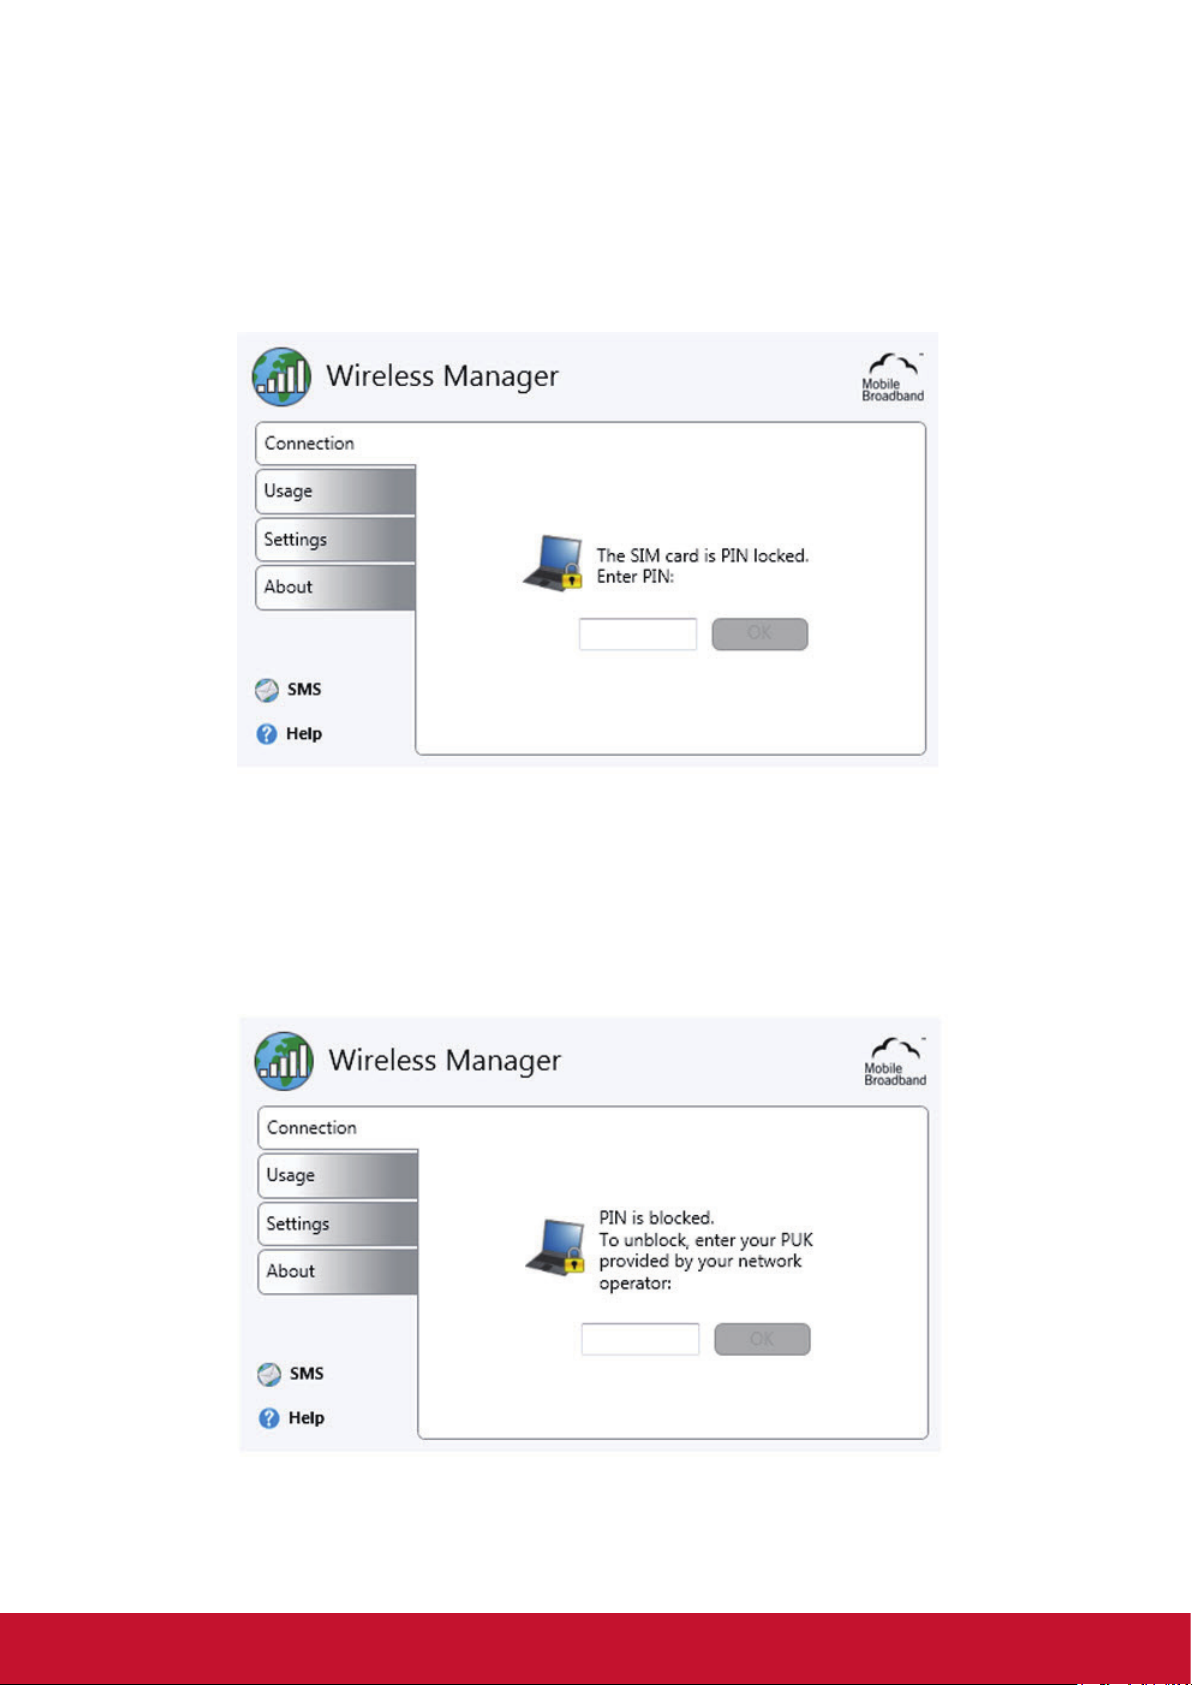
After entering the correct PUK, you will be prompted to change the PIN.
NOTE!
The PIN only protects your subscription and not your Mobile Broadband Module from
unauthorized use. If you change your PIN, the module will still work with another SIM card..
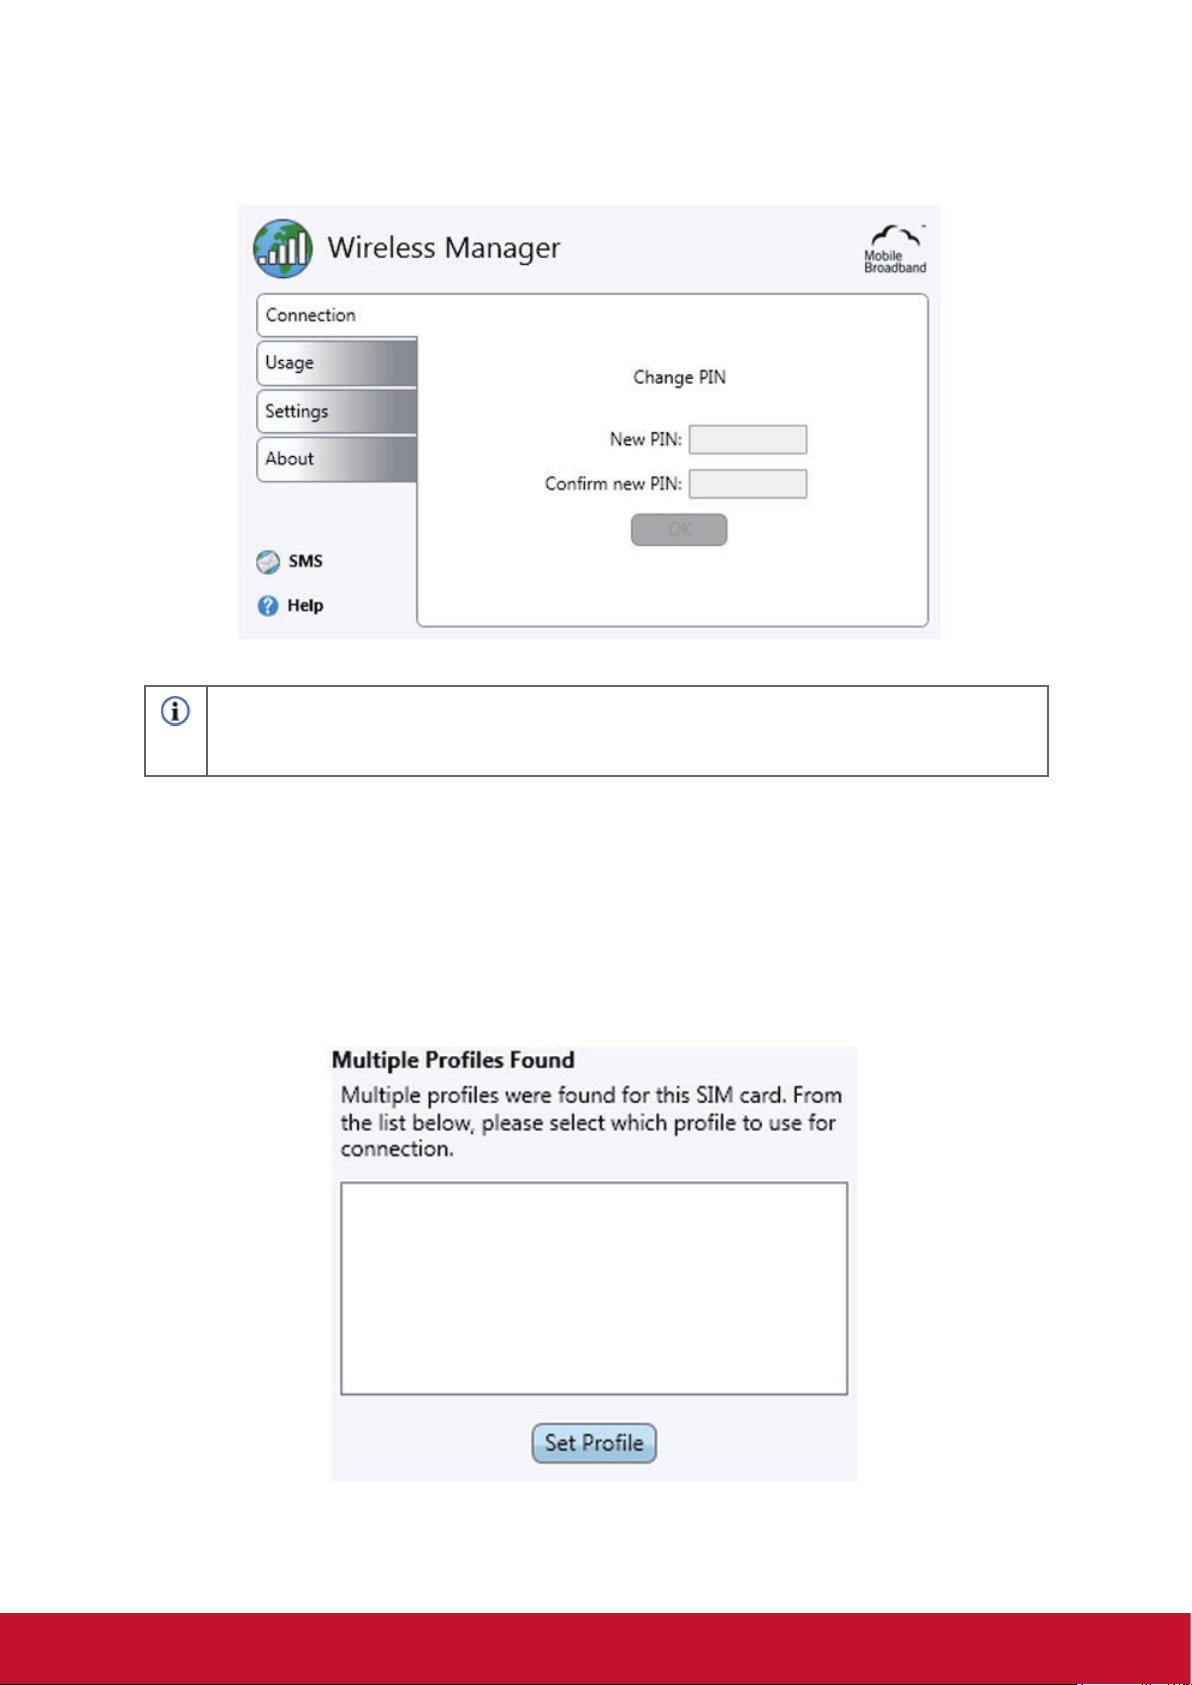
Multiple Proles
A SIM card can have multiple pre-dened proles. The rst time the Wireless
Manager starts, a dialog will appear with a question prompting you to set a
connection prole. Select a suitable prole from the list and click Set prole to
continue.
13
Page 18
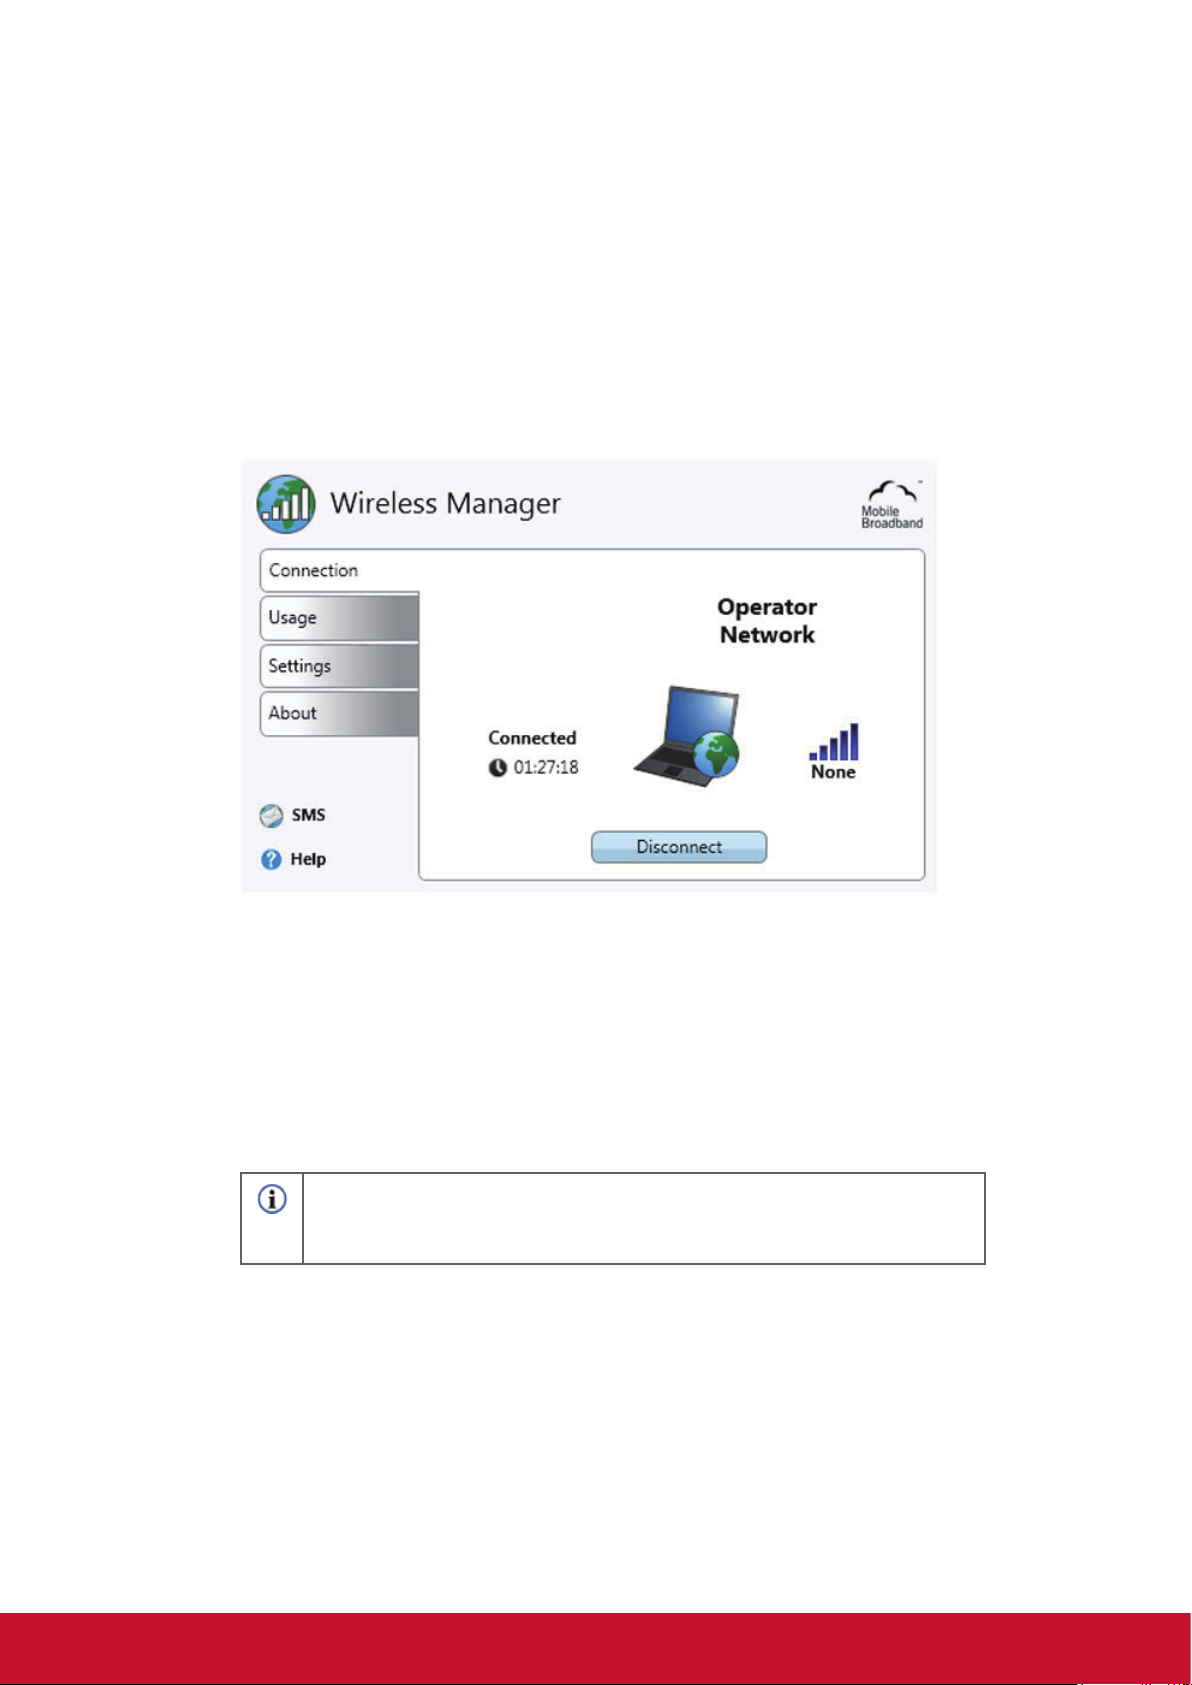
Connection
The Connection section tab enables you to connect or disconnect from an operator
network and provides information about your current Mobile Broadband Connection
(for example, signal strength and service type). From the Wireless Manager Main
Window it is also possible to open the following Wireless applications or Help:
• SMS link. Opens the SMS Utility.
• Help link. Opens the help window.
The following information is displayed in the Connection section tab:
• Your network operator’s name or icon or both. If roaming, the roaming
network name may also be shown. Roaming enables automatic use of
another network when travelling outside the geographical coverage area of
the home network. Roaming is marked with an R, next to the signal strength
bars.
NOTE!
If roaming, trafc charges may be higher than normal. Check with your
service provider for more details.
• Signal strength is indicated on a scale of ve bars, from zero to ve. The
bars also show if a connection is established or not. A lled bar symbolizes
a connection and an empty bar symbolizes that there is no connection.
• Type of service available (for example, GPRS and UMTS).
• Connection status messages, such as Connected/Disconnected and
Acquiring IP.
• Connect/Disconnect button.
• Status Image showing if a connection is established.
14
Page 19
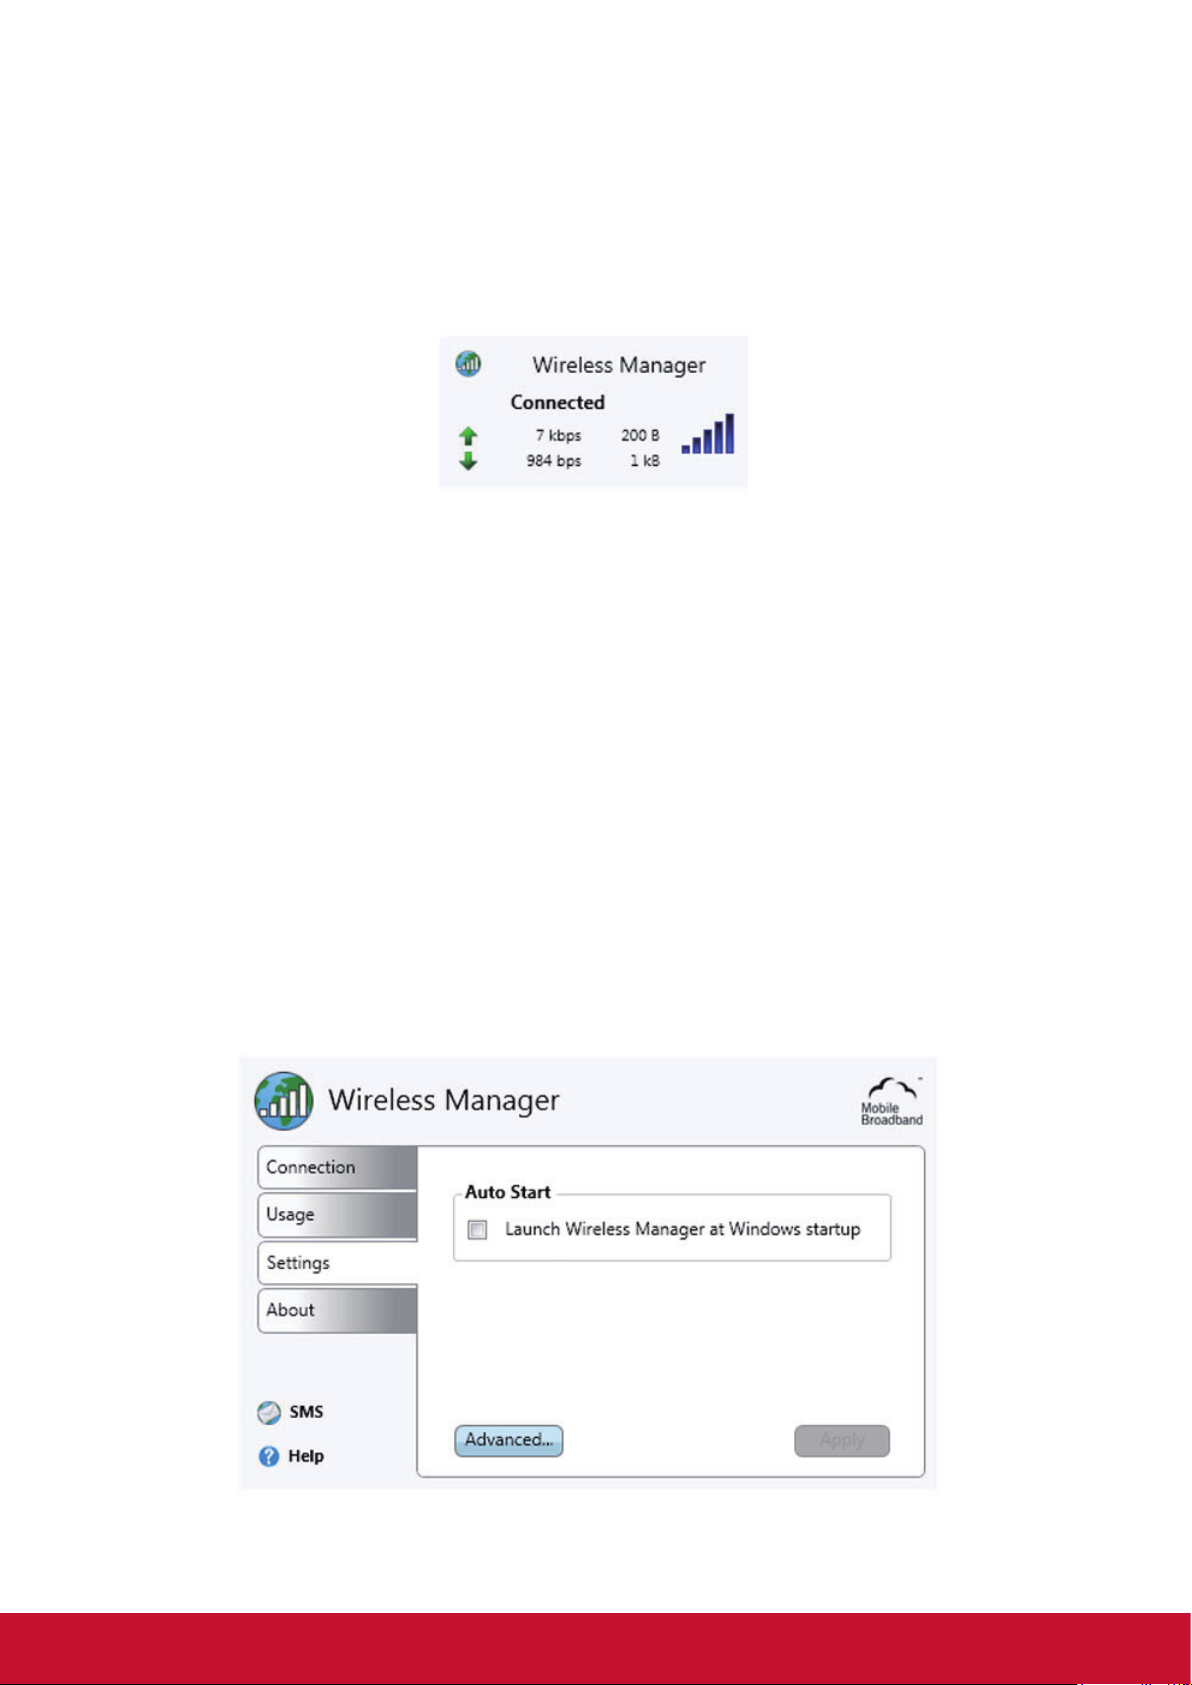
The Status Window
Some of the information displayed in the Connection section tab is also visible in
the status window. The status window is visible when the mouse pointer is held over
the status icon in the Windows notication area.
Connecting to a Corporate Network
Mobile access to a corporate network may require a special conguration to keep the
data secure. VPN software may be used to encrypt the data so that it can be safely
be sent over an Internet connection. Some corporations may also have a dedicated
APN enabling data to pass directly from the service provider to the corporate
servers.
Usage
The Usage section tab enables you to view Session and History information.
Settings
The Settings section tab enables you to change Wireless Manager settings.
15
Page 20
Auto Start
Automatically launch Wireless Manager at Microsoft Windows startup. Click Apply
after changing the Auto Start settings.
Advanced Settings
Further settings can be found by clicking Advanced...:
• SIM
• Radio
• Proles
• Networks
• Connection
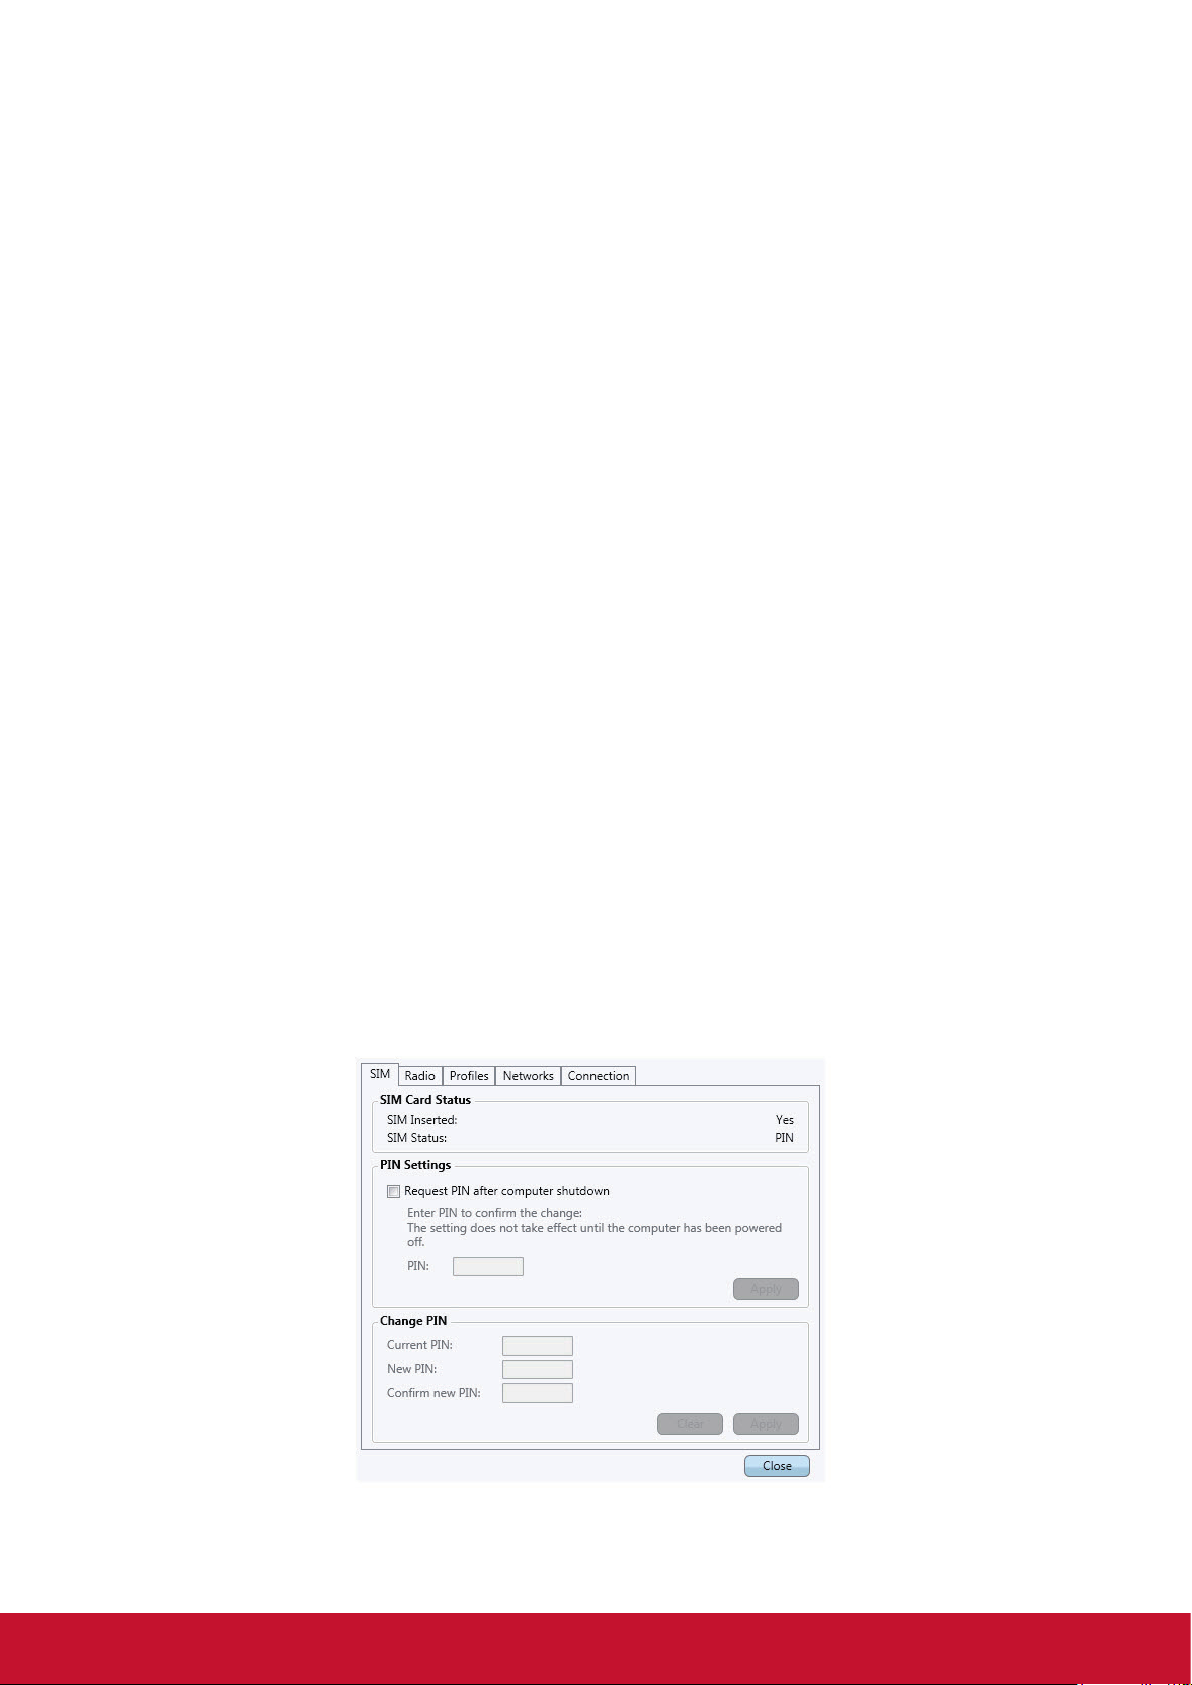
SIM
Most SIM cards are protected by a Personal Identity Number (PIN) at the time of
purchase. If PIN lock is activated for your SIM card, you have to enter the PIN when
you start Wireless Manager. You are allowed a limited numbers of attempts to enter
the correct PIN. If you fail to enter the SIM card’s PIN correctly, you will be locked
from accessing the SIM card and you will need a PUK to unlock the SIM card.
Make sure that the GSM/UMTS services that you require are included on your SIM
card subscription. The SIM tab contains information about the SIM state. It is also
possible to activate or deactivate the Request PIN at startup functionality and
change the PIN from this tab.
16
Page 21
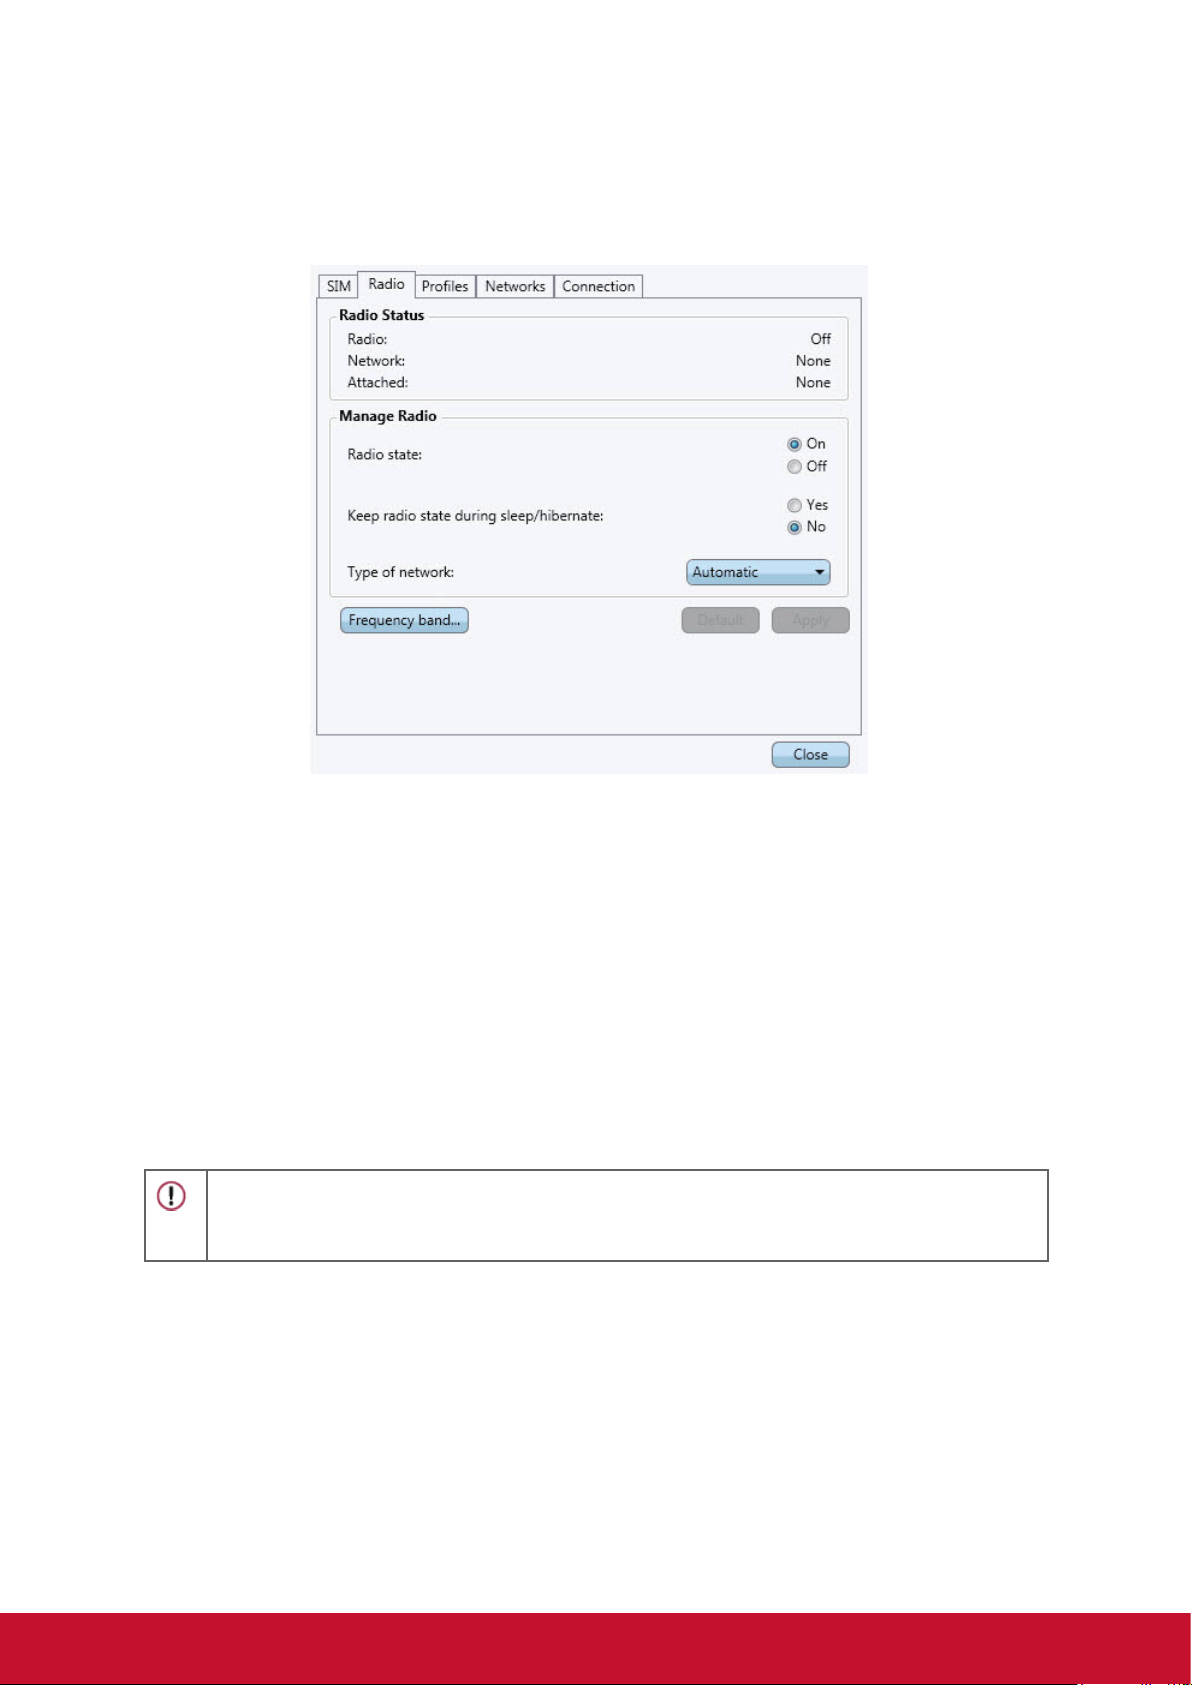
Radio
The Radio tab contains Radio Status information and radio settings.
Radio State
The radio needs to be turned on before you can make a connection or send and
receive text messages. Choose between On and Off.
Keep radio state during sleep/hibernate
The radio can be always on, even when the ViewPad is in power saving mode.
Choose between Yes and No.
CAUTION!
Within areas where no radio transmission or reception is allowed, the radio has to be turned
off to prevent disturbances.
Type of network
Automatic
The Automatic mode uses 3G networks where available, and if supported by current
subscription, otherwise switches to 2G. This is the recommended setting.
17
Page 22
3G(WCDMA)
The Mobile Broadband Module will only use 3G where available. If you are outside
of 3G coverage, the module will not switch to 2G. It will enter search mode until 3G
coverage is found.
2G(GSM)
The Mobile Broadband Module will only use 2G service where available. It may limit
your possibility to fully use the Wireless Manager applications.
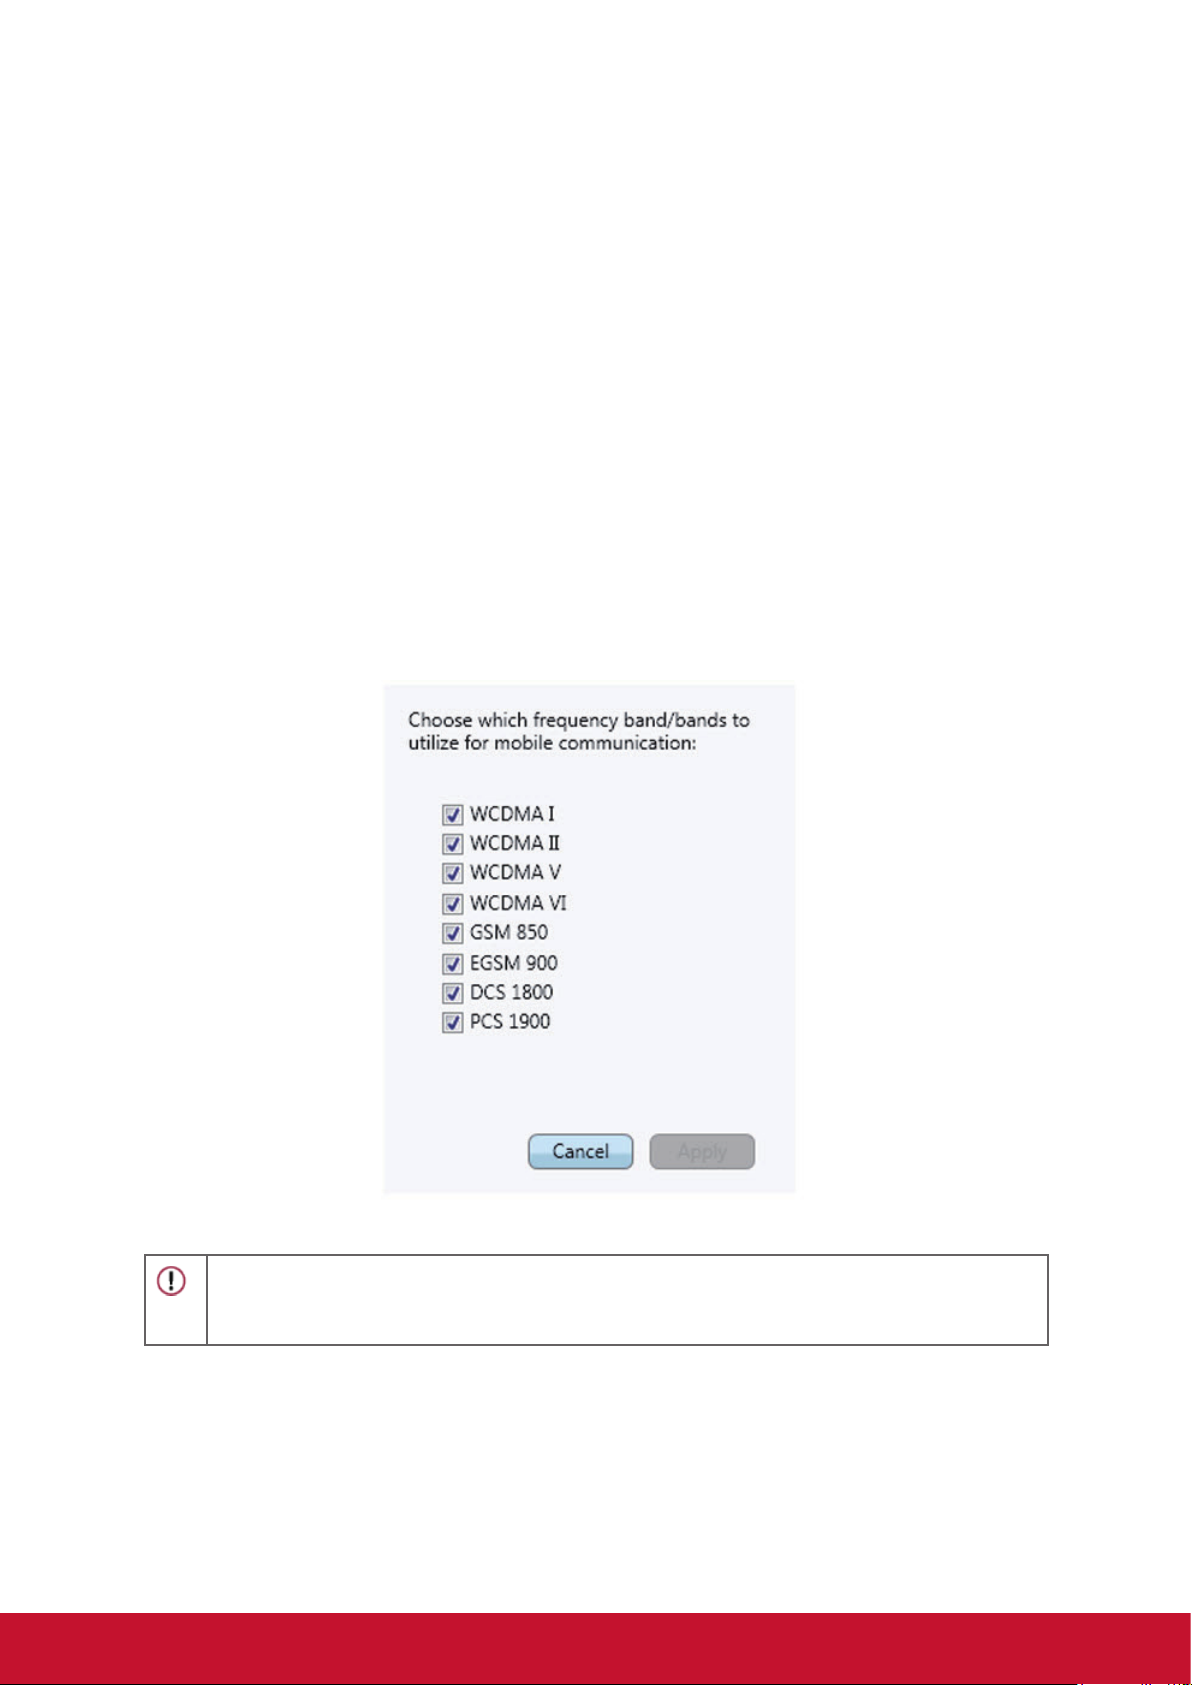
Frequency Band
It is possible to choose which frequency band/bands to use for mobile
communication by clicking the Frequency band button. All bands are selected as
default.
CAUTION!
Deselecting frequency bands may lead to connection problems. It is not recommended to
change the Frequency Band settings.
18
Page 23
Proles
A prole contains the information necessary to enable your Mobile Broadband
Module to connect to the Internet or to a corporate network. A prole is the same for
all services: 2G and 3G. Obtain the APN, user name and password and any further
advanced settings such as DNS server addresses from your network operator or
network administrator.
The Wireless Manager has a large database of operator proles which are used to
establish an Internet connection. These proles are also, in most cases, suitable for
use with VPN software. The rst time you start the Wireless Manager it will by default
use Automatic selection of prole.
It is possible to manually select the prole. Multiple Proles may be available for your
SIM card.
If you later insert a different network operator’s SIM card in your ViewPad and start
Wireless Manager, a new prole will be selected for this network operator.
Automatic Prole Selection
When automatic selection is chosen the operator prole database is searched to
nd a prole matching the network operator’s details on your SIM card. If the correct
prole for your operator is found it will be selected as your automatic selection.
19
Page 24

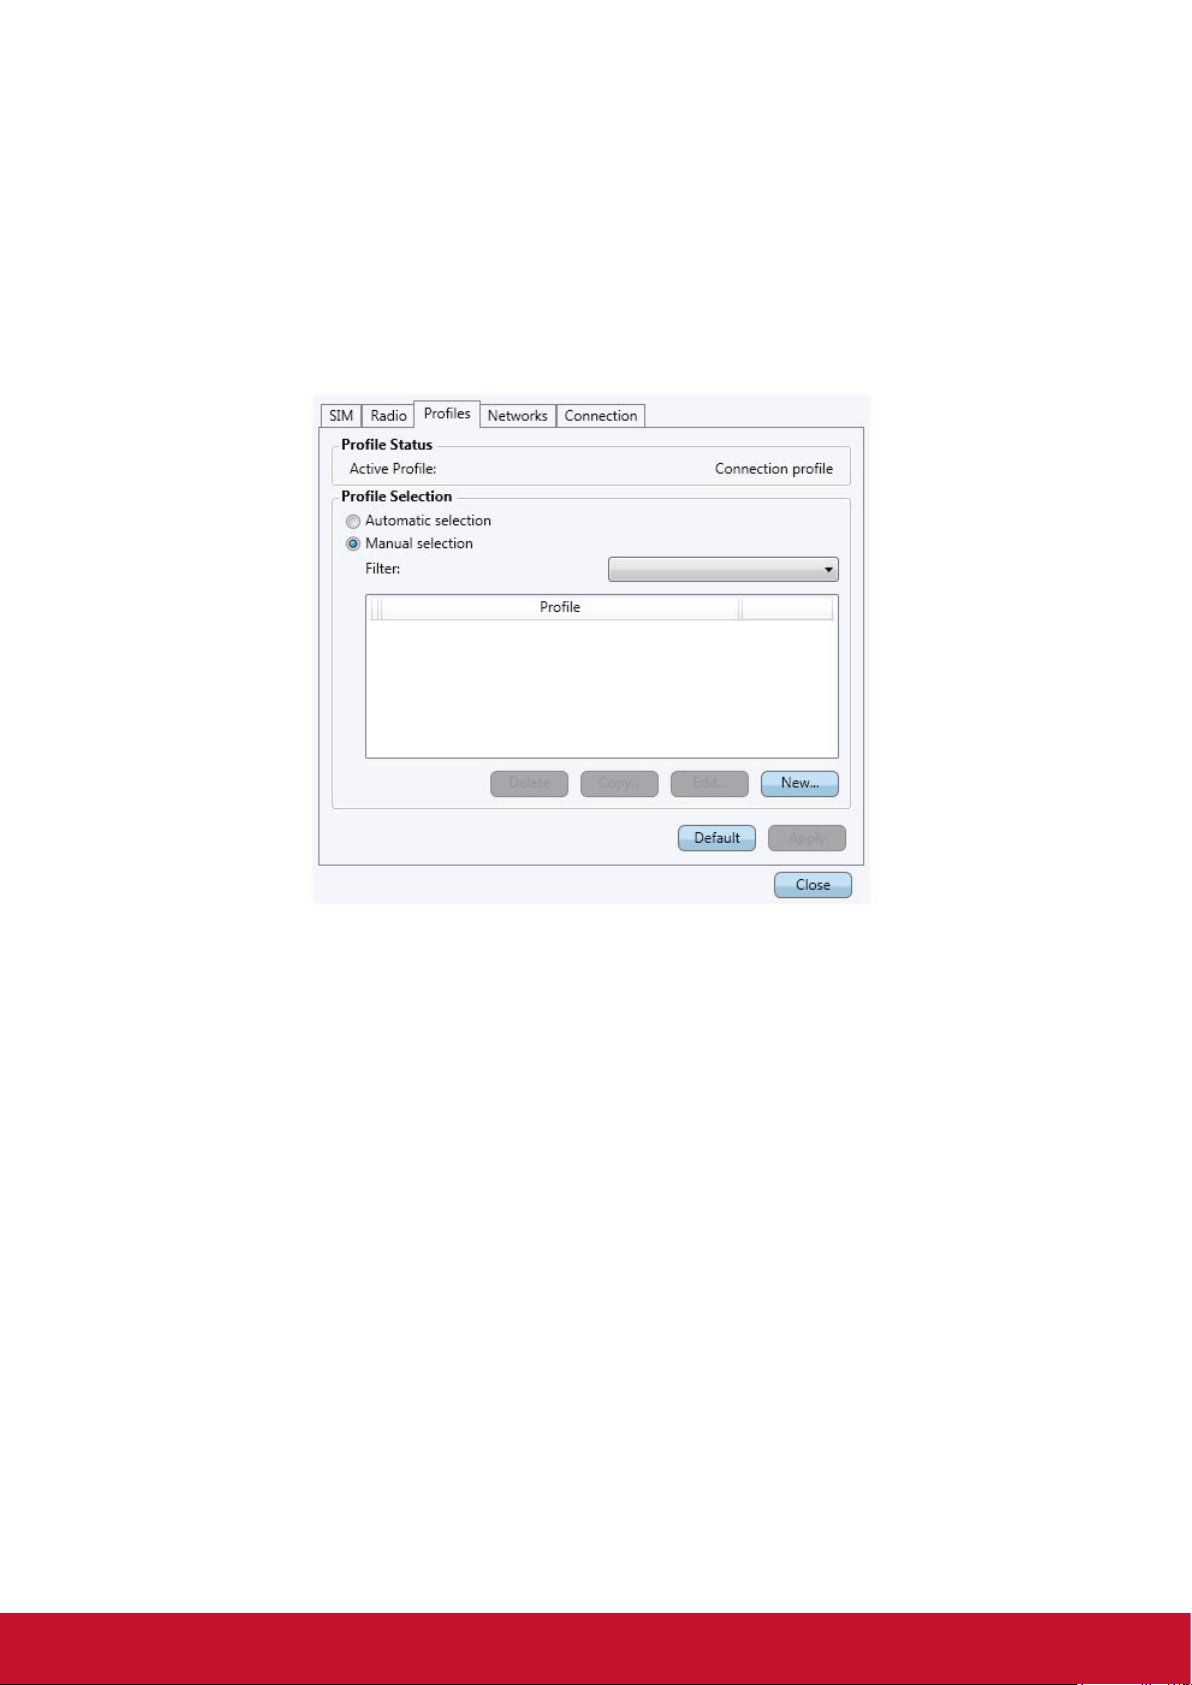
Manual Prole Selection
It is possible to manually select which prole to use from the prole database or to
create a new prole.
Selecting a Prole
1. Select the Manual selection option from Prole Selection.
2. In the Prole list, select the prole you want to use and then click Apply. Your
new connection prole is dened and selected.
NOTE!
If a manual prole is selected from the list, automatic prole selection will not be actived until
re-selected.
Creating a Prole
1. Select the Manual selection option from Prole Selection.
2. Click New.
3. Enter the Prole name of your choice. For example, “My Prole.”
4. Enter the Access Point Name (APN).
5. Enter the User name and Password if required. These are often left blank.
6. If needed, enter IP address, DNS server information and Protocols under the
corresponding tab.
7. Save the prole by clicking Save.
NOTE!
The new prole settings will be used the next time you connect.
Deleting a Prole
1. Select the Manual selection option from Prole Selection.
2. Select the prole you want to delete from the Prole list.
3. Click Delete.
Modifying a Prole
1. Select the Manual selection option from Prole Selection.
2. Select the prole you want to modify from the Prole list.
3. Click Edit. Change the settings as required.
4. Save the prole by clicking Save.
NOTE!
Only user dened proles can be modied. In order to change a operator dened prole a
copy has to be made.
20
Page 25
Copying a Prole
1. Select the Manual selection option from Prole Selection
2. Select the prole you want to copy from the Prole list.
3. Click Copy. Change the settings if required.
4. Save the prole by clicking Save.
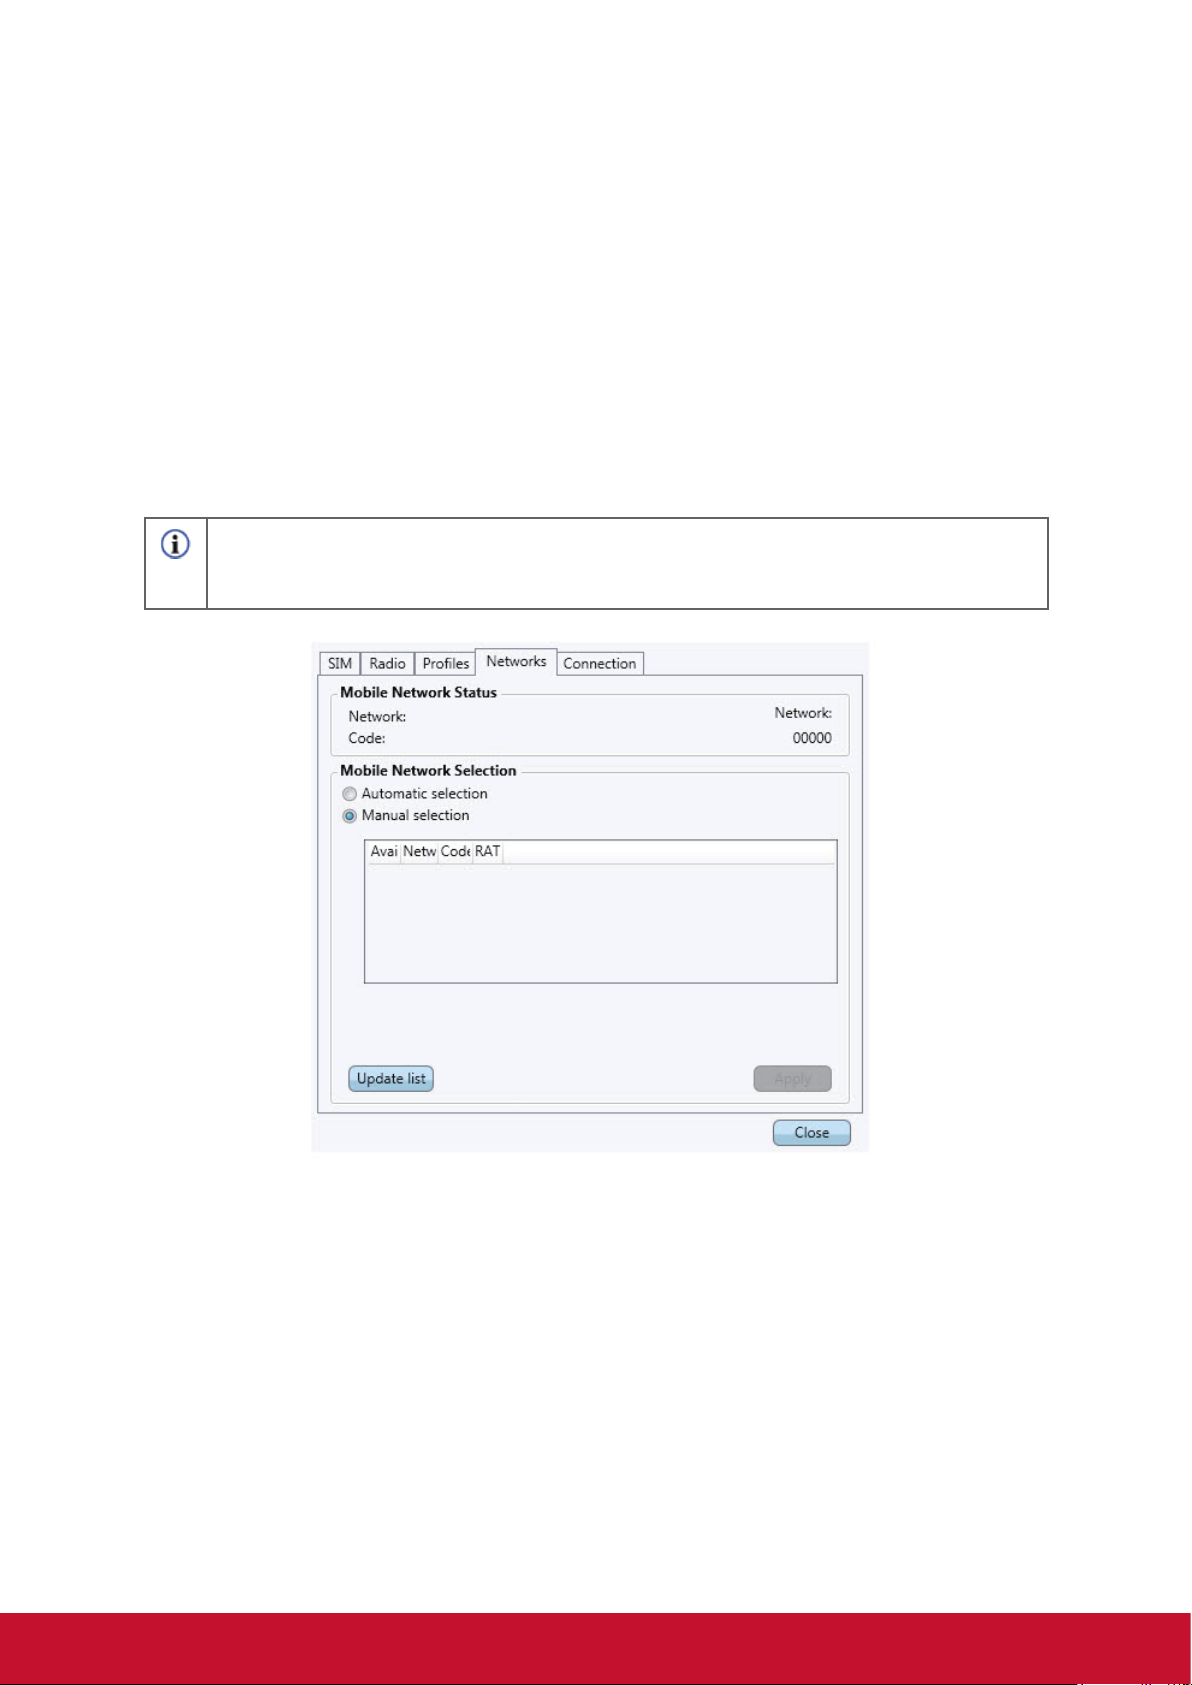
Networks
The mobile network list displays the networks available at your location. You can also
select what network you want to connect to.
NOTE!
Disconnect any ongoing connection before changing the mobile network or update the list of
networks.
Viewing Available Networks
1. If connected, click the Disconnect button.
2. Switch the Mobile Networks Selection mode to Manual Selection.
3. Update the list by clicking Update list. When the search is completed, the
networks that are currently available are displayed.
21
Page 26
The available networks will fall into one of the following three categories:
• The Home network: this is the network selected by default.
• Available networks: These are networks that your home network operator has a
roaming agreement with.
• Forbidden networks: Normally, you will not be able to access these networks.
If your home network has reached an agreement that allows you to use the
forbidden network, you might be able to access it.
Networks are also categorized as:
• 2G networks
• 3G networks
NOTE!
If you select a 2G network but the service provider also has 3G services, then the Mobile
Broadband Module will switch to the 3G network automatically.
Selecting Another Network
1. Set the Selection Mode to Manual.
2. Click Update List.
3. When the search is completed, the networks that are currently available are
displayed in the Select a Network list box.
4. In the Select a Network list box, select the network that you want to use.
5. Click Apply. If you are not allowed to use the network that you have chosen,
Forbidden is displayed.
NOTE!
Manual selection may be restricted, even on a network that is listed as Available. Check
your subscription to determine the appropriate roaming networks to use.
22
Page 27
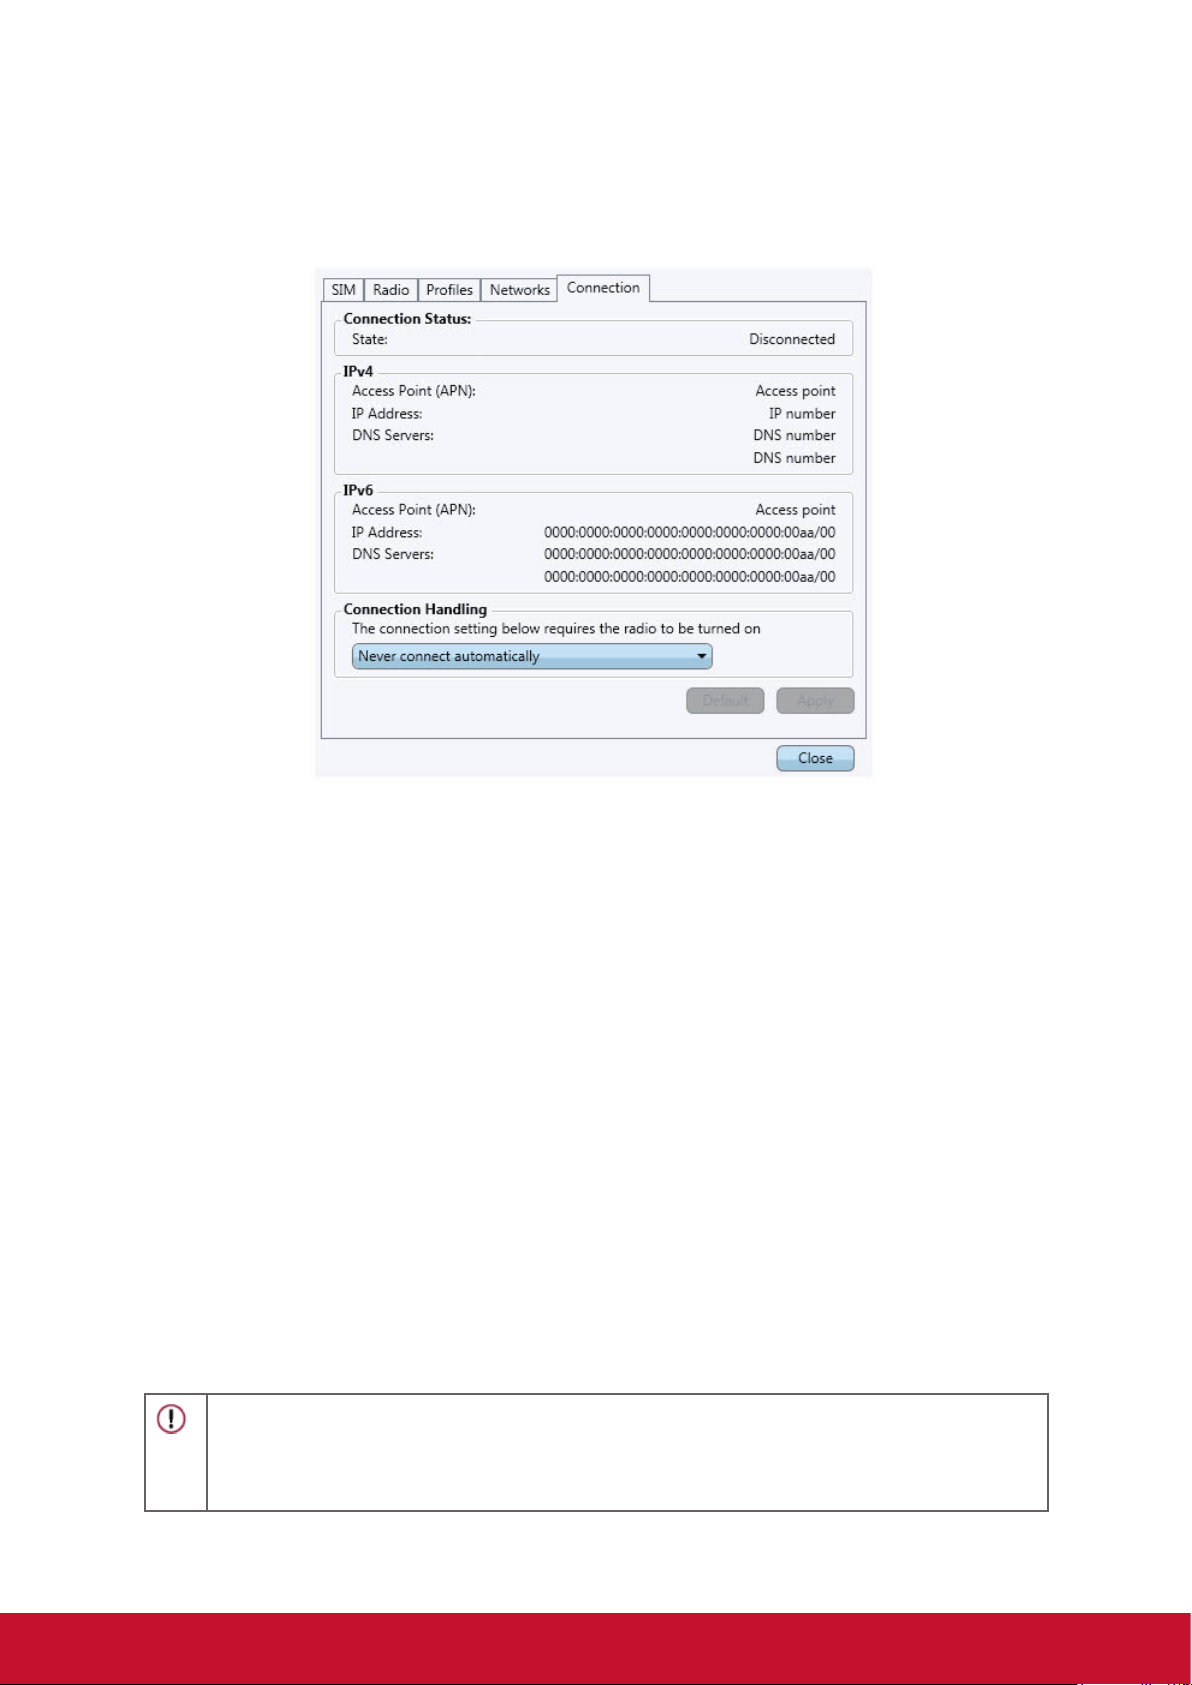
Connection
The Connection tab contains information about the connection.
Autoconnect
It is possible to set Wireless Manager to connect automatically at Microsoft Windows
startup, when resuming from sleep/hibernate and after turning on the Mobile
Broadband device through the WWAN switch. Autoconnect requires the radio to be
on.
• Always connect automatically allows Wireless Manager to connect
automatically, whenever a network is available.
• Connect automatically except when roaming allows Wireless Manager to
connect automatically to your operator’s network (home network). If only roaming
networks are available, Wireless Manager will not connect automatically.
• Never connect automatically disallows Wireless Manager to connect
automatically.
Click the Apply button to apply the change. The default settings can be retrieved by
clicking Default.
CAUTION!
Be aware that some applications automatically transmit data when you are connected.
Depending on subscription you may be charged for the data transfer. Be aware that
automatic connection can lead to roaming costs.
23
Page 28
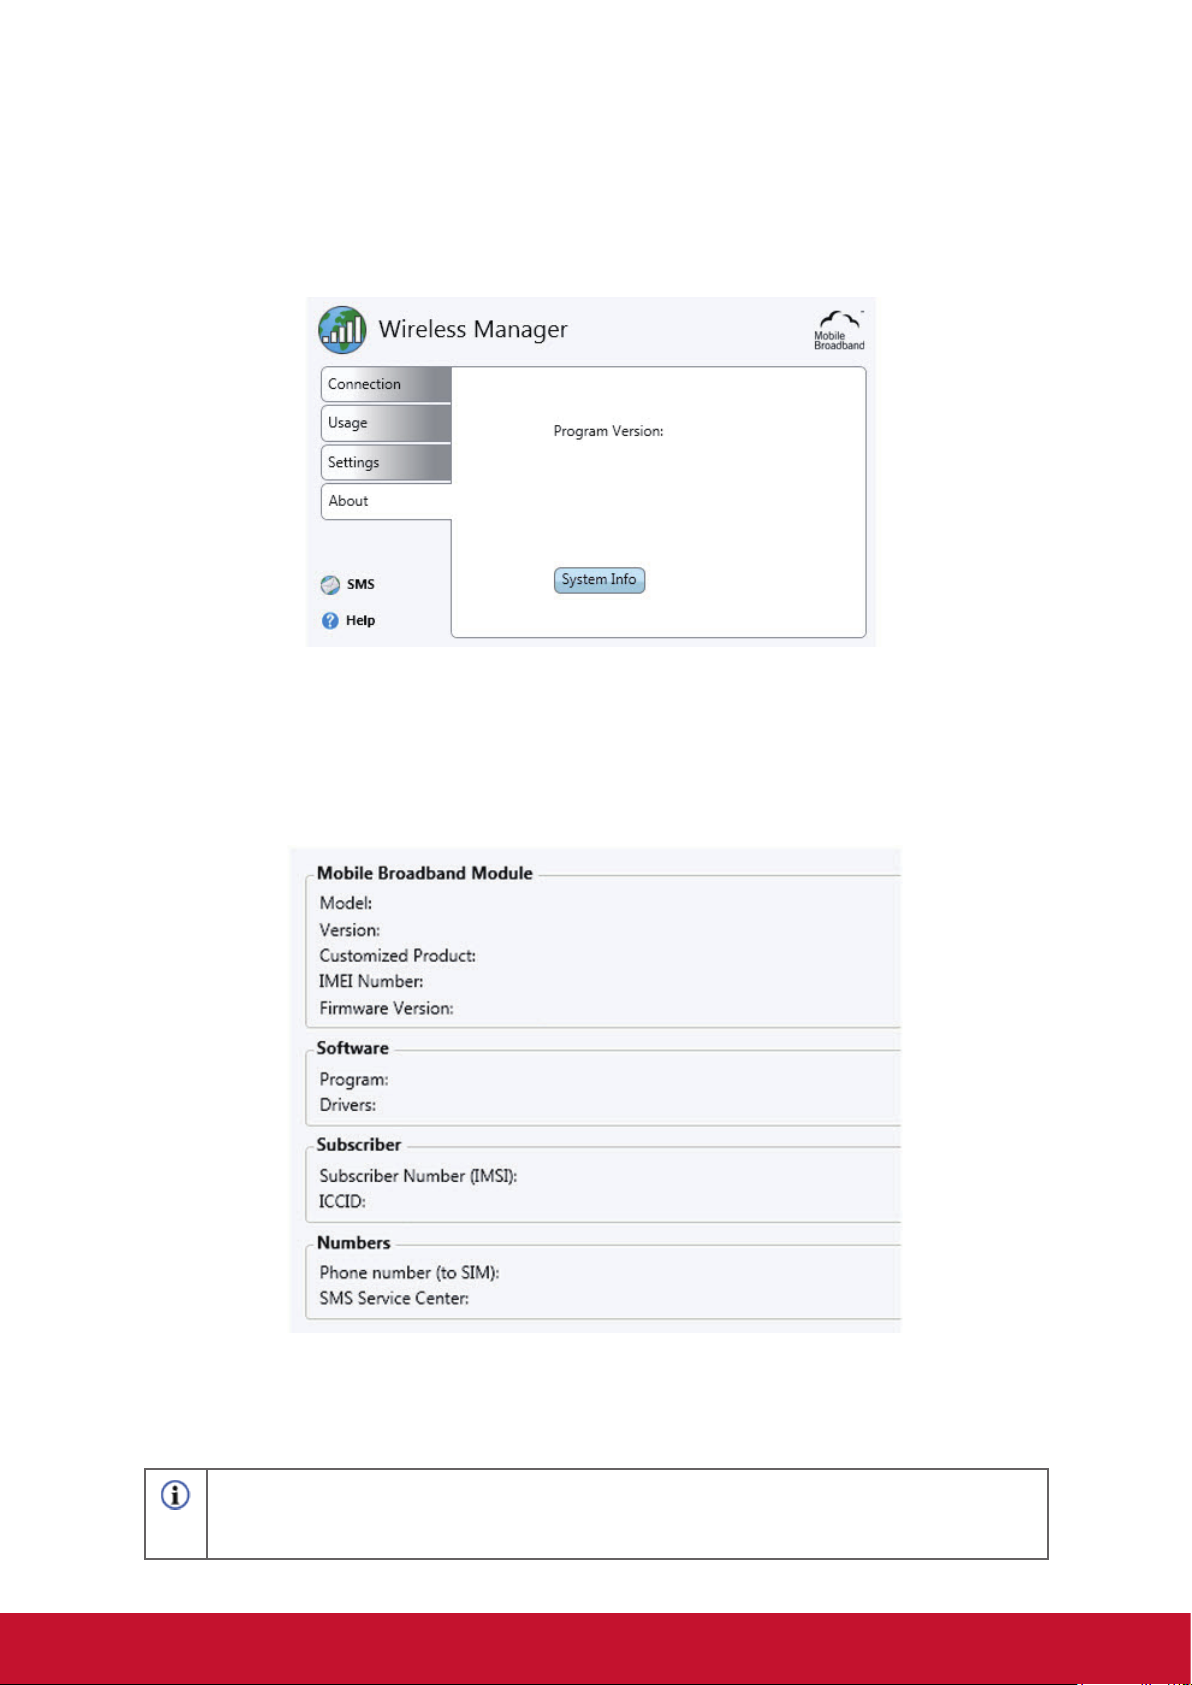
About
The About section tab displays system and program version information for your
Mobile Broadband Module and Wireless Manager software.
System Information
By clicking System Info the System Information window is displayed containing
information about the mobile broadband system.
The Copy to clipboard button copies the information shown in the window, as text.
The information can be pasted into, for example, an email or a text document.
NOTE!
IMEI Number and Subscriber Number (IMSI) might be omitted due to legal requirements in
some countries.
24
Page 29
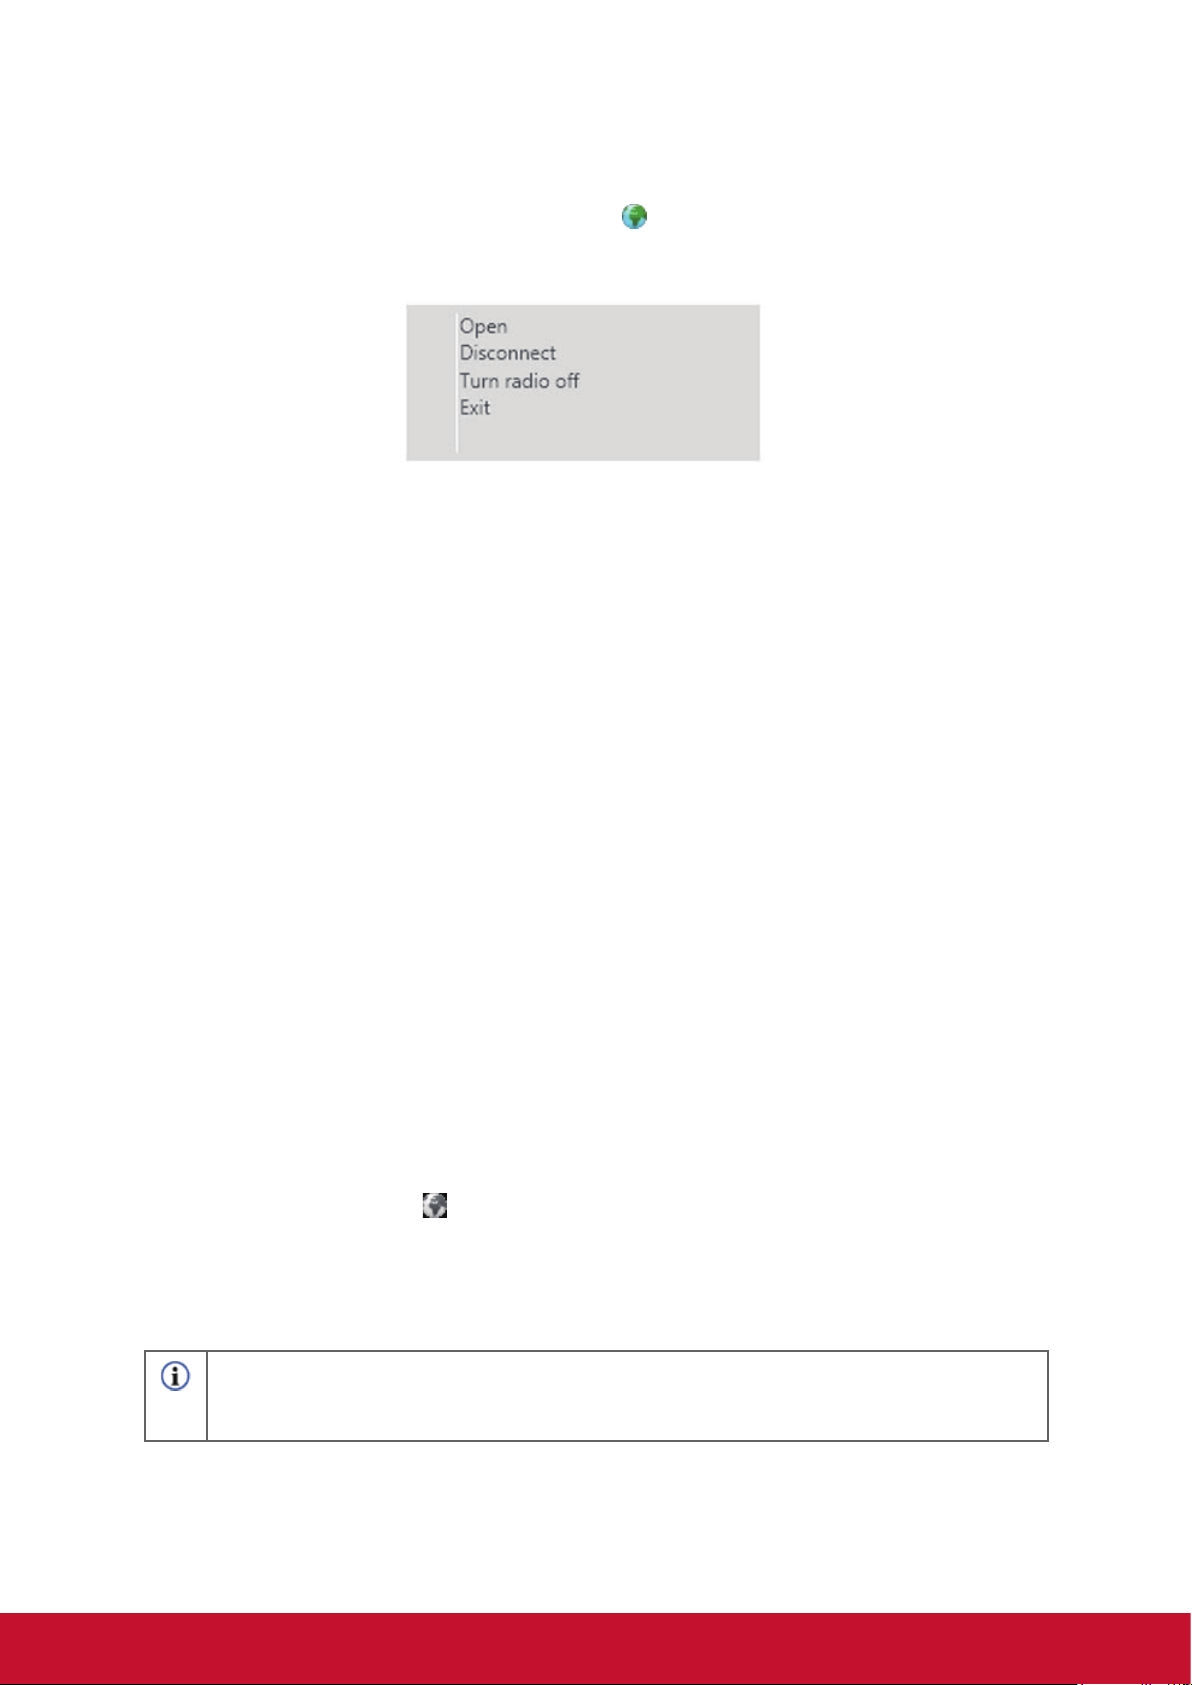
Wireless Manager menu
Right-click the Wireless Manager status icon in the Windows notication area to
access the Wireless Manager Notication icon menu options:
Some of these menu options may be disabled depending on the current state of your
Mobile Broadband Module.
Opening Wireless Manager
The Wireless Manager window does not need to be open when the program is
running. Use the Open menu option if you want to open the window.
Connecting/Disconnecting
If you are currently disconnected, the menu gives you the option to Connect. If you
are connected, the menu gives you the option to Disconnect.
Turning Radio On or Off
The Radio menu option is dynamic. It monitors the current state of the radio
transmitter and gives you the option to change it to the opposite state. For example,
if your radio transmitter is on, the menu option reads Turn Radio off.
Exiting Wireless Manager
Right-click the status icon in the Microsoft Windows notication area and select
Exit from the menu. Your Mobile Broadband connection will be terminated when
you exit Wireless Manager. Closing the Wireless Manager window will not exit the
Wireless Manager application.
NOTE!
Radio will be kept on after exiting the Wireless Manager. If you wish to manually turn the
radio off before exiting, see Radio section.
For more information and usage of Wireless Manager, please refer to the Help
window.
25
Page 30
Chapter 4 Basic Operation
Power up and off
1. Press on button located at top of device to power up.
Warning: Do not turn off the device before it is fully booted or it may cause an error
on the next power up.
2. In Windows 7, click Start>Shutdown> or push the
Note 1: Windows can be congured to automatically shut down by single press. Please use
Windows help & support (Keyword “Power”) for more power conguration information.
Note 2: Hard power off can be achieved by holding down for 4 second.
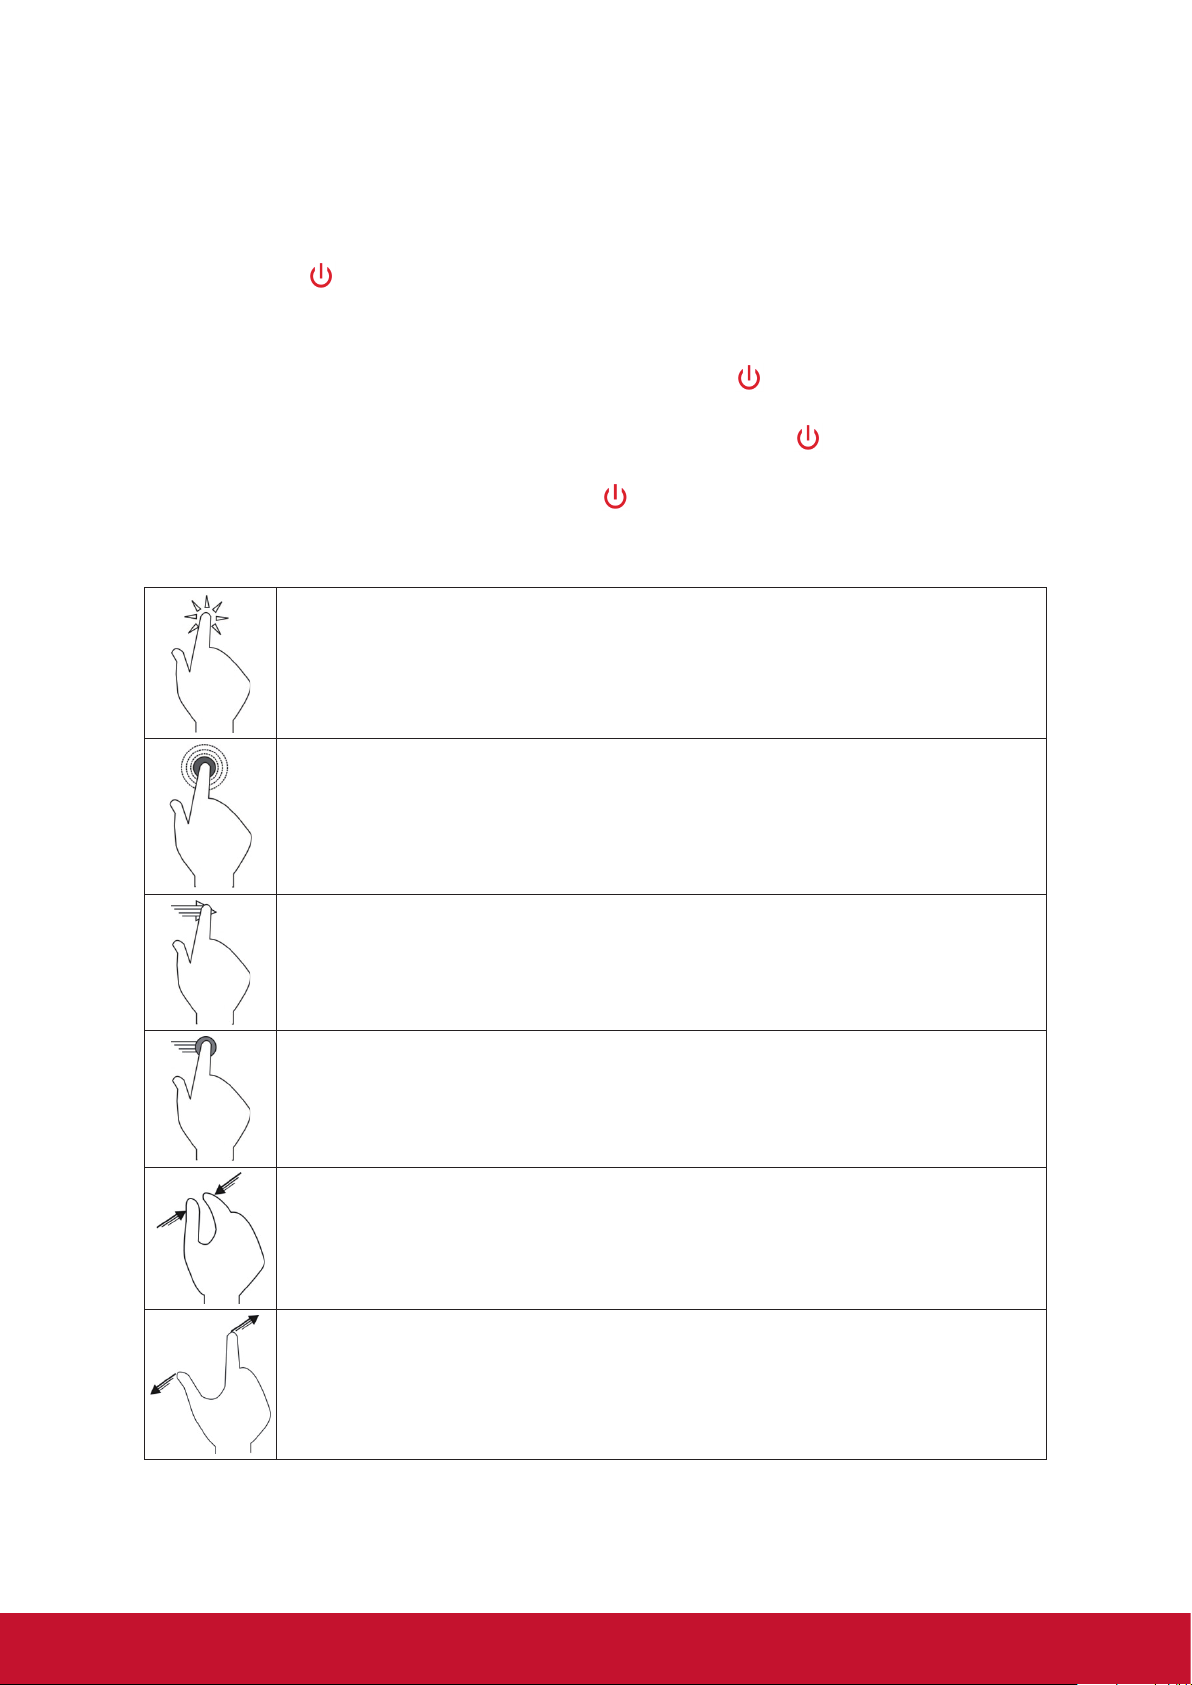
Touch Screen Control
Tap: Quick single tap motion. Emulates left mouse click.
button to power off.
Tap & Hold: Press on open area for >4 seconds. Emulates right
mouse click.
Slide: Quick directional motion. Emulates scrolling.
Drag: Press on icon for >4 seconds then perform directional motion.
Emulates left mouse button hold.
Pinch: Two-points inward motion. Zoom in.
Spread: Two-points outward motion. Zoom out.
Note: An application can denes more complex hand gestures, availability based on application
support.
26
Page 31

Virtual Keyboard
ViewPad includes the Swype input method as the default on-screen keyboard.
The keyboard will appear automatically when you select a text input eld. You can
show and hide the keyboard manually by pressing the Swype icon in the taskbar or
the Hide button in the lower right corner of the keyboard.
Press the lock button in the lower right part of the keyboard to enable Lock or
Manual mode. In this mode, the keyboard only appears and hides when you press
the Swype icon.
The re-size icon in the lower left corner of the keyboard toggles between large and
small sizes. Next to that is the Swype settings button. Press that to adjust settings or
to view the Swype tutorial.
Using Swype is as easy as sliding your nger from one letter to the next – no tapping
required. View the built-in tutorial to learn more.
To use the standard Windows on-screen keyboard instead, go to Control Panel,
select Ease of Access Center, and check “Start On-Screen Keyboard.”
To make the Windows keyboard appear at start up, scroll down in the Ease of
Access Center and select “Use the computer without a mouse or keyboard.” Check
“Use On-Screen Keyboard” to bring up the Windows keyboard automatically
whenever you turn on the tablet.
ViewScene
The ViewPad comes equipped with the ViewScene user interface, powered by Thinix
Touch technology. ViewScene is your touch friendly, tablet optimized dashboard. Just
tap the ViewScene shortcut on your desktop to experience Windows in a whole new
way.
The ViewScene user interface offers seven customizable tabs for one-touch access
to your favorite applications and web sites and important tools and utilities. You will
see a Home screen, Ofce resources, My Stuff for your documents and media les,
Windows Accessories, ViewSonic ViewTools and Support documentation.
The ViewTools menu includes powerful utilities such as vsPresenter, which lets you
log on to your ViewSonic projector. ViewSonic has made it easy to integrate your
ViewPad with your ViewSonic projector, to deliver your tablet display right on to the
big screen.
ViewDraw gives you the ability to annotate, draw and highlight right on screen –
perfect for delivering presentations in the conference room or classroom. You can
even save your work for later.
The Support tab includes a variety of documentation including the Quick Start Guide,
User Guide, Frequently Asked Questions and this tutorial video.
Quick Edit makes it easy to customize your layout. Just turn on Quick Edit mode, tap
the button you wish to change, and choose a new item from the drop-down menu.
See the user guide to learn about advanced customization options, including creating
your own tabs and buttons with the ViewScene Conguration Utility.
ViewScene also includes the Thinix Tablet Browser, which you can launch from the
ViewScene home screen or from your Windows desktop. Tablet Browser offers a full-
screen browsing experience designed just for touch tablets.
27
Page 32

Troubleshooting
Symptom Possible Causes Remedy
Touch
panel is not
functioning
properly
Battery is not
charging
1. Environmental conditions are
signicantly different from factory
default.
2. Touching surface does not provide
sufcient electrical charge.
1.Using wrong AC power adapter
with insufcient power rating or
incorrect plug.
2.Using USB. This device does not
Perform touch screen
recalibration.
- Ensure nger is dry and
clean.
- Ensure stylus pen is
approved for capacitive
touch panel use.
Use AC power adapter
provided with this device.
support USB battery
charging.
Multi Touch
not working
System locks upMultiple possible causes: Windows
1. Using Windows 7 Starter or Basic
(Single touch only)
2. Application is not support Use an application that
3. Improper hand gesture Ensure the hand gesture is
code, Intel device failure, device
driver, overheating or application
code.
Upgrade OS to Windows 7
Home Premium or higher.
supports multi touch
function.
properly performed.
Push reset button to
restart the system. Perform
Windows updates regularly
for latest system and
device updates, install
latest device drivers and
application version.
28
Page 33

Customer Support
For technical support or product service, see the table below or contact your reseller.
NOTE: You will need the product serial number.
Country/Region Website
Australia/New Zealand www.viewsonic.com.au
Canada www.viewsonic.com
Europe
Hong Kong www.hk.viewsonic.com T= 852 3102 2900 service@hk.viewsonic.com
India www.in.viewsonic.com T= 1800 266 0101 service@in.viewsonic.com
www.viewsoniceurope.
com
T = Telephone
F = FAX
AUS= 1800 880 818
NZ= 0800 008 822
T (Toll-Free)= 1-866-463-4775
T (Toll)= 1-424-233-2533
F= 1-909-468-3757
www.viewsoniceurope.com/uk/support/call-desk/
Email
service@au.viewsonic.com
service.ca@viewsonic.com
Ireland (Eire)
Korea www.kr.viewsonic.com T= 080 333 2131 service@kr.viewsonic.com
Latin America
(Argentina)
Latin America (Chile) www.viewsonic.com/la/ T= 1230-020-7975 soporte@viewsonic.com
Latin America
(Columbia)
Latin America (Mexico) www.viewsonic.com/la/ T= 001-8882328722 soporte@viewsonic.com
Renta y Datos, 29 SUR 721, COL. LA PAZ, 72160 PUEBLA, PUE. Tel: 01.222.891.55.77 CON 10 LINEAS
Electroser, Av Reforma No. 403Gx39 y 41, 97000 Mérida, Yucatán. Tel: 01.999.925.19.16
Other places please refer to http://www.viewsonic.com/la/soporte/index.htm#Mexico
Latin America (Peru) www.viewsonic.com/la/ T= 0800-54565 soporte@viewsonic.com
Macau www.hk.viewsonic.com T= 853 2870 0303 service@hk.viewsonic.com
Middle East ap.viewsonic.com/me/ Contact your reseller service@ap.viewsonic.com
Puerto Rico & Virgin
Islands
Singapore/Malaysia/
Thailand
www.viewsoniceurope.
com/uk/
www.viewsonic.com/la/ T= 0800-4441185 soporte@viewsonic.com
www.viewsonic.com/la/ T= 01800-9-157235 soporte@viewsonic.com
www.viewsonic.com
www.ap.viewsonic.com T= 65 6461 6044 service@sg.viewsonic.com
www.viewsoniceurope.com/uk/
support/call-desk/
T= 1-800-688-6688 (English)
T= 1-866-379-1304 (Spanish)
F= 1-909-468-3757
service_ie@viewsoniceurope.com
service.us@viewsonic.com
soporte@viewsonic.com
South Africa ap.viewsonic.com/za/ Contact your reseller service@ap.viewsonic.com
United Kingdom
United States www.viewsonic.com
www.viewsoniceurope.
com/uk/
www.viewsoniceurope.com/uk/
support/call-desk/
T (Toll-Free)= 1-800-688-6688
T (Toll)= 1-424-233-2530
F= 1-909-468-3757
service_gb@viewsoniceurope.com
service.us@viewsonic.com
29
Page 34

Limited Warranty
VIEWSONIC® ViewPad
What the warranty covers:
ViewSonic warrants its products to be free from defects in material and workmanship,
under normal use, during the warranty period. If a product proves to be defective in
material or workmanship during the warranty period, ViewSonic will, at its sole option,
repair or replace the product with a like product. Replacement product or parts may
include remanufactured or refurbished parts or components.The replacement unit will
be covered by the balance of the time remaining on the customer’s original limited
warranty. ViewSonic provides no warranty for the third-party software included with
the product or installed by the customer.
How long the warranty is effective:
ViewSonic ViewPad are warranted for at least 1 year for labor from the date of the
rst customer purchase.
User is responsible for the back up of any data before returning the unit for service.
ViewSonic is not responsible for any data lost.
Who the warranty protects:
This warranty is valid only for the rst consumer purchaser.
What the warranty does not cover:
1. Any product on which the serial number has been defaced, modied or
removed.
2. Damage, deterioration or malfunction resulting from:
a. Accident, misuse, neglect, re, water, lightning, or other acts of nature,
unauthorized product modication, or failure to follow instructions supplied
with the product.
b. Repair or attempted repair by anyone not authorized by ViewSonic.
c. Causes external to the product, such as electric power uctuations or failure.
d. Use of supplies or parts not meeting ViewSonic’s specications.
e. Normal wear and tear.
f. Any other cause which does not relate to a product defect.
3. Any product exhibiting a condition commonly known as “image burn-in” which
results when a static image is displayed on the product for an extended period
of time.
4. Removal, installation, insurance, and set-up service charges.
How to get service:
1. For information about receiving service under warranty, contact ViewSonic
Customer Support (Please refer to the web site and Customer Support pages).
You will need to provide your product’s serial number.
2. To obtain warranty service, you will be required to provide (a) the original dated
sales slip, (b) your name, (c) your address, (d) a description of the problem, and
(e) the serial number of the product.
3. Take or ship the product freight prepaid in the original container to an authorized
ViewSonic service center or ViewSonic.
4. For additional information or the name of the nearest ViewSonic service center,
contact ViewSonic.
30
Page 35

Limitation of implied warranties:
There are no warranties, express or implied, which extend beyond the description
contained herein including the implied warranty of merchantability and tness for a
particular purpose.
Exclusion of damages:
ViewSonic’s liability is limited to the cost of repair or replacement of the product.
ViewSonic shall not be liable for:
1. Damage to other property caused by any defects in the product, damages
based upon inconvenience, loss of use of the product, loss of time, loss of
prots, loss of business opportunity, loss of goodwill, interference with business
relationships, or other commercial loss, even if advised of the possibility of such
damages.
2. Any other damages, whether incidental, consequential or otherwise.
3. Any claim against the customer by any other party.
4. Repair or attempted repair by anyone not authorized by ViewSonic.
Effect of state law:
This warranty gives you specic legal rights, and you may also have other rights
which vary from state to state. Some states do not allow limitations on implied
warranties and/or do not allow the exclusion of incidental or consequential damages,
so the above limitations and exclusions may not apply to you.
Sales outside the U.S.A. and Canada:
For warranty information and service on ViewSonic products sold outside of the
U.S.A. and Canada, contact ViewSonic or your local ViewSonic dealer. The warranty
period for this product in mainland China (Hong Kong, Macao and Taiwan Excluded)
is subject to the terms and conditions of the Maintenance Guarantee Card.
For users in Europe and Russia, full details of warranty provided can be found in
www.viewsoniceurope.com under Support/Warranty Information.
4.3: ViewSonic TPC Warranty TPC_LW01 Rev. 1A 06-20-08
31
Page 36

Page 37

ViewPad 10pi
使用手冊 ( 简中 )
Model No. VS14406
Page 38

重要的安全指示及回收处理提示
1. 请勿按压或触碰 LCD 屏幕;请勿将平板计算机与微小物品一同存放,否则容易刮
伤 LCD 屏幕或掉入平板计算机内部。
2. 请勿将平板计算机放置在肮脏或灰尘聚积的环境中,请保持环境干燥清洁。
3. 请勿将平板计算机放置在不平稳的工作表面上。
4. 请勿于平板计算机上方放置物品,或使物品掉落在平板计算机上;请勿将异物强行
推入平板计算机内部。
5. 请勿将平板计算机放置在有强烈磁场或电场的环境中;请勿将软盘片放在平板计算
机附近或上方,否则可能导致软盘片内数据遗失。
6. 请勿将平板计算机放置在阳光直射之处,尤其是车内,否则将导致 LCD 屏幕受损。
7. 安全运作温度:本平板计算机仅限于周遭温度介于 5° C (41° F) 至 35° C (95° F) 之
间的环境中使用。
8. 请勿将平板计算机放置在(或靠近)液体、雨水或潮湿的环境中。
9. 注意:使用错误类型的电池可能会有爆炸的风险;请依照说明妥善弃置旧电池。
10. 请勿将平板计算机作为一般都市废弃物处理,请先确认当地的废电子产品处置规
范;请将电池组妥善回收处理,并可洽询当地的相关机构或零售商,以了解回收的
建议信息。
11. 平板计算机及变压器在运作或充电时,温度可能稍微升高,请勿将平板计算机置于
膝上或身体上的任何部位,以免其高温引起身体不适或受伤。
12. 电源额定值:请参考平板计算机的电源额定值标签,并确认变压器符合额定值。仅
限使用制造商指定的原厂配件。
13. 开启平板计算机的电源前,请先检查主机与附属零件的连接状态。
14. 请勿在饮食时使用平板计算机,以避免污损。
15. 请勿于平板计算机上插入任何对象,否则可能导致短路或电路损坏。
16. 由于不支持热插入,若要安装或移除某些外接设备时,请先关闭平板计算机的电
源。
17. 清洁平板计算机前,请先拔除电源插头。请将平板计算机及其他附属零件放置在孩
童无法触及之处。
18. 请勿擅自拆解平板计算机,仅限由合格的技术人员维修计算机。
19. 仅限使用制造商核准的电池组,否则可能导致计算机损坏。
20. 平板计算机上有许多散热孔,请勿将平板计算机放置在柔软的物体上(例如:床、
沙发、膝上),或其他可能导致平板计算机过热而引起系统当机之处。
21. 当用户不再需要此产品或产品寿命终止时,请遵守国家废弃电器电子产品回收处理
相关法律法规,将其交给当地具有国家认可的回收处理资质的厂商进行回收处理。
i
Page 39

中国电子信息产品污染控制标识要求
依据中国政府针对"电子信息产品污染控制管理办法"为控制和减少电子信息产品废弃后对
环境造成的污染,促进生产和销售低污染电子信息产品,保护环境和人体健康,仅提供有关
本产品可能含有有毒及有害物质如后:
中国电子信息产品污染控制标识要求
部件名称
铅(Pb) 镉(Cd) 汞(Hg)
六价铬
(Cr(VI))
多溴联苯
(PBB)
多溴联苯醚
(PBDE)
锂电池
电线组件
电源适配器
主板 + 电子部件
(PCBA 电子部件
&PCB)
显示屏
硬盘
摄像头
喇叭
麦克风
散热风扇
天线
无线网卡 + 蓝牙
3G 模块(可选件)
结构件(外壳)
〇 〇 〇 〇 〇 〇
〇 〇 〇 〇 〇 〇
╳ 〇 〇 〇 〇 〇
╳ 〇 〇 〇 〇 〇
〇 〇 〇 〇 〇 〇
╳ 〇 〇 〇 〇 〇
〇 〇 〇 〇 〇 〇
〇 〇 〇 〇 〇 〇
╳ 〇 〇 〇 〇 〇
〇 〇 〇 〇 〇 〇
〇 〇 〇 〇 〇 〇
〇 〇 〇 〇 〇 〇
〇 〇 〇 〇 〇 〇
〇 〇 〇 〇 〇 〇
结构件(按键螺丝
等)
包装材料
〇 〇 〇 〇 〇 〇
〇 〇 〇 〇 〇 〇
○:表示该有毒有害物质在该部件所有均质材料中的含量均在SJ/T11363-2006标准规定的限量
要求以下。
×: 表示该有毒有害物质至少在该部件的某一均质材料中的含量超出SJ/T11363-2006《电子信息
产品中有毒有害物质的限量要求》规定的限量要求。
环保使用期限说明
此电子信息产品在说明书所述的使用条件下使用本产品,含有的有毒有害物质或元素不致发生外泄,从而对环
境造成污染或对人身、财产造成严重损害的期限为10年。
ii
Page 40

版权信息
版权所有 © ViewSonic® Corporation,2011。保留所有权利。
ViewSonic、三只鸟徽标、OnView、ViewMatch 和 ViewMeter 是 ViewSonic
Corporation 的注册商标。
本设备用到的所有产品,以及本手册中提及的商标均为相关公司的商标或注册商标,
受法律保护。
Microsoft®、Windows®、Windows NT® 和 Window® 徽标是 Microsoft®
Corporation 和美国和其它国家的注册商标。
Intel®,Pentium®,和 AtomTM 均为 Intel® Corporation 的注册商标。
Wi-Fi 及 Wi-Fi CERTIFIED 标志为 Wireless Fidelity Alliance 之注册商标。
SD 和 SDHC 为 SD Card Association 之商标。
Bluetooth 及 Bluetooth 标志为 Bluetooth SIG, Inc. 之商标。
输入法的预测引擎为 COOTEK 提供的 TOUCHPAL。
免责声明:ViewSonic 公司将不对此文件中出现的技术、编辑错误或遗漏负责;也不
对因提供本材料,或因操作本产品之性能或使用所造成意外或衍生的损坏负责。
为了持续产品改良的利益,ViewSonic 公司保留在没有通知的情况下更改此产品规格
的权利。本文件中信息如有修改,恕不另行通知。
未经 ViewSonic Corporation 事前书面授权,本文件均不得为任何目的,以任何方式
进行拷贝、复制、翻版或传播此手册。
产品注册
为满足您未来的需要并使您在第一时间内收到附加产品信息,请在以下因特网地址注
册您产品 : www.viewsonic.com。您也可以使用 ViewSonic 向导光盘来打印注册表,
填写后可将其邮寄或传真至 ViewSonic
请您记录
产品名:
型号:
文档号:
序列号:
购买日期:
产品达到使用寿命后废弃产品
ViewSonic 注重环境保护,致力于绿色工作和生活。感谢您参与 Smarter, Greener
Computing。如需更多信息,请访问 ViewSonic 网站。
美国和加拿大:http://www.viewsonic.com/company/green/recycle-program/
欧洲:http://www.viewsoniceurope.com/uk/kbase/article.php?id=639
台湾:http://recycle.epa.gov.tw/recycle/index2.aspx
ViewPad 10pi
VS14406
ViewPad 10pi_UG_SCH Rev. 1A 09-02-11
_______________________________
_______________________________
iii
Page 41

目录
第一章 产品概述-------------------------- 2
包装内容物------------------------------------------- 2
按键及接口简介--------------------------------------- 3
按键功能定义----------------------------------------- 4
指示灯----------------------------------------------- 5
第二章 基本设置-------------------------- 6
更换电池--------------------------------------------- 6
给电池充电------------------------------------------- 6
开机与关机------------------------------------------- 6
存储卡----------------------------------------------- 7
使用触摸屏------------------------------------------- 7
使用虚拟键盘----------------------------------------- 8
使用网络--------------------------------------------- 9
第三章: 使用3G网络数据服务--------------- 11
启动 Wireless Manager-------------------------------- 11
PIN码------------------------------------------------ 11
PUK码 ----------------------------------------------- 12
连接 ------------------------------------------------ 14
设置------------------------------------------------- 16
SIM 卡----------------------------------------------- 17
无线电----------------------------------------------- 18
网络类型--------------------------------------------- 19
配置文件 -------------------------------------------- 21
网络------------------------------------------------- 23
Wireless Manager 菜单 ------------------------------- 26
常见故障排除------------------------------ 28
1
Page 42

第一章 产品概述
User Guide and
Installation Software
PC System Requirements
Intel® Pentium® processor or
greater running on Windows®
Platform, 4x CD-ROM drive;
64MB or more of available
RAM; 800x600 color display.
Copyright © 2011, ViewSonic Corporation. All rights reserved. All trademarks,
registered or otherwise, are the property of their respective companies. Disclaimer:
ViewSonic Corporation shall not be liable for technical or editorial reeors or
omissions contained herein; nor for incidental or consequential damages resulting
from furnishing this meterial, or the performance or use of this product. In the
interest of continuing product improvement, ViewSonic Corporation reserves the
right to change product specifications without notice. Information in this CD-ROM
may change without notice, No part of this CD-ROM may be copied, reproduced, or
transmitted by any means, for any purpose without prior written permission of
ViewSonic Corporation.
ViewPad Series Tablet
03/14/11 • ViewPad_CD • Made in China
包装内容物
拆开包装后,请检查包装内物品是否齐全,如有缺失,请与经销商联系。
包装内容物有
• ViewPad平板电脑
• 电源线及电源适配器
• Android还原、驱动程序及使用手册光盘
• 快速启用指南
ViewPad 10pi
Quick Start Guide
2
Page 43

按键及接口简介
正面及背面视图
正面及背面视图
1. 触摸屏幕 用手指轻松操作系统和应用程序
2. 感光器
3. 摄像头 内建摄像头,可实现拍照、录像和视频聊天
4. 散热孔 内建风扇帮助降低平板电脑的温度;请不要堵塞散热孔
5. 扩音器 高品质喇叭
6. 背部摄像头(可选配置) 自动对焦,支持最高2048 x 1536分辨率
根据环境光线强度自动调节屏幕亮度;按住菜单键3秒钟可关闭
或打开感光器
3
Page 44

侧面视图
侧面视图
1. 锁孔 7. 返回键 13. 扩充底座接口
2. 主页键 8. 电源插孔 14. 麦克风
3. 菜单键 9. 音频输出接口 15. 重力感应器开关
4. 音量/亮度调节键 10. USB接口 16. 强制关机针孔
5. 指示灯 11. SD卡插槽
6. 电源开关 12. 3G SIM卡插槽(可选配置)
按键功能定义
按键在不同的操作系统下可实现不同的功能。
按键 图标 位置 在Windows中的功能
主页键 顶部
菜单键 顶部 Ctrl+Alt+Delete组合键功能 打开菜单
短按:在当前窗口和桌面间切换
长按3秒:关闭或开启感光器
在Android中的
功能
返回主页
在BIOS或
DOS中的功
能
向上
向下
音量- 顶部
音量+ 顶部
短按:降低音量
长按3秒:降低屏幕亮度.
短按:增大音量
长按3秒:增加屏幕亮度
4
降低音量
增大音量
向左
向右
Page 45

电源
开关
顶部
短按:系统待机或唤醒
长按4秒:关机
短按:
睡眠/唤醒
长按2.5至7秒:
弹出关机菜单
长按7秒以上:强
制关机
开/关机
返回键 顶部
重力
感应器
开关
强制
关机
底部
底部 强制关机 强制关机
指示灯
短按:返回,相当于键盘ESC键
功能
长按10秒:触摸屏校正
向左或右拨动可以关闭或开启重
力感应器
短按:
返回
长按10秒:
触摸屏校正
向左或右拨动可
以关闭或开启重
力感应器
确定键
向左或右拨
动可以关闭
或开启重力
感应器
强制关机
指示灯
1. 电源指示灯
2. 充电指示灯
3.无线网络指示灯
系统运行时,显示蓝色
当系统处在睡眠模式时,闪烁蓝色
关机或休眠模式时,指示灯熄灭
充电时,显示红色
电池电量低时,闪烁红色
充电完成时,显示蓝色
无线网络(3G或者WiFi)开启时,显示蓝色
无线网络(3G或者WiFi)关闭时,指示灯熄灭
5
Page 46

第二章 基本设置
电池
更换电池
此产品电池固定在机壳内部,如果您需要更换电池,请联系ViewSonic当
地售后服务中心获取帮助,以免因操作不当而损坏机器。不可以使用其他
型号的电池,以免损坏机器。
给电池充电
当电量不足时,请使用随机附带的适配器充电。充电指示灯在不同状态下
的颜色,请参见第一章。
【注意】请使用随机附带的充电器充电,以免影响电池性能。
开机与关机
向左拨动平板电脑顶部的 开关即可启动平板电脑
【注意】在系统启动的过程中,不要强行关闭平板电脑,否则在下一次启动是系统将
会提示错误信息。
在 Windows 7 系统下,您可以从开始菜单关机,也可以直接按按钮关
机。
Windows 系统提供了电源按钮设定功能,您可以在控制面板的电源。
6
Page 47

存储卡
本机支持标准SD、SDHC存储卡,帮助您扩展存储空间。
使用触摸屏
单击:快速点击触摸屏,模拟鼠标左键功能
长按:持续按压4秒以上,模拟鼠标右键功能
滑动:快速朝某一方向滑动手指,模拟鼠标滚轮
拖动:按住某一图标4秒以上,可以实现拖动功能.
缩小:两个手指相向滑动,实现缩小功能
放大:两个手指反向滑动,实现放大功能
【注意】通过软件可以扩充手势功能,取决于您所安装的软件。
产品出厂前已经执行过触摸屏校正。但是因使用环境的差异,触摸屏的功
能可能出现异常。当触摸屏功能异常时,您需要校正触摸屏。
7
Page 48

软件校正方法:
1. 双击桌面上的 打开触摸屏校正程序窗口。如下图:
2. 将平板电脑放置在平整的桌面上,在校正的过程中不要触碰屏幕。
3. 单击 “Calibration” 开始校正。
4. 校正完成时,您会看到 “Calibration OK”。关闭窗口即可。
硬件校正方法:
您也可以通过硬件方式来校正触摸屏,做法为:按住返回键10秒钟直至充
电指示灯闪烁红色。
使用虚拟键盘
在 Windows 桌面上,虚拟键盘隐藏在桌面左上角处。单击或将其拖至屏
幕中央,即可以开始使用虚拟键盘进行输入。
当你需要在某个界面或对话框中输入文字时,单击编辑区域,即会出现下
图所示的键盘图标。单击此图标打开虚拟键盘。
8
Page 49

使用网络
Wi-Fi 连接设置
1. 确认您位于无线网络的服务区内。
2. 确认Wi-Fi已启用。
3. 单击位于桌面右下角的通知区域中的 WLAN 图标 ,弹出一个菜单。
4. 选择一个网络,然后单击 [连接]。 如果您使用的网络不要求安全验
证,会显示一条成功消息,告知您已连接到网络。
5. 为连接到一些要求安全验证的网络,您必须执行一个验证过程并输入
用户名称和密码。 有关详细信息,请咨询 您的网络管理员。
Bluetooth 连接设置
当蓝牙打开后,任务栏通知区域会出现蓝牙图标 ,点击图标会弹开如下菜
单。可以通过此菜单添加一个蓝牙连接设备。发送和接收图片,或者通过
蓝牙创建个人区域网等等。
9
Page 50

10
Page 51

第三章: 使用3G网络数据服务
重要提示!
3G卡不支持热插拔。当您要插入或者移除3G卡时,请先关闭平板电脑的电源。
注意!
因型号差异,您 的平板电脑可能不支持3G服务,请以实际配置为准。
启动 Wireless Manager
您的 Mobile Broadband Module 配备了 Wireless Manager 软件应用程
序。Wireless Manager 提供了一系列工具,您可以使用它们来配置和管
理您的平板电脑的移动宽带连接。当您打开 Wireless Manager 时,会显
示 Wireless Manager 主视窗。该主视窗提供了重要的状态信息,并允许
您连接或断开移动网络。
您可以通过双击桌面上的 图标来启动Wireless Manager。当Wireless
Manager正在运行时,你可以通过双击通知区域的 图标调出Wireless
Manager窗口,或者右键单击此图标,然后选择Open Wireless
Manager。
PIN码
当启动 Wireless Manager 时,您可能需要为 SIM 卡输入 PIN 码以继续
操作。在该栏位中输入您的 PIN 码,然后点击确定。请参阅您的入网订
用以获取 PIN 信息。
11
Page 52

PUK码
允许您尝试输入正确的 PIN 码的次数有限。如果您未能正确地输入 SIM
卡 PIN 码,您将无法访问 SIM 卡,您将需要 PUK 码来解锁 SIM 卡。
在输入了正确的 PUK 码后,将提示您更改 PIN 码。
12
Page 53

注意!
PIN 码仅能保护您的入网订用,不能防止您的 Mobile Broadband Module 被未经授权的他人
擅自使用。如果您更改了您的 PIN 码,模块还是可以使用另一张 SIM 卡。
多个配置文件
一张 SIM 卡可具有多个预定义配置文件。首次启动 Wireless Manager
时,将会出现一个带有问题的对话框,提示您设置连接配置文件。从该列
表中选择适当的配置文件,并点击设定配置文件以继续操作。
13
Page 54

连接
连接
标签卡可使您连接或断开运营商网络,并提供您的当前移动宽带连
接的相关信息(例如,信号强度和服务类型)。从 Wireless Manager 主
视窗也可打开下列无线应用程序或帮助:
• GPS 链接。打开 GPS Utility(选装)。
• 短信链接。打开SMS Utility。关于更多信息,请参见开始使用SMS
Utility。
帮助链接。打开“帮助”视窗。
•
注意!
对于某些供应商,GPS功能和GPS Utility可能不可用。
14
Page 55

下列信息显示在连接标签卡中。
• 您的网络运营商的名称或图标,或两者均会显示。如果在漫游中,漫
游网络的名称也会显示。当处于原籍网络的地理覆盖区之外时,通过
漫游方式,自动使用另一个网络。漫游时,在信号强度柱旁边有一个
R 标记。
注意!
如果漫游,通讯费用可能会比平常高。请联络您的服务提供商,以获取详细信息。
• 信号强度从零到五,以五个条柱显示。这些条柱还显示出是否建立了
连接。条柱填满表示连接,而空条柱则表示并无连接。
•
可供使用的服务类型(例如,GPRS 和 UMTS)。
连接状态信息,例如已连接/已断开和获取 IP 地址。
•
• 连接/断开按钮。
• 状态图像可显示是否已经建立连接。关于更多信息,请参见状态信
息。
状态视窗
在状态视窗中,还可以看到连接标签卡中显示的一些信息。当鼠标指针处
于 Microsoft Windows 通知区域中的状态图标上方时,可以看到状态视
窗。
连接到一个公司网络
无线接入公司网络,可能要求进行特别的配置,以保持数据的安全。使用
了 VPN 软件对数据加密,这样就可以通过互联网连接安全地发送数据。
一些公司还可能会有专用的 APN,使数据可以从服务提供商处直接传送到
公司服务器。
注意!
配置为连接到公司局域网时,通常通过一个代理服务器连接到互联网。
15
Page 56

使用
使用标签卡使您能够查看时段和历史信息。
设置
设置标签卡可让您更改 Wireless Manager 设置。
自动启动
Microsoft Windows 启动时,自动启用 Wireless Manager。在更改了自
动启动设置之后,点击应用。
高级设置
点击 高级...便可找到更多设置:
• SIM 卡
• 无线电
• 配置文件
• 网络
• 连接
16
Page 57

SIM 卡
大多数 SIM 卡在购买时都受到“个人身份号码”(PIN 码)保护。如果
您的 SIM 卡启动了 PIN 锁,当您启动 Wireless Manager 时必须要输
入 PIN 码。允许您尝试输入正确的 PIN 码的次数有限。如果您未能正确
地输入 SIM 卡 PIN 码,您将无法访问 SIM 卡,您将需要 PUK 码来解锁
SIM 卡。
确定您的 SIM 卡入网订用中包含了您需要的 GSM/UMTS 服务。
SIM 卡标签卡包含 SIM 卡状态的相关信息。还可以启动或停用启动时要
求输入 PIN 码功能并可从此标签卡中更改 PIN 码。
查看 SIM 卡标签卡
1. 从 Wireless Manager 视窗,选择设置标签卡。
2. 点击高级...。
3. 选择 SIM 卡标签卡。
注意!
您必须输入您的 PIN 码,以更改 PIN 设置。
17
Page 58

为您的 SIM 卡关闭启动时要求输入 PIN 码功能
1. 清除启动时要求输入 PIN 码勾选框。
2. 输入您的 PIN 码。点击应用。启动时要求输入 PIN 码功能现已停
用。
为您的 SIM 卡开启启动时要求输入 PIN 码功能
1. 选择启动时要求输入 PIN 码勾选框。
2. 输入您的 PIN 码。点击应用。“启动时要求输入 PIN 码”功能现已
启用。
注意!
启动时要求输入 PIN 码功能仅在将您的平板电脑完全关闭并再次启动(重新启动可能不会起
到同样的作用)后才可应用。
变更您的 SIM 卡 PIN 码
1. 在当前 PIN 码栏中,键入当前的 PIN 码。
2. 在新 PIN 码栏中,键入您希望用作新 PIN 码的四到八个数字。
3. 在确认新 PIN 码栏中,再次键入新 PIN 码。
4. 点击应用。新 PIN 码便会应用至您的 SIM 卡。
无线电
无线电标签卡包含无线电状态信息和无线电设置。
查看无线电标签卡
1. 从 Wireless Manager 视窗,选择设置标签卡。
1. 点击
1. 选择
1. 更改偏好设置,并在设置完成后点击
高级...。
无线电标签卡。
应用:
18
Page 59

无线电状态
在您可以进行连接或者发送和接收文本讯息之前,需要开启无线电。选择
开启或者关闭。
在睡眠/休眠模式下保持无线电状态
无线电可以保持开启,即使当平板电脑处于省电模式时也为开启状态。选
择
是或者否。
小心!
在不允许无线电发送或接收的区域内,必须关闭无线电,以防止干扰。
网络类型
自动
当有 3G 网络并且得到了当前入网的支持时,“自动”模式会使用 3G 网
络,否则转换为 2G 网络。这是推荐的设置。
19
Page 60

3G(WCDMA)
当 3G 可用时,Mobile Broadband Module 将仅使用 3G。如果您处于 3G
覆盖区域之外,模块将转换到 2G。它将进入搜索模式,直到找到 3G 覆
盖。
2G(GSM)
当 2G 服务可用时,Mobile Broadband Module 将仅使用 2G 服务。它可
能会限制您充分利用 Wireless Manager 应用程序。
频段
点击频段按钮,便可为移动通信选择哪个/些频段。默认选择所有所有频
段。
小心!
取消频段选择可能会导致连接故障。不推荐更改“频段”设置。
20
Page 61

配置文件
配置文件中包含有必要的信息,使您的 Mobile Broadband Module 可以
连接到互联网或者公司网络。对于所有服务:2G 和 3G,配置文件都是相
同的。从您的网络运营商或者网络管理员处获取 APN、用户名和密码,以
及 DNS 服务器地址等进一步的高级设置。参见附录 A.连接参数以获得更
多信息。
查看配置文件标签卡
2. 从 Wireless Manager 应用程序,选择设置标签卡。
3. 点击高级...。
4. 选择配置文件标签卡。
Wireless Manager 具有一个大型数据库,装载用于建立互联网连接的运
营商配置文件。大多数情况下,这些配置文件还很适合与 VPN 软件配合
使用。在您首次开启 Wireless Manager 时,默认情况下,将会使用自动
配置文件选项。
21
Page 62

还可手动选择配置文件,请参见选择配置文件。
有多个配置文件可供您的 SIM 卡使用。请参见多个配置文件。
如果后来您在平板电脑中插入不同网络运营商的 SIM 卡,并启动
Wireless Manager,将需要为此网络运营商选择新的配置文件。
自动配置文件选择
当选定自动选择后,将会搜索运营商配置文件数据库,以寻找符合您的
SIM 卡上所载的网络运营商细节的配置文件。如果发现符合您的网络运营
商要求的适当配置文件,则会选择其作为您的自动选择。
手动配置文件选择
可从配置文件数据库中手动选择使用的配置文件,或创建新的配置文件。
选择配置文件
1. 从配置文件选择中,选择手动选择选项。
2. 在配置文件清单中,选择您想要使用的配置文件,然后点击应用。您
的新连接配置文件就定义并选择好了。
注意!
如果从该清单中手动选择配置文件,则自动配置文件选择功能将在重新选择后方可激活。
创建配置文件
1. 从配置文件选择中,选择手动选择选项。
2. 点击
3. 输入您选择的
4. 输入
5. 如果有要求,则输入
6. 如有必要,请在相应的标签卡下输入
新建。
配置文件名称。例如,“我的配置文件”。
接入点名称(APN)。
用户名和密码。它们通常都为空白。
IP 地址、DNS 服务器信息及协
议
。
7. 点击保存,保存配置文件。
注意!
在您下次连接时,将会使用新的配置文件设置。
22
Page 63

删除配置文件
1. 从配置文件选择中,选择手动选择选项。
2. 从配置文件清单中选择您想要删除的配置文件。
3. 点击删除。
修改配置文件
1. 从配置文件选择中,选择手动选择选项。
2. 从配置文件清单中选择您想要修改的配置文件。
3. 点击编辑。按需要更改设置。
4. 点击保存,保存配置文件。
注意!
仅可修改用户定义的配置文件。为了更改运营商定义的配置文件,必须复制该配置文件。
复制配置文件
1. 从配置文件选择中,选择
手动选择选项。
2. 从配置文件清单中选择您想要复制的配置文件。
3. 点击复制。如果有要求,可更改设置。
4. 点击保存,保存配置文件。
网络
移动网络列表显示您所在的位置可用的网络。您还可以选择连接到哪一个
网络。
注意!
在更改移动网络或者更新网络列表之前,应断开所有的网络连接。
查看网络标签卡
1. 从 Wireless Manager 视窗,选择设置标签卡。
2. 点击高级...。
3. 选择网络标签卡。
23
Page 64

查看可用网络
1. 如果处于连接状态,点击断开按钮。
2. 将移动网络选择模式切换为手动选择。
3. 点击更新列表,更新该列表。搜索完毕后,将会显示当前可用的网
络。
可用的网络将为下列类型之一:
• 原籍网络:这是默认情况下选择的网络。
• 可用网络:您的原籍网运营商与这些网络有漫游协议。
• 禁用网络:一般来说,您将不能访问这些网络。如果您的原籍网有允
许您使用禁用网络的协议,您可以访问它。
24
Page 65

网络还分类为:
• 2G 网络
• 3G 网络
注意!
如果您选择了一个 2G 网络,但服务提供商也有 3G 服务,则 Mobile Broadband Module 将
会自动切换到 3G 网络。
选择其他网络
1. 将
2. 点击
3. 当搜索完成后,当前可用的网络会显示在
选择模式设置为手动。
更新列表。
选择一个网络列表框中。
4. 在选择一个网络列表框中,选择您希望使用的网络。
5. 点击应用。如果您未被允许使用您选择了的网络,会显示“禁用”。
注意!
即使是被列为可用的网络,手动选择也可能受到限制。查看您的入网方案,以确定可以使用
的适当的漫游网络。
关于
关于标签卡可显示您的 Mobile Broadband Module 和 Wireless Manager
软件的系统和程序版本信息。
25
Page 66

系统信息
点击系统信息,将出现“系统信息”视窗,其中包含了关于移动宽带系
统的信息。
“复制到剪贴板”按钮可复制窗口中显示的信息作为文本。因此这些信息
可以粘贴至电子邮件或文本文件等。
注意!
IMEI号码和用户号(IMIS)可能应某些国家的法定要求予以省略。
Wireless Manager 菜单
右击 Windows 通知区域中的 Wireless Manager 状态图标 ,以访问
Wireless Manager 通知图标菜单选项:
26
Page 67

取决于您的 Mobile Broadband Module 当前状况,这些菜单选项中的一
些可能被停用了。
打开 Wireless Manager
当程序运行时,Wireless Manager 视窗不需要处于打开状态。如果您希
望打开视窗,则使用打开菜单选项。
连接/断开
如果您当前是断开的,菜单向您提供连接选项。如果您当前是连接的,则
菜单向您提供断开选项。
开启或关闭无线电
无线电菜单选项是动态的。它监控无线电发射器的当前状态,并向您提供
将其改变为相反状态的选项。例如,如果您的无线电发射器是打开的,该
菜单选项显示为关闭无线电。
退出 Wireless Manager
选择退出 Wireless Manager 以终止应用程序。
更多关于3G的使用和设置,请参考帮助选项。
27
Page 68

常见故障排除
症状 可能的原因 处理方法
触摸屏功能不正常 1. 使用环境发生明显变化 校正触摸屏不要用湿手按压
触摸屏
按压力度不均
2. 按压力度不均 使用经认可的适用与本产品
的手写笔
无法充电 1. 使用了错误的充电器或者
插头,或者实际电压与适
配器不符
2. 使用 USB 充电 本产品不支持 USB 充电
多指触控功能无法
使用
死机 可能是系统本身的原因,或
1. 安装的是 Windows 7 初
级班或者基础版本
2. 软件不支持
3. 不正确的手势
者驱动程序,机器过热等
使用随机附带的充电器
将系统升级到家庭进阶版或
更高版本
安装多指触控软件
确保手势正确
按 Reset 键关闭平板电
脑,重新启动后升级
Windows 系统,安装最新
版本的驱动和应用程序
28
Page 69

客户支持
关于技术支持或产品服务信息,请参见下表或与经销商联系。
注意信息:您需要提供产品列号
国家/地区 网站 电话 电子邮件
中国
香港
澳门
www.viewsonic.com.cn 4008 988 188 service.cn@cn.viewsonic.com
www.hk.viewsonic.com 852 3102 2900 service@ hk.viewsonic.com
www.hk.viewsonic.com 853 2870 0303 service@hk.viewsonic.com
。
有限保修
ViewSonic ViewPad 产品有限保修政策( 仅限大陆区域,香港、澳门、台湾地区除
外),请参阅该产品的保修卡。
29
Page 70

Page 71

ViewPad 10pi
Guide de l'utilisateur
Model No. VS14406
Page 72

Informations de conformité
AVISO FCC
La siguiente declaración se aplica a todos los productos que han recibido la
aprobación FCC. Los productos correspondientes llevan el logotipo FCC y/o un
identicador FCC con el formato GSS-VS14406 en la etiqueta del producto.Este
dispositivo cumple el Apartado 15 de las Normas FCC. La operación está sujeta a
las siguientes dos condiciones: (1) Este dispositivo no debe causar interferencias
perjudiciales y (2) este dispositivo debe aceptar cualquier interferencia recibida,
incluidas aquellas que provoquen un funcionamiento no deseado. Este dispositivo
ha sido comprobado y se determinó que cumple con los límites de dispositivo
digital Clase B, de acuerdo con la Parte 15 de las Normas FCC. Estos límites han
sido diseñados para proporcionar una protección razonable contra interferencias
perjudiciales en una instalación residencial. Este equipo genera, utiliza y puede
irradiar energía de radiofrecuencia y, si no se instala y utiliza de acuerdo con las
instrucciones, podría ocasionar interferencias perjudiciales en las comunicaciones
de radio. Sin embargo, no existe garantía alguna de que no ocurrirán interferencias
en una instalación en particular. Si este equipo causa interferencias perjudiciales en
la recepción de radio o televisión, lo cual puede determinarse al apagar y encender
nuevamente el equipo, se recomienda que el usuario intente corregir la interferencia
tomando una o más de las siguientes medidas:
• Reoriente o traslade la antena receptora.
• Aumente la separación entre el equipo y el receptor.
• Conecte el equipo a un tomacorriente que se encuentre en un circuito diferente al
que está conectado el receptor.
• Solicite ayuda a su distribuidor o a un técnico de radio/TV experimentado.
Los cambios o modicaciones no aprobados expresamente por la parte responsable
de su cumplimiento anularán la autorización del usuario para trabajar con el equipo.
Las antenas utilizadas por este transmisor no deben ubicarse ni trabajar junto con
ninguna otra antena o transmisor.
Información sobre SAR de la FCC
Declaración de exposición a radiaciones de la FCC
Este dispositivo cumple con los límites de exposición a radiaciones de
radiofrecuencia de la FCC establecidos para un entorno sin control. No se deberá
colocar o utilizar este transmisor junto con otra antena o transmisor.
Este dispositivo ha sido sometido a pruebas y cumple con los estándares y
procedimientos de medición especicados en el Boletín OET 65, anexo C de la
FCC.
i
Page 73

Importantes instructions de sécurité
1. NE PAS placer d'objet sur le ViewPad. Les objets peuvent le rayer ou pénétrer
dans l'écran.
2. NE PAS exposer le ViewPad à la saleté ou à la poussière.
3. NE PAS placer le ViewPad sur une surface instable ou irrégulière.
4. NE PAS faire pénétrer un objet étranger dans le ViewPad.
5. NE PAS exposer le ViewPad à un champ magnétique ou électrique puissant.
6. NE PAS exposer le ViewPad à la lumière directe du soleil. Cela risque
d'endommager l'écran LCD. Le garder à distance des sources de chaleur.
7. TEMPÉRATURE DE FONCTIONNEMENT: Ce ViewPad ne devrait être utilisé
que dans des environnements dont la température est comprise entre -15°C et
55°C.
8. NE PAS utiliser le ViewPad sous la pluie.
9. Veuillez consulter l'autorité locale ou votre distributeur pour connaître les
dispositions concernant la mise au rebut des produits électroniques.
10. Le ViewPad et l'adaptateur peut générer de la chaleur en fonctionnement
normal, ou pendant son chargement. NE PAS LAISSER le ViewPad sur votre
ordinateur, pour éviter d'être gêné ou de souffrir de l'exposition à la chaleur.
11. PUISSANCE NOMINALE D'ENTRÉE: référez-vous à l'étiquette sur le ViewPad
concernant la puissance, et assurez-vous que l'adaptateur d'alimentation
corresponde bien à ladite puissance. Utilisez uniquement les accessoires
spéciés par le constructeur.
12. NE PAS UTILISER de stylo ou tout autre objet pointu pour toucher l'écran.
13. Nettoyez l'écran tactile avec un chiffon doux. Si nécessaire, utilisez un chiffon
légèrement humide pour le nettoyer. N'utilisez jamais d'abrasif ou de produit de
nettoyage.
14. Mettez systématiquement le ViewPad hors tension avant d'installer ou de retirer
des appareils externes qui ne sont pas connectables "à chaud".
15. Mettez le ViewPad hors tension et débranchez-le de la prise électrique avant de
le nettoyer.
16. NE PAS DÉMONTER le ViewPad. Seul un technicien certié est habilité à
effectuer des réparations.
17. Le ViewPad est doté d'ouvertures pour disperser la chaleur. NE PAS OBTURER
la ventilation du ViewPad. Il risque sinon d'entrer en surchauffe et de présenter
des dysfonctionnements.
18. il risque d’exploser si la batterie est remplacée par un type incorrect.
Débarrassezvous des batteries usagées conformément aux instructions.
19. Les utilisateurs doivent utiliser une connexion du type USB 2.0 ou plus avec les
interfaces USB.
20. APPAREIL BRANCHABLE, la prise de courant doit être située près de l’appareil
et doit être facile d’accès.
ii
Page 74

Informations de copyright
Copyright © ViewSonic® Corporation, 2011. Tous droits réservés.
ViewSonic, le logo Trois Oiseaux, OnView, ViewMatch et ViewMeter sont les
marques de fabrique déposées de ViewSonic Corporation.
Tous les produits utilisés dans cet appareil et toutes les marques commerciales
mentionnées dans ce manuel sont des marques commerciales ou des marques
déposées appartenant à leurs propriétaires respectifs.
Microsoft®, Windows®, Windows NT® et le logo de Windows® sont des marques
déposées par Microsoft Corporation aux États-Unis et dans d’autres pays.
Intel®, Pentium®, et Atom™ sont des marques déposées d’Intel Corporation.
Wi-Fi et le logo Wi-Fi CERTIFIED sont des marques commerciales de Wireless
Fidelity Alliance.
SD, SDHC sont des marques déposées de SD Card Association.
Bluetooth et le logo Bluetooth sont des marques commerciales appartenant à
Bluetooth SIG, Inc.
Le système de prédiction de la méthode de saisie est TOUCHPAL, qui est fourni
COOTEK.
Dans un but d’amélioration continue du produit, ViewSonic Corporation se réserve le
droit de changer les spécications du produit sans préavis. Les informations dans ce
document peuvent changer sans préavis.
Aucune partie de ce document ne peut être copiée, reproduite ni transmise de quelle
manière que ce soit et quel qu’en soit le motif, sans l’autorisation écrite préalable de
ViewSonic Corporation.
Enregistrement du produit
Pour répondre à vos besoins à venir et pour recevoir toutes les informations
supplémentaires au moment de leur parution, veuillez enregistrer votre produit par le
biais d’Internet à l’adresse suivante: www.viewsonic.com.
Pour votre information
Nom du produit :
Numéro du modèle :
Numéro du document :
Numéro de série :
Date d’achat :
Elimination du produit en n de vie
ViewSonic respecte l’environnement et fait des efforts allant dans le sens d’un
environnement de travail et de vie écologiques. Merci d’oeuvrer aussi pour une
informatique plus intelligente et plus écologique. Pour en savoir plus, veuillez visiter le
site web de ViewSonic.
Etats-Unis et Canada : http://www.viewsonic.com/company/green/recycle-program/
Europe : http://www.viewsoniceurope.com/uk/kbase/article.php?id=639
Taiwan : http://recycle.epa.gov.tw/recycle/index2.aspx
ViewPad 10pi
VS14406
ViewPad 10pi_UG_FRN Rev. 1A 09-02-11
_______________________________
_______________________________
iii
Page 75

Table des matières
Chapitre 1 : Présentation du produit ----------------------------------------- 2
Contenu de la boîte------------------------------------------------------------------------2
Boutons de contrôle et connectivité ---------------------------------------------------3
Avant et arrière--------------------------------------------------------------------------3
Vue de côté ------------------------------------------------------------------------------4
Boutons de navigation et de contrôle ---------------------------------------------4
Voyants -----------------------------------------------------------------------------------5
Chapitre 2 : Préparation ---------------------------------------------------------- 6
Remplacement de la batterie --------------------------------------------------------6
Chargement de la batterie -----------------------------------------------------------6
Carte mémoire --------------------------------------------------------------------------7
Réglage du panneau tactile ---------------------------------------------------------7
Connexion à un réseau sans l -----------------------------------------------------8
Bluetooth ---------------------------------------------------------------------------------9
Chapitre 3 : Conguration du Réseau de données cellulaires
(Données 3G) -------------------------------------------------------11
Démarrer le Gestionnaire sans l ----------------------------------------------- 11
PIN -------------------------------------------------------------------------------------- 12
PUK ------------------------------------------------------------------------------------- 12
Prols multiples ---------------------------------------------------------------------- 13
Réglages ------------------------------------------------------------------------------- 15
Démarrage automatique ----------------------------------------------------------- 16
SIM -------------------------------------------------------------------------------------- 16
Radio ----------------------------------------------------------------------------------- 17
Réseaux -------------------------------------------------------------------------------- 21
Connexion ----------------------------------------------------------------------------- 23
Menu du Gestionnaire sans l --------------------------------------------------- 25
Quitter le Gestionnaire sans l --------------------------------------------------- 25
Chapitre 4 Opérations basiques ----------------------------------------------26
Allumer et éteindre ------------------------------------------------------------------- 26
Contrôle de l'écran tactile ---------------------------------------------------------- 26
Clavier virtuel -------------------------------------------------------------------------- 27
ViewScene ----------------------------------------------------------------------------- 27
1
Page 76

Chapitre 1 : Présentation du produit
User Guide and
Installation Software
PC System Requirements
Intel® Pentium® processor or
greater running on Windows®
Platform, 4x CD-ROM drive;
64MB or more of available
RAM; 800x600 color display.
Copyright © 2011, ViewSonic Corporation. All rights reserved. All trademarks,
registered or otherwise, are the property of their respective companies. Disclaimer:
ViewSonic Corporation shall not be liable for technical or editorial reeors or
omissions contained herein; nor for incidental or consequential damages resulting
from furnishing this meterial, or the performance or use of this product. In the
interest of continuing product improvement, ViewSonic Corporation reserves the
right to change product specifications without notice. Information in this CD-ROM
may change without notice, No part of this CD-ROM may be copied, reproduced, or
transmitted by any means, for any purpose without prior written permission of
ViewSonic Corporation.
ViewPad Series Tablet
03/14/11 • ViewPad_CD • Made in China
Copyright © 2011, ViewSonic Corporation. All rights reserved. All trademarks,
registered or otherwise, are the property of their respective companies. Disclaimer:
ViewSonic Corporation shall not be liable for technical or editorial reeors or
omissions contained herein; nor for incidental or consequential damages resulting
from furnishing this meterial, or the performance or use of this product. In the
interest of continuing product improvement, ViewSonic Corporation reserves the
right to change product specifications without notice. Information in this CD-ROM
may change without notice, No part of this CD-ROM may be copied, reproduced, or
transmitted by any means, for any purpose without prior written permission of
ViewSonic Corporation.
This disc contains 32-bit software only.
External Recovery Media Disc 1 of 1
For distribution only with
a new ViewSonic
®
PC.
Support for these products
provided by ViewSonic
®
.
For technical support
information, visit
www.viewsonic.com
Portions © 2011 Microsoft
Corporation. All rights reserved.
© 2011 ViewSonic
Part No. 03/14/11_VPD_Ver.1
Microsoft
®
Windows® 7 Professional
03/14/11 • ViewPad_CD • Made in China
Contenu de la boîte
Vériez toujours le contenu de la boîte lorsque vous l’ouvrez la première fois. S'il
manque un élément ou si un élément est endommagé, contactez immédiatement
votre revendeur. La boîte devrait contenir les éléments suivants :
• Une tablette ViewPad.
• Un adaptateur secteur avec un cordon d’alimentation
• Un CD des pilotes et du Guide d’utilisation
• Un Guide de démarrage rapide
• Un disque de restauration du système
ViewPad 10pi
Quick Start Guide
2
Page 77

Boutons de contrôle et connectivité
Avant et arrière
Composants à l'avant et à l'arrière
1. Ecran tactile Utilisez un doigt pour utiliser le système & les applications.
2. Capteur de lumière
ambiante
3. Webcam
4. Fentes
5. Haut-parleurs
6. Caméra arrière
(optionnelle)
Ajuste automatiquement la luminosité de l'écran. Appuyez
pendant 3 seconde sur le bouton Menu pour l'allumer/l'éteindre
Une Webcam intégrée qui vous permet de prendre des photos,
d'enregistrer des clips vidéo et de discuter en ligne.
Pour permettre à la chaleur de sortir an que votre ViewPad
reste à la température optimale.
Reproduit le son des chiers multimédia ou du système
d'exploitation.
Vous pouvez prendre des photos à des résolutions de jusqu'à
2048 x 1536 et enregistrer des vidéos.
3
Page 78

Vue de côté
Composants sur le côté
1. Fente de verrouillage 7. Bouton Retour 13. Connecteur d'accueil
2. Bouton Accueil 8. Prise d’alimentation 14. MIC
3. Bouton Menu 9. Prise de sortie audio 15. Bouton de verrouillage
4. Boutons de volume/luminosité 10. Ports USB 16. Bouton d'éjection de
réinitialisation
5. Voyants 11. Fente de carte mémoire
6. Bouton d’alimentation 12. Fente pour carte SIM 3G
(optionnelle)
Boutons de navigation et de contrôle
Les boutons externes ont différentes fonctions dans différents SE.
Bouton Icône Emplacement
Accueil
Menu
Volume -
Dessus
Dessus Ctrl+Alt+Supprimer Ouvrir le menu
Dessus
Fonction dans
Windows
Appui court :
Aller au Bureau
Appuyez pendant
environ 3 secondes :
Allumer/éteindre le
capteur de lumière
Appui court :
Baisser le volume ;
Appuyez pendant
environ 3 secondes :
Baisser la luminosité.
ANDROID
Aller à l'écran
d’accueil
Appui court :
Baisser le volume
Fonction
dans DOS
Flèche vers
le haut
Flèche vers
le bas
Flèche vers
la gauche
4
Page 79

Volume
+
Allumer
Retour
Ver-
rouiller
Réinitiali-
ser
Appui court :
Augmenter le volume ;
Dessus
Dessus
Dessus
Bas
Bas Panne d'alimentation
Appuyez pendant
environ 3 secondes :
Augmenter la
luminosité.
Appui court :
Veille/Réveil ;
Appuyez pendant
environ 4 secondes :
Eteindre
Appui court :
Fonction ECH ;
Appuyez pendant
environ 10 secondes:
Calibrage de l'écran
tactile
Tourner à gauche ou
à droite pour
désactiver ou activer
le capteur-G.
Appui court :
Augmenter le volume
Appui court <2,5s :
Sommeil/Réveil
Appui long 2,5-7s :
Afcher la boîte de
dialogue d’arrêt
Appui long >7s :
Panne d’alimentation
Fonction Retour
Appuyez 10s pour le
calibrage
H/V
Gauche pour
verrouiller
Capteur-G ;
Droite pour
déverrouiller
Capteur-G
Panne d'alimentation
Flèche vers
la droite
Appui court
:Marche /
Arrêt
Entrer
Aucune
fonction
Panne
d'alimenta-
tion
Voyants
Voyants
1. Voyant d'ali-
mentation
2. Voyant d’état
de la batterie
3. Voyant LAN
sans l
Lorsque le système est allumé, il s'allume en bleu.
Lorsque le système est en veille, il clignote en bleu.
Lorsque le système est éteint ou en Hibernation, il s'éteint.
Lorsque la batterie est en train de se charger, il s'allume en rouge.
Lorsque la batterie est faible, il clignote en rouge.
Lorsque la batterie est complètement chargée, il s'allume en bleu.
Lorsque WiFi ou 3G est allumé, il s'allume en bleu.
Lorsque WiFi ou 3G est éteint, il s'éteint.
5
Page 80

Chapitre 2 : Préparation
Remplacement de la batterie
La batterie est attachée à l'intérieur dans l'appareil. La batterie ne doit être remplacée que dans un centre de service agréé de ViewSonic. Pour des informations
détaillées, veuillez contacter le service clientèle de ViewSonic.
Chargement de la batterie
La nouvelle batterie est partiellement chargée lorsque vous la recevez. Pour charger
complètement la batterie, suivez les instructions suivantes.
1. Branchez la che de l'adaptateur secteur sur la prise de chargement.
2. Branchez l'adaptateur secteur sur une prise de courant pour commencer le
chargement.
Lorsque la batterie est en train de se charger, le voyant DEL de chargement clignote
en orange ; l'icône de la batterie est aussi afchée dans la barre d'état. Lorsque la
batterie est complètement chargée, le voyant DEL de chargement devient bleu ; si
l'appareil est allumé, l'icône de la batterie apparaît complètement chargée.
Remarque : Utilisez seulement l'adaptateur d’alimentation secteur fourni pour charger la batterie. La
durée de la batterie peut varier en fonction de comment vous utilisez l'appareil.
6
Page 81

Carte mémoire
Une carte mémoire SD vous permet d'avoir plus d'espace pour le stockage des données.
Pour installer une carte SD/SDHC
1. Ouvrez le couvercle du compartiment de la carte.
2. Insérez une carte SD/SDHC dans le sens indiqué.
3. Fermez le couvercle du compartiment de la carte.
Pour retirer une carte SD/SDHC
1. Pour l'enlever correctement, allez dans la barre des tâches de Windows et cliquez
avec le bouton droit de la souris sur l'icône. Choisissez l'option Ejecter la carte SD.
2. Lorsque Windows afche le message “The device is now safe to remove” (Le périphé-
rique peut être enlevé maintenant), ouvrez le couvercle du compartiment de la carte.
3. Poussez la carte SD pour l'éjecter de la fente.
REMARQUE !
N’enlevez pas la carte mémoire lorsqu'elle est en train d'être utilisée. Si vous enlevez brusquement
la carte mémoire, cela peut corrompre des données ou causer des problèmes avec le système.
Réglage du panneau tactile
Le panneau tactile de cet appareil a été calibré en usine. Dans la plupart des cas, il
ne sera pas nécessaire de le recalibrer. Cependant, à cause de la nature capacitive
du panneau tacile, un changement géographique peut nécessiter un recalibrage
pour les conditions ambiantes du nouvel environnement.
Si le panneau tactile marche bizarrement, essayez de le calibrer en suivant la méthode décrite ci-dessous.
1. Pressez sur l'icône
panneau tactile.
(ILITEK) pour ouvrir le menu de calibration (calibrage) du
2. Posez l'appareil sur une table horizontale. Evitez de toucher le panneau tactile
pendant le calibrage.
7
Page 82

3. Pressez sur "Calibration" (Calibrage) pour commencer le calibrage.
4. Lorsque le calibrage est terminé, le message "Calibration OK" (Calibrage OK)
s'afche.
Calibrage de l'équipement :
Vous pouvez aussi calibrer le panneau tactile en pressant pendant 10 secondes sur
le bouton Retour jusqu'à ce que le voyant de la batterie clignote en rouge.
Connexion à un réseau sans l
1. Assurez-vous que vous êtes dans la zone de couverture du réseau sans l. Ap-
puyez sur le bouton WiFi pour activer WiFi, le voyant WiFi s'allume en bleu. (
Si vous avez inséré une carte SIM et que vous avez allumé la fonction 3G, vous
pouvez aussi vous connecter à des réseaux 3G.
2. Cliquez sur l'icône de réseau
sans l disponibles s'afche.
les risques de sécurité de vol.)
dans la zone de notication, une liste des réseaux
Les hotspots WiFi et les réseaux 3G sont af-
(
chés en même temps dans la même liste. Windows
7 virtualise la carte WiFi, vous pouvez ainsi l'utiliser
deux fois, par exemple pour connecter des appareils
WPS à un point d'accès non-WPS.)
(Pour vous connecter à certains réseaux avec
sécurité nécessitant une identication, vous devrez
vous identier et entrer un nom d'utilisateur et un mot
de passe. Pour plus de détails, contactez l'administrateur de votre réseau.)
(Pour protéger vos données, il est fortemment
recommandé de vous connecter, lorsque possible, à
des réseaux sans l avec sécurité.)
(Lorsque vous voyagez dans un avion, assurezvous de bien éteindre la fonction sans l pour réduire
3. Choisissez un réseau, puis cliquez sur Connect (Connecter). Si une identication
de sécurité n'est pas requise par le réseau que vous utilisez, un message s'afche indiquant que vous vous êtes connecté au réseau.
Les congurations peuvent varier selon le numéro du modèle. Vériez le modèle
pour des informations plus spéciques.
8
Page 83

Bluetooth
1. Cliquez avec le bouton droit sur dans la zone de notication (située en bas à droite
du bureau ou cliquez sur
tionnez Open Settings (Ouvrir les réglages) (si l'adaptateur est éteint, allumez-le.)
2. Dans l'onglet Options, sélectionnez Allow Bluetooth devices to nd this computer (Permettre aux appareils Bluetooth de détecter cet ordinateur), et cliquez sur OK. Les appareils Bluetooth peuvent alors détecter votre ViewPad et établir la connexion Bluetooth.
pour accéder à à partir des icônes cachées) et sélec-
(Vous devez aussi allumer la fonction de connexion Bluetooth sur l'appareil au-
quel vous voulez vous connecter.)
3. Cliquez avec le bouton droit et sélectionnez Add a Device (Ajouter un appareil).
Attendez quelques instants, les appareils Bluetooth actifs détectés s'afchent.
(Pour plus de détails sur l'activation de la fonction Bluetooth de l'appareil, référezvous au manuel.)
(La portée maximum effective de connexion entre votre ViewPad et un appareil
Bluetooth est approximativement 10 mètres.)
9
Page 84

4. Sélectionnez un appareil Bluetooth et cliquez sur Next (Suivant).
5. Windows produira un code numérique aléatoire, afché sur l'écran. Entrez ce
code numérique sur l'appareil Bluetooth auquel vous voulez connecter le ViewPad.
10
Page 85

Chapitre 3 : Conguration du Réseau de données
cellulaires (Données 3G)
AVERTISSEMENT!
3G ne supporte pas les branchements à chaud. Assurez-vous que l'appareil est éteint
avant d'insérer ou de retirer une carte SIM. Si vous insérez ou retirez une carte SIM lorsque
l'alimentation de l'appareil est allumée, cela peut causer un arrêt du système.
REMARQUE !
Votre ViewPad peut ne pas avoir une fente de carte SIM. Les congurations peuvent varier
selon le numéro du modèle. Vériez le modèle pour des informations plus spéciques.
Pour installer une carte SIM, vous devez en premier éteindre la tablette, puis insérer
la carte SIM dans le sens indiqué.
Pour retirer une carte SIM, vous devez en premier éteindre la tablette, puis pousser
la carte SIM pour l'éjecter de la fente.
Démarrer le Gestionnaire sans l
Votre module haut débit mobile est fourni avec le logiciel d'application Gestionnaire
sans l. Gestionnaire sans l fournit un ensemble d'outils que vous pouvez utiliser pour congurer et gérer les connexions haut débit mobile sur votre ViewPad.
Lorsque vous ouvrez Gestionnaire sans l, la fenêtre principale de Gestionnaire
sans l s'afche. La fenêtre principale fournit des informations importantes sur l'état
et vous permet de vous connecter et de vous déconnecter.
Dans le bureau de Windows, pressez sur l'icône pour ouvrir Gestionnaire sans
l. Si Gestionnaire sans l est ouvert mais que la fenêtre de Gestionnaire sans l
n'est pas afchée, double-cliquez sur l'icône d'état dans la zone de notication de
Windows ou cliquez avec le bouton droit sur l'icône et sélectionnez Open Wireless
Manager (Ouvrir Gestionnaire sans l).
11
Page 86

PIN
Lors du démarrage du Gestionnaire sans l, vous pouvez avoir besoin d'entrer le
code PIN de votre carte SIM pour continuer. Entrez votre code PIN dans le champ
puis cliquez sur OK. Reportez-vous à votre abonnement réseau pour les informations du code PIN.
PUK
Vous n'avez qu'un nombre limité de tentatives de saisie du code PIN. Si vous n'arrivez pas à entrer le code PIN de la carte SIM correctement, vous serez bloqué et
vous ne pourrez plus accéder à la carte SIM ; vous aurez besoin d'un code PUK
pour débloquer la carte SIM.
12
Page 87

Lorsque le code PUK a été entré correctement, vous pourrez alors changer le code PIN.
REMARQUE !
Le code PIN protège uniquement votre abonnement et pas votre module haut débit mobile
contre l'accès non autorisé. Si vous changez votre code PIN, le module marche toujours
avec une autre carte SIM.
Prols multiples
Une carte SIM peut avoir plusieurs prols prédénis. La première fois que le Gestionnaire sans l démarre, une boîte de dialogue apparaît avec une question et vous
invite à créer un prol de connexion. Sélectionnez un prol approprié dans la liste et
cliquez sur Set prole (Régler le prol) pour continuer.
13
Page 88

Connexion
L'onglet de la section Connection (Connexion) vous permet de vous connecter ou déconnecter
d'un réseau d'opérateur et fournit des informations sur votre connexion haut débit mobile actuelle
(par exemple, la puissance du signal et le type de service). Dans la fenêtre principale du Gestionnaire sans l, il est également possible d'ouvrir les applications sans l suivantes ou l'Aide:
• Lien SMS. Ouvre l'utilitaire SMS.
• Lien Help (Aide). Ouvre la fenêtre d'aide.
Les informations suivantes sont afchées dans l'onglet de la section Connection (Connexion):
• Le nom ou l'icône de votre opérateur de réseau ou les deux. Si en itinérance, le
nom du réseau d'itinérance peut aussi être afché. L'itinérance permet d'utiliser
automatiquement un autre réseau lorsque vous voyagez et sortez de la zone de
couverture géograhique de votre fournisseur de réseau. L'itinérance est indiqué
par un R, à côté des barres de puissance du signal.
REMARQUE !
Si en itinérance, les frais de trac peuvent être plus chers que normal.
Vériez avec votre fournisseur de services pour plus d'informations.
• Signal strength (Puissance du signal) indique la puissance du signal avec cinq barres,
de zéro à cinq. Les barres montrent aussi si une connexion est établie ou non. Une barre
pleine indique une connexion, et une barre vide indique qu'il n'y a pas de connexion.
• Type of service available (Types de services disponibles) (par exemple,
GPRS et UMTS).
• Connection status messages (Messages d'état de connexion), comme Connected/Disconnected (Connecté/Déconnecté) et Acquiring IP (En train d'acquérir IP).
• Bouton Connect/Disconnect (Connecter/Déconnecter).
• Status Image (Image d'état) montre si une connexion a été établie.
14
Page 89

La fenêtre d'état
Certaines des informations afchées dans l'onglet de la section Connection (Connexion)
sont aussi visibles dans la fenêtre d'état. La fenêtre d'état est visible lorsque le curseur de
la souris est mis au-dessus de l'icône d'état, dans la zone de notication de Windows.
Connexion à un réseau d'entreprise
L'accès mobile à un réseau d'entreprise peut exiger une conguration spéciale pour
garder les données sécurisées. Un logiciel VPN peut être utilisé pour chiffrer les
données an qu'elles puissent être envoyées en sécurité via une connexion Internet.
Certaines sociétés peuvent également avoir un APN dédié permettant aux données
de passer directement du fournisseur de service sur les serveurs d'entreprise.
Utilisation
L'onglet de la section Usage (Utilisation) permet d'afcher les informations de la
Session et de l'Historique.
Réglages
L'onglet de la section Settings (Réglages) permet de modier les réglages du Gestionnaire sans l.
15
Page 90

Démarrage automatique
Lance automatiquement le Gestionnaire sans l lorsque Microsoft Windows démarre. Cliquez sur Apply (Appliquer) après avoir modié les réglages Auto Start (Démarrage auto).
Réglages avancés
D'autres réglages sont disponibles si vous cliquez sur Advanced... (Avancé):
• SIM
• Radio
• Proles (Prols)
• Networks (Réseaux)
• Connection (Connexion)
SIM
La plupart des cartes SIM sont protégées par un numéro d'identication personnel (PIN)
au moment de l'achat. Si le verrouillage du PIN est activé pour votre carte SIM, vous devez entrer le code PIN lorsque vous démarrez Gestionnaire sans l. Vous n'avez qu'un
nombre limité de tentatives de saisie du code PIN. Si vous n'arrivez pas à entrer le code
PIN de la carte SIM correctement, vous serez bloqué et vous ne pourrez plus accéder à
la carte SIM ; vous aurez besoin d'un code PUK pour débloquer la carte SIM.
Assurez-vous que les services GSM/UMTS dont vous avez besoin sont inclus avec
l'abonnement de votre carte SIM. L'onglet SIM contient des informations sur l'état de la
carte SIM. Il est également possible d'activer ou de désactiver la fonction Request PIN
at startup (Demander PIN au démarrage) et de modier le code PIN dans cet onglet.
16
Page 91

Radio
L'onglet Radio contient les informations d'état de la radio et les réglages de radio.
Radio State (Etat de la radio)
La radio doit être allumée avant de pouvoir établir une connexion ou envoyer ou
recevoir des messages textes. Choisissez entre On (Marche) et Off (Arrêt).
Keep radio state during sleep/hibernate (Garder l'état de la radio pendant sommeil/
hibernation)
La radio peut rester toujours allumée, même lorsque le ViewPad est mode d'économie d'énergie. Choisissez entre Yes (Oui) et No (Non).
AVERTISSEMENT!
Dans les zones où aucune transmission ou réception radio n'est autorisée, la radio doit être
éteinte pour éviter les interférences.
Type of network (Type de réseau)
Automatic (Automatique)
Le mode Automatic (Automatique) utilise les réseaux 3G lorsque disponible, et si cela est
supporté par l'abonnement actuel, autrement il change à 2G. C'est le réglage recommandé.
17
Page 92

3G(WCDMA)
Le module haut débit mobile utilisera seulement les services 3G lorsque disponible.
Si vous êtes en dehors de la couverture 3G, le module ne changera pas à 2G. Il entrera en mode de recherche jusqu'une couverture 3G soit trouvée.
2G(GSM)
Le module haut débit mobile utilisera seulement les services 2G lorsque disponible.
Cela peut limiter les fonctions et l'utilisation des applications de Gestionnaire sans l.
Frequency Band (Plage de fréquences)
Il est possible de choisir quelle bande/bandes de fréquence à utiliser pour la communication mobile en cliquant sur le bouton Frequency band (Bande de fréquences).
Toutes les bandes sont sélectionnées par défaut.
AVERTISSEMENT!
La désélection de bandes de fréquences peut causer des problèmes de connexion. Il n'est
pas recommandé de modier les réglages de Frequency Band (Bande de fréquences).
18
Page 93

Proles (Prols)
Un prol contient les informations nécessaires pour permettre à votre module haut
débit mobile de se connecter à Internet ou à un réseau d'entreprise. Un prol est le
même pour tous les services : 2G et 3G. Obtenez l'APN, le nom d'utilisateur et le
mot de passe et tous les paramètres plus avancés tels que les adresses de serveur
DNS de votre opérateur réseau ou de votre administrateur réseau.
Le Gestionnaire sans l Manager possède une grande base de données de prols d'opérateurs qui sont utilisés pour établir une connexion Internet. Ces prols sont aussi, dans la
plupart des cas, appropriés pour une utilisation avec le logiciel VPN. La première fois que
vous démarrez le Gestionnaire sans l, il utilisera par défaut la sélection Automatic (Automatique) du prol.
Il est possible de sélectionner manuellement le prol. Multiples prols peuvent être
disponibles pour votre carte SIM.
Si vous insérez la carte SIM d'un opérateur de réseau différents dans votre ViewPad puis
démarrez Gestionnaire sans l, un nouveau prol sera sélectionné pour cet opérateur de
réseau.
Sélection automatique de prol
Lorsque la sélection automatique est choisie, la base de données des prols d'opérateurs est recherchée pour trouver un prol correspondant à l'opérateur du réseau
sur votre carte SIM. Si le bon prol pour votre opérateur est trouvé, il sera sélectionné par la sélection automatique.
19
Page 94

Sélection manuelle de prol
Il est possible de sélectionner manuellement le prol à utiliser à partir de la base de
données des prols ou de créer un nouveau prol.
Sélectionner un prol
1. Sélectionnez l'option Manual selection (Sélection manuelle) dans Prole Se-
lection (Sélection de prol).
2. Dans la liste Prole (Prol), sélectionnez le prol que vous voulez utiliser et cliquez
sur Apply (Appliquer). Votre nouveau prol de connexion est déni et sélectionné.
REMARQUE !
Si un prol manuel est sélectionné dans la liste, la sélection automatique de prol ne
s'activera pas jusqu'à ce que vous la re-sélectionnez.
Créer un prol
1. Sélectionnez l'option Manual selection (Sélection manuelle) dans Prole Se-
lection (Sélection de prol).
2. Cliquez sur New (Nouveau).
3. Entrez le Prole name (Nom du prol) de votre choix. Par exemple, "My Prole (Mon prol)".
4. Entrez le Access Point Name (Nom du point d'accès) (APN).
5. Entrez le User name (Nom d'utilisateur) et Password (Mot de passe) si néces-
saire. Ces champs sont souvent laissés vides.
6. Si besoin, entrez IP address (Adresse IP), les informations du serveur DNS et
Protocols (Protocoles) dans l'onglet correspondant.
7. Enregistrez le prol en cliquant sur Save (Enregistrer).
REMARQUE !
Les réglages du nouveau prol seront utilisés la prochaine fois que vous vous connectez.
Supprimer un prol
1. Sélectionnez l'option Manual selection (Sélection manuelle) dans Prole Selection (Sélection de prol).
2. Sélectionnez le prol que vous voulez supprimer, dans la liste Prole (Prol).
3. Cliquez sur Delete (Supprimer).
Modier un prol
1. Sélectionnez l'option Manual selection (Sélection manuelle) dans Prole Selection (Sélection de prol).
2. Sélectionnez le prol que vous voulez modier, dans la liste Prole (Prol).
3. Cliquez sur Edit (Editer). Changez les réglages comme désiré.
4. Enregistrez le prol en cliquant sur Save (Enregistrer).
REMARQUE !
Seulement les prols dénis par l'utilisateur peuvent être modiés. Pour changer un prol
déni par un opérateur, une copie doit être faite.
20
Page 95

Copier un prol
1. Sélectionnez l'option Manual selection (Sélection manuelle) dans Prole Selection (Sélection de prol).
2. Sélectionnez le prol que vous voulez copier, dans la liste Prole (Prol).
3. Cliquez sur Copy (Copier). Changez les réglages comme désiré.
4. Enregistrez le prol en cliquant sur Save (Enregistrer).
Networks (Réseaux)
La liste des réseaux mobiles afche les réseaux disponibles à votre position. Vous
pouvez aussi sélectionner le réseau auquel vous voulez vous connecter.
REMARQUE !
Déconnectez toutes les connexions existantes avant de changer de connexion mobile ou de
mettre à jour la liste des réseaux.
Afcher les réseaux disponibles
1. Si vous êtes connecté, cliquez sur le bouton Disconnect (Déconnecter).
2. Changez le mode de sélection des réseaux mobiles sur Manual Selection (Sé-
lection manuelle).
3. Mettez la liste à jour en cliquant sur Update list (Mettre à jour la liste). Lorsque
la recherche est terminée, les réseaux qui sont disponibles sont afchés.
21
Page 96

Les réseaux disponibles seront dans l'une des trois catégories suivantes :
• Le réseau Home (Accueil) : C'est le réseau sélectionné par défaut.
• Les réseaux Available (Disponible) : Ce sont des réseaux que votre opérateur
de réseau a un accord d'itinérance avec.
• Réseaux Forbidden (Interdits) : Normalement, vous ne pourrez pas accéder à
ces réseaux. Si votre réseau domestique a un contrat qui vous permet d'utiliser
un réseau interdit, il est possible que vous puissiez y accéder.
Les réseaux sont aussi catégorisés avec :
• 2G networks (Réseaux 2G)
• 3G networks (Réseaux 3G)
REMARQUE !
Si vous sélectionnez un réseau 2G, mais que le fournisseur de services a également
des services 3G, alors le module haut débit mobile va sélectionner le réseau 3G
automatiquement.
Sélectionner un autre réseau
1. Réglez Selection Mode (Mode de sélection) sur Manual (Manuel).
2. Cliquez sur Update List (Mettre à jour la liste).
3. Lorsque la recherche est terminée, les réseaux qui sont disponibles sont afchés
dans la liste Select a Network (Sélectionner un réseau).
4. Dans la liste Select a Network (Sélectionner un réseau), sélectionnez le réseau que vous voulez utiliser.
5. Cliquez sur Apply (Appliquer). Si vous n'avez pas le droit d'utiliser le réseau
choisi, Forbidden (Interdit) est afché.
REMARQUE !
La sélection manuelle peut être limitée, même sur un réseau qui est indiqué Available
(Disponible). Vériez votre abonnement an de déterminer les réseaux d'itinérance
appropriés à utiliser.
22
Page 97

Connexion
L'onglet Connection (Connexion) contient des informations sur la connexion.
Connexion auto
Il est possible de régler le Gestionnaire sans l pour se connecter automatiquement
au démarrage de Microsoft Windows, lors de la reprise du sommeil/hibernation et
après avoir allumé l'appareil haut débit mobile avec le bouton WWAN. La connexion
auto a besoin que la radio soit allumée.
• Always connect automatically (Toujours connecter automatiquement) permet au
Gestionnaire sans l de se connecter automatiquement, lorsqu'un réseau est disponible.
• Connect automatically except when roaming (Connecter automatiquement sauf
en itinérance) permet au Gestionnaire sans l de se connecter automatiquement au
réseau de votre opérateur (réseau domestique). SI seulement des réseaux d'itinérance sont disponibles, Gestionnaire sans l ne se connecte pas automatiquement.
• Never connect automatically (Jamais connecter automatiquement) empêche
le Gestionnaire sans l de se connecter automatiquement.
Cliquez sur le bouton Apply (Appliquer) pour appliquer les modications. Les réglages par défaut peuvent être restaurés en cliquant sur Default (Défaut).
AVERTISSEMENT!
Sachez que certaines applications peuvent transmettre automatiquement des données
lorsque vous êtes connecté. Selon l'abonnement, vous pouvez être facturé pour le transfert
de données. Sachez que la connexion automatique peut mener à des coûts d'itinérance.
23
Page 98

À propos
L'onglet de la section About (A propos) afche les informations de version du système
et du programme pour votre module haut débit mobile et le logiciel Gestionnaire sans l.
Informations du système
Lorsque vous cliquez sur System Info (Infos du système), la fenêtrre des informations du système s'afche et contient des informations sur le système débit mobile.
Le bouton Copy to clipboard (Copier dans presse-papiers) copie les informations
de la fenêtre dans du texte. Les informations peuvent ensuite être collées dans, par
exemple, un email ou un document texte.
REMARQUE !
IMEI Number (Numéro IMEI) et Subscriber Number (Numéro d'abonnement) (IMSI) peut
aussi ne pas s'afcher dans certains pays.
24
Page 99

Menu du Gestionnaire sans l
Cliquez avec le bouton droit sur l'icône d'état du Gestionnaire sans l dans la
zone de notication de Windows pour afcher les options du menu de l'icône de notication du Gestionnaire sans l:
Certaines de ces options de menu peuvent être désactivées, en fonction de l'état
actuel de votre module haut débit mobile.
Ouvrir le Gestionnaire sans l
La fenêtre du Gestionnaire sans l n'a pas besoin d'être Open (Ouvrir) lorsque le pro-
gramme est exécuté. Utilisez l'option du menu Open (Ouvrir) si vous voulez ouvrir la fenêtre.
Connecter/Déconnecter
Si vous êtes déconnecté, le menu vous permet de choisir l'option Connect (Connecter). Si
vous êtes connecté, le menu vous permet de choisir l'option Disconnect (Déconnecter).
Allumer ou éteindre la radio
L'option du menu Radio est dynamique. Elle reète l'état actuel de l'émetteur radio
et vous permet de changer son état. Par exemple, si l'émetteur radio est allumé,
l'option du menu afche Turn Radio off (Eteindre la radio).
Quitter le Gestionnaire sans l
Cliquez avec le bouton droit sur l'icône d'état dans la zone de notication de Microsoft
Windows et sélectionnez Exit (Quitter) dans ce menu. Votre connexion haut débit mobile
sera terminée lorsque vous quittez le Gestionnaire sans l. La fermeture de la fenêtre du
Gestionnaire sans l ne quitte pas automatiquement l'application Gestionnaire sans l.
REMARQUE !
La radio restera allumé lorsque vous quittez le Gestionnaire sans l. Si vous voulez éteindre
manuellement la radio avant de quitter, vois la section Radio.
Pour plus d'informations sur l'utilisation du Gestionnaire sans l, référez-vous
à la fenêtre d'Aide.
25
Page 100

Chapitre 4 Opérations basiques
Allumer et éteindre
1. Appuyez sur le bouton situé au-dessus de l'appareil pour l'allumer.
Attention : N'éteignez pas l'appareil avant qu'il ait ni de démarrer complètement ou
vous pourriez avoir un message d'erreur la prochaine fois que vous l'allumez.
2. Dans Windows 7, cliquez sur Démarrer > Arrêt> ou appuyez sur le bouton
pour l'éteindre.
Remarque 1 : Windows peut être conguré pour s'éteindre automatiquement avec un seul appui sur
. Veuillez utiliser l'Aide et Support de Windows (Mot de recherche "Alimentation")
pour plus d'informations sur la conguration de l'alimentation.
Remarque 2 : Un arrêt complet peut être effectué en appuyant pendant 4 secondes sur .
Contrôle de l'écran tactile
Pressez : Un appui rapide. Similaire au bouton gauche d'une souris.
Presser sans arrêter : Pressez sur un endroit vide pendant >4
secondes. Similaire au bouton droit d'une
souris.
Glisser : Mouvement directionnel rapide. Similaire à un délement.
Déplacer : Pressez sur une icône pendant >4 secondes puis faites un
mouvement directionnel. Similaire à un appui continu sur le
bouton gauche d'une souris.
Pincer : Mouvement vers l'intérieur avec deux points. Zoom avant.
Etaler : Mouvement vers l'extérieur avec deux points. Zoom arrière.
Remarque : Une application peut dénir des mouvements de main plus complexes, la disponibilité
dépend des applications.
26
 Loading...