

Page 1
19” / 20.1”/ 22” WIDE SCREEN
TFT-LCD MONITOR
V193/ V220 Series
V202 Series
Rev. 2.0
USER MANUAL
www.viewera.com
Page 2

Table of Contents
EMC Compliance …………………..……………………………………………………….……....1
Important Precautions ............................................................................................................2
1. Package contents .……………………………………………………………………..……….3
2. Installation……………………………………………………………………………………….3
2.1 Rear panel……………………............................................................................................3
2.2 Installation……………………………………………............................................................4
2.3 Resolution setup……….....................................................................................................6
3. Controls functions……………………………………………………………………………..7
3.1 User controls…..................................................................................................................7
3.2 OSD menu….....................................................................................................................8
4. Specifications .................................................................................................................9
5. Dead Pixel Policy ………………………………………………………………………….…..12
6. Warranty & Customer Service........................................................................................12
7. Registration ………………………………………………………………………………….…12
8. Troubleshooting ………………………………..……………………………….....................13
Page 3

EMC COMPLIANCE
This device has been tested and found to comply with the standards for a class B digital device,
pursuant to Part 15 of FCC Rules. Those standards are designed to provide reasonable protection
against harmful interference in a residential installation. This device generates and can radiate radio
frequency energy and, if not installed and used in accordance with the instructions, may cause harmful
interference to radio communications.
If this device does cause harmful interference to radio or television reception, which can be determined
by turning the device off and on, user is encouraged to try to correct the interference by one or more of
the following measures:
> Reorient or relocate the receiving antenna
> Increase the separation between the device and receiver
> Plug the device into a wall outlet different from that connected to the receiver.
> Consult the dealer or an experienced technician for help.
CAUTION: any change or modification not expressly illustrated in this manual may void the warranty.
NOTE: any unshielded cable is not allowed to be used in the device.
1
Page 4

IMPORTANT PRECAUTIONS
1. Before using this device, please read all the instructions in this manual carefully.
2. Please keep the manual carefully for future reference.
3. Unplug this device from the wall outlet before cleaning. Do not use liquid cleaners or aerosol cleaners.
Use a damp or wet cloth to clean. Please use LCD screen detergent for cleaning if it is still dirty.
4. Do not use the parts not recommended by the manufacturer, otherwise it may cause a hazard.
5. When unplugging the power cord of the display, please hold the plug with your hands. Do not pull the
cord directly.
6. Do not place any object on the power cord. Do not trample it either.
7. Do not use the device near water sources, e.g. bathtub, basin, kitchen sink, or washing machine. Do
not place the device on a wet floor, or near a swimming pool etc. Do not touch the screen with your
fingers or other hard objects.
8. Slots and openings on the housing and its back or bottom are provided for ventilation. To ensure
reliable operation of the components and to protect them from overheating, these openings must not
be blocked or covered placing the device on a bed, sofa, rug, or other similar surface. The device
should never be placed near or over a radiator or heater and should not be placed in a built-in
installation unless proper ventilation is provided.
9. Make sure that the device is at least 5 cm distance from the wall or other objects around when it is in
use.
10. As a safeguard measure, the display is equipped with a power cord with three-terminal
plug, the third terminal is grounded. If the plug can not be inserted into the outlet, please contact an
electrical technician for replacing the original outlet while keeping the safeguard measure in effect.
11. Ensure that the power socket and cord in use are able to take the sum of the rated currency of all the
products.
12. Do not put the device at the place where user is subject to mal-operation.
13. Observe all the warnings and instructions described in the manual.
14. Do not overload the power outlet or use any extension cord, otherwise it may cause fire or electric
shock.
15. Do not attempt to repair this device yourself since opening or removing covers may expose you to
dangerous voltage or other hazards. Refer servicing to qualified service personnel.
16. Unplug this display from the wall outlet and refer servicing to qualified service personnel under the
following conditions:
a. When the power cord or plug is damaged or worn.
b. If the device has been dropped or its housing has been damaged.
c. When the performance of the device deteriorates distinctly.
17. The power cord is the main facility to turn on/off the device; unplug it if the device is not used for a
long period of time.
18. Store the device at a place of good ventilation; avoid strong sunlight, high temperature or humidity.
19. Store the device at a place at -20~55 Celsius degree room temperature.
2
Page 5
1. Package Contents
Unpack the package and check you have the following items.
TFT-LCD monitor (19 inch for V193 series, 20.1 inch for V202 series, 22 inch for V220 series)
VGA signal cable
Power cord
User manual
DVI signal cable
Audio cable
If any of the items is missing, please contact with your dealer at which you
purchased the monitor.
2. Installation
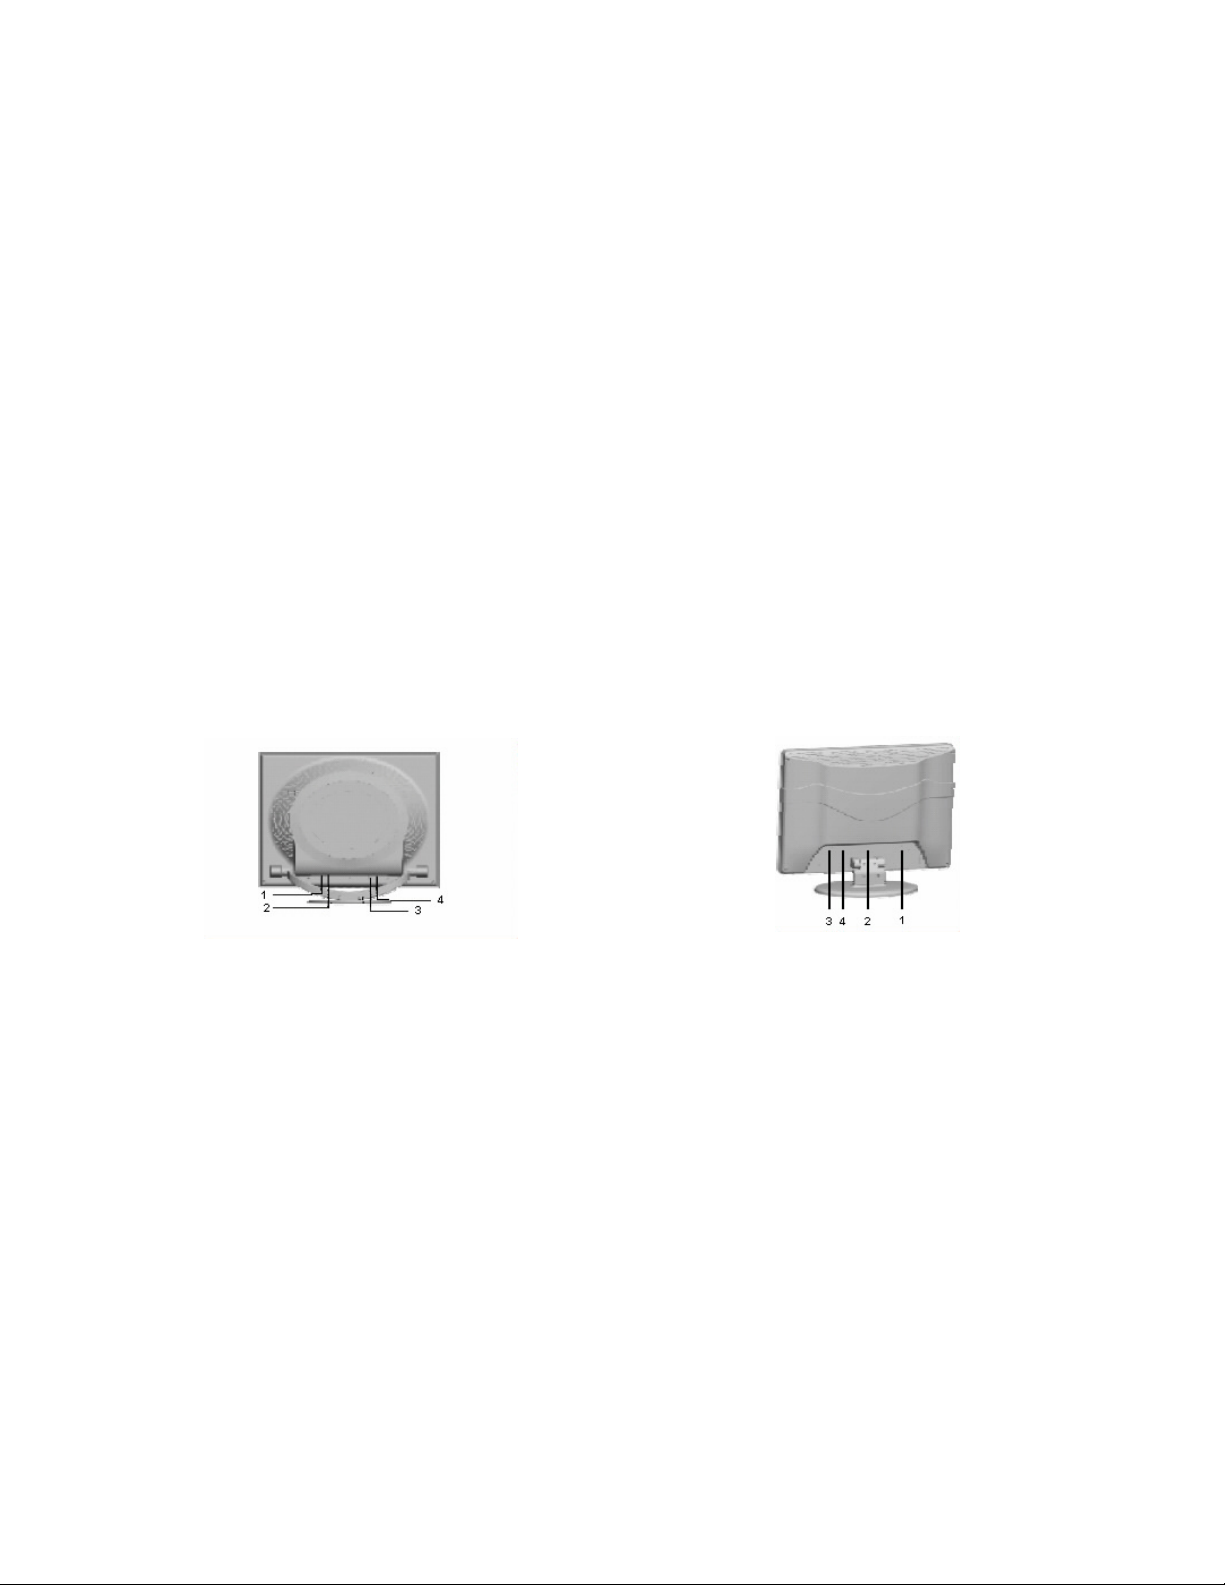
2.1 Rear Panel
2.1.1 V193 and V220 series 2.1.2 V202 series
1. Power supply: AC 100-240 V, 60/50 Hz.
2. Audio: Connecting one end of the PC audio cable to AUDIO on the monitor and the other end to
the sound card audio in on a computer.
3. DVI: Connecting one end of DVI cable to DVI connector on the monitor and the other end to a
video/ graphic card on a computer, if your video/ graphic card supports DVI.
4. VGA: Connecting one end of VGA cable to VGA connector on the monitor and the other end to a
video/ graphic card on a computer.
3
Page 6

2.2 Installation
The monitor is equipped with an automatic sensing AC power adapter for a voltage range from 100 to
240 VAC at a frequency of 50 to 60 Hz. Before connecting the cables, please make sure that the
monitor and the computer power are both turned off. Please follow the steps to install your monitor.
Before connecting cables to the V193 or V220 monitor, you need to remove the plastic cover on the
back of the monitor at first.
2.2.1 Connecting the signal cable
Plug one end of the VGA cable or DVI cable to the computer and the other end to the video signal
connector on the monitor, and then tighten the two screws on the cable connector.
2.2.2 Connecting power cord
Plug one end of the power cord into the input port of the monitor power supply and then insert the
other end into the socket of the electrical source.
2.2.3 Connecting the audio cable
Plug one end of the audio cable to audio jack on either computer or video device and the other end
to audio jack on the monitor.
4
Page 7

2.2.4 Installing the monitor base
1. Take the monitor and the base out of the box and place its side on the table.
2. 1 For V193 and V220 series, align the three bolt holes on the monitor base with the three bolt
hoes on the monitor arm, and then screw the threes bolts with a screwdriver.
2.2 For V202 series
(1) After taking the monitor out of the carton, carefully turn the monitor screen face down.
(2) Align the base with the knighthead of the monitor and push the base in the direction of arrows
until the fasteners both on the knighthead and the base are well connected.
(3) Insert the plastic pin into the base in the direction of arrow, then use screwdriver to lock the
bolt firmly.
(a) V193 and V220 series (b) V202 series
2.2.5 Power on
Turn on your monitor and computer. The LED indicator will light green (or blue) when the screen is
under normal condition. If the LED indicator lights red, please check if the signal cable is securely
connected between the computer and the monitor.
5
Page 8

2.3 Resolution setup
For the best display quality, please set the monitor type in Windows.
Control Panel > Display > Settings > Advanced > List All Modes
(a) For V193 series, please set resolution to “1440 x 900 @ 60 Hz”.
(b) For V202 and V220 series, please set resolution to “1680 × 1050 @ 60 Hz”.
Note 1. To avoid picture stretching, you need to select the resolution of 16:10 aspect ratio, like 1680 x
1050, or approximate to 16:10, like 15:9 (i.e. 1280 x 768).
6
Page 9

3. Control Functions
3.1 User Controls
The monitor digital control functions are located on the front panel. They are shown in the figure
below and described in the following paragraphs.
(a) V193 and V220 series
5 4 3 2 1
(b) V202 series
5 4 1 3 2
1. Power switch with LED indicator key: It is used to turn on or off the monitor. When the monitor is
turned on, the LED is lit up in green (or blue). When the monitor is in power saving mode, the LED
will turn red and flashing.
2. “ ” (OSD Menu) key: When it is pressed, the OSD menu appears on the screen. It is also used to
confirm the function selection.
3. “+” key: It is used to move the cursor clockwise or increase the value of the control function. It is
also a shortcut key to enter Brightness adjustment.
4. “- “ key: It is used to move the cursor counterclockwise or decrease the value of the control
function. It is also a shortcut key to enter Contrast adjustment.
5. “AUTO” key: It is used to adjust the picture to the best display quality in VGA mode. If the picture is
shifted to one side, especially at the first time the monitor is connected to a new system, you can
correct the display position by pressing this key.
7
Page 10

3.2 OSD menu
a. OSD menu with VGA connection b. OSD menu with DVI connection
1. Auto Adjustment: Adjust geometry of the picture automatically. (for VGA mode only)
2. Brightness: Adjust the brightness level of the picture.
3. Contrast: Adjust the difference in luminance between light and dark areas of the picture.
4. H. Position: Adjust the horizontal position of the picture.
5. V. Position: Adjust the vertical position of the picture.
6. Clock: Adjust the frequency of the signal.
7. Phase: Adjust the phase of the signal.
8. Signal Source: Change the signal mode between VGA and DVI on OSD.
9. Color: Adjust the color temperature of the picture.
9300K - Select the color temperature of 9300K.
7800K - Select the color temperature of 7800K.
6500K - Select the color temperature of 6500K.
User mode: Adjust R. G. B. gain levels.
W-B: Auto color balance.
10. Volume: Adjust the speaker volume.
11. Sharpness: Adjust the picture to be in focus.
12. OSD Position/ Transparency: Adjust the OSD display position and transparency.
13. Recall: Reset the factory default settings.
14. Language: Set the language of the OSD windows.
15. Exit: Close the OSD menu.
16. Resolution in use
17. Horizontal frequency in use
18. Vertical frequency in use
19. OSD Timer: Set the OSD menu display time. (It appears when “Signal Source” is selected.)
8
Page 11

4. Specifications
Specifications are subject to change without notice. For the latest specification information, please
refer to ViewEra’s product page on the website.
Features
Model
V193 Series
Panel Type:
Size:
Pixel Pitch:
Brightness:
Contrast Ratio:
Response Time:
Viewing Angle(H / V)
Max. Resolution:
Display Color
Active TFT-LCD
19" diagonal
0.2835 (W) × 0.2835 (H) mm
300 cd/ m2 (typical)
800:1 (typical)
5 ms (on/ off, typical)
160°/160° (typical)
1440 (W) x 900 (H)
16.7 M
Supported resolution 720 x 400 @ 70 Hz, VGA
640 x 480 @ 60 Hz, VGA and DVI; @72/ 75 Hz, VGA
800 x 600 @ 60 Hz, VGA and DVI; @72/ 75 Hz, VGA
1024 x 768 @ 60 Hz, VGA and DVI; @70/ 75 Hz, VGA
1152 x 864 @ 75 Hz, VGA
1280 x 960 @ 60 Hz, VGA
1280 x 1024 @ 60 Hz, VGA and DVI; @ 75 Hz, VGA
1440 x 900 @ 60 Hz, VGA and DVI (recommended resolution)
Video Input Analog:15-pin, D-sub connector
Digital: DVI-D connector
Display Area 16.07 (W) x 10.04 (H) inches
[408.24 (W) x 255.15 (H) mm]
Power Supply Input voltage: 100-240V /60-50Hz
Power Consumption 45 watts (maximum), 5 watts (standby)
Audio Built-in speakers, 2W x 2
Frequency Horizontal:30K-80KHz; Vertical: 55-75Hz
Dimensions (pack size) 20.08 (W) x 16.54 (H) x 6.50 (D) inch
[510 (W) x 420 (H) x 165 (D) mm]
Safety & EMI FCC, CE, CB
Weight N.W.: 12.1 lbs (5.5 Kg)
G.W.: 15.4 lbs (7.0 Kg)
Operating Conditions 5°C ~ 40°C; 10%-85% RH
Storage Conditions: -20°C ~ 55°C; 5%-95% RH
Wall mount VESA 100 bracket
9
Page 12

Features
Model
V202 Series
Panel Type:
Size:
Pixel Pitch:
Brightness:
Contrast Ratio:
Response Time:
Viewing Angle(H / V)
Max. Resolution:
Display Color
Active TFT-LCD
20.1" diagonal
0.258 (W) × 0.258 (H) mm
300 cd/ m2 (typical)
1000:1 (typical)
8 ms (gray to gray, typical), 16 ms (on/ off, typical)
178°/178° (typical)
1680 (W) x 1050 (H)
16.7 M
Supported resolution 640 x 480 @ 60 Hz, VGA and DVI; @72/ 75 Hz, VGA
724 x 400 @ 70 Hz, VGA
800 x 600 @ 60 Hz, VGA and DVI; @72/ 75 Hz, VGA
1024 x 768 @ 60 Hz, VGA and DVI; @70/ 75 Hz, VGA
1152 x 864 @ 75 Hz, VGA
1280 x 768 @ 60 Hz, VGA and DVI; @70/ 75 Hz, VGA
1280 x 960 @ 60 Hz, VGA
1280 x 1024 @ 60 Hz, VGA and DVI; @ 75 Hz, VGA
1600 x 1200 @ 60 Hz, VGA and DVI
1680 x 1050 @ 60 Hz, VGA and DVI (recommended resolution)
Video Input Analog:15-pin, D-sub connector
Digital: DVI-D connector
Display Area 17.06 (W) x 10.67 (H) inches
[433.44 (W) x 270.90 (H) mm]
Power Supply Input voltage: 100-240V /60-50Hz
Power Consumption 50 watts (maximum), 5 watts (standby)
Audio Built-in speakers, 2W x 2
Frequency Horizontal:30K-80KHz; Vertical: 55-75Hz
Dimensions (pack size) 21.85 (W) x 16.54 (H) x 6.50 (D) inches
[555 (W) x 420 (H) x 165 (D) mm]
Safety & EMI FCC, CE, CB
Weight N.W.: 14.3 lbs (6.5 Kg)
G.W.: 17.6 lbs (8.0 Kg)
Operating Conditions 5°C ~ 40°C; 10%-85% RH
Storage Conditions: -20°C ~ 55°C; 5%-95% RH
Wall mount Do not support wall mount.
10
Page 13

Features
Model
V220 Series
Panel Type:
Size:
Pixel Pitch:
Brightness:
Contrast Ratio:
Response Time:
Viewing Angle(H / V)
Max. Resolution:
Display Color
Active TFT-LCD
22" diagonal
0.282 (W) × 0.282(H) mm
300 cd/ m2 (typical)
800:1 (typical)
5 ms (gray to gray, typical)
160°/160° (typical)
1680 (W) x 1050 (H)
16.7 M
Supported resolution 640 x 480 @ 60 Hz, VGA and DVI; @72/ 75 Hz, VGA
724 x 400 @ 70 Hz, VGA
800 x 600 @ 60 Hz, VGA and DVI; @72/ 75 Hz, VGA
1024 x 768 @ 60 Hz, VGA and DVI; @70/ 75 Hz, VGA
1152 x 864 @ 75 Hz, VGA
1280 x 768 @ 60 Hz, VGA and DVI; @70/ 75 Hz, VGA
1280 x 960 @ 60 Hz, VGA
1280 x 1024 @ 60 Hz, VGA and DVI; @ 75 Hz, VGA
1600 x 1200 @ 60 Hz, VGA and DVI
1680 x 1050 @ 60 Hz, VGA and DVI (recommended resolution)
Video Input Analog:15-pin, D-sub connector
Digital: DVI-D connector
Display Area 18.65 (W) x 11.66 (H) inches
[473.76 (W) x 296.10 (H) mm]
Power Supply Input voltage: 100-240V /60-50Hz
Power Consumption 48 watts (maximum), 2 watts (standby)
Audio Built-in speakers, 2W x 2
Frequency Horizontal:30K-80KHz; Vertical: 55-75Hz
Dimensions (pack size) 22.83 (W) x 18.30 (H) x 6.50 (D) inches
[580 (W) x 465 (H) x 165 (D) mm]
Safety & EMI FCC, CE, CB
Weight N.W.: 14.3 lbs (6.5 Kg)
G.W.: 17.6 lbs (8.0 Kg)
Operating Conditions 5°C ~ 40°C; 10%-85% RH
Storage Conditions: -20°C ~ 55°C; 5%-95% RH
Wall mount VESA 100 bracket
11
Page 14

5. Dead Pixel Policy
Dead pixels on the TFT LCD panel are sometimes inevitable. The replacement policy varies with
different models. Please refer to the product specification on ViewEra’s website.
6. Warranty & Customer Service
a. Warranty
ViewEra warrants the V193, V202 and V220 series TFT-LCD monitors for 1 year on LCD panel,
parts and labor. For detailed information, please refer to our website.
(http:// www.viewera.com/warranty.htm)
b. Customer Service
Contact your ViewEra retailer or ViewEra for after sale service.
You may contact ViewEra Customer Service for technical support or RMA:
By Mail: ViewEra Corp.
20526 Carrey Road
Walnut, CA 91789
2. By Telephone: (800)900-6098
3. By Fax: (909)595-3708
4. By E-mail: Tech. Support-- support@viewera.com
RMA-- rma@viewera.com
The business hours are 9:00 am – 6:00 pm PST, Mon – Fri.
7. Registration
To receive the full warranty applicable to your purchase, you need to get on our website to fill out the
online registration form in Support - http://www.viewera.com/registration.htm , and then email or fax us
your purchase invoice. (Email: support@viewera.com ; Fax: (909)595-3708 )
12
Page 15

8. Troubleshooting
1) No image
Check if the power cord、the monitor and the power plug are well connected.
Check if the monitor is off, please contact support@viewera.com for assistance.
2) “No Input Signal” appears.
Check if the VGA cable is tightly connected between the video output connector on the video
card and the video input connector on the monitor.
Check if your video card driver is correctly installed. If possible, please re-install or update your
video card driver.
3) The image is blurry or not positioned correctly.
Enter the Image menu in the OSD and then select “Auto Adjust” to adjust the display to optimum.
Refer to Chapter 2.6, set your monitor to its native resolution of 1680 by 1050.
4) The color is abnormal
Check the connection of signal cable and make sure the two screws on the connector are
securely tightened.
Chick if there is any pin on the signal cable bent or broken off. If there is, it is required to replace
the signal cable.
Enter the Color Temperature menu and select AUTO Color to recall the factory settings for color
hue.
13
 Loading...