


Language
English |
1 |
Deutsch |
15 |
Français |
30 |
Italiano |
45 |
Español |
60 |
|
75 |

Foreword
Thank you for purchasing Victure Hunting Camera. This product is a multipurpose and versatile camera for outdoor hunting. It can be used for outdoor hunting , animals monitoring and home security. The waterproof design allows the camera to detect animals and take pictures / videos 24 hours outdoors automatically.
This user's manual will explain in detail how to use and install this product and provide you with technical specifications and other information. Please read this manual carefully before use so that you can make better use of this product.
We hope this product can meet your needs and serve you for a long time!
1

Content
|
FAQ |
3 |
|
Product Introduction |
4 |
|
Product structure |
|
|
Product accessories |
|
|
Preparations before Using |
7 |
|
Product Operations and Settings |
8 |
|
Product operations |
|
|
Settings |
|
|
Connect to the Computer |
12 |
|
Specification |
13 |
|
Warranty |
14 |
2

FAQ
Q:Why is the camera prompts "CARD BLOCKED" and "CARD ERROR" after inserting SD card?
A:(1) Please make sure the SD card is Class 6 or above; the camera maximum supports 32 GB;
(2)Please make sure that the read-write function of the SD card had been turned off;
(3)Please make sure that you have formatted the card with the camera.
Q: Why the photos taken at night were black and white?
A:The machine will use infrared lighting at night shooting, but our eyes cannot see an infrared scene, so it can only be processed into black and white images for viewing.
Q:Why the machine can not detect moving objects in the ON mode and automatically taking pictures?
A:(1) Please check if you have set the time lapse or time switch function for the machine. Under time lapse mode, the auto-sensing feature of the camera will stop working. And the camera also does not work beyond the time set by the time switch function.
(2) Please check whether you have attached the machine to a proper place. This machine takes a range of 120 degree fan-shaped area right in front of the camera. The best imaging distance is 3-10 meters in front of the camera.
Q: Why does the camera automatically take many photos?
A:When the machine automatically shoot a number of useless photos, please extend the interval time in settings.
3
Product Introduction
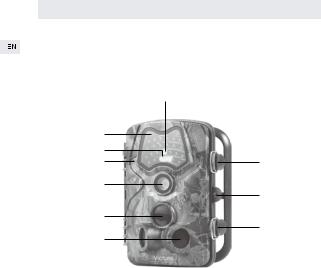
Product structure
Front view
|
1 |
2 |
|
3 |
|
4 |
8 |
5
9
6
10
7
1. |
Light sensor |
6. |
Central sensor zone |
2. |
LED infrared light |
7. |
PIR sensor |
3. |
Motion indicator,blue and red LEDs |
8. |
Locking bracket |
4. |
Microphone |
9. |
Locking hole |
5. |
Lens |
10. Locking bracket |
|
4
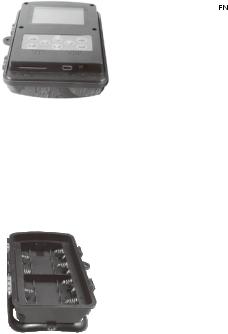
Inside view
|
|
|
|
|
|
|
1 |
|
|
|
|
|
|
2 |
|
|
|
|
|
|
|
|
|
|
|
|
|
|
|
|
|
|
|
|
|
|
|
|
|
|
|
|
|
|
|
|
|
|
|
|
|
|
|
|
|
|
|
|
|
|
|
|
|
|
|
|
|
|
|
|
|
|
|
|
|
||
|
3 |
|
|
|
|
|
|
|
|
|
|
|
|
|
|
|
|
|
|
|
|
|
|
|
|
|
|
|
|
|
|
|
|
|
|
|
|
|
|
|
|
|
|
|
|
|
|
|
|
|
|
|
4 |
|
5 |
6 |
|
|||||||
1. LCD |
|
|
4. SD card compartment |
|
||||||||
2. |
Locking hole for lock |
5. |
Mini USB connection |
|
||||||||
3. |
Speaker |
6. |
Mode switch |
|
||||||||
Battery compartment |
1 |
|
|
3 |
|
|
|
|
|
|
|
|
|
|
|
|
|
|
|
|
|
|
|
|
|
|
|
|
|
|
|
|
|
|
|
|
|
|
|
|
|
|
|
|
|
|
|
|
||
|
2 |
|
|||||
1. |
Battery compartment |
2. Tripod thread |
|||||
3. |
External power connection |
|
|||||
5

Product accessories
|
B |
|
|
C |
A. Drilled holes |
|
|||||
|
|
|
|
||
|
|
|
|
||
|
|
|
|
D |
B. Tripod bolt |
|
|
|
|
||
|
|
|
A |
C. Anti-screw |
|
|
|
|
|
|
D. Hinge screws |
Tips:
The shooting range of this product is 120 degree fan-shaped area right in front of the camera. The best imaging distance is 3-10 meters in front of the camera. In order to achieve the desired detection of shooting, please install the camera following below instructions:
(1)Please attach the product to a suitable place, the installation height is close to the height of the detected animal.
(2)Make a horizontal walk in front of the main PIR sensor window of the product. When the indicator light flashes once, it indicates that the PIR has sensed successfully. At this moment, the area you are in is the valid detection area. Keep doing this test repeatedly, you can obtain the effective detection area of the PIR sensor.
(3)If you make a vertical walk in front of the PIR sensor window, PIR will not make a correct sense, so please walk horizontally. When you doing walking test far away from the PIR sensor window, please speed up the pace.
(4)According to the default setting, the camera will automatically shut down after 5 minutes without any operation, so please press either one of the button to wake up the system.
6
Preparations before Using
Step1 |
Step2 |
Step3 |
|
Step4 |
|
|
|
||||
|
|
||||
|
|
Step1: Open the battery compartment located on the right side of the camera as shown above;
Step2: Insert 8 AA LR6 batteries in the correct direction;
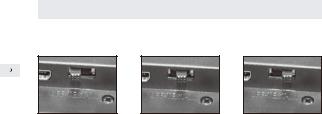
Step3: Turn off the read-write protection of the SD card, which located in the left of the card, so that the camera can recognize the card.
Step4: Insert the SD card and then toggle the mode switch into TEST. After the machine is turned on, enter the settings interface to format the card with the camera's format function.
Tip:
This machine supports SD card which is Class 6 or above. The camera maximum support 32 GB SD card.
7

Product Operations and Settings
Product operations
This machine has three modes: OFF/TEST/ON
OFF mode - When the camera in this mode, the machine is off.
TEST mode - When the machine in this mode, you can set up the camera; you can manually take pictures, videos or playback photos. Under this mode, the red LED flashing shows that the central sensor area is working; the blue LED flashing shows the PIR sensor is working.
ON mode - When mode switch in the "ON" position, the camera will count down for 5 seconds, indicating that the PIR sensor is start to work. After 5 seconds the display goes out, the product will work automatically and the LEDs will not flash:
A.When an animal enter into the PIR sensor area, the camera will quickly start and shoot. After shooting the camera will be stand-by.
B.Every shot done, the camera will be in the auto-sensing detection mode once again after 1 minute. When there is another animal moving in the sensor area, the camera will turn on automatically to take pictures or record videos again, repeat like this.
Tips:
1.The product’s default interval is 1 minutes, you can set your own for 5-59 seconds or 1-60 minutes.
2.Before entering the ON mode, please set related parameters in
8

TEST mode.
3.When entering the ON mode, you can press any button under the LCD to wake up the product to check the battery power and memory condition.
4.When the battery is low, the product will be intelligent into the power saving mode, in the night shooting it will automatically reduce the brightness of IR lights. The shooting quality will be slightly reduced.
Settings
Camera mode
Camera; Video; Camera + Video
When you choose Camera mode or Video mode, the machine will automatically start taking pictures or videos after monitoring the movement.
When you choose Camera+ Video mode, the machine will take photos firstly and then record videos after monitoring the movement. The system defaults to camera mode.
Photo size
5M; 8M; 12M, the system defaults to 5M
Video size
1080P; 720P; WVGA; VGA, the system defaults to 1080P.
Picture No.
Photo number setting, optional 1P, 2P and 3P, the system defaults to 1P. When set to 3P, three pictures are taken in succession.
Tip: 3 continuous shooting only supports 5M resolution.
9

Video length
The length of the recording time can be set from 1 to 60 seconds, 3 minutes, 5 minutes and 10 minutes, the default setting is 10 seconds. This setting only works in ON mode and does not affect the recording time in test mode.
Interval
The system defaults to 1 minute, and the user can set it as 5 secondsto 59 seconds or 1 minute to 60 minutes as needed. During the interval, the camera will stop working. This function needs to be set in TEST mode to ensure that the setting is run in ON mode.
Time stamp
Time stamp on video or photo, select ON to print the time on each photo.
Time switch
Use this function to set the product to work for a predetermined period of time and standby for other periods of time.
Tip: In this mode, the PIR sensor function will continue working.
Time lapse
This function can be used for long-term observation of special scenes. The camera will taken photo after certain period. The default setting is OFF. When ON is selected, users can set the interval time. Tip: In this mode, the PIR sensor function will stop working.
Password set
This function can prevents others from entering TEST mode and modifying the product's system parameters.
This function defaults to OFF. When ON is selected, the four-digit password can be set. After successful setting, you should put in the
10

password to enter into TEST mode. Please keep your password in mind .
Serial NO. set
The default setting is OFF. When ON is selected, the four-digit machine number can be set. After successful setting, the machine number will be printed on the photo.
Format
This function can help you format your SD card. Select YES, then click OK to confirm, the SD card will be formatted, the files in the card will be deleted. Please archive the files you need before proceeding this.
Set clock
System time settings, the specific operations are as follows: short press the left and right keys to move to the position you want then adjust the time, from left to right are the year, month, day, hour and minute, short press the up and down keys to adjust the corresponding settings.
Default set
This function will restore all settings of the machine to the default state.
Auto power off
Under the TEST mode, when you don’t operate the camera for a certain period of time, the machine will automatically shut down to save power.
Tip: The camera can be switched on again by pressing any button.
11

Connect the Computer
Please pull the mode switch to the OFF state, connect the product to the computer via USB cable, the screen will display "MSDC" prompt means the PC has been connected successfully.
12

Specification
Image sensor |
5.0 mega pixels, 1/2.5” CMOS sensor |
|
|
|
|
||
|
|
|
|
Photo resolution |
12M/8M/5M |
|
|
|
|
|
|
Recording medium |
Support SD/SDHC memory cards up to |
|
|
32GB (not included) |
|
|
|
|
|
|
|
|
|
|
|
Video resolution |
1920 x1080(15fps);1280 x 720(30fps); |
|
|
848 x 480 (30fps); 640 x 480(30fps) |
|
|
|
|
|
|
|
Storage formats |
Photo:JPEG; Video:AVI. |
|
|
|
|
|
|
PIR angle |
120 |
|
|
|
|
|
|
PIR distance |
up to 20m |
|
|
|
|
|
|
Lens |
F=7.45mm; F/NO=2.4; FOV=55°; |
|
|
Auto IR filter |
|
|
|
|
|
|
|
|
|
|
|
Spray Water protected |
IP66 |
|
|
|
|
|
|
Triggering time |
approx. 0.7 seconds |
|
|
|
|
|
|
IP flash |
24 infrared LEDs for night shots |
|
|
|
|
|
|
|
4x or 8x batteries type LR6(AA); 4x or |
|
|
|
8x NIMH Power supply batteries type |
|
|
Power supply |
LR6(AA) with low self discharge; |
|
|
|
External 6V power supply, at least 1.5A |
|
|
|
(not included) |
|
|
|
|
|
|
Connections |
Mini USB 2.0 |
|
|
|
|
|
|
13

Warranty
This product has a 12-month warranty from the date of purchase.
If you have any questions about this product, you can contact us through the following email: support@govicture.com
There will be seller support reaching you as soon as possible.
14

Vorwort
Vielen Dank für Ihren Einkauf der Visture Jagd Kamera. Dieses Produkt ist eine vielseitige und allgewaltige Kamera für Freien Jagd, Tierbeobachtung und Heimsicherheit. Sein subtiles, wasserdichtes und staubdichtes Design ermöglicht es Ihnen, 24 Stunden am Tag im Freien Tiere zu erkennen und Bilder / Videos automatisch aufzunehmen, um den Aufenthaltsort von Tieren zu erfassen.
In diesem Benutzerhandbuch wird beschrieben, wie dieses Produkt verwendet und installiert wird und Ihnen technische Spezifikationen und andere Informationen zur Verfügung gestellt werden. Bitte lesen Sie vor der Verwendung sorgfältig dieses Handbuch durch, damit Sie dieses Produkt besser nutzen können.
Wir hoffen, dass dieses Produkt Ihre Bedürfnisse erfüllen und einen langen Dienst für Sie anbieten kann!
15

Inhaltsverzeichnis
|
FAQ |
17 |
|
Produkteinführung |
18 |
|
||
|
||
|
Produktstruktur |
|
|
Produktzubehör |
|
|
Vorbereitung der Produktverwendung |
21 |
|
Produktbedienung und Einstellungen |
22 |
|
Produktbedienung |
|
|
Einstellungen |
|
|
Anschließen des Computers |
27 |
|
Systemparameter |
28 |
|
After-Sales-Services |
29 |
16
FAQ
F:Warum bekomme ich nach dem Einlegen der SD-Karte "AUTO BLOCKED" oder "CARD ERROR"?
A:(1) Stellen Sie sicher, dass Sie eine Karte verwenden, die Klasse 6 oder höher und 32 GB oder weniger ist.
(2)Stellen Sie sicher, dass Sie den Lese- / Schreibschutz der SD-Karte deaktiviert haben.
(3)Stellen Sie sicher, dass Sie die Karte mit der Formatierungsfunktion in den Kameraeinstellungen formatieren.
F: Warum ist das Foto in der Nacht schwarz und weiß?
A:Die Kamera wird bei Aufnahmen in der Nacht mit Infrarotlicht beleuchtet, aber das menschliche Auge kann die Szene unter Infrarotlicht nicht sehen und kann nur zu einem Schwarz-Weiß-Bild zur Betrachtung verarbeitet werden.
F:Warum kann die Kamera im ON Modus nicht überwachen und automatisch Bilder aufnehmen?
A:(1) Bitte überprüfen Sie, ob Sie die Timer-Funktion für die Kamera eingestellt haben. In der Timer-Aufnahmestellung funktioniert die automatische Erkennung der Kamera nicht mehr.
(2)Bitte überprüfen Sie, ob Sie die Kamera an der richtigen Stelle installiert haben. Diese Kamera nimmt im fächerförmigen Bereich eine Reichweite von 120 Grad vor der Kamera auf, die beste Aufnahmeentfernung beträgt 3-10 Meter vor der Kamera.
F: Warum macht die Kamera automatisch viele Fotos?
A:Wenn die Kamera automatisch eine Anzahl nutzloser Fotos aufnimmt, verlängern Sie bitte den Zeitabstand.
17

Produkteinführung
Produktstruktur
Frontseite
|
1 |
2 |
|
3 |
|
4 |
8 |
5
9
6
10
7
1. |
Sensorlicht |
6. |
Zentraler Erfassungsbereich |
2. |
Infrarot-LED-Leuchten |
7. |
PIR-Erfassungsbereich |
3. |
Photosensitives Original, |
8. |
Snap |
|
rotes und blaues Licht |
|
|
4. |
Aufnahmebohrung |
9. |
Schloss |
5. |
Linse |
10. Snap |
|
18

Innenteil
|
|
|
|
|
1 |
|
|
|
|
|
|
2 |
|
|
|
|
|
|
|
|
|
|
|
|
|
|
|
|
|
|
|
|
|
|
|
|
|
|
|
|
|
|
|
|
|
|
|
|
|
|
|
|
|
|
|
|
|
|
|
|
|
||||
|
|
|
|
|
|
|
|
|
|
|
|
3 |
|
|
|
|
|
|
|
|
|
|
|
|
|
|
|
|
|
|
|
|
|
|
|
|
|
|
|
|
|
|
|
|
|
|
|
|
|
|
|
|
|
|
|
4 |
5 |
6 |
|
||||||
1. |
LCD |
4. |
SD-Karte Buchse |
|
||||||
2. |
Schloss |
5. |
Mini-USB-Buchse |
|
||||||
3. |
Lautsprecher |
6. |
Modusschalter |
|
||||||
Batteriefach
1
|
3 |
|
|
|
|
|
|
|
|
|
|
|
|
|
|
|
|
|
|
|
|
|
|
|
|
|
|
|
|
|
|
|
|
|
|
|
|
|
|
|
|
|
|
|
|
||
|
2 |
|
|||||
1. |
Batteriefach |
2. Stativschrauben |
|||||
3. |
Externer Stromanschluss |
|
|||||
19

Produktzubehör
|
B |
|
|
C |
A. Bohren |
|
|||||
|
|
|
|
||
|
|
|
|
||
|
|
|
|
D |
B. Stativschrauben |
|
|
|
A |
C. Anti-Schraube |
|
|
|
|
|||
|
|
|
|||
|
|
|
|
|
D. Scharnierschraube |
Tipps:
Dieses Produkt kann den 120-Grad-Sektor-Bereich vor der Kamera aufnehmen, der optimale Abbildungsabstand ist genau vorwärts 3-10 Meter. Um die geplante Erkennung von Aufnahmen zu erreichen, sollten Sie die Installation wie folgt debuggen:
(1)Bauen Sie das Produkt an einer geeigneten Stelle an. Bringen Sie das Produkt in der Höhe 1,5 - 2 Meter Höhe an. Damit jegliche Tierarten erfasst werden können.
(2)Gehen Sie quer zu Fuß vor dem PIR-Sensorfenster, wenn das rote Licht blinkt einmal , bedeutet das, PIR-Sensor war erfolgreich. Dann sind Sie in einem Bereich, der effektiver Detektionsbereich ist. Wiederholte Teste können effektiven Erkennungsbereich von PIR erhalten werden.
(3)Gehen Sie vertikal zu Fuß vor dem PIR-Sensorfenster, wenn PIR-Sensor nicht richtig erkennen kann, bitte gehen Sie quer. Wenn Sie beim Gehtest ein bisschen weiter vom PIR-Sensorentfernteren entfernen, beschleunigen Sie bitte entsprechend Ihre Schritte.
(4)Das Produkt wird standardmäßig auf 5 Minuten ohne Betrieb automatisch abgeschaltet. Drücken Sie bitte eine beliebige Taste, um das System wieder zu starten.
20

Vorbereitung der Produktverwendung
|
|
|
|
|
|
|
|
|
|
|
|
|
|
|
Schritt 1 |
Schritt 2 |
Schritt 3 |
Schritt 4 |
|
Schritt 1: Öffnen Sie auf der rechten Seite der Kamera in der gezeigten Richtung das Batteriefach.
Schritt 2: Legen Sie acht AA LR6 Alkalibatterien in der richtigen Ausrichtung ein.
Schritt 3: Schalten Sie oben links auf der Karte den Lese- / Schreibschutz aus, damit die Kamera die Karte erkennen kann.
Schritt 4: Legen Sie die SD-Karte ein und stellen Sie den Stellungschalter auf TEST. Nachdem die Kamera eingeschaltet wurde, geben Sie die Einstellungen ein, um die Karte mit der Formatierungsfunktion der Kamera zu formatieren.
Tipp:
Dieses Gerät unterstützt Klasse 6 und höher, 32G und weniger der SD-Karte
21
Produktbedienung und Einstellungen
Produktbedienung
Die Kamera hat 3 Modi: OFF / TEST / ON
OFF - Wenn die Kamera in diesem Modus befindet, wird die Kamera ausgeschaltet.
TEST - Wenn die Kamera in diesem Modus ist, können Sie die Kamera nach ihrer gewünschten Funktionen einstellen; manuell Bilder aufnehmen oder Video wiedergeben; da bedeutet rote blinkende LED der zentrale Erfassungsbereich ist im Arbeitszustand; blaue blinkende LED bedeutet PIR-Erfassungsbereich ist im Arbeitszustand.
ON - Wenn der Zugschalter in „ON“ Schaltposition ist, wird das Produkt automatischen Aufnahem-Modus des PIR-Sensors. Diesmal blinkt die LED für 5 Sekunden, was darauf hindeutet, die Kamera geht in den automatischen Aufnahem-Modus des PIR-Sensors. Nach 5 Sekunden wird die Anzeige ausgeschaltet werden. Das Produkt funktioniert automatisch und blaue und rote Lichter nicht blinken:
A.Wenn ein Tier den PIR Erfassungsbereich betritt, wird die Kamera prompt starten und aufnehmen. Nachdem die Kamera aufgenommen hat, wird in Stand-by Modus gehen.
B.Eine Aufnahme ist jeweils erledigt, wird die Kamera nach 1 Minute Intervall in den Auto-Erfassungsmodus, wenn es in dem Erfassungsbereich Tieraktivität gibt, wird die Kamera automatisch starten, fotographieren oder Video aufnehmen, so Zyklus.
22

Tipps:
1.Das Standardintervall dieses Produkts ist 1 Minute, können Sie selbst auf 5-59 Sekunden oder 1-60 Minuten einstellen.
2.Bevor Sie in den ON-Modus wechseln, stellen Sie zuerst den Arbeitsmodus und die zugehörigen Parameter im TEST-Modus ein.
3.Beim Tritt in den EIN-Modus können Sie ein beliebige Taste unter dem LCD drücken um das Produkt zu wecken und den Batteriestatus und Speicherbedingungen zu überprüfen.
4.Wenn die Batterie schwach ist, wird das Produkt intelligent in den Energiesparmodus eingeben, wird es bei der Aufnahme in der Nacht automatisch die Helligkeit einer IR-Lampe reduzieren. Der Aufnahmeeffekt ist ein bisschen verschlechtert.
Einstellungen
AufnahmeStellung: Kamera, Video, Kamera + Video
Wenn Sie den Kameraund Videomodus wählen, beginnt das Gerät nach der Überwachung der Bewegung automatisch mit der Aufnahme von Fotos oder Videos.
Wenn Sie den Kamera + Video-Modus wählen, nimmt die Kamera ein Bild auf und geht nach der Überwachung der Bewegung in den Aufnahmemodus über. Das System wählt standardmäßig den Kameramodus.
Fotopixel
5M, 8M, 12M, das System ist standardmäßig auf 5 M eingestellt.
Video-und Video-Spezifikationen
1080P, 720P, WVGA, VGA, das System standardmäßig auf 1080P.
Fotonummer eingestellt
optional 1P, 2P und 3P, das System ist standardmäßig auf 1P eingestellt. Bei 3P werden drei Bilder nacheinander aufgenommen. Tipp: 3 Serienaufnahmen sind nur für die 5M Auflösung unterstützt.
23

Die Länge der Aufnahmezeit
Die Länge der Aufzeichnungszeit kann auf 1 bis 60 Sekunden, 3 Minuten, 5 Minuten und 10 Minuten eingestellt werden. Die Standardeinstellung ist 10 Sekunden. Diese Einstellung funktioniert nur im ON-Modus und beeinflusst im Testmodus keine Aufnahmezeit.
Aufnahmeintervall
Das System ist standardmäßig auf 1 Minute eingestellt und der Benutzer kann bei Bedarf 5 Sekunden bis 59 Sekunden oder 1 Minute bis 60 Minuten einstellen. Während des Intervalls wird die Kamera nicht mehr funktionieren. Diese Funktion muss im TEST-Modus eingestellt werden, um sicherzustellen, dass die Einstellung im ON-Modus ausgeführt wird.
Zeitwasserzeichen
Wasserzeichen für Video oder Photo, ON ist an, OFF ist aus, die Systemeinstellung ist aktiviert.
Zeitschalter
Verwenden Sie diese Funktion, um das Produkt für einen bestimmten Zeitraum und für andere Zeiträume in Standby zu versetzen.
Tipp: In diesem Modus funktioniert die PIR-Sensorfunktion weiterhin.
Zeitraffer
Diese Funktion kann zur Langzeitbeobachtung spezieller Szenen verwendet werden. Die Kamera wird nach einer gewissen Zeit fotografiert. Die Standardeinstellung ist AUS. Wenn ON ausgewählt ist, können Benutzer die Intervallzeit einstellen.
Tipp: In diesem Modus funktioniert die PIR-Sensorfunktion nicht mehr.
24

Passworteinstellung der Kamera
Diese Funktion verhindert, dass andere in den TEST-Modus wechseln oder die Systemparameter des Produkts ändern.
Diese Funktion ist standardmäßig auf OFF(AUS). Wenn ON ausgewählt ist, können Sie die vierstellige PIN einstellen. Nach erfolgreicher Einstellung müssen Sie beim Tritt des TEST-Modus das Passwort eingeben, beherzigen Sie bitte Ihr Passwort.
Maschinennummereinstellung
Vorgabe ist OFF(AUS). Wenn ON ausgewählt ist, können Sie die vierstellige PIN einstellen. Nach erfolgreicher Einstellung wird die Kamerannummer auf der Fotografie gedruckt werden. Man kann bei der gleichzeitig Verwendung mehrerer Geräte über die Nummer den Fotographierort erkennen.
Formatierung
Formatierung der SD-Karte. Wenn Sie diese Option wählen, wählen Sie JA und bestätigen Sie mit OK. Das Gerät formatiert die SD-Karte, die Kartendateien werden gelöscht. Bitte bedienen Sie vorsichtig.
Systemzeiteinstellung
Systemzeiteinstellung ist wie folgt:
Kurz klicken Sie auf Links-, Rechts-Taste, um die Position der Zeit einzustellen, von links nach rechts: Jahr, Monat, Tag, Stunde und Minute. Dann drücken Sie kurz auf Oben-, Unten-Taste um die entsprechenden Einstellungen vorzunehmen.
Wiederherstellen der Standardeinstellung
Diese Funktion setzt alle Einstellungen des Geräts auf den Standardzustand zurück.
25
 Loading...