


Language
English |
1 |
Deutsch |
20 |
Français |
39 |
Italiano |
58 |
Español |
77 |
|
97 |

Content
Foreword |
2 |
|
Product Introduction |
3 |
|
Installation Guide |
4 |
|
Waterproof Case Open&Close |
4 |
|
Dust-proof Cover Replacement |
5 |
|
Battery Charging and Installation |
6 |
|
SD Card Insertion and Formatting |
7 |
|
Mode Operation Instructions |
9 |
|
Settings Table |
11 |
|
Wifi Connecting |
15 |
|
Computer Connecting |
16 |
|
TV Connecting |
17 |
|
Specifications |
18 |
|
Warranty |
19 |
|
1

Foreword
Thank you for your purchase of Victure AC800 and welcome to Victure’s world of photography. The AC800 Series action camera adopted 6-layers optical lens to record 4K / 24fps FHD videos and shoot maxim 20MP high quality pictures. With Gyroscope or Anti-shake function ON, the AC800 can reduce the impact of shake on the screen significantly.
Victure consistently attaches great importance to product quality and high customer satisfaction. We sincerely hope you can make a few suggestions during your use to help us improve our products. Your precious suggestions will help us shape our products to perfectly fit your standards.
If you encountered any problem during your use, please contact us via: support@govicture.com. Please be assured that seller support is just a mail away from you in case you find any difficulty. Do not hesitate to write to us by email if you need any kind of help. There will be seller support reaching to you as soon as we can. Please note that all items purchased from Victure are covered by 1 year warranty from the date of purchase.
We thank you infinitely for choosing our camera. We wish you all the best.
Kind regards,
Victure Support Team
2

Product Introduction
Power/MODE Button Lens |
Up/Wi-Fi |
|
|||||
|
|||||||
|
|
|
|
|
|
|
|
|
|
|
|
|
|
|
|
|
|
|
|
|
|
|
|
|
|
|
|
|
|
|
|
|
|
|
|
|
|
|
|


 Speaker
|
Down/Audio |
|
Recording Switch |
Working Indicator |
|
(Flashes BLUE during working) |
MICRO USB |
|
|
|
MIC |
|
MICRO SD |
|
MICRO |
|
HDMI |
Charging Indicator |
LCD Screen |
(Flashes RED during charging) |
|
Wifi Indicator
(Flashes ORANGE when wifi is ON)
OK Button |
Battery cover |
3
Installation Guide
Waterproof Case Open&Close
Waterproof Case Open:


1.To open the waterproof case, firstly take the switch on the top to right as indicated by the arrow.
Waterproof Case Close:


1.To close the waterproof case. Firstly please compress the back cover of the waterproof case as arrow 1 shows;
2.Please pull down the buckle, and connects it to the back cover as arrow 2 shows.


2.Pull up the buckle of waterproof case;
3.Open the back cover of the waterproof case.


3. Pull down the buckle of the waterproof case as arrow 3 shows.
4

Tips:
1.Please tear the protective films on the waterproof case lens before shoot/record;
2.To achieve better waterproof performance, the voice record within waterproof case will be weakened.
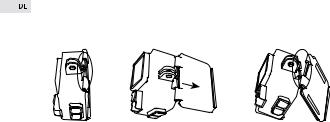
Dust-proof Cover Replacement:
Step 1 |
Step 2 |
Step 3 |
1.To replace the dust proof case, first please find the slot of the waterproof case as circled place showed in step 1.
2.Hold the case with your hands as step 2 picture shows, face the slot on the case front, tear the waterproof back cover off.
3.Find the dust proof back cover in your accessories, which has two inter-spaces in left and right side. Insert the lower half of the cover in the slot, then push the upper half into the slot until the whole back cover being totally installed.
Tips:
1.This usage can be operated based on your own needs.
2.The dust proof case can not be used under water.
5

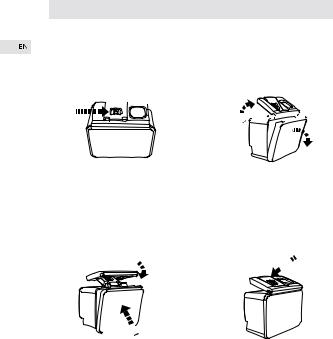
Battery Charging and Installation
The battery and the camera are packaged separately, so please make sure that the battery is charged with power, inserted into the camera before getting the camera started.
Battery Charging:
The battery charging steps are as below:
1.Find the dual USB battery charger in the camera’s accessories.
2.Connecting the charger with USB cable, you can charge it with power plug or with computer. Charging with computer may be slower than using a power adapter due to lower power output of computer USB ports.
3.Insert the two batteries into the charging compartment. When the charger is on working, the red light means its charging, the blue light means it has been fully charged.
Battery Installation:
After the batteries have been fully charged, please install one battery into the camera to get the camera’s power working. The battery installation steps are as below:
1. Find the battery compartment part in the camera. Open the battery cover as below picture shows. First, use your right thumb’s fingernail to push the switch into right as arrow 1 shows. Second, lift the battery cover with your left thumb’s fingernails as arrow 2 shows.
6
2. Install the battery cover after the battery has been inserted. Please note the extended part of the battery cover should be inserted to the left of the battery compartment first as below picture shown. Then press the right half of the battery cover down into the battery compartment.
Tips:
Please note the directions of the battery and battery cover.
SD Card Insertion and Formatting
After the batteries fulled charged with power, a SD card is needed to get the camera working. Our camera supports Class 10 micro SD card, maxim support 64GB. Please note the SD card is NOT INCLUDED in the camera.
SD Card Insertion and Out :
1.Find the Micro SD card slot in the camera, inserting the card into the camera as the direction mark shows on the camera until you hear a insertion sound.
2.SD card out: Press down the SD card until you’ve heard a insertion sound; Then the SD card will pop out along with a poping sound.
7

Tips: Please use your fingernails to push the SD card since the slot is a little bit deep.
Formatting:
Considering the compatibility of the SD card, it should be formatted before using. Formatting steps are as below:
1.Short press the “MODE” button to start up the camera. Press the “MODE" button thrice to enter the settings mode;
2.Press “DOWN” button until you find “format” setting then press OK button to confirm, the memory card will be formatted at once.
Tips:
1.Please make sure the SD card is class 10 micro card, and the memory maxim supports 64 GB;
2.Please transfer your valuable files into other place to store before format the SD card.
8

Mode Operation Instructions
The AC800 series has four kinds of mode: Video Mode, Photo Mode, Playback Mode, Settings Mode. Below are the function instructions of each button under these modes.
 Turn ON/OFF
Short press Power/MODE Button : Turn on the camera; Extended press Power/MODE button : Turn off the camera.Under each mode.
 Video Mode
OK Button : Begin&Stop recordingUp Button (Short Press): Wifi switch
Up button (Extended Press) : Enlarge the focal length(Maxim 4X)Down Button (Short Press): Audio recording switch
Down button (Extended Press): Narrow focal lengthPower/MODE Button (Short Press): Shoot pictures(During recording)
 Photo Mode
OK Button : Shoot picture
Up Button : Enlarge the focal length(Maxim 4X)Down button : Narrow focal length
Power/MODE Button (Short Press): Mode switch(Video→Photo→ Playback→Settings)
 Playback Mode Under Playback
OK Button (Short Press): Play&Pause videoUp Button : Fast forward( Maxim 8X)Down button : Rewind( Maxim 8X)
9

Non-playback time
Up Button : Page upDown button : Page down
Power/MODE Button (Short Press): Mode switch(Video→Photo→ Playback→Settings)
 Settings Mode
Up Button : Page upDown button : Page downOK Button : Confirm
Power/MODE Button (Short Press): Mode switch(Video→Photo→ Playback→Settings)
10

Settings Table
Camera Settings Page Explanation Table
V Video Mode; P=Settings which effective under photo mode
Setting |
Value |
V |
P |
Explanation |
|
|
|
|
|
Video |
4K/2K/1080P/ |
○ |
|
To set the video’s resolution. |
Resolution |
720P/480P/240P |
|
||
Loop |
Off/3 Minutes/ |
○ |
|
The file will be record by |
5 Minute/ |
|
segment based on the time |
||
Recording |
|
|||
10 Minutes |
|
|
unit you’ve set. |
|
|
|
|
||
|
|
|
|
|
Gyroscope |
Off/On |
○ |
|
This setting can counteract |
|
the hand-shake and vibration’s |
|||
|
|
|
|
effect to the recording. |
|
|
|
|
|
WDR |
Off/On |
○ |
|
Wide Dynamic Range |
|
It can automatically adjust the |
|||
|
|
|
|
darkness in the image. |
|
|
|
|
|
|
|
|
|
Time-lapse photography is a |
|
|
|
|
technique whereby the freq- |
|
Off / |
|
|
uency at which film frames |
|
|
|
are captured (the frame rate) |
|
|
0.1 Second/ |
|
|
|
Time-lapse |
|
|
is much lower than that used |
|
0.2 Seconds/ |
○ |
|
||
|
to view the sequence. When |
|||
Record |
0.5 Seconds/ |
|
||
|
|
played at normal speed, time |
||
|
1 Second/ |
|
|
|
|
|
|
appears to be moving faster |
|
|
5 Seconds |
|
|
|
|
|
|
and thus lapsing. |
|
|
|
|
|
|
|
|
|
|
This function can not be |
|
|
|
|
used under 4K video resolution. |
|
|
|
|
|
Motion |
|
|
|
Under standby mode, the |
Off/On |
○ |
|
camera will record and save |
|
detection |
|
a 10 seconds video when it |
||
|
|
|
||
|
|
|
|
detects a moving object. |
|
|
|
|
|
|
|
|
|
It decides whether there is an |
Audio |
Off/On |
○ |
|
audio record into the video. |
Recording |
|
Use down button to turn on/ |
||
|
|
|
||
|
|
|
|
off the audio during recording. |
|
|
|
|
|
11

|
|
Date Stamp |
Off/On |
○ |
○ |
Date stamp on the videos or |
|
|
|
|
|
|
pictures. |
|
|
Angle |
170°/140°/ |
○ |
|
The angle of the camera’s |
|
|
110°/70° |
|
lens is adjustable. |
||
|
|
|
|
|
||
|
|
|
|
|
|
|
|
|
|
|
|
|
The camera will adjust the |
|
|
Diving Mode |
Off/On |
○ |
○ |
white balance automatically |
|
|
|
|
|
|
when record/shoot under |
|
|
|
|
|
|
water. |
|
|
|
|
|
|
|
|
|
|
|
○ |
○ |
The screen brightness will be |
|
|
Night Scene |
Off/On |
automatically adjusted when |
||
|
|
|
|
|
|
the camera shoot night scenes. |
|
|
|
|
|
|
|
|
|
Interval Timer |
Off/2s Timer/5s |
|
○ |
The camera will take a picture |
|
|
Shooting |
Timer/10s Timer |
|
after the set interval timer. |
|
|
|
|
|
|
|
|
|
|
Image |
20M /16M / |
|
○ |
To set the image’s resolution. |
|
|
12M /10M /8M / |
|
|||
|
|
Resolution |
|
|||
|
|
5M/3M /VGA |
|
|
|
|
|
|
|
|
|
|
|
|
|
|
|
|
|
|
|
|
Continuous |
|
|
|
Press OK button without stop |
|
|
Off/On |
|
○ |
to continuously shoot pictures |
|
|
|
Shooting |
|
|||
|
|
|
|
|
|
under photo mode. |
|
|
Image |
High Quality / |
|
○ |
To adjust the image quality |
|
|
Quality |
Good/Normal |
|
|
of the pictures. |
|
|
Sharpness |
Strong/ |
|
○ |
To adjust the object’s edge |
|
|
Level |
Standard/Soft |
|
|
pixels within the image. |
|
|
|
Auto/Daylight/ |
|
|
|
|
|
White |
Cloudy/ |
○ |
○ |
To set the camera’s white |
|
|
Balance |
Tungsten light/ |
|
|
balance. |
|
|
|
Fluorescent |
|
|
|
|
|
|
|
|
|
|
|
|
|
Normal/ |
○ |
○ |
|
|
|
Color |
Black & white/ |
To set the image’s color. |
||
|
|
|
Brown |
|
|
|
|
|
|
|
|
|
|
|
|
ISO |
Auto/100/ |
○ |
○ |
To adjust the light |
|
|
Sensitivity |
200/400 |
|
|
sensitiveness. |
|
|
Exposure |
+2.0/+1.7/+1.3/ |
|
|
To adjust the exposure value |
|
|
+1.0/+0.7/+0.3/ |
○ |
○ |
||
|
|
+(Brightness)/-(Darkness) |
||||
|
|
Value |
0/-0.3/-0.7/-1.0/ |
|
|
adjustment. |
|
|
|
-1.3/-1.7/-2.0 |
|
|
|
|
|
|
|
|
|
|
|
|
|
|
|
|
|
12

|
|
|
○ |
To counteract the hand- |
|
Anti-Shaking |
Off/On |
|
shake/vibration‘s influence |
||
|
|
|
|
to taking pictures. |
|
|
|
|
|
|
|
Delete |
Delete Current |
|
|
To delete the files. |
|
File/Delete All |
|
|
|||
|
|
|
|
||
|
|
|
|
|
|
|
Lock Current File/ |
|
|
To prevent files overwriting |
|
|
Unlock Current File/ |
|
|
||
Protect |
|
|
caused by loop recording |
||
Lock All the Files/ |
|
|
|||
|
|
|
under car mode. |
||
|
Unlock All the Files |
|
|
||
|
|
|
|
||
|
|
|
|
|
|
WIFI |
Off/On |
|
|
Press up button to turn on/ |
|
|
|
off the wifi with one key |
|||
|
|
|
|
button. |
|
|
|
|
|
|
|
WIFI SSID |
|
|
|
To set the name of the Wifi. |
|
|
|
|
|
|
|
WIFI |
|
|
|
WIFI Password |
|
Password |
|
|
|
||
|
|
|
|
||
|
|
|
|
|
|
|
|
|
|
To set the system’s date. |
|
|
|
|
|
1. Please note to set the |
|
Date&Time |
|
|
|
date during first time using. |
|
|
|
|
2.It will be changed into |
||
|
|
|
|
||
|
|
|
|
default date after you |
|
|
|
|
|
exchanged the battery. |
|
|
|
|
|
|
|
|
Off/ |
|
|
The camera will enter into a |
|
Automatic |
1 Minute/ |
○ |
○ |
screen saver mode then |
|
3 Minutes/ |
automatically shutdown under |
||||
Shutdown |
|||||
5 Minutes / |
|
|
no operation. |
||
|
|
|
|||
|
10 Minutes |
|
|
Except in video mode. |
|
|
|
|
|
|
|
Key Volume |
Off/On |
○ |
○ |
The key volume during |
|
|
|
|
|
operation. |
|
|
|
○ |
|
The camera will voice |
|
Voice Prompts |
Off/On |
|
prompting video start/video |
||
|
|
|
|
stop when doing its operations. |
|
|
|
|
|
|
|
OSD |
Off/On |
○ |
○ |
The display of the function |
|
|
|
|
|
menu parameters on the screen. |
13

|
|
|
|
|
|
Connect to the car charger, |
|
|
|
|
|
|
the camera will automatically |
|
|
|
|
○ |
|
start recording once the en- |
|
|
Car Mode |
Off/On |
|
gine is turned on. And auto- |
|
|
|
|
|
|
|
matically saving recording files |
|
|
|
|
|
|
and shut down once the engine |
|
|
|
|
|
|
is turned off. |
|
|
|
|
|
|
|
|
|
|
English / Français / |
|
|
|
|
|
|
Español / Polski / |
|
|
|
|
|
|
Deutsch / Italiano / |
|
|
|
|
|
Language |
/ |
○ |
○ |
To set the system’s language. |
|
|
|
Pусский/ / |
|
|
|
|
|
|
/ Cesky / |
|
|
|
|
|
|
Português |
|
|
|
|
|
|
|
|
|
|
|
|
TV mode |
NTSC/PAL |
○ |
|
Video output format. |
|
|
|
|
|
|
|
|
|
TV |
Off/On |
|
|
FPV function |
|
|
|
|
|
|
|
|
|
|
Off/ |
|
|
To set the screen saver’s time |
|
|
|
|
|
interval. |
|
|
|
|
30 Seconds/ |
○ |
○ |
|
|
|
Screen Saver |
Short press any key button |
|||
|
|
|
1 Minute/ |
|
|
to wake up the screen under |
|
|
|
3 Minutes |
|
|
|
|
|
|
|
|
this setting. |
|
|
|
|
|
|
|
|
|
|
|
|
|
|
|
|
|
Power |
|
○ |
○ |
To set the power frequency |
|
|
50 Hz/60 Hz |
Europe: 50Hz/ |
|||
|
|
Frequency |
||||
|
|
|
|
|
North America: 60Hz |
|
|
|
|
|
|
|
|
|
|
|
|
|
|
|
|
|
|
|
|
|
To format the SD card. |
|
|
Format |
SD card |
|
|
When you confirm OK, |
|
|
|
|
the memory card will be |
||
|
|
|
|
|
|
|
|
|
|
|
|
|
formatted shortly. |
|
|
|
|
|
|
|
|
|
Default |
Settings |
|
|
To restore the camera into |
|
|
Settings |
|
|
default settings |
|
|
|
|
|
|
||
|
|
|
|
|
|
|
|
|
Hardware |
Model: |
|
|
The display of the model of |
|
|
Victure AC800 |
|
|
the product and the hardware |
|
|
|
information |
|
|
||
|
|
Version: 1.0 |
|
|
version. |
|
|
|
|
|
|
||
|
|
|
|
|
|
|
14

Wifi Connecting
Download the App
Download the ‘OKCAM’ app from the App Store(iOS)/ Google Play(Android).
Wifi Connecting
After the download step finished you can use your phone to control the camera through App, view the video or pictures on your phone, and download the recordings from the camera. The connecting steps are as following:
1.Short press MODE button to turn on the camera;
2.Short press Up button to turn on the wifi(when the camera under Video mode);
3.Find and connect the wifi through your phone with the wifi’s name and password displayed on the camera;
4.Enter the app after the wifi is connected, you’ll find the camera is controlled by your phone.
5.To disconnect wifi, short press Up button again.
Tips:
1.The wifi information display will be shorten into a wifi mark in the lower left of camera’s screen once the wifi is connected with your phone;
2.The camera can only connect to one device at a time;
3.The wifi connection is a little bit power consuming, so please avoid connecting wifi when the camera is low in battery.
15

Computer Connecting
There are two options when you use the included micro-USB cable to connect to a computer: Mass Storage and PC Camera. Press Up/Down button to switch between these two modes.
Mass Storage: Access to the files which stored in camera’ s micro SD card to copy or view them on a computer. This function can also achieved by a micro SD card reader.
PC Camera: Use as a web cam for video chats and video recording on your computer. You may need to allow Adobe Flash Player to run in your video chat software before display the video.
16
TV Connecting
With HDMI output, you can display the movies and images recorded by this camera on large screens of TV, projector, etc.
1.Turn off the camera.
2.Connect the camera and TV with a commercially available Micro HDMI cable (NOT INCLUDED).
3.Turn on the camera and turn on the HDMI setting on the device which you intended to input.
1. The HDMI input device should supports 1080P.
2. When outputting HDMI, the display of the camera turns black. The screen is displayed on the HDMI input device, but the operation is operated with the camera.
17

Specifications
|
|
Model |
AC800 |
|
|
|
|
|
|
Chip |
NT96660 |
|
|
|
|
|
|
Sensor |
SONY IMX078 |
|
|
|
|
|
|
Screen |
2” LCD |
|
|
|
|
|
|
Lens |
170° Wide angle lens(Adjustable) |
|
|
|
|
|
|
Video Compression Format |
H.264 |
|
|
|
|
|
|
Video Format |
MOV |
|
|
|
|
|
|
Image Format |
JPG |
|
|
|
|
|
|
Wifi Connection |
Android / iOS supported |
|
|
|
|
|
|
SD Card |
Class 10 Micro SD card, maxim |
|
|
supports 64 GB. |
|
|
|
|
|
|
|
|
|
|
|
Ports |
Micro USB / Micro HDMI |
|
|
|
|
|
|
Charging Time |
About 3 hours |
|
|
|
|
|
|
Recording Time |
1080P 120 minutes/ 4K 60 minutes |
|
|
|
|
|
|
Battery |
Rechargeable 1050mAh Li-ion |
|
|
battery |
|
|
|
|
|
|
|
|
|
|
|
Power Input |
5V/1A |
|
|
|
|
|
|
Waterproof Case Depth Rating |
40M/131.2ft |
|
|
|
|
|
|
Weight |
78g/ 2.75oz (with battery) |
|
|
|
|
|
|
Dimensions |
60*25*40mm / 2.36*0.98*1.57 inch |
|
|
|
|
18

Warranty
All Victure products come with a limited warranty of 12 months from the date of purchase. And we have professional customer service team for your support as soon as we can.
If you have any questions or confusions about our product or the warranty, please feel free to contact us via: support@govicture.com. We will do our best to help you solve the problem until you are satisfied.
19

Inhalt
|
Vorwort |
21 |
|
Produktvorstellung |
22 |
|
||
|
||
|
Inbetriebnahme |
23 |
|
Wasserdichtes Gehäuse öffnen & schließen |
23 |
|
Ersatz des staubdichten Gehäuses |
24 |
|
Aufladen und Batterieinbetriebnahme |
25 |
|
SD Karte einsetzen und formatieren |
26 |
|
Bedienungsanleitung |
28 |
|
Einstellungen Tabelle |
30 |
|
Verbinden mit einem Drahtlosnetzwerk (WIFI) |
34 |
|
Verbinden mit einem Computer |
35 |
|
TV Verbindung |
36 |
|
Technische Daten |
37 |
|
Garantie |
38 |
20

Vorwort
Danke für ihren Kauf der Victure AC800 Actionkamera und willkommen in Victure’s Welt der Fotografie. Die AC800 Actionkamera hat 6-lagige optische Linsen um 4K / 24fps FHD Videos aufzunehmen, und schießt Fotos mit maximal 20 Megapixel in höchster Qualität. Mit eingeschaltetem Gyroskop und Anti-Shake verfügt die AC800 über eine signifikante Bildstabilisierung. Mit der Time Lapse Funktion (Zeitraffer) ist es möglich Naturschauspiele wie den Sonnenlauf oder den Sternenhimmel mit der AC800 aufzunehmen.
Victure legt größten Wert auf höchste Produktqualität und Kundenzufriedenheit. Wenn Sie Wünsche oder Vorschläge haben, würden wir uns freuen, wenn sie uns diese mitteilen. Sie helfen uns so, unsere Produkte zu verbessern. Ihre Anregungen unterstützen unsere Entwicklung, und dienen der Verbesserung unserer Standards.
Falls Probleme während des Gebrauchs auftauchen, kontaktieren Sie uns bitte unter support@govicture.com. Unser Support Team wird sich umgehend um eine Lösung Ihres Problems bemühen. Bitte beachten Sie, dass Sie auf alle Geräte von Victure ein Jahr Garantie haben.
Nochmals herzlichen Dank, dass Sie sich für ein Produkt von Victure entschieden haben.
Mit freundlichen Grüßen, Ihr Victure Support Team
21

Produktvorstellung
|
Power/MODE Schalter Linse |
Auf/Wi-Fi |
|||||
|
|
|
|
|
|
|
|
|
|
|
|
|
|
|
|
|
|
|
|
|
|
|
|
|
|
|
|
|
|
|
|
|
|
|
|
|
|
|
|
|
|
|
|
|
|
|
|
|
Lautsprecher |
|
Ab/ Audio |
|
Aufnahme Taste |
Indikator LED |
|
(Blinkt BLAU während der Aufzeichnung) |
MICRO USB |
|
|
|
Mikrofon |
|
MICRO SD |
|
Kartenslot |
|
HDMI |
Ladeindikator LCD Display (Blinkt ROT während des Ladevorgangs)
Wifi Indikator
(Blinkt ORANGE wenn WIFI aktiv)
OK Taste |
Batterie Abdeckung |
22
Inbetriebnahme
Wasserdichtes Gehäuse öffnen & schließen
Wasserdichtes Gehäuse öffnen:


|
|
|
|
1.Um das wasserdichte Gehäuse |
2.Drücken Sie die Schnalle |
zu öffnen, schieben sie zuerst den |
nach oben; |
Schalter oben nach rechts (siehe |
3.Öffnen Sie die hintere |
Pfeil). |
Abdeckung. |
Wasserdichtes Gehäuse schließen: |
|
|
|
|
|
|
|
1.To close the waterproof case. Firstly Drücken Sie die hintere Abdeckung wie abgebildet an das Gehäuse;
2. Schließen Sie die Schnalle, und verbinden sie mit der hinteren Abdeckung (wie abgebildet).
3.Drücken Sie die Schnalle nach unten.
23
Hinweise:
1.Bitte entfernen Sie die Schutzfolien vom wasserdichten Gehäuse, bevor sie mit der Aufnahme beginnen.
2.Durch die Dichtheit des Gehäuses wird die Qualität der Tonaufnahme verringert.
Ersatz des staubdichten Gehäuses
Schritt 1 |
Schritt 2 |
Schritt 3 |
1.Um die staubdichte Hülle zu ersetzen, finden Sie zuerst den Schlitz der wasserdichten Hülle, wie in Schritt 1 gezeigt.
2.Halten Sie die Hülle mit Ihren Händen, wie Schritt 2 Bild zeigt, Gesicht der Schlitz an der Vorderseite der Hülle, reißen Sie die wasserdichte Rückseite ab.
3.Finden Sie die staubdichte Rückabdeckung in Ihrem Zubehör, das zwei Zwischenräume auf der linken und rechten Seite hat. Setzen Sie die untere Hälfte der Abdeckung in den Steckplatz ein und drücken Sie die obere Hälfte in den Steckplatz, bis die gesamte hintere Abdeckung vollständig installiert ist.
Hinweise:
1.Die Benutzung kann basierend auf Ihren eigenen Wünschen stattfinden. 2.Das Gehäuse ist staubgeschützt, aber nicht für den Gebrauch unter Wasser geeignet.
24

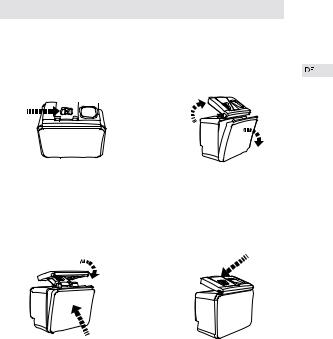
Aufladen und Batterieinbetriebnahme
Die Kamera und die Batterie wird seperat verpackt geliefert. Bitte laden Sie die Batterie vor dem ersten Gebrauch ganz auf, und legen sie erst dann in die Kamera ein.
Aufladen:
Hier die Schritte zum Aufladen:
1.Entnehmen Sie das USB Ladegerät ihrem Zubehör (siehe Bild).
2.Sie können zum Laden einen USB Trafo oder ihren Computer verbinden . Wegen der geringen Ladespannung am USB Port des Computers dauert das Aufladen länger. Wir empfehlen daher die Verwendung eines Ladegerätes. 3.Setzen sie beide Batterien ein, achten Sie bitte darauf, den Plus und Minuspol richtig einzusetzen. Die Ladeanzeige leuchtet während des Ladevorgangs rot, und wechselt zu blau, wenn die Batterien voll sind.
Batterie einsetzen:
Nachdem die Batterien voll geladen sind setzen sie diese bitte in die Kamera ein. Das funktioniert wie folgt:
1.Auf der Unterseite der Kamera finden Sie das Batteriefach mit dem Öffnungsschalter auf der rechten Seite. Öffnen Sie das Batteriefach wie abgebildet. Drücken Sie den Schalter mit ihrem rechten Daumennagel nach rechts (Siehe 1) und öffnen dann das Batteriefach mit den Fingernagel (Abbildung 2).
25

2.Nach dem Einsetzen der Batterie setzten Sie bitte die Batterieabdeckung ein. Achten Sie bitte darauf, den vorstehenden Teil der Abdeckung links einzusetzen (siehe Abbildung). Anschließend drücken sie die rechte Seite der Batterieabdeckung in das Batteriefach.
Hinweise:
Achten Sie dabei bitte auf die richtige Polung und darauf, dass die Batterieabdeckung richtig eingesetzt ist.
SD Karte einsetzen und formatieren
Nachdem Sie die Batterie voll aufgeladen haben, benötigen Sie noch eine SD Karte für Ihre Kamera.Die Kamera unterstützt Class 10 SDHC Karten mit maximal 64 GB. ACHTUNG – die SD Karte ist NICHT IM LIEFERUMFANG enthalten.
SD Karte einsetzen und entnehmen:
1.Wenn Sie die SD Karte einsetzen, achten Sie darauf, daß der beschriftete Teil der Karte in Richtung Bildschirm zeigt. Beim Einsetzen klickt die Karte, wenn sie einrastet.
2.Drücken sie leicht auf die SD Karte, bis es klickt, Die SD Karte wird mit Federmechanismus aus dem Halter geschoben.
26
 Loading...