


Contents
English |
|
1 |
|
|
|
|
9 |
|
|
|
|
|
|||
Deutsch |
|
10 |
|
|
18 |
||
|
|
|
|||||
Français |
|
19 |
|
|
27 |
||
|
|
|
|
||||
Español |
|
28 |
|
|
36 |
||
|
|
|
|||||
Italiano |
|
37 |
|
|
45 |
||
|
|
|
|||||
|
|
46 |
|
|
55 |
||
Thank you for purchasing product from Victure. Please read and follow this user manual carefully and keep it in a safe place for future reference.
Victure consistently attaches great importance to product quality and high customer satisfaction. We sincerely hope you can make a few suggestions during your use to help us improve our products. Your precious suggestions will help us shape our business to perfectly fit your standards. We'll soon introduce series of new products for our valued customers, please share this with your friends.
Just let us know if you encounter any problem during your use. Our support team will provide you our best solution without any delay. And all items purchased from Victure are covered by 1 year warranty.
You can find our contact information below: support@govicture.com
Look forward to bringing you more great products in the future.
Kind regards,
Victure Support Team

Product Diagram
Power |
Lens |
Up |
Down/Wi-Fi 


 Speaker
MICRO USB
MIC


 MICRO SD
HDMI
LCD Screen
OK |
Battery Cover |
1

Specifications
|
|
Model |
AC600 |
|
|
|
|
|
|
|
4K (25fps), 2.7K (30fps) |
|
|
|
|
|
|
Video Resolution |
1080p (60fps), 1080p (30fps) |
|
|
|
|
|
|
|
720p (120fps), 720p (60fps) |
|
|
|
|
|
|
Image Resolution |
16MP, 12MP, 8MP, 5MP, 4MP |
|
|
|
|
|
|
Lens |
170° HD wide-angle fish eye lens |
|
|
|
|
|
|
Video Compression Format |
H.264 |
|
|
||
|
|
|
|
|
|
Video / Image Format |
MOV / JPG |
|
|
|
|
|
|
Wi-Fi Connection |
Android / iOS supported |
|
|
|
|
|
|
Storage |
32GB micro SD card support (Max), |
|
|
Class 10+ recommended (not included) |
|
|
|
|
|
|
|
|
|
|
|
USB Interface |
USB 2.0 |
|
|
|
|
|
|
Charging Time |
About 3 hours |
|
|
|
|
|
|
Continuous Recording Time |
Up to 90 minutes (or continuously if powered |
|
|
through the cable) |
|
|
|
|
|
|
|
|
|
|
|
Battery |
Removable 3.7V 1050mAh Li-ion battery |
|
|
|
|
|
|
Waterproof Case Depth Rating |
30m / 98.4ft |
|
|
|
|
|
|
|
English / German / French / Spanish / Italian / |
|
|
Language Options |
Portuguese / Chinese Traditional / Chinese |
|
|
|
Simplified / Japanese / Russian / Korean |
|
|
|
|
|
|
Weight |
78g/ 2.75oz (with battery) |
|
|
|
|
|
|
Dimensions |
60*25*40mm / 2.36*0.98*1.57 inch |
|
|
|
|
2

Getting Started
Charging
To charge, connect one end of the included micro-USB cable to a power adapter or a USB charging port and the other end to the micro-USB port on the camera. When you connect the camera to the power, the camera will automatically turn on. To more effectively charge the camera, turn it off. The red charging indicator will stay on when the camera is charging and turn off when the camera is fully charged. Charging with the power adapter takes around 3 hours.
Turning the Camera On/Off
Press and hold the power button for 2 seconds to turn the camera on/off. When the camera is turned on, the two LED status indicators will light up and the display will turn on.
Using a Micro SD Card
The camera does not include internal storage and requires a micro SD card (Class10 + recommended and 32GB Max supported) to function. Use a high-quality, branded card for maximum reliability. Insert a micro SD card into the micro SD card slot and format it ( ‘Format’ in camera system settings) to prepare the card for use. Formatting will permanently erase any data on the micro SD card.
Camera Modes
Press the mode button to cycle through video, photo, burst photo, time lapse and setting mode. Press up button to go to playback mode.
Video Mode: Press the OK button to start or end recording. When the camera is recording, the LED status indicators flash once every 2 seconds. When it stops recording, the LED status indicators stay on.
Photo Mode: Press OK button once to take photos.
Burst Photo Mode: Press OK button once to take 3 photos in 1.5 seconds.
Time Lapse Photo Mode: Press OK button to take a photo after a set time (you can set 2, 3, 5, 10, 20, 30, or 60-second timings in settings). Take a series of photos automatically at the set interval by turning on the ‘continuous lapse’ setting and pressing OK button once (cancel by pressing again).
3

Settings Mode:
. Press mode button until the spanner symbol is shown and press OK
. button to enter settings mode.
Use up/down to highlight individual setting and press OK button to enter
. those settings.
Use up/down to choose an option (a white area on the scroll bar means there are more pages). Press OK button again to confirm or press mode
. button to return to settings menu without changing.
To exit settings, move up/down to highlight the cross symbol at the top of the page and press OK button to exit.
Playback Mode:
 Press up button to enter playback menu.
 Press down or mode button to switch between video or picture files and then press OK button to confirm.
 Press up/down button to choose desired picture or video. For videos, press OK button to play/pause, mode button to stop, and up/down to rewind/fast-forward.
 If you want to delete a file, go to the video or photo, then press and hold OK button for several seconds until a delete confirmation appears. Press up to choose ‘Yes’ and press OK button to confirm. It will then move to the next video or photo. Press OK button to select ‘No’ to stop deleting files or press up and then OK button to delete the next.
 Press mode button to return to playback menu. Press up button to exit playback mode.
Connecting to a Computer
There are two options when you use the included micro-USB cable to connect to a computer: USB and PC Camera. Press OK button to switch between the two modes. Charging works in either mode but is more effective if you turn off the camera (press and hold camera power button). Charging may be slower than when using a power adapter due to lower power output of computer USB ports.
USB Mode: Access files on the camera’ s micro SD card to copy them or view them on a computer. Alternatively, take the micro SD card out of the camera and insert it into a micro SD card slot or reader.
4

.....
.
..
PC Camera: Use as a web cam for video chats and video recording on your computer. You may need to allow Adobe Flash Player to run in your video chat software before video will display.
Connecting to a TV or Monitor
If your TV or monitor has a USB port or SD card slot (requires a micro-SD card adapter), you can access and view files in a similar way as ‘Connecting to a Computer’ (see above). You can also use a micro-HDMI cable (not included) to connect and view directly.
Operating Camera via Mobile Phone
Download the app to view and control the camera on your mobile device.
Download the App
Option 1: Download the ‘iSmart DV’ app from the App Store (iOS 7.1 or above) or Google Play (Android 4.3 or above). Option 2: Scan the QR code below that corresponds with your device OS to download and install the ‘iSmart DV’ app.
Wi-Fi Connection
Connect your phone to the camera wirelessly. You can see the camera picture, control the camera, and download recordings from the camera to your phone.
Turn on the camera; then long press up button.
Switch on Wi-Fi on your phone and scan for Wi-Fi connections.
Find and connect with ‘ActionCam’ Wi-Fi using the password: 1234567890. Open the ‘iSmart DV’ app on your phone.
To turn off Wi-Fi (and disconnect), long press up again.
Note:
When you use your mobile phone to operate the camera, the camera screen will stay off.
The camera can only connect to one device at a time.
Using the Wi-Fi connection is more energy-intensive; avoid using it when the camera is low on battery.
5
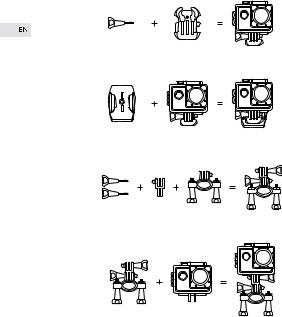
Camera Mount Assembly and Application
This Action Camera comes with a large selection of mount parts and other practical accessories for a wide variety of configuration options and applications. The camera can be mounted on bicycles and other vehicles, helmets, clothing, and much more. Below are a few common configuration and application options but you can arrange and use the parts according to your situation and desired use.
6
7

8

Product Care & Use
. Keep away from liquids (unless using the waterproof case), extreme heat, and
. strong magnetic fields.
Ensure the camera is mounted safely and fixed securely to avoid causing an
. accident or damage to the camera.
. Always pay attention to your surroundings and safety when using the camera.
. Wipe any dust and water off the camera after each use.
Gently clean the camera lens with the included lens-cleaning cloth when
. necessary.
. Keep the camera out of the waterproof case when storing.
Keep your videos and photos backed up elsewhere to protect against file
. corruption or loss caused by extreme conditions or SD card issues.
If the camera crashes or becomes unresponsive, you can reset it by disconnecting and reconnecting the battery. You can also leave it turned off for a short time to cool down.
Warranty & Customer Support
All Victure products come with a limited warranty of 12 months from the date of purchase. Also professional customer service team for your support without any delay.
If you have any question about our product or the warranty, please feel free to contact us at the address below with your Amazon order number.
support@govicture.com
9

Diagramm des Produkts
Power Taste |
Objektiv |
Up |
Unten/WLAN 


 Lautsprecher
Micro USB
Mikro

 Mikro SD
HDMI
LCD-Bildschirm
OK Batterieabdeckung
10

Spezi kationen
Modell |
AC600 |
|
|
|
|
|
|
|
4K (25fps), 2.7K (30fps) |
|
|
|
|
|
|
Auflösung des Videos |
1080p (60fps), 1080p (30fps) |
|
|
|
|
|
|
|
720p (120fps), 720p (60fps) |
|
|
|
|
|
|
Auflösung des Bilds |
16MP, 12MP, 8MP, 5MP, 4MP |
|
|
|
|
|
|
Objektiv |
170° HD Weitwinkel-Fishaugenobjektiv-Objektiv |
|
|
|
|
|
|
Kompressionsformat des Videos |
H.264 |
|
|
|
|
|
|
Format des Videos / Bilds |
MOV / JPG |
|
|
Wi-Fi-Verbindung |
Android / iOS unterstützt |
|
|
|
|
||
|
|
|
|
Speicher |
32GB microSD-Karte unterstützt (max.), |
|
|
Class 10+ wird empfohlen (nicht enthalten) |
|
|
|
|
|
|
|
|
|
|
|
USB-Anschluss |
USB 2.0 |
|
|
|
|
|
|
Ladedauer |
Ca. 3 Stunden |
|
|
|
|
|
|
Kontinuierliche Aufnahmezeit |
Bis zu 90 Minuten (durch die Stromversorgung |
|
|
über USB kann man die Kamera nachhaltig |
|
|
|
|
verwenden |
|
|
Akku |
Entfernbarer 3,7V 1050mAh Li-Akku |
|
|
|
|
|
|
Tiefe-Schutzklasse von |
30m / 98,4ft |
|
|
|
|
|
|
|
Englisch / Deutsch / Französisch / Spanisch / |
|
|
Sprachoptionen |
Italienisch / Portugiesisch / Traditionelles |
|
|
Chinesisch / Vereinfachtes Chinesisch / |
|
|
|
|
|
|
|
|
Japanisch / Russisch / Koreanisch |
|
|
Gewicht |
78g / 2.75oz (mit Akku) |
|
|
|
|
|
|
Abmessungen |
60*25*40mm / 2.36*0.98*1.57 inch |
|
|
|
|
|
|
11
Starten
Aufladen
Zum Aufladen schlie3en Sie ein Ende von dem mitgelieferten Micro-USB-Kabel an ein Netzteil oder einen USB-Ladeanschluss und das andere Ende an den Micro-USB-Anschluss auf der Kamera an. Wenn Sie die Kamera an eine Stromquelle anschlie3en,wird sich die Kamera einschalten. Um die Kamera effektiver aufzuladen, schalten Sie bitte sie aus. Die Ladeanzeige leuchtet beim Aufladen dauernd rot, und schaltet sich aus, wenn vollstandig aufgeladen ist. Die Ladung mit Netzteil dauert etwa 3 Stunden.
Ein/Ausschalten der Kamera
Halten Sie 2 Sekunden lang die Power-Taste gedruckt, um die Kamera ein / auszuschalten. Wenn die Kamera eingeschaltet ist, leuchten die zwei Statusanzeigen auf und schaltet das Display ein.
Verwendung der microSD-Karte
Die Kamera enthält keinen internen Speicher und erfordert eine microSD-Karte (Class 10+ wird empfohlen und unterstützt max. 32GB) zum Funktionieren. Verwenden Sie eine hochwertige, gebrandmarkte Karte für maximale Zuverlässigkeit. Setzen Sie eine microSD-Karte in den microSD-Karte-Slot ein und formatieren Sie sie („Format “ in Kamerasystemeinstellungen), um die Karte zur Verwendung vorzubereiten. Beim Formatieren werden alle Daten auf der microSD-Karte dauerhaft gelöscht.
Kameramodus
Drücken Sie die Modus-Taste zu wechseln zwischen VideoFotoSerienaufnahmemodi Zeitraffer und Einstellung. Drücken Sie den Up-Knopf, um WiedergabeModus zu gelangen.
Videomodus: Drücken Sie die Taste OK, um die Aufnahme zu starten oder zu beenden. Wenn die Kamera aufgenommen wird, blinken die LED-Statusanzeigen einmal alle 2 Sekunden. Stoppen die Aufnahmen, bleiben die LED-Statusanzeigen eingeschaltet.
Fotomodus: Drücken Sie die OK-Taste, um Fotos aufzunehmen.
Serienfotomode: Drücken Sie die OK-Taste einmal, um 3 Fotos in 1,5 Sekunden aufzunehmen.
Zeirtaffer-Fotomodus: Drücken Sie die OK-Taste, nachdem Sie eine bestimme Zeit gewählt haben(Sie können 2, 3, 5, 10, 20, 30 oder 60 Sekunden in den Einstellungen wählen) SerienFotos werden automatisch gemacht, indem Sie die OKTaste einmal drücken( abbrechen durch erneut drücken) , wenn Sie im gewählten Interval die Kontinuierlichen Zeitraffer einschalten.
12

Einstellungsmodus:
 Drücken Sie die Modus-Taste, bis das Symbol „Schraubenschlüssel“ erscheint und drücken Sie die OK-Taste, um in den Einstellungsmodus zu gelangen.
Heben Sie Individuelle Einstellung mit Up / Down hervor und drücken Sie die OK-Taste, um in die entsprechenden Einstellungen zu gelangen.
 Wählen Sie eine Option mit Up / Down (Ein weißer Bereich auf der Bildlaufleiste bedeutet, dass es noch mehr Seiten gibt). Drücken Sie die
  OK-Taste wieder, um zu bestätigen oder drücken Sie die Modus-Taste, um
zum Einstellungsmenü ohne Änderung zurückzukehren.
Um den Einstellungsmodus zu verlassen, drücken Sie Up / Down, um das Symbol „Kreuz“ hervorzuheben, das sich oben auf der Seite befindet und  drücken Sie OK-Taste zu verlassen.
Wiedergabemodus:
 Drücken Sie die Up-Taste, um in das Wiedergabemenü zu gelangen.
 Drücken Sie Untenoder Modus-Taste, um zwischen Videooder Bild-Dateien umzuschalten und dann drücken Sie die OK-Taste zur Bestätigung.
 Drücken Sie Up- / Unten-Taste, um ein gewünschtes Bild oder Video auszuwählen. Für Videos, drücken Sie die OK-Taste, um wiederzugeben oder zu pausieren, Modus-Taste zu stoppen, und Up- / Down-Taste zurückoder vorzuspulen.
 Um in das Video- / Bildmenü zurückzukehren, drücken Sie die Modus-Taste. Wenn Sie eine Datei löschen wollen, wählen Sie das Video oder Foto aus, dann halten Sie die OK-Taste für einige Sekunden lang gedrückt, bis die
  Bestätigung des Löschens erscheint. Drücken Sie Up-Taste, um „Yes“ zu wählen und drücken Sie die OK-Taste zur Bestätigung. Das Display wird dann das nächste Video oder Foto anzeigen. Drücken Sie die OK-Taste, um „No“ zu wählen, und das Löschen von Dateien zu stoppen oder
drücken Sie die Up-Taste, dann OK-Taste, um die nächste zu löschen.  Drücken Sie die Modus-Taste, um zum Wiedergabemenü zurückzukehren. Drücken Sie die Up-Taste, um den Wiedergabemodus zu verlassen.
Verbindung mit dem Computer
Es gibt zwei Optionen, wenn Sie das mitgelieferte Micro-USB-Kabel zur Verbindung mit dem Computer verwenden: USB und PC-Kamera. Drücken Sie die OK-Taste, um zwischen zwei Modi umzuschalten. Die Ladung funktioniert in beiden Modi, aber es ist effektiver, wenn Sie die Kamera ausschalten (halten Sie Power-Taste gedrückt). Die Ladung kann langsamer als mit einem Netzteil sein, aufgrund der geringeren Leistung der Computer-USB-Anschlüsse.
13

USB-Modus: Sie können die Dateien auf der microSD-Karte der Kamera zugreifen, und die auf einen Computer kopieren oder anschauen. Alternativ, nehmen Sie die microSD-Karte aus und stecken Sie sie in einen microSD-Karte-Slot oder Kartenleser ein.
PC-Kamera: Die Kamera kann als eine Web-Cam für Video-Chats und Videoaufnahme mit Ihrem Computer verbinden. Möglicherweise müssen Sie Adobe Flash Player in Ihrem Video-Chat-Software laufen lassen, bevor das Video angezeigt wird.
Verbindung mit dem TV oder Monitor
Wenn Ihr Fernsehgerät oder Ihr Monitor über einen USB-Anschluss oder einen SD-Karte-Slot verfügt (benötigt einen Micro-SD-Kartenadapter), können Sie Dateien auf ähnliche Weise zugreifen und anschauen, wie „Verbindung mit dem Computer“ (siehen oben). Sie können auch ein Micro-HDMI-Kabel (nicht im Lieferumfang enthalten) verwenden und direkt anzuschauen.
Herunterladen der App
Laden Sie die App herunter, um die Kamera auf Ihrem Mobilgerät anzuschauen und zu steuern.
Herunterladen der App
Option 1: Laden Sie die App „iSmart DV“ von App Store (iOS 7.1 oder hoher) oder Google Play (Android 4.3 oder hoher) herunter.
Option 2: Scannen Sie den unteren QR-Code zum Herunter¬laden und installieren Sie die App "iSmart DV"
der Ihrem Gerat-OS entspricht.
Wi-Fi-Verbindung
Verbinden Sie Ihr Handy drahtlos mit der Kamera. Sie können das Kamerabild anschauen, die Kamera steuern und Aufnahmen von der Kamera auf Ihr Handy herunterladen.
.. Schalten Sie die Kamera ein; dann drücken Sie lang die Unten-Taste.
. Aktivieren Sie Wi-Fi an Ihrem Handy und scannen Sie für Wi-Fi-Verbindung.
. Finden und verbinden Sie „ActionCam“, geben Sie das Passwort: 1234567890
. einÖffnen. Sie die App „iSmart DV“ auf Ihrem Handy.
Schalten Sie das Wi-Fi (und trennen) aus, drücken Sie die Unten-Taste wieder.
14

.
..
Hinweis:
Wenn Sie Ihr Handy benutzen, um die Kamera zu steuern, bleibt der Kamera-Dis- play aus.
Die Kamera kann jeweils nur mit einem Gerät verbinden.
Die Nutzung der Wi-Fi-Verbindung ist energieintensiver; vermeiden Sie es, wenn der Akkuzustand niedrig ist.
Kamerahalterung und Anwendung
Diese Action Kamera kommt mit einer großen Auswahl an Montageteilen und anderem praktischem Zubehör für eine Vielzahl von Konfigurationsmöglichkeiten und Anwendungen. Die Kamera kann auf Fahrrädern und anderen Fahrzeugen, Helmen, Kleidung und vielen mehreren montiert werden. Im Folgenden finden Sie einige gängige Konfigurations-und Anwendungsmöglichkeiten, aber Sie können die Teile entsprechend Ihrer Situation und Ihrem gewünschten Gebrauch einrichten und verwenden.
15
 Loading...