

Page 1
User Guide
Page 2

1
Table of Contents
Section 1. Getting Started ................................................ 3
Understanding this User Guide ......................................................3
Front ............................................................................................................5
Back ..............................................................................................................5
Sides ........................................................................................................... 6
Attach the Bumper ............................................................................... 7
Charge the Tablet ................................................................................. 8
Memory Card .......................................................................................... 8
Turning Your Tablet On/Off ............................................................. 9
Unlocking the Screen ......................................................................... 9
Setup Wizard ........................................................................................10
Setting Up Your Google Account ................................................10
Sign in to Zoodles Kid Mode ..........................................................11
Create a Child’s Profile .................................................................... 12
Setting Up Other Email Accounts ..............................................13
Section 2. Kid Mode ............................................................14
Home Screen Overview ...................................................................14
Play Mode ...............................................................................................14
Using Kids Camera ............................................................................ 20
Using Kids Photos ..............................................................................21
Parent Dashboard ..............................................................................21
Turning Kid Mode Off ........................................................................38
Section 3. Standard Mode ...............................................39
Managing Applications ....................................................................39
Using Recent Apps ............................................................................44
The Pre-loaded Applications ........................................................45
Using Camera ....................................................................................... 50
Using Gallery .........................................................................................53
Using Clock ............................................................................................ 55
Using Play Store ..................................................................................58
Using Maps ............................................................................................58
Widgets ...................................................................................................59
Section 4. Connections .....................................................61
Wi-Fi ......................................................................................................... 61
Bluetooth ................................................................................................63
Page 3

2
Wi-Fi Direct ........................................................................................... 66
VPN ............................................................................................................67
Tetherin g ................................................................................................67
Connecting to a Computer ............................................................ 68
Section 5. Settings .............................................................70
More Wireless and Network Settings ...................................... 70
Home .........................................................................................................77
Sound ....................................................................................................... 78
Display ..................................................................................................... 79
Storage .................................................................................................... 83
Battery ................................................................................................... 84
Application Manager ........................................................................85
Location .................................................................................................. 87
Security ................................................................................................... 87
Language and Input ..........................................................................92
Back Up and Reset ............................................................................ 98
Accounts ................................................................................................ 99
Date and Time ................................................................................... 100
Accessibility .......................................................................................101
Printing .................................................................................................10 4
System Updates ..............................................................................104
Help ........................................................................................................ 105
Ab ou t Ta bl et ...................................................................................... 105
Section 6. Health and Safety Information ...........106
Important Safety Precautions..................................................106
Additional Safety Guidelines .................................................... 107
Caring for Your Device ..................................................................109
Federal Communication Commission Interference
Statement ...........................................................................................110
RF Exposure Information (SAR) ................................................ 111
WEEE ......................................................................................................113
Section 7. Warranty Information .............................. 114
Warranty Period ............................................................................... 114
Limited Warranty Statement .................................................... 114
Disclaimer of Warranties; Exclusion of Liability ...............115
Page 4

3
Section 1. Getting Started
Understanding this User Guide
The sections of this guide generally follow the features of
your device:
• The safety information beginning on page 106 provides
the important information that you should know before
using your device.
This guide gives navigation instructions according to
the default display settings. If you select other settings,
navigation steps may be different.
Unless otherwise specified, all instructions in this guide
assume that you are starting from the Home screen. To get to
the Home screen, you may need to unlock the device.
All screen images in this guide are for your reference only.
Actual displays may vary, depending on the software version
of your device and any changes to the device’s Settings.
NOTE!
Instructions in this guide are based on default settings,
and may vary from your device, depending on the software
version on your device, and any changes to the device’s
Settings.
Page 5

4
Special Text
In this guide, you’ll find text that is set apart from the rest.
These are intended to point out important information, share
quick methods for activating features, to define terms, and
more. The definitions for these methods are as follows:
• Notes: Presents alternative options for the current
feature or menu.
• Tips: Provides quick or innovative methods, or useful
shortcuts.
• Important: Points out important information about the
current feature that could affect performance.
• Caution: Brings to your attention important information
to prevent loss of data or functionality, or even damage
to your device.
Text Conventions
This guide provides condensed information about how to
use your device. To make this possible, the following text
conventions are used to represent often-used steps:
Arrows are used to represent the sequence
of selecting successive options in longer, or
repetitive, procedures.
For example:
“From the Home screen, tap Apps Settings .”
Page 6
5
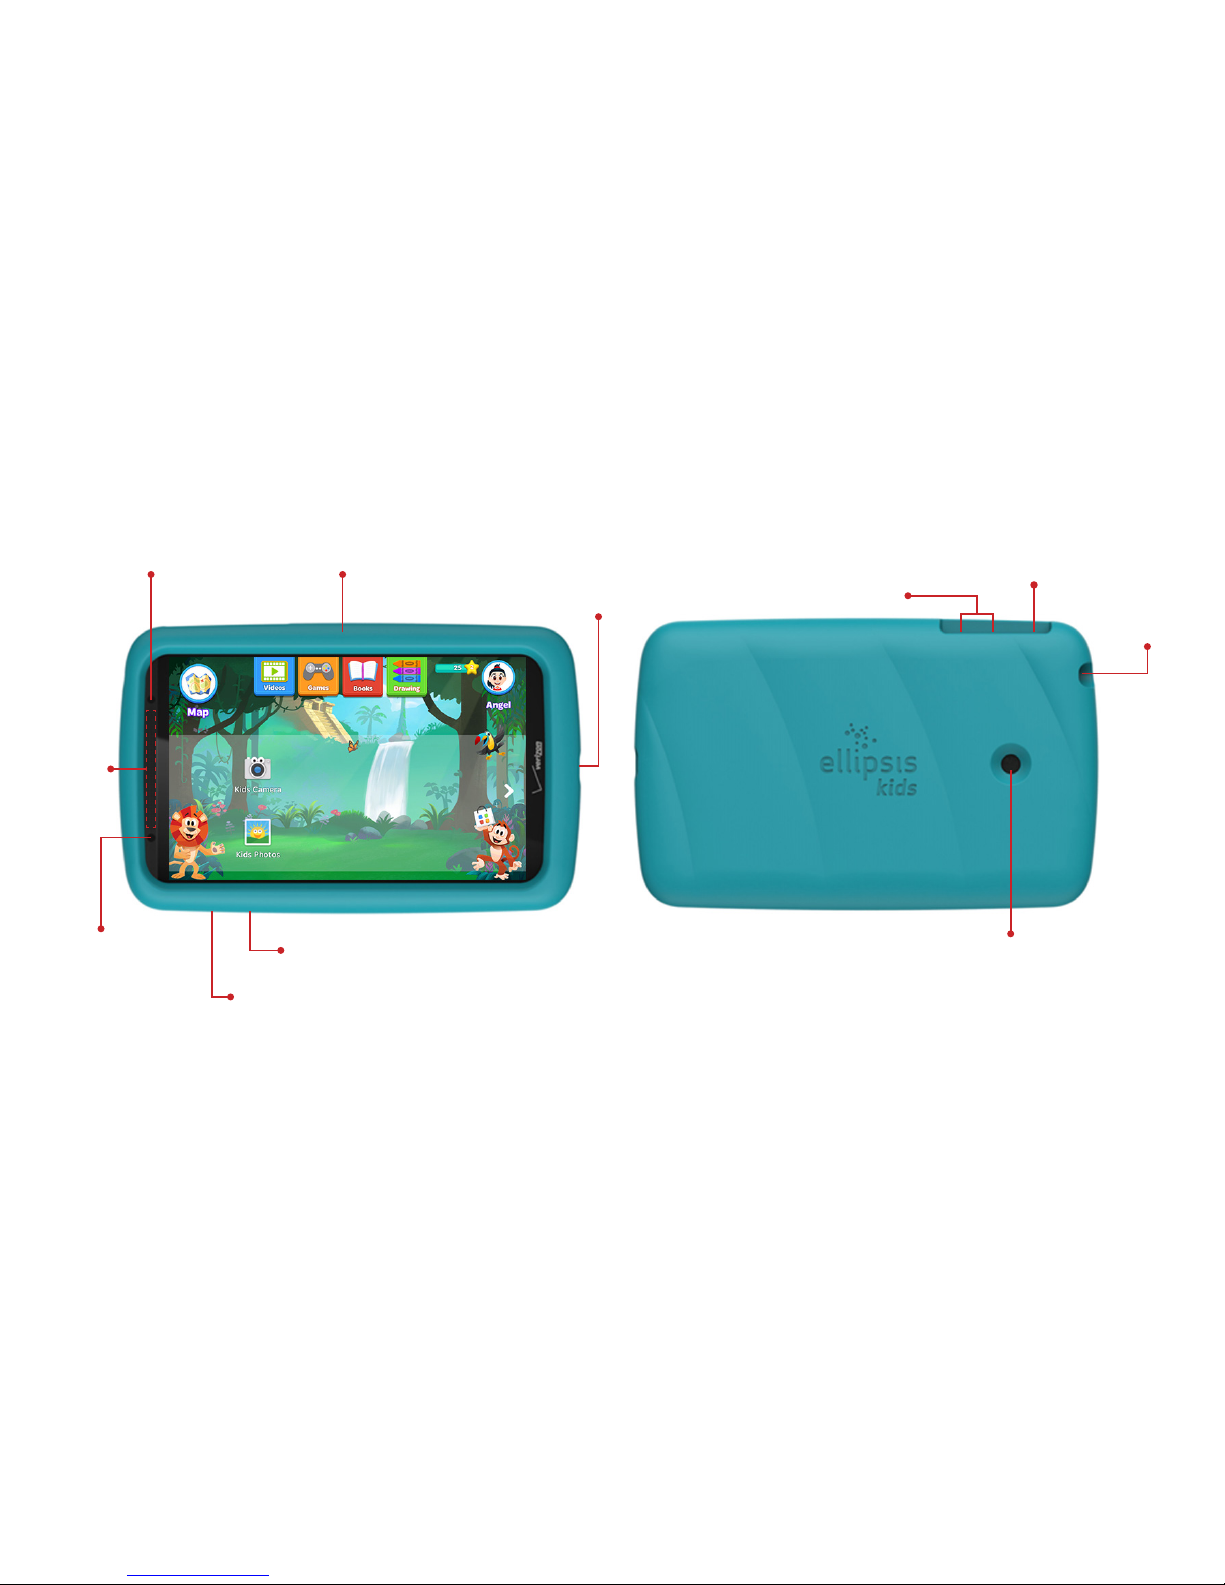
Front
Front Camera: Take pictures and record videos.
Back
Back Camera: Take pictures and record videos.
Headset
Jack
Rear Camera
Power/Lock Button
Volume Buttons
USB/Charger
Port
Proximity Sensor
Speaker
SIM Card Slot
microSD™ Card Slot
BumperFront Camera
Page 7
6
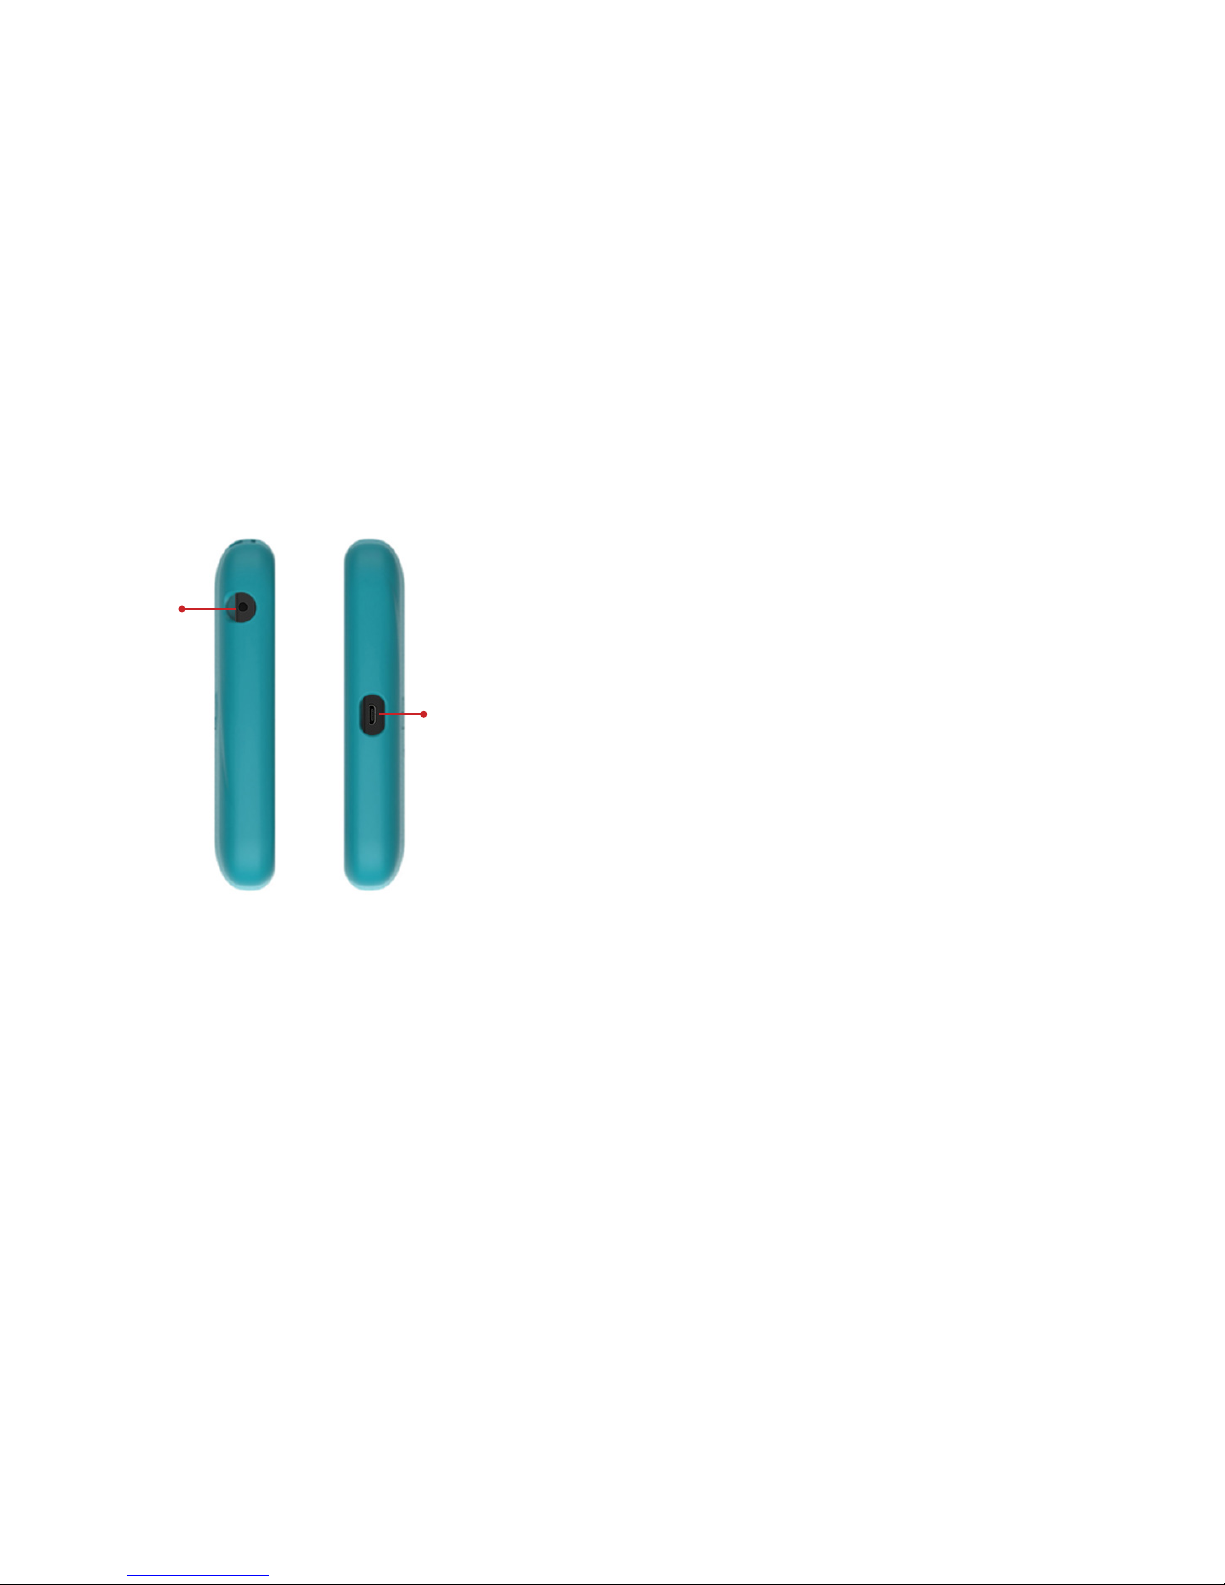
Sides
Power/Lock Button:
• Press and hold to turn the device ON/OFF;
• When the device is turned ON, press to access Airplane
mode or Restart the device;
• You can also lock the device or to wake the screen for
unlocking, press this button.
Volume Buttons:
• From the Home screen, press to adjust the system
volume;
• Press to adjust volume during playback;
• Press to mute an alert notification.
Speaker: Emit sound.
Headset Jack: Plug in a 3.5mm headset or earphones (not
included).
microSD Card Slot: Install a memory card (sold separately)
for storage of songs, pictures, and other data.
Speaker
Headset Jack
Page 8
7
Nano SIM Card Slot: Contain the 4G LTE SIM card
(pre-installed).
NOTE!
Your tablet only supports nano SIM cards. The nano SIM
card should come pre-installed in your device. The Verizon
Wireless 4G LTE Nano SIM Card is compatible with any
Verizon Wireless 4G LTE certified device that uses the same
size nano SIM card. The 4G LTE Nano SIM Card can move from
one device to another, and your wireless service will support
the services that are compatible with your new device and
service plan.
To see which devices are compatible with the Verizon
Wireless 4G LTE Nano SIM Card, visit verizonwireless.com/
certifieddevice.
USB/Charger Port: Charge or sync music and files by
connecting the provided USB cable.
CAUTION!
Use only an approved charger to charge your tablet.
Improper handling of the charging port, as well as the use of
an incompatible charger, may cause damage to your device
and void the warranty.
Your tablet is equipped with an internal rechargeable
battery that is non-removable. You should never attempt to
open or disassemble this tablet. Doing so may cause damage
that voids your warranty.
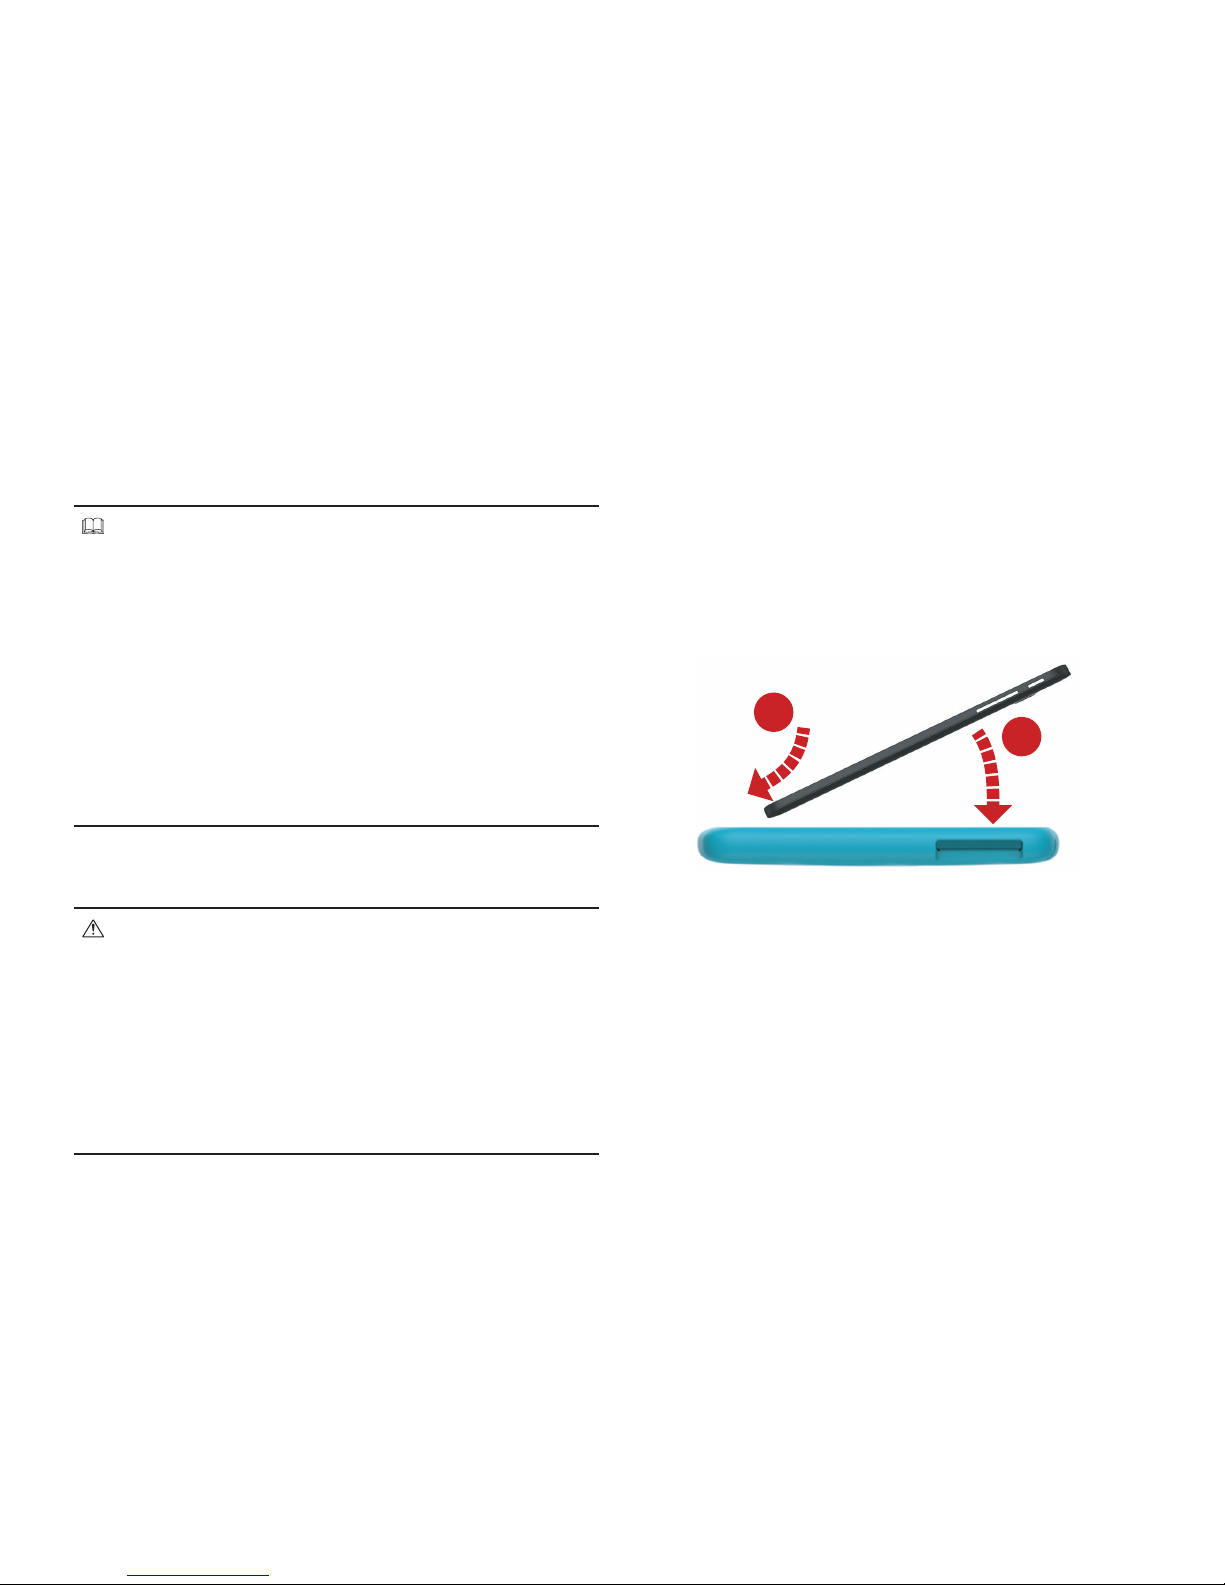
Attach the Bumper
1. Insert your tablet into the bumper, bottom first, aligning
the USB/Charger port of your tablet with the USB/
Charger port slot on the bumper.
2. Press down until the edges of the bumper wrap around
all edges of the table.
1
2
Page 9
8
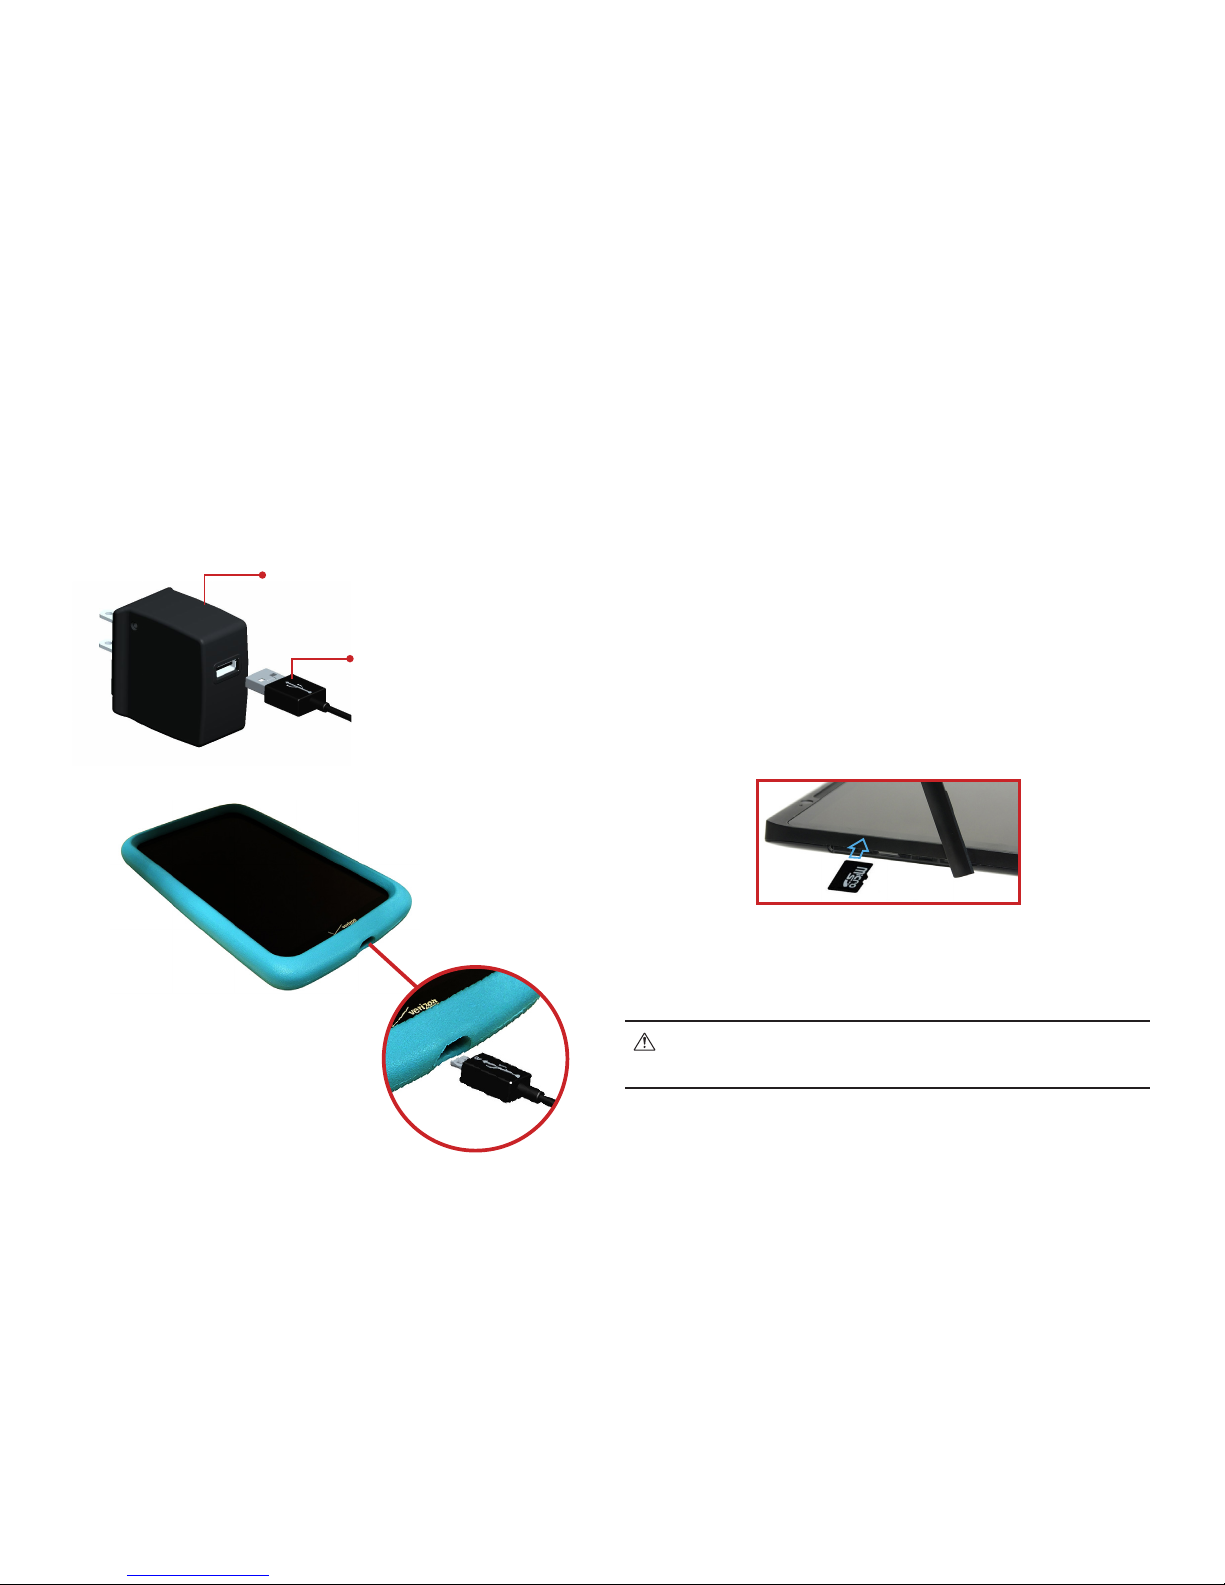
Charge the Tablet
Before turning on your tablet, charge it fully. Be sure to use
the charger that came with your tablet.
USB Cable
Charger
Memory Card
The device supports up to 32GB microSD memory cards. The
microSD card is sold separately. The manufacturer does not
guarantee the product’s compatibility with microSD cards
from all providers.
1. Remove the bumper.
2. With the tablet facing up, open the card slot cover.
3. Insert the microSD card with the gold contacts facing
down. Then carefully push the microSD card into the slot
until it clicks into place.
4. Close the card slot cover.
5. To remove the card, gently push the top edge of the card
inwards to release it, and pull it out of the slot.
CAUTION!
DO NOT apply pressure to the center of the card.
Page 10
9
Turning Your Tablet On/Off
• To turn your tablet on, press and hold the Power/Lock
button for a couple of seconds until the screen lights
up.
• To turn your tablet off, press and hold the Power/Lock
button until the tablet options are displayed. Tap
Power off OK.
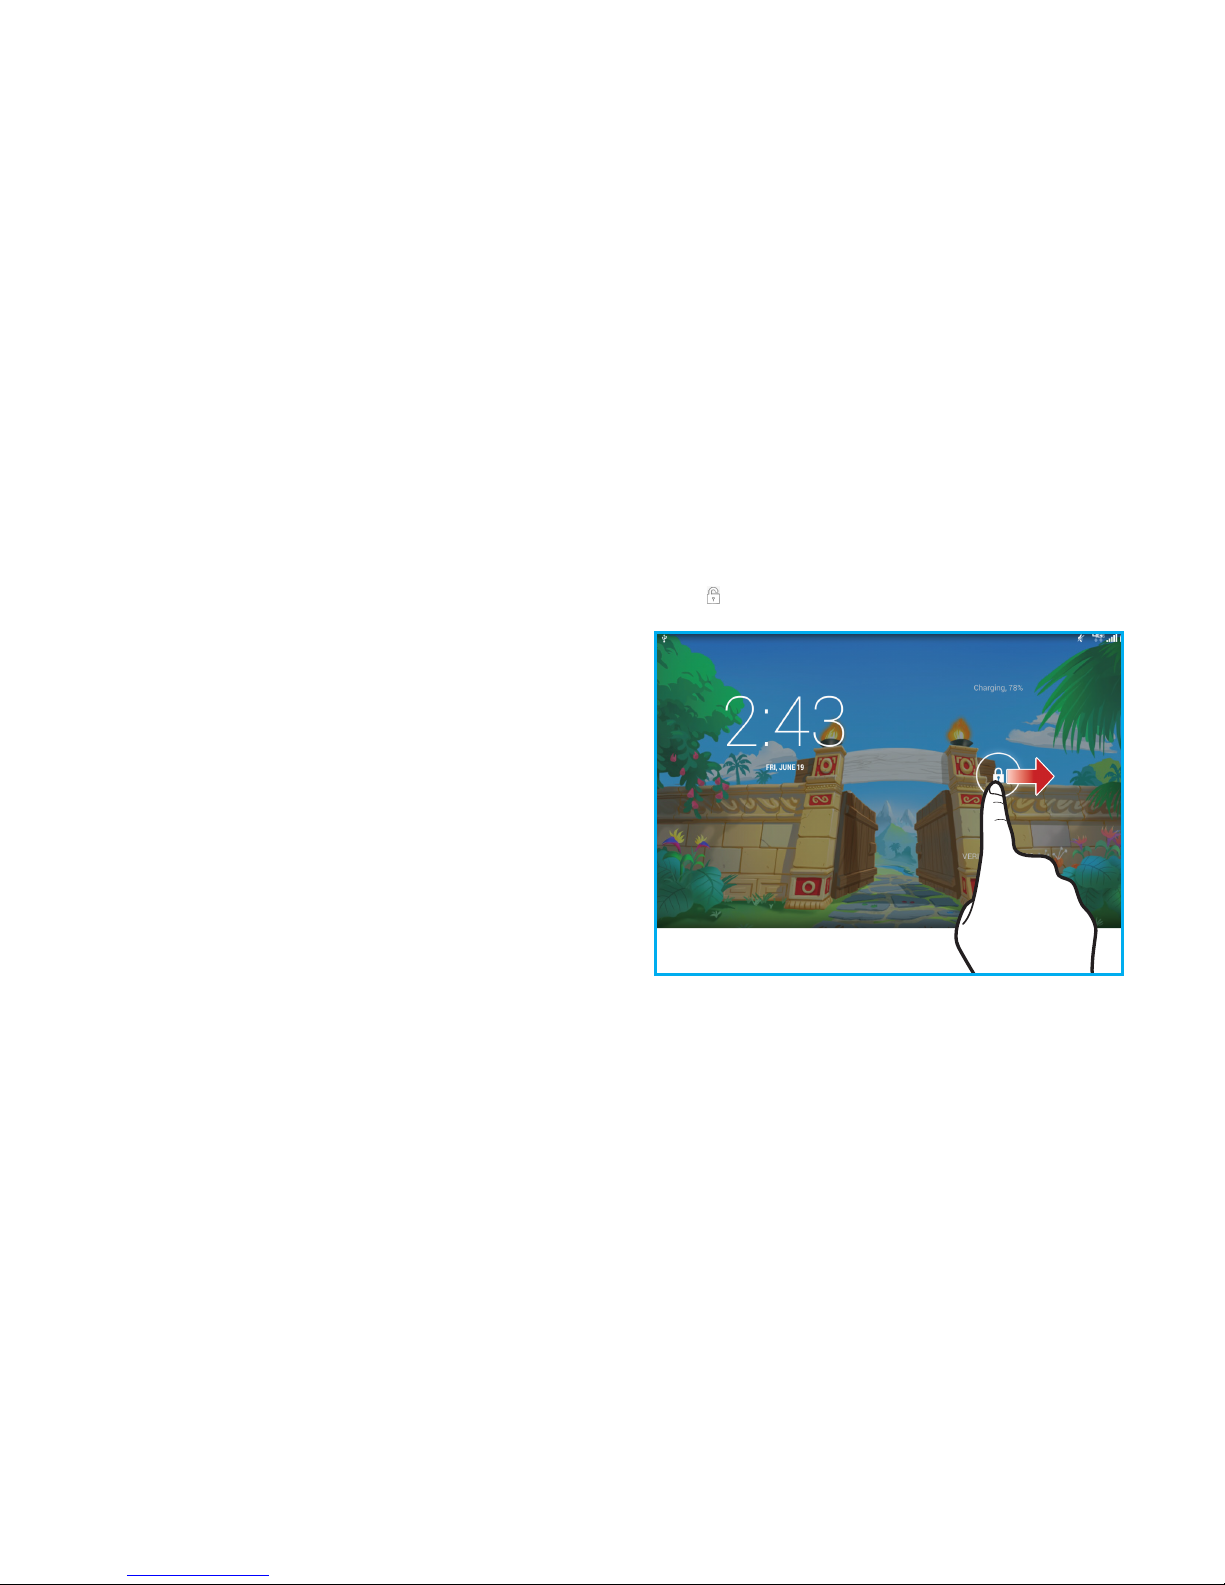
Unlocking the Screen
1. Press the Power/Lock button to turn on your screen.
Your Lock Screen will appear.
2. From the center of the screen, drag the lock icon to the
right ( ) to unlock it.
Page 11
10
Setting Up Your Google Account
Your Gmail™, Google™ contacts, and Google calendar events
can all be loaded to your tablet automatically.
Follow the onscreen instructions to quickly set up your Gmail
account.
Record your Google account information here. Please keep
this document in a safe place.
Username: ____________________________@gmail.com
Password: _____________________________
Setup Wizard
The Setup Wizard will prompt when you start using the
device for the very first time, which will guide you through
the required basic settings of the tablet.
Complete the Setup Wizard to choose your preferred
language, activate network connection, set up your account,
and more.
1. Turn on your tablet by pressing and holding the Power/
Lock button for a couple of seconds until the screen
lights up.
2. Follow the prompts to set up your new device:
• Select the display language
• Configure the Wi-Fi network connection
• Set up/Create your Google account
• Get content you have backed up with Google account
• Turn on location services
• Sign in to Zoodles Kid Mode
• Create a child’s profile
TIP!
You can change these settings while using the tablet from
the Settings menu.
Page 12
11
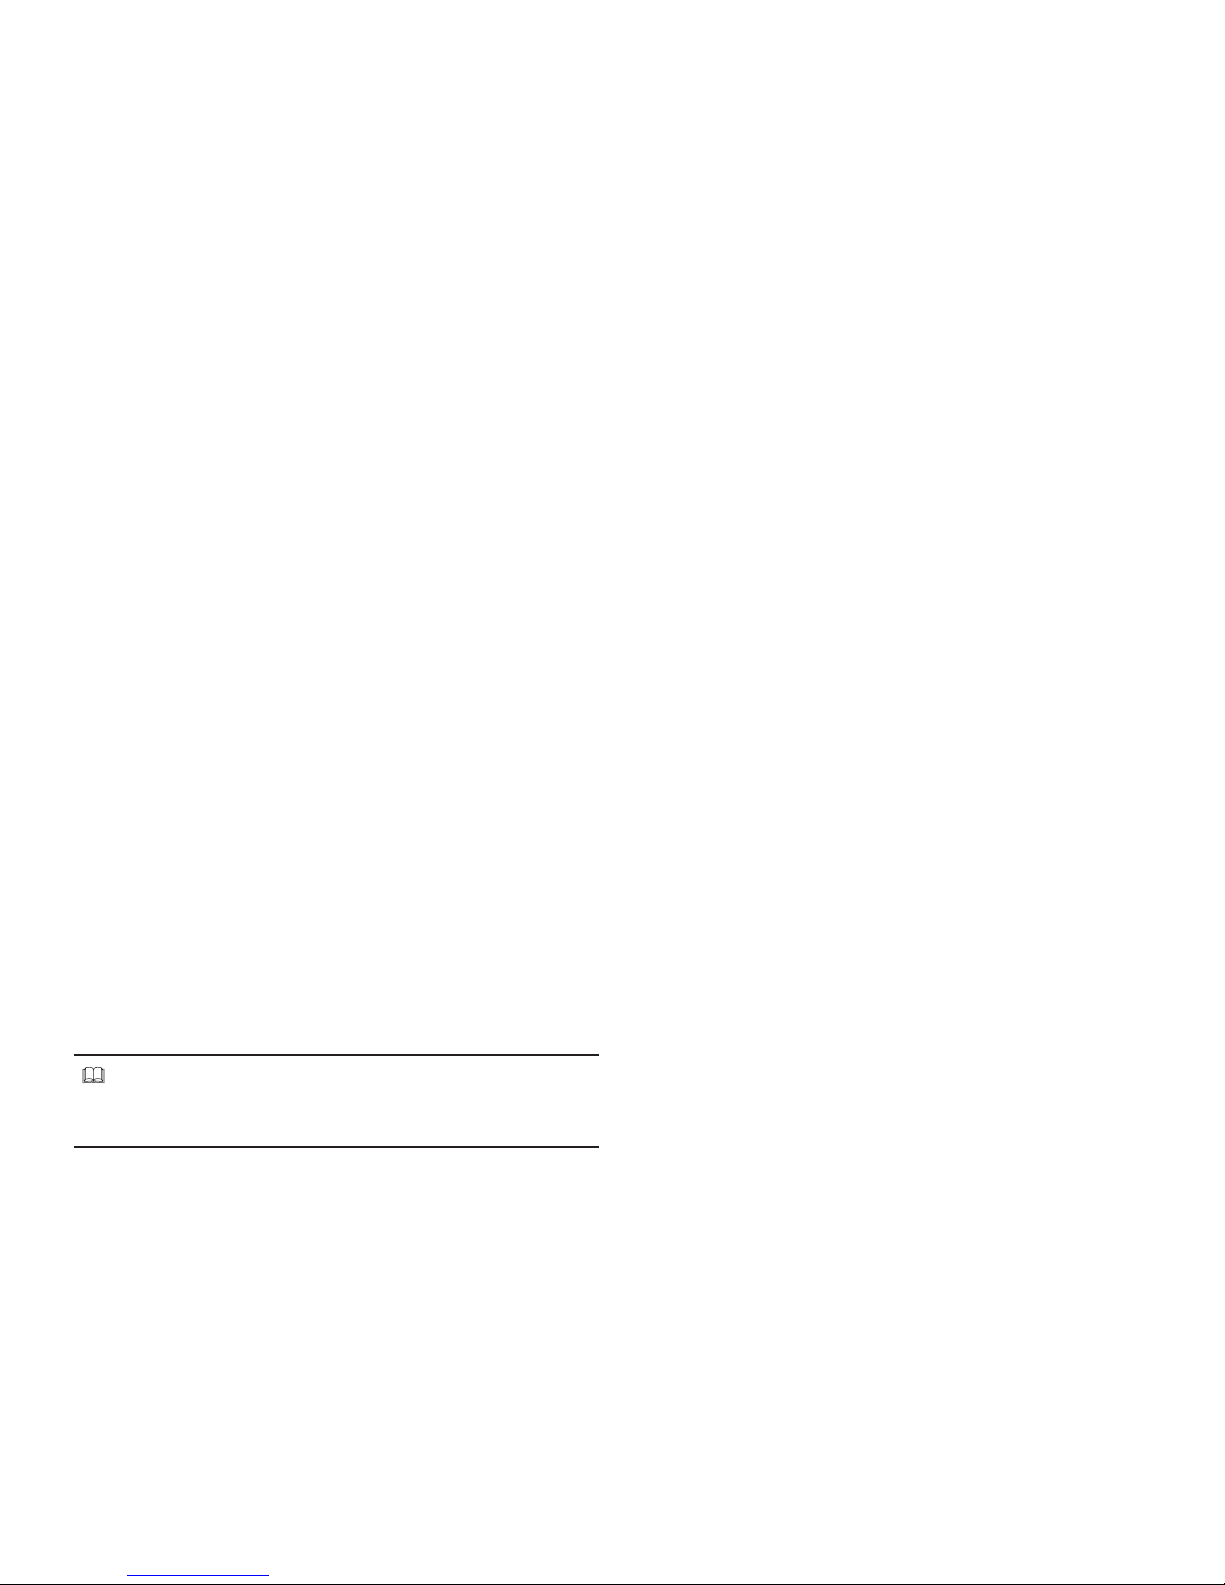
Sign in to Zoodles Kid Mode
Your device comes with a free subscription to a premium Kid
Mode account.
Perform the following to set up your Premium account:
1. After you have complete the Setup Wizard, tap START
KID MODE to enter the Kid Mode’s home screen.
2. Enter your email address and password. Then enter again
your password.
3. Tap Create Account to set up your account.
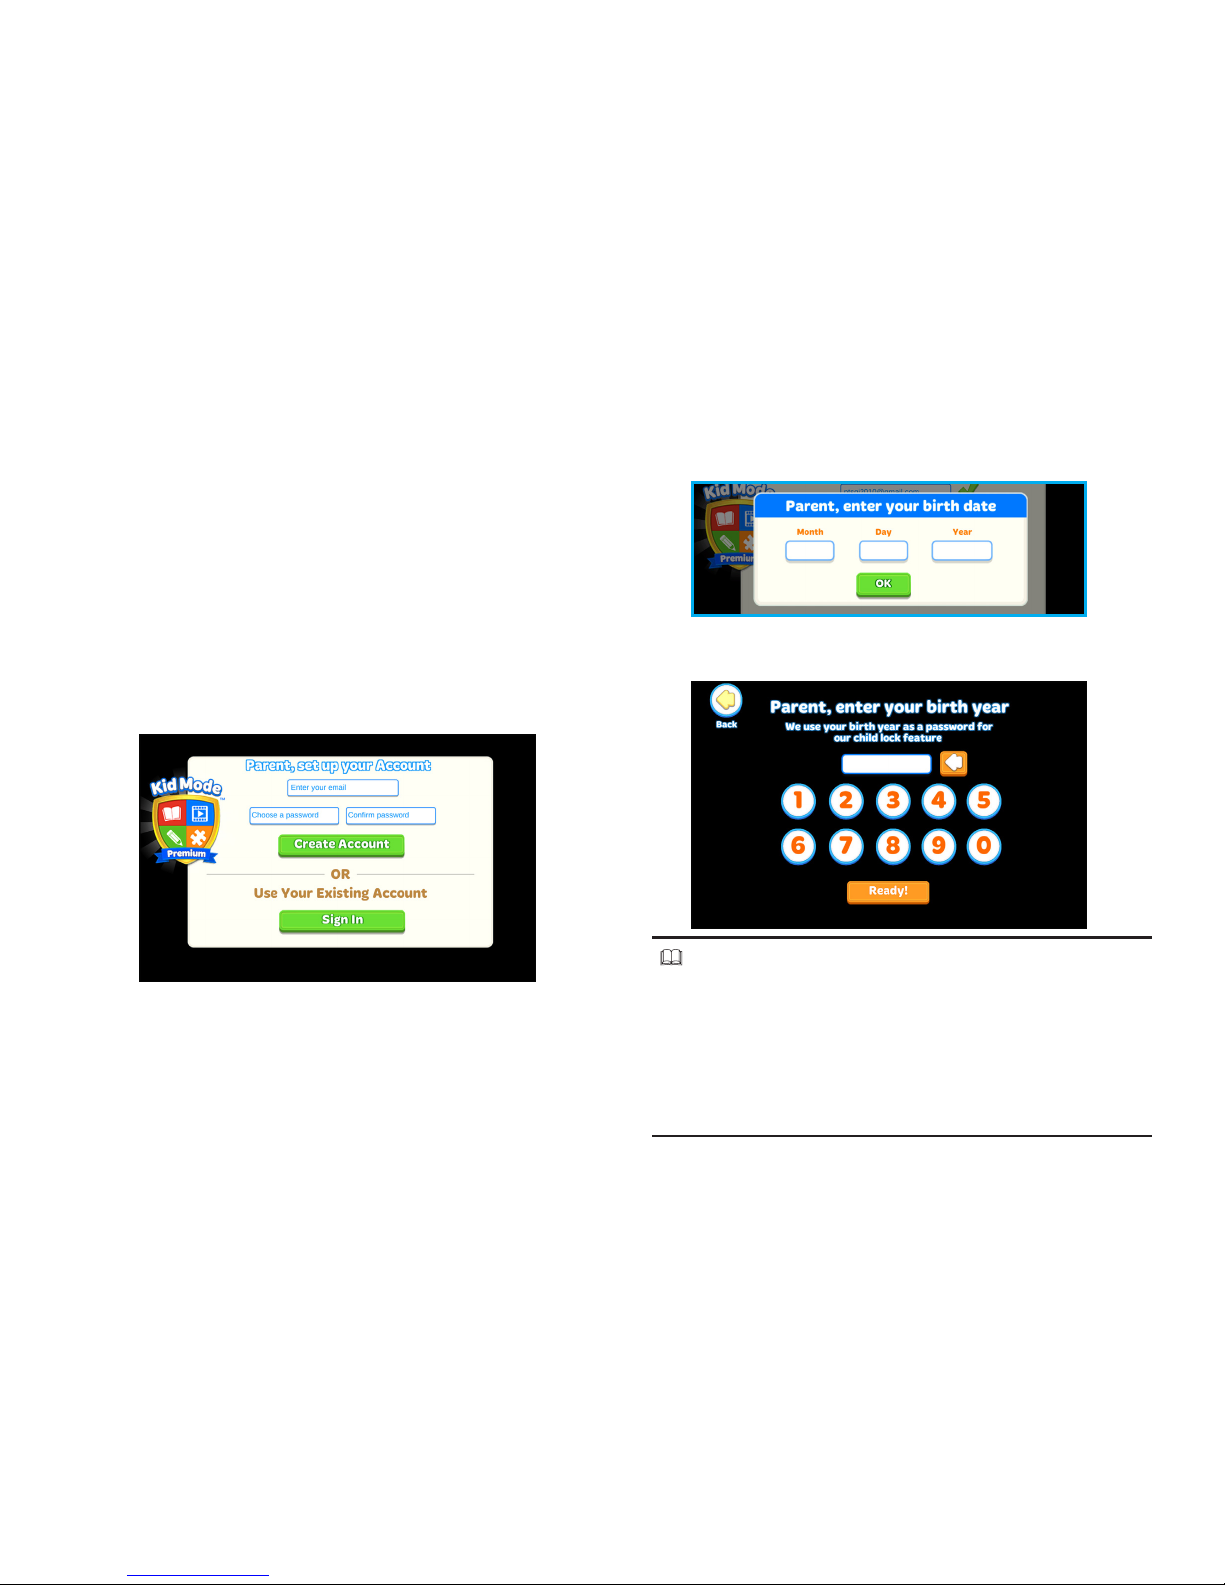
4. Enter your birth date. Then tap OK.
5. Enter your birth year.
NOTE!
• Your birth year will be used as the password for the
child lock function. To set up the child lock function,
see “Configuring Child Lock Function” on page 36.
• You will be prompted to enter your birth year
before entering the Parent Dashboard. See “Parent
Dashboard” on page 21.
Page 13
12
6. When done, tap Ready! . Now you can continue to create
your child’s profile.
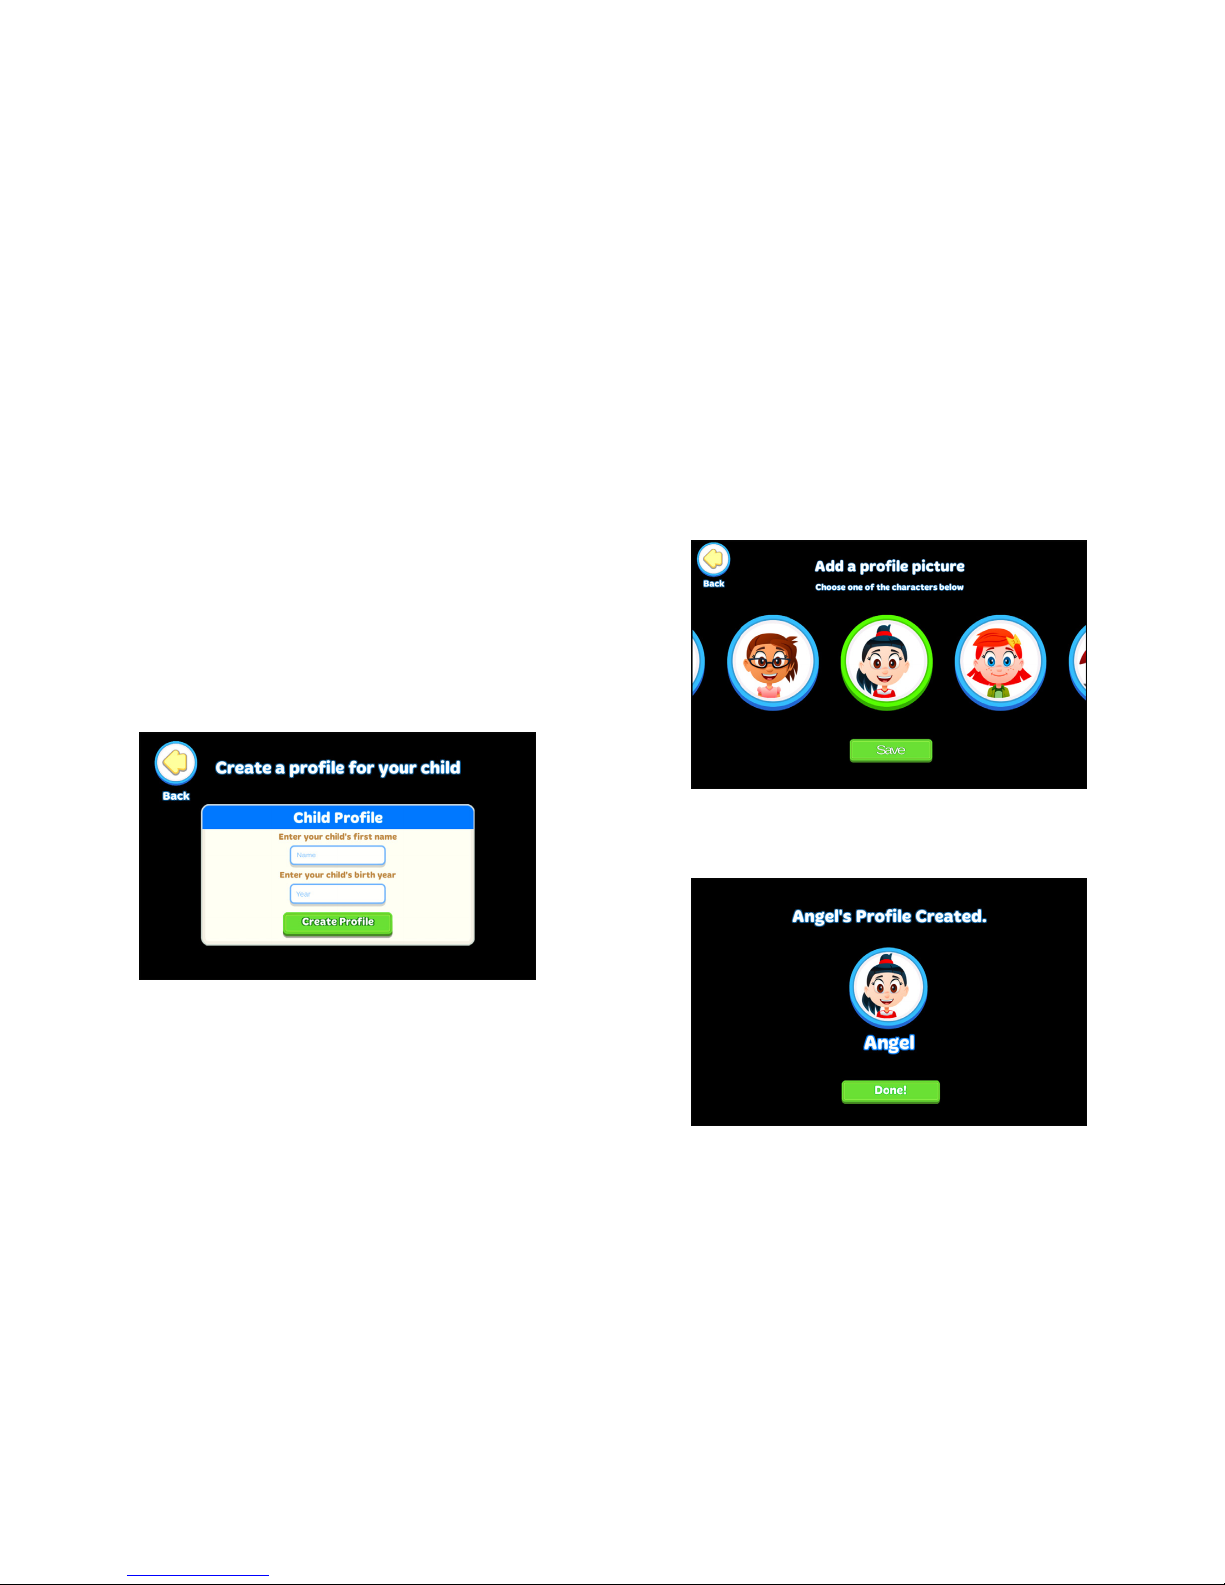
Create a Child’s Profile
For easy monitoring your child’s progress, you can create
your child profile first before letting them using this tablet.
Perform the following to create a profile for your child:
1. Enter your child’s name and birth year.
2. Tap Create Profile to set up your child profile.
3. Select one of the characters to set it as your child’s profile
picture. You can swipe your finger to the left or to the
right to browse more characters. Then tap Save.
4. Your child’s profile is created. Tap Done! to enter Kid
Mode’s dashboard.
Page 14

13
Setting Up Other Email Accounts
To add additional email accounts, tap Apps Settings
Add account. Tap one of the options and enter your email
address, password, and any other necessary information.
• Cloud is for registering your Verizon account before
using Verizon Cloud.
• Corporate is for Exchange server work email accounts.
• Google is for adding other Gmail accounts.
• IMAP / Personal (IMAP) / Personal (POP3) / POP3 is
for most personal email accounts. For account details,
contact the account provider.
Page 15
14
Section 2. Kid Mode
Home Screen Overview
Your tablet starts out in Kid Mode so your kids can have fun
learning in a safe environment right away.
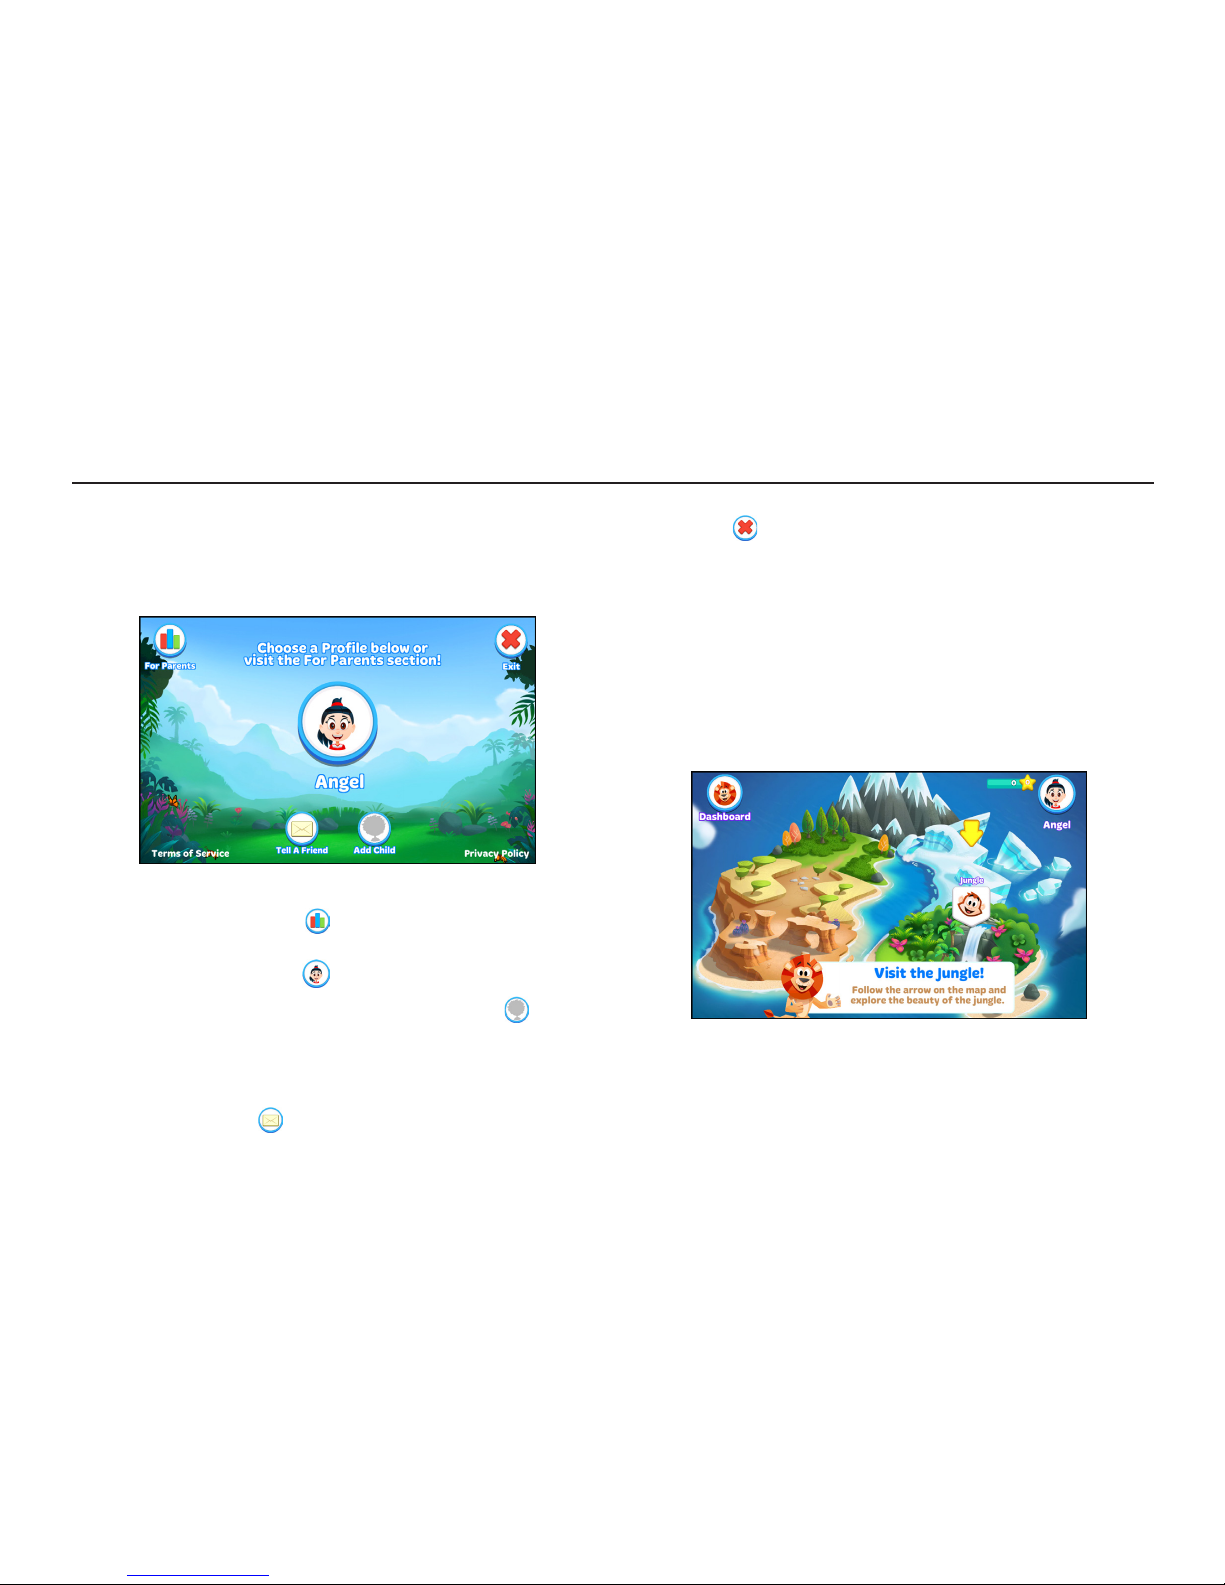
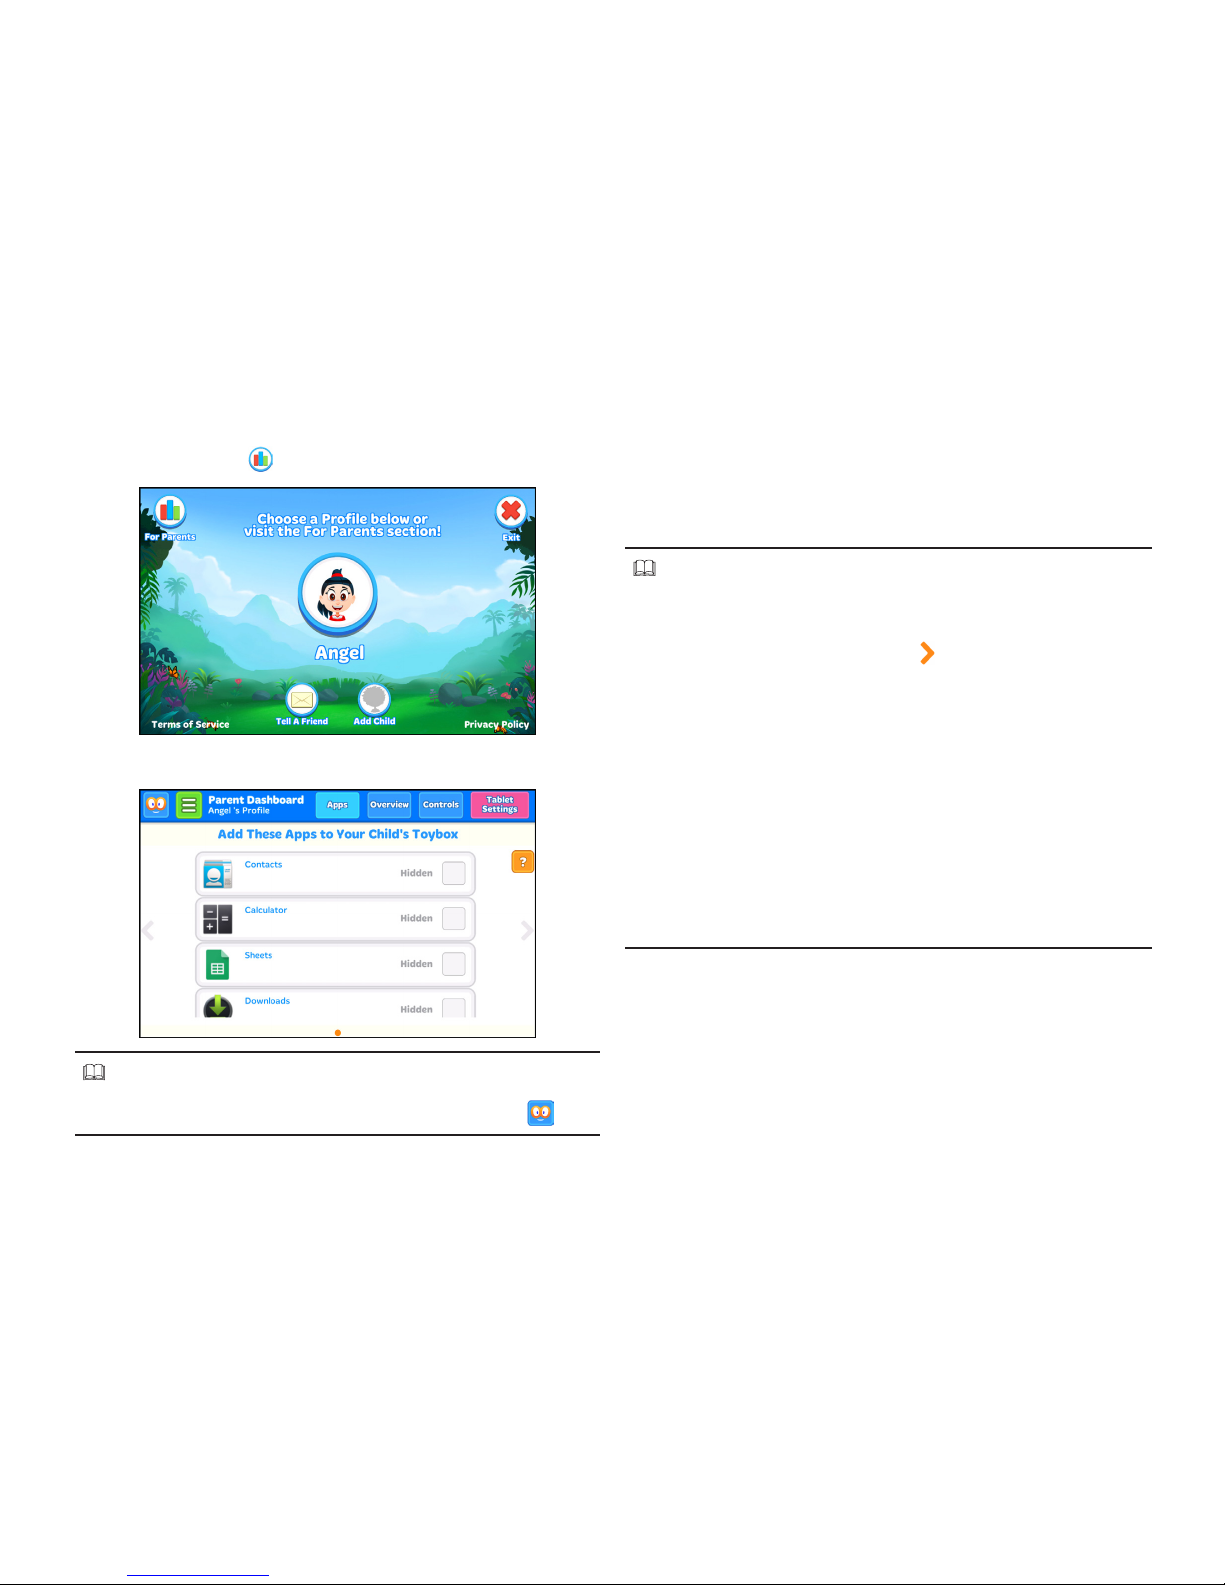
On the Dashboard’s home screen, you can do the following:
• Parent Dashboard: Tap to enter the Parent
Dashboard.
• Your Child Profile: Ta p to enter the Play mode.
• Add Child: If you have more than one child, tap to
create a new profile for your another child. You can also
create a profile in Parent Dashboard. See “Adding New
Child Profile” on page 32.
• Tell A Friend: Ta p to send an email to your friend
about Kid Mode.
• Exit: Tap to exit the Kid Mode and switch to the
standard Android Home screen.
Play Mode
In Play mode, your child can enjoy doing a variety of
educational activities which are fun and interesting. While
your child having fun, the system will keep track your child’s
learning progress.
On the Play mode’s home screen, tap Jungle to switch to your
child’s home screen and start playing.
Page 16

15
Watching Videos
1. From your child’s home screen, tap Videos.
TIP!
To view more applications, tap the Monkey (marked in red
in the illustration below).
2. Swipe your finger to the left or to the right to browse the
videos. Tap the desired video thumbnail to see full screen
preview.
3. Tap to start the video playback.
Page 17
16
4. Tap to return to the previous screen.
NOTE!
Your child’s recently watched and most watched videos
will be automatically added into the favorite list. Tap the
Favorites tab to access the videos.
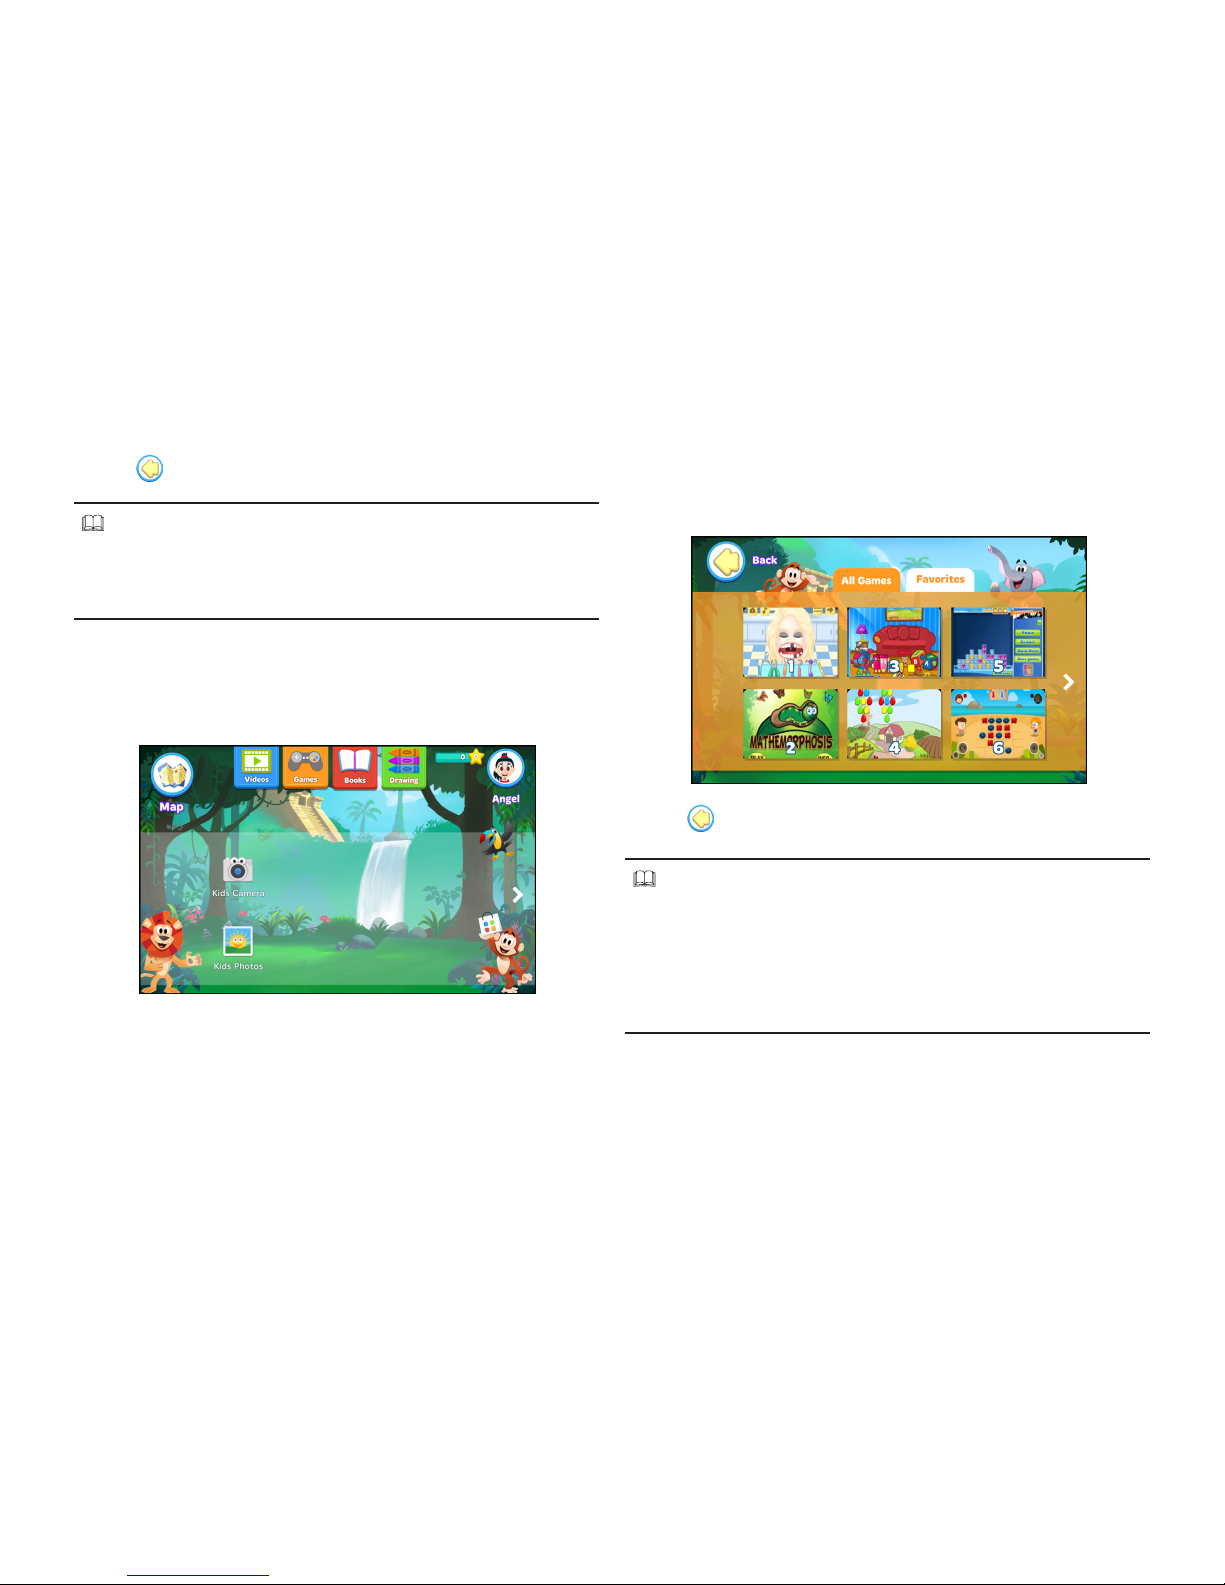
Playing Games
1. From your child’s home screen, tap Games.
2. Swipe your finger to the left or to the right to browse the
games. Tap the desired game thumbnail to start playing
the game.
3. Tap to return to the previous screen.
NOTE!
• The method of playing each game varies. You may need to
teach your child first when starting a new game.
• Your child’s recently and frequently played games will
be automatically added into the favorite list. Tap the
Favorites tab to access the games.
Page 18
17
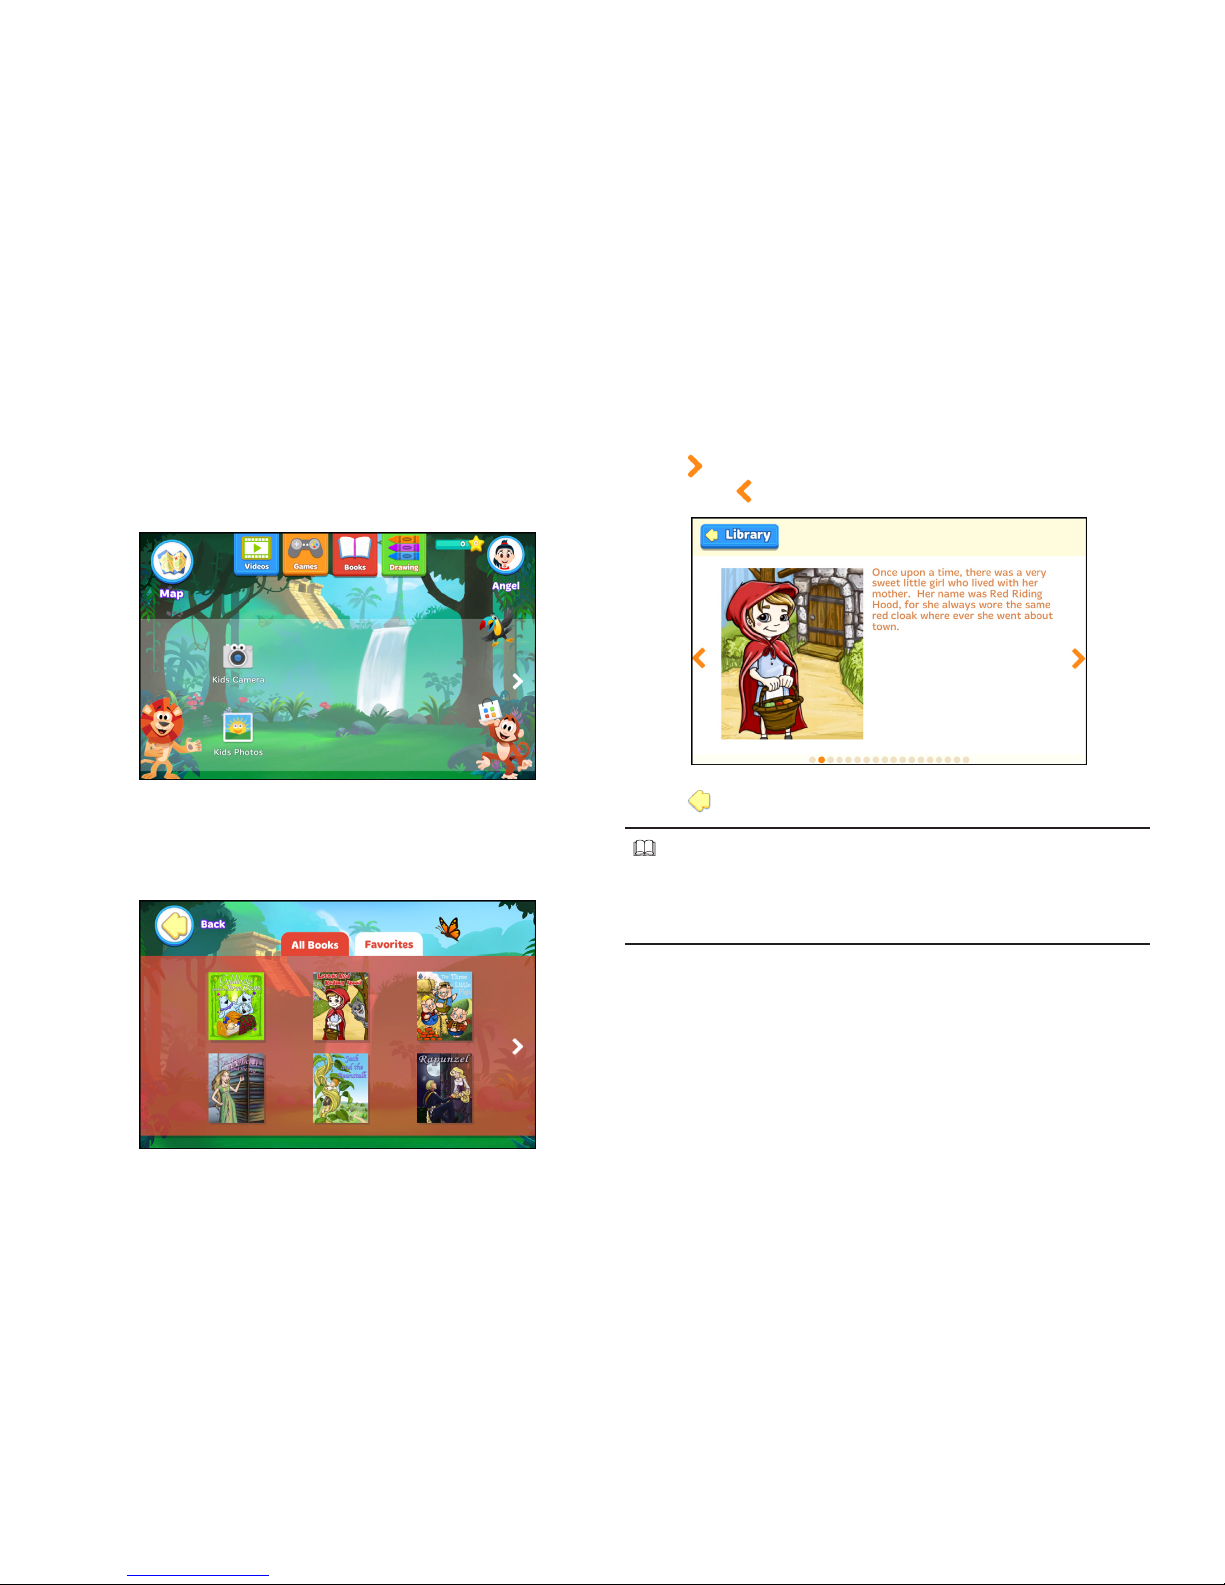
Reading Books
1. From your child’s home screen, tap Books.
2. Swipe your finger to the left or to the right to browse the
books. Tap the desired book thumbnail to start reading
the book.
3. Tap to go to the next page. To return to the previous
page, tap .
4. Tap to return to the library.
NOTE!
Your child’s recently and frequently read books will be
automatically added into the favorite list. Tap the Favorites
tab to access the books.
Page 19
18
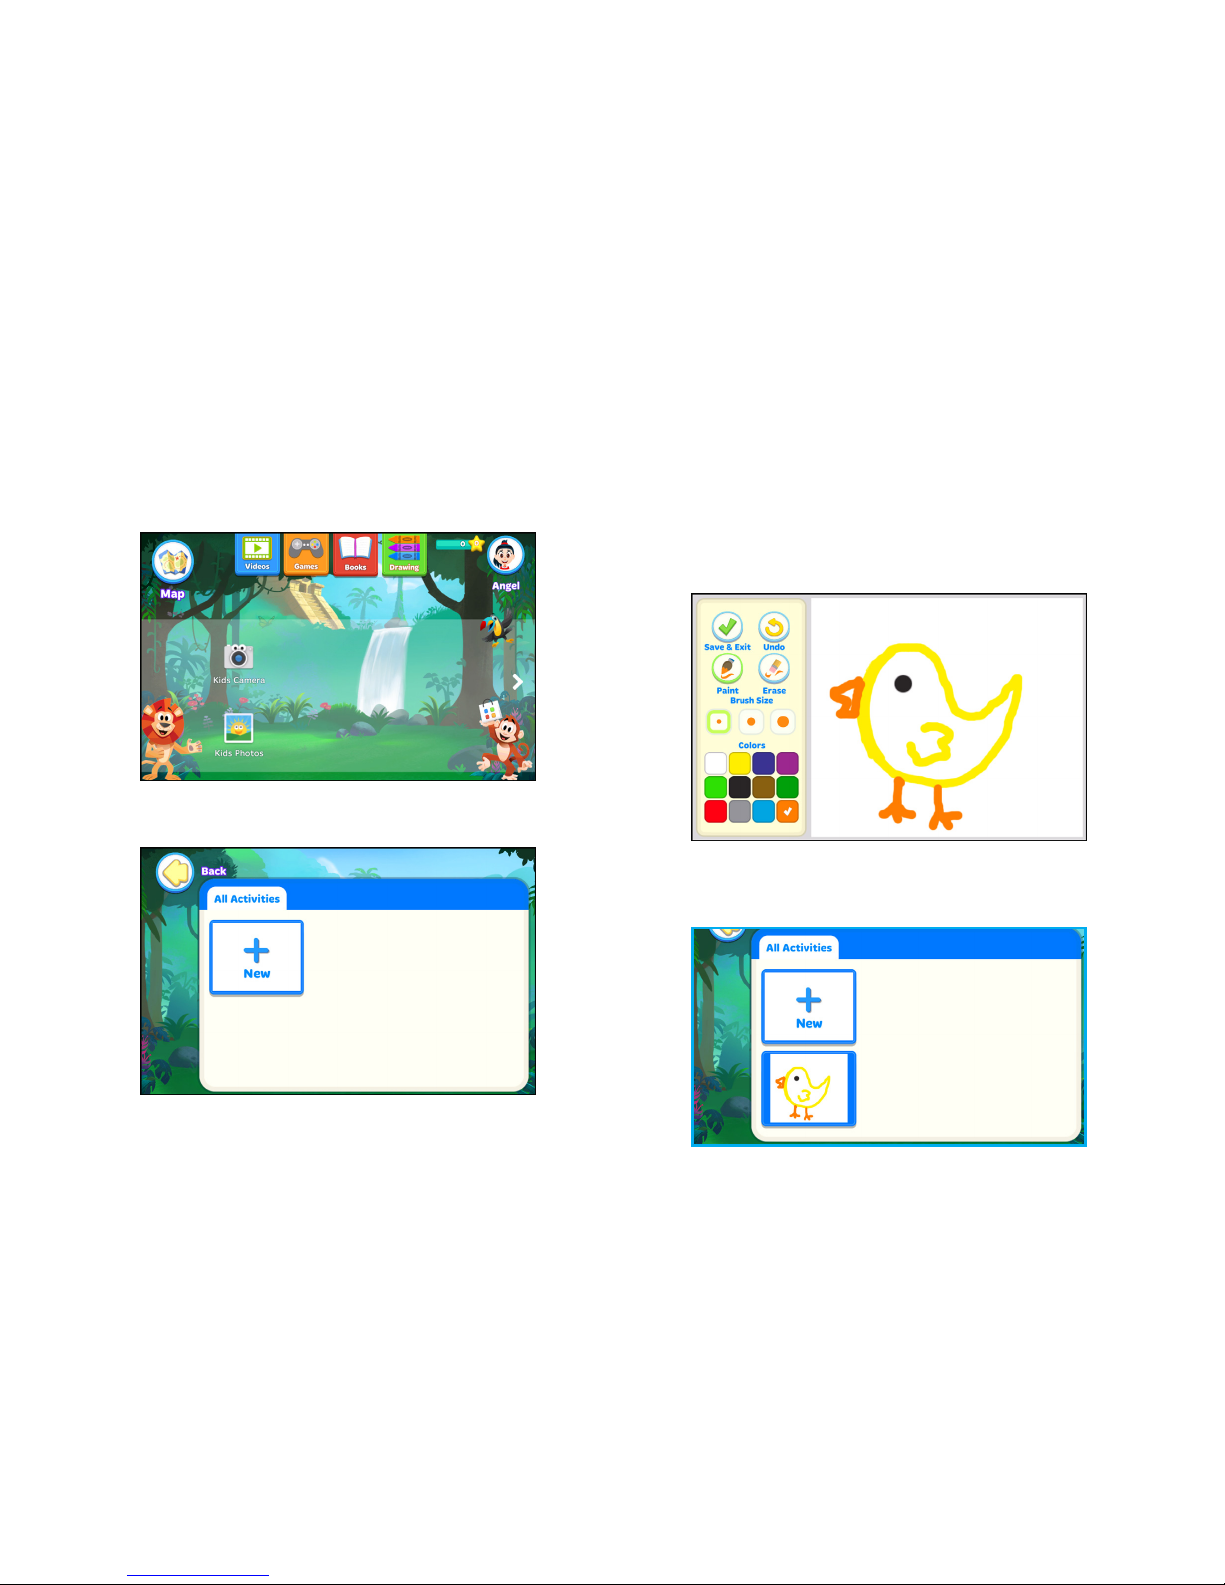
Drawing Pictures
1. From your child’s home screen, tap Drawing.
2. Tap New to open a blank screen.
3. Tap Paint and select brush size and color. Using your
finger, draw a picture on the screen.
• To edit the drawing, tap Erase and touch the area
that you want to delete. To revert the changes, tap
Undo.
4. When done, tap Save & Exit to save the file into the
library.
Page 20
19
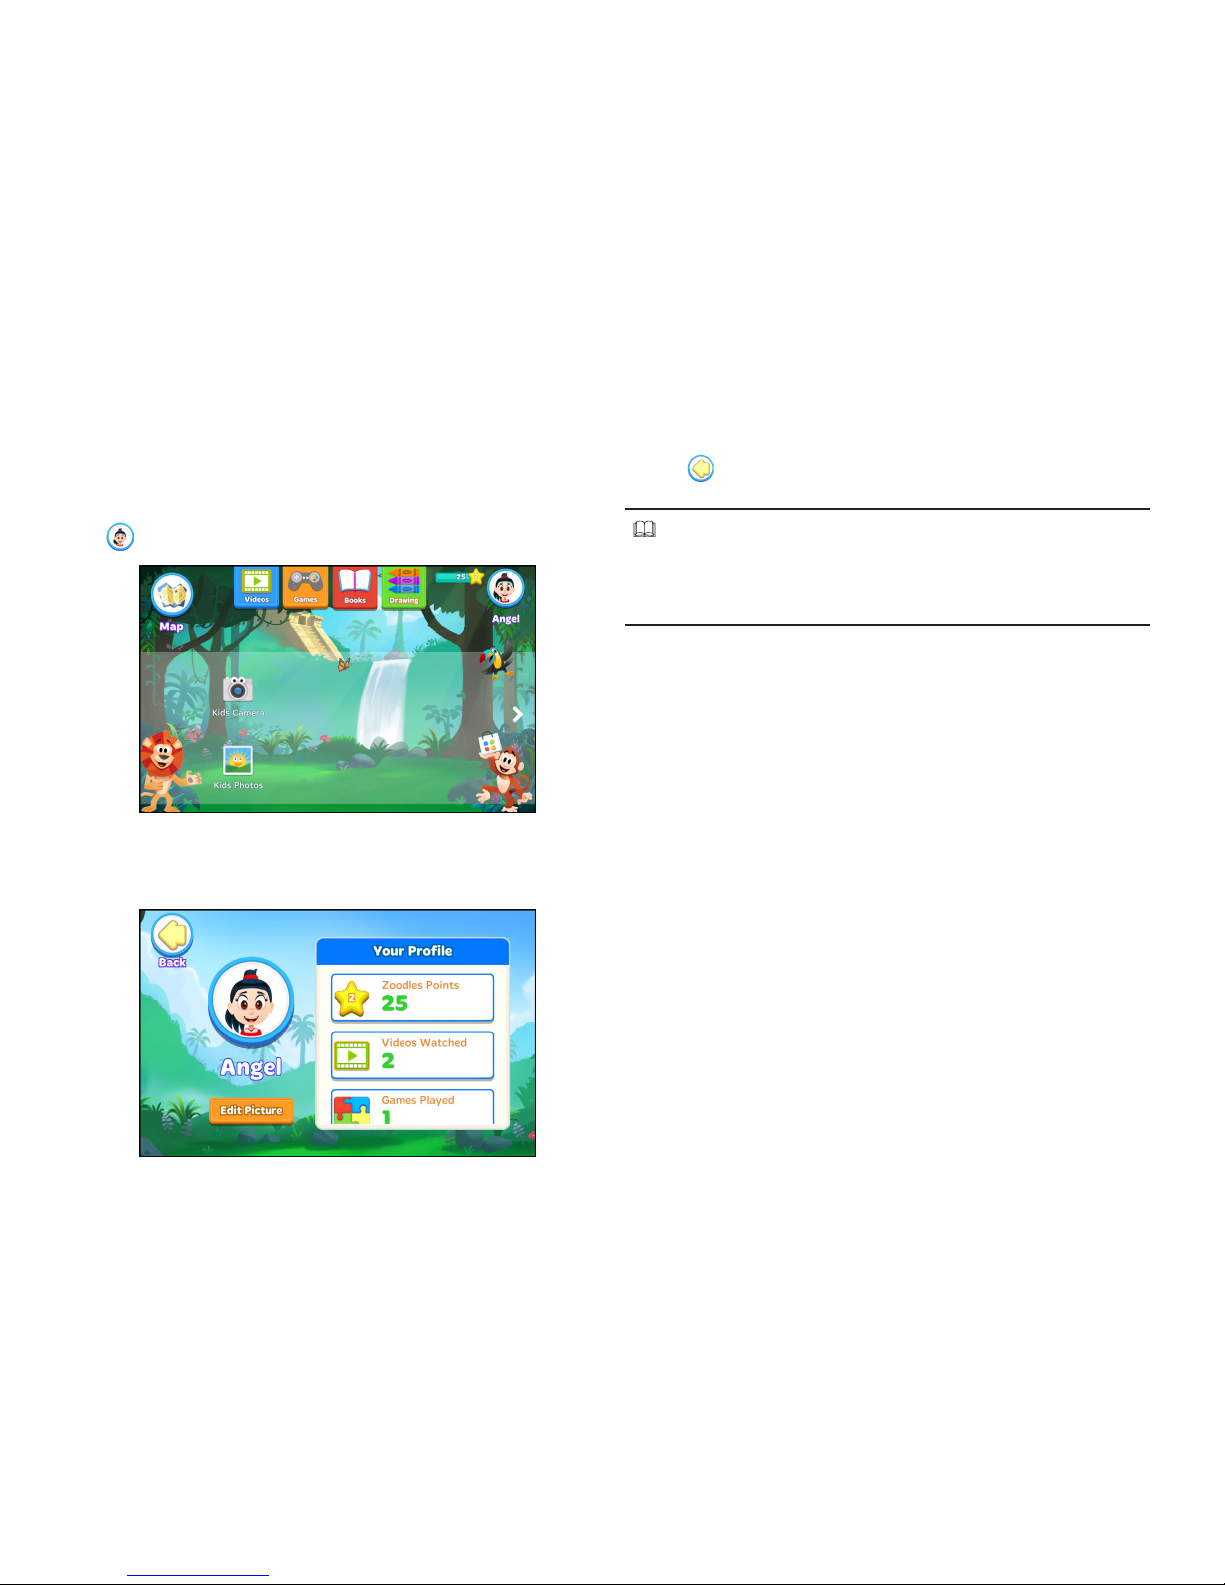
Viewing Your Child’s Progress
1. From your child’s home screen, tap your child’s profile
( ).
2. A summary of your child’s progress is displayed on the
screen.
3. Tap to return to the previous screen.
NOTE!
To change your child’s profile photo, tap Edit Picture. Then
select the desired character and tap Save to change the
profile photo.
Page 21
20
Using Kids Camera
In Kid Mode, your child can use the camera application that is
specially designed for kids, with a large button on the main
capture screen.
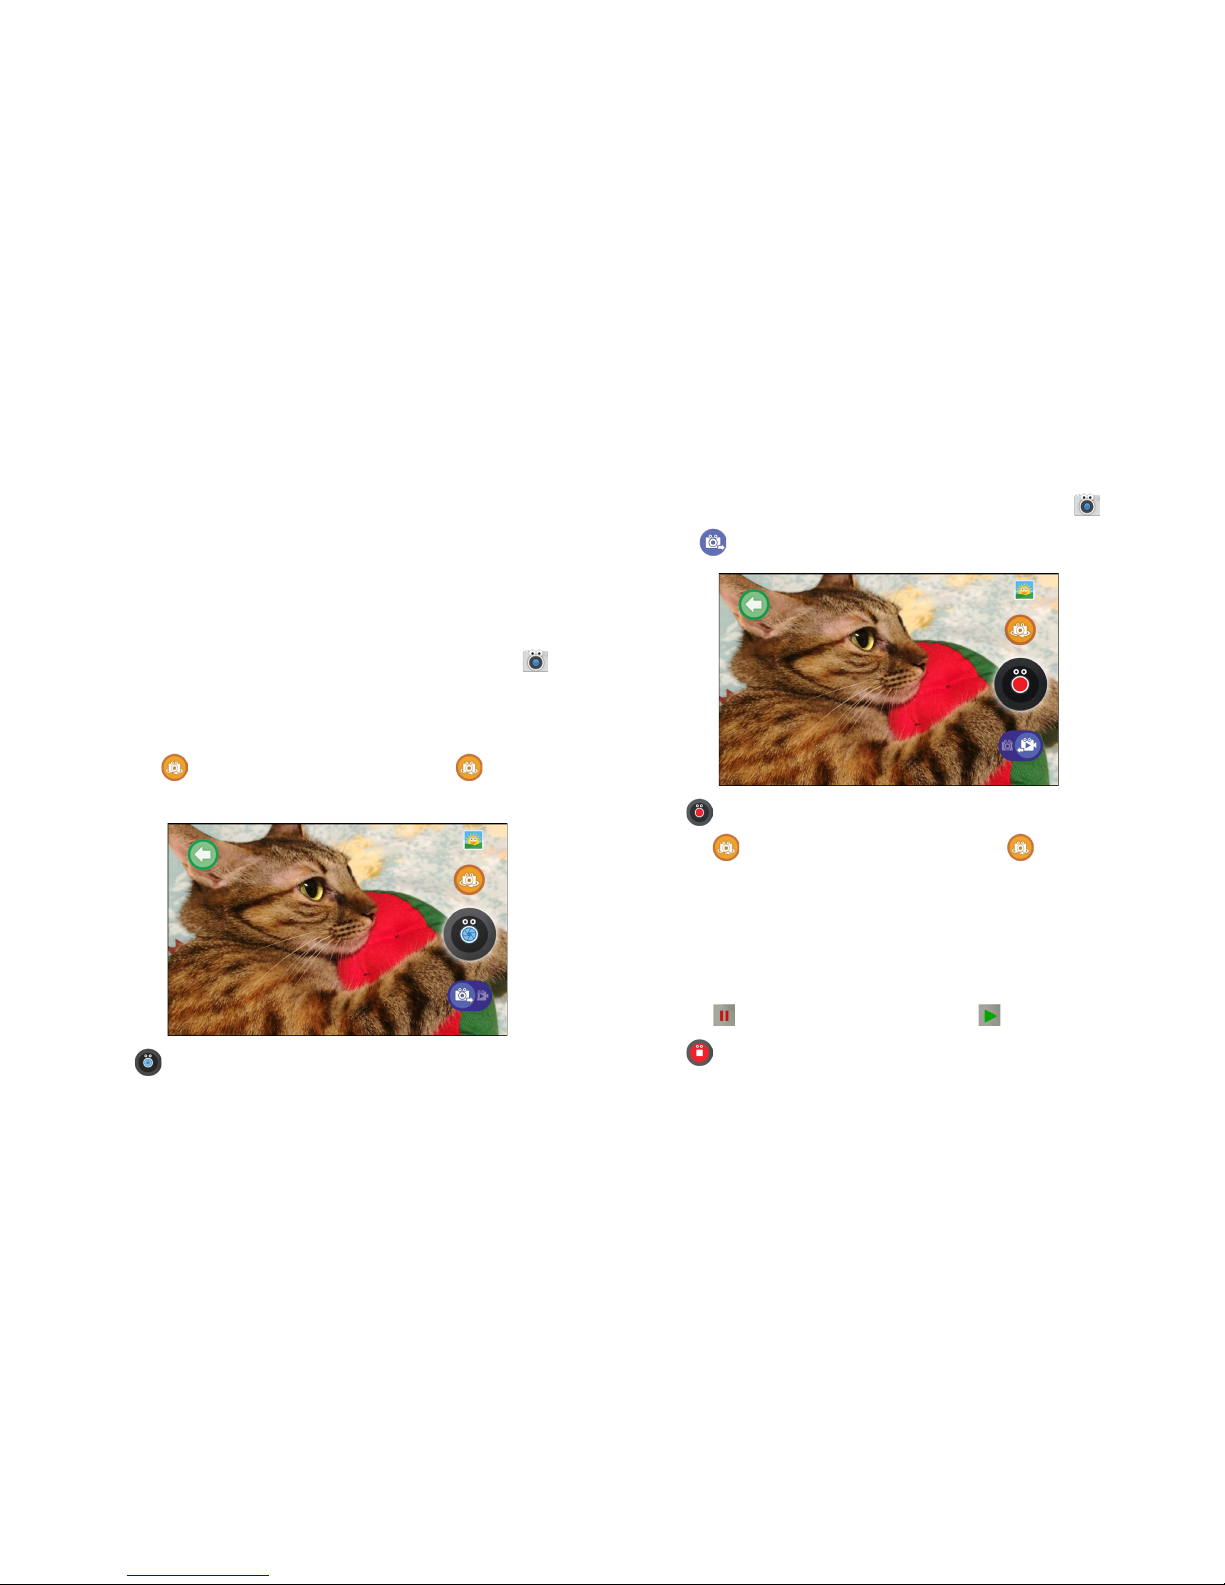
Taking Pictures
1. From your child’s home screen, tap Kids Camera .
2. Compose your shot.
• Pinch the screen to zoom in/out on the subject.
• Tap to switch to front camera. Tap again to
switch back to rear camera.
3. Tap to take the picture.
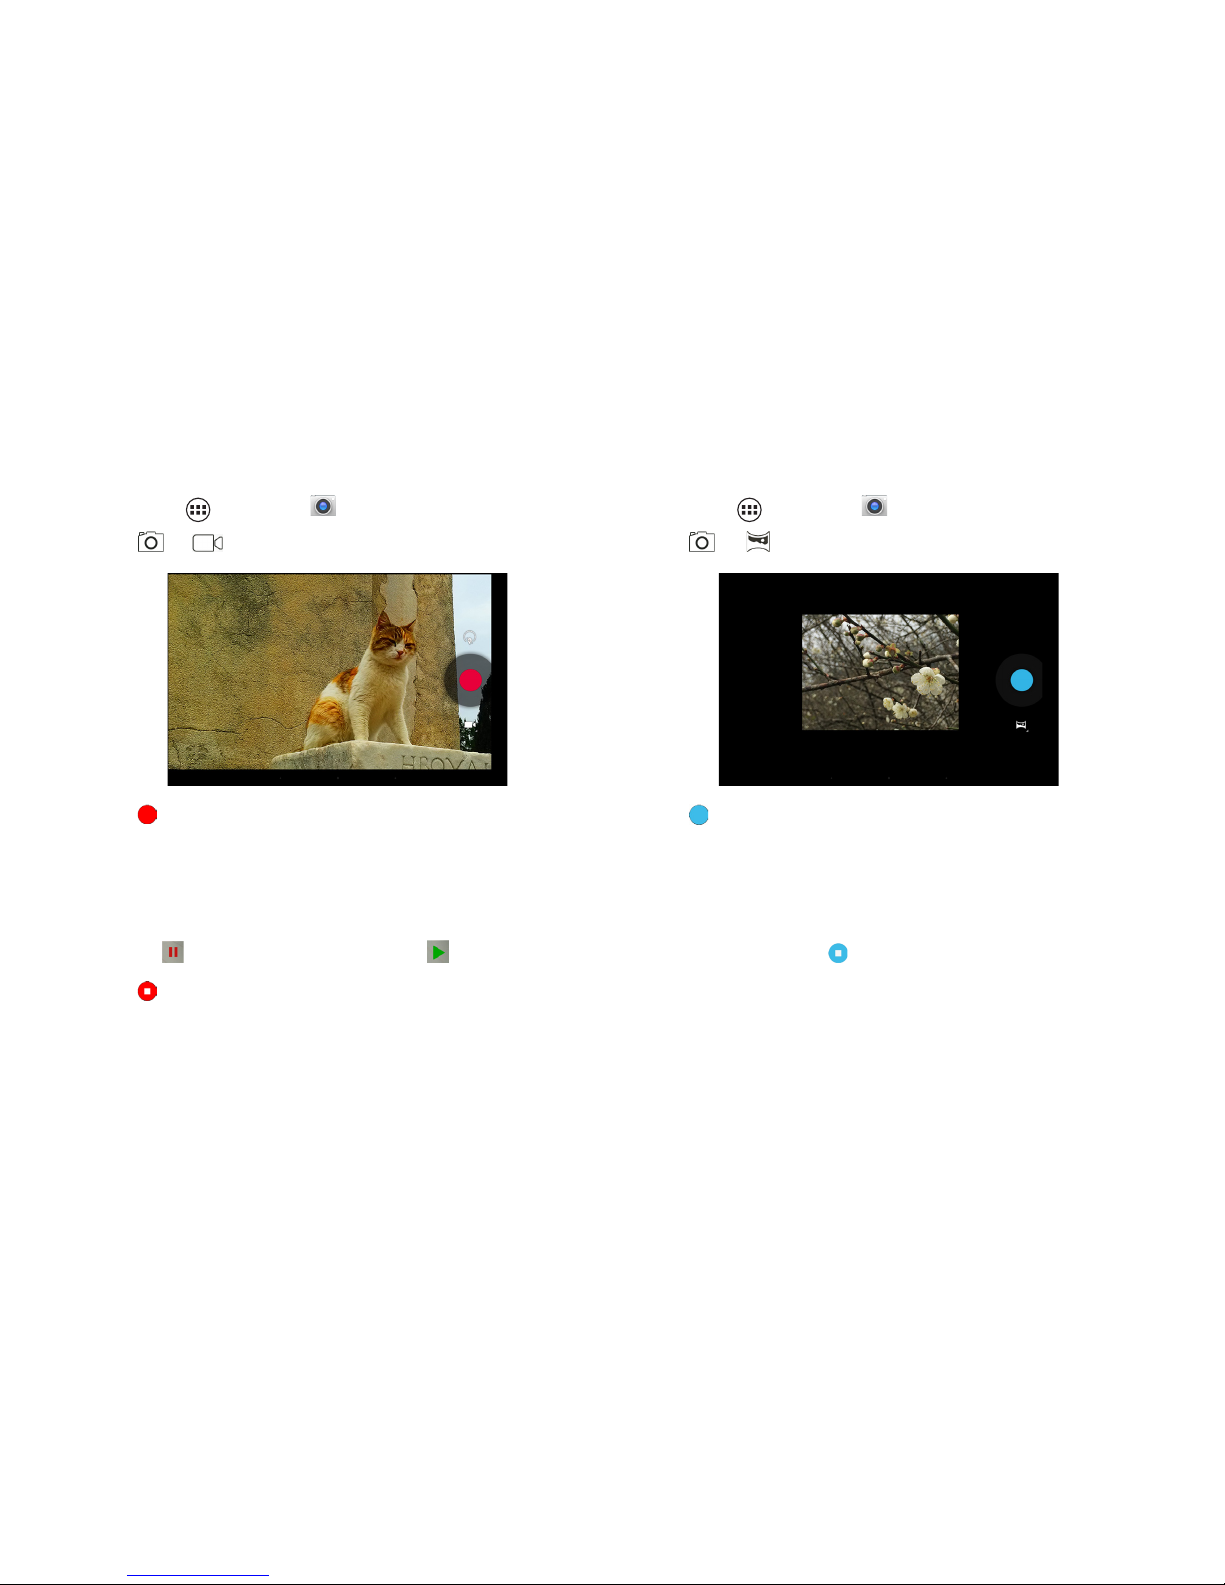
Recording Videos
1. From your child’s home screen, tap Kids Camera .
2. Slide to the right to switch to Video mode.
3. Tap to start recording.
• Tap to switch to front camera. Tap again to
switch back to rear camera.
4. While recording, do one of the following:
• Pinch the screen to zoom in/out on the subject.
• Touch the screen to take a photo.
• Tap to pause the recording. Tap to resume.
5. Tap to stop recording.
Page 22
21
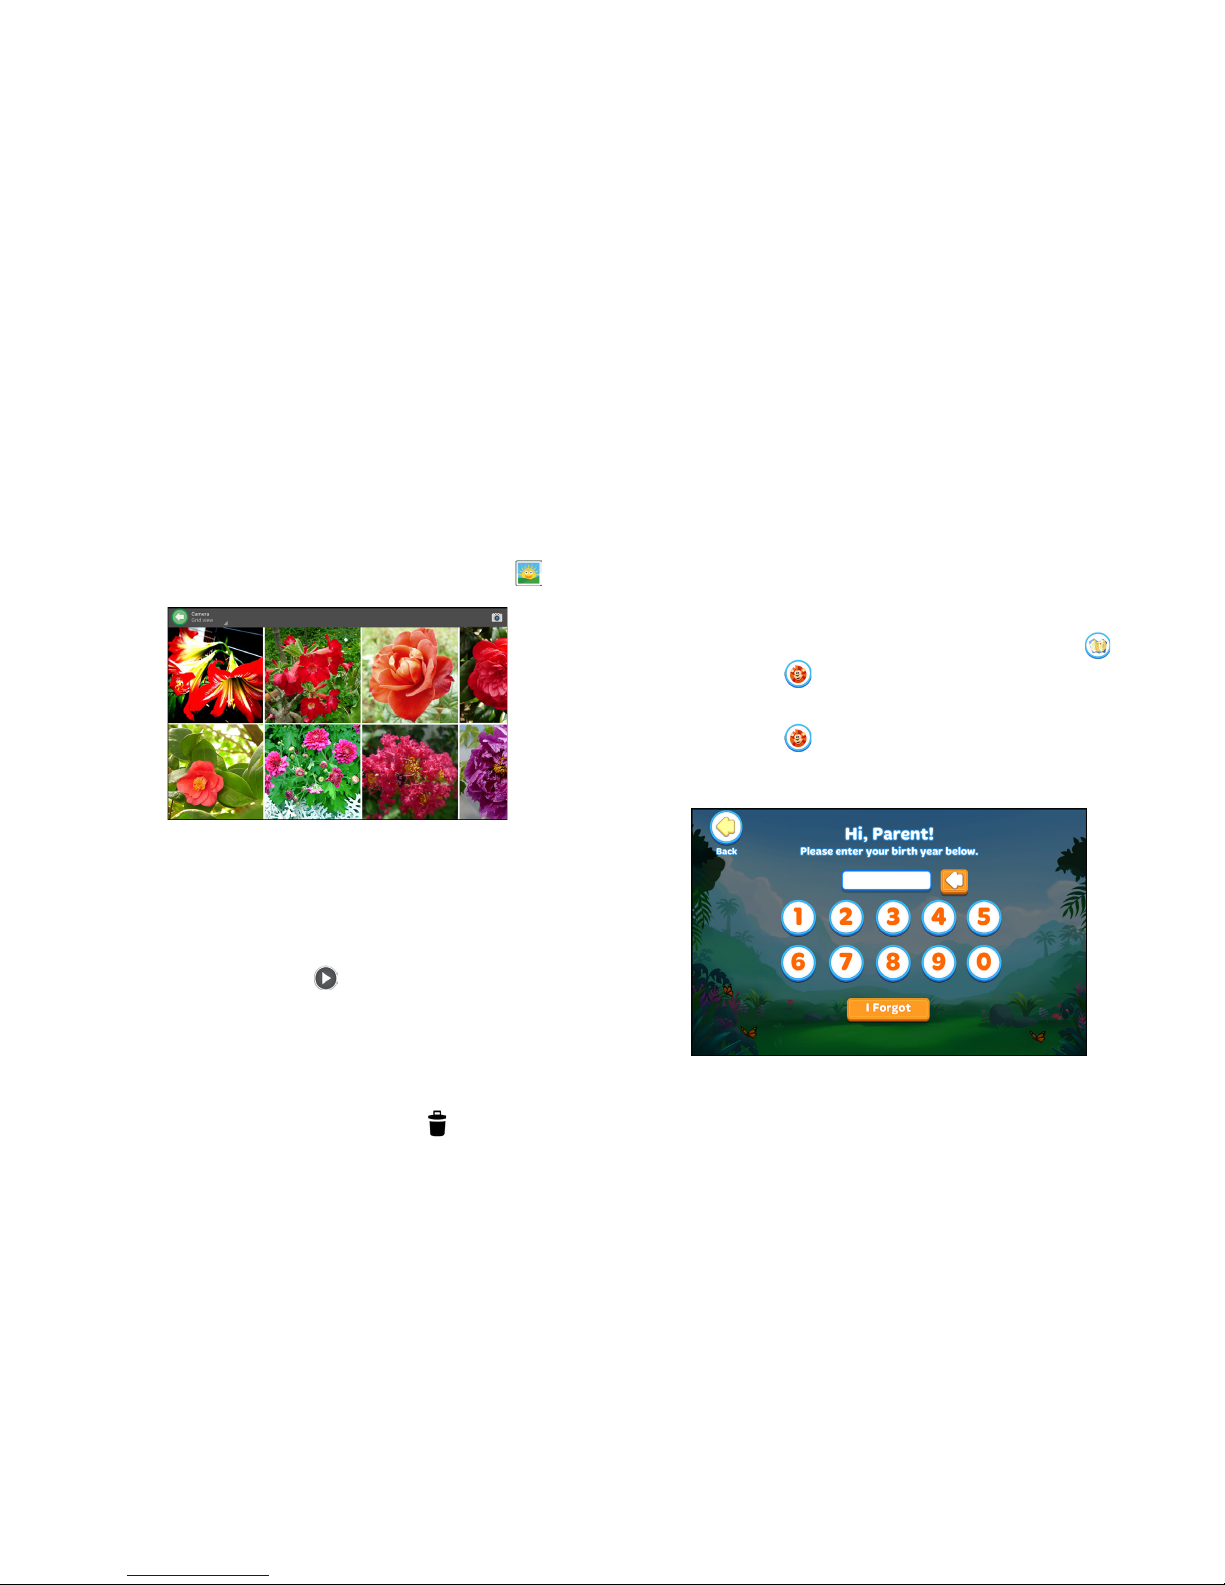
Using Kids Photos
After taking a picture or recording video, your child can
review it in Kids Photos.
1. From your child’s home screen, tap Kids Photos .
2. Swipe your finger to the left or to the right to browse the
pictures/videos.
3. Tap the desired picture/video thumbnail to see full
screen preview.
• To play the video, tap .
• While viewing a picture, you can “pinch” the screen to
zoom in or out, or double-tap to zoom all the way in or
out. When zoomed in, tap and drag your finger on the
screen to move the picture around on the screen.
• To delete the picture or video, tap > OK.
Parent Dashboard
In Parent Dashboard, you can control and customize features
that make learning and playing more fun for your child.
To switch to Parent Dashboard, perform the following:
1. Enter the Dashboard’s main screen.
• If you are in your child’s home screen, tap Map ( ) >
Dashboard ( ).
• If you are in the Play mode’s home screen, tap
Dashboard ( ).
2. Enter your birth year.
Page 23
22
3. Tap For Parents ( ) to enter the Parent Dashboard.
Parent Dashboard appears on the screen.
NOTE!
To return to the Dashboard’s home screen, simply tap .
Adding Applications to Your Child’s Home Screen
Use this feature to make other applications from your tablet
visible on your child’s home screen.
NOTE!
• To download and install new applications, you can access
Google Play Store by using two methods:
a. Select Overview tab and tap until you reach the
“Recommended apps “ page. Then tap Launch Google
Play. For more information, refer to “Viewing the
recommended applications” on page 26.
b. Select Tablet Settings tab and tap Google Play. For
more information, refer to “Configuring Tablet Settings”
on page 31.
• A credit card number is required to verify parental
consent. The credit card information is not stored, but it
will be used for a one-time charge and immediate refund
of $0.01 in order to validate the card.
To add an application , do the following:
1. Tap Apps tab.
2. Select the application you want to add. Scroll down for
more options.
Page 24
23
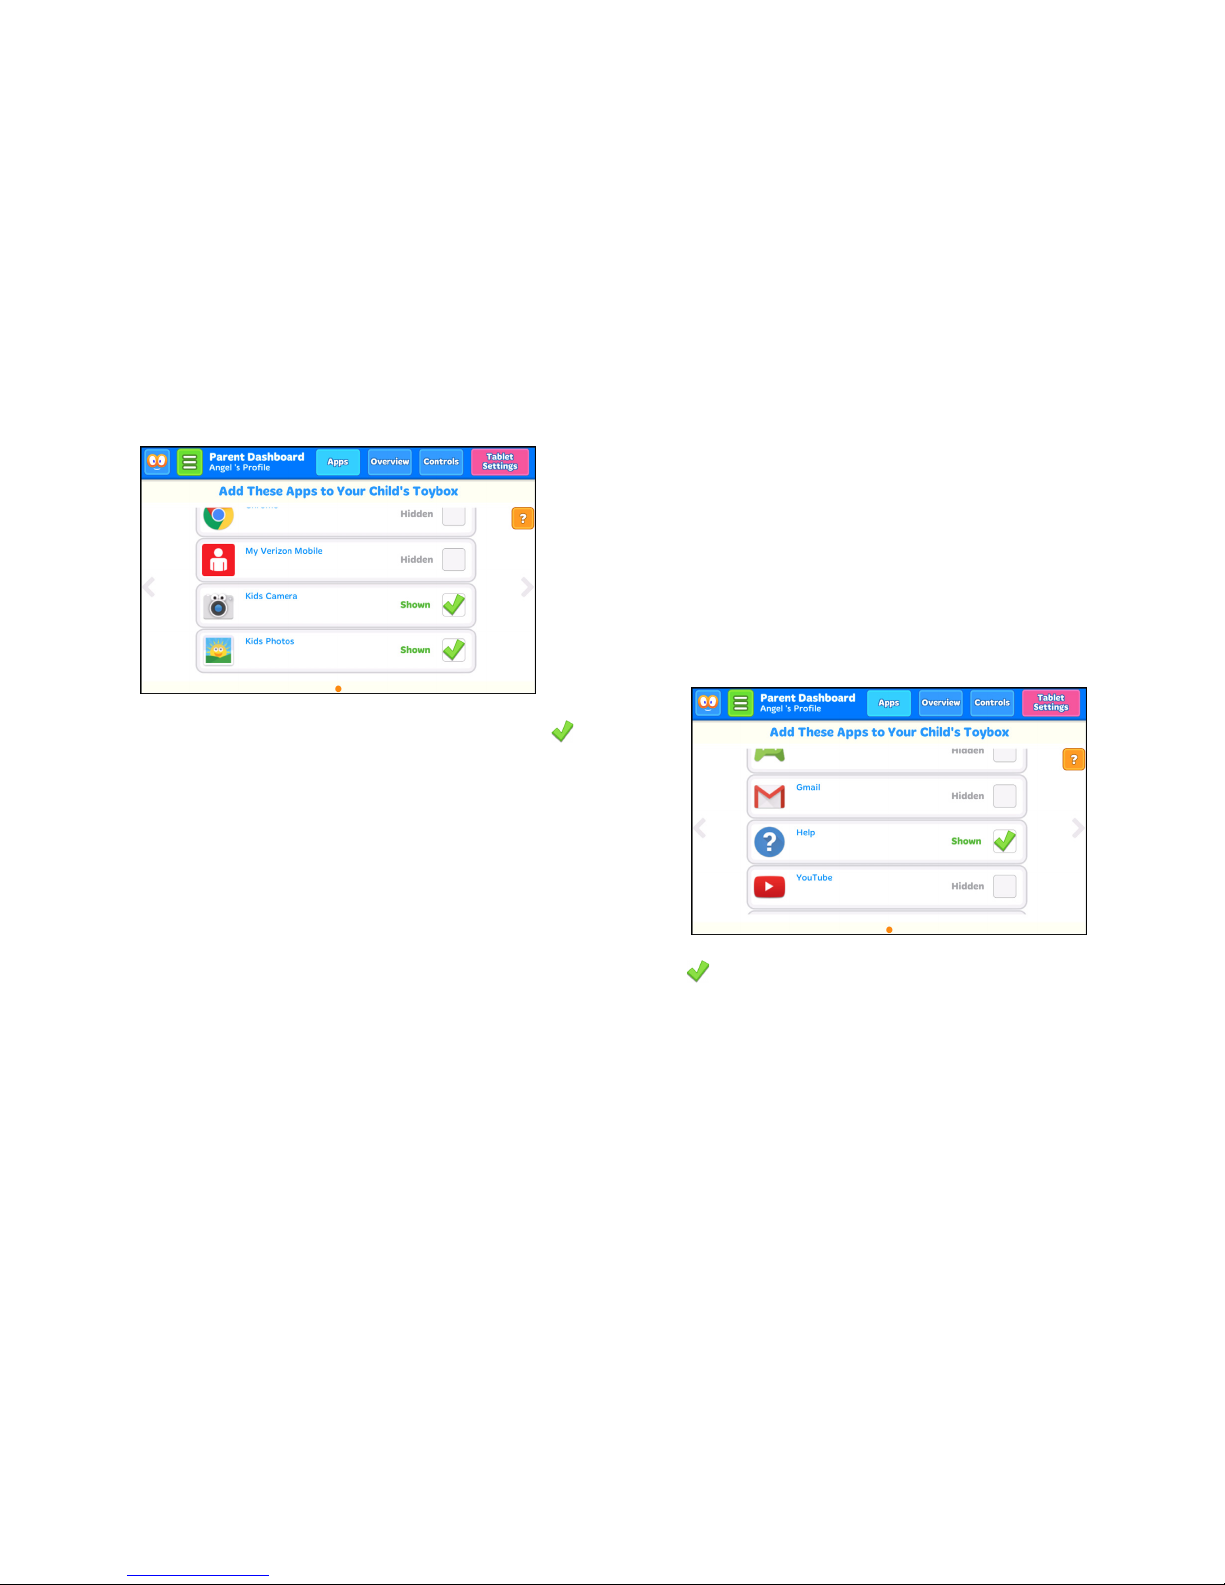
3. Tap the checkbox to add the desired application. An
icon will appear on the screen, indicating the application
has been selected and it will appear in Kids’ jungle screen.
Removing Applications from Your Child’s Home
Screen
Use this feature to remove the application from your child’s
home screen.
1. Tap Apps tab.
2. Select the application you want to remove from Kids’
jungle screen.
3. Tap to remove the selected application.
Page 25
24
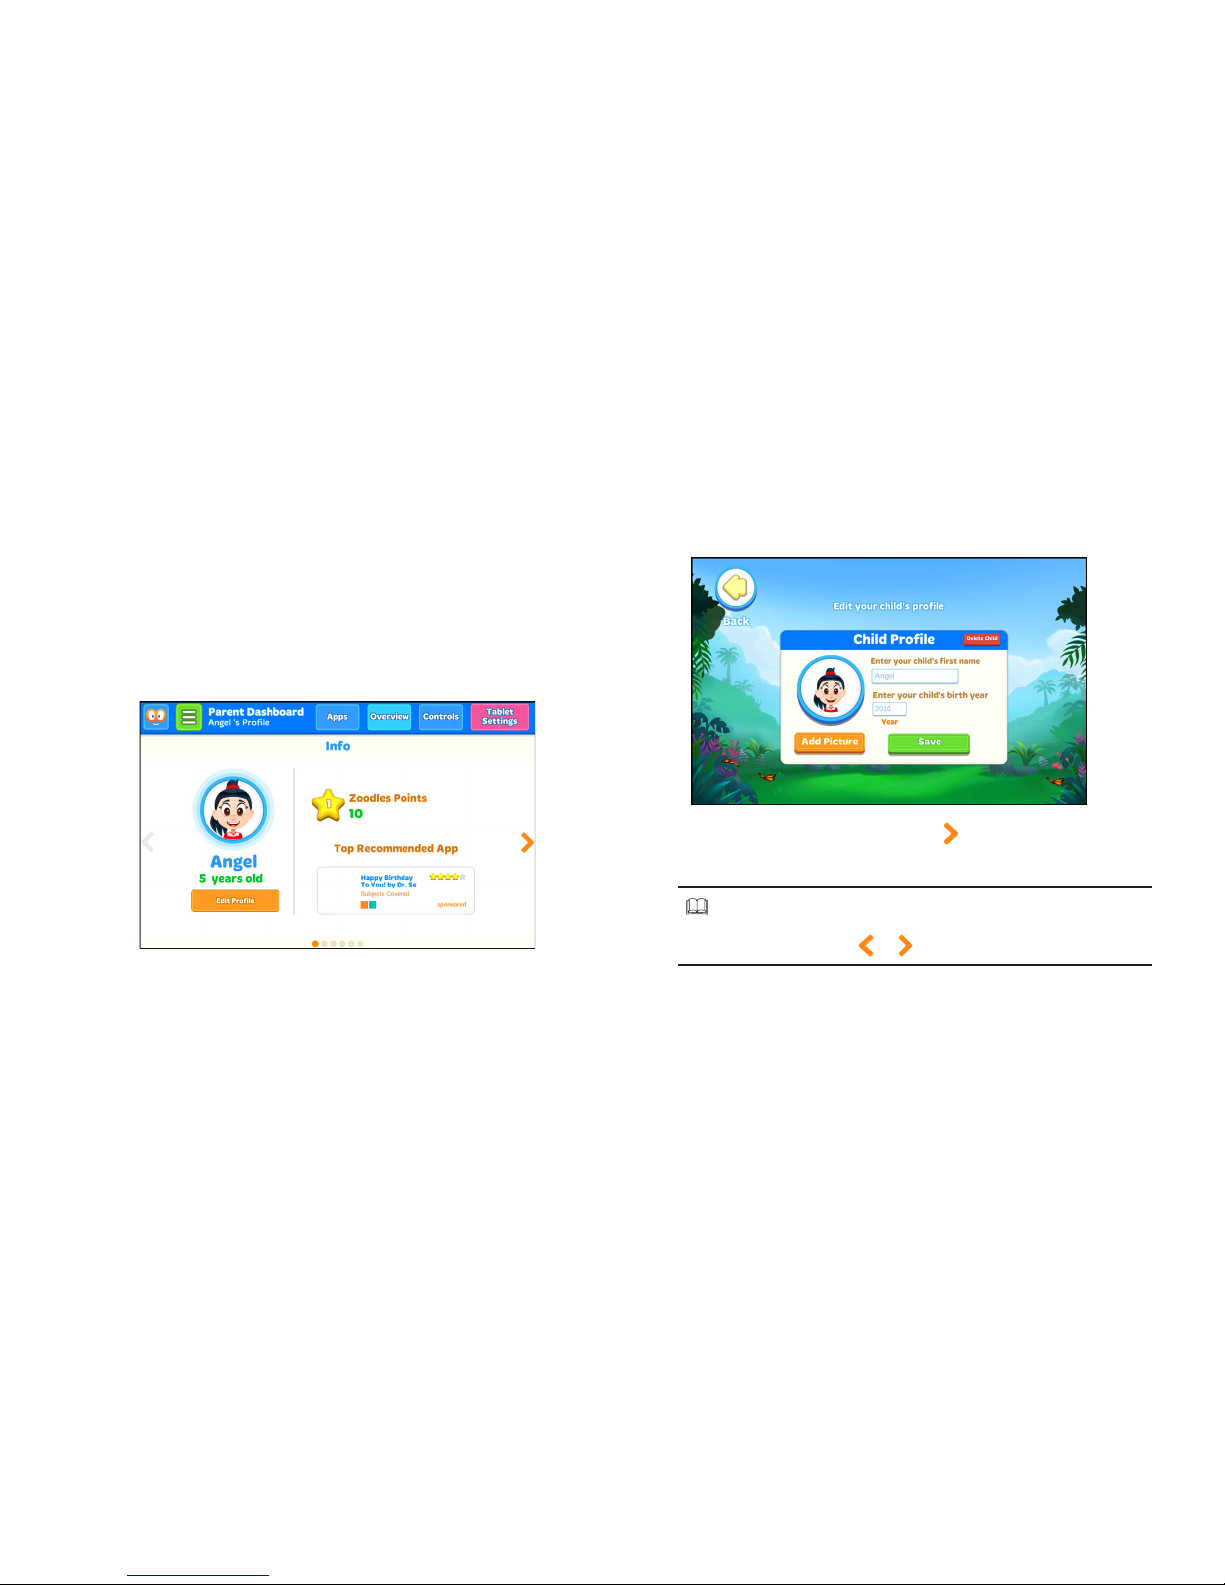
Viewing Information
Select this option to edit your child’s profile, check the
Zoodles point, view the summary of time spent in each
subject, and other information.
1. Tap Overview tab.
2. Your child’s profile, the current Zoodles points, and the
top recommeded application are shown on the screen.
3. Do the following:
• To edit your child’s profile, tap Edit Profile. Then
make the necessary changes and tap Save to save the
changes.
• To view more information, tap to go to the next
page.
NOTE!
To switch pages, tap or .
Page 26
25
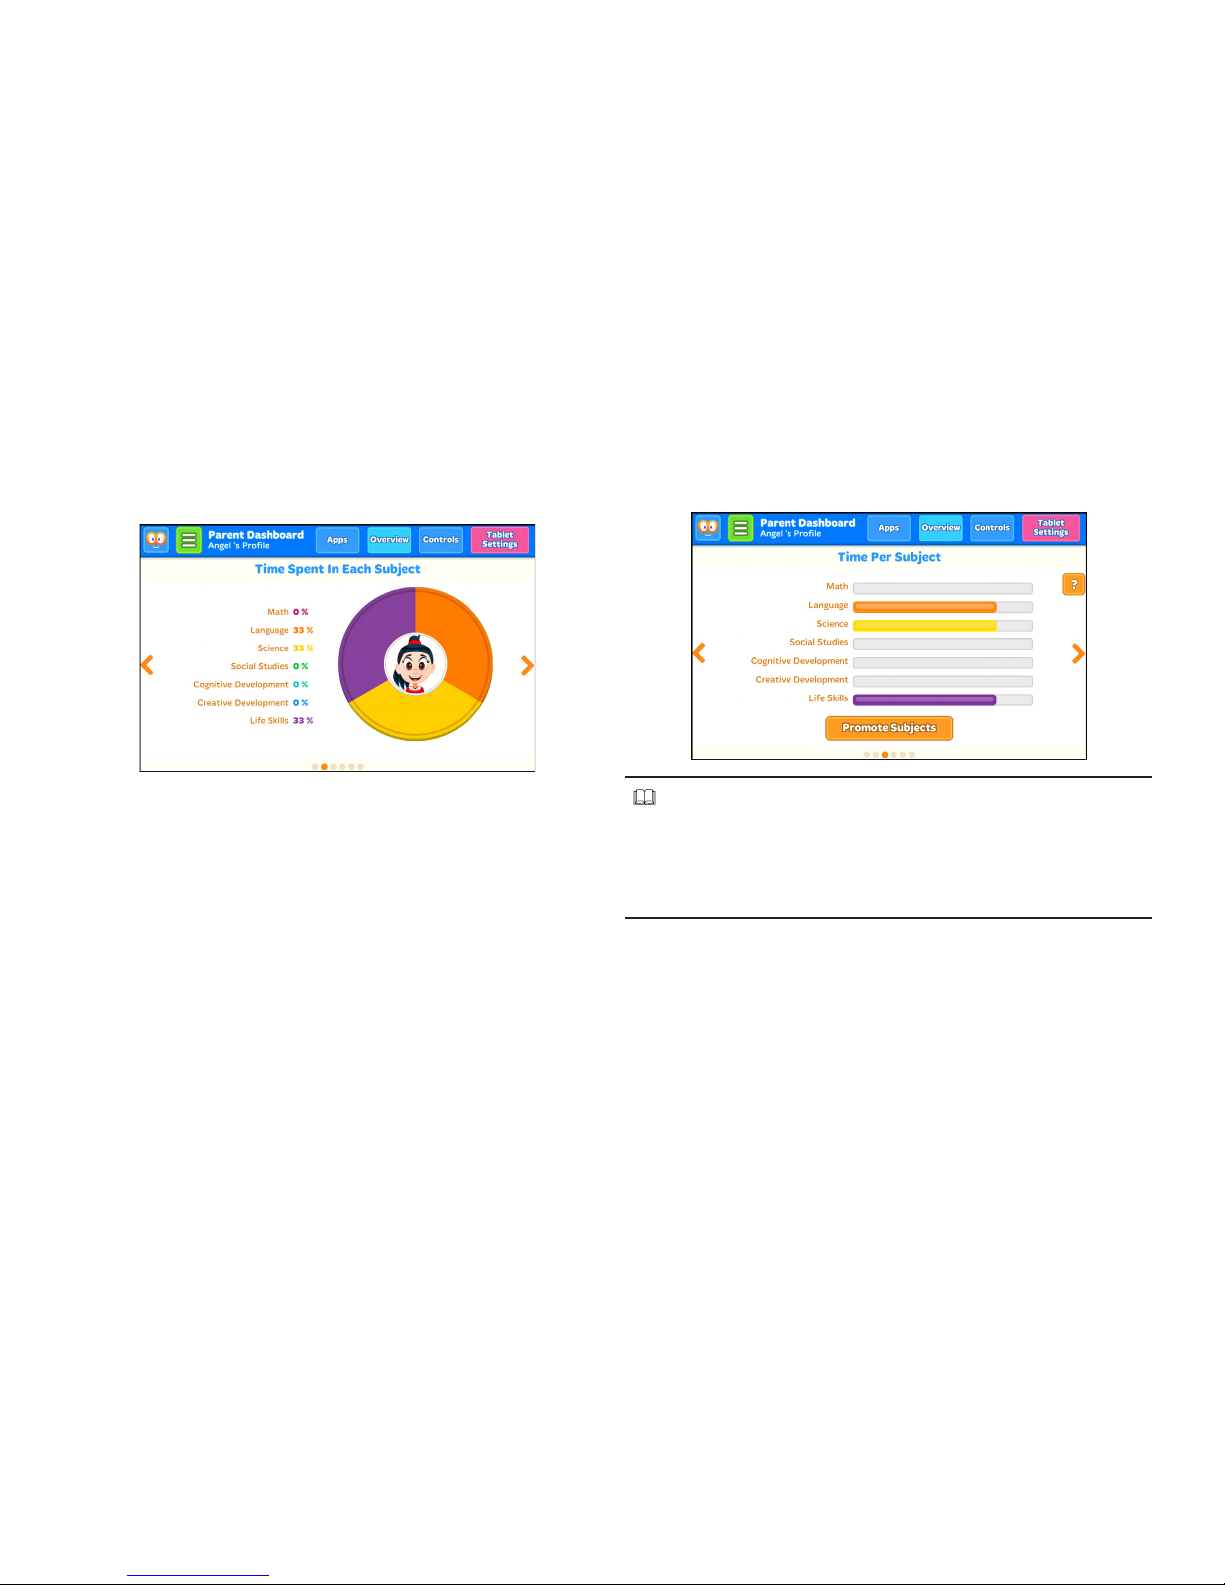
¬ Viewing time spent in each subject
You can view how much time your child spent on each subject.
¬ Viewing time allocation per subject
Monitor how your kids are spending their time by subject.
NOTE!
To configure how much time your child is spending on each
educational subject, select Controls tab and select the
“Promote Subjects “ page. For more information, refer to
“Promoting subject” on page 28.
Page 27

26
¬ Viewing the recommended applications
You can install any new application that is suitable for your
child.
NOTE!
A credit card number is required to verify parental consent.
The credit card information is not stored, but it will be used
for a one-time charge and immediate refund of $0.01 in
order to validate the card.
• To install an application, select the desired application
and tap Install.
NOTE!
Each application’s summary will include a basic overview
of the application, its safety rating, the suitable ages,
and the subjects covered.
• To view more applications, tap See More Apps.
• To download new applications, tap Launch Google Play.
For more information, refer to the “Using Play Store”
section.
NOTE!
The new installed applications will only appear on the
applications list ( ) of the standard Android Home screen.
To let the application appears on Kids’ jungle screen, refer
to “Adding Applications to Your Child’s Home Screen” on page
22.
Page 28
27
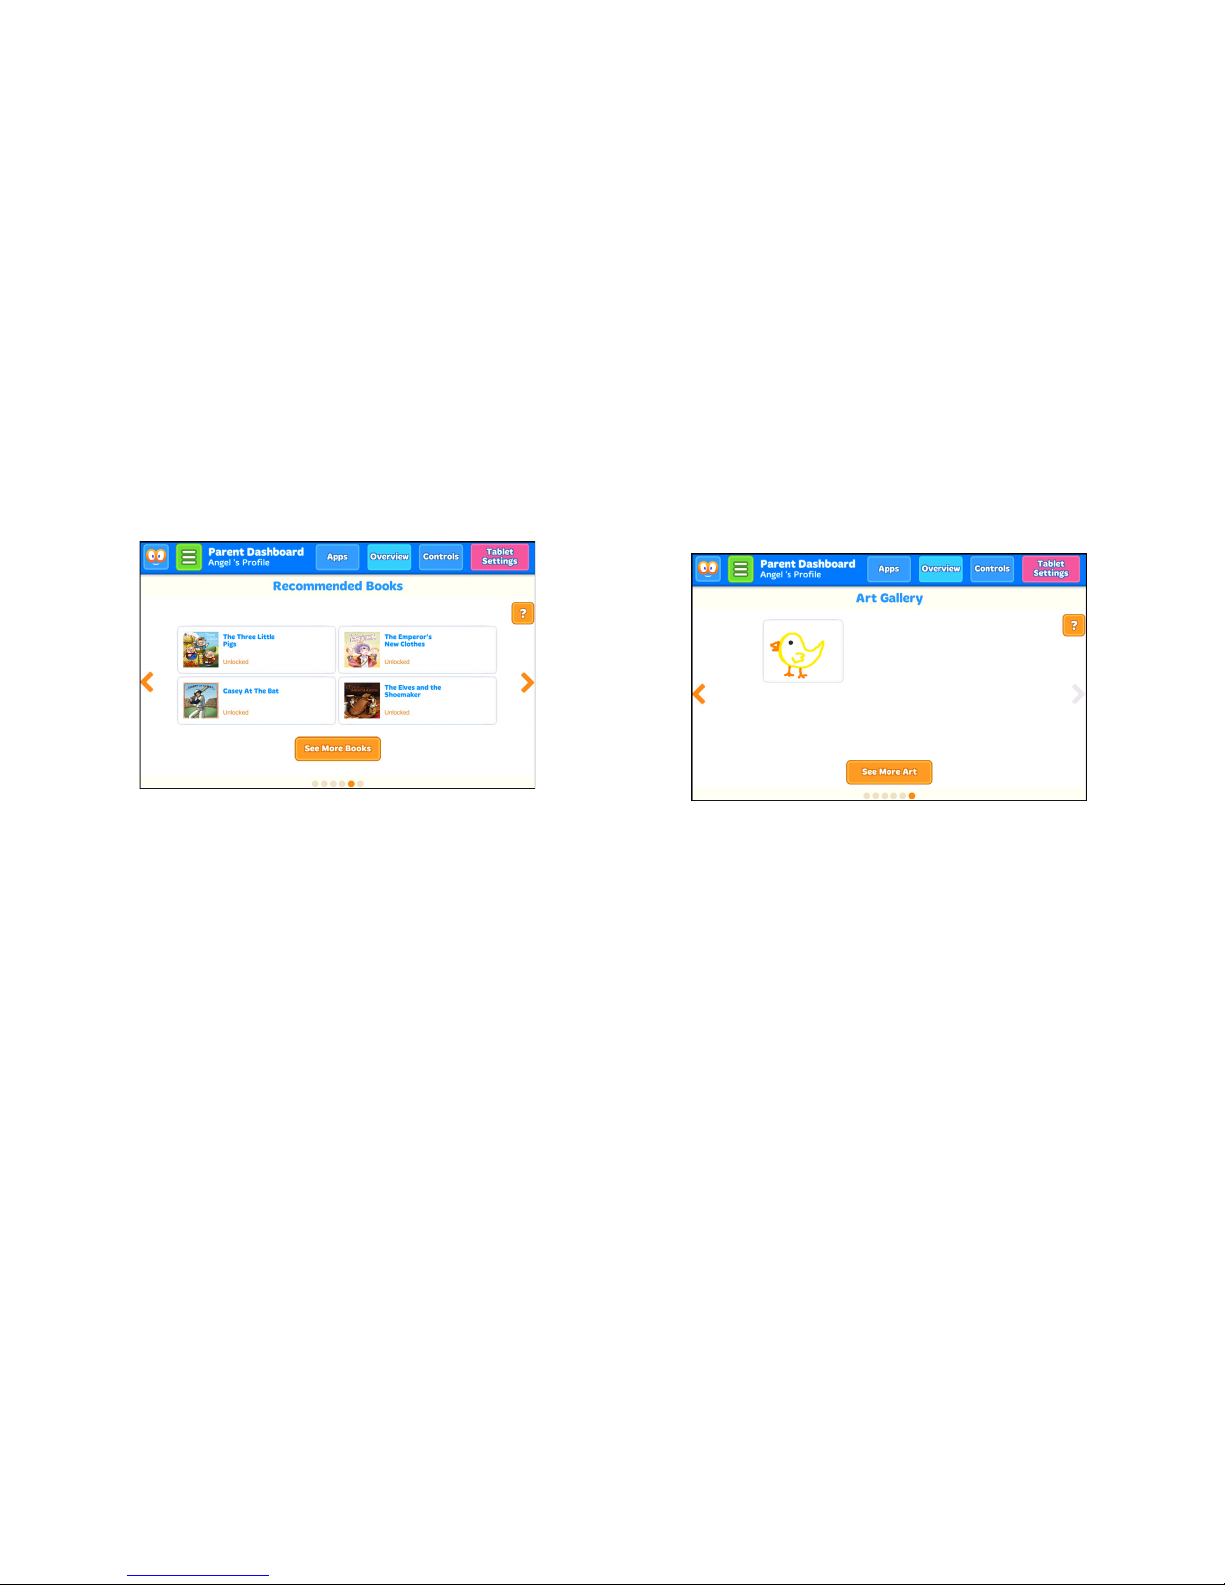
¬ Viewing the recommended books
Since you are the premium user, you will see all the
recommend books in your child’s book library.
¬ Viewing art gallery
All your child’s drawing are automatically saved to the art
gallery.
• To delete the drawing, select the drawing you want to
delete and tap Delete. A confirmation message appears,
tap Yes to confirm the deletion.
Page 29
28
Configuring Rules in Kid Mode
Select this option to configure the Kid Mode’s general rules
including the time allocation on each subject, language,
schedule, and violance filters.
1. Tap Controls tab.
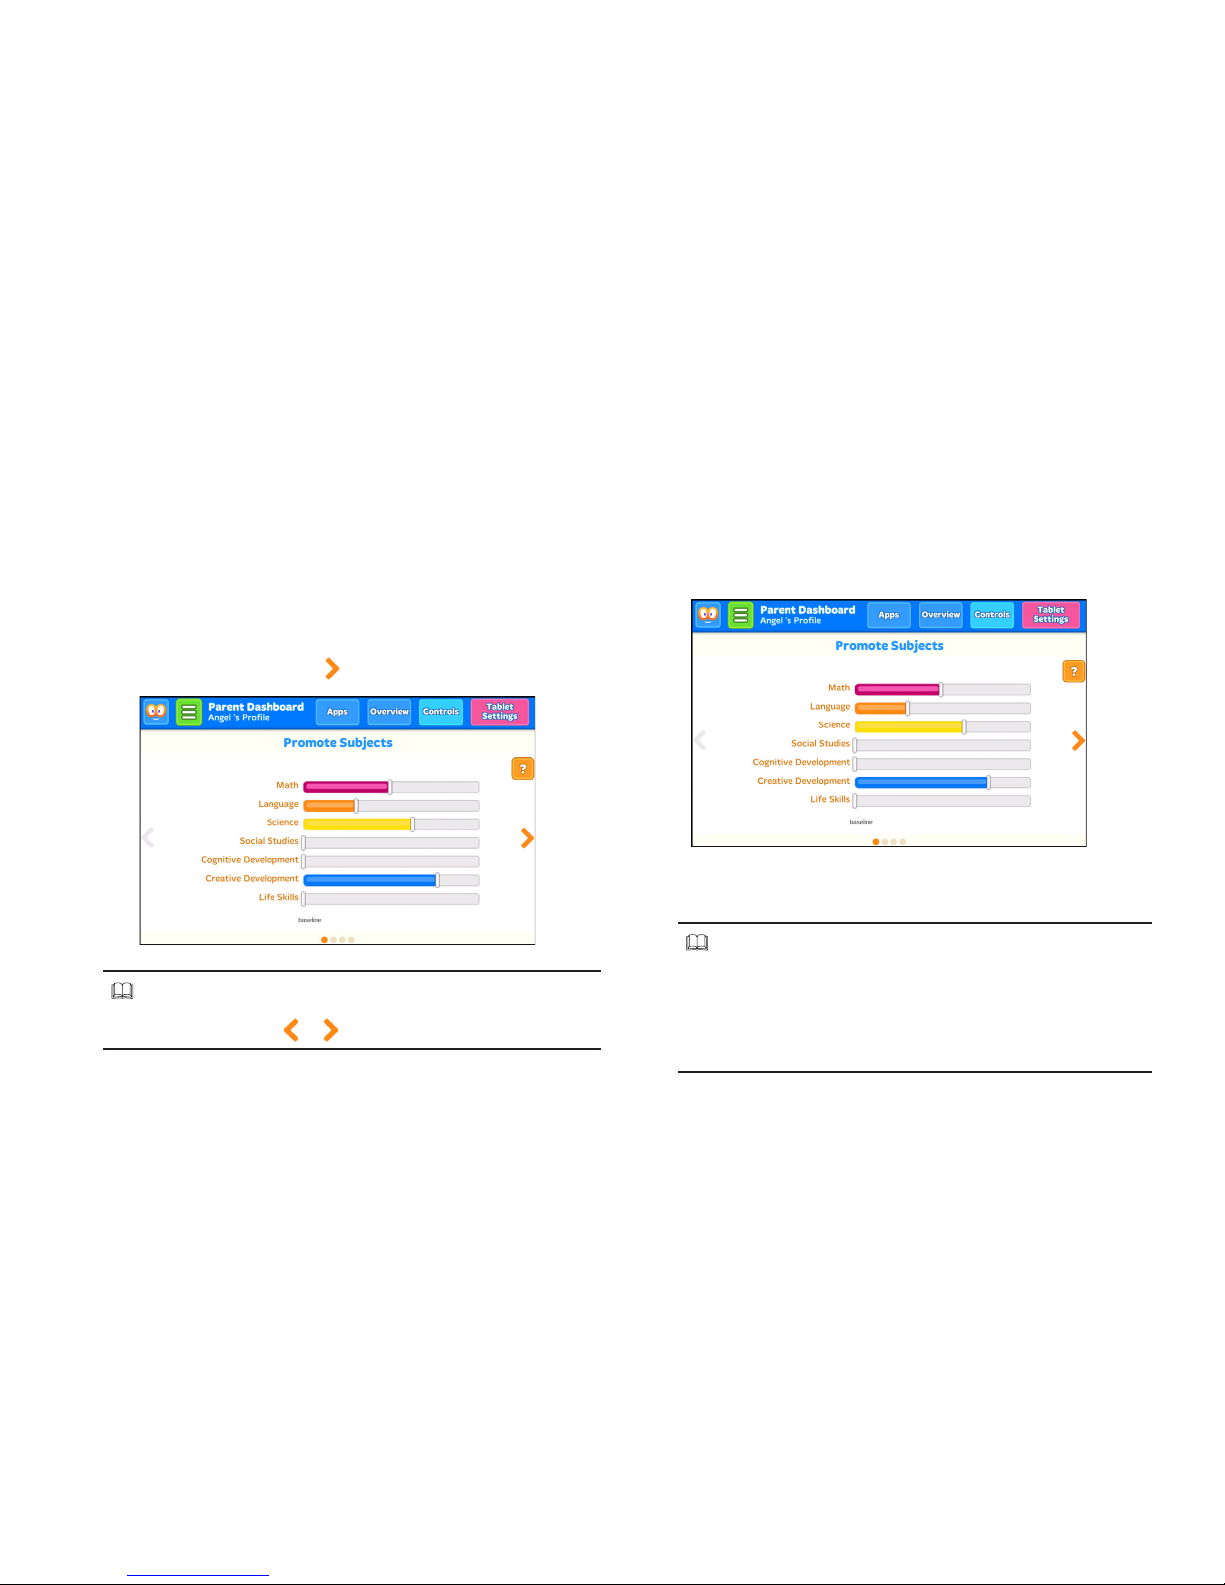
2. The Promote Subjects page appears on the screen. To
access other options, tap to go to the next page.
NOTE!
To switch pages, tap or .
¬ Promoting subject
You can determine how much time your child is spending
on each educational subject. Once you have configured this
setting, the Kid Mode recommendation technology will
seamlessly adjust the content for your child.
• To set the priority of the subject, select the desired
subject and drag the slider to adjust the setting.
NOTE!
• To put more focus on a subject, drag the slider to
the right.
• To put less focus on a subject, drag the slider to the
left.
Page 30
29
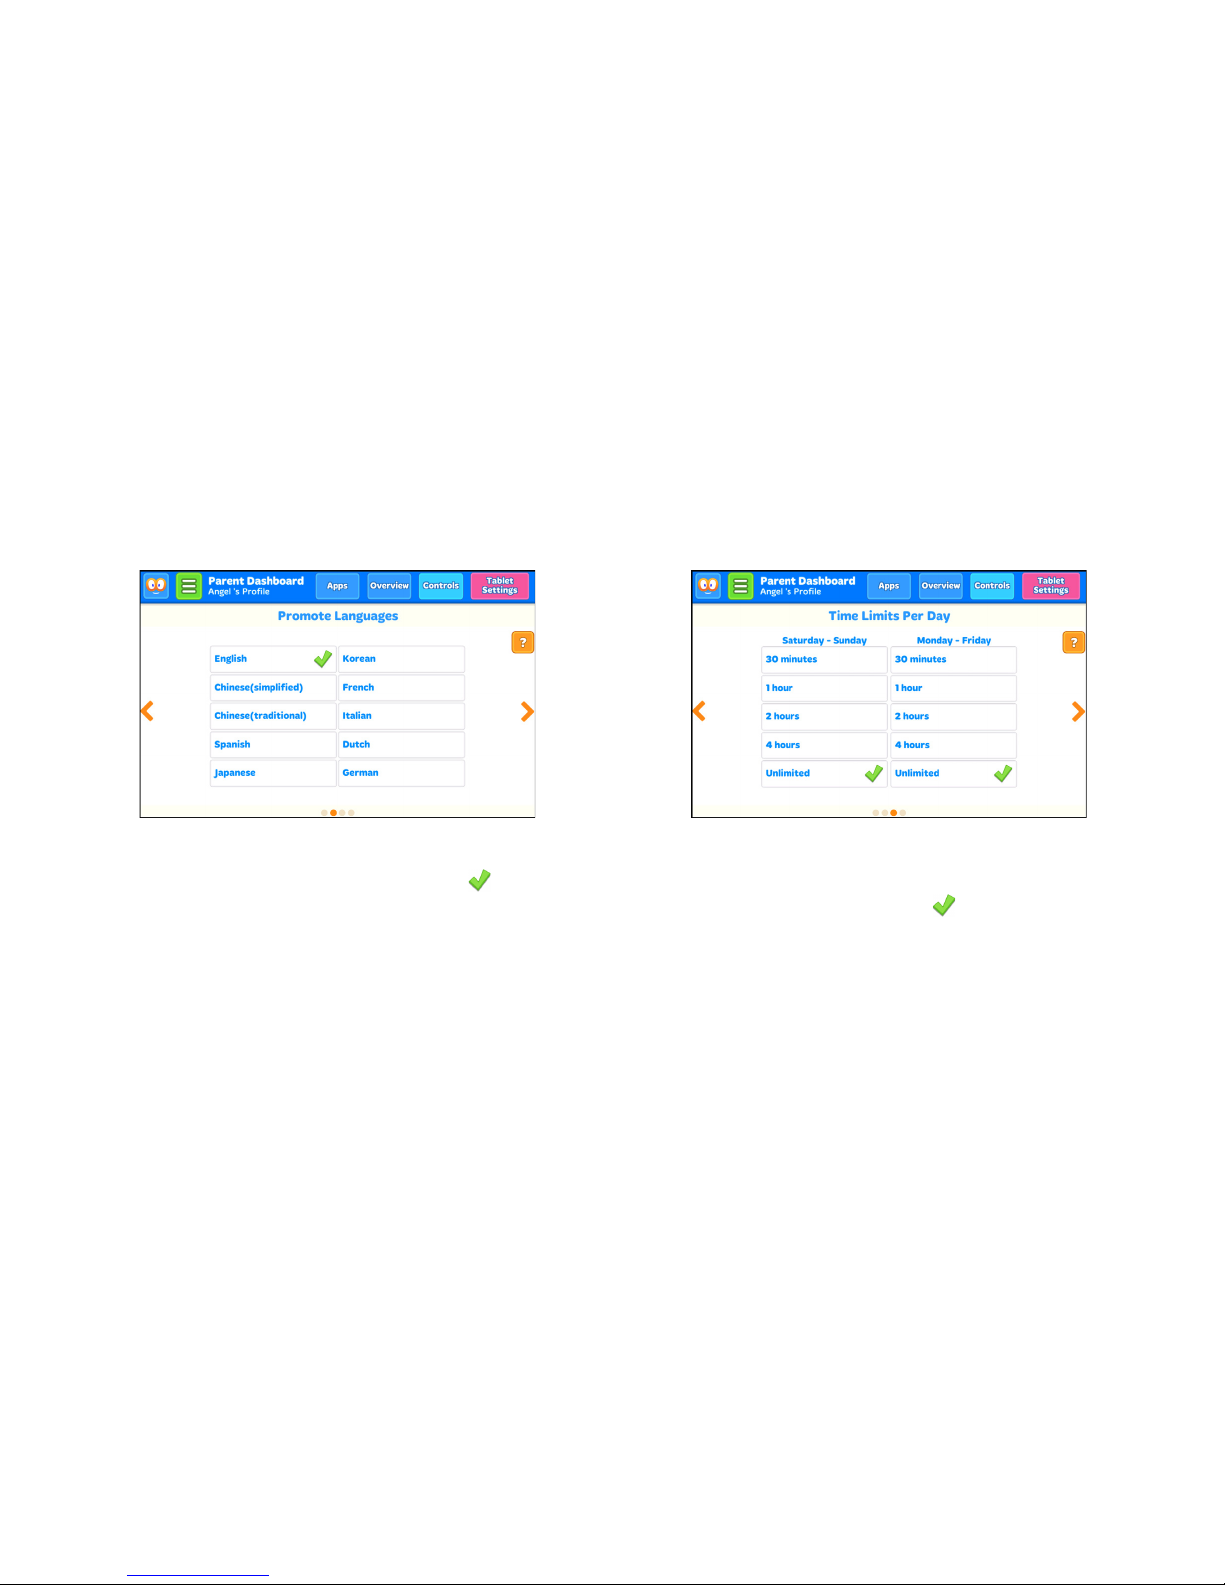
¬ Promoting language
You can help your child building language skills or learn a new
language with applications and videos in the languages you
set.
• To configure multi-language for applications and
videos, select the desired language. An icon will
appear on the screen, indicating the language has
been selected.
¬ Configuring daily schedule
You can set the daily time limit to control how long your child
can play in Kid Mode. You can also set different limits for
weekdays or weekends.
• To set the time limits, select the desired time slot
on the weekends (Saturday - Sunday) or weekdays
(Monday - Friday) column. An icon will appear on
the screen, indicating the time slot has been selected.
Page 31

30
¬ Configuring violence filters
Zoodles applications and videos are reviewed and rated
based on the following criteria:
• No Violence: Do not allow violent content of any kind.
• Level 1: Contain some aggressive actions.
• Level 2: Contain actions that include blasts and
explosions.
• Level 3: Contain the use of weapons such as cannons and
darts.
• Level 4: Contain the characters may use levels of force
against each other.
You can use these filters to control which videos and
applications your child may view.
• To set the violence filter, select the desired filter
level. An icon will appear on the screen, indicating
the violence filter level has been selected.
Page 32

31
Configuring Tablet Settings
Select this option to configure your tablet settings and
wireless connections, exit the Kid Mode, or access Play Store
( ) application.
1. Tap Tablet Settings tab.
2. The Tablet Settings page appears on the screen.
3. To configure your tablet settings, do one of the following:
• Tap Settings to access Settings ( ) application. For
more information, refer to the “Settings” section.
• Tap Exit to exit the Kid Mode and enter the standard
Android Home screen. For more information, refer to
the “Turning Kid Mode Off” section.
• Tap Wi-Fi to configure the Wi-Fi connection. For more
information, refer to the “Wi-Fi” section.
• Tap Google Play to access Play Store ( ) a pplicatio n.
For more information, refer to the “Using Play Store”
section.
Page 33

32
Adding New Child Profile
If you have multiple children using your tablet, it is highly
recommended to create a unique profile for each child so
they can have their own age-appropriate dashboard.
Perform the following to create a profile for your another
child:
1. Tap > Profiles.
2. Tap Add a Child.
3. Enter your child’s name and birth year.
4. Tap Create Profile to set up your child profile.
Page 34

33
5. Select one of the characters to set it as your child’s profile
picture. Then tap Save.
6. Tap Done! to complete the setup.
Then the new created profile appears on the dashboard.
Page 35

34
Deleting a Child Profile
Perform the following to delete your child’s profile:
1. Tap > Profiles.
2. Select a child profile you want to delete.
3. Tap Edit Profile.
4. Tap Delete Child.
Page 36

35
5. A confirmation message appears. Tap Confirm to
confirm deletion.
Viewing Applications Information
Select this option to view Zoodles Premium membership
plan details, edit your profile, and sign out of Kid Mode.
1. Tap > App Settings.
2. The App Info page appears on the screen.
Do the following:
• Tap Plan Details to view the Zoodles Premium
membership plan details.
• Tap Sign Out to sign out of Kid Mode. A confirmation
message appears, tap Yes to confirm.
Page 37

36
Configuring Child Lock Function
Select this option to enable child lock function that helps to
keep your child in Kid Mode. When this function is enabled,
you will be prompted to enter your birth year to unlock.
1. Tap > App Settings.
2. Tap the General tab. The App Info page page appears on
the screen.
3. Tap to go to the next page.
4. Check the box. An icon will appear on the selected
item, indicating the function is enabled or the
verification action has been set.
Configuring Notifications Settings
Select this option to configure the notification options for
applications.
1. Tap > App Settings.
2. Tap the Device tab. The Notifications page appears on the
screen.
3. Check the box. An icon will appear on the selected
item, indicating the notification option is enabled.
Page 38

37
Configuring Device Settings
Select this option to adjust the volume level of the
application.
1. Tap > App Settings.
2. Tap the Device tab. The Notifications page appears on the
screen.
3. Tap to go to the next page.
4. Select a volume option and drag the slider to adjust the
volume level.
5. To show helpful hints and tips, check the Show Helpful
Tips box. An icon will appear on the screen, indicating
the option has been enabled.
Viewing FAQ
You can find answers to our most frequently asked questions
about Kid Mode.
1. Tap > App Settings.
2. Tap the FAQ tab.
3. Select the desired topic. Scroll down to see more topics.
NOTE!
If you still need further assitance, please send an email to
support@zoodles.com.
Page 39

38
Turning Kid Mode Off
To exit the Kid Mode and switch to the standard Android
tablet experience, perform the following:
1. Enter the Parent Dashboard. Refer to “Parent
Dashboard” on page 21.
2. Tap Tablet Settings tab. The Tablet Settings page
appears on the screen.
3. Tap Exit.
NOTE!
To turn Kid Mode back on again, from the Home screen, tap
Kid Mode .
Page 40

39
Section 3. Standard Mode
Managing Applications
The Apps screen holds all applications installed on your
tablet. Applications that you download and install from Play
Store or from the web are displayed on the Apps screen.
1. From the Home screen, tap Apps .
2. From the Apps screen, you can:
• Move between screens: Just slide your finger left or
right until the next screen appears so you can browse
all apps on your tablet.
• Open an app: Tap its icon to launch the app.
• Place an app shortcut on the Home screen: Tap and
hold the app icon, slide your finger, and lift your finger
to drop the icon in place on the desired home screen
page.
Page 41

40
TIP!
To remove the shortcut of the app from the Home screen, tap
& hold it, slide your finger toward the top of the screen, and
then drop the app over the X icon.
NOTE!
To browse widgets, tap and hold the screen from the Home
screen. Then tap WIDGETS at the bottom of the Home
screen.
Downloading and Installing New Apps
From the Home screen, tap Play Store to find new apps.
Browse the app stores and follow the prompts to download
and install apps on your tablet.
Uninstalling Apps
You can remove apps that you have downloaded and installed
on your device.
To remove an app:
1. From the Home screen, tap Apps Settings
Application manager.
2. Select the app you would like to remove, and tap
Uninstall OK.
NOTE!
Pre-loaded apps cannot be uninstalled.
Page 42

41
Creating App Shortcuts
You can access to some of your favorite applications easily
by creating app shortcuts on your Home screen.
To create an app shortcuts:
1. From the Home screen, tap Apps .
2. From the Apps screen, tap and hold the app’s icon then
drag it to the Home screen.
Organizing the App Shortcuts
Once you create many app shortcuts on your Home screen,
you can organize the desktop by moving or deleting the
existing app shortcut. You can also create a “folder” to
manage these app shortcuts.
¬ Moving the app shortcut
Tap and hold the app shortcut until it displays as movable
mode, and then drag it to the place you want.
movable mode
You can also move the app shortcut to a different screen. Tap
and hold the app shortcut until it displays as movable mode,
and then drag it to the edge of the current screen. Wait for
awhile and the screen will switch to the next home screen
automatically. Drag the app shortcut to the desired position
on the new screen and release.
Page 43

42
¬ Removing the app shortcut
You can free up space for new app shortcuts by removing
existing app shortcuts on your Home screen.
To remove an app shortcut:
1. On the Home screen, tap and hold an app shortcut until
the X appears on the screen.
2. Drag the app shortcut to X and release.
¬ Creating app folder
Once you create many app shortcuts on your Home screen,
you can create “folder” to manage the app shortcuts.
To make a new folder on your Home screen, stack one app on
top of another.
1. On the Home Screen, tap and drag an app shortcut onto
another app shortcut until a black circle appears.
Page 44

43
2. You can add multiple apps in your folder by repeating
step 1.
3. To open the folder, tap on the folder icon.
4. From the opened folder, you can:
• Tap the app shortcut to launch the application.
• Tap Unnamed Folder to change the folder name.
Viewing App Info
While creating a shortcut for the app, you can view the
detailed app information.
1. From the Home screen, tap Apps .
2. While holding an app on the Apps screen, the icon will
appear on the Home screen.
3. Drag the app to the icon to display its detailed
information.
Page 45

44
Using Recent Apps
The Recent Apps screen displays a list of app shortcuts
based from your recently launched apps. You can also use
this screen to go back to or switch between the apps you
recently launched.
To access the Recent Apps screen:
1. From the Home screen, tap the Recent Apps icon.
2. The Recent Apps list displays all of your recently
launched apps.
3. From the Recent Apps list, you can:
• Tap on the app you want to launch.
• To remove the app from the list, tap and hold the
desired item to display a pop-up menu, and then tap
Remove from list.
• To view the information of an app, tap and hold the
desired item to display a pop-up menu, and then tap
App info.
TIP!
You can easily remove an app from the list by swiping it
upwards or downwards.
Page 46

45
The Pre-loaded Applications
From the Home screen, tap Apps to display the pre-loaded
apps. Simply tap the desired icon to launch the application.
Calculator
Launch Calculator and then you can use your device to
perform mathematical calculations.
Calendar
Your device’s Calendar allows you to record events and
appointments to manage your schedule.
You can also use the Calendar widget in the WIDGETS tab.
Camera
Camera lets you take pictures and record video with your
device.
For more information, refer to the “Using Camera” section.
IMPORTANT!
Do not take videos of people without their permission.
Do not take videos in places where cameras are not allowed.
Do not take videos in places where you may interfere with
another person’s privacy.
Chrome
Google Chrome is a full function web browser that lets you
surf the Internet easily.
For more information about Google Chrome, visit:
http://support.google.com/chrome
Clock
Tap Clock to display the current date and time on the screen.
The Clock also provides you with the alarm, timer, and
stopwatch functions.
Cloud
Verizon Cloud allows you to back up your contacts, photos,
videos, music, documents, and text and media messages to
secure cloud storage.
Docs
Docs allows you to create, edit, or share documents and work
together with others.
Page 47

46
Downloads
Files, apps, and other items that you have downloaded from
the Web, Gmail, Email, or in other ways, are stored in your
device’s internal storage. Use Downloads to view, reopen, or
delete what you have downloaded.
Drive
Drive allows you to back up your videos, photos, and
documents to Google Drive.
Email
Email lets you send and receive email using popular email
services.
Gallery
You can use Gallery to view, share, and manage pictures and
videos.
Gmail
Gmail lets you send and receive emails via Gmail, Google’s
web-based email.
Google
Google allows you to search the web, or applications,
contacts and music stored on your device.
Google Settings
You can easily change your Google account settings by using
Google Settings.
Google+
You can stay connected and share life as it happens with
Google+ on your device. Join a Hangout, post a photo, or see
what friends are sharing while you are on the go.
Hangouts
The instant messaging and video chat platform developed
by Google, Hangouts, will let you reach friends easily and
happily.
Help
You can get information about using your device, including
videos, useful tips, and other information.
Page 48

47
Kids Photos
Kids Photos is specially designed for kids to view the
captured pictures and the recorded videos.
For more information, refer to the “Using Kids Photos”
section.
Maps
You can use Google Maps to find your current location, get
directions, and other location-based information.
For more information, refer to the “Using Maps” section.
NOTE!
You must enable location services to use Maps and some
features require Standalone or Google location services.
Movie Studio
You can use the unique video editing app, Movie Studio, to
share your video memories with your friends easily.
Keep
With Keep, you can capture, edit, share, and collaborate on
your notes on your tablet and computer. Everything you add
to Keep syncs across your devices so your important stuff is
always with you.
Kid Mode
You can switch your Home screen to Kid Mode. Kid Mode
allows you (as parents) to ensure your kid is learning and
playing in a safe digital environment. This application
measures and displays key aspects of your kid’s learning
progress, and enables you to customize the learning
experience.
Kids Camera
Kids Camera is specially designed for kids to take pictures
and record video with your device.
For more information, refer to the “Using Kids Camera”
section.
Page 49

48
My Verizon Mobile
My Verizon Mobile allows you to access self-serve
functionality for managing your wireless account directly
from your device.
NOTE!
You can use My Verizon Mobile free of charge. You will not
incur any airtime or megabyte charges when you use My
Verizon Mobile in the national Enhanced Service Area.
News & Weather
With News & Weather, you can view the headline stories and
check the local news and weather.
People
You can use People to quick access to everyone you want to
reach.
Photos
With Photos, you can manage your Google+ photos, albums,
and videos.
Play Books
Play Books lets you discover your favorite books and authors
has never been easier. You can shop the world’s largest
selection of ebooks and read them anywhere you like - on a
tablet, phone, e-reader, or the Web.
Play Games
Play Games lets you discover new games, track achievements
and scores, and play with friends around the world.
Play Movies & TV
Play Movies & TV allows you to watch movies and TV shows
purchased or rented from Google Play. Watch your favorite
movies and shows instantly on your Android phone or tablet,
or on any HDTV using Chromecast. You can also download
and watch from anywhere, even when you’re not connected.
Play Music
Play Music lets you shop for millions of songs from your
favorite artists, including hundreds of free tracks from the
biggest names in Rock, Pop, Hip-Hop, and more.
Page 50

49
Play Newsstand
Play Newsstand enables you to subscribe to the news
and magazines you are interested and build your very own
newsroom on your device.
Play Store
Google Play Store can provide you with all your favorite
books, movies, apps, and games are all in one place that’s
accessible from the Web and your device.
For more information, refer to the “Using Play Store” section.
NOTE!
You need a Google account set up on your device to
download apps and music.
Settings
Launch Settings to customize your device.
For more information, refer to the “Settings” section.
Sheets
Sheets allows you to create, edit, or share spreadsheets and
work together with others.
Slides
Slides allows you to create, edit, or share presentations and
work together with others.
Voice Search
Voice Search allows you to search the web and access things
on your phone just by speaking.
YouTube
YouTube lets you view and upload YouTube videos from your
device.
Page 51

50
Using Camera
The Camera app allows you to take pictures and record
videos using your device.
To launch Camera, tap Apps Camera .
Taking Pictures
After launching Camera, the image from the camera lens will
be displayed on the screen.
Follow the instructions below to take a picture:
• While using Camera, hold the device in either landscape
or portrait orientation. The Camera screen orientation
and the onscreen function icons will adjust depending on
how you are holding the device.
• You can use the screen display as a viewfinder. To
compose your picture, aim the camera at the subject.
• Use the onscreen function icons or tap to set up the
Camera, including zoom in/out, changing image settings,
switching the front/rear camera, and more.
• Pinch the screen to zoom in/out on the subject.
• Tap to take the picture.
Onscreen Controls
On the Camera screen, the onscreen controls allow you to
take the picture and change the Camera settings.
Shutter
Settings
Mode
Focus frame
Viewfinder
• Shutter: Tap to take a picture.
• Mode: Tap to switch to Video or Panorama mode.
• Settings: Tap to change the Camera settings.
Page 52
51
Recording Videos
1. Tap Apps Camera .
2. Tap to switch to Video mode.
3. Tap to start recording.
4. While recording, do one of the following:
• Pinch the screen to zoom in/out on the subject.
• Touch the screen to take a photo.
• Tap to pause the recording. Tap to resume
5. Tap to stop recording.
Taking Panorama Photos
1. Tap Apps Camera .
2. Tap to switch to Panorama mode.
3. Tap to take the shot.
4. Move your device steadily and in one direction.
5. When the shooting guide reaches the end of the shooting
point, the shooting ends. You can also manually stop
shooting by tapping .
Page 53

52
Menu Option Descriptions
Picture size
( )
Set the image resolution.
Picture
Playback
Select Infinity to enable user to directly
view the last captured photo right after
capturing an image.
Burst capture
mode
Select the number of photos per second
in Burst mode. Select OFF to disable this
function.
Color Effect Select the desired color effect to be
applied on the captured image.
Banding
Filter
Set the anti-banding value.
ISO Select the desired ISO sensitivity level.
Contrast/
Saturation
Adjust the desired saturation/contrast
setting.
Brightness/
Sharpness
Adjust the desired brightness/sharpness
setting.
Storage
Location
Specify the location where to save the
captured photo.
White
Balance ( )
Select the desired white balance setting.
Rear Camera
( )
Tap to switch to front camera. Tap to
switch back to rear camera.
Configure the Camera Settings
Tap to enter the Settings menu. Tap the desired menu
option icon to change the respective setting.
Camera mode
More options
(Location, Countdown
timer, Picture size,
Picture Playback,
Burst capture mode,
Color Effect, Banding
Filter, ISO, Contrast/
Saturation, Brightness/
Sharpness)
HDR
Exposure
White Balance
Rear Camera
Menu Option Descriptions
HDR ( )
Tap to disable/enable the HDR function.
Exposure ( )
Adjust the proper exposure level to fix the
overall brightness of the image.
Location ( )
Tap to enable to include the location of the
captured picture.
Countdown
timer ( )
Set the countdown timer setting.
Page 54

53
Video mode
More options
(Time lapse, Video
quality, Store Location
in Picture)
White Balance
Rear Camera
Menu Option Descriptions
White
Balance ( )
Select the desired white balance setting.
Time lapse To enable the time lapse function, set the
setting to ON. Then select the desired time
interval. Tap Done to save the setting.
Video quality Set the recording quality.
Store
Location in
Picture
Check the box to enable to include the
location of the captured picture.
Storage
Location
Specify the location where to save the
recorded video.
Menu Option Descriptions
Rear Camera
( )
Tap to switch to front camera. Tap to
switch back to rear camera.
Using Gallery
After taking a picture or recording video, a thumbnail of the
last picture or video you captured appears for a few seconds.
You can also review it in Gallery.
In Gallery, you can use options to modify or share the picture
or video.
• While viewing a picture, you can “pinch” the screen to
zoom in or out, or double-tap to zoom all the way in or
out. When zoomed in, tap and drag your finger on the
screen to move the picture around on the screen.
• To share the picture or video, tap , then select an
application for sharing.
Page 55

54
• Tap to access the menu options:
Menu Option Descriptions
Delete Delete the picture or video.
Slideshow
(for photo only)
View a slideshow of all recorded files.
Edit
(for photo only)
Open the picture in Photo Editor to
modify it.
Rotate left/
Rotate right
(for photo only)
Change the picture’s orientation.
Crop
(for photo only)
Crop the picture.
Set picture as
(for photo only)
Assign the picture as a Contact photo,
or as Wallpaper.
Menu Option Descriptions
Details
View information about the picture or
video.
Print
(for photo only)
Print the picture or save the picture as
PDF.
Trim
(for video only)
Allows you to select the best portion of
the video clip.
Mute
(for video only)
Allows you to mute the audio during the
video playback.
• Tap (Photo Editor) to display the tools, allowing you to
edit or apply an effect to the picture.
Page 56

55
Using Clock
The Clock app displays the current time, can be used to set
alarm(s), and more.
Opening Clock
Do one of the following to open the Clock:
• Tap the clock area on the Home screen; or
• From the Home screen, tap Apps Clock .
You can also add the Analog Clock widget to your tablet’s
Home screen. Tap the analog clock icon to open the Clock
app.
Page 57

56
Setting an Alarm
To set an alarm, do the following:
1. From the Home screen, tap Apps Clock .
2. Tap the Alarm Clock icon ( ) on the top of the screen.
3. Tap the Add icon ( ) to add a new alarm.
4. To set the time, slide the pointer, and tap OK.
5. To set repeat mode, check Repeat checkbox and select
the desired week days.
6. To set the ringtone, tap the Ringtone icon ( ), and select
the alarm sound. Then tap OK to confirm.
7. To enter an alarm label, tap Label. Enter the name and
tap OK.
NOTE!
By default, the alarm is automatically set to ON.
Page 58
57
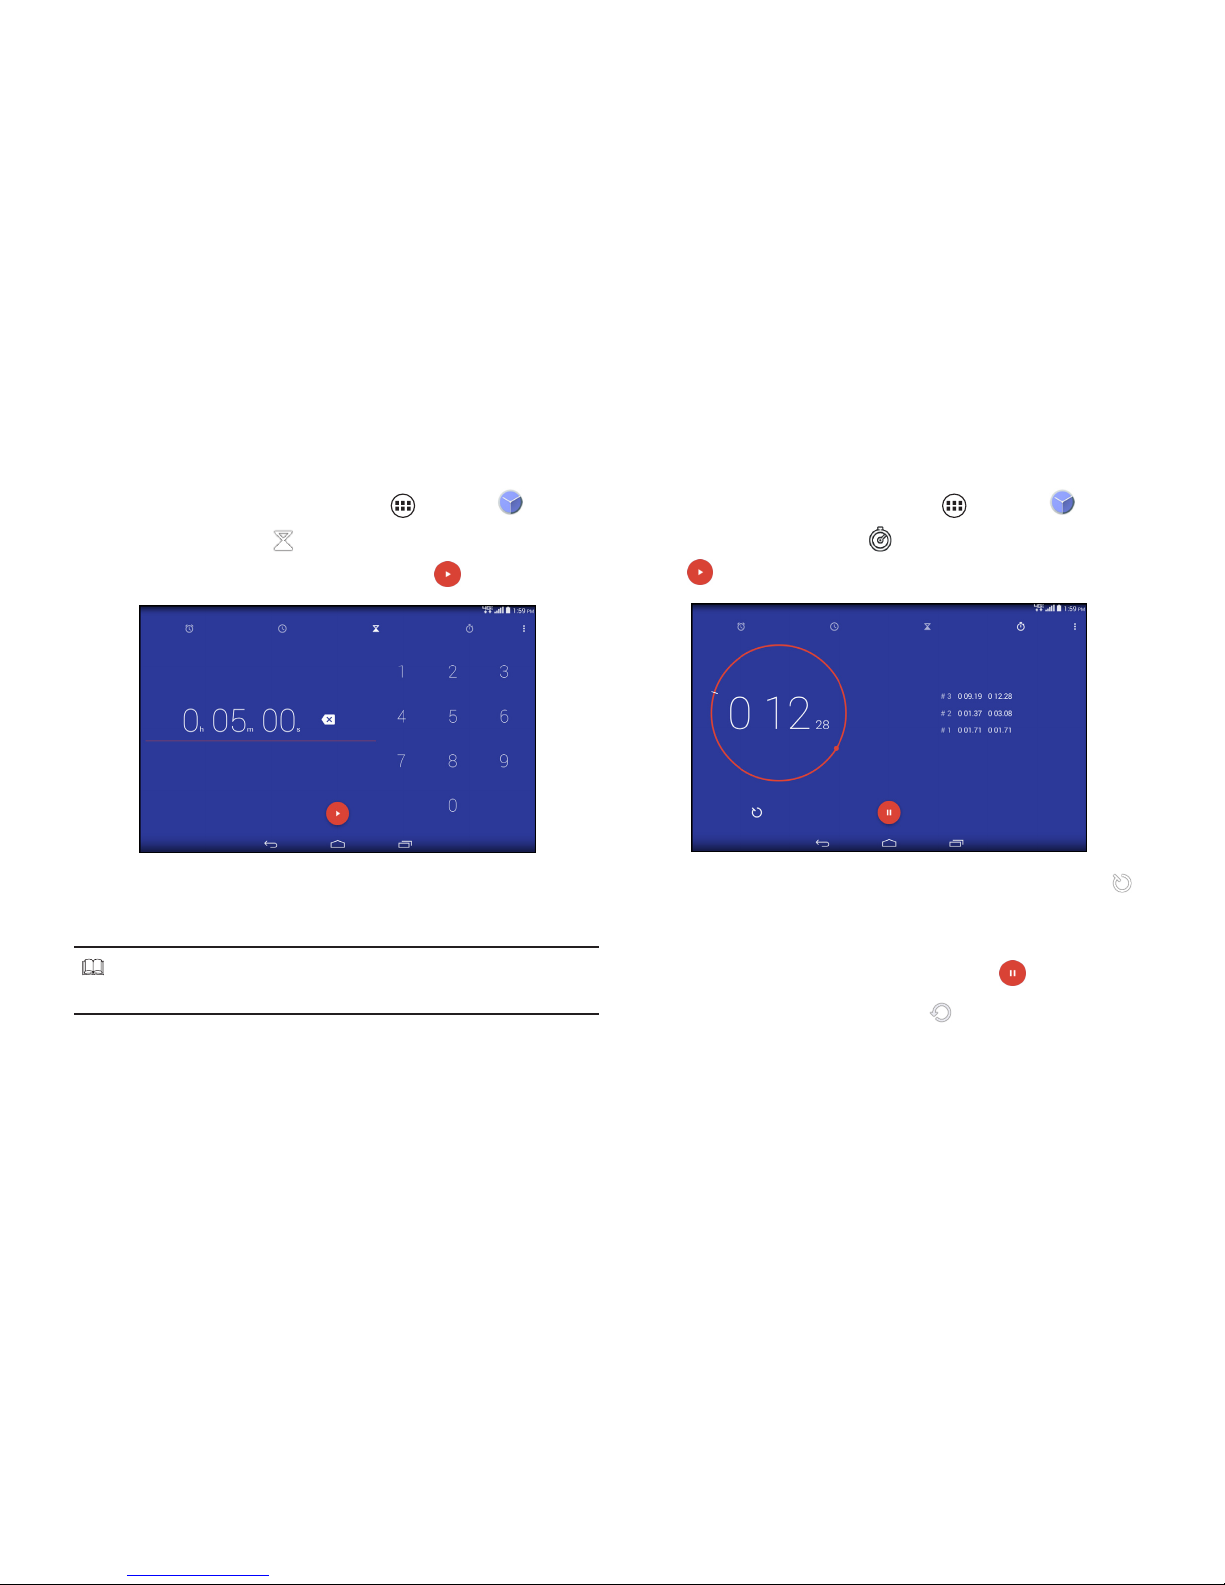
Setting the Countdown Timer
1. From the Home screen, tap Apps Clock .
2. Tap the Timer icon ( ) on the top of the screen.
3. Enter the time you want, and then tap .
4. When the timer is running, you can add an additional
minute, pause the timer, or delete the current timer.
NOTE!
The timer beeps when the time is up.
Using the Stopwatch
1. From the Home screen, tap Apps Clock .
2. Tap the Stopwatch icon ( ) on the top of the screen.
3. Tap to start the stopwatch.
• To record a lap while the watch is running, tap the
icon. It displays the first lap time. Repeat this step to
record a new lap.
4. If you want to pause the stopwatch, tap .
5. To reset the stopwatch, tap the icon.
Page 59

58
Using Play Store
Play Store lets you access lots of fun games and apps using
your Google account.
NOTE!
You can only access Play Store by signing in to your Google
account.
Accessing Play Store
1. From the Home screen, tap tap Play Store .
2. Sign in with your Google account.
• If you already have an existing Google account, tap
Existing and enter your email account and password.
• If you do not have an account, tap New and follow the
onscreen instructions to create an account.
3. After signing in, you can start downloading from Play
Store.
NOTE!
Some apps are free and some might charge you through a
credit card. Before you can download a paid application, you
must set up a billing arrangement.
Using Maps
You can use Google Maps to view and find places,
establishments and get directions. You can also check your
current location and share the information with others.
Accessing Google Maps
1. From the Home screen, tap Apps Maps .
2. You can use the tool bar on top of the screen to
customize your search.
Page 60

59
Widgets
Widgets are mini apps that allow you to conveniently access
useful and fun applications on your tablet’s Home Screen.
Different from the application shortcuts, widgets are
self-contained applications that can be added to the Home
screen. The widgets can be placed on any of the Home and
extended screens, allowing you to manage the desktop
conveniently.
Adding a Widget on the Home Screen
1. From the Home screen, tap and hold the screen.
2. Tap WIDGETS.
You can swipe your finger to the left or to the right to
browse more widgets.
Page 61

60
3. Tap and hold the selected widget, then drag it to the
Home screen.
NOTE!
You may be prompted to perform additional tasks such as
permission, registration, or activation before you can use a
selected widget.
If there is not enough space on the screen where you placed
the widget, the widget will not be added to the screen.
Removing a Widget from the Home Screen
1. From the Home screen, tap and hold the widget until
X appears on the screen.
2. Drag the widget to X and release.
Page 62

61
Section 4. Connections
You can use your device to connect to the Internet and
to other devices. This section lets you learn how to use
connection features of the device, including Wi-Fi, VPN,
Bluetooth, and more.
Wi-Fi
Wi-Fi is a term used for certain types of wireless local area
networks, which lets you access the Internet through a
wireless connection. To use Wi-Fi on your device, you need
access to a wireless access point (or other Wi-Fi Direct
devices). The coverage of the Wi-Fi signal can be up to 300
feet (100 meters). However, it varies greatly due to the type
of infrastructure, and other objects through which the signal
passes.
TIP!
Wi-Fi networks, or Access Points (WAPs) can be Open
(unsecured), or Secured (requiring you to provide login
credentials).
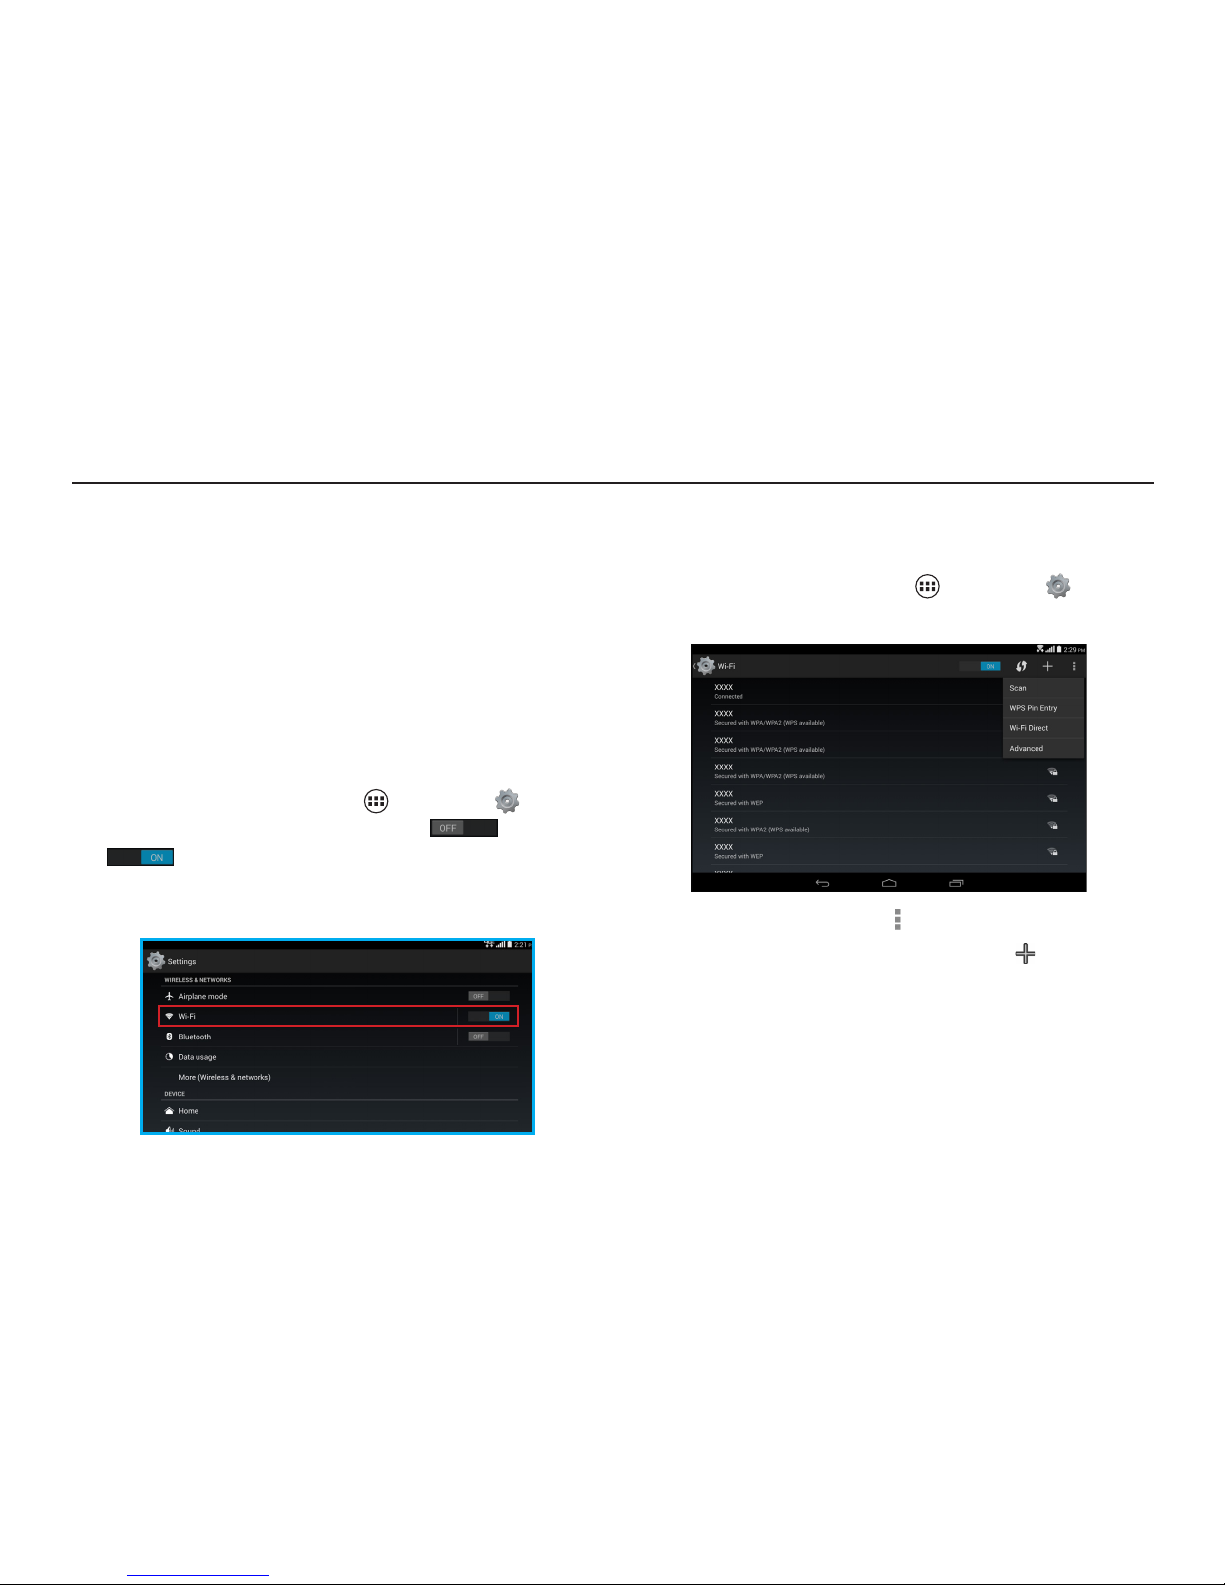
Turning Wi-Fi On and Connecting to Wi-Fi
1. From the Home screen, tap Apps Settings
Wi-Fi.
2. Tap the Wi-Fi switch from OFF to ON .
Page 63

62
3. When you turn Wi-Fi service on, the device will
automatically scan for available wireless networks.
4. From the list of the available wireless networks, choose
a Wi-Fi to connect.
• If you choose an Open network, you will be
automatically connected to the network.
• If you choose a Secured network, enter the password
and then tap Connect.
5. When your device is connected to a wireless network,
the Wi-Fi icon ( ) will appear in the status bar indicating
the signal strength (number of bands that light up).
6. The next time your device connects to a previously
accessed secured wireless network, you will not be
prompted to enter the key again, unless you reset your
device to its factory default settings.
Checking Connection Status
You can check the current wireless connection status from
one of the following:
• When your device is connected to a wireless network,
the Wi-Fi icon ( ) will appear in the status bar, showing
the signal strength (number of bands that light up).
• Tap the Wi-Fi option in Settings to display the Wi-Fi list.
Tap the wireless network that the device is currently
connected to.
TIP!
If you want to remove the wireless network settings on
your device, tap Forget on this pop-up window. You need
to complete the required settings again to connect to this
wireless network.
Page 64

63
Bluetooth
Bluetooth is a short-range wireless communications
technology that allows Bluetooth-enabled devices to
exchange information over a distance of about 30 feet (10
meters) without requiring a physical connection.
Turning Bluetooth On
1. From the Home screen, tap Apps Settings
Bluetooth.
2. Tap the Bluetooth switch from OFF to
ON .
3. When the Bluetooth function is enabled, the Bluetooth
icon ( ) appears in the status bar.
Bluetooth Mode
Bluetooth on your device operates in three different modes:
¬ On
Bluetooth is turned on, and the device will be able to detect
the other Bluetooth-enabled devices, but not vice versa.
¬ Visible
Bluetooth is turned on, and all other Bluetooth-enabled
devices can detect your device.
¬ Of f (default)
Bluetooth is turned off. You cannot send/receive data using
Bluetooth.
Page 65

64
Bluetooth Profiles
Bluetooth profiles are specifications for services supported
by individual devices. Profiles improve the ability of different
devices to work together. Your device supports these
Bluetooth profiles:
¬ Serial Port
SPP allows a remote Bluetooth device to act as a virtual
serial port.
¬ Stereo/Audio/Video
A2DP, AVRCP, GAVDP, AVCTP and AVDTP support deliveryof
stereo audio to compatible Bluetooth devices.
¬ Object Exchange
OPP allows sending and receiving of contact name cards
(vCard 2.1), calendar events (vCalendar), and other non-DRM
items between devices.
¬ Human Interface Devices
HID supports certain interface devices.
¬ Personal Area Network
PAN profile supports connections between multiple
Bluetooth devices.
Pairing Bluetooth Devices
Before you can send/receive data using Bluetooth, you need
to establish trusted connections between your device and
the other Bluetooth devices.
Follow the steps to pair your device with another Bluetooth
device:
1. From the Home screen, tap Apps Settings
Bluetooth.
2. Tap the Bluetooth switch from OFF to
ON . The tablet will automatically scan for nearby
Bluetooth devices.
3. Tap the name of the device you want to pair with your
tablet.
NOTE!
Depending on the type of device you are pairing with, you will
be asked to enter a passkey, confirm matching passkeys, or
the device will automatically pair.
Page 66

65
Unpairing the Bluetooth Devices
Unpairing a device from the Bluetooth devices list removes
its connection record. You will need to complete all the
settings of pairing again to re-connect the devices.
Follow the steps to unpair your device with another
Bluetooth device:
1. From the Home screen, tap Apps Settings
Bluetooth.
2. Tap the Bluetooth switch from OFF to
ON .
3. From the Bluetooth settings screen, tap the icon next
to the name of the paired device in the Bluetooth devices
section to open the pop-up menu.
4. Tap Unpair.
Bluetooth Settings
1. From the Home screen, tap Apps Settings
Bluetooth.
2. Tap the Bluetooth switch from OFF to
ON .
3. Tap to display the settings menu, including:
• Rename tablet: Tap this option to display your
tablet’s default name. You can change the device
name.
• Visibility timeout: You can set the length of time
your tablet remains visible to other device’s scans.
• Show received files: This option displays a list of files
transferred to your tablet from other devices via
Bluetooth.
Page 67

66
Wi-Fi Direct
Your device features Wi-Fi Direct, which is a standard that
allows your to connect to each other directly via Wi-Fi,
without a Wi-Fi network or hotspot, and without having to set
up the connection.
This type of connection is commonly called peer-to-peer. For
example, your device can use Wi-Fi Direct to share photos,
contacts and other content with other Wi-Fi Direct devices.
Turning Wi-Fi Direct On or Off
1. From the Home screen, tap Apps Settings
Wi-Fi.
2. Tap the Wi-Fi switch from OFF to
ON . Then tap to display the settings menu.
3. Tap Wi-Fi Direct.
Connecting to Wi-Fi Direct Devices
1. Enable Wi-Fi Direct on your tablet.
2. Enable Wi-Fi Direct on the other device(s). Consult the
other device’s documentation for more information.
3. In the scanned list, tap a device to connect with it, or tap
Multi-connect to connect to multiple devices (not all
devices support multi-connect).
4. Follow the prompts on both devices to complete the
connection.
Page 68

67
VPN
Your tablet features VPN (Virtual Private Network) that
allows you to connect to VPNs.
Adding a VPN
1. From the Home screen, tap Apps Settings
More (Wireless & networks) VPN.
2. Tap to set up a connection to a VPN. Available
settings depend on the type of VPN.
NOTE!
You must set pattern, PIN or password screen lock before
setting up a VPN. If you have not yet set a screen lock, you
will be prompted to do so the first time you launch VPN.
Tethering
You device features Tethering allowing you to share your
device’s mobile data network connection with other devices
via USB or Bluetooth.
USB Tethering
You can use USB tethering to share your tablet’s network
connection with another device that connects to your tablet
via USB cable.
1. From the Home screen, tap Apps Settings
More (Wireless & networks) Tethering & Mobile
Hotspot.
2. Connect the other device to your tablet via USB cable.
Page 69

68
3. On the USB tethering option, check the box to turn
tethering On.
Bluetooth Tethering
Share your device’s network connection with another device
that connects to your device via Bluetooth.
Before starting, pair your computer with your tablet, then
configure your computer to obtain its network connection via
Bluetooth.
1. From the Home screen, tap Apps Settings
More (Wireless & networks) Tethering & Mobile
Hotspot.
2. On the Bluetooth tethering option, check the box to turn
tethering On.
NOTE!
Tethering consumes battery power and increases your data
usage. Roaming while using tethering will incur extra data
charges.
Connecting to a Computer
You can connect your tablet to a Windows computer
through a USB cable. When connected, you can transfer
music, pictures, and other files between the computer and
your tablet.
When you connect your tablet to the USB port on your
computer, its USB storage is mounted as a drive and
appears on your computer screen. You can copy files back
and forth as you would use any other external device.
NOTE!
If you are using USB tethering, you must turn that off
before using USB to transfer files between your tablet and
computer.
1. Connect your tablet to the computer with a USB cable.
Your tablet recognizes the connection as the last
connection method you used, and displays a connection
alert in the status bar.
2. Tap and slide the status bar downwards, then tap the USB
connection notification.
Page 70

69
3. Select a connection method:
• Media device (MTP): Transfer media files with
Windows, or using Android file transfer on a Mac (see
www.android.com/filetransfer).
• Camera (PTP): Transfer photos using camera
software, and transfer files to computers that do not
support MTP.
4. On your computer, choose a method for accessing
your tablet. Available options depend on the programs
installed on your computer.
5. Transfer files to the tablet. When finished, you can
disconnect the USB cable.
NOTE!
When you connect your tablet to a computer via USB cable,
the data connection takes precedence over charging, and the
tablet will only charge when it is turned off.
Page 71
70
Section 5. Settings
More Wireless and Network Settings
This section teaches you how to control your tablet’s wireless
connections.
Wi-Fi
Set up and manage Wireless Access Points (WAPs). Your
tablet supports Wi-Fi 802.11 b/g/n.
¬ Turning Wi-Fi On or Off
From the Home screen, tap Apps Settings Wi-Fi
and then slide the Wi-Fi switch from OFF to
ON . When you turn Wi-Fi service on, your device
automatically searches for available, in-range Wi-Fi
networks.
¬ Wi-Fi settings
You can set up and manage connections to Wi-Fi networks.
From the Home screen, tap Apps Settings Wi-Fi
to display the Wi-Fi list, and then you can:
• Refresh the list by tapping Scan.
• Add a Wi-Fi network manually by tapping . You need to
complete the required settings in the Network SSID and
Security fields. About the related information, please
contact your network administrator.
Page 72

71
• Tap for more settings, including: Scan, WPS Pin Entry,
Wi-Fi Direct, and Advanced.
¬ Advanced Wi-Fi settings
From the Home screen, tap Apps Settings Wi-Fi
Advanced to display the advanced settings screen for
the following options:
• Network notification: Enable this option and the Wi-Fi
icon will appear in the status bar whenever the tablet
detects an available wireless network within range.
• Keep Wi-Fi on during sleep: You can specify whether to
automatically turn off Wi-Fi when the backlight goes out
and the tablet locks. This option can affect the behavior
of devices you connect to your tablet, such as when
tethering or using your tablet as a mobile hotspot.
• Scanning always available: Enable this option to let
Google’s location service and other apps scan for
networks, even when Wi-fi is off.
• Avoid poor connection: Enable this option to prohibit
the system using a Wi-Fi network unless it has a good
internet connection.
• Install certificates: This option allows you to install
certificates (for Wi-Fi authentication) stored in Drive,
Download folder, or the internal storage.
• Wi-Fi optimization: Enable this option to minimize
battery usage when Wi-Fi is on.
• MAC address: This option displays the tablet’s unique
identifier, used when connecting to Wi-Fi, or when
other devices connect to your tablet via Wi-Fi (not
configurable).
• IP address: This option displays the tablet’s IP (internet
Protocol) address (not configurable).
• Wi-Fi Active Roaming: Enable this option to enable the
device gets connected to the WiFi hotspot data device
when you are abroad.
Page 73

72
Mobile Hotspot
You can use Mobile Hotspot to share your tablet’s mobile
data network connection with a PC or other device via Wi-Fi.
¬ Turning Mobile Hotspot On or Off
1. From the Home screen, tap Apps Settings
More (Wireless & networks) Tethering & Mobile
Hotspot.
2. On the Mobile Wi-Fi hotspot option, check the box to
turn mobile hotspot On.
NOTE!
Please note that using your tablet as a mobile hotspot
consumes battery power and increases your data usage.
Roaming while using your device as a mobile hotspot will
incur extra data charges. Using Mobile Hotspot may require a
subscription to Mobile Hotspot/Mobile Broadband Connect
service. For more information, contact Verizon Wireless.
¬ Configure Mobile Hotspot
1. From the Home screen, tap Apps Settings
More (Wireless & networks) Tethering & Mobile
Hotspot.
2. Tap Set up Wi-Fi hotspot to display the settings screen,
allowing you to configure your Mobile Hotspot’s:
• Network SSID: Set the name of the network that will
Page 74

73
be broadcast.
• Channel: Select the appropriate channel that
corresponds to your network settings.
• Security: Select the security type.
• Password: Set the password that user will need to
enter it on the device that you are connecting to the
hotspot with.
3. Tap Save to apply the settings.
¬ Bluetooth settings
1. From the Home screen, tap Apps Settings
Bluetooth.
2. Tap the Bluetooth switch from OFF to
ON .
3. Tap to display the settings menu, including:
• Rename tablet: Tap this option to display your
tablet’s default name. You can change the device
name.
• Visibility timeout: You can set the length of time
your tablet remains visible to other device’s scans.
• Show received files: This option displays a list of files
transferred to your tablet from other devices via
Bluetooth.
Page 75

74
Data Usage
You can control your tablet’s connection to mobile data
service, and monitor your data usage.
¬ Turning Mobile data On or Off
1. From the Home screen, tap Apps Settings
Data usage.
2. Tap the Mobile data from OFF to
ON .
¬ Setting mobile data limit
Set a mobile data limit, to have your tablet automatically
disable the mobile data connection when the limit is reached.
You can set a warning threshold, to have your tablet alert you
when data usage nears your set limit.
Data usage is measured by your device. Your service
provider may account for usage differently, so you may
want to consider using a conservative limit. Contact your
service provider for more information on actual data usage.
1. From the Home screen, tap Apps Settings
Data usage.
2. Tap the Set mobile data limit option to enable the limit.
3. Tap the Alert me about data usage option to have your
device alert you when data usage reaches your set limit.
4. Configure the limit by tapping and dragging the limit and
warning lines on the graph.
Page 76

75
¬ Viewing data usage by app or process
1. From the Home screen, tap Apps Settings
Data usage.
2. Tap and check the Show Wi-Fi usage box to display
the status of using mobile data service. Tap a process
or app to see data usage for the process or app, and to
configure specific settings.
Airplane Mode
When you are in an airplane or in the area where data
transferring is not allowed, enable Airplane mode.
1. From the Home screen, tap Apps Settings .
2. Tap the Airplane mode switch from OFF to
ON . A confirmation message appears, tap OK.
When airplane mode is enabled, all your tablet’s wireless
connections are disabled. While in airplane mode, you can use
other features of your tablet, such as playing music, watching
downloaded videos, or other applications.
Page 77

76
VPN
You can set up and manage Virtual Private Networks (VPNs).
You must set pattern, PIN or password screen lock before
setting up a VPN. If you have not yet set a screen lock, you
will be prompted to do so the first time you launch VPN.
To add a VPN:
1. From the Home screen, tap Apps Settings
More (Wireless & networks) VPN.
2. Tap to set up a connection to a VPN. Available
settings depend on the type of VPN.
Mobile Networks
You can set options for roaming, networks and Access Point
Names. Depending on your service plan, changes you make to
Mobile networks settings may incur extra charges. Consult
Verizon Wireless for more information.
1. From the Home screen, tap Apps Settings
More (Wireless & networks) Mobile networks.
2. Configure the following settings:
• Data enabled: Check this option to enable data
access over the mobile network.
• Data roaming: Check this option to enable connection
to data services when roaming.
• Roaming state: This option displays the device
roaming status.
Page 78

77
• Access Point Names: This option allows you to select
the APN or configure a new APN setting.
View Verizon Account
You can launch the Browser to view information and manage
your Verizon account.
From the Home screen, tap Apps Settings More
(Wireless & networks) View Verizon Account.
Home
Change Home Screen
You can set the default Home screen.
1. From the Home screen, tap Apps Settings
Home.
2. You can set the default Home screen.
Page 79

78
Notification Ringtone
You can select a default ringtone for message and other
notifications.
1. From the Home screen, tap Apps Settings
Sound Default notification sound.
2. Select the desired ringtone.
3. When done, tap OK.
Sound
Volume
You can set default volume for music, video, games, and
other media, notifications, and system volume.
TIP!
You can set System volume from the Home screen by
pressing the Volume Keys Up or Down.
1. From the Home screen, tap Apps Settings
Sound Volumes.
2. Tap and drag the sliders to set volume for:
• Music, video, games & other media
• Notifications
• Alarms
3. When done, tap OK.
Page 80

79
Touch Sounds
When you enable the Touch sounds function, tones play when
you touch the screen to make selections.
1. From the Home screen, tap Apps Settings
Sound.
2. On the Touch sounds option, check the box to enable
tones.
Screen Lock Sound
When you enable the Screen lock sound function, tones play
when unlocking and locking the screen.
1. From the Home screen, tap Apps Settings
Sound.
2. On the Screen lock sound option, check the box to enable
tones.
Display
Brightness
You can set the default screen brightness.
1. From the Home screen, tap Apps Settings
Display Brightness.
2. Tap and drag the slider to set the brightness. You can
also tap AUTO to enable the device to automatically
adjust the brightness of the screen depending on the
surrounding light.
Page 81

80
Wallpaper
You can customize the device’s Home screen by selecting a
background image.
NOTE!
This option is only available in Standard Mode.
1. From the Home screen, tap Apps Settings
Display Wallpaper.
2. Choose a source from Gallery, Kids Photos, Live
Wallpapers, Photos, or Wallpapers.
3. Select a picture or wallpaper, then follow the onscreen
instructions to set it as the background.
¬ Gallery
¬ Kids Photos
Page 82

81
¬ Live Wallpapers
¬ Photos
¬ Wallpapers
TIP!
You can also set wallpaper from the Home screen. Tap and
hold on the Home screen, then select WALLPAPERS from
the Home screen menu.
Page 83

82
Sleep
You can set the length of delay between the last key press
or screen touch and the automatic screen timeout (dim, then
lock).
1. From the Home screen, tap Apps Settings
Display Sleep.
2. Select the desired length of time. Your setting is
automatically saved.
Daydream
You can specify what the screen displays when your device is
docked or while charging.
1. From the Home screen, tap Apps Settings
Display Daydream.
2. Tap the Daydream switch from OFF to
ON .
3. Select the desired setting.
Page 84

83
Font Size
You can set the size of fonts in the display.
1. From the Home screen, tap Apps Settings
Display Font size.
2. Select the desired font size. Your setting is
automatically saved.
Cast screen
Use this function to display your device screen on a TV.
1. From the Home screen, tap Apps Settings
Display Cast screen.
2. Select the desired device to connect.
Storage
You can monitor usage for your tablet’s internal memory, and
for installed memory cards (sold separately).
Device Storage
1. From the Home screen, tap Apps Settings
Storage.
2. Under INTERNAL STORAGE, view Total space and
Available space, and view space used by the following:
• Apps (app data & media content)
• Pictures, videos
• Audio (music, ringtones, podcasts, etc.)
• Downloads
• Cached data
Page 85

84
• Misc Items.
TIP!
You can tap Apps to launch Application manager to display
more information about applications installed on your
tablet.
Memory Card
1. From the Home screen, tap Apps Settings
Storage.
2. Under EXTERNAL SD CARD, you have these options:
• View Total space and Available space on an installed
memory card.
• Tap Unmount SD card to prepare the memory card for
safe removal or formatting.
• Tap Erase SD card to erase the memory card content
and prepare it for use with your tablet.
Battery
You can see what is using battery power.
1. From the Home screen, tap Apps Settings
Battery.
2. The battery usage for applications and services
currently running is displayed. You can tap an item for
more information, or to configure options for managing
power use.
Page 86

85
If you see the battery symbol with question mark ( ),
perform the following:
1. Plug the USB cable into the USB port on your computer
(remove the wall charger plug).
2. Allow the device to charge (wait) at least 15 minutes.
3. Press the Power/Lock button for 1 second and see if a
different battery charging icon shown on the screen ( ).
4. You can then switch back to the wall charger to continue
charging if you see the different (normal) charging icon
described in step 3.
Application Manager
You can use Application manager to manage applications on
your device. You can download and install applications from
Google Play Store, from other sources, or create applications
using the Android SDK and install them on your tablet.
Because this tablet can be configured with system software
not provided by or supported by Google or any other
company, end-users operate these devices at their own risk.
Manage applications
You can manage and remove applications from your tablet.
1. From the Home screen, tap Apps Settings
Application manager.
2. Tap the DOWNLOADED, RUNNING, or ALL tab to view
and update information about applications, including
memory usage, default settings and permissions.
3. Tap an app for more information, and for app options
such as stopping or uninstalling.
Page 87

86
Running services
You can view and control services running on your tablet.
Please note that not all services can be stopped, and
stopping services may have undesirable consequences on
the application or Android System.
1. From the Home screen, tap Apps Settings
Application manager.
2. Select the RUNNING tab to display the running services.
3. To stop a service, tap the service and then tap Force
stop.
¬ DOWNLOADED
¬ RUNNING
¬ ALL
Page 88

87
Location
You can select how your tablet determines its location.
Configure Location Mode
1. From the Home screen, tap Apps Settings
Location.
2. Tap the Location switch from OFF to
ON . A “Location consent” message appears, tap
Agree to confirm.
3. A “Improve location accuracy?” message appears, tap
Agree or Disagree to continue.
4. Tap Mode and select the desired option.
Security
Screen Security
This function allows you to configure a screen lock to secure
your device when you are not using it. Your tablet offers
several screen lock options, with different levels of security.
¬ Slide
When Slide screen lock is enabled, you can unlock the tablet
by swiping your finger across the screen. This is the default
screen lock, and offers no security.
1. From the Home screen, tap Apps Settings
Security.
2. Tap Screen lock Slide.
Page 89

88
¬ Face Unlock
When Face unlock is enabled, you can unlock the tablet
by looking at the screen. This option offers low security,
because someone who looks similar to you could unlock
your tablet, but you can also set up backup unlock by PIN or
pattern.
1. From the Home screen, tap Apps Settings
Security.
2. Tap Screen lock Face Unlock.
3. Tap Set it up and follow the onscreen instructions to
complete the setup.
¬ Pattern
When Pattern is enabled, you can draw a pattern, which you
create, on the screen to unlock the tablet. You can also create
a PIN, as a backup unlock.
1. From the Home screen, tap Apps Settings
Security.
2. Tap Screen lock Pattern.
3. Draw an unlock pattern and follow the onscreen
instructions to complete the setup.
Page 90

89
¬ PIN
When PIN is enabled, you can enter a numeric PIN (Personal
Identification Number), which you create, to unlock the
tablet.
1. From the Home screen, tap Apps Settings
Security.
2. Tap Screen lock PIN.
3. Enter your PIN and follow the onscreen instructions to
complete the setup.
¬ Password
When Password is enabled, you can enter an alphanumeric
password, which you create, to unlock the tablet.
1. From the Home screen, tap Apps Settings
Security.
2. Tap Screen lock Password.
3. Enter your password and follow the onscreen
instructions to complete the setup.
Page 91

90
Encrypt Tablet
You can also encrypt the contents of your tablet and require
a PIN or password to decrypt the contents each time you turn
it on.
1. From the Home screen, tap Apps Settings
Security Encrypt tablet.
2. Tap Encrypt tablet to start encryption and follow the
onscreen instructions to complete encryption.
Device Administrators
You can add or remove device administrators, used by some
applications when synchronizing with your tablet.
1. From the Home screen, tap Apps Settings
Security Device administrators.
2. Select the desired administrator.
NOTE!
Available administrators depends on the accounts you have
set up.
Page 92

91
Unknown Sources
When this option is enabled, apps can be installed from
sources other than Play Store.
1. From the Home screen, tap Apps Settings
Security.
2. Tap the Unknown sources check box to enable the
setting.
3. A message appears on the screen. Tap OK to confirm.
Credential Storage
This function allows you to install credentials from device
storage, and allow applications to access the secure
certificates. Trusted credentials are used to establish some
kinds of VPN and Wi-Fi connections.
¬ Trusted credentials
You can view credentials stored on your tablet, and enable or
disable their use.
1. From the Home screen, tap Apps Settings
Security.
2. Tap Trusted credentials to display credentials.
¬ Install from SD card
You can install encrypted certificates from an SD card.
1. Insert the memory card that contains the encrypted
certificates.
2. From the Home screen, tap Apps Settings
Security.
3. Tap Install from SD card, then choose a certificate and
follow the onscreen instructions to install the certificate.
Page 93

92
¬ Clear credentials
You can clear stored credentials. This setting only appears if
you have trusted certificates installed.
1. From the Home screen, tap Apps Settings
Security.
2. Tap Clear credentials to clear stored credentials.
Language and Input
You can select a language for your tablet’s screens, and
configure other input options.
Language
1. From the Home screen, tap Apps Settings
Language & input.
2. Tap Language.
3. Select a language from the list.
Page 94
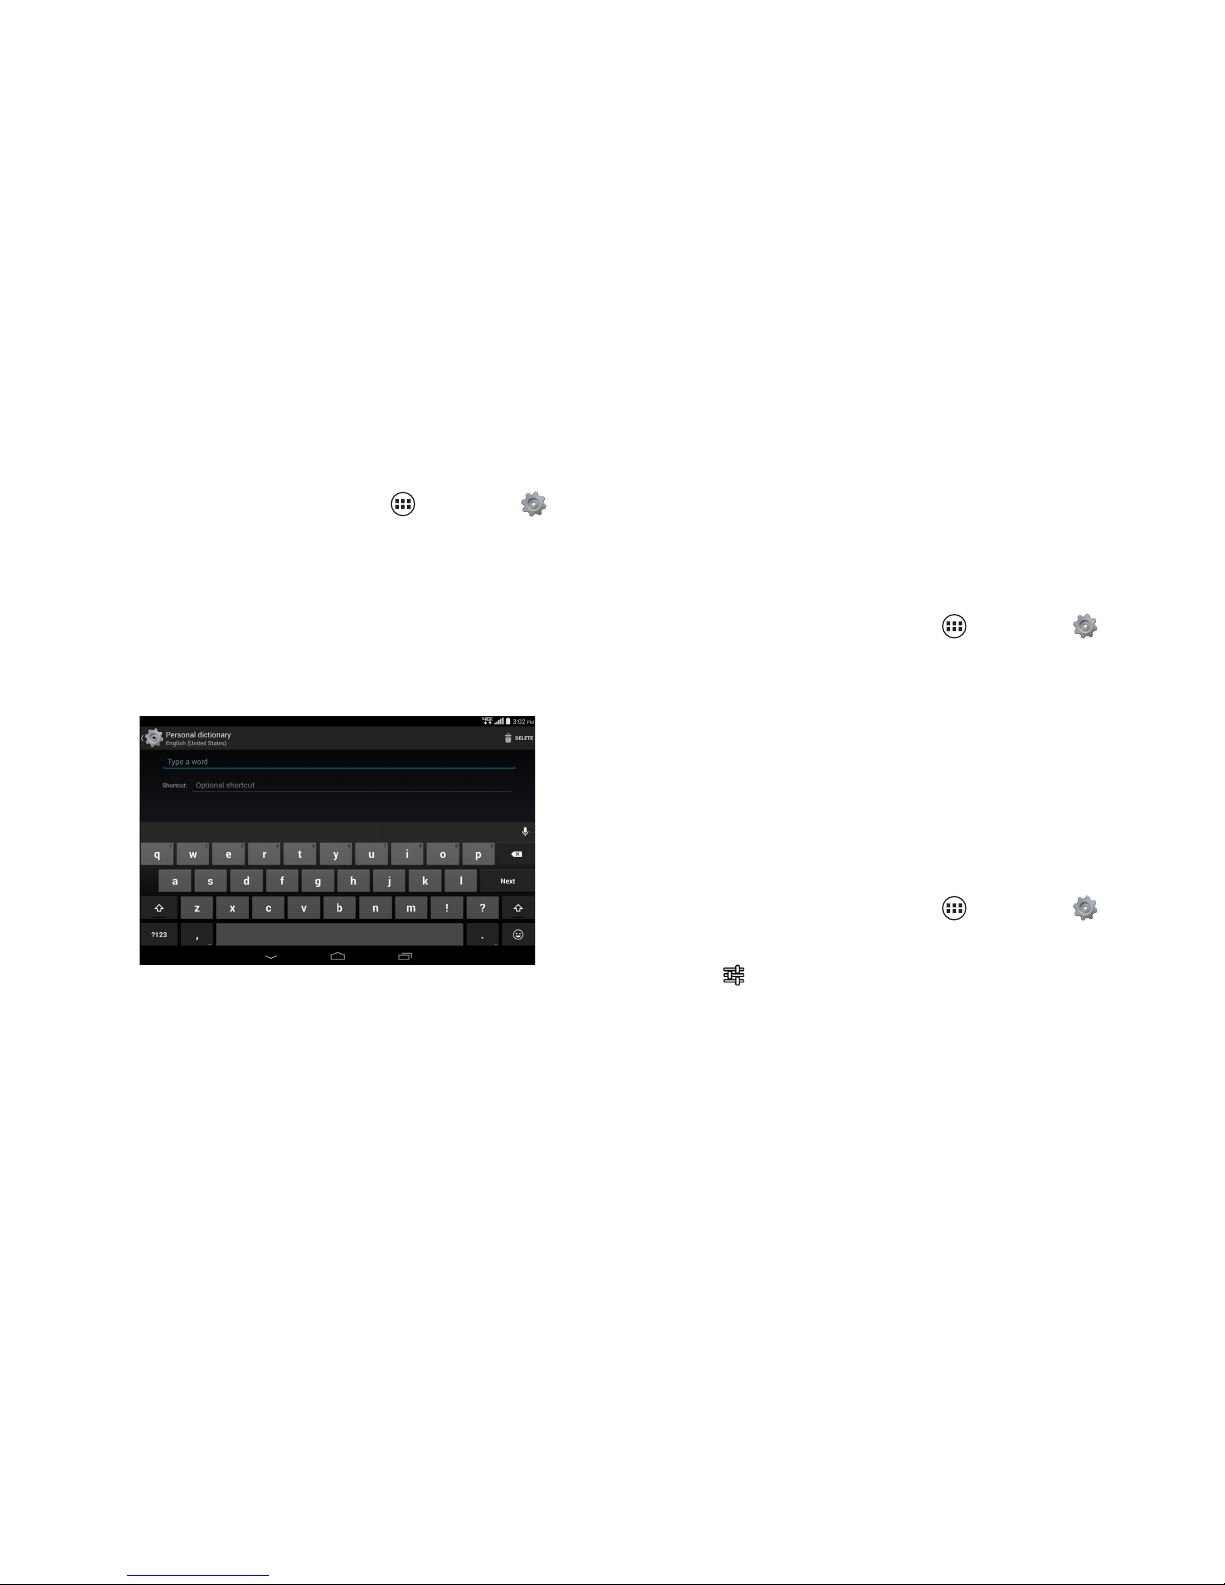
93
Personal Dictionary
1. From the Home screen, tap Apps Settings
Language & input.
2. Tap Personal dictionary.
3. Do the following:
• To add a word: Tap ADD. Then enter a word and tap
Next. Enter the shortcut, if necessary, and then tap
Done to save the word into the dictionary.
• To delete a word: Select the word to delete and tap
DELETE.
Keyboards and Input Methods
You can configure text input to your preferences.
¬ Default
You can choose the default method for entering text.
1. From the Home screen, tap Apps Settings
Language & input.
2. Tap Default.
3. Select a default text entry mode.
¬ Google Keyboard
You can configure Google Keyboard, and enable or disable it
for text input.
1. From the Home screen, tap Apps Settings
Language & input.
2. Tap the icon next to the Google Keyboard option to
configure the following:
• Languages: Select languages for the keyboard.
• Preferences: Select this option to enable the system
automatically capitalizes words in your text based
on common usage, to enable double tap on spacebar
to insert a period followed by a space, or enable the
Page 95

94
function that alerts you with a sound when the key is
pressed such as at the beginning of sentences.
• Accounts & Privacy: Select this option to switch
the accounts, sync your personal dictionary across
device, delete your synced data from Google, or send
usage statistics to Google.
• Appearance & Layouts: Select this option to specify
the keyboard theme or customize the input styles.
• Gesture Typing: Enable this option to input a word by
sliding through the letters, see the suggested word
while gesturing, or see the gesture trail.
• Text correction: Select this option to add your
personal dictionary, add more dictionaries, enable the
function so the system will not suggest potentially
offensive words, enable the function so the spacebar
and punctuation will automatically correct the
mistyped words, display suggested words while
typing, learn from Google apps and services and your
typed data to improve suggestions, use names from
Contact for suggestions/corrections, or enable the
function so the system will use the previous word in
making suggestions.
• Advanced settings: Tap to display more advanced
settings.
Page 96

95
¬ Google Voice Typing
You can configure Google voice typing, and enable or disable
it for text input.
1. From the Home screen, tap Apps Settings
Language & input.
2. Tap the Google voice typing check box to enable the
function.
3. Tap the icon next to the Google voice typing option to
configure the following:
• Languages: Select language(s).
• “Ok Google” detection: Enable the From the Google
app function to start a voice search from the Google
app. You can also enable the From any screen function
to let the system responds to your voice when the
screen is on or the device is charging, enable the
Personal results function to view personal result for
your voice searches , reteach Google the sound of
your voice, or delete the voice model that Google uses
to recognize your voice.
• Hands-free: Enable this function to allow requests
with locked device to use the voice search when using
Bluetooth devices or wired headsets.
• Speech output: Select this option to enable this
function to hear spoken responses to some of your
searches or enable it only when you are connected
with the hands-free only.
• Offline speech recognition: Select this option to
manage the downloaded languages.
• Block offensive words: When you enable this option,
the system will automatically hide recognized
offensive voice results.
• Bluetooth headset: When you enable this option, you
can record audio through the Bluetooth headset if
available.
Page 97

96
Speech
You can configure options for entering text by speaking.
¬ Voice Search
Configure the voice search settings.
1. From the Home screen, tap Apps Settings
Language & input.
2. Tap Voice Search and configure the necessary settings:
• Languages: Select language(s).
• “Ok Google” detection: Enable the From the Google
app function to start a voice search from the Google
app. You can also enable the From any screen function
to let the system responds to your voice when the
screen is on or the device is charging, enable the
Personal results function to view personal result for
your voice searches , reteach Google the sound of
your voice, or delete the voice model that Google uses
to recognize your voice.
• Hands-free: Enable this function to allow requests
with locked device to use the voice search when using
Bluetooth devices or wired headsets.
• Speech output: Select this option to enable this
function to hear spoken responses to some of your
searches or enable it only when you are connected
with the hands-free only.
• Offline speech recognition: Select this option to
manage the downloaded languages.
• Block offensive words: When you enable this option,
the system will automatically hide recognized
offensive voice results.
• Bluetooth headset: When you enable this option, you
can record audio through the Bluetooth headset if
available.
¬ Text-to-speech Output
Text-to-speech provides readout of text. For example, you
can have the contents of messages read out to you.
1. From the Home screen, tap Apps Settings
Language & input.
2. Tap Text-to-speech output.
3. Tap Google Text-to-speech Engine to enable the Google
engine.
You can tap the icon next to the Google Text-to-
speech Engine option to configure the following:
• Language: Choose a language for text readout.
• Settings for Google Text-to-speech Engine: Select
the respective option check box to enable autoupdates voices or download voices data using only
Page 98

97
Wi-Fi.
• Install voice data: Install the voice data required for
speech synthesis.
4. Configure the following settings:
• Speech rate: Choose the speed at which text is spoken.
• Listen to an example: If you have enabled a speech
synthesizer, tap this option to example option to play a
brief sample of voice output.
• Default language status: Display the default language
for text readout.
Mouse/trackpad
Set the cursor speed.
1. From the Home screen, tap Apps Settings
Language & input.
2. Tap Pointer speed.
3. Tap and drag the slider to set the speed, and then tap OK
to confirm the setting.
Page 99

98
Back Up and Reset
Back Up My Data
You can enable or disable backup of your current settings
and application data to the Google server for the Backup
account.
1. From the Home screen, tap Apps Settings
Backup & reset.
2. Tap the Back up my data check box to enable backup of
app data, Wi-Fi passwords, and other settings to the
Google server.
Automatic Restore
When you enable this option, the system will restore backed
up settings when you reinstall an application.
1. From the Home screen, tap Apps Settings
Backup & reset.
2. Tap the Automatic restore check box to enable
automatic restoration of settings from the Google
server.
Page 100

99
Factory Data Reset
Use this function to return your tablet to its factory defaults.
This setting erases all data from your tablet, including
your Google or other email account settings, system and
application data and settings, and downloaded applications.
After a reset, you will be prompted to set up your tablet the
next time you turn it on.
1. From the Home screen, tap Apps Settings
Backup & reset.
2. Tap Factory data reset Reset tablet to erase all data
on your tablet.
Accounts
You can manage accounts, including your Google, social
networking, cloud server, and Email accounts.
Add an Account
1. From the Home screen, tap Apps Settings
Add account.
2. Select an account type. Then follow the onscreen
instructions to log in to the account and complete setup.
 Loading...