

Page 1
User Guide
10
Page 2

1
Table of Contents
Section 1. Getting Started ................................................ 3
Understanding this User Guide ......................................................3
Front ............................................................................................................5
Back ..............................................................................................................5
Sides ........................................................................................................... 6
Charge the Tablet ................................................................................. 8
Memory Card .......................................................................................... 8
Turning Your Tablet On/Off ............................................................. 9
Unlocking the Screen ......................................................................... 9
Setup Wizard ........................................................................................10
Setting Up Your Google Account ................................................10
Setting Up Other Email Accounts ..............................................11
Section 2. Messaging .........................................................12
Types of Messages ........................................................................... 12
Email ........................................................................................................ 12
Gmail .........................................................................................................14
Message+ ...............................................................................................14
Section 3. Apps .....................................................................15
Managing Applications ....................................................................15
Using Recent Apps .............................................................................19
The Pre-loaded Applications ....................................................... 20
Using Camera ...................................................................................... 26
Using Gallery .........................................................................................30
Using Clock ............................................................................................ 31
Using Play Store ..................................................................................34
Using Maps ............................................................................................ 35
Widgets ...................................................................................................35
Section 4. Connections .....................................................37
Wi-Fi .......................................................................................................... 37
Bluetooth ................................................................................................39
Wi-Fi Direct ........................................................................................... 42
VPN ............................................................................................................43
Tetherin g ............................................................................................... 44
Connecting to a Computer .............................................................45
Page 3

2
Section 5. Settings .............................................................47
More Wireless and Network Settings ...................................... 47
Display .....................................................................................................54
Sound and Notification ...................................................................59
Storage ................................................................................................... 61
Battery ................................................................................................... 62
Application Manager ........................................................................63
Location ..................................................................................................65
Security ...................................................................................................65
Accounts ................................................................................................ 69
Language and Input ...........................................................................70
Back Up and Reset ............................................................................. 75
Date and Time ...................................................................................... 76
Accessibility ...........................................................................................77
Printing ................................................................................................... 81
System Updates ................................................................................ 82
Ab ou t Ta bl et ........................................................................................ 82
Section 6. Health and Safety Information ............. 84
Important Safety Precautions....................................................84
Additional Safety Guidelines .......................................................85
Caring for Your Device ..................................................................... 87
Federal Communication Commission Interference
Statement ............................................................................................. 88
RF Exposure Information (SAR) .................................................. 89
WEEE ........................................................................................................ 91
Section 7. Warranty Information .................................92
Warranty Period ................................................................................. 92
Limited Warranty Statement ...................................................... 92
Disclaimer of Warranties; Exclusion of Liability ..................93
Page 4

3
Section 1. Getting Started
Understanding this User Guide
The sections of this guide generally follow the features of
your device:
• The safety information beginning on page 84 provides
the important information that you should know before
using your device.
This guide gives navigation instructions according to
the default display settings. If you select other settings,
navigation steps may be different.
Unless otherwise specified, all instructions in this guide
assume that you are starting from the Home screen. To get to
the Home screen, you may need to unlock the device.
All screen images in this guide are for your reference only.
Actual displays may vary, depending on the software version
of your device and any changes to the device’s Settings.
NOTE!
Instructions in this guide are based on default settings,
and may vary from your device, depending on the software
version on your device, and any changes to the device’s
Settings.
Page 5

4
Special Text
In this guide, you’ll find text that is set apart from the rest.
These are intended to point out important information, share
quick methods for activating features, to define terms, and
more. The definitions for these methods are as follows:
• Notes: Presents alternative options for the current
feature or menu.
• Tips: Provides quick or innovative methods, or useful
shortcuts.
• Important: Points out important information about the
current feature that could affect performance.
• Caution: Brings to your attention important information
to prevent loss of data or functionality, or even damage
to your device.
Text Conventions
This guide provides condensed information about how to
use your device. To make this possible, the following text
conventions are used to represent often-used steps:
Arrows are used to represent the sequence
of selecting successive options in longer, or
repetitive, procedures.
For example:
“From the Home screen, tap Apps Settings .”
Page 6
5
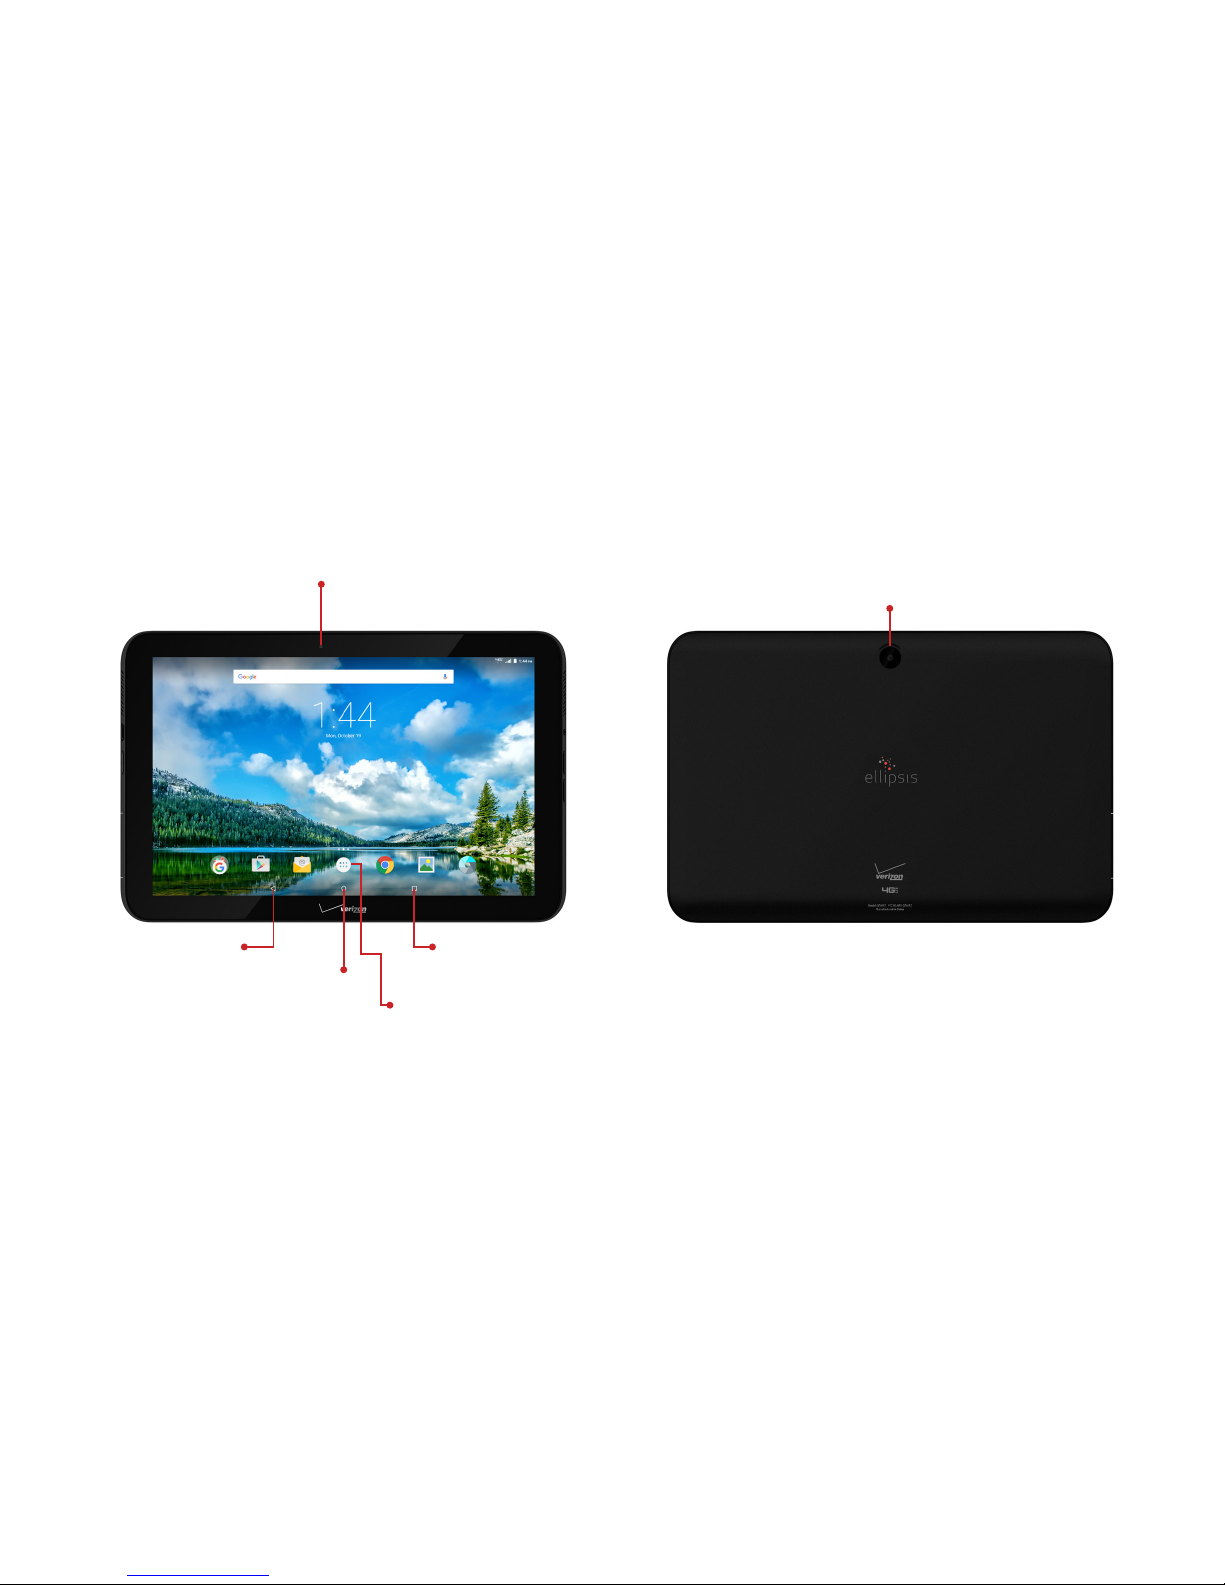
Front
Front Camera: Take pictures and record videos.
Back
Back Camera: Take pictures and record videos.
Front Camera
Home
Recent Apps
Back
Apps
Back Camera
Page 7

6
Sides
Speaker
Volume Buttons
Nano SIM Card Slot
Power/Lock Button:
• Press and hold to turn the device ON/OFF;
• When the device is turned ON, press and hold to access
Airplane mode or Restart the device;
• You can also lock the device or to wake the screen for
unlocking, press this button.
Volume Buttons:
• From the Home screen, press to adjust the system
volume;
• Press to adjust volume during playback;
• Press to mute an alert notification.
Speaker: Emit sound.
Headset Jack: Plug in a 3.5mm headset or earphones (not
included).
microSD Card Slot: Install a memory card (sold separately)
for storage of songs, pictures, and other data.
Power/Lock Button
USB/Charger Port
Speaker
microSD™ Card Slot
Headset Jack
Page 8
7
Nano SIM Card Slot: Contain the 4G LTE SIM card
(pre-installed).
NOTE!
Your tablet only supports nano SIM cards. The nano SIM
card should come pre-installed in your device. The Verizon
Wireless 4G LTE Nano SIM Card is compatible with any
Verizon Wireless 4G LTE certified device that uses the same
size nano SIM card. The 4G LTE Nano SIM Card can move from
one device to another, and your wireless service will support
the services that are compatible with your new device and
service plan.
To see which devices are compatible with the Verizon
Wireless 4G LTE Nano SIM Card, visit verizonwireless.com/
certifieddevice.
USB/Charger Port: Charge or sync music and files by
connecting the provided USB cable.
CAUTION!
Use only an approved charger to charge your tablet.
Improper handling of the charging port, as well as the use of
an incompatible charger, may cause damage to your device
and void the warranty.
Your tablet is equipped with an internal rechargeable
battery that is non-removable. You should never attempt to
open or disassemble this tablet. Doing so may cause damage
that voids your warranty.
Page 9
8
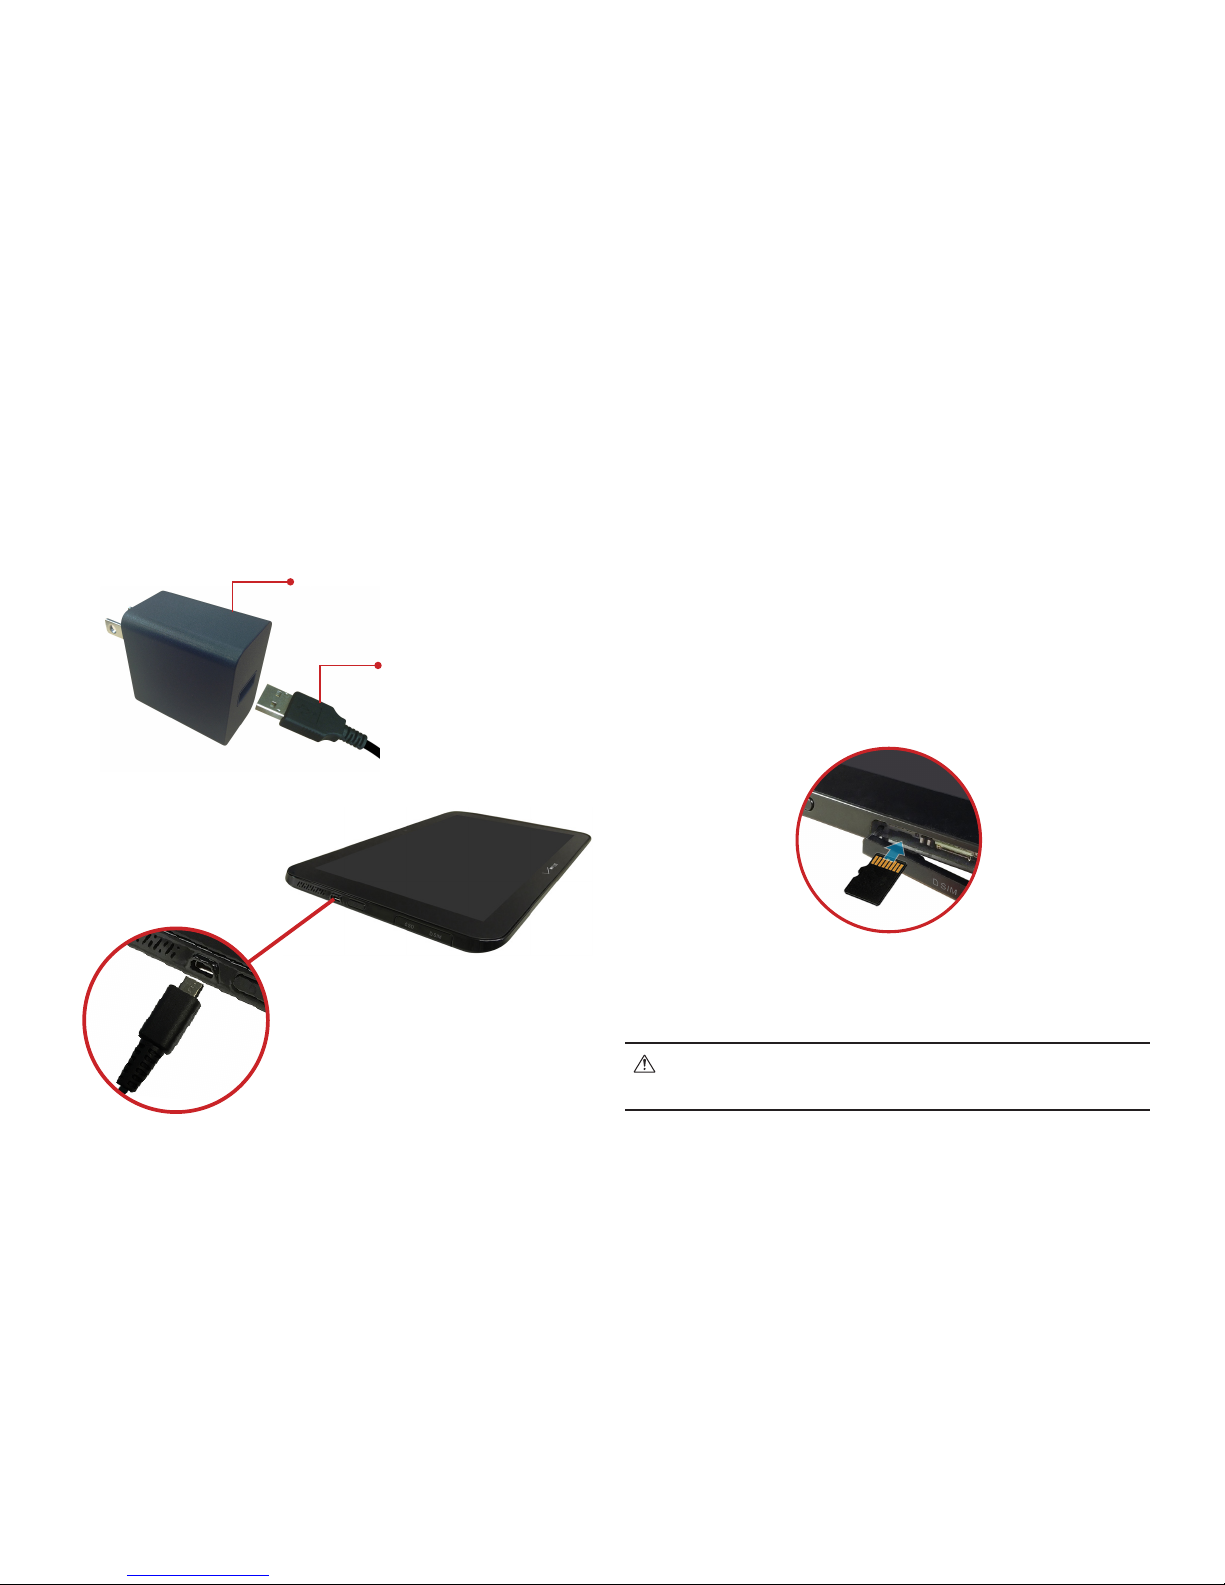
Charge the Tablet
Before turning on your tablet, charge it fully. Be sure to use
the charger that came with your tablet.
USB Cable
Charger
Memory Card
The device supports up to 32GB microSD memory cards. The
microSD card is sold separately. The manufacturer does not
guarantee the product’s compatibility with microSD cards
from all providers.
1. With the tablet facing up, open the card slot cover.
2. Insert the microSD card with the gold contacts facing
up. Then carefully push the microSD card into the slot (as
shown) until it clicks into place.
3. Close the card slot cover.
4. To remove the card, gently push the top edge of the card
inwards to release it, and pull it out of the slot.
CAUTION!
DO NOT apply pressure to the center of the card.
Page 10
9
Turning Your Tablet On/Off
• To turn your tablet on, press and hold the Power/Lock
button for a couple of seconds until the screen lights
up.
• To turn your tablet off, press and hold the Power/Lock
button until the tablet options are displayed. Tap
Power off.
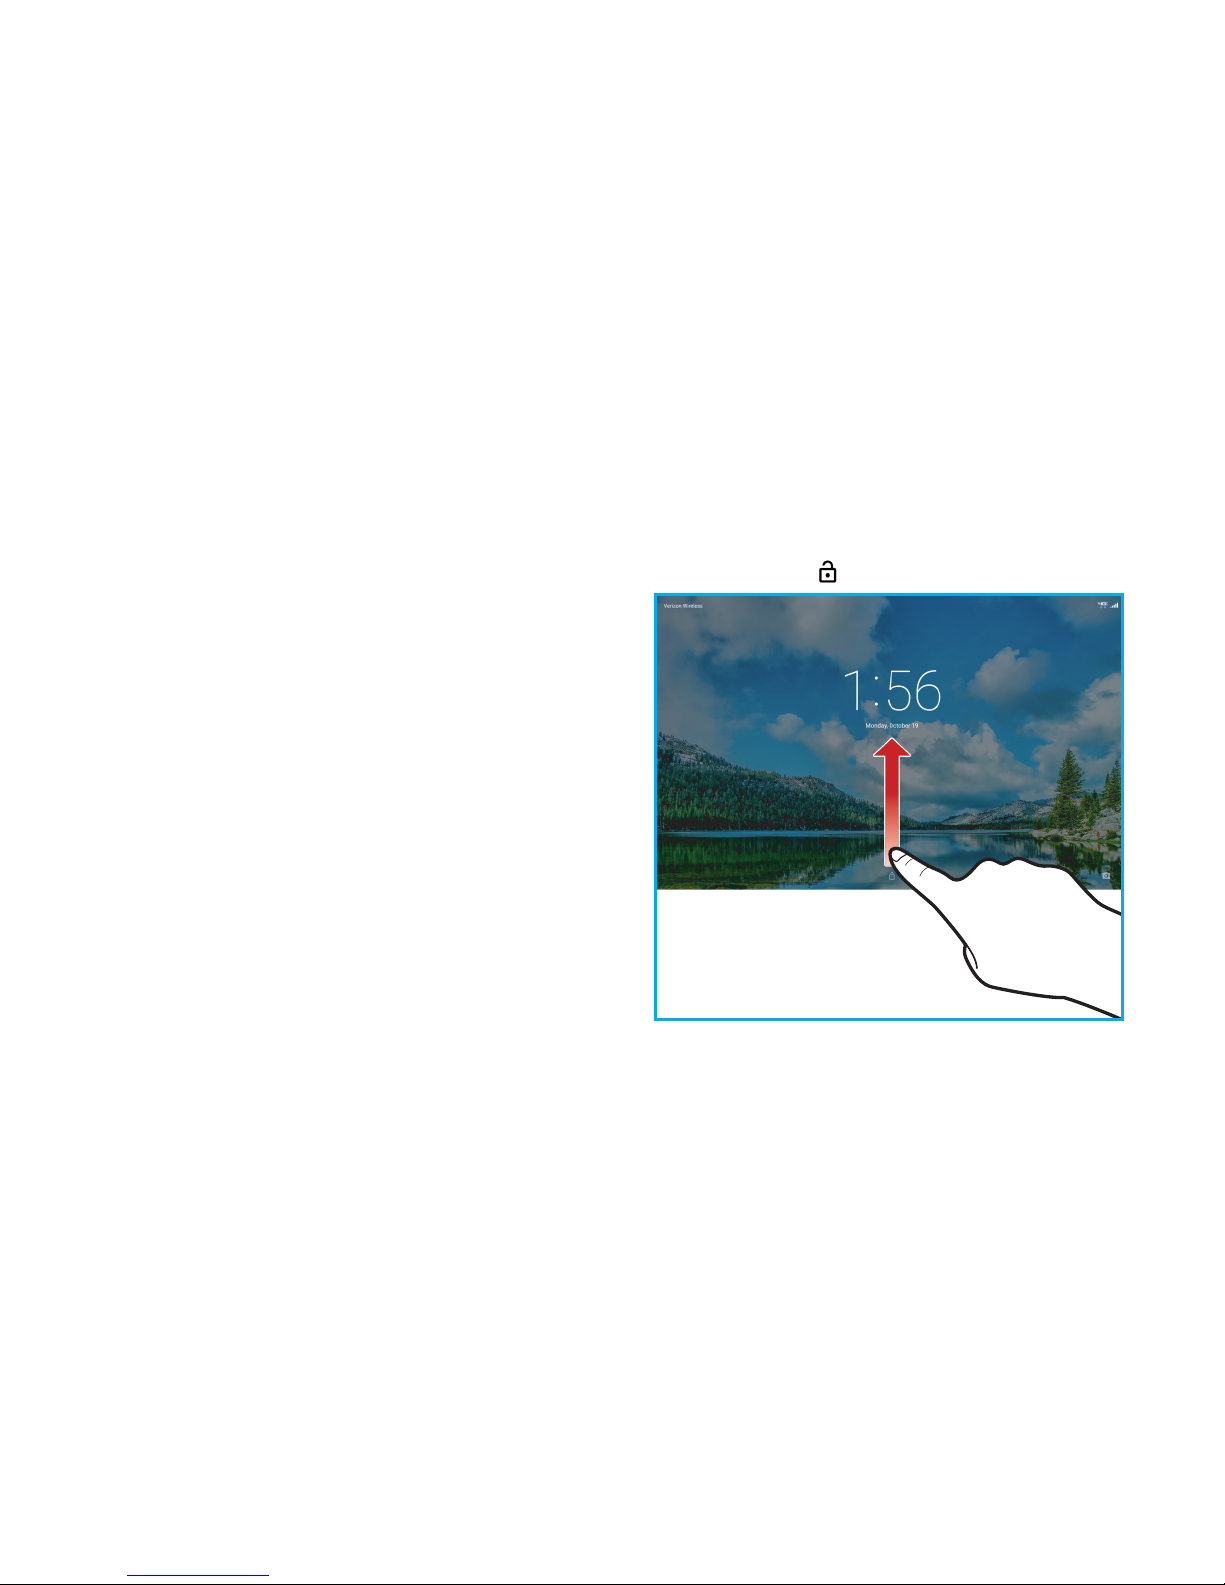
Unlocking the Screen
1. Press the Power/Lock button to turn on your screen.
Your Lock Screen will appear.
2. Drag the lock icon ( ) upwards to unlock the screen.
Page 11
10
Setting Up Your Google Account
Your Gmail™, Google™ contacts, and Google calendar events
can all be loaded to your tablet automatically.
Follow the onscreen instructions to quickly set up your Gmail
account.
Record your Google account information here. Please keep
this document in a safe place.
Username: ____________________________@gmail.com
Password: _____________________________
Setup Wizard
The Setup Wizard will launch when you start using the device
for the very first time, which will guide you through the
required basic settings of the tablet.
Complete the Setup Wizard to choose your preferred
language, activate network connection, set up your account,
and more.
1. Turn on your tablet by pressing and holding the Power/
Lock button for a couple of seconds until the screen
lights up.
2. Follow the prompts to set up your new device:
• Select the display language
• Configure the Wi-Fi network connection
• Set up/Create your Google account
• Set the screen lock
• Get content you have backed up with Google account
• Turn on location services
TIP!
You can change these settings while using the tablet from
the Settings menu.
Page 12

11
Setting Up Other Email Accounts
To add additional email accounts, tap Apps Settings
Accounts Add account. Tap one of the options and
enter your email address, password, and any other necessary
information.
• Appstore is for registering/creating your Amazon
Appstore account.
• Cloud is for registering your Verizon account before
using Verizon Cloud.
• Exchange is for Exchange server work email accounts.
• Google is for adding other Gmail accounts.
• Personal (IMAP) / Personal (POP3) is for most personal
email accounts. For account details, contact the account
provider.
Page 13
12
Section 2. Messaging
Types of Messages
Your device supports the following messages types:
• Email: Send and receive email using popular email
services.
• Gmail: Send and receive emails via Gmail, Google’s web-
based email.
• Message+: Send and receive text, picture and video
messages seamlessly from your phone, tablet or the web
using your Verizon Wireless phone number.
NOTE!
Depends on your network and service plan, some of
the Messaging service may not be available. For more
information, please contact Verizon Wireless service center.
Email
Email allows you to send and receive email using popular
email services.
Configuring Email Accounts
1. From the Home screen, tap Email .
2. Enter your email address and password, and then follow
the prompts to set up your email account.
From the Home screen, you can also tap Settings
Accounts Add account, and then select your email
provider and follow the onscreen instructions to set up
your email account.
Page 14

13
Composing Email
1. From the Home screen, tap Email .
2. Select an account, and then tap .
3. Tap the required fields to enter recipients, a subject, and
the email text.
To attach an attachment, tap Attach file.
4. When done, tap to send email.
Combined View
The Combined view function allows you to view email from all
accounts together.
1. From the Home screen, tap Email .
2. Tap the Menu ( ) icon on the top left corner, and then
choose Combine view.
Synchronizing Your Email Account
You can refresh your account to update your device from the
servers.
1. From the Home screen, tap Email .
2. Swipe down to refresh.
Change Email Account Settings
You can use Account settings to change your email account
settings.
1. From the Home screen, tap Email .
2. Tap the Menu ( ) icon on the top left corner, and then
choose Settings.
3. Select an account and change the settings as desired.
NOTE!
Depending on the email service provider, the related Email
settings may differ.
Page 15

14
Gmail
Gmail allows you to send and receive emails via Gmail.
From the Home screen, tap Apps Gmail .
For more information about Gmail, visit:
http://www.google.com/mobile/gmail/
Message+
Verizon Messages allows you to send and receive text,
picture and video messages seamlessly from your phone,
tablet or the web using your Verizon Wireless phone number.
From the Home screen, tap Apps Message+ .
Page 16
15
Section 3. Apps
Managing Applications
The Apps screen holds all applications installed on your
tablet. Applications that you download and install from Play
Store or from the web are displayed on the Apps screen.
1. From the Home screen, tap Apps .
2. From the Apps screen, you can:
• Move between screens: Just slide your finger left or
right until the next screen appears so you can browse
all apps on your tablet.
• Open an app: Tap its icon to launch the app.
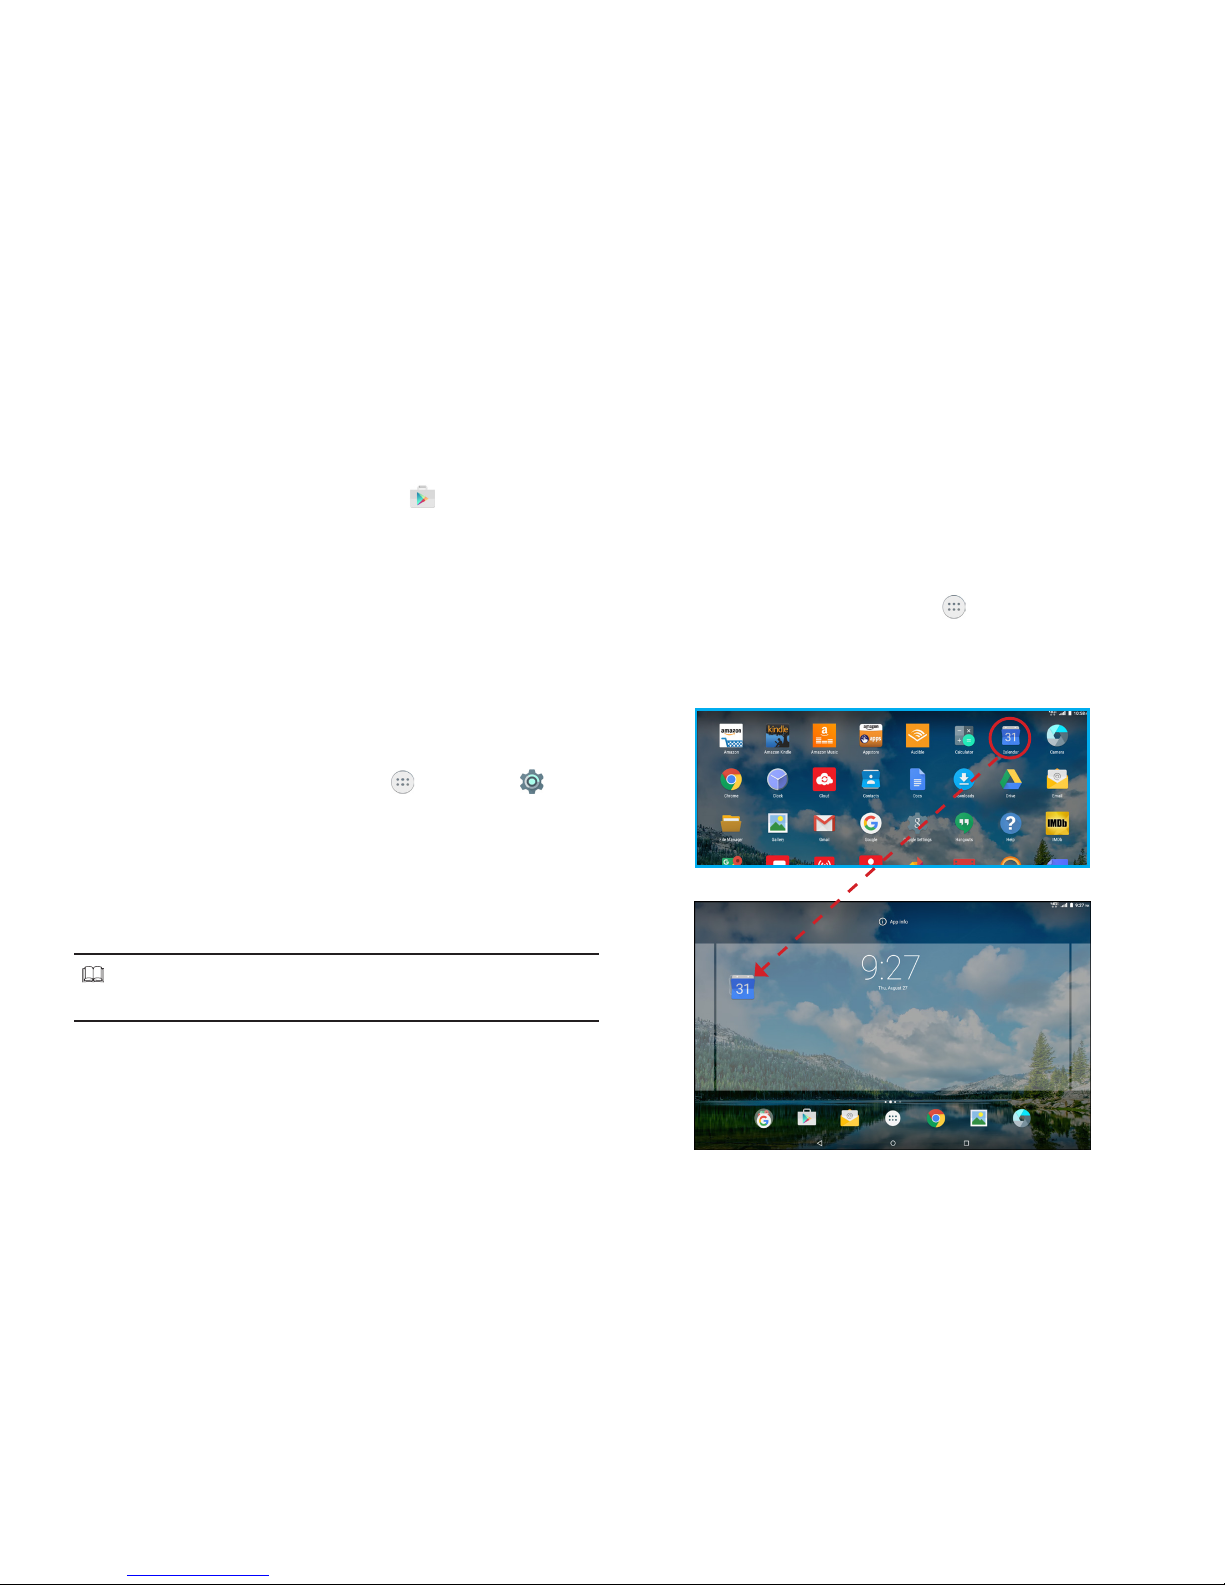
• Place an app shortcut on the Home screen: Tap and
hold the app icon, slide your finger, and lift your finger
to drop the icon in place on the desired home screen
page.
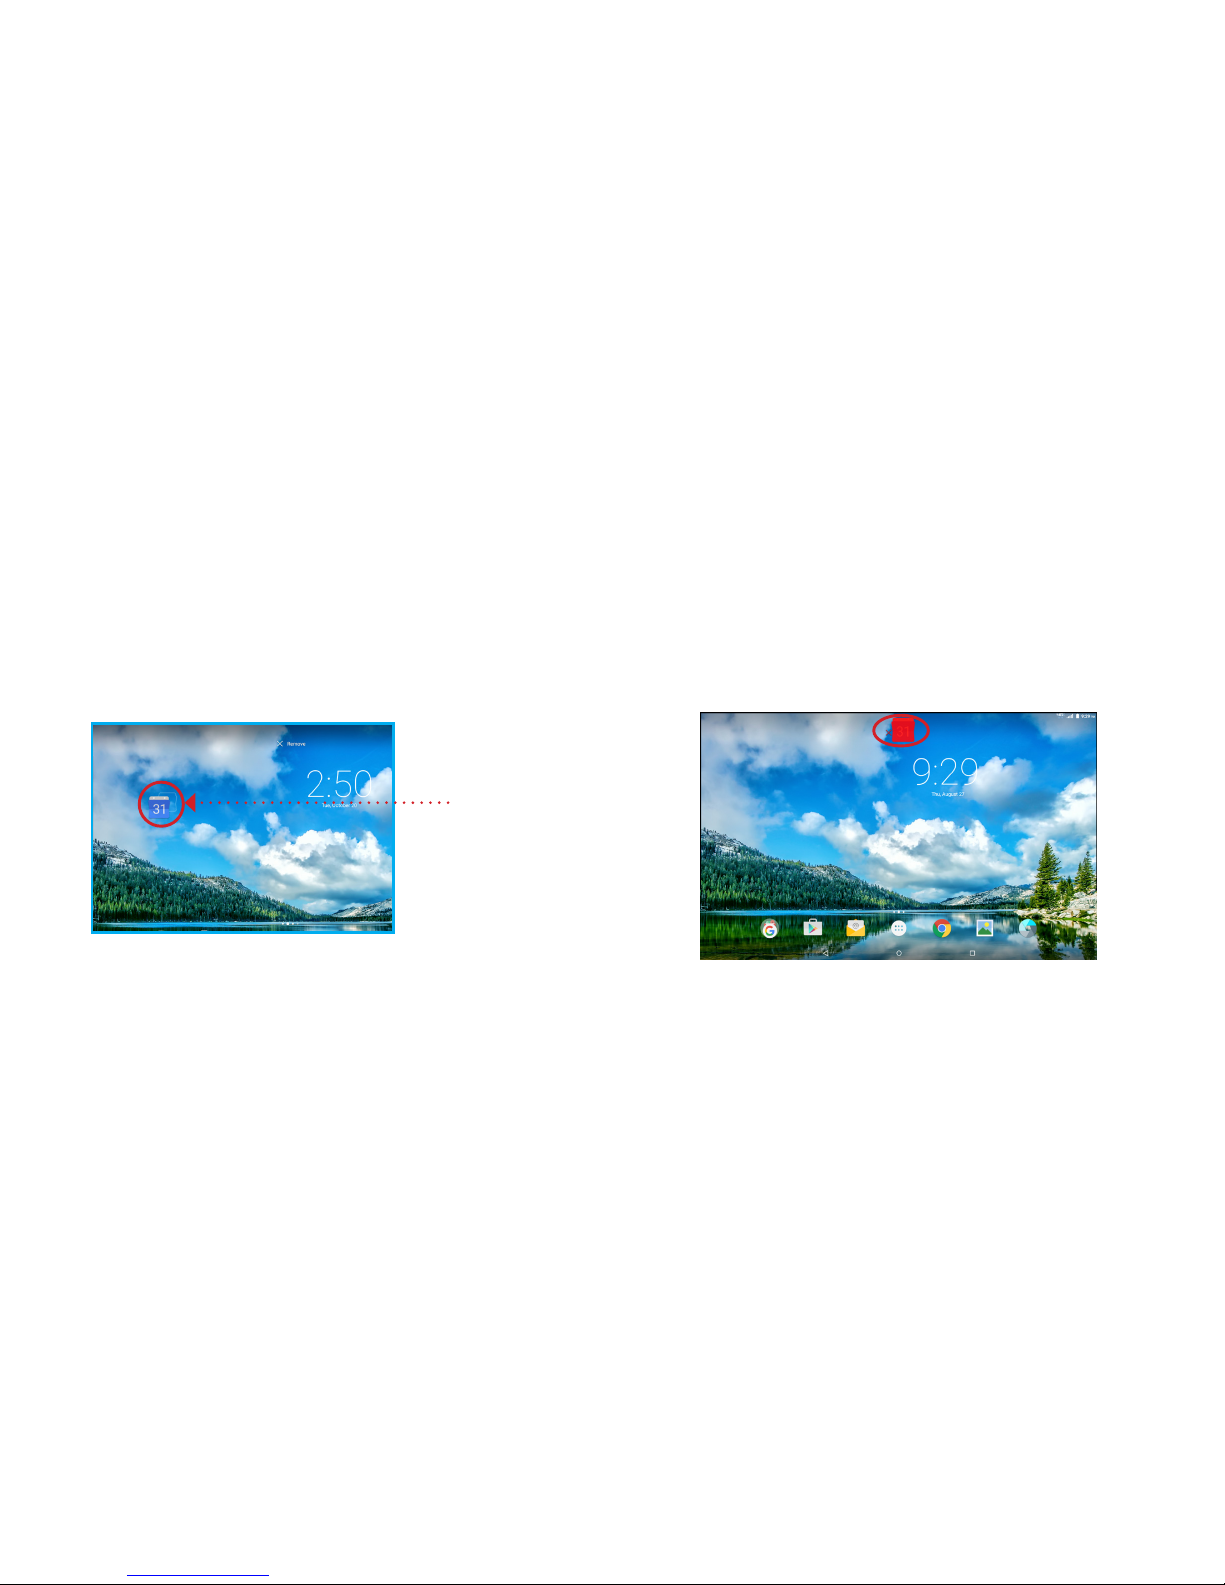
TIP!
To remove the shortcut of the app from the Home screen, tap
& hold it, slide your finger toward the top of the screen, and
then drop the app over the X Remove icon.
NOTE!
To browse widgets, tap and hold the screen from the Home
screen. Then tap WIDGETS at the bottom of the Home
screen.
Page 17
16
Downloading and Installing New Apps
From the Home screen, tap Play Store to find new apps.
Browse the app stores and follow the prompts to download
and install apps on your tablet.
Uninstalling Apps
You can remove apps that you have downloaded and installed
on your device.
To remove an app:
1. From the Home screen, tap Apps Settings
Application manager.
2. Select the app you would like to remove, and tap
UNINSTALL OK.
• From the Apps screen, tap and hold the app’s icon
then drag it to Uninstall.
NOTE!
Pre-loaded apps cannot be uninstalled.
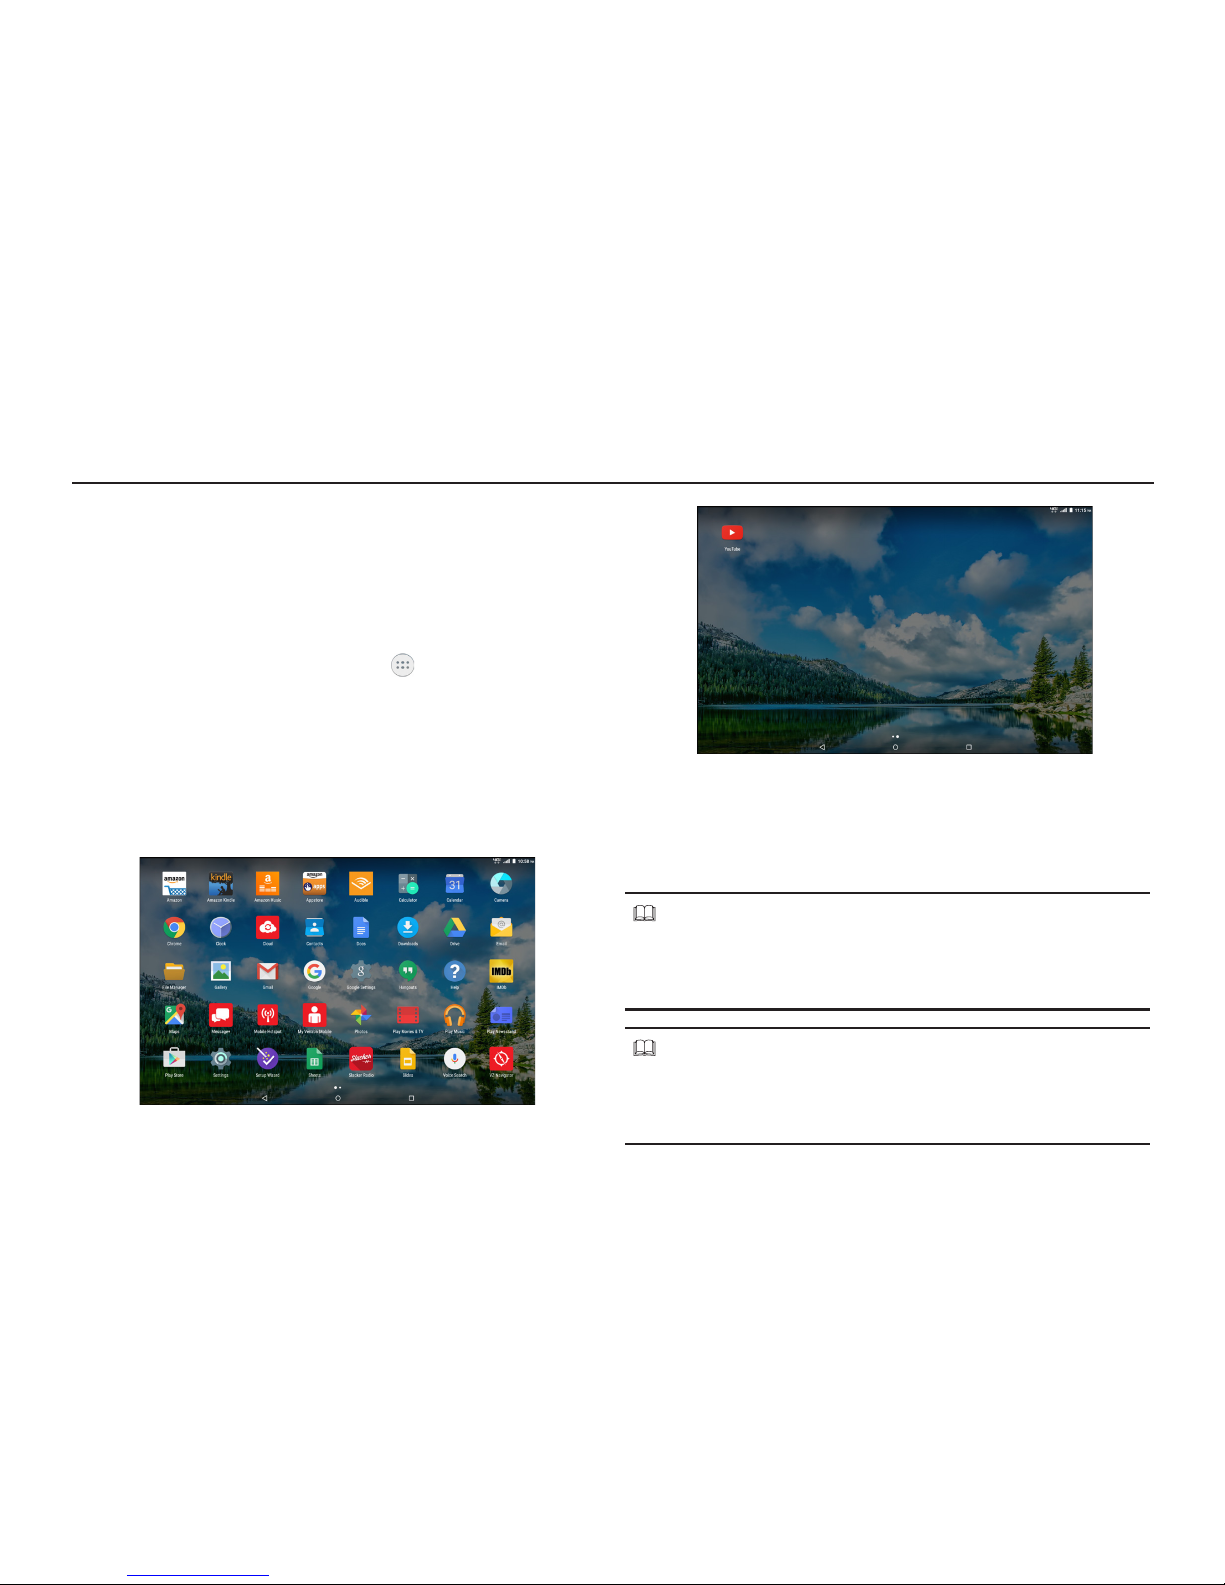
Creating App Shortcuts
You can access to some of your favorite applications easily
by creating app shortcuts on your Home screen.
To create an app shortcuts:
1. From the Home screen, tap Apps .
2. From the Apps screen, tap and hold the app’s icon then
drag it to the Home screen.
Page 18
17
Organizing the App Shortcuts
Once you create many app shortcuts on your Home screen,
you can organize the desktop by moving or deleting the
existing app shortcut. You can also create a “folder” to
manage these app shortcuts.
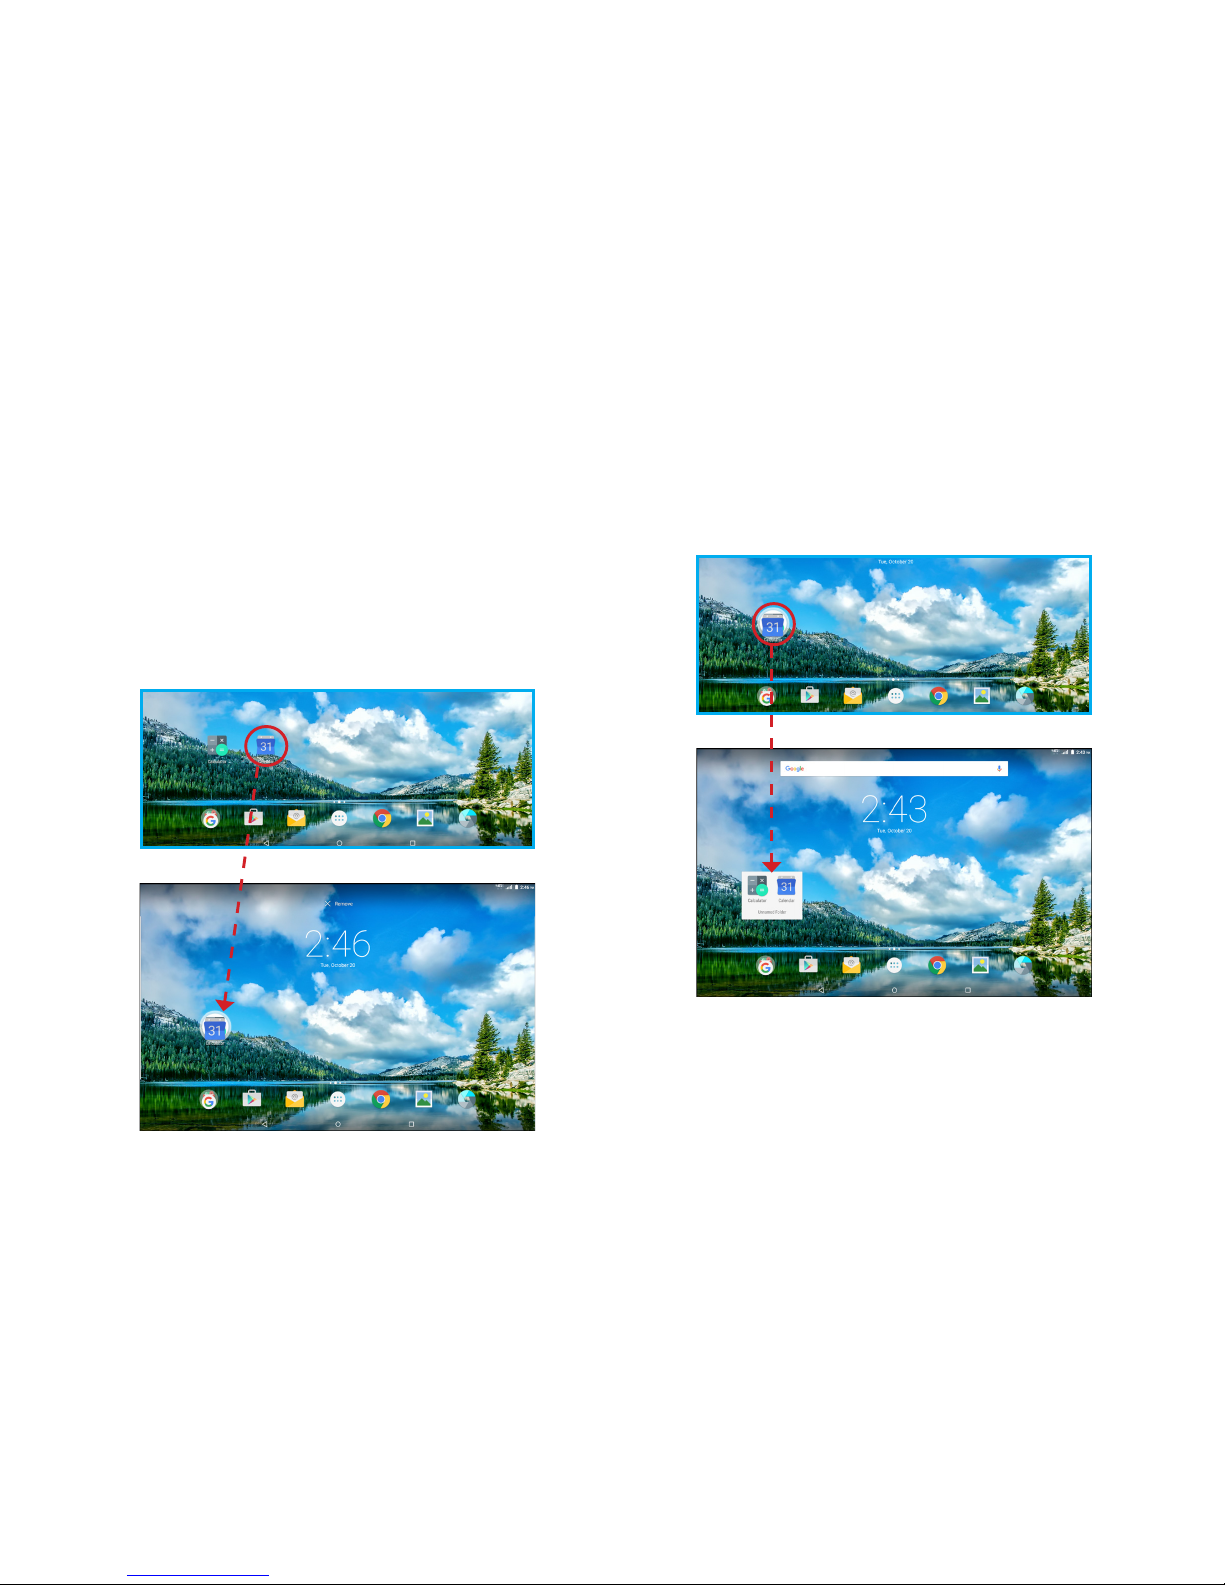
¬ Moving the app shortcut
Tap and hold the app shortcut until it displays as movable
mode, and then drag it to the place you want.
¬ Removing the app shortcut
You can free up space for new app shortcuts by removing
existing app shortcuts on your Home Screen.
To remove an app shortcut:
1. On the Home screen, tap and hold an app shortcut until
the X Remove appears on top of the screen.
2. Drag the app shortcut to X Remove and release.
You can also move the app shortcut to a different screen. Tap
and hold the app shortcut until it displays as movable mode,
and then drag it to the edge of the current screen. Wait for
awhile and the screen will switch to the next home screen
automatically. Drag the app shortcut to the desired position
on the new screen and release.
movable mode
Page 19
18
¬ Creating app folder
Once you create many app shortcuts on your Home screen,
you can create “folder” to manage the app shortcuts.
To make a new folder on your Home screen, stack one app on
top of another.
1. On the Home Screen, tap and drag an app shortcut onto
another app shortcut until a white circle appears.
2. You can add multiple apps in your folder by repeating
step 1.
3. To open the folder, tap on the folder icon.
4. From the opened folder, you can:
• Tap the app shortcut to launch the application.
• Tap Unnamed Folder to change the folder name.
Page 20
19
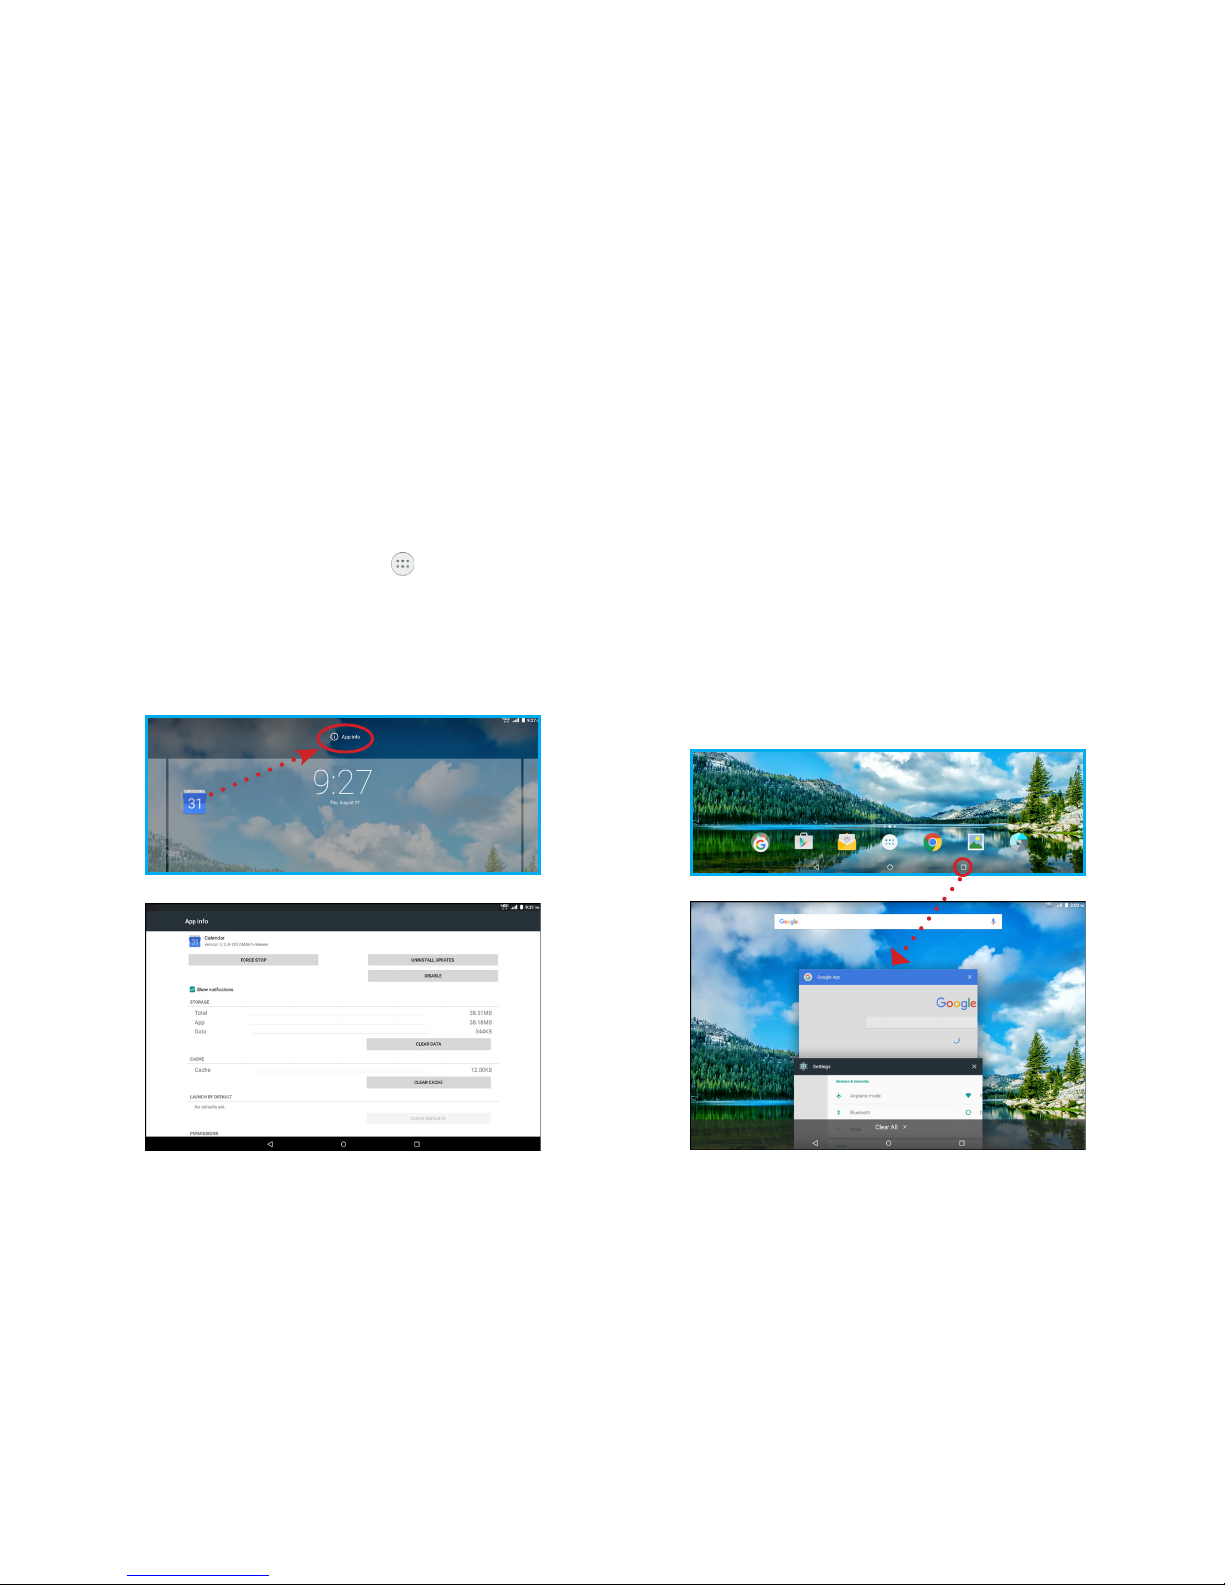
Viewing App Info
While creating a shortcut for the app, you can view the
detailed app information.
1. From the Home screen, tap Apps .
2. While holding an app on the Apps screen, the App info
will appear on the top of the Home Screen.
3. Drag the app to App info to display its detailed
information.
Using Recent Apps
The Recent Apps screen displays a list of app shortcuts
based from your recently launched apps. You can also use
this screen to go back to or switch between the apps you
recently launched.
To access the Recent Apps screen:
1. From the Home screen, tap the Recent Apps icon.
2. The Recent Apps list displays all of your recently
launched apps.
Page 21

20
3. From the Recent Apps list, you can:
• Tap on the app you want to launch.
• To remove the app from the list, swipe it left or right.
• To clear the list, tap Clear All.
The Pre-loaded Applications
From the Home screen, tap Apps to display the pre-loaded
apps. Simply tap the desired icon to launch the application.
Amazon
Amazon app lets you shop and manage your Amazon orders
from anywhere. Browse and shop by department, compare
prices, read reviews, share products with friends, make
purchases, and check the status of your orders.
Amazon Kindle
Amazon Kindle lets you read more than one million
eBooks available in the Kindle store. Enjoy personalized
recommendations, customer reviews, and automatic syncing
with other Kindle-capable devices you own.
Amazon Music
Amazon Music lets you play your Amazon Music purchases,
AutoRip CDs, and imported music instantly from the cloud.
Appstore
Amazon Appstore lets you purchase apps from the Amazon
Appstore and install them to your device.
Page 22
21
Audible
Audible lets you listen to books while you are on the go.
Calculator
Launch Calculator and then you can use your device to
perform mathematical calculations.
Calendar
Your device’s Calendar allows you to record events and
appointments to manage your schedule.
You can also use the Calendar widget in the WIDGETS tab.
Camera
Camera lets you take pictures and record video with your
device.
For more information, refer to the “Using Camera” section.
IMPORTANT!
Do not take videos of people without their permission.
Do not take videos in places where cameras are not allowed.
Do not take videos in places where you may interfere with
another person’s privacy.
Chrome
Google Chrome is a full function web browser that lets you
surf the Internet easily.
For more information about Google Chrome, visit:
http://support.google.com/chrome
Clock
Tap Clock to display the current date and time on the screen.
The Clock also provides you with the alarm, timer, and
stopwatch functions.
Cloud
Verizon Cloud allows you to back up your contacts, photos,
videos, music, documents, and text and media messages to
secure cloud storage.
Contacts
Contacts allows you to create a new contact and manage
your contacts.
Page 23
22
Docs
Docs allows you to create, edit, or share documents and work
together with others.
Downloads
Files, apps, and other items that you have downloaded from
the Web, Gmail, Email, or in other ways, are stored in your
device’s internal storage. Use Downloads to view, reopen, or
delete what you have downloaded.
Drive
Drive allows you to back up your videos, photos, and
documents to Google Drive.
Email
Email lets you send and receive email using popular email
services.
For more information, refer to the “Email” section.
File Manager
File Manager allows you to can manage the files and
applications.
Gallery
You can use Gallery to view, share, and manage pictures and
videos.
Gmail
Gmail lets you send and receive emails via Gmail, Google’s
web-based email.
Google
Google allows you to search the web, or applications,
contacts and music stored on your device.
Google Settings
You can easily change your Google account settings by using
Google Settings.
Page 24
23
Message+
You can use Verizon Messages to send and receive text,
picture and video messages seamlessly from your phone,
tablet or the web using your Verizon Wireless phone number.
Mobile Hotspot
Mobile Hotspot allows you to share your mobile network to
your computer, other smartphone/tablet, or any device that
supports Wi-Fi connection.
My Verizon Mobile
My Verizon Mobile allows you to access self-serve
functionality for managing your wireless account directly
from your device.
NOTE!
You can use My Verizon Mobile free of charge. You will not
incur any airtime or megabyte charges when you use My
Verizon Mobile in the national Enhanced Service Area.
Photos
Photos allows you to manage your Google+ photos, albums,
and videos.
Hangouts
The instant messaging and video chat platform developed
by Google, Hangouts, will let you reach friends easily and
happily.
Help
You can get information about using your device, including
videos, useful tips, and other information.
IMDb
With IMDb, you can find showtimes, watch movie trailers,
rate movies and TV shows, explore popular TV shows, share
movie information, and more.
Maps
You can use Google Maps to find your current location, get
directions, and other location-based information.
For more information, refer to the “Using Maps” section.
NOTE!
You must enable location services to use Maps and some
features require Standalone or Google location services.
Page 25

24
Play Movies & TV
Play Movies & TV allows you to watch movies and TV shows
purchased or rented from Google Play. Watch your favorite
movies and shows instantly on your Android phone or tablet,
or on any HDTV using Chromecast. You can also download
and watch from anywhere, even when you’re not connected.
Play Music
Play Music lets you shop for millions of songs from your
favorite artists, including hundreds of free tracks from the
biggest names in Rock, Pop, Hip-Hop, and more.
Play Newsstand
Play Newsstand enables you to subscribe to the news
and magazines you are interested and build your very own
newsroom on your device.
Play Store
Google Play Store can provide you with all your favorite
books, movies, apps, and games are all in one place that’s
accessible from the Web and your device.
For more information, refer to the “Using Play Store” section.
NOTE!
You need a Google account set up on your device to
download apps and music.
Settings
Launch Settings to customize your device.
For more information, refer to the “Settings” section.
Setup Wizard
Setup Wizard guides you through setting up your device
before the initial usage.
Sheets
Sheets allows you to create, edit, or share spreadsheets and
work together with others.
Slacker Radio
Slacker Radio is a free streaming music service. When you
listen to music, the Wi-Fi or data connection will be used.
Page 26
25
Slides
Slides allows you to create, edit, or share presentations and
work together with others.
Voice Search
Voice Search allows you to search the web and access things
on your device just by speaking.
VZ Navigator
You can use VZ Navigator to find, share and navigate to
millions of locations, avoid traffic and drive or walk with
ease.
NOTE!
Download, subscription, and airtime required for use; airtime
and data usage for download only. Roaming rates may apply.
VZ Navigator only available in National Enhanced Services
Coverage Area; accuracy and completeness of information is
not guaranteed; information about location of device will be
used to deliver service. You must have VZ Navigator added to
your account in order for GPS features to work.
YouTube
YouTube lets you view and upload YouTube videos from your
device.
Page 27
26
Using Camera
The Camera app allows you to take pictures and record
videos using your device.
To launch Camera, tap Camera .
Taking Pictures
After launching Camera, the image from the camera lens will
be displayed on the screen.
Follow the instructions below to take a picture:
• While using Camera, hold the device in either landscape
or portrait orientation. The camera screen orientation
and the onscreen menu/function icons will adjust
depending on how you are holding the device.
• You can use the screen display as a viewfinder. To
compose your picture, aim the camera at the subject.
• Use the onscreen menu icons or tap to set up the
camera, including changing image settings, selecting the
banding filter, and more.
• Pinch the screen to zoom in/out on the subject.
• Tap to take the picture.
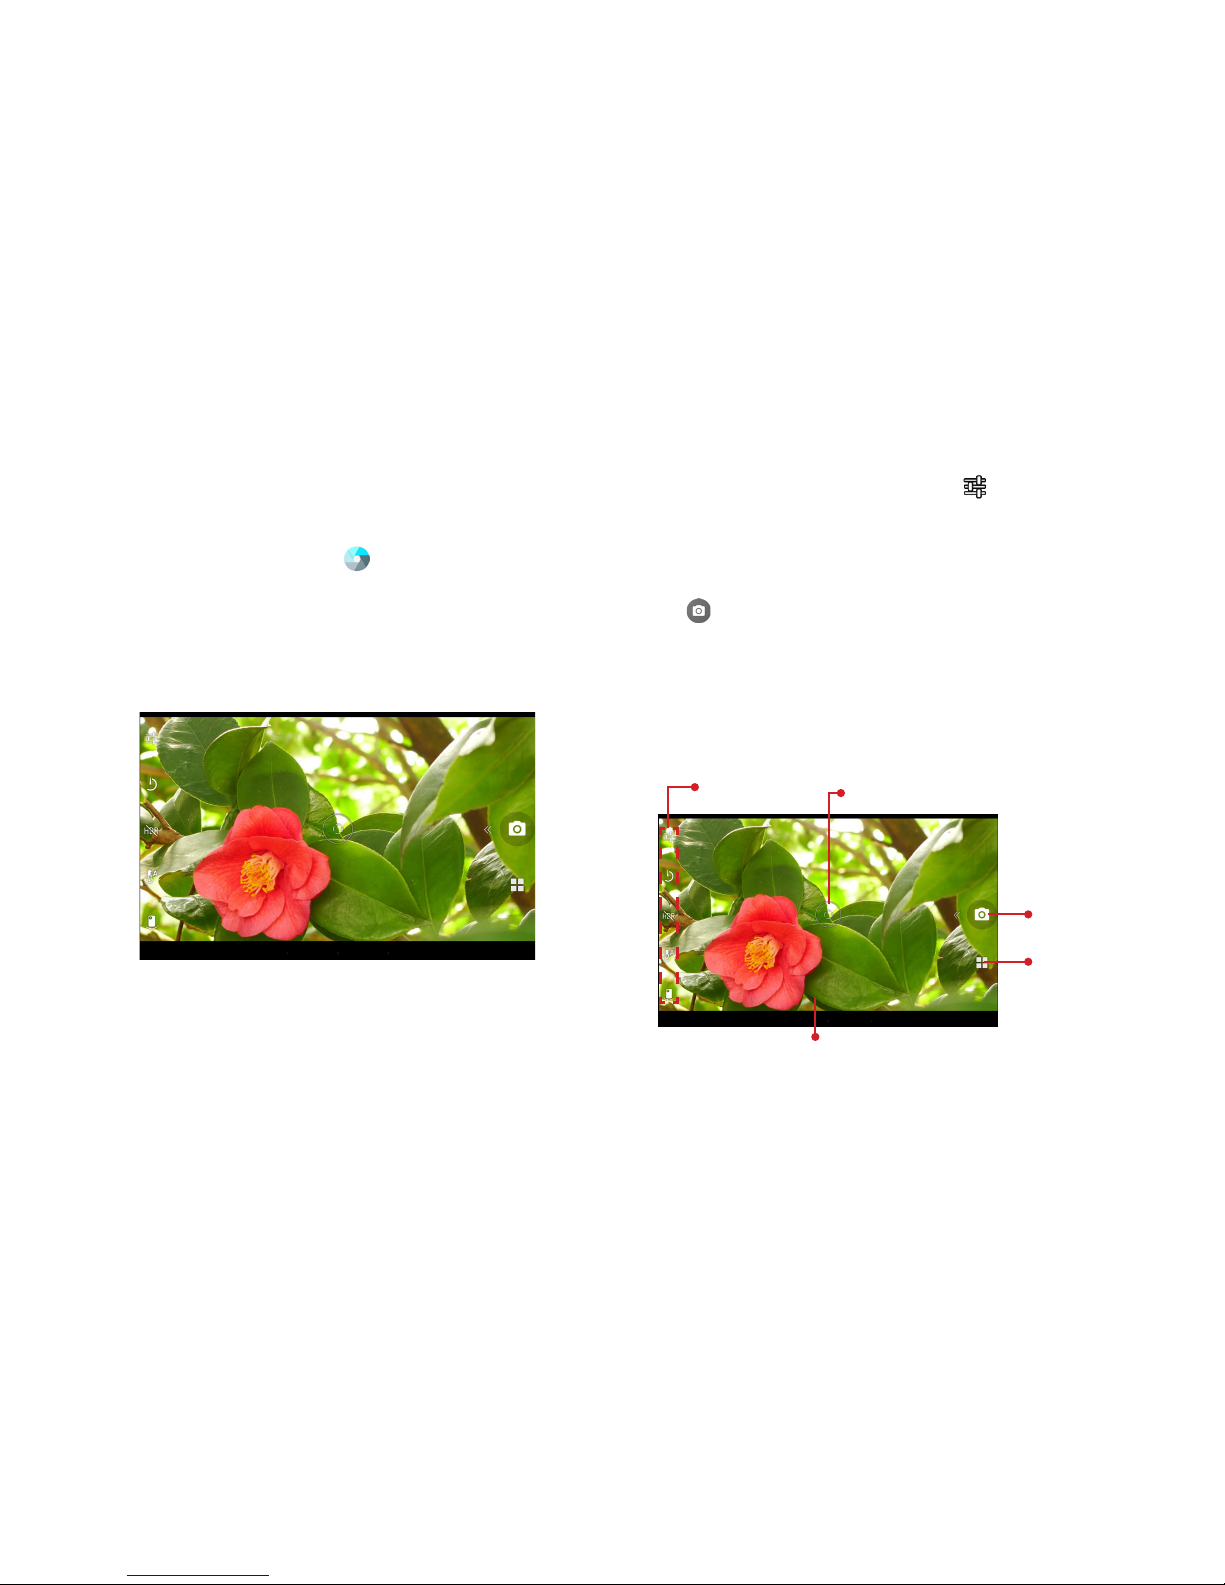
Onscreen Controls
On the camera screen, the onscreen controls allow you to
take the picture and change the camera settings.
Shutter
Mode
selection
Settings
Viewfinder
Focus frame
• Shutter: Tap to take a picture.
• Mode: Tap to switch to Video mode.
Page 28

27
• Settings: Tap to change the camera settings.
Recording Videos
1. From the Home screen, tap Camera .
2. Tap and select Video ( ) to switch to Video mode.
3. Tap to start recording.
4. While recording, do one of the following:
• Pinch the screen to zoom in/out on the subject.
• Touch the screen to take a photo.
• Tap to pause the recording. Tap to resume.
5. Tap to stop recording.
Taking Panorama Shots
1. From the Home screen, tap Camera .
2. Tap and select Panorama ( ) to switch to Panorama
mode.
3. Tap to take the shot.
4. Move the device slowly towards the desired shooting
direction. The device automatically starts shooting when
it detects the panorama direction.
5. When the shooting guide reaches the end of the shooting
point, the shooting ends. You can also manually stop the
shooting by tapping .
Page 29
28
Menu Option Descriptions
Exposure Adjust the proper exposure level to fix the
overall brightness of the image.
Jpeg Quality Set the image quality.
Effect Adjust the contrast, saturation, brightness,
or sharpness setting.
Save location Select ON to enable to include the location
of the captured picture.
Picture
Playback
Select ON to enable user to directly
view the last captured photo right after
capturing an image.
Grid line Select ON to display the grid lines to help
composition when taking the photo.
Shutter
Sound
Select ON to enable to enable the shutter
sound.
Storage
Location
Specify the location where to save the
captured photo.
Reset
Settings
Reset all settings to the default values.
Onscreen menu options
Countdown
timer ( )
Set the countdown timer setting.
HDR ( )
Tap to disable/enable the HDR function.
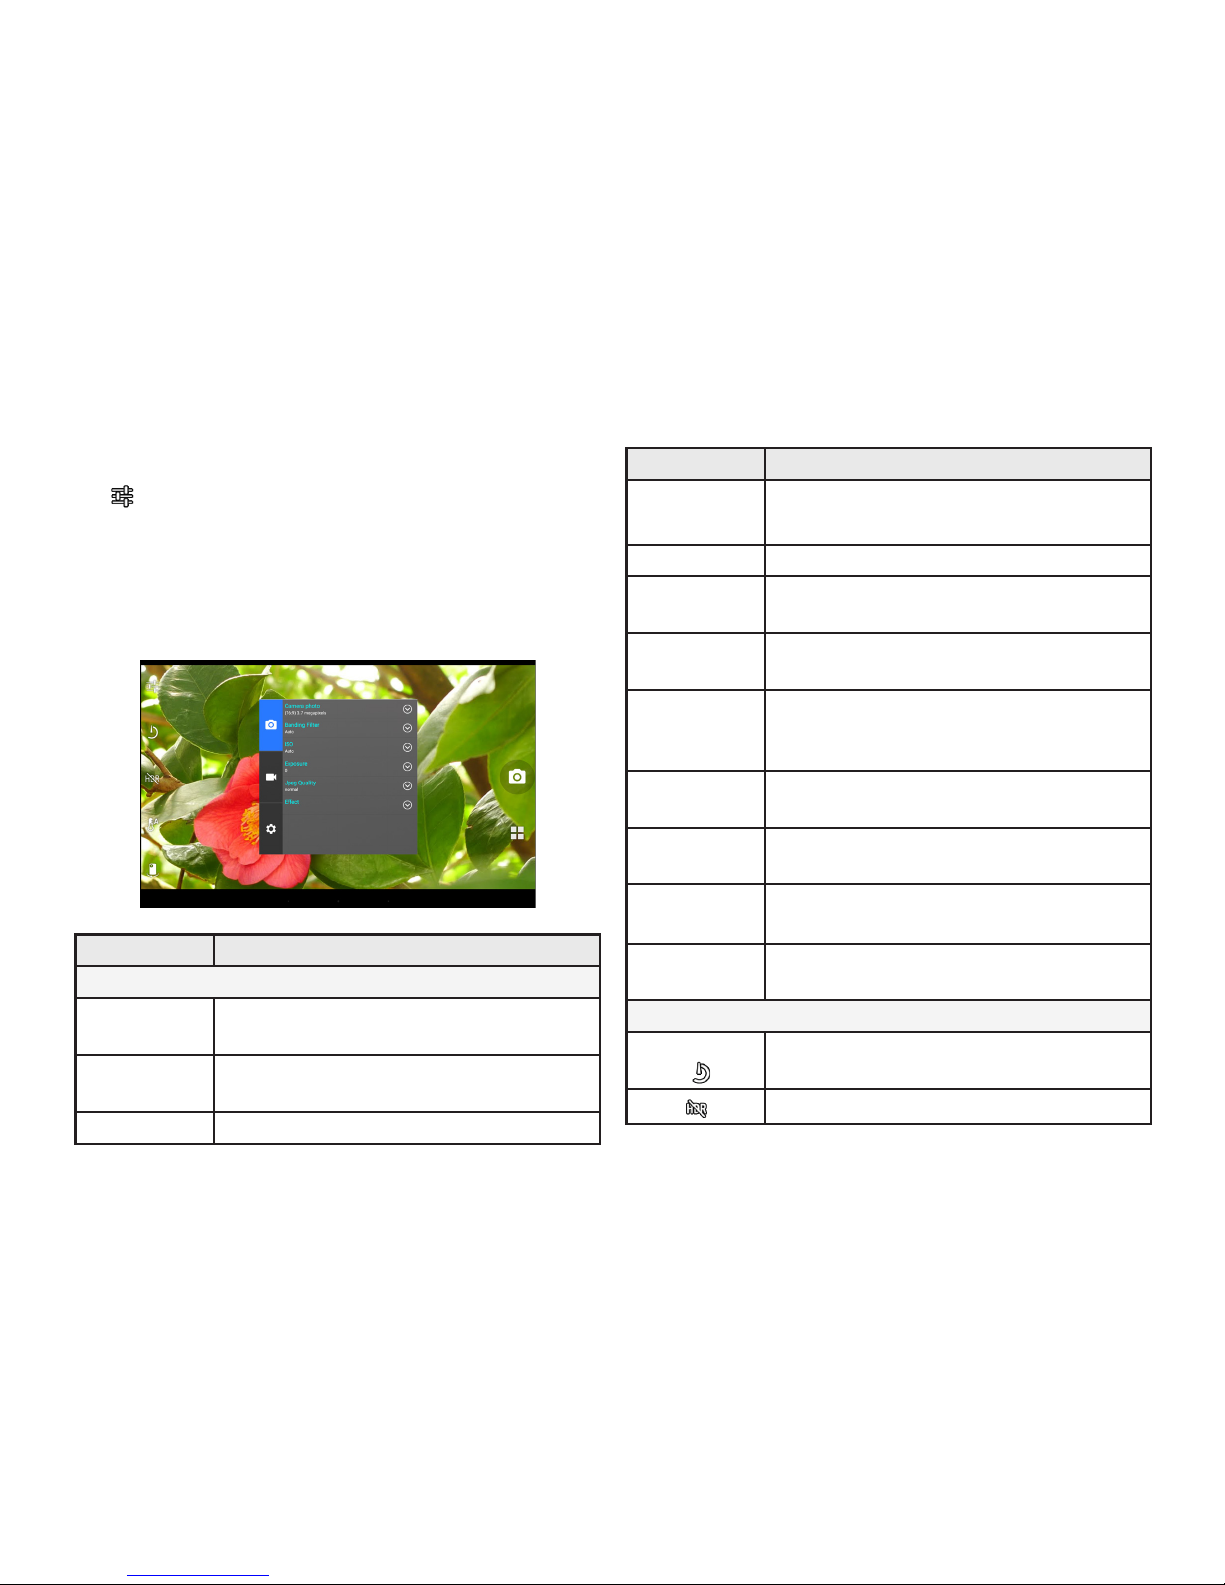
Configure the Camera Settings
Tap to enter the Settings menu. Tap the desired menu
option icon to change the respective setting. You can also tap
the onscreen menu icons to directly configure the selected
settings.
Camera mode
Menu Option Descriptions
Settings menu options
Camera
photo
Set the image resolution.
Banding
Filter
Set the anti-banding value.
ISO Select the desired ISO sensitivity level.
Page 30

29
Menu Option Descriptions
White
Balance ( )
Select the desired white balance setting.
Rear Camera
( )
Tap to switch to front camera. Tap to
switch back to rear camera.
Color Effect
( )
Select the desired color effect to be
applied on the captured image.
Mode Select
( )
Tap to switch to Video or Panorama mode.
Video mode
Menu Option Descriptions
Settings menu options
Camera video Set the recording quality.
Save location Select ON to enable to include the location
of the recorded video.
Picture
Playback
Select ON to enable user to directly
view the last captured photo right after
capturing an image.
Grid line Select ON to display the grid lines to help
composition when recording the video.
Shutter
Sound
Select ON to enable to enable the shutter
sound.
Storage
Location
Specify the location where to save the
recorded video.
Reset
Settings
Reset all settings to the default values.
Onscreen menu options
White
Balance ( )
Select the desired white balance setting.
Rear Camera
( )
Tap to switch to front camera. Tap to
switch back to rear camera.
Mode Select
( )
Tap to switch to Camera or Panorama
mode.
Page 31

30
Using Gallery
If the Picture Playback function is enabled, the last captured
picture appears right after taking a picture. You can also
review the captured picture and recorded videos in Gallery.
In Gallery, you can use options to modify or share the picture
or video.
• While viewing a picture, you can “pinch” the screen to
zoom in or out, or double-tap to zoom all the way in or
out. When zoomed in, tap and drag your finger on the
screen to move the picture around on the screen.
• To share the picture or video, tap , then select an
application for sharing.
• Tap to access the menu options:
Menu Option Descriptions
Delete Delete the picture or video.
Slideshow
(for picture only)
View a slideshow of all recorded files.
Edit
(for picture only)
Open the picture in Photo Editor to
modify it.
Rotate left/
Rotate right
(for picture only)
Change the picture’s orientation.
Crop
(for picture only)
Crop the picture.
Set picture as
(for picture only)
Assign the picture as a Contact photo or
Wallpaper.
Page 32

31
Menu Option Descriptions
Details
View information about the picture or
video.
Show on map
(for picture only)
Show the location on the map where the
picture is captured.
Print
(for picture only)
Print the picture or save the picture as
PDF.
Trim
(for video only)
Allows you to select the best portion of
the video clip.
Mute
(for video only)
Allows you to mute the audio during the
video playback.
• Tap (Photo Editor) to display the tools, allowing you to
edit or apply an effect to the picture.
Using Clock
The Clock app displays the current time, can be used to set
alarm(s), and more.
Opening Clock
Do one of the following to open the Clock:
• Tap the clock area on the Home screen; or
• From the Home screen, tap Apps Clock .
Page 33

32
You can also add the Analog Clock widget to your tablet’s
Home screen. Tap the analog clock icon to open the Clock
app.
Setting an Alarm
To set an alarm, do the following:
1. From the Home screen, tap Apps Clock .
2. Tap the Alarm Clock icon ( ) on the top of the screen.
3. Tap the Add icon ( ) to add a new alarm.
4. To set the time, slide the pointer, and tap OK.
Page 34

33
5. To set repeat mode, check Repeat checkbox and select
the desired week days.
6. To set the ringtone, tap the Ringtone icon ( ), and select
the alarm sound. Then tap OK to confirm.
7. To enter an alarm label, tap Label. Enter the name and
tap OK.
NOTE!
By default, the alarm is automatically set to ON.
Setting the Countdown Timer
1. From the Home screen, tap Apps Clock .
2. Tap the Timer icon ( ) on the top of the screen.
3. Enter the time you want, and then tap .
4. When the timer is running, you can add an additional
minute, pause the timer, or delete the current timer.
NOTE!
The timer beeps when the time is up.
Page 35

34
Using the Stopwatch
1. From the Home screen, tap Apps Clock .
2. Tap the Stopwatch icon ( ) on the top of the screen.
3. Tap to start the stopwatch.
• To record a lap while the watch is running, tap the
icon. It displays the first lap time. Repeat this step to
record a new lap.
4. If you want to pause the stopwatch, tap .
• To reset the stopwatch, tap the icon.
5. To share your results, tap the Share icon ( ).
Using Play Store
Play Store lets you access lots of fun games and apps using
your Google account.
NOTE!
You can only access Play Store by signing in to your Google
account.
Accessing Play Store
1. From the Home screen, tap Play Store .
2. Sign in with your Google account.
• If you already have an existing Google account, enter
your email account and password.
• If you do not have an account, tap Or create a new
account and follow the onscreen instructions to
create an account.
3. After signing in, you can start downloading from Play
Store.
NOTE!
Some apps are free and some might charge you through a
credit card. Before you can download a paid application, you
must set up a billing arrangement.
Page 36

35
Using Maps
You can use Google Maps to view and find places,
establishments and get directions. You can also check your
current location and share the information with others.
Accessing Google Maps
1. From the Home screen, tap Apps Maps .
2. You can use the tool bar on top of the screen to
customize your search.
Widgets
Widgets are mini apps that allow you to conveniently access
useful and fun applications on your tablet’s Home screen.
Different from the application shortcuts, widgets are
self-contained applications that can be added to the Home
screen. The widgets can be placed on any of the Home and
extended screens, allowing you to manage the desktop
conveniently.
Adding a Widget on the Home Screen
1. From the Home screen, tap and hold the screen.
2. Tap WIDGETS.
Page 37

36
You can swipe your finger to the left or to the right to
browse more widgets.
3. Tap and hold the selected widget, then drag it to the
Home screen.
NOTE!
You may be prompted to perform additional tasks such as
permission, registration, or activation before you can use a
selected widget.
If there is not enough space on the screen where you placed
the widget, the widget will not be added to the screen.
Removing a Widget from the Home Screen
1. From the Home screen, tap and hold the widget until
X Remove appears on top of the screen.
2. Drag the widget to X Remove and release.
Page 38

37
Section 4. Connections
You can use your device to connect to the Internet and
to other devices. This section lets you learn how to use
connection features of the device, including Wi-Fi, VPN,
Bluetooth, and more.
Wi-Fi
Wi-Fi is a term used for certain types of wireless local area
networks, which lets you access the Internet through a
wireless connection. To use Wi-Fi on your device, you need
access to a wireless access point (or other Wi-Fi Direct
devices). The coverage of the Wi-Fi signal can be up to 300
feet (100 meters). However, it varies greatly due to the type
of infrastructure, and other objects through which the signal
passes.
TIP!
Wi-Fi networks, or Access Points (WAPs) can be Open
(unsecured), or Secured (requiring you to provide login
credentials).
Turning Wi-Fi On and Connecting to Wi-Fi
1. From the Home screen, tap Apps Settings
Wi-Fi.
2. Tap the Wi-Fi switch from Off to On .
3. When you turn Wi-Fi service on, the device will
automatically scan for available wireless networks.
Page 39

38
4. From the list of the available wireless networks, choose
a Wi-Fi to connect.
• If you choose an Open network, you will be
automatically connected to the network.
• If you choose a Secured network, enter the password
and then tap CONNECT.
5. When your device is connected to a wireless network,
the Wi-Fi icon ( ) will appear in the status bar indicating
the signal strength (number of bands that light up).
6. The next time your device connects to a previously
accessed secured wireless network, you will not be
prompted to enter the key again, unless you reset your
device to its factory default settings.
Connecting to Hidden Wi-Fi Networks
1. From the Home screen, tap Apps Settings
Wi-Fi.
2. Tap the Wi-Fi switch from Off to On . Then tap
to display the settings menu.
3. Tap Add network to manually add the network.
4. Enter the necessary information. Available settings
depend on the selected security type.
5. Tap SAVE to apply the settings.
Page 40

39
Checking Connection Status
You can check the current wireless connection status from
one of the following:
• When your device is connected to a wireless network,
the Wi-Fi icon ( ) will appear in the status bar, showing
the signal strength (number of bands that light up).
• Tap the Wi-Fi option in Settings to display the Wi-Fi list.
Tap the wireless network that the device is currently
connected to.
TIP!
If you want to remove the wireless network settings on
your device, tap FORGET on this pop-up window. You need
to complete the required settings again to connect to this
wireless network.
Bluetooth
Bluetooth is a short-range wireless communications
technology that allows Bluetooth-enabled devices to
exchange information over a distance of about 30 feet (10
meters) without requiring a physical connection.
Page 41

40
Turning Bluetooth On
1. From the Home screen, tap Apps Settings
Bluetooth.
2. Tap the Bluetooth switch from Off to On .
3. When the Bluetooth function is enabled, the Bluetooth
icon ( ) appears in the status bar.
Bluetooth Mode
Bluetooth on your device operates in two different modes:
¬ On
Bluetooth is turned on, and all other Bluetooth-enabled
devices can detect your device.
¬ Of f (default)
Bluetooth is turned off. You cannot send/receive data using
Bluetooth.
Bluetooth Profiles
Bluetooth profiles are specifications for services supported
by individual devices. Profiles improve the ability of different
devices to work together. Your device supports these
Bluetooth profiles:
¬ Serial Port
SPP allows a remote Bluetooth device to act as a virtual
serial port.
¬ Stereo/Audio/Video
A2DP, AVRCP, GAVDP, AVCTP and AVDTP support deliveryof
stereo audio to compatible Bluetooth devices.
¬ Object Exchange
OPP allows sending and receiving of contact name cards
(vCard 2.1), calendar events (vCalendar), and other non-DRM
items between devices.
¬ Human Interface Devices
HID supports certain interface devices, example: Keyboard,
Mouse.
¬ Personal Area Network
PAN profile supports connections between multiple
Bluetooth devices.
Page 42

41
Pairing Bluetooth Devices
Before you can send/receive data using Bluetooth, you need
to establish trusted connections between your device and
the other Bluetooth devices.
Follow the steps to pair your device with another Bluetooth
device:
1. From the Home screen, tap Apps Settings
Bluetooth.
2. Tap the Bluetooth switch from Off to On .
The tablet will automatically scan for nearby Bluetooth
devices.
3. Tap the name of the device you want to pair with your
tablet.
NOTE!
Depending on the type of device you are pairing with, you will
be asked to enter a passkey, confirm matching passkeys, or
the device will automatically pair.
Unpairing the Bluetooth Devices
Unpairing a device from the Bluetooth devices list removes
its connection record. You will need to complete all the
settings of pairing again to re-connect the devices.
Follow the steps to unpair your device with another
Bluetooth device:
1. From the Home screen, tap Apps Settings
Bluetooth.
2. Tap the Bluetooth switch from Off to On .
3. From the Bluetooth settings screen, tap the icon next
to the name of the paired device in the Bluetooth devices
section to open the pop-up menu.
4. Tap FORGET.
Page 43

42
Bluetooth Settings
1. From the Home screen, tap Apps Settings
Bluetooth.
2. Tap the Bluetooth switch from Off to On .
3. Tap to display the settings menu, including:
• Refresh: Tap this option to scan again for nearby
Bluetooth enabled devices.
• Rename this device: Tap this option to display your
device default name. You can change the device
name.
• Show received files: This option displays a list of files
transferred to your tablet from other devices via
Bluetooth.
Wi-Fi Direct
Your device features Wi-Fi Direct, which is a standard
that allows you to connect to each other directly via Wi-Fi,
without a Wi-Fi network or hotspot, and without having to set
up the connection.
This type of connection is commonly called peer-to-peer. For
example, your device can use Wi-Fi Direct to share photos,
contacts and other content with other Wi-Fi Direct devices.
Turning Wi-Fi Direct On or Off
1. From the Home screen, tap Apps Settings
Wi-Fi.
2. Tap the Wi-Fi switch from Off to On . Then tap
to display the settings menu.
3. Tap Advanced Wi-Fi Direct.
Page 44

43
Connecting to Wi-Fi Direct Devices
1. Enable Wi-Fi Direct on your tablet.
2. Enable Wi-Fi Direct on the other device(s). Consult the
other device’s documentation for more information.
3. In the scanned list, tap a device to connect with it, or tap
Multi-connect to connect to multiple devices (not all
devices support multi-connect).
4. Follow the prompts on both devices to complete the
connection.
VPN
Your tablet features VPN (Virtual Private Network) that
allows you to connect to VPNs.
Adding a VPN
1. From the Home screen, tap Apps Settings
More VPN.
2. Tap to set up a connection to a VPN. Available
settings depend on the type of VPN.
NOTE!
You must set pattern, PIN, or password screen lock before
setting up a VPN. If you have not yet set a screen lock, you
will be prompted to do so the first time you launch VPN.
Page 45

44
Tethering
You device features Tethering allowing you to share your
device mobile data network connection with other devices
via USB or Bluetooth.
USB Tethering
You can use USB tethering to share your tablet’s network
connection with another device that connects to your tablet
via USB cable.
1. From the Home screen, tap Apps Settings
More.
2. Connect the other device to your tablet via USB cable.
3. On the USB tethering option, tap the USB tethering
switch from Off to On to enable this function.
Bluetooth Tethering
Share your device network connection with another device
that connects to your device via Bluetooth.
Before starting, pair your computer with your tablet, then
configure your computer to obtain its network connection via
Bluetooth.
1. From the Home screen, tap Apps Settings
More.
2. On the Bluetooth tethering option, tap the Bluetooth
tethering switch from Off to On to enable this
function.
NOTE!
Tethering consumes battery power and increases your data
usage. Roaming while using tethering will incur extra data
charges.
Page 46

45
3. Select a connection method:
• Media device (MTP): Transfer media files with
Windows, or using Android file transfer on a Mac (see
www.android.com/filetransfer).
• Camera (PTP): Transfer photos using camera
software, and transfer files to computers that do not
support MTP.
• Charge only: Charge the device only.
• PC Suite: Install PC Suite.
4. On your computer, choose a method for accessing
your tablet. Available options depend on the programs
installed on your computer.
Connecting to a Computer
You can connect your tablet to a Windows computer
through a USB cable. When connected, you can transfer
music, pictures, and other files between the computer and
your tablet.
When you connect your tablet to the USB port on your
computer, its USB storage is mounted as a drive and
appears on your computer screen. You can copy files back
and forth as you would use any other external device.
NOTE!
If you are using USB tethering, you must turn that off
before using USB to transfer files between your tablet and
computer.
1. Connect your tablet to the computer with a USB cable.
Your tablet recognizes the connection as the last
connection method you used, and displays a connection
alert in the status bar.
2. Tap and slide the status bar downwards, then tap the USB
connection notification.
Page 47

46
5. Transfer files to the tablet. When finished, you can
disconnect the USB cable.
NOTE!
When you connect your tablet to a computer via USB cable,
the data connection takes precedence over charging, and the
tablet will only charge when it is turned off.
Page 48

47
Section 5. Settings
More Wireless and Network Settings
This section teaches you how to control your tablet’s wireless
connections.
Wi-Fi
Set up and manage Wireless Access Points (WAPs). Your
tablet supports Wi-Fi 802.11 b/g/n.
¬ Turning Wi-Fi On or Off
From the Home screen, tap Apps Settings Wi-Fi
and then tap the Wi-Fi switch from Off to On .
When you enable this function, your device automatically
searches for available, in-range Wi-Fi networks.
¬ Wi-Fi settings
You can set up and manage connections to Wi-Fi networks.
From the Home screen, tap Apps Settings Wi-Fi
to display the Wi-Fi list, and then you can:
• Refresh the list by tapping Refresh.
• Add a Wi-Fi network manually by tapping Add
network. You need to complete the required settings
in the Network SSID and Security fields. For other
the related information, please contact your network
administrator.
• Tap for more settings, including: Saved networks,
Rename this device, and Advanced.
Settings
Page 49

48
¬ Advanced Wi-Fi settings
From the Home screen, tap Apps Settings Wi-Fi
Advanced to display the advanced settings screen for
the following options:
• Network notification: Enable this option and the Wi-Fi
icon will appear in the status bar whenever the device
detects an available wireless network within range.
• Scanning always available: Enable this option to let
Google’s location service and other applications scan for
networks, even when Wi-Fi is off.
• Keep Wi-Fi on during sleep: You can specify whether to
automatically turn off Wi-Fi when the backlight goes out
and the tablet locks. This option can affect the behavior
of devices you connect to your tablet, such as when
tethering or using your tablet as a mobile hotspot.
• Avoid bad Wi-Fi connections: Enable this option to use
the mobile network whenever the Wi-Fi network you are
connected to has no internet connection.
• Wi-Fi frequency band: This option allows you to select
the frequency that matches the frequency used by your
access point.
• Install certificates: This option allows you to install
certificates (for Wi-Fi authentication) stored in Drive,
Download folder, or the internal storage.
• Wi-Fi Direct: This option allows you to share photos,
contacts and other content with other Wi-Fi Direct
devices.
• WPS Push Button: This option allows you to initiate a
connection just by pushing a button.
• WPS Pin Entry: This option allows you to initiate a
connection just by entering the PIN.
• MAC address: This option displays your device unique
identifier, used when connecting to Wi-Fi, or when
other devices connect to your tablet via Wi-Fi (not
configurable).
• IP address: This option displays your device IP (internet
Protocol) address (not configurable).
• WAPI Certificate Mgmt: This option allows you to
management WAPI access authentication.
• Wi-Fi Active Roaming: Enable this option to enable the
Page 50

49
device gets connected to the Wi-Fi hotspot data device
when you are abroad.
Mobile Hotspot
You can use Mobile Hotspot to share your tablet’s mobile
data network connection with a PC or other device via Wi-Fi.
¬ Turning Mobile Hotspot On or Off
1. From the Home screen, tap Apps Settings
More Mobile Hotspot.
2. On the Mobile Hotspot option, tap the mobile hotspot
switch from Off to On . A confirmation
message appears on the screen, tap OK to enable this
function.
NOTE!
Please note that using your tablet as a mobile hotspot
consumes battery power and increases your data usage.
Roaming while using your device as a mobile hotspot will
incur extra data charges. Using Mobile Hotspot may require a
subscription to Mobile Hotspot/Mobile Broadband Connect
service. For more information, contact Verizon Wireless.
¬ Configure Mobile Hotspot
1. From the Home screen, tap Apps Settings
More Mobile Hotspot.
2. Tap Set up Mobile Hotspot to display the settings
screen, allowing you to configure your device mobile
hotspot:
Page 51

50
• Network name: Set the name of the network that will
be broadcast.
NOTE!
Check the Hide my device check box to make your
tablet Wi-Fi network name hidden.
• Security: Select the security type.
• Password: Set the password that user will need to
enter it on the device that you are connecting to the
hotspot with.
3. Tap SAVE to apply the settings.
¬ Bluetooth settings
1. From the Home screen, tap Apps Settings
Bluetooth.
2. Tap the Bluetooth switch from Off to On .
3. Tap to display the settings menu, including:
• Refresh: Tap this option to scan again for nearby
Bluetooth enabled devices.
• Rename this device: Tap this option to display your
device default name. You can change the device
name.
• Show received files: This option displays a list of files
transferred to your tablet from other devices via
Bluetooth.
Page 52

51
Data Usage
You can control your device connection to mobile data
service, and monitor your data usage.
¬ Turning Mobile data On or Off
From the Home screen, tap Apps Settings Data
usage.
¬ Setting mobile data limit
Set a mobile data limit, to have your tablet automatically
disable the mobile data connection when the limit is reached.
You can set a warning threshold, to have your tablet alert you
when data usage nears your set limit.
Data usage is measured by your device. Your service
provider may account for usage differently, so you may
want to consider using a conservative limit. Contact your
service provider for more information on actual data usage.
1. From the Home screen, tap Apps Settings
Data usage.
2. Tap the Set mobile data limit option to enable the limit.
3. Tap the Alert me about data usage option to have your
device alert you when data usage reaches your set limit.
4. Configure the limit by tapping and dragging the limit and
warning lines on the graph.
Page 53

52
¬ Viewing data usage by app or process
1. From the Home screen, tap Apps Settings
Data usage.
2. Tap Show Wi-Fi to display the status of using mobile
data service. Tap a process or app to see data usage for
the process or app, and to configure specific settings.
Airplane Mode
When you are in an airplane or in the area where data
transferring is not allowed, enable the Airplane mode.
1. From the Home screen, tap Apps Settings
Airplane mode.
2. Tap the Airplane mode switch from Off to On .
When the Airplane mode is enabled, all your device wireless
connections are disabled. While in Airplane mode, you can
use other features of your tablet, such as playing music,
watching downloaded videos, or other applications.
Page 54

53
VPN
You can set up and manage Virtual Private Networks (VPNs).
You must set pattern, PIN or password screen lock before
setting up a VPN. If you have not yet set a screen lock, you
will be prompted to do so the first time you launch VPN.
To add a VPN:
1. From the Home screen, tap Apps Settings
More VPN.
2. Tap to set up a connection to a VPN. Available
settings depend on the type of VPN.
Mobile Networks
You can set options for roaming, networks and Access Point
Names. Depending on your service plan, the changes you
make to Mobile Networks settings may incur extra charges.
Consult Verizon Wireless for more information.
1. From the Home screen, tap Apps Settings
More Mobile networks.
2. Configure the following settings:
• Data roaming: Enable this option to allow connection
to data services when roaming.
• Roaming state: This option displays the device
roaming status.
Page 55

54
• Enchanced 4G LTE Mode: Enable this option to
use LTE services to improve voice and other
communications.
• Access Point Names: This option allows you to select
the APN or configure a new APN setting.
View Verizon Account
You can launch any type of browser application to view
information and manage your Verizon account.
From the Home screen, tap Apps Settings More
View Verizon Account.
Display
Brightness
You can set the default screen brightness.
1. From the Home screen, tap Apps Settings
Display Brightness level.
2. Tap and drag the slider to set the brightness.
Page 56

55
3. Select a picture or wallpaper, then follow the onscreen
instructions to set it as the background.
¬ Gallery
Adaptive Brightness
When this function is enabled, your device will automatically
adjust the screen brightness depending on the surrounding
light conditions.
NOTE!
This feature is enabled by default.
1. From the Home screen, tap Apps Settings
Display.
2. On the Adaptive brightness option, tap the switch from
On to Off to disable this function.
Wallpaper
You can customize the Home screen by selecting a
background image.
1. From the Home screen, tap Apps Settings
Display Wallpaper.
2. Choose a source from Gallery, Live Wallpapers, Photos,
or Wallpapers.
Page 57

56
¬ Live Wallpapers
¬ Photos
¬ Wallpapers
TIP!
You can also set wallpaper from the Home screen. Tap and
hold on the Home screen, then select WALLPAPERS from
the Home screen menu.
Page 58

57
Sleep
You can set the length of delay between the last button press
or screen touch and the automatic screen timeout (dim, then
lock).
1. From the Home screen, tap Apps Settings
Display Sleep.
2. Select the desired length of time. Your setting is
automatically saved.
Daydream
You can specify what the screen displays when your device is
docked or while charging.
1. From the Home screen, tap Apps Settings
Display Daydream.
2. Tap the switch from Off to On to enable the
function.
3. Select the desired setting.
Page 59

58
Font Size
You can set the size of fonts in the display.
1. From the Home screen, tap Apps Settings
Display Font size.
2. Select the desired font size. Your setting is
automatically saved.
Cast screen
Use this function to display your device screen on a TV.
NOTE!
The TV needs to support Miracast.
1. From the Home screen, tap Apps Settings
Display Cast screen.
2. Select the desired device to connect.
Page 60

59
Sound and Notification
Volume
You can set default volume for music, video, games, and
other media, notifications, and system volume.
TIP!
You can set System volume from the Home screen by
pressing the Volume Buttons Up or Down.
1. From the Home screen, tap Apps Settings
Sound & notification.
2. Tap and drag the slider to set volume for:
• Media
• Alarm
• Notification
Interruptions
You can configure the interruptions settings, including the
priority interruptions and downtime.
1. From the Home screen, tap Apps Settings
Sound & notification Interruptions.
2. Select the desired setting.
Page 61

60
Notification Ringtone
You can select a default ringtone for message and other
notifications.
1. From the Home screen, tap Apps Settings
Sound & notification Default notification ringtone.
2. Select the desired ringtone.
3. When done, tap OK.
NOTE!
To configure the notification settings, select When device is
lock, App notifications, or Notification access option and set
the desired settings.
Screen Lock Sound
When you enable the Screen lock sound function, tones play
when unlocking and locking the screen.
NOTE!
Screen lock is enabled by default.
1. From the Home screen, tap Apps Settings
Sound & notification Other sounds.
2. On the Screen locking sounds option, tap the screen
locking sounds switch from On to Off to
disable tones.
Page 62

61
Touch Sounds
When you enable the Touch sounds function, tones play when
you touch the screen to make selections.
NOTE!
Touch sounds is enabled by default.
1. From the Home screen, tap Apps Settings
Sound & notification Other sounds.
2. On the Touch sounds option, tap the touch sounds switch
from On to Off to disable tones.
Storage
You can monitor usage for your tablet’s internal memory, and
for installed memory cards (sold separately).
Device Storage
1. From the Home screen, tap Apps Settings
Storage.
2. Under Internal storage, view Total space and Available
space, and view space used by the following:
• Apps (app data & media content)
• Pictures, videos
• Audio (music, ringtones, podcasts, etc.)
• Downloads
• Cached data
Page 63

62
• Misc.
TIP!
You can tap Apps to launch Settings Application manager
to display more information about applications installed on
your device.
Memory Card
1. From the Home screen, tap Apps Settings
Storage.
2. Under SD card, you have these options:
• View Total space and Available space on an installed
memory card.
• Tap Unmount SD card to prepare the memory card for
safe removal or formatting.
• Tap Erase SD card to erase the memory card content
and prepare it for use with your device.
Battery
You can view the battery status or enable the battery saver
function.
1. From the Home screen, tap Apps Settings
Battery.
2. The remaining battery power is displayed on the screen.
To enable the battery saver function, tap Battery
saver On .
Page 64

63
NOTE!
• When the battery saver is enabled, it will reduce your
device’s performance, location services, and most
background data in order to extend your battery life.
Those apps that rely on syncing may not update unless
you open them.
• The battery saver function will automatically disable
when your device is charging.
Application Manager
You can use Application manager to manage applications on
your device. You can download and install applications from
Google Play Store, from other sources, or create applications
using the Android SDK and install them on your device.
Manage applications
You can manage and remove applications from your device.
1. From the Home screen, tap Apps Settings
Application manager.
2. Tap the DOWNLOADED, RUNNING, or ALL tab to view
and update information about applications, including
memory usage, default settings and permissions.
3. Tap an application for more information, and for
application options such as stopping or uninstalling.
Page 65

64
Running services
You can view and control services running on your device.
Please note that not all services can be stopped, and
stopping services may have undesirable consequences on
the application or Android System.
1. From the Home screen, tap Apps Settings
Application manager.
2. Select the RUNNING tab to display the running services.
3. To stop a service, tap the service and then tap STOP.
¬ DOWNLOADED
¬ RUNNING
¬ ALL
Page 66

65
Location
You can select how your tablet determines its location.
Configure Location Mode
1. From the Home screen, tap Apps Settings
Location.
2. Tap the switch from Off to On to enable this
function.
3. Tap Mode and select the desired option.
Security
Screen Security
This function allows you to configure a screen lock to secure
your device when you are not using it. Your tablet offers
several screen lock options, with different levels of security.
¬ Swipe
When this function is enabled, you can unlock your tablet
by swiping your finger across the screen. This is the default
screen lock, and offers no security.
1. From the Home screen, tap Apps Settings
Security.
2. Tap Screen lock Swipe.
Page 67

66
¬ Pattern
When this function is enabled, you can draw a pattern, which
you create, on the screen to unlock your tablet. You can also
create a PIN, as a backup unlock.
1. From the Home screen, tap Apps Settings
Security.
2. Tap Screen lock Pattern.
3. An encryption message appears on the screen. Select
your option and tap CONTINUE to continue.
4. Draw an unlock pattern and follow the onscreen
instructions to complete the setup.
¬ PIN
When this function is enabled, you can enter a numeric PIN
(Personal Identification Number), which you create, to unlock
your tablet.
1. From the Home screen, tap Apps Settings
Security.
2. Tap Screen lock PIN.
3. An encryption message appears on the screen. Select
your option and tap CONTINUE to continue.
4. Enter your PIN and follow the onscreen instructions to
complete the setup.
Page 68

67
¬ Password
When this function is enabled, you can enter an alphanumeric
password, which you create, to unlock your tablet.
1. From the Home screen, tap Apps Settings
Security.
2. Tap Screen lock Password.
3. An encryption message appears on the screen. Select
your option and tap CONTINUE to continue.
4. Enter your password and follow the onscreen
instructions to complete the setup.
Device Administrators
You can add or remove device administrators, used by some
applications when synchronizing with your tablet.
1. From the Home screen, tap Apps Settings
Security Device administrators.
2. Select the desired administrator.
NOTE!
Available administrators depends on the accounts you have
set up.
Page 69

68
Unknown Sources
When this option is enabled, the applications can be installed
from sources other than Play Store.
1. From the Home screen, tap Apps Settings
Security.
2. On the Unknown sources option, tap the unknown
sources switch from Off to On to enable this
option.
3. A message appears on the screen. Tap OK to confirm.
Credential Storage
This function allows you to install credentials from device
storage, and allow applications to access the secure
certificates. Trusted credentials are used to establish some
kinds of VPN and Wi-Fi connections.
¬ Trusted credentials
You can view credentials stored on your tablet, and enable or
disable their use.
1. From the Home screen, tap Apps Settings
Security.
2. Tap Trusted credentials to display credentials.
¬ Install from SD card
You can install encrypted certificates from an SD card.
1. Insert the memory card that contains the encrypted
certificates.
2. From the Home screen, tap Settings Security.
3. Tap Install from SD card, then choose a certificate and
follow the onscreen instructions to install the certificate.
Page 70

69
¬ Clear credentials
You can clear stored credentials. This setting only appears if
you have trusted certificates installed.
1. From the Home screen, tap Apps Settings
Security.
2. Tap Clear credentials to clear stored credentials.
Screen Pinning
When this function is enabled, you can use screen pinning to
keep the current screen in view until you unpin.
1. From the Home screen, tap Apps Settings
Security Screen pinning.
2. Tap the switch from Off to On to enable this
function.
3. Open the screen you want to pin.
4. Touch Overview.
5. Swipe up and then touch the pin icon.
Accounts
You can manage accounts, including your Google, social
networking, cloud server, and Email accounts.
Add an Account
1. From the Home screen, tap Apps Settings
Accounts Add account.
2. Select an account type. Then follow the onscreen
instructions to log in to the account and complete setup.
Page 71

70
Language and Input
You can select a language for your device screens, and
configure other input options.
Language
1. From the Home screen, tap Apps Settings
Language & input.
2. Tap Language.
3. Select a language from the list.
Personal Dictionary
1. From the Home screen, tap Apps Settings
Language & input.
2. Tap Personal dictionary.
3. Do the following:
• To add a word: Tap ADD. Then enter a word and
tap . Enter the shortcut, if necessary, and then tap
to save the word into the dictionary.
• To delete a word: Select the word to delete and tap
DELETE.
Page 72

71
Keyboards and Input Methods
You can configure text input to your preferences.
¬ Current Keyboard
You can choose the default method for entering text.
1. From the Home screen, tap Apps Settings
Language & input Current Keyboard.
2. Tap CHOOSE KEYBOARDS.
3. Select a default text entry mode.
¬ Google Keyboard
You can configure Google Keyboard settings.
1. From the Home screen, tap Apps Settings
Language & input Google Keyboard .
2. Configure the following:
• Languages: Select languages for the keyboard.
• Preferences: Select this option to enable the system
automatically capitalizes words in your text based
on common usage, to enable double tap on spacebar
to insert a period followed by a space, or enable the
function that alerts you with a sound when the key is
pressed such as at the beginning of sentences.
• Accounts & Privacy: Select this option to switch
the accounts, sync your personal dictionary across
device, delete your synced data from Google, or send
usage statistics to Google.
• Appearance & Layouts: Select this option to specify
the keyboard theme or customize the input styles.
• Gesture Typing: Enable this option to input a word by
sliding through the letters, see the suggested word
while gesturing, see the gesture trail, or input spaces
during gestures by gliding the space key.
• Text correction: Select this option to add your
personal dictionary, add more dictionaries, enable the
function so the system will not suggest potentially
offensive words, enable the function so the spacebar
and punctuation will automatically correct the
mistyped words, display suggested words while
typing, learn from Google apps and services and your
Page 73

72
typed data to improve suggestions, use names from
Contact for suggestions/corrections, or enable the
function so the system will use the previous word in
making suggestions.
• Advanced settings: Tap to display more advanced
settings.
¬ Google Voice Typing
You can configure Google voice typing settings.
1. From the Home screen, tap Apps Settings
Language & input Google voice typing.
2. Configure the following:
• Languages: Select language(s).
• “Ok Google” detection: Enable the From the Google
app function to start a voice search from the Google
app. You can also enable the From any screen function
to let the system responds to your voice when the
screen is on or the device is charging.
• Hands-free: Enable this function to allow requests
with locked device to use the voice search when using
Bluetooth devices or wired headsets.
• Speech output: Select this option to enable this
function to hear spoken responses to some of your
searches or enable it only when you are connected
with the hands-free only.
• Offline speech recognition: Select this option to
manage the downloaded languages.
• Block offensive words: When you enable this option,
the system will automatically hide recognized
offensive voice results.
• Bluetooth headset: When you enable this option, you
can record audio through the Bluetooth headset if
available.
Page 74

73
Speech
You can configure options for entering text by speaking.
¬ Voice Input
Configure the voice input services.
1. From the Home screen, tap Apps Settings
Language & input.
2. Tap Voice input and configure the necessary settings:
• Enhanced Google services: Select this option to
control all applications that support voice commands.
• Basic Google recognition: Select this option to
perform Google searches and basic functions using
voice commands.
¬ Text-to-speech Output
Text-to-speech provides readout of text. For example, you
can have the contents of messages read out to you.
1. From the Home screen, tap Apps Settings
Language & input.
2. Tap Text-to-speech output.
3. Tap Google Text-to-speech Engine to enable the Google
engine.
You can tap the icon next to the Google Text-to-speech
Engine option to configure the following:
• Language: Select this option to choose a language for
text readout.
• Settings for Google Text-to-speech Engine: Select
the respective option check box to enable autoupdates voices or download voices data using only
Wi-Fi.
• Install voice data: Select this option to install the
voice data required for speech synthesis.
Page 75

74
4. Configure the following settings:
• Speech rate: Select this option to choose the speed at
which text is spoken.
• Listen to an example: If you have enabled a speech
synthesizer, tap this option to example option to play a
brief sample of voice output.
• Default language status: Select this option to display
the default language for text readout.
Mouse/trackpad
You can configure the cursor speed.
1. From the Home screen, tap Apps Settings
Language & input.
2. Tap Pointer speed.
3. Drag the slider to set the speed, and then tap OK to
confirm the setting.
Page 76

75
Back Up and Reset
Back Up My Data
You can enable or disable backup of your current settings
and application data to the Google server for the Backup
account.
1. From the Home screen, tap Apps Settings
Backup & reset.
2. On the Back up my data option, tap the switch from Off
to On to enable backup of app data, Wi-Fi
passwords, and other settings to the Google server.
Automatic Restore
When you enable this option, the system will restore backed
up settings when you reinstall an application.
1. From the Home screen, tap Apps Settings
Backup & reset.
2. On the Automatic restore option, tap the switch from
Off to On to enable automatic restoration of
settings from the Google server.
Page 77

76
Factory Data Reset
Use this function to return your tablet to its factory defaults.
This setting erases all data from your tablet, including
your Google or other email account settings, system and
application data and settings, and downloaded applications.
After a reset, you will be prompted to set up your tablet the
next time you turn it on.
1. From the Home screen, tap Apps Settings
Backup & reset.
2. Tap Factory data reset RESET TABLET to erase all
data on your tablet.
Date and Time
By default, your tablet receives date and time information
from the wireless network. When you are outside network
coverage, you may want to set date and time information
manually using the date and time settings.
1. From the Home screen, tap Apps Settings
Date & time.
2. Configure the following settings:
• Automatic date & time: When you enable this option,
your tablet receives automatic date and time updates
from the wireless network.
• Automatic time zone: When you enable this option,
your tablet receives the time zone from the wireless
network.
Page 78

77
• Set date: When the Automatic date & time setting is
disabled, you can set the current date manually. Tap
OK to save the setting.
• Set time: When the Automatic date & time setting is
disabled, you can set the current time manually. Tap
OK to save the setting.
• Select time zone: When the Automatic time zone
setting is disabled, you can choose your local time
zone manually.
• Use 24-hour format: Enable this option to use a
24-hour format for time displays.
Accessibility
The special features make using the device easier for those
with certain physical disabilities.
TalkBack
You can enable spoken feedback as you navigate your tablet.
1. From the Home screen, tap Apps Settings
Accessibility.
2. Tap Talk Back .
3. Tap the switch from Off to On to enable this
function.
4. A pop-out message appears, tap OK to start using
TalkBack.
5. When you activate TalkBack, spoken feedback starts
immediately. As you navigate your tablet, TalkBack
describes your actions and alerts you of notifications.
Page 79

78
Switch Access
You can control your device using configurable key
combinations. You can move focus to clickable items and
select them.
1. From the Home screen, tap Apps Settings
Accessibility.
2. Tap Switch Access.
3. Tap the switch from Off to On to enable this
function.
4. A pop-out message appears, tap OK to start using
Switch Access.
Captions
The device will display subtitles where available.
1. From the Home screen, tap Apps Settings
Accessibility.
2. Tap Captions.
3. Tap the switch from Off to On to enable this
function.
4. Configure the following settings:
• Language: This option allows you to specify the
language in which you want captions to appear.
• Text size: This option allows you to select the size of
the caption text.
• Caption style: This option allows you to select the
style and color for the caption text and background.
Magnification Gestures
With magnification gestures function, you can zoom in and
out by triple-tapping the screen.
1. From the Home screen, tap Apps Settings
Accessibility.
2. Tap Magnification gestures.
3. Tap the switch from Off to On to enable this
function.
Page 80

79
Large Tex t
When this function is enabled, it increases the text size on
your device to the largest available.
1. From the Home screen, tap Apps Settings
Accessibility.
2. On the Large text option, tap the switch from Off to
On to enable this function.
High Contrast Text
High contrast will automatically fix the text color to make the
text easier to read on your device.
1. From the Home screen, tap Apps Settings
Accessibility.
2. On the High contrast text option, tap the switch from
Off to On to enable this function.
Auto-rotate Screen
When this function is enabled, the screen orientation
changes automatically when you rotate your device.
1. From the Home screen, tap Apps Settings
Accessibility.
2. On the Auto-rotate screen option, tap the switch from
Off to On to enable automatic screen rotation.
Page 81

80
Speak Passwords
When this function is enabled, characters entered in
password fields are read out by your device.
1. From the Home screen, tap Apps Settings
Accessibility.
2. On the Speak passwords option, tap the switch from Off
to On to enable this function.
Accessibility Shortcut
This option allows you to make accessibility options easily
available. When the setting enabled, you can quickly enable
accessibility features pressing and holding the
Power/Lock
button until you hear a sound/feel a vibration. Then tap and
hold two fingers until you hear audio confirmation
.
1. From the Home screen, tap Apps Settings
Accessibility.
2. Tap Accessibility shortcut.
3. Tap the Accessibility shortcut switch from Off to
On to enable the shortcut.
Touch & Hold Delay
This option allows you to adjust the amount of time required
for your device to notice that you are touching an object on
the screen.
1. From the Home screen, tap Apps Settings
Accessibility.
2. Tap Touch & hold delay.
3. Select the desired setting.
Color Inversion
This option allows you to exchange color values.
1. From the Home screen, tap Apps Settings
Accessibility.
2. On the Color inversion option, tap the switch from Off
to On to enable this function.
Page 82

81
Color Correction
This option allows your device to compensate for color
blindness.
1. From the Home screen, tap Apps Settings
Accessibility.
2. Tap Color correction.
3. Tap the switch from Off to On to enable this
function.
4. On the Correction mode option, select the desired color
correction mode.
Printing
You can print photos or documents from your device, via
Wi-Fi, to a compatible printer (not included). Your device and
the printer must be connected to the same Wi-Fi network.
1. From the Home screen, tap Apps Settings
Printing.
2. Tap Cloud Print.
3. Tap the switch from Off to On to enable this
function.
4. Select the desired printer or select Save to Google Drive
to convert any compatible document or photo to a file
that can be stored in your Google Drive account.
Page 83

82
System Updates
You can check for any available software updates and view
the currrent software and configuration versions.
1. From the Home screen, tap Apps Settings
System updates.
2. Select an option to view the details:
• Check for new system update: This option allow you
to check for the new software and configuration
updates for your tablet.
• Show system update history: This option displays the
software and configuration versions.
About Tablet
You can view information about your tablet, including status,
legal information, hardware and software version.
1. From the Home screen, tap Apps Settings
About tablet.
2. Select an option to view the details:
• Status: This option display the battery, network and
other status information.
• Legal information: This option displays the legal
related information including open source/system
WebView licenses and Google legal/ Wallpapers
information.
• Model number: This option displays your tablet’s
model number.
• Android version: This option displays the firmware
version of your tablet.
• Baseband version: This option displays the baseband
version of your tablet.
• Kernel version: This option displays the kernel version
of your tablet.
• Build number: This option displays your tablet build
number.
• Software version: This option displays the software
version of your tablet.
Page 84

83
• Hardware version: This option displays the hardware
version of your tablet.
• Configuration version: This option displays the
configuration version of your tablet.
Page 85

84
Section 6. Health and Safety Information
• Do not use or store your device in extreme temperatures
as your device might overheat and may present a burn and
fire risk and cease to function.
• Do not dispose of your device in a fire as this might
cause an explosion resulting in serious injury, death, and
property loss.
• Federal Aviation Administration (FAA) and Federal
Communications Commission (FCC) regulations prohibit
using the radio of wireless devices while in the air. Turn off
all wireless connections on your device before boarding
an aircraft. Using your device on an aircraft might
affect aircraft instrumentation, communication, and
performance; might disrupt the network; might otherwise
be dangerous to the operation of the aircraft, its crew, and
its passengers; and might be illegal.
• When listening to audio files using headphones,
permanent hearing loss might occur if headphones are
used at a high volume. Avoid increasing the volume of
your headphones to block out noisy surroundings. If you
experience ringing in your ears or muffled speech, consult
a physician to have your hearing checked.
This section outlines the safety precautions associated with
using the device.
Important Safety Precautions
Please read the safety and operation instructions before
using your device or any accessories that came with it. Retain
these instructions for future use.
• Do not install your device in your vehicle or use it while
driving. Using your device while driving could put you
and others at greater risk of an accident causing serious
injury, death, and property loss. You are responsible for
knowing and obeying the laws and regulations regarding
the use of wireless devices in the areas where you drive
• Do not use your device or accessories near water (for
example, near a bathtub or a sink, in a wet basement, or
near a swimming pool) or spill liquid of any kind on your
device or accessories as this might cause a short circuit, a
fire, or an electric shock which could cause serious injury,
death, and property loss.
• Do not use your device in the presence of gas fumes as it
presents a risk of fire or explosion.
Page 86

85
• Do not disassemble your device. Your device contains
small parts that might be a choking hazard.
• Most modern electronic equipment is shielded from
radio frequency (RF) signals. However, certain electronic
equipment might not be shielded against the RF signals
from your device. Keep your device away from medical
devices, including pacemakers and hearing aids, as they
might malfunction and cause serious injury or death to
you and others.
• Turn off all wireless connections on your device in health
care facilities when any regulations posted in these
areas instruct you to do so. Hospitals or health care
facilities may be using equipment that could be sensitive
to external RF energy.
• Certain jurisdictions might prohibit or restrict your use
of certain features on your device.
Additional Safety Guidelines
About Charging
• Use only the charger supplied with your device. Use of
another type of charger will result in malfunction and/or
danger.
• Do not use the charger in a high moisture environment.
Never touch the charger when your hands or feet are wet
• Allow adequate ventilation around the charger when
using it to operate the device or charge the battery. Do
not cover the charger with paper or other objects that will
reduce cooling. Do not use the charger while it is inside a
carrying case.
• Connect the charger to a proper power source. The
voltage requirements are found on the product case and/
or packaging.
• Do not use the charger if the cord becomes damaged.
• Do not attempt to service the unit. There are no
serviceable parts inside. Replace the unit if it is damaged
or exposed to excess moisture.
Page 87

86
About the Battery
This unit contains a non-replaceable internal Lithium
Ion battery. The battery can burst or explode, releasing
hazardous chemicals. To reduce the risk of fire or burns, do
not disassemble, crush, puncture, or dispose of in fire or
water.
Only use the battery with a charging system that has
been qualified with the system per CTIA Certification
Requirements for Battery System Compliance to IEEE 1725.
Use of an unqualified battery or charger may present a risk
of fire, explosion, leakage, or other hazard.
Do not short circuit a battery or allow metallic conductive
objects to contact battery terminals.
Replace the battery only with another battery that has been
qualified with the system per this standard, IEEE-Std-1725.
Use of an unqualified battery may present a risk of fire,
explosion, leakage or other hazard. Only authorized service
providers shall replace battery.
Promptly dispose of used batteries in accordance with local
regulations.
Battery usage by children should be supervised.
For those host devices that utilize a USB port as a charging
source, the host device’s User Guide shall include a
statement that the phone shall only be connected to CTIA
certified adapters, products that bear the USB-IF logo
or products that have completed the USB-IF compliance
program.
Important instructions (for service personnel only)
Caution: Risk of explosion if battery is replaced by an
incorrect type. Dispose of used batteries according to the
instructions.
- The battery must be recycled or disposed of properly.
- Use the battery only in the specified equipment.
Page 88

87
Caring for Your Device
Taking good care of your device will ensure trouble-free
operation and reduce the risk of damage to your device:
• Keep your device away from excessive moisture and
extreme temperatures.
• Do not place anything on top of your device or drop
objects on your device.
• Do not drop your device or subject it to severe shock.
• Do not subject your device to sudden and severe
temperature changes. This could cause moisture
condensation inside the unit, which could damage your
device. In the event of moisture condensation, allow your
device to dry out completely before use.
• The screen surface can easily be scratched. Avoid
touching it with sharp objects. Nonadhesive generic
screen protectors designed specifically for use on
portable devices with LCD panels may be used to help
protect the screen from minor scratches.
• Never clean your device when it is turned on. Use a soft,
lint-free cloth to wipe the screen and the exterior of your
device.
• Do not use paper towels to clean the screen.
• Never attempt to disassemble, repair or make any
modifications to your device. Disassembly, modification
or any attempt at repair could cause damage to your
device and even bodily injury or property damage and will
void any warranty.
• Do not store or carry flammable liquids, gases or
explosive materials in the same compartment as your
device, its parts or accessories.
• Do not expose your device to extreme heat or direct
sunlight for prolonged periods. Overheating may damage
your device.
• Do not use alcohol or any abrasive material when cleaning
the accessories.
• Do not expose the accessories to extreme heat or direct
sunlight for prolonged periods.
• Store the accessories in a cool and dry place.
Page 89

88
Federal Communication Commission
Interference Statement
This device complies with part 15 of the FCC Rules.
Operation is subject to the following two conditions:
(1) This device may not cause harmful interference, and
(2) This device must accept any interference received,
including interference that may cause undesired operation.
This device has been tested and found to comply with
the limits for a Class B digital device, pursuant to Part 15
of the FCC Rules. These limits are designed to provide
reasonable protection against harmful interference in a
residential installation. This equipment generates, uses,
and can radiate radio frequency energy, and, if not installed
and used in accordance with the instructions, may cause
harmful interference to radio communications. However,
there is no guarantee that interference will not occur in a
particular installation if this equipment does cause harmful
interference to radio or television reception, which can be
determined by turning the equipment off and on, the user is
encouraged to try to correct the interference by one or more
of the following measures:
• Reorient or relocate t he receiving antenna.
• Increase the separation between the equipment and
receiver.
• Connect the equipment into an outlet on a circuit
different from that to which the receiver is connected.
• Consult the dealer or an experienced radio/TV technician
for help.
FCC Caution:
Any Changes or modifications not expressly approved by
the party responsible for compliance could void the user‘s
authority to operate the equipment.
The antenna(s) used for this transmitter must not be colocated or operating in conjunction with any other antenna or
transmitter.
Note: The country code selection is for non-US model only
and is not available to all US model. Per FCC regulation, all
Wi-Fi products marketed in US must fixed to US operation
channels only.
Page 90

89
RF Exposure Information (SAR)
This device meets the government’s requirements for
exposure to radio waves.
This device is designed and manufactured not to exceed the
emission limits for exposure to radio frequency (RF) energy
set by the Federal Communications Commission of the U.S.
Government.
The exposure standard for wireless device employs a unit
of measurement known as the Specific Absorption Rate, or
SAR. The SAR limit set by the FCC is 1.6 W/kg. *Tests for SAR
are conducted using standard operating positions accepted
by the FCC with the device transmitting at its highest
certified power level in all tested frequency bands. Although
the SAR is determined at the highest certified power level,
the actual SAR level of the device while operating can be
well below the maximum value. This is because the device
is designed to operate at multiple power levels so as to use
only the poser required to reach the network. In general, the
closer you are to a wireless base station antenna, the lower
the power output.
The highest SAR value for the model device as reported to
the FCC when tested is 0.83 W/kg as described in this user
guide.
While there may be differences between the SAR levels of
various devices and at various positions, they all meet the
government requirement.
The FCC has granted an Equipment Authorization for this
model device with all reported SAR levels evaluated as
in compliance with the FCC RF exposure guidelines. SAR
information on this model device is on file with the FCC and
can be found under the Display Grant section of
www.fcc.gov/oet/ea/fccid
For body worn operation, this device has been tested
and meets the FCC RF exposure guidelines for use with
an accessory that contains no metal and be positioned a
minimum of 0 cm from the body. Use of other accessories
may not ensure compliance with FCC RF exposure guidelines.
Page 91

90
§15.19 (a)(3)
This device complies with part 15 of the FCC Rules.
Operation is subject to the following two conditions:
(1) This device may not cause harmful interference, and
(2) this device must accept any interference received,
including interference that may cause undesired operation.
§15.21
Changes or modifications not expressly approved by the
party responsible for compliance could void the user‘s
authority to operate the equipment.
§15.105 (b)
This equipment has been tested and found to comply with
the limits for a Class B digital device, pursuant to part 15
of the FCC Rules. These limits are designed to provide
reasonable protection against harmful interference in a
residential installation. This equipment generates uses
and can radiate radio frequency energy and, if not installed
and used in accordance with the instructions, may cause
harmful interference to radio communications. However,
there is no guarantee that interference will not occur in a
particular installation. If this equipment does cause harmful
interference to radio or television reception, which can be
determined by turning the equipment off and on, the user is
encouraged to try to correct the interference by one or more
of the following measures:
- Reorient or relocate the receiving antenna.
- Increase the separation between the equipment and
receiver.
- Connect the equipment into an outlet on a circuit different
from that to which the receiver is connected.
- Consult the dealer or an experienced radio/TV technician
for help.
Page 92

91
WEEE
This device must not be disposed of as normal household
waste, in accordance with the EU directive for waste
electrical and electronic equipment (WEEE - 2002/96/EC).
Instead, it should be disposed of by returning it to the point
of sale, or to a municipal recycling collection point.
Page 93

92
Section 7. Warranty Information
2) Failure to follow operating instructions; accident; excess
moisture; insects; lightning; power surges; connections to
improper voltage supply;
3) Unauthorized alteration or modification of original
condition;
4) Damages caused by inadequate packing or shipping
procedures;
5) Devices purchased from unauthorized dealers.
During the warranty period, manufacture will, at its sole
option,(using new or refurbished replacement parts), repair
any defective devices. Repaired devices will be warranted
for a period equal to the remainder of the original Limited
Warranty on the original device or for NINETY (90) days,
whichever is longer. All replaced parts, components, boards
and equipment shall become the property of manufacture.
The warranty is good only to the original purchaser of the
device during the warranty period as long as it is in the U.S.
Warranty Period
The manufacture warrants this device is free from defects in
material and workmanship under normal use and service for
twelve (12) months commencing upon the date of purchase
by the first consumer purchaser. If proof of purchase
cannot be provided, the manufacture date as recorded by
manufacture based upon the serial number will be deemed to
be the start of Warranty Period.
Limited Warranty Statement
The consumer should never attempt to open or disassemble
the device and doing so may cause damage that voids your
warranty.
The device is equipped with an internal rechargeable battery
that is non-removable.
This warranty does not cover defects
1) Resulting from improper or unreasonable use or
maintenance;
Page 94

93
Disclaimer of Warranties; Exclusion of
Liability
Except as set forth in the express warranty contained on
the warranty page enclosed with the device, the purchaser
takes the device “AS IS”, and manufacture makes no express
or implied warranty or any kind whatsoever with respect to
the product, including but not limited to the merchantability
of the product or its fitness for any particular purpose
or use; The design, condition or quality of the device; The
performance of the product; The workmanship of the product
or the components contained therein; Or compliance of the
product with the requirements of any law, rule, specification
or contract pertaining thereto. Nothing contained in the
instruction guide shall be construed to create an express
or implied warranty of any kind whatsoever with respect
to the device. In addition, manufacture shall not be liable
for any damages of any kind resulting from the purchase or
use of the device or arising from the breach of the express
warranty, including incidental, special or consequential
damages, or loss of anticipated profits or benefits.
Manufacture is not liable for performance issues or
incompatibilities caused by your editing of registry settings,
or your modification of operating system software.
Using custom operating system software may cause your
device and applications to work improperly. Your carrier
may not permit users to download certain software, such as
custom OS.
If your carrier prohibits this, if you attempt to download
software onto the device without authorization, you will be
notified on the screen that the device will no longer operate
and be instructed to power down the device. You must then
contact your carrier to restore the device to the carrier
authorized settings.
Page 95

© 2015 Verizon Wireless. All Rights Reserved.
 Loading...