

Page 1

User guide
GizmoWatch
Disney Edition
TM
Page 2

Table of Contents
What You’ll Find in the Box ........................................5
GizmoWatch Disney Edition Overview ...................6
Front ............................................................................................6
Back ............................................................................................. 7
Charging Your GizmoWatch ......................................8
Turning Your GizmoWatch On and Off.....................9
Pairing Your GizmoWatch to the GizmoHub App 10
Register as Guardian 1 and Add Your Child’s Profile in
the GizmoHub App ................................................... 12
Adding Contacts .......................................................14
The GizmoHub App ..................................................19
Dashboard................................................................................19
The GizmoHub Control Panel ............................................. 21
Adding Another Child ........................................................... 24
Adding Another Gizmo ........................................................ 29
Calling your Gizmo from GizmoHub ................................. 30
Messaging ................................................................................ 31
Checking Your GizmoWatch’s Location .......................... 33
Setting Alerts and Location Checks ................................ 34
Viewing Notifications ........................................................... 42
Using the Step Counter ....................................................... 43
Managing Your Child’s To-Do List .....................................45
School Mode............................................................................47
2
Page 3

Managing Gizmo Settings ................................................... 48
Make Gizmo’s Alarm Ring ...................................................50
Reset Your GizmoWatch ...................................................... 51
Setting Up a PIN for Security .............................................. 51
About the GizmoHub App ................................................... 54
Using GizmoWatch ..................................................55
Wearing The GizmoWatch .................................................. 55
Swapping the Loop Strap ................................................... 56
Replacing the Wristband ..................................................... 58
Home Screen.......................................................................... 59
Making and Receiving Calls ............................................... 60
Sending and Receiving Messages .................................... 62
Changing a Contact’s Avatar .............................................64
Configuring GizmoWatch Settings ...................................66
Other Features.......................................................................69
Safety Information....................................................74
Watch Water Resistance Information ...............................74
Important Safety Precautions ............................................75
Additional Safety Guidelines ..............................................77
Caring for Your Device ..........................................................78
Federal Communication Commission Interference
Statement ............................................................................... 80
RF Exposure Information (SAR) ........................................81
WEEE ........................................................................................ 83
Warranty Information .............................................. 84
Warranty Period ....................................................................84
3
Page 4

Limited Warranty Statement .............................................84
Disclaimer of Warranties; Exclusion of Liability ........... 85
IEEE 1725 Battery Safety Statement ................................87
4
Page 5

What You’ll Find in the Box
Make sure the following components are included in
the GizmoWatch box:
• GizmoWatch Disney Edition
• Loop Straps x3
• Charging Cord
• Charging Adapter
• Quick Reference Guide
• Product Safety & Warranty Brochure
• Important Consumer Safety Information
NOTE: If any component is missing, please contact the store
where you bought it.
5
Page 6

GizmoWatch Disney Edition Overview
Front
Wristband
Camera
Speaker Power button
Touch screen
6
SOS button
Microphone
Page 7

Back
Charging
contacts
NOTE: Devices, software and apps are constantly evolving.
The images, icons and features mentioned in this document
are for reference only.
7
Page 8

Charging Your GizmoWatch
Before you start, charge your watch completely.
1. Line up the gold pins on the charging cord with
the charging contacts on the back of the watch.
The watch and charging cord are magnetized
and should connect without effort.
2. Plug the other end of the cord into the charging
adapter and plug the adapter into an electrical
outlet.
WARNING: Use only approved chargers with your device.
Incompatible chargers or tampering with the charging
contacts could damage your device and void the warranty.
8
Page 9
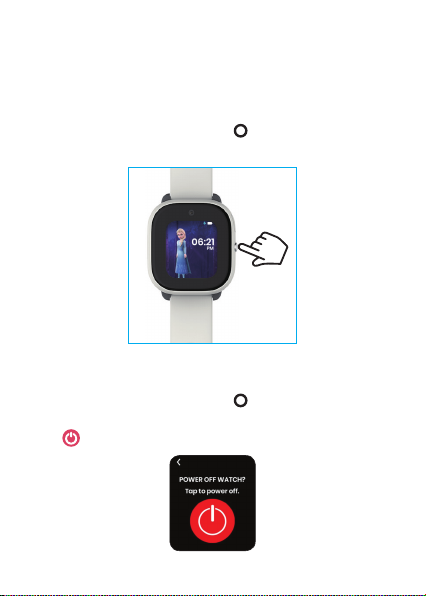
Turning Your GizmoWatch On and Off
Turning your watch on
• Press and hold the Power
screen lights up.
Turning your watch o
• Press and hold the Power
“POWER OFF WATCH?” on the screen. Then tap
to turn o your watch.
button until the
button until you see
9
Page 10
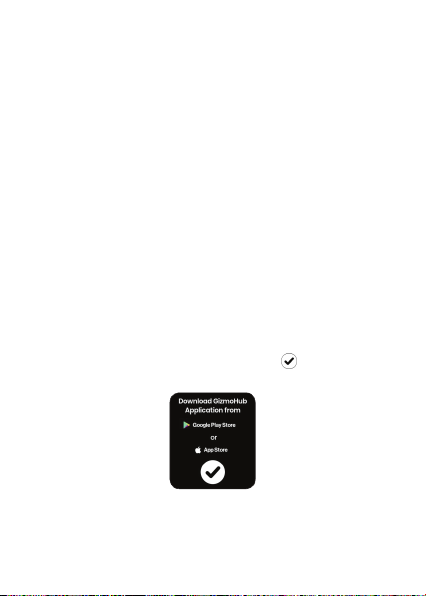
Pairing Your GizmoWatch to the GizmoHub App
Make sure you’re in an area with a strong wireless
signal.
1. Your GizmoWatch should start activating
automatically the first time you turn it on.
2. When the watch instructs you to download the
GizmoHub app, first decide who you want to
be Guardian 1 (the person who completes the
registration and sets up the GizmoWatch).
3. Then download and install the GizmoHub app
on that person’s smartphone from the Google
Play Store (Android OS 4.0 or higher) or the
Apple App Store (iOS 7 or higher). Data usage
may apply for app download and use.
4. Once you download the app, tap
bottom of the watch screen to continue.
10
on the
Page 11
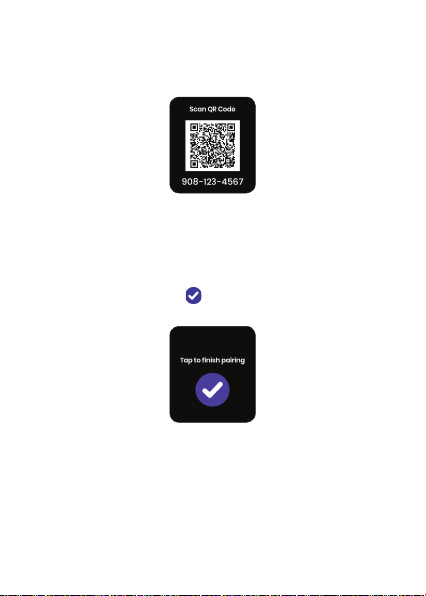
5. When your GizmoWatch has been activated
successfully, it will announce and show the
mobile number.
6. Follow the instructions in the app and on your
watch to pair your GizmoWatch, by scanning
the QR code with your phone’s camera or by
entering the GizmoWatch’s mobile number into
the app.
NOTE: Be sure to tap on the screen under Tap to
finish pairing.
11
Page 12
Register as Guardian 1 and Add Your Child’s Profile in the GizmoHub App
Follow the instructions in the app to:
• Accept the Gizmo Privacy Policy and register as
Guardian 1
12
Page 13
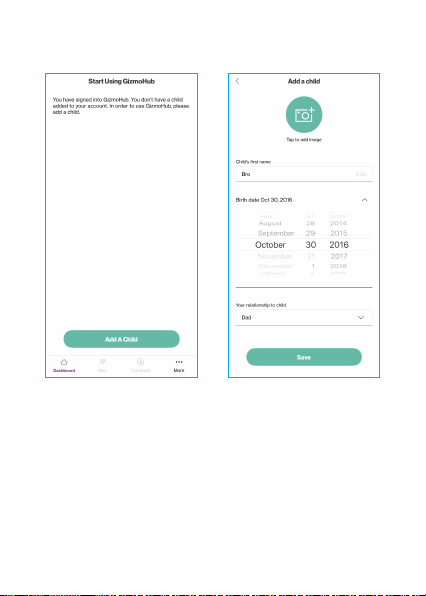
• Add your child’s profile
13
Page 14
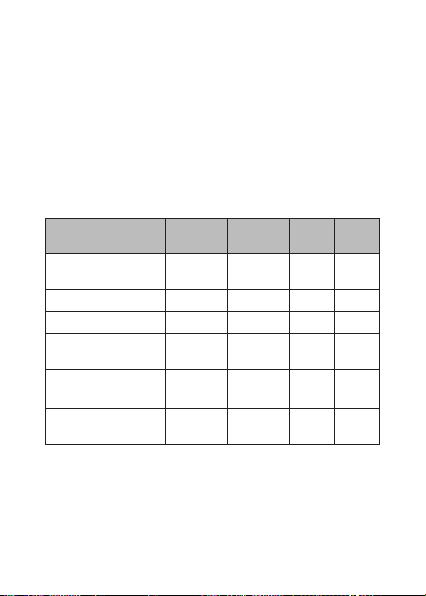
Adding Contacts
Guardian 1 can use the GizmoHub app to register
up to 9 additional phone numbers as Guardians,
Caregivers, Gizmo Buddies, or Buddies.* All
contacts can call the GizmoWatch from their
registered phone number and receive calls from
it. GizmoBuddies can text the GizmoWatch
from their Gizmo devices. Only Guardians and
Caregivers can use the app.
Contact Types
Call & get calls
from Gizmo
Text with Gizmo √ √ √
Locate Gizmo √ √
Get Time, Location
& other alerts
Turn Gizmo o &
change settings
Add & manage
contacts
Guardians Caregivers
√ √ √ √
√ √
√
√
To view GizmoWatch’s contact list in the GizmoHub
app, scroll down to Contacts in the child’s profile.
To view the contacts on the watch, swipe left from
the main screen.
NOTE: *You will be notified on your GizmoHub app when you
have reached the maximum number of contacts.
14
Gizmo
Buddy
Buddy
Page 15
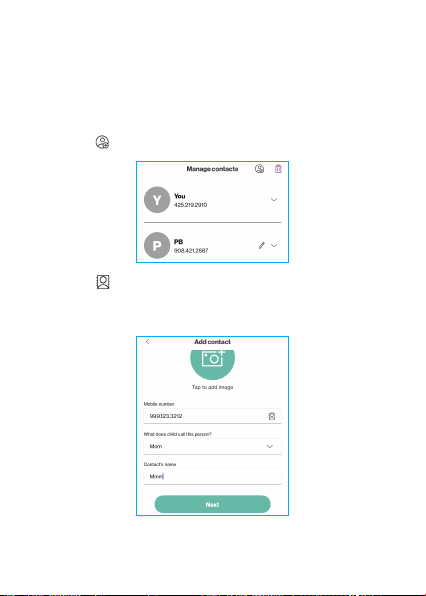
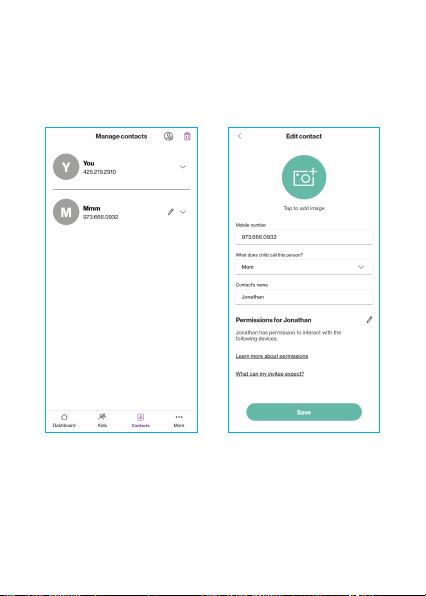
Adding Contacts
Your GizmoWatch will support up to 9 contacts in
addition to Guardian 1. To add contacts:
1. From your GizmoHub app, tap Contacts.
2. Tap
at the top right of the screen.
3. Tap to add a contact from your phone or
enter the contact’s information in each field.
Then tap Next.
15
Page 16
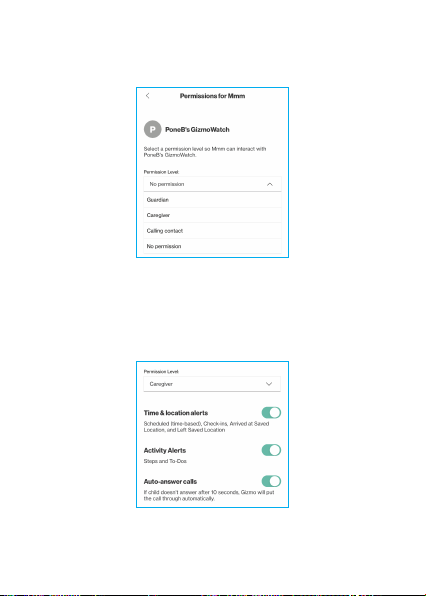
4. Select the Permission Level you want to assign
to the contact and tap Save.
NOTE:
• The new contact will also appear in the Gizmo’s Contact
List.
• If you give the contact a higher Permission Level, you
will be able to give the contact more information.
16
Page 17
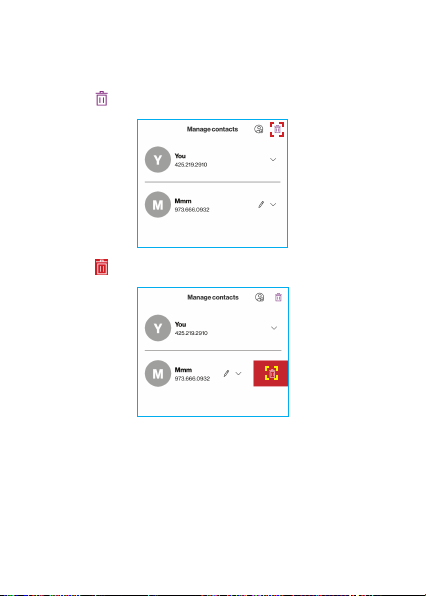
Deleting Contacts
1. From your GizmoHub app, tap Contacts.
2. Tap
at the top right.
3. Tap next to the contact you want to remove.
17
Page 18

4. You are prompted to confirm deletion. Tap
Continue and then tap Delete Contact.
NOTE: Deleting Guardian 1 will cause the GizmoWatch to
reset. All contacts will be deleted and must be added again by
a new Guardian 1.
18
Page 19

The GizmoHub App
Guardians and Caregivers can use the GizmoHub
app to locate and communicate with the
GizmoWatch and all their Gizmo devices.
Guardians can also use the app to manage child
contacts and other profile settings, as well as
Gizmo settings.
Dashboard
From your GizmoHub Dashboard, you can call
and chat with your child, see your Gizmo’s
location on the map, and see your notifications,
your call log, your child’s step counter and To-do
list, as well as your Gizmo’s battery status.
If you have more than one child, swipe left or
right to see each child’s Dashboard.
19
Page 20
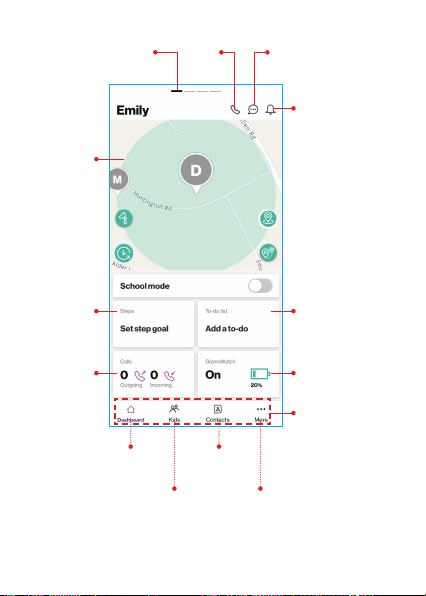
Child’s profile
Map view
indicator
Call
Chat
Notifications
Step
counter
Call log
Dashboard
Contacts
Kids More
20
To-do list
Battery
status
Control
panel
Page 21

The GizmoHub Control Panel
At the bottom of the Dashboard, you’ll find the
Control Panel. Use the Control Panel to navigate to
dierent parts of the GizmoHub app.
• Tap Dashboard to return to the Dashboard.
• Tap Kids to access your child’s full profile. If you
have more than one child, swipe left or right to
see more profiles. From here, you can manage
your child’s location alerts, contacts, To-do list
and more.
21
Page 22
• Tap Contacts to manage your contacts.
Add, edit and delete contacts, manage their
permission level in relation to each child, as well
as which Gizmos they can contact.
• Tap More to see other options. From here, you can:
• Go to the Manage devices screen to manage
all you Gizmo devices and add new Gizmos.
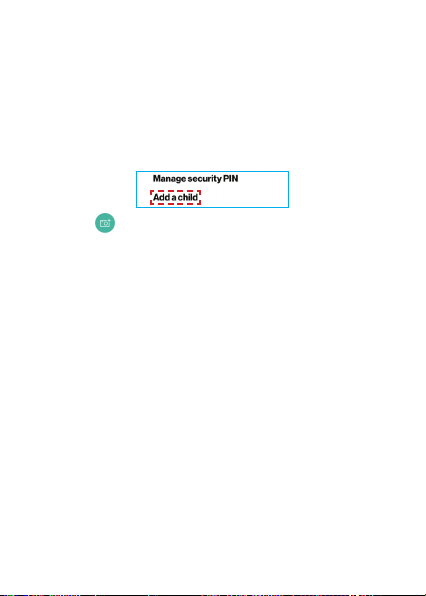
• Manage your profile
• Manage security PIN
22
Page 23
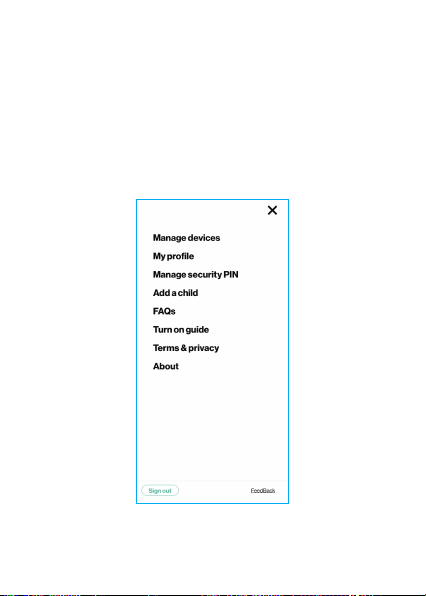
• Add a child
• Read FAQs
• Turn the Guide feature on and off
• Read the Terms & privacy info
• See the GizmoHub About screen
• Sign out from GizmoHub
• Provide feedback on GizmoHub app
23
Page 24
Adding Another Child
The GizmoHub app lets you manage all your Gizmo
devices in one place. To add a Gizmo for another
child, start by adding the child.
1. From a Guardian’s GizmoHub Dashboard, tap
More > Add a child.
2. Tap to change the profile picture. Then
enter the child’s information, such as name,
birth month, birth day, birth year, and your
relationship to the child.
3. Tap Save.
24
Page 25
4. Make sure the Gizmo you want to add to this
child’s profile is fully charged and activated.
When you’re ready, tap Add a Gizmo.
5. Tap Pair Gizmo and choose how you want to
pair the GizmoWatch with the GizmoHub app.
25
Page 26
26
Page 27
• Select Scan QR code to automatically pair
the watch by using the QR code.
27
Page 28

• Select Don’t see a QR code to manually
pair the watch by entering its phone number.
After entering the number, tap Next.
NOTE:
• The QR Code will only appear on the GizmoWatch after
the device is activated. See “Pairing Your GizmoWatch
to the GizmoHub App”.
• To obtain the phone number on the GizmoWatch, see
“Managing Gizmo Settings”.
6. Once the GizmoWatch has successfully paired
with the GizmoHub app, tap
(on the watch)
to complete the setup.
28
Page 29

NOTE: To edit an existing child profile, swipe to that child’s
profile on the Dashboard. Then tap Kids >
can also tap Remove child to delete the child’s profile.
. From here, you
Adding Another Gizmo
You can link multiple Gizmos (including GizmoPals,
GizmoGadgets and GizmoWatches) to the GizmoHub
app. There are several ways to do this:
• From the Control Panel, tap More > Manage
devices > Add a Gizmo.
• If you’re adding a Gizmo for a child who doesn’t
have a profile yet, you can add the child and then
add the Gizmo. (See “Adding Another Child”).
• If you want to add the device to an existing child’s
profile: from the Dashboard, either find the child’s
profile or tap Kids in the Control Panel and find
the profile there. Then tap Add a Gizmo.
Then follow the onscreen instructions.
29
Page 30

Calling your Gizmo from GizmoHub
From the GizmoHub Dashboard, swipe left or right
to find the child you want to call. Then tap
the GizmoWatch.
NOTE: When the Auto-answer calls setting is turned on,
GizmoWatch will automatically answer the call in 10 seconds.
The call will automatically end after 1 minute.
30
to call
Page 31

Messaging
Sending and receiving messages from the
GizmoWatch
Kids can use the GizmoWatch to exchange text
messages with Guardians and Caregivers (using
GizmoHub), and Gizmo Buddies (using their Gizmo
devices).
1. Tap
2. Type your message and then tap
GizmoWatch
NOTE: Besides sending the message, you can also send an
image as an attachment or send the message with an emoji.
at the top right corner of the Dashboard
or the child’s profile.
. You can
enter up to 120 characters.
Caregiver
31
Page 32

Messaging Options
to select one of the available options:
Tap
• Tap Edit Child’s messages to change any of the
quick messages your child can send.
• Tap Delete all messages to delete the
conversation.
NOTE: GizmoWatch can only send ONE emoji per message.
32
Page 33

Checking Your GizmoWatch’s Location
Tap Dashboard and swipe to select the child you
want to locate. Tap the map and then tap
locate your Gizmo.
In the map view, you can also do the following:
• Tap
• Tap
to turn on the Real-Time tracking.
to switch to the Satellite view (default is
street view).
• Tap
/ / and select Add to Saved
Locations or Directions to the address where
your Gizmo is currently located.
• Tap any area of the map to zoom in on that
specific location.
33
to
Page 34

Setting Alerts and Location Checks
Guardians and Caregivers can use the GizmoHub
app to set Alerts and Location Checks to keep
track of the Gizmo’s location.
To start, tap Kids in the Control Panel and swipe to
the child’s profile.
Naming places
You can name places your child visits often (e.g.,
“home”, “school” or “aunt’s house”) so you can
identify it by name instead of a GPS address.
1. Tap Add a location. Enter the address and tap
Next to continue.
34
Page 35

2. Enter the location name and tap Next.
Using alerts to show when the GizmoWatch is at
a place you have set
You can choose between 2 kinds of alerts.
• Location-based alerts notify you when your
child’s Gizmo moves into or out of a specific
area. (e.g., Maybe your child is supposed to be at
the library on Wednesday between 3 and 5 PM.
A location-based alert can send you notifications
when your child’s Gizmo arrives at the library at
35
Page 36

3:05 PM and leaves at 4:50 PM.)
• Time-based alerts check on the Gizmo’s
location at a specific time or time range.
To add an alert:
1. From the child’s profile, tap Add a location
alert.
2. Select the method you want to use to track the
Gizmo.
NOTE:
• You can create up to 5 location-based and 20 time-based
notifications.
Location-based
1. If a window pops up asking to share a location,
tap Allow.
2. Enter or select a location in the Add Location
field or drag your child’s location pin to a
desired spot on the map.
36
Page 37

3. Drag the circle around the location pin to your
desired size. You will receive an alert any time
your Gizmo crosses the circle.
4. Give this location a name (e.g., aunt’s house)
and tap Next.
37
Page 38

5. Set the time range and the day for notification.
Then tap Save.
38
Page 39

Time-based
1. Tap Time-based.
2. Select when you want to be notified.
• Tap Specific Time to set the time and the
day. Then tap Save.
• Select Time Range to select a start time
and end time to get alerted of your Gizmo’s
location. Then select the day(s) for the alert
and tap Next.
39
Page 40

Adjust the Frequency Setting slider to select
how often you want to be alerted of your
child’s location.
NOTE: More frequent checks will aect the Gizmo’s battery life.
40
Page 41

About Location Information and Accuracy
Your GizmoWatch’s location will usually be shown
as a place name or an address. When a place name
or address can’t be determined, GPS coordinates
will be shown.
Location is usually provided by Assisted GPS for
fast positioning. If unsuccessful, the GizmoHub
app will attempt to locate the GizmoWatch using a
dierent method.
• When the GizmoWatch is located in a place
where GPS or Wi-Fi isn’t available (or if the
GizmoWatch is turned off), the GizmoHub app
won’t be able to show location information.
• Location information may be unavailable,
inaccurate or incomplete, depending on your
Gizmo’s surroundings.
• It may take up to 3 minutes to get your Gizmo’s
location information.
• A location error of up to several miles can occur.
• If the GizmoWatch is indoors, the location can be
inaccurate or unavailable.
NOTE: The Wi-Fi connection for this GizmoWatch is for
reception only. There’s no Wi-Fi signal transmission.
41
Page 42

Viewing Notifications
To see notifications about Gizmo activity, go to your
child’s Dashboard or profile and tap
notifications.
42
to view all
Page 43

Using the Step Counter
On the Dashboard, you can turn the pedometer
function on and o and set a step goal for your child.
Turning on the step counter
On the Dashboard, swipe to select a child. In the
Steps card, tap Set step goal. Then slide the
switch to the right to turn it on.
43
Page 44

Setting a step goal
Once the step counter is on, you can set a goal
(number of steps), request a daily notification, and
add a reward for reaching the goal. Then tap Save
to save the settings.
The daily steps goal will appear on the Dashboard
and in your child’s profile.
NOTE:
• The number of steps will also appear on your child’s watch,
but not the rewards. See “Viewing step count”.
44
Page 45

• You can also edit the goal from your child’s profile. In the
Control Panel, tap Kids. Then swipe to find the profile you
want to update.
Managing Your Child’s To-Do List
You can create a to-do list to remind your child of
important tasks.
1. From your child’s Dashboard, tap Add a to-do
in the To-do list card. Then tap Add to-do.
45
Page 46

2. Slide the switch to turn on the To-do.
3. Enter the task name, set the duration (if there
is one) and how often you want it to be done
(Recurrence).
4. Enter the reward for completing the task. Then
tap Save.
46
Page 47

NOTE:
• The To-do list and the reward will appear on your child’s
watch.
See “Viewing tasks”.
• You can also edit the current task or add a new task from
your child’s profile. In the Control Panel, tap Kids. Then
swipe to find the profile you want to update.
School Mode
While your child is at school, you can switch Gizmo
to School mode to restrict Gizmo to emergency
calling only. The School mode can be turned on
either temporarily or based on a schedule.
• Turning on the School mode temporarily:
From your child’s Dashboard, slide the
School mode switch to the right to turn on
the mode.
• Scheduled School mode:
1. From the Control Panel, tap More > Manage
devices and select the GizmoWatch.
47
Page 48

2. Tap Schedule school mode and then follow
the screen instructions to set the schedule.
Managing Gizmo Settings
You can manage your GizmoWatch’s settings
from the GizmoHub app. From the Control Panel,
tap More > Manage devices and select the
GizmoWatch.
From here, you can see information on battery life
and the watch’s name, mobile number, and software
version. You can control settings for:
• School mode
• Volume
• Auto-answer calls
• Ringtone
• Touch sound
• Theme
48
Page 49

• Resolution
• Check for device software update
• Sync device settings
• Gizmo power settings
• Turn off Gizmo
• Delete Gizmo
NOTE: If you turn off Gizmo, it cannot be turned back on from
the app.
49
Page 50

Make Gizmo’s Alarm Ring
If you can’t find your child’s Gizmo, you can use the
GizmoHub app to make the alarm ring.
1. From the child’s profile, tap Find Gizmo.
2. The app will automatically find and ring your
child’s watch.
NOTE: The watch will stop ringing when your child taps the
button on the watch.
Power
50
Page 51

Reset Your GizmoWatch
1. From the Control Panel, tap More > Manage
devices and select the GizmoWatch.
2. Tap Delete Gizmo to reset your GizmoWatch to
its factory settings.
NOTE: You can also reset your GizmoWatch to
settings by placing it on the charging
its factory
cord, and pressing the Power
Then tap
at the RESET DEVICE? prompt.
button 4 times.
Setting Up a PIN for Security
If you didn’t create a security PIN during setup, you
can still create one, so that others can’t open the
GizmoHub app on your smartphone.
1. From the GizmoHub Dashboard, tap More >
Manage security PIN.
51
Page 52

2. Enter a 4-digit PIN.
3. Enter the same 4-digit PIN and tap SAVE .
NOTE: To change the PIN, you must first remove the existing PIN
by entering your current PIN to the More > Manage security PIN
> Change security PIN > Enter your current 4-digit security
PIN field. Then create a new PIN and enter it to Now enter
your new 4-digit security PIN and Re-enter your new 4-digit
security PIN fields. Tap Finished to complete the procedure. If
you enter your PIN incorrectly 5 times, the GizmoHub app will be
reset. To continue using the GizmoHub app after it is reset, you
will need to log back into your account.
FAQs
Tap FAQs to find answers to the most frequently
asked questions about Gizmo devices.
Turn On Guide
Tap Turn on guide to show tips about various
functions.
52
Page 53

NOTE: To hide the tips, go to More > Turn o guide.
53
Page 54

About the GizmoHub App
Tap About to view the version number of GizmoHub
app, operating system, MapQuest SDK, MapBox
SDK, Analytics, and Activation.
Share Feedback
Tap Feedback to email Gizmo Support directly
from your smartphone.
54
Page 55

Using GizmoWatch
Wearing The GizmoWatch
The GizmoWatch should fit snugly, but not too
tightly, around your child’s wrist.
1. Wrap the wristband around your child’s wrist,
making sure that the camera is on top of the
screen.
2. Slide the wristband through the buckle and
adjust for comfort (
3. Insert the pin on the underside of the buckle
into one of the holes on the wristband (B).
A).
A
B
55
Page 56

4. Slide the wristband through the loop (C).
C
Swapping the Loop Strap
NOTE: Additional loop straps are supplied in three dierent
colors: orange, green, and blue.
1. Pull the release knob all the way in the opposite
direction (A).
A
56
Page 57

2. Detach the wristband from your GizmoWatch (B).
B
3. Remove the loop strap from the wristband (C).
C
4. Replace the loop strap (D).
D
57
Page 58

Replacing the Wristband
1. Insert the pin (the opposite side of the release
knob) into the pin hole on your GizmoWatch (A).
A
2. Pull the release knob all the way in the opposite
direction and align the other end of the pin with
the hole on your GizmoWatch (B). Release the
knob to lock the wristband in place.
B
58
Page 59

Home Screen
Your GizmoWatch Disney Edition has a touch
screen. Just swipe left, right, up or down to switch
pages:
• Watch Face
• Contacts
• Gadgets
• Settings
• Location
Watch Screen Contact List Gadgets
GadgetsLocation
Settings
NOTE: To move to the previous screen, tap .
59
Page 60

Making and Receiving Calls
Making a call
1. From the Watch screen, swipe left to open the
Contact List. Then select the contact you want
to call.
2. Tap to make a call.
To end the call, tap .
NOTE: Your GizmoWatch can only make and receive calls from
phone numbers on your child’s Contact List. These numbers
may be for mobile phones, landlines, and other Gizmo devices.
You can manage the Contact List in the GizmoHub app.
60
Page 61

Receiving a call
When someone from your child’s contact list calls
the GizmoWatch, it will ring and the caller name will
be shown on the screen.
• To answer the call, tap
• To reject the call, tap
.
.
• To end the call, tap .
TIP: To adjust the volume during the call, tap .
NOTE:
• Making and receiving calls requires a network connection.
• If you have missed a call, a missed call notification will appear
on the screen.
61
Page 62

Sending and Receiving Messages
Sending a message
1. From the Watch screen, swipe left to open the
Contact List. Then select the contact you want
to message.
2. Tap to create a new message. Then:
• To create a voice message, tap .
62
Page 63

• To choose an emoji, tap .
• To capture a selfie or record a video and
send it to the contact, tap
and do any of
the following:
Photo mode Video mode
- Tap to switch between photo mode and
video mode.
- In photo mode, tap
to capture a selfie
and send to the contact.
- In video mode, tap
to record a video and
send to the contact.
• To choose from a list of pre-written
messages, swipe up on the message screen.
NOTE: GizmoWatch can only send one emoji per message.
63
Page 64

Receiving a message
When the GizmoWatch receives a new message, it
will appear on the Watch screen. To reply, tap
NOTE: Your GizmoWatch can only receive messages from
contacts with the GizmoHub app or from other Gizmo
devices if the sender is a GizmoBuddy. It can’t receive
messages from non-Gizmo devices.
Changing a Contact’s Avatar
You can change a contact’s avatar.
1. From the Watch screen, swipe left to open
the Contact List. Then tap the contact whose
picture you want to change and tap
64
.
.
Page 65

2. Tap to select a new avatar.
Sending Current Location Information
Children can send their current location to the
GizmoHub by swiping down from the Watch screen
and then swiping
Guardians and Caregivers will receive a message
displaying the GizmoWatch’s location.
to the right.
65
Page 66

Configuring GizmoWatch Settings
Changing the watch face
Swipe to the left from the Watch screen until you
see the
Tap
select the desired watch face and tap on it.
Adjusting the screen brightness
Swipe to the left from the Watch screen until you
see the
Tap
slider to increase or decrease the brightness level.
icon.
to go to the Watch Face screen. Then
icon.
> to adjust brightness. Then drag the
66
Page 67

Adjusting the volume
Swipe to the left from the Watch screen until you
see the
Tap
icon.
> to adjust volume. Then drag the slider
to increase or decrease the volume level.
NOTE: To turn o the sound temporarily, tap . To turn it
back on, tap
.
Changing the ringtone
Swipe to the left from the Watch screen until you
see the
Tap
icon.
> to select a ringtone. Then select the
desired ringtone and tap on it.
67
Page 68

Configuring screen timeout
Swipe to the left from the Watch screen until you
see the
Tap
icon.
> to select screen timeout. Then select
the length of time you want the screen to display
before it times out, and tap on it to confirm the
selection.
View GizmoWatch information
Swipe to the left from the Watch screen until you
see the
Tap
icon.
and swipe to the left to see GizmoWatch
information. It displays your GizmoWatch’s model
number, mobile number, IMEI, ICCID, software
version, and the total lifetime calls.
68
Page 69

Other Features
Playing fun sounds
Swipe to the left from the Watch screen until you
see the
Tap on the desired theme to play fun sounds.
Using calculator
Swipe to the left from the Watch screen until
you see the
calculations.
icon.
icon. Then perform mathematical
69
Page 70

Viewing step count
Swipe to the left from the Watch screen until you
see the
Tap
icon.
to start counting steps. The number of
steps and the set goal will be shown on the screen.
Viewing tasks
Swipe to the left from the Watch screen until you
see the
icon. Then swipe up until you see the
icon.
to view a list of tasks of the day. The
Tap
incomplete task(s) will be shown on the screen.
70
Page 71

A reminder will pop up on the screen to let you
know a scheduled event is about to start.
• Tap to mark that you have started performing
the assigned task.
to snooze the To-do for 10 minutes.
• Tap
to skip the task.
• Tap
Viewing weather forecast
Swipe to the left from the Watch screen until you
see the
Tap
icon.
to view weather forecast.
71
Page 72

Taking a selfie
Swipe to the left from the Watch screen until you
see the
Tap
icon.
to open the camera screen.
To take a selfie, tap . Then tap either of the
following:
to retake a selfie;
•
to save the selfie to the photo gallery. Tap
•
at the prompt to return to the camera screen.
72
Page 73

Managing photos in the gallery
Swipe to the left from the Watch screen until you
see the
Tap
icon.
to open the camera screen.
To access the photo gallery, tap . Swipe the
screen up or down to browse the gallery. To
manage, apply a filter, or send a photo to a contact,
select the photo and then tap the following:
• to delete the photo. When prompted, tap
to keep the photo or tap
to apply a filter to the photo. Then tap to
•
to confirm deletion.
confirm the filter.
to send the photo to a contact in the Contact
•
List.
73
Page 74

Safety Information
This section outlines the safety precautions associated with
using the device.
Watch Water Resistance Information
Your device has been certified with an IP67 rating. It is
splash and water resistant, but submerging your watch is
not recommended.
To maintain water resistant performance of your device,
observe the following:
• Do not submerge your device in water for extended
periods of time (more than 30 minutes).
• Do not immerse your device in:
- water deeper than 1 meter (about 3 feet)
- any other liquid chemicals other than water
- salt water, such as sea water
- warm water
• Do not wear your device while swimming or snorkeling.
• Do not place your device directly on sand or mud.
• Do not use your device in places where it may be exposed
to high pressure water such as ocean waves or waterfalls.
• Do not drop your device or subject it to shock. Doing so
might damage the main unit, allowing water to get inside
your device.
74
Page 75

Important Safety Precautions
Please read the safety and operation instructions before
using your device or any accessories that came with it.
Retain these instructions for future use.
• Do not set up your device or use it while driving. Using your
device while driving could put you and others at greater risk
of an accident causing serious injury, death, and property
loss. You are responsible for knowing and obeying the laws
and regulations regarding the use of wireless devices in the
areas where you drive.
• Do not use your device or accessories near water (for
example, near a bathtub or a sink, in a wet basement, or
near a swimming pool) or spill liquid of any kind on your
device or accessories, as this might cause a short circuit, a
fire, or an electric shock which could cause serious injury,
death and property loss.
• Do not use your device in the presence of gas fumes, as it
presents a risk of fire or explosion.
• Do not use or store your device in extreme temperatures,
as your device might overheat and may present a burn
and fire risk and cease to function.
• Do not dispose of your device in a fire, as this might
cause an explosion, resulting in serious injury, death and
property loss.
• Federal Aviation Administration (FAA) and Federal
Communications Commission (FCC) regulations prohibit
using the radio of wireless devices while in the air.
Turn off all wireless connections on your device before
boarding an aircraft. Using your device on an aircraft
might affect aircraft instrumentation, communication, and
75
Page 76

performance; might disrupt the network; might otherwise
be dangerous to the operation of the aircraft, its crew, and
its passengers; and might be illegal.
• Do not disassemble your device. Your device contains
small parts that might be a choking hazard.
• Most modern electronic equipment is shielded from
radio frequency (RF) signals. However, certain electronic
equipment might not be shielded against the RF signals
from your device. Keep your device away from medical
devices, including pacemakers and hearing aids, as they
might malfunction and cause serious injury or death to
you and others.
• Turn off all wireless connections on your device in health
care facilities when any regulations posted in these areas
instruct you to do so. Hospitals or health care facilities
may be using equipment that could be sensitive to
external RF energy.
• Certain jurisdictions might prohibit or restrict your use of
certain features on your device.
76
Page 77

Additional Safety Guidelines
About Charging
• Use only the charger supplied with your device. Use of
another type of charger will result in malfunction and/or
danger.
• Do not use the charger in a high moisture environment.
Never touch the charger when your hands or feet are wet.
• Allow adequate ventilation around the charger when
using it to operate the device or charge the battery. Do
not cover the charger with paper or other objects that will
reduce cooling. Do not use the charger while it is inside a
carrying case.
• Connect the charger to a proper power source. The
voltage requirements are found on the product case and/
or packaging.
• Do not use the charger if the cord becomes damaged.
• Do not attempt to service the unit. There are no
serviceable parts inside. Replace the unit if it is damaged
or exposed to excess moisture.
77
Page 78

About the Battery
This unit contains a non-replaceable internal lithiumion battery. The battery can burst or explode, releasing
hazardous chemicals. To reduce the risk of fire or burns,
do not disassemble, crush, puncture or dispose of in fire or
wat er.
Important instructions (for service personnel only)
CAUTION: Risk of explosion if battery is replaced by an
incorrect type. Dispose of used batteries according to the
instructions.
• The battery must be recycled or disposed of properly.
• Use the battery only in the specified equipment.
Caring for Your Device
Taking good care of your device will ensure trouble-free
operation and reduce the risk of damage to your device:
• Keep your device away from excessive moisture and
extreme temperatures.
• Do not place anything on top of your device or drop
objects on your device.
• Do not drop your device or subject it to severe shock.
• Do not subject your device to sudden and severe
temperature changes. This could cause moisture
condensation inside the unit, which could damage your
device. In the event of moisture condensation, allow your
device to dry out completely before use.
• The screen surface can easily be scratched. Avoid
touching it with sharp objects. Non-adhesive generic
screen protectors designed specifically for use on
78
Page 79

portable devices with LCD panels may be used to help
protect the screen from minor scratches.
• Never clean your device when it is turned on. Use a soft,
lint-free cloth to wipe the screen and the exterior of your
device.
• Do not use paper towels to clean the screen.
• Never attempt to disassemble, repair or make any
modifications to your device. Disassembly, modification or
any attempt at repair could cause damage to your device
and even bodily injury or property damage and will void
any warranty.
• Do not store or carry flammable liquids, gases or explosive
materials in the same compartment as your device, its
parts or accessories.
• Do not expose your device to extreme heat or direct
sunlight for prolonged periods. Overheating may damage
your device.
• Do not use alcohol or any abrasive material when cleaning
the accessories.
• Do not expose the accessories to extreme heat or direct
sunlight for prolonged periods.
• Store the accessories in a cool and dry place.
79
Page 80

Federal Communication Commission Interference Statement
This device complies with Part 15 of the FCC Rules. Operation
is subject to the following two conditions:
(1) This device may not cause harmful interference, and
(2) This device must accept any interference received,
including interference that may cause undesired
operation.
This device has been tested and found to comply with
the limits for a Class B digital device, pursuant to Part 15
of the FCC Rules. These limits are designed to provide
reasonable protection against harmful interference in a
residential installation. This equipment generates, uses,
and can radiate radio frequency energy, and, if not installed
and used in accordance with the instructions, may cause
harmful interference to radio communications. However,
there is no guarantee that interference will not occur in a
particular installation. If this equipment does cause harmful
interference to radio or television reception, which can be
determined by turning the equipment o and on, the user is
encouraged to try to correct the interference by one or more
of the following measures:
• Reorient or relocate the receiving antenna.
• Increase the separation between the equipment and
receiver.
• Connect the equipment into an outlet on a circuit different
from that to which the receiver is connected.
• Consult the dealer or an experienced radio/TV technician
for help.
80
Page 81

FCC Caution:
Any changes or modifications not expressly approved by
the party responsible for compliance could void the user’s
authority to operate the equipment.
The antenna(s) used for this transmitter must not be colocated or operating in conjunction with any other antenna
or transmitter.
Operations in the 5.15-5.25GHz band are restricted to indoor
usage only.
FOR PORTABLE DEVICE USAGE (<20cm from body/SAR
needed)
NOTE: The country code selection is for non-US models only
and is not available to all U.S models. Per FCC regulation, all
Wi-Fi products marketed in U.S must be fixed to US operation
channels only.
RF Exposure Information (SAR)
This device meets the government’s requirements for
exposure to radio waves.
This device is designed and manufactured not to exceed the
emission limits for exposure to radio frequency (RF) energy
set by the Federal Communications Commission of the U.S.
Government. The exposure standard for wireless device
employs a unit of measurement known as the Specific
Absorption Rate, or SAR. The SAR limit set by the FCC
is 4.0W/kg (Head 1g SAR 1.6W/kg). Tests for SAR are
conducted using standard operating positions accepted by
the FCC with the device transmitting at its highest certified
power level in all tested frequency bands. Although the SAR
81
Page 82

is determined at the highest certified power level, the actual
SAR level of the device while operating can be well below the
maximum value.
This is because the device is designed to operate at multiple
power levels so as to use only the power required to reach
the network. In general, the closer you are to a wireless base
station antenna, the lower the power output. The highest
SAR value for the model device as reported to the FCC when
tested is 1.21 W/kg as described in this user guide (head 1g
SAR 1.09W/kg). While there may be dierences between the
SAR levels of various devices and at various positions, they
all meet the government requirements.
The FCC has granted an Equipment Authorization for this
model device with all reported SAR levels evaluated as in
compliance with the FCC RF exposure guidelines.
SAR information on this model device is on file with the
FCC and can be found under the Display Grant section of
www.fcc.gov/oet/ea/fccid.
For body worn operation, this device has been tested and
meets the FCC RF exposure guidelines for use with an
accessory that contains no metal and be positioned a
minimum of 10mm from the body. Use of other accessories
may not ensure compliance with FCC RF exposure
guidelines.
82
Page 83

§15.19 (a)(3)
This device complies with Part 15 of the FCC Rules. Operation
is subject to the following two conditions: (1) This device may
not cause harmful interference, and (2) this device must
accept any interference received, including interference that
may cause undesired operation.
§15.21
Changes or modifications not expressly approved by the
party responsible for compliance could void the user‘s
authority to operate the equipment.
WEEE
This device must not be disposed of as normal household
waste, in accordance with the EU directive for waste
electrical and electronic equipment (WEEE - 2002/96/EC).
Instead, it should be disposed of by returning it to the point of
sale, or to a municipal recycling collection point.
83
Page 84

Warranty Information
Warranty Period
The manufacturer warrants this device is free from defects in
material and workmanship under normal use and service for
twelve (12) months commencing upon the date of purchase
by the first consumer purchaser. If proof of purchase
cannot be provided, the manufacture date as recorded by
manufacturer based upon the serial number will be deemed
to be the start of Warranty Period.
Limited Warranty Statement
The consumer should never attempt to open or disassemble
the device and doing so may cause damage that voids your
warranty.
The device is equipped with an internal rechargeable battery
that is non-removable.
This warranty does not cover defects resulting from:
(1) Improper or unreasonable use or maintenance
(2) Failure to follow operating instructions; accident; excess
moisture; insects; lightning; power surges; connections
to improper voltage supply;
(3) Unauthorized alteration or modification of original
condition;
(4) Damages caused by inadequate packing or shipping
procedures;
(5) Devices purchased from unauthorized dealers.
84
Page 85

During the warranty period, manufacturer will, at its sole
option, (using new or refurbished replacement parts), repair
any defective devices. Repaired devices will be warranted
for a period equal to the remainder of the original Limited
Warranty on the original device or for NINETY (90) days,
whichever is longer. All replaced parts, components,
boards and equipment shall become the property of the
manufacturer.
The warranty is good only to the original purchaser of the
device during the warranty period as long as it is in the US.
Disclaimer of Warranties; Exclusion of Liability
Except as set forth in the express warranty contained on the
warranty page enclosed with the device, the purchaser takes
the device “AS IS,” and manufacturer makes no express or
implied warranty or any kind whatsoever with respect to
the product, including but not limited to the merchantability
of the product or its fitness for any particular purpose
or use; the design, condition or quality of the device; the
performance of the product; the workmanship of the product
or the components contained therein; or compliance of the
product with the requirements of any law, rule, specification
or contract pertaining thereto. Nothing contained in the
instruction manual shall be construed to create an express or
implied warranty of any kind whatsoever with respect to the
device. In addition, manufacturer shall not be liable for any
damages of any kind resulting from the purchase or use of
the device or arising from the breach of the express warranty,
including incidental, special or consequential damages, or
loss of anticipated profits or benefits. Manufacturer is not
liable for performance issues or incompatibilities caused
85
Page 86

by your editing of registry settings, or your modification of
operating system software. Using custom operating system
software may cause your device and applications to work
improperly. Your carrier may not permit users to download
certain software, such as custom OS. If your carrier prohibits
this, if you attempt to download software onto the device
without authorization, you will be notified on the screen that
the device will no longer operate and be instructed to power
down the device. You must then contact your carrier to
restore the device to the carrier-authorized settings.
Tech-Front (Shanghai) Computer Co., Ltd.
No 2, Lane 58, Sanzhang Road,
Songjiang Export Processing Zone,
Shanghai, China, 201613
+86-21-37818268
86
Page 87

IEEE 1725 Battery Safety Statement
• Do not disassemble or open, crush, bend or deform,
puncture or shred.
• Do not modify or remanufacture, attempt to insert foreign
objects into the battery, immerse or expose to water or
other liquids, expose to fire, explosion or other hazard.
• Only use the battery with a charging system that has
been qualified with the system per CTIA Certification
Requirements for Battery System Compliance to IEEE
1725. Use of an unqualified battery or charger may
present a risk of fire, explosion, leakage, or other hazard.
• Replace the battery only with another battery that has
been qualified with the system per this standard, IEEEStd-1725. Use of an unqualified battery may present a risk
of fire, explosion, leakage or other hazard. Only authorized
service providers shall replace battery.
• Promptly dispose of used batteries in accordance with
local regulations.
• Avoid dropping the Wearable Product. If the Wearable
Product is dropped, especially on a hard surface, and
the user suspects damage, take it to a service center for
inspection.
• Improper battery use may result in a fire, explosion or
other hazard. For Wearable that utilizes a USB port as a
charging source, the Wearable’s user manual shall include
a statement that the phone shall only be connected to
CTIA-certified adapters, products that bear the USBIF logo or products that have completed the USB-IF
compliance program.
87
Page 88

• The recommended minimum age of a child who uses this
I.T.E. E142692
Wearable is 3 years old.
• For Wearable with power supplies not intended to be
handled by children: “As with all electrical products,
precautions should be observed during handling and use
to prevent electric shock. The power supply (adapter)
should not be handled by the children.”
• For Wearable with power supplies (adapter) intended to
be handled by children: “As with all electrical products,
precautions should be observed during handling and use
to prevent electric shock. The child should be very careful
while handling the power supply (adapter), in particular
plugging the power supply into the receptacle (power
outlet).”
• The Wearable product, including power supply should not
be left in the rain or subjected to exposure to water. If
cleaning is necessary do not immerse in water; wipe clean
with damp cloth.
• The Wearable product, including power supply should not
be dropped, crushed (stepped on) or otherwise abused.
• The children should be careful with the interconnect cable
(wiring) between the power supply (adapter) and the
Wearable product, in particular as a potential trip hazard.
• An adult should inspect the Wearable product, including
power supply, periodically for damage, and replace if
necessary. Similarly, if a child notices damaged/broken
parts, this should be reported to the guardian/caregiver
immediately so that the damaged parts can be replaced.
R
88
Page 89

© 2020 Verizon Wireless. All Rights Reserved.
 Loading...