

Page 1

User Guide
Delphi Connect
Page 2

2
Welcome .................................................................................................................................................................10
Is My Vehicle Compatible? ...............................................................................................................................11
Package Contents ..............................................................................................................................................12
Equipment Overview ..........................................................................................................................................12
System Requirements .......................................................................................................................................13
Installation Requirements ...............................................................................................................................13
First-Time Setup Using Smartphone App ..................................................................................................14
Find Your Vehicle’s OBD Connector Port ....................................................................................................19
Need help finding your vehicle’s OBD Connector Port? ........................................................................19
Install Your Module .............................................................................................................................................21
Initiate Module Setup ........................................................................................................................................22
Verify Module Setup ..........................................................................................................................................23
First-Time Setup Using Delphi Connect Website ....................................................................................25
Launch Your Internet Browser ........................................................................................................................25
Sign In to Your Delphi Account .......................................................................................................................25
Find Your Vehicle’s OBD Connector Port ....................................................................................................28
Need help finding your vehicle’s OBD Connector port? ........................................................................29
Install Your Module .............................................................................................................................................32
Verify Module Setup ..........................................................................................................................................35
Reconnect Your Module ....................................................................................................................................36
Install Your Module .............................................................................................................................................36
Initiate Module Setup ........................................................................................................................................37
Verify Module Setup ..........................................................................................................................................38
Application & Service Features .....................................................................................................................39
Using the Android App ......................................................................................................................................39
Forgot Username or Password .............................................................................................................39
Navigating Around .....................................................................................................................................43
Refreshing Your Vehicle Data ................................................................................................................ 45
Selecting Your Vehicle .............................................................................................................................. 46
Dashboard ....................................................................................................................................................47
Location .........................................................................................................................................................50
Table Of Contents
Page 3

3
Map View .......................................................................................................................................................51
Geo-Fences ..................................................................................................................................................52
Live Tracking ................................................................................................................................................53
Find My Car ..................................................................................................................................................54
Navigate to Vehicle ...................................................................................................................................55
Programmable Odometer .......................................................................................................................56
Managing Geo-Fences ..............................................................................................................................58
Create a Geo-Fence Using the Map .....................................................................................................58
Create a Geo-Fence by Searching for an Address or Business Name ....................................64
Edit an Existing Geo-Fence ....................................................................................................................72
Delete an Existing Geo-Fence ...............................................................................................................77
Enable or Disable a Geo-Fence .............................................................................................................80
Live Tracking ................................................................................................................................................84
Alerts ..............................................................................................................................................................87
Clearing Alerts ............................................................................................................................................89
Health .............................................................................................................................................................91
Performing a Diagnostic Code Scan on Your Vehicle ....................................................................92
Clearing Diagnostic Codes .....................................................................................................................93
Recent Trips .................................................................................................................................................96
Key Fob Pairing ...........................................................................................................................................99
Key Fob Pairing Without VIN..................................................................................................................103
Pair Smartphone Bluetooth® to Module ............................................................................................106
Remove the Bluetooth Connection to Your Module .....................................................................112
Settings .........................................................................................................................................................118
Account Settings........................................................................................................................................119
User Settings ...............................................................................................................................................120
Account Email Address ...........................................................................................................................120
Add Account Email Address ...................................................................................................................120
Edit or Delete Account Email Address ...............................................................................................121
Change Username ......................................................................................................................................123
Change Password .......................................................................................................................................125
Page 4

4
Module Management ................................................................................................................................127
View Modules Associated with Your Account .................................................................................127
Add a Module to Your Account ..............................................................................................................128
Remove a Module from Your Account ................................................................................................132
Vehicle Settings ..........................................................................................................................................135
Review Your Vehicle Information .........................................................................................................135
Edit Your Vehicle Information ...............................................................................................................137
Configuring Alerts .....................................................................................................................................141
Configuring the Geo-Fence Alerts .......................................................................................................141
Configuring the Speed Alert ..................................................................................................................148
Configuring the Motion Alert ................................................................................................................154
Configuring the Engine RPM Alert .......................................................................................................160
Configuring Notifications .......................................................................................................................166
Add a Notification......................................................................................................................................167
Modify or Delete a Notification ............................................................................................................175
About Section ..............................................................................................................................................187
Locating Your OBD Connector ..............................................................................................................187
Reviewing the Terms of Use and Privacy Policy .............................................................................189
Logout ............................................................................................................................................................191
Using the iPhone App .........................................................................................................................................192
Forgot Username or Password .............................................................................................................192
Navigating Around .....................................................................................................................................196
Refreshing Your Vehicle Data ................................................................................................................ 198
Selecting Your Vehicle .............................................................................................................................. 199
Dashboard ....................................................................................................................................................200
Location .........................................................................................................................................................203
Map View .......................................................................................................................................................204
Geo-Fences ..................................................................................................................................................205
Live Tracking ................................................................................................................................................206
Find My Car ..................................................................................................................................................207
Navigate To Vehicle ...................................................................................................................................208
Page 5

5
Programmable Odometer .......................................................................................................................209
Managing Geo-Fences ..............................................................................................................................211
Create a Geo-Fence Using the Map .....................................................................................................211
Create a Geo-Fence by Searching for an Address or Business Name ....................................216
Edit an Existing Geo-Fence ....................................................................................................................221
Delete an Existing Geo-Fence ...............................................................................................................226
Enable or Disable a Geo-Fence .............................................................................................................229
Live Tracking ................................................................................................................................................232
Alerts ..............................................................................................................................................................234
Health .............................................................................................................................................................238
Performing a Diagnostic Code Scan on Your Vehicle ....................................................................239
Clearing Diagnostic Codes .....................................................................................................................240
Recent Trips .................................................................................................................................................242
Key Fob Pairing ...........................................................................................................................................245
Key Fob Pairing Without VIN..................................................................................................................252
Pair Smartphone Bluetooth® to Module ............................................................................................256
Remove the Bluetooth Connection to Your Module .....................................................................265
Settings .........................................................................................................................................................271
Account Settings........................................................................................................................................272
User Settings ...............................................................................................................................................272
Account Email Address ............................................................................................................................272
Add Account Email Address ...................................................................................................................273
Edit or Delete Account Email Address ...............................................................................................274
Change Username ......................................................................................................................................276
Change Password .......................................................................................................................................278
Module Management ................................................................................................................................280
View Modules Associated with Your Account .................................................................................280
Add a Module to Your Account ..............................................................................................................281
Remove a Module from Your Account ................................................................................................285
Vehicle Settings ..........................................................................................................................................288
Review Your Vehicle Information .........................................................................................................288
Page 6

6
Edit Your Vehicle Information ...............................................................................................................290
Configuring Alerts .....................................................................................................................................294
Configuring the Geo-Fence Alerts .......................................................................................................294
Configuring the Speed Alert ..................................................................................................................301
Configuring the Motion Alert ................................................................................................................307
Configuring the Engine RPM Alert .......................................................................................................313
Configuring Notifications .......................................................................................................................319
Add a Notification......................................................................................................................................320
Delete a Notification ................................................................................................................................327
Enable Personal PIN-Code......................................................................................................................333
Disable Personal PIN-Code ....................................................................................................................336
About Section ..............................................................................................................................................339
Locating Your OBD Connector ..............................................................................................................339
Reviewing the Terms of Use and Privacy Policy .............................................................................341
Logout ............................................................................................................................................................343
Using the Delphi Connect Website ...............................................................................................................344
Accessing the Website .............................................................................................................................344
Forgot Username or Password .............................................................................................................344
Navigating Around .....................................................................................................................................348
Selecting Your Vehicle .............................................................................................................................. 349
Vehicle Settings ..........................................................................................................................................352
Edit Your Vehicle Information ...............................................................................................................352
Refreshing Your Vehicle Data ................................................................................................................ 355
Dashboard ....................................................................................................................................................356
Location .........................................................................................................................................................359
Customizing the Website Map Display ..............................................................................................360
Programmable Odometer .......................................................................................................................362
Managing Geo-Fences ..............................................................................................................................364
Create a Geo-Fence Using the Map .....................................................................................................364
Create a Geo-Fence by Searching for an Address or Business Name ....................................368
Edit an existing Geo-Fence ....................................................................................................................373
Page 7

7
Delete an Existing Geo-Fence ...............................................................................................................374
Enable or Disable a Geo-Fence .............................................................................................................376
Live Tracking ................................................................................................................................................379
Alerts ..............................................................................................................................................................381
Clearing Alerts ............................................................................................................................................382
Health .............................................................................................................................................................383
Performing a Diagnostic Code Scan on Your Vehicle ....................................................................384
Clearing Diagnostic Codes .....................................................................................................................385
Recent Trips .................................................................................................................................................387
Key Fob Pairing ...........................................................................................................................................388
Key Fob Setup without VIN ....................................................................................................................392
Account Settings........................................................................................................................................395
Locating Your OBD Connector ..............................................................................................................396
Add Email Address ....................................................................................................................................397
Edit or Delete Email Address ................................................................................................................398
Change Username ......................................................................................................................................400
Change Password .......................................................................................................................................402
Settings .........................................................................................................................................................404
Module Management ................................................................................................................................404
View Modules Associated with Your Account .................................................................................405
Add a Module to Your Account ..............................................................................................................406
Remove a Module from Your Account ................................................................................................409
Configuring Alerts .....................................................................................................................................411
Configuring the Geo-Fence Alerts .......................................................................................................411
Configuring the Speed Alert ..................................................................................................................415
Configuring the Motion Alert ................................................................................................................418
Configuring the Engine RPM Alert .......................................................................................................420
Configuring Notifications .......................................................................................................................422
Add a Notification Email Address ........................................................................................................422
Delete a Notification Email Address ..................................................................................................425
Add a Notification Text Number ...........................................................................................................427
Page 8

8
Delete a Notification Text Number ......................................................................................................430
Logout ............................................................................................................................................................432
Frequently Asked Questions ..........................................................................................................................433
Status LED and Troubleshooting ................................................................................................................... 447
Understanding the Status LED Indicators .................................................................................................447
Troubleshooting ...................................................................................................................................................449
Customer Information .......................................................................................................................................456
Product Safety and Warranty .........................................................................................................................457
Page 9

9
Page 10

10
Welcome
You are about to experience a powerful device that will deliver a new level of convenience
and peace of mind with your vehicle. When combined with Delphi Connect smartphone app or
website, you can:
• Check the health and status of your vehicle, decode a “check engine light”
• Find where you parked your vehicle
• Track your vehicle’s location in real-time, and create virtual Geo-Fence boundaries anywhere
on a map
• Receive alerts for speeding, Geo-Fence boundary crossings and vehicle-related issues
• Make your key fob functions available on your smartphone or online for convenient use
anywhere. See connectedcar.delphi.com/fitment for vehicle compatibility.
• Track your driving history and see past trips on a map
This manual covers all models offered as part of the Delphi Connect system. Depending on your
model you have purchased, some features may not be available.
Page 11

11
Is My Vehicle Compatible?
The Delphi Connect module works with most 1996 and newer vehicles (cars, light trucks, SUVs
and minivans) sold in the United States including domestic, Asian and European imports. Before
you start installation, please visit connectedcar.delphi.com/fitment to make sure your vehicle is
compatible with the Delphi Connect system. The fitment guide will also tell you if a Relocation
Kit* is recommended for your vehicle. These can be purchased at
verizonwireless.com/accessories.
NOTE: Screen images and icons shown are for reference only. Changes may occur in the future.
*
Sold Separately
Page 12
12
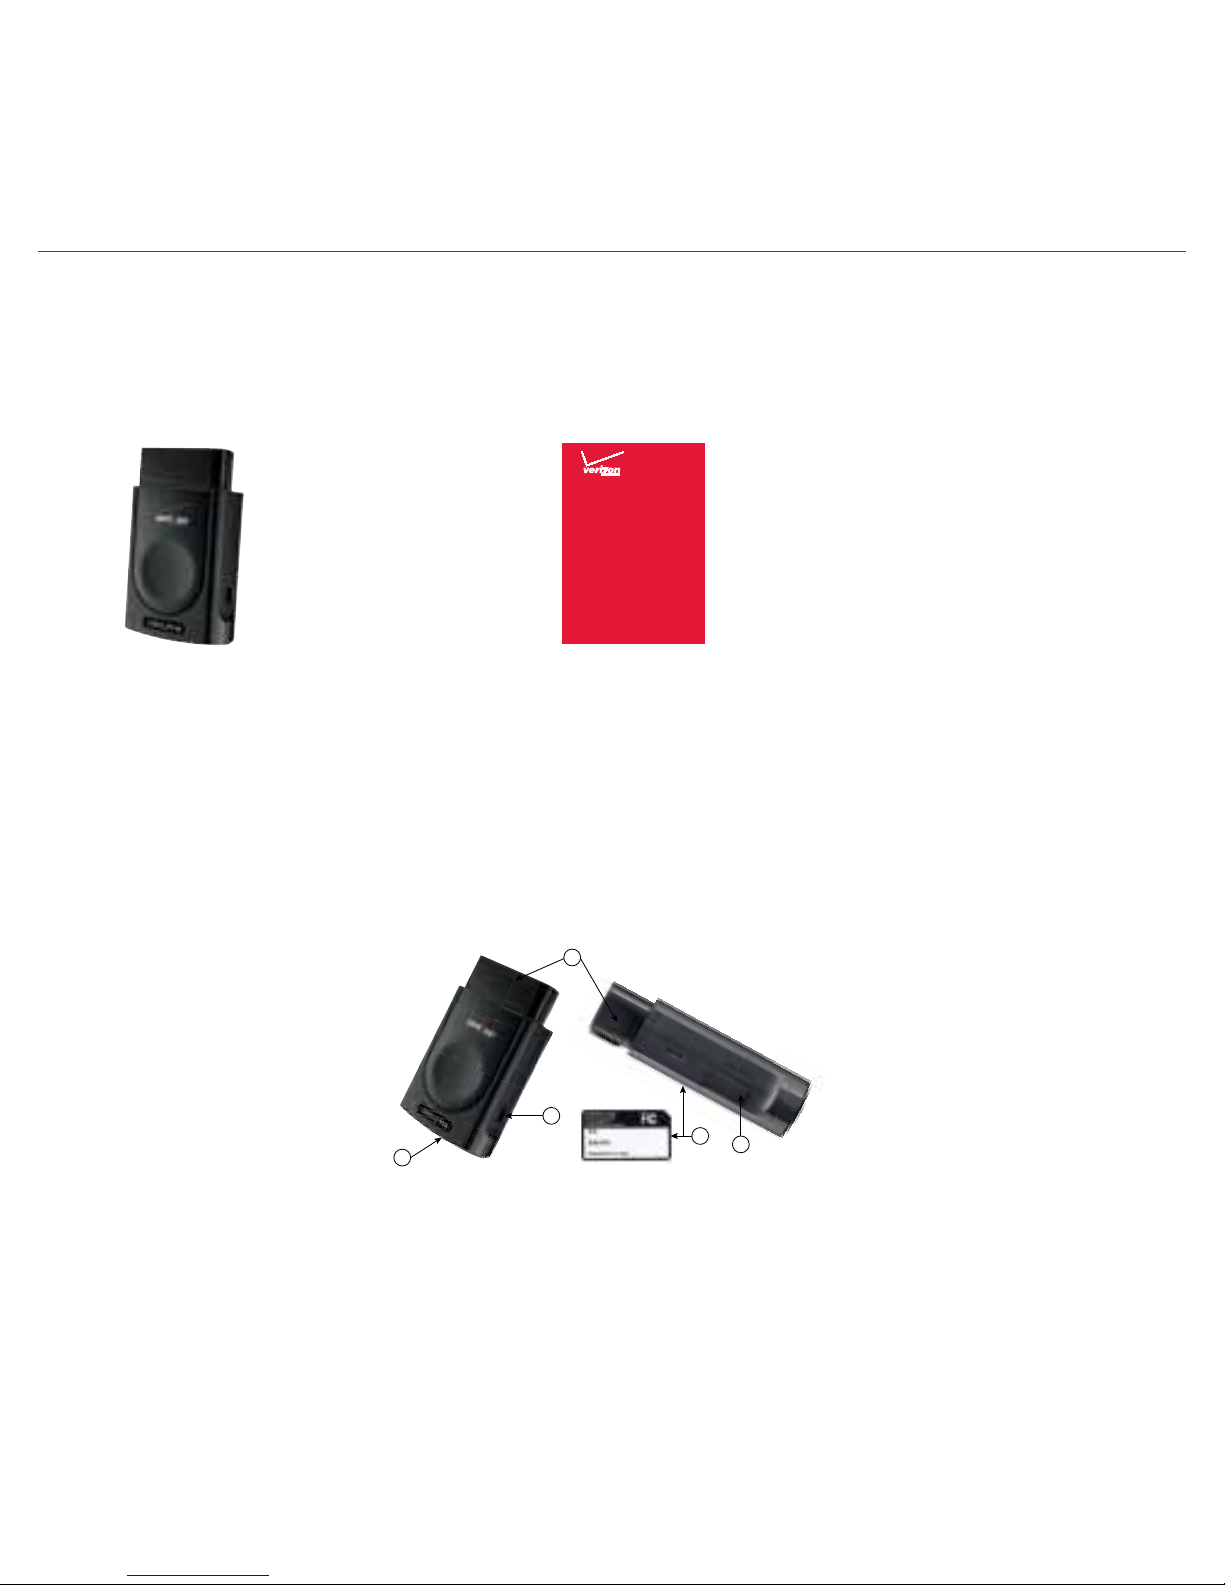
• Delphi Connect Module
• Get to Know Your Device Guide
• Product Safety and Warranty Guide
If anything is missing, please contact Verizon Wireless Customer Service at (800) 922-0204 or by
dialing *611 from your Verizon mobile phone.
Note: The figures are only for your reference. The actual shape and color of the product may differ slightly.
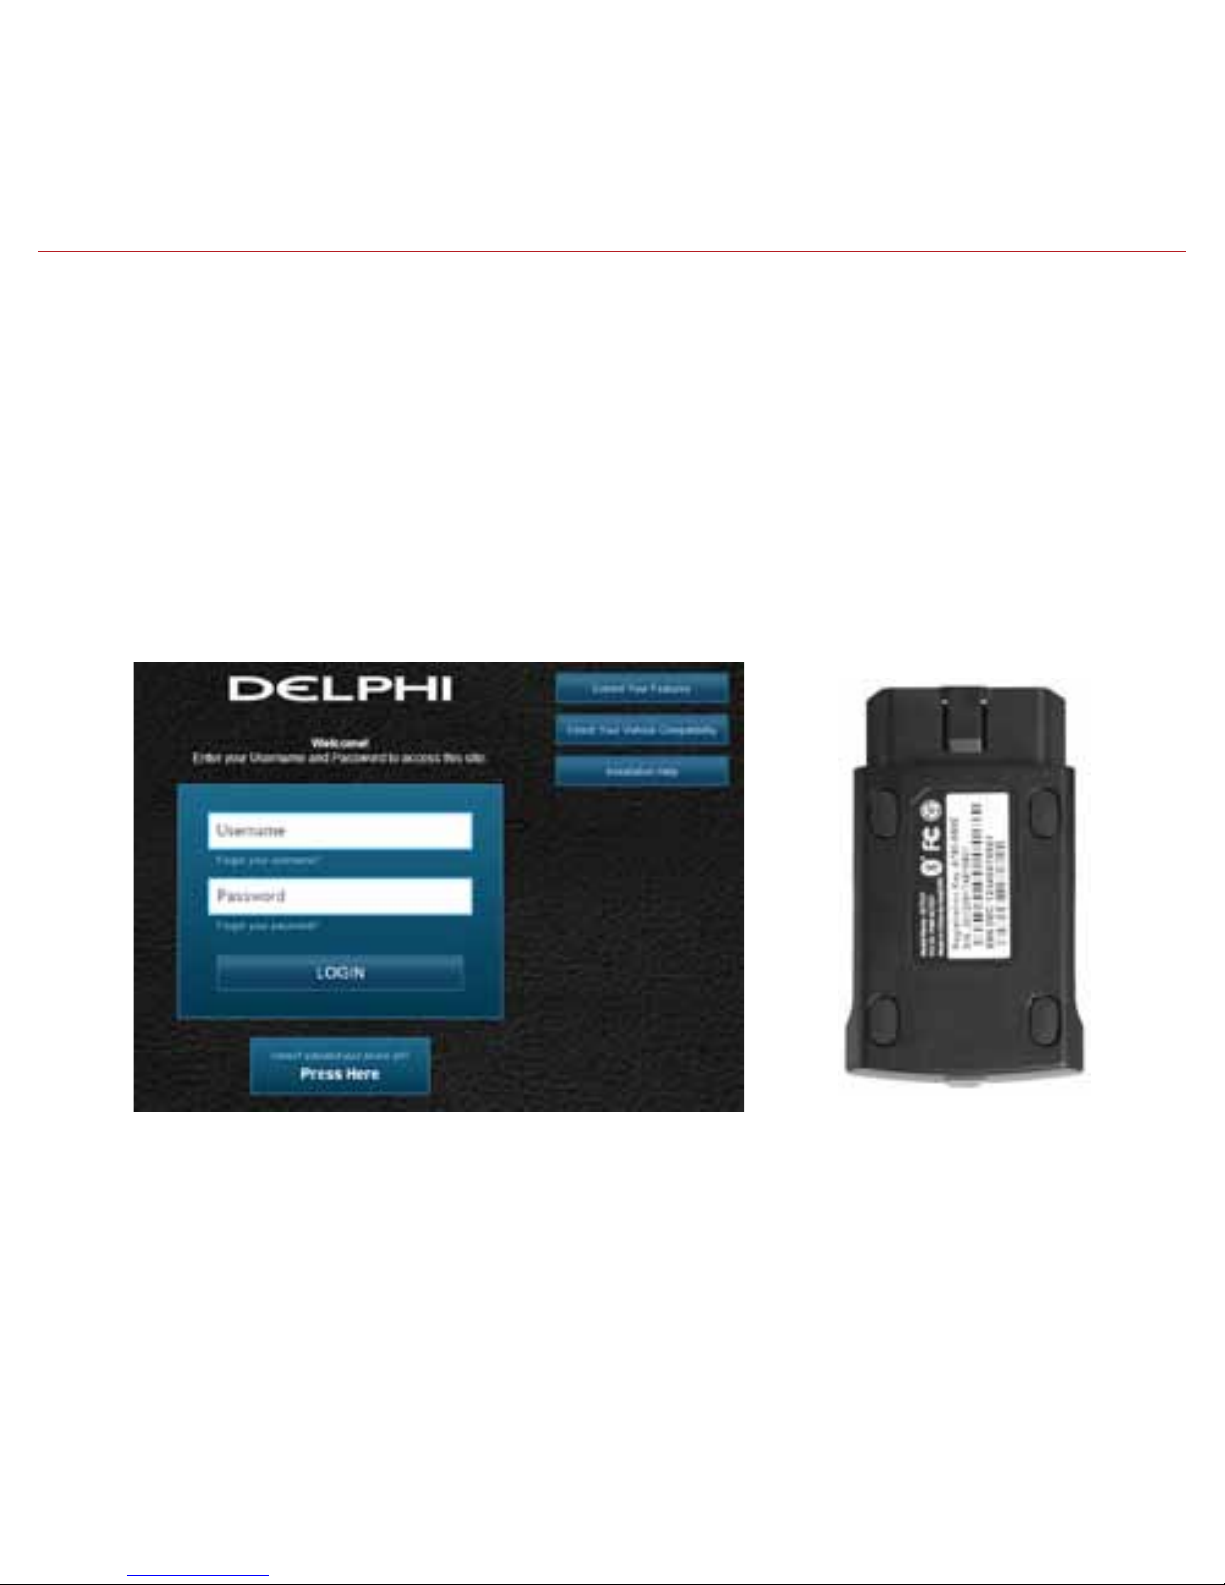
Equipment Overview
Package Contents
The package you purchased should contain the following items. Please contact Verizon Wireless
if any of the items are missing or damaged.
1. OBD connector (plugs into vehicle ’s
OBD-II port)
2. Function button
3. Status LED
4. Service connector (manufacturer use only)
5. Labels, showing product information
1
2
3
4
5
(bottom)
Product
Safety &
Warranty
Information
PSW231VW
Delphi Connect System
A
Get to Know
Your De vi ce
Delphi Connect System
Page 13

13
System Requirements
The Delphi Connect smartphone app works on:
• Android 2.2 and later
• Apple iOS 5.0 and later
The Delphi website at mycar.delphi.com works with:
• Internet Explorer 7 and later
• Google Chrome
• Apple Safari
• Firefox
Note: Bluetooth® features of this product are only available by using the Delphi Connect smartphone app.
Installation Requirements
• A supported vehicle identied in the tment guide at connectedcar.delphi.com/fitment
• Relocation Kit*, if needed (refer to the fitment guide for a recommendation)
• An activated Delphi Connect module with a qualied Verizon Wireless service plan
If you do not have a Verizon Wireless service plan, please visit vzw.com/certifieddevice to
activate this product before starting installation. When asked for Device ID, enter the ESN DEC
found on the label of the module.
*
Sold Separately
Page 14
14
First-Time Setup Using Smartphone App
Download Delphi Connect Smartphone App
1. Launch your smartphone’s app store—either Google Play Store for Android or Apple’s
App Store for iPhone.
2. Search for the Delphi Connect app and download it to your smartphone.
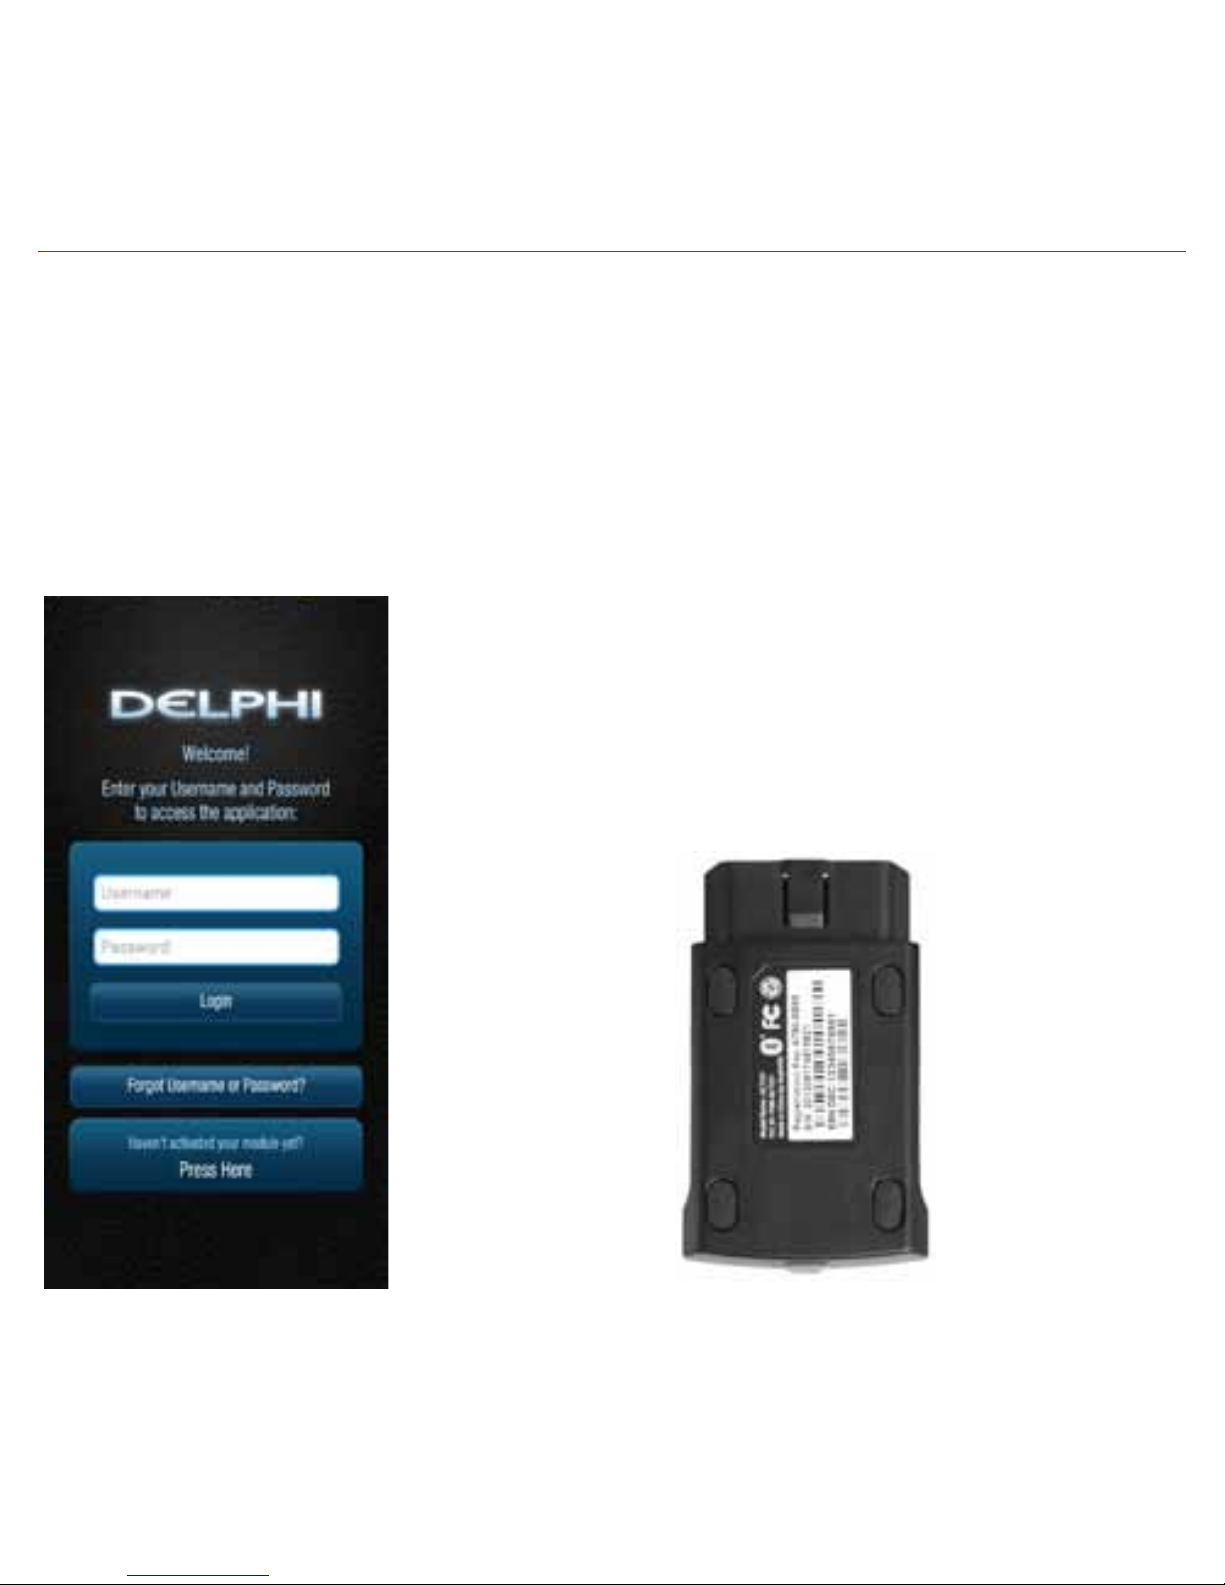
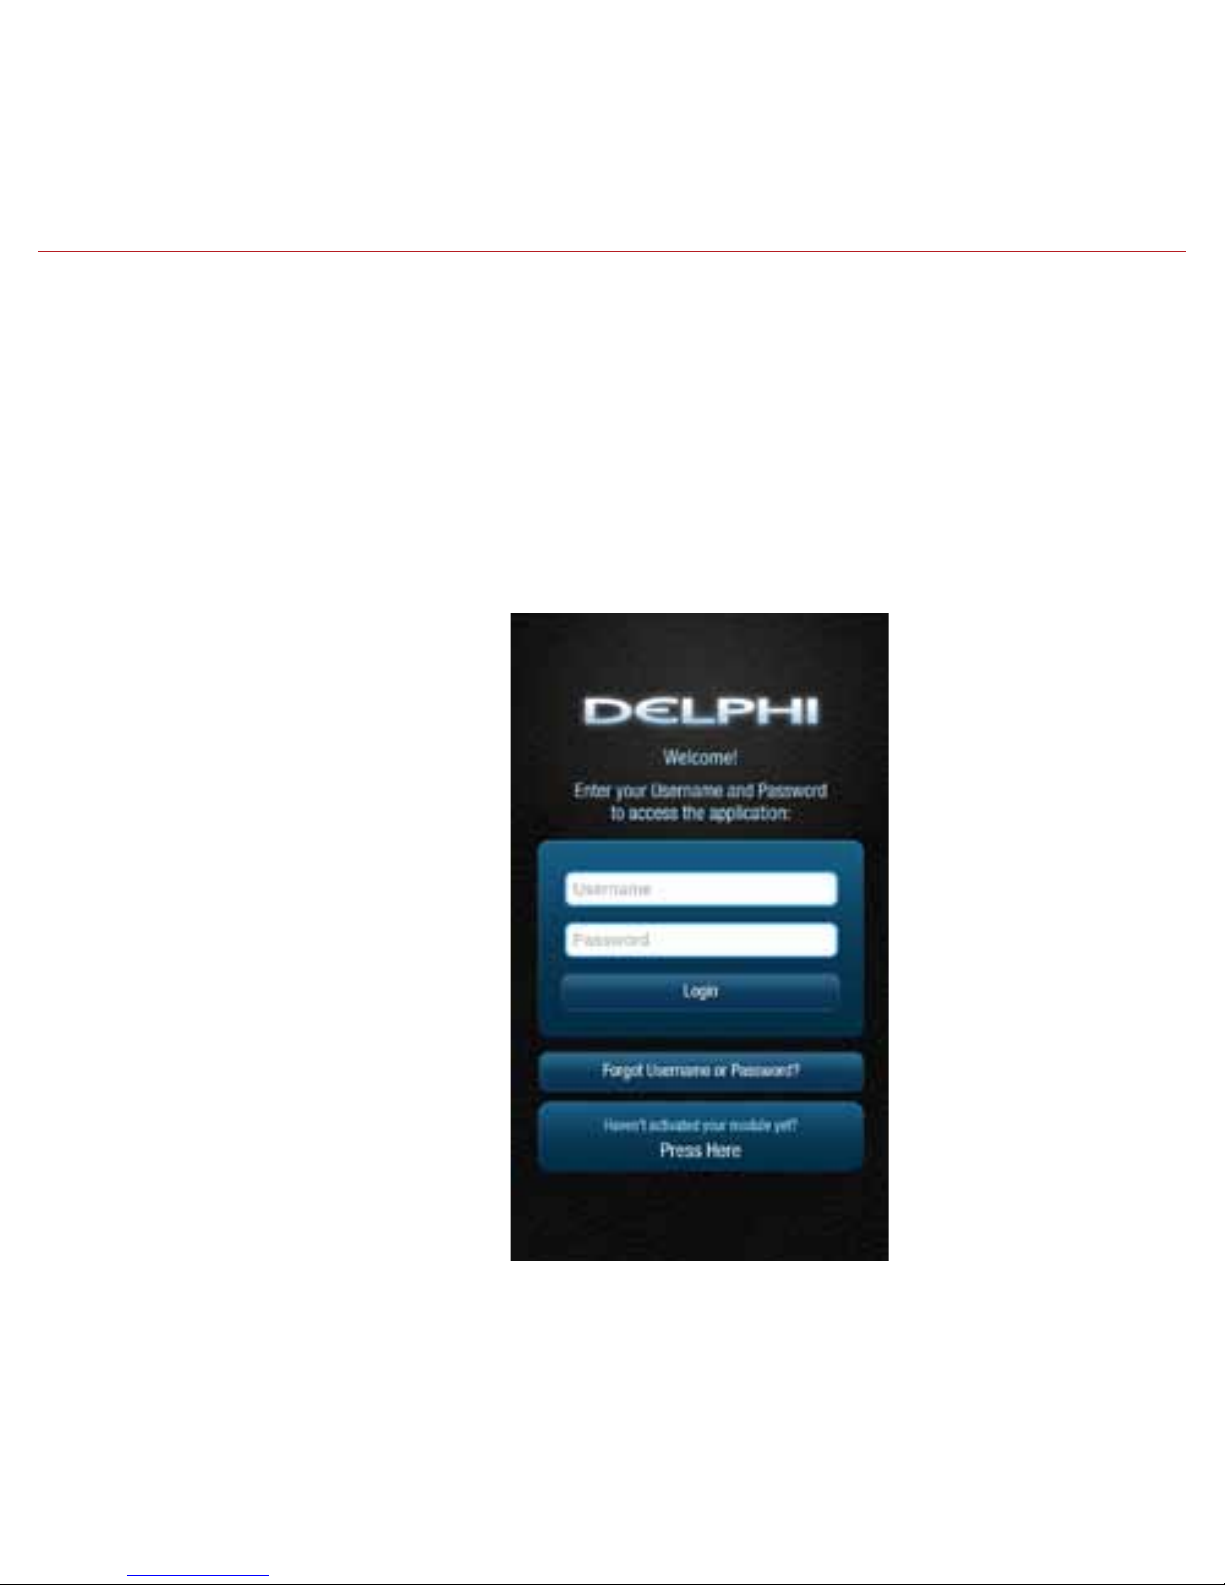
Sign In to Your Delphi Account
1. Launch the Delphi Connect app.
2. In the Username, enter the Registration Key exactly as it
is printed on the module label - including the dash. In the
Password field, enter the ESN DEC exactly as it is printed
on the label.
Page 15
15
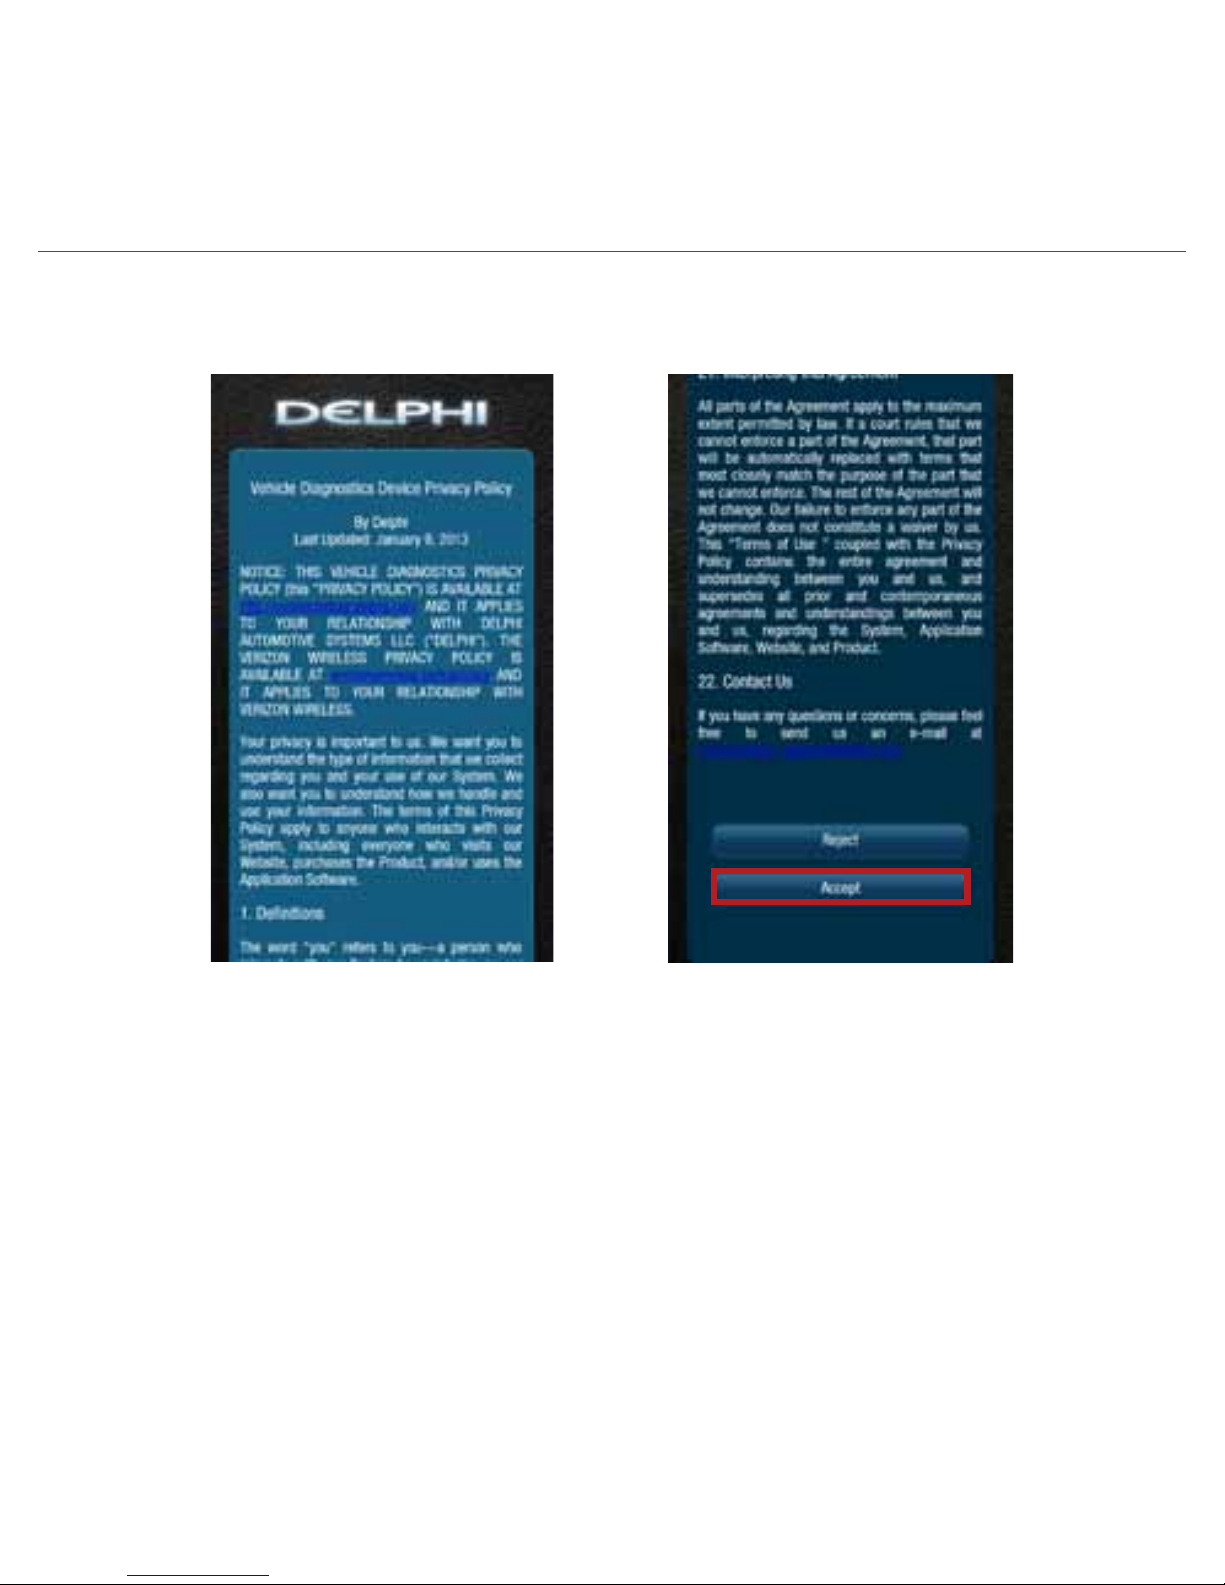
3. Review and accept the privacy and terms of use.
On Android:
Page 16
16
On iPhone:
Page 17
17
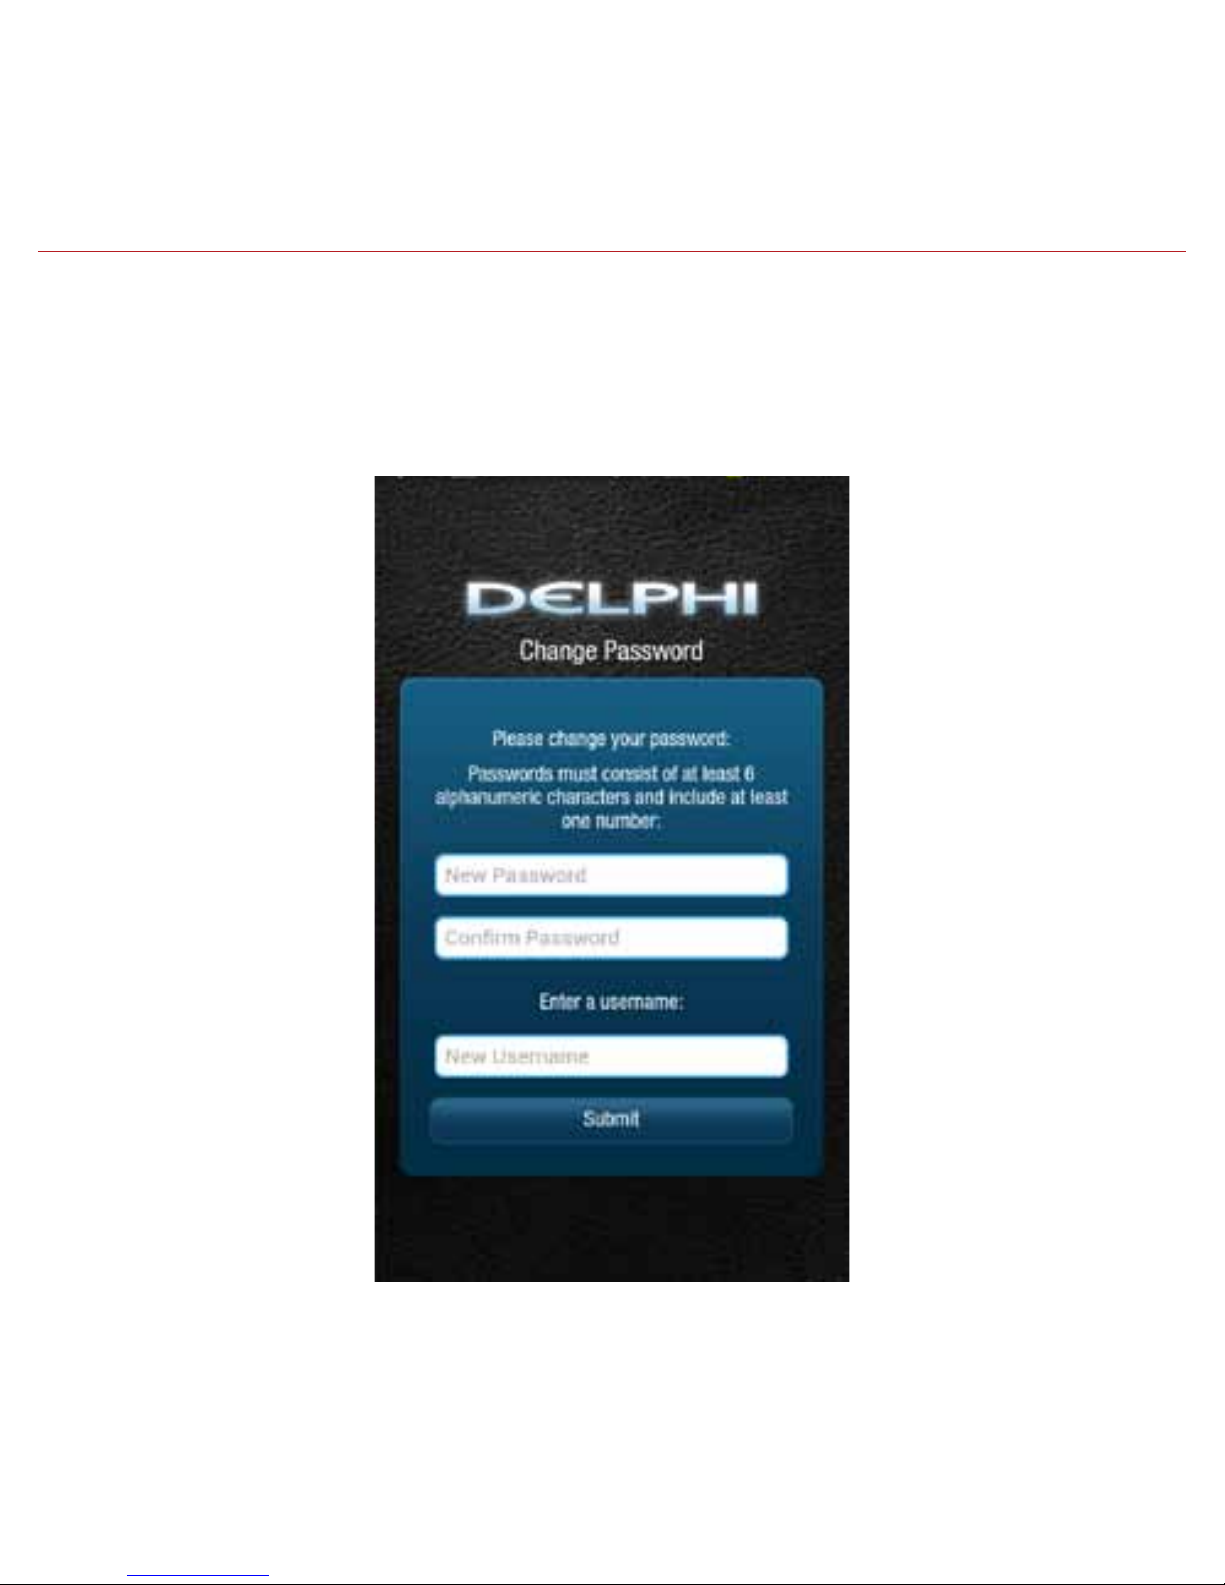
4. When prompted, change your Username and Password, to something easy to remember but
difficult for other people to guess. Passwords must be at least six characters long and
include at least one number. Usernames must be at least one character long and do not
have to include a number.
Page 18
18
5. You will see the following screen after successfully changing your username and password.
6. Now you’re ready to install the module in your vehicle.
Note: The Delphi Connect smartphone app will remain logged in to your vehicle
indefinitely, unless you log out using the Log Out feature on page 191.
Note: The Delphi Connect smartphone app will be updated periodically and you will receive notification of
updates via standard Android and iOS app update notifications.
Note: You can review Delphi’s complete Terms of Use and Privacy Policy at
connectedcar.delphi.com/terms
Page 19
19
Find Your Vehicle’s OBD Connector Port
The OBD connector is usually located on or under the dash, on the driver’s side. Other possible
locations are the center console area or inside the glove compartment.
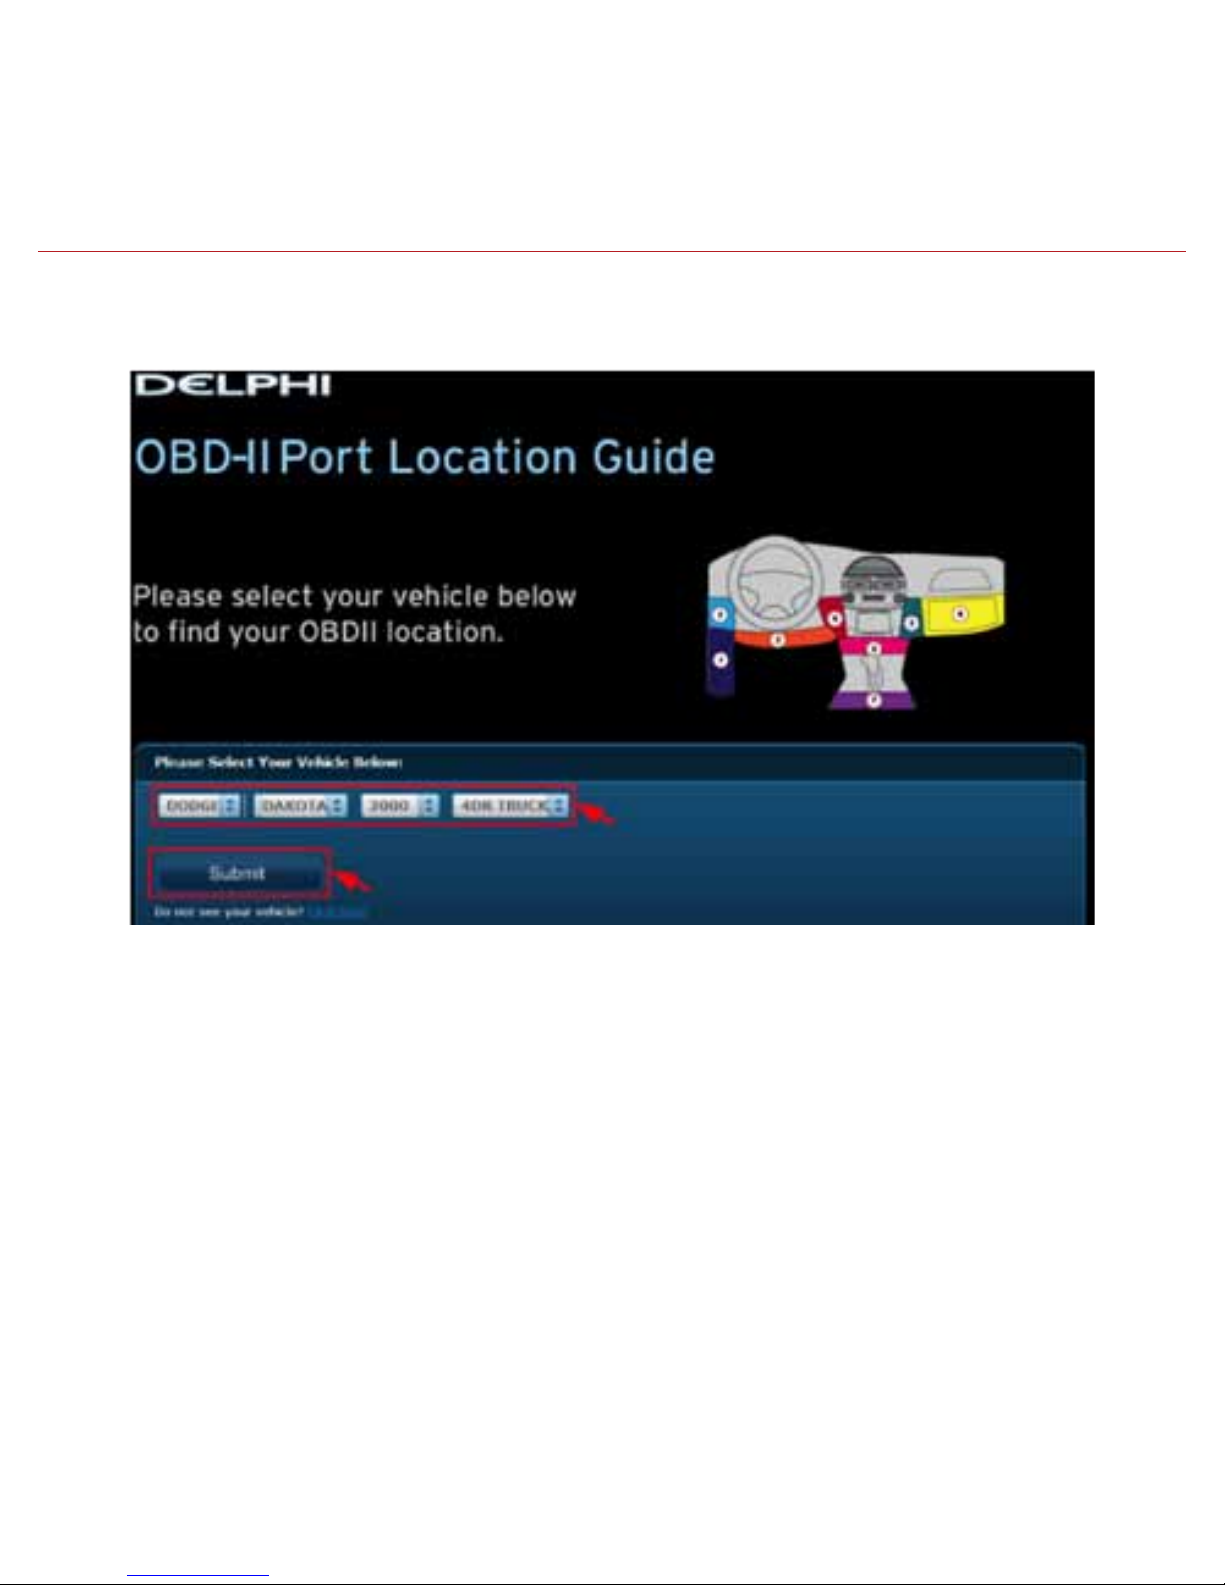
Need help finding your vehicle’s OBD Connector Port?
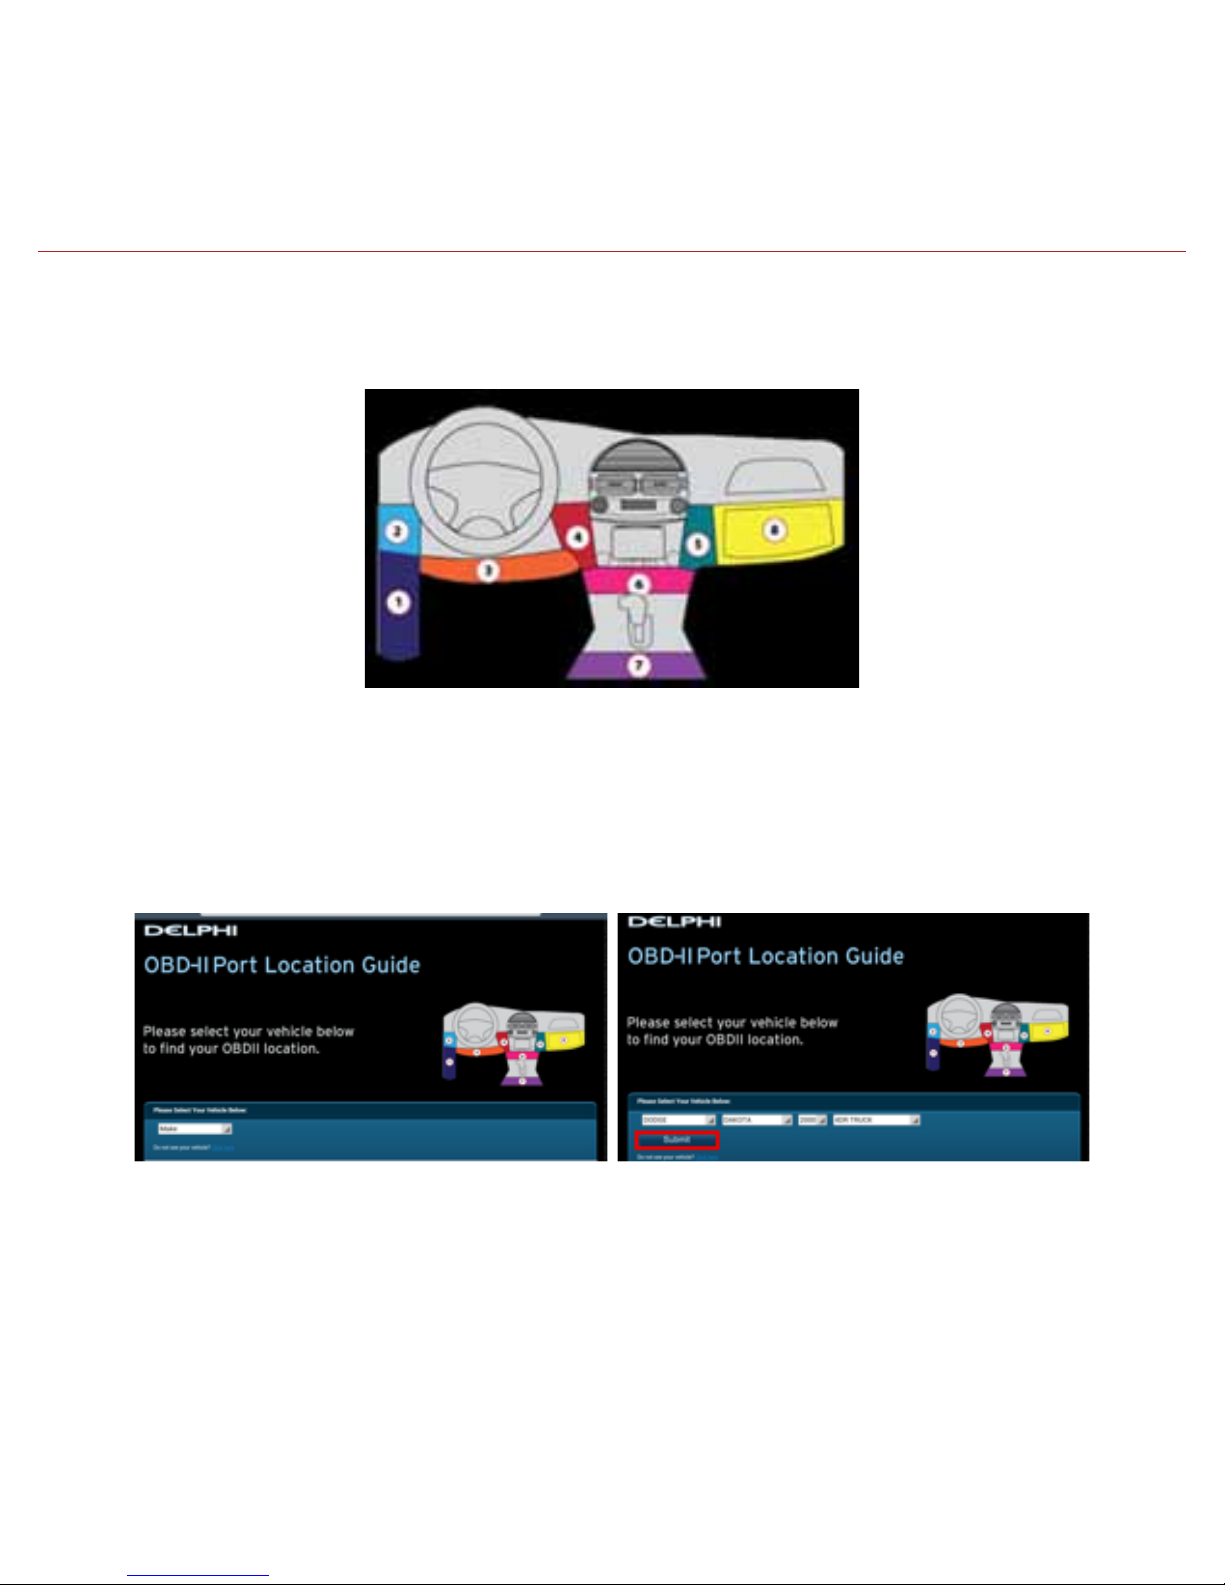
1. After logging in for the first time, tap OBD LOCATOR.
2. Select your vehicle make from the provided drop-down selector and tap Submit. If you are
unable to select your vehicle, you can use the “Click here” link to submit an email for the
unlisted vehicle.
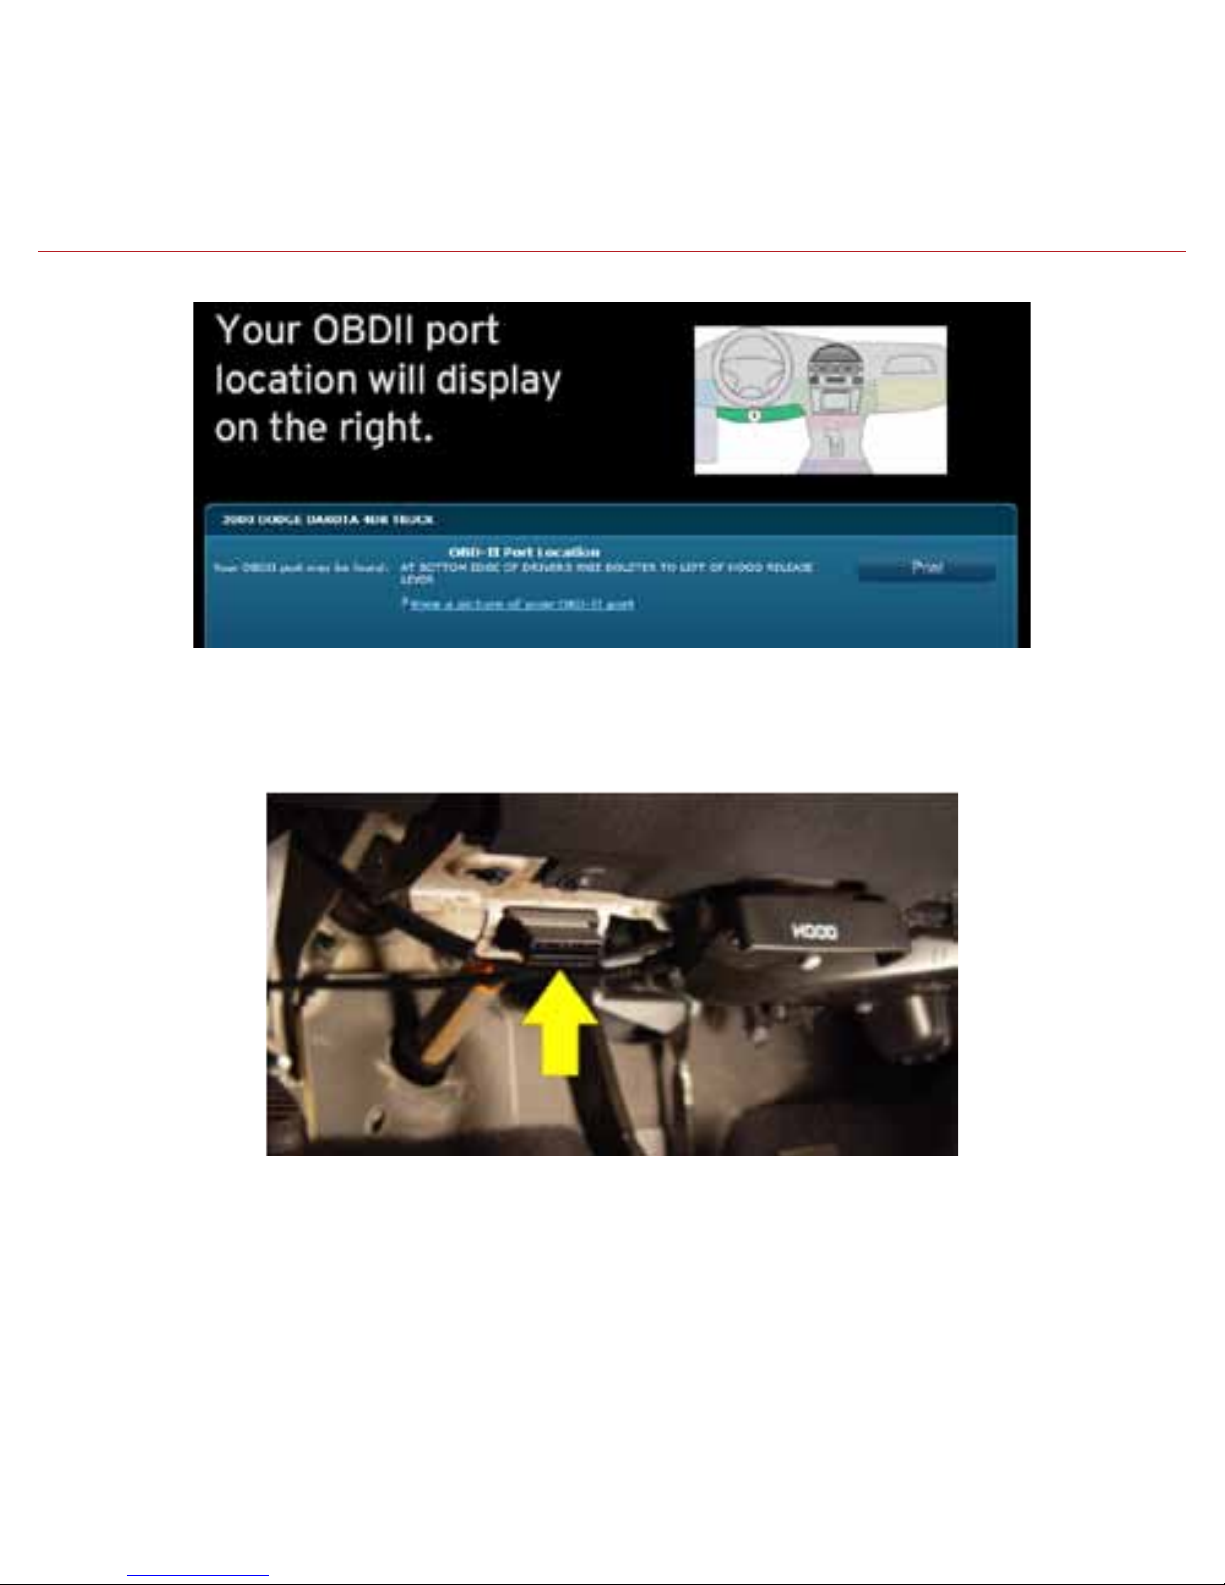
3. A description of the location of your OBD II port will be given. Click “View a picture of your
OBD-II port” to view an actual photograph of the location of your OBD II port.
Page 20
20
4. You will see a picture of the location of your OBD II connector.
Note: If needed, you can access the OBD Locator from the smartphone app or website at any time. In the
smartphone app, this feature is located in the Side Menu under Settings > About > OBD Locator
Page 21

21
Install Your Module
1. Use your Verizon Wireless smartphone to check that you have a strong signal where your
vehicle is parked. Don’t have Verizon coverage? Visit Verizon’s interactive coverage map:
verizonwireless.com/maps.
2. Make sure your vehicle is parked outside in a safe location and the engine is turned off.
3. Now plug the module into the OBD II port (or into the extension cable if it is required). Make
sure that the module is fully seated.
Helpful Installation Tips:
• If the module seems to be difcult to insert, DO NOT FORCE IT. Remove the device and
examine both connectors for any bent pins.
• There is only one orientation that the module will plug in.
• Place two ngers behind the plug in your vehicle to hold it steady while plugging in the
Module.
• If the module protrudes into the knee or foot area or prevents an access panel door from
closing, a Relocation Kit may be used to relocate the module. See connectedcar.delphi.com/
fitment for recommendations on using a relocation kit with your vehicle.
• Wait for the Status LED to turn solid blue.
• To minimize drain on the vehicle battery, the “Install Your Module” and “Initiate Module Setup”
steps should be performed without interruption. The process will take less than 5 minutes.
Note: The first time the module connects to the Verizon network, it will perform a one-time network setup
which will take a few minutes. The Status LED will turn solid white and turn off, followed by a blinking white
sequence. When network setup is successfully completed, the Status LED will turn solid blue. See
Understanding the Status LED for more information on the LED color status.
Page 22

22
Note: To avoid any unnecessary drain on the vehicle battery, it is recommended to not leave the module in the
solid blue state for more than 24 hours.
Initiate Module Setup
Stop! Do not proceed until the Status LED is solid blue, indicating activation on the Verizon
network is complete.
1. Insert your vehicle’s ignition key and turn it to the On position (not ACC/Accessory). Do not
start the engine!
Note: Typically, all of the warning lamps on the dashboard will illuminate briefly in this position.
Note: For pushbutton-start vehicles, the procedure is typically to push the Start button without your foot on
the brake (check your vehicle owner’s manual to determine how many presses are required to turn the ignition
on).
2. Press and hold the Function Button on the side of the module until the Status LED blinks red
one time. This will occur after approximately 5 seconds. Then release the Function Button.
The LED will blink red several times while vehicle setup occurs.
3. Wait up to 30 seconds for the LED to display a mix of solid and blinking green.
4. Wait until the LED stops flashing green and goes out.
5. When the LED begins to flash blue every 10 seconds, setup is complete.
Stop! Do not proceed if the Status LED never turned green and returned to solid blue. Your
vehicle may not be compatible with the Delphi Connect system
(check fitment guide connectedcar.delphi.com/fitment) or you did not place the ignition in the
On position.
Page 23

23
Verify Module Setup
1. Start the engine and let it run for at least 30 seconds.
2. Stop the engine and wait at least 20 seconds.
3. You are now ready to access your vehicle information using the Delphi Connect app or
website.
• Open the Delphi Connect app and, if needed, sign in using the username and password
you created in Sign In to Your Delphi Account.
• You should see the Dashboard screen.
Page 24
24
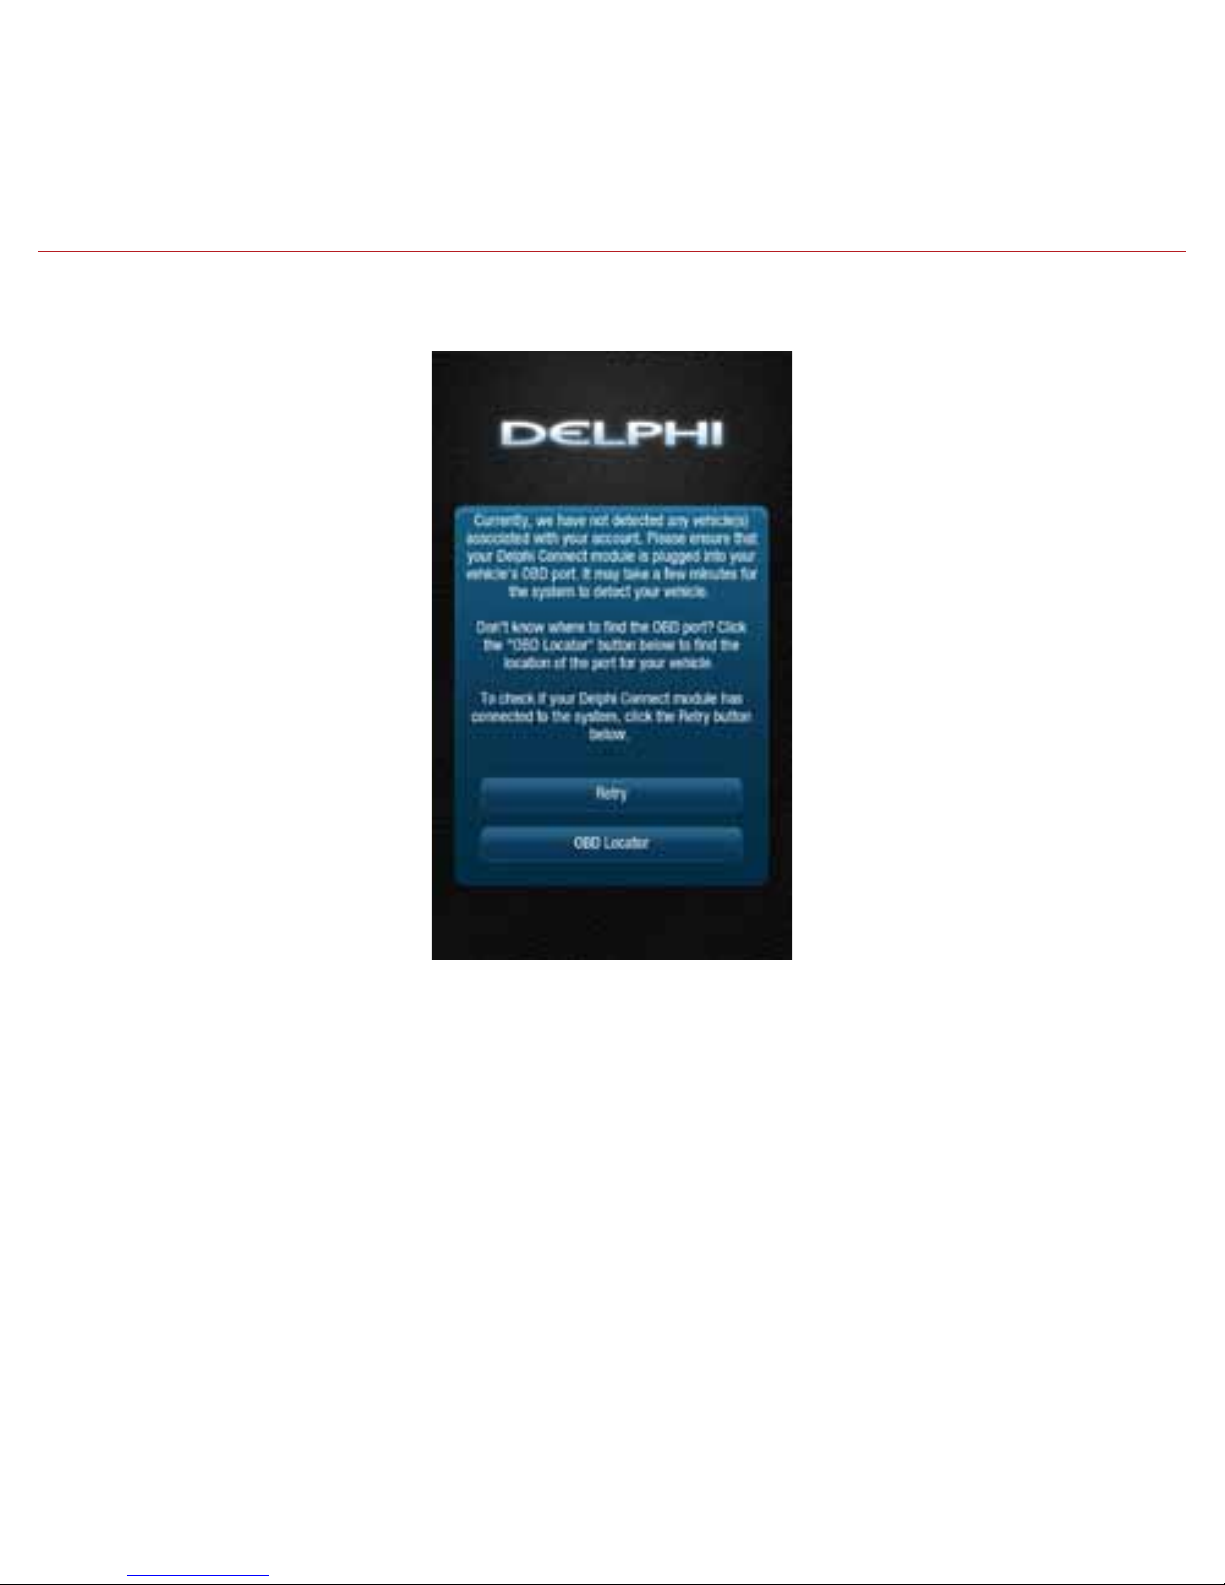
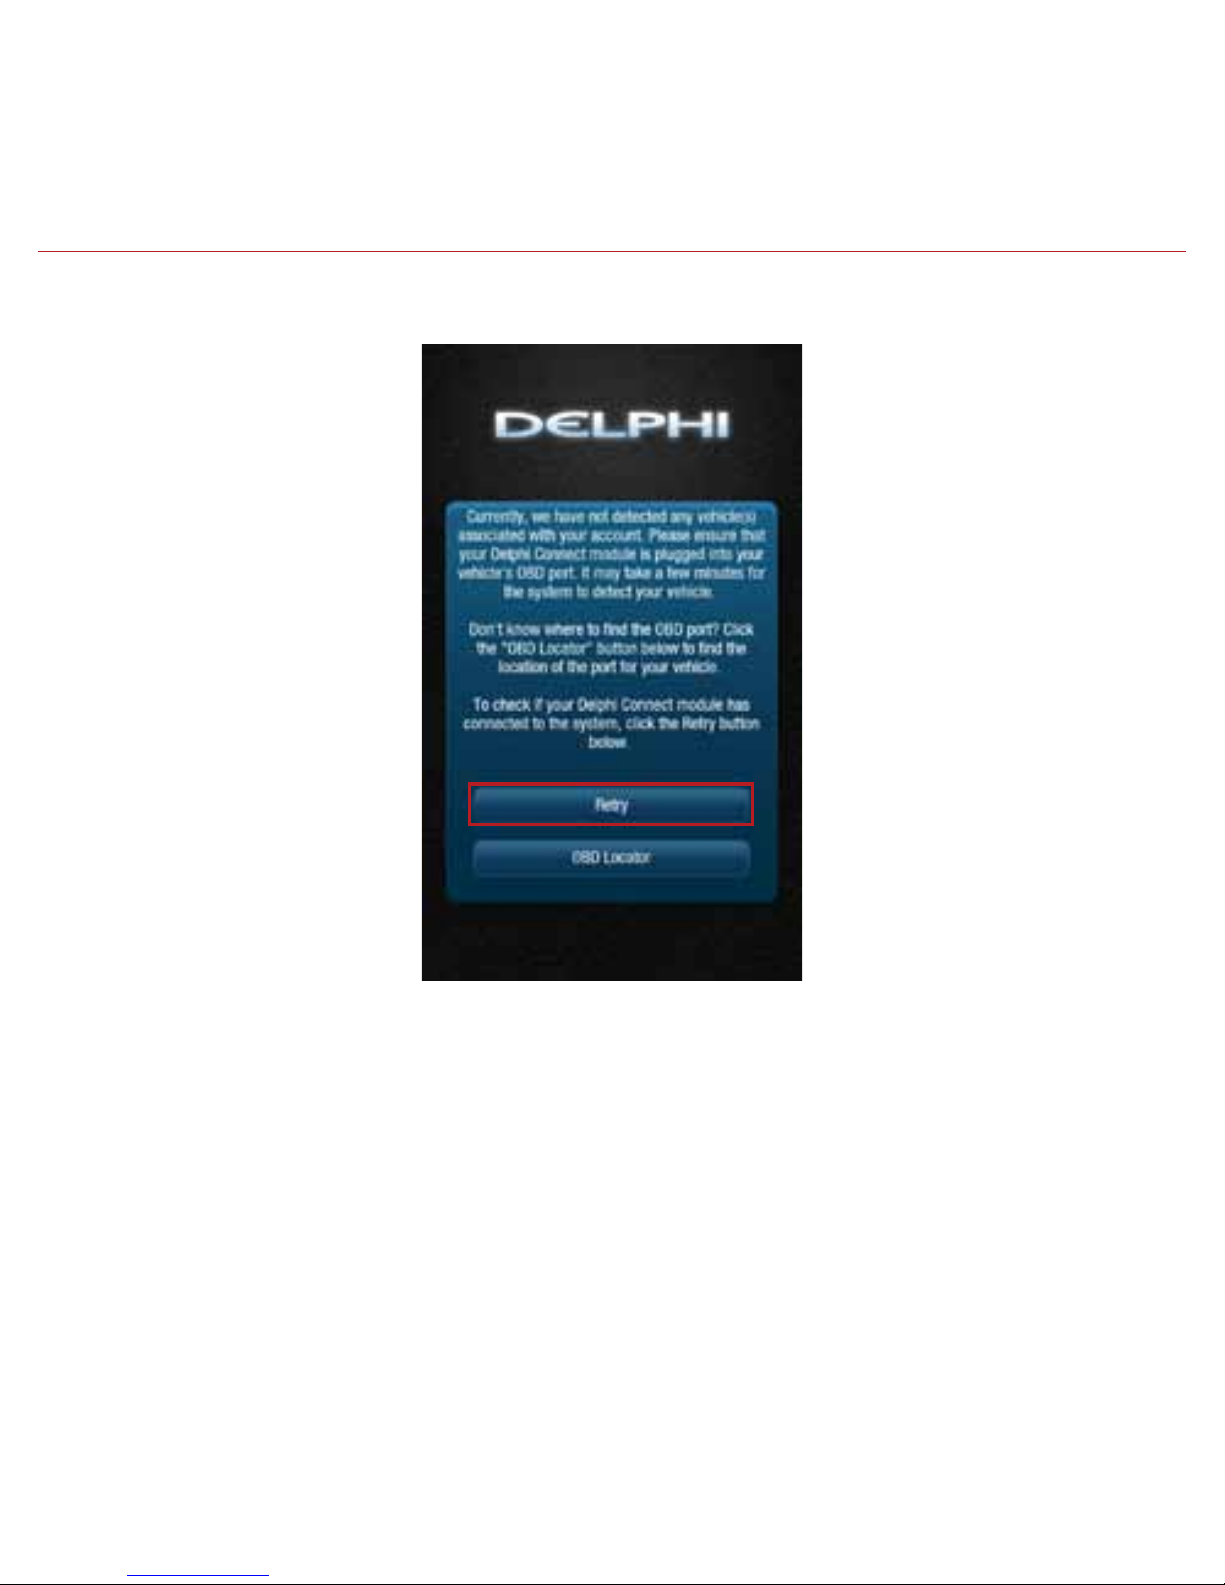
• If not, tap the Retry button.
• If you still do not see the Dashboard screen, go to the Troubleshooting section of this
guide.
Page 25
25
First-Time Setup Using Delphi Connect Website
Launch Your Internet Browser
Use your website browser and go to mycar.delphi.com.
Sign In to Your Delphi Account
1. In the Username field, enter the Registration Key exactly as it is printed on the module
label – including the dash.
2. In the Password field, enter the ESN DEC exactly as it is printed on the label.
Page 26

26
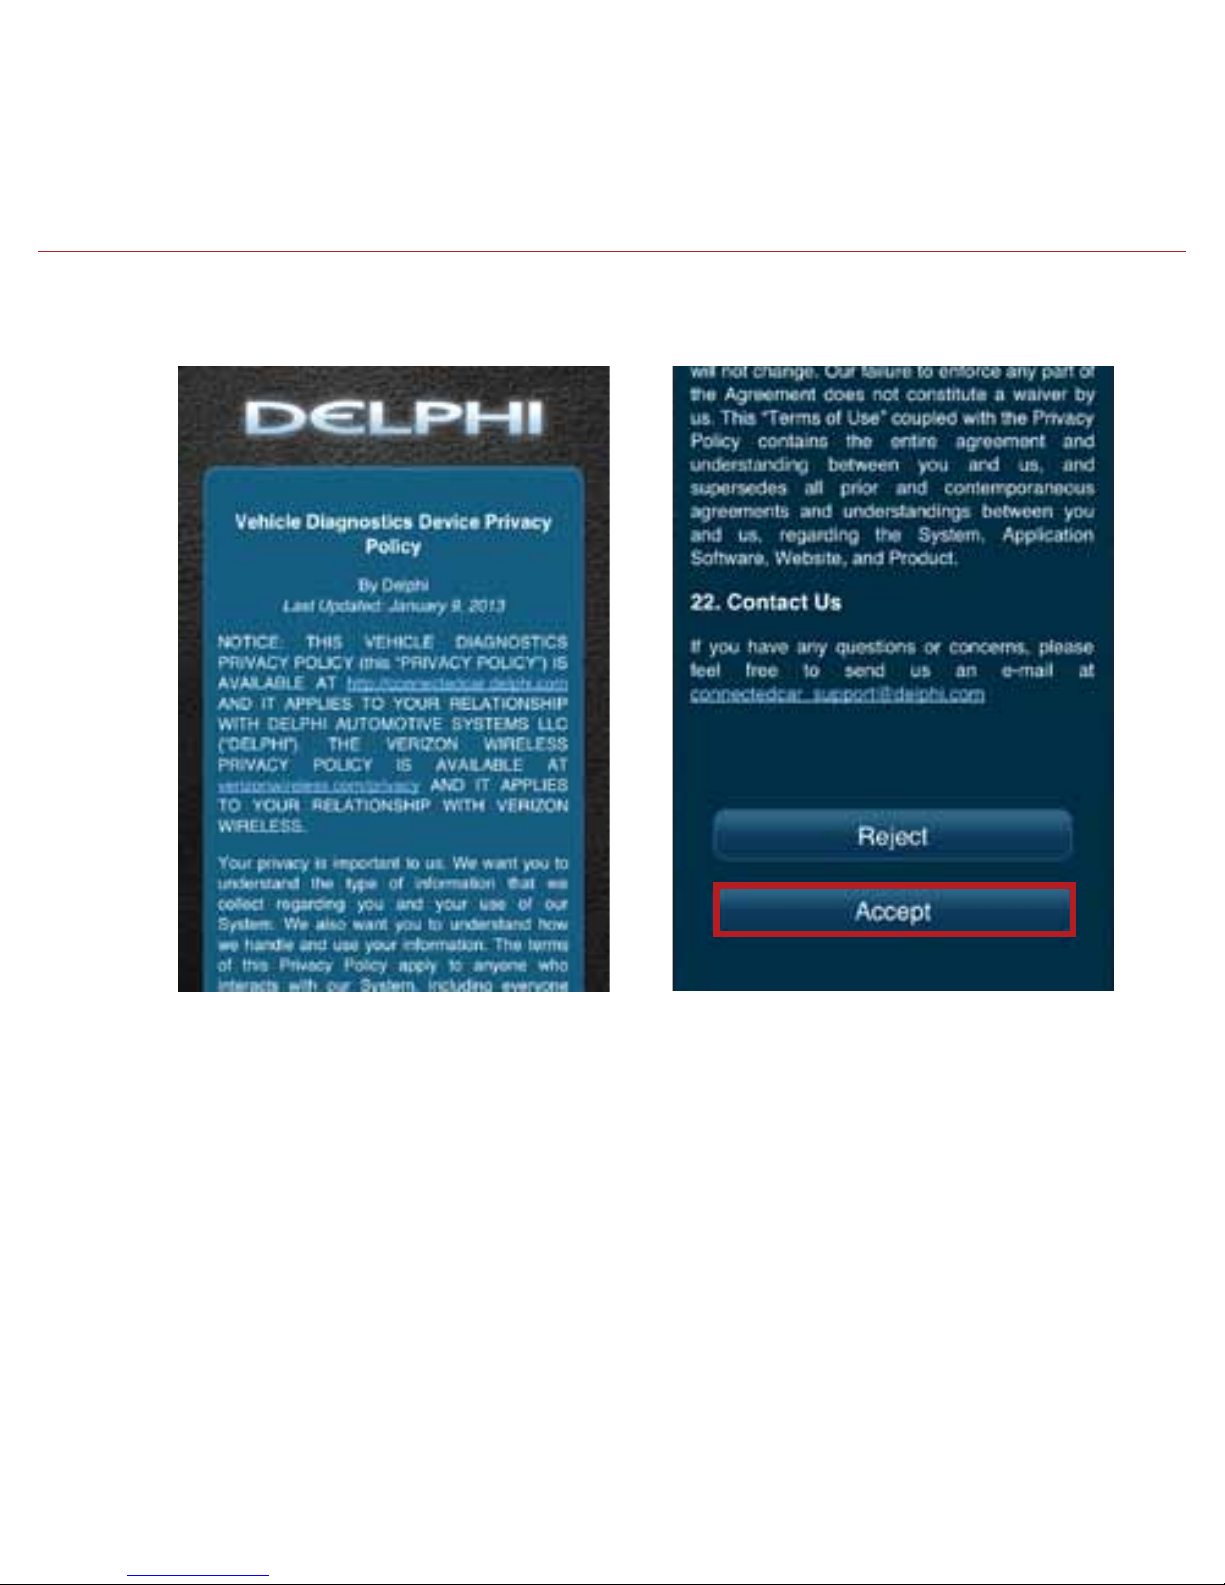
3. Review and select ACCEPT to accept the privacy statement and terms of use.
Page 27

27
4. When prompted, change your Username and Password to something easy to remember but
difficult for other people to guess. Passwords must be at least six characters long and include
at least one number. Usernames must be at least one character long and do not have to
include a number.
Page 28

28
6. Now you’re ready to install the module in your vehicle.
Note: The website will automatically log you out after 20 minutes of inactivity, unless you log
out using the Log Out feature.
Note: You can review Delphi’s complete Terms of Use and Privacy Policy at
connectedcar.delphi.com/terms
Find Your Vehicle’s OBD Connector Port
The OBD connector is usually located on or under the dash, on the driver’s side. Other possible
locations are the center console area or inside the glove compartment.
5. You will see the following screen after successfully changing your username and password.
Page 29

29
Need help finding your vehicle’s OBD Connector port?
1. After logging in for the first time, click the button labeled OBD LOCATOR. You will be
presented with the OBD II Port Location Guide.
2. Select you vehicle make from the provided drop-down selections.
Page 30
30
3. Complete your vehicle selections using the drop-downs for Make, Model, Year, Body Type and
Trim as requested and then select Submit.
If you are unable to select your vehicle, you can use the “Click here” link to submit an email for
the unlisted vehicle.
Page 31

31
4. A description of the location of your OBD II port will be given. Click “View a picture of your
OBD II port” to view an actual photograph of the location of your OBD II port.
You can also use the Print button to print this page to have with you in your vehicle.
Page 32

32
Note: If needed, you can access the OBD Locator from the website or the smartphone app. On the website,
click on your username in the upper right-hand corner. From the drop-down menu, click the button labeled
OBD LOCATOR.
Install Your Module
1. Check that you have a strong signal where your vehicle is parked. Visit Verizon’s interactive
coverage map: verizonwireless.com/maps.
2. Make sure your vehicle is parked outside in a safe location and the engine is turned off.
3. Now plug the module into the OBD II port (or into the extension cable if it is required).
Make sure that the module is fully seated.
5. You will see a picture of the location of your OBD-II connector.
Page 33

33
Helpful Installation Tips:
• If the module seems to be difcult to insert, DO NOT FORCE IT. Remove the module and
examine both connectors for any bent pins.
• There is only one orientation that the module will plug in.
• Place two ngers behind the plug in your vehicle to prevent it from moving while plugging in
the module.
• If the module protrudes into the knee or foot area or prevents an access panel door from
closing, a Relocation Kit may be used to relocate the module. See connectedcar.delphi.com/
fitment for recommendations on using a relocation kit with your vehicle.
• Wait for the Status LED to turn solid blue.
• To minimize drain on the vehicle battery, the “Install Your Module” and “Initiate Module Setup”
steps should be performed without interruption. The process will take less than 5 minutes.
Note: The first time the module connects to the Verizon network, it will perform a one-time network setup
which will take a few minutes. The Status LED will turn solid white then turn off, followed by a blinking white
sequence. When network setup is successfully completed, the Status LED will turn solid blue. See
Understanding the Status LED for more information on the LED color status.
Note: To avoid any unnecessary drain on the vehicle battery, it is recommended to not leave the module in the
solid blue state for more than 24 hours.
Page 34

34
Initiate Module Setup
Do not proceed until the Status LED is solid blue, indicating activation on the Verizon network is
complete.
1. Insert your vehicle’s ignition key and turn it to the On position (not ACC/Accessory). Do not
start the engine!
Note: Typically, all of the warning lamps on the dashboard will illuminate briefly in this position.
Note: For pushbutton-start vehicles, the procedure is typically to push the Start button without your foot on
the brake (check your vehicle owner’s manual to determine how many presses are required to turn the ignition
on).
2. Press and hold the Function Button on the side of the module until the Status LED blinks red
one time. This will occur after approximately 5 seconds. Then release the Function Button.
The LED will blink red several times while vehicle setup occurs.
3. Wait up to 30 seconds for the LED to display a mix of solid and blinking green.
4. Wait until the LED stops flashing green and goes out.
5. When the LED begins to flash blue every 10 seconds, setup is complete.
Stop! Do not proceed if the Status LED never turned green and returned to solid blue. Your
vehicle may not be compatible with the Delphi Connect system (check fitment guide
connectedcar.delphi.com/fitment) or you did not place the ignition in the On position.
Page 35

35
Verify Module Setup
1. Start the engine and let it run for at least 30 seconds.
2. Stop the engine and wait at least 20 seconds.
3. You are now ready to access your vehicle information using the Delphi Connect app or
website.
• If you see the following screen, click on RETRY to connect to your vehicle. If you see the login
screen, enter in the password and username you used during setup.
• You should see the Dashboard screen. If not, click the Retry button.
Page 36

36
• If you still do not see the Dashboard screen, see the Troubleshooting section of this guide.
Reconnect Your Module
If you are installing the module for the first time, please refer to the instructions for First-Time
Setup.
If your device becomes disconnected from your vehicle or the battery is disconnected from your
vehicle, you will need to re-initialize the module with your vehicle. In this case, please complete
the following steps.
Note: If you are re-initializing the module to a vehicle that you have previously used with the
module:
• The vehicle history will be available for all times the Module was connected
• If you paired the keyfob previously to this vehicle, it will remain paired once reconnected
Install Your Module
1. If you are currently using the app on your Verizon Wireless smartphone, use your smartphone
to check that you have a strong signal where your vehicle is parked. Don’t have Verizon
coverage? Visit Verizon’s interactive coverage map: verizonwireless.com/maps.
2. Make sure your vehicle is parked outside in a safe location and the engine is turned off.
3. Now plug the module into the OBD port (or into the extension cable if it is needed). Make
sure that the module is fully seated.
Helpful Installation Tips:
• If the module seems to be difcult to insert, DO NOT FORCE IT, remove the device and
examine both connectors for any bent pins.
Page 37

37
• There is only one orientation that the module will plug in.
• Place two ngers behind the plug in your vehicle to prevent it from moving while plugging in
the module.
• If the module protrudes into the knee or foot area or prevents an access panel door from
closing, a Relocation Kit may be used to relocate the module. See connectedcar.delphi.com/
fitment for recommendations on using a relocation kit with your vehicle.
• Wait for the Status LED to turn solid blue.
• To minimize drain on the vehicle battery, the “Install Your Module” and “Initiate Module Setup”
steps should be performed without interruption. The process will take less than 5 minutes.
Note: The Status LED will remain dark for approximately 30 seconds. When vehicle setup is
successfully completed, the Status LED will turn solid blue.
Note: To avoid any unnecessary drain on the vehicle battery, it is recommended to not leave the module in the
solid blue state for more than 24 hours.
Initiate Module Setup
Stop! Do not proceed until the Status LED is solid blue, indicating activation on the Verizon
network is complete.
1. Insert your vehicle’s ignition key and turn it to the On position (not ACC/Accessory). Do not
start the engine!
Note: Typically, all of the warning lamps on the dashboard will illuminate briefly in this position.
Note: For pushbutton-start vehicles, the procedure is typically to push the start button without
your foot on the brake (check your vehicle owner’s manual to determine how many presses are
required to turn the ignition on).
Page 38

38
2. Press and hold the Function Button on the side of the module until the Status LED blinks red
one time. This will occur after approximately 5 seconds. Then release the Function Button.
The LED will blink red several times while vehicle setup occurs.
3. Wait up to 30 seconds for the LED to display a mix of solid and blinking green.
4. Wait an additional 10 seconds for the LED to go out.
5. When the LED begins to flash blue every 10 seconds, setup is complete.
Stop! Do not proceed if the Status LED never turned green and returned to solid blue. Your
vehicle may not be compatible with the Delphi Connect system (check fitment guide
connectedcar.delphi.com/fitment) or you did not place the ignition in the On position.
Verify Module Setup
1. Start the engine and let it run for at least 30 seconds.
2. Stop the engine and wait at least 20 seconds.
You are now ready to access your vehicle information using the Delphi Connect app or
web site.
Page 39
39
Application & Service Features
Using the Android App
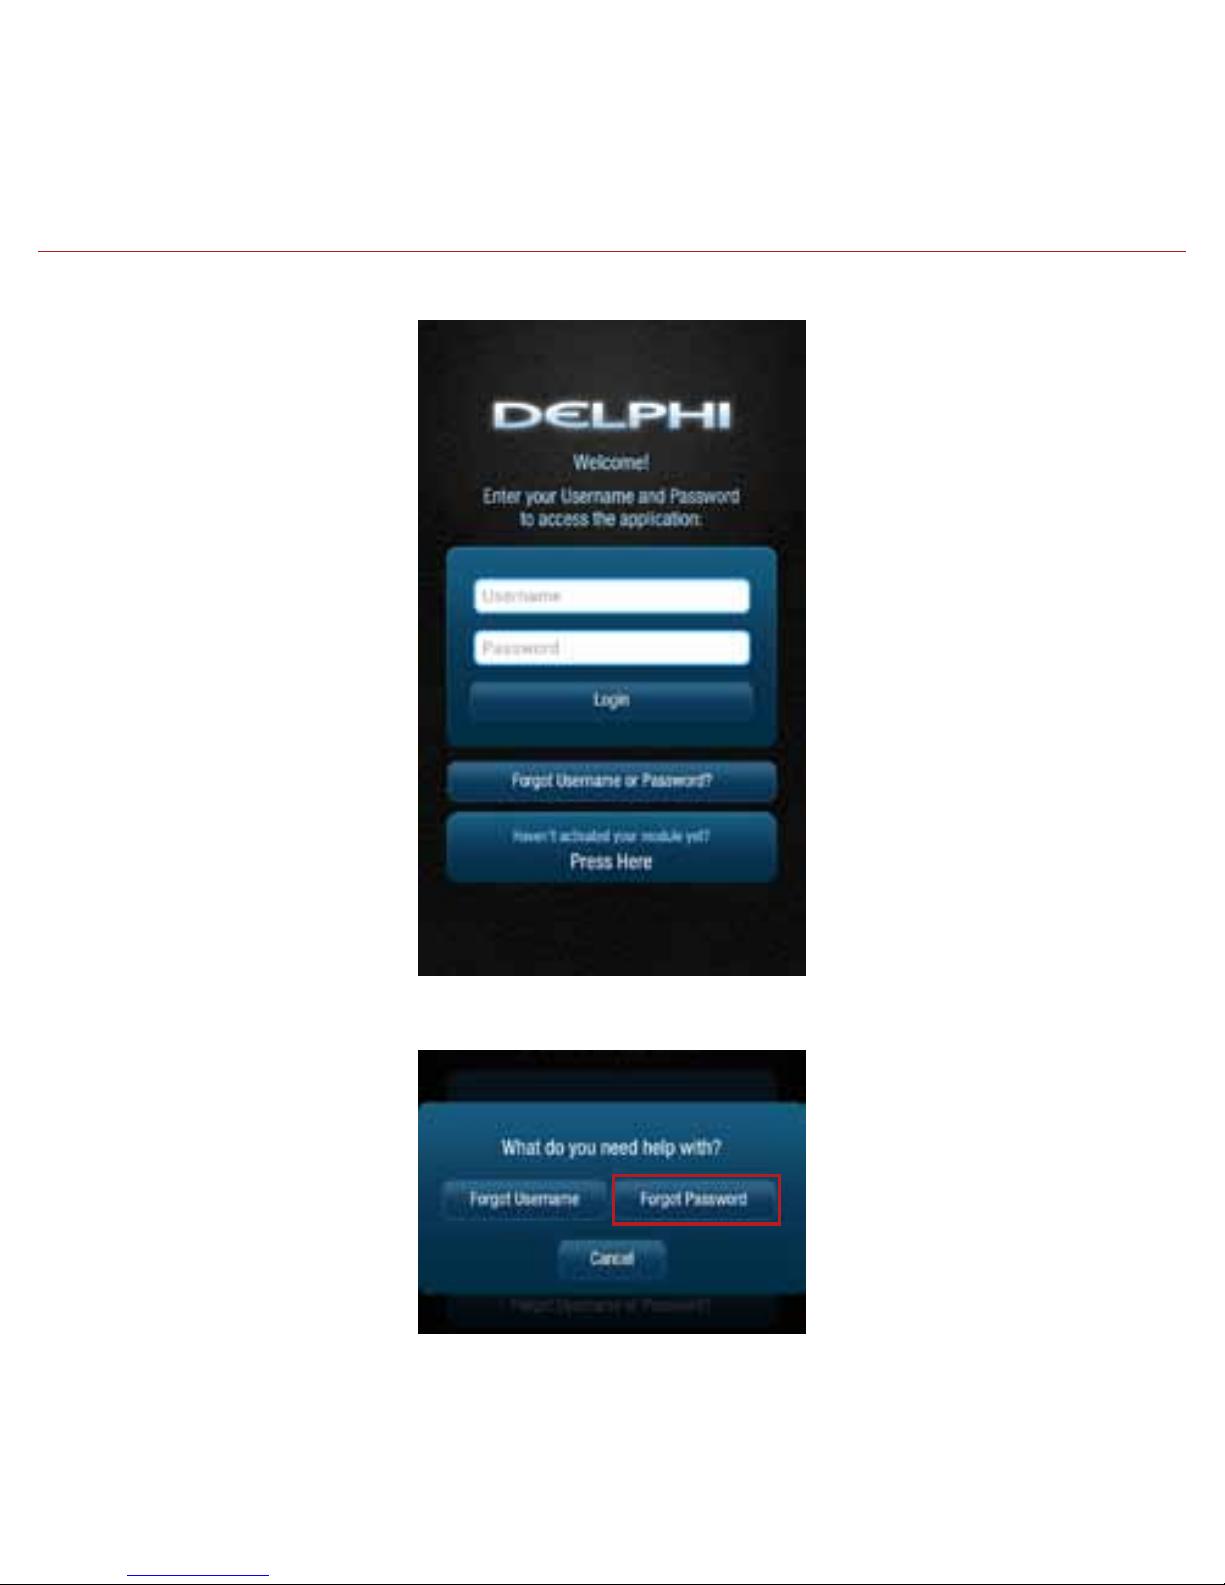
Forgot Username or Password
Should you forget your account login credentials, you can request your username or a password
reset from the login screen.
To request your Username, tap Forgot Username or Password?
Page 40

40
Tap Forgot Username.
Enter the account email address you provided in your User Settings and tap Submit.
You will receive an email with your Username sent to the account email address you provided
as part of your User Settings. If you did not provide an email in your User Settings or do not
receive the email with your Username, please call Verizon Wireless Customer Service at
(800) 922-0204.
Page 41
41
To request a Password reset, tap Forgot Username or Password?
Tap Forgot Password.
Page 42

42
You will receive an email providing you a temporary password sent to the account email
address you provided as part of your User Settings. Use this temporary password to login to
your account. You will be required to change your password once you login. If you did not provide
an email in your User Settings or do not receive the email with your temporary password, please
call Verizon Wireless Customer Service at (800) 922-0204.
Enter your Username and tap Submit.
Page 43

43
Navigating Around
To navigate to a specific category, tap the item you want to view, such as Alerts, Recent Trips,
Health and Location (as shown in the red boxes). You can also tap the Side Menu icon, located in
the top left corner to navigate to the various features of the app.
Side Menu
Page 44

44
• From the Side Menu, you can navigate to any of the Delphi Connect features.
• Open the Settings feature to modify account information, manage your modules, congure
Alerts and Notifications, and set up Bluetooth® pairing for compatible devices.
• Tap Key Fob to access the key fob feature for compatible vehicles.
• Tap Logout to log out from your vehicle. You can also tap the Back button to return to the
previous screen.
Side Menu
Options
Page 45

45
Refreshing Your Vehicle Data
The Delphi Connect system will update your vehicle information as it becomes available. This
may cause the display to change while you are viewing it. If you wish to request the most recent
data from the module, tap the Refresh button from anywhere within the app. A refresh may take
up to two minutes. You can continue to use the app during this time. The newest information will
be displayed when it becomes available.
Note: Trips are not complete until after the engine has been turned off for a short period of time. Therefore,
the Recent Trip list will not show a trip that is currently underway.
Refresh Button
Page 46
46
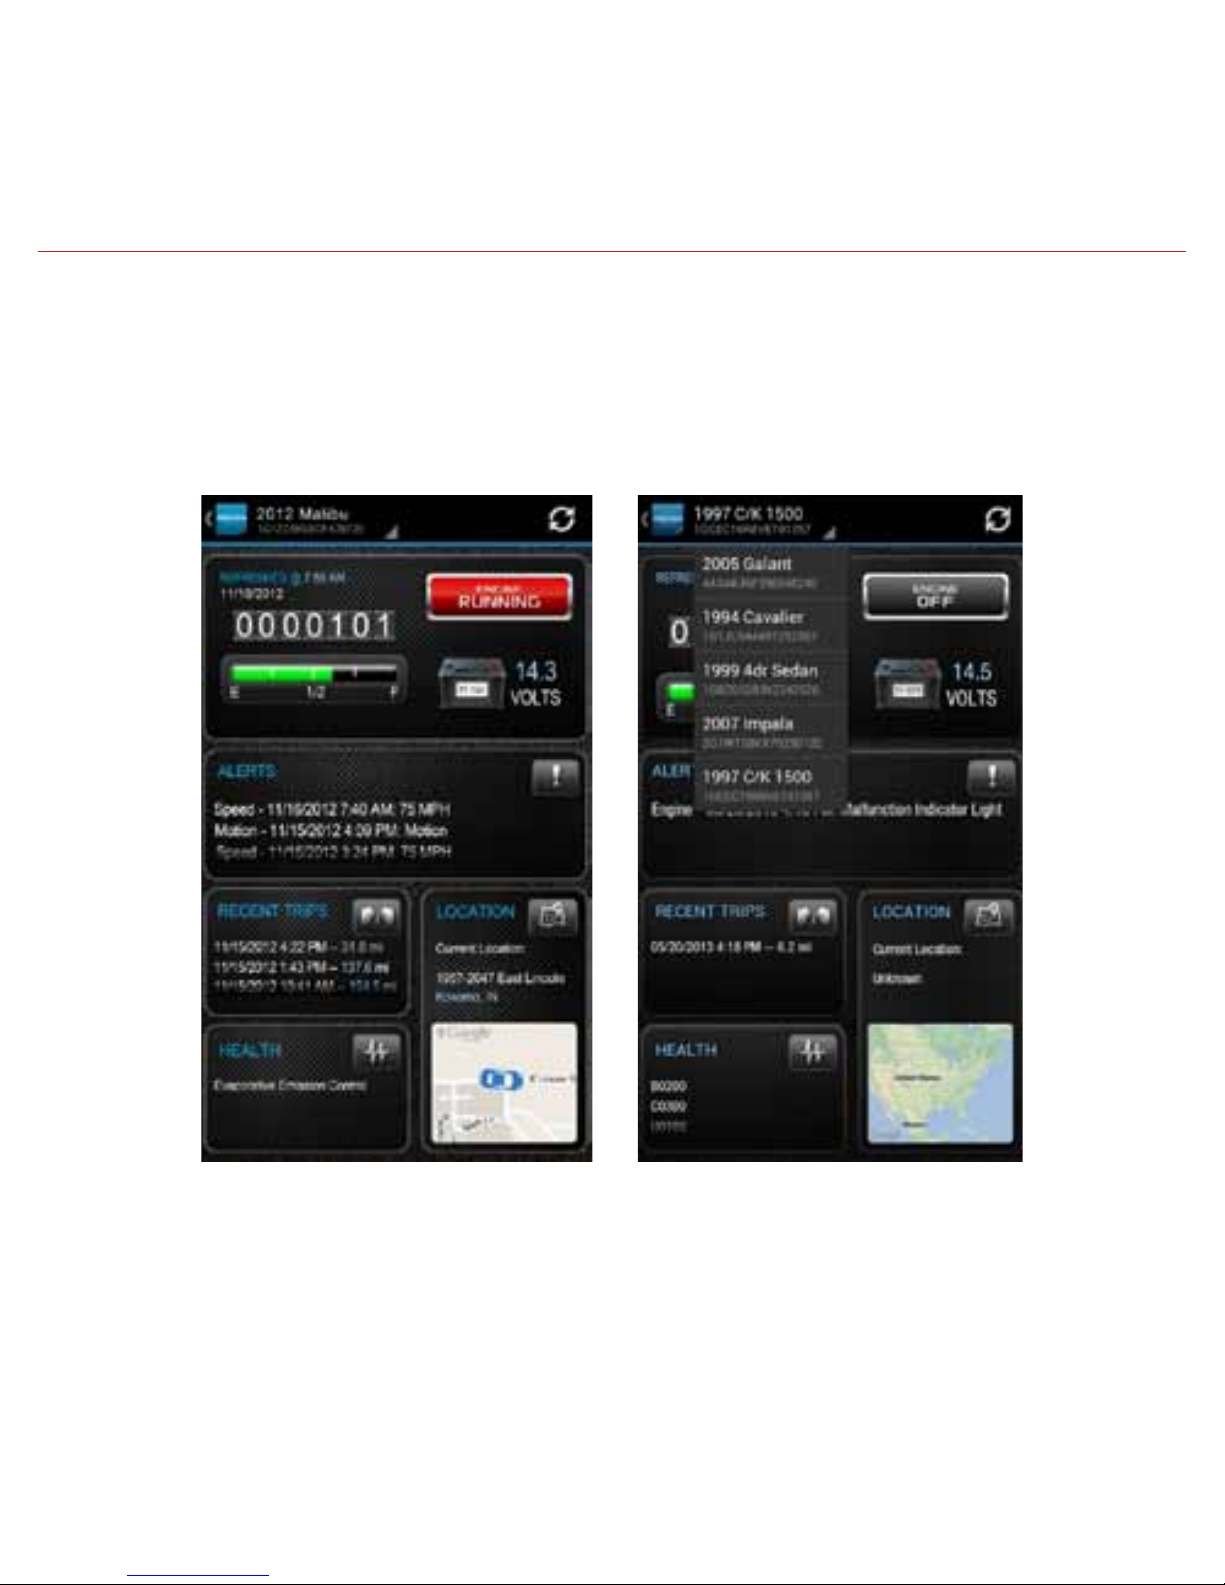
Selecting Your Vehicle
If you have more than one module associated with your account, you can select which vehicle’s
information to view. Tap your vehicle name at the top of the screen using the drop down button. Tap the vehicle you wish to view or select the current vehicle if you do not wish to change
vehicles.
Page 47

47
Dashboard
The Dashboard provides a summary of your vehicle status.
It includes the following information.
• Basic vehicle information including the engine run status, current programmable odometer,
battery voltage and the fuel level, if your vehicle supports this feature.
Note: Fuel level readings will work on compatible vehicles.
Page 48

48
• Last recorded location of vehicle:
• The most recent alerts:
Page 49

49
• The most recent health information reported by your vehicle:
• The most recent trips:
Note: You will only see Health information if your vehicle has reported trouble codes using the diagnostic
code scanning feaure. See Performing a Diagnostic Scan on Your Vehicle.
Page 50

50
Location
Use the Location feature to locate your vehicle at any time. The location screen indicates the
last recorded vehicle location and the time and date when that location was last updated. You
can also see the address and latitude and longitude of your vehicle. To close the vehicle
information box, tap the X in the upper right-hand corner.
Note: Vehicle location is subject to GPS accuracy.
Note: Depending on local conditions, it can take a few minutes to locate your vehicle using GPS services.
This may delay your ability to see your vehicle location when installing the module. In addition, when your
vehicle is located in an enclosed structure, such as a garage, determining your vehicle’s location may not be
possible.
Page 51

51
Map View
The Map view can be customized using the map controls. You can use the standard Android map
controls, such as scrolling and zooming to adjust the Map view. To enable and disable the
Satellite view, tap Satellite View on the soft menu.
Soft Menu
Android soft
menu
Page 52

52
Geo-Fences
To enable and disable the display of Geo-Fences, select Geo-Fences on the soft menu. See
Managing Geo-Fences for more information.
Soft Menu
Android soft
menu
Page 53

53
Live Tracking
The Live Tracking button will enable real-time tracking of your vehicle. See Live Tracking for
more information.
Note: While in Location view, depending on your Android version, either tap the Live Tracking icon or tap Live
Tracking from the soft menu to start the live tracking feature.
Note: If the GPS is enabled on your phone, the location of your phone will be indicated with a blue dot on the
map.
Page 54

54
Find My Car
Tap Locate My Vehicle on the soft menu to center the map on the vehicle’s current location.
Soft Menu
Android soft
menu
Page 55

55
Navigate to Vehicle
If the GPS is enabled on your smartphone, you can have your default navigation app provide
directions from your location to your vehicle. Tap Navigate To Vehicle on the soft menu. This
command will launch the default navigation app on your phone and plot a route from your
location to your vehicle’s location.
Note: Navigate to vehicle will default to standard driving directions to the vehicle’s location.
Soft Menu
Android soft
menu
Page 56

56
Programmable Odometer
A programmable odometer is provided for your vehicle. You can set it to your vehicle’s odometer
to track total mileage or you can set the odometer to 0 prior to a trip to use it as a trip
odometer.
To set the odometer value, tap the odometer on the dashboard.
Page 57

57
Enter the desired value in miles. Tap Save to save the value or tap back to exit without saving.
Page 58

58
Managing Geo-Fences
A Geo-Fence allows you to define a location that is of interest to you and create a boundary
around it. When your vehicle crosses the boundary to enter or exit that location, an alert will occur and can be viewed on the Delphi Connect app or the website. You can also be notified via an
email or text message if desired. See Configuring Notifications on page 75 for more information. You can define up to six Geo-Fences. These can be edited or deleted as often as you like. A
Geo-Fence can be made as small as 0.01 miles, about 50 feet, or as large as you would like. Due
to GPS location tolerance, it is suggested to make a Geo-Fence at least 0.1 miles in any
direction to avoid false alerts.
Create a Geo-Fence Using the Map
1. While in Location view, tap Manage Geo Fences on the soft menu to begin managing
Geo-Fences.
Page 59

59
2. In the Geo-Fences settings panel, tap CREATE NEW FENCE.
Page 60

60
3. Select the desired geo-fence shape, circle or rectangle. You can change the shape at anytime.
4. Scroll and zoom the map to where you would like to place the Geo-Fence. The cross-hairs
indicate the center of the geo-fence.
Page 61

61
5. To resize the geo-fence, tap Resize Shape on the soft menu and use the handles to change the
shape of the geo-fence boundaries. Tap the checkmark when done or tap Discard to return to
the previous boundaries.
Page 62

62
6. Tap the Save icon (upper right hand corner) to save your geo-fence.
7. Enter the name of the new geo-fence and tap OK, or tap Cancel to exit without saving.
Page 63

63
8. Create additional Geo-Fences as desired.
9. Tap the Back button or Side Menu button when you are finished to return to Location view.
Page 64

64
Create a Geo-Fence by Searching for an Address or Business Name
1. While in Location view, tap Manage Geo Fences on the soft menu to begin managing
Geo-Fences.
Page 65

65
2. In the Geo-Fences settings panel, tap CREATE NEW FENCE.
Page 66

66
3. Tap Search on the soft menu.
Page 67

67
4. Enter the address or business name you want to find and tap the search icon (magnifying
glass)
Page 68

68
5. Scroll through the list of search results. You can modify the search criteria and tap the search
icon (magnifying glass) to refresh the results. Within the search results, tap the desired
location. A Geo-Fence will be placed at the selected location.
Page 69

69
6. Select the desired geo-fence shape, circle or rectangle. You can change the shape at anytime.
Page 70

70
7. To resize the geo-fence, tap Resize Shape on the soft menu and use the handles to change the
shape of the geo-fence boundaries. Tap the checkmark when done or tap Discard to return to
the previous boundaries.
Page 71

71
8. Tap the Save icon (upper right hand corner) to save your geo-fence.
9. The search text you used will be automatically entered as the geo-fence name. If desired, edit
the geo-fence name and tap OK, or tap Cancel to exit without saving.
Page 72

72
Edit an Existing Geo-Fence
1. While in Location view, tap Manage Geo Fences on the soft menu to begin managing
Geo-Fences.
Page 73

73
2. Tap the pencil icon to the right of the name of the Geo-Fence you want to edit.
Page 74

74
3. Select the desired geo-fence shape, circle or rectangle. You can change the shape at anytime.
Page 75

75
4. Scroll and zoom the map to where you would like to place the geo-fence. The cross-hairs
indicate the center of the geo-fence.
5. To resize the geo-fence, tap Resize Shape on the soft menu and use the handles to change the
shape of the geo-fence boundaries. Tap the checkmark when done or tap Discard to return to
the previous boundaries.
Page 76

76
6. Tap the Save icon (upper right hand corner) to save your geo-fence.
7. Edit the name of the new geo-fence if needed and tap OK, or tap Cancel to exit without
saving.
Page 77

77
Delete an Existing Geo-Fence
1. While in Location view, tap Manage Geo-Fences on the soft menu to begin managing
Geo-Fences.
Page 78

78
2. Tap the pencil icon to the right of the name of the Geo-Fence you want to delete.
Page 79

79
3. On the soft menu tap Delete, then tap OK to delete or Cancel to exit without deleting.
Page 80

80
Enable or Disable a Geo-Fence
1. While in Location view, tap Manage Geo Fences on the soft menu to begin managing
Geo-Fences.
Page 81

81
2. In the Geo-Fence settings panel, tap the checkbox to the left of the Geo-Fence you wish to
disable.
Page 82

82
3. The checkmark will be cleared and the Geo-Fence will no longer be visible on the map. This
will not delete the Geo-Fence, but alerts will no longer be generated by this Geo-Fence.
Page 83

83
4. To enable a Geo-Fence, tap the box to the left of the Geo-Fence name. The Geo-Fence will be
shown on the map again.
Page 84

84
Live Tracking
Live tracking provides you the ability to track your vehicle in real time using the Delphi
Connected Car smartphone app or the Delphi website. Due to the amount of data usage
required to perform live tracking, tracking will automatically timeout after 10-minutes. You can
restart tracking by selecting this feature again. During Live Tracking, your vehicle’s speed,
heading and location on the map will be updated approximately every 5 seconds.
If you are concerned about the location of your vehicle and wish to call the authorities, you can
use the emergency CALL 911 button. You will then need to press Dial on your phone to initiate
the call.
1. While in Location view, tap the Live Tracking icon to start the live tracking feature.
Note: While in Location view, depending on your Android version, either tap the Live Tracking
icon or tap Live Tracking from the soft menu to start the live tracking feature.
Page 85

85
2. You will be see a warning message with a reminder of the 10-minute timeout. To continue, tap
OK. To exit live tracking, tap Cancel. If you do not wish to see this message again, check the
box labeled “Do not show again”.
Page 86

86
3. During Live Tracking, the live tracking icon will be red and the vehicle will be shown as a red
car. The vehicle’s current direction and speed will be shown. Live tracking has a 10-minute
timeout counter. When the timeout counter reaches zero, live tracking will automatically be
exited. You can end live tracking at any time by selecting the Live Tracking icon.
Countdown
Timer
Page 87

87
Alerts
The Delphi Connect application will notify you with alerts of specific vehicle behaviors. Current
alerts include the following:
• Vehicle speed exceeding a limit that you choose
• Vehicle RPM exceeding a limit that you choose
• Vehicle has entered or exited a Geo-Fence location
• The Check Engine Light (CEL) has illuminated, this is sometimes referred to as the
Malfunction Indicator Lamp (MIL)
• The battery voltage falls below 11.5 volts
• While the engine is not running and the vehicle experiences a motion that exceeds a threshold
that you choose.
• 5 failed attempts logging into your account
You can also configure email and text message notifications for each alert. For more
information on configuring your alerts and the associated notifications, see sections
Configuring Alerts and Configuring Notifications.
Note: The motion alert is enabled 10 minutes after the vehicle is turned off and disabled when the vehicle is
started.
Page 88

88
Within the smartphone app, you can scroll to view all of your Alerts. The most recent Alert
appears first.
Page 89

89
Clearing Alerts
To clear alerts, tap the box next to the alerts you wish to clear and tap Clear. The smartphone
app only displays the most recent alerts, you may not be able to clear all recorded alerts. In
order to clear all alerts at one time, login to your account using the mycar.delphi.com website
and select the Alerts tab.
Page 90

90
You will need to confirm that you wish to clear the selected alerts. Tap OK to confirm, or tap
Cancel to exit.
Page 91

91
Health
The Health feature displays a history of vehicle diagnostic codes, often called trouble codes,
which you have read from your vehicle. If the Check Engine Light comes on, you can perform a
diagnostic scan of your vehicle which will display the codes reported by your vehicle. The Delphi
Connect app will show you both the numeric diagnostic code and the meaning of the code. In
some cases, the definition of a manufacturer specific code may not be available.
Each time you perform a diagnostic scan, any newly reported codes will be added to the list
being displayed. Every code displayed will show the time and date when the code was read from
your vehicle. Therefore, you may read the same code from the vehicle multiple times and see it
in the list multiple times.
For more information on reading your vehicle codes, see section Performing a Diagnostic Scan
on Your Vehicle on page 80.
You can scroll to view all of the reported diagnostic codes. The most recent codes are listed
first.
Note: A diagnostic scan will be performed automatically during the initial installation process.
Page 92

92
Performing a Diagnostic Code Scan on Your Vehicle
To begin a diagnostic scan, tap the soft menu at the bottom of the screen. Then tap Perform
trouble code scan.
You will see a warning to make sure the engine is turned off and the key is in the On position
before continuing. Once you begin the scan, please wait at least 2 minutes before starting your
vehicle. Select Cancel to cancel the scan.
Page 93

93
Clearing Diagnostic Codes
You can choose to clear the codes from either your display or from from your vehicle. If you
clear the codes from your display, you will no longer see them in your vehicle’s data but they may
still be active in your vehicle. Performing a diagnostic scan will allow to see if they are still being
reported by your vehicle.
If you clear the codes from your vehicle, the module will command your vehicle to clear the
current diagnostic codes. If a fault condition exists in your vehicle, a diagnostic code may return
until the problem is fixed. Clearing the codes in the vehicle will not clear the codes you see
displayed in the app in the Health section. You can leave this list if you want to maintain a
history of your vehicle’s health.
Note: Simply clearing the diagnostic codes in your vehicle will not repair any problems it may have. Driving
a vehicle that has diagnostic problems without first repairing them may cause damage to your vehicle. You
should always correct any problems before clearing the diagnostic codes in your vehicle.
Page 94

94
To begin clearing codes, tap the soft menu at the bottom of the screen. Then tap Clear trouble
codes
Page 95

95
Tap Display only to clear the codes from your display, tap Vehicle to clear the codes from your
vehicle, or tap Cancel to exit.
Page 96

96
Recent Trips
The Recent Trips feature records all the trips the vehicle has taken since you installed the
module. Within the smartphone app, you can view the ten most recent vehicle trips. The most
recent trip is listed first. Select any trip to view the trip details. To view all the recorded trips,
use the website.
Tap any trip to view its details.
Page 97

97
The trip details include total distance, start date and time, start location, end date and time,
end location, and the amount of time the engine was idle time during the trip. Tap View Trip Map
to view the trip on a map.
Page 98

98
Use the map control tools (on page 49) to scroll and zoom the map, or turn on Satellite view.
Note: During trips, the location of the vehicle is logged every minute. These points are called breadcrumbs
and are shown as dots on the map. The blue line connects these breadcrumbs to approximate the route the
vehicle took.
Page 99

99
Key Fob Pairing
The key fob setup process has two main steps, configuring your module for your vehicle and
pairing your module with your vehicle. You can perform the configuration step at any time from
either the smartphone app or the website. To complete the pairing step you will need to be in
your vehicle. It is necessary to perform this step in your vehicle because you may be prompted
at times to turn your ignition key and press specific vehicle buttons. Following the successful
set up of your key fob, you will be able to use the smartphone app to send key fob commands to
your vehicle in the same manner as you would with your original key fob. In addition, you can use
the Delphi Connect website to send key fob commands as well.
Note: While the Delphi Connect system currently supports most remote start systems that
came from the manufacturer, you can check if your remote start feature is supported. Refer
to the fitment guide at connectedcar.delphi.com/fitment. For vehicles that require a sequence
of buttons to be pressed to perform a remote start, you only need to press the Remote Start
button once. The module will automatically provide any button sequence required to start the
vehicle.
Note: You will only need to pair the key fob using the Delphi Connect app or website one time.
After the initial pairing, the key fob capability will be available from either location.
Note: The key fob setup should be only performed when all key fobs are present. If you do this
with only one present it may de-program your secondary key fobs.
Before attempting the key fob setup process, look on your dashboard view to see if your
vehicle’s VIN has been identified. If the module was able to read your vehicle’s VIN, you will see
it displayed at the top of the screen below your vehicle name. If the module was unable to read
your vehicle’s VIN, your vehicle will be identified by the word Vehicle followed by a number. If
your VIN is not available, see section Key Fob Setup without VIN. You can also edit your vehicle
information and provide either the VIN or the Make, Model, and Model Year of your vehicle prior
to fob setup. See section Edit Your Vehicle Information.
Page 100

100
To enable your keyfob feature:
1. Navigate to the Key Fob feature which is accessible from the Side Menu. Tap OK to begin
the fob setup process or Cancel to exit.
 Loading...