

Page 1

User Guide
MiFi® 6620L
90026966 - R1
Page 2

©2014 Novatel Wireless, Inc. All rights reserved. The information contained in this document is subject to change
without notice and should not be construed as a commitment by Novatel Wireless, Inc.
Patents and Licenses
For a complete list of all Novatel Wireless patents, visit www.novatelwireless.com/about/contact-us.
Software License
Proprietary Rights Provisions:
The software drivers provided with this product are copyrighted by Novatel Wireless and/or Novatel Wireless’ suppliers.
Although copyrighted, the software drivers are unpublished and embody valuable trade secrets proprietary to Novatel
Wireless and/or Novatel Wireless’ suppliers. The disassembly, decompilation, and/or Reverse Engineering of the software
drivers for any purpose is strictly prohibited by international law. The copying of the software drivers, except for a reasonable
number of back-up copies is strictly prohibited by international law. It is forbidden by international law to provide access
to the software drivers to any person for any purpose other than processing the internal data for the intended use of the
software drivers.
U.S. Government Restricted Rights Clause:
The software drivers are classied as “Commercial Computing device Software” and the U.S. Government is acquiring only
“Restricted Rights” in the software drivers and their Documentation.
U.S. Government Export Administration Act Compliance Clause:
It is forbidden by US law to export, license or otherwise transfer the software drivers or Derivative Works to any country where
such transfer is prohibited by the United States Export Administration Act, or any successor legislation, or in violation of the
laws of any other country.
Trademarks and Service Marks
Novatel Wireless is a trademark of Novatel Wireless, Inc., and the other trademarks, logos, and service marks (collectively the
“Trademarks”) used in this user manual are the property of Novatel Wireless or their respective owners. Nothing contained in
this user manual should be construed as granting by implication, estoppel, or otherwise, a license or right of use of Novatel
Wireless or any other Trademark displayed in this user manual without the written permission of Novatel Wireless or its
respective owners.
• Novatel Wireless, and the Novatel Wireless logo are all trademarks of Novatel Wireless, Inc.
• MiFi® and the MiFi logo are registered trademarks of Novatel Wireless, Inc.
• Microsoft and Windows are either registered trademarks or trademarks of Microsoft Corporation in the United States and/or
other countries.
• Apple®, Mac®, and Mac OS® are trademarks of Apple, Inc., registered in the U.S. and other countries.
• Linux® is the registered trademark of Linus Torvalds in the U.S. and other countries.
The names of actual companies and products mentioned in this user manual may be the trademarks of their respective
owners.
Novatel Wireless Revision History
Part Number Revision Description Date
90026966 R1 Initial release 25 Sep 2014
FCC ID: PKRNVWMIFI6620
PN: 90026966_R1_MASTER_UG_MiFi6620L_VZW_25 Sep 2014
Please visit www.novatelwireless.com for the latest information about your device.
Page 3

Contents
Getting Started . . . . . . . . . . . . . . . . . . . . . . . . . . . . . . . . . . . . . . . . . . . . . . . . . . . . . . . . . 1
Overview. . . . . . . . . . . . . . . . . . . . . . . . . . . . . . . . . . . . . . . . . . . . . . . . . . . . . . . . . . . . . . . . . . . . . . . . . . . . . . . . . . . . 2
Features ................................................................................. 2
Package Contents ....................................................................... 3
System Requirements. . . . . . . . . . . . . . . . . . . . . . . . . . . . . . . . . . . . . . . . . . . . . . . . . . . . . . . . . . . . . . . . . . . . 3
Components ............................................................................ 4
Status Indicators ......................................................................... 5
Power Management ......................................................................... 7
Caring for Your Jetpack ...................................................................... 8
Using Your Jetpack . . . . . . . . . . . . . . . . . . . . . . . . . . . . . . . . . . . . . . . . . . . . . . . . . . . . . . 9
Accessing the Network .....................................................................10
4G LTE. . . . . . . . . . . . . . . . . . . . . . . . . . . . . . . . . . . . . . . . . . . . . . . . . . . . . . . . . . . . . . . . . . . . . . . . . . . . . . . . . . 10
Using Your Jetpack for the First Time ........................................................11
Charging the Battery ....................................................................12
Replacing the Battery . . . . . . . . . . . . . . . . . . . . . . . . . . . . . . . . . . . . . . . . . . . . . . . . . . . . . . . . . . . . . . . . . . . 12
Replacing the 4G LTE SIM Card ..........................................................14
Universal Charging ..................................................................... 15
Battery Tips. . . . . . . . . . . . . . . . . . . . . . . . . . . . . . . . . . . . . . . . . . . . . . . . . . . . . . . . . . . . . . . . . . . . . . . . . . . . . 16
Power the Jetpack On and O. . . . . . . . . . . . . . . . . . . . . . . . . . . . . . . . . . . . . . . . . . . . . . . . . . . . . . . . . . . 17
Power On. . . . . . . . . . . . . . . . . . . . . . . . . . . . . . . . . . . . . . . . . . . . . . . . . . . . . . . . . . . . . . . . . . . . . . . . . . . 17
Power O ..........................................................................17
Connecting to Your Jetpack . . . . . . . . . . . . . . . . . . . . . . . . . . . . . . . . . . . . . . . . . . . . . . . . . . . . . . . . . . . . . . . . . 18
Using Your Jetpack After Setup is Complete .................................................20
Using the Jetpack User Interface ........................................................23
Jetpack Settings ....................................................... 25
Managing Your Jetpack ..................................................................... 26
On the Jetpack Display. . . . . . . . . . . . . . . . . . . . . . . . . . . . . . . . . . . . . . . . . . . . . . . . . . . . . . . . . . . . . . . . . . 26
On the Jetpack Admin Website. . . . . . . . . . . . . . . . . . . . . . . . . . . . . . . . . . . . . . . . . . . . . . . . . . . . . . . . . . 27
Sign In .................................................................................28
Sign In to the Jetpack Admin website ................................................ 28
Menu Panel. . . . . . . . . . . . . . . . . . . . . . . . . . . . . . . . . . . . . . . . . . . . . . . . . . . . . . . . . . . . . . . . . . . . . . . . . 29
My Jetpack Home ..........................................................................30
On the Jetpack Display. . . . . . . . . . . . . . . . . . . . . . . . . . . . . . . . . . . . . . . . . . . . . . . . . . . . . . . . . . . . . . . . . . 30
On the Jetpack Admin Website. . . . . . . . . . . . . . . . . . . . . . . . . . . . . . . . . . . . . . . . . . . . . . . . . . . . . . . . . . 31
Manage My Jetpack. . . . . . . . . . . . . . . . . . . . . . . . . . . . . . . . . . . . . . . . . . . . . . . . . . . . . . . . . . . . . . . . . 32
My Account & Tools . . . . . . . . . . . . . . . . . . . . . . . . . . . . . . . . . . . . . . . . . . . . . . . . . . . . . . . . . . . . . . . . . 38
Help & Support . . . . . . . . . . . . . . . . . . . . . . . . . . . . . . . . . . . . . . . . . . . . . . . . . . . . . . . . . . . . . . . . . . . . . 44
Page 4

Data Usage. . . . . . . . . . . . . . . . . . . . . . . . . . . . . . . . . . . . . . . . . . . . . . . . . . . . . . . . . . . . . . . . . . . . . . . . . . . . . . . . . 47
On the Jetpack Display. . . . . . . . . . . . . . . . . . . . . . . . . . . . . . . . . . . . . . . . . . . . . . . . . . . . . . . . . . . . . . . . . . 47
On the Jetpack Admin Website. . . . . . . . . . . . . . . . . . . . . . . . . . . . . . . . . . . . . . . . . . . . . . . . . . . . . . . . . . 48
Connected Devices . . . . . . . . . . . . . . . . . . . . . . . . . . . . . . . . . . . . . . . . . . . . . . . . . . . . . . . . . . . . . . . . . . . . . . . . . 49
On the Jetpack Admin Website. . . . . . . . . . . . . . . . . . . . . . . . . . . . . . . . . . . . . . . . . . . . . . . . . . . . . . . . . . 50
Connected Devices ................................................................. 50
Blocked Devices .................................................................... 53
Jetpack Settings ............................................................................55
On the Jetpack Display. . . . . . . . . . . . . . . . . . . . . . . . . . . . . . . . . . . . . . . . . . . . . . . . . . . . . . . . . . . . . . . . . . 55
Wi-Fi ...............................................................................55
Screen Timeout. . . . . . . . . . . . . . . . . . . . . . . . . . . . . . . . . . . . . . . . . . . . . . . . . . . . . . . . . . . . . . . . . . . . . 55
Audio On/O . . . . . . . . . . . . . . . . . . . . . . . . . . . . . . . . . . . . . . . . . . . . . . . . . . . . . . . . . . . . . . . . . . . . . . . 56
Audio Alerts ........................................................................56
Network Technology ................................................................ 57
On the Jetpack Admin Website. . . . . . . . . . . . . . . . . . . . . . . . . . . . . . . . . . . . . . . . . . . . . . . . . . . . . . . . . . 58
Wi-Fi ...............................................................................59
Jetpack. . . . . . . . . . . . . . . . . . . . . . . . . . . . . . . . . . . . . . . . . . . . . . . . . . . . . . . . . . . . . . . . . . . . . . . . . . . . . 61
Advanced ..........................................................................70
Firewall. . . . . . . . . . . . . . . . . . . . . . . . . . . . . . . . . . . . . . . . . . . . . . . . . . . . . . . . . . . . . . . . . . . . . . . . . . . . . 76
Universal Charging .........................................................................83
On the Jetpack Display. . . . . . . . . . . . . . . . . . . . . . . . . . . . . . . . . . . . . . . . . . . . . . . . . . . . . . . . . . . . . . . . . . 83
On the Jetpack Admin Website. . . . . . . . . . . . . . . . . . . . . . . . . . . . . . . . . . . . . . . . . . . . . . . . . . . . . . . . . . 83
Wi-Fi Protected Setup (WPS) ................................................................84
On the Jetpack Display. . . . . . . . . . . . . . . . . . . . . . . . . . . . . . . . . . . . . . . . . . . . . . . . . . . . . . . . . . . . . . . . . . 84
On the Jetpack Admin Website. . . . . . . . . . . . . . . . . . . . . . . . . . . . . . . . . . . . . . . . . . . . . . . . . . . . . . . . . . 85
Software Update ...........................................................................86
On the Jetpack Display. . . . . . . . . . . . . . . . . . . . . . . . . . . . . . . . . . . . . . . . . . . . . . . . . . . . . . . . . . . . . . . . . . 86
On the Jetpack Admin Website. . . . . . . . . . . . . . . . . . . . . . . . . . . . . . . . . . . . . . . . . . . . . . . . . . . . . . . . . . 86
Messages ..................................................................................87
On the Jetpack Display. . . . . . . . . . . . . . . . . . . . . . . . . . . . . . . . . . . . . . . . . . . . . . . . . . . . . . . . . . . . . . . . . . 87
On the Jetpack Admin Website. . . . . . . . . . . . . . . . . . . . . . . . . . . . . . . . . . . . . . . . . . . . . . . . . . . . . . . . . . 88
Parental Controls ........................................................................... 90
Summary. . . . . . . . . . . . . . . . . . . . . . . . . . . . . . . . . . . . . . . . . . . . . . . . . . . . . . . . . . . . . . . . . . . . . . . . . . . 90
Site List. . . . . . . . . . . . . . . . . . . . . . . . . . . . . . . . . . . . . . . . . . . . . . . . . . . . . . . . . . . . . . . . . . . . . . . . . . . . . 90
Device List .........................................................................93
About Jetpack . . . . . . . . . . . . . . . . . . . . . . . . . . . . . . . . . . . . . . . . . . . . . . . . . . . . . . . . . . . . . . . . . . . . . . . . . . . . . . 94
On the Jetpack Display. . . . . . . . . . . . . . . . . . . . . . . . . . . . . . . . . . . . . . . . . . . . . . . . . . . . . . . . . . . . . . . . . . 94
On the Jetpack Admin website . . . . . . . . . . . . . . . . . . . . . . . . . . . . . . . . . . . . . . . . . . . . . . . . . . . . . . . . . . 95
Internet Status. . . . . . . . . . . . . . . . . . . . . . . . . . . . . . . . . . . . . . . . . . . . . . . . . . . . . . . . . . . . . . . . . . . . . . 95
Jetpack Info ........................................................................ 97
Diagnostics. . . . . . . . . . . . . . . . . . . . . . . . . . . . . . . . . . . . . . . . . . . . . . . . . . . . . . . . . . . . . . . . . . . . . . . . . 98
Logs ...............................................................................103
Help ......................................................................................106
On the Jetpack Display. . . . . . . . . . . . . . . . . . . . . . . . . . . . . . . . . . . . . . . . . . . . . . . . . . . . . . . . . . . . . . . . . 106
iii
Page 5

Troubleshooting . . . . . . . . . . . . . . . . . . . . . . . . . . . . . . . . . . . . . . . . . . . . . . . . . . . . . . 107
Overview. . . . . . . . . . . . . . . . . . . . . . . . . . . . . . . . . . . . . . . . . . . . . . . . . . . . . . . . . . . . . . . . . . . . . . . . . . . . . . . . . . 108
Common Problems and Solutions. . . . . . . . . . . . . . . . . . . . . . . . . . . . . . . . . . . . . . . . . . . . . . . . . . . . . . . . . . 109
Technical Support .........................................................................113
Technical Support .....................................................................113
Product Specications and Regulatory Information .....................114
Product Specications .....................................................................115
General ...............................................................................115
Technology/Bands. . . . . . . . . . . . . . . . . . . . . . . . . . . . . . . . . . . . . . . . . . . . . . . . . . . . . . . . . . . . . . . . . . . . . 115
Environmental. . . . . . . . . . . . . . . . . . . . . . . . . . . . . . . . . . . . . . . . . . . . . . . . . . . . . . . . . . . . . . . . . . . . . . . . . 116
Regulatory Statements ....................................................................117
Wireless Communications. . . . . . . . . . . . . . . . . . . . . . . . . . . . . . . . . . . . . . . . . . . . . . . . . . . . . . . . . . . . . . . . . . 119
Limited Warranty and Liability .............................................................119
Safety Hazards. . . . . . . . . . . . . . . . . . . . . . . . . . . . . . . . . . . . . . . . . . . . . . . . . . . . . . . . . . . . . . . . . . . . . . . . . . . . . 120
Proper Battery Use and Disposal ...........................................................122
Glossary. . . . . . . . . . . . . . . . . . . . . . . . . . . . . . . . . . . . . . . . . . . . . . . . . . . . . . . . . . . . . . 123
iv
Page 6

1
Getting Started
Overview
Power Management
Caring for Your MiFi 6620L
Page 7

Overview
Congratulations on your purchase of the Verizon Mobile Hotspot - MiFi® 6620L for 4GLTE™
and Wi-Fi!
With the Jetpack you can access 4G LTE networks for faster apps, uploads and downloads. Connect
up to 15 Wi-Fi enabled devices to the Internet at once - laptops, tablets, e-readers, gaming consoles
and more* - and experience download speeds up to 10 times faster than with Verizon’s 3G*.
The Jetpack is backwards compatible to 3G networks, ensuring reliable connectivity when you need
it most.
Features
• Global Connectivity for up to 15 Wi-Fi Enabled Devices to High-Speed Wireless Data
• Connect to 4G LTE and numerous Global Bands.
• Universal Charging
• The built-in Universal Charger provides a spare charge for tablets, smartphones and other
devices running low on battery power.
• Up to 20 Hours of Battery Life on a Single Charge
• Manage Wireless Network Activity
• MiFi Settings is an easy-to-use web-based interface that allows you to manage, monitor,
and customize your Wi-Fi and 4G LTE connection.
• Advanced Embedded Antenna Design
• VPN Capability
• Auto Connectivity Options
• Parental Controls
* Average download speeds of 5-12 Mbps/average upload speeds of 2-5 Mbps. Actual throughput speed and coverage may vary.
2
Page 8

Package Contents
The Verizon Wireless MiFi6620L package includes:
• MiFi 6620L
• 4000mAh Standard Lithium Ion Battery
• Pre-installed 4G LTE SIM Card
• Wall Charger
• USB Cable
• Verizon Wireless Brochures
System Requirements
• Compatible with all major operating systems
• Works with the latest versions of browsers, including Android™, Google Chrome®, Firefox®, Internet
Explorer®, Safari™ and Mobile Safari™.
To use Wi-Fi mode, your computer or other device needs Wi-Fi capability and Internet browser
software. If your computer does not have Wi-Fi capability you can use Ethernet over USB tethering.
Your Jetpack must have proper data service to function. (See Using Your Jetpack for the First Time
on page 11.)
3
Page 9
Components
➓
➒
➑
➐
➏
➎
➊ ➋ ➌ ➌ ➍
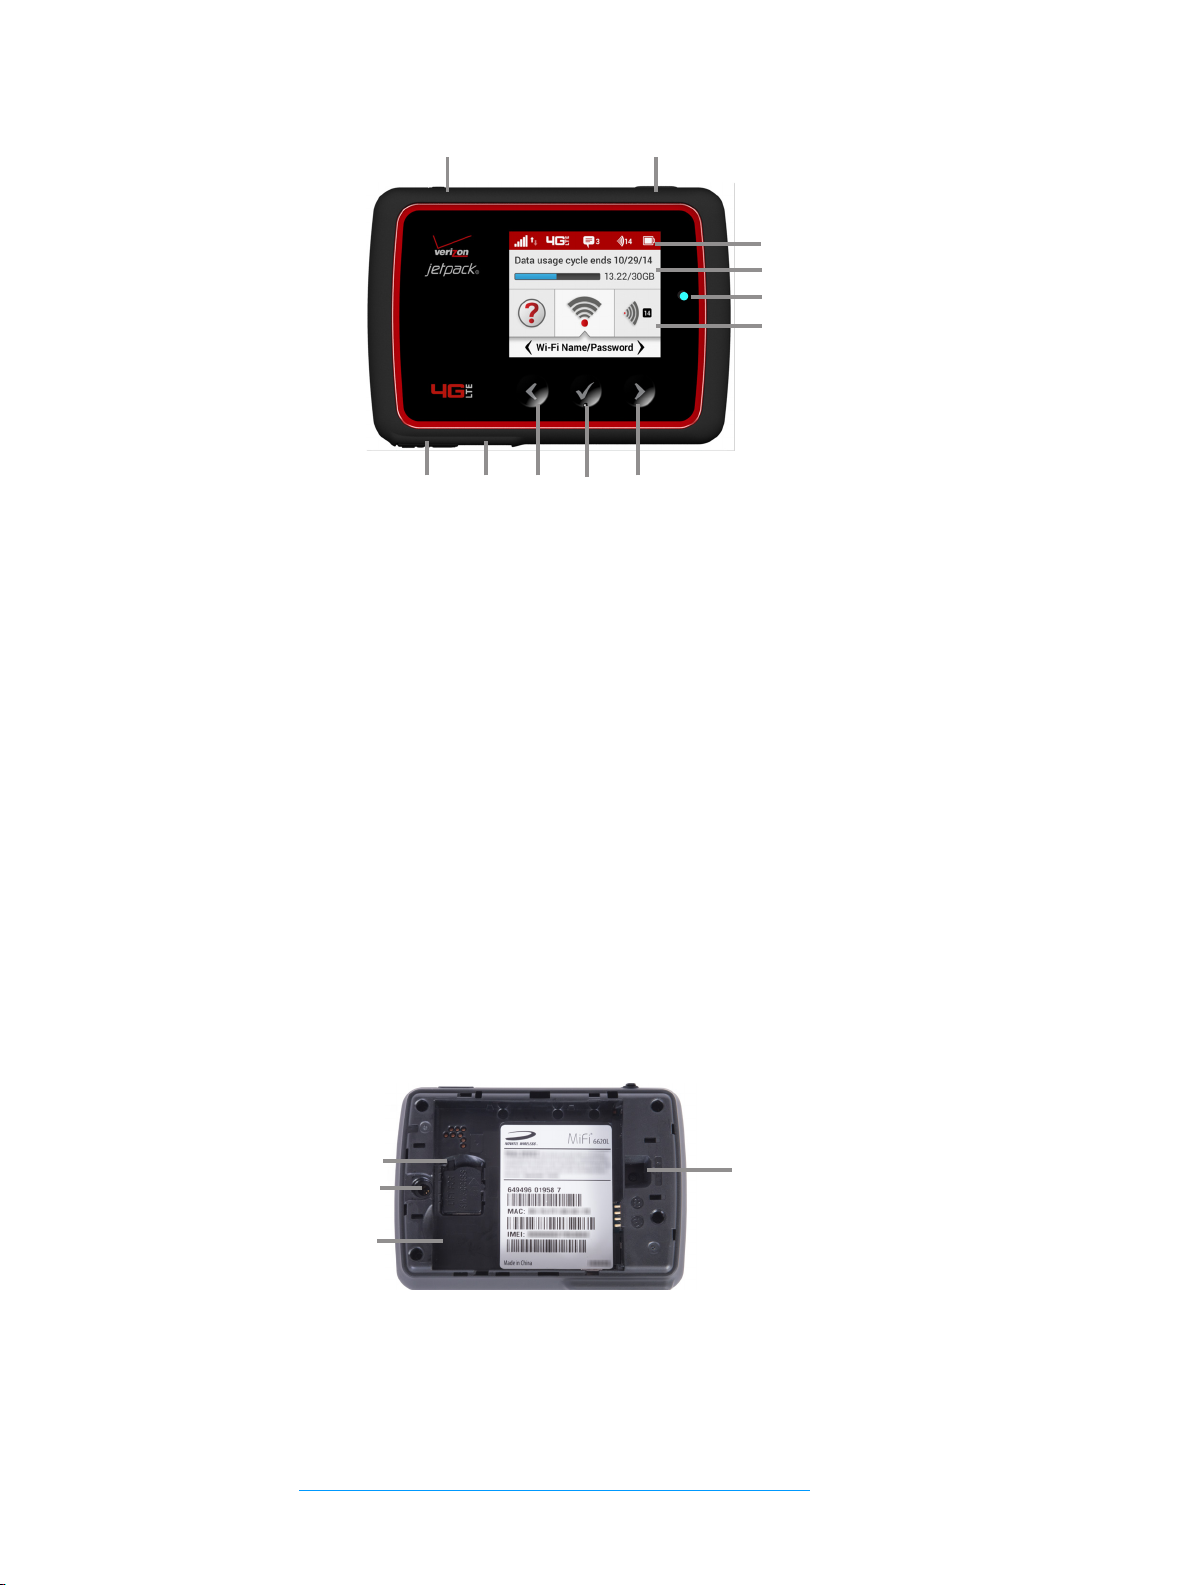
➊ Universal Charging Port — Use to charge one additional wireless device.
➋ Jetpack Charging Port — Use to connect the wall charger or to tether a device.
➌ Navigation Buttons — Scrolls left/up or right/down through available menu options.
➍ Select Button — Use to select a menu option.
➎ Home Screen — Displays the status bar, data usage meter, and menu options.
➏ LED Indicator — When the display is o and the Jetpack is turned on, the LED indicator
blinks.
➐ Real-time Data Usage Meter — Displays current data usage in GB and cycle end date.
➑ Status Bar — Provides connection and battery status, network signal strength, roaming
status, number of unread messages, and the number of users connected with Wi-Fi.
➒ Power Button — Powers the Jetpack on and o, and turns display back on when device is in
power-saving mode.
➓ Test port — Use for testing and diagnostics.
➊
➍
➋
➌
➊ SIM Card Slot — The SIM card is pre-installed here.
➋ Battery Removal Divot — Insert a ngernail here and lift to remove the battery.
➌ Battery Compartment — The battery contacts connect here.
➍ Master Reset Button — Insert a paperclip in the small hole to reset the Jetpack to factory
settings.(See How do I reset the Jetpack back to factory settings? on page 109.)
4
Page 10
Status Indicators
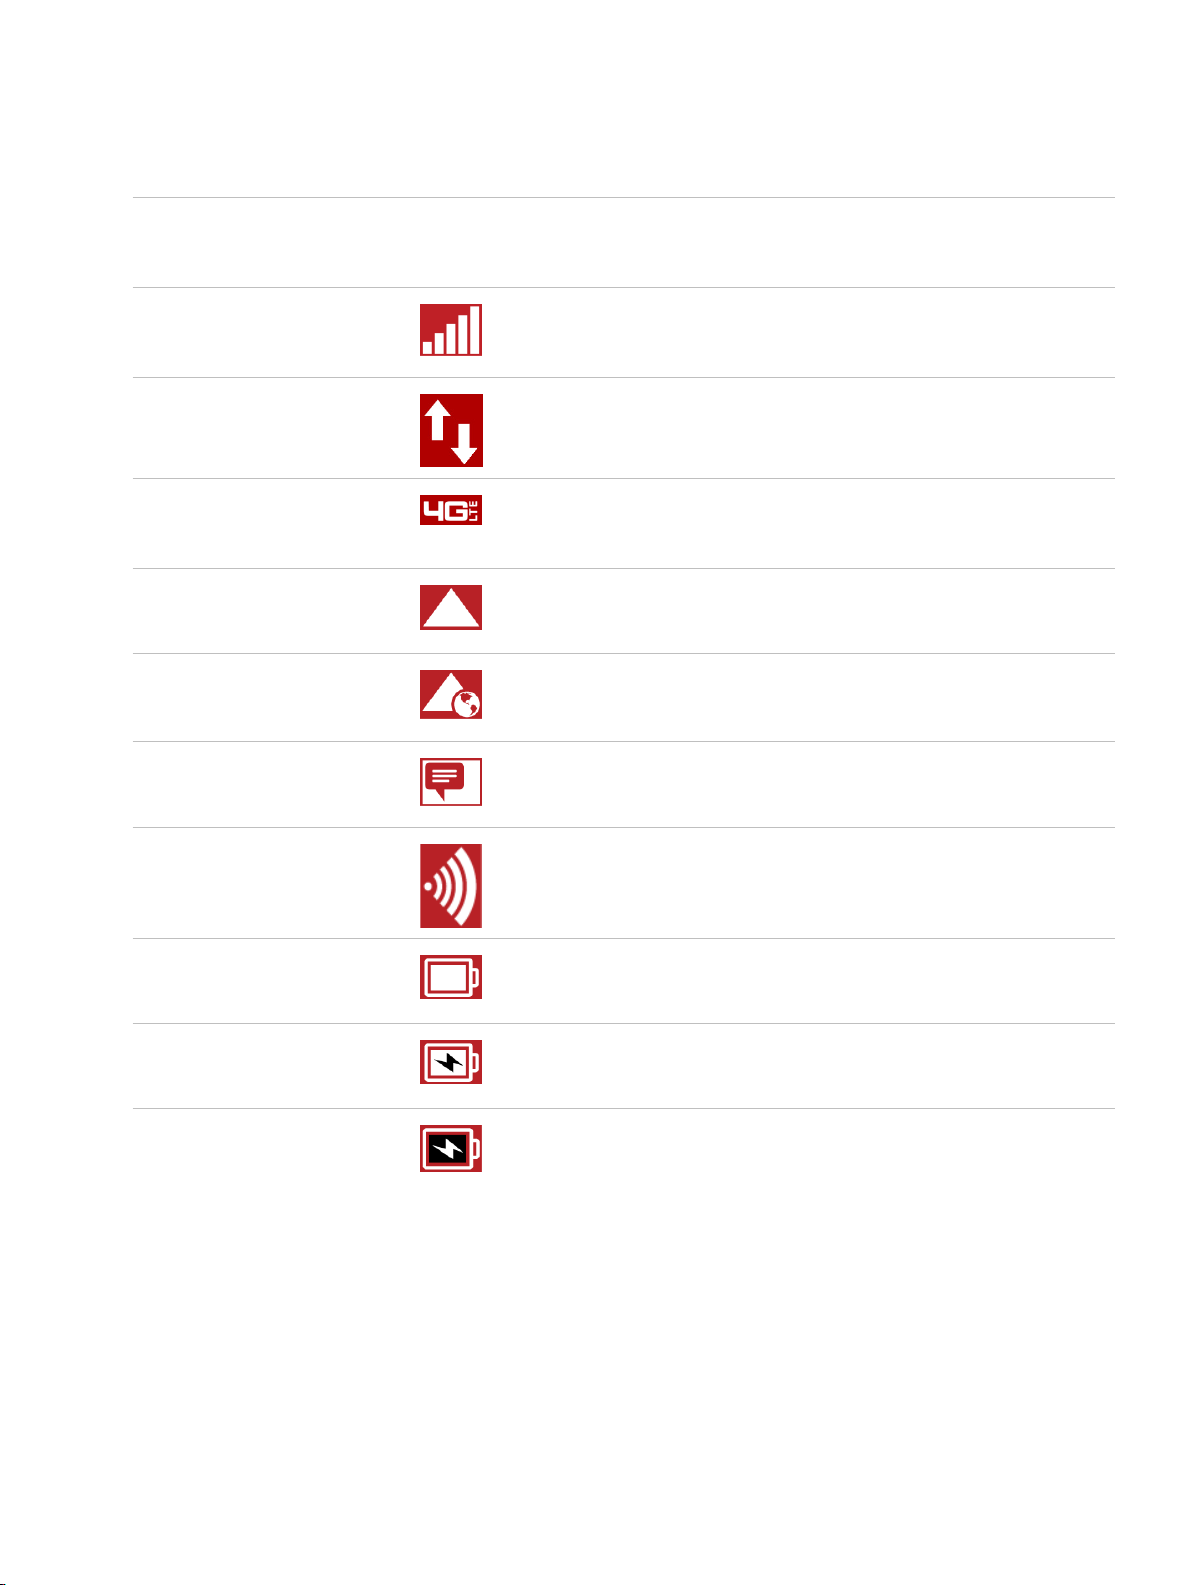
DISPLAY ICON
No icons The Jetpack is powered o or not receiving power, or the
Network Signal Strength More bars indicate more signal strength.
Activity Indicator If this icon is displayed, data is being transferred between
Network Indicator Displays the type of network to which your Jetpack is
Roaming If this icon is displayed, your Jetpack is connected to a
International Roaming If this icon is displayed, your Jetpack is connected to a
DESCRIPTION
screen is in power-saving mode.
your Jetpack and connected device(s).
connected.
network outside the home network area.
network outside the United States.
Messages If this icon is displayed, you have unread Verizon system
messages.
Connected Devices
Battery Charge Indicator
Battery AC Charging
Indicator
Battery USB Charging
Indicator
If this icon is displayed, it shows the number of devices
connected to your Jetpack.
Displays remaining battery power
Displays when the Jetpack is connected to the AC
charger.
Displays when another device is connected to the
Jetpack and charging via a USB cable.
5
Page 11

CAROUSEL ICON
Wi-Fi Scroll and select the icon to display the Wi-Fi name,
password and URL.
SIM If this icon is displayed, there is no SIM card installed.
If this icon is displayed, your SIM is locked. Real-time data
usage meter will not display.
If this icon is displayed, there is a SIM error. Check to be
sure your SIM card is properly installed.
Connected Devices Scroll and select the icon to display the number and IP
address of connected and blocked devices .
Data Usage Scroll and select the icon to view the amount of data
used as of the current date and the usage billing cycle.
Settings Scroll and select the icon to display settings options,
including Wi-Fi, screen timeout, audio on/o, audio
alerts, and network technology.
Universal Charging Scroll and select icon to display Universal Charging
status. Options include Available, Charging, or Not
available.
WPS Scroll and select icon to set WPS.
Software Update Scroll and select the icon to display the current SW
version, and to download and install an update.
Message Center Scroll and select the icon to display unread messages,
and to save or delete read messages.
About Jetpack Scroll and select the icon to display Internet connection
status and Jetpack information, including model, SW
version, wireless number, IMEI, and battery level.
Help Scroll and select the icon to display Jetpack Admin
website connection instructions, Advanced Features,
WPS, Unlock SIM, and Tips.
FRONT PANEL
Power Indicator When the display is o and the Jetpack is turned on, the
Power indicator blinks.
6
Page 12

Power Management
Your Jetpack will work from its charged battery alone, or when the device with the installed battery
is plugged into a power source.
• Battery — Charge the battery by plugging in the wall charger. While the battery is charging
the battery charging icon displays. When the battery is fully charged, the battery icon is solid.
• USB wall charger — You can use the Jetpack when the battery is installed and the charger is
plugged into a wall socket. Please ensure the wall socket is located near the equipment and
is easily accessible. The MiFi battery charges while it is plugged into the charger.
• Universal charging — You can use the Jetpack to charge external devices such as
smartphones and tablets, to help keep you powered and connected longer.
Before using the Jetpack, read the battery safety information in the "Safety Hazards" section of this
guide. (See Proper Battery Use and Disposal on page 122.)
7
Page 13

Caring for Your Jetpack
Like any electronic device, the Jetpack must be handled with care to ensure reliable operation.
Novatel Wireless recommends the following guidelines:
• Protect the Jetpack from liquids, dust, and excessive temperatures.
• Do not apply adhesive labels to the Jetpack; they might cause the Jetpack to potentially
overheat and they might alter the performance of the antenna.
• Store the Jetpack in a safe place when not in use.
8
Page 14

2
Using Your Jetpack
Accessing the Network
Using Your Jetpack for the First Time
Connecting to Your Jetpack
Using Your Jetpack After Setup is Complete
Page 15

Accessing the Network
4G LTE
With LTE bandwidth you can get the broadband speed you require to work eciently outside the
home or oce. You can connect to the Internet, access your corporate intranet, check your email
and download attachments at speeds that are up to 10 times faster than 3G*.
4G Mobile Broadband with LTE*
• Download: typical download speeds of 5-12 Mbps.
• Upload: typical upload speeds of 2-5 Mbps.
3G Mobile Broadband with EVDO Rev. A
• Download: typical download speeds of 600 kbps–1.4 Mbps with bursts up to 3.1 Mbps.
• Upload: typical upload speeds of 500-800 kbps with bursts up to 1.8 Mbps.
Wi-Fi 802.11a/b/g/n
• 802.11a uses the 5.0 GHz frequency with a bandwidth up to 12 Mbps.
• 802.11b uses the 2.4 GHz frequency with a bandwidth up to 12 Mbps.
* Actual throughput speed and coverage may vary. Speed claims not applicable when roaming.
10
Page 16

Using Your Jetpack for the First Time
Your SIM Card and battery are pre-installed. To get started:
➊ Conrm your computer meets the minimum system requirements. (See System
Requirements on page 3).
➋ Fully charge the battery. (See Charging the Battery on page 12).
➌ Power on the Jetpack. (See Power the Jetpack On and O on page 17).
➍ Connect the Jetpack to your computer using Wi-Fi. (See Connecting to Your Jetpack on
page18.)
11
Page 17
Charging the Battery
IMPORTANT Before you use your Jetpack, be sure to charge the battery for at least three hours
to ensure a full initial charge. When fully charged, the battery has up to 20 hours of life.
To charge the battery:
➊ Connect the micro USB end of the charger into the charging port of the Jetpack.
➋ Plug the other end of the wall charger into the appropriate electrical outlet.
CAUTION! Use only batteries and chargers with your Jetpack that have been approved by
Novatel Wireless for optimal performance and safe operation.
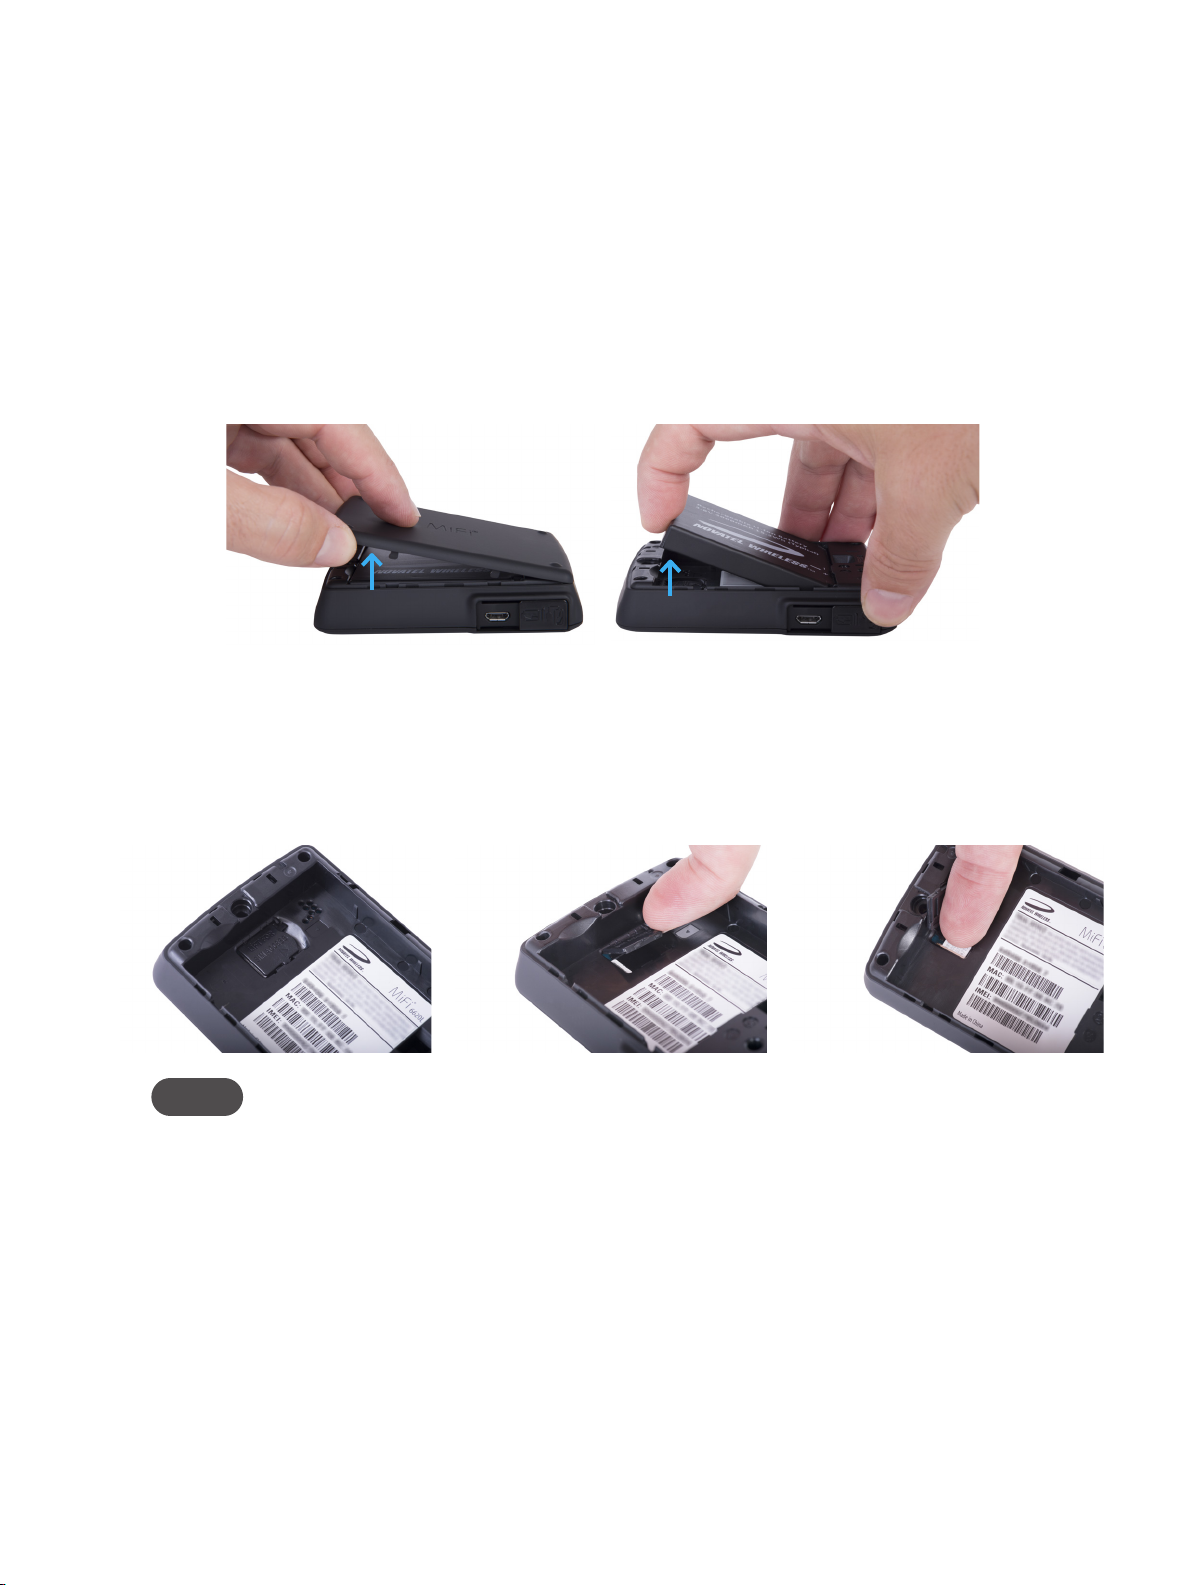
Replacing the Battery
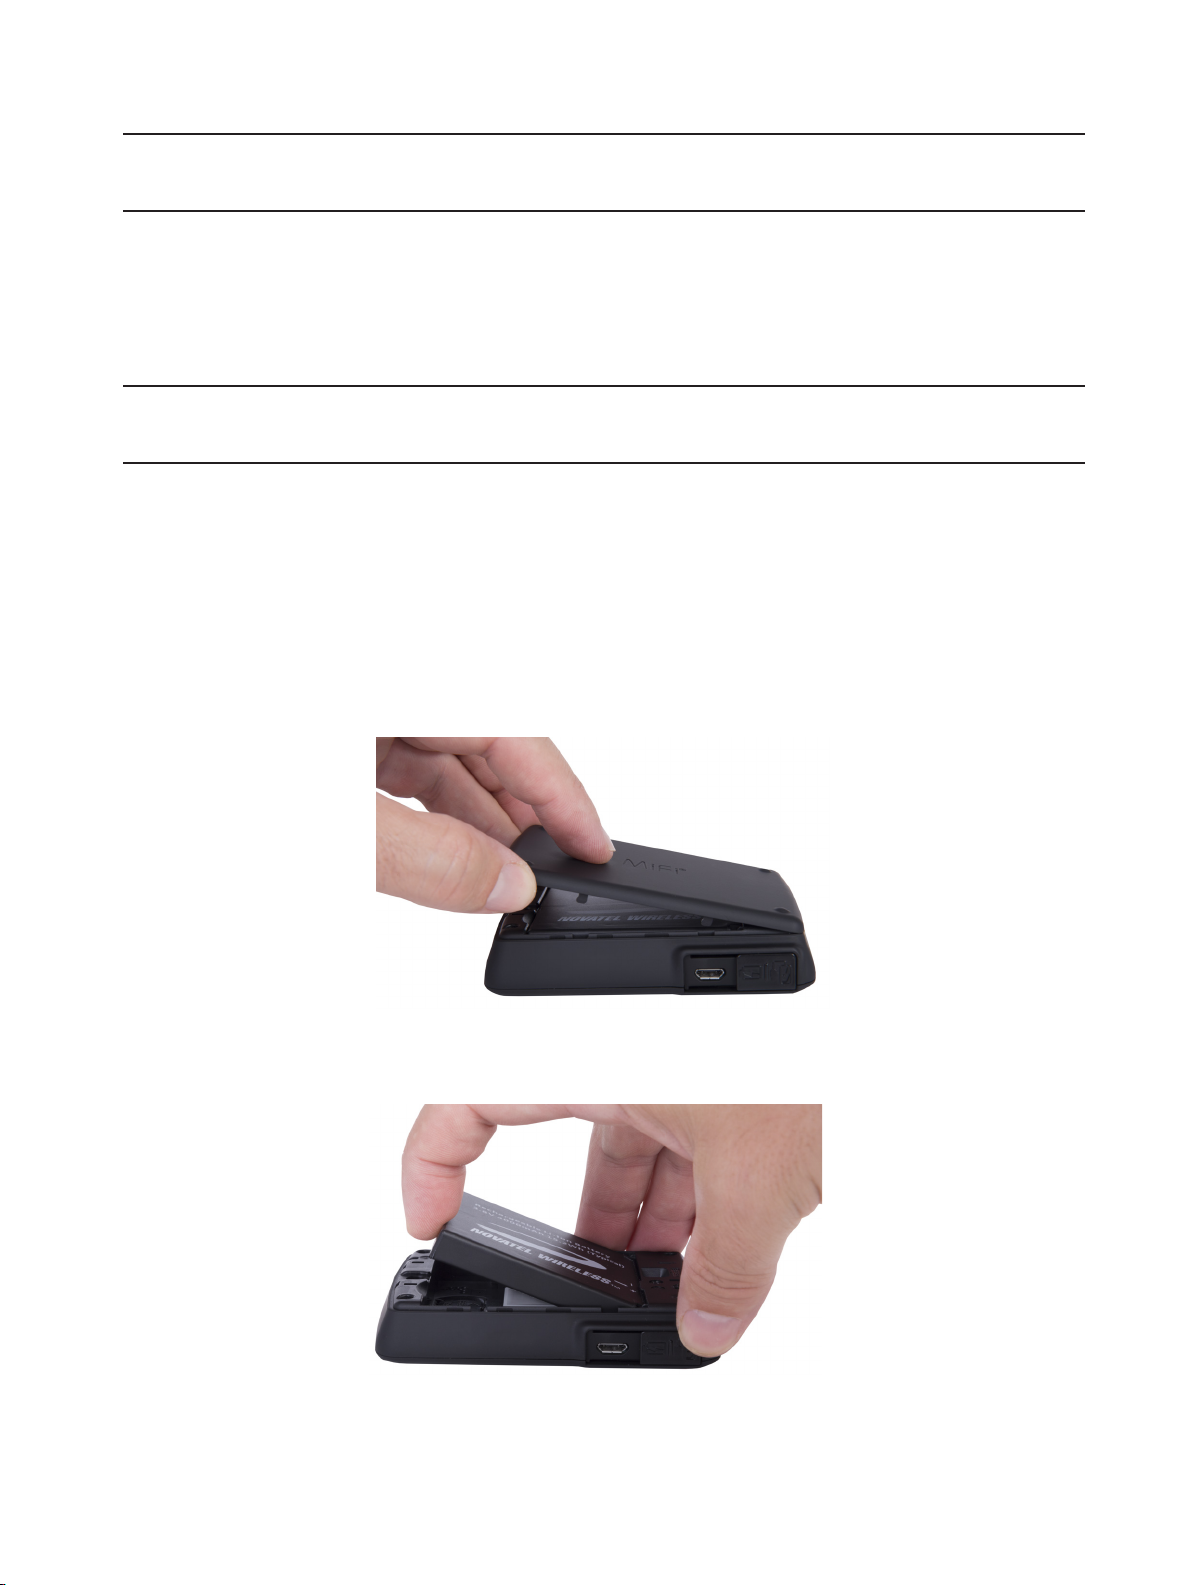
To remove and replace the battery:
➊ Press your nger against the battery door removal tab, then lift and remove the battery
cover. Set the cover aside.
➋ Insert your nger into the battery removal divot and lift the battery out of the battery
compartment.
➌ Align the gold-colored contacts on the new battery with the gold-colored contacts on the
MiFi6620L and gently slide the battery into place.
12
Page 18
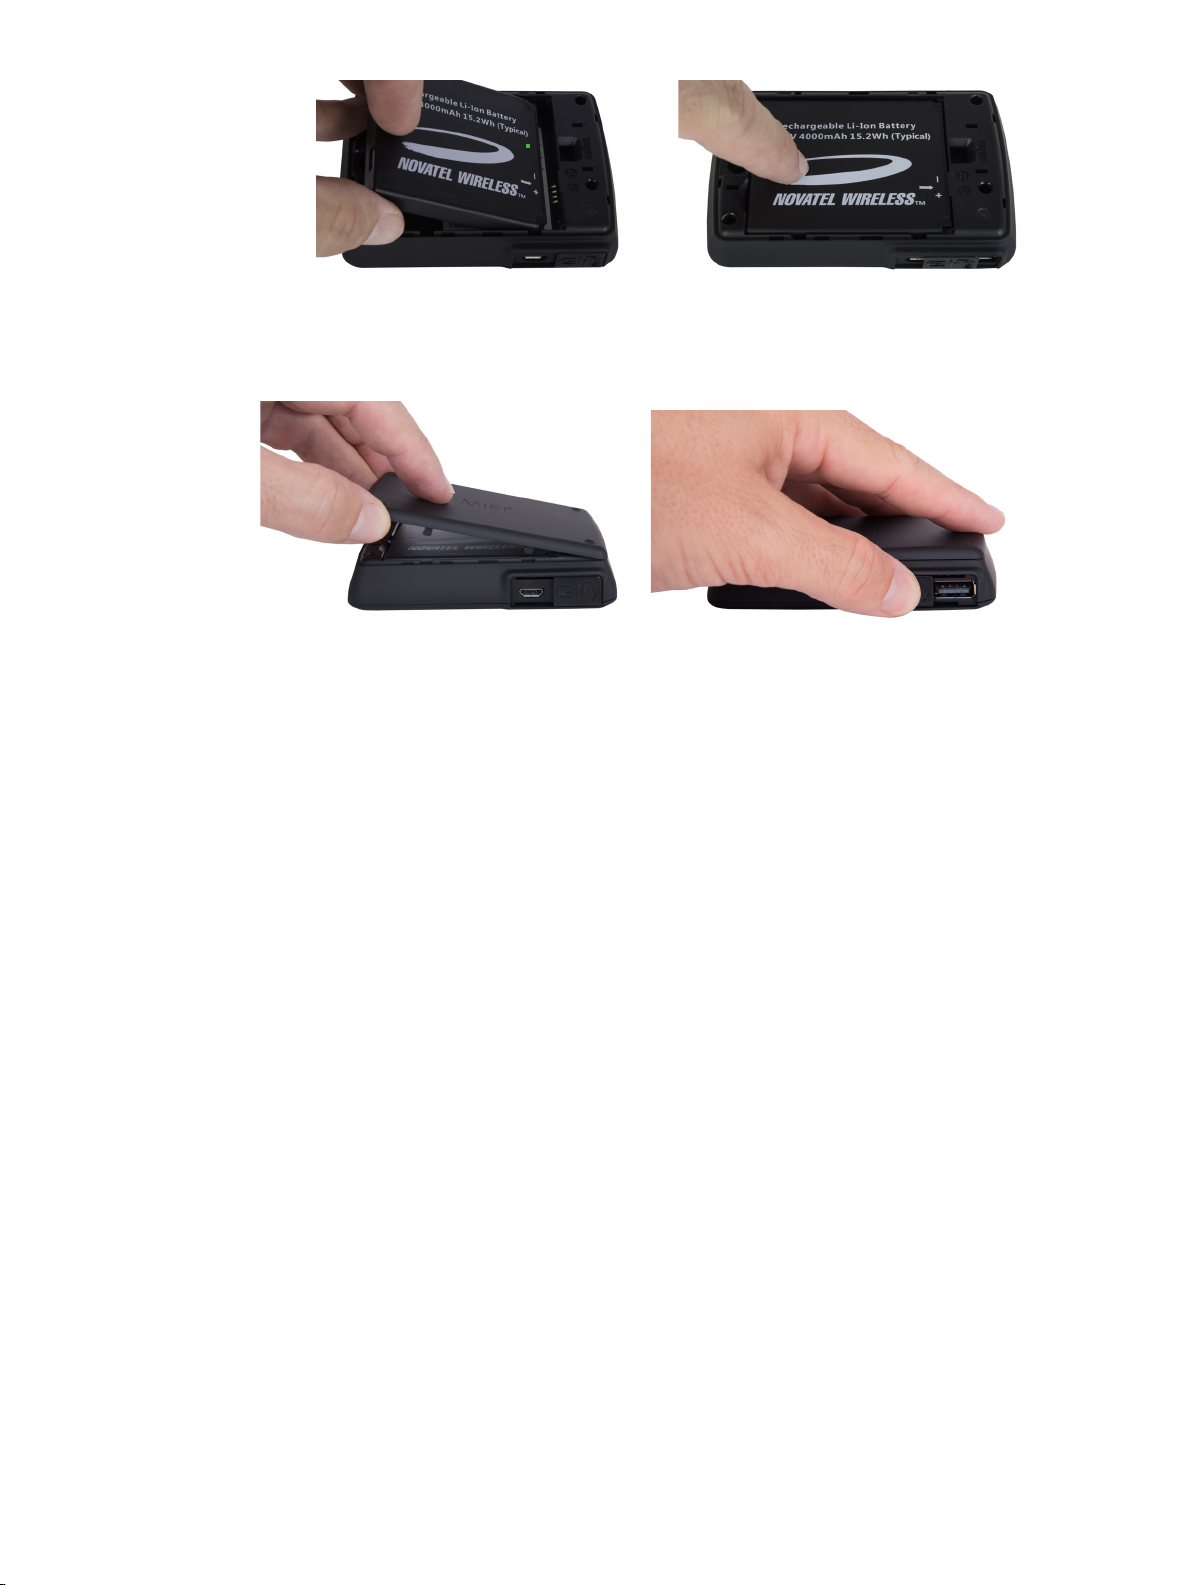
➍ Replace the cover by setting it on the Jetpack where the notches align, then press on the
cover until it clicks into place and is at across the entire bottom surface.
13
Page 19
Replacing the 4G LTE SIM Card
Your SIM (Subscriber Identity Module) card is a small rectangular plastic card that stores your phone
number and important information about your wireless service. Your Jetpack comes with the SIM
card and battery already installed.
To remove the 4G LTE SIM card:
➊ Remove the battery cover located on the underside of the Jetpack.
➋ Remove the battery from the back of the Jetpack by inserting your ngernail into the battery
removal divot and lifting the battery out of the battery compartment.
➌ Locate the SIM Card protector and lift to open.
➍ Push the SIM Card toward the SIM Card slot to release, then carefully slide the card
backwards to remove.
NOTE Should your 4G SIM card be lost or damaged, contact your network operator.
14
Page 20
To install a new 4G LTE SIM card:
➊ Remove the battery cover located on the underside of the Jetpack.
➋ If necessary, remove the SIM card from the outer card, being careful not to touch the gold-
colored contacts.
➌ Hold the card with the gold-colored contact points facing down.
➍ Insert the SIM card into the slot. The SIM card MUST remain in the SIM card slot when in use.
CAUTION! Do not bend or scratch your SIM card. Avoid exposing your SIM card to static
electricity, water, or dirt.
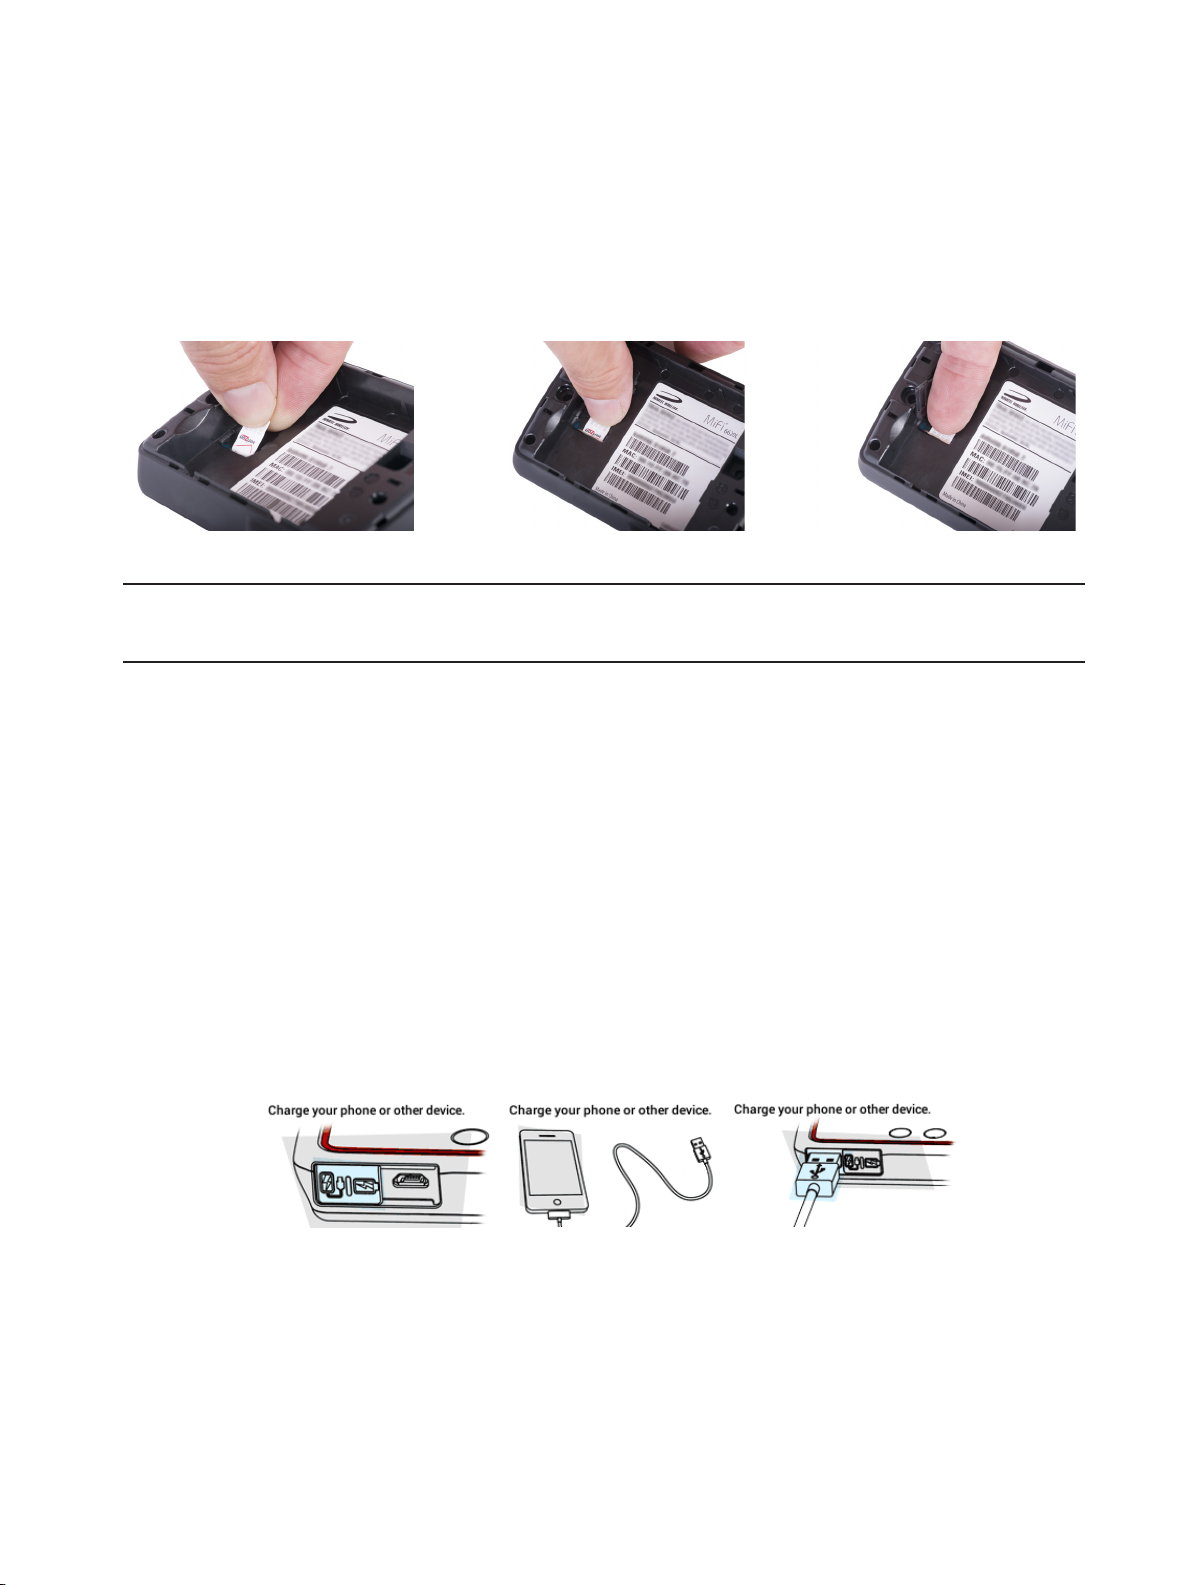
Universal Charging
The universal charging port allows you to charge an additional device using your Jetpack.
To charge an additional device:
➊ Slide the port shield to expose the USB universal charging port.
➋ Connect the USB cable to the device to be charged.
➌ Connect the other end of the USB cable to the Universal Charging port on the Jetpack.
15
Page 21

Battery Tips
WARNING ! Always use only approved batteries and chargers with your Jetpack. The warranty
does not cover damage caused by non-approved batteries and/or chargers.
• It normally takes at least three hours to fully charge the battery with the wall charger.
• Do not use sharp objects or use excessive force to remove the battery or to access the battery
well, this may damage the Jetpack and the battery.
• The battery discharges more rapidly as additional devices access your Jetpack.
• Battery life depends on the network, signal strength, temperature, features, and accessories
you use.
• New batteries or batteries stored for a long time may take more time to charge.
• When charging your battery, keep it near room temperature.
• When storing your battery, keep it uncharged in a cool, dark, dry place.
• Never expose batteries to temperatures below -20°C (4°F) or above 60°C (140°F).
• Never leave the Jetpack in an unattended vehicle due to uncontrollable temperatures that
may be outside the desired temperature for this Jetpack.
• Some batteries perform best after several full charge/discharge cycles.
• It is normal for batteries to gradually wear down and require longer charging times. If you
notice a change in your battery life, it is probably time to purchase a new battery.
IMPORTANT Whenever you remove or insert either the battery or the SIM card, ensure your
Jetpack is not connected to any device or power source. Never use tools, knives, keys, pens or
any type of object to force the door open or to remove the battery. Using any of these types of
objects could result in puncturing the battery.
16
Page 22
Power the Jetpack On and O
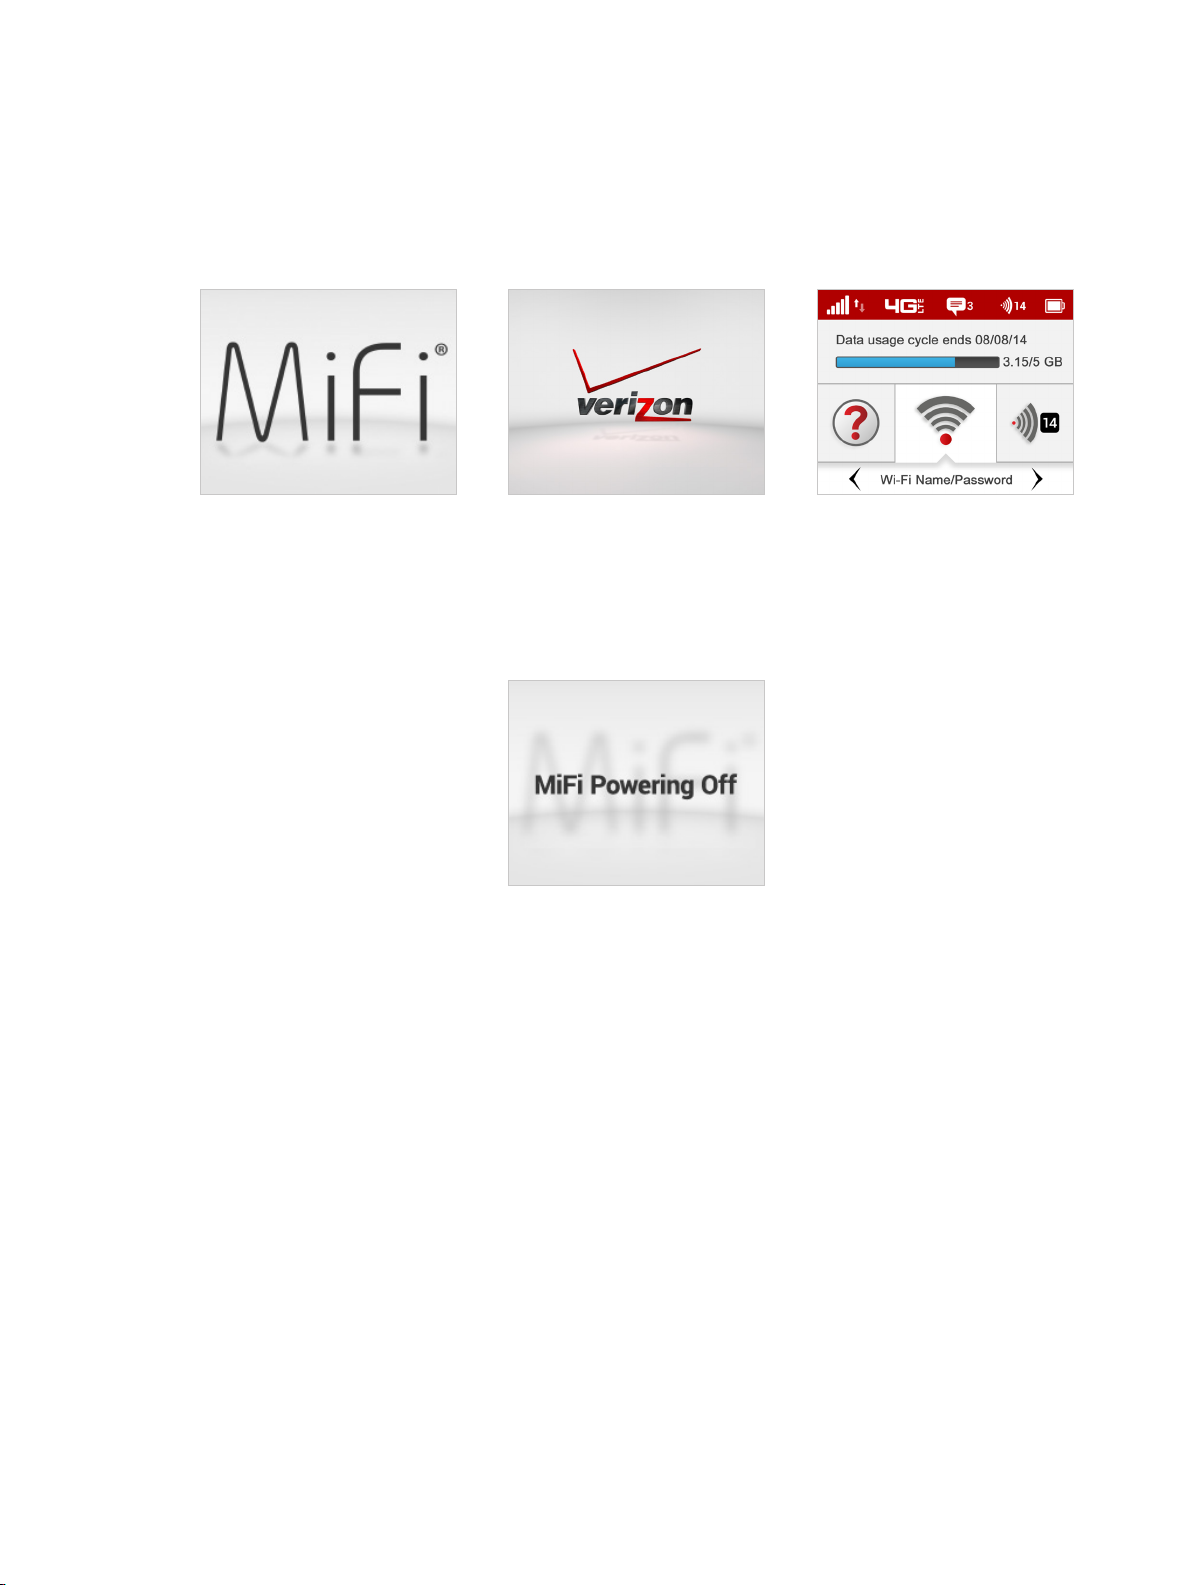
Power On
• Press the Power Button until the Jetpack display lights up. After the initial startup screens
display, the Home screen and menu options are available.
Power Off
• Press and hold the Power Button until the display shows MiFi. The Jetpack will continue its
shutdown process for several seconds and then automatically turn o the display.
17
Page 23
Connecting to Your Jetpack
Now you can connect your Wi-Fi enabled device to your Jetpack using Wi-Fi. Your computer,
tablet, or other Wi-Fi enabled devices need Wi-Fi capability and Internet browser software. Your
Jetpack is compatible with all major operating systems, and works with the latest version of
browsers, including Android™, Chrome™, Firefox®, Internet Explorer®, Safari™ and Mobile Safari™.
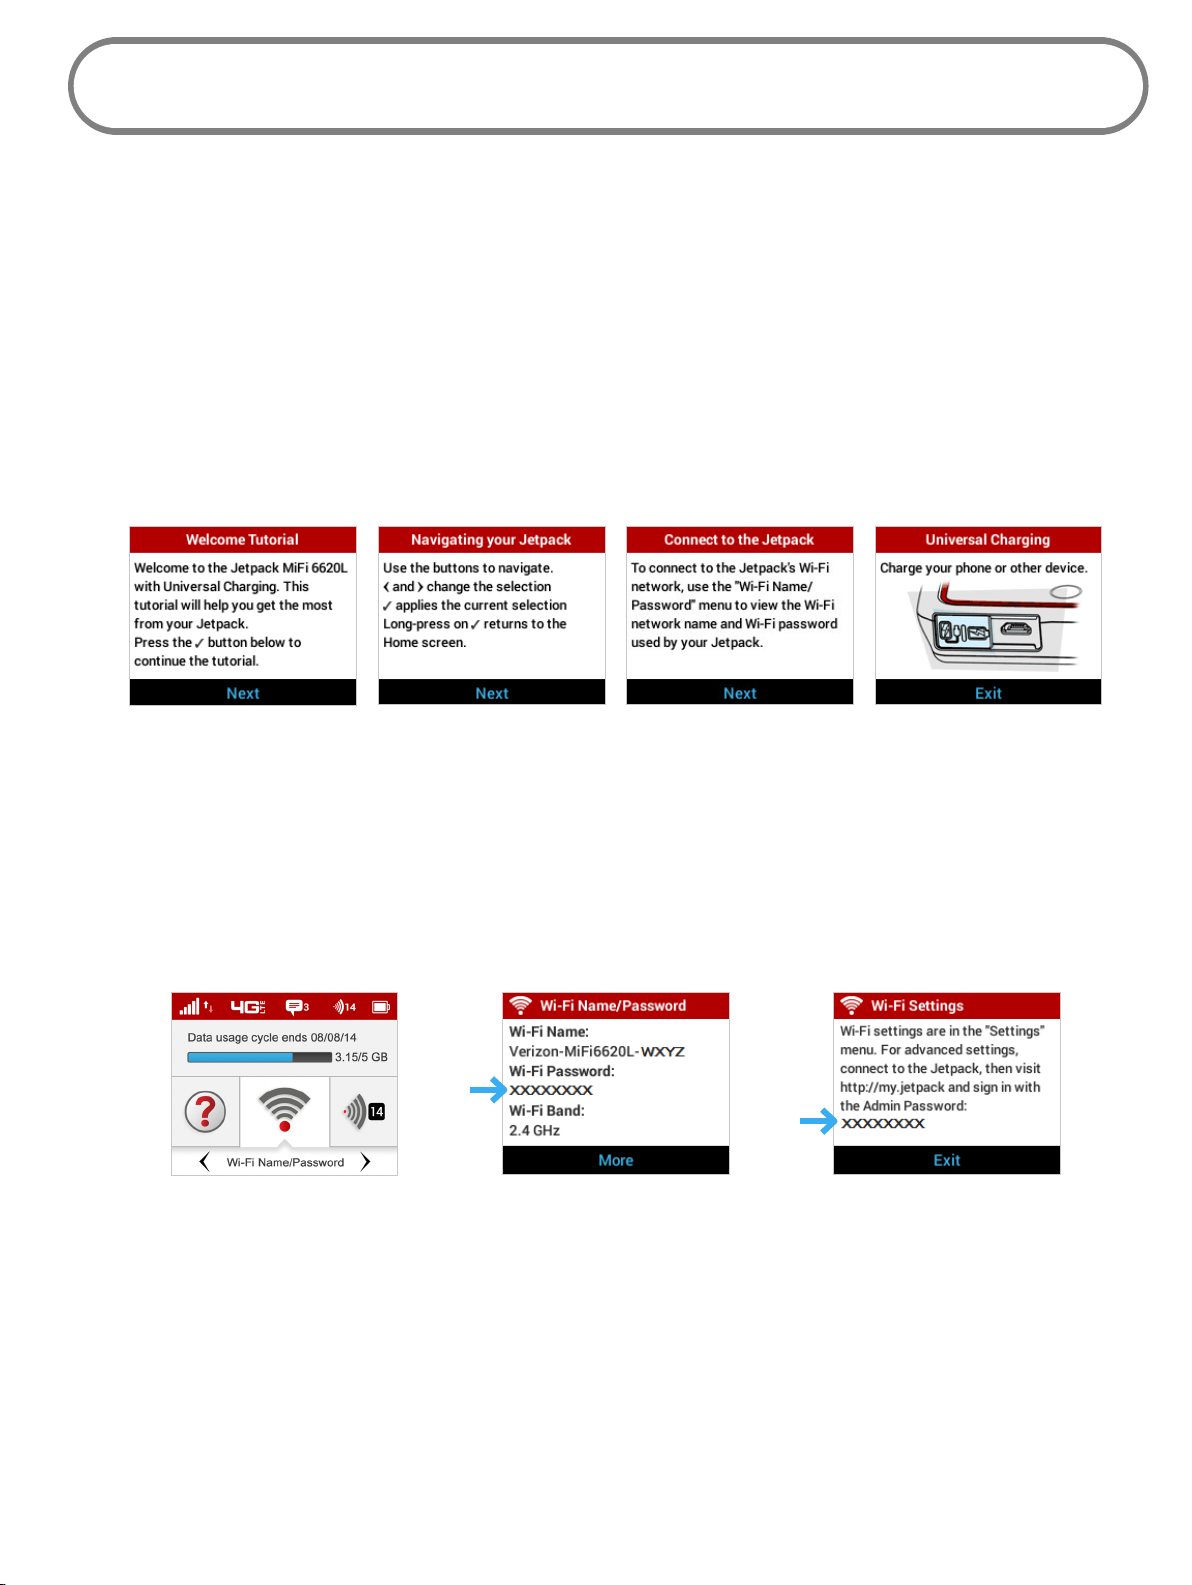
Welcome Tutorial
The Jetpack Welcome Tutorial displays upon initial power up.
➊ Power on your Jetpack for the rst time to display the Welcome Tutorial screen.
➋ Press the select button to navigate through the tutorial screens.
Welcome Tutorial Navigating Your Jetpack Connect to the Jetpack Universal Charging
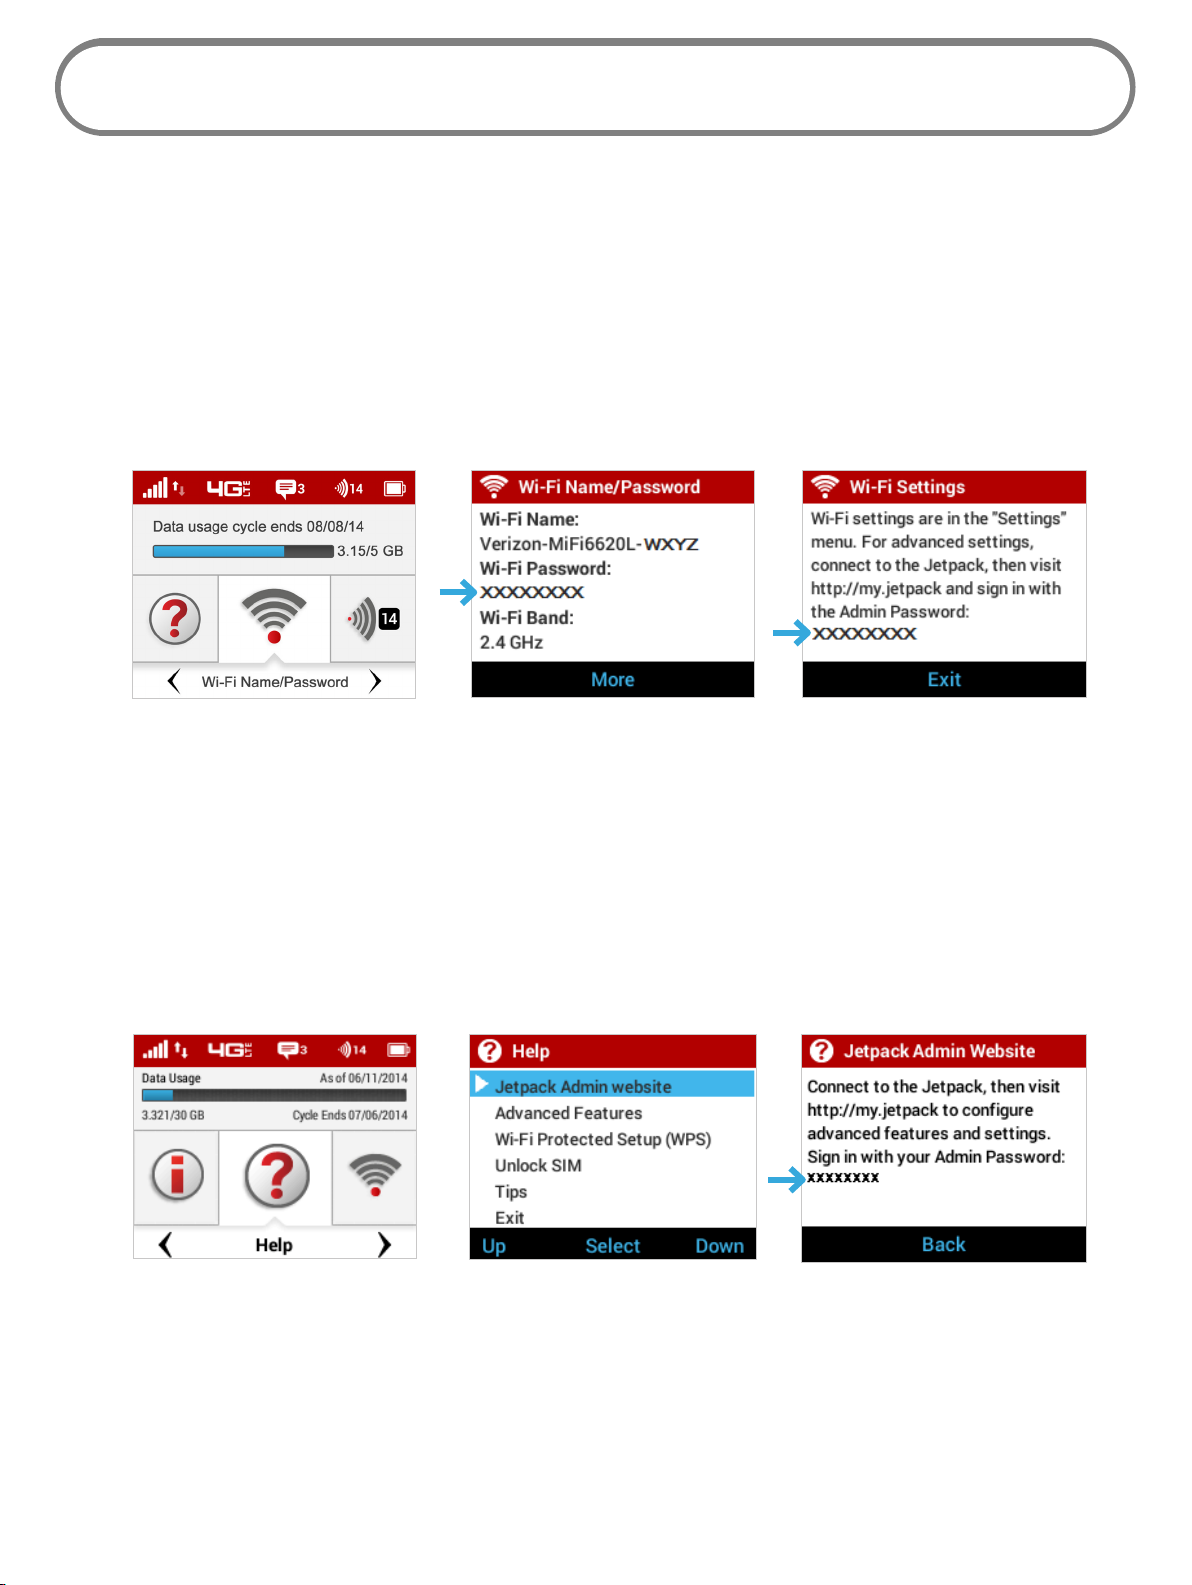
To access your Wi-Fi Name (SSID) and Wi-Fi Password after the initial power up or a device reset:
➊ Power on your Jetpack.
➋ Select Wi-Fi Name/Password to display the Wi-Fi Name/Password page.
➌ Select More to display the Wi-Fi Settings page and display your Admin Password. Press the
select button to exit and return to the Home screen and menu options.
Wi-Fi Name/Password Option Display Wi-Fi Name/Password Display Wi-Fi Settings Directions
To connect to your Jetpack:
➊ Turn on your Wi-Fi enabled device and turn on your Jetpack using the power button. The
Jetpack display will light up. The Jetpack broadcasts its own wireless network and name.
➋ Open the Wi-Fi application or controls on the computer or Wi-Fi enabled device that you
want to connect to your Jetpack and nd the Wi-Fi name (SSID).
18
Page 24

Tip! The steps to connect to a Wi-Fi network vary depending on your operating system and whether
you use the native application or third-party software. Generally, you click an icon in the Windows
notification area where you can select View Available Wireless Networks, or click the Airport
icon in the menu bar on a Mac. If you are unfamiliar with wireless networking on your computer,
consult the computer help system.
➌ When prompted, enter your Wi-Fi Network password. The Jetpack Home screen should now
show an additional connected device. Your Wi-Fi enabled device is now connected to the
Internet.
➍ You can view or change Jetpack settings by connecting to the Jetpack Admin website at
http://my.jetpack or http://192.168.1.1.
IMPORTANT Charge the battery completely before you connect your computer to your
Jetpack. (See Charging the Battery on page 12).
19
Page 25
Using Your Jetpack After Setup is Complete
You can use the Jetpack as a wireless mobile hotspot to connect your computer and up to a total
of 15 Wi-Fi enabled devices to the mobile broadband network. The Jetpack is powered on as soon as
you press and hold the power button and the display turns on.
To nd the name of the Wi-Fi Network (SSID) and Wi-Fi Password on the Jetpack display:
➊ Select Wi-Fi Name/Password to display the Wi-Fi Name/Password page.
➌ Select More to display the Wi-Fi Settings page for directions to access advanced settings.
Press the select button to exit and return to the Home screen and menu options.
Wi-Fi Name/Password Option Display Wi-Fi Name/Password Display Wi-Fi Settings Directions
The Jetpack comes from the factory with security enabled. You can change the security settings
using the Jetpack Admin website. To change your Jetpack security settings:
➊ Open the web browser of a device connected to the Jetpack and enter http://my.jetpack or
http://192.168.1.1.
➋ Login with the Jetpack Admin Password which can be found on the Jetpack display by
selecting Help > Jetpack Admin website. The default Admin Password is admin. Press and
hold the select button to return to the Home screen.
Help Option Select Jetpack Admin Website Admin Password
➌ To change your Wi-Fi Name/Password, from My Jetpack Home select Manage My MiFi >
Customize my Wi-Fi Settings.
➍ Enter the new Wi-Fi Name in the Wi-Fi name eld and the new Wi-Fi Password in the Wi-Fi
Password eld.
20
Page 26
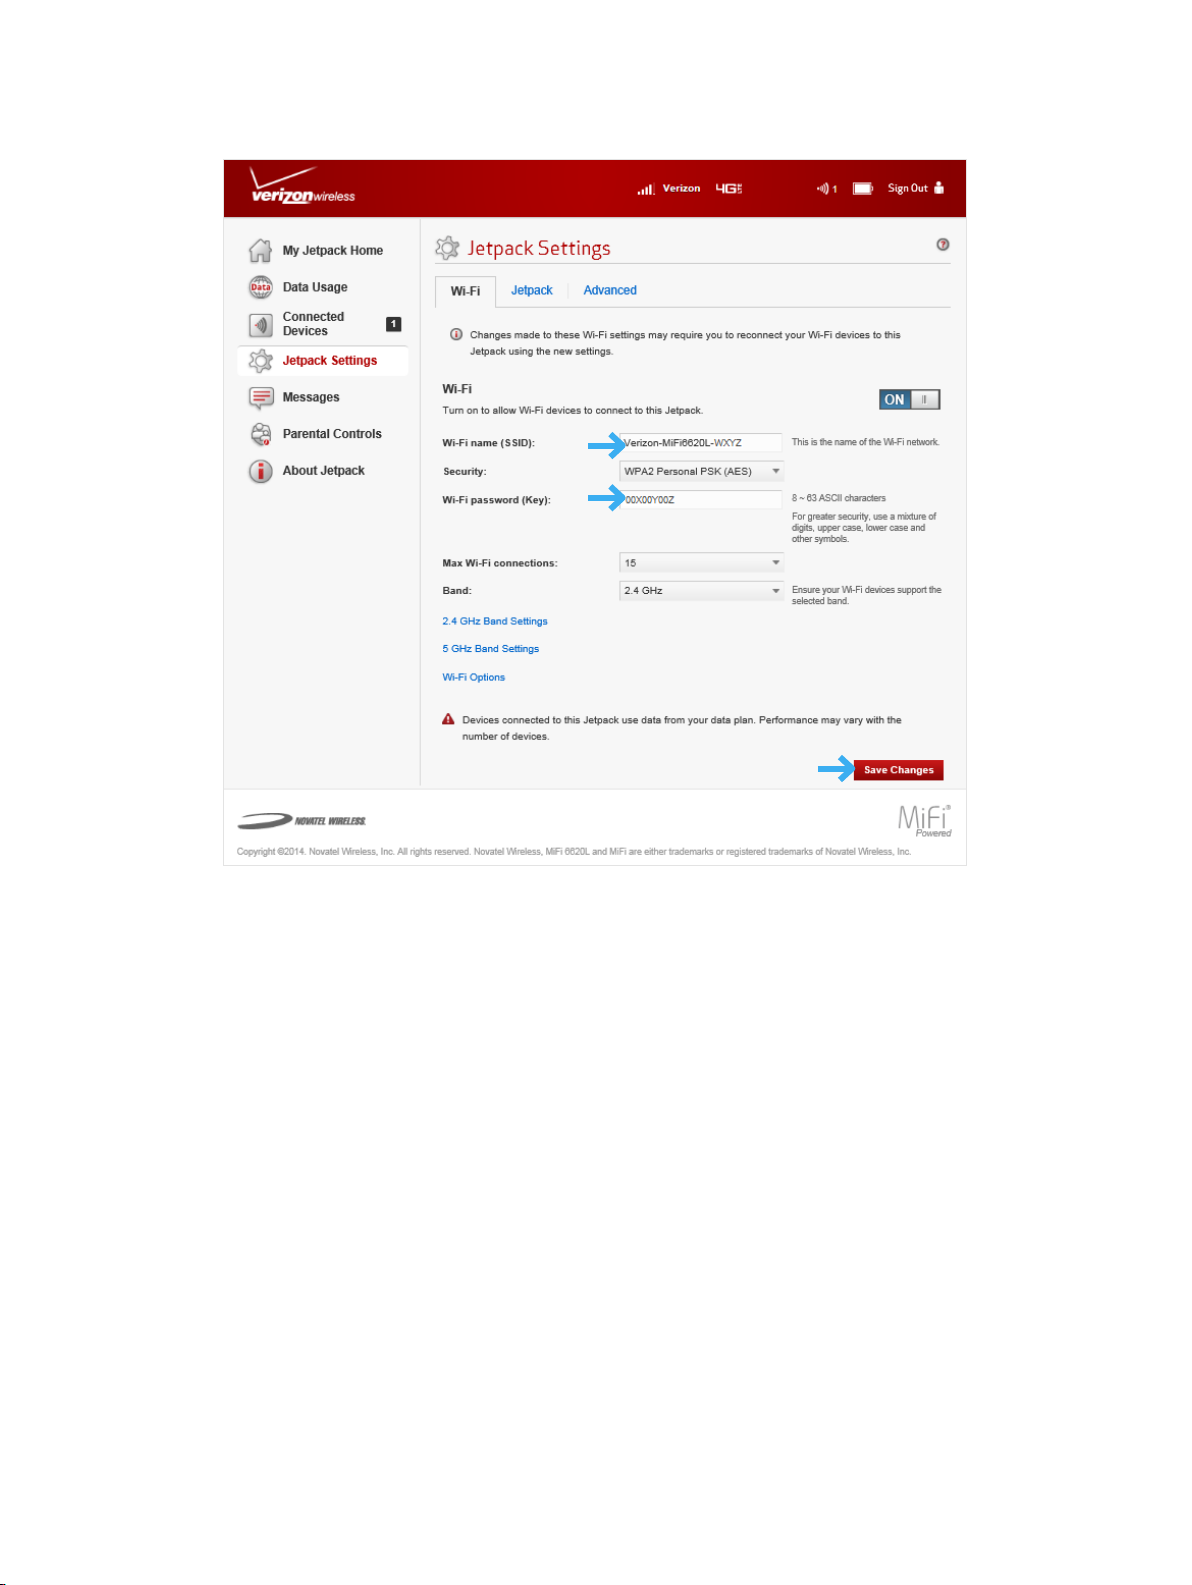
➎ Click Save Changes.
Change Wi-Fi Name/Password
➏ To change your Admin Password from My Jetpack Home, select Manage My MiFi > Change
my Jetpack Admin Password.
➐ Enter your current Admin Password in the Enter current password eld.
➑ Enter your new password in the Enter new password eld, and re-enter to conrm in the
Conrm new password eld.
21
Page 27
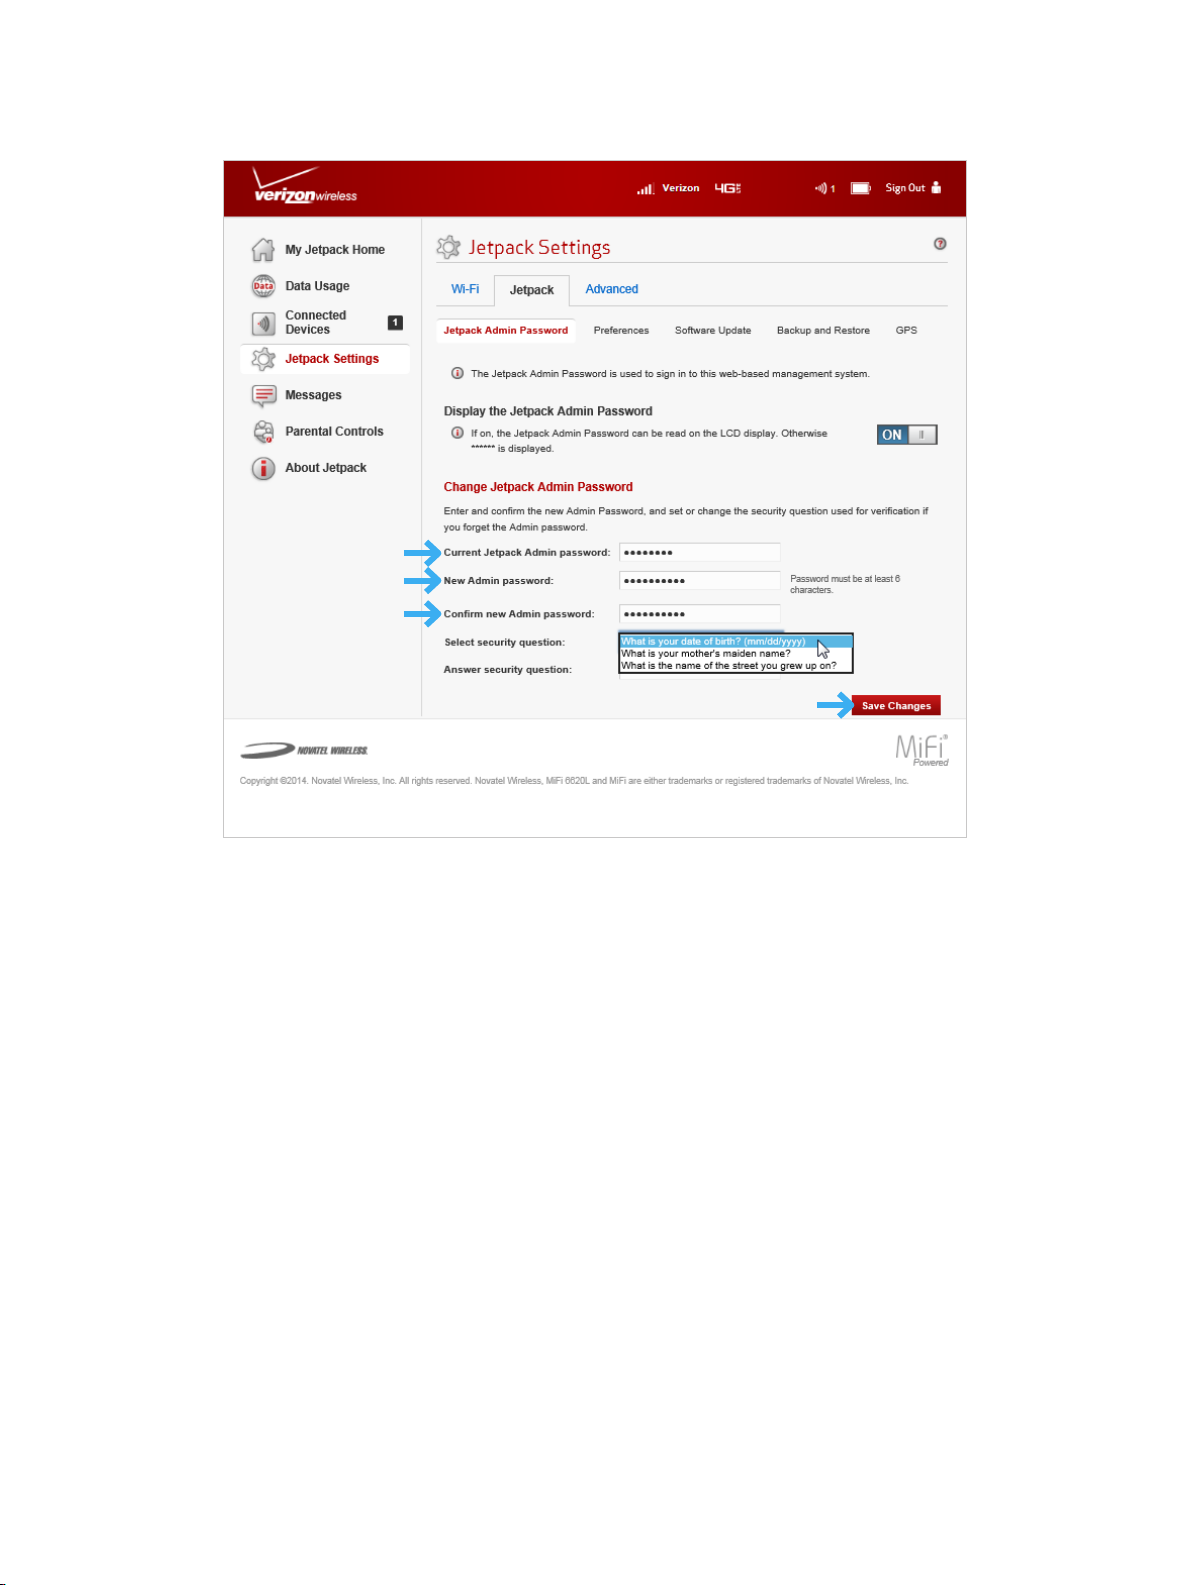
➒ Click Save Changes.
Change Jetpack Admin Password
22
Page 28
Using the Jetpack User Interface
From the Jetpack display you can check your Jetpack status, view your current data usage, and
access an icon-based menu by using the Navigation and Select buttons. (See Status Indicators on
page 5).
To view the current status of your Jetpack:
➊ Press the power button to turn on the Jetpack and display the Home screen. The status bar is
at the top of the screen.
➋ Check the status indicators for network signal strength , data trac activity , unread
Verizon system messages , active roaming /international roaming , connected
devices , and battery strength .
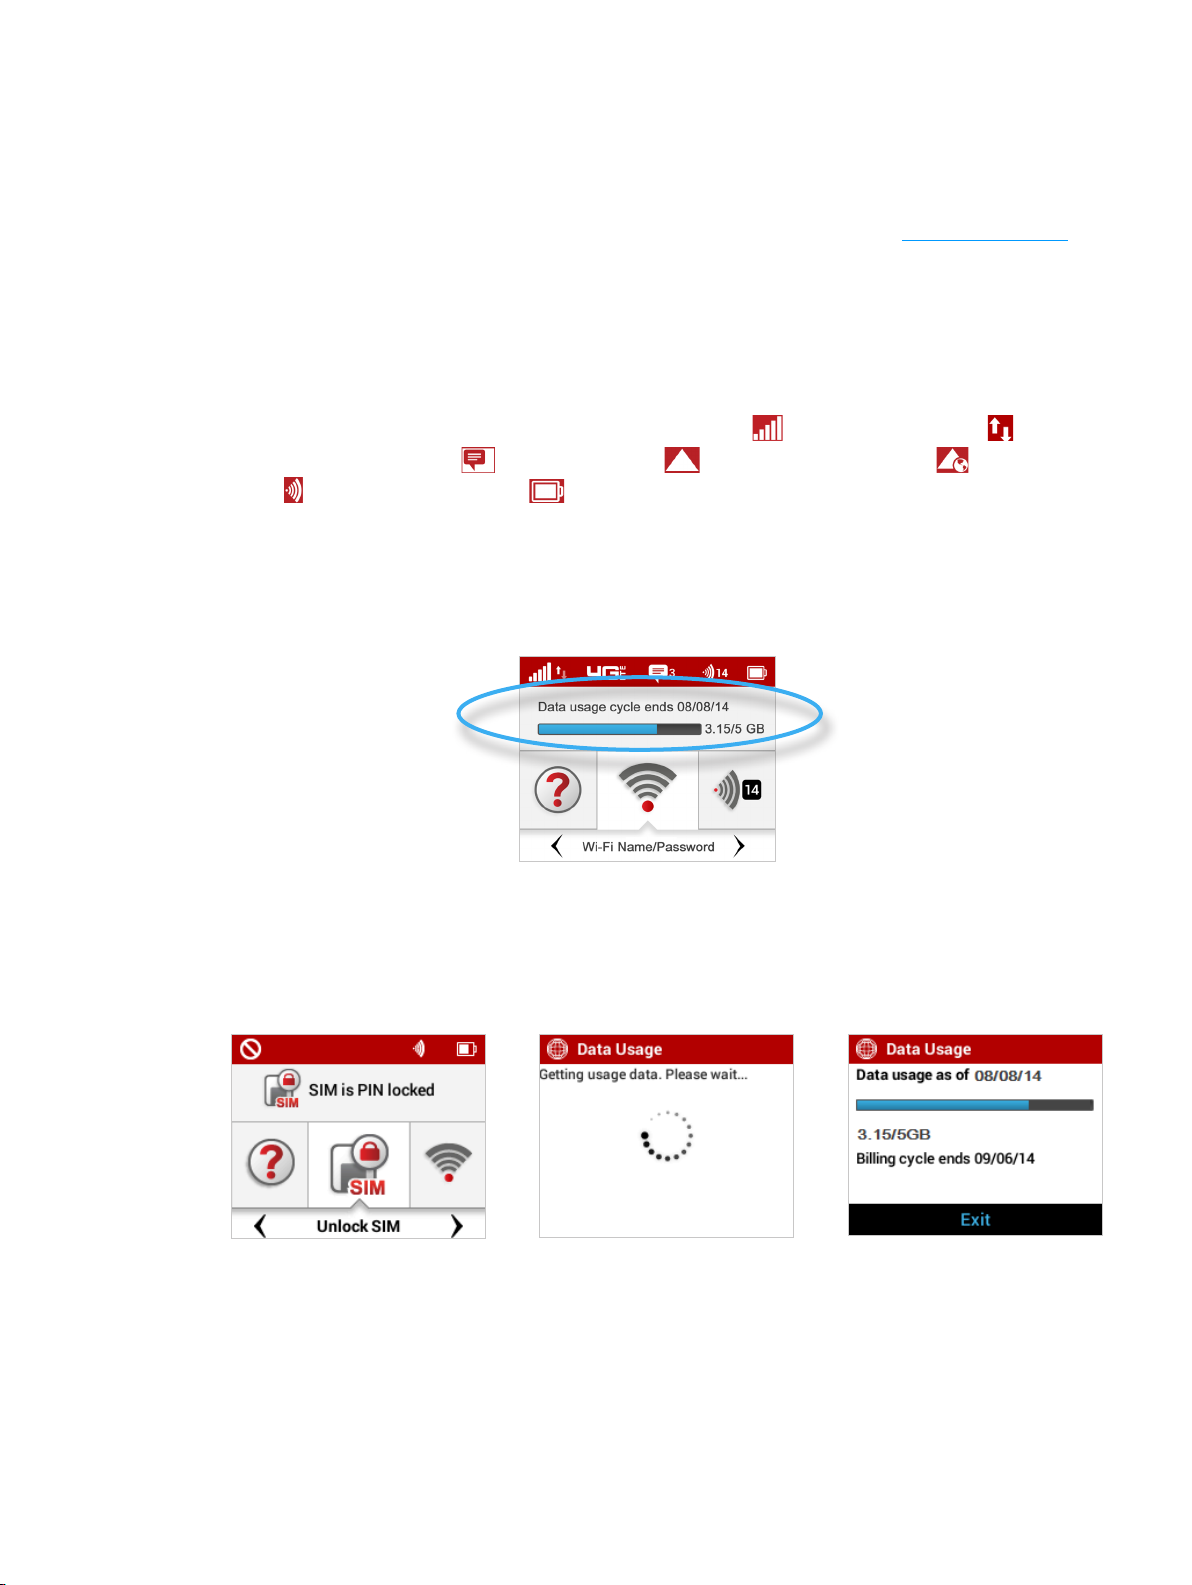
To view your current data usage:
➊ Use the real-time data usage meter on the Home screen to check your data usage and billing
cycle schedule.
Jetpack Display Home
➋ If SIM Lock is turned on, or if another device is connected to the Universal Charging port
and being charged, the Data Usage meter will not display. Scroll to the Data Usage icon and
press the select button to view your current data usage details.
SIM Lock Turned On Retrieve Data Usage Data Usage Display
23
Page 29
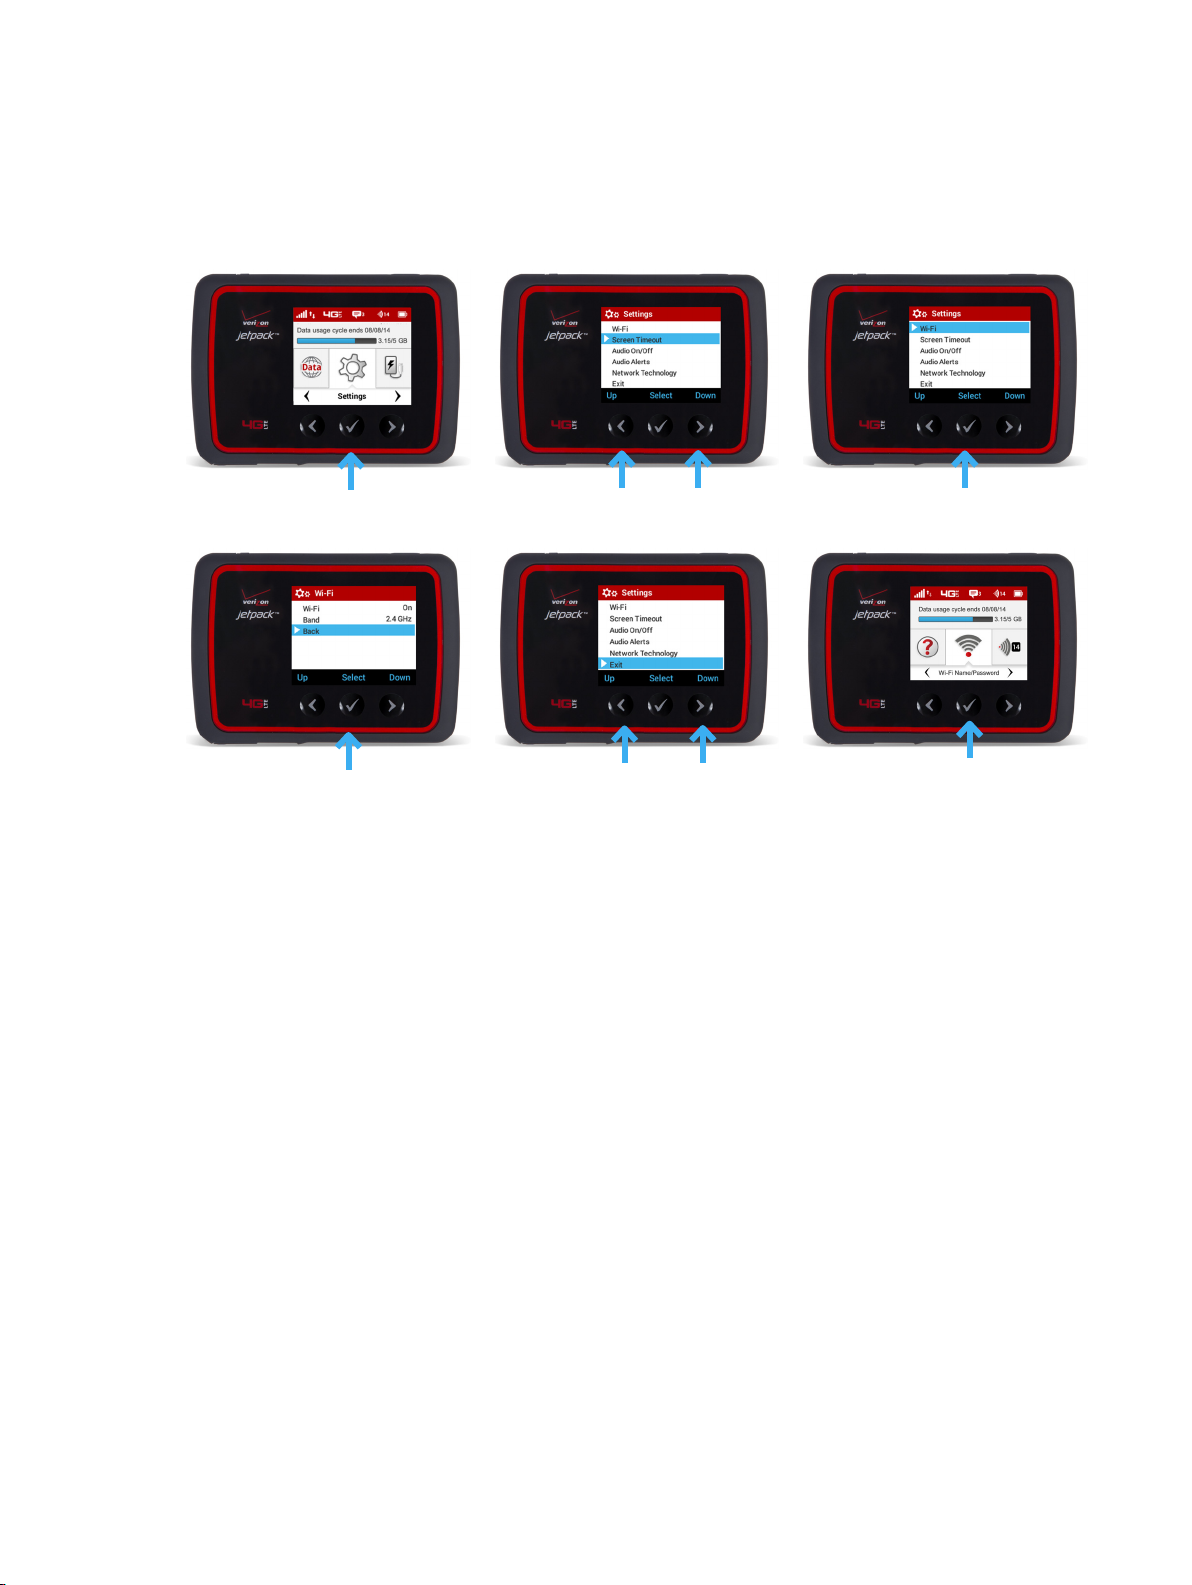
To access the icon-based menu options:
• From the Home screen, use the navigation buttons to move left or right to highlight the
desired Menu option, then press the select button to open the highlighted option. Continue
to press the select button to move through any additional screens.
Press Select to Open Option Menu Scroll Up/Down to Desired Option Press Select to View Desired Option
Press Select to go Back to Option Menu Scroll down to the Exit Option Press/Hold Select to Return Home
24
Page 30

3
Jetpack Settings
Managing Your Jetpack
My Jetpack Home
Data Usage
Connected Devices
Jetpack Settings
Universal Charging
WPS
Messages
Parental Controls
About Jetpack
Page 31

Managing Your Jetpack
Manage, monitor, and customize your Jetpack settings directly on the Jetpack, or by using the
Jetpack Admin website.
On the Jetpack Display
➊ Power on your Jetpack by pressing and holding the power button until the display lights
and the Home screen displays.
➋ Use the status bar to monitor network signal strength, data activity, roaming, messages,
connected devices, universal charging, and battery life .
➌ Use the Real-time Data Usage meter to monitor current data usage and billing cycle
schedule.
➍ Use the navigation buttons to scroll to the desired Menu option.
➎ Press the select button to open the selected Menu screen.
➏ To return to the Home screen from any other screen, press and hold the select button until
the Home screen displays.
Jetpack Status Real-time Data Usage Scroll & Select
26
Page 32

On the Jetpack Admin Website
To connect to the Jetpack Admin website and customize your Jetpack settings:
➊ Connect your computer or Wi-Fi enabled device to your Jetpack to access the Internet.
(See Connecting to Your Jetpack on page 18.)
➋ Open your connected device’s web browser and type http://my.jetpack/ or http://192.168.1.1
into the address bar. Press Enter. The My Jetpack Home page opens. (See Sign In on
page28.)
My Jetpack Home
➌ Click Sign In in the upper right corner of the window and type your Jetpack Admin password
in the Admin password eld and click Sign In to display the My Jetpack Home page.
(See My Jetpack Home on page 30.)
You are now able to customize your Jetpack settings conguration.
27
Page 33

Sign In
The Sign In page is the rst page you see after connecting and prior to signing in. You can access
more information after you sign in.
Jetpack Sign In
Sign In to the Jetpack Admin website
Type the Jetpack Admin Password (the default password is found on the Jetpack by selecting Help >
Jetpack Admin website) in the Sign In eld at the top right corner of the window. Click Sign In.
If you forget your Admin Password, click I Forgot the Admin Password and a reminder will appear
telling you where to nd your password. Click OK.
Jetpack Admin Password Reminder
28
Page 34

Menu Panel
The Menu Panel is the primary navigation for MiFi Settings. You can access each feature under the
appropriate menu.
My Jetpack Home - Menu Panel
29
Page 35

My Jetpack Home
My Jetpack Home is your gateway to conguring and managing your Jetpack.
On the Jetpack Display
➊ Power on your Jetpack by pressing and holding the power button until the display lights
and the Home screen displays.
➋ Use the navigation buttons to scroll to the desired Menu option.
➌ Press the select button to open the selected Menu screen.
➍ To return to the Home screen, press/hold the select button to exit the selected Menu screen.
Home Screen Displays Scroll to Desired Menu Option Press Select Button to Exit
30
Page 36

On the Jetpack Admin Website
My Jetpack Home allows you to quickly access commonly used links and all available menu
options for your Jetpack. My Jetpack Home contains the following quick link menu options:
• Manage My Jetpack (See Manage My Jetpack on page 32.)
• My Account & Tools (See My Account & Tools on page 38.)
• Help & Support (See Help & Support on page 44.)
My Jetpack Home
31
Page 37

Manage My Jetpack
The Manage My Jetpack menu contains the following options:
• Customize my Wi-Fi Settings (See Customize my Wi-Fi Settings on page 33.)
• Change my Jetpack Admin Password (See Change my Jetpack Admin Password on
page34.)
• Set GPS Options (See Set GPS Options on page 36.)
My Jetpack Home - Manage My Jetpack
NOTE The next time you sign in to Jetpack Settings, you will need to use the new password.
32
Page 38

Customize my Wi-Fi Settings
Clicking on Customize my Wi-Fi Settings takes you to the Jetpack Settings page Wi-Fi menu where
you can customize Wi-Fi proles and view details about the devices connected to your Jetpack.
(See Wi-Fi on page 59.)
Jetpack Settings - Wi-Fi Network Settings
33
Page 39

Change my Jetpack Admin Password
Clicking on Change Admin Password takes you to the Jetpack Admin Password section of the
Settings page, where you can change the Admin Password. (See Jetpack Admin Password on
page62.) The default Admin password is admin. This is the password you use to Sign In to
Settings.
To change the Admin Password used to Sign In to your Jetpack:
➊ Enter your current Admin password in the Enter current password box, then click Continue.
Jetpack Settings - Change Jetpack Admin Password
➋ Enter your new password in the Enter new password box.
➌ Re-enter your new password in the Confirm new password box.
➍ Select a security question from the drop down menu.
Jetpack Settings - Select Jetpack Security Question
34
Page 40

➎ Enter the answer to the selected security question in the Answer Security Question eld.
Jetpack Settings - Answer Security Question
➏ Click Save Changes.
➐ A message displays conrming that your password has been changed.
NOTE The next time you sign in to Jetpack Settings, you will need to use the new password.
35
Page 41

Set GPS Options
Clicking on Set GPS Options will take you to the Jetpack Settings page where you can congure the
GPS settings for your Jetpack.
To congure your Jetpack GPS settings:
➊ Slide the ON/OFF button to ON to activate the Jetpack location services and display the GPS
Agreement.
Jetpack Settings - GPS
➋ To proceed, click Confirmed after reading and agreeing to the GPS Agreement.
Jetpack Settings - GPS Agreement
36
Page 42

➌ Select the desired option from the Turn off drop down menu. The choices are Always on or
Turn off on power down.
GPS - Turn O Options
➍ NMEA is a standard method of providing a GPS data stream in Windows and other
computing platforms. If this check box is selected, when connected via a USB cable, a NMEA
(serial) port is available to applications that can use a NMEA stream. To use GPS over Wi-Fi
(NMEA), click Download GPS Over Wi-Fi Drivers at the bottom of page to download and
install the drivers.
➎ Click Save Changes.
GPS - Download GPS Over Wi-Fi Drivers
37
Page 43

My Account & Tools
The My Account & Tools menu contains the following options:
• My Verizon Wireless (See My Verison Wireless on page 38.)
• Coverage Map (See Coverage Map on page 39.)
• Data Calculator (See Data Calculator on page 41.)
• Trip Planner (See Trip Planner on page 42.)
My Jetpack Home - My Account & Tools
My Verison Wireless
Clicking on My Verizon Wireless takes you to the Verizon Wireless website where you can manage
your wireless service. Sign in to your account or watch videos to learn more about your Jetpack.
To sign in to your My Verizon account and access your account options:
➊ Type your User ID or Mobile Number in the User ID or Mobile Number eld.
➋ Select the desired option from the Take Me To drop down menu.
My Verizon Wireless
38
Page 44

Coverage Map
Clicking on Coverage Map takes you to the Coverage Locator on the Verizon Wireless website where
you can view a detailed coverage map, including Data, Push to Talk, 4G LTE Data, Prepaid, and Voice
& Messaging.
To display detailed information about Verizon Wireless coverage in your area (U.S.):
➊ Type your Street Address, City and State, or Zip code in the appropriate eld, then click
Search.
➋ To limit the coverage areas by service type, click the button by each service type desired,
then click Refresh Map.
➌ Use the map navigation tools to adjust the size and location of the area displayed.
Verizon Coverage Locator
39
Page 45

To display detailed information about Verizon Wireless international coverage:
➊ Type your Street Address, City and State, or Zip code in the appropriate eld, then click the
magnifying glass icon.
➋ To limit the coverage areas by service type, click the button by the service type desired.
Verizon International Coverage Map
➌ Use the map navigation tools to adjust the size and location of the area displayed.
Verizon International Coverage Map - Adjust Size
40
Page 46

Data Calculator
Clicking on Data Calculator takes you to the Data Usage Calculator on the Verizon Wireless website
where you can calculate your Jetpack usage to determine which plan will best meet your needs.
To use the Data Calculator to select the best Verizon plan to meet your needs:
➊ Select your device type at the top of the page. Your choices are 3G and 4G Smartphones, 3G
Mobile Broadband, and 4G Mobile Broadband.
➋ Select the correct usage amounts from each category, including email, web access,
streaming music and video, uploading and downloading photos, 4G VoIP (if applicable),
video calling and online gaming.
Verizon Data Calculator
41
Page 47

Trip Planner
Clicking on Trip Planner takes you to the interactive Trip Planner on the Verizon Wireless website
where you can determine the global services you need when you travel and see if your device is
covered.
To use the interactive Trip Planner:
➊ Select where you are going in the Location panel. Your choices are Country and Cruise Ship.
➋ Type in country or cruise ship and select from the drop down tab.
➌ Click Add to List.
➍ Repeat for additional locations, then click Next.
Verizon Trip Planner - Enter Location
➎ Select how you want to keep in touch in the Communication panel. Choose any
combination from Voice/Messaging, Smartphone, Wireless Internet, and Tether/Hotspot.
➏ Click Next.
Verizon Trip Planner - Enter Communication Type
42
Page 48

➐ Select what device you will take with you from the Devices panel. Select the brand from the
Select Brand drop down menu, and the model from the Select Model drop down menu.
➑ Click Show me what I need to display an overview of your trip information.
Verizon Trip Planner - Show me what I need
Verizon Trip Planner - Options
43
Page 49

Help & Support
The Help & Support menu contains the following options:
• Attend a Wireless Workshop (See Attend a Wireless Workshop on page 45.)
• Community Forum (See Community Forums on page 46.)
• Device Support Page & User Guide (See Device Support Page & User Guide on page 46.)
My Jetpack Home - Help & Support
44
Page 50

Attend a Wireless Workshop
Clicking on Attend a Wireless Workshop takes you to the Verizon Wireless website where you can
sign up for classes taught by Verizon experts to learn everything you need to know about your
Jetpack.
To attend a Wireless Workshop:
➊ Select Help & Support > Attend a Wireless Workshop on the My Jetpack Home page to
display the Wireless Workshops page.
➋ Enter your Zip Code into the Enter Zip Code eld, or select a State and City from the
dropdown menu.
➌ Click View Workshops to display a list and description of available in-store workshops in your
selected location.
➍ To register, choose a location and time from the available options, then click Register.
➎ Enter the required information on the Registration form, then click Register.
Verizon Wireless Workshops
45
Page 51

Community Forums
Clicking on Community Forums takes you to Community Forums on the Verizon Wireless website
where you can select the type of device you are interested in learning about and read questions and
answers from other device users.
To access the Jetpack 4G LTE Mobile Hotspot Forum and ask a question or read questions and
answers from other device users:
➊ Select Verizon Jetpack from the carousel of devices at the top of the page.
➋ Enter your question into the Type your question eld, then click Ask it.
Verizon Support - Community Forums
Device Support Page & User Guide
Clicking on Device Support Page & User Guide takes you to Wireless Support section on the Verizon
Wireless website where you can access Top Device Questions , Articles, Community Advice, and and
Features & Apps.
46
Page 52

Data Usage
Data Usage allows you to quickly check your data usage and billing cycle directly on the Jetpack
display, or on the Jetpack Admin website.
On the Jetpack Display
➊ Use the real-time data usage meter on the Home screen to check your data usage and billing
cycle schedule.
Real-time Data Usage
➋ For an expanded view of your data usage information, or if Data Usage information is not
available on the Home screen, use the navigate button to scroll to the Data Usage icon and
press the select button to display current data usage date, data usage meter, amount of data
used/total available in GB, and the billing cycle end date. Press/hold the select button to exit
and return to the Home screen.
NOTE The real-time data usage meter will not display when SIM lock is turned on or when another device
is connected to the Jetpack via the Universal Charging port.
Data Usage Option Getting Usage Data Data Usage & Billing Cycle
47
Page 53

On the Jetpack Admin Website
The Data Usage page allows you to obtain your current estimated data usage, and to access My
Account & Tools. Click Data Usage on the Menu panel to display the Data Usage page and access
information specic to your particular plan.
Jetpack Data Usage
NOTE Roaming charges or roaming minutes may not be included in your estimate. Credits and
adjustments to your account may not appear until your next billing statement, and may not be
reflected in your current balance. Payments are applied to your account on the same day they are
made.
48
Page 54

Connected Devices
Connected Devices allows you to view and edit Wi-Fi enabled devices currently connected to your
Jetpack network, as well as any devices currently blocked.
NOTE An audio alert automatically sounds whenever a device connects to your Jetpack Wi-Fi network.
On the Jetpack Display
➊ To display Wi-Fi enabled devices currently connected to or blocked from your Jetpack, use
the navigation button to scroll to the Devices icon and press the select button.
➋ Select the Wi-Fi Devices option to display the type, name, DNS and MAC details for each
device connected to the Jetpack Network, and to block or unblock each device.
➌ Select the Blocked Devices option to display the type, name, DNS and MAC details for each
blocked device, and to unblock any of the blocked devices.
➍ Select the USB Tethering option to display the type, name, DNS and MAC details for a
tethered device, and to block or unblock this device.
➎ Press/hold the select button to close the Connected Devices screen and return to the Home
screen.
Connected Devices Option Select Wi-Fi Devices Option Connected Device Detail Exit Connected Devices
49
Page 55

On the Jetpack Admin Website
The Connected Devices page allows you to view and edit devices that are currently connected to
your Jetpack. You can also view and unblock any blocked devices. The Connected Devices page
contains the following:
• Connected Devices — Displays the IP Address, MAC Address and Link Local of up to 15
connected devices.
• Blocked Devices — Displays any blocked devices.
Jetpack Connected Devices
Connected Devices
The Connected Devices menu contains the following options:
• Name — Normally, this is the hostname of the connected device, as set on the connected
device. If you have used this interface to assign a name to a connected device, the assigned
name displays in place of the hostname. In rare cases, the hostname may be unavailable. You
can use the Edit option to change the name of any connected device.
• Type — The rst column indicates the type of connected device. You can use the Edit option
to set or change the type. If the type has not been set, no icon is displayed. Once you set the
device type, an appropriate icon is displayed.
• IP Address — The IP address of the connected device.
• MAC Address — The MAC Address is a unique network identier for this connected device.
• Link-Local — If the connected device supports IPv6, the Link-Local IPv6 address is displayed.
• Edit — Allows you to edit a connected device type or name.
• Block — Allows you to prevent a specic device from connecting to the Jetpack.
50
Page 56

Edit a Connected Device
To edit a connected device:
➊ Click the pencil tool. A page opens allowing you to edit a connected device.
Jetpack Connected Devices - Edit
➋ Select the appropriate change from the Connected Devices dropdown menu.
Jetpack Connected Devices - Select Device Type
➌ Click Save to nish editing the device.
Jetpack Connected Devices - Accept Changes
51
Page 57

Change the Maximum Number of Connected Devices
To change the maximum number of connected devices:
➊ Click Change Max Connections on the Connected Devices page.
Change Maximum Number of Connected Devices
➋ The Jetpack Settings Wi-Fi page opens. Select the number of devices from the Maximum
Wi-Fi connected devices dropdown menu.
➌ Click Save Changes.
Change Maximum Number of Connected Devices
52
Page 58

Blocked Devices
The Blocked Devices menu contains the following menu options:
• Block Button — Click Block to disconnect a connected device and prevent it from
reconnecting. The blocked device then appears in the Blocked List. This option is available for
use with each connected device, except for your own device, and any device connected via
USB.
Jetpack Connected Devices - Block
• Blocked List — This lists any devices you have blocked. Note that since these devices are
not currently connected, and are blocked from connecting, they do not have an IP address.
Instead, they are identied by their name and MAC address.
Jetpack Connected Devices - Blocked List
53
Page 59

• Unblock Button — Click Unblock to unblock a previously blocked device, freeing it to
connect again. The unblocked device is deleted from the Blocked List, and will reappear in
the Connected Devices list when it connects.
Jetpack Connected Devices - Unblock
54
Page 60

Jetpack Settings
Jetpack Settings allow you to make device changes such as screen brightness and audio ON/OFF,
and to select mobile network options for your Jetpack.
On the Jetpack Display
Wi-Fi
➊ On the Home screen, navigate to the Settings icon and press the select button to open the
Settings select screen and display Settings options.
➋ Navigate to the Wi-Fi option and press the select button to display the Wi-Fi settings options.
The settings options include: Wi-Fi Turn On/Turn O, and Band 2.4 GHz/5GHz.
➌ Select the desired Wi-Fi setting, and press select to save the setting and return to the
Settings select screen.
➍ Navigate to the Exit option, or press/hold the select button to return to the Home screen.
Settings Option Wi-Fi Settings Change Wi-Fi Band
Screen Timeout
➊ On the Home screen, navigate to the Settings icon and press the select button to open the
Settings select screen and display Settings options.
➋ Navigate to the Screen Timeout option and press the select button to display the Screen
Timeout settings options. The settings options include: after 30 seconds, after 1 minute,
after 2 minutes, after 5 minutes, after 10 minutes, and never. The current setting will be
selected when the screen is displayed.
➌ Select the desired Screen Timeout setting, and press select to save the setting and return to
the Settings select screen.
55
Page 61

➍ Navigate to the Exit option, or press/hold the select button to return to the Home screen.
Settings Option Select Screen Timeout Set Screen Timeout
Audio On/Off
➊ On the Home screen, navigate to the Settings icon and press the select button to open the
Settings select screen and display Settings options.
➋ Navigate to the Audio On/O option and press the select button to display the Audio On/O
settings options. The settings options are Turn On and Turn O. Setting Turn O will disable
all audio on the Jetpack.
➌ Select the desired Audio On/O setting, and navigate down to Back, then press the select
button to save the setting and return to the Settings select screen.
➍ Navigate to the Exit option, or press/hold the select button to return to the Home screen.
Settings Option Select Audio On/O Set Audio On/O
Audio Alerts
➊ On the Home screen, navigate to the Settings icon and press the select button to open the
Settings Select screen and display Settings options.
➋ Navigate to the Audio Alerts option and press the select button to display the Audio Alerts
settings options. Alert settings include Alert Information, Startup/Shutdown, Low battery,
Critical low battery, Charging Jetpack, Charging complete, External charging, USB mode, SIM
errors, New message, Software Update, Roaming, Wi-Fi turned o, Network selection, and
Back. The current settings are displayed for each alert.
➌ Select the desired setting for each alert, and press the Turn On/Turn O to save the setting.
56
Page 62

➍ Navigate to the Back option to return to the Settings options, or press/hold the select button
to return to the Home screen.
Settings Option Select Audio Alerts Set Audio Alerts
Network Technology
➊ On the Home screen, navigate to the Settings icon and press the select button to open the
Settings Select screen and display Settings options.
➋ Navigate to the Network Technology option and press the select button to display the
Network Technology screen with the available technology options.
➌ Navigate to the desired technology option and press the select button.
➍ Navigate to the Back option and press the select button to return to the Settings options, or
press/hold the select button to return to the Home screen.
Settings Option Select Network Technology Set Network Technology
57
Page 63

On the Jetpack Admin Website
The Jetpack Settings page allows you to make administration password and preference changes;
obtain software update information; backup and restore les to your Jetpack; and set GPS
preferences. The Jetpack Settings page contains the following sections:
• Wi-Fi (See Wi-Fi on page 59.)
• Jetpack (See Jetpack on page 61.)
• Advanced (See Advanced on page 70.)
Jetpack Wi-Fi Settings
58
Page 64

Wi-Fi
The Wi-Fi section allows you to enable Wi-Fi devices to connect to the Jetpack Wi-Fi network, to
change the Basic Wi-Fi Settings including Wi-Fi Name/Password, to select 2.4 GHx and 5 GHz Band
Settings, and to turn ON/OFF Wi-Fi Options.
Change Wi-Fi Name and Password
59
Page 65

To change the Band Settings:
➊ Select the desired Band Setting from the drop down menu. The choices are Dual band
(2.4 GHz/5 GHz), 2.4 GHz only, and 5 GHz only.
➋ Select the Bandwidth, 802.11 Mode, and Channel from the drop down menus
Change Band Settings
To turn ON/OFF Wi-Fi Options:
➊ To turn on an option, click the option checkbox to display the check mark. To turn o an
option, click the option checkbox to remove the check mark.
➋ Click Save Changes to nalize and accept the new settings.
Turn ON/OFF Wi-Fi Options
60
Page 66

Jetpack
The Jetpack section allows you to change the Jetpack Admin Password, select device preferences,
check current software version and check for updates, backup your Jetpack settings, and set GPS
preferences. The Jetpack Settings Jetpack section contains the following menu options:
• Jetpack Admin Password (See Jetpack Admin Password on page 62.)
• Preferences (See Preferences on page 64.)
• Software Update (See Software Update on page 65.)
• Backup and Restore (See Backup and Restore on page 66.)
• GPS (See GPS on page 68.)
Jetpack Settings - Jetpack Admin Password
61
Page 67

Jetpack Admin Password
The Jetpack Admin Password page allows you to display, hide and/or change the Admin Password.
Display or Hide the Admin Password
Slide the ON/OFF button to ON to display the Jetpack Admin Password on the device or OFF to hide
the Jetpack Admin Password on the device.
Change Jetpack Admin Password
Change the Admin Password
To change your Admin Password:
➊ Type your current password in the Current Admin Password eld. Select Continue to display
the Change Jetpack Admin Password screen.
➋ Type your new password in the New Admin Password eld.
➌ Type your new password a second time in the Confirm new Admin Password eld.
➍ Select a security question from the dropdown menu options.
➎ Type the answer to the selected security question in the Answer security question eld.
62
Page 68

➏ Click Save Changes to save any changes made to your password.
Save Changes to Jetpack Admin Password
63
Page 69

Preferences
The Preferences page contains the following options:
• Allow Settings Changes — Turn on to allow settings to be changed from the Jetpack display.
• Universal Charging — Use this feature to charge your cellphone or similar device.
• Device Preferences — Allows you to set the behaviour of the Jetpack.
• Notifications — Allows you to turn ON/OFF listed notications.
• User Preferences — Allows you to customize the date, time, distance and number formats.
Jetpack Settings - Jetpack Preferences
64
Page 70

Software Update
The Software Update page contains the following sections:
• Current software version— Displays information for the current software version, date of last
check for updates and the number of updates currently available.
• Checked for update — Displays the date of the last software update.
• Update available — Displays the software update history.
Jetpack Settings - Software Update
65
Page 71

Backup and Restore
The Backup and Restore page contains the following sections:
• Backup — Allows you to save your Jetpack settings to your computer. You must enter your
Admin Password in the Admin Password eld and click Download to save settings to your
computer.
• Restore — Allows you to upload a previously saved backup le from your computer to your
Jetpack. Click Browse and select a le, then enter the Admin Password in eect when the
backup le was saved in the Admin Password eld and click Restore Now.
• Restore to Factory Defaults — Allows you to restore all settings on your Jetpack to the
factory default values. Click Restore Factory Defaults to restore all such settings. If prompted
for a password, use the default Admin Password which is admin.
• Restart Jetpack — Use to restart your Jetpack.
• Shutdown Jetpack — Use to shutdown your Jetpack.
Jetpack Settings - Jetpack Backup and Restore
66
Page 72

To save your Jetpack settings to your computer:
➊ Enter your Admin Password in the Admin Password eld.
➋ Click Download to save your current Jetpack settings to a designated location on your
computer.
Download Current Jetpack Settings
To restore a previous version of your Jetpack settings to your Jetpack device:
➊ Click Browse to navigate to the desired settings backup le saved on your computer.
➋ Enter the Admin Password in eect when the backup le was saved in the Admin Password
eld.
➌ Click Restore Now.
Restore Previous Jetpack Settings
To restore all settings on your Jetpack to factory default settings:
➊ Click Restore Factory Defaults.
➋ If prompted for a password, enter the default Admin Password admin.
Restore Factory Defaults
67
Page 73

GPS
The GPS page contains the following sections:
• GPS ON/OFF — Use this control to turn ON/OFF the GPS feature.
• Turn off — Allows you to set when the GPS receiver will turn o, once it is on.
• GPS over Wi-Fi (NMEA) — Allows you to download and install the GPS over Wi-Fi driver for
your computing platform.
Jetpack Settings - Jetpack GPS
To turn GPS ON:
➊ Slide the ON/OFF button to ON.
➋ Select the desired turn o option from the drop down menu. The choices are Turn off on
power down or Always on.
Jetpack Settings - Jetpack GPS Turn ON
68
Page 74

To activate GPS over Wi-Fi (NMEA):
➊ Click GPS over Wi-Fi (NMEA).
➋ Click the Turn ON GPS over Wi-Fi checkbox.
➌ Click Download GPS over Wi-Fi Drivers and select the appropriate driver from the list of
available drivers. Save the driver to the desired location on your computer.
➍ Open the driver .exe le and follow the installation instructions.
Click Save Changes to nalize and accept the new GPS settings.
Jetpack Settings - Jetpack GPS download GPS over Wi-Fi Drivers
69
Page 75

Advanced
The Advanced section allows you to change the Jetpack advanced settings. The Advanced page
provides network, manual DNS, SIM, rewall, MAC lter and LAN settings, as well as options for
conguring port ltering and forwarding applications.
IMPORTANT! Changing the Jetpack's Advanced settings can adversely aect stability,
performance and security of the Jetpack.
Jetpack Settings - Advanced Settings Warning
Click Continue on the Advanced page to access Advanced page options.
70
Page 76

The Advanced page contains the following menu options:
• Networks (See Networks on page 72.)
• Manual DNS (See Manual DNS on page 74.)
• SIM (See SIM on page 75.)
• Firewall (See Firewall on page 76.)
• MAC Filter (See MAC Filter on page 77.)
• LAN (See LAN on page 78.)
• Port Filtering (See Port Filtering on page 79.)
• Port Forwarding (See Port Forwarding on page 82.)
Jetpack Settings Advanced - Networks
71
Page 77

Networks
The Networks menu contains the following sections:
• Cellular Data — Allows you to turn o cellular data to prevent all internet trac from using
the Jetpack mobile broadband connection.
• Preferred network technology — Allows you to select the network technologies whivh
will be used. The choices are Global, LTE only, CDMA only, and LTE/UMTS/GSM.
• Content Delivery Optimization (CDO) — Provides better download performance for a
single user.
• Show Advanced Settings — Click to display or change the following:
» 4G LTE APN — Displays the network carrier APN
» GSM/UMTS/HSPA APN — Use only when a non-Verizon SIM is inserted.
• Save Changes — Use to activate and save new settings.
•
Jetpack Settings Advanced Networks - Cellular Data ON
72
Page 78

To turn o cellular data and prevent all internet trac from using the Jetpack mobile broadband
connection:
➊ Slide the Cellular Data ON/OFF button to OFF.
➋ Click Confirm on the Conrm warning pop-up window.
NOTE All internet connections will be immediately terminated when you click Confirm.
➌ Click Save Changes to accept and nalize the new Advanced Networks settings.
Turn Cellular Data OFF Conrmation
To change your preferred network technology:
➊ Select the desired network technology from the dropdown menu. Choose from Global,
LTEonly, CDMA only, and LTE/UMTS/GSM.
➋ Click Save Changes to accept and nalize the revised preferred network setting.
To turn on Content Delivery Optimization for better download performance for a single user:
➊ Click the Content Delivery Optimization checkbox.
➋ Click Save Changes to accept and nalize the revised CDO setting.
To display or change the Networks Advanced Settings:
➊ Click Show Advanced Settings. The 4G LTE APN displays the pre-congured APN and should
not be changed unless you have a corporate account with your own APN.
➋ If you are using a non-Verizon SIM, enter the APN in the GSM/UMTS/HSPA APN eld.
73
Page 79

Manual DNS
The Jetpack automatically selects a Domain Name Server (DNS). The Manual DNS menu allows you
to manually select up to two DNS IP addresses.
Jetpack Settings Advanced - Manual DNS
To manually select a Domain Name Server:
➊ Click the box next to Enable manual DNS.
➋ Enter the IP address for the rst DNS in the DNS 1 IP address eld.
➌ Enter the IP address for the second DNS in the DNS 2 IP address eld, if applicable.
➍ Click Save Changes.
74
Page 80

SIM
The SIM menu gives you settings and information about the Jetpack's Subscriber Identity Module
(SIM) card. The SIM card inside your Jetpack can be locked with a PIN code for additional security. If
locked, the PIN code must be entered before the Jetpack can connect to the Internet. The SIM menu
takes you to the SIM page. The SIM menu has the following options:
• SIM PIN Lock feature — Indicates whether or not the PIN lock feature is in use. If ON, the PIN
lock has been turned on, and the SIM PIN must be entered in order to connect to the mobile
network. If OFF, the PIN lock feature is not turned on, and the SIM PIN is not required.
• SIM status — Indicates the current status of the SIM card. Possible values include:
• Ready — This is the normal state. The SIM PIN is not used.
• PIN Locked — The SIM PIN must be entered before you can use the mobile network.
• PUK Locked — The PUK for the SIM must be entered in order to continue. The PUK can be
obtained from your service provider.
• Unlocked — The SIM PIN is needed, but has already been entered.
• No SIM — No SIM was detected. If you do have a SIM, check that it is inserted correctly.
• SIM Error — A SIM was detected, but it did not respond as expected, and cannot be used.
• Desired action — Allows you to turn the PIN lock feature ON/OFF.
• Enter current PIN — Type the desired PIN in the Enter current PIN eld. The default PIN is
• Save Changes — Use to activate and save new settings.
1111.
Jetpack Settings Advanced - SIM
IMPORTANT! Entering an incorrect PIN will lock the SIM. The default PIN is 1111.
75
Page 81

Firewall
The Jetpack rewall determines which Internet trac is allowed. The Firewall menu contains the
following sections:
• VPN Passthrough — Turns ON/OFF the VPN feature and allows or disallows connected
devices to establish a VPN tunnel.
• If ON, this feature allows VPN clients to connect through the Jetpack to remote VPN
Servers. Normally, this option should be turned on.
• If OFF, VPN clients are not allowed to connect.
• IPv6 Transparent Mode — Allows connected devices to be accessible from the Internet.
• DMZ (IPv4) — Allows the connected device specied as the DMZ IP address to receive all
trac which would otherwise be blocked by the rewall.
• DMZ (checkbox) — Use the checkbox to turn ON/OFF the DMZ feature.
• DMZ IP Address — Enter the IP address of the connected device you wish to become the
DMZ device.
• Save Changes — Use to activate and save new settings.
Jetpack Settings Advanced - Firewall
76
Page 82

MAC Filter
The MAC Filter allows you to specify which devices can access the Jetpack Wi-Fi network.
ON/OFF — Turns the MAC Filter ON/OFF. Before turning on, ensure that the Allowed Devices list is
not empty. When turning on, any Connected Device which is not in the Allowed Devices list will
immediately be disconnected.
• Refresh — Use to refresh the screen and delete any unsaved changes.
• Add Device — Use to add a new device to the devices list.
• Save Changes — Use to activate and save new settings.
Jetpack Settings Advanced - MAC Filter
To add a device to the device list:
➊ Click Add Device and enter the device name in the Name eld.
➋ Select the device type from the Type dropdown menu.
➌ Enter the MAC Address in the MAC Address eld.
➍ Mark the Blocked and/or MAC Address Filter check box as required.
➎ Click Save Changes to activate and save the settings.
77
Page 83

LAN
The LAN page gives you settings and information about the Jetpack's network. The LAN menu
contains the following sections:
• IPv4
• IP address — The IP address for the Jetpack.
• Subnet mask — The subnet mask network setting for the Jetpack. The default value
255.255.255.0 is standard for small (class "C") networks. If you change the LAN IP Address,
ensure you use the correct Subnet Mask for the IP address range containing the LAN IP
address.
• MAC address — The Media Access Controller (MAC) or physical address for the Jetpack.
• Turn On DHCP server — The Turn On DHCP Server checkbox enables or disables the DHCP
Server feature. Normally this should be left turned on.
• Start DHCP address range at — The start range of IP addresses reserved for use by the
Jetpack's DHCP server table.
• DHCP address range — The current range of IP addresses reserved for use by Jetpack's
DHCP server table. If a device with a static IP address wants to connect to MiFi6620L's
network, the static IP should be outside of the DHCP address range. Most devices do not
have a static IP.
• DHCP lease time — Use todetermine how often connected devices must renew the IP
address assigned to them by the DHCP server. Normally this is left at the default value,
but if you have special requirements you can change the value.
• IPv6
• Enable IPv6 — The Enable IPv6 checkbox turns ON/OFF the IPv6 feature.
• Link-Local address — Displays the local address when IPv6 is turned on.
• Save Changes — Use to activate and save new settings.
78
Page 84

Jetpack Settings Advanced - LAN
Port Filtering
Port Filtering allows you to block outgoing Internet connections and permit only allowed
applications to access the Internet. You can also customize a list of allowed applications which
permits only certain programs to connect to the Internet.
Slide the ON/OFF button to ON to turn on Port Filtering. When the feature is turned on you must
select a port ltering application in the Applications list to allow that application to connect to
the Internet. For example, if you select VPN in the Applications list but do not select HTTP, you can
connect to a VPN server but you cannot connect to a web page using your Internet browser.
The Port Filtering menu contains the following sections:
• Applications — Turn on each port ltering application that needs to be able to access the
Internet by checking the box next to one or more applications. When port ltering is turned
on, all other applications are blocked.
• Custom Applications — You can dene your own applications, and then turn them ON/
OFF as needed. To dene an application, you need to know the outgoing ports used by the
application.
• Add Custom Application — Use to dene your own applications, and then turn them on
or o as needed.
• Save Changes — Use to activate and save new settings.
79
Page 85

Jetpack Settings Advanced - Port Filtering
To select the applications you wish to allow:
➊ Mark the checkbox to the left of the application. The choices are Email (POP3, IMAP, SMTP),
FTP, HTTP, HTTPS, and Telnet.
➋ Click Add Custom Application to add a new custom application to the list of allowed
applications. You can dene and turn on custom Port Filtering applications. You need to
know details of the trac used and generated by the applications you wish to dene.
NOTE The Add Custom Application option is only available when port filtering is turned ON. You can
add up to ten custom applications.
80
Page 86

The Custom Port Filtering page uses check boxes to turn on port ltering for custom
applications. Similar to the Applications list, you must turn on custom applications so they
can connect to the Internet.
Jetpack Settings Advanced Port Filtering - Add Custom Application
➌ Enter the beginning of the range of port numbers used by outgoing trac for the custom
application being added in the Start Port eld.
➍ Enter the end of the range of port numbers in the End Port eld. If the port is a single port
instead of a range, type the same value for both the Start Port and the End Port.
➎ Select the protocol (TCP, UDP, or both) used by each port range from the Protocol dropdown
menu.
➏ Click Save Changes to activate and save any changes made to the custom applications.
➐ Select the Delete checkbox next to any custom application you wish to delete and click Save
Changes.
NOTE Click on the Port Filtering menu tab again to remove deleted custom applications from view on the screen.
81
Page 87

Port Forwarding
Port Forwarding allows incoming trac from the Internet to be forwarded to a particular computer
or device on your Wi-Fi network. Normally, the built-in rewall blocks incoming trac from the
Internet. Use Port Forwarding to allow Internet users to access any server you are running on your
computer, such as a Web, FTP, or E-mail server. For some online games, Port Forwarding must be
used in order for the games to function correctly. The Port Forwarding menu contains the following
sections:
• ON/OFF — Slide the ON/OFF button to ON to activate Port Forwarding.
• Default Applications — The IP address for the selected application. Choose from DNS, FTP,
HTTP, POP3, SMTP, SNMP Telnet and TFTP.
• Custom Applications
• Add Custom Application — Allows you to dene your own applications. Once dened,
these applications can be turned ON/OFF in the same way as pre-dened applications.
• Save Changes — Use to activate and save new settings.
Jetpack Settings Advanced - Port Forwarding
82
Page 88

Universal Charging
Universal Charging allows you to charge your phone or other device using your Jetpack. You can
also set battery charging limits, check current charging availability, and customize your device
preferences.
On the Jetpack Display
To charge your phone or other device using your Jetpack:
➊ On the Home screen, scroll to the Universal Charging icon and press the select button to
display an animation showing how to connect and charge a phone or other device using the
Universal Charging port.
➋ Select More to display charging status.
➌ Select Exit to return to the Home screen.
Universal Charging Option Instruction Animation Instruction Animation Current Charging Availability
On the Jetpack Admin Website
The Jetpack Settings Jetpack Preferences page provides many options to customize the behaviour
of your Jetpack. (See Preferences on page 64.)
83
Page 89

Wi-Fi Protected Setup (WPS)
WPS is a system that allows Wi-Fi devices to connect to a Wi-Fi network without having to manually
enter the network key, and is accessible through the Jetpack display.
On the Jetpack Display
To start Push Button WPS:
➊ On the Home screen, scroll to the WPS icon and press the select button to display WPS
Method options.
➋ Navigate to the Start Push Button option and press the select button. WPS starts and you
have 2 minutes to press the WPS button on the Wi-Fi device you want to connect to your
Jetpack to complete automatic setup.
➌ To exit the Push Button WPS option and return to the Home screen, navigate to Exit and
press the select button.
WPS Option Start Push Button Method Push Button WPS Started Exit WPS Setup
To start PIN Input WPS:
➊ On the Home screen, scroll to the WPS icon and press the select button to display WPS
Method options.
➋ Navigate to the PIN Input option and press the select button. Follow the instructions on the
screen to enter a PIN and connect the selected Wi-Fi device to your Jetpack.
➌ To exit the PIN Input WPS option and return to the Home screen, navigate to Exit and press
the select button.
WPS Option Select PIN Input Method Input PIN Exit WPS Setup
84
Page 90

On the Jetpack Admin Website
To turn on the WPS system on your Jetpack:
➊ Select Jetpack Settings > Wi-Fi Options.
➋ Mark the WPS checkbox, then click Save Changes.
Jetpack Settings Wi-Fi - Turn ON WPS
85
Page 91

Software Update
Software Update allows you to view the current software version and when the last check was made
for updates, lists available updates, and provides an update history. You can also download and
install a new update using your Jetpack device.
On the Jetpack Display
To check for a Software update:
➊ On the Home screen, scroll to the Software Update icon and press the select button to
display the current Software Version and last check for an update. Press the select button to
move to the Software Update page.
➋ Select Yes , then press the select button to check for an update. If an update is available, you
can choose to download and install the update using your Jetpack device.
➌ Press/hold the select button to return to the Home screen.
Software Update option Select Yes to Check Checking for New Version Update Status
On the Jetpack Admin Website
The Software Update page displays the current software version, and when a check is made for
updates lists available updates and provides an update history. (See Software Update on page
65.)
86
Page 92

Messages
Messages displays the number of unopened Verizon system messages sent to your Jetpack, and
allows you to read and retain or delete each message.
On the Jetpack Display
To display unread messages:
➊ On the Home screen, scroll to the Messages icon and press the select button to open the
rst unread message.
➋ To delete the message, press the select button. To retain the message, use the right scroll
button to move to the next unread message.
➌ When No More Messages displays, press the select button to exit and return to the Home
screen.
Select Messages Scroll Right to Next Message Press Select to Delete Press Select Button to Exit
87
Page 93

On the Jetpack Admin Website
The Jetpack Messages page displays all existing Verizon system messages, and allows you to delete
messages individually or all messages at one time. Unread messages are marked with a red message
icon .
Jetpack Messages
To delete existing messages:
➊ To delete one message at a time, click the garbage can icon for each message you want
to delete.
Jetpack Messages - Delete
88
Page 94

➋ To delete all messages at one time, click Delete All Messages at the bottom of the page.
Jetpack Messages - Delete All
89
Page 95

Parental Controls
Parental Controls options are available on the Jetpack Admin website, and allow you to block or
allow access to specied sites. The block/allow function can be applied to all devices or specied
devices only. The Parental Controls page includes the following sections:
• Summary (See Summary on page 90.)
• Site List (See Site List on page 90.)
• Device List (See Device List on page 93.)
Jetpack Parental Controls - Summary
Summary
The Parental Controls Summary section allows you to turns the Site List ON/OFF, and displays Site
List and Device List status information
To turn on the Site Filter and block access to specied sites, slide the ON/OFF button to ON.
Site List
The Parental Controls Site List section allows you to block access to a list of sites, or allow access only
to specied sites.
To block access to a list of sites:
➊ Select the Block List button to display a list of currently blocked sites.
➋ Click Add Website to display a new eld where you can enter the domain name of an
additional site to block. Repeat until you have entered all sites you want to block.
90
Page 96

➌ Click Save Changes to update and save the revised Block List.
Jetpack Parental Controls Site List - Block List Add
To delete a site from the Blocked List:
➊ Select the Block List button to display the current list of blocked sites.
➋ Select the Delete checkbox for the site you want to delete. To delete all blocked sites, click
Select All.
➌ Click Save Changes to delete the selected sites and save the revised Block List.
Jetpack Parental Controls Site List - Block List Delete
91
Page 97

To allow access to a specied site:
➊ Select the Allow List button to display the current list of allowed sites.
➋ Click Add Website to display a new eld where you can enter the domain name of an
additional site to allow. Repeat until you have entered all sites you want to allow.
➌ Click Save Changes to update and save the revised Allow List.
Jetpack Parental Controls Site List - Allow List Add
To delete a site from the Allow List:
➊ Select the Allow List button to display the current list of allowed sites.
➋ Select the Delete checkbox for the site you want to delete. To delete all blocked sites, click
Select All.
➌ Click Save Changes to delete the selected sites and save the revised Allow List.
Jetpack Parental Controls Site List - Allow List Delete
92
Page 98

Device List
The Parental Controls Device List section allows you to turn the Device List ON/OFF and identify
which devices will use the Site Filter.
• If the Device List is turned ON, only devices listed and selected will use the Site Filter.
Jetpack Parental Controls Device List - ON
• If the Device List is turned OFF, all devices will use the Site Filter.
Jetpack Parental Controls Device List - OFF
93
Page 99

About Jetpack
About Jetpack displays information about your Jetpack, including Internet and roaming status,
model and version, wireless and IMEI number, and battery charge level.
On the Jetpack Display
➊ On the Home screen, navigate to the About Jetpack icon and press the select button to open
the Internet Status screen and display status information, including connection, network,
technology, signal SNR and roaming.
➋ Press the select button to navigate to the Jetpack Info screen and display model number,
version, wireless number, IMEI, and battery level.
➌ Press the select button to exit the Jetpack Info screen and return to the Home screen.
About Jetpack Option Internet Connection Status Jetpack Details
94
Page 100

On the Jetpack Admin website
The About Jetpack page allows you to view detailed information about Jetpack internet status,
device specic information, diagnostics, troubleshooting and support. The About page contains the
following menu options:
• Internet Status (See Internet Status on page 95.)
• Jetpack Info (See Jetpack Info on page 97.)
• Diagnostics (See Diagnostics on page 98.)
• Logs (See Logs on page 103.)
• Jetpack Support (See Jetpack Support on page 105.)
Internet Status
The Internet Status page shows Jetpack settings and status and contains the following sections:
• Internet Status (See Internet Status on page 96.)
• IPv4 (See IPv4 on page 96.)
• IPv6 (See IPv6 on page 96.)
About Jetpack - Internet Status
95
 Loading...