

Page 1

VRC801D2 – UNIVERSAL 8-IN-1 REMOTE CONTROL WITH LEARNING FUNCTION
1. Introduction & Features
To all residents of the European Union
Important environmental information about this product
This symbol on the device or the package indicates that disposal of the device after its lifecycle could harm the
environment.
Do not dispose of the unit (or batteries) as unsorted municipal waste; it should be taken to a specialised company for
recycling.
This device should be returned to your distributor or to a local recycling service.
Respect the local environmental rules.
If in doubt, contact your local waste disposal authorities.
Thank you for buying the VRC801D2! Please read the manual thoroughly before bringing this device into service. If the device was
damaged in transit, don't install or use it and contact your dealer.
This universal remote control replaces the remote for most brands of television sets, video recorders, DVD and CD players,
radios, satellite cable TV, audio amplifiers, and other devices.
The VRC801D2 features a quick, automatic or manual code search function. In case the code has not been found, the remote
control can learn the new code. VOLUME and DEVICE can be locked to avoid unwanted modifications.
The large blue backlit LCD shows you the actual operation status. A lo-bat icon warns you when the batteries are low.
Once set up, all data (except time) will be stored in the back-up memory to avoid data loss when changing the batteries.
2. Description (fig. 1)
Key Function
SET Set up remote control
TV VCR DVB DVD
TUNER TAPE CD
AUX
AV Works like the TV/VIDEO key on your original TV
MENU Works like the MENU, OSD or MEMORY key on
CH
VOL
0 ~9 The numeral keys operate in the same way as
OK EXIT Keys work like the LEFT, RIGHT, UP, DOWN, OK
PLAY Play your CD, DVD etc.
REC Record
STOP Stop
PAUSE Pause
MUTE Instant sound muting
RED, GREEN,
YELLOW and BLUE
ALL OFF Turn all devices on or off
LEARN Set the learning function
SHOW VIEW Scan all channels for your quick view
MACRO Carry out several functions with just one press
Select the device you want to control
Turn the device ON or OFF
remote control and TV/SAT key on your original
satellite remote control
your original remote control
Channel UP and DOWN
Volume UP and DOWN
those on your original remote control. They can also
be used to enter the device codes during setup
and EXIT keys on your original remote control.
During the setup, they will be used to select, to
confirm and to exit when programming your remote
control
Works like the ENTER key on your original remote
control
Fast rewind / fast forward
Television video
TV and text mixed
Teletext mode
Page hold
Fastext
VRC801D2 VELLEMAN
- 1 -
Page 2
3. Device Setup
a. Device Code Assignment
Key on the Remote Device Initial Code Total of
TV Television set 048 488
VCR Video recorder 075 182
DVB Satellite cable DVB 075 403
DVD DVD or digital video recorder 026 190
TUNER Radio 039 114
TAPE Tape receiver 067 134
CD CD player 035 124
AUX Amplifier, LD or video CD 032 204
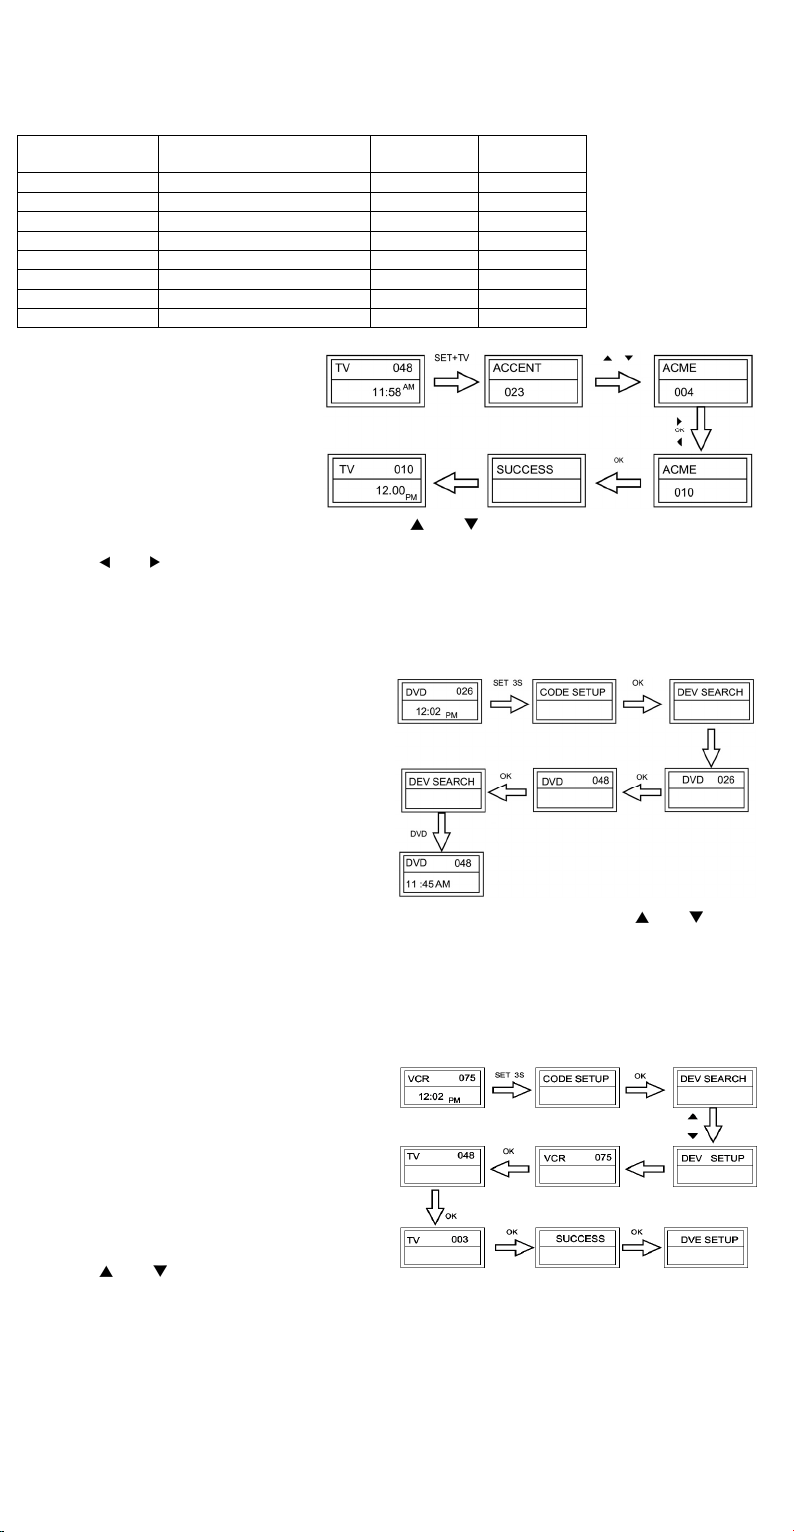
b. Direct Setup by Brand and Code
• Turn on the device (e.g. television set) you
would like to operate (insert a videotape if
it’s a VCR).
• Hold the SET key pressed on the
VRC801D2 and press the device key (in this
example: TV).
• Release both buttons. A random brand will
be displayed on the LCD. Select the correct brand by using the
or the button.
• Point the remote at the device and check the functions of the keys. If none or most of the keys work, select another code
using the
or the button.
• Press OK to confirm. SUCCES will be displayed on the LCD.
Remark: - Exit the codes by pressing the EXIT or the device key (in this example: TV).
- If the device is locked, unlock it before setup (see “5.c. Locking the Device”).
c. Setup by Auto Search
You may use the auto-search function to find the correct
code of the device.
• Turn on the device (e.g. DVD player) you would like to
operate (insert a videotape if it’s a VCR).
• Hold the SET key pressed for 3 seconds. CODE SETUP
appears on the LCD. Press OK to confirm.
• DEV SEARCH appears on the LCD. Press OK and select
the device using one of the device keys. Point the
VRC801D2 at the device and press OK. The auto-search
function starts.
• If the device reacts press a key to stop the auto-search function. You can also select a code using the
Point the remote at the device and check the functions of the keys. If none or most of the keys work, repeat the steps above.
• Press OK to confirm the code. SUCCESS will be displayed on the LCD. Now you can exit the auto-search function by
pressing the EXIT button twice or auto-search the code for another device by pressing the corresponding device key and
repeating the steps above.
Remark: - When the remote has searched through all the codes, it will stop at the first code.
- If the device is locked, unlock it before setup (see “5.c. Locking the Device”).
d. Setup by Entering a Code
• Turn on the device (e.g. television set) you would like to
operate (insert a videotape if it’s a VCR).
• Consult the code table at the back of this manual and find
the code corresponding to the brand of the device (in this
example: Lifetec: 003, 010, 062).
• Hold the SET key pressed for 3 seconds. CODE SETUP
appears on the LCD. Press OK to confirm.
• DEV SEARCH appears on the LCD. Select DEV SETUP
using the
or the button and press OK.
• Press the device key corresponding to the device you want to operate (in this example: TV) and press OK. Enter the 3-digit
code (in this example: 003 for Lifetec) and press OK to save.
• The LCD will display SUCCESS. Press EXIT twice to exit the setup mode.
• Point the remote at the device and check the functions of the keys. If none or most of the keys work, repeat the steps above
and try another code (in this example: 010 or 062).
Codes
or the button.
VRC801D2 VELLEMAN
- 2 -
Page 3
4. Learning Function
The learning function is used to supplement the pre-programmed code list. The standard code list may provide most of the
functions needed, but you can add a small number of functions for your remote control or add a new code from a remote
control not mentioned in the code list. Prepare the other remote control from which you will copy the code.
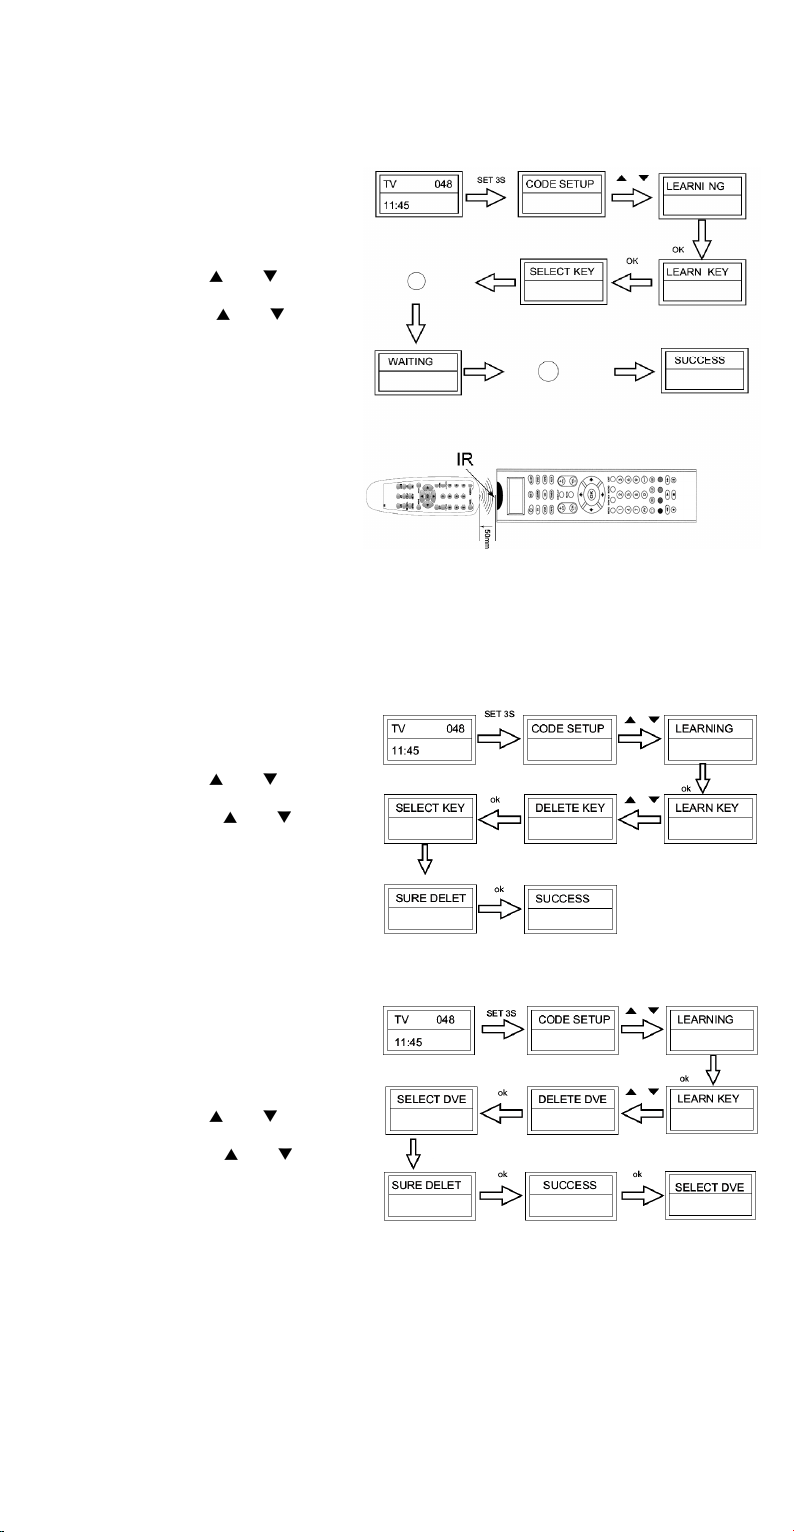
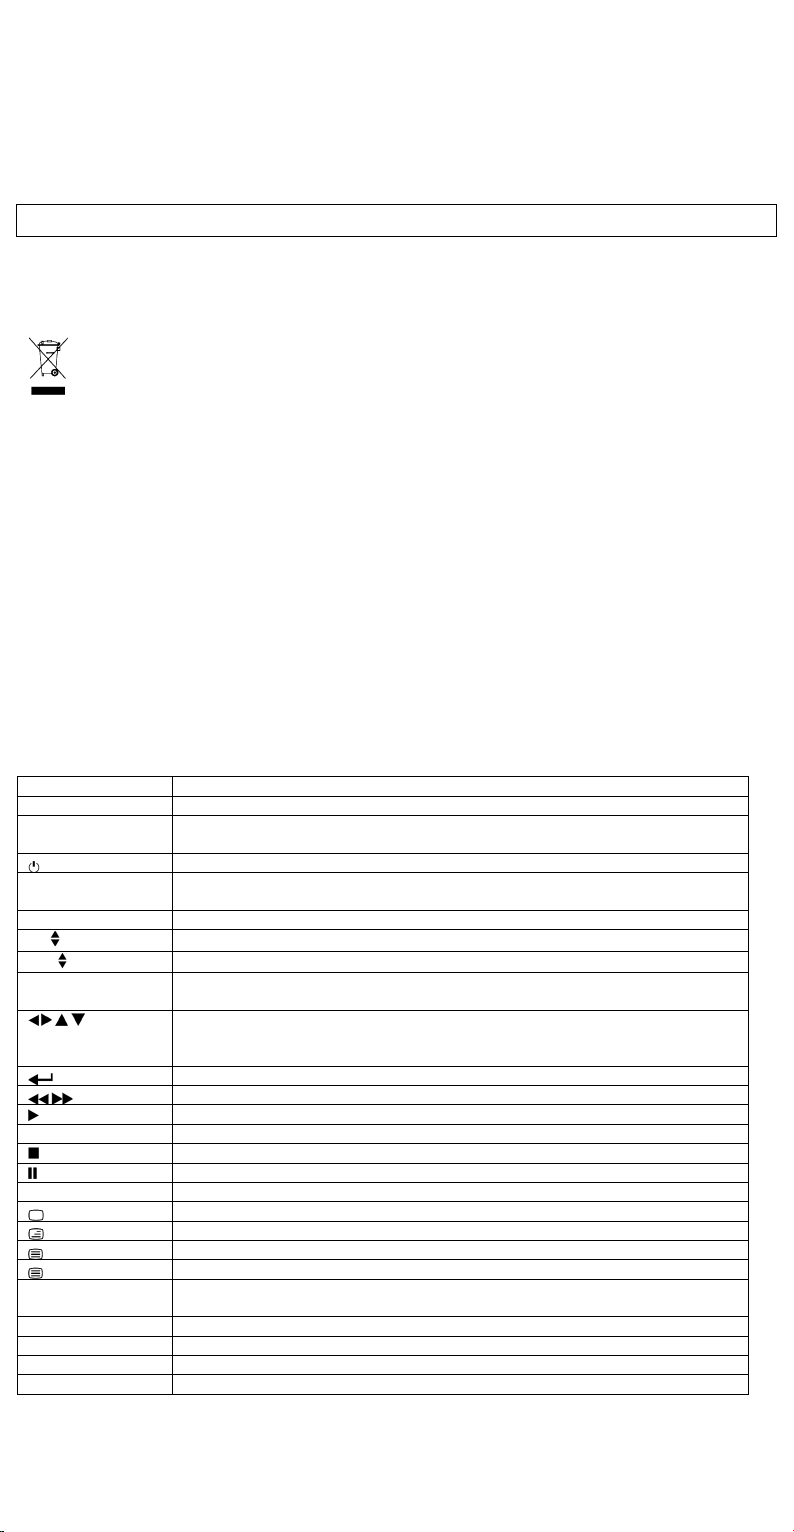
a. Learning a Command
• Press the device key you would like to learn a
command to.
• Hold the SET key pressed for 3 seconds.
• Select LEARNING using the
press OK.
• Select LEARN KEY using the
and press OK. The LCD will display SELECT KEY.
Press a device key to exit the learning mode.
• Select the target key you want to learn the
command (in this example: power) to. The LCD will
display WAITING.
• Point the IR sensor of the VRC801D2 towards the
IR sensor of the other remote control (max.
distance of 5cm).
• Hold the original key (in this example: power) on
the other remote control pressed until the LCD of
the VRC801D2 reads SUCCESS. Repeat the 3
steps above if the LCD displays FAILED or to learn
another command.
Remark: - When transferring multiple commands to the same target button, the VRC801D2 will only save the last programmed
command.
- All functions are transferable except for SHOW VIEW, MACRO, SET, LEARN and ALL OFF.
- This remote control accepts up to 100 codes for a total of 8 devices. However, it may not accept some codes.
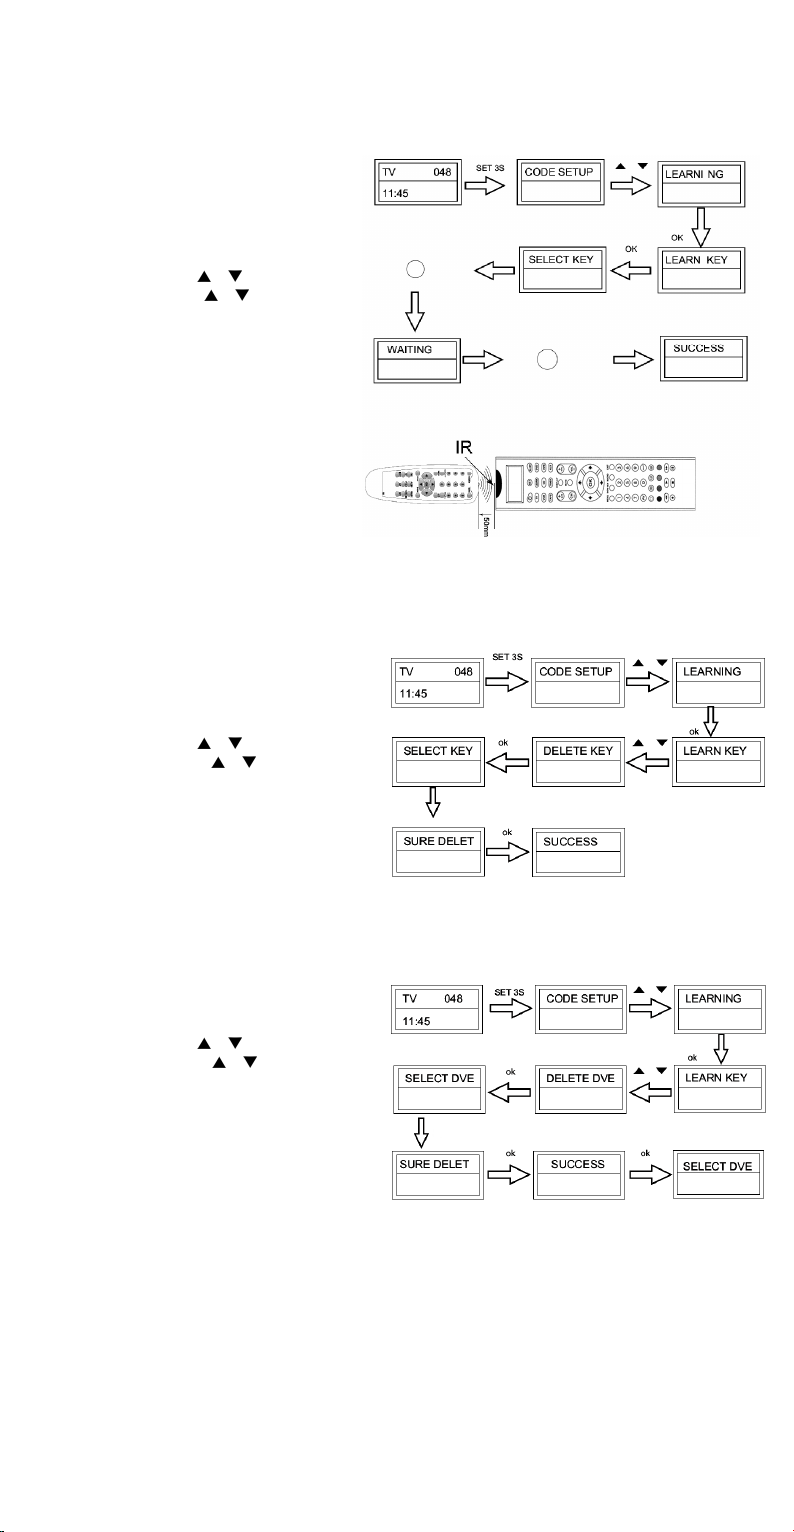
b. Deleting a Learned Command of a Device
• Press the device key if you would like to delete a
command from.
• Hold the SET key pressed for 3 seconds.
• Select LEARNING using the
press OK.
• Select DELETE KEY using the
press OK. The LCD will display SELECT KEY.
• Press the key you would like to delete. SURE DELET
will appear on the LCD. Press OK to confirm.
SUCCESS will be displayed.
• Repeat the step above for each key you would like to
delete. Press a device key to exit the delete mode.
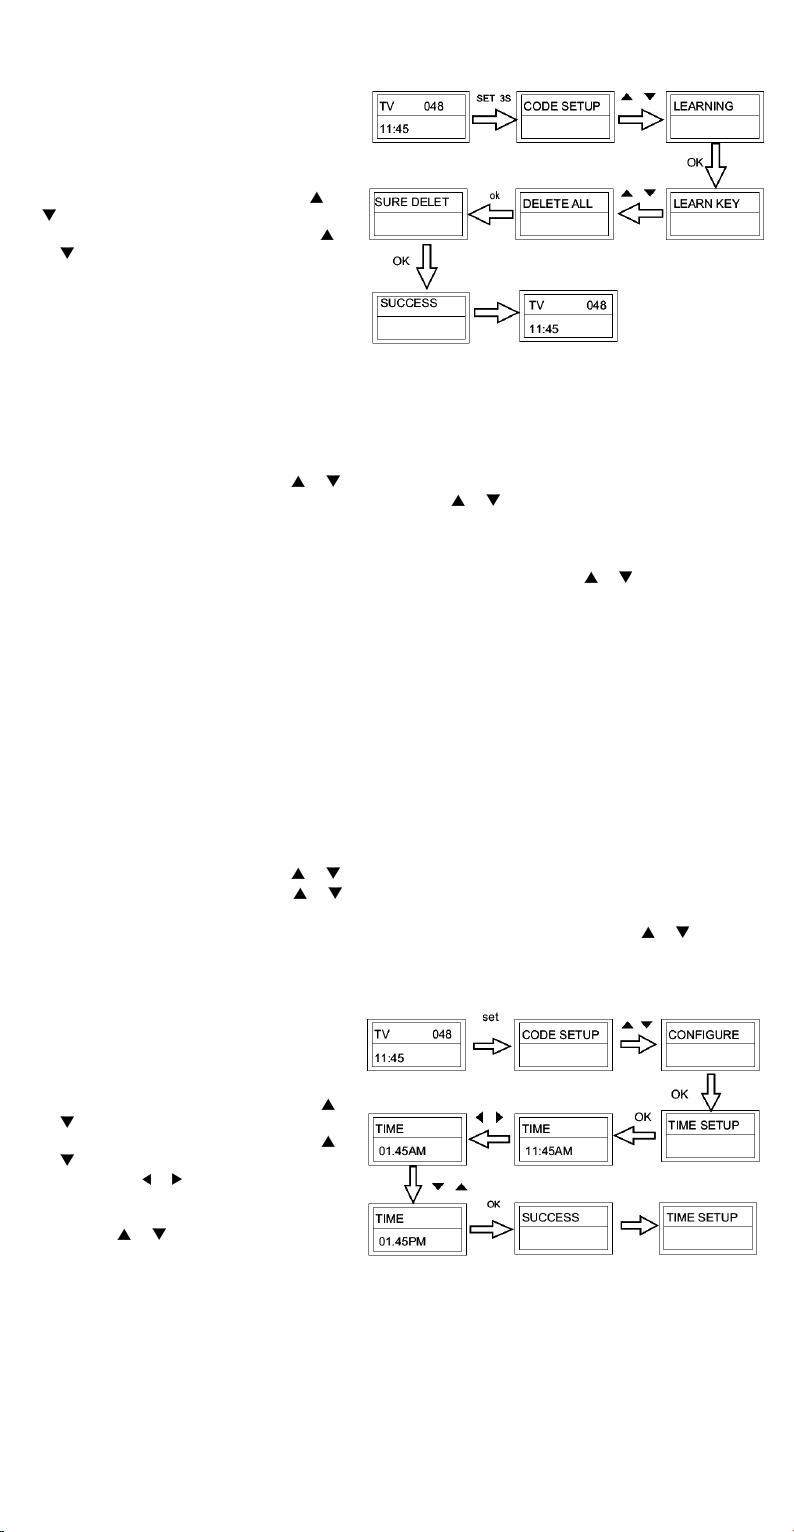
c. Deleting All Learned Commands of a Device
Use this function to delete all the commands of a device
instead of deleting all the commands one by one.
• Press the device key you would like to delete the
commands from.
• Hold the SET key pressed for 3 seconds.
• Select LEARNING using the
press OK.
• Select DELETE DEV using the
press OK. The LCD will display SELECT DEV.
• Select the device you would like to delete using the
corresponding device key. Press OK.
• SURE DELET appears on the LCD. Press OK to
confirm.
• Repeat the two steps above if you would like to delete the commands from another device.
• Press EXIT to quit.
Remark: - It will take about 3 minutes to delete all the commands in one device. If the commands are not numerous, we
suggest deleting the commands one by one.
or the button and
or the button
or the button and
or the button and
or the button and
or the button and
VRC801D2 VELLEMAN
- 3 -
Page 4
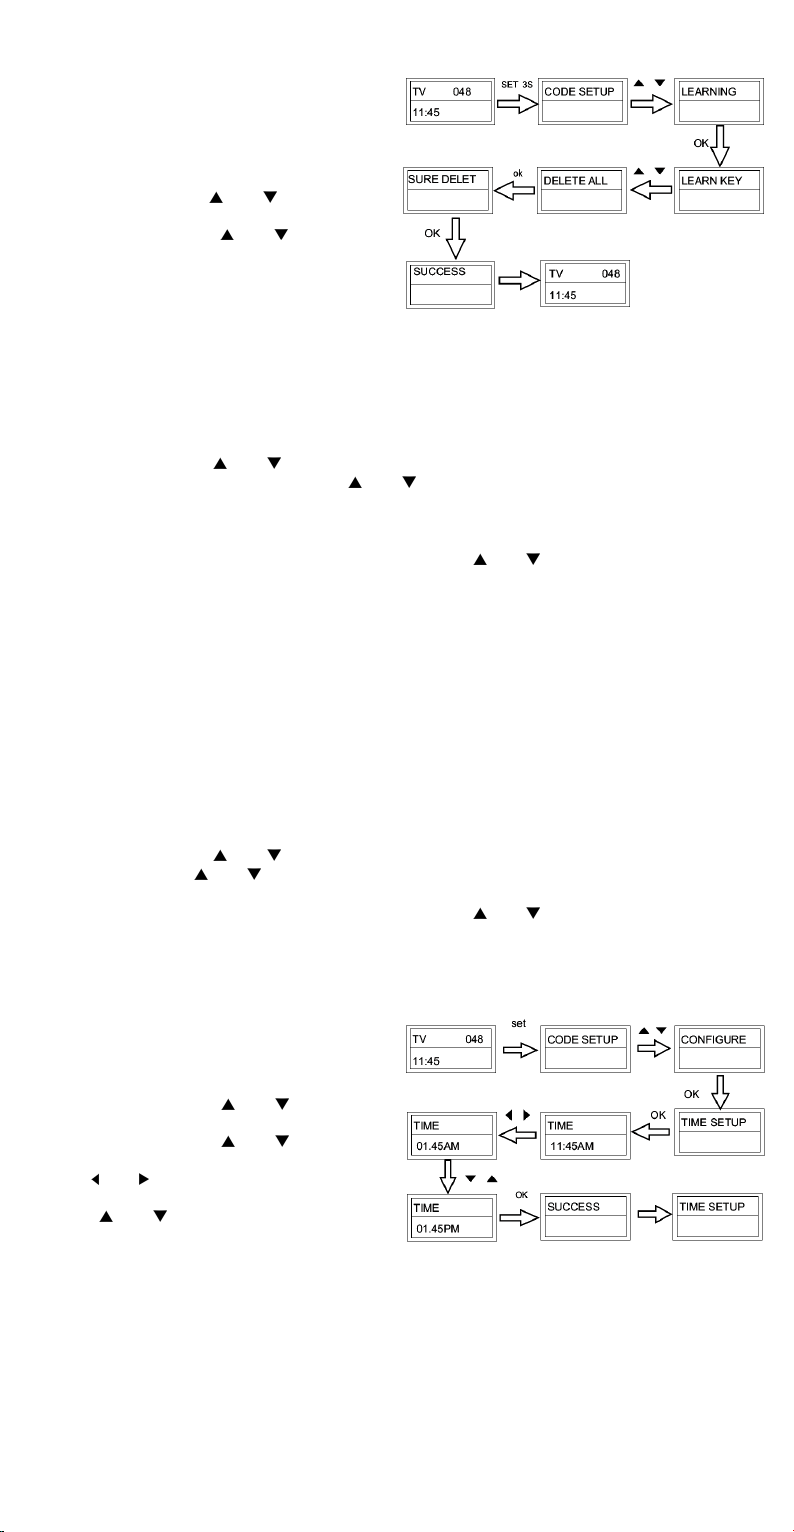
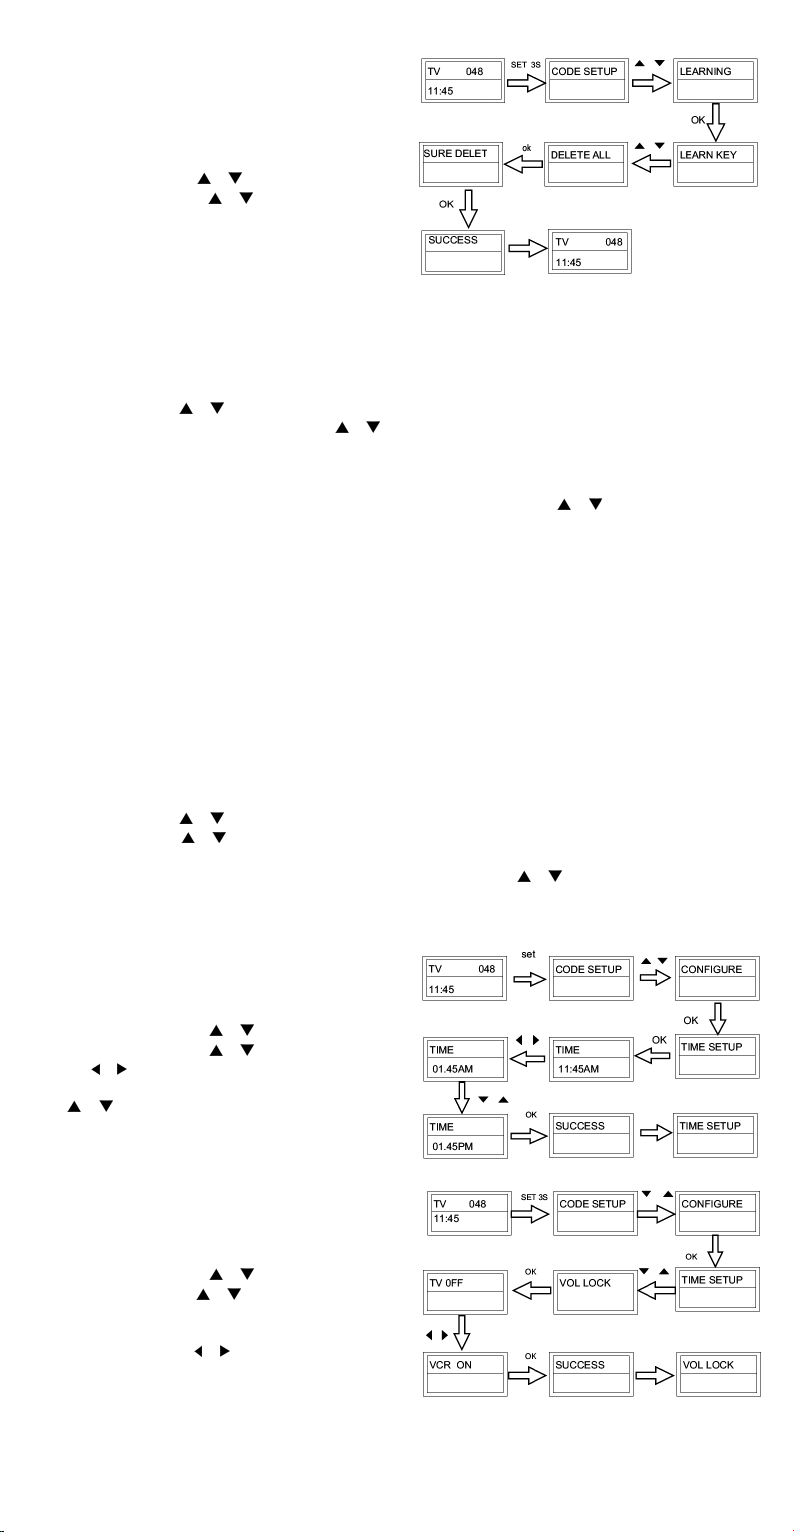
d. Deleting All Learned Commands in the Remote Control
Use this function if you would like to delete all learned
commands in the VRC801D2.
• Hold the SET key pressed for 3 seconds.
• Select LEARNING using the
OK.
• Select DELETE ALL using the
press OK.
• SURE DELET appears on the LCD. Press OK to confirm.
All the learned commands have been deleted.
or the button and press
or the button and
5. Macros
A macro is a succession of operations set into one press of a button.
a. Setting Up a Macro
• Hold the SET key pressed for 3 seconds.
• Select the MACRO using the
• Select MACRO 1, MACRO 2 or MACRO 3 using the
• SET UP appears on the LCD. Press OK to confirm.
• SELECT KEY appears on the LCD. Select a device and the function(s) you wish to set up, e.g. VCR + POWER + REC if you
wish to turn on your VCR player and start to record.
• Press OK to save the settings. SUCCESS appears on the LCD. Press the
any key to exit the mode.
Remark: - One macro can contain a maximum of 10 commands.
- Ensure that all the keys can transmit signals. Check the key function prior to setting the macro.
- Observe that a macro will only be executed under certain conditions, e.g. the VCR player must contain a cassette if
you wish to record.
b. Operating a Macro
Hold the MACRO key pressed and press 1, 2 or 3 (depending on the desired macro). The remote control will execute the
sequence of programmed functions.
c. Deleting a Macro
• Hold the SET key pressed for 3 seconds.
• Select the MACRO using the
• Select DELETE using the
• SURE DELET appears on the LCD. Press OK to confirm.
• Press OK to save the settings. SUCCESS appears on the LCD. Press the
press any key to exit the mode.
or the button and press OK.
or the button and press OK.
or the button to set another macro or press
or the button and press OK.
or the button and press OK.
or the button to delete another macro or
6. Other Functions
a. Setting Up the Clock
• Hold the SET key pressed for 3 seconds.
• Select CONFIGURE using the
press OK.
• Select TIME SETUP using the
press OK.
• Use the
• Press EXIT to quit.
or the button to select the hour, minute and
AM/PM. Set the time using the numeral keys, set AM/PM
using the
or the button. Press OK.
or the button and
or the button and
VRC801D2 VELLEMAN
- 4 -
Page 5
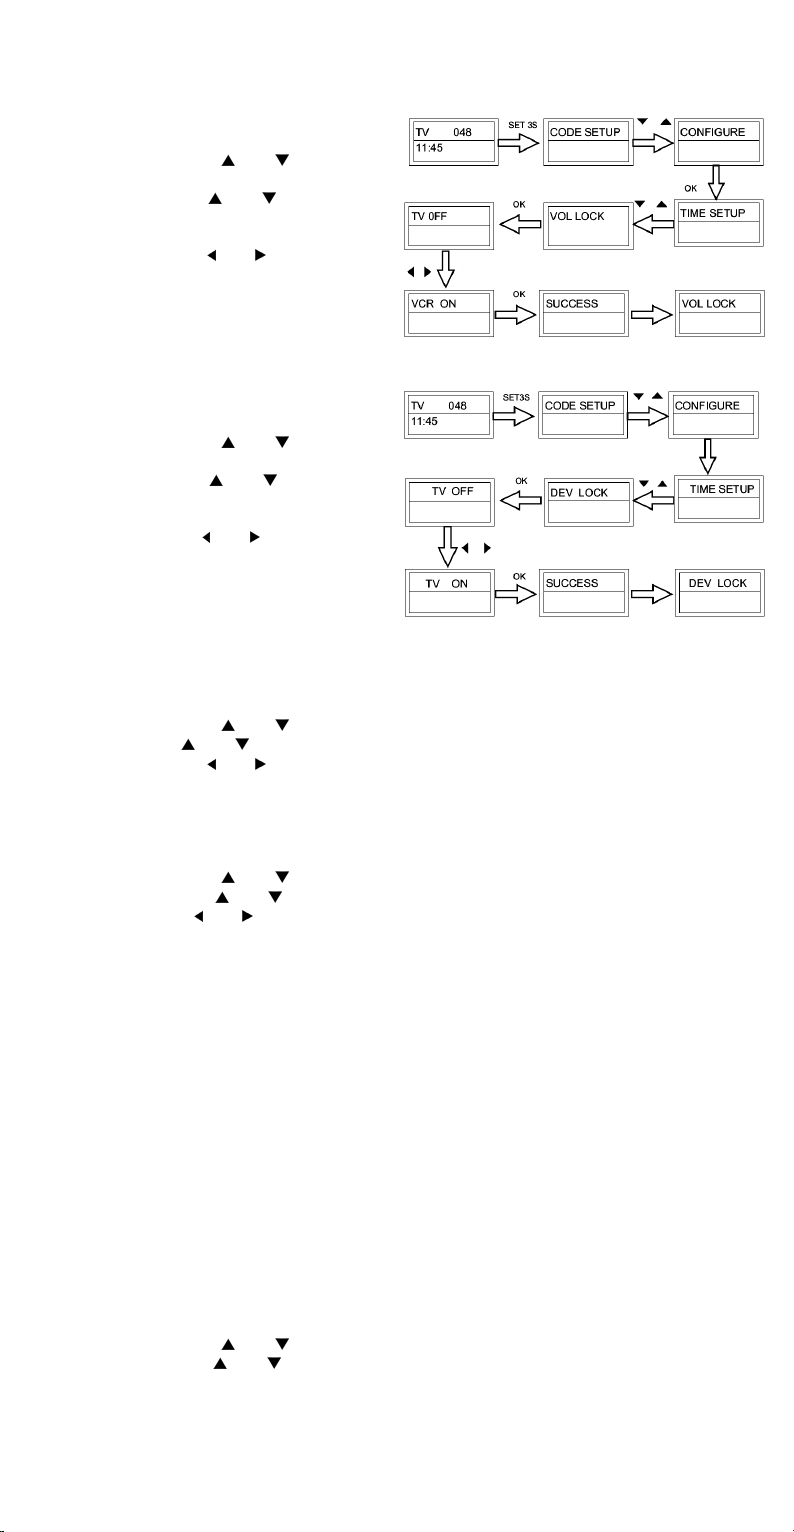
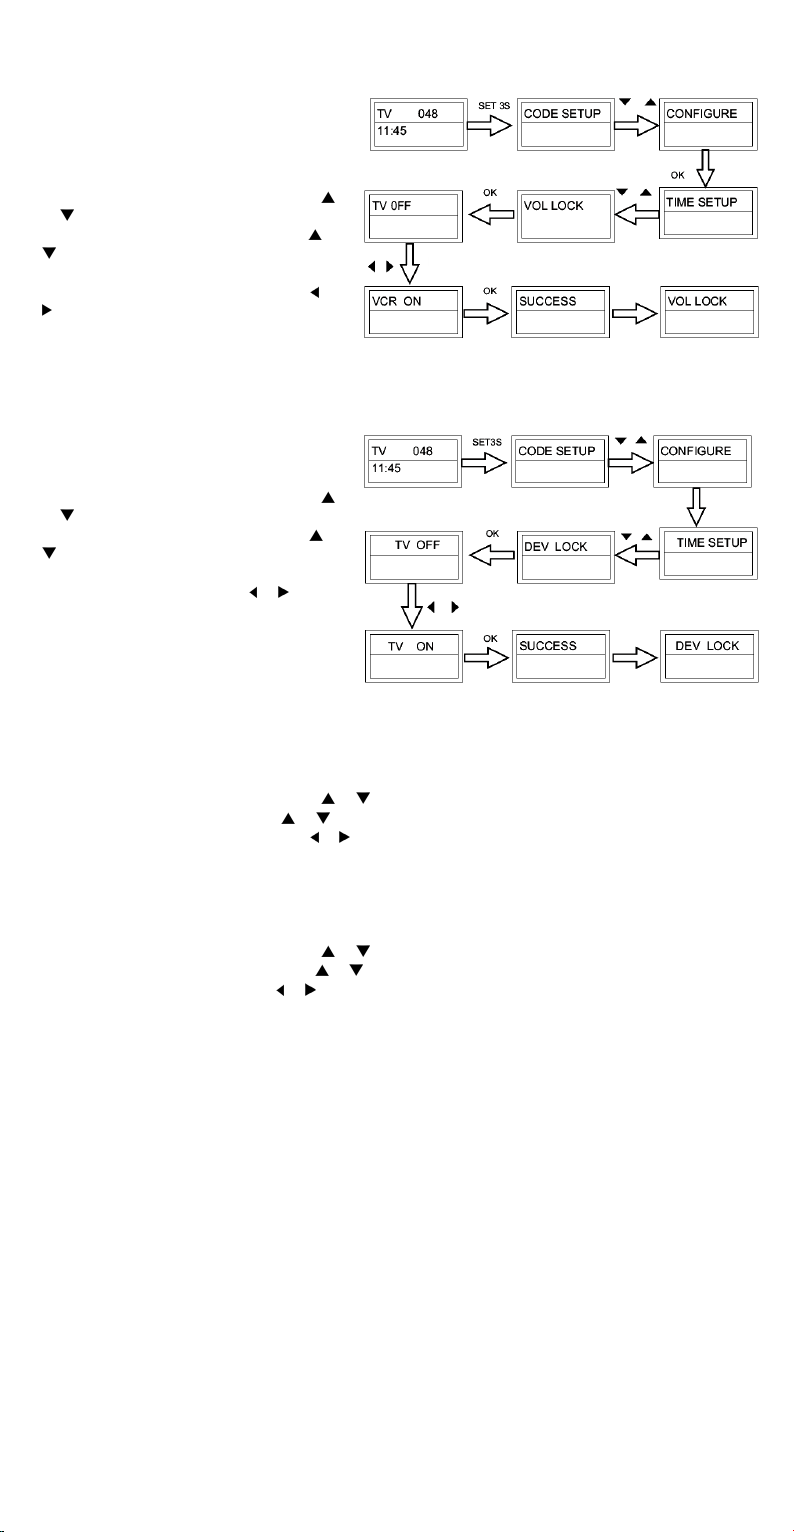
b. Locking the Volume
Enable this function when you only use one device to adjust the volume.
• Hold the SET key pressed for 3 seconds.
• Select CONFIGURE using the
or the button and
press OK.
• Select VOL LOCK using the
or the button and press
OK.
• Select the device key corresponding to the device
• Select ON or OFF using the
or the button. Press OK
to confirm.
• Press EXIT to quit.
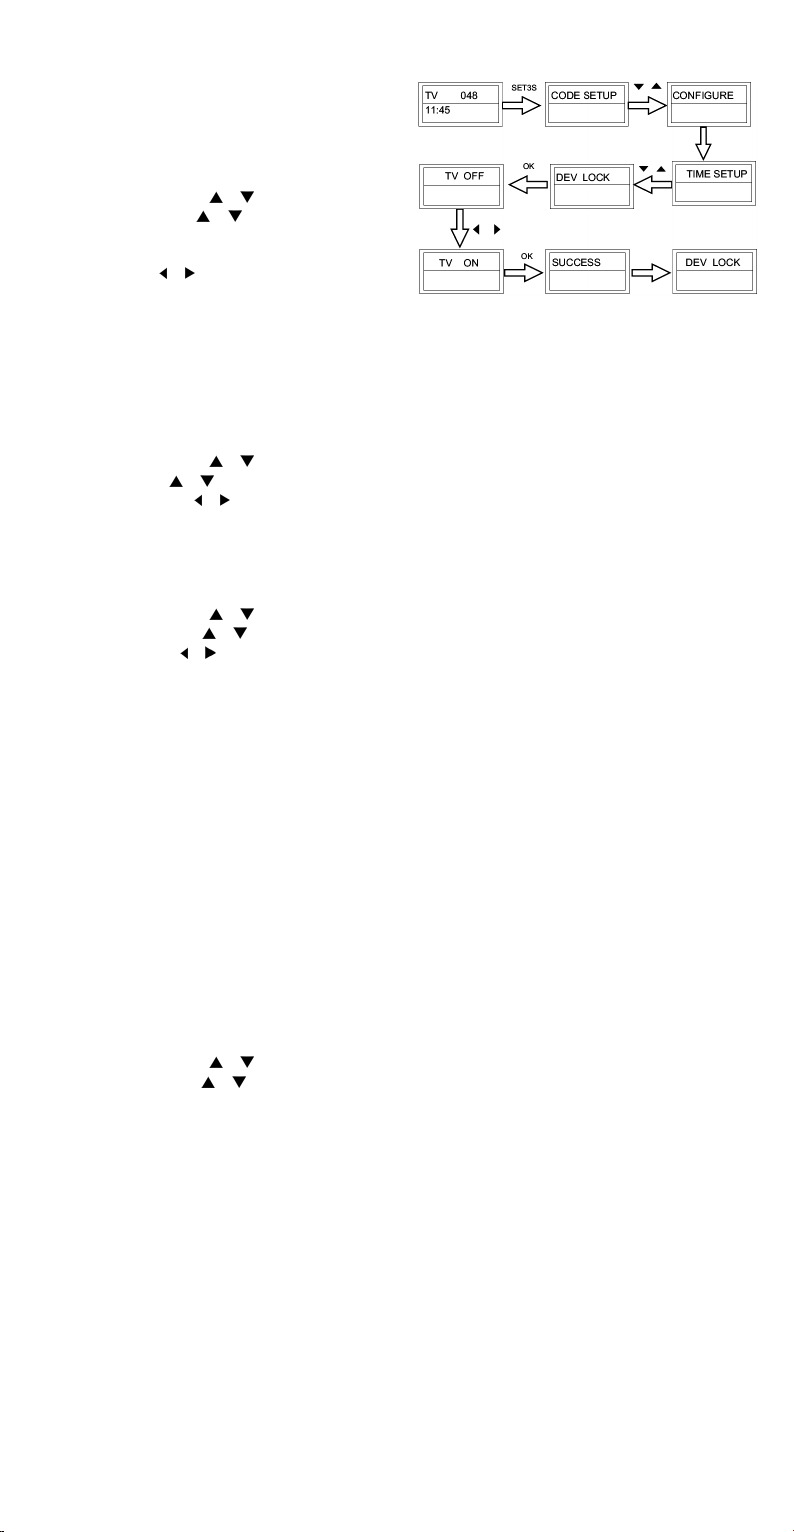
c. Locking the Device
Enable the device-lock function to lock the code of your device. This code will not be modified during an automatic code
search.
• Hold the SET key pressed for 3 seconds.
• Select CONFIGURE using the
or the button and
press OK.
• Select DEV LOCK using the
or the button and press
OK.
• Select the device using the corresponding device key.
• Modify the status using the
or the button. Press OK to
confirm.
• Repeat the 2 steps above to lock other devices if desired.
• Press EXIT to quit.
d. Backlight
When the backlight is activated, the backlight will light every time a key is pressed.
• Hold the SET key pressed for 3 seconds.
• Select CONFIGURE using the
• Select LIGHT using the
• Select ON or OFF using the
or the button and press OK.
or the button and press OK.
or the button and press OK to confirm.
• Press EXIT to quit.
e. Adjusting the Contrast of the LCD
• Hold the SET key pressed for 3 seconds.
• Select CONFIGURE using the
• Select CONTRAST using the
• Set the contrast using the
or the button and press OK.
or the button and press OK.
or the button and press OK to confirm.
• Press EXIT to quit.
f. ShowView Function
The VRC801D2 features a ShowView function with which you are able to scan all TV or CAB/SAT channels.
• Press the device key first.
• Hold the SHOW VIEW key pressed. The remote control automatically scans all channels as soon as the LED flashes.
Remark: - Point the remote control to the device during the entire operation.
- Press any key to exit the ShowView mode.
g. All Off Function
This key allows you to turn all devices on or off with a single press. Point the remote control towards the device and hold the
ALL OFF key pressed.
h. Clear All
Use this function to erase all the data and return to the factory settings.
• Hold the SET key pressed for 3 seconds.
• Select CONFIGURE using the
• Select CLEAR ALL using the
or the button and press OK.
or the button and press OK.
• SURE CLEAR appears on the LCD. Press OK to confirm. All your settings have been deleted.
VRC801D2 VELLEMAN
- 5 -
Page 6
7. Technical Specifications
Power Supply 2 x 1.5V AAA batteries (not incl.)
Dimensions 210 x 56 x 28mm
Total Weight 150g
The information in this manual is subject to change without prior notice.
VRC801D – UNIVERSELE 8-IN-1 AFSTANDSBEDIENING MET AANLEERFUNCTIE
1. Inleiding en kenmerken
Aan alle ingezetenen van de Europese Unie
Belangrijke milieu-informatie betreffende dit product
Dit symbool op het toestel of de verpakking geeft aan dat, als het na zijn levenscyclus wordt weggeworpen, dit
toestel schade kan toebrengen aan het milieu.
Gooi dit toestel (en eventuele batterijen) niet bij het gewone huishoudelijke afval; het moet bij een gespecialiseerd
bedrijf terechtkomen voor recyclage.
U moet dit toestel naar uw verdeler of naar een lokaal recyclagepunt brengen.
Respecteer de plaatselijke milieuwetgeving.
Hebt u vragen, contacteer dan de plaatselijke autoriteiten inzake verwijdering.
Dank u voor uw aankoop! Lees deze handleiding grondig voor u het toestel in gebruik neemt. Werd het toestel beschadigd
tijdens het transport, installeer het dan niet en raadpleeg uw dealer.
Deze afstandsbediening vervangt de afstandsbediening van de meeste televisietoestellen, videorecorders, dvd- en cd-spelers,
radio’s, satellietsystemen, audioversterkers en andere toestellen.
De VRC801D2 is uitgerust met een snelle, een automatische en een manuele zoekfunctie voor de code. U kunt de
afstandsbediening ook een nieuwe code aanleren. Het VOLUME en het TOESTEL kunnen worden vergrendeld tegen
ongewenste aanpassingen.
Het brede lcd-scherm met achtergrondverlichting toont de huidige stand. Een icoon wijst op zwakke batterijen.
Alle ingegeven data (uitgenomen de tijd) wordt in het geheugen van de afstandsbediening opgeslagen zodat deze niet wordt
gewist tijdens het vervangen van de batterijen.
2. Omschrijving (zie fig. 1)
Toets Functie
SET Instellen van de afstandsbediening
TV VCR DVB DVD
TUNER TAPE CD AUX
AV Dezelfde functie als de TV/VIDEO-toets op de originele afstandsbediening van uw
MENU Dezelfde functie als MENU, OSD of MEMORY op de originele afstandsbediening
CH
VOL
0 ~9 De cijfertoetsen hebben dezelfde functie als deze op de originele afstandsbediening. U kunt
OK EXIT Dezelfde functie als LINKS, RECHTS, BOVEN, BENEDEN, OK and VERLATEN op de
PLAY Start uw cd, dvd enz.
REC Opname
STOP Stop
PAUSE Pauze
MUTE Geluid uit
ROOD, GROEN,
GEEL en BLAUW
ALL OFF In- of uitschakelen van alle apparaten
LEARN Configureren van de aanleerfunctie
SHOW VIEW Scannen van alle kanalen
MACRO Macro configureren of gebruiken
Selecteren van het toestel
In- of uitschakelen van het toestel
televisietoestel of de TV/SAT-toets op de originele afstandsbediening van uw satelliet
Kanaal VERDER of TERUG
Volume MEER of MINDER
hen ook gebruiken om de code van uw toestel in te geven
originele afstandsbediening. U gebruikt deze toetsen enkel tijdens het configureren van de
afstandsbediening en om het configuratiemenu te verlaten
Dezelfde functie als de ENTER-toets op de originele afstandsbediening
Terugspoelen / doorspoelen
Video
Tekst over het beeld
Teletekst
Pagina vasthouden
Sneltoetsen teletekst
VRC801D2 VELLEMAN
- 6 -
Page 7

3. Configuratie van het toestel
a. Toewijzing van een code
Toets op de afstandsbediening Toestel Aanvangscode Totaal aantal codes
TV Televisietoestel 048 488
VCR Videorecorder 075 182
DVB DVB-toestel 075 403
DVD Dvd of digitale videorecorder 026 190
TUNER Radio 039 114
TAPE Cassettedeck 067 134
CD Cd-speler 035 124
AUX Versterker, LD of video-cd 032 204
b. Configuratie via merk en code
• Schakel het toestel in (bvb. televisietoestel) dat u wenst te bedienen (steek een videoband in de videorecorder).
• Houd SET ingedrukt op de VRC801D2 en druk op de knop van het desbetreffende toestel (hier: TV).
• Laat beide knoppen los. Er verschijnt een
willekeurig merk op het lcd-scherm.
Selecteer het correcte merk met
• Richt de afstandsbediening naar het toestel
en ga na of de meeste functies werken.
Zoniet, selecteer een andere code met
.
• Druk op OK om te bevestigen. SUCCES
verschijnt op het lcd-scherm.
Opmerking: - Verlaat de codes door op EXIT of de toets van het toestel (hier: TV) te drukken.
- Ontgrendel eerst het toestel wanneer het vergrendeld is (zie “5.c. Het toestel vergrendelen”).
c. Automatische zoekfunctie
Gebruik de automatische zoekfunctie om de code van het
toestel terug te vinden.
• Schakel het toestel in (bvb. dvd-speler) dat u wenst te
bedienen (steek een videoband in de videorecorder).
• Houd SET gedurende 3 seconden ingedrukt. CODE
SETUP verschijnt op het lcd-scherm. Druk op OK om te
bevestigen.
• DEV SEARCH verschijnt op de lcd. Druk op OK en
selecteer uw toestel op de afstandsbediening. Richt de
VRC801D2 naar het toestel en druk op OK. De automatische zoekfunctie start.
• Druk op een knop om de automatische zoekfunctie te stoppen wanneer het toestel reageert. U kunt eveneens een code
zoeken met
of . Richt de afstandsbediening naar het toestel en controleer of de functies werken. Zoniet, herhaal de
stappen hierboven.
• Druk op OK om te bevestigen. SUCCESS verschijnt op het scherm. Verlaat de automatische zoekfunctie door tweemaal op
EXIT te drukken of herhaal de stappen hierboven wanneer u de code voor een ander toestel wenst te zoeken.
Opmerking: - De afstandsbediening stopt op de eerste code wanneer deze alle codes heeft doorlopen.
- Ontgrendel eerst het toestel wanneer het vergrendeld is (zie “5.c. Het toestel vergrendelen”).
d. Ingeven van een code
• Schakel het toestel in (bvb. dvd-speler) dat u wenst te
bedienen (steek een videoband in de videorecorder).
• Raadpleeg de codetabel achteraan de handleiding en
noteer de code die met het toestel overeenstemt (hier:
Lifetec: 003, 010, 062).
• Houd SET gedurende 3 seconden ingedrukt. CODE
SETUP verschijnt op de lcd. Druk OK om te bevestigen.
• DEV SEARCH verschijnt op de lcd. Selecteer DEV SETUP
of en druk op OK.
met
• Selecteer het toestel (hier: TV) en druk op OK. Geef de 3
cijfers van de code in (hier: 003 voor Lifetec) en druk op
OK om te bewaren.
• Op de lcd verschijnt SUCCESS. Druk tweemaal op EXIT om te verlaten.
• Richt de afstandsbediening naar het toestel en ga na of de functies werken. Zoniet, herhaal de stappen hierboven en
probeer een andere code (hier: 010 of 062).
of .
of
VRC801D2 VELLEMAN
- 7 -
Page 8
4. De aanleerfunctie
Met de aanleerfunctie kunt u de voorgeprogrammeerde codelijst aanvullen. De standaard codelijst verschaft het grootste deel
van de nodige functies. U kunt de afstandsbediening echter een aantal nieuwe functies aanleren of zelfs een nieuwe code aan
de lijst toevoegen. Houd hiervoor de originele afstandsbediening waaruit u de code kopieert binnen handbereik.
a. Een functie aanleren
• Selecteer het toestel waarnaar u een functie wenst
aan te leren.
• Houd SET gedurende 3 seconden ingedrukt.
• Selecteer LEARNING met
• Selecteer LEARN KEY met
De lcd geeft SELECT KEY weer. Selecteer een
toestel om de functie te verlaten.
• Druk op de toets waarnaar u de functie wens aan te
leren (hier: POWER). De lcd geeft WAITING weer.
• Richt de IR-sensor van de VRC801D2 naar de IR-
sensor van de originele afstandsbediening (max.
afstand van 5cm).
• Houd de toets (hier: POWER) op de originele
afstandsbediening ingedrukt tot u SUCCESS op de
lcd van de VRC801D2 ziet verschijnen. Herhaal de
3 stappen hierboven indien nodig.
Opmerking: - Wanneer u één enkele knop
verscheidene functies aanleert, zal enkel de laatst aangeleerde functie worden bewaard.
- Alle functies zijn overdraagbaar uitgenomen SHOW VIEW, MACRO, SET, LEARN en ALL OFF.
- Deze afstandsbediening kan tot 100 codes voor een totaal van 8 toestellen opslaan. Sommige codes worden
echter niet aanvaard.
b. Een aangeleerde functie wissen
• Selecteer het toestel waaruit u een functie wenst te
wissen.
• Houd SET gedurende 3 seconden ingedrukt.
• Selecteer LEARNING met
• Selecteer DELETE KEY met
SELECT KEY verschijnt op de lcd.
• Druk op de toets die u wenst te wissen. SURE DELET
verschijnt op de lcd. Druk op OK om te bevestigen.
SUCCESS verschijnt op de lcd.
• Herhaal de bovenste stap voor elke toets die u wenst te
wissen. Druk op EXIT om te verlaten.
c. Alle aangeleerde functies wissen
Om niet alle functies één voor één te moeten wissen, kunt u deze functie gebruiken.
• Selecteer het toestel waaruit u de functies wenst te
wissen.
• Houd SET gedurende 3 seconden ingedrukt.
• Selecteer LEARNING met
• Selecteer DELETE DEV met
De lcd geeft SELECT DEV weer.
• Selecteer het toestel en druk op OK.
• SURE DELET verschijnt op de lcd. Druk op OK om te
bevestigen.
• Herhaal de bovenste 2 stappen indien u alle functies
voor een ander toestel wenst te wissen.
• Druk op EXIT om te verlaten.
Opmerking: - Alles wissen neemt ongeveer 3 minuten in beslag. Zijn er niet veel functies, dan raden wij u aan deze één voor
één te wissen.
of en druk op OK.
of en druk op OK.
of en druk op OK.
of en druk op OK.
of en druk op OK.
of en druk op OK.
VRC801D2 VELLEMAN
- 8 -
Page 9
d. Alle aangeleerde functies in de afstandsbediening wissen
Gebruik deze functie wanneer u alle aangeleerde functies in de
VRC801D2 wenst te wissen.
• Houd SET gedurende 3 seconden ingedrukt.
• Selecteer LEARNING met
• Selecteer DELETE ALL met
• SURE DELET verschijnt op de lcd. Druk op OK om te
bevestigen. Alle aangeleerde functies zijn gewist.
of en druk op OK.
of en druk op OK.
5. Macro’s
Een macro is een opeenvolging van functies ondergebracht onder een enkele toetsdruk.
a. Een macro instellen
• Houd SET gedurende 3 seconden ingedrukt.
• Selecteer MACRO met
• Selecteer MACRO 1, MACRO 2 of MACRO 3 met
• SET UP verschijnt op de lcd. Druk op OK om te bevestigen.
• SELECT KEY verschijnt op de lcd. Selecteer een toestel en de functie(s) die u wenst in te stellen, bv. VCR + POWER +
REC indien u de videorecorder wenst in te schakelen en op te nemen.
• Druk op OK om de macro-instelling op te slaan. SUCCESS verschijnt op de lcd. Druk op
te stellen of druk op een toets om de functie te verlaten.
Opmerking: - Een macro kan tot maximaal 10 opdrachten bevatten.
- Zorg ervoor dat de ingestelde toetsen de opdracht kunnen uitvoeren. Test de toetsen alvorens ze in de macro te
programmeren.
- Merk op dat de macro enkel uitgevoerd kan worden onder bepaalde voorwaarden, bv. de videorecorder moet
een cassette bevatten indien u wenst op te nemen.
b. Een macro gebruiken
Houd MACRO ingedrukt en druk op 1, 2 of 3 (naargelang de gewenste macro). De afstandsbediening voert de
opdrachtopeenvolging uit.
c. Een macro wissen
• Houd SET gedurende 3 seconden ingedrukt.
• Selecteer MACRO met
• Selecteer DELETE met
• SURE DELET verschijnt op de lcd. Druk op OK om te bevestigen.
• Druk op OK om de instelling op te slaan. SUCCESS verschijnt op de lcd. Druk op
of druk op een toets om de functie te verlaten.
of en druk op OK.
of en druk op OK.
of om een volgende macro in
of en druk op OK.
of en druk op OK.
of om een volgende macro te wissen
6. Andere functies
a. De tijd instellen
• Houd SET gedurende 3 seconden ingedrukt.
• Selecteer CONFIGURE met
• Selecteer TIME SETUP met
• Gebruik
• Druk op EXIT om te verlaten.
b. Vergrendeling van het volume
Activeer deze functie wanneer u het volume van uw toestellen
vanaf één toestel wenst te regelen.
• Houd SET gedurende 3 seconden ingedrukt.
• Selecteer CONFIGURE met
• Selecteer VOL LOCK met
• Selecteer het toestel door op de overeenkomstige knop te
• Selecteer ON of OFF met
• Druk op EXIT om te verlaten.
of om het uur, de minuten en AM/PM te
selecteren. Stel de tijd in met de cijfertoetsen, stel AM/PM in
of . Druk op OK.
met
drukken.
bevestigen.
of en druk op OK.
of en druk op OK.
of en druk op OK.
of en druk op OK.
of en druk op OK om te
VRC801D2 VELLEMAN
- 9 -
Page 10
c. Vergrendeling van het toestel
Schakel deze functie in om de code van uw toestel te
vergrendelen zodat hij niet wordt gewijzigd wanneer u een
automatische zoekactie uitvoert.
• Houd SET gedurende 3 seconden ingedrukt.
• Selecteer CONFIGURE met
• Selecteer DEV LOCK met
of en druk op OK.
of en druk op OK.
• Selecteer uw toestel door op de overeenkomstige knop te
drukken.
• Wijzig naar ON met
of en druk op OK om te bevestigen.
• Herhaal de laatste 2 stappen om andere toestellen te
vergrendelen.
• Druk op EXIT om te verlaten.
d. Achtergrondverlichting
Wanneer de achtergrondverlichting is ingeschakeld, licht de achtergrondverlichting op wanneer u op een toets drukt.
• Houd SET gedurende 3 seconden ingedrukt.
• Selecteer CONFIGURE met
• Selecteer LIGHT met
• Selecteer ON of OFF met
of druk op OK.
of en druk op OK.
of en druk op OK om te bevestigen.
• Druk op EXIT om te verlaten.
e. Het contrast van de lcd instellen
• Houd SET gedurende 3 seconden ingedrukt.
• Selecteer CONFIGURE met
• Selecteer CONTRAST met
• Stel het contrast in met
of druk op OK.
of en druk op OK.
of en druk op OK om te bevestigen.
• Druk op EXIT om te verlaten.
f. ShowView-functie
De VRC801D2 is uitgerust met een ShowView-functie die alle tv- of kabel-/satellietkanalen scant.
• Selecteer een toestel.
• Houd SHOW VIEW ingedrukt. De aftstandsbediening scant automatische alle kanalen af van zodra de led flitst.
Opmerking: - Richt de afstandsbediening naar het toestel tijdens de uitvoering van de opdracht.
- Druk op een toets om de functie te verlaten.
g. All Off-functie
Met deze toets schakelt u alle toestellen in of uit. Richt de afstandsbediening naar het toestel en houd ALL OFF ingedrukt.
h. Alles wissen
Gebruik deze functie om alle instellingen te wissen en om naar de fabrieksinstellingen terug te keren.
• Houd SET gedurende 3 seconden ingedrukt.
• Selecteer CONFIGURE met
• Selecteer CLEAR ALL met
of druk op OK.
of en druk op OK.
• SURE CLEAR verschijnt op de lcd. Druk op OK om te bevestigen. Alle instellingen zijn gewist.
7. Technische specificaties
Voeding 2 x 1.5V AAA-batterijen (niet meegelev.)
Afmetingen 210 x 56 x 28mm
Totaal gewicht 150g
De informatie in deze handleiding kan te allen tijde worden gewijzigd zonder voorafgaande kennisgeving.
VRC801D2 VELLEMAN
- 10 -
Page 11

VRC801D2 – TÉLÉCOMMANDE UNIVERSELLE 8-EN-1 AVEC FONCTION D'APPRENTISSAGE
1. Introduction et caractéristiques
Aux résidents de l'Union européenne
Des informations environnementales importantes concernant ce produit
Ce symbole sur l'appareil ou l'emballage indique que l’élimination d’un appareil en fin de vie peut polluer
l'environnement.
Ne pas jeter un appareil électrique ou électronique (et des piles éventuelles) parmi les déchets municipaux non
sujets au tri sélectif ; une déchèterie traitera l’appareil en question.
Renvoyer les équipements usagés à votre fournisseur ou à un service de recyclage local.
Il convient de respecter la réglementation locale relative à la protection de l’environnement.
En cas de questions, contacter les autorités locales pour élimination.
Nous vous remercions de votre achat ! Lire la présente notice attentivement avant la mise en service de l’appareil. Si l’appareil
a été endommagé pendant le transport, ne pas l’installer et consulter votre revendeur.
Cette télécommande universelle remplace la télécommande de la plupart des téléviseurs, magnétoscopes, lecteurs DVD,
lecteurs CD, radios, satellites, amplificateurs audio et autres.
La VRC801D2 dispose d’une recherche de code rapide, automatique ou manuelle. Si le code est introuvable, il est possible d’y
introduire un nouveau code. Le VOLUME et l’APPAREIL peuvent être verrouillés pour éviter des modifications non désirées.
Le large écran à cristaux liquides bleu affiche le statut actuel. Une icône dénonce les piles faibles.
Une fois la configuration terminée, toutes les données (à l’exception de l’heure) seront sauvegardées dans la mémoire pour
éviter la perte de données lors du remplacement des piles.
2. Description (voir ill. 1)
Touche Fonction
SET Configuration de la télécommande
TV VCR DVB DVD
TUNER TAPE CD
AUX
AV Fonction identique à celle de la touche TV/VIDEO sur la télécommande d’origine du
MENU Fonction identique à celle de la touche MENU, OSD ou MEMORY sur la télécommande
CH
VOL
0 ~9 Les touches numériques ont une fonction identique à celle des touches numériques sur
OK EXIT Fonction identique aux touches GAUCHE, DROIT, HAUT, BAS, OK et EXIT sur la
PLAY Lecture de votre CD, DVD etc.
REC Enregistrement
STOP Stop
PAUSE Pause
MUTE Coupure instantanée du son
ROUGE, VERT,
JAUNE et BLEU
ALL OFF (Dés)activation de tous les appareils
LEARN Configuration de la fonction d’apprentissage
SHOW VIEW Balayage des canaux
MACRO Configuration ou utilisation d’une macro
Sélection de l’appareil
Mise sous / hors tension
téléviseur ou de la touche TV/SAT sur la télécommande originale du satellite
originale
Canal PRÉCÉDENT ou SUIVANT
AUGMENTER ou DIMINUER le niveau du volume
votre télécommande d’origine. Utilisez-les pour entrer le code lors du paramétrage.
télécommande originale. Ces touches serviront à sélectionner, à confirmer et à quitter lors
du paramétrage de la télécommande
Fonction identique à la touche ENTER sur la télécommande originale
Rembobiner / avance rapide
Vidéo
Texte sur image TV
Télétexte
Figer la page
Fastext - Touches de raccourci
VRC801D2 VELLEMAN
- 11 -
Page 12

3. Paramétrage de l’appareil
a. Attribution d’un code
Touche sur la télécommande Appareil Code initial Nombre total de codes
TV Téléviseur 048 488
VCR Magnétoscope 075 182
DVB Satellite DVB 075 403
DVD DVD ou magnétoscope numérique 026 190
TUNER Radio 039 114
TAPE Platine à cassettes 067 134
CD Lecteur CD 035 124
AUX Amplificateur, LD ou vidéo CD 032 204
b. Configuration directe depuis la marque et le code
• Mettre sous tension l’appareil (p.ex. le
téléviseur) que vous désirez opérer (insérer
une cassette dans le magnétoscope).
• Maintenir enfoncé la touche SET et enfoncer la
touche correspondent à l’appareil (ici : TV).
• Relâcher les touches. Une marque apparaît sur
l’afficheur. Sélectionner votre marque à l’aide
de la touche
• Pointer la télécommande vers l’appareil et vérifier le bon fonctionnement des touches. Si la plupart des touches n’engendre
aucune réaction, sélectionner un autre code à l’aide de la touche
• Enfoncer OK pour confirmer. SUCCES apparaît sur l’afficheur.
Remarque : - Quitter ce mode en enfonçant la touche EXIT ou la touche correspondant à l’appareil (ici : TV).
c. Configuration depuis la recherche automatique
Il est possible d’utiliser la recherche automatique pour
trouver le code correct de votre appareil.
• Mettre sous tension l’appareil (p.ex. le lecteur DVD) que
vous désirez opérer (insérer une cassette dans le
magnétoscope).
• Maintenir enfoncé la touche SET pendant 3 secondes.
CODE SETUP apparaît sur l’afficheur. Enfoncer OK pour
confirmer.
• DEV SEARCH apparaît sur l’afficheur. Enfoncer OK et
sélectionner votre appareil. Pointer la VRC801D2 vers l’appareil et enfoncer OK. La recherche automatique démarre.
• Si l’appareil réagit aux commandes, arrêter la recherché automatique en enfonçant une touche. Il est également possible de
sélectionner un code à l’aide de la touche
des touches. Si la plupart des touches n’engendre aucune réaction, répéter les étapes ci-dessus.
• Enfoncer OK pour confirmer votre code. SUCCESS apparaît sur l’afficheur. Quitter la recherche automatique en enfonçant
la touche EXIT à deux reprises ou effectuer une recherche de code pour un autre appareil en répétant les étapes ci-dessus.
Remarque : - La télécommande revient au premier code après avoir parcouru les codes.
d. Entrée d’un code
• Mettre sous tension l’appareil (p.ex. le lecteur DVD) que
vous désirez opérer (insérer une cassette dans le
magnétoscope).
• Vous trouverez les codes correspondant à la marque de
l’appareil à l’arrière de cette notice (ici : Lifetec : 003, 010,
062).
• Maintenir enfoncé la touche SET pendant 3 secondes.
CODE SETUP apparaît sur l’afficheur. Enfoncer la touche
OK pour confirmer.
• DEV SEARCH apparaît sur l’afficheur. Sélectionner DEV SETUP à l’aide de la touche
• Sélectionner votre appareil (ici : TV) et enfoncer OK. Entrer les 3 chiffres du code (ici : 003 pour Lifetec) et enfoncer OK
pour sauvegarder le code.
• SUCCESS apparaît sir l’afficheur. Enfoncer EXIT à deux reprises pour quitter la configuration.
• Pointer la télécommande vers l’appareil et vérifier le bon fonctionnement des touches. Si la plupart des touches n’engendre
aucune réaction, répéter les étapes ci-dessus et choisir un code différent (ici : 010 ou 062).
ou .
ou .
- Déverrouiller un appareil avant sa configuration (voir « 5.c. Verrouillage de l’appareil »).
ou . Pointer la télécommande vers l’appareil et vérifier le bon fonctionnement
- Déverrouiller un appareil avant sa configuration (voir « 5.c. Verrouillage de l’appareil »).
ou et enfoncer OK.
VRC801D2 VELLEMAN
- 12 -
Page 13

4. La fonction d’apprentissage
Utilisez la fonction d’apprentissage pour compléter la liste des codes préprogrammés. Cette liste vous procure la majorité des
fonctions nécessaires. Cependant, il est possible d’intégrer des codes provenant d’autres télécommandes et d’étendre les
fonctionnalités de votre VRC801D2. Il faut disposer de la télécommande d’origine en état de marche lors de l’apprentissage.
a. Apprentissage d’une commande
• Sélectionner votre appareil.
• Maintenir enfoncé la touche SET pendant 3 secondes.
• Sélectionner LEARNING à l’aide de la touche
et enfoncer OK.
• Sélectionner LEARN KEY à l’aide de la touche
et enfoncer OK. SELECT KEY apparaît sur l’afficheur.
Sélectionner un appareil pour quitter le mode
d’apprentissage.
• Sélectionner la touche qui acquerra la commande (ici :
POWER). WAITING apparaît sur l’afficheur.
• Pointer le capteur IR de la VRC801D2 vers le capteur
IR de la télécommande originale (distance max. de
5cm).
• Maintenir enfoncé la touche originale (ici : POWER) sur
la télécommande originale jusqu’à ce que SUCCESS
apparaît sur l’afficheur de la VRC801D2. Répéter les 3
étapes ci-dessus au cas où vous désirez apprendre une
autre commande ou si FAILED apparaît sur l’afficheur.
Remarque : - Si vous attribuez plusieurs commandes à une seule touche, la VRC801D2 ne sauvegardera que la dernière
commande.
- Toutes les fonctions sont intégrables à l’exception de SHOW VIEW, MACRO, SET, LEARN et ALL OFF.
- La VRC801D2 assimile jusqu’à 100 codes pour un total de 8 appareils. Toutefois, il est possible qu’elle
n’assimile pas certains codes.
b. Effacement d’une commande pour un appareil
• Sélectionner votre appareil.
• Maintenir enfoncé la touche SET pendant 3
secondes.
• Sélectionner LEARNING à l’aide de la touche
et enfoncer OK.
ou
• Sélectionner DELETE KEY à l’aide de la touche
et enfoncer OK. SELECT KEY apparaît sur
ou
l’afficheur.
• Sélectionner la touche que vous désirez effacer.
SURE DELET apparaît sur l’afficheur. Enfoncer
OK pour confirmer. SUCCESS apparaît sur
l’afficheur.
• Répéter les étapes ci-dessus pour chaque
commande à effacer. Enfoncer EXIT pour quitter.
c. Effacement de toutes les commandes
Il est possible d’effacer toutes les commandes en une seule action.
• Sélectionner votre appareil.
• Maintenir enfoncé la touche SET pendant 3
secondes.
• Sélectionner LEARNING à l’aide de la touche
et enfoncer OK.
• Sélectionner DELETE DEV à l’aide de la touche
et enfoncer OK. SELECT DEV apparaît sur
ou
l’afficheur.
• Sélectionner l’appareil duquel vous désirez effacer
les commandes. Enfoncer OK.
• SURE DELET apparaît sur l’afficheur. Enfoncer OK
pour confirmer.
• Répéter les deux étapes ci-dessus si vous désirez
effacer les commandes d’un autre appareil.
• Enfoncer EXIT pour quitter.
Remarque : - L’effacement de toutes les commandes d’un appareil occupe un délai d’environ 3 minutes. Il est conseillé
d’effacer les commandes une à une au cas où elles ne seraient pas nombreuses.
ou
ou
ou
VRC801D2 VELLEMAN
- 13 -
Page 14
d. Effacement de toutes les commandes de la VRC801D2
Utilisez cette fonction si vous désirez effacer toutes les
commandes dans la VRC801D2.
• Maintenir enfoncé la touche SET pendant 3
secondes.
• Sélectionner LEARNING à l’aide de la touche
et enfoncer OK.
• Sélectionner DELETE ALL à l’aide de la touche
et enfoncer OK.
ou
• SURE DELET apparaît sur l’afficheur. Enfoncer OK
pour confirmer. Toutes les commandes sont
effacées.
ou
5. Macros
Une macro est un ordre donné et destiné à générer une séquence d’instructions au moyen d’une seule pression de touche.
a. Configuration d’une macro
• Maintenir enfoncé la touche SET pendant 3 secondes.
• Sélectionner MACRO à l’aide de la touche
• Sélectionner MACRO 1, MACRO 2 ou MACRO 3 à l’aide de la touche
• SET UP apparaît sur l’afficheur. Enfoncer OK pour confirmer.
• SELECT KEY apparaît sur l’afficheur. Sélectionner l’appareil et la (les) commande(s) désirés, p.ex. VCR + POWER + REC
si vous désirez brancher votre magnétoscope et enregistrer.
• Enfoncer OK pour sauvegarder la configuration. SUCCESS apparaît sur l’afficheur. Enfoncer
prochaine macro ou enfoncer une touche pour quitter le mode.
Remarque : - Une macro peut contenir un maximum de 10 commandes.
- Veiller à ce que chaque touche soit fonctionnelle. Vérifier chaque fonction avant de configurer la macro.
- Il est à noter qu’une macro ne sera exécutée sous certaines conditions, p.ex. le magnétoscope doit contenir une
cassette si l’on veut enregistrer.
b. Utilisation d’une macro
Maintenir enfoncé la touche MACRO et enfoncer la touche 1, 2 ou 3 (selon la macro). La télécommande génèrera la séquence
de commandes programmée.
c. Effacement d’une macro
• Maintenir enfoncé la touche SET pendant 3 secondes.
• Sélectionner MACRO à l’aide de la touche
• Sélectionner DELETE à l’aide de la touche
• SURE DELET apparaît sur l’afficheur. Enfoncer OK pour confirmer.
• Enfoncer OK pour sauvegarder la configuration. SUCCESS apparaît sur l’afficheur. Enfoncer la touche
la macro suivante ou enfoncer une touche pour quitter le mode.
ou et enfoncer OK.
ou et enfoncer OK.
ou pour configurer la
ou et enfoncer OK.
ou et enfoncer OK.
ou pour effacer
6. Autres fonctions
a. Configuration de l’heure
• Maintenir enfoncé la touche SET pendant 3
secondes.
• Sélectionner CONFIGURE à l’aide de la touche
et enfoncer OK.
ou
• Sélectionner TIME SETUP à l’aide de la touche
et enfoncer OK.
ou
• Utiliser la touche
minutes et AM/PM. Configurer l’heure à l’aide des
touches numériques, sélectionner AM/PM à l’aide
de la touche
• Enfoncer EXIT pour quitter.
ou et sélectionner l’heure, les
ou . Enfoncer OK.
VRC801D2 VELLEMAN
- 14 -
Page 15
b. Verrouillage du niveau du volume
Activer cette fonction si vous désirez régler le niveau
du volume depuis un appareil.
• Maintenir enfoncé la touche SET pendant 3
secondes.
• Sélectionner CONFIGURE à l’aide de la touche
et enfoncer OK.
ou
• Sélectionner VOL LOCK à l’aide de la touche
ou
et enfoncer OK.
• Sélectionner l’appareil.
• Sélectionner ON ou OFF à l’aide de la touche
ou
. Enfoncer OK pour confirmer.
• Enfoncer EXIT pour quitter.
c. Verrouillage de l’appareil
Activez le verrouillage pour figer le code d’un appareil. Ce code ne sera pas modifié lors d’une recherche automatique du
code.
• Maintenir enfoncé la touche SET pendant 3
secondes.
• Sélectionner CONFIGURE à l’aide de la touche
et enfoncer OK.
ou
• Sélectionner DEV LOCK à l’aide de la touche
ou
et enfoncer OK.
• Sélectionner l’appareil à verrouiller.
• (Dé)verrouiller à l’aide de la touche
ou .
Enfoncer OK pour confirmer.
• Répéter les 2 étapes ci-dessus au cas où vous
désireriez verrouiller d’autres appareils.
• Enfoncer EXIT pour quitter.
d. Le retro-éclairage
Activé, le rétro-éclairage s’allume à chaque pression d’une touche.
• Maintenir enfoncé la touche SET pendant 3 secondes.
• Sélectionner CONFIGURE à l’aide de la touche
• Sélectionner LIGHT à l’aide de la touche
• Sélectionner ON ou OFF à l’aide de la touche
ou et enfoncer OK.
ou et enfoncer OK.
ou et enfoncer OK pour confirmer.
• Enfoncer EXIT pour quitter.
e. Réglage du contraste de l’afficheur
• Maintenir enfoncé la touche SET pendant 3 secondes.
• Sélectionner CONFIGURE à l’aide de la touche
• Sélectionner CONTRAST à l’aide de la touche
• Régler le contraste à l’aide de la touche
ou et enfoncer OK.
ou et enfoncer OK.
ou et enfoncer OK pour confirmer.
• Enfoncer EXIT pour quitter.
f. La fonction ShowView
La VRC801D2 intègre une fonction ShowView qui pemet de balayer tous les canaux TV ou CAB/SAT.
• Sélectionner d’abord l’appareil.
• Maintenir enfoncé la touche SHOW VIEW. La télécommande balaye automatiquement les canaux dès que la LED clignote.
Remarque : - Pointer la télécommande vers l’appareil durant le balayage.
- Enfoncer une touche pour quitter la fonction ShowView.
g. La fonction All Off
Cette touche vous permet d’activer ou de désactiver tous les appareils au moyen d’une seule pression de touche. Pointer la
télécommande vers l’appareil et maintenir enfoncé la touche ALL OFF.
VRC801D2 VELLEMAN
- 15 -
Page 16

h. Effacement complet
Utilisez cette fonction pour effacer toutes les données et pour revenir aux paramétrages d’usine.
• Maintenir enfoncé la touche SET pendant 3 secondes.
• Sélectionner CONFIGURE à l’aide de la touche
• Sélectionner CLEAR ALL à l’aide de la touche
• SURE CLEAR apparaît sur l’afficheur. Enfoncer OK pour confirmer. Tous les paramétrages sont effacés.
ou et enfoncer OK.
ou et enfoncer OK.
7. Spécifications techniques
Alimentation 2 piles 1.5V type R03 (non incl.)
Dimensions 210 x 56 x 28mm
Poids total 150g
Toutes les informations présentées dans cette notice peuvent être modifiées sans notification préalable.
VRC801D2 – MANDO A DISTANCIA UNIVERSAL 8 EN 1 CON FUNCIÓN DE PROGRAMACIÓN
1. Introducción & Características
A los ciudadanos de la Unión Europea
Importantes informaciones sobre el medio ambiente concerniente este producto
Este símbolo en este aparato o el embalaje indica que, si tira las muestras inservibles, podrían dañar el medio
ambiente.
No tire este aparato (ni las pilas eventuales) en la basura doméstica; debe ir a una empresa especializada en
reciclaje. Devuelva este aparato a su distribuidor o a la unidad de reciclaje local.
Respete las leyes locales en relación con el medio ambiente.
Si tiene dudas, contacte con las autoridades locales para eliminación.
¡Gracias por haber comprado el VRC801D! Lea atentamente las instrucciones del manual antes de usarlo. Si el aparato ha
sufrido algún daño en el transporte no lo instale y póngase en contacto con su distribuidor.
Este mando a distancia universal reemplaza el mando a distancia de la de la mayoría de los televisores, magnetoscopios,
lectores DVD, lectores CD, radios, satélites, amplificadores audio, etc.
El VRC801D está equipado con una búsqueda del código rápida, automática y manual. Si no hay forma de encontrar el
código, es posible introducir un nuevo código. Es posible bloquear el VOLUMEN y el APARATO para evitar modificaciones no
deseadas.
La larga pantalla LCD con retroiluminación azul visualiza el estado actual. Un icono indica si las pilas están agotadas.
Después de haber terminada la configuración, todos los datos (salvo la hora) se guardarán en la memoria para evitar la
pérdida de datos al reemplazar las pilas.
2. Descripción (véase fig. 1)
Tecla Función
SET Ajustar el mando a distancia
TV VCR DVB DVD
TUNER TAPE CD
AUX
AV Misma función que la tecla TV/VIDEO del mando a distancia original del televisor o la tecla
MENU Misma función que la tecla MENU, OSD o MEMORY del mando a distancia original
CH
VOL
0 ~9 Estas teclas tienen la misma función que las teclas del mando a distancia original. Utilícelas
OK EXIT Misma función que las teclas IZQUIERDA, DERECHA, HACIA ARRIBA, HACIA ABAJO, OK
PLAY Reproducción del CD, DVD, etc.
REC Grabación
STOP Stop
PAUSE Pausa
MUTE Desactivación inmediata del sonido
Seleccionar el aparato
Activar / desactivar el aparato
TV/SAT del mando a distancia original del satélite
Canal ANTERIOR o SIGUIENTE
AUMENTAR o DISMINUIR el nivel del volumen
para introducir el código de su aparato.
y EXIT del mando a distancia original. Estas teclas se utilizan durante el ajuste del mando a
distancia y para salir del menú
Misma función que la tecla ENTER del mando a distancia original
Reproducción rápida hacia atrás / reproducción rápida hacia adelante
Vídeo
Texto en la pantalla
Teletexto
Fijar la página
VRC801D2 VELLEMAN
- 16 -
Page 17

ROJO, VERDE,
Fastext (teclas abreviadas)
AMARILLO y AZUL
ALL OFF (Des)activación de todos los aparatos
LEARN Ajuste de la función de programación
SHOW VIEW Exploración de los canales
MACRO Ajuste o uso de un macro
3. Ajustar el aparato
a. Atribuir un código
Tecla del mando a distancia Aparato Código inicial Número total de
TV Televisor 048 488
VCR Magnetoscopio 075 182
DVB Satélite DVB 075 403
DVD DVD o magnetoscopio digital 026 190
TUNER Radio 039 114
TAPE Casete 067 134
CD Lector CD 035 124
AUX Amplificador, LD o vídeo CD 032 204
b. Ajuste directo por la marca y el código
• Active el aparato (p.ej. el televisor) que quiere
manejar (introduzca un casete en el
magnetoscopio).
• Mantenga pulsada la tecla SET y pulse la tecla
del aparato correspondiente (aquí: TV).
• Suelte las teclas. Una marca cualquiera
aparece en la pantalla. Seleccione la marca
correcta con las teclas
y .
• Apunte el mando a distancia al aparato y verifique si las teclas funcionan de manera correcta. Si la mayoría de las teclas no
funciona, seleccione otro código con las teclas
y .
• Pulse OK para confirmar. SUCCES se visualiza en la pantalla.
Nota: - Para salir de este modo pulse la tecla EXIT o la tecla del aparato correspondiente (aquí: TV).
- Primero, desbloquee el aparato antes de ajustarlo (véase « 5.c. Bloquear el aparato »).
c. Ajuste por la búsqueda automática
Es posible utilizar la búsqueda automática para encontrar
el código correcto del aparato.
• Active el aparato (p.ej. el lector de DVD) que quiere
manejar (introduzca un casete en el magnetoscopio).
• Mantenga pulsada la tecla SET durante 3 segundos.
CODE SETUP aparece en la pantalla. Pulse OK para
confirmar.
• DEV SEARCH aparece en la pantalla. Pulse OK y
seleccione el aparato. Apunte el VRC801D al aparato y
pulse OK. La búsqueda automática empieza.
• Si el aparato reacciona, desactive la búsqueda automática al pulsar una tecla. También es posible seleccionar un código
con las teclas
o . Apunte el mando a distancia al aparato y verifique si las teclas funcionan de manera correcta. Si la
mayoría de las teclas no funciona, repita los pasos anteriormente mencionados.
• Pulse OK para confirmar el código. SUCCESS se visualiza en la pantalla. Para salir de la búsqueda automática pulse la
tecla EXIT dos veces o efectúe una búsqueda del código para otro aparato al repetir los pasos anteriormente mencionados.
Nota: - El mando a distancia vuelve al primer código después de haber recorrido los códigos.
- Primero, desbloquee el aparato antes de configurarlo (véase « 5.c. Bloquear el aparato »).
códigos
VRC801D2 VELLEMAN
- 17 -
Page 18

d. Introducir un código
• Active el aparato (p.ej. el lector de DVD) que quiere
manejar (introduzca un casete en el magnetoscopio).
• Encontrará los códigos correspondientes a la marca del
aparato al final de este manual del usuario (aquí: Lifetec:
003, 010, 062).
• Mantenga pulsada la tecla SET durante 3 segundos.
CODE SETUP aparece en la pantalla. Pulse OK para
confirmar.
• DEV SEARCH aparece en la pantalla. Seleccione DEV
SETUP con las teclas
o y pulse OK.
• Seleccione el aparato (aquí: TV) y pulse OK. Introduzca las 3 cifras del código (aquí: 003 para Lifetec) y pulse OK para
guardar el código.
• SUCCESS aparece en la pantalla. Pulse EXIT dos veces para salir del ajuste.
• Apunte el mando a distancia al aparato y verifique si las teclas funcionan de manera correcta. Si la mayoría de las teclas no
funciona, repita los pasos anteriormente mencionados y seleccione otro código (aquí: 010 ó 062).
4. La función de programación
Utilice la función de programación para completar la lista de los códigos preprogramados. Esta lista le procura la mayoría de
las funciones necesarias. Sin embargo, es posible introducir códigos de otros mandos a distancia y programar nuevas
funciones. Mantenga el mando a distancia original del que quiere copiar el código al alcance de la mano.
a. Programar una función
• Seleccione el aparato.
• Mantenga pulsada la tecla SET durante 3 segundos.
• Seleccione LEARNING con las teclas
OK.
• Seleccione LEARN KEY con las teclas
OK. SELECT KEY aparece en la pantalla. Seleccione
un aparato para salir del modo de programación.
• Seleccione la tecla que programará la función (aquí:
POWER). WAITING aparece en la pantalla.
• Apunte el sensor IR del VRC801D al sensor IR del
mando a distancia original (distancia máx. de 5cm).
• Mantenga pulsada la tecla original (aquí: POWER) del
mando a distancia original hasta que SUCCESS
aparezca en la pantalla del VRC801D. Repita los 3
pasos anteriormente mencionados si quiere programar
otra función o si FAILED aparece en la pantalla.
Nota: - Si atribuye varios mandos a una sola tecla, el
VRC801D sólo guardará el último mando.
- Todas las funciones son transmisibles salvo SHOW VIEW, MACRO, SET, LEARN y ALL OFF.
- El VRC801D puede guardar hasta 100 códigos para un total de 8 aparatos. No obstante, es posible que no se acepten
algunos códigos.
b. Borrar una función programada
• Seleccione el aparato.
• Mantenga pulsada la tecla SET durante 3 segundos.
• Seleccione LEARNING con las teclas
OK.
• Seleccione DELETE KEY con las teclas
pulse OK. SELECT KEY aparece en la pantalla.
• Seleccione la tecla que quiere borrar. SURE DELET
aparece en la pantalla. Pulse OK para confirmar.
SUCCESS aparece en la pantalla.
• Repita los pasos anteriormente mencionados para
cada función que quiere borrar. Pulse EXIT para salir.
o y pulse
o y pulse
o y pulse
o y
VRC801D2 VELLEMAN
- 18 -
Page 19

c. Borrar todas las funciones programadas
Es posible borrar todas las funciones programadas a la
vez.
• Seleccione el aparato.
• Mantenga pulsada la tecla SET durante 3 segundos.
• Seleccione LEARNING con las teclas
o y pulse
OK.
• Seleccione DELETE KEY con las teclas
o y pulse
OK. SELECT DEV aparece en la pantalla.
• Seleccione el aparato cuyas funciones programadas
quiere borrar. Pulse OK.
• SURE DELET aparece en la pantalla. Pulse OK para confirmar.
• Repita los pasos anteriormente mencionados si quiere borrar las funciones programadas de otro aparato.
• Pulse EXIT para salir.
Nota: - Borrar todas las funciones programadas de un aparato dura aproximadamente 3 minutos. Si no ha programado
muchas funciones, bórrelas una a una.
d. Borrar todas las funciones programadas del
VRC801D
Utilice esta función si quiere borrar todas las funciones
programadas del VRC801D.
• Mantenga pulsada la tecla SET durante 3 segundos.
• Seleccione LEARNING con las teclas
• Seleccione DELETE ALL con las teclas
o y pulse OK.
o y pulse
OK.
• SURE DELET aparece en la pantalla. Pulse OK para
confirmar. Todas las funciones programadas se borrarán.
5. Macros
Una macro es un orden dado y destinado a generar una secuencia de instrucciones con una sola presión de tecla.
a. Ajustar una macro
• Mantenga pulsada la tecla SET durante 3 segundos.
• Seleccione MACRO con la tecla
• Seleccione MACRO 1, MACRO 2 o MACRO 3 con la tecla
• SET UP aparece en la pantalla. Pulse OK para confirmar.
• SELECT KEY aparece en la pantalla. Seleccione el aparato y el (los) mando(s) deseados, p.ej. VCR + POWER + REC si
quiere conectar el magnetoscopio y grabar.
• Pulse OK para guardar el ajuste. SUCCESS aparece en la pantalla. Pulse
una tecla para salir del modo.
Nota: - Una macro puede contener máx. 10 mandos.
- Asegúrese de que cada tecla pueda realizar el mando. Controle cada función antes de ajustar la macro.
- Tenga en cuenta que una macro no se realizará bajo algunas condiciones, p.ej. el magnetoscopio debe contener un
casete si quiere grabar.
b. Utilizar una macro
Mantenga pulsada la tecla MACRO y pulse la tecla 1, 2 ó 3 (según la macro). El mando a distancia generará la secuencia de
mandos programado.
c. Borrar una macro
• Mantenga pulsada la tecla SET durante 3 segundos.
• Seleccione MACRO con la tecla
• Seleccione DELETE con la tecla
• SURE DELET aparece en la pantalla. Pulse OK para confirmar.
Pulse OK para guardar el ajuste. SUCCESS aparece en la pantalla. Pulse la tecla
pulsar una tecla para salir del modo.
o y pulse OK.
o y pulse OK.
o para ajustar la siguiente macro o pulse
o y pulse OK.
o y pulse OK.
o para borrar la siguiente macro o
VRC801D2 VELLEMAN
- 19 -
Page 20

6. Otras funciones
a. Ajustar la hora
• Mantenga pulsada la tecla SET durante 3 segundos.
• Seleccione CONFIGURE con las teclas
OK.
• Seleccione TIME SETUP con las teclas
OK.
• Utilice las teclas
o y seleccione la hora, los minutos y
AM/PM. Ajuste la hora con las teclas digitales, seleccione
AM/PM con las teclas
o . Pulse OK.
• Pulse EXIT para salir.
b. Bloquear el nivel del volumen
Active esta función si quiere ajustar el nivel del volumen
desde un aparato.
• Mantenga pulsada la tecla SET durante 3 segundos.
• Seleccione CONFIGURE con las teclas
OK.
• Seleccione VOL LOCK con las teclas
• Seleccione el aparato.
• Seleccione ON u OFF con las teclas
para confirmar.
• Pulse EXIT para salir.
c. Bloquear el aparato
Active el bloqueo para fijar el código de un aparato. Este código no se modificará durante una búsqueda automática del
código.
• Mantenga pulsada la tecla SET durante 3 segundos.
• Seleccione CONFIGURE con las teclas
OK.
• Seleccione DEV LOCK con las teclas
• Seleccione el aparato que quiere bloquear.
• (Des)bloquee con las teclas
o . Pulse OK para
confirmar.
• Repita los 2 pasos anteriormente mencionados si quiere
bloquear otros aparatos.
• Pulse EXIT para salir.
d. La retroiluminación
Si la retroiluminación está activada, se ilumina al pulsar una tecla.
• Mantenga pulsada la tecla SET durante 3 segundos.
• Seleccione CONFIGURE con las teclas
• Seleccione LIGHT con las teclas
• Seleccione ON u OFF con las teclas
• Pulse EXIT para salir.
e. Ajustar el contraste de la pantalla
• Mantenga pulsada la tecla SET durante 3 segundos.
• Seleccione CONFIGURE con las teclas
• Seleccione CONTRAST con las teclas
• Ajuste el contraste con las teclas
• Pulse EXIT para salir.
f. La función ShowView
El VRC801D2 incluye una función ShowView que pemite de explorar todos los canales TV o CAB/SAT.
• Primero, seleccione el aparato.
• Mantenga pulsada la tecla SHOW VIEW. El mando a distancia explora automáticamente los canales en cuanto el LED
parpadea.
Nota: - Apunte el mando a distancia al aparato durante la exploración.
- Pulse una tecla para salir de la función ShowView.
o y pulse
o y pulse
o y pulse
o y pulse OK.
o . Pulse OK
o y pulse
o y pulse OK.
o y pulse OK.
o y pulse OK.
o y pulse OK para confirmar.
o y pulse OK.
o y pulse OK.
o y pulse OK para confirmar.
VRC801D2 VELLEMAN
- 20 -
Page 21

g. La función All Off
Esta tecla permite activar o desactivar todos los aparatos con una sola presión en la tecla. Apunte el mando a distancia al
aparato y mantenga pulsada la tecla ALL OFF.
h. Borrar todo
Utilice esta función para borrar todos los datos y para volver a los ajustes de fábrica.
• Mantenga pulsada la tecla SET durante 3 segundos.
• Seleccione CONFIGURE con las teclas
• Seleccione CLEAR ALL con las teclas
• SURE CLEAR aparece en la pantalla. Pulse OK para confirmar. Todos los ajustes han sido borrados.
o y pulse OK.
o y pulse OK.
6. Especificaciones
Alimentación 2 x pila AAA de 1.5V (no incl.)
Dimensiones 210 x 56 x 28mm
Peso total 150g
Se pueden modificar las especificaciones y el contenido de este manual sin previo aviso.
VRC801D2 – UNIVERSALFERNBEDIENUNG 8-IN-1 MIT LERNFUNKTION
1. Einführung & Eigenschaften
An alle Einwohner der Europäischen Union
Wichtige Umweltinformationen über dieses Produkt
Dieses Symbol auf dem Produkt oder der Verpackung zeigt an, dass die Entsorgung dieses Produktes nach seinem
Lebenszyklus der Umwelt Schaden zufügen kann.
Entsorgen Sie die Einheit (oder die verwendeten Batterien) nicht als unsortiertes Hausmüll; die Einheit oder die
verwendeten Batterien müssen von einer spezialisierten Firma zwecks Recycling entsorgt werden.
Diese Einheit muss an den Händler oder ein örtliches Recycling-Unternehmen retourniert werden.
Respektieren Sie die örtlichen Umweltvorschriften.
Falls Zweifel bestehen, wenden Sie sich für Entsorgungsrichtlinien an Ihre örtliche Behörde.
Danke für Ihren Ankauf! Lesen Sie diese Bedienungsanleitung vor Inbetriebnahme sorgfältig durch und wenden Sie sich an
Ihren Händler.
Diese Fernbedienung ersetzt die Fernbedienung der meisten Fernsehgeräte, Videorecorder, DVD- und CD-Player, Radios,
Satellitensysteme, Audioverstärker und anderer Geräte.
Die VRC801D2 ist mit einer schnellen, einer automatischen und einer manuellen Suchfunktion für den Code ausgestattet. Sie
können die Fernbedienung auch einen neuen Code lernen lassen. Die LAUTSTÄRKE und das GERÄT können gesperrt
werden.
Der breite LCD-Schirm mit Hintergrundbeleuchtung zeigt den aktuellen Zustand. Ein Symbol zeigt an, dass die Batterien fast
leer sind.
Alle eingegebenen Daten (außer der Zeit) werden im Speicher der Fernbedienung gespeichert, sodass diese nicht gelöscht
werden wenn die Batterien gewechselt werden.
2. Umschreibung (siehe Abb. 1)
Taste Funktion
SET Einstellung der Fernbedienung
TV VCR DVB DVD
TUNER TAPE CD
AUX
AV Dieselbe Funktion wie die TV/VIDEO-Taste auf der Originalfernbedienung Ihres
MENU Dieselbe Funktion wie MENU, OSD oder MEMORY auf der Originalfernbedienung
CH
VOL
0 ~9 Die Ziffertasten haben dieselbe Funktion wie die der Originalfernbedienung. Auch zum
OK EXIT Dieselbe Funktion wie LINKS, RECHTS, AUFWÄRTS, ABWÄRTS, OK und VERLASSEN auf
PLAY CD, DVD, usw. starten
REC Aufnahme
STOP Stop
VRC801D2 VELLEMAN
Selektieren des Gerätes
Ein- oder ausschalten des Gerätes
Fernsehgerätes oder die TV/SAT-Taste auf der Originalfernedienung Ihres Satellitensystems
Zum NÄCHSTEN oder VORIGEN Kanal gehen
Lautstärke ERHÖHEN oder VERRINGERN
Eingeben des Gerätecodes.
der Originalfernbedienung. Sie verwenden diese Taste nur während der Konfiguration der
Fernbedienung und zum Verlassen des Konfigurationsmenüs.
Dieselbe Funktion wie die ENTER-Taste auf der Originalfernbedienung
Zurückspulen / Vorspulen
- 21 -
Page 22

PAUSE Pause
MUTE Stummschaltung
ROT, GRÜN, GELB
Video
Text über Bild
Teletext
Seite festhalten
Schnelltasten Teletext
UND BLAU
ALL OFF alle Geräte ein- oder ausschalten
LEARN Die Lernfunktion konfigurieren
SHOW VIEW Alle Kanäle abtasten
MACRO Makro konfigurieren oder verwenden
3. Konfiguration des Gerätes
a. Code zuweisen
Taste auf der Fernbedienung Gerät Anfangscode Gesamtanzahl der Codes
TV Fernsehgerät 048 488
VCR Videorecorder 075 182
DVB DVB-Gerät 075 403
DVD DVD oder digitaler Videorecorder 026 190
TUNER Radio 039 114
TAPE Kassettenspieler 067 134
CD CD-Spieler 035 124
AUX Verstärker, LD oder Video-CD 032 204
b. Konfiguration über Marke und Code
• Schalten Sie das Gerät, das Sie bedienen wollen ein (z.B. Fernsehgerät) (stecken Sie eine Videokassette in den
Videorecorder).
• Halten Sie auf VRC801D2 die SET-Taste
gedrückt und drücken Sie die Taste des
entsprechenden Gerätes (hier: TV).
• Lassen Sie die beiden Tasten los. Eine
willkürliche Marke wird auf dem Schirm
erscheinen. Wählen Sie die korrekte Marke
oder .
mit
• Richten Sie die Fernbedienung auf das Gerät
und überprüfen Sie, ob die meisten
Funktionen funktionieren. Wenn das nicht der Fall ist, wählen Sie einen anderen Code mit
• Drücken Sie die OK-Taste zum Bestätigen. SUCCES erscheint auf dem LCD-Schirm.
Bemerkung: - Verlassen Sie mit der EXIT-Taste oder die Taste des Gerätes (hier: TV).
- Entsperren Sie zuerst das Gerät wenn es gesperrt wurde (siehe “5.c. Gerät sperren”).
c. Automatische Suchfunktion
Verwenden Sie die automatische Suchfunktion um den Code des Gerätes zu finden.
• Schalten Sie das Gerät, das Sie bedienen wollen (z.B. DVD-Player) ein (stecken Sie eine Videokassette in den
Videorecorder).
• Halten Sie die SET-Taste 3 Sekunden gedrückt.
CODE SETUP erscheint auf dem LCD-Schirm.
Drücken Sie OK zum Bestätigen.
• DEV SEARCH erscheint auf dem LCD. Drücken
Sie OK und wählen Sie Ihr Gerät auf der
Fernbedienung. Richten Sie die VRC801D2 auf
das Gerät und drücken Sie OK. Die automatische
Suchfunktion wird anfangen.
• Drücken Sie eine Taste um die automatische
Suchfunktion zu beenden wenn das Gerät reagiert.
Sie können auch mit
oder den Code suchen.
Richten Sie die Fernbedienung auf das Gerät und
überprüfen Sie, ob die Funktionen funktionieren.
Sollte das nicht der Fall sein, wiederholen Sie die oben erwähnten Schritte.
• Drücken Sie OK zum Bestätigen. SUCCESS wird auf dem Schirm erscheinen. Verlassen Sie die Suchfunktion, indem Sie
die zweimal EXIT drücken oder wiederholen Sie die oben erwähnten Schritte wenn Sie den Code für ein anderes Gerät
suchen wollen.
Bemerkung: - Die Fernbedienung hört beim ersten Code auf wenn sie alle Codes durchlaufen hat.
- Entsperren Sie zuerst das Gerät wenn es gesperrt wurde (siehe “5.c. Gerät sperren”).
d. Code eingeben
• Schalten Sie das Gerät, das Sie bedienen wollen (z.B. DVD-Player) ein (stecken Sie eine Videokassette in den
Videorecorder).
VRC801D2 VELLEMAN
- 22 -
oder .
Page 23

• Siehe die Codetabelle am Ende der
Bedienungsanleitung und notieren Sie den Code,
der mit dem Gerät übereinstimmt (hier: Lifetec: 003,
010, 062).
• Halten Sie SET 3 Sekunden gedrückt. CODE
SETUP erscheint auf dem LCD. Drücken Sie OK
zum Bestätigen.
• DEV SEARCH erscheint auf dem LCD. Wählen Sie
DEV SETUP mit
oder und drücken Sie OK.
• Wählen Sie das Gerät (hier: TV) und drücken Sie
OK. Geben Sie den 3-stelligen Code ein (hier: 003
für Lifetec) und drücken Sie OK zum Speichern.
• Auf dem LCD erscheint SUCCESS. Drücken Sie
zweimal EXIT zum Verlassen.
• Richten Sie die Fernbedienung auf das Gerät und überprüfen Sie, ob die meisten Funktionen funktionieren. Wenn das nicht
der Fall ist, wiederholen Sie die oben erwähnten Schritte und versuchen Sie einen anderen Code (hier: 010 oder 062).
4. Lernfunktion
Mit der Lernfunktion können Sie die vorprogrammierte Codeliste ergänzen. Die standardmäßige Codeliste ist ausreichend für
die meisten erforderlichen Funktionen. Sie können die Fernbedienung auch einige neue Funktionen lehren oder der Liste
einen neuen Code hinzufügen. Dazu brauchen Sie die Originalfernbedienung.
a. Eine Funktion lehren
• Wählen Sie das Gerät, das Sie eine Funktion lehren
wollen.
• Halten Sie SET 3 Sekunden gedrückt.
• Wählen Sie LEARNING mit
OK.
• Wählen Sie LEARN KEY mit
Sie OK. Das LCD zeigt SELECT KEY. Wählen Sie ein
Gerät aus, um die Funktion zu verlassen.
• Drücken Sie die Taste, welche die neue Funktionen
lernen soll (hier: POWER). Das LCD zeigt WAITING.
• Richten Sie den IR-Sensor der VRC801D2 auf den IR-
Sensor der Originalfernbedienung (max. Entfernung
von 5cm).
• Halten Sie die Taste der Originalfernbedienung (hier:
POWER) gedrückt bis SUCCES auf der VRC801D2
erscheint. Wiederholen Sie die 3 Schritte falls nötig.
Bemerkung: - Wenn Sie einer Taste verschiedene Funktionen zuweisen, wird nur die zuletzt gelehrte Funktion gespeichert.
- Alle Funktionen sind übertragbar außer SHOW VIEW, MACRO, SET, LEARN und ALL OFF.
- Diese Fernbedienung kann bis zu 100 Codes für insgesamt 8 Geräte speichern. Manche Codes werden aber
nicht akzeptiert.
b. Eine gelehrte Funktion löschen
• Wählen Sie das Gerät, bei dem Sie eine Funktion
löschen wollen.
• Halten Sie SET 3 Sekunden gedrückt.
• Wählen Sie LEARNING mit
drücken Sie OK.
• Wählen Sie die DELETE KEY mit
drücken Sie OK. SELECT KEY erscheint auf dem
LCD.
• Drücken Sie die Taste, die Sie löschen wollen.
SURE DELET erscheint. Drücken Sie OK zum
Bestätigen. SUCCESS erscheint auf dem LCD.
• Wiederholen Sie den oben erwähnten Schritt für jede Taste, die Sie löschen wollen.
oder und drücken Sie
oder und drücken
oder und
oder und
VRC801D2 VELLEMAN
- 23 -
Page 24

c. Alle gelehrten Funktionen löschen
Um nicht Schritt für Schritt alle Funktionen löschen zu müssen, können Sie diese Funktion verwenden.
• Wählen Sie das Gerät, bei dem Sie die Funktionen
löschen wollen.
• Halten Sie SET 3 Sekunden gedrückt.
• Wählen Sie LEARNING mit
oder und
drücken Sie OK.
• Wählen Sie DELETE DEV mit
oder und
drücken Sie OK. Das LCD zeigt SELECT DEV.
• Wählen Sie das Gerät und drücken Sie OK.
• SURE DELET erscheint auf dem LCD. Drücken
Sie OK zum Bestätigen.
• Wiederholen Sie die 2 obersten Schritte wenn Sie
alle Funktionen für ein anderes Gerät löschen.
• Drücken Sie EXIT zum Verlassen.
Bemerkung: - Alles löschen dauert ungefähr 3 Minuten. Wenn es wenig Funktionen gibt, können Sie diese am besten die eine
nach der anderen löschen.
d. Alle gelehrte Funktionen der Fernbedienung löschen
Verwenden Sie diese Funktion wenn Sie alle gelehrten
Funktionen der VRC801D2 löschen wollen.
• Wählen Sie das Gerät, bei dem Sie die Funktionen
löschen wollen.
• Wählen Sie LEARNING mit
oder und drücken
Sie OK.
• Wählen Sie DELETE ALL mit
oder und
drücken Sie OK.
• SURE DELET erscheint auf dem LCD. Drücken Sie
OK zum Bestätigen. Alle gelehrten Funktionen sind
gelöscht.
5. Macros
Ein Macro ist eine Aufeinanderfolge von Funktionen untergebracht mit nur einem Tastendruck.
d. Ein Macro einstellen
• Halten Sie SET 3 Sekunden gedrückt.
• Wählen Sie MACRO mit
• Wählen Sie MACRO 1, MACRO 2 oder MACRO 3 mit
• SET UP verschijnt op de lcd. Druk op OK om te bevestigen.
• SELECT KEY erscheint im LCD-Display. Wählen Sie ein Gerät aus und die Funktion(en) die Sie einstellen möchten, z.B.
VCR + POWER + REC wenn Sie den Videorecorder einschalten möchten und aufnehmen möchten.
• Drücken Sie OK, um die Makro-Einstellung zu speichern. SUCCESS erscheint im LCD-Display. Drücken Sie
ein nächstes Macro einzustellen oder drücken Sie eine Taste, um die Funktion zu verlassen.
Bemerkung: - Ein Macro kann max. 10 Befehle enthalten.
- Sorgen Sie dafür, dass die eingestellten Tasten den Befehl ausführen können. Prüfen Sie die Tasten ehe Sie
diese in das Macro programmieren.
- Bemerken Sie, dass das Makro nur unter bestimmten Bedingungen ausgeführt werden kann, z.B. der
Videorecorder muss eine Kassette enthalten wenn Sie aufnehmen möchten.
e. Ein Macro verwenden
Halten Sie MACRO gedrückt und drücken Sie 1, 2 oder 3 (abhängig vom gewünschten Macro). Die Fernbedienung führt die
Sequenz von Befehlen aus.
f. Ein Makro löschen
• Halten Sie SET 3 Sekunden gedrückt.
• Wählen Sie MACRO mit
• Wählen Sie DELETE mit
• SURE DELET erscheint im LCD-Display. Drücken Sie OK zum Bestätigen.
Drücken Sie OK, um die Einstellung zu speichern. SUCCESS erscheint im LCD-Display. Drücken Sie
folgendes Macro zu löschen oder drücken Sie eine Taste, um die Funktion zu verlassen.
oder aus und drücken Sie OK.
oder aus und drücken Sie OK.
oder um
oder aus und drücken Sie OK.
oder aus und drücken Sie OK.
oder um ein
VRC801D2 VELLEMAN
- 24 -
Page 25

6. Andere Funktionen
a. Die Zeit einstellen
• Halten Sie SET 3 Sekunden gedrückt.
• Wählen Sie CONFIGURE mit
drücken Sie OK.
• Wählen Sie TIME SETUP mit
drücken Sie OK.
• Verwenden Sie
oder um die Stunden, Minuten
und AM/PM zu selektieren. Stellen Sie Zeit ein mit
den Ziffertasten, AM/PM mit
OK.
• Drücken Sie EXIT zum Verlassen.
b. Lautstärke sperren
Aktivieren Sie diese Funktion wenn Sie die Lautstärke von einem Ihrer Geräte regeln wollen.
• Halten Sie SET 3 Sekunden gedrückt.
• Wählen Sie CONFIGURE mit
drücken Sie OK.
• Wählen Sie VOL LOCK mit
Sie OK.
• Wählen Sie das Gerät, indem Sie die entsprechende
Taste drücken.
• Wählen Sie ON oder OFF mit
Sie zum Bestätigen.
• Drücken Sie EXIT zum Verlassen.
c. Gerät sperren
Schalten Sie diese Funktion ein um den Code Ihres Gerätes zu sperren, sodass er bei einer automatischen Suche nicht
geändert werden kann.
• Halten Sie SET 3 Sekunden gedrückt.
• Wählen Sie CONFIGURE mit
drücken Sie OK.
• Wählen Sie DEV LOCK mit
Sie OK.
• Wählen Sie das Gerät, indem Sie die entsprechende
Taste drücken.
• Ändern Sie auf ON mit
zum Bestätigen.
• Wiederholen Sie die letzten 2 Schritte um andere
Geräte zu sperren.
• Drücken Sie EXIT zum Verlassen.
d. Hintergrundbeleuchtung
Wenn die Hintergrundbeleuchtung eingeschaltet ist, leuchtet die Hintergrundbeleuchtung wenn eine Taste gedrückt wird.
• Halten Sie SET 3 Sekunden gedrückt.
• Wählen Sie CONFIGURE mit
• Selektieren Sie LIGHT mit
• Selektieren Sie ON oder OFF mit
• Drücken Sie EXIT zum Verlassen.
e. LCD-Kontrast einstellen
• Halten Sie SET 3 Sekunden gedrückt.
• Wählen Sie CONFIGURE mit
• Selektieren Sie CONTRAST mit
• Stellen Sie den Kontrast mit
• Drücken Sie EXIT zum Verlassen.
oder und
oder und
oder . Drücken Sie
oder und
oder und drücken
oder und drücken
oder und
oder und drücken
oder und drücken Sie OK
oder und drücken Sie OK.
oder und drücken Sie OK.
oder und drücken Sie OK zum Bestätigen.
oder und drücken Sie OK.
oder und drücken Sie OK.
oder ein und drücken Sie OK zum Bestätigen.
VRC801D2 VELLEMAN
- 25 -
Page 26

f. ShowView-Funktion
Die VRC801D2 ist mit einer ShowView-Funktion, die alle TV- oder Kabel-/Satellitenkanäle abtastet.
• Wählen Sie ein Gerät aus.
• Halten Sie SHOW VIEW gedrückt. Die Fernbedienung tastet automatisch alle Kanäle ab sobald die LED blinkt.
Bemerkung:- Richten Sie die Fernbedienung während der Ausführung des Befehls auf das Gerät.
- Drücken Sie eine Taste, um die Funktion zu verlassen.
g. All Off-Funktion
Mit dieser Taste schalten Sie alle Geräte ein oder aus. Richten Sie die Fernbedienung auf das Gerät und halten Sie ALL OFF
gedrückt.
h. Alles löschen
Verwenden Sie diese Funktion um alle Einstellungen zu löschen und zu den Werkseinstellungen zurückzukehren.
• Halten Sie SET 3 Sekunden gedrückt.
• Wählen Sie CONFIGURE mit
• Selektieren Sie CLEAR ALL mit
oder und drücken Sie OK.
oder und drücken Sie OK.
• SURE CLEAR erscheint auf dem Schirm. Drücken Sie OK zum Bestätigen. Alle Einstellungen werden gelöscht.
7. Technische Daten
Stromversorgung 2 x 1.5V AAA (Micro)-Batterien (nicht mitgeliefert)
Abmessungen 210 x 56 x 28mm
Gesamtgewicht 150g
Alle Änderungen vorbehalten.
VRC801D2 VELLEMAN
- 26 -
Page 27

VRC801D2 VELLEMAN
- 27 -
Page 28

VRC801D2 VELLEMAN
- 28 -
Page 29

VRC801D2 VELLEMAN
- 29 -
Page 30

VRC801D2 VELLEMAN
- 30 -
Page 31

VRC801D2 VELLEMAN
- 31 -
Page 32

VRC801D2 VELLEMAN
- 32 -
Page 33

VRC801D2 VELLEMAN
- 33 -
Page 34

VRC801D2 VELLEMAN
- 34 -
Page 35

VRC801D2 VELLEMAN
- 35 -
Page 36

VRC801D2 VELLEMAN
- 36 -
Page 37

VRC801D2 VELLEMAN
- 37 -
Page 38

VRC801D2 VELLEMAN
- 38 -
Page 39

VRC801D2 VELLEMAN
- 39 -
Page 40

VRC801D2 VELLEMAN
- 40 -
Page 41

VRC801D2 VELLEMAN
- 41 -
Page 42

VRC801D2 VELLEMAN
- 42 -
Page 43

VRC801D2 VELLEMAN
- 43 -
Page 44

VRC801D2 VELLEMAN
- 44 -
Page 45

VRC801D2 VELLEMAN
- 45 -
Page 46

VRC801D2 VELLEMAN
- 46 -
Page 47

VRC801D2 VELLEMAN
- 47 -
Page 48

VRC801D2 VELLEMAN
- 48 -
Page 49

Velleman® Service and Quality Warranty
Velleman® has over 35 years of experience in the electronics world and distributes
its products in more than 85 countries.
All our products fulfil strict quality requirements and legal stipulations in the EU. In
order to ensure the quality, our products regularly go through an extra quality
check, both by an internal quality department and by specialized external
organisations. If, all precautionary measures notwithstanding, problems should
occur, please make appeal to our warranty (see guarantee conditions).
General Warranty Conditions Concerning Consumer Products (for EU):
• All consumer products are subject to a 24-month warranty on production flaws
and defective material as from the original date of purchase.
• Velleman® can decide to replace an article with an equivalent article, or to refund
the retail value totally or partially when the complaint is valid and a free repair or
replacement of the article is impossible, or if the expenses are out of proportion.
You will be delivered a replacing article or a refund at the value of 100% of the
purchase price in case of a flaw occurred in the first year after the date of purchase
and delivery, or a replacing article at 50% of the purchase price or a refund at the
value of 50% of the retail value in case of a flaw occurred in the second year after
the date of purchase and delivery.
• Not covered by warranty:
- all direct or indirect damage caused after delivery to the article (e.g. by oxidation,
shocks, falls, dust, dirt, humidity...), and by the article, as well as its contents (e.g.
data loss), compensation for loss of profits;
- frequently replaced consumable goods, parts or accessories such as batteries,
lamps, rubber parts, drive belts... (unlimited list);
- flaws resulting from fire, water damage, lightning, accident, natural disaster, etc.
…;
- flaws caused deliberately, negligently or resulting from improper handling,
negligent maintenance, abusive use or use contrary to the manufacturer’s
instructions;
- damage caused by a commercial, professional or collective use of the article (the
warranty validity will be reduced to six (6) months when the article is used
professionally);
- damage resulting from an inappropriate packing and shipping of the article;
- all damage caused by modification, repair or alteration performed by a third party
without written permission by Velleman®.
• Articles to be repaired must be delivered to your Velleman® dealer, solidly
packed (preferably in the original packaging), and be completed with the original
receipt of purchase and a clear flaw description.
• Hint: In order to save on cost and time, please reread the manual and check if
the flaw is caused by obvious causes prior to presenting the article for repair. Note
that returning a non-defective article can also involve handling costs.
• Repairs occurring after warranty expiration are subject to shipping costs.
• The above conditions are without prejudice to all commercial warranties.
The above enumeration is subject to modification according to the article
(see article’s manual).
Velleman® service- en kwaliteitsgarantie
Velleman® heeft ruim 35 jaar ervaring in de elektronicawereld en verdeelt in meer
dan 85 landen.
Al onze producten beantwoorden aan strikte kwaliteitseisen en aan de wettelijke
bepalingen geldig in de EU. Om de kwaliteit te waarborgen,
ondergaan onze producten op regelmatige tijdstippen een extra kwaliteitscontrole,
zowel door onze eigen kwaliteitsafdeling als door externe gespecialiseerde
organisaties. Mocht er ondanks deze voorzorgen toch een probleem optreden, dan
kunt u steeds een beroep doen op onze waarborg (zie waarborgvoorwaarden).
Algemene waarborgvoorwaarden consumentengoederen (voor Europese
Unie):
• Op alle consumentengoederen geldt een garantieperiode van 24 maanden op
productie- en materiaalfouten en dit vanaf de oorspronkelijke aankoopdatum.
• Indien de klacht gegrond is en een gratis reparatie of vervanging van een artikel
onmogelijk is of indien de kosten hiervoor buiten verhouding zijn, kan Velleman®
beslissen het desbetreffende artikel te vervangen door een gelijkwaardig artikel of
de aankoopsom van het artikel gedeeltelijk of volledig terug te betalen. In dat geval
krijgt u een vervangend product of terugbetaling ter waarde van 100% van de
aankoopsom bij ontdekking van een gebrek tot één jaar na aankoop en levering, of
Page 50

een vervangend product tegen 50% van de kostprijs of terugbetaling van 50 % bij
ontdekking na één jaar tot 2 jaar.
• Valt niet onder waarborg:
- alle rechtstreekse of onrechtstreekse schade na de levering veroorzaakt aan het
toestel (bv. door oxidatie, schokken, val, stof, vuil, vocht...), en door het toestel,
alsook zijn inhoud (bv. verlies van data), vergoeding voor eventuele winstderving.
- verbruiksgoederen, onderdelen of hulpstukken die regelmatig dienen te worden
vervangen, zoals bv. batterijen, lampen, rubberen onderdelen, aandrijfriemen...
(onbeperkte lijst).
- defecten ten gevolge van brand, waterschade, bliksem, ongevallen,
natuurrampen, enz.
- defecten veroorzaakt door opzet, nalatigheid of door een onoordeelkundige
behandeling, slecht onderhoud of abnormaal gebruik of gebruik van het toestel
strijdig met de voorschriften van de fabrikant.
- schade ten gevolge van een commercieel, professioneel of collectief gebruik van
het apparaat (bij professioneel gebruik wordt de garantieperiode herleid tot 6
maand).
- schade veroorzaakt door onvoldoende bescherming bij transport van het
apparaat.
- alle schade door wijzigingen, reparaties of modificaties uitgevoerd door derden
zonder toestemming van Velleman®.
• Toestellen dienen ter reparatie aangeboden te worden bij uw Velleman®verdeler. Het toestel dient vergezeld te zijn van het oorspronkelijke aankoopbewijs.
Zorg voor een degelijke verpakking (bij voorkeur de originele verpakking) en voeg
een duidelijke foutomschrijving bij.
• Tip: alvorens het toestel voor reparatie aan te bieden, kijk nog eens na of er geen
voor de hand liggende reden is waarom het toestel niet naar behoren werkt (zie
handleiding). Op deze wijze kunt u kosten en tijd besparen. Denk eraan dat er ook
voor niet-defecte toestellen een kost voor controle aangerekend kan worden.
• Bij reparaties buiten de waarborgperiode zullen transportkosten aangerekend
worden.
• Elke commerciële garantie laat deze rechten onverminderd.
Bovenstaande opsomming kan eventueel aangepast worden naargelang de
aard van het product (zie handleiding van het betreffende product).
Garantie de service et de qualité Velleman®
Velleman® jouit d’une expérience de plus de 35 ans dans le monde de
l’électronique avec une distribution dans plus de 85 pays.
Tous nos produits répondent à des exigences de qualité rigoureuses et à des
dispositions légales en vigueur dans l’UE. Afin de garantir la qualité, nous
soumettons régulièrement nos produits à des contrôles de qualité supplémentaires,
tant par notre propre service qualité que par un service qualité externe. Dans le cas
improbable d’un défaut malgré toutes les précautions, il est possible d’invoquer
notre garantie (voir les conditions de garantie).
Conditions générales concernant la garantie sur les produits grand public
(pour l’UE) :
• tout produit grand public est garanti 24 mois contre tout vice de production ou de
matériaux à dater du jour d’acquisition effective ;
• si la plainte est justifiée et que la réparation ou le remplacement d’un article est
jugé impossible, ou lorsque les coûts s’avèrent disproportionnés, Velleman®
s’autorise à remplacer ledit article par un article équivalent ou à rembourser la
totalité ou une partie du prix d’achat. Le cas échéant, il vous sera consenti un
article de remplacement ou le remboursement complet du prix d’achat lors d’un
défaut dans un délai de 1 an après l’achat et la livraison, ou un article de
remplacement moyennant 50% du prix d’achat ou le remboursement de 50% du
prix d’achat lors d’un défaut après 1 à 2 ans.
• sont par conséquent exclus :
- tout dommage direct ou indirect survenu à l’article après livraison (p.ex.
dommage lié à l’oxydation, choc, chute, poussière, sable, impureté…) et provoqué
par l’appareil, ainsi que son contenu (p.ex. perte de données) et une indemnisation
éventuelle pour perte de revenus ;
- tout bien de consommation ou accessoire, ou pièce qui nécessite un
remplacement régulier comme p.ex. piles, ampoules, pièces en caoutchouc,
courroies… (liste illimitée) ;
- tout dommage qui résulte d’un incendie, de la foudre, d’un accident, d’une
catastrophe naturelle, etc. ;
- out dommage provoqué par une négligence, volontaire ou non, une utilisation ou
un entretien incorrects, ou une utilisation de l’appareil contraire aux prescriptions
du fabricant ;
Page 51

- tout dommage à cause d’une utilisation commerciale, professionnelle ou collective
de l’appareil (la période de garantie sera réduite à 6 mois lors d’une utilisation
professionnelle) ;
- tout dommage à l’appareil qui résulte d’une utilisation incorrecte ou différente que
celle pour laquelle il a été initialement prévu comme décrit dans la notice ;
- tout dommage engendré par un retour de l’appareil emballé dans un
conditionnement non ou insuffisamment protégé.
- toute réparation ou modification effectuée par une tierce personne sans
l’autorisation explicite de SA Velleman® ; - frais de transport de et vers Velleman®
si l’appareil n’est plus couvert sous la garantie.
• toute réparation sera fournie par l’endroit de l’achat. L’appareil doit
nécessairement être accompagné du bon d’achat d’origine et être dûment
conditionné (de préférence dans l’emballage d’origine avec mention du défaut) ;
• tuyau : il est conseillé de consulter la notice et de contrôler câbles, piles, etc.
avant de retourner l’appareil. Un appareil retourné jugé défectueux qui s’avère en
bon état de marche pourra faire l’objet d’une note de frais à charge du
consommateur ;
• une réparation effectuée en-dehors de la période de garantie fera l’objet de frais
de transport ;
• toute garantie commerciale ne porte pas atteinte aux conditions susmentionnées.
La liste susmentionnée peut être sujette à une complémentation selon le
type de l’article et être mentionnée dans la notice d’emploi.
Garantía de servicio y calidad Velleman®
Velleman® disfruta de una experiencia de más de 35 años en el mundo de la
electrónica con una distribución en más de 85 países.
Todos nuestros productos responden a normas de calidad rigurosas y disposiciones
legales vigentes en la UE. Para garantizar la calidad, sometimos nuestros productos
regularmente a controles de calidad adicionales, tanto por nuestro propio servicio
de calidad como por un servicio de calidad externo. En el caso improbable de que
surgieran problemas a pesar de todas las precauciones, es posible apelar a nuestra
garantía (véase las condiciones de garantía).
Condiciones generales referentes a la garantía sobre productos de venta al
público (para la Unión Europea):
• Todos los productos de venta al público tienen un período de garantía de 24
meses contra errores de producción o errores en materiales desde la adquisición
original;
• Si la queja está fundada y si la reparación o la sustitución de un artículo es
imposible, o si los gastos son desproporcionados, Velleman® autoriza reemplazar el
artículo por un artículo equivalente o reembolsar la totalidad o una parte del precio
de compra. En este caso, recibirá un artículo de recambio o el reembolso completo
del precio de compra al descubrir un defecto hasta un año después de la compra y
la entrega, o un artículo de recambio al 50% del precio de compra o la sustitución
de un 50% del precio de compra al descubrir un defecto después de 1 a 2 años.
• Por consiguiente, están excluidos entre otras cosas:
- todos los daños causados directamente o indirectamente al aparato y su
contenido después de la entrega (p.ej. por oxidación, choques, caída,...) y
causados por el aparato, al igual que el contenido (p.ej. pérdida de datos) y una
indemnización eventual para falta de ganancias;
- partes o accesorios que deban ser reemplazados regularmente, como por ejemplo
baterías, lámparas, partes de goma, ... (lista ilimitada)
- defectos causados por un incendio, daños causados por el agua, rayos,
accidentes, catástrofes naturales, etc. ;
- defectos causados a conciencia , descuido o por malos tratos, un mantenimiento
inapropiado o un uso anormal del aparato contrario a las instrucciones del
fabricante;
- daños causados por un uso comercial, profesional o colectivo del aparato (el
período de garantía se reducirá a 6 meses con uso profesional) ;
- daños causados por un uso incorrecto o un uso ajeno al que est está previsto el
producto inicialmente como está descrito en el manual del usuario ;
- daños causados por una protección insuficiente al transportar el aparato.
- daños causados por reparaciones o modificaciones efectuadas por una tercera
persona sin la autorización explicita de SA Velleman® ;
- se calcula gastos de transporte de y a Velleman® si el aparato ya no está cubierto
por la garantía.
• Cualquier reparación se efectuará por el lugar de compra. Devuelva el aparato
con la factura de compra original y transpórtelo en un embalaje sólido
(preferentemente el embalaje original). Incluya también una buena descripción del
defecto ;
Page 52

• Consejo: Lea el manual del usuario y controle los cables, las pilas, etc. antes de
devolver el aparato. Si no se encuentra un defecto en el artículo los gastos podrían
correr a cargo del cliente;
• Los gastos de transporte correrán a carga del cliente para una reparación
efectuada fuera del periode de garantía.
• Cualquier gesto comercial no disminuye estos derechos.
La lista previamente mencionada puede ser adaptada según el tipo de
artículo (véase el manual del usuario del artículo en cuestión)
Velleman® Service- und Qualitätsgarantie
Velleman® hat gut 35 Jahre Erfahrung in der Elektronikwelt und vertreibt seine
Produkte in über 85 Ländern.
Alle Produkte entsprechen den strengen Qualitätsforderungen und gesetzlichen
Anforderungen in der EU. Um die Qualität zu gewährleisten werden unsere Produkte
regelmäßig einer zusätzlichen Qualitätskontrolle unterworfen, sowohl von unserer
eigenen Qualitätsabteilung als auch von externen spezialisierten Organisationen.
Sollten, trotz aller Vorsichtsmaßnahmen, Probleme auftreten, nehmen Sie bitte die
Garantie in Anspruch (siehe Garantiebedingungen).
Allgemeine Garantiebedingungen in Bezug auf Konsumgüter (für die
Europäische Union):
• Alle Produkte haben für Material- oder Herstellungsfehler eine Garantieperiode
von 24 Monaten ab Verkaufsdatum.
• Wenn die Klage berechtigt ist und falls eine kostenlose Reparatur oder ein
Austausch des Gerätes unmöglicht ist, oder wenn die Kosten dafür
unverhältnismäßig sind, kann Velleman® sich darüber entscheiden, dieses Produkt
durch ein gleiches Produkt zu ersetzen oder die Kaufsumme ganz oder teilweise
zurückzuzahlen. In diesem Fall erhalten Sie ein Ersatzprodukt oder eine
Rückzahlung im Werte von 100% der Kaufsumme im Falle eines Defektes bis zu 1
Jahr nach Kauf oder Lieferung, oder Sie bekommen ein Ersatzprodukt im Werte von
50% der Kaufsumme oder eine Rückzahlung im Werte von 50 % im Falle eines
Defektes im zweiten Jahr.
• Von der Garantie ausgeschlossen sind:
- alle direkten oder indirekten Schäden, die nach Lieferung am Gerät und durch das
Gerät verursacht werden (z.B. Oxidation, Stöße, Fall, Staub, Schmutz, Feuchtigkeit,
...), sowie auch der Inhalt (z.B. Datenverlust), Entschädigung für eventuellen
Gewinnausfall.
- Verbrauchsgüter, Teile oder Zubehörteile, die regelmäßig ausgewechselt werden,
wie z.B. Batterien, Lampen, Gummiteile, Treibriemen, usw. (unbeschränkte Liste).
- Schäden verursacht durch Brandschaden, Wasserschaden, Blitz, Unfälle,
Naturkatastrophen, usw.
- Schäden verursacht durch absichtliche, nachlässige oder unsachgemäße
Anwendung, schlechte Wartung, zweckentfremdete Anwendung oder
Nichtbeachtung von Benutzerhinweisen in der Bedienungsanleitung.
- Schäden infolge einer kommerziellen, professionellen oder kollektiven Anwendung
des Gerätes (bei gewerblicher Anwendung wird die Garantieperiode auf 6 Monate
zurückgeführt).
- Schäden verursacht durch eine unsachgemäße Verpackung und unsachgemäßen
Transport des Gerätes.
- alle Schäden verursacht durch unautorisierte Änderungen, Reparaturen oder
Modifikationen, die von einem Dritten ohne Erlaubnis von Velleman® vorgenommen
werden.
• Im Fall einer Reparatur, wenden Sie sich an Ihren Velleman®-Verteiler. Legen Sie
das Produkt ordnungsgemäß verpackt (vorzugsweise die Originalverpackung) und
mit dem Original-Kaufbeleg vor. Fügen Sie eine deutliche Fehlerumschreibung
hinzu.
• Hinweis: Um Kosten und Zeit zu sparen, lesen Sie die Bedienungsanleitung
nochmals und überprüfen Sie, ob es keinen auf de Hand liegenden Grund gibt, ehe
Sie das Gerät zur Reparatur zurückschicken. Stellt sich bei der Überprüfung des
Geräts heraus, dass kein Geräteschaden vorliegt, könnte dem Kunden eine
Untersuchungspauschale berechnet.
• Für Reparaturen nach Ablauf der Garantiefrist werden Transportkosten berechnet.
• Jede kommerzielle Garantie lässt diese Rechte unberührt.
Die oben stehende Aufzählung kann eventuell angepasst werden gemäß
der Art des Produktes (siehe Bedienungsanleitung des Gerätes).
 Loading...