

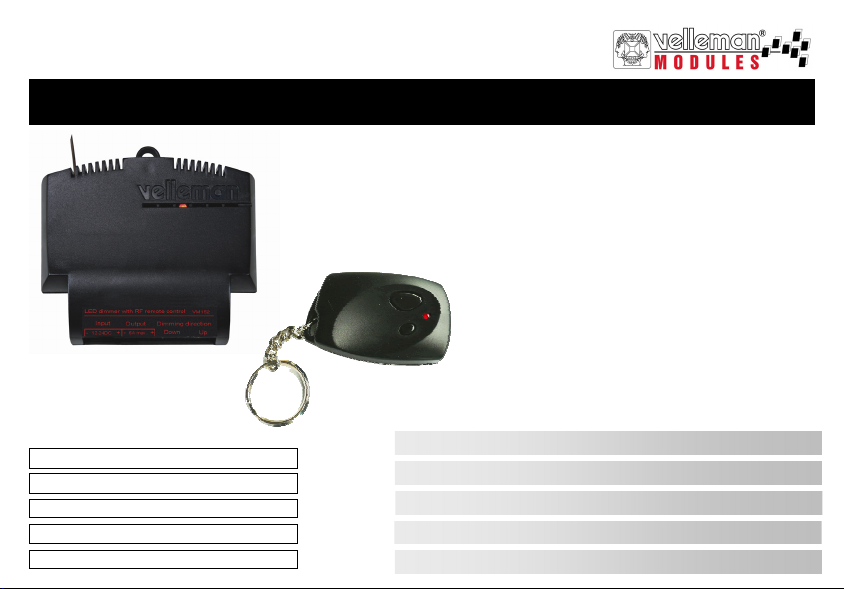
LED DIMMER with RF remote control
VM152
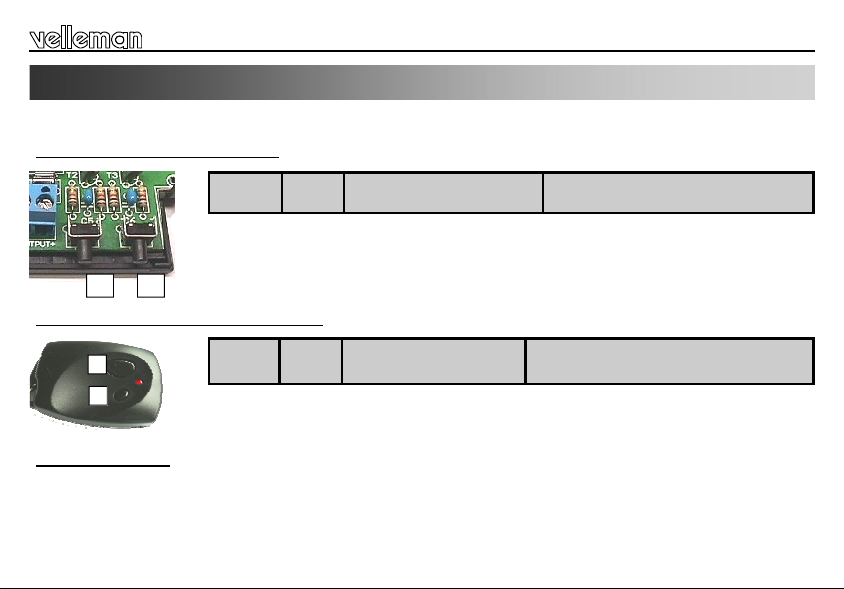
Extra remote: VM130T
Belgium [Head office] +32(0)9 384 36 11
France +33(0)3 20 15 86 15
Netherlands +31(0)76 514 7563
USA +1(817)284-7785
Spain +32(0)9 384 36 11
LED dimmer with RF remote control 4
Leddimmer met RF-afstandsbediending 7
Graduateur LED avec télécommande RF 10
LED-Dimmer mit RF-Fernbedienung 13
Dimmer LED con mando a distancia RF 16
OPEN
1
2
-
+
4
3
7
9
8
12 - 24VDC
5
6
Description
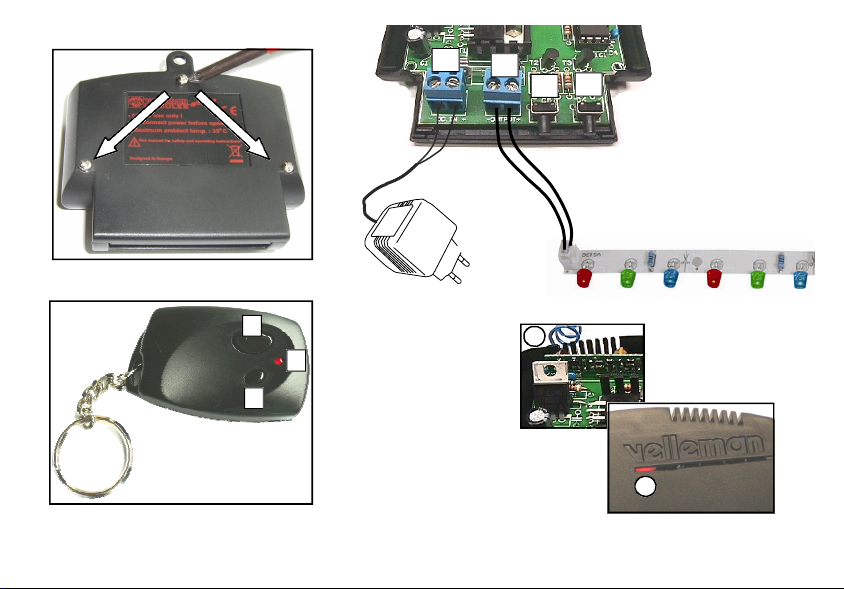
-1- 12 - 24V DC input
-2- LED/LAMP connection (6A max.)
-3- Dim Down
-4- Dim up
-5- Antenna
-6- Dim level indicator
-7- Dim up
-8- Dim down
-9- Indication
-1- 12 tot 24VDC ingang
-2- Aansluiting LED/LAMP (6 A max.)
-3- Dimmen naar minimum
-4- Dimmen naar maximum
-5- Antenne
-6- Aanduiding dimniveau
-7- Dimmen naar maximum
-8- Dimmen naar minimum
-9- indicator
Beschreibung
-1- 12 – 24 VDC-Eingang
-2- Anschluss LED/LAMP (6 A max.)
-3- Dimmen unten
-4- Dimmen oben
-5- Antenne
-6- Anzeige Dimmpegel
-7- Dimmen obten
-8- Dimmen unten
-9- Anzeige
Do not mount the uni t in the proxi mity of other electronic devices or metal objects. Straighten the antenna !
Monteer de ontvanger niet in de omgeving van andere electronische toestellen of metalen objecten. Recht de antenne !
N’installer pas l’appareil à proximité d’autres appareils électroniques ou d’objets métalliques. Rajustez l’antenne.
Montieren Sie das Gerät nicht in der Nähe von anderen elektronischen Geräten oder Metallgegenständen. Ziehen Sie die Antenne gerade!
No instale el aparato cerca de otros aparatos electrónicos u objetos metálicos. ¡Enderece la antena!
-1- Entrada 12 – 24 VCC
-2- Conexión LED/LAMP (6 A máx.)
-3- Intensidad de luz hacia abajo
-4- Intensidad de luz hacia arriba
-5- Antena
-6- Indicación del nivel de la intensidad de
-7- Intensidad de luz hacia arriba
-8- Intensidad de luz hacia abajo
-9- Indicación
luz
Beschrijving
Descripción
Description
-1- Entrée 12 – 24 VCC
-2- Connexion LED/LAMP (6 A max.)
-3- Variation vers le bas
-4- Variation à la hausse
-5- Antenne
-6- Indication du niveau de variation
-7- Variation à la hausse
-8- Variation vers le bas
-9- Indi catio n
Velleman hereby certifies that the device
VM152 meets the essential requirements and all
other relevant stipulations of
directive ETS 300-220
For the complete co nformity declaration
http://www.velle man.be/downloads/doc/ce_VM152.pdf
check out :
3
Specifications - features - mounting
Specifications and features
SPECIFICATIONS
Receiver:
power supply: 12-24VDC
max load: 6A
LED PWM frequency: +/- 300Hz
Transmitter:
433.92 MHz operation
R&TTE compliant ( ETS 300-220)
FEATURES
ideal for use with LED strips see our website
suited for incandescent lamps
automated Slow on / slow off effect mode selectable
learn up to 16 remotes
Hi power MOSFET output
memory for last selected function
on-board operation is possible
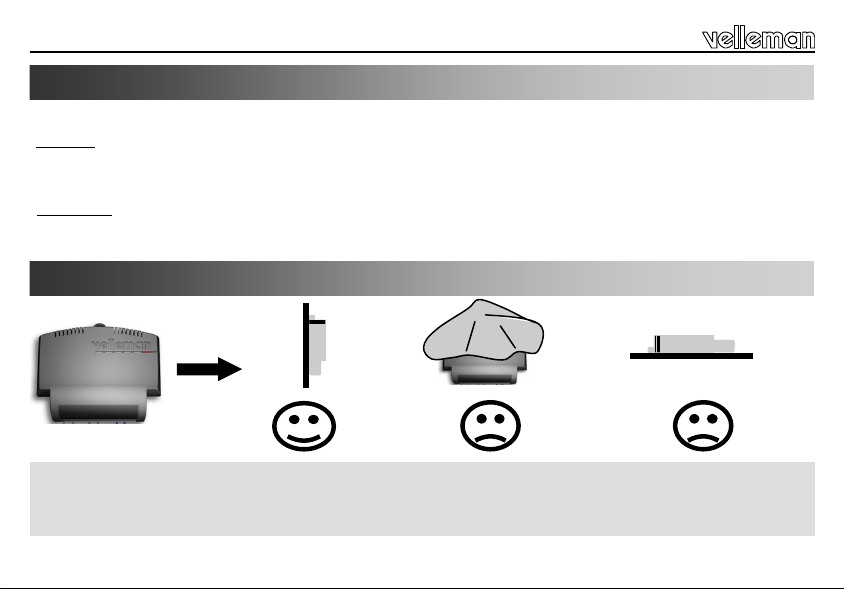
Mounting
WARR ANTY
This product is guaranteed against defects in components and construction from the moment it is purchased and for a period of TWO YEAR starting f rom the date of sale. This guarantee is only
valid if the unit is submitted together with the original purchase invoice. VELLEMAN components Ltd limits its respo nsibility to the rep aration of defects or, as V ELLEMAN components Ltd
deems necessary, to the replacement or reparation of defective components. Costs and risks connected to the transport, removal or placement of the product, or any other costs directly or
indirectly connected to the repair, will not be reimbursed by VELLEMAN components Ltd. VELLEMAN components Ltd will not be held responsible for any damages caused by the malfunctioning
of a unit .
4
Bediening
Operation
For led dimming there are 2 possibilities, you can control directly on the receiver or with the remote.
CONTROLLING ON THE RECEIVER :
3 4
CONTROLLING WITH REMOTE CONTROL :
7
8
LEARN A REMOTE :
Keep button 3 & 4 pressed, the led blinks for a few seconds. Pres button 7 of the remote to learn, keep at the same time
button 3 & 4 pressed! The led's blinks to confirm that the remote has been stored.
At full memory led keeps blinking!
Dim
down
Press
button 3
Dim
down
Press
button 8
Dim up Automated slow on/off Erase all remotes
Press
button 4
keep button 4 pressed en press
button 3 briefly.
Press button 3 & 4 while powering on.
Led's will blink to confirm, when LED's are
Power off.
extinct release button 3 & 4.
Dim up Automated slow on/off Cancelling automated slow on/off
Press
button 7
keep for a second button
8 & 7 pressed.
keep button 8 pressed until LED's are extinct.
5

Specificaties – eigenschappen - Montage
Specificaties en eigenschappen
SPECIFICATIES
Ontvanger:
voeding: 12-24 VDC
max. last: 6 A
PWM-frequentie led: +/- 300 Hz
Afstandsbediening:
433.92 MHz
Conform R&TTE (ETS 300-220)
EIGENSCHAPPEN
ideaal voor gebruik met ledstrips - zie onze website
geschikt voor gloeilampen
automatische en selecteerbare trage in-/uitschakeldimmer
aanleerfunctie voor 16 afstandsbedieningen
Hi-power MOSFET-uitgang
laatst gebruikte instelling wordt in het geheugen bewaard
on-boardbediening mogelijk
Montage
WAARBORG
Dit produkt is gewaarborgd wat betreft gebreken in materialen en vakmanschap op het ogenblik van de aankoop en dit gedurende een period e van TWEE JAAR vanaf de aankoop. De waarborg
geldt enkel indien het produkt voorgelegd wordt samen met het origineel aankoop bewijs. De verplichtingen van VELL EMAN COMPO NENTS N.V. beperken zich tot het he rstellen van defecten
of, naar vr ije ke uze van V ELLE MAN COMP ONENTS N.V ., tot he t vervange n of herste llen van de fecte onderde len. Kos ten en ri sico ’s van trans port ; het weg nemen e n terugp laatse n van het
produkt, evenals om het even welke andere kosten die re chtstreeks of onrechtstreeks verband houd en met de herstelling , worden niet door VELLEMAN COMPONENTS N.V. vergoed.
VELLEMAN COMPONENTS N.V. is niet verantwoordelijk voor sc hade van gelijk welke aard, ve roorzaakt door het falen van een product.
6

Gebruik
Gebruik
U kunt de leds op twee manieren laten dimmen: via directe bediening op de ontvanger of via de afstandsbediening.
BEDIENING VIA DE ONTVANGER:
3 4
BEDIENING VIA DE AFSTANDSBEDIENING:
7
8
AANLEREN VAN EEN AFSTANDSBEDIENING:
Houd toets 3 en 4 ingedrukt. De led knippert gedurende enkele seconden. Druk op toets 7 op de afstandsbediening en houd
tegelijkertijd toets 3 en 4 ingedrukt om de afstandsbediening aan te leren. De led knippert om aan te geven dat de
afstandsbediening opgeslagen is. De led knippert continu bij een vol geheugen!
Neer-
dimmen
Druk op
toets 3
Neer-
dimmen
Druk op
toets 8
Op-
dimmen
Druk op
toets 4
Op-
dimmen
Druk op
toets 7
Automatische trage in-/
uitschakeldimmer
Houd toets 4 ingedrukt en
druk kort op toets 3
Automatische trage in-/
uitschakeldimmer
Houd toets 8 en 7 gedurende
1 seconde ingedrukt
Alle afstandsbedieningen wissen
Druk op toets 3 en 4 terwijl u inschakelt.
De leds knipperen ter bevestiging. Laat toets
3 en 4 los van zodra de leds doven.
Houd toets 8 ingedrukt tot de leds gedoofd zijn
Uitschakelen.
Automatische trage in-/
uitschakeldimmer opheffen
7

Spécifications – Caractéristiques – Montage
Spécifications et caractéristiques
SPÉCIFICATIONS
Récepteur :
Alimentation : 12-24 VCC
Charge max. : 6 A
Fréquence MLI de la LED : +/- 300 Hz
Télécommande :
433.92 MHz
Conforme R&TTE (ETS 300-220)
CARACTÉRISTIQUES
idéal pour usage avec les barrettes LED - voir notre site
convient pour usage avec des ampoules
variation d'allumage/extinction progressif automatique et sélectionnable
fonction d'apprentissage pour 16 télécommandes
sortie MOSFET de puissance
mémorisation du dernier réglage
commande on-board
Montage
GARANT IE
Ce produit est garanti contre les défauts des composantes et de fabrication au moment de l’achat, et ce pour une période de DEUX ANS à partir de la date d’achat. Cette garantie est
uniquement valable si le produit est accompagné de la preuve d’ac hat or igina le. Les obligatio ns de VEL LEMAN CO MPONENT S S.A. . se limite nt à la rép aration de s déf auts ou, s ur seule
décision de VELLEMAN COMPONENTS S.A. au remplacement ou à la réparation des pièces défectueuses. Les frais et les risques de transport, l’ enlève ment et le re nvoi du p roduit, ainsi q ue
tous autres frais liés directement ou indirectement à la réparation, ne sont pas pris en charge par VELLEMAN COMPONENTS S.A. VELLEMAN COMPONENTS S.A. n’est pas responsable des
dégâts, quels qu’ils soient, provoqués par le mauvais f onctionnement d’un produit.
8

Emploi
Emploi
Il y a deux façons de varier l’intensité des LED : pilotage direct depuis le récepteur ou depuis la télécommande.
PILOTAGE DEPUIS LE RÉCEPTEUR :
Variation
vers le bas
Enfoncez la
touche 3
3 4
PILOTAGE DEPUIS L A TÉLÉCOMMANDE :
APPRENTISSAGE D’UNE TÉLÉCOMMANDE :
Maintenez enfoncé les touches 3 et 4. La LED clignotent pendant quelques secondes. Enfoncez la touche 7 sur la télécommande et maintenez enfoncé les touches 3 et 4 pour apprendre la télécommande. Les LED clignotent pour confirmer que la
télécommande a été sauvegardée. La LED clignote en continu lors d’une mémoire pleine.
7
8
Variation
vers le bas
Enfoncez la
touche 8
Variation à
la hausse
Enfoncez la
touche 4
Variation à
la hausse
Enfoncez la
touche 7
Variation d’allumage/
extinction automatique et
progressif
Maintenez enfoncé la touche
4 et enfoncez brièvement la
Variation d’allumage/extinction
automatique et progressif
Maintenez enfoncé les touches
8 et 7 pendant une seconde.
touche 3
Effacement de toutes les télécommandes
Désactivez. Enfoncez les touches 3 et 4 tout
en allumant. Les LED clignotent pour confir-
mer. Relâcher les touches 3 et 4 dès que les
LED ne clignotent plus.
Effacement variation d’allumage/
extinction automatique et progressif
Maintenez enfoncé la touche 8 jusqu’à ce
que les LED s’éteignent
9

Technische Daten – Eigenschaften - Montieren
Technische Daten und Eigenschaften
TECHNISCHE DATEN
Empfänger:
Stromversorgung: 12-24 VDC
max. Last: 6 A
PWM-Frequenz LED: +/- 300 Hz
Fernbedienung:
433.92 MHz
Gemäß R&TTE (ETS 300-220)
EIGENSCHAFTEN
ideal für Anwendung mit LED-Streifen - siehe unsere W ebsite
eignet sich für Glühbirnen
automatischer und wählbarer 'Slow On/Slow Off'-Dimmer
Speicherfunktion für 16 Fernbedienungen
Hi-Power MOSFET-Ausgang
die letzt verwendete Einstellung wird gespeichert
Bordbedienung möglich
Montieren
GARANT IE
Dieses Produkt trägt eine Garantie für fehlerhaftes Material oder Verarbeitungsschäden im Moment des Ankaufs. Sie ist ZWEI JAHRE gültig ab A nkauf sdatum . Die G arantie k ann nur
beansprucht werden, wenn das Produtk mit der Originalrechnung ab gegebe n wird. Di e Ve rpflic htungen d er VELLEMAN CO MPO NENTS A G besc hränken si ch auf die A ufhebung der Fehle r,
oder, nach freier Wahl der VELLEMAN COMPONENTS AG , auf den Austausch oder die Reparation der fehlerhaften Teile. Kosten und Risiken des T ransport s; das Entfe rnen und
Wiedereinsetzen des Produkts, sowie alle anderen Kosten die direkt oder indirekt mit der Reparation in Verbindung gebracht werden können, werden durch die VELLEMAN COMPONENTS AG
nicht zurückerstatte t. VELLEMAN COMPONENTS AG is t nicht für Schäden gleich welc her Art, entstanden aus de r fehlerhaften Funktion des Produkt, haft bar.
10

Anwendung
Anwendung
Es gibt zwei Möglichkeiten, um die LEDs auf zu dimmen: über direkte Bedienung des Empfängers oder über die Fernbedienung
BEDIENUNG ÜBER EMPFÄNGER:
Dimmen
unten
Drücken
Sie Taste 3
3 4
BEDIENUNG ÜBER FERNBEDIENUNG:
EINE FERNBEDIENUNG PROGRAMMIEREN:
Halten Sie Taste 3 und 4 gedrückt. Die LED blinkt einige Sekunden. Drücken Sie Taste 7 der Fernbedienung und halten Sie
gleichzeitig Taste 3 und 4
Fernbedienung gespeichert ist. Die LED blinkt ständig wenn der Speicher voll ist!
Dimmen
7
8
unten
Drücken
Sie Taste 8
gedrückt, um die Fernbedienung zu programmieren. Die LED blinkt, um anzuzeigen, dass die
Dimmen
oben
Drücken
Sie Taste 4
Dimmen
oben
Drücken
Sie Taste 7
Automatischer langsamer
EIN/AUS-Dimmer
Halten Sie Taste 4 gedrückt und
drücken Sie Taste 3 kurz
Automatischer langsamer
EIN/AUS-Dimmer
Halten Sie Taste 8 und 7
während 1 Sekunde gedrückt
Alle Fernbedienungen löschen
Ausschalten. Drücken Sie Taste 3 und 4
während Sie einschalten. Die LEDs
blinken zur Bestätigung. Lassen Sie Taste
3 und 4 los sobald die LEDs löschen.
Automatischen langsamen EIN/AUS-
Halten Sie Taste 8 gedrückt bis die LEDs nicht
Dimmer löschen
mehr brennen
11

Especificaciones – Características – Montaje
Especificaciones y características
ESPECIFICACIONES
Receptor:
Alimentación: 12-24 VCC
Carga máx. : 6 A
Frecuencia MLI de la LED: +/- 300 Hz
Mando a distancia:
433.92 MHz
Cumple con la norma R&TTE (ETS 300-220)
CARACTERÍSTICAS
Ideal para el uso con las cintas con LEDs - véase nuestra página Web
Apto para el uso con lámparas incandescentes
Dimmer de encendido/apagado gradual automático y seleccionable
Función de programación para 16 mandos a distancia
Salida MOSFET de potencia
Se guarda el último ajuste
Control a bordo
Montaje
GARANT ÍA
Este producto está garantizado contra defectos de componentes y construcción a partir de su adquisición y durante un período de TRES AÑO a partir de la fecha de venta. Esta garantía sólo es
válida si la unidad se entrega junto con la factura de compra original. VELLEMAN COMPONENTS Ltd. limita su responsabilidad a la reparación de los defectos o, si VELLEMAN
COMPONENTS Ltd. lo estima necesario, a la sustitución o reparación de los componentes defectuosos. Los gastos y riesgos con respecto al transporte, el desmontaje o la instalación del
dispositivo, o cualquier otro gasto directa o indirectamente vinculado con la reparación, no será reembolsado por VELLEMAN COMPONENTS Ltd. VELLEMAN COMPONENTS Ltd no
respo nderá de ning ún daño causad o por el mal f uncionamie nto de la unidad .
12

Uso
Hay dos maneras para viariar la intensidad de los LEDs: control directo por el receptor o el mando a distancia.
CONTROL POR EL RECEPTOR
3 4
CONTROL POR EL MANDO A DISTANCIA:
7
8
PROGRAMAR UN MANDO A DISTANCIA
Mantenga pulsada la tecla 3 y 4. Los LEDs parpadean durante algunos segundos. Pulse la tecla 7 del mando a distancia y
m
antenga pulsada las teclas 3 y 4 para programar el mando a distancia. Los LEDs parpadean para confirmar que está pro-
gramado el mando. El LED parpadea de manera continua si la memoria está llena.
:
Intensidad de
luz hacia ab ajo
Pulse la tecla 3
Intensidad de
luz hacia ab ajo
Pulse la tecla 8
Intensidad de
luz hacia arriba
Pulse la tecla 4 Mantenga pulsada la tecla
Intensidad de
luz hacia
arriba
Pulse la tecla 7 Mantenga pulsada la tecla
Dimmer de encendido/
apaga automático y
progresivo
4 y pulse brevemente la
Dimmer de encendido/
apaga automático y
8 y 7 durante un segundo.
tecla 3
progresivo
:
Borrar todos los mandos
Desactive. Pulse la tecla 3 y 4
mientras está activando. Los LEDs
parpadean para confirmar. Suelte las
teclas 3 y 4 en cuanto los LEDs ya
no parpadeen.
Borrar dimmer de encendido/
apaga automático y progresivo
Mantenga pulsada la tecla 8 hasta que
los LEDs se activen
Uso
13

All repairs should be executed by qualified technicians.
Avoid the installatio n of the module in locations wi th standing or running water or e xcessiv e humidity. Indoor use only !
Handle the module gently and care fully. Dropping it can da mage the circuit board.
Never exceed the protection li mit va lues indicate d in the specifications.
As safety requi rement vary , please chec k with your local aut horities.
Facilit ate the operation of the devic e by fa miliarising yourself with its a djustments and indica tions.
Velleman modules are not suitable for use or as part of life suppor t systems, o r systems t hat might c reate hazardo us situations o f kind.
Re paraties mogen uitslui tend uitgevoerd wor den doo r vakkundi ge personen.
I nstalleer de module niet op plaatsen met staand of stromend water of in ruimtes met een te hoge vochtigheidsgraad. Binnengebruik en kel!
Ver mijd een ruwe behandeli ng. Stoten of laten vallen kunne n ernstige schade aanbr engen.
Oversc hrijdt nooit de opgegeve n veili gheidswaarden in de specificaties.
Ver mits de veiligheid ve reisten verschille n van plaa ts tot plaats, dient U ervoor te zor gen dat Uw montage voldoet aa n de plaat selijke geldende vereis ten.
Zorgt ervoo r dat u met alle bedieningse lementen vertrouwd raakt , wanneer U met het toestel zal wer ken.
Velle man modules zijn niet geschikt voor gebruik in of a ls gedeelte van systemen welke lev ensfuncties in sta nd houde n of syst emen welke gevaarli jke situaties van gelijk welke aard kunnen veroor zaken.
Al l repair s should be execute d by quali fied tec hnici ans. Tout e répara tion doi t être exé cutée pa r du perso nnel qua lifié.
Évitez l’installation de ce module à proximité d’eau courante ou dormante ou à une endroit avec un taux d’humidité trop élevé.
Ev itez les manipulatio ns br utales. Un chute pourrait endo mmage r le boîtier ou les plaque et pour rait causer des défauts.
Ne jamais excéder les valeurs limites de protection indiquées dans les spécifications.
Eta nt donné que les exigences en matiè re de sécurité varient d’ un lieu à l’autre, vous devez vous ass urer que votre montage satisfait aux exigences.
Familia risez-vous avec tous les ré glages et indications de l'a ppareil afin de facilite r l'opération.
Les modules Velleman ne conviennent pas pour une utilisation dans ou comme parties de systèmes servant à assurer des fonctions de survie ou des sys tèmes pouva nt entraîner des situatio ns
dangereus es, de quelque nature qu‘e lles soient.
Lassen Sie Reparaturen durch Fachleute erfolgen
Installieren Sie das Modul nicht in einer Umgebung mit stehendem oder fließendem Wasser oder in einer sehr feuchten Umgebung
Ge hen Sie behutsam mit dem Modul um. Es fallen lassen, kann die Leite rplatte und das Gehäuse bes chädigen.
Über schreiten Sie nie die i n den technischen Daten erwähnt en Eingangsgröße n.
Sic herheitsvorsc hriften können sich änder n, bitte beachten Sie die loka len Vorschriften Ihres La ndes.
Mac hen Sie sich mit allen Bedie nungselement vertraut , wenn Sie mit diesem Gerät arbeite n.
De r von Ihnen ge kaufte Bausatz ist aber f ür den Privatgebrauch ko nzipiert und ni ch für de n Einsatz in Le benserha ltenden oder Lebe nsrettende n Systemen o der unter auße rgewöhnlic hen
Umweltbe dingungen (Ex-systeme) geei net.
El servicio debe ser realizado por personal especializado
No i nstale el módulo en un lugar con agua estancada o agua corrie nte, ni en lugares excesivame nte húmedos.
Ma néjese con cuidado. De jar cae r el dispositivo puede daña r el circ uito impreso y la caja.
Nunca exceda los valores lí mites indicados en las especi ficaciones.
L as exi gencias en materia de seguri dad varían de un lugar a otro. Ase gúrese que el montaje reali zado sea conforme a las exigenc ias en vigor de su loca lidad.
Si ga cuidadosa mente todas las instrucci ones y famili arícese co n los ajustes al operar es te disposi tivo.
Los modulo Ve lleman no son adecuados para una utilización dentro o cor no sist ema destinado a garanti zar funcio nes para sobrevivir o siste mas conllevando sit uacio nes peligrosas sea cual su nat uraleza.
SAFETY INSTRUCTIONS
VEILIG HEIDSA ANWIJZ INGEN
CONSIGNES DE SÉCURITÉ
SICHERHEITSHINWEISE
LAS MEDIDAS DE SEG URIDAD


5 410329 411657
Modifications and typographical errors reserved - © Velleman nv - HVM152G - 2010 - ED1 (rev.1)
LED
LED
LED
DIMMER
DIMMER
DIMMER
WITH
WITH
WITH
RF
RF
RF
REMOTE
REMOTE
REMOTE
CONTROL
CONTROL
CONTROL
 Loading...