

Page 1
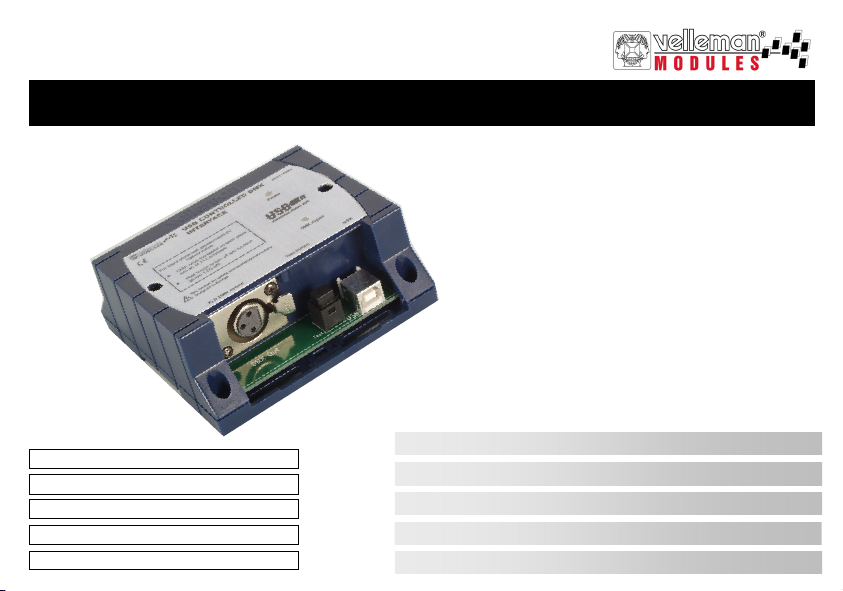
USB Controlled DMX interface
VM116
Belgium [Head office] +32(0)9 384 36 11
France +33(0)3 20 15 86 15
Netherlands +31(0)76 514 7563
USA +1(817)284-7785
Spain +32(0)9 384 36 11
USB Controlled DMX interface 4
USB gestuurde DMX interface 7
Interface DMX avec pilotage USB 10
DMX-Schnittstelle über USB 13
Interface DMX controlado por USB 16
Page 2

Warnings and contents
Thank you for purchasing this module. Please read the instructions carefully to ensure correct and safe use of this device.
WARRANTY
This product is guaranteed against defects in components and construction from the moment it is purchased and for a period of ONE YEAR starting from the
date of sale. This guarantee is only valid if the unit is submitted together with the original purchase invoice. VELLEMAN Ltd limits its responsibility to the
reparation of defects or, as VELLEMAN Ltd deems necessary, to the replacement or reparation of defective components. Costs and risks connected to the
transport, removal or placement of the product, or any other costs directly or indirectly connected to the repair, will not be reimbursed by VELLEMAN Ltd.
VELLEMAN Ltd will not be held responsible for any damages caused by the malfunctioning of a unit.
CONTENTS :
FEATURES & SPECIFICATIONS .....................................................................................................................................................................3
PREPARATION & CONNECTION ...................................................................................................................................................................4
SOFTW ARE .........................................................................................................................................................................................................5
READ THE OPERATING AND MAINTENANCE INSTRUCTIONS IN
READ BOTH THE PDF-FILES AND THE MANUAL OF THE “DMX
THIS USER’S GUIDE CAREFULLY.
LIGHTPLAYER” SOFTWARE ON THE CD-ROM.
STAND-ALONE TEST ........................................................................................................................................................................................6
SAFETY & WARNING INSTRUCTIONS .........................................................................................................................................................7
2
Page 3

Specifications & features
Specifications and features
FEATURES
This unit can control DMX fixtures using a PC and USB interface.
Test software and "DMX Light Player" software is included, a DLL is provided to write you own software.
Furthermore there is a stand-alone test function that outputs all 512 channels at a time, with adjustable levels.
SPECIFICATIONS*
Connected and powered through USB.
512 DMX channels with 256 levels each.
3 pin XLR—DMX output connector.
Windows 98SE or higher compatible.
DLL included to write your own software.
Optional 9V battery needed for stand alone test mode.
Solid state - fuse protection on DMX output.
Dimensions: 106 x 101 x 44.5mm (4.2" x 4.0" x 1.75").
*If a DMX terminator is used, you will also need a USB hub (e.g. our PCUSB3).
INCLUDES:
USB cable
CD with: test software, DLL for own developments, free DMX light player*
* If not included, check our website ‘www.velleman.be‘
3
Page 4

Preparation & connection
Preparation & connection
You can also use the DMX interface as a stand-alone test tool, in
other words you do not have to connect the DMX interface with
your computer!
If you mean to use the stand-alone function (pag. 6), you should
take care to execute the following steps before installing the
software :
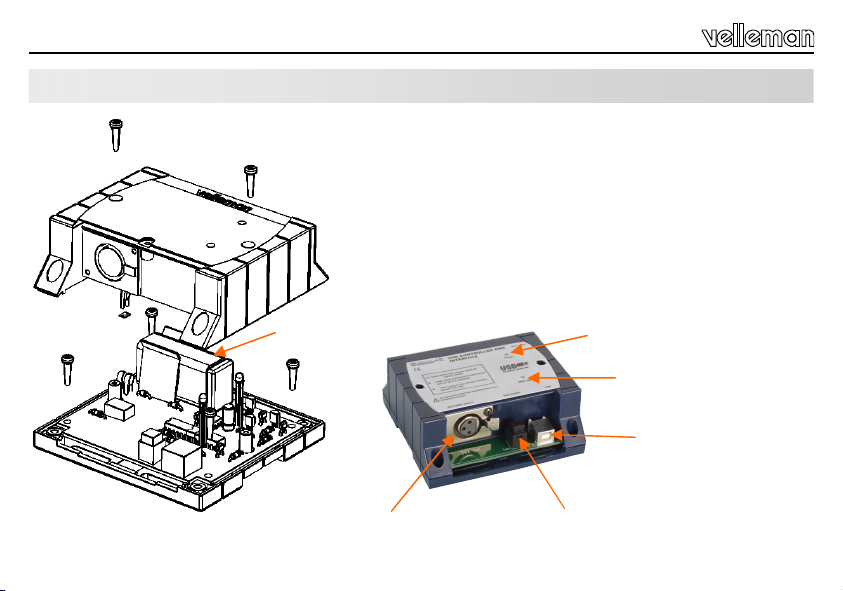
Open the housing.
Connect the battery with the batter y snap.
Insert the battery in the battery compartment.
Close the housing.
9V Battery
Power indication
DMX output indication
USB connection to computer
using USB cable
XLR - DMX output
Test button SW1
4
Page 5

Software
Browse through the CD and open the K8062 - VM116 … folder.
Check the appropriate PDF files for further information.
The ‘light player’ software is installed in the folder by default: c:\program files\DMX
This is a screen shot of the DMX_demo software used to test the unit or to create s ome simple shows
You will find the latest version of the software on our website
Software
5
Page 6

Stand - alone test
Stand - alone test
Test button SW1 is used to control the operation of the test mode.
Operation :
Do not connect the unit to the USB cable.
A short button press turns the unit on. - Power LED goes on and the unit starts to send DMX code "0" on all the 512 DMX
Next button press increments the code on all the channels to '1', next button press increments to '2' etc.
The "DMX signal" LED starts to light periodically when the test button is pressed for some times.
The LED's flashes are longer after pressing the button for several times.
Pressing the button 256 times the internal counter rolls back to 0 and the unit starts again to send code "0" on all the 512
If you use e.g. a dimmer as a test equipment you should see how the intensity of the light increases on every button
To turn the power off, keep pressing the button about 3 seconds until the power LED goes off.
channels.
DMX channels.
press.
6
Page 7
Safety & warning instructions
WARNINGS
All repairs should be executed by qualified technicians.
Avoid the installation of the module in locations with standing or running water or excessive humidity. Indoor use only !
Handle the module gently and carefully. Dropping it can damage the circuit board and case.
SAFETY INSTRUCTIONS
Never exceed the protection limit values indicated in the specifications.
As safety requirement vary, please check with your local authorities.
No objects or liquids should be allowed to penetrate the housing.
Make sure that the ventilation slots are not blocked.
Wipe the device with a dry and clean cloth. Do not use detergents or other liquids that may dam age the housing.
Keep the device away from children.
Facilitate the operation of the device by familiarising yourself with its adjustments and indications.
Velleman modules are not suitable for use or as part of life suppo rt systems, or systems that might create hazardous situations of kind.
Repair under warranty is only possible with date and proof of purchase.
7
Page 8
Waarschuwingen en inhoud
Hartelijk dank voor de aanschaf van deze dm x-interface. Lees de gebruiksaanwijzing aandachtig, zodat u het apparaat op de
juiste manier gebruikt.
WAARBORG
Dit produkt is gewaarborgd wat betreft gebreken in materialen en vakmanschap op het ogenblik van de aankoop en dit gedurende een periode van EEN JAAR
vanaf de aankoop. De waarborg geldt enkel indien het produkt voorgelegd wordt samen met het origineel aankoop bewijs. De ve rplic hti ngen van
VELLEMAN N.V. beperken zich tot het herstellen van defecten of, naar vrije keuze van VELLEMAN N.V., tot het vervangen of herstellen va n de fec te
onderdelen. Kosten en risico’s van transport; het wegnemen en terugplaatsen van het produkt, evenals om het e ven welke andere kosten die rechtstreeks of
onrechtstreeks verband houden met de herstelling, worden niet door VELLEMAN N.V. vergoed. VELLEMAN N.V. is niet verantwoordelijk voor schade van
gelijk welke aard, veroorzaakt door het falen van een product.
CONTENTS
KENMERKEN & SPECIFICATIES ....................................................................................................................................................................9
VOORBEREIDING & AANSLUITING ............................................................................................................................................................ 10
SOFTW ARE ...................................................................................................................................................................................................... 11
STAND-ALONE TESTMODE ......................................................................................................................................................................... 12
VEILIIGHEIDSAANWIJZINGEN EN W AARSCHUWINGEN ..................................................................................................................... 13
LEES DE GEBRUIKS - EN ONDERHOUDSAANWIJZINGEN VAN DE
GEBRUIKERSHANDLEIDING VAN DE DMX LIGHTPLAYER
HANDLEIDING ZORGVULDIG DOOR.
LEES DE BIJGELEVERDE PDF-FILES ALS OOK DE
SOFWTARE OP DEZE CD-ROM.
8
Page 9

Specificaties en kenmerken
Specificaties en kenmerken
TECHNISCHE EIGENSCHAPPEN :
Dit toestel kan DMX-apparaten aansturen via een PC met USB interface.
Testsoftware en “DMX Light Player”-software zijn meegeleverd, met een DLL om uw eigen software te schrijven.
Bovendien is er een stand-alone testfunctie die alle 512 kanalen tegelijk aanstuurt op éénzelfde (regelbaar) niveau.
SPECIFICATIES* :
Aansturing en voeding via USB.
512 DMX-kanalen met elk 256 niveaus.
3 pin XLR - DMX uitgangconnector.
Compatibel met Windows 98SE of hoger.
DLL meegeleverd om uw eigen software te schrijven.
Optionele 9V batterij nodig voor stand-alone testfunctie.
Solid state zekeringbeveiliging op de DMX uitgang.
Afmetingen: 106 x 101 x 44.5mm.
*Indien u een DMX terminator gebruikt, dan heeft u ook een USB hub nodig (bv. onze PCUSB3).
KIT OMVAT :
USB-kabel
CD met: testsoftware, DLL voor eigen software-ontwikkeling, gratis DMX light player
* Bezoek onze website ‘www.velleman.be’ indien de software niet meegeleverd is.
9
Page 10
Voorbereiding & aansluiting
Voorbereiding & aansluiting
U kunt de DMX interface ook gebruiken als een stand-alone test
tool, m.a.w. u hoeft de DMX interface niet aan te sluiten op uw
computer!
Indien u de stand-alone functie (pag. 12) gebruikt dan moet u
eerst de volgende stappen uitvoeren voor u de software
installeert :
Open de behuizing.
Sluit de batterij aan op de batterijclip.
Plaats de batterij in het batterijvak.
Sluit de behuizing.
9V Batterij
VoedingsLED
DMX uitgangsLED
USB aansluiting naar
computer.
10
XLR - DMX uitgang
Test drukknop SW 1
Page 11

Software
Browse door de CD en open de K8062 - VM116... folder.
Meer info vind je in de PDF files in kwestie.
De software wordt automatisch geïnstalleerd in de volgende folder: c:\program files\DMX
Dit is een screenshot van de DMX_software die wordt gebruikt om het toestel te testen
of een eenvoudige lichtshow in elkaar te steken.
Zie onze website voor de laatste software versie
Software
11
Page 12

Stand - alone testmode
Stand - alone test
We gebruiken testknop SW1 voor de testmode.
Operation :
In de stand-alone testmode mag de K8062 niet aangesloten zijn op uw computer.
Druk kort op de knop om het toestel in te schakelen. De voedingsLED licht op en het toestel begint de DMX code "0" te
Druk op de knop om de code voor alle kanalen te wijzigen naar '1', druk opnieuw om de code te verhogen naar '2', enz.
De "DMX signaal"-LED zal kort knipperen wanneer de testknop 1 of meerdere keren wordt ingedrukt.
De LED knippert langer wanneer u de knop herhaaldelijk indrukt.
Wanneer u de knop 256 keer heeft ingedrukt, dan keert de interne teller terug naar 0 en dan begint het toestel weer code
Wanneer u voor uw test bv. een dimmer gebruikt, dan ziet u de lichtintensiteit toenemen telkens u de knop indrukt.
Om het toestel uit te schakelen, houdt u de knop gedurende ±3 seconden ingedrukt tot de voedingsLED dooft.
versturen naar elk van de 512 DMX kanalen.
"0" te sturen naar de 512 DMX kanalen.
12
Page 13

Veiligheidsaanwijzingen en waarschuwingen
WAARSCHUWING
Reparaties mogen uitsluitend uitgevoerd worden door vakkundige personen.
Installeer de module niet op plaatsen met staand of stromend water of in ruimtes met een te hoge vochtigheidsgraad.
Binnengebruik enkel!
Vermijd een ruwe behandeling. Stoten of laten vallen kunnen ernstige schade aanbrengen.
VEILIGHEID SAANWIJZINGEN
Overschrijdt nooit de opgegeven veiligheidswaarden in de specificaties.
Vermits de veili gheid vereist en verschille n van plaa ts tot plaats, di ent U ervoor te zorgen da t Uw montage voldoet aan d e plaatselijke geldende vereisten.
Let op dat er geen voorwerpen of vloeistoffen in het toestel dringen.
Zorg ervoor dat de lucht ongehinderd door de ventilatiegleuven van het toestel kan stromen.
Reinig het toestel met een droge doek. Vermijd gebruik van reinigingsmiddelen daar deze de behuizing kunnen beschadigen.
Houdt vooral kinderen uit de buurt van het toestel dit ter veiligheid van hun zelf.
Zorgt ervoor dat u met alle bedieningselementen vertrouwd raakt, wanneer U met het toestel zal we rken.
Velleman modules zijn niet geschikt voor gebruik in of als gedeelte van systemen welke levensfuncties in stand houden of systemen welke
gevaarlijke situaties van gelijk welke aard kunnen veroorzaken.
Herstelling onder garantie is enkel mogelijk met aankoopbewijs.
13
Page 14

Avertissements et sommaire
Nous vous félicitons pour l’achat de ce Interface DMX avec pilotage USB. Lisez attentivement le mode d’emploi de façon à
utiliser l’appareil de manière adéquate.
GARANT IE
Ce pr oduit e st garan ti co ntre les dé fauts des composantes et de fabr ication au mome nt de l’achat, et c e pour une période d’UN AN à partir de la date d’ac hat.
Cette garantie est uniquement valable si le produit est accompagné de la preuve d’achat originale. Les obligations de VELLEMAN S.A. se limitent à la
réparation des défauts ou, sur seule décision de VELLEMAN S.A., au remplacement ou à la réparation des pièces défectueuses. Les frais et les risques de
transport, l’enlèvement et le renvoi du produit, ainsi que tous autres frais liés directement ou indirectement à la réparation, ne sont pas pris en charge par
VELLEMAN S.A. VELLEMAN S.A. n’est pas responsable des dégâts, quels qu’ils soient, provoqués par le mauvais fonctionne ment d’un produit.
CONTENTS :
CARACTERISTIQUES & DONNEES TECHNIQUES................................................................................................................................. 15
LIRE ATTENTIVEMENT LES INSTRUC TIONS DE SERVICE ET DE
LISEZ AUSSI BIEN LES FICHIERS PDF QUE LA NOTICE DU LOGICIEL
“DMX LIGHTPLAYER” QUE VOUS TROUVEREZ SUR LE CD-ROM.
MAINTENANCE DU PRESENT MANUEL..
PREPARATION ET RACCORDEMENT ....................................................................................................................................................... 16
LOGICIEL .......................................................................................................................................................................................................... 17
MODE D’ESSAI STAND-ALONE ................................................................................................................................................................... 18
CONSIGNES DE SECURITE ET MISES EN GARDE ................................................................................................................................ 19
14
Page 15

Caractéristiques et données techniques
Caractéristiques et données techniques
DONNEES TECHNIQUES
La K8062 utilise un PC et une interface USB pour piloter des appareils DMX.
Du logiciel d'essai et du logiciel “DMX Light Player” sont inclus et vous pouvez même développer votre propre logiciel
avec le DLL.
L'appareil est également pourvu d'une fonction d'essai "stand alone" qui active les 512 canaux à la fois, avec un niveau
réglable.
SPECIFICATIONS :
Connexion et alimentation via USB
512 canaux DMX, chacun avec 256 niveaux
Connecteur de sortie XLR-DMX 3 broches
Compatible avec Windows 98SE ou mieux
DLL inclus pour développer votre propre logiciel
Une pile 9V optionnelle est nécessaire pour le mode d'essai "stand alone"
Fusible état solide protège la sortie DMX
Consommation 60mA (sans appareils DMX)
Dimensions : 100 x 82mm (CI)
*En cas d'usage d'une terminaison DMX vous aurez également besoin d'un hub USB (p. ex. notre PCUSB3).
CE KIT COMPREND:
Un câble USB
CD avec: logiciel de test, DLL pour vos propres développements, DMX light player gratuit
* Consultez notre site internet ‘www.velleman.be‘ si le logiciel n’est pas inclus.
15
Page 16

Préparation et raccordement
Préparation et raccordement
Vous pouvez également utiliser l’interface DMX comme un testeur de signal autonome, c.-à-d. il n’est pas indispensable de
connecter l’interface DMX à votre ordinateur!
Si vous utilisez la fonction stand-alone (pag.18), vous devez
parcourir les étapes suivantes avant d’installer le logiciel :
Ouvrez le boîtier.
Connectez la pile au contact à pression.
Insérez la pile dans le porte-piles.
Fermez le boîtier.
16
Pile 9V
Sortie DMX type XLR
LED d’alimentation
LED de sortie DMX
Connexion USB vers
l'ordinateur.
Bouton d‘essai SW1
Page 17

Software
Explorez le contenu du CD et ouvrez le dossier K8062 - VM116.
Consultez les fichiers PDF en question pour plus d’infos.
Par défaut, le logiciel est installé dans le dossier suivant : c:\program files\DMX
Ceci est un screenshot du logiciel DMX_demo servant à tester l’appareil ou à créer quelques simples spectacles lumineux
Visitez notre site web pour la version la plus récente du logiciel
Software
17
Page 18

Mode d’essai stand-alone
Mode d’essai stand-alone
L'essai s'effectue à l'aide du bouton d'essai SW1.
Opération
Votre K8062 ne peut pas être connecté avec votre ordinateur pour le mode d'essai.
Pressez le bouton momentanément pour activer l'appareil. La LED d'alimentation s'allume et l'appareil commence à
transmettre le code DMX "0" vers chacun des 512 canaux DMX.
Pressez le bouton afin de changer le code des canaux en "1", presser de nouveau pour instaurer le code "2", etc.
La LED "signal DMX" clignotera quand le bouton d'essai est pressé une ou plusieurs fois.
La LED clignote plus longtemps quand le bouton est pressé à plusieurs reprises.
Après avoir pressé le bouton 256 fois, le compteur interne est remis à zéro et l'appareil recommence à transmettre
le code "0" vers les 512 canaux DMX.
Si vous utilisez p.ex. un variateur pour votre test, vous devriez voir que l'intensité lumineuse augmente chaque fois
que vous pressez le bouton.
Pour désactiver l'appareil, vous n'avez qu'à enfoncer le bouton pendant ±3 secondes jusqu'à ce que la LED d'ali-
mentation s'éteigne.
18
Page 19

Consignes de sécurité et mises en garde
AVERTISSEMENT
All repairs should be executed by qualified technicians. Toute réparation doit être exécutée par du personnel qualifié.
Évitez l’installation de ce module à proximité d’eau courante ou dormante ou à une endroit avec un taux d’humidité trop
élevé.
Evitez les manipulations brutales. Un chute pourrait endommager le boîtier ou les plaque et pourrait caus er des défauts.
SAFETY INSTRUCTIONS
Ne j amais excéder les valeurs limites de protection in diquées dans les s pécifications.
Eta nt donné que les e xigences en matière de sécuri té varient d’un lieu à l’aut re, vous devez vous assurer q ue votre m ontage s atisfait aux exigences.
Aucun objet ou liquide ne peut pénétrer le boîtier.
Evitez de bloquer les fentes d'aération.
Essuyez l'appareil à l'aide d'un chiffon propre et sec. Evitez donc l'usage de détergents ou d'autres liquides, comme ceux-ci endomm ageraient le boî tier.
Gardez l'appareil hors de la portée d'enfants.
Familiarisez-vous avec tous les réglages et indications de l'appareil afin de faciliter l'opération.
Les modules Velleman ne conviennent pas pour une utilis ation dans ou comme parties de systèmes servant à assurer des fonctions de survie ou des
systèmes pouvant entraîner des situations dangereuses, de quelque nature qu‘elles soient.
La réparation sous garanie est uniquement possible avec la preuve de l‘achat !
19
Page 20

Warnungen und inhalt
Herzlichen Dank für den Kauf dieses DMX-Schinttstelle über USB. Lesen Sie Bitte aufmerksam die Bedienunggsanleitung, so dass sie das
Gerät richtig benutzen.
GARANT IE
Dieses Produkt trägt eine Garantie für fehlerhaftes Material oder Verarbeitungsschäden im Moment des Ankaufs. Sie ist EIN JAHR gült ig a b Ankaufs datu m.
Die Garantie kann nur beansprucht werden, wenn das Produtk mit der Originalrechnung abgegeben wird. Die Verpflichtungen der VELLEMAN AG
beschränken sich auf die Aufhebung der Fehler, oder, nach freier Wahl der VELLEMAN AG, auf den Austausch oder die Reparation der fehlerhaften Teile.
Kosten und Risiken des Transports; das Entfernen und Wiedereinsetzen des Produkts, sowie alle anderen Kosten die direkt oder indirekt mit de r Reparation in
Verbindung gebracht werden können, werden durch die VELLEMAN AG nicht zurückerstattet. VELLEMAN AG ist nicht für Schäden gleich welch er Ar t,
entstanden aus der fehlerhaften F unktion des Produkt, haftbar.
INHALT :
LESSEN SIE DIE BETRIEBS– UND WARTUNGSANW EISUNGEN
DIESES HANDBUCHS SORGFÄLTIG DURCH.
LESEN SIE NICHT NUR DIE PDF-DATEI, SONDERN AUCH DIE
“DMX LIGHTPLAYER” - SOFTWARE AUF DEM CD-ROM
SORGFÄLTIG DURCH.
EIGENSCHAFTEN & TECHNISCHE KENNDATEN................................................................................................................................... 21
VORBEREITUNG UND ANSCHLÛSSE ....................................................................................................................................................... 22
SOFTWARE-INSTALLATION......................................................................................................................................................................... 23
STAND ‘ALONE’-TESTMODUS ..................................................................................................................................................................... 24
SICHERHEITS– UND WARNHINWEISE ..................................................................................................................................................... 25
20
Page 21

Eigenschaften und T echnische kenndaten
Eigenschaften und Technische kenndaten
SPEZIFIKATIONEN :
Diese Einheit kann DMX-Ger äte über einen PC mit USB-Schni ttstelle steuern.
Testsoftware und "DMX-Light Player" Software werden mitgeliefert, eine DLL wird zum Schreiben der Software verschafft.
Darüber hinaus gibt es noch eine autonome Testfunktion (Bausatz muss nicht an den PC angeschlossen sei n), die es
ermöglic ht, mit einem Tastendr uck alle 512 Kanäle gleichzeitig zu aktivieren.
TECHNISCHE DATEN :
Angeschlossen und mit Strom versorgt über USB.
512 DMX-Kanäle mit jeweils 256 Niveaus.
3-poliger XLR—DMX-Ausgangsanschluss.
Kompatibel mit Windows 98SE oder höher.
DLL zum Schreiben Ihrer eigenen Software mitgeliefert.
Optionale 9V-Batterie erforderlich für die autonome Testfunktion.
'Solid State' – Sicherungsschutz auf DMX-Ausgang.
Abmessungen: 106 x 101 x 44.5mm.
*Wenn ein DMX-Abschlusswiderstand verwendet wird, muss ein USB-Hub (z.B. PCSSB3) benutzt werden.
LIEFERUMFANG :
USB-Kabel
CD mit: Test Software, DLL für eigene Projekte, kostenloser "DMX-LIGHT PLAYER"
* Besuchen Sie unsere Internetsite ‘www.velleman.be‘ wenn die Software nicht mitgeliefert wurde
21
Page 22

Vorbereitung und Anschlusse
Vorbereitung und Anschlusse
Sie können die DMX-Schni ttstelle auch als ein autonomes SignalPrüfgerät verwenden, m.a.W . Sie brauchen die DMX-Schnittstelle
nicht an den Computer anzuschließen!
Wenn Sie die ‘Stand-Alone’-Funktion (Seite 24) verwenden, müssen
Sie zuerst folgende Schritte aus führen vor Sie die Software
installieren:
Öffnen Sie das Gehäuse.
Schließen Sie Batterie an den Batterieclip an.
Legen Sie die Batterie in das Batteriefach ein.
Schließen Sie das Gehäuse.
9V Batterie
Spannungs-LED
DMX Ausgangs-LED
USB-Verbindung mit
Computer
22
DMX-Ausgang, Typ XLR
Prüftaster SW1
Page 23

Software-installation
Durchsuchen Sie die CD und öffnen Sie die K8062 - VM116 ... Datei.
Schlagen Sie die entsprechenden PDF-Dateien nach für weitere Informationen.
Die Software ist standardmäßig in c:\program files\DMX installiert
Dies ist ein Bildschirmfoto der DMX_Demo-Software, die verwendet wird, um das Gerät
zu prüfen oder einige einfache Lichtshows zu kreieren.
Bitte besuchen Sie unsere Website für die neueste Software-Version.
Software-installation
23
Page 24

Stand ‘alone’ testmodus
Stand ’alone’ testmodus
Die Test-Taste SW1 wird verwendet um den Ablauf des Testmodus zu steuern.
Betri eb :
Bei dem 'Stand Alone'-Testmodus darf die Einheit nicht mit dem Computer verbunden werden.
Ein kurzer T astendruck schaltet die Einheit ein. Die Strom-LED leuchtet auf und sendet allen 512 DMX-Kanälen den
DMX-Code '0'.
Der nächste Tastendruck erhöht den Code auf '1' bei allen Kanälen, der nächste T astendruck erhöht den Code auf '2'
usw.
Die DMX-Signal-LED blinkt wenn die Test-Taste wiederholt eingedrückt wird.
Die Blitze der LED werden länger, nachdem Sie wiederholt auf die Taste drücken.
Wenn die Taste 256 Male eindrückt wird, schaltet der interne Zähler erneut auf 0 und die Einheit sendet wiederum allen
512 DMX-Kanälen den Code '0'.
Wenn Sie z.B. einen Dimmer als Testgerät verwenden, werden Sie feststellen können, wie die Lichtstärke bei jedem
Tastendruck zunimmt.
Zum Ausschalten: die Taste 3 Sekunden eingedrückt halten bis die Strom-LED erlischt.
24
Page 25

Sicherheits– und Warnhinweise
WARNUNG
Lassen Sie Reparaturen durch Fachleute erfolgen
Gehen Sie behutsam mit dem Modul um. Es fallen lassen, kann die Leiterplatte und das Gehäuse beschädigen.
Installieren Sie das Modul nicht in einer Umgebung mit stehendem oder fließendem Wasser oder in einer sehr feuchten
Umgebung
SICHERHEITSHINWEISE
Überschreiten Sie nie die in den technischen Daten erwähnten Eingangsgrößen.
Sicherheitsvorschriften können sich ändern, bitte beachten Sie die lokalen Vorschriften Ihres Landes.
Schützen Sie die Innenseite des Gehäuses vor Flüssigkeiten und Gegenständen.
Sorgen Sie dafür, dass die Lüftungsschlitze frei sind.
Nehmen Sie zur Reinigung des Gerätes ein feuchtes Reinigungstuch. Benutzen Sie auf keinen Fall Scheuer- oder Lösungsmittel
Von Kindern fernhalten.
Machen Sie sich mit allen Bedienungselement vertraut, wenn Sie mit diesem Gerät arbeiten.
Der von Ihnen gekaufte Bausatz ist aber für den Privatgebrauch konzipiert und nich für den Einsatz in Lebenserhaltenden oder Lebensrettenden
Systemen oder unter außergewöhnlichen Umweltbedingungen (Ex-systeme) geeinet.
Reparatur unter Garantiebedingungen ist nur bei Vorlage des Kaufbeleges möglich.
25
Page 26

Advertencias y contenido
Gracias por haber comprado el Interface DMX controlado por USB. Lea cuidadosamente todas las instrucciones antes de
usar el dispositivo.
GARANTÍA
Este producto está garantizado contra defectos de componentes y construcción a partir de su adquisición y durante un período de UN AÑO a par tir de la fec ha
de ve nta. Esta gar antía só lo e s vá lida si la unida d se entr ega junto c on la factura de compra original. VELLEMAN Ltd. limita su responsabilidad a la
reparación de los defectos o, si VELLEMAN Ltd. lo estima necesario, a la sustitución o reparación de los componentes defectuosos. Los gastos y riesgos con
respecto al transporte, el desmontaje o la instalación del dispositivo, o cualquier otro gasto directa o indirectamente vinculado con la r epar aci ón, no se rá
reembolsado por VELLEMAN LTD. VELLEMAN Ltd. no responderá de ningú n daño causado por el mal funcionamiento de la unidad.
CONTENIDO :
LEA ESTE MANUAL EN SU TOTALIDAD Y SIGA CUIDADOSAMENTE
NO SOLO LEA CUIDADOSAMENTE LOS FICHEROS PDF SINO
LAS INSTRUCCIONES DE MANTENIMIENTO -
TAMBIÉN EL MANUAL DEL USUARIO DEL SOFTWARE “DMX
LIGHTPLAYER” QUE SE ENCUENTRA EN EL CD-ROM.
CARACTERÍSTICAS & ESPECIFICACIONES ........................................................................................................................................... 27
PREPARACIÓN & CONEXIONES ............................................................................................................................................................... 28
INSTALACIÓN DEL SOFTWARE ................................................................................................................................................................. 29
MODO DE PRUEBA AUTÓNOMO................................................................................................................................................................ 30
SEGURIDAD Y AVISOS ................................................................................................................................................................................. 31
26
Page 27

Características y Especificaciones
Características y Especificaciones
ESPECIFICACIONES :
Esta unidad puede controlar aparatos DMX usando un ordenador y un interface USB.
Software de prueba y “DMX Light Player” incl., DLL está previsto para poder escribir su propio software.
El aparato está también provisto de una función de prueba "stand alone" que activa los 512 canales a la vez a un
mismo nivel (ajustable).
CARACTERÍSTICAS :
Conectado y alimentado por USB.
512 canales DMX con 256 niveles cada uno.
Cconector de salida XLR—DMX de 3 polos.
Apto para Windows 98SE o más.
DLL incl. para escribir su propio software.
Se necesita una pila de 9V (opcional) para el modo 'stand alone'.
Fusible de estado sólido protege la salida DMX.
Dimensiones: 106 x 101 x 44.5mm.
* Si utiliza un terminador DMX, necesitará también un hub USB (p. ej. el PCUSB3).
EL KIT INCLUYE el kit incluye:
cable USB
CD con: software de prueba, DLL para escribir su propio software, DMX Light Player gratis.
* Visite nuestra página Web ‘www.velleman.be‘ si el software no está incluido.
27
Page 28

Preparación & conexiones
Preparación & conexiones
¡Es posible utilizar la interfaz DMX también como comprobador
de señal autónomo, es decir, no es necesario conectar la interfaz
DMX al ordenador!
Al utilizar la función ‘stand-alone’ (pág. 30), siga los siguientes
pasos antes de instalar el software:
Abra la caja.
Conecte la pila al clip.
Introduzca la pila en el portapilas.
Cierre la caja.
Una batería
de 9V
LED de alimentación
LED de salida DMX
Conexión USB hacia el
ordenador
28
Salida DMX, tipo XLR
Botón de prueba SW 1
Page 29

Instalación del software
Examine el contenido del CD y descubra el expediente K8062 - VM116.
Consulte los ficheros PDF en cuestión para más informaciones.
Ajuste de fábrica : el software se instala en el siguiente expediente: c:\program files DMX
Esto es una captura de la pantalla (screenshot) del software DMX_demo que sirve para probar
el aparato o crear algunos espectáculos luminosos
Visite www.velleman.be para más informaciones y software.
Software
29
Page 30

Modo de prueba autónomo
Modo de prueba autónomo
El botón de prueba SW1 se usa para controlar la operación del modo de prueba.
La operación
No conecte la unidad al cable USB.
La unidad se enciende pulsando brevemente el botón. El LED de encendido se iluminará y la unidad comenzará a enviar
el valor DMX “0” a los 512 canales DMX.
Si se vuelve a pulsar el botón, el valor se incrementará a “1” en todos los canales, pulsando otra vez se incrementará a
“2”, etc.
El LED de señal DMX parpadea brevemente cuando se pulsa varias veces el botón de prueba.
Los parpadeos de los LEDs se alargan al pulsar el botón varias veces.
Al pulsar el botón 256 veces el contador interno retrocederá a 0 y la unidad volverá a enviar el valor “0” a los 512
canales DMX.
Si utiliza como dispositivo de prueba, por ejemplo, un variador, debería poder ver cómo aumenta la intensidad de la luz
cada vez que se pulsa el botón.
Para apagarlo, mantenga pulsado el botón durante unos 3 segundos hasta que el LED de encendido se apague.
30
Page 31

Seguridad y avisos
AVISOS
El servicio debe ser realizado por personal especializado
No instale el módulo en un lugar con agua estancada o agua corriente, ni en lugares excesivamente húmedos.
Manéjese con cuidado. Dejar caer el dispositivo puede dañar el circuito impreso y la caja.
LAS MEDIDAS DE SEGURIDAD
Nunca exceda los valores límites indicados en las especificaciones.
Las exigencias en materia de seguridad varían de un lugar a otro. Asegúrese que el montaje realizado sea conforme a las exigencias
en vigor de su localidad.
Asegúrese de que no penetren objetos o líquidos en el dispositivo.
Asegúrese de que haya una buena circulación del aire en el dispositivo.
Limpie el dispositivo con un paño húmedo. Evite el uso de productos químicos abrasivos, solventes o detergentes.
Manténgase lejos de niños.
Siga cuidadosamente todas las instrucciones y familiarícese con los ajustes al operar este dispositivo.
Los modulo Velleman no son adecuados para una utilización dentro o corno sistema destinado a garantizar funciones para sobrevivir o
sistemas conllevando situaciones peligrosas sea cual su naturaleza.
La reparación en garantía sólo es posible con el ticket y la fecha de compra.
31
Page 32

5 410329 328 665
Modifications and typographical errors reserved - © Velleman nv - HVM116G - 2010 - ED1 (Rev.1)
USB CONTROLLED DMX
USB CONTROLLED DMX
USB CONTROLLED DMX
INTERFACE
INTERFACE
INTERFACE
 Loading...