

Page 1
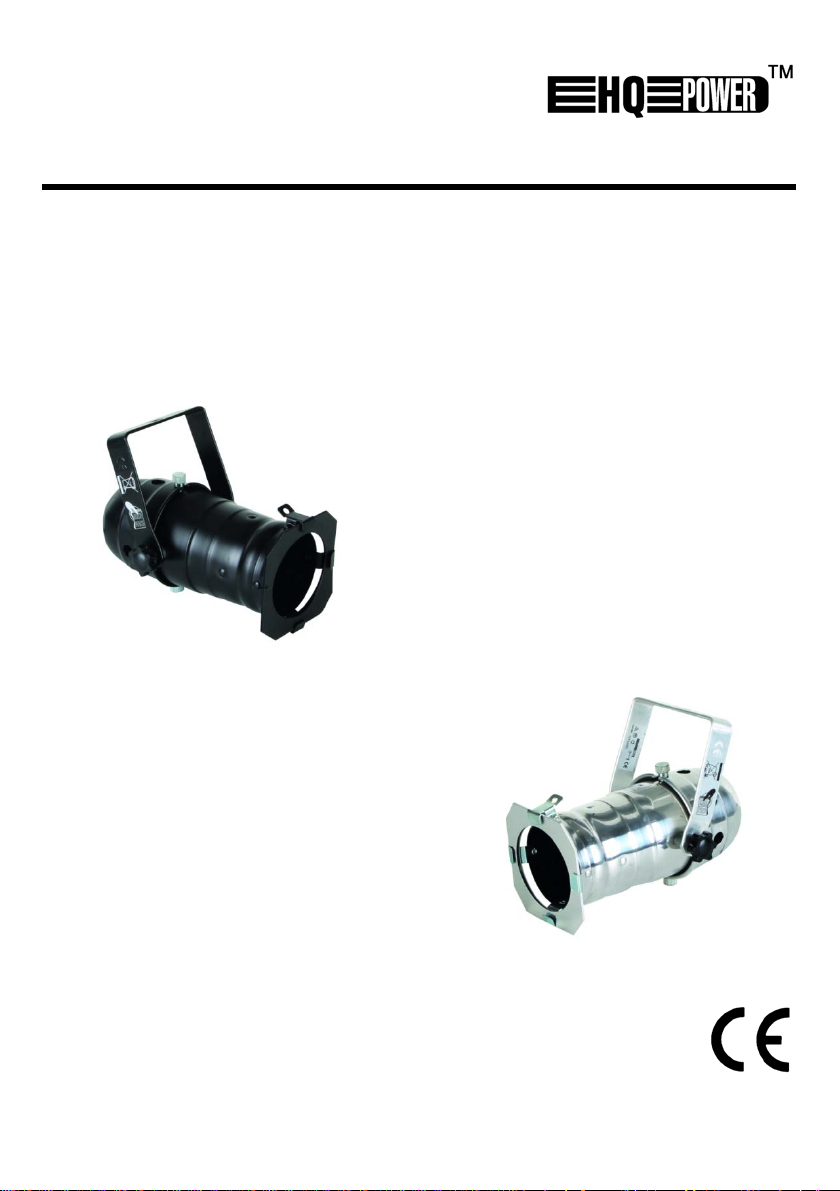
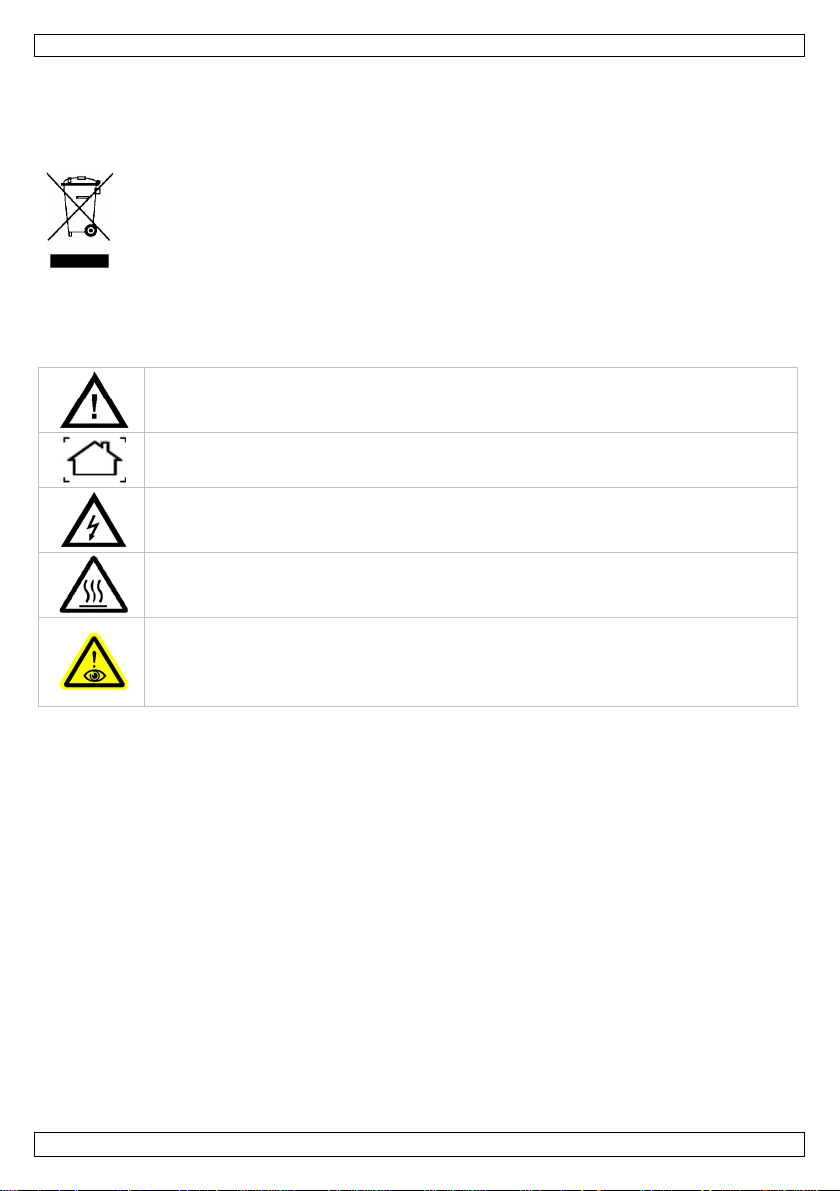
VLP20B - VLP20C
PAR20 PROJECTOR - BLACK OR CHROME
PAR20-PROJECTOR - ZWART OF VERCHROOMD
PROJECTEUR PAR20 - NOIR OU CHROMÉ
PAR20-SCHEINWERFER - SCHWARZ ODER VERCHROMT
USER MANUAL 2
FOCO PAR20 - NEGRO O C ROMADO
VLP20B VLP20C
GEBRUIKERSHANDLEIDING 5
MODE D'EMPLOI 8
MANUAL DEL USUARIO 11
BEDIENUNGSANLEITUNG 14
Page 2

VLP20B - VLP20C
Do n ot sta r e d ir ectly at th e l ight source, as thi s may cau se
USER MANUAL
1. Introduction
To all residents of the European Union
Important environmental information about this product
Thank you for choosing HQPower™! Please read the manual thoroughly before bringing this device into
service. If the device was damaged in transit, don't install or use it and contact your dealer.
2. Safety Instructions
This symbol on the device or the package indicates that disposal of the device after its lifecycle
could harm the environment. D o not dispose of the unit (or batteries) as unsorted municipal
waste; it sho uld be taken to a specializ ed company for recycling. This device should be
returned to your distributor or to a local recycling service. Respect the local environmental
rules.
If in do u bt, c o nta ct yo ur local wa s te dis p o s a l a utho ritie s.
Keep this device away from children and unauthorized users.
Indoor use only. Keep this device away from rain, moisture, splashing and dripping
liquids.
Be very careful during the installation: touching live wires can cause life-threatening
electroshocks.
Do not touch the device during operation as the housing heats up.
• epileptic seizure in sensitive people
• temporarily loss of sight (flash blindness)
• permanent (ir reversible) eye damag e.
• Always disconnect mains power when device not in use or when servicing or maintenance activities
are performed. Handle the power cord by the plu g only.
• This device falls u nder p r otecti on class I . It is theref ore essential that the device be ear thed. H ave a
qualified person carry out the electric connection.
• Make sure that the available volta g e does not exceed the vol tage stated in the specifi cations of this
manual.
• Do not crimp the power cord and protect it against damage. Have an authorised dealer replace it if
necessary.
• Respect a minimum distance of 1 m bet we en the device’s light output and any illuminated surface.
• Use an appropriate safety cable to fix the device (e.g. VDLSC7N or VDLSC8N).
3. General Guidelines
Refer to the Velleman® Service and Quality Warranty on the last pages of this manual.
• Familiarise yourself with the functions of the device before actually using it. Do not allow operation
by unqualified people. Any damage that may occur will most probably be due to unprofessional use
of the de vice.
• All modi f ications of the devi ce are f orbidden for safety reasons. Damag e cau sed by user modifications
to the device is not covered by th e warranty.
• Only use the device for its intended purpose. All other uses may lead to short circuits, burns,
el ectroshocks, l a mp expl osion, cr a sh, etc. U sin g the devi ce in a n u naut horised way will void the
warranty.
• Damage caused by disregard of certain guidelines in this manual is not covered by th e warranty and
the dealer wi l l not accept responsib i lity for an y ensuing d ef ects or problems.
V. 01 – 22/10/2013 2 ©Velleman nv
Page 3

VLP20B - VLP20C
• A qualified technician should install and service this device.
• Do not switch the device on i mm ed iately after it has been exposed to changes in temperature.
Protect the device against da mage by leaving i t swi tched off un til it has r ea ch ed room te mperature.
• This de vice i s desi gned for professional use on stage, in discos, th e a tres, etc. The d evice sh ould only
be used indoors with the appr opriate current and power supply (see Technical Specifications).
• Lighting effects are not designed for permanent operati on: regular operation breaks will prolong their
lives.
• There may be a particular smell when the device is activated for the first time. This is normal and
any smell will gradua lly disappear.
• Do not connect the device to a dimming pack, even if the dimmer channel is used solely for 0% to
100% s wi tch .
• Use the original packaging if the device is to be transported.
• Keep th is manu al for future referen ce.
4. Features
• lightweight aluminium construction
• socket for 50 W / 230 V lamps
• power cable with plug
5. Installation
Lamp
• Only fit or replace a lamp when the device is unplugged from the mains.
• Let a lamp cool down before replacing it as the temperature of a lamp can reach 700°C during
operation.
• When handling a halogen lamp, do not touch it with your bare hands. Use a cloth to insert or remove
it.
• Do not install lamps with a higher wattage. They get hotter than this device was designed for.
• Do not operate the device as long as the lamp is not secur ely fasten ed or the cover still opened.
• Replace any d ef ormed or d amaged lamp with a lamp of the same typ e (see Technical Specifications).
To repl ace the la mp:
1. Pull the extension spring and open the housing.
2. Remove the old and insert a new one.
3. Fix the socket and close the device.
Mounting guidelines
• Have the device installed by a qualified person, respecting EN 60598-2-17 and all other applicable
no rms.
• The construction to which the device is attached should be able to support 10 times the weight of the
device for one hour wit hout deformation.
• The installation must always be secured with a secondary attachment e.g. a safety cable.
• Never stand directly below the device when it is be ing moun ted, removed or serviced .
• Have a qu alified tech nician check th e device once a year and once before you b r ing it into servi ce.
• Install the device in a location with few passers-by that is inaccessible to unauthorise d per sons.
• Overhead mountin g requires extensive experience: calcul ati ng work load l imits, determinin g the
install ation material to be used. H ave the material and the device itself checked regularly. Do not
attempt to instal l the device yourself if you lack these qualifications as improper installation may
re sult in in j urie s.
• Make sure there is no flammable material within a 0.5 m radius of the device.
• Connect the device to the mains with the power plug.
• The installation has to be approved by an e xpert before the d evice is taken into service.
6. Cleaning and Maintenance
• Disconnect the device from the mai ns prior to mai ntenance activities. Let the device cool down.
V. 01 – 22/10/2013 3 ©Velleman nv
Page 4

VLP20B - VLP20C
la mp so cket
E27
dimensions
Ø 100 x 200 mm
lamp (not incl.)
Sylvania spot: LAMP50P2SP
flood: LAMP50P20FL
available body colours
black: VLP20B
• All screws should be tightened and free of corrosion.
• The ho using, vis ible parts, mounting supports and the installation location (e.g. ceiling, suspension,
trussing) should not be deformed, modified or tampered with e.g. do not drill extra holes in mounting
supports, do not change the location of the connections...
• Mechanically moving parts must not show any signs of wear and tear.
• The electric power supply cables must not show any damage. Have a qualified technician mainta in
the device.
• Wipe the device regularly with a moist, lint-free cloth. D o not use alcohol or sol vents.
• There are no user-serviceable parts apart from the lamp.
• Contact your dealer for spare parts if necessary.
7. Technical Specificat ions
power supply 230 Va c
chrome: VLP20C
Use this device with or iginal accessories only. Ve lleman nv cannot be he ld responsible in the
event of damage or injury resulting from (incorrect) use of this device.
For more info concerning this product and the latest version of this manual, please visit our
website www.hqpower.eu.
The information in this manual is subject to change without prior notice.
© COPYRIGHT NOTICE
The copyright to this manual is owned by Velleman nv. All worldwide rights reserved. No part
of this man ual may b e copied, r eproduced, translated or reduced to any electr onic medium or otherwise
without the prior written consent of the copyright holder.
V. 01 – 22/10/2013 4 ©Velleman nv
Page 5
VLP20B - VLP20C
. Bescherm het toe stel tegen regen, vochtigheid
Ki j k niet rechtstreeks in de li chtbron, o m h et volg ende te v ermijd en:
GEBRUIKERSHANDLEIDING
1. Inleiding
Aan alle i ngezetenen van de Europese Unie
Belangrijke milieu-informatie betreffende dit product
verwijdering.
Dank u voor u w aankoop! Lees deze handleiding grondig voor u het toestel in gebruik neemt. Werd het
toestel beschadig d tijden s het transp ort, installeer het dan ni et en raadpleeg uw dealer.
2. Veiligheidsinstructies
Dit symbool op h et toestel of de verpak king geeft aan d a t, als het na zijn levenscy clus wordt
weggeworpen, dit toestel schad e kan toebrengen aan het milieu. Gooi dit toestel (en eventuele
batterijen) niet bij het gew one h uishoudelijke afval; het m oet bij een gespecialiseerd bedrijf
terechtkomen voor recyclage. U moet dit toestel naar uw verdel er of naar een lokaal
recyclagepunt brengen. Resp ecteer de plaa tselijke milieuwetgeving.
Hebt u vragen, contacteer dan de plaatselijke autoriteiten b etreffende de
Houd dit toestel buiten het bereik van kinderen en onbevoegden.
Gebruik het toestel enkel binnenshuis
en opspatten de vl oeist offen.
Wees vo orzichtig bi j d e installatie: raak geen kabels aan di e onder stroom staan, o m
dodelijke elektrosho cks te vermi jden.
Raak het toestel niet aan wanneer het in gebruik is: de behuizing wordt warm.
• epilepsi ea anvall en bij g evoel ige personen
• tijdelijke blindheid (flitsblindheid)
• permanente (onherroepelijke) schade aan d e ogen.
• Trek de stekker uit het stopcontact voordat u het toestel reinigt of als u het niet gebruikt. Houd de
voedingskabel altijd vast b ij de stekker en niet bi j d e kabel.
• Dit toestel va lt onder b escher mingsklasse I. Het toestel m oet dus g eaard zijn. Een geschoolde
technicus moet de elektrische aansluit ing uitvoeren.
• De beschikbare netspanning mag niet hoger zijn dan de spanning in de specificaties achteraan de
handle iding.
• Zorg ervoor da t het str o omsnoer niet gekneld of geplooid is en bescherm het tegen besch adiging.
Laat uw dealer zo nodig een nieuwe kabel plaatsen.
• Zorg voor een minimumafstand van 1 m tussen de li chtuitgang van het toestel en het belichte
oppervlak.
• Maak het toestel vast met een geschikte vei l igheidskabel (bijv. VDL S C7N of VDLS C8N).
3. Algemene rich tlijn en
Raadpleeg de Velleman® service- en kwaliteitsgarantie achteraan deze handleiding.
• Leer eerst d e functies van het toestel kennen voor u het gaat gebr uiken. Ongesch ool de personen
mogen dit toestel niet gebruiken . Meestal is beschadiging h et gevolg van onprofessioneel gebrui k van
het t oestel.
• Om veiligheidsredenen mag u geen wijzigingen aanbrengen aan het toestel. Schade door wijzigingen
di e de gebr uiker heef t a angebr acht aan h et toestel valt niet onder d e garantie.
• Gebruik het toestel enkel waarvoor het gemaakt is. An d ere toepassingen kunnen leiden tot
kortsluitingen, brandwonden, elektrische schokken, enz. De garantie vervalt automatisch bij
ongeoorloofd gebruik.
V. 01 – 22/10/2013 5 ©Velleman nv
Page 6

VLP20B - VLP20C
• De gar a ntie geldt niet vo or schade door h et negeren van bepaalde richtli j nen in deze hand leidin g en
uw deal er zal de verantw o ordelij kheid afwi j zen voor defec ten of problem en die hier rechtstreeks
verband mee houden.
• Laat dit toestel installeren en onderhouden door een geschoolde technicus.
• Het i s b eter om het t oestel niet onmidd el lijk i n te schakelen nadat het werd blootgesteld aan
temper atuurschommelingen. Om beschadiging te vermijd en, moet u wa chten tot het toestel
kamertemperatuur heeft ber eikt.
• Dit toestel is o ntworpen voor professio neel gebruik op po dia, in disco's, enz. Het toestel is uitsluitend
geschikt voor gebruik binnenshuis met de juiste stroom en voeding (zie Technische specificaties).
• Het toe stel is niet ontworpen voor een continue werking: regel matige onderbrekingen verlengen de
levensduur.
• Wanneer u het toestel voor het eer st gebruikt, kan dit gepaar d gaan met een bepaalde geur. Dit is
normaal en de eventuele geur zal geleidelijk aan ver dwijn en.
• Sluit het toestel niet aan op een dimmerpack, zelfs al gebruikt u het dimcircuit uitsluitend voor 0 %
tot 100 % schakelen.
• Gebruik de oorspronk elijke verpakki ng wanneer u het toestel vervoert.
• Bewaar deze handleiding voor verdere raadplegi n g.
4. Eigenschappen
• lichte alum inium behuizing
• fitting voor 100 W / 23 0 V-lampen
• str oo mkab el met stekker
5. Installatie
Lamp
• Plaa ts of v ervang een lamp enkel wanneer het toestel niet is aangesloten op het li chtnet.
• Laat een lamp afkoelen voor u ze vervangt: de bed ri jfstemper atuur van een lamp ligt rond de
700 °C.
• Raak een halogeenlamp niet aan met uw blote handen . Gebruik een doek om d e lamp te vervang en.
• Installeer geen lampen met een hoger vermogen. Deze worden warmer d an die waar op dit toestel is
voorzien.
• Gebruik het toestel niet indien de lamp ni et g oed vastgedraai d is of zond er beschermdeksel.
• Vervang een vervormd e of beschadigde lamp do or een lamp van hetzelfde type (zie “T echnische
specificaties”).
De lamp vervangen:
1. Trek aan het veer tj e en open d e behuizing.
2. Verwijder de oude lamp en breng de nieuwe i n.
3. Maak de fitting vast en sluit de behuizing.
Het toestel mo nteren
• Laat een g eschoolde tech ni cu s dit toestel install eren conform EN 60598-2-17 en and er e toepassel ijke
normen.
• De constr uctie w a araan h et toestel wordt bevestigd, moet gedurende 1 uur 10 keer het gewicht van
di t toestel kunnen dragen zonder te vervormen.
• Maak het toestel ook alti j d vast met een tweede b evestigin gsmiddel bv. een veiligheidskabel.
• Sta nooi t r echt onder het toestel wann eer u het monteer t, ver wijdert of h er stelt.
• Laat het toestel controleren door een geschool de technicus voor u het i n gebr uik neemt en laat het 1
x per jaar volledig nakijken.
• Installeer dit toestel op een plaats waar n iet veel mensen voorbijkomen en niet toeg a nkelijk i s voor
onbevoegden.
• Een d eg el ijke praktij kervaring is ver eist voor de p laatsing van dit toestel. U moet de
maximumbelasting van de draagconstructie kunnen berekenen, weten welk constructiemateriaal u
kunt g eb ruiken. Laat het materiaal en het toestel regelmatig nakijken . Monteer het toestel niet zelf
indien u er geen ervaring mee heeft. Een slechte montage k an l eiden tot verwondingen.
V. 01 – 22/10/2013 6 ©Velleman nv
Page 7

VLP20B - VLP20C
voeding
230 Va c
fitting
E27
afmetingen
Ø 100 x 200 mm
lamp (niet meegelev.)
Sylvania spot: LAMP50P2SP
flood: LAMP50P20FL
beschikbare kleuren
zwart: VLP20B
verchroomd: VLP20C
• Verwijder alle b randbaar materiaal in een straal van 0,5 m rond het t o estel.
• Sl uit het toestel via de stekker aan op het lichtnet.
• De installatie moet voor het e er ste gebruik gekeu r d worden d o or een exper t.
6. Reiniging en ond e rhoud
• Ontkoppel het toestel van het lichtnet voor u aan onderhoudswerkzaa mheden beg int. Laat het toestel
afkoelen.
• All e g ebruikte sch roeven moeten goed zijn aangespan nen en mogen geen sporen van roest vertonen.
• De beh ui zing, de zichtb a r e ond er del en, de montagebeugels en de montageplaats (bv. het plafond of
het gebinte) mogen niet vervormd zij n of aan g epast w orden (g een extr a g aten i n montageb eugels
boren, aansluitingen niet verplaatsen, enz.).
• Mechanisch bewegend e delen mog en geen sporen van slijtage vertonen en mog en niet onregelmatig
bewegen.
• De voedingskabels mogen niet beschadigd zijn. L aa t het toestel onder houden door een geschool de
technicus.
• Maak het toestel geregeld schoon met een vochtige, niet pluizende doek. Gebr uik geen alcohol of
oplosmiddelen.
• Er zijn geen door de gebruiker vervan gbare onderdelen in dit toestel, behalve de l amp.
• Bestel eventuele reserve onderdelen bij uw plaatselijke verdeler.
7. Technische specificaties
Gebruik dit toestel enkel met origi nele accessoi res. Velleman nv is niet aansprakel ijk voor
schade of k wetsuren bij (verkeerd) gebruik van dit toestel.
Voor meer informatie over dit product en de laatste versie van deze handleiding, zie
www.hqpower.eu.
De informatie in deze handleiding k an te allen tijde worden gewijzigd zonder vo orafgaand e
kennisgeving.
© AUTEURSRECHT
Velleman nv heeft het auteursrecht voor deze ha ndleiding. Alle wereldwijde r echten
voorbehouden. Het is ni et toegestaan om de ze handleiding of gedeelten ervan over te nemen, te
kopiëren, te ver talen, te bewerken en op te slaan op een elektronisch medium zonder voorafg aande
schriftelijke toeste mmin g van de rechtheb b ende.
V. 01 – 22/10/2013 7 ©Velleman nv
Page 8

VLP20B - VLP20C
. Protéger d e la pluie, d e l’ humi dité et des
Ne pas reg arder d irectement dans la source lumi neuse afin d’éviter les ri sq ues
MODE D 'E M PLOI
1. Introduction
Aux résidents de l'Union eu ropéenne
Informations environnementales importantes concernant ce produit
En cas de questions, contacter les autorités locales pour élimination.
Nous vous r emercions de votre achat ! Li r e attentivement le présent mode d'emploi avant la mise en
servi ce d e l'appareil. Si l’appareil a été endommagé pendant le transport, ne p as l’installer et consulter
votre reven d eur.
2. Consignes de sécurité
Ce symbole sur l'appareil ou l'emballage indique que l’é limination d’un appareil en fin de vie
peut polluer l'environnement. Ne pas jeter un appareil électr ique ou électroni q ue (et des piles
éventuelles) parmi les déchets municipaux non sujets au tri sélectif ; u ne déchèter ie traitera
l’appareil en question. R envoyer les équ ipements usagés à votre f our ni sseu r ou à un ser vice de
recycla g e local. Il convien t de respecter la réglemen tation local e rel ative à la protection de
l’environnement.
Garder l'appareil hors de la portée des en f a nts et des personnes non au tori sées.
Util iser cet appareil uniquement à l'i ntérieur
projections d’eau.
Être prudent lors de l'installation : toucher un câbl e sous tension p e ut causer des
él ectrochocs mortels.
Ne pas toucher l’appareil l orsqu’il est en service : le boîtier chauffe !
• de crise d’épi lepsie chez les p er sonnes su j ettes
• d’aveug lement temporaire (aveuglement par éclair)
• d’endommagement per man ent (irréversi ble) de l ’ œil.
• Toujour s d éb rancher l’ ap pareil s’il n’est pas utili sé et avant le nettoyage ou l'entretien. Tirer su r la
fiche pour débrancher l'appareil ; non pas sur le câble.
• Cet app areil r essort à l a classe de protection I, ce qui implique que l’a p pareil d oi t êtr e mis à la terre.
Un technicien qualifié doit établir la connexion électrique.
• La tension réseau ne peut pas dépasser la tension mentionnée dans les spécifications à la fin de ce
mode d'emploi.
• Ne pas sertir le cordon d’alimentation et protéger des dommages. Demander à votre reven deur d e le
remplacer si nécessaire.
• Respect er une di stan ce minimum de 1 m entre la sortie lumière de l’appareil et la su rface illuminée.
• Utiliser un câble de sécurité approprié pour fixer l'appareil (p. ex. VDLSC7N ou VDLSC8N).
3. Directives générales
Se référ er à l a garantie de service et de qualité Velleman® en fin de ce mode d'emploi.
• Se fami l iariser avec l e fonctionnement avant l’emploi. Seul es d es p ersonnes q ualifiées sont
autorisées à utiliser ce t appareil. La plupart des dégâts sont causés par un usage non professionnel
de l'appareil.
• Il est interdit de modifier l'appareil pour des raisons de sécurité. Les dommages occasionnés par des
modifications par le client ne tombent pas so us la garantie.
• N’utiliser l'appareil qu’à sa fonction prévue. Tout autre usage peut causer des courts-circuits, des
brûl ures, d es électrochocs, etc. Un usage interd it peut annuler d 'office la garantie.
• La garantie ne s’applique pas aux dommages survenus en négligeant certaines di rectives de ce mode
V. 01 – 22/10/2013 8 ©Velleman nv
Page 9

VLP20B - VLP20C
d'emploi et v otre revendeur déclinera toute r esponsabilité pour les problèmes et les défauts qui en
résultent.
• Confier l’installation et l’entretien à un technicien qualifié.
• Ne pas br ancher immédiatement l’ap pareil apr ès exposition à des variations de température. Afin
d’évi ter des dommages, attendre jusqu’à ce q ue l ’a p pareil ait atteint la température ambiante avan t
de l’utiliser.
• Cet app areil a été développé pour usage profe ssionnel dans des discothèqu es, des théâtres, etc.
Utiliser cet appareil uniquement à l'intéri eur avec le courant et alimentati on appropriés (voir
Spécifications t echni ques).
• L'appareil ne convient pas à un fonctionnement continu : des pauses régulières prolongeront la durée
de vi e.
• La première mise en service peut s’accompa g ner d’une odeur p articuli ère. C’est normal. T oute odeur
disparaîtra graduellement.
• Ne pas c onn ecter l'app areil à un bloc de puissance, mê me si le circuit variateur est util isé comme un
interrupteur marche/arrêt (de 0% à 100%).
• Transporter l’appareil dans son emballage o riginel.
• Garder ce mode d'emploi pour toute référence ultérieure.
4. Caractéristiques
• boîtier léger en aluminium
• culot pour ampoules de 50 W / 230 V
• câble d'alimentation avec fiche
5. Installation
Lampe
• Déc onn ecter l’appareil du r éseau él ectr ique avan t d’i nstall er ou d e rempl acer une lampe.
• Laisser refr oidir une lampe avant de la remplacer ; celle-ci peut atteindre une température de
700 °C.
• Eviter de toucher une lampe halogène à mains nues. Remplacer la lampe avec un chiffon.
• Ne pas in staller des lampes avec une puissance plus élevée. Les lamp es d eviennent plus chaudes qu e
la température maximale p révue.
• Ne pas utiliser l'ap p a r ei l si la lamp e n'est pas bien fixée ou ave c le couv ercle d e protection ouv ert.
• Remplacer t oute lampe déformée ou end o mmag ée p ar une lampe du même t yp e (voir S pécif ications
techniques).
Remplacer la lampe :
1. Tirer sur le ressort et ouvrir le boîtier.
2. Reti r er l’ancienne lampe et remp lacer par l a nouvelle.
3. Fixer la douille de l a l ampe et refermer le boîtier.
Montage
• Un technicien qualifié doit installer l’appareil en respectant EN 60598-2-17 et toute autre norme
applicable.
• La construction portante de l’appareil doit être capable de supporter 10 fois le poids de l’appare il
pendant une heure, sans qu’une déformation de la construction en résulte.
• Fixer toujours l'appareil a vec u n câble de sécur ité (sécurité additionnel le).
• Éviter de vous positionner en dessous de l’appareil pour l’enlever ou lors du montage ou du
nettoyage.
• Un technicien qualifié doit réviser l’appareil a vant la mise en ser vice et ensuite u ne fois par an.
• Installer l’appareil à un endroit où il n'y a pas beaucoup de passage et inaccessible à des personnes
non autorisées.
• L’installation de cet appareil exige une sol ide expéri ence pra tique : le calcul de la char g e max. d e la
construction, les matériaux d’installation requis. Un technicien qualifié doit régulièrement vérifier la
constru ction portante et l ’appareil même. Ne p as essayer d’installer cet app areil si vous n ’avez pas
les qualifications requises ; une installation incorrecte p eut entraîner des bl essures.
V. 01 – 22/10/2013 9 ©Velleman nv
Page 10

VLP20B - VLP20C
alimentation
230 Vc a
culot
E27
dimensions
Ø 100 x 200 mm
ampoule (non incl.)
Sylvania spot : LAMP50P2SP
flood : LAMP50P20FL
couleurs disponibles
noir : VLP20B
chromé : VLP20C
• Enlever tout matériau inflammable dans un rayon de 0,5 m autour de l’appareil.
• Brancher l’appareil sur le réseau électrique par la fiche d’a limentation.
• Un expert doit approuver l’installation avant q u’el le puisse être mise en servi ce.
6. Nettoyage et entretien
• Débrancher l’appareil avan t ch aq ue entretien ou netto yage. Lai sser refroidir l 'ap p areil.
• Serrer les écr ous et l es vis et vérifier qu’ils n e r ouillent pas.
• Le boîtier, les parties extérieu res, les sup p orts de montage et la construction portante ne peuv ent
pas être déformés, adaptés ou bricolés p. ex. ne pas forer de trous additi onnels dans un support, ne
pas dépl a ce r l es connexions, etc.
• Les parties mécaniques mobiles ne peuvent pas être usées ou bouger de manière irrégulière.
• Les câbles d'ali men tation électriques ne peuven t pas être endommagés. Confi er l' entretien à un
technicien qualifié.
• Essuyer régulièrement l’appareil avec un chiffon humide non pelucheux. Éviter l’usage d’alcool et de
solvants.
• Il n’y a aucune pièce réparable par l’utilisateur sauf l'ampoule.
• Comman der des pièces de recha nge év entuelles chez votre reven deur.
7. Spécifications techniques
N’employer cet appareil qu’avec des accessoires d’ori gine. La SA Velleman ne peu t, dan s la
mesure conforme au dro it applicable être tenue responsable des dommag es ou lésions
(directs ou indirects) pouvant résulter de l’utilisation de cet appareil.
Pour plus d’informations concernant cet article et la dernière version de ce mod e d'emploi,
visiter notre site web www.hqpower.eu.
Toutes les informations présentées dans ce mode d'emploi peuvent être modifiées sans
notification préalable.
© DROITS D’AUTEUR
SA Velleman est l’ayant droit des droits d’auteur pour ce mode d'emploi. Tous droits mondiaux
réservés. Toute reproduction, traduction, copie ou diffusion, intégrale ou partielle, du contenu de ce
mode d'emploi par quelque procédé ou sur tout support électronique qu e ce soit est interd ite sans
l’accord préalable écrit de l’ayant droit.
V. 01 – 22/10/2013 10 ©Velleman nv
Page 11

VLP20B - VLP20C
No mire directamente a la fuente de luz porque esto podría cau sar
MANUAL D E L USUARI O
1. Introducción
A los ciudadanos de la Unión Europea
Importantes info rmaciones sobre el medio ambiente concerniente a este pro ducto
¡Gracias por elegir HQPower™! Lea aten tamente l as instrucciones del man u al antes de usar el ap arato. Si
ha sufrido algún daño en el transporte no lo instale y póngase en contacto con su distribuidor.
2. Instrucciones de seguridad
Este símbolo en este aparato o el embalaje indica que, si tira las muestras inservibles, podrían
dañar el medio ambiente. No tire este aparato (ni las pilas, si las hubiera) en la basura
doméstica; debe ir a una empr esa especializada en reciclaje. D evu elva este aparato a su
distribuidor o a la unidad de reciclaje lo cal. Respete las leyes locales en relació n co n el medio
ambiente.
Si tiene dudas, contacte con las autor idades locales para residuos.
Mantenga el aparato lejos del alcan ce d e p er sonas n o capa citadas y niños.
Util ice el aparato sólo en inter iores. No exponga este equipo a lluvia, humedad ni a
ningún tipo de salpicadura o goteo.
Cuidado durante la instal ación: puede su f rir una p el ig rosa descarga el éctrica al tocar un
cable conectado a l a red eléctrica
¡No toque el aparato durante su operaci ón: l a caja se cal ienta!
• un ataq ue epiléptico en personas sensib les
• pérdida temporal de la vista (por deslumbramiento)
• dañ os irre versibles en los ojos.
• Desconecte si emp r e el aparato de la red eléctrica si no va a usarlo durante un largo período de
tiempo y a ntes de su limpieza o manten imiento. Tire si emp r e del enchu f e para desconectar el cable
de red, nunca del propio cable.
• Este apar ato p er tenece a la clase de pr ote cción I. Por lo tanto, es esen cial que el aparato esté puesto
a tierra. La conexión eléctrica debe llevarla a cabo un técnico cualificado .
• Asegúr ese d e q ue l a tensión d e r ed no sea mayor que la tensión indicad a en las especi ficaciones.
• No aplaste el cable de alimentación y protéjalo contra posibles daños. S i es necesario, pida a su
distribuidor reemplazar el cable de alimentación.
• Respete una distancia de mín. 1 m entre la sali da de luz y el área iluminada.
• Fije el aparato con un cable de seguridad adecuado (p.ej. VDLSC7N o VDLSC8N).
3. Norma s gene ra les
Véase la Garantía de servicio y calidad Velleman® al final de este manual del usuario.
• Familiarícese con el funcionamiento del aparato antes de utilizarlo. Sólo personas cualificadas pueden
manejar e ste aparato. La may oría de l os daños son causados por un uso inadecuado.
• Por razones de seguridad, las modificaciones no autorizadas del aparato están prohibidas. Los daños
causad os p or modificaciones no autorizadas, no están cu b iertos por la g ar antía.
• Utilice sólo el aparato para las apli caciones descritas en este manual. a fi n de evitar p. ej .
cortocircuitos, quemaduras, descarg as eléctricas, etc. S u uso incorrecto anula la garantí a
completamente.
• Los daños causados por descuido de las instrucciones d e se gur idad de este manual inva l idarán su
garantía y su di stribuidor no será responsable de ningún daño u otros problemas resultantes.
V. 01 – 22/10/2013 11 ©Velleman nv
Page 12

VLP20B - VLP20C
• La instalac ión y el mantenimiento deben ser realizados por un técnico cualificado.
• No conecte el aparato si ha estado expuesto a grandes cambios de t empera tu ra. E sp er e hast a que el
aparat o l legue a la temperatura ambien te.
• Este aparato ha si do diseñado para u so pr ofe sional en una discoteca, u n teatro, et c. El ap arato sólo
es apto para el us o en interiores con la corriente y la alimentación adecuadas (véase
Especificaciones).
• El ap arato no ha sido diseñado para un uso ininterrumpido. Introduzca frecuentemente una pausa
para pr olongar la vida del aparato.
• Puede pr oducirse olor durante la pri mera p uesta en march a. Es n ormal y el olor desaparecer á poco a
poco.
• No conecte el aparato a un dimmer, aunque el canal dimmer sólo sirva para una con mutación del 0%
al 100%.
• Transport e el aparato en su embalaje ori ginal.
• Guarde este manual del usuario para cuando necesite consultarlo.
4. Características
• modelo ligero de aluminio
• casquillo para bombillas de 50 W / 230 V
• cable de alimentación con conector
5. Instalación
Tipo de bombilla
• Desconecte el aparato de la r ed an tes de instalar o reemplazar una lámpara.
• Las lámpar as llegan a temperatur as d e h asta 700 °C. D eje q ue l a lámpara se enfríe antes de
reemplazarla.
• No toque una lámpara h alógena con las manos desn udas. Us e u n paño para reemplazar un a lámpara.
• No use l ámpar as con más vatios porque ést as g en eran te mperaturas para l as que este apar ato no ha
sido diseñado.
• No manej e el aparato si la bombilla no está fijad a completamente o si la tapa sig ue abierta.
• Reemplace cada lámpara deformada o defectuosa por un a lámpara d el mi smo tipo (véase
"Especificaciones).
Reemplazar la bombilla:
1. Tire del resorte y abra la carcasa.
2. Qu ite la lámpara vi eja e introduzca la nueva.
3. Fije el casquillo y cierre el aparato.
Pautas para el montaje
• Respete la directiva EN 6059 8-2-17 y toda norma nacional antes de in stalar el aparato. La instal ación
debe ser r ea lizada por un técnico especiali zado.
• El soporte donde irá el aparato, debe ser capaz d e sostener 10 v eces el peso de éste dur a nte una
hora, sin que se produzca una deformación de dicho soporte.
• Fije siempre el aparato con un cable de seguridad (seguridad adicional).
• Evi te ponerse debajo d el aparato duran te el montaje, la li mpieza, etc.
• Un técnico especializado debe revisar el aparato antes de la puesta en mar ch a . Despu és, debe
revisar lo una vez al año.
• Instale el aparato fuera del alcance de personas no autorizadas y en un lugar con poca gente.
• La i nstalación de este ap ar ato exige un a sólida experiencia p ráctica: debe poder cal cu lar l a carga
máx. del soporte, debe cono cer los material es necesari os para la instalación, etc. De vez en cuando,
una verificación de l a estructura y del aparato mismo debe ser ll evada a cabo p or un técnico
especializ ado . No intente instalar este aparato si no tiene las cualificaciones requeridas; una
instalación incorrecta puede causar lesio nes.
• Quite tod o materi al inflamable en un radio de 0.5m al r ed ed or del aparato.
• Enchufe el aparato a la red eléctrica.
• Un experto debe pr obar la instalación antes de la puesta en marcha.
V. 01 – 22/10/2013 12 ©Velleman nv
Page 13

VLP20B - VLP20C
No mod ifique la caj a, los soporte s y l as óptica s p .ej. no taladre agujeros adicionales en un soporte o
alimentació n
230 Va c
casquillo
E27
dimensiones
Ø 100 x 200 mm
bombilla (no inc l.)
Sylvania spot: LAMP50P2SP
flood: LAMP50P20FL
colores disponibles:
negro: VLP20B
cromado: VLP20C
6. Li mp ieza y mant eni m iento
• Desconecte el aparato de toda fu ente antes d e l impiarlo. Dej e q ue el aparato se en f ríe.
• Apriete bi en las tuer cas y los tornill os y verifique q ue no hay señales de o xidación.
•
no modifiqu e l a s conexione s, etc.
• Las partes móviles no pueden mostrar ningún rastro de desgaste y deben estar bien equilibradas.
• No dañe los cables de alimentación. El mantenimiento debe ser realizado por un técnico cualificado.
• Limpie el aparato regularmente con un paño húmedo sin pelusas. No utilice a lcohol ni diso lventes.
• El usuario no habrá de efectuar el mantenimiento de ninguna pieza sal vo la lámpara.
• Contacte c on su di stri buidor si necesita pie zas de reca mb io.
7. Especificaciones
Util ice este aparato sól o con los accesorios originales. Velleman NV n o será responsable de
daños ni lesiones causados por un uso (indebido) de este aparato.
Para más información sobre este producto y la versión más reciente d e este manual del
usuario, visite nuestra página www.hqpower.eu.
Se pued en modificar las especificaciones y el conteni do de este manual sin previo avi so.
© DERECHOS DE AUTOR
Velleman NV di spone de los derechos de autor p a ra este manual del usu ario. Todos los
derechos mundiales reservados. Está estrictamente prohibido reproducir, traducir, copiar, editar y
guar d a r este manu al del usuari o o par tes d e ello si n previo permiso escrito del derecho habiente.
V. 01 – 22/10/2013 13 ©Velleman nv
Page 14

VLP20B - VLP20C
Blicken Sie nicht direkt in die Lichtquelle, um Folgendes zu vermeiden:
BEDIENUNGSANLEITUNG
1. Einführung
An alle Einwohner der Europäischen Union
Wichtige Umweltinformationen über dieses Produkt
Falls Zweifel bestehen, wenden Sie sich für Entsorgungsrichtlinien an Ihre örtliche Behörde.
Vielen Dank, dass Sie sich für HQPower™ entschieden haben ! Lesen Sie diese B ed ienungsanleitung vor
Inbetriebnahme sorgfälti g durch. Überprüfen Sie, ob Transportschäden vorliegen. Sollte dies der Fall
sein, verwenden Sie das Gerät nicht und wenden Sie sich an Ihren Händler.
2. Sicherheitshinweise
Dieses Symbol auf dem Produkt oder der Verpackung zeigt an, dass die Entsorgung dieses
Produkt es nach s einem Lebenszyklu s der Umw elt Schaden zufügen kann. Entsorgen Sie die
Einhei t (oder verwendeten Batteri en) nicht als unsorti ertes Hausmül l; di e Einheit oder
ver wend eten Ba tterien müssen von einer speziali sierten Fir ma zwecks Recyclin g entsorgt
werden. Diese Einheit muss an den Händler oder ein örtliches Recycling-Unternehmen
retourniert werden. Resp ektieren S ie di e örtlichen Umweltvorsch riften.
Halten Sie Kinder und Unbefugte vom Gerät fern.
Verwenden Sie das Gerät nur im Innenbere ich. Schützen Sie das Gerät v or Regen und
Feuchte. S etzen Sie das Gerät keiner Flüssigkeit wie z.B. T r opf- oder Spritzwasser, aus.
Sei en Sie während der Installation d es Gerätes sehr vorsichtig: das Berühren von unter
Spannung stehenden Leitungen könnte zu lebensgefährlichen elektrischen Schlägen
führen.
Berühren Sie das Gehäuse während des Betriebs nicht, denn das Gehäuse heizt auf.
• epileptische Anfälle bei empfindlich en Menschen
• kurzzeitige Sehstörungen (Blitze)
• permanente und unwiderrufliche Augenschäden
• Trennen Sie das Gerät bei Nichtbenutzung und vor jeder Reinigung vom Netz. Fassen Sie dazu den
Netzstecker an d er Gri f f fläche an und ziehen Sie nie an der Netzlei tung.
• Der A ufbau des Geräte s e ntspr icht der Schu tzkla sse I. Gemäß den Vorschriften muss das Gerät
geerdet sein. Der elektri sch e A nschluss darf nu r von einer Fachkraft durchgeführt werden.
• Vergewissern Sie sich, dass die anzuschließende Netzspannung nicht höher ist als die Netzspannung
beschrieben in dieser Bedienungsanleitung.
• Achten Sie darauf, dass die Netzleitung nicht gequetscht werden kann. Bei Beschädigungen so ll eine
Fachkraf t das K ab el ersetzen.
• Beachten Sie eine minimale Entfernung von 1 m zwischen der Lichtausbeute und irgendeiner
bel euchteten Fläche.
• Si ch ern Sie die Montag e mit einem geeigneten S icherheitsfangsei l (z.B. V DLSC7N oder VDLSC8N).
3. All g e me ine Richtlinien
Siehe Velleman® Service- und Qualitätsgarantie am Ende dieser Bedienungsanleitung.
• Nehmen Sie das Gerät erst in Betrieb, nachdem Sie sich mit seinen Funktionen vertraut gemacht
haben. Lassen Sie das Gerät nicht von Personen bedienen, die sich nicht mit dem Gerät auskennen.
Meist ist die Beschädigung des Gerätes das Ergebnis von unfachmännischer Bedienung.
• Eigenmächtige Veränderungen sind aus Sicherheitsgründen verboten. Bei Schäden verursacht durch
eigenmächtige Änderungen erlischt der Garantieanspruch.
• Verwenden Sie das Gerät nur für Anwendungen beschrieben in dieser Bedienungsanleitung Jede
andere Verwendung ist mit Gefahren wie Kurzschluss, Brandwunden, elektrischem Schlag, usw.
V. 01 – 22/10/2013 14 ©Velleman nv
Page 15

VLP20B - VLP20C
verbunden. Dies kann zu Schäden am Produkt führen und dafür sorgen, dass der Garantieanspruch
erlischt.
• Bei Schäden, die durch Nichtbeachtung der Bedienungsanleitung verursacht werden, erlischt der
Garantieanspruch. Für daraus resultierende Folgeschäden übernimmt der Hersteller keine Haftung.
• Lassen Sie dieses Gerät von einem Fachmann installieren und warten.
• Das Gerät bei Temperaturschwankungen nicht sofort einschalten. Schützen Sie das Gerät vor
Beschädigung, indem Sie es ausgesch altet lassen bis es die Zimmert emperatur err eicht hat.
• Di eses Gerät wurde für den professionellen Einsatz auf Bühnen, in Discotheken, Theatern, usw.
entworfen. Das Gerät eignet sich nur für die Anwendung im Innenbereich und für den Anschluss an
den geeigneten Str om u nd die geei gnete Str omversorgung (S iehe technische Daten).
• Das Gerät ei g net sich nicht für p ermanenten B etri eb : eine regelmäßige Pau se ver längert die
Lebensdauer.
• Beim ersten Gebrauch könnte es einen spezifi schen Geruch geben. Das ist normal und wird nach
einiger Zeit allmählich verschwinden.
• Schließen Sie das Gerät nicht an einem Dimmer an, auch wenn Sie den Dimmer-Kanal als EIN/AUS-
Schalter (0% bis 100%) verw enden.
• Verwenden Sie die Or iginalverp acku ng, wenn das Gerät transportiert werden soll.
• Bewahren Sie diese Bedienungsanleitung für künftige Einsichtnahme auf.
4. Eigenschaften
• leichtes Gehäuse aus Aluminium, schwarz
• Fassu ng fü r 50 W / 230 V-Lampen
• Stromk abel mit Stecker
5. Installation
Leuchtmittel
• Setzen Sie eine Lampe nur bei un eingeschaltetem Ger ät ein.
• Lassen Sie eine Lampe erst abküh len bevor Sie sie ersetzen, denn eine Lampe erreicht eine
Temperatur von 700 °C während des Betriebs.
• Berühren Sie die Halogenlampen nicht mit bloßen Händen. Verwenden Sie ein sauberes Tuch um
Lampen einzusetzen und zu wechseln.
• Setzen Sie keine Lampen mit einer höheren L eistungsang abe ein. Lampen mit einer höheren Leistung
entwickeln höhere Temperaturen, für die das Gerät nicht ausgelegt ist.
• Schalten Sie das Gerät nicht ein wenn die Lampe nicht ganz befestigt ist oder wenn denn die
Abdeckung noch offen ist.
• Ersetzen Sie eine verformte oder bes ch ä d igte Lampe dur ch eine Lampe gleichen T yps (sieh e
“Technische Daten”).
Einen Lampenwechsel durchführen:
1. Ziehen Sie a n die Feder und öffnen Sie das Gehäuse.
2. Entfernen Sie die alte Lampe u nd legen Sie eine n eue ei n.
3. Bringen Sie die Fassung wi ed er an u nd schließen Sie das Gerät.
Richtlinien für die Montage
• Lassen Sie das Gerät von einem Fachmann und gemäß den EN 60598-2-17 und allen anderen
zutreffend en N ormen installi eren.
• Die Konstruktion muss während einer Stunde eine Punktlast von maximal 10 x dem Gewicht des
Gerätes tragen können, ohne dass Verformung verursacht wird.
• Das Gerät muss immer mit einer zweiten Bef estigung (z.B. Sicherheitsfang seil) gesichert werd en.
• Stehen Sie während der Montage, Entfernung oder Wartung nie direkt unter dem Gerät.
• Lassen Sie das Gerät jährlich und vor der Inbetriebnahme von einem Fachmann prüfen.
• Montieren Sie das Gerät an einem Ort, wo niemand es berühren kann und wo wenige Leute
vorübergehen.
• Eine gründliche praktische Erfahrung ist für die Installation des Gerät es notwendig: Sie müssen die
max. Belastung der Tragkonstruktion berechnen können, wissen welches Konstruktionsmaterial Sie
V. 01 – 22/10/2013 15 ©Velleman nv
Page 16

VLP20B - VLP20C
Stromversorgung
230 Va c
Fassung
E27
Abmessungen
Ø 100 x 200 mm
Leuchtmittel (nicht
Sylvania Spot: LAMP50P2SP
Flood: LAMP50P20FL
verfügbare Farben
schwarz: VLP20B
verchromt: VLP20C
ver wend en dür f en. Lassen Si e regelmäßi g e Sicherheitsinspekti onen des ver wend eten Material s und
des Gerätes durchführen. Montieren Sie das Gerät ni e selber wenn Sie dami t kei ne Erf ahrung haben.
Eine schlechte Montage kann Verletzungen verursachen.
• Entfernen Sie alle entflammbaren Materialen in einem Abstand von 0,5 m.
• Verbinden Sie das Gerät über das Stromkabel mit dem Netz.
• Installation muss vor Inbetriebnahme von einem Experten genehmigt werden.
6. Reinigung und Wartung
• Trennen Sie das Gerät vom Netz ehe Sie mi t den Ser vicearbeiten anfangen. L assen Sie das Gerät
abkühlen.
• Alle verwendeten Schrauben müssen fest angespannt werden und dürfen keine Rostspuren zeigen.
• Das Gehäu se, die Li nsen, die Montageb ügel und der Montageort (z.B. Decke oder Gebinde) dür f en
nicht angepasst werden, z.B. bohren Sie keine zusätzlichen Löcher in Montagebügel, verändern Sie
die An schlüsse ni cht, usw.
• Mechanisch bewegende Teile dürfen keine Spuren von Abnutzung aufweisen.
• Sorgen Sie dafür, dass die Netzkabel nicht beschädigt sind. Lassen Sie das Gerät von einer Fachkraft
installieren.
• Verwenden Sie zur Reinigung ein feuchtes, f usself reies T uch. V erwenden Sie auf keinen Fall Alkohol
oder irgendwelche Lösungsmittel.
• Außer der L ampe gibt es keine zu wartend en Teile.
• Bestellen Sie eventuelle Ersatzunterteile bei Ihrem Fachh ä ndler.
7. Technische Daten
mitgeliefert)
Verwend en Sie dieses Gerät nur mit originellen Zubehörteilen. Velleman NV übernimmt keine
Haftung für Schaden oder Verletzungen bei (falsch er) Anwendung dieses Gerätes.
Für mehr Informationen zu diesem Produkt und die neueste Version dieser
Bedienungsanleitung, siehe www.hqpower.eu.
Alle Änderungen ohne vorherige Ankündigung vorbehalten.
© URHEBERRECHT
Velleman NV besitzt das Urheberrecht für di ese Bedienungsanlei tung. Alle weltweiten Rec hte
vorbehalten. Ohne vorherige schriftliche Genehmigung des Urhebers ist es nicht gestattet, diese
Bedienungsanleitung ganz oder in Teilen zu reprodu zieren, zu kopieren, zu übersetzen, zu bearbeiten
oder zu speichern.
V. 01 – 22/10/2013 16 ©Velleman nv
Page 17

Velleman® Service and Quality Warranty
Since its foundation in 1972, Velleman® acquired extensive experience in
the electronics world and currently distributes its products in over 85
countries.
All our products fulfil strict quality requirements and legal stipulations in
the EU. In order to ensure the quality, our products regularly go through
an extra quality check, both by an internal quality department and by
specialized external organisations. If, all precautionary measures
notwithstanding, problems should occur, please make appeal to our
warranty (see guarantee conditions).
General Warranty Conditions Concerning Consumer Products (for
EU):
• All consumer products are subject to a 24-month warranty on production
flaws and defective material as from the original date of purchase.
• Velleman® can decide to replace an article with an equivalent article, or
to refund the retail value totally or partially when the complaint is valid and
a free repair or replacement of the article is impossible, or if the expenses
are out of proportion.
You will be delivered a replacing article or a refund at the value of 100%
of the purchase price in case of a flaw occurred in the first year after the
date of purchase and delivery, or a replacing article at 50% of the
purchase price or a refund at the value of 50% of the retail value in case
of a flaw occurred in the second year after the date of purchase and
delivery.
• Not covered by warranty:
- all direct or indirect damage caused after delivery to the article (e.g. by
oxidation, shocks, falls, dust, dirt, humidity...), and by the article, as well
as its contents (e.g. data loss), compensation for loss of profits;
- consumable goods, parts or accessories that are subject to an aging
process during normal use, such as batteries (rechargeable, nonrechargeable, built-in or replaceable), lamps, rubber parts, drive belts...
(unlimited list);
- flaws resulting from fire, water damage, lightning, accident, natural
disaster, etc.…;
- flaws caused deliberately, negligently or resulting from improper
handling, negligent maintenance, abusive use or use contrary to the
manufacturer’s instructions;
- damage caused by a commercial, professional or collective use of the
article (the warranty validity will be reduced to six (6) months when the
article is used professionally);
- damage resulting from an inappropriate packing and shipping of the
article;
- all damage caused by modification, repair or alteration performed by a
third party without written permission by Velleman®.
• Articles to be repaired must be delivered to your Velleman® dealer,
solidly packed (preferably in the original packaging), and be completed
with the original receipt of purchase and a clear flaw description.
• Hint: In order to save on cost and time, please reread the manual and
check if the flaw is caused by obvious causes prior to presenting the
article for repair. Note that returning a non-defective article can also
involve handling costs.
• Repairs occurring after warranty expiration are subject to shipping costs.
• The above conditions are without prejudice to all commercial warranties.
The above enumeration is subject to modification according to the
article (see article’s manual).
Velleman® service- en kwaliteitsgarantie
Velleman® heeft sinds zijn oprichting in 1972 een ruime ervaring
opgebouwd in de elektronicawereld en verdeelt op dit moment producten
in meer dan 85 landen. Al onze producten beantwoorden aan strikte
kwaliteitseisen en aan de wettelijke bepalingen geldig in de EU. Om de
kwaliteit te waarborgen, ondergaan onze producten op regelmatige
tijdstippen een extra kwaliteitscontrole, zowel door onze eigen
kwaliteitsafdeling als door externe gespecialiseerde organisaties. Mocht
er ondanks deze voorzorgen toch een probleem optreden, dan kunt u
steeds een beroep doen op onze waarborg (zie waarborgvoorwaarden).
Algemene waarborgvoorwaarden consumentengoederen (voor
Europese Unie):
• Op alle consumentengoederen geldt een garantieperiode van 24
maanden op productie- en materiaalfouten en dit vanaf de oorspronkelijke
aankoopdatum.
• Indien de klacht gegrond is en een gratis reparatie of vervanging van
een artikel onmogelijk is of indien de kosten hiervoor buiten verhouding
zijn, kan Velleman® beslissen het desbetreffende artikel te vervangen
door een gelijkwaardig artikel of de aankoopsom van het artikel
gedeeltelijk of volledig terug te betalen. In dat geval krijgt u een
vervangend product of terugbetaling ter waarde van 100% van de
aankoopsom bij ontdekking van een gebrek tot één jaar na aankoop en
levering, of een vervangend product tegen 50% van de kostprijs of
terugbetaling van 50 % bij ontdekking na één jaar tot 2 jaar.
• Valt niet onder waarborg:
- alle rechtstreekse of onrechtstreekse schade na de levering veroorzaakt
aan het toestel (bv. door oxidatie, schokken, val, stof, vuil, vocht...), en
door het toestel, alsook zijn inhoud (bv. verlies van data), vergoeding voor
eventuele winstderving.
- verbruiksgoederen, onderdelen of hulpstukken die onderhevig zijn aan
veroudering door normaal gebruik zoals bv. batterijen (zowel oplaadbare
als niet-oplaadbare, ingebouwd of vervangbaar), lampen, rubberen
onderdelen, aandrijfriemen... (onbeperkte lijst).
- defecten ten gevolge van brand, waterschade, bliksem, ongevallen,
natuurrampen, enz.
- defecten veroorzaakt door opzet, nalatigheid of door een
onoordeelkundige behandeling, slecht onderhoud of abnormaal gebruik of
gebruik van het toestel strijdig met de voorschriften van de fabrikant.
- schade ten gevolge van een commercieel, professioneel of collectief
gebruik van het apparaat (bij professioneel gebruik wordt de
garantieperiode herleid tot 6 maand).
- schade veroorzaakt door onvoldoende bescherming bij transport van het
apparaat.
- alle schade door wijzigingen, reparaties of modificaties uitgevoerd door
derden zonder toestemming van Velleman®.
• Toestellen dienen ter reparatie aangeboden te worden bij uw
Velleman®-verdeler. Het toestel dient vergezeld te zijn van het
oorspronkelijke aankoopbewijs. Zorg voor een degelijke verpakking (bij
voorkeur de originele verpakking) en voeg een duidelijke foutomschrijving
bij.
• Tip: alvorens het toestel voor reparatie aan te bieden, kijk nog eens na
of er geen voor de hand liggende reden is waarom het toestel niet naar
behoren werkt (zie handleiding). Op deze wijze kunt u kosten en tijd
besparen. Denk eraan dat er ook voor niet-defecte toestellen een kost
voor controle aangerekend kan worden.
• Bij reparaties buiten de waarborgperiode zullen transportkosten
aangerekend worden.
• Elke commerciële garantie laat deze rechten onverminderd.
Bovenstaande opsomming kan eventueel aangepast worden
naargelang de aard van het product (zie handleiding van het
betreffende product).
Garantie de service et de qualité Velleman®
Depuis 1972, Velleman® a gagné une vaste expérience dans le secteur
de l’électronique et est actuellement distributeur dans plus de 85 pays.
Tous nos produits répondent à des exigences de qualité rigoureuses et à
des dispositions légales en vigueur dans l’UE. Afin de garantir la qualité,
nous soumettons régulièrement nos produits à des contrôles de qualité
supplémentaires, tant par notre propre service qualité que par un service
qualité externe. Dans le cas improbable d’un défaut malgré toutes les
précautions, il est possible d’invoquer notre garantie (voir les conditions
de garantie).
Conditions générales concernant la garantie sur les produits grand
public (pour l’UE) :
• tout produit grand public est garanti 24 mois contre tout vice de
production ou de matériaux à dater du jour d’acquisition effective ;
• si la plainte est justifiée et que la réparation ou le remplacement d’un
article est jugé impossible, ou lorsque les coûts s’avèrent
disproportionnés, Velleman® s’autorise à remplacer ledit article par un
article équivalent ou à rembourser la totalité ou une partie du prix d’achat.
Le cas échéant, il vous sera consenti un article de remplacement ou le
remboursement complet du prix d’achat lors d’un défaut dans un délai de
1 an après l’achat et la livraison, ou un article de remplacement
moyennant 50% du prix d’achat ou le remboursement de 50% du prix
d’achat lors d’un défaut après 1 à 2 ans.
• sont par conséquent exclus :
- tout dommage direct ou indirect survenu à l’article après livraison (p.ex.
dommage lié à l’oxydation, choc, chute, poussière, sable, impureté…) et
provoqué par l’appareil, ainsi que son contenu (p.ex. perte de données) et
une indemnisation éventuelle pour perte de revenus ;
- toute pièce ou accessoire nécessitant un remplacement causé par un
usage normal comme p.ex. piles (rechargeables comme non
rechargeables, intégrées ou remplaçables), ampoules, pièces en
caoutchouc, courroies… (liste illimitée) ;
- tout dommage qui résulte d’un incendie, de la foudre, d’un accident,
d’une catastrophe naturelle, etc. ;
- out dommage provoqué par une négligence, volontaire ou non, une
utilisation ou un entretien incorrect, ou une utilisation de l’appareil
contraire aux prescriptions du fabricant ;
Page 18

- tout dommage à cause d’une utilisation commerciale, professionnelle ou
collective de l’appareil (la période de garantie sera réduite à 6 mois lors
d’une utilisation professionnelle) ;
- tout dommage à l’appareil qui résulte d’une utilisation incorrecte ou
différente que celle pour laquelle il a été initialement prévu comme décrit
dans la notice ;
- tout dommage engendré par un retour de l’appareil emballé dans un
conditionnement non ou insuffisamment protégé.
- toute réparation ou modification effectuée par une tierce personne sans
l’autorisation explicite de SA Velleman® ; - frais de transport de et vers
Velleman® si l’appareil n’est plus couvert sous la garantie.
• toute réparation sera fournie par l’endroit de l’achat. L’appareil doit
nécessairement être accompagné du bon d’achat d’origine et être dûment
conditionné (de préférence dans l’emballage d’origine avec mention du
défaut) ;
• tuyau : il est conseillé de consulter la notice et de contrôler câbles, piles,
etc. avant de retourner l’appareil. Un appareil retourné jugé défectueux
qui s’avère en bon état de marche pourra faire l’objet d’une note de frais à
charge du consommateur ;
• une réparation effectuée en-dehors de la période de garantie fera l’objet
de frais de transport ;
• toute garantie commerciale ne porte pas atteinte aux conditions
susmentionnées.
La liste susmentionnée peut être sujette à une complémentation
selon le type de l’article et être mentionnée dans la notice d’emploi.
Garantía de servicio y calidad Velleman®
Desde su fundación en 1972 Velleman® ha adquirido una amplia
experiencia como distribuidor en el sector de la electrónica en más de 85
países. Todos nuestros productos responden a normas de calidad
rigurosas y disposiciones legales vigentes en la UE. Para garantizar la
calidad, sometemos nuestros productos regularmente a controles de
calidad adicionales, tanto a través de nuestro propio servicio de calidad
como de un servicio de calidad externo. En el caso improbable de que
surgieran problemas a pesar de todas las precauciones, es posible
recurrir a nuestra garantía (véase las condiciones de garantía).
Condiciones generales referentes a la garantía sobre productos de
venta al público (para la Unión Europea):
• Todos los productos de venta al público tienen un perìodo de garantìa
de 24 meses contra errores de producción o errores en materiales desde
la adquisición original;
• Si la queja está fundada y si la reparación o sustitución de un artìculo no
es posible, o si los gastos son desproporcionados, Velleman® autoriza
reemplazar el artículo por un artículo equivalente o reembolsar la
totalidad o una parte del precio de compra. En este caso, usted recibirá
un artículo de recambio o el reembolso completo del precio de compra si
encuentra algún fallo hasta un año después de la compra y entrega, o un
artículo de recambio al 50% del precio de compra o el reembolso del 50%
del precio de compra si encuentra un fallo después de 1 año y hasta los 2
años después de la compra y entrega.
Por consiguiente, están excluidos entre otras cosas:
- todos los daños causados directa o indirectamente al aparato (p.ej. por
oxidación, choques, caída,...) y a su contenido (p.ej. pérdida de datos)
después de la entrega y causados por el aparato, y cualquier
indemnización por posible pérdida de ganancias;
- partes o accesorios, que estén expuestos al desgaste causado por un
uso normal, como por ejemplo baterías (tanto recargables como no
recargables, incorporadas o reemplazables), bombillas, partes de goma,
etc. (lista ilimitada);
- defectos causados por un incendio, daños causados por el agua, rayos,
accidentes, catástrofes naturales, etc.;
- defectos causados a conciencia, descuido o por malos tratos, un
mantenimiento inapropiado o un uso anormal del aparato contrario a las
instrucciones del fabricante;
- daños causados por un uso comercial, profesional o colectivo del
aparato (el período de garantía se reducirá a 6 meses con uso
profesional);
- daños causados por un uso incorrecto o un uso ajeno al que está
previsto el producto inicialmente como está descrito en el manual del
usuario;
- daños causados por una protección insuficiente al transportar el
aparato.
- daños causados por reparaciones o modificaciones efectuadas por una
tercera persona sin la autorización explícita de Velleman®;
- se calcula gastos de transporte de y a Velleman® si el aparato ya no
está cubierto por la garantía.
• Cualquier artìculo que tenga que ser reparado tendrá que ser devuelto a
su distribuidor Velleman®. Devuelva el aparato con la factura de compra
original y transpórtelo en un embalaje sólido (preferentemente el
embalaje original). Incluya también una buena descripción del fallo;
• Consejo: Lea el manual del usuario y controle los cables, las pilas, etc.
antes de devolver el aparato. Si no se encuentra un defecto en el artículo
los gastos podrían correr a cargo del cliente;
• Los gastos de transporte correrán a carga del cliente para una
reparación efectuada fuera del período de garantía.
• Cualquier gesto comercial no disminuye estos derechos.
La lista previamente mencionada puede ser adaptada según el tipo
de artículo (véase el manual del usuario del artículo en cuestión).
Velleman® Service- und Qualitätsgarantie
Seit der Gründung in 1972 hat Velleman® sehr viel Erfahrung als Verteiler
in der Elektronikwelt in über 85 Ländern aufgebaut.
Alle Produkte entsprechen den strengen Qualitätsforderungen und
gesetzlichen Anforderungen in der EU. Um die Qualität zu gewährleisten
werden unsere Produkte regelmäßig einer zusätzlichen Qualitätskontrolle
unterworfen, sowohl von unserer eigenen Qualitätsabteilung als auch von
externen spezialisierten Organisationen. Sollten, trotz aller
Vorsichtsmaßnahmen, Probleme auftreten, nehmen Sie bitte die Garantie
in Anspruch (siehe Garantiebedingungen).
Allgemeine Garantiebedingungen in Bezug auf Konsumgüter (für die
Europäische Union):
• Alle Produkte haben für Material- oder Herstellungsfehler eine
Garantieperiode von 24 Monaten ab Verkaufsdatum.
• Wenn die Klage berechtigt ist und falls eine kostenlose Reparatur oder
ein Austausch des Gerätes unmöglich ist, oder wenn die Kosten dafür
unverhältnismäßig sind, kann Velleman® sich darüber entscheiden,
dieses Produkt durch ein gleiches Produkt zu ersetzen oder die
Kaufsumme ganz oder teilweise zurückzuzahlen. In diesem Fall erhalten
Sie ein Ersatzprodukt oder eine Rückzahlung im Werte von 100% der
Kaufsumme im Falle eines Defektes bis zu 1 Jahr nach Kauf oder
Lieferung, oder Sie bekommen ein Ersatzprodukt im Werte von 50% der
Kaufsumme oder eine Rückzahlung im Werte von 50 % im Falle eines
Defektes im zweiten Jahr.
• Von der Garantie ausgeschlossen sind:
- alle direkten oder indirekten Schäden, die nach Lieferung am Gerät und
durch das Gerät verursacht werden (z.B. Oxidation, Stöße, Fall, Staub,
Schmutz, Feuchtigkeit, ...), sowie auch der Inhalt (z.B. Datenverlust),
Entschädigung für eventuellen Gewinnausfall.
- Verbrauchsgüter, Teile oder Zubehörteile, die durch normalen Gebrauch
dem Verschleiß ausgesetzt sind, wie z.B. Batterien (nicht nur aufladbare,
sondern auch nicht aufladbare, eingebaute oder ersetzbare), Lampen,
Gummiteile, Treibriemen, usw. (unbeschränkte Liste).
- Schäden verursacht durch Brandschaden, Wasserschaden, Blitz,
Unfälle, Naturkatastrophen, usw.
- Schäden verursacht durch absichtliche, nachlässige oder
unsachgemäße Anwendung, schlechte Wartung, zweckentfremdete
Anwendung oder Nichtbeachtung von Benutzerhinweisen in der
Bedienungsanleitung.
- Schäden infolge einer kommerziellen, professionellen oder kollektiven
Anwendung des Gerätes (bei gewerblicher Anwendung wird die
Garantieperiode auf 6 Monate zurückgeführt).
- Schäden verursacht durch eine unsachgemäße Verpackung und
unsachgemäßen Transport des Gerätes.
- alle Schäden verursacht durch unautorisierte Änderungen, Reparaturen
oder Modifikationen, die von einem Dritten ohne Erlaubnis von Velleman®
vorgenommen werden.
• Im Fall einer Reparatur, wenden Sie sich an Ihren Velleman®-Verteiler.
Legen Sie das Produkt ordnungsgemäß verpackt (vorzugsweise die
Originalverpackung) und mit dem Original-Kaufbeleg vor. Fügen Sie eine
deutliche Fehlerbeschreibung hinzu.
• Hinweis: Um Kosten und Zeit zu sparen, lesen Sie die
Bedienungsanleitung nochmals und überprüfen Sie, ob es keinen auf de
Hand liegenden Grund gibt, ehe Sie das Gerät zur Reparatur
zurückschicken. Stellt sich bei der Überprüfung des Gerätes heraus, dass
kein Geräteschaden vorliegt, könnte dem Kunden eine
Untersuchungspauschale berechnet.
• Für Reparaturen nach Ablauf der Garantiefrist werden Transportkosten
berechnet.
• Jede kommerzielle Garantie lässt diese Rechte unberührt.
Die oben stehende Aufzählung kann eventuell angepasst werden
gemäß der Art des Produktes (siehe Bedienungsanleitung des
Gerätes).
Legen Heirweg 33, 9890 Gavere, Belgium
Imported by Velleman nv
Made in PRC
www.velleman.eu
 Loading...