

Velleman CCTVPROM18 Quick Installation Manual
CCTVPROM18
CCTV PACK EAGLE EYES: H.264 FULL FRAME DVR + 2 IR BULLET
CAMERAS
CCTV-PACK EAGLE EYES: H.264 FULL FRAME-VIDEORECORDER +
2 CILINDRISCHE IR-CAMERA'S
ENSEMBLE DE VIDÉOSURVEILLANCE EAGLE EYES: ENREGISTREUR
H.264 PLEIN ÉCRAN + 2 CAMÉRAS IR CYLINDRIQUES
JUEGO DE VIGILANCIA EAGLE EYES: VIDEOGRABADORA H.264
PANTALLA COMPLETA + 2 CÁMARAS CILÍNCRICAS CON LEDS IR
CCTV-PROMOPACK EAGLE EYES: H.264 VOLLBILD-VIDEORECORDER
+ 2 ZYLINDRISCHE KAMERAS MIT IR-LEDS
CONJUNTO CCTV EAGLE EYES: VIDEOGRAVADOR H.264 +
2 CÂMARAS CILÍNDRICAS IR
ZESTAW TELEWIZYJNY EAGLE EYES: REJESTRATOR DVR H.264
PELNORAMKOWY + 2 KAMERY TUBOWE NA PODCZERWIEN
QUICK INSTALLATION GUIDE 3
BEKNOPTE HANDLEIDING 11
GUIDE D'INSTALLATION RAPIDE 19
GUÍA RÁPIDA 27
SCHNELLEINSTIEG 35
GUIA RÁPIDO PARA INSTALAÇÃO 43
SKRÓCONA INSTRUKCJA INSTALACJI 51
CCTVPROM18
V. 02.1 – 30/01/2014 2 ©Velleman nv
2 x
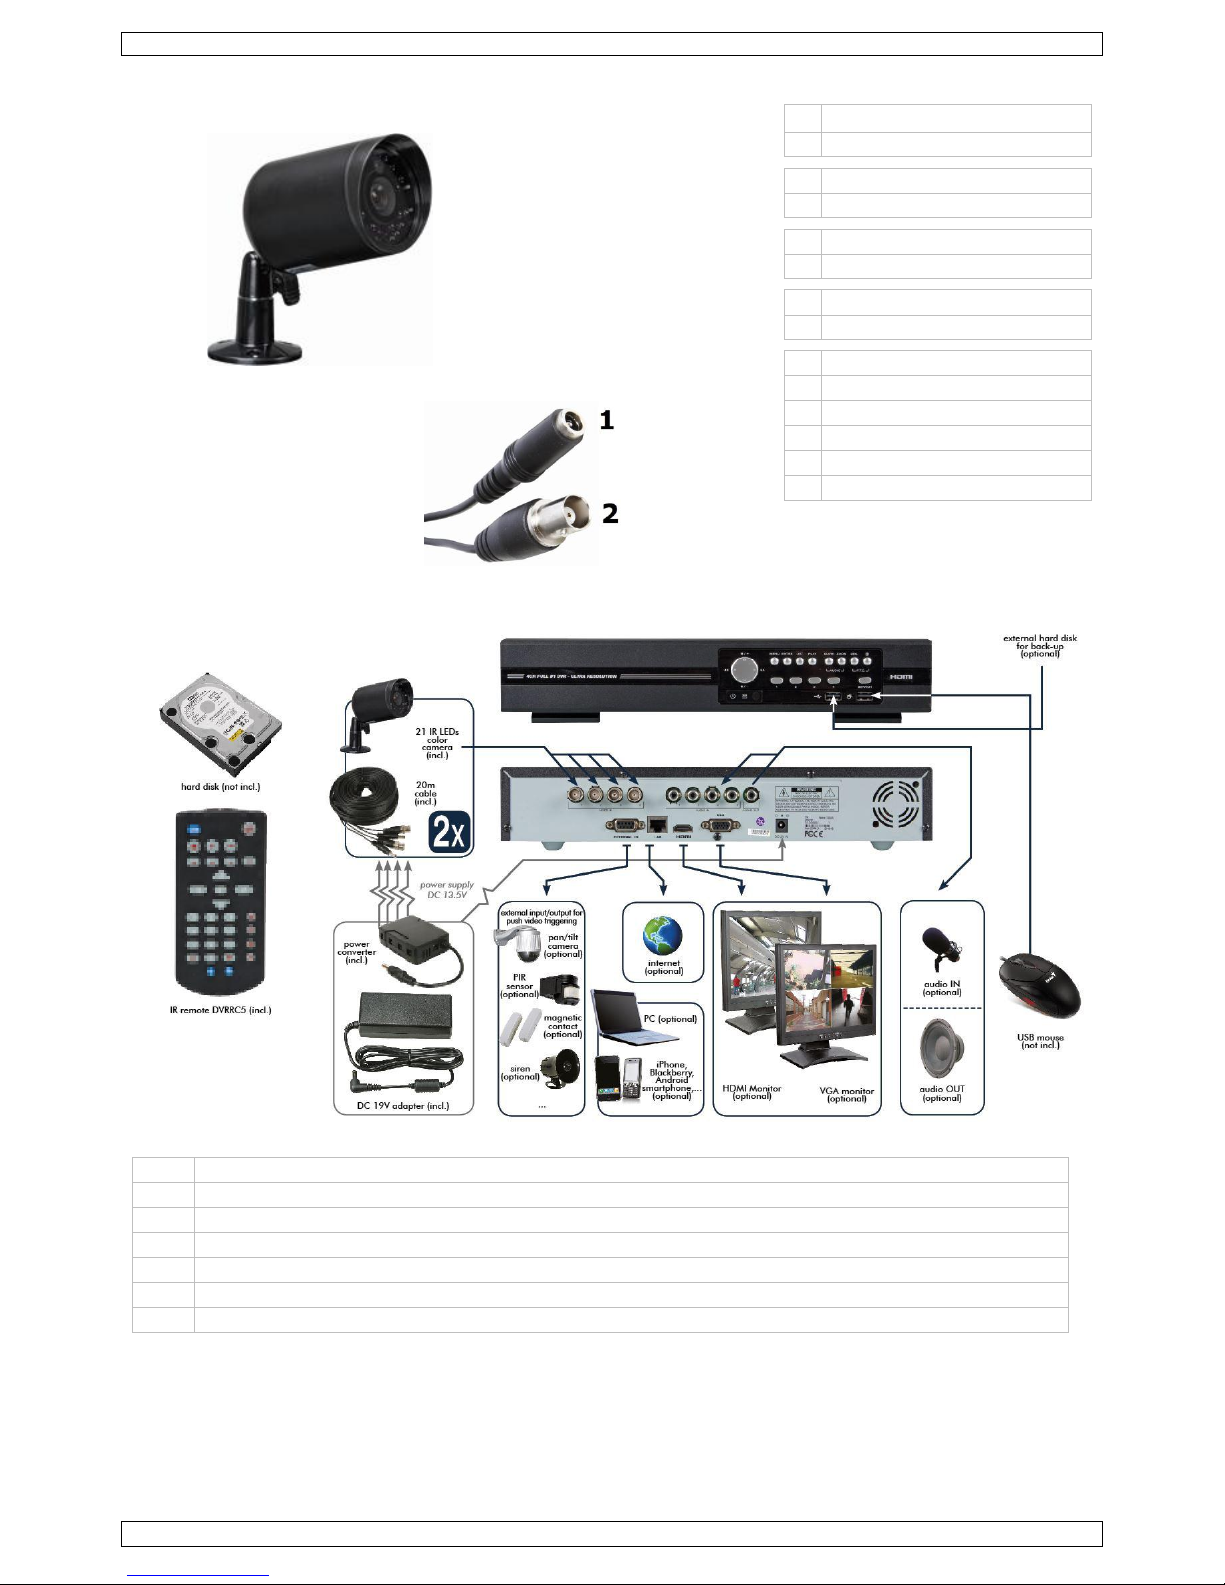
EN 1 12 VDC input terminal
2
Video output connector
NL 1 12VDC-ingangsaansluiting
2
Video-uitgangsaansluiting
FR 1 Connexion d’entrée 12 VCC
2
Connexion de sortie vidéo
ES 1 Conexión de entrada 12 VCC
2
Conexión de salida de vídeo
DE 1 12VDC-Eingangsanschluss
2
Video-Ausgangsanschluss
PT 1 Terminal de entrada 12 VDC
2
Conector de saída de vídeo
PL 1 Wejście zasilania 12 VDC
2
Złącze wyjściowe wideo
EN
Actual product may differ from the shown images due to product enhancement.
NL
Door productverbetering kan het product afwijken van de getoonde afbeeldingen.
FR
Les images peuvent différer du produit réel en raison des améliorations constantes effectuées sur le produit.
ES
Debido a algunas mejoras, el producto actual puede diferir de las imágenes visualizadas.
DE
Durch einige Verbesserungen kann das aktuelle Produkt von dem angezeigten Bild abweichen.
PT
O produto atual pode ser diferente das imagens apresentadas devido ao aperfeiçoamento do mesmo.
PL
Rzeczywisty produkt może różnić się od przedstawionych rysunków ze względu na wprowadzane ulepszenia.
CCTVPROM18
V. 02.1 – 30/01/2014 3 ©Velleman nv
QUICK INSTALLATION GUIDE
1. Introduction
To all residents of the European Union
Important environmental information about this product
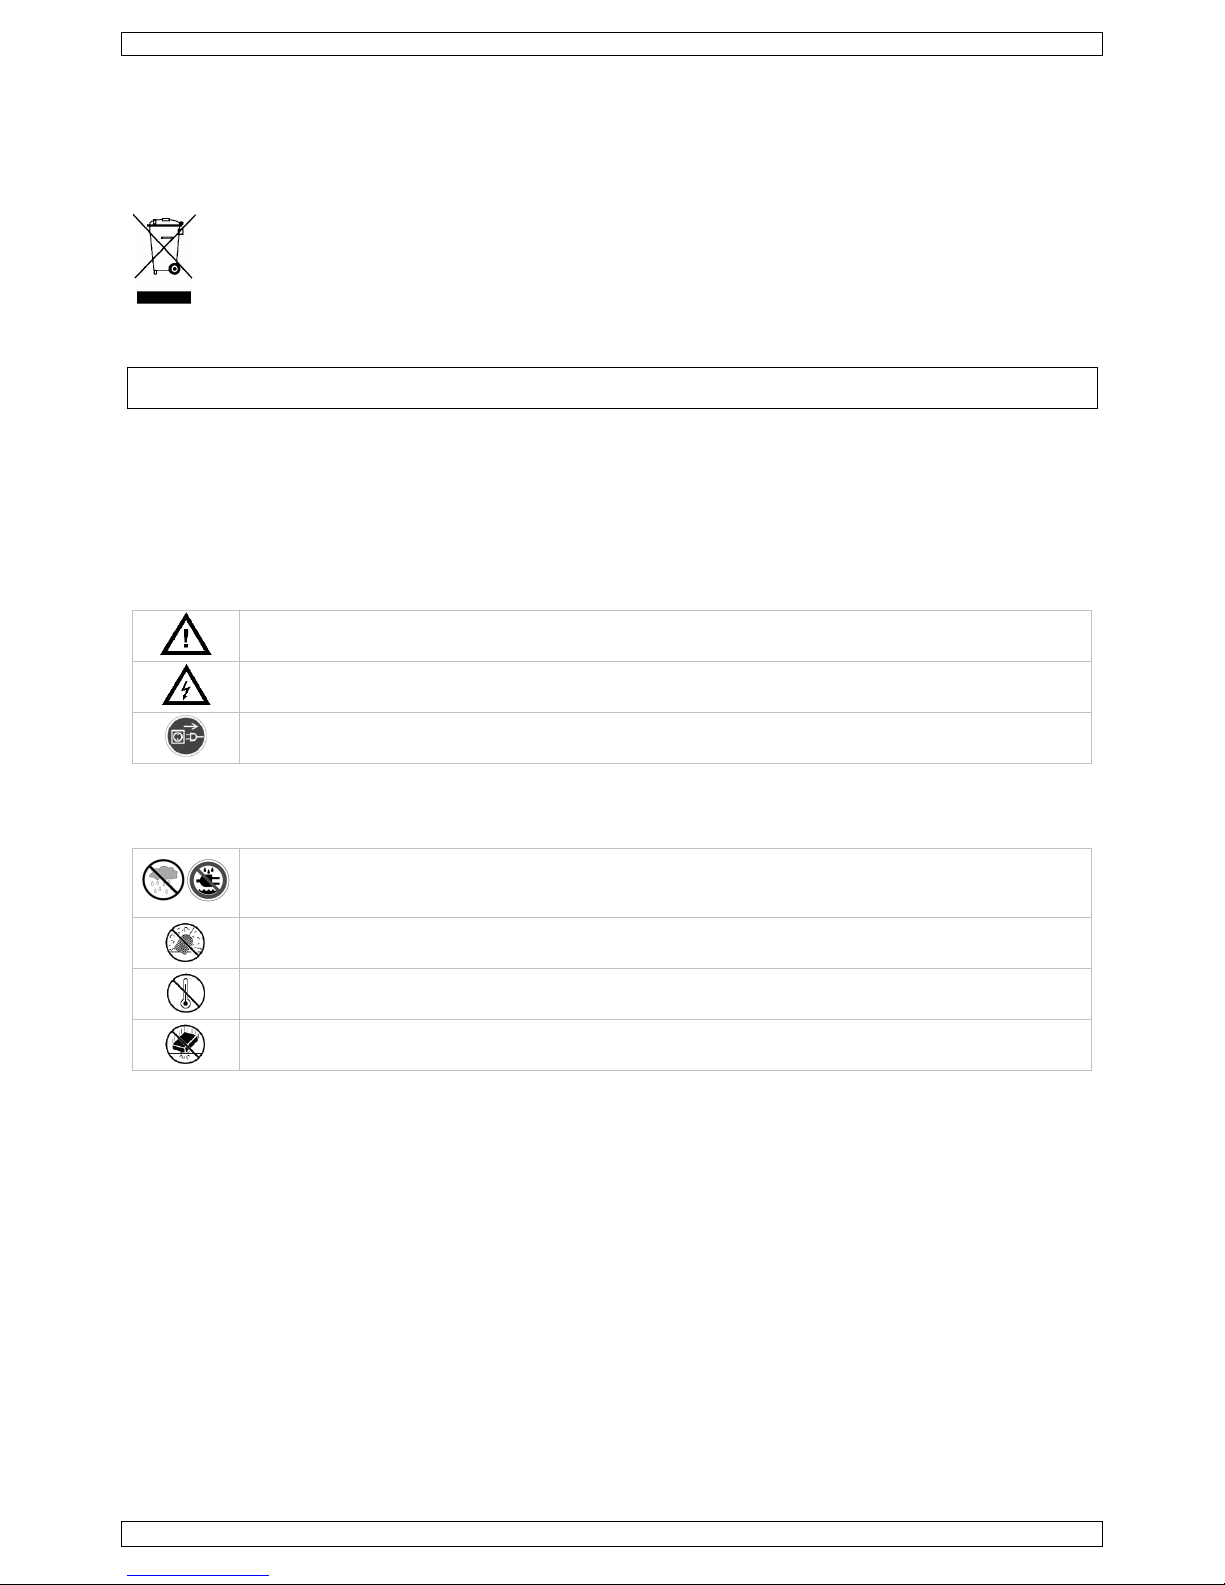
This symbol on the device or the package indicates that disposal of the device after its lifecycle could harm the
environment. Do not dispose of the unit (or batteries) as unsorted municipal waste; it should be taken to a
specialized company for recycling. This device should be returned to your distributor or to a local recycling service.
Respect the local environmental rules.
If in doubt, contact your local waste disposal authorities.
Thank you for choosing Velleman! Please read the manual thoroughly before bringing this device into service. If the device
was damaged in transit, don't install or use it and contact your dealer.
NOTE: This document is a Quick installation guide. For more details, refer to the full user manual which can be found on the
included CD-ROM.
Package content:
1 x full frame DVR with push status function
2 x IR colour cameras
2 x 20 m camera cables (DVR4/CAB)
1 x 19 V power supply
1 x high-efficiency DC-DC converter for DVR and cameras
remote control (DVRRC5).
2. Safety Instructions
Keep the device away from children and unauthorised users.
Risk of electroshock when opening the cover. Touching live wires can cause life-threatening electroshocks.
Always disconnect mains power when the device is not in use or when servicing or maintenance activities are
performed. Handle the power cord by the plug only.
3. General Guidelines
Refer to the Velleman® Service and Quality Warranty on the last pages of this manual.
Indoor use only
Keep this device away from rain, moisture, splashing and dripping liquids. Never put objects filled with liquid
on top.
Keep this device away from dust.
Keep this device away from extreme heat. Make sure the ventilation openings are clear at all times. For
sufficient air circulation, leave at least 1" (± 2.5 cm) in front of the openings.
Protect this device from shocks and abuse. Avoid brute force when operating the device.
Familiarise yourself with the functions of the device before actually using it.
All modifications of the device are forbidden for safety reasons.
Only use the device for its intended purpose. Using the device in an unauthorised way will void the warranty.
Damage caused by disregard of certain guidelines in this manual is not covered by the warranty and the dealer will not
accept responsibility for any ensuing defects or problems.
Do not use this product to violate privacy laws or perform other illegal activities.
4. Features
compression format: H.264 real-time
high resolution recording:
o full frame: 704 x 576 pixels
o 960H: 960 x 576 pixels with 700 TVL cameras: CAMCOLBUL28, CAMCOLD23, CAMCOLD24
mobile surveillance via free EagleEyes software:
o iPhone, iPad, Android: push status notification: system events (video loss, clear HDD, key unlock, HDD full, net login)
o other smart phones (BlackBerry, Windows Mobile, Symbian): remote surveillance
mobile phone connection via GPRS, 3G data or Wi-Fi
GUI (Graphical User Interface) display and USB mouse control
automatic integrated Dynamic Domain Name Service (DDNS): free service.

CCTVPROM18
V. 02.1 – 30/01/2014 4 ©Velleman nv
Not included:
hard disk: HD500GB/S, HD1TB/S & HD2TB/S
VGA & DVI monitor: MONSCA4N1
computer mouse.
5. Overview
Refer to the illustrations on page 2 of this manual.
Front panel
LED indications
HDD
Reading or recording activities on the hard disk.
ALARM
An alarm was triggered.
TIMER
Timed recording is enabled.
PLAY
The DVR is in playing mode.
POWER
DVR power is on.
Navigation
button
In settings mode:
Press ▲ / ▼ / ◄ / ► to move the cursor accordingly.
When changing a setting, press + or – to increase or decrease the setting.
In playback mode:
Press to pause playback.
Press to stop playback.
Press to fast forward.
Press to fast rewind.
MENU
Press to enter the main menu.
ENTER
Press to confirm settings.
LIST
List the information of the recorded files.
QUICK SEARCH / RECORD / MOTION / ALARM / TIMER / FULL LIST
PLAY
Press to play the recorded video.
SLOW
In playback mode, press to play the recorded file slowly.
ZOOM
In live or playback mode, press to enlarge the image of the selected channel.
SEQ
Press to show all screens sequentially in full screen mode. Press again to quit.
4CH: Press to show the 4 channel display mode.
1–4
Press a button to select the corresponding channel.
AUDIO
= SLOW + ZOOM
Press SLOW and ZOOM simultaneously to select live or play-back sounds.
P.T.Z.
= SEQ +
Press SLOW and simultaneously to enter or exit PTZ control mode.
SEARCH
Opens the QUICK SEARCH function.
USB port (2 x)
Connect a USB flash drive for video backup to one USB port; connect a USB mouse to the other.
Note: do not connect two USB flash drives or USB mice at the same time.
Rear panel
LAN port
Connect the DVR to a local network by plugging a network cable into this port.
VGA
Connector for video monitor (not included).
AUDIO IN
4 audio input channels to connect four external audio sources, e.g. from cameras with audio.
AUDIO OUT
1 audio output to connect to an audio device, e.g. a speaker (mono).
VIDEO IN
4 video input channels to connect 4 external video sources, e.g. cameras.
HDMI
1 video output channel to connect the DVR to the main monitor.
EXTERNAL I/O
Use a 9-pin DSUB connector to connect external signals, e.g. alarm, PTZ…
19V DC
Power supply input
CCTVPROM18
V. 02.1 – 30/01/2014 5 ©Velleman nv
6. Hardware Setup
Refer to the illustrations on page 2 of this manual.
Connecting a Video Monitor
Obtain a suitable monitor (not included) and connect it to the HDMI or VGA video output port on the back of the DVR.
Connecting the Power Supply
1. Plug the DC output connector of the included power adaptor into the 19 VDC power input at the back of the DVR.
WARNING: only use the included adaptor.
2. Plug the included power cable into the adaptor input connector and plug the other end into the mains. Do not switch the
DVR on yet.
Connecting a Camera
1. You can connect up to four suitable cameras (2 cameras included). Each camera needs its own power supply.
2. Connect the video output of the camera to either video input at the back of the DVR. The number next to the input
connectors represents the channel number. Connector type is BNC (cables included).
Connecting Audio
1. The DVR supports four audio inputs. Connect the audio output of an audio source to an audio input of the DVR. Make
sure to connect the audio channel to the corresponding video channel. Connector type is BNC.
2. There is also an audio output connector. Connect an audio device, e.g. a speaker to this connector when desired.
Connector type is BNC.
Connecting Local Area Network (LAN)
Connect the DVR to a local network by plugging a network cable into the LAN port at the back of the DVR. Connector type is
8P8C (RJ45). To setup the network connection, press the Menu button and select . Refer to the full manual on the included
CD-ROM for details.
7. Getting Started
1. Make sure the connected cameras are powered on.
2. Set the power switch of the DVR at the back of the device to ON.
It takes about 15 to 30 seconds to start up.
Menu Overview
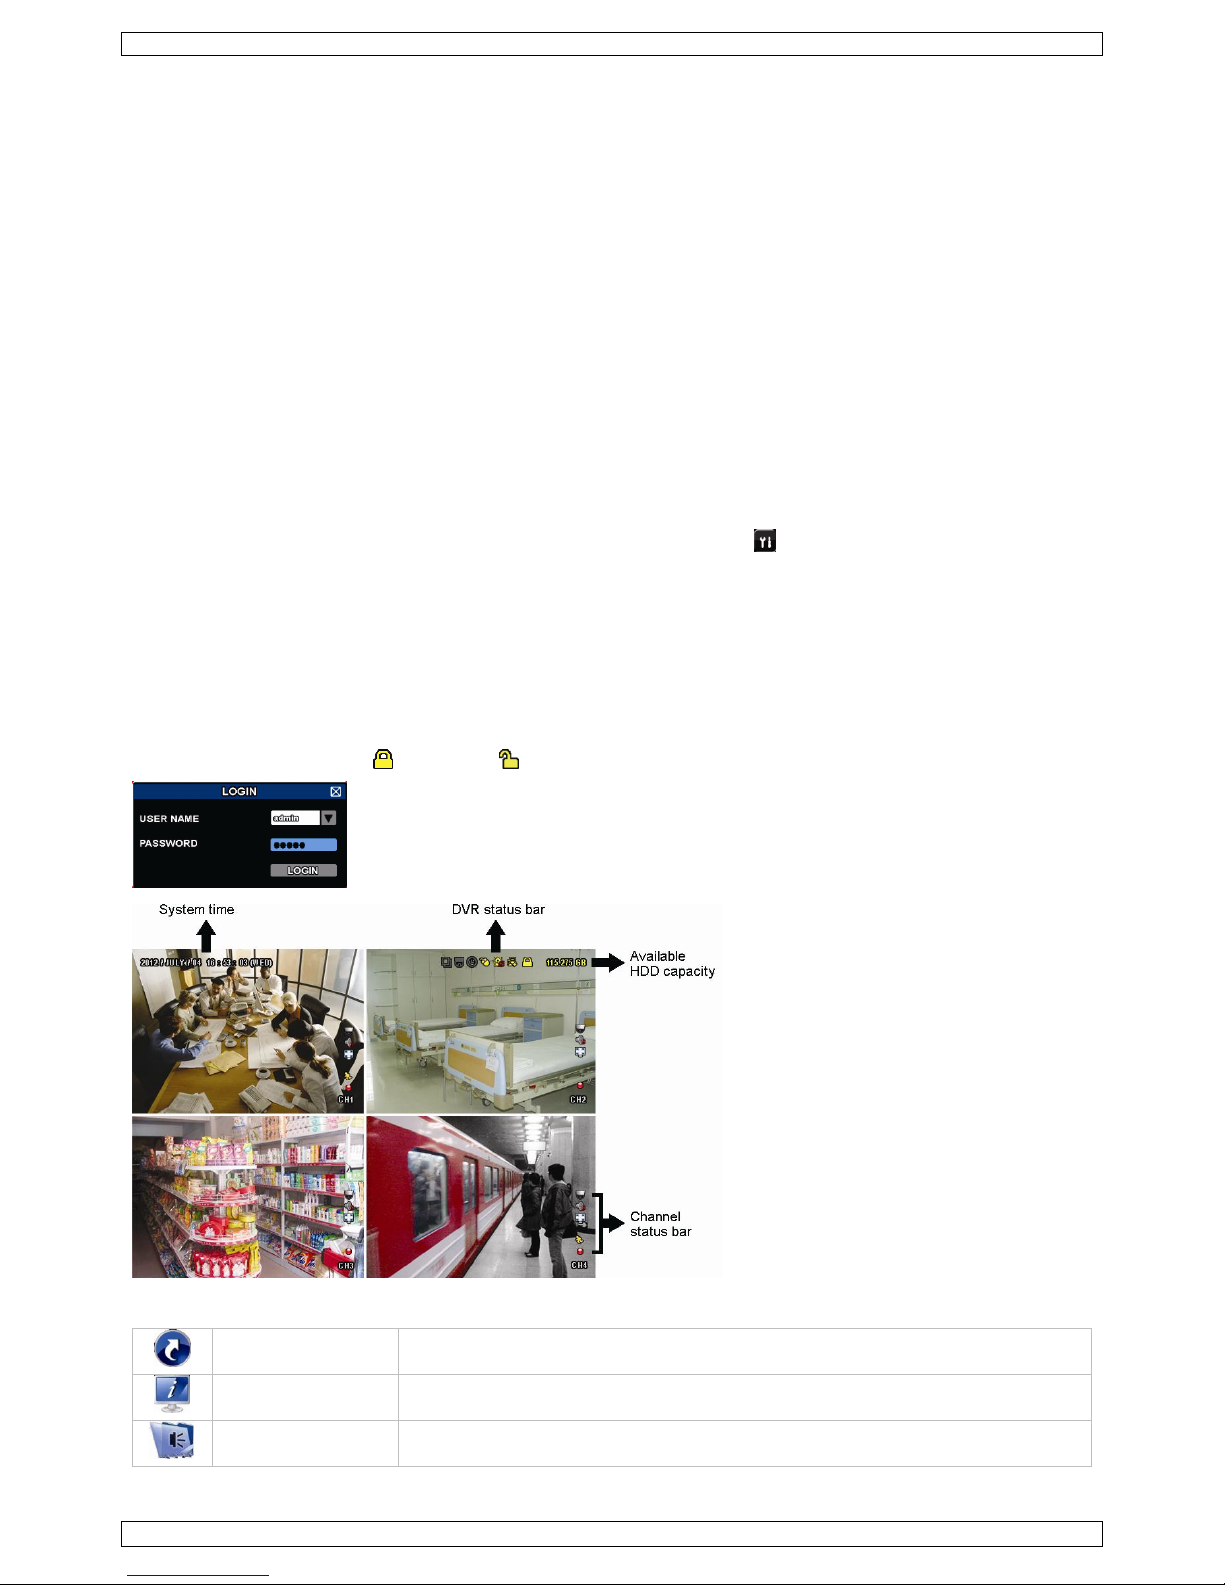
Move your mouse to enter the DVR password with the password keypad.
The default user name and password are both “admin”.
The status will change from (key lock) to (unlock).
Right-click anywhere on the screen to show the main menu, and right-click again to exit.
QUICK START
Click to set the status display, image settings, and date & time.
SYSTEM
Click to set the system configurations.
EVENT INFORMATION
Click to enter the event search menu.
CCTVPROM18
V. 02.1 – 30/01/2014 6 ©Velleman nv
ADVANCED CONFIG
Click to set CAMERA, DETECTION, ALERT, NETWORK, DISPLAY, RECORD, DEVICES,
DCCS, IVS & NOTIFY.
SCHEDULE SETTINGS
Click to set record timer, detection timer & alarm timer.
Refer to the full user manual on the included CD-ROM for more details.
Setting Date and Time
Before using the DVR, the time and date shall be set to get a valid time stamp.
1. Right-click the screen and enter the admin password.
2. Click the QUICK START icon.
3. Select TIME SETUP to set date and time.
Note: once recording started, do not change date or time as this will make it very difficult to find back the recorded files.
Note: when using the DVR for the first time and the correct time is set, leave it on for at least 48 hours.
Password Setting
1. Right-click the screen and enter the admin password.
2. Click the SYSTEM icon.
3. Go to ACCOUNT. Select the password you want to set and click EDIT.
Note: an operator cannot access the main menu, only the quick menu bar (see below).
4. Press the cursor up ( ) or down ( ) button to select the value of the first number and press enter to save and go to
the next character, or use the mouse to select the desired value. Repeat this for all four password numbers.
Note: the default admin password is admin.
Record Settings
1. Right-click the screen and enter the admin password.
2. Use the arrow button to select ADVANCED CONFIG.
3. Use the arrow button to select RECORD.
4. Select the record type you want to set (manual, event or timer).
5. In "CHANNEL", select "ALL" to apply the changes to all channels.
6. Or, select "BY CHANNEL" to set the image size, image per second & image quality individually for each channel.
7. Use the arrow button to select GENERAL.
8. Set the image size, images per second (I.P.S.) and image quality.
9. Select APPLY.
Refer to the full user manual on the included CD-ROM for more details.
Audio Playback
Press the SLOW and ZOOM button simultaneously to select the desired audio channel or use the quick menu bar (see below).
The current audio channel is indicated in the status bar.
Switch Users
1. The DVR can be accessed as administrator ( ) or operator ( ), icons are indicated in the status bar.
2. To switch between users, click on the user icon ( or ) to lock the current session ( ).
3. Click the key lock icon ( ) and enter the password of the desired profile.
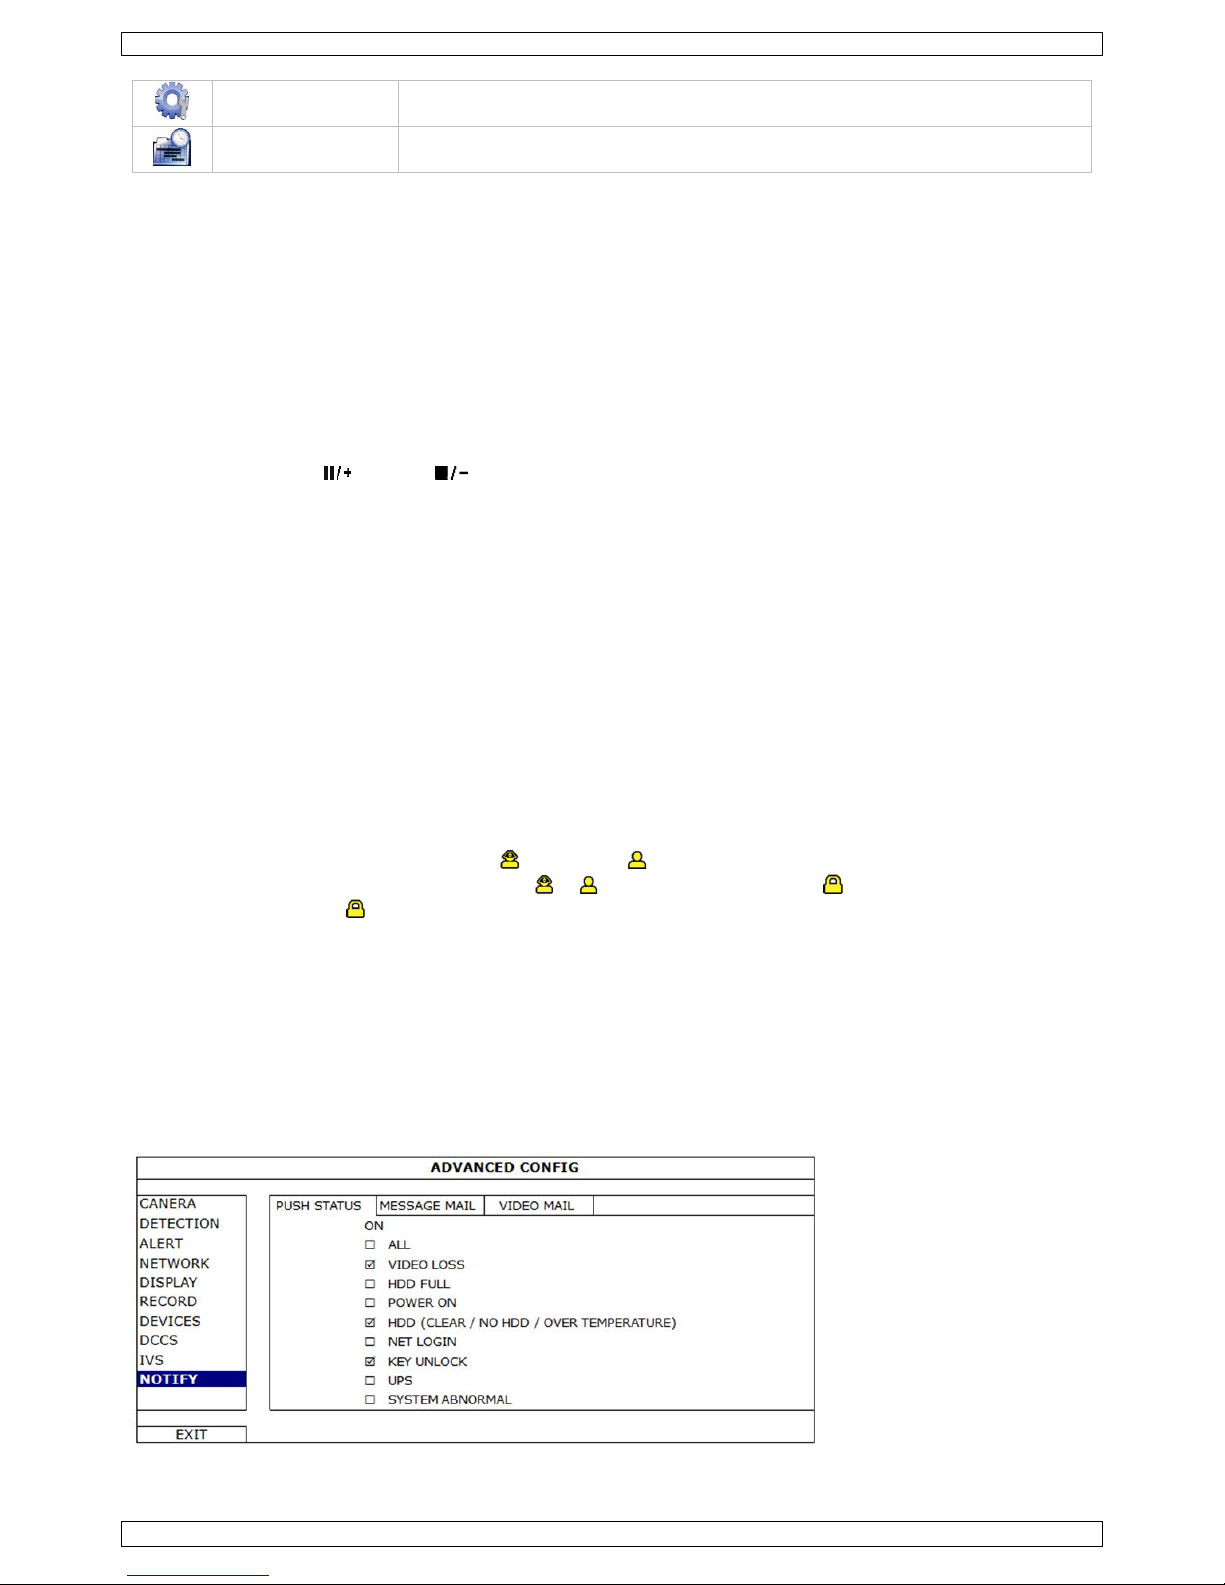
8. Push Status Configuration
If you have an iPhone, iPad, or Android mobile device, you can use the DVR's push status function: the DVR will send a
notification to your device when an alarm event occurs.
The alarm events are:
ALL
VIDEO LOSS
HDD FULL
POWER ON
HDD (CLEAR / NO HDD / OVER TEMPERATURE)
NET LOGIN
KEY UNLOCK
NETWORK
UPS
SYSTEM ABNORMAL.
To do so, you need to install the EagleEyes app on your mobile device (see Installing the EagleEyes App below).

CCTVPROM18
V. 02.1 – 30/01/2014 7 ©Velleman nv
On the DVR:
1. Set "ACTION" to ON.
2. Select the system event or events you want to get notified about on your mobile device.
You will receive a text message whenever an event occurs.
8.2 Installing the EagleEyes App
Prerequisites
Before installing EagleEyes to your mobile phone for remote surveillance, make sure you have checked the following:
You have subscribed to and you can access mobile internet services for your mobile phone.
Note: You may be charged for internet access via wireless or 3G networks. For the internet access rate details, please
check with your local network operator or service provider.
You have noted down the IP address, port number, user name and password used to access your network camera from
the internet.
Where to Download
1. Connect to www.eagleeyescctv.com from your mobile device, and sign in.
Please do not try to download EagleEyes from your computer.
o For Android, select the download link from the website to start downloading.
o For iPhone and iPad, two versions of EagleEyes are available: EagleEyesHD Plus (at a fee), and EagleEyesHD Lite
(free).
2. Select the version you want, and you will be directed to the App Store to download the application.
3. When the download is completed, EagleEyes will install automatically to the default location or any location you choose.
Note: For more details about configuring and operating EagleEyes, visit the website www.avtech.com.tw.
8.3 Configuration
Before configuring push status, make sure that:
The DVR system is set up as described in point 3. Connection and Setup in the full manual on the included CD-ROM.
The DVR is connected to the internet.
The EagleEyes app is installed on your mobile device (see Installing the EagleEyes App above).
Steps
1. Open EagleEyes, and add this DVR to the EagleEyes address book.
For more details about EagleEyes operation, visit www.eagleeyescctv.com.
2. In the EagleEyes app, enable push status as described below.
3. Try triggering an alarm event to see if you get a push status message.
9. Operation
Display
The following image shows the screen layout.
A system date and time
B general system status
C available HDD capacity
D
channel status
live audio channel 1–4 enabled
playback audio channel 1–4 enabled (yellow)
audio channel disabled
timer recording
digital zoom on (yellow) / off
USB mouse connected
LAN connected
internet connected
no network connection
hard disk overwrite (default)
USB flash drive connected
PTZ mode

CCTVPROM18
V. 02.1 – 30/01/2014 8 ©Velleman nv
key lock on
motion mode
sequence mode
alarm
recording mode
alarm mode
administrator logged on
operator logged on
Note that actual screen icons might differ slightly from the ones shown above.
Quick Menu Bar
Note: the quick menu bar is only available when a USB mouse is connected.
Move the cursor to the arrow mark to open the quick menu bar. It contains the following icons:
Click to show the channel switch panel and select the channel you want.
Click to display the playback control panel.
Click to play the latest recorded video clip, or click to enter the search list.
Switch to the channel you want first, and click to enter the zoom-in mode.
In this mode, click and drag the red frame on the bottom left of the screen to move to the place you want to see.
To exit this mode, click .
Click to show the power-off panel to either stop or reboot the system.
Refer to the full user manual on the included CD-ROM for more details.
Recording
Check whether the camera or cameras are properly connected.
When the auto-recording and pre-alarm functions are enabled, the device will start recording images.
Default the recording icon ( ) is shown.
In case the motion or alarm detection is activated and a motion or alarm is detected, the motion ( ) resp. alarm ( )
icon is shown.
When timed recording is enabled, the timed recording icon ( ) is shown and the timed recording LED is on.
Default, the device is in HDD overwrite mode and the icon ( ) is shown.
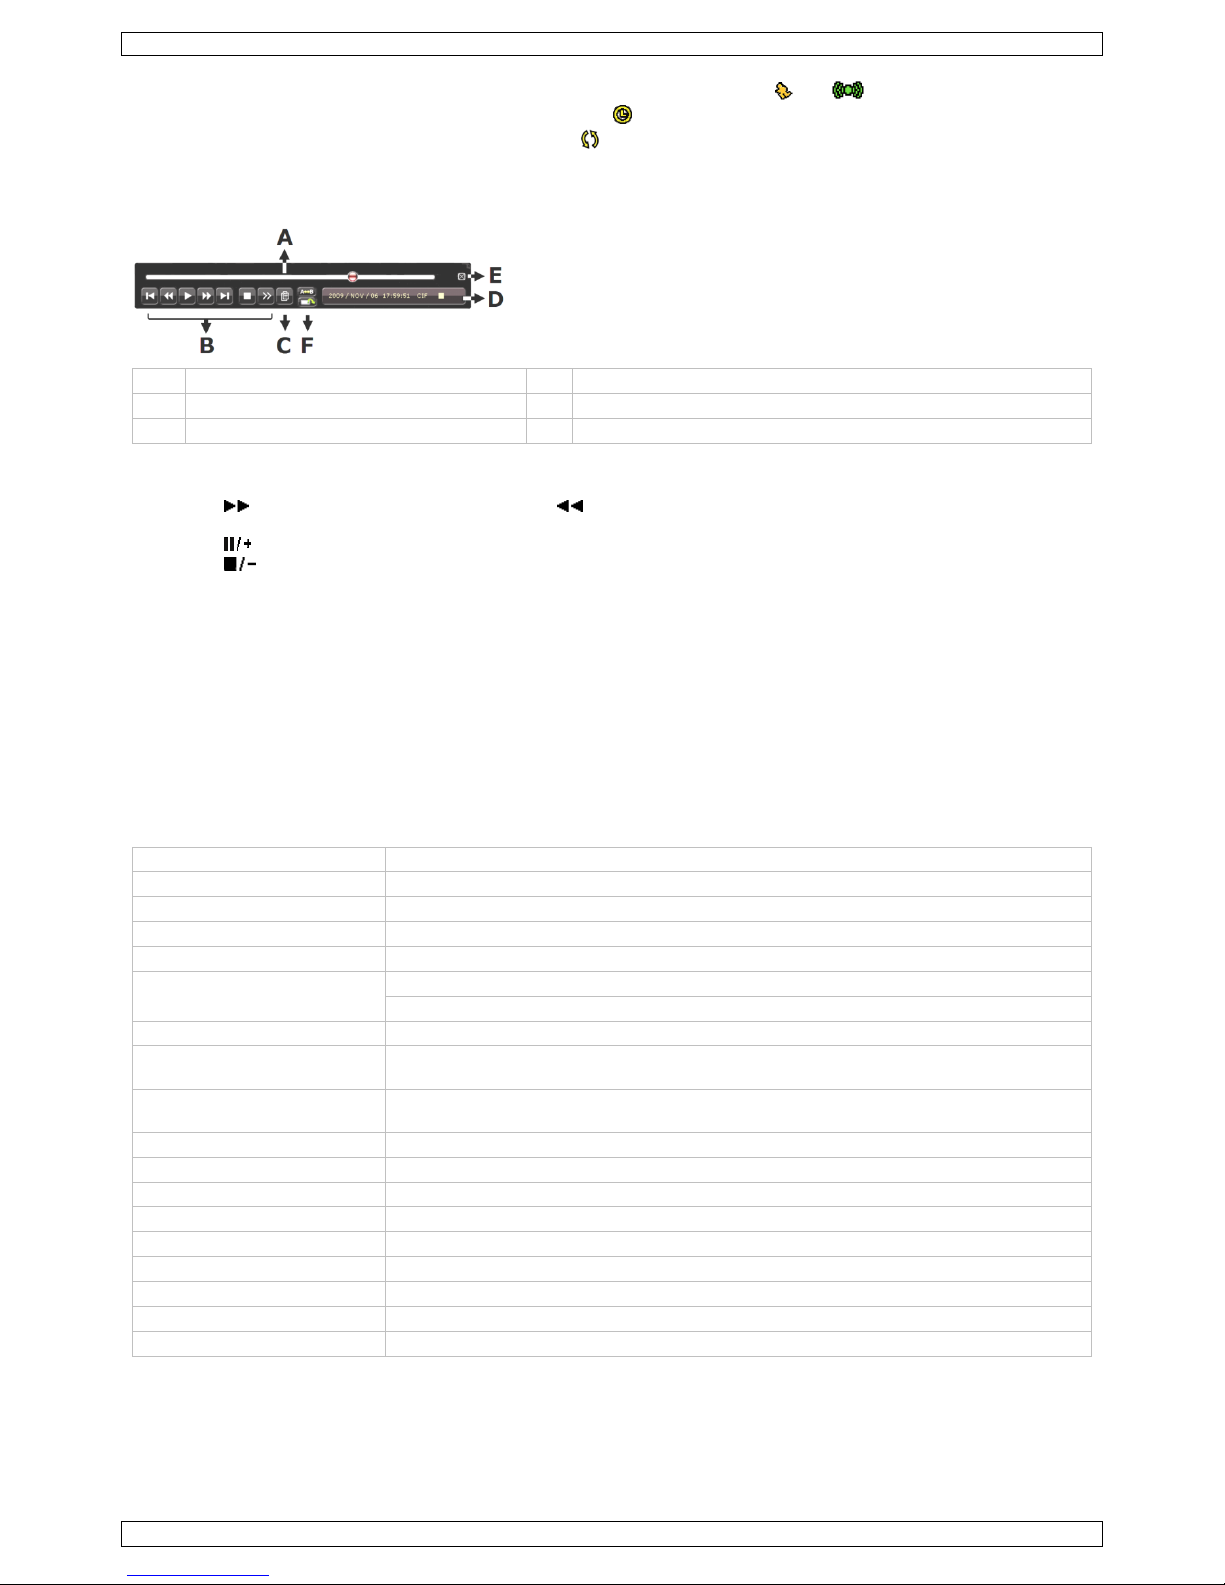
Play-back
Make sure the control panel is not locked and press the PLAY button on the control panel or use the quick menu bar to open
the playback control panel:
A
progress bar
D
information
B
playback control
E
close
C
event search
F
set repeat function AB / open backup menu
Note: play-back needs at least 8192 recorded images to work properly (e.g. with images per second set to 30, the recording
must be at least 273 seconds long).
The fast forward ( ) and fast rewind ( ) buttons will increase resp. decrease the play-back speed. Repeatedly pressing
the button will increase/decrease speed to 4x, 8x, 16x, or 32x (max.).
Press the pause button ( ) to temporary suspend video play-back.

CCTVPROM18
V. 02.1 – 30/01/2014 9 ©Velleman nv
Press the stop button ( ) to return to live monitoring.
Press the SLOW button once to set play-back speed to 1/4
th
and twice for 1/8th.
Search
1. To search an event, press the LIST button on the front panel.
The system displays an overview of recorded file types.
2. You can search the recordings by file type. Available types are ALARM, MANUAL, MOTION, SYSTEM, and FULL LIST.
3. Select a list and recording from this list.
4. Press ENTER to start play-back.
Note: the recorded files can also be searched via the included Video Viewer software.
10. Technical specifications
DVR
video format
PAL
video compression
H.264
video input
4 channels, composite video signal 1 Vpp / 75 ohm BNC
video output
HDMI (1080p) & VGA (max. 1920 x 1080 pixels)
video loopout
–
maximum recording rate
(PAL)
960H: 960 x 576 pixels with 100 IPS (PAL)
frame/D1: 704 x 576 pixels with 100 IPS (PAL)
image quality setting
super best – best – high – normal
hard disk storage
built-in SATA type, supports 1 x HDD, supported HDD capacity over 3 TB (HDD not incl.)
HDD quick cleaning
quick cleanup the "index system" of the recorded files. 1 TB in under 2 seconds
recording mode
manual / timer / motion / network / alarm controlled
multiplex operation
live display, record, playback, backup and network
audio I/O
4 x audio in, 1 x audio out (mono)
motion detection area
16 x 12 grids per channel
motion detection sensitivity
high – normal – low
pre-alarm recording
yes
backup device
USB 2.0 flash drive (for backup and firmware updates)
Ethernet
10/100BASE-T, supports remote control and LiveView via Ethernet
network connection
supports TCP/IP, PPPoE, DHCP and DDNS function
mobile surveillance
smart
phones
EagleEyes software
push status: on iPad, iPod Touch, iPhone, and Android phone
remote login via all smart phone platforms (Apple, Android, BlackBerry, Nokia
Symbian and Windows Mobile)
computer
video viewer software on Windows and Mac
web browser: Internet Explorer, Firefox, Google Chrome and Safari via Java,
QuickTime or VLC plug-in
IR remote control
remote control DVR and PTZ (DVRRC5 incl.)
PTZ control
yes (via RS-485)
alarm I/O
4 in / 1 out
digital zoom
2 x (live & playback)
key lock
yes
video loss detection
yes
camera title
up to 6 characters
video adjustments
hue / colour / contrast / brightness
date display format
YY/MM/DD, DD/MM/YY, MM/DD/YY, and off
power source
19 Vdc
power consumption
< 40 W
daylight saving
yes
operating temperature
10–40 °C (50–104 °F)
system recovery
system auto recovery after power reconnected
dimensions
375 x 281 x 61 mm
Cameras
water resistance
IP67
pick-up element
1/3" HR colour CCD image sensor
number of pixels
753 (H) x 582 (V) – PAL
resolution
520 TV lines

CCTVPROM18
V. 02.1 – 30/01/2014 10 ©Velleman nv
min. illumination
0.1 lux
IR LEDs
21
max. IR projection distance
15 m
S/N ratio
> 48 dB (AGC off)
electronic shutter
1/50 to 1/100 000 s
lens
f 3.6 mm / F 2.0
lens angle
92.6°
colour rolling suppress
yes
AGC
yes
white balance
automatic
video output
1.0 Vpp composite, 75 ohm
audio
no
power supply
12 Vdc
current consumption
70 mA (IR off), 270 mA (IR on)
operating temperature
0–45 °C
dimensions
140 x 56 x 80 mm
weight
285 g
Use this device with original accessories only. Velleman nv cannot be held responsible in the event of damage or
injury resulting from (incorrect) use of this device. For more info concerning this product and the latest version
of this manual, please visit our website www.velleman.eu. The information in this manual is subject to change
without prior notice.
© COPYRIGHT NOTICE – The copyright to this manual is owned by Velleman nv. All worldwide rights reserved.
No part of this manual may be copied, reproduced, translated or reduced to any electronic medium or otherwise without the
prior written consent of the copyright holder.

CCTVPROM18
V. 02.1 – 30/01/2014 11 ©Velleman nv
BEKNOPTE HANDLEIDING
1. Inleiding
Aan alle ingezetenen van de Europese Unie
Belangrijke milieu-informatie betreffende dit product
Dit symbool op het toestel of de verpakking geeft aan dat, als het na zijn levenscyclus wordt weggeworpen, dit
toestel schade kan toebrengen aan het milieu. Gooi dit toestel (en eventuele batterijen) niet bij het gewone
huishoudelijke afval; het moet bij een gespecialiseerd bedrijf terechtkomen voor recyclage. U moet dit toestel naar
uw verdeler of naar een lokaal recyclagepunt brengen. Respecteer de plaatselijke milieuwetgeving.
Hebt u vragen, contacteer dan de plaatselijke autoriteiten betreffende de verwijdering.
Dank u voor uw aankoop! Lees deze handleiding grondig voor u het toestel in gebruik neemt. Werd het toestel beschadigd
tijdens het transport, installeer het dan niet en raadpleeg uw dealer.
OPMERKING: Dit document is een beknopte installatiehandleiding. Voor meer informatie, raadpleeg de volledige handleiding
die beschikbaar is op de meegeleverde cd-rom.
Inhoud:
1 x DVR met push status-functie
2 x IR-kleurencamera
2 x camerakabel van 20 m (DVR4/CAB)
1 x 19V-voedingsadapter
1 x high-efficiency DC-DC converter voor de DVR en de camera's
afstandsbediening (DVRRC5).
2. Veiligheidsinstructies
Houd dit toestel uit de buurt van kinderen en onbevoegden.
Elektrocutiegevaar bij het openen van het toestel. Raak geen kabels aan die onder stroom staan om
dodelijke elektrische schokken te vermijden.
Trek de stekker uit het stopcontact wanneer het toestel niet in gebruik is of voordat u het toestel reinigt. Houd
de voedingskabel altijd vast bij de stekker en niet bij de kabel.
3. Algemene richtlijnen
Raadpleeg de Velleman® service- en kwaliteitsgarantie achteraan deze handleiding.
Gebruik het toestel enkel binnenshuis
Bescherm dit toestel tegen regen, vochtigheid en opspattende vloeistoffen. Plaats nooit objecten gevuld met
een vloeistof op het toestel.
Bescherm dit toestel tegen stof.
Bescherm dit toestel tegen extreme hitte. Zorg dat de verluchtingsopeningen niet verstopt geraken. Voorzie
een ruimte van minstens 1" (± 2,5 cm) tussen het toestel en elk ander object.
Bescherm het toestel tegen schokken. Vermijd brute kracht tijdens de bediening.
Leer eerst de functies van het toestel kennen voor u het gaat gebruiken.
Om veiligheidsredenen mag u geen wijzigingen aanbrengen aan het toestel.
Gebruik het toestel enkel waarvoor het gemaakt is. De garantie vervalt automatisch bij ongeoorloofd gebruik.
De garantie geldt niet voor schade door het negeren van bepaalde richtlijnen in deze handleiding en uw dealer zal de
verantwoordelijkheid afwijzen voor defecten of problemen die hier rechtstreeks verband mee houden.
Installeer en gebruik deze camera NIET voor illegale praktijken en respecteer ieders privacy.
4. Eigenschappen
compressieformaat: H.264 real-time
opname in hoge resolutie:
o Full-Frame: 704 x 576 pixels
o 960H: 960 x 576 pixels met 700TVL-camera's: CAMCOLBUL28, CAMCOLD23, CAMCOLD24
mobiele videobewaking via gratis EagleEyes-software:
o iPhone, iPad, Android: push status-bericht: systeemevents (beeldverlies, harde schijf wissen, ontgrendelen, harde
schijf vol, net login)
o andere smartphones (BlackBerry, Windows Mobile, Symbian): bewaking op afstand
aansluiting met de gsm via GPRS, 3G of Wi-Fi
display met grafische gebruikersinterface (GUI) en USB-muis
automatische geïntegreerde dynamische domeinnaamservice (DDNS): gratis dienst.

CCTVPROM18
V. 02.1 – 30/01/2014 12 ©Velleman nv
Niet meegeleverd:
harde schijf: HD500GB/S, HD1TB/S & HD2TB/S
VGA- en DVI-monitor: MONSCA4N1
muis.
5. Omschrijving
Raadpleeg de afbeeldingen op pagina 2 van deze handleiding.
Voorpaneel
Leds
HDD
De harde schijf leest of neemt data op.
ALARM
Het alarm is ingeschakeld.
TIMER
De geprogrammeerde opnamefunctie is ingeschakeld.
PLAY
De DVR speelt de opname af.
POWER
De DVR is ingeschakeld.
Navigatieknop
In instellingenmodus:
Druk op ▲ / ▼ / ◄ / ► om de cursor naar boven/onder/links/rechts te verplaatsen.
Om een instelling te wijzigen, druk op + of – om de waarde te verhogen of te
verlagen.
In afspeelmodus:
Druk op om de opname te onderbreken.
Druk op om de opname te stoppen.
Druk op om vooruit te spoelen.
Druk op om terug te spoelen.
MENU
Druk op MENU om het hoofdmenu weer te geven.
ENTER
Druk op ENTER om te bevestigen.
LIST
Lijst van de opnamebestanden.
QUICK SEARCH / RECORD / MOTION / ALARM / TIMER / FULL LIST
PLAY
Druk op PLAY om de opname af te spelen.
SLOW
Druk op SLOW om het afgespeelde bestand traag af te spelen.
ZOOM
In live-weergave of afspeelmodus, druk op ZOOM om het beeld van het geselecteerde kanaal te vergroten.
SEQ
Druk op SEQ om alle kanalen achtereenvolgens op het volledige scherm weer te geven. Druk nogmaals om
de functie te verlaten.
4CH: Druk op 4CH om de 4-kanaalsmodus weer te geven.
1–4
Druk op een knop om het desbetreffende kanaal te selecteren.
AUDIO
= SLOW + ZOOM
Druk gelijktijdig op SLOW en ZOOM, om live-geluid te selecteren of geluid van de geluidskanalen af te
spelen.
P.T.Z.
= SEQ +
Druk gelijktijdig op SLOW en om de PTZ-modus in- of uit te schakelen.
SEARCH
De QUICK SEARCH-functie activeren.
USB-poort
(2 x)
Sluit een USB-flashdrive aan op een USB-poort voor back-upopnames. Sluit een USB-muis aan op de andere
USB-poort.
Opmerking: sluit geen twee flashdrives of USB-muizen gelijktijdig aan.
Achterpaneel
LAN-poort
Sluit de DVR via een netwerkkabel aan op een LAN-netwerk.
VGA
Aansluiting voor videomonitor (niet meegeleverd).
AUDIO IN
4 geluidsingangen voor het aansluiten van 4 externe geluidsbronnen (bijv. camera met geluid).
AUDIO OUT
1 geluidsuitgang voor het aansluiten van een geluidstoestel (bijv. mono-luidspreker).
VIDEO IN
4 video-ingangen voor het aansluiten van 4 externe videobronnen (bijv. camera's).
HDMI
1 video-uitgang voor het aansluiten van de DVR op de hoofdmonitor.
EXTERNAL I/O
Gebruik een 9-polige DSUB-stekker, om externe toestellen aan te sluiten (bijv. alarm, PTZ, enz.).
19V DC
Voedingsingang

CCTVPROM18
V. 02.1 – 30/01/2014 13 ©Velleman nv
6. De hardware installeren
Raadpleeg de afbeeldingen op pagina 2 van deze handleiding.
Een monitor aansluiten
Sluit een compatibele monitor (niet meegeleverd) aan op de HDMI- of VGA-uitgangspoort aan de achterkant van de DVR.
De voeding aansluiten
1. Sluit de DC-stekker van de meegeleverde voedingsadapter aan op de 19VDC-ingang aan de achterkant van de DVR.
WAARSCHUWING: gebruik enkel de meegeleverde voedingsadapter.
2. Koppel de meegeleverde voedingskabel aan de adapter en koppel de adapter vervolgens aan het lichtnet. Schakel de
DVR nog niet in.
Een camera aansluiten
1. U kunt tot 4 camera's aansluiten (2 camera's meegeleverd). Elke aangesloten camera heeft een eigen voeding nodig.
2. Sluit de video-uitgang van de camera aan op de video-ingang aan de achterkant van de DVR. Het nummer naast de
aansluiting duidt op het kanaalnummer. Het aansluittype is BNC (kabels meegeleverd).
Audio aansluiten
1. De DVR heeft vier geluidsingangen. Sluit de geluidsuitgang van een geluidsbron aan op de geluidsingang van de DVR.
Zorg ervoor dat u het geluidskanaal aansluit op het correcte videokanaal. Gebruik een stekker van het type BNC.
2. Er is ook een geluidsuitgang. Sluit een extern geluidstoestel aan, bv. een luidspreker. Gebruik een stekker van het type
BNC.
Een lokaal netwerk (LAN) aansluiten
Sluit de DVR via een netwerkkabel aan op een LAN-netwerk. Gebruik hiervoor een stekker van het type 8P8C (RJ45). Om de
netwerkverbinding in te stellen, druk op de MENU-knop en selecteer . Voor meer informatie, raadpleeg de uitgebreide
handleiding op de meegeleverde cd-rom.
7. Aan de slag
1. Zorg ervoor dat de aangesloten camera's ingeschakeld zijn.
2. Zet de voedingsschakelaar aan de achterkant van de DVR op ON.
Het opstarten duurt ongeveer 15 à 30 seconden.
Menu-overzicht
Gebruik de muis om het wachtwoord van de DVR in te voeren met het toetsenbord.
De standaard gebruikersnaam en wachtwoord zijn “admin”.
De status wijzigt van (vergrendeld) naar (ontgrendeld).
Klik met de rechtermuisknop op een willekeurige plaats op het scherm om het hoofdmenu te openen, en klik nogmaals om te
sluiten.
QUICK START
Klik om de statusweergave, de beelden, de datum en het uur in te stellen.
SYSTEM
Klik om de systeemconfiguratie in te stellen.
EVENT INFORMATION
Klik om naar het zoekmenu voor events te gaan.

CCTVPROM18
V. 02.1 – 30/01/2014 14 ©Velleman nv
ADVANCED CONFIG
Klik om CAMERA, DETECTION, ALERT, NETWORK, DISPLAY, RECORD, DEVICES, DCCS,
IVS & NOTIFY in te stellen.
SCHEDULE SETTINGS
Klik om de opnametimer, detectietimer en alarmtimer in te stellen.
Raadpleeg de uitgebreide handleiding op de meegeleverde cd-rom voor meer details.
Datum en tijd instellen
Stel voor het eerste gebruik de datum en het uur in.
1. Klik met de rechtermuisknop en geef het admin wachtwoord in.
2. Klik op de icoon QUICK START.
3. Selecteer TIME SETUP om de datum en het uur in te stellen.
Opmerking: verander de datum en het uur niet nadat u de opnamefunctie geactiveerd hebt. Zo niet is het moeilijk om de
opgenomen bestanden terug te vinden.
Opmerking: Laat de DVR bij de eerste ingebruikname minstens 48 uur ingeschakeld, nadat u de datum en het uur hebt
ingesteld.
Het wachtwoord instellen
1. Klik met de rechtermuisknop en geef het admin wachtwoord in.
2. Klik op de icoon SYSTEM.
3. Ga naar ACCOUNT. Selecteer het wachtwoord dat u wilt instellen en klik op EDIT.
Opmerking: een gewone gebruiker heeft geen toegang tot het hoofdmenu, enkel tot de snelmenubalk.
4. Scroll naar boven ( ) of naar onder ( ) om de waarde van het eerste nummer te selecteren en druk op ENTER om
op te slaan. Ga naar het volgende teken of gebruik de muis om de gewenste waarde te selecteren. Herhaal dit voor de
vier wachtwoordcijfers.
Opmerking: het standaard admin wachtwoord is admin.
Opname-instellingen
1. Klik met de rechtermuisknop en geef het admin wachtwoord in.
2. Gebruik de pijltjestoets om ADVANCED CONFIG te selecteren.
3. Gebruik de pijltjestoets om RECORD te selecteren.
4. Selecteer het opnametype dat u wilt instellen (manueel, event of timer).
5. In "CHANNEL", selecteer "ALL" om de wijzigingen op alle kanalen toe te passen.
6. Of selecteer "BY CHANNEL" om de beeldgrootte, beelden per seconde & beeldkwaliteit voor elk kanaal afzonderlijk in te
stellen.
7. Gebruik de pijltjestoets om GENERAL te selecteren.
8. Stel de beeldgrootte, beelden per seconden (I.P.S.) en beeldkwaliteit in.
9. Selecteer APPLY.
Raadpleeg de uitgebreide handleiding op de meegeleverde cd-rom voor meer details.
Geluid afspelen
Druk gelijktijdig op SLOW en ZOOM om het gewenste geluidskanaal te selecteren of gebruik de menubalk (zie hieronder). Het
geselecteerde geluidskanaal wordt in de statusbalk weergegeven.
Het gebruikerstype veranderen
1. U kunt als administrator ( ) of als gebruiker ( ) toegang tot de DVR hebben. De symbolen worden in de statusbalk
weergegeven.
2. Om tussen de gebruikers te schakelen, klik op het gebruikersymbool ( of ) om de huidige sessie te vergrendelen
( ).
3. Druk op het toetsvergrendelingssymbool ( ) en geef het wachtwoord van het gewenste profiel in.
8. Push status-configuratie
Hebt u een iPhone, iPad of Android-telefoon, dan kunt de push status-functie van de DVR gebruiken: de DVR zal een bericht
naar uw mobiele toestel sturen wanneer een alarm geactiveerd wordt.
De alarmevents zijn:
ALL
BEELDVERLIES
HARDE SCHIJF VOL
AAN
HARDE SCHIJF (WISSEN / GEEN HARDE SCHIJF / TE
WARME TEMPERATUUR)
NETWERKTOEGANG
TOETSVERGRENDELING INACTIEF
NETWERK
UPS
SYSTEEMFOUT.
Om dit te doen, moet u de EagleEyes-applicatie op uw mobiele toestel installeren (zie De EagleEyes-app installeren).

CCTVPROM18
V. 02.1 – 30/01/2014 15 ©Velleman nv
Op de DVR:
1. Stel "ACTION" in op ON.
2. Selecteer de events waarvoor u een bericht wilt ontvangen op uw mobiele toestel.
U ontvangt een bericht telkens er zich een event voordoet.
8.2 De EagleEyes-app installeren
Vereisten
Voordat u EagleEyes voor bewaking op afstand installeert op uw mobiele telefoon, zorg ervoor dat u het volgende hebt
gecontroleerd:
U heeft toegang tot mobiele internetdiensten via uw mobiele telefoon.
Opmerking: De kosten voor internettoegang via draadloze of 3G-netwerken kunnen mogelijk in rekening worden
gebracht. Voor meer informatie over internettoegang, neem contact op met uw lokale netwerk- of serviceprovider.
U hebt het IP-adres, poortnummer, de gebruikersnaam en het wachtwoord genoteerd om toegang te krijgen tot uw
netwerkcamera via internet.
De software downloaden
1. Ga naar www.eagleeyescctv.com vanaf uw mobiele telefoon en log in.
Probeer niet om EagleEyes vanaf uw computer te downloaden.
o Voor Android, selecteer de downloadlink van de website om het downloaden te starten.
o Voor iPhone en iPad zijn twee versies van EagleEyes beschikbaar: EagleEyesHD Plus (tegen betaling), en EagleEyesHD
Lite (gratis).
2. Selecteer de gewenste versie, en u wordt naar de App Store doorgestuurd om de applicatie te downloaden.
3. Wanneer het downloaden voltooid is, zal EagleEyes automatisch worden geïnstalleerd op de locatie waar alle
toepassingen standaard in uw telefoon zijn opgeslagen, of op de locatie die u opgeeft.
Opmerking: Voor meer details over de configuratie en het gebruik van EagleEyes, raadpleeg de officiële website
www.avtech.com.tw.
8.3 Configuratie
Voor u push status configureert, zorg ervoor dat:
Het DVR-systeem is ingesteld zoals beschreven in het hoofdstuk 3. Connection and Setup van de volledige handleiding
op de meegeleverde cd-rom.
De DVR is aangesloten op het internet.
De EagleEyes-app is geïnstalleerd op uw mobiele toestel (zie De EagleEyes-app installeren hierboven).
Stappen
1. Open EagleEyes, en voeg deze DVR toe aan het EagleEyes-adresboek.
Voor meer details over het gebruik van EagleEyes, raadpleeg de website www.eagleeyescctv.com.
2. In de EagleEyes-applicatie, schakel de push status-functie in.
3. Activeer het alarm om te controleren of u een bericht ontvangt.

CCTVPROM18
V. 02.1 – 30/01/2014 16 ©Velleman nv
9. Gebruik
Display
De volgende afbeelding geeft de lay-out van de display weer.
A systeemdatum en -uur
B algemene systeemstatus
C beschikbare schijfruimte
D
kanaalstatus
live-geluid geluidskanaal 1–4 inschakelen
geluidskanaal 1–4 (geel) afspelen
geluidskanaal uitgeschakeld
geprogrammeerde opname
digitale zoom aan (geel) / uit
USB-muis aangesloten
LAN-aansluiting
met internet verbonden
geen netwerkverbinding
harde schijf overschrijven (standaard)
USB-flashdrive aangesloten
PTZ-modus
toetsvergrendeling aan
beweging waargenomen
sequentiefunctie
alarm
opnamemodus
alarmmodus
als administrator ingelogd
als gebruiker ingelogd
Deze symbolen kunnen lichtjes van de weergegeven symbolen afwijken.
Snelmenubalk
Opmerking: Enkel zichtbaar wanneer een USB-muis aangesloten is.
Beweeg de cursor naar links, om de snelmenubalk weer te geven. Deze geeft de volgende pictogrammen weer:
Klik om het kanaalkeuzevenster weer te geven en een kanaal te kiezen.
Klik om het afspeelpaneel weer te geven.
Klik op om de laatste opname af te spelen, of klik op om een bestand te zoeken.
Kies het gewenste kanaal en klik op om in te zoomen.
Klik en sleep het rode kader (linksonder) om in te zoomen.
Om opnieuw uit te zoomen, klik op .
Klik om het uitschakelmenu weer te geven en het apparaat uit te schakelen of opnieuw op te starten.
Voor meer details, raadpleeg de uitgebreide handleiding op de meegeleverde cd-rom.
Opname
Sluit de camera('s) en de harde schijf correct aan op het toestel.
Het toestel start de opname wanneer de opname- en de prealarmfunctie ingeschakeld zijn.
Het symbool ( ) verschijnt op de display.
CCTVPROM18
V. 02.1 – 30/01/2014 17 ©Velleman nv
Bij bewegingswaarneming of alarm (functie is ingeschakeld) wordt het symbool ( ) of ( ) weergegeven.
Bij een geprogrammeerde opname verschijnt het symbool ( ) en licht de opnameled op.
Standaard staat de DVR in overschrijfmodus en wordt ( ) weergegeven.
Weergave
Zorg ervoor dat het controlepaneel niet vergrendeld is. Druk op PLAY in het controlepaneel of gebruik de snelmenubalk, om
het afspeelpaneel te openen:
A
statusbalk
D
informatie
B
bedieningstoetsen
E
sluiten
C
zoekfunctie
F
herhaalfunctie AB instellen / back-up menu openen
Opmerking: een bestand moet minstens 8192 beelden bevatten (vb. ips = 30, de opname moet minstens 273 seconden
lang zijn).
Druk op om de opname vooruit te spoelen of op om de opname terug te spoelen. Druk meermaals op de knop om
de snelheid aan te passen: 4x, 8x, 16x of 32x (max.).
Druk op om de opname te pauzeren.
Druk op om naar de live-weergave terug te keren.
Druk eenmaal op SLOW om de opname aan 1/4 afspeelsnelheid af te spelen, of druk tweemaal om de opname aan 1/8
afspeelsnelheid af te spelen.
Zoekfunctie
1. Om een event te zoeken, druk op LIST op het voorpaneel.
Een overzicht van alle opgenomen bestandsformaten verschijnt.
2. U kunt via bestandstype zoeken. ALARM, MANUAL, MOTION, SYSTEM en FULL LIST.
3. Selecteer de gewenste lijst en opname.
4. Druk op ENTER om het bestand af te spelen.
Opmerking: U kunt de opgenomen bestanden ook met de Video Viewer-software zoeken.
10. Technische specificaties
DVR
videoformaat
PAL
formaat videocompressie
H.264
video-ingang
4 kanalen, composiet videosignaal 1 Vpp / 75 ohm BNC
video-uitgang
HDMI (1080p) & VGA (max. 1920 x 1080 pixels)
video loopuitgang
–
max. opnamefrequentie (PAL)
960H: 960 x 576 pixels met 100 IPS (PAL)
frame/D1 704 x 576 pixels met 100 IPS (PAL)
instelling beeldkwaliteit
Super best (superieur) – Best (best) – High (hoog) – Normal (normaal)
opslagruimte harde schijf
ingebouwd SATA type, ondersteunt 1 x HDD, capaciteit van HDD is meer dan 3 TB (HDD
niet meegelev.)
snelwisfunctie van de harde
schijf
snel wissen van het "indexsysteem" van de opgenomen bestanden. 1 TB in minder dan
2 seconden
opnamemodus
manueel / timer / beweging / netwerk / alarm
mutliplex-functies
live-weergave, opname, afspelen, back-up en netwerk
audio I/O
4 audio-ingangen, 1 audio-uitgang (mono)
detectiebereik
rooster 16 x 12 per kanaal
detectiegevoeligheid
hoog – normaal – laag
pre-alarmopname
ja
back-uptoestel
USB 2.0 flash drive (voor back-up en updates van firmware)
Ethernet
10/100BASE-T, ondersteunt bediening op afstand en LiveView via Ethernet
netwerkverbinding
ondersteunt TCP/IP, PPPoE, DHCP en DDNS

CCTVPROM18
V. 02.1 – 30/01/2014 18 ©Velleman nv
bewaking op afstand
smartphones
EagleEyes-software
push status: op iPad, iPod Touch, iPhone en Android-telefoon
beheer op afstand vanaf alle smartphoneplatforms (Apple, Android,
BlackBerry, Nokia Symbian en Windows Mobile)
computer
video viewer-software op Windows en Mac
webbrowser Internet Explorer, Firefox, Google Chrome en Safari via Java,
QuickTime of VLC plug-in
IR-afstandsbediening
bediening op afstand van de DVR en PTZ-functies (DVRRC5 meegelev.)
PTZ-besturing
ja (via RS-485)
alarm I/O
4 ingangen / 1 uitgang
digitale zoom
2 x (live-weergave & afspelen)
toetsvergrendeling
ja
detectie beeldverlies
ja
cameranaam
tot 6 tekens
videoregelingen
tint / kleur / contrast / helderheid
formaat tijdsweergave
JJ/MM/DD, DD/MM/JJ, MM/DD/JJ en geen
voeding
19 Vdc
verbruik
< 40 W
zomertijd (DST)
ja
werktemperatuur
10–40 °C
systeemherstel
automatisch systeemherstel na stroomonderbreking
afmetingen
375 x 281 x 61 mm
Camera's
waterbestendigheid
IP67
opneemelement
1/3" HR kleuren-CCD
aantal pixels
753 (H) x 582 (V) – PAL
resolutie
520 tv-lijnen
min. verlichting
0,1 lux
IR-leds
21
max. bereik IR
15 m
S/R-verhouding
> 48 dB (AGC uit)
elektronische sluiter
1/50 tot 1/100 000 s
lens
f 3.6 mm / F 2.0
lenshoek
92,6°
colour rolling suppress
ja
automatische versterking (AGC)
ja
witbalans
automatisch
video-uitgang
1,0 Vpp composiet, 75 ohm
geluid
nee
voeding
12 Vdc
stroomverbruik
70 mA (IR uit), 270 mA (IR aan)
werktemperatuur
0–45 °C
afmetingen
140 x 56 x 80 mm
gewicht
285 g
Gebruik dit toestel enkel met originele accessoires. Velleman nv is niet aansprakelijk voor schade of kwetsuren
bij (verkeerd) gebruik van dit toestel. Voor meer informatie over dit product en de laatste versie van deze
handleiding, zie www.velleman.eu. De informatie in deze handleiding kan te allen tijde worden gewijzigd zonder
voorafgaande kennisgeving.
© AUTEURSRECHT – Velleman nv heeft het auteursrecht voor deze handleiding. Alle wereldwijde rechten
voorbehouden. Het is niet toegestaan om deze handleiding of gedeelten ervan over te nemen, te kopiëren, te vertalen, te
bewerken en op te slaan op een elektronisch medium zonder voorafgaande schriftelijke toestemming van de rechthebbende.
 Loading...