

Page 1
CCTVPROM16
CCTV PACK – H.264 FULL FRAME DVR - 4 IR CAMERAS – 500 GB HARD DISK
JUEGO DE VIGILANCIA - H.264 VIDEOGRABADORA FULL FRAM E - 4 CÁMARAS IR -
CCTV-PACK - H.264 FULL FRAME VIDEORECORDER - 4 IR-KAMERAS - FESTPLATTE
ZESTAW MONITORINGOWY- H.264 FULL FRAME DVR - 4 KAMERY IR - HD 500GB
QUICK INSTALLAT ION GUIDE 3
CCTV-PACK – H.264 FULL FRAME DVR - 4 IR-CAMERA'S - HARDE SCHIJF 500GB
PACK VIDEOSURVEILLANCE – DVR H.264 PLEIN ÉCRAN - 4 CAMÉRAS IR - DISQUE
DUR 500GO
DISCO DURO 500GB
500GB
CONJUNTO CCTV - H.264 FULL FRAME DVR - 4 CÂMARAS IR – DISCO RIGIDO
500GB
BEKNOPTE INSTALL AT IE HANDLEIDING 11
GUIDE D'INSTALL AT ION RAPIDE 19
GUÍA RÁPIDA 27
SCHNELLEINSTIEG 35
GUIA RÁPIDO PAR A INSTALAÇÃO 43
SKRÓCONA INSTRUKC J A INSTALACJI 51
Page 2
CCTVPROM16
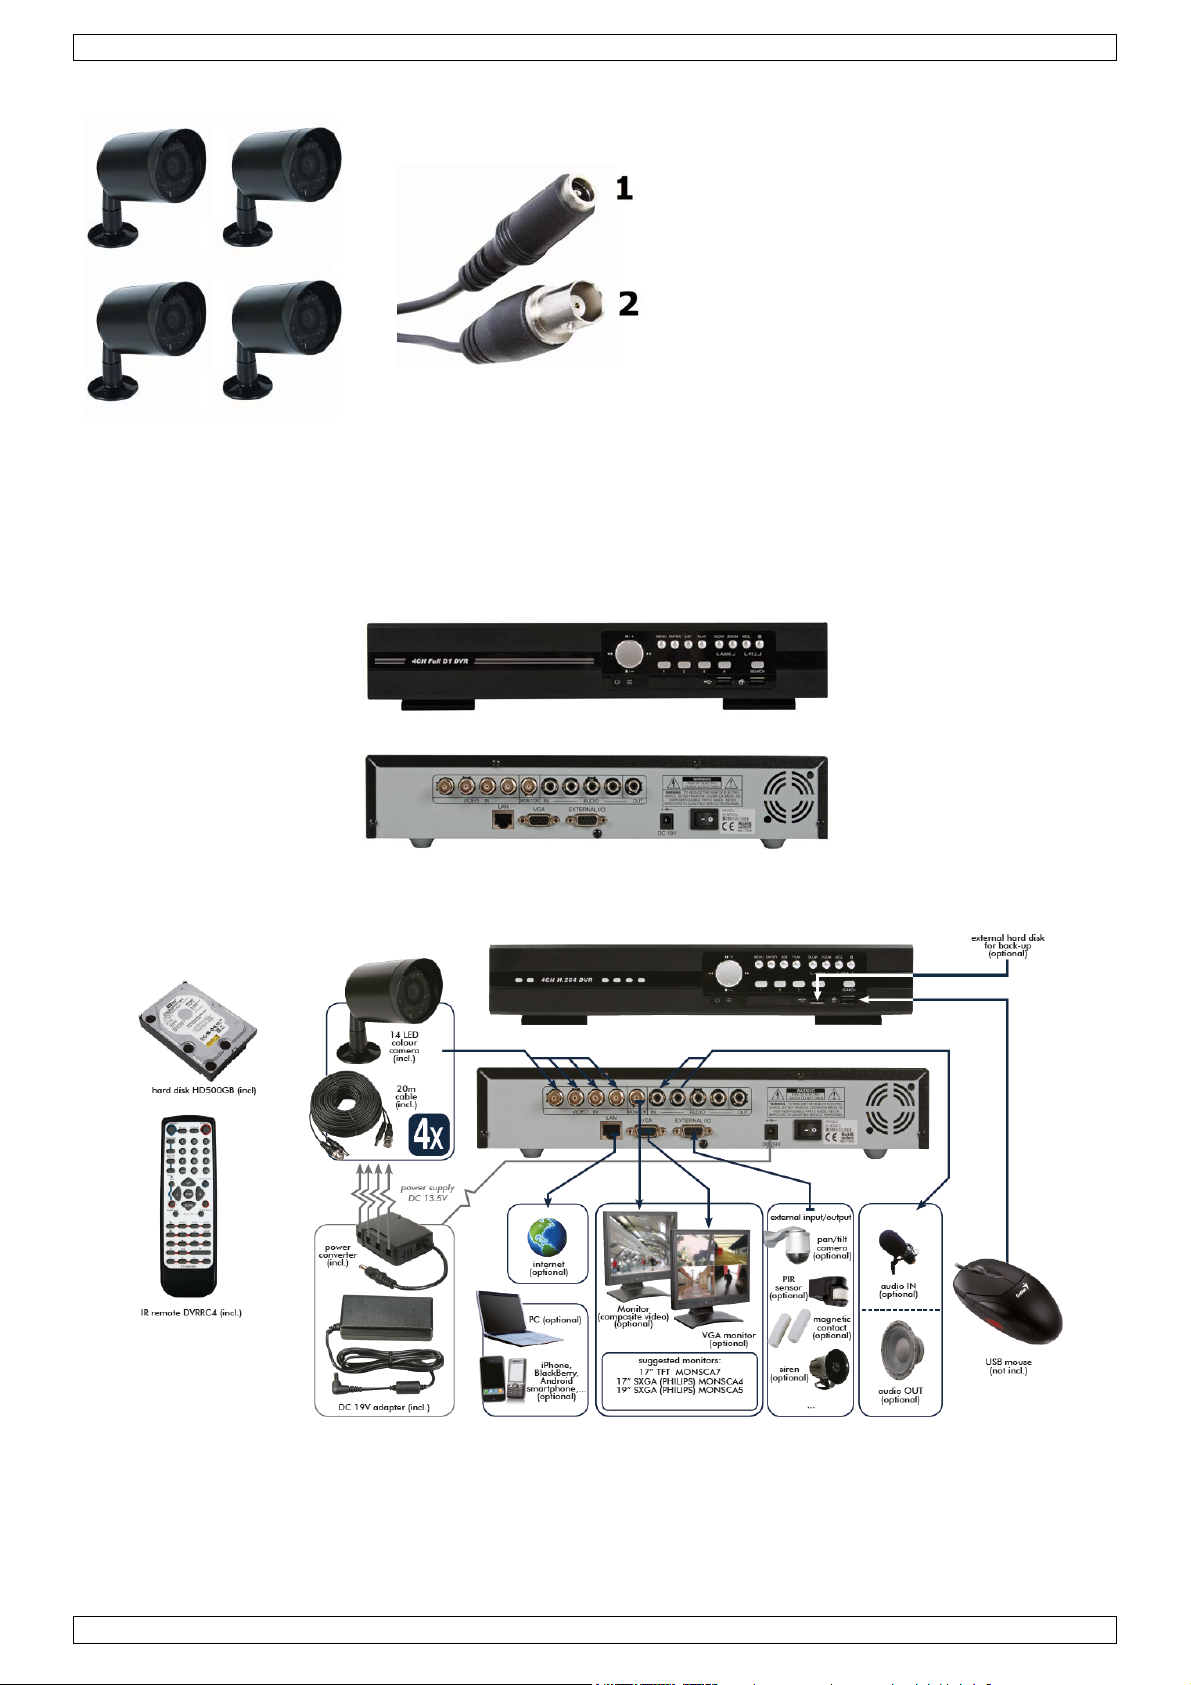
EN 1 DC 12V input t erminal
2
NL 1 DC 12V ingangsaansluiting
2
Video-uitgangsaansluiting
FR 1 Connexion d’entrée CC 12V
2
Connex io n de so rtie vidéo
DE 1 DC 12V-Eingangsanschluss
2
Video-Ausgangsanschluss
PL
ES 1
2
Conexión de entrada CC 12V
Conexión de salida de vídeo
PT 1
2
Terminal de entrada DC 12V
Conector de saída de vídeo
Video output connector
1
Wejście zasilania DC 12 V
2
Złącze wyjściowe wideo
V. 02 – 21/08/2013 2 ©Velleman nv
Page 3
CCTVPROM16
Always di sconnect mains power whe n t he device i s not in u se or when s er vicing or m ai n tenanc e
Indoor use only
Keep this device awa y form r ai n , moisture, splashing and dripping l iquids. Never pu t o bjects
QUICK I NS TA LLATION GUIDE
1. Introduction
To all residents of the European Union
Important environmental information about this product
This symbol on th e device or the package indic ates that disposal of t he device after it s l i fecycle could
harm the environment. Do not dispose of the unit (or batteries) as un so r ted municipal waste; it sh o u ld
be taken t o a speciali zed company for r ecycling. This device should be retur n ed to your distribut o r or to
a local re cycling service. Respect the local environmental rules.
If in doubt, contact your local waste disposal authorities.
Thank you for choosing Velleman! Please read the manual thoroughly before bringing this device into service. If
the device was damaged in t r ansit, don't instal l o r u se it and contact yo ur dealer.
Notes
• This docu ment is a quick installation guide. For more detailed information, refer to th e ful l u ser manual on
the included CD-ROM.
• Product images are for il lustrative pu rposes o n l y. Due to con stant product improvements, the actual
product may differ from the images.
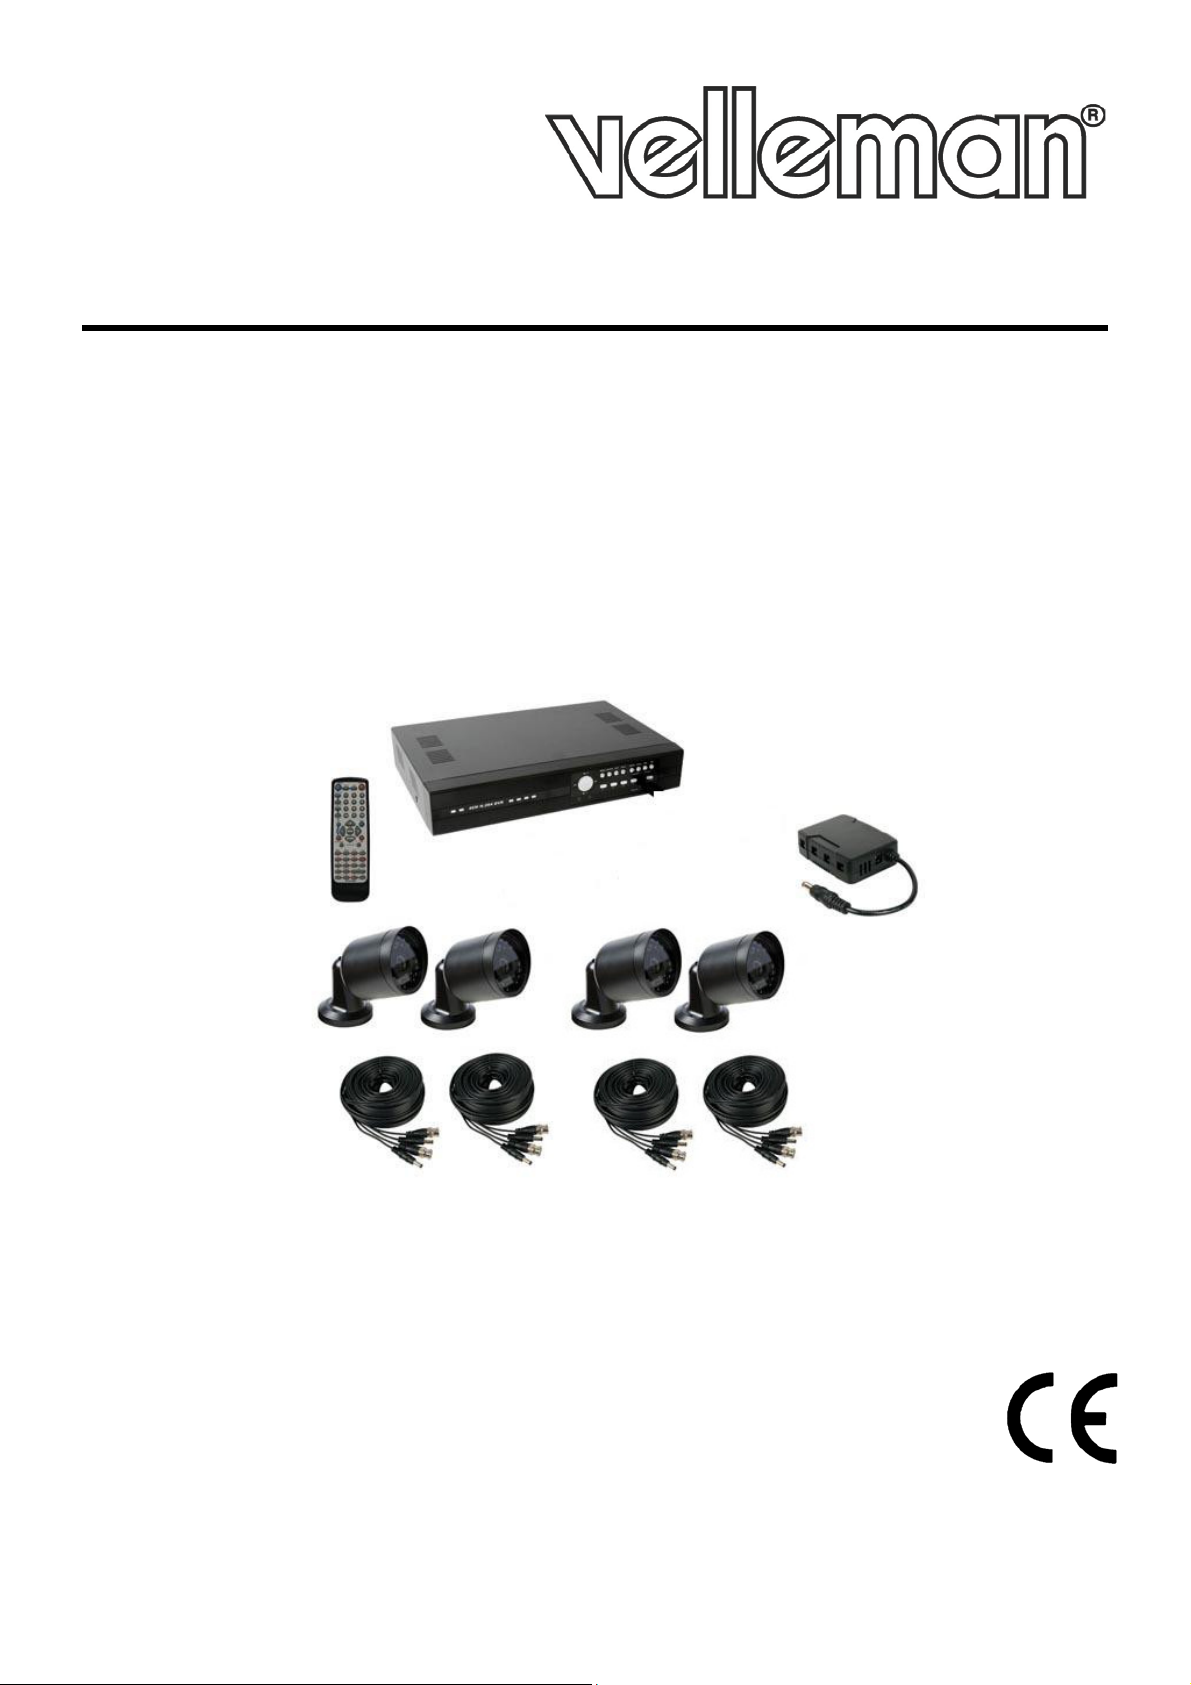
Package content:
• 1 x DVR with built-in SATA connection: DVR4H3
• 4 x IR col ou r cameras: CAMCOLBUL29
• 4 x 20 m camera cables
• 1 x 19 V power supply
• 1 x high-efficiency DC-DC converter for DVR and cameras
• hard disk (built in): HD500GB/S
• remote control: DVRRC4
2. Safety Instructions
Keep the device away from children and unauthoris ed users.
Risk of electroshock when opening the cover. Touching live wires can cause life-threatening
electroshocks.
activities are per formed. Handle the power cord by th e plug only.
3. General Guidelines
Refer to the Velleman® Service and Quality Warranty on the last pages of this manual .
filled with liquid on top.
Keep this device awa y from dust.
Keep this device aw a y fro m extreme heat. Make sure the ventilation openin gs are clear at
all times. For sufficient air circulation, leave at least 1” (±2.5 cm) in front of the openings.
Protect this devi ce f r om shocks and abuse. Av oid brute f o r ce when operating the device.
• Familiarise yourself with the functions of the device before actually using it.
• All modif ications of the device are f orbidden fo r safet y reasons.
• Only use the device for its intended purpose. Using the device in an unauthorised way will void the
warranty.
V. 02 – 21/08/2013 3 ©Velleman nv
Page 4
CCTVPROM16
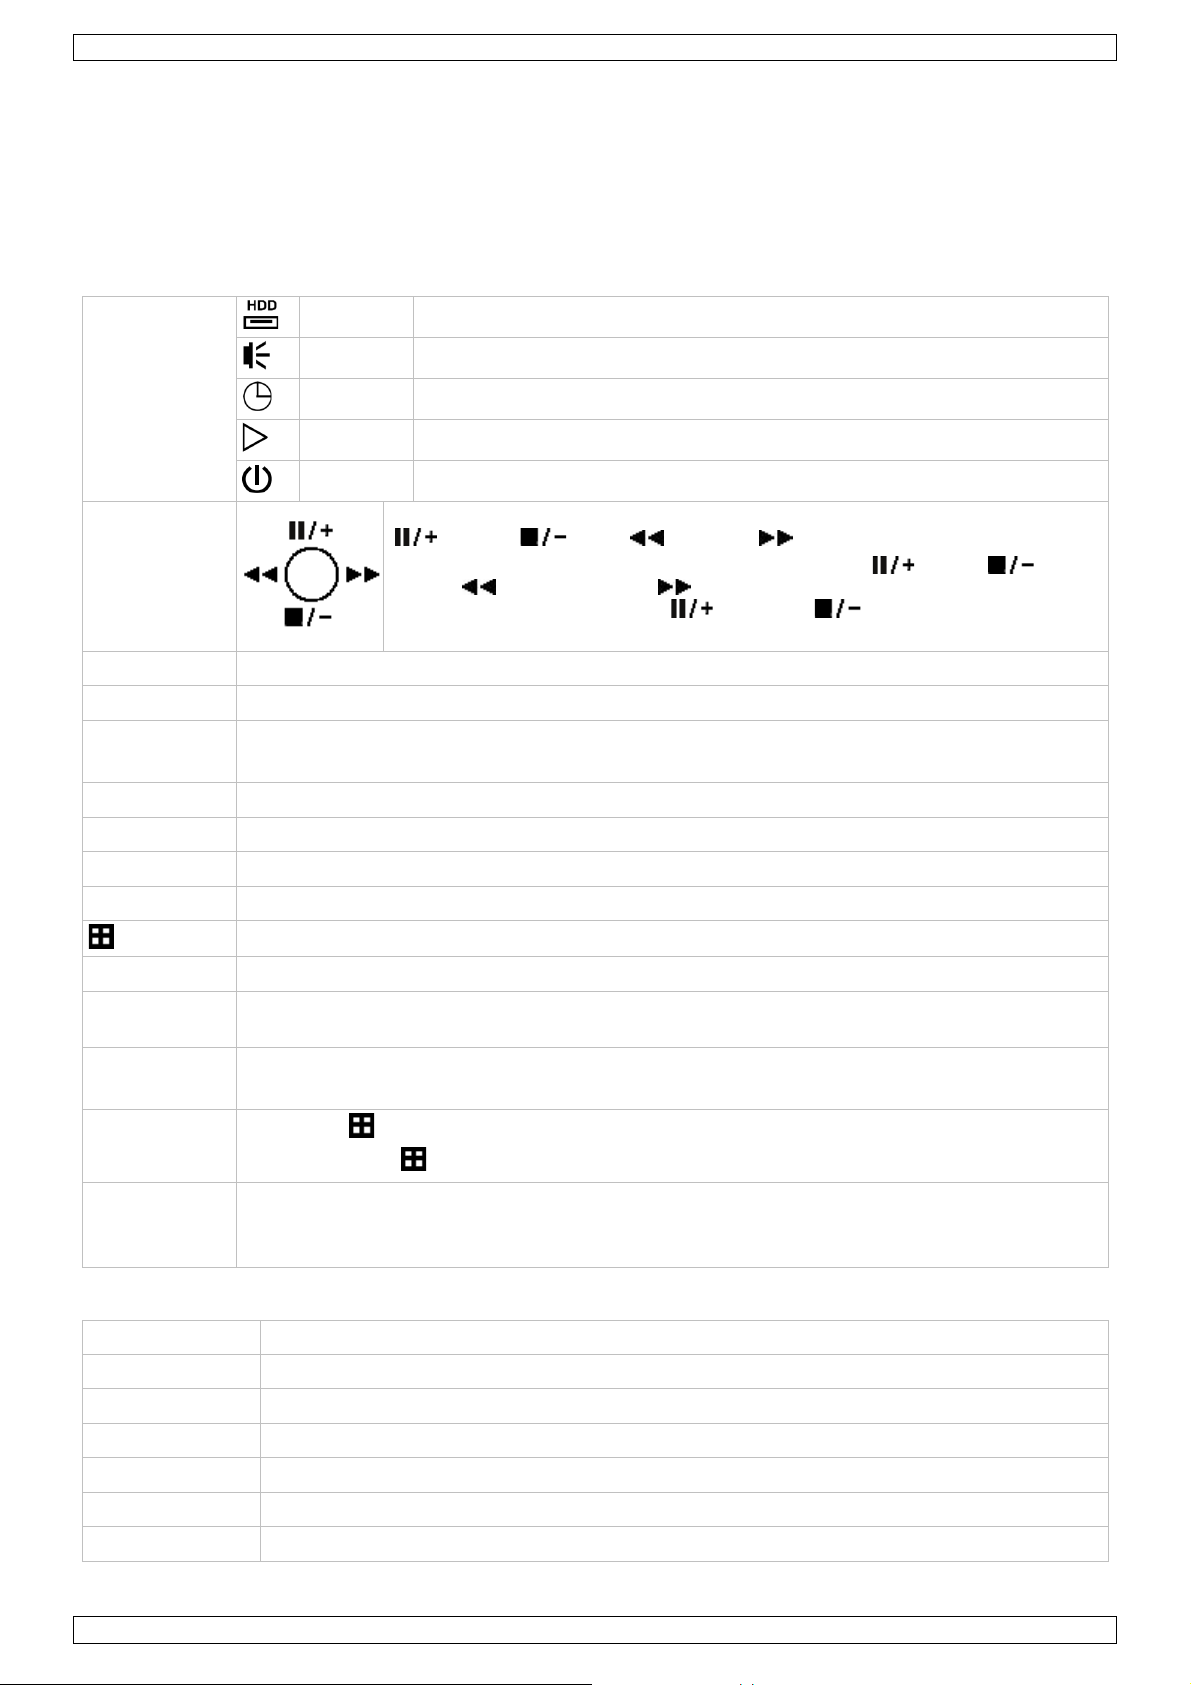
ALARM
an alarm w as triggered
PLAY
the DVR is in playing mode
Press one of the four positi ons on the navigate butt on to move the cursor up
MENU
Press to ent er t he main menu.
List the information of the recorded files.
PLAY
Press to pl ay the reco rded video.
SLOW
In playback mode , press to play the recorded f ile slowly .
ZOOM
In live or playback mode, press to enlarge the ima ge of t he sele c ted channel .
4CH: Press to show the 4 channel display mo de.
1 ~ 4
Press a button to sel ect the cor res pon di ng cha nn el.
SEARCH
Enter time se arch mode. S et time range an d press START to see all recordi ngs within the time
= SLOW + ZOOM
Connect a USB flash drive for video backup to one USB port; connect a USB mouse to the
VGA
connector for video monitor (monitor not included)
AUDIO IN
4 audio input channels to conn ect four external au di o sources e.g. fro m camera s with audio.
AUDIO O UT
1 audio ou tput to connect to an audio device, e .g. a speak er (mono) .
VIDEO IN
4 video input channels to connect 4 external video sou r ces e.g. cameras.
EXTERNAL I/O
use a 9 pin DSUB connector to connec t ex ternal signals, for example alarm, PTZ…
• Damage caused by disregard of certain guidel ines in this manual is not covered by the warranty an d the
dealer will not accept responsibility for any ensuing defects or problems.
• Do not use th is product to violate privacy laws or perform o ther ill egal activities.
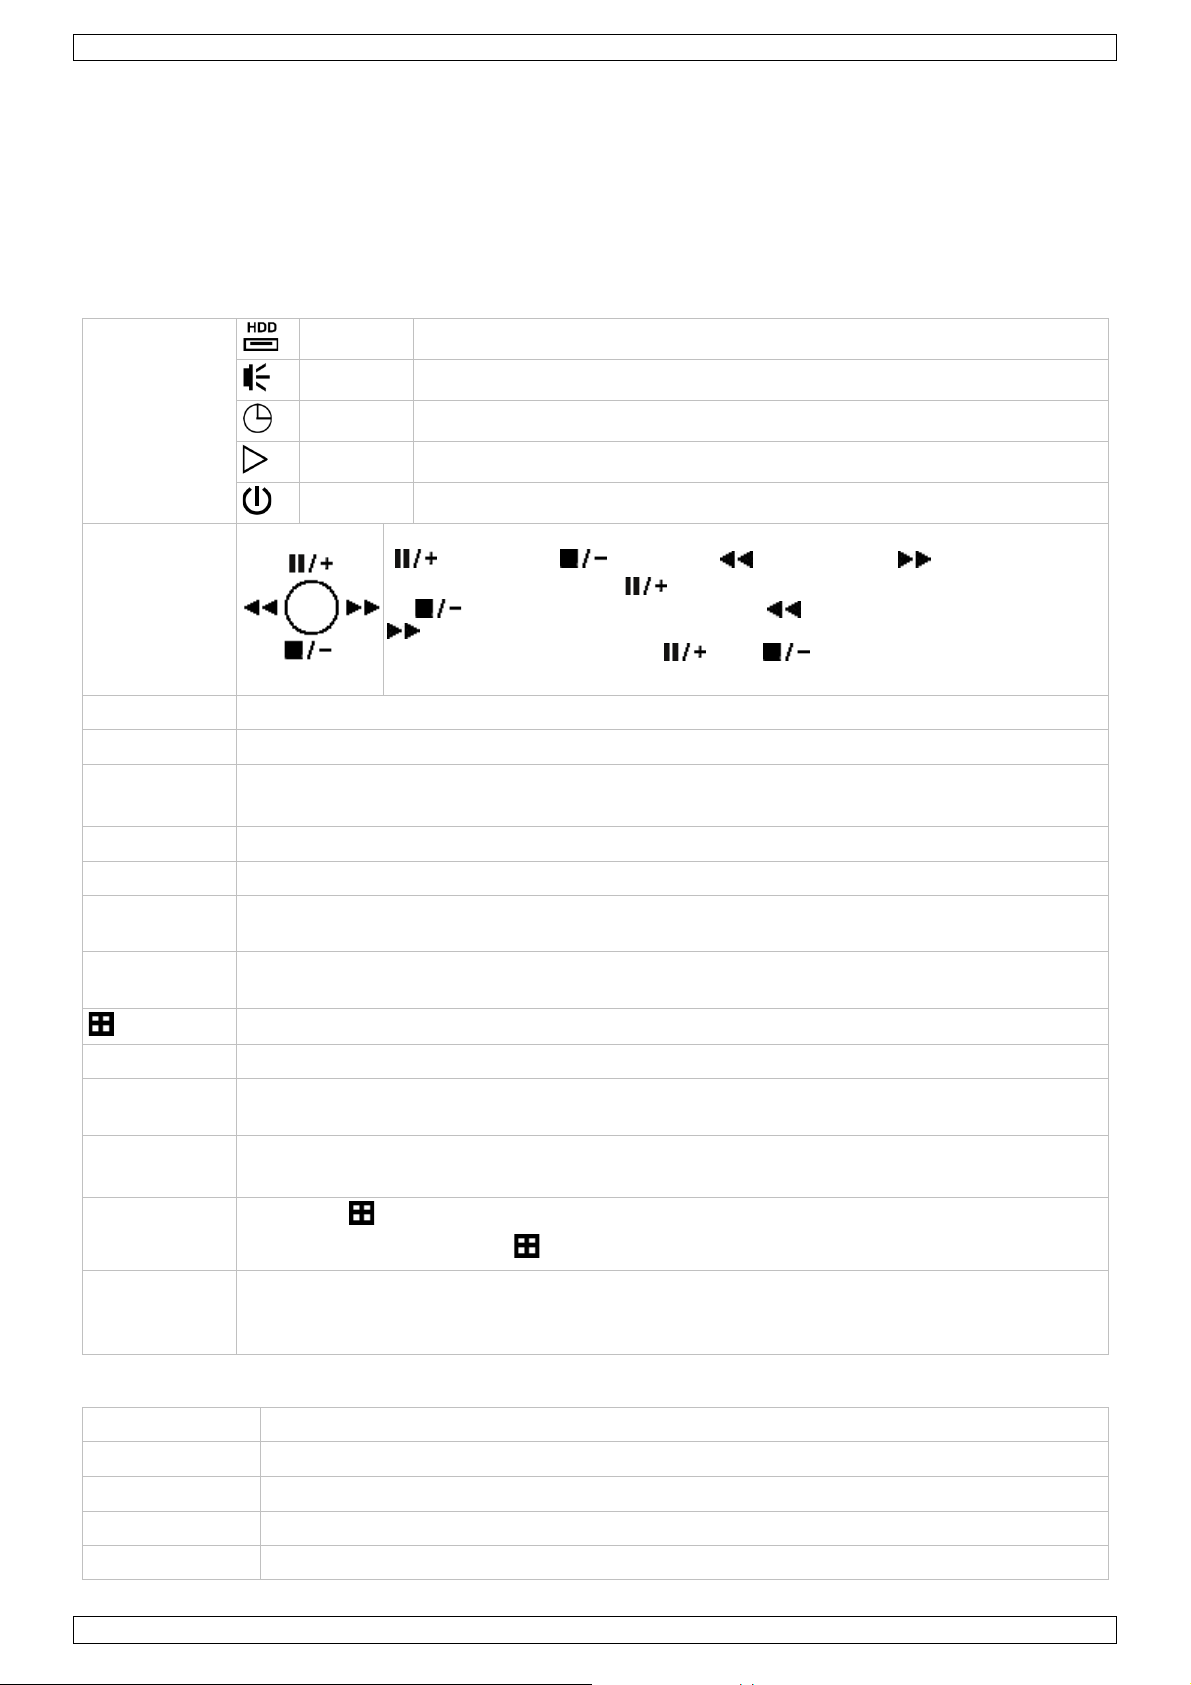
4. Overview
Refer to the illustrations on page 2 of this manual.
Front panel
HDD reading or recording activities on the hard disk
LED indications
NAVIGATE
TIMER timed recording is enabled
POWER DVR power is on
( ), down ( ), left ( ) or right ( ).
In play-back mode , press th e buttons to play / pause (
rewind (
In setting mo de , press the u p (
setting in the men u.
) or fast forward ( ) the play-back file.
), stop ( ), fast
) or down ( ) button to change the
ENTER Press to confir m settings
LIST
SEQ Press to sho w all scr eens sequentially in full scr een mode. Press again to quit.
AUDIO
PTZ
(pan tilt zoom)
USB port
(2x)
QUICK SEARCH / RECORD / MOTION / ALARM / TIMER / FULL LIST
range.
Press SL OW and ZO OM simult a neous to select live or play-back sounds.
= SLOW +
Press SL OW and simultaneous to ent er or ex i t PTZ control mode.
other.
Note: do not connec t two USB flash drives or USB mice at the same time.
Rear panel
LAN port Connect the DVR to a local network by plugging a network cable into this port.
VIDEO OUT 1 video output channel to connect the DVR to th e main monitor.
V. 02 – 21/08/2013 4 ©Velleman nv
Page 5

CCTVPROM16
power switch
19V DC
power supply input
5. Hardware setup
Installing the har d di s k drive (HDD)
The DVR has a built-in hard disk. To install another hard di sk, proceed as follows:
1. Obtain a suitable HDD (see Technical Specifications below), type SATA. The HDD must be formatted.
2. Unplug th e device f r o m the mains before servicing and do not tou ch any elect r onic circuitry to avoid
electros t atic disch arge.
3. Unscrew the 6 screws (1 on ei ther side and 4 on the back) th at hold th e cover in place.
4. Lift the cover (back f irst).
5. Remove the ha rd di sk.
6. Screw the mo unting brack ets on the new har d disk (screws included).
The PCB must be facing upwards when mou nti ng the HDD i nto the DVR.
7. Connect the SATA data ca ble and power su pply to the HDD .
8. Screw the HDD on the botto m o f the DVR h ousing PCB facing upwards using the inclu ded screws.
9. Close th e cover (fr o nt first) an d secure i t w i th the 6 screws.
Connecting a video monitor
• Obtain a suitable m oni tor ( not included) an d c onnect it to the BNC or VGA video output port on the back of
the DVR.
Connecting the power supply
1. Plug the DC output con nector of the included power adaptor into the 19VDC power input at the back of
the DVR.
WARNING: only u se the included ada ptor.
2. Plug the included power ca ble into t he adaptor input c onnector and pl ug the o t her en d into the mains.
Do not switch the DVR on yet.
Connecting a camera
1. The CCVT pack comes with 4 cameras. Each camera needs its own power supply.
2. Connect the v i deo output of the camera to either video input at the back of the DVR. The number next to
the in put connectors represen t s t he channel number. Connector t ype is B NC.
Connecting audio
1. The DVR supports four a udio i nputs. Connect the audio output of an audio source to an audio input of the
DVR. Make sure to co nnect the audio c h annel to t h e corres ponding v ideo channel. Connector type is BN C.
2. There is also an au di o o utput connector. Connect an audio device e.g. a speaker to this connector when
desired. Connecto r t ype is BNC.
Connecting Local Area Network (LAN)
• Connect the DVR to a local netw o rk by plugging a network cabl e into the LAN por t at the back of the DVR.
Connector type is 8P8C (RJ45). Setup is done through the OSD.
6. Preliminary settings
Make sure the conn ected camera s are on a nd set t he power switch at t he rea r of the device to th e ON position.
It takes abou t 15 to 30 seconds to start up.
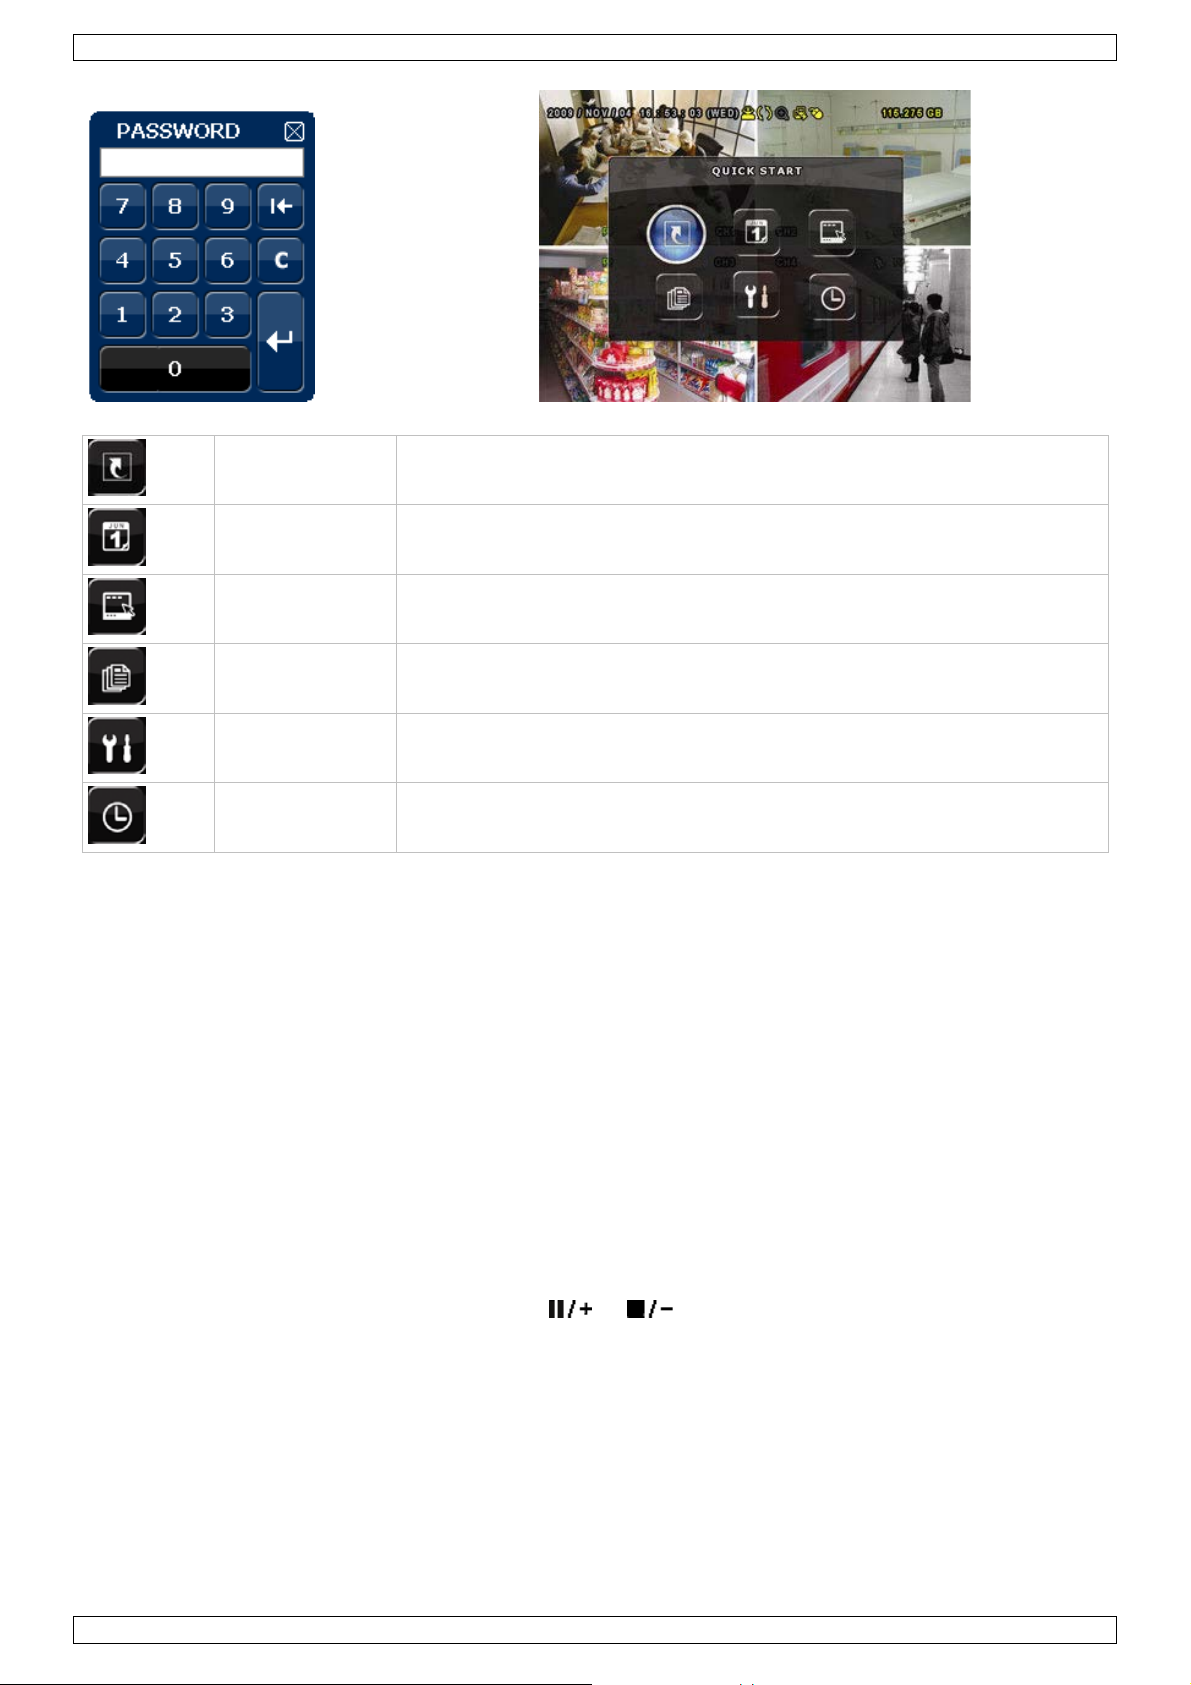
Menu overview
Press the MENU button and enter the password to go into the menu list.
Note: default admin p assword i s “0000” (4 times zero).
V. 02 – 21/08/2013 5 ©Velleman nv
Page 6

CCTVPROM16
QUICK START
GENERAL - TIME SETUP
DATE SETUP
DATE INFO - DAYLIGHT
SYSTEM
EVENT
QUICK SEARCH - EVENT SEARCH - HDD INFO - EVENT LOG
ADVANCED
CAMERA – DETECTION – ALERT – NETWORK – DISPLAY – RECORD - REMOTE
TOOLS - SY ST EM INFO – BACKUP DATA – BACKUP LOG
INFORMATION
CONFIG
SCHEDULE
RECORD – DETECTION – ALARM
SETTING
For more detailed information, refer to the full user manual on the included CD-ROM.
Setting date and time
Before usin g the DVR the tim e and date shoul d be set to get a v al id time stamp.
1. Press the MENU button and enter the admin password to g o i nto the menu list.
2. Select the QUICK START menu item.
3. Use the NAVIGATION butt on to move to t he TIME SET UP menu item. Select it to set date and time.
Note: once reco rding started, do not change date or time as this will make it very difficul t to find back the
recorded files.
Note: when using the DVR for the f i r st ti me and the correct tim e i s set, l eave it on for at l ea st 4 8 hours.
Password setting
1. Press the MENU button and enter the password to go into the menu list.
2. Select the SY STEM menu item.
3. Go to TOOLS. Select ADMIN PASSWORD (or OPERATOR PASSWORD) and press the ENTER button to set the
password.
Note: an operator can n ot access the main menu, only the quick menu bar (se e b elow) .
4. Press th e c ursor up (
) or down ( ) button to sel ect the value of the first numb er and press enter to
save an d go to the nex t charac ter, or use the mouse to sel ect the desi r ed value. Repeat th i s f o r all four
passwor d number s.
Note: default admin password is “0000” (4 times zero).
Record settings
1. Press the MENU button and enter the password to go into the menu list.
2. Select the QUICK START menu item.
3. Select the GENERAL menu item using the NAVIGATION button.
4. Set the imag e s ize, image qu a lity and im a ges per seco n d for r ec o rding.
5. Refer to the full user manual on the included CD-ROM for more details.
V. 02 – 21/08/2013 6 ©Velleman nv
Page 7
CCTVPROM16
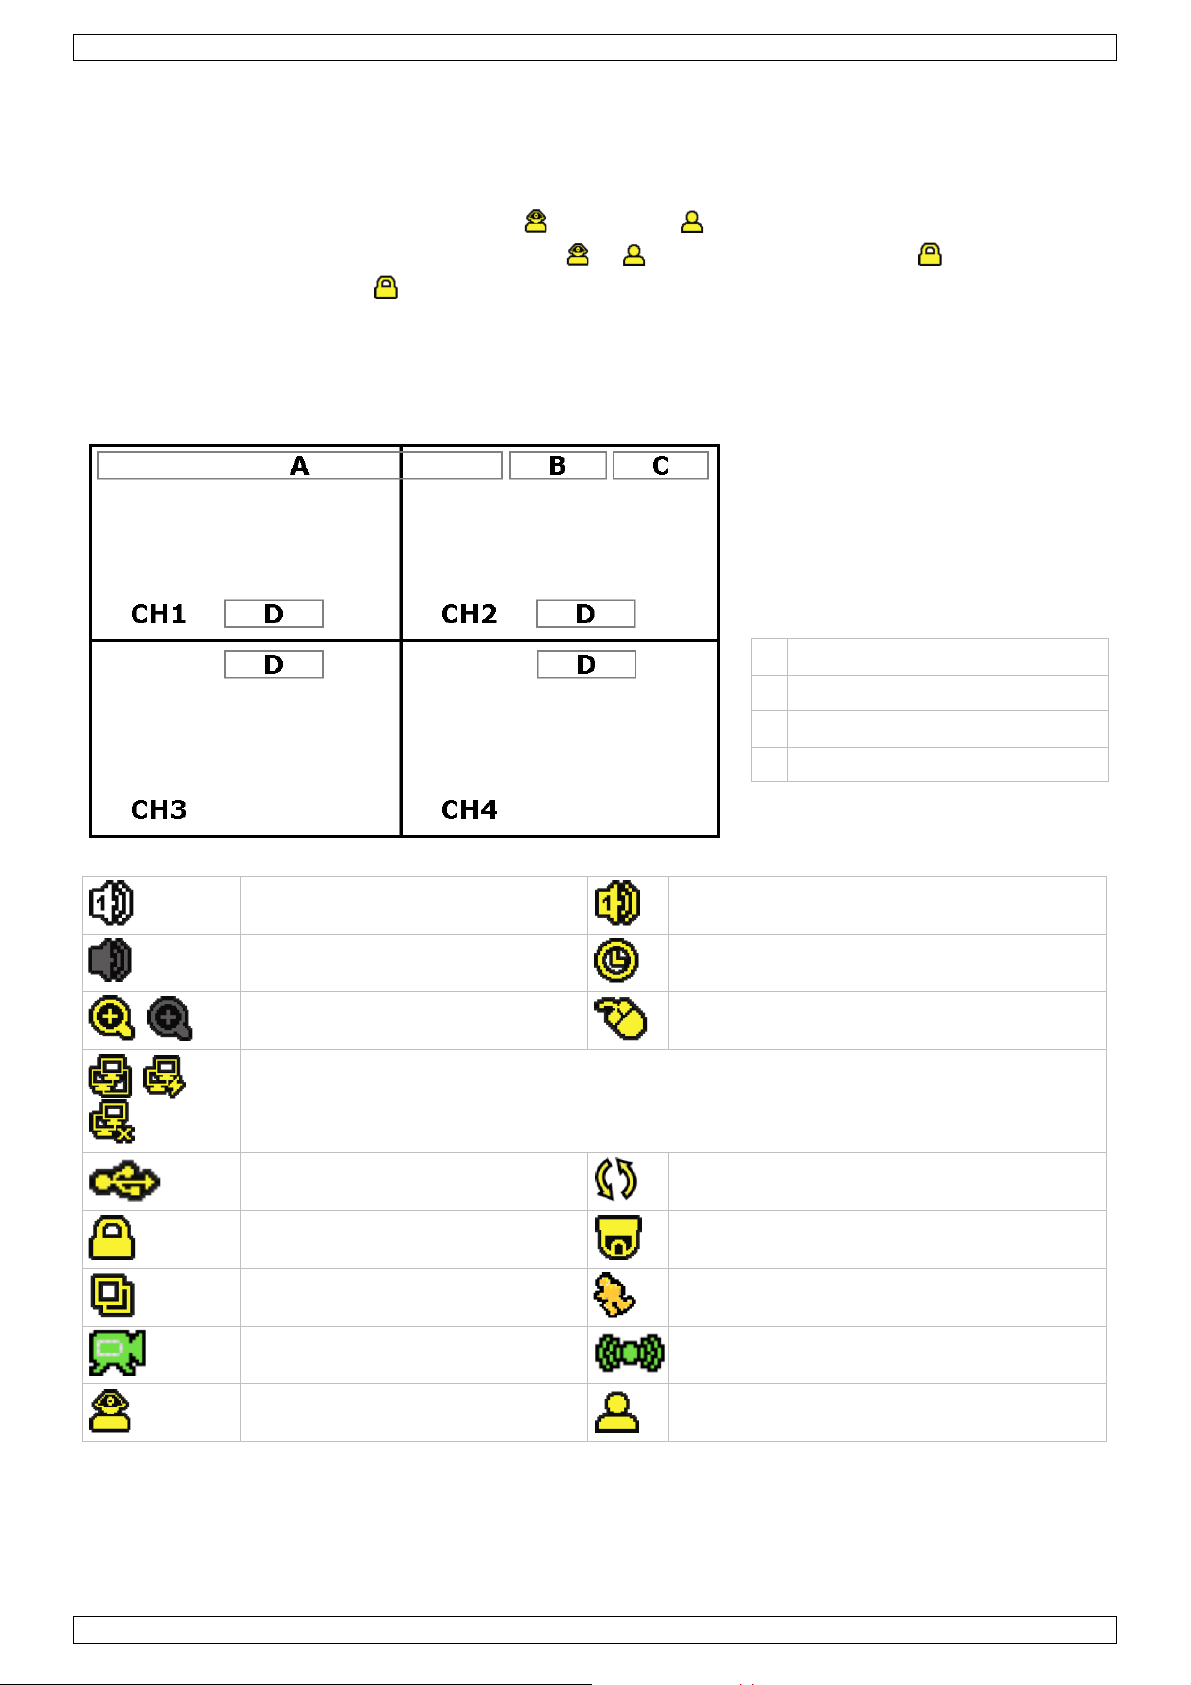
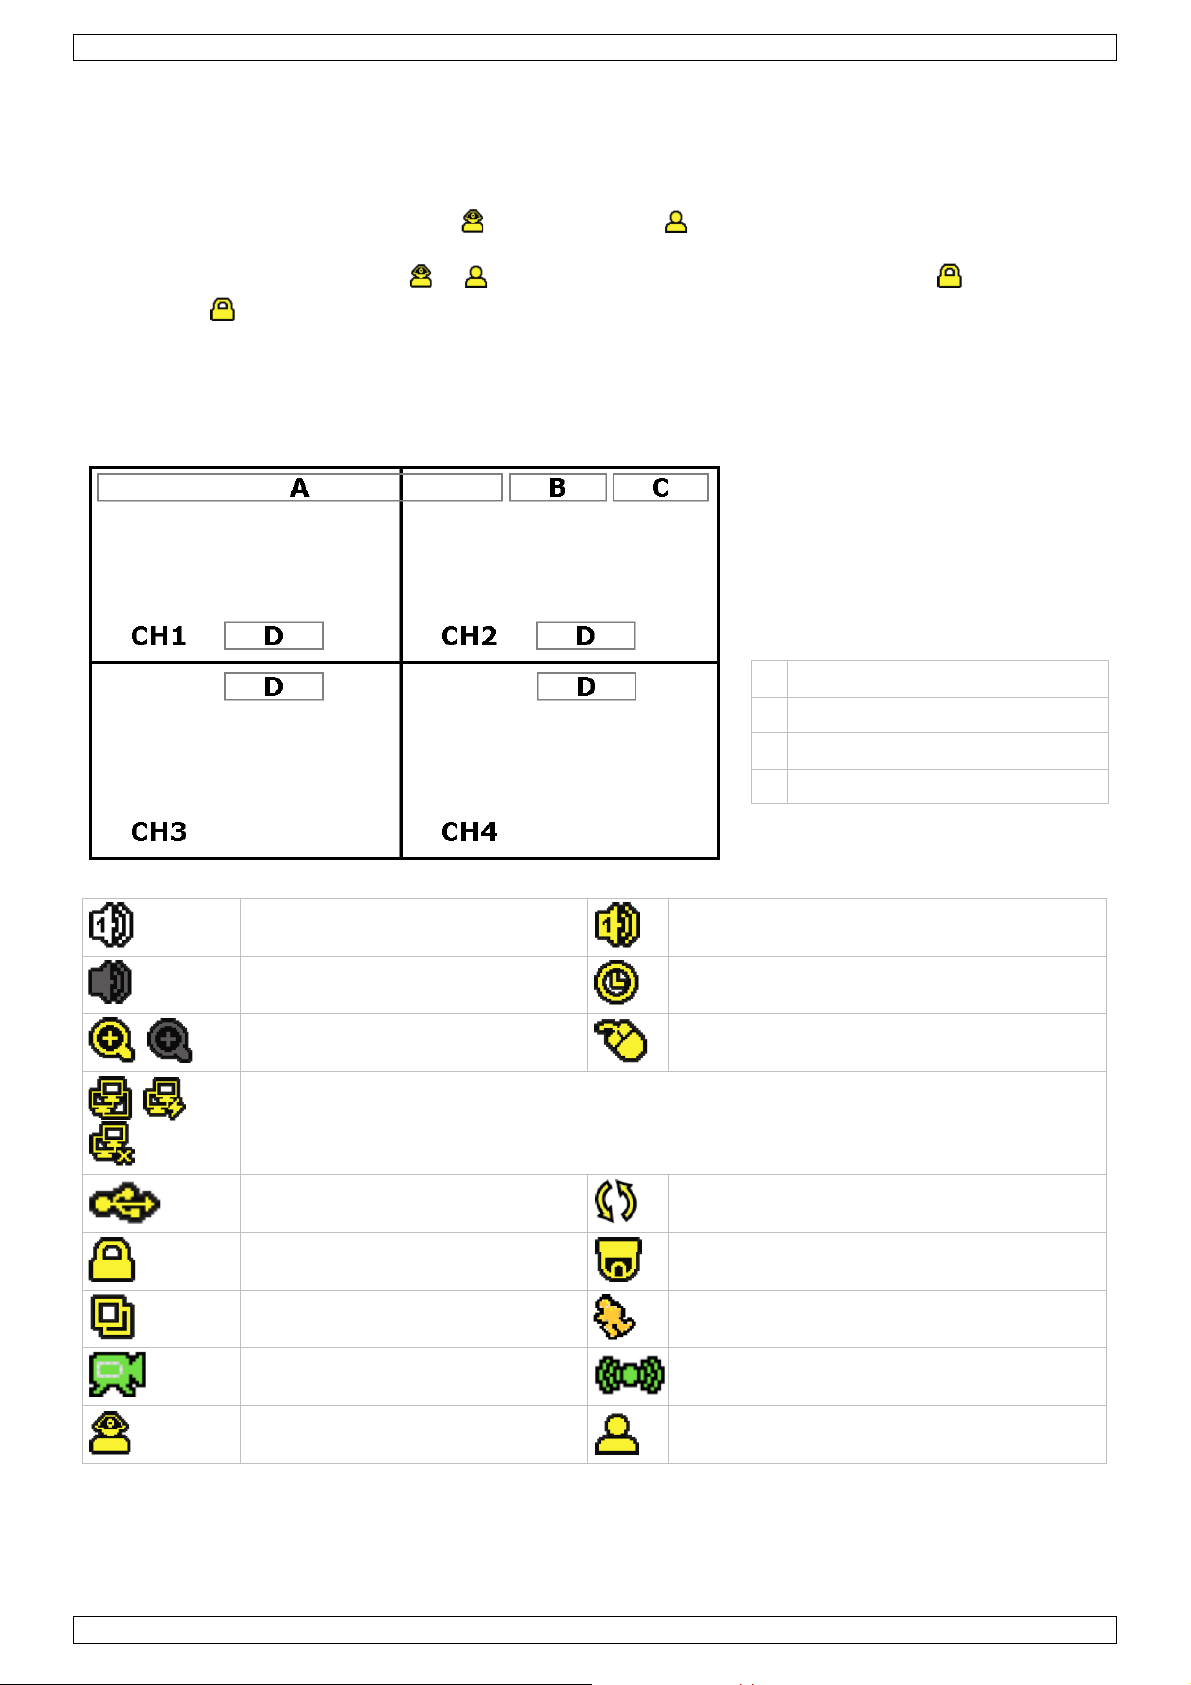
B general system sta tus
D
channel status
Audio playback
Press the SLO W an d ZOOM button simul taneously to sel ect t he desired audio channel or use the quick menu
bar (see below). The curre n t audio channel is in dicate d i n th e status bar.
Switch users
1. The DVR c an be acce ssed as administrator ( ) or operator ( ), icons are indicat ed i n the status bar.
2. To switch betwee n u sers, cli ck on the user icon ( or ) to lock th e current session ( ).
3. Press on t h e key lock icon ( ) than enter the passwor d of the desir ed profile.
7. Operation
7.1 Display
The following image shows the screen layout.
A system date and time
C availabl e HDD capa city
live audio channel 1 .. 4 enabled
audio channel disabled
digital zoom on (yellow) / off
LAN connected / Internet connected / no network connection
USB flash dr ive con n ected
playback audio channel 1 .. 4 enabled (yellow)
timer recording
USB mouse connecte d
Hard disk ov erwrite (default)
Note that actual screen icons might differ sl i gh tly fro m the ones s h ow n above.
7.2 Quick menu bar
Note: only available when USB mo use is connected.
Move the pointer to wards t he left of the monitor to open th e q uick menu bar:
V. 02 – 21/08/2013 7 ©Velleman nv
key lock on
sequence mo de
recording mode
administrator logged on
PTZ mode
motion mode
alarm mode
operator logged on
Page 8
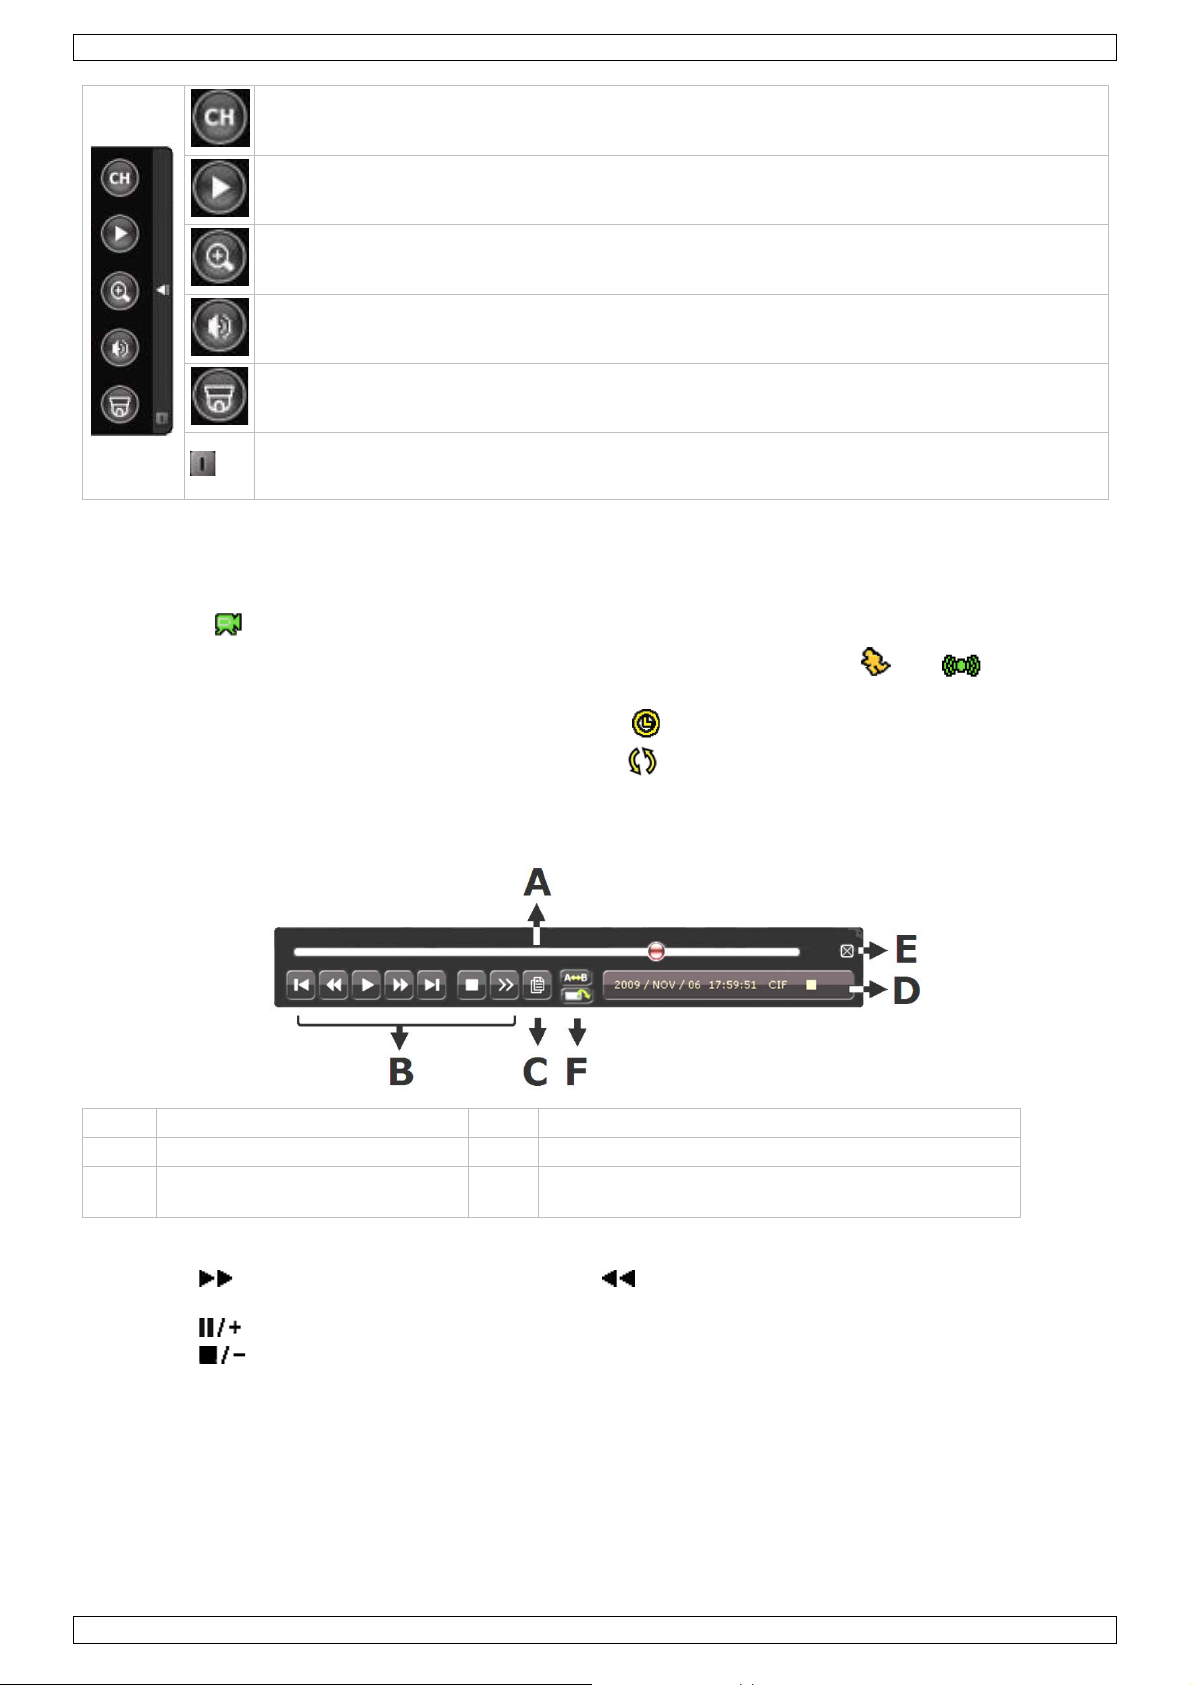
CCTVPROM16
A
progress bar
D
information
B
playback control
E
close
C
event searc h
F
set repeat function A→B / open backup menu
Open channel swi tch panel.
Show playback co nt r o l panel.
Zoom-in mode (s elect d esire d c hann el first before ent ering zo om-mode).
Select audio channel (live mode only live channels can be selected).
Enter PTZ mode an d show PTZ control pa nel
Click to show the power off panel to either halt or reboot the system.
7.3 Recording
• Check w hether the camera(s) is (are) properly co nnected and a HDD i s present inside t he device.
• When the auto-recording and pre-alarm functions are enabled, the device will start recording images.
• Default the recording icon (
) is shown.
• In case the motion or alarm detection i s activa ted and a motion or alarm is detected, the moti on (
) resp.
alarm ( ) icon is shown.
• When ti med recordi n g is ena bled, th e t imed r ecording ico n ( ) is show n and th e t imed recordi ng LED
is on.
• Defaul t, th e device is in HD D over write m ode and the icon ( ) is shown.
7.4 Play-back
Make sur e th e control panel is not locked and press the PLAY button on the control p anel or use the quick men u
bar to op en t he playback contr o l panel:
Note: play-back needs at l east 8192 recor ded images to wo rk properly (e .g. with IPS=3 0, the recording must
be at least 2 73 seconds long).
• The fast forward (
) and fast rewind ( ) buttons will increase resp. decre ase the play-back speed.
Repeatedly p ressing the button will increase/decrease speed to 4x, 8x 16x o r 32x (max.) .
• Press th e pause button (
• Press th e stop butt o n (
) to tem po rary s u spen d video play-back.
) to return to live monitoring.
• Press the SLOW button once to set play-back speed to 1/4
7.5 Search
• There are f our ways to sear ch recorded files: by r ecord li st, motion list, alarm l ist or by timer li st.
• To search an event, press the LIST bu tton on t he front panel (mak e sure the co n trol pan el is not locked).
An overview of the recorded file types (ALARM, MANUAL, MOTION, SYSTEM and FULL LIST) is shown.
• Select the desired list and recording from the list.
V. 02 – 21/08/2013 8 ©Velleman nv
th
and twice for 1/8th.
Page 9

CCTVPROM16
video compression
H.264
video input
4 channels, com posite video signal 1 Vpp / 75 o hm BNC
maximum re cording rate ( PAL)
- frame: 704 x 576 pixels with 100 IP S (PAL)
hard disk stora ge
built-in SATA type, support 1 x HDD, s u pport HDD ca pacity over 2 TB (5 0 0 GB
recording mode
manual / ti mer / motion / network / alarm controlled
refresh rate
100 IPS for PAL
multiplex operation
live display, reco r d, playback, backup and network
motion detection are a
16 x 12 grids per channel
pre-alarm recording
8 MB
Central Management System
remote surveillance to monitor up to 1 0 different I P addresses (Windo w s &
web transmit ting / compression
H.264
mobile surveillance
Smartphones:
computer:
web brow ser: Inter net Explorer, Fir ef o x, Google Chrome and Safar i via Java,
IR remote control
remote contr o l D VR and PTZ (DVRRC4)
PTZ control
yes (via RS-485)
alarm I/ O
4 in / 1 out
digital zoom
2x (live & playback)
key lock
yes
video loss detection
yes
video adjustments
hue / colour / contrast / brightness
date displ ay format
YY/MM/DD, DD/MM/YY, MM/DD/YY, and off
power source
19 VDC
daylight saving
yes
operating temper a t u re
10-40 °C (50-104 °F)
dimensions
343 x 59 x 223 mm
pick-up element
1/3" colour CCD image sensor
resolution
420 TV lines
• Press ENTER to start play-back.
8. Technical Specifications
video format PAL
video output composite video signal 1 Vpp / 75 ohm BNC + VGA
- CIF: -
image quality setting super best - best - high - normal
hard disk inclu de d)
audio I/O 4x audio in, 1x audio out (mono)
motion detection sensitivity high - normal - low
backup dev i ce USB 2.0 f l a sh drive (f o r backup and firmware updates)
Mac OS)
format
Ethernet 10/100BASE-T, supports remote control and LiveView v ia Ethernet
EagleEyes software: remote login via all smartphone platforms
(Apple, Andr oi d, Black B erry , Noki a Symbi an and Win dow s Mobile)
- video viewer software on Windows and Mac
Quicktime or VLC plug-in
network connection support s T CP/IP, PPPoE, DH CP and DDNS functi o n
camera title up to 6 character s
power consumption < 42 W
system recovery system auto recov ery after power rec o n nected
IR camera
number of pixels 712 (H) x 582 (V) - PAL -
V. 02 – 21/08/2013 9 ©Velleman nv
Page 10

CCTVPROM16
min. illumination
0.05 lux (F2.0); 0 lux (IR on)
IR LEDs
14
range (IR light)
15 m
S/N ratio
> 48 dB (AGC off)
electronic shutter
1/50 to 1/100 000 s
lens angle
92.6°
white balance
automatic
standard board lens
f3.6mm / F2.0
video output
1.0 Vpp composite, 75 ohm
current consumption
70 mA (IR off), 200 mA (IR on)
weight
250 g (i n c luding bracket)
water resistance IP67
AGC yes
power supply DC 12 V ± 10 %
dimensions Ø 60 x 91 mm
Use this device with original accessories only. Velleman nv cannot be held responsible in the event
of damage or injury resulting from (incorrect) use of this device.
For more info concerning this product and the latest version of this manual, please visit our website
www.velleman.eu.
The information in this manual is subject to change without prior notice.
© COPYRIGHT NOTICE
The copyright to this manual is owned by Velleman nv. All worldwide rights reserved. No p art of this
manual may be co pied, reproduced, translated or reduced to any electronic m edium or otherwise withou t the
prior written consent of the copyright holder.
V. 02 – 21/08/2013 10 ©Velleman nv
Page 11
CCTVPROM16
Trek de stekker uit het st o pcont act wa n neer h et t oestel niet in ge bruik i s of voordat u het toestel
Gebruik het toestel enkel binnen shuis
BEKNOPTE INSTALLATIEHANDLEIDING
1. Inleiding
Aan alle ingezetenen van de Europese Unie
Belangrijke milie u-informatie betreffende dit product
Dit symb o o l op het toe stel of de verpakking geeft aan dat, al s het na zij n l evenscy cl u s wordt
weggew orpen , dit toestel schade kan toebrengen aan het m ilieu. Gooi d it toestel (en even tuel e
batterijen) n iet bij het gewone h u ishoudelijke afval; het m oet bi j een ge specialiseer d bedri jf
terechtkomen voo r recycl age. U moet dit toestel naar uw verdeler of naar een lok aal recyclagepunt
brengen. Respecteer de p laat selijke mili eu wetgeving.
Hebt u vragen, contacteer dan de plaatselijke autoriteiten betreffende de verwijdering.
Dank u voor uw aankoop! Lees deze han dleiding gron dig v oo r u het toestel in gebruik neemt. Werd het toestel
beschadigd tijdens het transport, installeer of gebruik het dan niet en ra adpleeg uw dealer .
Opmerkingen
• Dit document is een beknopte installatiehandleiding. Raadpleeg de volledige handleiding op de
meegelever de cd-rom voor meer informatie.
• De afbeeldingen v a n het pr o duct zijn enkel ter i llustratie. We streven v o ortd u rend n a a r verbetering van
onze producten. Daarom kan dit product uiterlijk verschillen van de afbeeldingen.
Inhoud:
• 1 x DVR met in ge bouwde SATA-aansluiting: DVR4H3
• 4 x IR-kleurencamera: CAMCOLBUL29
• 4 x camerakabels van 20 m
• 1 x 19V-voedingsadapter
• 1 x high-efficiency DC-DC converter voor de DVR en de c amera's
• harde schijf (ing eb ouwd): HD500GB/S
• afstandsbediening: DVRRC4
2. Veiligheidsinstructies
Houd dit toestel ui t de buurt van kinder en e n onbevoegden.
Elektrocutiegevaar bij het openen van de behui zi ng. Raak geen kabels aan die onder stroom
staan om dodelijke elektrosch o kken t e vermijden .
reinigt. Neem de voedingskabel enkel vast bij de stek ker, tr ek niet aan de kabel.
3. Algemene richtlijnen
Raadpleeg de V el lema n ® service- en kwaliteitsgarantie achteraan deze handlei ding.
Bescherm het toestel te gen regen, vochtig h eid en opspat t ende vloeistoffen. Plaats nooit
objecten gevuld met een vloeis t o f op het toestel.
Bescherm dit toestel teg en stof.
Bescherm dit toestel teg en extreme hitte. Zorg dat de verluchtings o peningen niet
geblokkeerd zijn. Voor voldoende luchtcirculatie, laat een minimumafstand van 2.5 cm
tussen het to estel en elk an der obj ect.
Bescherm di t t oestel tegen schokken. Vermi j d brut e kracht tijden s de ins t allatie of de
• Leer eerst de functies van het to estel kennen voor u h et gaat gebrui ken.
• Om veil igheidsredenen mag u g een wijz igingen aanbrengen aan h et toes tel.
• Gebru ik het toestel enkel waarvoor het gema a kt is. Bij onoo rdeel kundi g gebruik vervalt d e garan t ie.
V. 02 – 21/08/2013 11 ©Velleman nv
bediening van he t toestel.
Page 12
CCTVPROM16
HDD
De hard e schijf leest of nee m t data op
ALARM
Het alar m werd in geschakeld
PLAY
De DVR speelt de opname af
Druk op d e navigatietoetsen om de cursor te verplaat sen naar boven
MENU
Druk op ENTER o m he t hoofdmenu weer te geven.
ENTER
Druk op ENTER om de instellingen te bevestigen.
PLAY
Druk o p PLAY om de opname af te spelen.
SLOW
In afs peelmod us, dru k op SLOW om het afgespeelde bestand traag af te spelen.
ZOOM
In live-weergav e o f afspeelmodus, druk op ZOOM om het beeld v an het geselecteerde kan aal
SEQ
Druk o p S EQ om alle kanalen a chter eenvol gens op het volledi ge scherm weer te geven. Druk
SEARCH
Druk o p S EARC H om de zoekfu nctie i n te scha kelen. Geef de period e in en druk op S TART om
= SLOW + ZOOM
LAN-poort
Sluit d e DVR v ia een netwer kkabel aan op een LAN-netwerk.
AUDIO IN
4 audio-ingangen voor 4 externe audiobronnen, bv. camer a met au dio.
AUDIO O UT
1 audio-uitgang naar een audiotoestel, bv. lui ds preker (mono).
VIDEO IN
4 video-ingang en voor 4 exter n e videobron n en, bv. cam era's.
• De gara ntie geldt ni et voor schade door het ne geren van bep a alde ri chtlijnen in deze h an dlei ding en uw
dealer zal d e verant woordelijkheid afwijz e n voor d efecten of proble m en die hier re c h tstr eeks verband mee
houden.
• Installeer en gebruik deze camera NIET vo o r illegale prak t ijken en respecteer ieders priv acy.
4. Omschrijving
Raadpleeg de a fbeeldingen op pagina 2 van deze handleiding.
Frontpaneel
Leds
NAVIGATIE
TIMER De ge programmeerde op n amefunctie is ing eschakeld
POWER De DVR is ingeschakeld
( , naar onder , naar links of naar rechts ).
In afs peelmo dus, dru k op
op
In instellingenmo dus, druk op
te wijzigen.
om de weergave te s t oppen , op om snel vooruit te spoelen of op
om sn el terug te spoelen.
om de weergave af te sp elen/te o nderbreken,
of op om de instellingen in het menu
LIST
1 ~ 4 Druk o p een cijfertoets om het de sbetreffende kan a al te selecteren.
AUDIO
PTZ
(pan tilt zoom)
USB-poort
(2x)
Lijst van de opnamebesta n den.
QUICK SEARCH / RECORD / MOTION / ALARM / TIMER / FULL LIST
te ver groten.
nogmaals om de fun ct ie te verlaten.
4CH: Druk op 4CH om de 4-kanaalsdisplay weer te geven.
alle opnames in die perio de weer te geven.
Druk gelijkt ijdig o p SLOW en ZOO M, om d e geluidsop t ies te s electeren.
= SLOW +
Druk geli jk tij di g op SLO W en om de PTZ-functie in-of u it te scha kelen.
Sluit een USB-flashdrive aan op een US B-po ort voor back-up opn am es. Slui t een US B-muis
aan op de andere USB-poort.
Opmerking: sluit geen twee flashdrives of USB-muizen gelijktijdig aan op de USB-poorten.
Achterpaneel
VGA aansluiting voor videomonitor (niet meegeleverd)
V. 02 – 21/08/2013 12 ©Velleman nv
Page 13

CCTVPROM16
VIDEO OUT
1 video-uitgang voor het aansluiten van de DVR op de hoofdmonitor.
Voedingsschakelaar
19V DC
Voedingsingang
EXTERNAL I/O Sluit een ext er n signaal aan, zoal s een alarm of PTZ-camera, via een 9-p o l. DSUB-stekker.
5. De hardware installeren
De harde schijf installeren (HDD)
De DVR is uitgerust met een ingebouwde harde schijf . Om een andere harde sch i j f te installeren, gaat u als
volgt te werk:
1. Deze D V R is geschikt voor g ebruik met een compatib ele harde schi j f (niet meege leverd), type SAT A (Seri al
Advanc ed Technol ogy Atta chment). Formatteer eerst de har de schijf.
2. Ontkoppel he t toestel van het lichtn et. Raak geen elek t r o n i sche circu its aan om elektrostatisch e o ntladin gen
te voorkomen.
3. Draai de 6 schroeven los (1 aan elke zi jde en 4 achteraan) die de behuizing same nhouden.
4. Open de DVR ( ach t erk a nt eer st ).
5. Verwij der de har de s chi jf .
6. Bevestig de monta gebeu gels op d e n ieuw e harde schi jf met de meeg eleverde schroev en.
Installeer de har de schijf met de printplaa t naar boven geri cht in de DVR.
7. Sluit de SATA-datak abel en de v oedingskabel a an op de har de schijf.
8. Schroef de harde schijf onderaan de DVR v a st met de me egelev e r de schr oev en .
9. Sluit de D V R (voork ant eerst) en draai de 6 schr o even vast.
Een videomonitor aan sluiten
• Sluit een compatibele monitor (niet me egeleverd) aa n op e en BNC of VGA video-uitgang achteraan op de
DVR.
De voe dingsa da pt e r aansluiten
1. Sluit de DC-stekker van de m eegeleverde voedingsa dapter aan op de 19 VDC-ingang a chteraan de DVR.
WAARSCHUWING: gebruik enkel de meegeleverde vo edings adapter.
2. Koppel de meegeleverde voedingsk a bel aan de ada p ter en koppel de ada pter ver volgens aan h et lichtnet.
Schakel de DVR nog niet in.
Een camera aansluiten
1. De CCTV-set wordt geleverd m et 4 camer a's. Elke ca m era heeft een e igen voedin g nodig.
2. Sluit de video-uitgang van de camera aa n op een BNC video-ingang achtera an de DVR. Het numm er naast
de aansluiting duidt op het kanaalnummer. Gebruik e en stekker van het type BNC.
Audio aansluiten
1. De DVR heeft v ier audio-ingangen. Sluit de audio-uitgang van de audio bron aan de au dio-ingang van de
DVR. Zorg ervoor dat u het audiokanaa l aansluit op het correcte videokanaal . Gebruik een stekker van het
type BNC.
2. De DVR heeft ook een B NC au dio-uitgang . Sl ui t een extern audiotoestel aan, bv. e en l ui ds preker. Gebruik
een st ekker v an het type BNC.
Aansluiting op een LAN-netwerk
• Sluit de DVR via een netwerkkabel aan op een LAN-netwerk. Gebruik hierv oor e en stekker van het type
8P8C (RJ45). De instellingen gebeuren via het OSD-instelmenu.
6. Basisinstellingen
Schakel de aangesloten camera' s in en zet de v oedingsschakelaar aan de achterkant van de DVR op ON.
Opstarten duurt o ngeveer 10 à 15 sec o nden.
Menu-overzicht
Druk op MENU en g eef het wachtwoord in, om het menu weer te geven.
Opmerking: het stan daard wac ht w oord is "0000" (4 x nul).
V. 02 – 21/08/2013 13 ©Velleman nv
Page 14
CCTVPROM16
QUICK START
GENERAL - TIME SETUP
DATE SETUP
DATE INFO - DAYLIGHT
SYSTEM
EVENT
QUICK SEARCH - EVENT SEARCH - HDD INFO - EVENT LOG
ADVANCED
CAMERA – DETECTION – ALERT – NETWORK – DISPLAY – RECORD - REMOTE
TOOLS - SY ST EM INFO – BACKUP DATA – BACKUP LOG
INFORMATION
CONFIG
SCHEDULE
RECORD – DETECTION – ALARM
SETTING
Raadpleeg de volledige handleiding op de meegelev erde cd-rom voor meer informatie.
Het uur en de datum instellen
Stel vo o r het eerste gebruik de datum en het uur in.
1. Druk op MENU en g eef het wachtwoord in, om het menu weer te geven.
2. Select eer het submen u QUICK START.
3. Gebru ik de na vigatietoetsen om naar het submenu T IME SETUP t e gaan. Selec t eer TIME SETUP om de
datum en het uur in te stellen.
Opmerking: Wijzi g de ingestel de datum en het uur niet meer eenmaal een opname i s gestar t.
Opmerking: Laat ee n pas ingestelde DVR gedurende 48 uur ingeschak eld.
Het wachtwoord instellen
1. Druk op MENU en g eef het wachtwoord in, om het menu weer te geven.
2. Select eer het submen u SY ST EM .
3. Ga naar TOOLS. Selecteer ADMIN PASSWORD (of OPERATOR PASSWORD) en druk op ENTER om het
wachtwoord in te stellen.
Opmerking: Een gewone gebruiker heeft geen toegan g t ot het hoofd menu, enkel t o t de menubalk (zie
hieronder).
4. Stel h et nieuwe wach twoord in m et de toetsen
of , en bevestig met ENTER. U kunt d e gewenste
digit oo k met d e muis selecteren. Herhaal voor de resterende digits.
Opmerking: het standaard wachtwoord is "0000" (4 x nul).
Instellen van de opnamefunctie
1. Druk op MENU en g eef het wachtwoord in, om het menu weer te geven.
2. Select eer het submen u QUICK START.
3. Select eer het submen u GEN E RA L met d e nav ig ati et oe ts en .
4. Stel de beeldgroo t t e, de beeldkwaliteit en het aant a l beel den per seconde in .
5. Raadpleeg de uitge breide h andleiding o p de meegele verde c d-rom voor meer details.
V. 02 – 21/08/2013 14 ©Velleman nv
Page 15
CCTVPROM16
A
B
D
kanaalstatus
Audio afspelen
Druk gelijkt ijdig o p SLOW en ZOO M om het gewenste a u diokanaal te selecteren o f gebr u ik de menubalk (zi e
hieronder). Het geselecteerde audiokanaal staat in de statusbalk weergegev en.
De gebruiker selecteren
1. De DVR kan door een administrator ( ) of een gebruiker ( ) bediend w o r den. De symbole n staan in de
statusbalk weergegeven.
2. Klik op het gewenste sym bool ( of ) om als administrator of gebruiker in te loggen ( ).
3. Druk op ( ) en geef het wa c htwoord van het g ewenst e profi e l in.
7. Gebruik
7.1 Display
De vol gende a fb eel di ng ge eft de di s pla y-layout weer.
datum en uur
algemene statu s
C beschikbare schijfruimte
live-audio kanaal 1 .. 4 inschakel en
audiokan aal uitg eschakeld
digitale zoom ingeschakeld (geel) /
uitgeschakeld
LAN-aansluiting / internetaansluiting / geen netwerkaansluiting
USB-flashdrive aangesloten
audiokan aal 1 .. 4 (geel) afspelen
gepro gramm eerde opnam e
USB-muis aangeslo ten
Harde sc h i j f overschr ijven (standaar d)
Deze i conen k u nnen lichtjes ver s chillen met de iconen op uw display.
7.2 Menubalk
Opmerking: Enkel beschikbaar indi en er een USB-muis aangesloten is.
Verpl aats de muiscursor naar de linkerkant van het scher m om de menubalk weer te geven:
V. 02 – 21/08/2013 15 ©Velleman nv
vergrendeling
sequentiefunctie
opname
als administrator ingelogd
PTZ-functie
beweging wa a rgenomen
alarm
als gebruiker ingelogd
Page 16
CCTVPROM16
Klik om het ui t schakelmenu weer te gev en en h et appa raat ui t t e schakelen o f opni euw op t e
A
D
B
bedieningstoetsen
E
sluiten
C
zoekfunctie
F
herhaalf un ctie A→B instellen / back-up menu
kanaa lpane el openen
afspeelpaneel op enen
zoomfunctie (sel ecteer eerst het gewenste kanaal)
audiokanaal
PTZ-functie
starten.
7.3 Opname
• Sluit de camera(’s) en de h a r de schijf co r rect aa n o p de DVR.
• De DVR st ar t de opname indi en de auto mat ische opname- en de preal armfun ctie ingeschakeld zijn.
• De icoon (
) verschijnt automatisch op de display.
• Bij een bewegingswaarneming of alarm (functie is ingeschakeld) wordt de icoon (
) of ( )
weergegeven.
• Bij ee n geprogramm eerde opname ver sc h ijnt de icoon ( ) en licht de opnameled op.
• Standaard staat de DVR in overschrij fmodus en wordt ( ) weergegeven.
7.4 Weergave
Schak e l de to etsvergrendeling u it en druk op PLAY of open het afspeel pa neel met de m u is.
statusbalk
Opmerking: Het bestan d moet minstens 8192 beeld en bevatten (bv. IPS = 30, de opname moet mi nstens 273
seconde n lang zijn) .
• Druk op
om de opname vooruit t e s poelen of op om de opname terug te spoelen. Dr u k meermaals
op de toets om de spoelsnelheid aan te pass en: 4x, 8x 1 6x of 32x ( m ax.).
• Druk op
• Druk op
Druk eenmaal op SLOW om de opname aan 1/4 afspeelsnelheid af te spelen, of druk tweemaal om de opname aan 1/8 afspeelsnelheid af te spelen.
•
om de opna me te pauzeren.
om naar de live-weergav e terug te keren.
informatie
openen
7.5 Zoekfunctie
• Er zijn vier zoekfuncties beschikbaar: vol gens opname, beweging, alarm of tijdstip.
• Om een evenement te zoeken, druk op LIST op het frontpaneel (zorg ervoor dat het afspeelpan eel niet
vergrendel d i s). U k r ijgt een lijst met alle opna metypes (ALAR M, MANUEEL, MOTION, SYSTEM FULL LIST).
• Selecteer het gewenste type en opname uit de lijst .
• Druk op ENTER o m he t bestand af te spel en.
V. 02 – 21/08/2013 16 ©Velleman nv
Page 17

CCTVPROM16
videoformaat
PAL
videocompressie
H.264
video-ingang
4 kanale n, composiet video signaal 1 Vpp / 75 oh m BNC
video-uitgang
composiet videosignaal 1 Vpp / 75 oh m B NC + VG A
max. opnamefrequenti e (PAL )
- frame: 704 x 576 pixels aan 100 IPS (PAL)
opslagruimte harde schijf
ingebou w d SAT A-type, 1 x HDD, cap aciteit van harde sch ijf is meer dan 1
opnamemodus
manueel / timer / beweging / netwerk / alarm
beeldfrequentie
100 IPS voor PAL
multiplex-functies
directe weergave, opname, weergav e, ba ck-up en netw erk
zone voor bewegingsdetectie
rooster 16 x 12 per kanaal
opname pre-alarm
8 MB
CMS (Central Ma nagement
monitoring op afstand tot 10 IP-adressen (Windows & M ac OS)
webtransmissie/compressieformaat
H.264
mobiele bewaking
Smartphones:
netwerkaansluiting
ondersteunt TCP/IP, PPPoE, DHCP en DDNS
IR-afstandsbediening
bedien ing op afstan d van d e DVR en PTZ-functies (DVRRC4)
alarm in-en uitgangen
4 ingangen / 1 uitgang
toetsvergrendeling
ja
detectie beeldverlies
ja
cameratitels
tot 6 karakters
videoregelingen
tint / kleur / contrast / helderheid
voeding
19 VDC
zomertijd (D ST)
ja
werktemperatuur
10-40 °C
systeemherstel
automatisch systeemherstel na str oomonderbreki ng
afmetingen
343 x 59 x 223 mm
opneemelement
1/3" CCD kleu renbeeldsensor
resolutie
420 tv-lijnen
IR-LEDs
14
bereik (IR-LED)
15 m
8. Technische specificaties
- CIF: -
regeling beeldkwaliteit Super best (superieur) - Best (best) - High (hoog) - Normal (normaal)
TB (50 0 GB harde schi jf meegeleverd)
audio in- en uitgangen 4 audio-ingangen, 1 audio-uitgang (mono)
gevoel igh ei d be we gin gs d ete cti e hoog - normaal - laag
back-uptoestel USB 2.0-flashdriv e (voor back -up en updates van fir mw are)
System)
Ethernet 10/100BASE-T, onderste unt bediening op afstand en Liv eView via Ethernet
EagleEyes-software: beheer op afstand vanaf alle smar t phoneplatforms
(Apple, Android, BlackBerry, Nokia Symbian en Windows Mobile)
computer:
'video viewer'-softw ar e op Windo ws en Mac
- webbr owser : Inter net Ex plorer, Fir ef o x, Google Chr om e en Safari via
Java, Quicktime o f V LC plug-in
PTZ-besturing ja (via RS-485)
digitale zoom 2x (live-weergav e & afs pel en)
formaat tijd sweergave JJ/MM/DD, DD/MM/JJ, MM/DD/JJ en uit
verbruik < 42 W
IR-camera
aantal pixels 712 (H) x 582 (V) - PAL -
min. verlichting 0,05 lux (F2.0); 0 lux (IR aan)
V. 02 – 21/08/2013 17 ©Velleman nv
Page 18

CCTVPROM16
S/R-verhouding
> 48 dB (AGC uit)
waterbestendigheid
IP67
elektronische sluiter
1/50 tot 1/100 000 s
lenshoek
92,6°
automatische versterki n g
ja
video-uitgang
1.0 Vpp composite, 75 ohm
voeding
DC 12 V ± 10 %
afmetingen
Ø 60 x 91 mm
witbalans automatisch
(AGC)
standaard lens f3.6mm / F2.0
stroomverbruik 70 mA (IR uit), 200 mA (IR aan)
gewicht 250 g (met be ug el)
Gebruik dit toestel enkel met originele accessoires. Velleman nv is niet aansprakelijk voor schade of
kwetsuren bij (verkeerd) gebruik van dit toestel.
Voor meer informatie over dit product en de laatste versie van deze handleiding, zie
www.velleman.eu.
De informatie in deze handleiding kan te allen tijde worden gewijzigd zonder voorafgaande
kennisgeving.
© AUTEURSRECHT
Velleman nv heeft het auteursrecht voor deze handleiding. Alle wereldwijde rechten voorbehouden.
Het is niet toegest a an om deze handleiding of gedeelten er van over te nemen , te kopi ëren, t e vertalen, t e
bewerken en o p te sl aa n op ee n elektr o n isch medium zond er voorafgaande schrif t elijke to este mmin g van de
rechthebbende.
V. 02 – 21/08/2013 18 ©Velleman nv
Page 19

CCTVPROM16
Utiliser cet appareil uniquement à l'intérieur
Protéger cet appareil con t re la chaleu r extr ême. Veiller à ce qu e les fentes de ventilation ne
exercer un e force excessive lor s d'usage de l'appareil.
GUIDE D'INSTALLATION RAPIDE
1. Introduction
Aux résidents de l'Union europée nne
Des informations environnementales importantes concernant ce produit
Ce symbole sur l'appareil ou l'emballage indique que l’élimination d’un appareil en f in de vie peu t
polluer l'en vironnement. Ne p as jeter un appareil électrique ou él ect roni que (et des piles éventuel les)
parmi les déchets munici pau x non sujets au tri sélectif ; une déchèterie trait era l’a ppareil en question.
Renvoyer cet appareil à votre fourni sseur o u à un service de recy c lage local. Il conv ient d e r espec t er la
réglementation locale relative à la protection de l’environnement.
En cas de questions, contacter les autorités locales pour élimination.
Nous vous remercions de votre achat ! Lire la pr ésente n o t ice at t entiv ement avant la mise en service de
l’appareil. Si l’ appareil a été endommagé pe n dant le tra nsport, ne pas l’in staller et co nsulter votre rev endeur .
Remarques
• Ce document est un guide d'installation rapide. Pour plus de détails, se référer au mode d'emploi détaillée
sur le cédérom inclus.
• Les imag es des produits sont à titre indicatif s eu lemen t . D ans le souci d'un e amélioration con stante de nos
produits, il est possible que les ima ges diff èrent légèr e ment du produ it actuel.
Contenu :
• 1 x enregistreur DVR avec connexion SATA intégrée : DVR4H3
• 4 x caméra couleur à i n frarouge : CAMCOLBUL29
• 4 x câble de caméra de 20 m
• 1 x adapt at eur sect eur de 19 V
• 1 x convertisseur CC-CC haute performance pour le DVR et les caméras
• disque dur (intégré) : DH500Go/S
• télécommande : DVRRC4
2. Consignes de sécurité
Garder l ' appareil h o r s de la portée des enf ants et d es person nes non auto r isées.
Risque d’électrocution lors de l’ouverture du boîtier. Toucher un câble sous tension peut
causer des électrochocs mortels.
Toujours déconnecter l'appareil lorsque l'appareil n'est pas utilisé ou avant de le nettoyer. Tirer
sur la fiche pour débrancher l'appareil ; non pas s ur l e câ ble .
3. Directives générales
Se réf érer à la garantie de service et de qualité Velleman® en fin d e notice.
Protéger cet appareil de l a pluie, de l’ h u m idité et des projections d’eau. Ne ja m a is placer
d’objet contenant un liquide sur l’appareil.
Protéger cet appareil con t re la poussière.
soient p as bloquées. Lais ser une distance d'au moins de 2.5 cm entre l’appareil et to ut
autre o b jet.
Protéger l’appareil des cho cs. Evit er d'
• Se familiariser avec le fonctionnement avant l’emploi.
• Toute modification de l’appareil est interdite pour des raisons de sécurité.
• N’utiliser l'appareil qu’ à sa fonction prévue. Un usage impropre annule d'office la garantie.
V. 02 – 21/08/2013 19 ©Velleman nv
Page 20

CCTVPROM16
ALARM
L'alarm e s'est d éclen ch ée
PLAY
Lecture en cours
Appuyer sur les touches de navigat ion pour déplacer le curseur vers le haut
MENU
Accéder au menu principal.
SLOW
Lecture ralentie
ZOOM
Appuyer sur ZOOM pour agrandir l'image.
SEARCH
Appuyer sur SEAR CH pour activ er la fonction de recherche. I nt roduir e la pério de souhait ée et
= SLOW + ZOOM
Port LAN
Connecter l'enr egistreur DVR au rés eau LAN via un câble d e réseau.
AUDIO IN
4 entr ées audio pour conn ecter u n e sourc e audio exter n e, p. ex. u ne caméra avec audio.
AUDIO O UT
1 sortie audio pour connecter un appareil audio, p. ex . un haut-parleur (mono).
VIDEO IN
4 entrées vidéo po u r connecter des sources vi déo externes, p. ex. des caméras.
EXTERNAL I/O
Connecter un sign al externe, p. ex. une alarme, camé ra PTZ, par une fich e D SUB à 9
• La garan t i e ne s’ap pl ique pas a u x dommages survenus en n égligeant certaines direc tives de cette notice et
votre r even deur décliner a t oute respo n sabilité pour les pr oblèm es et l es défau ts qui en résultent.
• Installer et utiliser la caméra en respectant la l égislation et la vie privée des tiers.
4. Description
Se réf érer aux illus t ratio n s en page 2 de cette notice .
Panneau frontal
HDD Lecture ou enregistrement en cours
LEDs
NAVIGATION
TIMER L'enregistre ment programmé est activé
POWER L'enregistreur DVR est allumé
( , vers le bas , vers la gauche ou vers la droite ).
En mode de lecture , appuyer sur (
arrêter l a lecture, sur
rapidement.
En menu de configuration, appuyer sur
réglage dans le men u.
pour avancer rapidement ou sur pour reculer
) pour lire/interrompre, sur pour
ou sur pour modifier le
ENTER Confirmer les réglages
LIST
PLAY Appuyer pour lire l'enregistrement.
SEQ Appuyer sur SEQ p our un affichage séqu ent iel plein écran de tous les canaux. Appuyer de
1 ~ 4 Appuyer sur un bouton pour sélectionner le canal correspondant.
AUDIO
PTZ
(pan tilt zoom)
USB port
(2x)
Liste d’information des fichiers d’enregistrement.
QUICK SEARCH / RECORD / MOTION / ALARM / TIMER / FULL LIST
nouveau pour qui tter la fonction.
4CH: Appuyer sur 4CH pour le mode d'aff i chage à 4 cana ux .
enfoncer START pour affi cher les enregistrements co ncerné s.
Appuyer simult anément sur SLOW et ZOOM pour sélectionner le mode audio.
= SLOW +
Enfoncer simultanéme nt sur SLOW et pour ac céder ou quitter le mode de pilotage PTZ.
Connecter une clé USB à un des ports USB; connecter une souris USB au deuxième port USB .
Remarque : Ne pas connecter simultanément deux clés USB ou deux souris USB.
Panneau arrière
VGA Connecteur pour moniteur de vidé o ( non i ncl.)
VIDEO OUT 1 sortie vidéo pour connecter l'enregistreur DVR au moniteur principal.
V. 02 – 21/08/2013 20 ©Velleman nv
Page 21

CCTVPROM16
broches.
19V CC
Entrée d'alimentation
interrupteur marche/arrêt
5. Installer le matériel
Installer le disque dur (HDD)
L'enregistre u r D VR est doté d'un dis que dur intégré. Pour i nstaller un autre dis que dur, procéder comme suit :
1. Cet enre gistreur fo nctionne avec de s disques du rs (non inclus) de type SATA ( Serial Advanced Technology
Attachment) . Formater l e disque dur au préalable.
2. Déconnecter d'abord l'appareil du secteur . Ne pas toucher les ci rcuits électriqu es pour éviter des décharges
électrostatiques.
3. Desserrer les 6 vi s (1 de chaque côté et 4 à l’ar rière) fixant le boîtier.
4. Ouvrir l'enregistreur (d'abord la partie arrière).
5. Retirer le disque dur.
6. Fixer le support au nouveau disque dur avec les vis incluses.
Install er l e disque dur a vec le ci r cu it imprimé vers le haut.
7. Connecter le câble SATA et le câble d'alimentation au disque dur.
8. Fixer le sup po rt avec le disque du r à la partie inférieure de l' enregistreur avec les vis i n cl u ses.
9. Refermer l'enregistreur (d'ab o rd la partie frontale) et fixer le boîtier avec les 6 vis.
Connecter un moniteur vi déo
• Connecter un moniteur compatible (non incl.) au port vidéo BNC ou VGA à l 'arr i ère de l'enregistr eur DVR.
Connecter l'alimentation
1. Insérer le connecteur d'alimentation dans l'entrée d'a limentation de 19 VCC à l'arrière de l ' enregistreu r
DVR.
AVERTISSEMENT : N'utiliser que l'alimentation incluse.
2. Connecter le câble à l’alimentation. Connecter l’alimentation au rés eau . Ne pas encore allumer
l'enregistreur DVR.
Connecter une caméra
1. L'ensem ble de vidéosurveillance e st livré avec 4 caméras. Chaque caméra néc essite sa pr o pre source
d'alimentation.
2. Connecter la sortie audio de la cam éra à une e n tr ée audio à l ’ ar rière de l’e n registreur DVR. Le chiff re à côté
des co n necteu rs d' en t rée représente l e n umér o de canal. Le connecteur e st du type BNC.
Connexion audio
1. L'enregistreur D VR intègre 4 entré es audio. Connecter la sor t i e audio de la camér a à une entrée audio à
l'arrière de l'enregistreur DVR. Veiller à connecter le canal audio au canal vidéo correspondant. Le
connecteur est du type BNC.
2. L'enregistr eur est également m u n i d’une sortie audio BN C. Connecter u n appareil audio ex terne, p. ex. u n
haut-parl eur . Le connecteur es t du type BN C .
Connexion au réseau LAN
• Connecter l'enregistreu r D V R au réseau LAN avec un câble de r éseau. Le co nnecteu r est du type 8P8C
(RJ45). Configurer l'enregistr eur d epuis le menu à l'écran.
6. Configuration de base
Allumer les camér as conn ectées et régler l'interru pt eur à l'arrière de l'enregistre u r DVR sur ON. L ’enr egistreur
se réinitialise pe n dant 10 à 1 5 secondes.
Aperçu du menu
Appuyer sur la touche MENU et introduire le mot de pass e pour afficher le menu.
Remarque: Le mot de passe par défau t est "0000" (4 x zéro).
V. 02 – 21/08/2013 21 ©Velleman nv
Page 22

CCTVPROM16
QUICK START
GENERAL - TIME SETUP
DATE SETUP
DATE INFO - DAYLIGHT
SYSTEM
EVENT
QUICK SEARCH - EVENT SEARCH - HDD INFO - EVENT LOG
ADVANCED
CAMERA – DETECTION – ALERT – NETWORK – DISPLAY – RECORD - REMOTE
TOOLS - SY ST EM INFO – BACKUP DATA – BACKUP LOG
INFORMATION
CONFIG
SCHEDULE
RECORD – DETECTION – ALARM
SETTING
Pour plus de détails, se référer au mode d'e m p loi détaillée sur l e cédérom incl u s.
Régler l'heure et la date
Il est nécessa ire d e c onfigu rer l'heure et la data avant le premier emploi.
1. Appuyer sur la touche MENU et introduire le mot de pass e pour afficher le menu.
2. Sélectionner le sous-menu QUICK START.
3. Déplac er le curseur avec le s t o uches de navigation po ur accéder au sous-menu T IME SETUP. Sél ectionner
TIME SETUP pour régler la date et l'heure.
Remarque : Ne plus modifier l’heure et la date une fois l'enregistrement commencé.
Remarque : Laisser l ’ enregistreu r a llum é pend a n t 4 8 heures après la configuration de l’ heure e t de la d ate.
Configurer le mot de passe
1. Appuyer sur la touche MENU et introduire le mot de pass e pour afficher le menu.
2. Sélectionner le sous-menu SYSTEM.
3. Accéder au sou s-me nu TOOL S. Sélectio nner ADM IN P ASSW ORD (ou OPERAT OR PASS WORD) et appuyer su r
ENTER pour configurer le mot de passe.
Remarque : Un utilisateur autre que l’admin i strateur n’est pas autorisé à accéder au men u principal. Il
n’aura accès qu’à la barr e menu (voir ci-dessous).
4. Modifier le premier digit avec les touches
ou et confirmer avec la touche ENTER ou sélectionner
le digit avec la souris. Répéter cette procédure pour l es chiffr es restant s.
Remarque: Le mot de passe par défa ut est "0000" (4 x zéro).
Configurer la fonction d'enregistrement
1. Appuyer sur la touche MENU et intr o dui re le mo t de p ass e pou r aff icher le me nu.
2. Sélectionner le sous-menu QUICK START.
3. Déplac er le curseur avec le s t o uches de navigation et sélection n er le sous-menu GENERAL .
4. Configurer la taille de l’image, la qualité de l’image et le nombre d’images par seconde.
5. Pour plus d'informations, se référer au mode d'emploi détaillé sur le cédérom inclus.
V. 02 – 21/08/2013 22 ©Velleman nv
Page 23

CCTVPROM16
A
B
D
état du canal
Lecture d'audio
Appuyer simult anément sur SLOW et ZOOM ou utilis er la barre de menu (voi r ci-dessous) pour s él ectionner le
canal audio souhaité. Le canal sélectionné est indiqué dans la barre d' état.
Sélectionner l'utilisateur
1. Il est possible d'accéder à l'enregistreur DVR comme administrateur ( ) ou comme utilisateur ( ). Les
icônes s'affiche n t dans la barre d'ét at .
2. Commuter d’un utilisateur à l’autre en sélectionnant l’icône ( ou ). La sélection est verrouillée ( ).
3. Enfoncer l'icône ( ) et i n t rodui re le mot de pas se du profil souhaité.
7. Usage
7.1 Afficheur
L’illustration ci-dessous repré sente la dispositio n d’ affichage.
date et heure
état général du système
C espace disponible sur le disque
dur
canal audio 1 .. 4 a ctivé
audio désact iv é
zoom n umérique act ivé (j a u ne) /
désactivé
connexion LAN / c onnexion à l'interne t / pa s de connexi on au réseau
clé USB connectée
lecture du canal a udio 1 .. 4 (jaune)
enregistrement programmé
souris USB connectée
écraser les don né es du disq ue dur ( par défa ut)
Les icônes représ en tés peuven t différer légèrement de la réalité.
7.2 Barre de menu
Remarque : uniquement disponible si une souris USB est connectée.
Déplac er le pointeur de la souris vers la gauc he de l’é cr an :
V. 02 – 21/08/2013 23 ©Velleman nv
clavier verrouillé
mode s équent iel
mode enregistrement
connexi on com me ad mini str ate ur
pilotage PTZ
détection de mouvements
alarme
connexion comme utilisateur
Page 24

CCTVPROM16
A
D
B
touches de comm ande
E
fermer
C
fonction de recherche
F
régler la fonction de répétition A→B / ouvrir le
menu des canau x
menu de lecture
fonction zoom (sélection ner d'abord le can al souhaité)
Sélection du canal audio
menu du pilotage PTZ
Cliquer pour afficher l'icône de désactivation et pour éteindre ou réinitialiser l'appareil.
7.3 Enregistrement
• S’assurer que le s caméra s et le disque dur soient con n ectés correctem en t à l'enre gi st reur DV R .
• L’appareil démar r e un enregistrement si les fonctions d' enregistrement automa t ique et de pré-alarme sont
activées.
• L'icône (
) s'affiche automatiquement.
• L'icône (
) ou ( ) s'affiche après l a détectio n de mouvements ou u ne alarme ( si le mo de en questi o n
est activé).
• L'icône ( ) s'affiche et la LED s'a llume en mode d'enregi s t rement programm é.
• L'enregistre ment se met automatiquement en mode d'écrasem ent. L'icône ( ) s'aff iche.
7.4 Lecture d'un enregistrement
Enfoncer la touch e PLAY ou accéder à la barre de menu pour démarrer la lecture d’un fichier d’enregistrement.
barre de progression
Remarque : Le fichier doit contenir un minimum de 8192 images (p. ex. IPS = 30, l'enregistrement doit avoir
une durée mi n imale de 273 secondes).
• Enfoncer la touch e
pour une ava n ce rapide de l'enregist rement e t pour un recul rapide de
l'enregi stremen t . En foncer la touch e à plusieu r s reprises pour s électionner la vitesse : 4x, 8x 1 6 x ou 32x
(max.).
• Enfoncer la touche
• Enfoncer la touch e
Enfoncer une fois la touche SLOW pour lire l'enregistrement à 1/4 de la vitesse de lecture normale; enfoncer la touche une deuxième fois pour lire
•
l'enregistrement à 1/8 de la vitesse de lecture normale.
pour interro mpre la lecture de l'enr egistrement.
pour revenir au moni torage en direct .
information
menu de sauvegarde
7.5 La fonction de recherche
• Il y a qu at re fonctions de recherc he : selon l’en regi s t rement, selon l’heure d’enre g istrement, selon l ’alar m e
et selon dét e cti on d e mouvement.
V. 02 – 21/08/2013 24 ©Velleman nv
Page 25

CCTVPROM16
format de vidéo
PAL
entrée vidéo
4 canaux, signal vidéo com posite 1 V pp / 75 ohm BNC
sortie vidéo
signal vidéo composite 1 Vpp / 75 ohms BNC + VGA
résolution d'enr egistrement
- image : 704 x 576 pixels à 100 IPS (PAL)
qualité d'image
Super best (supérieur) - Best (meilleur) - High (haut) - Normal (normal)
mode d'en r e gist r em ent
manuel / pro gramm é / par d étection de mouve ment / depuis réseau / alarme
fonctions multiplex
afficha ge en direc t, enre gistr e me nt, lectu r e, co pie de sauv ega rde et ré seau
entrées/ sorties audio
4 entrées audio, 1 sortie audio (mono)
surface de déte cti on de
grille 16 x 12 par canal
sensibilité de détection de
haut - normal - faible
support de sauvegarde
clé USB 2.0 (pour la sauvegarde et le s m ises à jour du micrologiciel)
CMS (Central Ma nagement
monitor age à dist an ce jusqu ' à 1 0 adresses IP (Windows & M ac OS)
transmission web / format de
H.264
Ethernet
10/100BASE-T, supporte le contrôle à distance et LiveView vi a E thernet
ordinateur :
: Int ernet Explore r , Firef o x, Go o gle Chrome et Safari depui s
connexion réseau
supporte TCP/IP, PPPoE, DHCP et D D N S
pilotage PTZ
oui (via RS-485)
zoom numérique
2x (i m age directe & lectur e)
dispositif de verrouillage
oui
détecti on de per te de l'i m ag e
oui
titre de la caméra
jusqu'à 6 caract èr es
afficha ge de la date
AA/MM/JJ, JJ/MM/AA, MM/JJ/AA et OFF
consommation
< 42 W
heure d'été (DST)
oui
temp érat ur e de ser vi c e
10-40 °C
rétablisse ment du systèm e
rétablissement automati que du système a pr ès la remi se sous tension
• Pour rechercher un enregistrem ent selon un événem ent, enfoncer la touche LIST sur le pan neau (s'assurer
que le menu de lecture ne soit pa s verro u illé). U ne liste av ec t ous les types d’enregistrement (ALARM,
MANUAL, MOT ION, SYSTE M et FULL LIST) est af fi ché e.
• Sélectionner le type d' en regis t remen t souh aité.
• Enfoncer la touch e ENT ER pour démarrer l a l e cture.
8. Spécifications techniques
compression de v idéo H.264
max. (PAL)
capacité du dis qu e dur type SA TA int égré, 1 x HDD, c apacit é de plus de 1 To (disqu e dur de 5 00 Go
taux de raf raîchissement 100 IPS pour PAL
mouvement
mouvement
enregi strement pré-alarme 8 Mo
System)
compression
surveillance mobile Smartphones :
- CIF : -
inclus)
logiciel EagleEyes : gestion à distance dep uis toute s l es plateformes du
smartphone
(Apple, Android, BlackBerry, Nokia Symbian et Windows Mobile)
- logiciel 'video viewer' sur Windows et Mac
- navigateur web
Java, Quicktime ou plugin VLC
télécomm ande IR commande à di st ance de l ' enregistreur et d es f o nction s PTZ (DVRRC4)
entrées/ sorties alarme 4 entrées / 1 sortie
réglages de l'image teint / couleur / contraste / luminosité
alimentation 19 VCC
dimensions 343 x 59 x 223 mm
V. 02 – 21/08/2013 25 ©Velleman nv
Page 26

CCTVPROM16
nombre de pi x els
712 (H) x 582 (V) - PAL -
résolution
420 lignes TV
éclairage min.
0,05 lux (F2.0) ; 0 lux (IR allumé)
plage (lumière IR)
15 m
rapport S/B
> 48 dB (AGC éteint)
résistan ce à l'eau
IP67
obturateur électroniq ue
de 1/50 à 1/100 000 s
angle de vue
92.6°
balance des bl ancs
automatique
objectif standard
f3.6mm / F2.0
sortie vidéo
1.0 Vpp composite, 75 ohm
alimentation
CC 12 V ± 10 %
consom mat ion de courant
70 mA (IR éteint), 200 mA (IR al l umé)
dimensions
Ø 60 x 91 mm
poids
250 g (avec support)
caméra IR
capteur capteur CCD à couleur de 1/3"
LEDs IR 14
contrôl e de gain au t o matique
oui
(AGC)
N’employer cet appareil qu’avec des accessoires d’origine. La SA Velleman ne peut, dans la mesure
conforme au droit applicable être tenue responsable des dommages ou lésions (directs ou indirects)
pouvant résulter de l’utilisation de cet appareil.
Pour plus d’information concernant cet article et la dernière version de cette notice, visiter notre
site weber www.velleman.eu.
Toutes les informations présentées dans cette notice peuvent être modifiées sans notification
préalable.
© DROITS D’AUTEUR
SA Velleman est l’ayant droit des droits d’auteur pour cette notice. Tous droits mondiaux réservés.
Toute reproduction, traducti o n, co pie ou di ffusion, intégrale ou partielle, du contenu de c et te notice par quel que
procédé ou sur tout support électronique que ce soi t est interdite sans l ’ accord préalable écr i t de l’ay ant droit.
V. 02 – 21/08/2013 26 ©Velleman nv
Page 27

CCTVPROM16
al abrir la caja. Puede sufrir una p el igrosa descarga eléctrica al
Utilice el aparato sólo en interiores
GUÍA RÁPIDA
1. Introducción
A los ciudadanos de la Unión Europea
Importantes informaciones sobre el medio ambiente concerniente a este producto
Este sím bo l o en este aparato o el embalaje indica que, si t ira las muestras inservibles, podrían dañar el
medio am biente. No tire este aparato ( n i las pilas, si las hubiera) en la basura doméstica; debe ir a una
empresa especial i zada en reciclaje. Devuelva este a parato a su distrib u idor o a la u nidad de reciclaj e
local. Re spete la s leyes locales en relación con el medio ambiente.
Si tiene dudas, contacte con las autoridades locales para residuos.
¡Gracia s por elegir Velleman ! Lea aten tament e las ins tr u cciones del manual antes de usar el aparato. Si ha
sufrido algún daño en el transporte no l o i nstale y póngase en contacto con su distribuidor.
Observaciones
• Este documento es una guí a r ápida. P ar a más información, consul te el amplio manu al del usu ar io en el CDROM (incl.).
• Las imág enes son meramente ilustrativas D ebido a las contin u as mejoras, el producto podr ía diferi r del de
las imágenes.
incluye
• 1 x DVR con conexión SATA incorporada: DVR4H3
• 4 x cámara IR a color: CAMCO L B UL29
• 4 x cable de cámara de 20 m
• 1 x adaptador de red de 19 V
• 1 x convertidor DC-DC de al to rendimi ento para DVR y l as cámaras
• disco duro (incorporado): HD500GB/S
• mando a di stancia: DVRR C4
2. Instrucciones de seguridad
Manten ga el apar at o l ejos del al cance de personas no cap acitadas y n i ñ os.
Riesgo de descargas eléctricas
tocar un cable con ectado a la red eléct r ica
Descon ecte siem pre el aparato si no va a usarlo durante un largo periodo de tiempo o antes de
limpiarlo. Tire siempre del enchufe para desco n ectar el cable de red, nunca del propio cable.
3. Normas generales
Véase la Garantía de servicio y calidad Velle m an ® al final de este manual del usu ar io.
No exponga este equipo a lluvia, humedad ni a ningún tipo de salpicadura o goteo. Nun ca
ponga un objeto con líquido en el aparato.
No exponga este equipo a polvo.
No exponga este equipo a temperaturas extremas. A segúrese de que lo s orificios de
ventilación no estén bloqueados. Deje una di stancia de mín. 2,5 cm entre el apar ato y
cualquier otro obj eto para a segurar una ventilación s uficiente.
No agite el aparato. Evite u sar excesiv a f uerza durante el manejo y la instal ación.
• Familiarícese con el funcionamiento del aparato antes de utilizarlo.
• Por razone s de seguri dad , las modif ic aci on es no autor i zad as del apar ato est án pro hi bida s.
• Utilice s ólo el aparato par a las aplicaciones descritas en este manual. Su uso incorrecto a n u la la gar an tía
completamente.
V. 02 – 21/08/2013 27 ©Velleman nv
Page 28

CCTVPROM16
ALARM
Se ha activado una al arm a.
PLAY
El aparato está en el modo d e r eproduc ci ó n .
Pulse una de las cu atr o posici ones de la tecla de navegación para m o ver el
MENU
Pulse MENU para e ntrar en el menú prin ci pal.
PLAY
Pulse pa ra reprodu cir el vídeo grabado.
SLOW
En el modo de r eproducción, pulse para un a r eprodu cción lenta.
ZOOM
En el modo de r eprodu cción en direc t o o en el m odo de graba c ión, pulse par a agrandar la
SEQ
Pulse para visuali zar cada canal en pantalla co mpleta uno a uno. Vuelva a pu l sar para salir de
SEARCH
Pulse para entrar en el modo de búsqu ed a por hora. Introd uzca el rango de tie mp o y pulse
= SLOW + ZOOM
Puerto LAN
Para conectar la DV R a una red l ocal con un cable de red.
VGA
Conexión para monitor de vídeo (monitor no i ncl.)
AUDIO O UT
1 salida de audio p ara conectar a un aparato d e audio (p.ej. altav o z, mono).
• Los daño s causado s por descu ido de las instru cciones de segurid ad de este manual invalidarán su gara nt ía
y su distribuidor n o será res ponsable de ningún daño u otros problemas resultantes.
• Instale y ut ilice la cámara al r espetar la legislación et la vida priv ada de terceros.
4. Descripción
Véase las figuras en la pági na 2 de es te man ual del usuari o .
Panel Frontal
HDD El disco dur o está leyendo o grabando.
LEDs
NAVIGATE
TIMER La grabación pr o gra mada est á acti va da.
POWER El aparato está activado.
cursor haci a arrib a
(
), hacia aba jo ( ), hacia la izqu ierda ( ) o hacia la derecha ( ).
En el modo de r eprodu cción, pulse el botón para r eproducir/pausar (
parar(
En el modo de configuración, pulse el botó n ‘haci a ar riba’ (
abajo’(
), avanzar r ápidam ente( ) o retroced er rápidamente( ).
) para cambiar el ajust e en el menú.
),
) o ‘hacia
ENTER Pulse ENTER para confirmar el ajuste.
Lista con informa ci o nes so bre los ficheros grabados.
LIST
1 ~ 4 Pulse el botón para selecci o nar el can al deseado.
AUDIO
PTZ
(pan tilt zoom)
QUICK SEARCH (búsqueda rápida)/ RECORD (grabación)/ MOTION (movimiento)/ ALARM
(alarma)/ TIMER ( temporizador)/ FULL LIST ( lista completa)
imagen del canal seleccionado.
este m odo.
4CH: Pulse para v isualizar el modo d e 4 canales .
START para visualizar todas las grabaci o nes en este rango d e tiempo.
Pulse SLOW y ZOOM simultáneamente para seleccionar el audio en directo o el audio de
reprodu cción de l os canales de audio.
= SLOW +
Pulse SLOW y simultáneamente para entrar o salir del modo de control PTZ.
puerto USB
(2x)
Panel trasero
AUDIO IN 4 canales de entrada de audio para conectar cuatro f u entes de audio exter nas (p.ej.
V. 02 – 21/08/2013 28 ©Velleman nv
Conecte una unidad flash USB para hacer una copia de seguridad al primer puerto US B.
Conecte un ratón USB al otro puerto USB .
Observación: No cone cte dos ratones o do s u nidad es flash USB simultáneamente.
cámaras con audi o ) .
Page 29

CCTVPROM16
VIDEO IN
4 canales de entrada de víd eo para conectar 4 fuentes de vídeo ex ternos (p.ej. cámaras).
EXTERNAL I/O
Utilice un conecto r DSUB de 9 polos para cone ctar un di spositivo ex terno ( p.ej. alarma, PTZ,
interruptor ON/OFF
VIDEO OUT 1 canal de salida d e vídeo par a conectar el DVR al monitor principal.
etc.).
19V DC alimentación
5. El hardware
Instalar el disco duro (HDD)
La DVR está equip ada con un disco duro incorp o r ado. Para i nstalar o t r o disco duro, haga lo siguient e:
1. Utilice un disco duro SATA adecuado (véase especif i caciones). Formatee el disco duro .
2. Desconecte el aparato d e la red eléctrica antes del manten imien t o y no to q ue cir cu itos el ectr ó nicos par a
evitar descargas eléctri cas.
3. Desatorni lle los 6 to r n illos de l a tapa (1 en cada la do y 4 en la parte tras era).
4. Levante l a tapa (primero la parte trasera).
5. Saque el disco duro.
6. Fije los soportes al disco duro (tornillos incl.).
Instale el disco duro co n el lado CI hacia arriba.
7. Conecte la alime nt ación y el cable de datos SATA al disco duro.
8. Utilice los tornil los (incl.) para fijar el disco duro a la parte inferi o r de la caj a con el lad o CI hacia ar r iba.
9. Cierre la tapa (primero la parte frontal) y atornille los 6 tornillos.
Conectar un monitor
• Conecte un monit o r adecuado (no incl.) al puer t o de salida BNC o VGA de la parte trasera de la DVR .
Conectar la alimentación
1. Conecte el conecto r DC del ad aptador de red (incl.) a la entrada de al imentación (19V DC) de la parte
trasera de l a DVR.
ADVERTENCIA: Utilice sólo el adaptador incluido.
2. Utilice el cable de ali mentación (incl.) para en ch u far el aparato en una toma eléctrica adecuada. no
encien da l a DVR.
Conectar una cámara
1. Este juego de vigilancia in cluye 4 cámaras. Cada cámara necesita su pr opia alimentación.
2. Conecte la salida de vídeo de la cámara a la entrada de vídeo de la parte tr asera de la DVR. El número al
lado de cada con ector d e entra da es el númer o de can al. Tipo de con ect or: BNC.
Conectar audio
1. La DVR so porta cuatr o entra das de audi o . Conecte la salida de audio de una fuente de audio a la entrada d e
audio de la DVR. A segúrese de que conecte el canal de audio al canal de víd eo adecuado. Tipo de conecto r :
BNC.
2. También , está eq uipa do con un conector de salida de audio. Si fuera necesario, conect e u n aparato de
audio (p.ej. altav o z) a este conector. Tipo de conecto r : BNC.
Conectar una red de área local (Local Area Network, LAN)
• Conecte la DVR a una red local al introducir el cable de red en el puerto LAN de la pa rte trasera de la DVR.
Tipo de conector: 8P8C (RJ45). Utilice el menú en pantalla (OSD) para la configuración.
6. Ajustes
Asegúrese de qu e l a s cámara s estén activadas y ponga el interruptor ON/OFF en la posición ON . La activación
dura unos 15 a 30 segundo s.
El menú
Pulse el botón MENU e introduzca la contraseña.
Observación: La contrase ña de ad mini str ad or por def ecto es “0000” (cuatro veces cero).
V. 02 – 21/08/2013 29 ©Velleman nv
Page 30

CCTVPROM16
QUICK START
GENERAL - TIME SETUP
DATE SETUP
DATE INFO - DAYLIGHT
SYSTEM
EVENT
QUICK SEARCH - EVENT SEARCH - HDD INFO - EVENT LOG
ADVANCED
CAMERA – DETECTION – ALERT – NETWORK – DISPLAY – RECORD - REMOTE
TOOLS - SY ST EM INFO – BACKUP DATA – BACKUP LOG
INFORMATION
CONFIG
SCHEDULE
RECORD – DETECTION – ALARM
SETTING
Para má s i n formació n, consul te el amplio manu al del usuari o en el CD-R OM (incl.).
Configurar la fecha y la hora
Primero , ajuste la fecha y la ho ra antes de utili z ar la videograbadora.
1. Pulse el botón MENU e introduzca la contraseña.
2. Seleccio ne QUI CK START.
3. Seleccione TIME SE TUP con el botón de navegación. Seleccion e T IME SET UP para ajustar la f echa y la hora.
Observación: No modif ique la fecha ni la hora después de hab er activa do la funci ón de grabación. D e l o
contrari o , los dato s grabados estar án desordenados y no podrá en contrar di chos archivos a través de la
búsqu eda po r tie mp o.
Observación: Si utiliza la DVR por primera vez, actívela durante al menos 48 horas ininterrumpidamente
una vez que la fecha y la hora hayan sido confi guradas co r rectamente.
Configurar la contraseña
1. Pulse el botón MENU e introduzca la contraseña.
2. Seleccione SYSTEM.
3. Diríjase a TOOLS. Seleccione ADMIN PASSWORD (u OPERATOR PASSWORD) y pulse el botón ENTER para
ajustar l a contraseña.
Observación: Un op erador n o pued e acce d er al me nú principal, sólo a l a barra de m enú rápido (véase
abajo).
4. Desplácese ’haci a arri ba’ (
) o hacia a bajo ( ) para seleccionar el valor del primer número. Pulse
ENTER para guardar el número y para ir al siguiente o utilice el r atón para selecci o n ar el valor deseado .
Repita e st o para lo s cuatro nú meros d e la contra seña.
Observación: La contraseña de admi nistr ad or por d efe cto es “0000” (cuatro veces c ero ).
Ajust e s de grabaci ón
1. Pulse el botón MENU e introduzca la contraseña.
2. Seleccione QUICK START.
3. Seleccione GEN ER AL con el botón de navegación.
4. Ajuste el tamaño de l a image n , la calidad de la im agen y l as imágene s po r segundo para la grabación.
V. 02 – 21/08/2013 30 ©Velleman nv
Page 31

CCTVPROM16
A fecha y ho r a del sistema
B Estado general d el sistem a
C capacidad disponible en el disco
D
Estado de l os canales
reprodu cción de audio de los canales de audio
5. Para má s i n formació n, consul te el amplio manu al del usuari o en el CD-ROM (incl.).
Reproducción de sonido
Pulse SLOW y ZOOM simult á neamente para seleccion ar el canal d e audio de seado o utilice la barra de menú
rápido (véase a bajo ). El can al de audio actual se v isual iza en la barra de estado.
Cambiar el tipo de usuario
1. Es posible acced er a l sistema como adm inistrador ( ) u operador ( ). Él símbolo correspondiente se
visualiz a en la barr a de estado.
2. Para conmutar en t r e usuari o s, haga clic en el sím bolo de usuario ( o en el )para bloquear la sesión
actual ( ).
3. . Pulse el símbolo de tecla do blo queado ( ) e introduzca la co ntraseña del perfil dese ado.
7. Funcionamiento
7.1 pantalla
La siguien te imag en visuali z a la estruct uració n de la pantal la.
duro
audio en direc to de los can ale s de
audio 1 .. 4 activado
audio desact iv ado
zoom digital activado (amarillo) /
desactivado
conexión LAN / co nexi ón Internet / no co nexi ón
dispositi vo flash USB con ec ta do
teclado bloq ue a do
modo de visualización secuencial
1 .. 4 activada (ama r illo)
graba ción con tempor izador
ratón USB con ecta do
sobreescribir el disco duro (ajuste por defecto)
modo PTZ
modo de movimient o
Es posible que los símbolos difieran un poco de los visualizados arriba.
V. 02 – 21/08/2013 31 ©Velleman nv
modo de grabación
administr ado r con ec tado
modo de alarma
operador conect ado
Page 32

CCTVPROM16
Modo ‘zoom in’ (acercar la imagen). P r imero, seleccione el canal deseado antes de entrar en
Seleccionar el canal de audio (En el m odo en directo, sólo es posible selecci o n ar los canales
A
barra de pr ogreso
D
información
B
E
C
búsqu eda de ev en to
F
ajustar l a f u nción A→B / abrir el menú de copia de
7.2 Barra de menú rápido
Observación: Sólo está disponible si el ratón USB está conectado.
Mueve hacia la izquierda de la pantalla para abrir el menú rápido:
Abrir el panel de cambio de canal.
Visualizar el panel de control de la reproducción.
el modo zoom.
en dir ec to).
Entrar en el modo PTZ y visualizar el panel de control PTZ.
Haga cli c para visualizar el i co no de desactivación y para desactivar o reiniciar el a parato.
7.3 Grabación
• Asegúrese de qu e l a ( s) cámara(s) est é( n) conectada(s) correct amente y que el disco duro e sté instalado.
• El aparato empiez a a grabar si la función de grab a ci ón autom ática y la f u nción de prealarma están
activadas.
• El símbolo de grabación (
) se visu aliza (por defecto).
• El símbolo de movimiento (
movimiento o ala r ma y si est a función está activ ada.
• El símbolo de grabación por temporizador ( ) se visu aliza y el LED corre spondiente se ilumi n a si está
activa da la gra ba ci ón p or tem po ri za dor .
• El símbolo de sobreescribir ( ) se visualiza en la pantall a si esta funci ón está activada. (ajuste por
defecto)
) o el símbolo de alarma ( ) se visuali z a en caso de dete cció n de
7.4 Reproducción
Asegúrese de que el panel de cont rol no esté bloqueado. Pu lse PLAY en el panel de control o utilice la barra de
menú rápido para abr ir el pa n el de con t rol de reproducción.
control de la reproducción
cerrar
seguridad
Observación: Debe ha ber al menos 8192 imágenes de datos gr abados para que la reproducción funcione
correct a mente. Si no fuera el caso, el aparato detiene l a r eproducción. Por ejemplo: u n f ichero con 30 IPS debe
haber un a duració n de grabaci ón de mín. 273 segundos (8192 imágenes / 30 IPS) para que la reprodu cción
funcione correcta me nte.
• El botón de avanzar rápi damente (
la velocidad de reproducción. Haga clic para a vanzar/retro ceder a un a velocidad de 4, 8, 1 6 ó 3 2 ( máx.)
veces más rápida de lo normal.
• Pulse la botón de pausa (
V. 02 – 21/08/2013 32 ©Velleman nv
) para hacer una pausa.
) y el botón de retroceder ráp idamen te ( ) aumentan y disminuir
Page 33

CCTVPROM16
sistem a de vídeo
PAL
4 canales, señal de v ídeo compuesto 1 Vpp / 75 o hm BNC
frecuencia máx. de grabaci ón
- frame: 704 x 576 píxeles con 100 I PS (PAL)
ajuste de la calid ad de ima gen
Super B est (súper mejor), Best (mejor), High (alta) y Normal ( n ormal)
modo de grabación
manual / temporizador / por detección de movi m ientos / por la red / alarma
funciones multiplex
reprodu cción en di recta, grabación, reproducción, copia de seguridad y red
audio E/S
4 entradas de au dio, 1 sali da de audio (mo n o)
zona de detecció n de
rejilla 16 x 12 por canal
sensibilidad de detección de
alta - media - baja
grabaci ón prealarma
8 MB
USB 2.0 f l a sh drive (para la copia de s eguridad y las actualizacion es del
manejo central de hasta 10 di recciones IP (Windows & M ac OS)
transmisión web/formato de
H.264
Ethernet
10/100BASE-T, soporta el control a distancia y LiveView por Ethernet
ordenador:
conexión de red
soporta TCP/IP, PPPoE, DHCP y DDN S
control PTZ
sí (por RS-485)
zoom digital
2x (i m agen en directo & reproduc c ión)
bloque o d el tecl ado
sí
detección de p érdi da de la señal
sí
título de la cámara
máx. 6 caractere s
formato de la visualización del
AA/MM/DD, DD/MM/AA, MM/DD/AA y OFF
• Pulse el bot ón de parar ( ) par a volver a la visualización en di recto.
• Pulse el botón SLOW una vez para una reproducción a 1/ 4
de la vel ocidad normal. Pu lse dos veces para
una reproducción a 1/8 de l a velocidad norm al.
7.5 Función de búsqueda
• Hay cuatro maner a s para buscar ficheros gra bados: g r abación, mo vimiento, alarm a o tiempo.
• Para buscar u n evento, pulse el botón LIST d el panel front a l (Asegúrese de qu e el pan el de co n t rol no esté
bloqueado). Se v isualizan los tipos de archivo s grabados (ALARM, MANUAL, MOTION, SYSTEM y F UL L L IST)
• Seleccione la lista y la gra bación de seadas.
• Pulse ENTER para iniciar la reproducción.
8. Especificaciones
formato de compr esi ón víde o H.264
señal de víde o compuesto 1 Vpp / 75 ohm BN C + VGA
(PAL)
capaci da d dis co dur o tipo SATA incl., sopo rta 1 x HDD, sop orta ca pa cid ad HDD de más d e 2 TB
- CIF: -
(HDD 500 GB incl.)
frecuencia de actualización de
las imágenes
movimiento
movimientos
compresión
vigilancia a dist anci a por el
móvil
100 IPS para PAL
firmware)
smartphones:
conexió n a distanci a por cual quier plat aforma de smart phone
(Apple, Android, BlackBerry, Nokia Symbian y Windows Mobile)
- softw are 'video viewer' e n Windo ws y Mac
- navegador: I nternet Ex plorer, F irefo x, Google Chr ome y Safari mediante
Java, Quicktime o pl ug-in VLC
mando a di stancia I R la videograbadora y las funciones PTZ se manej an a distancia (DVRRC4)
alarma E/ S 4 entradas / 1 s alida
ajustes de vídeo matiz, col o r , contraste, bril lo
tiempo
V. 02 – 21/08/2013 33 ©Velleman nv
Page 34

CCTVPROM16
alimentación
19 VDC
consumo
< 42 W
horario de verano
sí
temperat ur a de funci on ami ento
10-40 °C (50-104 °F)
dimensiones
343 x 59 x 223 mm
elemento de imagen
sensor CCD a color d e 1/3"
númer o de pí xel e s
712 (H) x 582 (V) - PAL -
iluminación mínima
0,05 lux (F2.0); 0 lux (IR activado)
rango efectivo (iluminación
15 m
resisten cia al agu a
IP67
shutter electrónico
de 1/50 a 1/100 000 s
ángulo de visión
92.6°
balance de blancos
automático
óptica e stándar
f3.6mm / F2.0
salida de vídeo
1,0 Vpp compuesto, 75 ohm
alimentación
DC 12 V ± 10 %
consumo de corriente
70 mA (IR desactivado), 200 mA (IR activ ado)
dimensiones
Ø 60 x 91 mm
peso
250 g (con soporte)
restablecimiento restablecimiento automático del sistema después de haber activa do l a
alimentación de nuevo
cámara IR
resolución 420 líneas TV
LEDs IR 14
IR)
relación señal/ruido > 48 dB (AGC desactivado)
control auto mático de
sí
gananci a (AGC)
Utilice este aparato sólo con los accesorios originales. Velleman NV no será responsable de daños ni
lesiones causados por un uso (indebido) de este aparato.
Para más información sobre este producto y la versión más reciente de este manual del usuario,
visite nuestra página www.velleman.eu.
Se pueden modificar las especificaciones y el contenido de este manual sin previo aviso.
© DERECHOS DE AUTOR
Velleman NV dispone de los derechos de autor para este manual del usuario. Todos los derechos
mundiales reservados. Está estrictamente prohibido repro ducir, traducir, copiar, e di t ar y guardar este
manual del usuario o partes de ello sin previo permiso escrito del derecho habiente.
V. 02 – 21/08/2013 34 ©Velleman nv
Page 35

CCTVPROM16
Verwenden Sie das Gerät nur im Innenbereich
Vermeiden S ie Erschütt erung en . Vermeiden S ie rohe Gewal t währ end der Instal latio n u nd
SCHNELLEINSTIEG
1. Einführung
An alle Einwohner der Europäischen Union
Wichtige Umweltinformatione n über die ses Produ kt
Dieses Symbol auf dem Produkt oder der Ver packung zeigt an, dass die Entsorgu n g dieses Pr oduktes
nach seinem Lebenszyklus der U mwelt Schaden zufügen kann. Entsorgen Sie die Einheit ( oder
verwendeten B atterien) nicht als unsortier t es Hau s müll; die Einheit oder verwendeten Batter ien müssen
von einer spezial isierten Fi r ma zwe cks Recycl ing entsorgt werden. Die se E i nheit m uss an den Händler
oder ein örtliches Recycling-Unternehmen retourniert werden. Re s pektieren Sie die örtlichen
Umweltvorschriften.
Falls Zweifel bestehen, wenden Sie sich für Entsorgungsrichtlinien an Ihre örtliche Behörde.
Vielen Dank, dass Sie sich für Velleman entschie den haben! Lesen Sie diese Bedienungsanl eitung vor
Inbetrie bn ah me sorgf äl tig durch . Überprüfen Sie, ob Transportschäden vorliegen. Sollte dies der Fall sein,
verwenden Sie d as Gerät nicht und w en den Sie sich an Ihren H ändler.
Bemerkungen
• Dies ist ein Schn ell einstieg. Mehr Infor mationen hierzu fi nden Si e in der ausführlichen Bedienungsanl eitung
auf der mitgeliefe r ten CD -ROM.
• Die Abbildungen dienen nur zur Illustration. Durch st ändige Verbesserungen, kann d as Produkt von den
Abbildungen abweichen.
Lieferumfang
• 1 x DVR mit eing ebautem SATA-Anschluss: DVR4H3
• 4 x IR-Farbkamer a: CA MCOL B UL29
• 4 x Kamerakabel von 20 m
• 1 x 19V-Netzteil
• 1 x Hochleistungs-DC-DC-Umwandler für DVR und Kameras
• Festplatte (eingebaut): HD500GB/S
• Fernbedienung: DV RRC4
2. Sicherheitshinweise
Halten S ie Kin der und Unbefugte v om Gerät fern.
Stromschlaggefahr beim Öffnen des Gehäuses. Das Berühren von u nter Spannung st ehenden
Leitungen könnt e z u l eb ensgefährlichen elektrischen Schlä gen führen.
Trennen Sie das Gerät bei Nichtbenutzung und vor jeder Reinigung vom N et z. Fassen Sie dazu
den Netzstecker an der G rifff läche an u nd ziehen Si e nie an der Net z leitu ng.
3. Allgemeine Richtlinien
Siehe Velleman® Service- und Qualitätsgarantie am Ende dieser Bedie nungsanleitun g.
Schützen Sie das G erät vor Regen un d F euchte. Stellen Sie keine mit Flüssigkeit befüllten
Gegenstände auf das Ger ät.
Schützen Sie das Gerät vor Staub.
Schütz en Sie da s Ger ät vor extremen Tem p era t ure n. Bea cht en Sie , da ss die
Lüftungsschlitze nicht blockiert werden. Beachten Sie eine minimale Entfernung von 2,5 cm
• Nehmen Sie d as Gerät erst in Betrieb, nachde m S ie sich mit seinen F unktionen vertra u t gem ac ht ha ben.
V. 02 – 21/08/2013 35 ©Velleman nv
zwisc h en dem Gerät und jedem anderen Gegenstand.
Bedien u ng d es Ger ät es .
Page 36

CCTVPROM16
ALARM
Der Alarm wurde eingesch al tet.
PLAY
Das Gerät spielt D aten von der Festpl atte ab.
Drücken Sie auf eine der vier Positionen der Navigatio n st aste, um den Cursor
MENU
Drücken Sie diese Taste, um das Hau ptmenü aufzurufen.
ENTER
Drücken Sie, um die Einstellungen zu be stätigen.
ZOOM
Im Live- oder Wiedergabe-Modus, drücken Si e ZOOM, um das Bild i m ausgewählte n K anal zu
SEQ
Drücken Sie SEQ, um alle Kanäle nacheinander im ga nzen Bildschirm anzuzeigen. Drück en
1 ~ 4
Drücken Sie eine Taste, um den gewünschten Kan al zu wählen.
= SLOW + ZOOM
PTZ
Neigebewegung,
Ein USB-Port, um ein USB-Laufwerk zur schnellen Datensich erung anzuschließ en. Zweite
werk e glei ch zei tig
LAN-Port
Schließen Sie ein LAN-Kabel für den Internetzugang an.
• Eigenmächt ige Veränderungen sin d a us Sicherheitsgründen verboten.
• Verwenden Sie das Gerät nur für Anwendungen bes chrieben in dieser Be dienungsanleitung. sonst kann dies
zu Schäden am Produkt führen und erli scht der Garanti ean spruch.
• Bei Schäden, die d ur ch Ni chtbeachtun g d er Bedienungsanleitung verursacht werden, erlischt d er
Garantiean spruc h . Für daraus resulti erende Folg eschäden übernimmt der Hersteller keine Haftung.
• Installieren und verwenden Sie das Gerät nicht für illegale Praktiken und beachten Sie die Intimsphäre aller
4. Beschreibung
Siehe Abbildungen, Sei t e 2 dieser Bedie nungsanleitun g.
Vorderseite
Festplatte Die Fe stplatte spielt Daten ab oder ni mmt diese auf.
LEDs
NAVIGATE
TIMER Die Timer-Aufnahme ist einges chaltet.
POWER Das Gerät ist ein geschalte t .
nach oben
), nach unten( ), nach links ( ) oder nach rechts ( ).
(
Im Wiederga be-Modus, drücken Sie die Tasten, um di e Dat ei abzu spielen/ di e
Wiedergabe zu unterbrechen (
Vorlauf (
Im Einstellungsmodus, drücken Si e die Taste ‘nach o ben’ (
unten(
) oder für einen schnellen Rücklauf ( ) .
), um die Einstellung im Menü zu änder n.
), zu stoppen ( ), für einen schnellen
) oder nach
LIST
PLAY Drücken Sie PLAY, um die aufgenommene Datei a bzuspielen.
SLOW Drücken S i e S LOW, u m die aufgenomm ene Datei langsam abzuspi elen.
SEARCH Drücken Sie SEARCH, um die Zeit suc he aufzurufen. S tell en Sie den Zeitber eich ein und
AUDIO
(Schwenk-,
Zoom)
USB-Port
(2x)
Rückseite
Liste m it Informationen über die auf genomm enen D a teien .
QUICK SEARCH / RECORD / MOTION / ALARM / TIMER / FULL LIST
vergrößern
Sie wieder, um die Funktion zu verlassen.
4CH: Drücken Sie diese Taste, um den 4-Kanal-Modus anzuzeigen.
drücken Sie START, um alle Aufz eichnungen innerhalb des Zeitbereichs anzuzeigen.
Drücken Sie gleich zeitig auf SLOW und ZOOM, um Live-Audio auszuwählen oder Audio von
Audiokanal w ieder z ugeb en.
= SLOW +
Drücken Sie gleichzeitig auf SLOW und , um in den PTZ-Modus zu gelangen oder ihn zu
verlassen.
USB-Port, um eine USB-M aus anzuschließen
Bemerkung: Schließen Sie nie zwei USB-Mäusen oder zwei USB Flash-Lauf
an.
V. 02 – 21/08/2013 36 ©Velleman nv
Page 37

CCTVPROM16
VGA
Anschluss für Monitor (nicht mitgeli efert).
VIDEO IN
4 Video Ei n gangska n äle, um 4 ex terne Vi deoquellen (z.B. Kamera) anzusc h ließen.
VIDEO OUT
1 Video-Ausgangskanal, u m den DVR mit d em Hauptmoni to r zu verbind en.
EXTERNAL I/O
Verwenden Sie den 9 -pol. DSUB-Ansc hluss, um ex terne Geräte (z.B. Alar m, P TZ, usw.)
19V DC
Stromversorgung
AUDIO IN 4 Audio-Eingangskanäle, um vier externe Audioquellen (z.B. Kamera mit Audio)
anzuschließen.
AUDIO OUT 1 Audio-Ausgang, um ein Audiogerät (z.B. Mono-Lautsprec her) anzuschließen .
anzuschließen.
EIN/AUS-Schalter
5. Hardware
Die Festplatte installi e ren ( HDD)
Der DVR verfügt über eine eingebaute Fest platte. Um eine andere F es tplatte zu i n s tallieren, gehen Sie wie folgt
vor:
1. Verwenden Sie eine geeignet e S A TA-Festplatte (siehe T ech nische Daten). Formatieren Sie di e Festpl atte.
2. Trennen Si e d as G erät vor der Wartung vom Netz und berühr en Sie keine S chaltkreise, u m Str omschläge zu
vermeiden.
3. Lockern Sie die 6 S ch raub en (1 an j eder Seite und 4 auf der Rü ckseite) der Abdeckung.
4. Heben S ie die Abdeckung hoch (zuerst die Rückseite).
5. Entfernen Sie die Festpla tte.
6. Befest igen S ie die Festplattenhalter ungen an der neuen Festpl atte ( S c h rauben mitgeliefert).
Achten Sie darau f , dass die PCB-Seit e der Fe st pl att e n ach o ben zei gt .
7. Verbinden Sie das SATA-Datenkabel und die Stromversorgung mit der Festplatte.
8. Befest igen S ie die Festplatte mit den mitgelieferten Schrau ben an der Un t erseite des DV R. Bea cht en Si e,
dass die PCB-Seite nach oben zeigt.
9. Setzen S ie di e Abd eck u ng wi e der au f (zu er st di e Vo rd ers ei te) u nd sch r au be n Sie di e se mi t den 6 Sch ra ub e n
fest.
Einen Monitor anschließe n
• Schließen Si e ein en geeigneten Monito r (nicht mitgeliefert) a n den BNC- oder VGA-Videoport auf der
Rückseite des DVR an.
Die Stromversorgun g anschließe n
1. Verbi n den Si e den DC-Ausgangsstecker des mitgelieferten Netzteils mit d em 19VDC-
Stromv ersorgungseing ang auf der R ückseit e des DVR.
WARNUNG: Verw en d en Si e nur das mi tg eliefert e Netz t e il.
2. Verbi n den Si e das Gerät über das mitgelieferte Str o mkab el mit de m Netz . nicht ein.
Eine Kamera anschließen
1. Dieser CCTV-Satz wir d mit 4 Kameras geli efert. Jede Kamer a brau cht eine eigene Str o m versorgun g.
2. Verbinden Sie den Videoausgang der Kamera m it dem V ideo eingang auf der Rückseite des DVR. Di e
Nummern nebe n den Eingangsan schlüssen sind die Kanalnummer. Anschlusstyp: BNC
Audio anschließen
1. Der DVR unterstützt vier Audio-Eingäng e. Verbinden Sie den Audio-Ausgang einer Audioquelle mit dem
Audio-Eingang des DVR. Achten Sie darauf, dass Si e den Audiok anal mit dem entsprechenden Vid eokanal
verbinden. Ansc hl usstyp: BNC
2. Es gibt auch einen Audio-Ausg angsans ch l uss. Wenn nötig, schließen Sie einen A udiogerät (z.B.
Lautsprecher) an diesen Anschlus s an. Anschl usstyp: BNC
Ein lokales Netzwerk (LAN) anschließen
• Verbinden Sie den DVR mit ei nem lokalen Netzwerk, indem Sie das Netzwerkkabel mit dem LAN-Port auf
der Rückseite des Gerätes verbin den. Ansc hlusstyp: 8P8C (RJ45 ). Die Ko nfiguration ges ch ieht über OSD
(On-Screen Display).
V. 02 – 21/08/2013 37 ©Velleman nv
Page 38

CCTVPROM16
QUICK START
GENERAL - TIME SETUP
DATE SETUP
DATE INFO - DAYLIGHT
SYSTEM
TOOLS - SY ST EM INFO – BACKUP DATA – BACKUP LOG
EVENT
ADVANCED
CAMERA – DETECTION – ALERT – NETWORK – DISPLAY – RECORD - REMOTE
SCHEDULE
RECORD – DETECTION – ALARM
6. Einstellungen
Beachten Sie, dass die an geschl o ssenen Kam eras eingeschaltet sind und stellen S ie den EIN/A US-Schal t er auf
der Rückseite des Gerätes auf ON. Das Einschalten d auert etwa 15 bis 3 0 .
Das Menü
Drücken Sie MENU und geben Sie da s Kennwort ein, um d as M enü aufzurufen.
Bemerkung: Das Stand ard-Administratorpasswort i st “0000” (4 Mal Null).
QUICK SEARCH - EVENT SEARCH - HDD INFO - EVENT LOG
Mehr Informationen hierzu finden Sie in der ausführlichen Bedienung sa nleitung auf der mitgelieferten CD-ROM.
Datums- und Uhrzeiteinstellung
Bevor S ie den DVR verwenden, stellen S ie zu erst da s Datu m u nd die U h rzeit ein.
1. Drücken Sie MENU und geben Sie da s Kennwort ein, um d as M enü aufzurufen.
2. Wählen Sie QUICK START.
3. Wählen Sie TIME SET UP mit der Navi gationstaste. Wählen Sie TIME SETUP, um das Datum u n d die Uhrzeit
einzustellen.
Bemerkung: Ändern Sie da s Datum und die Uhrzeit nicht nachdem Sie die Aufnahmefunk ti on aktiviert
haben. Sonst ger ä t die Reih en folge der au fgeno mmenen Daten durcheinander und werden Sie die
aufgen ommene Dat e i bei ei ner späteren Zeit-Suche nicht wiederfinden können.
Bemerkung: Lasse n S ie den DVR bei erster Inb et riebnahme mindes tens 4 8 S t unden eing eschal t et,
nachdem Sie das Datum und die Uh rzeit korr ekt ein gestellt haben.
INFORMATION
CONFIG
SETTING
Das Kennwort einstellen
1. Drücken Sie MENU und geben Sie da s Kennwort ein, um d as M enü aufzurufen.
2. Wählen Sie SYSTEM.
3. Gehen Sie zu TOOLS. Wählen Sie ADMIN PASSWORD (oder OPERATOR PASSWORD) und drücken Sie
ENTER, um das Kennwort einzustellen.
Bemerkung: Ein Operator hat keinen Zugang zum Hauptmenü, nur zur Schnellmenüleiste (siehe unten).
4. Scrollen Sie nach oben (
drücken Sie ENTER zum Speichern. G ehen Sie zum näch sten Zeichen oder verwenden Sie die Maus, um den
V. 02 – 21/08/2013 38 ©Velleman nv
) oder nach unten ( ), um den Wert der ersten Numm er zu wählen und
Page 39

CCTVPROM16
A
B
D
Kanalstatus
gewünschten W ert zu wählen. Wied erholen Sie dies f ür die vi er Kennwortnummern.
Bemerkung: Das Stand ard-Administr atorpasswort i st “0000” (4 Mal Null).
Aufnahme-Einstellungen
1. Drücken Sie MENU und geben Sie da s Kennwort ein, um das Menü aufzurufe n.
2. Wählen Sie QUICK START.
3. Wählen Sie GENERAL mit der Navigationstaste.
4. Stellen Sie die Bildgröße, die Bildqualität und die Anzahl Bilder pro Sekunde für die Aufnahme ein.
5. Mehr Informationen hierzu finden Sie in der ausführli chen Bedienungsanleitung auf der mi tgelieferten CD-
ROM.
Audiowiedergabe
Drücken Sie gleich zeitig auf SLOW und ZOOM, um den gewünschten Audiokanal auszuwählen oder verwenden
Sie di e S chnell menüleiste (siehe unten ). Der aktuel le Audi o kanal w ird in der Statusleiste angezeigt.
Den Benutzertyp ändern
1. Sie können als Administrator ( ) oder als Operator ( ) Zugang zum DVR haben. Die Symbol e werden in
der Statu sleiste angezei gt.
2. Um zwischen den Benutzern zu schalten, kl icken Sie au f das Benu t zersymbol ( oder ) um die aktuelle
Benutzung ( ).
3. zu verriegeln. Dr ü cken Si e auf das Sy mbol der Taste n sperr e ( ) und geben Sie dann das Pass wor t d es
gewünschten Prof ils eins.
7. Anwendung
7.1 Display
Folgendes Bild zeigt die Bildschirmaufteilung.
Live-Audiokanal 1 .. 4 eingeschaltet
Systemdatum und -Zeit
allgemeiner Systemstat u s
C verfüg bar e HD D-Kapazität
Wiedergabe Audio kanal 1 .. 4 einge schaltet
(Gelb)
V. 02 – 21/08/2013 39 ©Velleman nv
Audiokanal aus ge sc hal tet
digitaler Zoom ein (Gelb) / aus
LAN verbunden / Internet verbunde n / k eine Netzwerkverbindung
USB-Flashlaufwerk verbunde n
Timer-Aufnahme
USB-Maus angeschlossen
Festplatte über sch reiben (Stand ar d)
Page 40

CCTVPROM16
Beachten S ie, da ss die aktuelle n Sy mbole geringfü gig von den oben angezeigten Symbolen abweichen können.
Tasten s per re ei n
Sequenz-Modus
Aufnahmemodus
Administrator eingeloggt
PTZ-Modus
Bewegung
Alarmmodus
Operator eingeloggt
7.2 Schnellmenüleiste
Bemerkung: nur verfügbar w enn die USB-Maus a ngeschlossen ist .
Bewegen Sie das Pfeil sy mbol nach links im Bi l dschirm, um das Schnellmenü zu öf f nen:
Das Kanalwec h selfenster ö ffnen.
Das Wie der g ab efe nst er anz ei g en.
Vergrößerun gs modus. Wählen Sie z uerst den gewünschten Kanal, bevor Sie den
Vergrößerun gs modus aufrufen.
Den Audiokanal wählen (Im Live-M odus können nur Live-Kanäle ausgewählt wo r den).
Den PTZ-Modus aufrufen un d d en PTZ-Steuerun g sfens ter an z eigen .
Klicken Sie, um da s Ausschaltmenü anzuzeigen und das Gerät auszus chalten oder neu zu
starten.
7.3 Aufnahme
• Überprüfen Sie, ob die Kamera(s) richtig angeschlo ssen ist (sind) und, ob sich eine Festpl atte im G er ät
befindet.
• Sind die automatische Aufnahme- und die Voralarm-Funktion ein geschaltet, dann f ä ngt das G er ät an,
aufzunehmen.
• Standar d wird das Au fnahmesymbol (
• Ist die Bewegung serkennung aktiv i ert und tritt ein Ereignis auf , dann wird das Be wegungssymbol (
oder das Alar msymbol ( ) angezeigt.
• Ist die Timer-Aufnahme akt i viert, so wird ( ) auf dem Bildschirm angezeigt und leuchtet die
entsprechende LED.
• Die Funkti on ‚Festplatte ü berschreiben‘ ist S tandar d eingesch altet un d ( ) wird auf dem Bildschirm
angezeigt.
) angezei gt.
7.4 Wiedergabe
)
Beachten Sie, da ss das Bedienfeld ni cht verriegelt ist. D r ücken Sie PLAY im Bedienfeld oder verwen den Si e die
Schnellmenü leiste, um das Wiedergabefe nster zu ö ffnen :
V. 02 – 21/08/2013 40 ©Velleman nv
Page 41

CCTVPROM16
A
Fortschrittbalken
D
Information
B
Wiedergabesteuerung
E
Schließen
C
Ereignissuche
F
Die Wiederholfunktion A→B einstellen / das Backup-
Videosystem
PAL
Videokompressionsformat
H.264
Video-Eingang
4 Kanäl e, K omposit-Videosignal 1 Vpp / 75 Ohm BN C
max. Aufnahmefrequenz (PAL)
- Frame: 704 x 576 Pixel mit 100 IP S (PAL)
Festplattenspeicherplatz
SATA-Typ ( eingebaut), un terstützt 1 x HDD, unterstützt HDD-Kapazität über 2
Aufnahmemodus
manuell / Ti mer / Bewegung / über das Netz g esteuert / Alarm
Bildwiederholrate
100 IPS für PAL
Multiplex-Betrieb
Live Displ ay, Aufnahme, Wi edergabe, Datensicheru ng und Netzwerk
Erfassungsbereich
Gitter 16 x 12 pro Kanal
Erfassungsempfindlichkeit
hoch - normal - niedrig
Pre-Alarm-Aufzeichnung
8 MB
Backup-Geräte
USB 2.0 Flash Driv e (f ür Si cherungsko pie und Aktualisierungen der Firmware)
CMS (Central Ma nagement
zentrale Verwaltung von bi s zu 10 IP-Adre ssen (Windows & Mac OS)
Kompre ssionsfor mat für die
H.264
Fernüberwachun g über Handy
Smartphones:
Rechner:
Menü öffnen
Bemerkung: Damit die Wiedergabefunkti on k or rekt funktioniert , müssen mindeste ns 819 2 Einzelbilder
aufgeno m men worden sein . Ist dies nicht der Fall, dann wir d die Wie dergabe g estoppt. Wenn die Bildrate z.B.
auf 30 Bilder pro Sekunde eingestellt ist, sollte die Aufnahmezeit mindestens 273 Sekunden (8192 Bild er/30
IPS) d am it ein e korr ekte Wieder gabe möglich ist.
• Mit den Tasten für schnellen Vorlauf(
Wiedergabegeschwindigkeit. Klicken Sie wiederh o lt, um die Geschwindigk eit zu er h öhen/verringern: 4 -fach,
8-fach, 16 -fach oder 32-fach (max.).
• Drücken Sie die P aus e-Taste (
• Drücken Sie die Stop-Taste (
• Drücken Sie SLOW ein Mal für 1/4 der Wiedergabegeschwindigkeit 1/4. Drücken Sie zwei Mal für 1/8 der
normalen Geschwindigkeit.
), um wieder auf das L i ve-Bild zu wechseln.
) und schnellen Rücklauf ( ) erhöhen oder verringern Sie die
) um die Wiedergab e anzuhalten.
7.5 Suchfunktion
• Es gibt vier Arten u nd Weisen, um aufgezeichnete Dateie n zu suchen: Aufnah me, Bewegun g, Alarm oder
Timer.
• Um ein Eireignis zu suchen, drücken Sie LIST auf der Vord erseite (Beacht en Sie, dass das Bedi enfeld nicht
verriegelt ist). Eine Übersicht der aufgezei chnete n Dateien ((ALARM , M A NUAL, MOTION, SYSTEM u nd FULL
LIST) wird angezeigt.
• Wählen Sie die gewünschte Liste und Aufnahme.
• Drücken Sie ENTER, um die Wied erg ab e zu starten.
8. Technische Daten
Video-Ausgang "composite" Videosignal 1 Vpp / 75 Ohm BNC + VGA
- CIF: -
Regelung der Bildqualität super be ste, beste, höhe und normale Quali t ät
TB (HDD 500 GB mitgeliefert)
Audio I/O 4 Audio-Eingänge, 1 Audio-Ausgang (Mono)
System)
Web-Übertragung
Ethernet 10/100BASE-T. Unt ers tützt Fernbedienung und Livebil d üb er Ethernet
Login über alle Smartphone-Plattforme möglich
(Apple, Android, BlackBerry, Nokia Symbian und Windows Mobile)
- 'Video Vie w er'-Software auf Windows und Mac
- Webbrowser : Internet E xplor er, Fir efox, Go ogle Ch rome und Saf ari über
Java, Quicktime oder VLC Plug-in
Netzverbindung unterstützt TCP/IP, PPPo E, DHCP und DDN S
V. 02 – 21/08/2013 41 ©Velleman nv
Page 42

CCTVPROM16
IR-Fernbedienung
Fernbedienung des DVR un d der PT Z -Funktionen (DVRRC4)
PTZ
ja (über RS-485)
Alarm I/O
4 Eingänge / 1 Ausg ang
digitaler Zoom
2x (Live-Anzeige & Wiedergabe)
Detektion Bildverlust
ja
Kameratitel
bis zu 6 Zeichen
Videoregelungen
Farbton , Fa rbe, Kontrast, Helligkei t
Stromversorgung
19 VDC
Stromverbrauch
< 42 W
Betriebstemperatur
10-40 °C (50-104 °F)
Abmessungen
343 x 59 x 223 mm
Aufnahme-Element
1/3" CCD-Farbkamera
Pixelanzahl
712 (H) x 582 (V) - PAL -
Mindestbeleuchtung
0,05 lux (F2.0); 0 lux (IR ein)
IR LEDs
14
Bereich (IR-LED)
15 m
Wasserfestigkeit
IP67
elektronischer S hutter
1/50 bis 1/100 000 Sekunden
Blickwinkel
92.6°
Weißabgleich
automatisch
automatische
ja
Objektiv
f3.6mm / F2.0
Stromversorgung
DC 12 V ± 10 %
Stromverbrauch
70 mA (IR aus), 200 mA (IR ein)
Abmessungen
Ø 60 x 91 mm
Gewicht
250 g (mit Montagebügel)
Tastensperre ja
Format der Datumsanzeige JJ/MM/TT, TT/MM/JJ, MM/TT/JJ und Aus
Sommerzeit ja
Systemwiederherstellung automati sche Systemwiederherstell u ng nach Stromunterbre chung
IR-Kamera
Auflösung 420 TV-Zeilen
Signal/Rauschabstand > 48 dB (AGC aus)
Verstärkungsregelung (AGC)
Video-Ausgang 1,0 Vpp 'composite', 75 Ohm
Verwenden Sie dieses Gerät nur mit originellen Zubehörteilen. Velleman NV übernimmt keine
Haftung für Schaden oder Verletzungen bei (falscher) Anwendung dieses Gerätes.
Für mehr Informationen zu diesem Produkt und die neueste Version dieser Bedienungsanleitung,
siehe www.velleman.eu.
Alle Änderungen ohne vorheri ge Ank ün digung v orbehalt en .
© URHEBERRECHT
Velleman NV besitzt das Urheberrecht für diese Bedienungsanleitung. Alle weltweiten Rechte
vorbehalten. Ohne vorherige sch r iftliche Genehm igung de s Ur hebers ist es nicht gestattet, diese
Bedienungsanl eitung ganz oder in T eil e n zu reproduzieren, zu kopieren, zu über se tzen, zu bearbeiten oder zu
speichern.
V. 02 – 21/08/2013 42 ©Velleman nv
Page 43

CCTVPROM16
Desligue sempre o aparelho da tom ada eléctrica se este não vai ser utiliza do ou antes de
Usar apenas em interiores
Mantenha o a parelho protegido de te m peratu ras extremas. Cert ifiqu e-se sempre que os
GUIA RÁPIDO PARA INSTALAÇÃO
1. Introdução
Aos cidadãos da União Europeia
Importantes informações sobre o meio ambiente no que respeita a este produto
Este sím bo l o n o aparelho ou na embalagem indica que, enquanto d esperdí cios, poderão cau sar danos
no meio ambiente. Não deite o aparelho (nem as pilhas, se as hou ver) no lixo doméstico; dirija-se a
uma empresa especializa da em reci clagem. Devolva o aparelho ao seu distribui dor o u ao post o de
reciclagem local. Respeite a legislação local relativa ao meio ambiente.
Em caso de dúvidas, contacte com as autoridades locais para os resíduos.
Agradecemos o facto de ter adquiri do este aparelho. Leia atentamente as instr uções do manual an tes de o
usar. Caso o apar el h o tenha sofr ido algu m dano durante o transport e não o ins tale e entre em conta cto com o
seu distri bu ido r .
Notas
• Este documento é um guia par a instal ação rápida. Par a i n formaçã o mais detalhada, co nsulte o m anual de
utilização completo incluído no CD-ROM.
• As imag ens do prod u to têm apenas uma função ilustrativa. Devi do às contantes melhorias do pro dut o, o
produto actual pode diferir das ima gens apr esentadas.
A embalagem contem:
• 1 x DVR com ligação SATA incorporada: DVR4H3
• 4 x câmaras a cores IR: CAMCOLBUL29
• 4 x 20 m ca bo s para câmara
• 1 X fonte de alimentação 19 V
• 1 x conversor de alt a ef iciência DC-DC par a DVR e câmaras
• disco rígido (incorporado): HD500GB/S
• comando à distânci a: DVRRC 4
2. Instruções de segurança
Manten ha o aparelho fora do alcance d e cr ianças e pesso as não autor izadas.
Risco de choque eléctrico ao tentar abrir o a parelho. Tocar em cabos ligados à corrente pode
provocar choque s eléctric os mortais.
quaisqu er operaçõ es de manutenção . Segure sempre na f icha para o desligar o cabo da r ede,
nunca no próprio cabo.
3. Normas gerais
Consulte a Garantia de serviço e quali da de Velle ma n® na parte final deste manual do utilizador.
Proteger o aparelho contra a chuva e humidade ou qualquer tipo de salpicos ou gotas.
Nunca colo qu e object os qu e conte nha m líqui dos em c im a do apar elho.
Mantenha o aparelho protegido do pó.
orifícios de ventilação não se encontram blo que ado s. Para qu e exist a suficiente circ ulaç ão
de ar d eixe pelo menos 1” ( ± 2 .5 cm) de espaço à frente das a b er turas.
Proteja o aparelho de que das e má utilização . E vite usar f o r ça exce ssiva ao uti lizar o
• Familiarize-se com o funci o namento do aparel h o antes de o utiliz ar .
• Por razões de seg urança, estão proíbidas qu aisquer modific a ções do aparelho desde qu e não autor izadas.
V. 02 – 21/08/2013 43 ©Velleman nv
aparelho.
Page 44

CCTVPROM16
HDD
a decorr er l eitura ou gravação no disco r ígido.
ALARM
um alarme f o i dispar ado
PLAY
o DVR está no modo de reprodução
Pressione uma das quatro posiçõe sdo botão navigate para mover o cur sor
parar
MENU
Pressione enter para aceder ao me n u pr i ncipal .
ENTER
Pression e para con fir m ar as config ur açõ es
SLOW
Durante a reprod u ção, pre ssione para reproduzir o ficheiro gravado em velocidade lenta.
ZOOM
No modo em directo ou reprodução, pressione para au mentar a i magem do canal
SEQ
Pressione para ex ibir todos os ecrã s sequenci almente no modo ecrã com pl eto. Pre ssione
Entrar no m odo de pe squisa por ho ra. Def ina o período de tempo e pressione ST ART par a ver
= SLOW + ZOOM
porta LAN
Ligue o DVR a uma rede local ligando um cabo de rede nesta por ta.
VGA
ligação para um monitor de vídeo (monitor não incluído)
• Utilize o aparelho apenas para as apl icações descrit as neste man ual. Uma utilização incorr ec ta anul a a
garantia comple tame nte.
• Danos ca u sados pel o não cumprimento das normas de s egurança referidas neste manual an ulam a garantia
e o seu dist r ibuidor não será responsável por qualque r danos ou outros problema s daí resul ta ntes.
• Nunca utilize este apar el h o para viol ar as leis de privacidade ou l ev ar a cabo quaisqu er actividades ile gais.
4. Descrição
Ver as figu ras da página 2 deste manual do utilizador.
Painel Frontal
indicações LED
NAVIGATE
TIMER a gravaç ã o tempori zada está activa
POWER o DVR está ligado
para cima
), baixo ( ), esquerd a ( ) ou direita( ).
(
No modo r eproduç ão, pressione os bo tões par a r eproduzir/pausa (
( ), retroceder rápido( ) ou avançar rápido ( ) o ficheiro em
reprodução.
No modo configuração, pressione o botã o para cima(
) para alt erar a configuraç ão n o menu.
),
) ou para baixo(
LIST
PLAY Pressionar para reprodu zir o vídeo gr avado.
1 ~ 4 Pressione um bot ão para seleccion ar o canal correspondente.
SEARCH
ÁUDIO
PTZ
(pan tilt zoom)
porta USB
(2x)
Lista a info rmação dos fichei ros gravados.
QUICK SEARCH / RECORD / MOTION / ALARM / TIMER / FULL LIST
seleccionado.
novamen te par a sair.
4CH: Pressione para ace der ao mod o visualização 4 c an ai s.
todas as gravações corre sponden tes a esse período de tempo.
Pressione SLO W e ZOOM em simultâneo para seleccionar o som em directo ou som de
reprodução.
= SLOW +
Pressione SLO W e em simultâneo para entrar ou sair do mo do controlo PTZ.
Ligue um dispositivo USB a uma porta USB par a f azer cópia de vídeos; ligu e u m rato USB à
outra porta.
Nota: não ligue dois dispositivo s USB ou dois ratos USB ao mesmo tempo.
Painel Traseiro
AUDIO IN 4 canais de entrada áudio para ligar 4 fontres de áudio externas, por ex. câmaras com
V. 02 – 21/08/2013 44 ©Velleman nv
Page 45

CCTVPROM16
áudio.
VIDEO IN
4 canais de entrada vídeo para ligar a 4 fontes externas de vídeo por ex. câmaras.
VIDEO OUT
1 canal de saída ví deo para li gar o DVR a um moni to r principal.
EXTERNAL I/O
use um co nector DS UB de 9 pins para li gar sinais ex ternos por exe mplo al arm e, PTZ. ..
interruptor de alime ntação
19V DC
entrada da alim entação
AUDIO O UT 1 saída áudio para lig ar a um dispositivo áudio, por ex. uma coluna (mono).
5. Configuração do hardware
Insta l aç ã o da Dr i ve de Di sc o Rí gido (HDD)
O DVR tem um disco r ígido inco rporado. Para in stalar o ut r o di sco rígido, proceda da se guinte forma:
1. Adquira um HDD apropriado ( ver Especifica ções Técnicas mais abaixo ) , do tipo SA TA. O HDD t em de ser
formatado.
2. Desligue o aparelho da tom ada de cor r ente ant es da intervenção e não toq ue em qual quer circ u i t o
electróni co para evitar des cargas electroestáticas.
3. Desaparafuse os 6 parafusos (1 em cada lado e 4 na parte traseira) que man têm tampa no devido lugar.
4. Levante a tampa ( a parte de tr ás primei r o ).
5. Retire o disco rígido.
6. Aparafuse os supor tes de montag em ao novo disco rígi do (parafu sos incluí dos).
O PCB deve estar virado p ar a cima quando instala o HDD n o DVR.
7. Ligue o cabo de dado s SATA e a alimen ta ção ao HDD .
8. Aparafuse o HDD na parte de cima do DVR com o PCB vi r ado para o la do de cim a u tilizando o s parafusos
incluídos.
9. Fech e a t ampa ( frente prim e iro) e fixe-a com os 6 paraf uso s.
Ligar um monitor de vídeo
• Escolha um monitor apropriado (não incluído) e ligue-o à porta de saída d e v ídeo BN C ou V GA na par te
traseira do DVR.
Ligar a alimentação
1. Ligue o conector de saída D C do adaptador incl u ído na entrada 19VDC na parte de tr ás do DVR.
ATENÇÃO: utilize apenas o adaptador incluído.
2. Ligue o cabo de alimentação incluí do ao cone ct or de en tr ada do adaptador e l igue a out r a extremi dade à
tomada el éctrica. Não ligue ainda o DVR.
Ligar uma câmara
1. O pack CCVT vem com 4 câmaras. Cada câmara necessita da su a própri a fonte de al imentação.
2. Ligue a saída de vídeo da câmara a um a das entr adas de vídeo na part e traseira do DVR . O número ju n to
aos conectores de entrada representa o número do canal. Conector do tipo BNC.
Ligação áudio
1. O DVR tem quatro entrada s de áudio. Ligue a s aída de áu di o de um fonte de áudi o a uma das entrada s de
áudio do DVR. Certifique-se de que liga o can al de áudio ao canal de vídeo correspondente. Conector do
tipo BNC.
2. Existe também u m co nector de saída áudio. Ligue um di spositivo de áudio por ex. uma colun a a este
conector se mpre que des ejar. Co necto r do tipo BNC.
Ligação à Local Area Network (Rede Local) (LAN)
• Ligue o DV R a uma r ede local através da l igação do cabo de rede à porta LAN n a parte traseira do DVR. O
conecto r é do tipo 8P 8C (RJ45) . A config u r ação é feita atrav és do OSD.
6. Configuração preliminares
Certifique-se de que as câmaras e st ão ligadas e coloque o inter r uptor na parte traseira do dispositi vo na
posição O N . D emora cerca de 15 a 3 0 segundo par a ini ciar.
V. 02 – 21/08/2013 45 ©Velleman nv
Page 46

CCTVPROM16
QUICK START
GERAL - ACERTAR A HORA
SYSTEM
FERRAMENTAS - INFORMAÇÃO DO SISTEMA - CÓPIA DE DADOS - REGISTO
EVENT
PESQUISA RÁPIDA - PESQ UISA OCORR ÊN CIA - INFO HDD - REGISTO
ADVANCED
CÂMARA – DETECÇÃO – ALERTA – REDE – ECRÃ – GRAVAR - REMOTO
Estrutura do menu
Pressione o botã o M E NU e introduza a password para aceder à lista do men u.
Nota: a password admin por d efeito é“0000” (4 vezes zero).
ACERTAR A D AT A INFORMA ÇÃO DA DATA - HORA DE VERÃO
CÓPIA
INFORMATION
OCORRÊNCIA
CONFIG
Definições de
GRAVAR - DETECÇÃO - ALARME
Agenda
Para informação m ais detalhada, con sulte o manual co mpleto incluído no CD-ROM.
Acertar a data e a hora
Antes de utilizar o DVR a data e a hora devem ser devidamente acertadas.
1. Pressione o botã o M E NU e introduza a password admin para aceder à lista de menu.
2. Seleccione o item QUICK START.
3. Utilize o botão NAVI GATION para passar para o item T IM E SE TUP. Seleccione esta opção para acertar a
data e a hor a.
Nota: uma vez in i ciada a gravação, não altere a data ou a hora visto que i sso iria i m pedir de encontrar o s
ficheiros gr av ado s.
Nota: ao utilizar o DVR pela primei ra vez, j á com a hor a acerta da, deixe-o li ga do pelo menos 48 horas.
Definição da Password
1. Pressione o botão MENU e introduza a password para ac eder à lista de menu.
2. Seleccione o item SYSTEM.
3. Vá a TOOLS Seleccione ADMIN PASSWORD (ou OPERATOR PASSWORD) e pressione ENTER para confirmar
a password.
Nota: um operador não pode ace der ao menu princi pal, apenas à barr a r ápida de menus (ver mais ab ai xo) .
4. Pressione ocursor para cima (
) ou para baixo ( ) para seleccionar o valor do pr imeiro número e
pressione enter para guardar e passar ao caracter seguinte, ou use o rato para s el eccionar o valor
deseja do. Repita isto para todos os q u atro núm er os da password.
Nota: a password admin por defeito é “0000” (4 veze s zero).
Definições de gravação
1. Pressione o botã o M E NU e introduza a password para aceder à lista de menu.
2. Seleccione o item QUICK START.
V. 02 – 21/08/2013 46 ©Velleman nv
Page 47

CCTVPROM16
A data e hor a do sistema
B estado g er al do sistema
C capacidade HDD disponível
D
Estado do Canal
3. Seleccione o item GENERAL usando o botão NAVIGATION.
4. Defina o tamanho da imagem, quali dade da imagem e número d e imagens po r segundo para a gr avação.
5. Consulte o manual completo incluído no CD-ROM para mai s informação.
Reprodução Áudio
Pressione os bot ões SLOW e ZOOM em simultâneo para seleccion ar o canal á udio des ejado ou utilizar a barra
de menu rápida (v er abaixo). O canal d e áudio actual é i ndicado na barra d e estado.
Mudar de utilizado r
1. O DVR pode se acedido na qualidade de administrador ( ) ou operador ( ), cujos í cones estão na barra
de estado .
2. Para alternar entre utilizadores, clique no ícone de utilizador ( ou ) para bloquear a sessão actual (
).
3. Pressione a tecl a de bloqu ei o ( ) e depois int r oduza a password do perfil desejado.
7. Utilização
7.1 Ecrã
A imagem seg u i nte mostra o layout do ecrã.
V. 02 – 21/08/2013 47 ©Velleman nv
áudio em direct o, ca nal 1 .. 4
activado
canal áudio desactivado
zoom digital ligado (amarelo) /
desligado
LAN ligado / Internet ligada / sem ligação de rede
dispositivo USB ligado
tecla de bloqueio activa
modo sequencial
modo de gravação
acesso administrador
áudio reproduçã o, canal 1 .. 4 activa do
(amarelo)
temporizador d e gravação
rato USB ligado
Disco rígido com f un ção de sobrescrita
(defeito)
modo PTZ
modo movimento
modo alarme
acesso operador
Page 48

CCTVPROM16
A
D
B
controlo de reprodução
E
fechar
C
event searc h
F
seleccine a funç ão de repeti ção A→B / abra o m enu
Tenha e m co nta qu e o s ícones apresentados no ecrã pode di ferir ligei r amente dos aqui apresentados.
7.2 Barra de menus rápida
Nota: apenas disponível se o rato USB estiver ligado.
Mova o pon teiro em direcção ao lado esquerdo do moni to r para abrir a barra de menus rápida.
Painel de alternância de c anal aberto
Ver painel de controlo de reprodução.
Modo zoom activo (seleccione o canal desejado antes de entrar no modo zoom).
Seleccione o can al áudio (no modo em directo apenas os canais em directo p o dem ser
seleccionados).
Entrar no modo PTZ e ver o painel de controlo PTZ.
Clique p ar a mostrar o painel de deslig ado ou para parar ou r ei n iciar o si stema.
7.3 Gravação
• Verifique se a câmara(s) está(ão) devidamente ligadas e s e o HDD se e n contra de n t r o do aparelho.
• Quando as fun ções de auto -gravação e pré-alarme estão activas , o aparelho começa a gravar imagens.
• O ícone de gravação por d efeito (
• No caso d a detecção de movimento ou alarme estarem a ctivos e u m mo vimen t o o u alarme f o r em
detectados, o s í co nes de movimento (
• Quando a gravação tempori zada está activa, o respectivo íco ne ( ) aparece e o LED fica ligado.
• Por defeito, a fun ção de sobrescrita do HDD está activa e o ícone ( ) aparece.
) apar ece.
) ou alarme( ) aparecem.
7.4 Reprodução
Verifique se o painel de controlo não está bloqueado e pressione PLAY no painel de controlo ou utilize a barra
de menus rápida para abrir o painel de controlo da reprodução:
barra de pr ogresso
Nota: a reprodução implica pel o menos 819 2 imagens gravad as para funcionar c o r rectamente (por ex. com
IPS=30, a gravação tem de ter pelo menos 273 segundos de duração).
• Os botões avan çar rápido (
velocid ade da reprodução . P ressionar repeti damente o botão vai aumentar/dimin uiro a velocidade 4x, 8x,
16x ou 32x mais (máx.).
• Pressione o botão d e p aus a(
• Pressione o botão sto p(
• Pressione o botã o S L OW para abrand ar a velocidade de r eproduç ão 1 /4e duas vezes para 1 / 8.
V. 02 – 21/08/2013 48 ©Velleman nv
) e retroceder rápido ( ) aumentam ou di m i n uem, re spectivamente, a
) para sus pender t emporari amente a reprodução do ví deo.
) para regressar à visualização em directo.
informação
de cópia de segurança
Page 49

CCTVPROM16
formato de vídeo
PAL
4 canais, sinal de vídeo com posto 1 Vpp / 75 oh m B NC
velocid ade máxim a de grav ação
- frame: 704 x 576 pixeis com 100 IPS (PAL)
ajuste de qu al i dade d e ima ge m
superior - melhor - elevado - normal
tipo SAT A incorporado, su por te 1 x HD D , suporte HDD capacidade superior a 2
modo de gravação
manual / te mporizador / movimento / rede / controlo por alarme
operações múltiplas
imagem em directo, gravação, re pr odução, có pia de segurança e r ede
área de d etecção de movimento
16 x 12 grids por canal
sensibilidade de detecç ão de
alto - normal - baixo
gravação pré-alarme
8 MB
dispositivo de cópia de
pen USB 2 .0 (para cópias de seguran ça e actuali zações de f irmware)
CMS (Central Ma nagement
vigilância à dist ância por m o nitoram en to de até 1 0 endereços de IP di ferentes
transmissão web / formato de
H.264
10/100BASE-T, suporta controlo remoto e LiveView (visualizaç ão em directo)
computador:
conex ão de r ede
compatív el com TCP/IP, PPPoE, DHCP e f un ção DDNS
controlo PTZ
sim (via RS-485)
alarme I/ O
4 entrad as / 1 saída
zoom digital
2 x (em directo & repr odução)
bloquei o de tec l ado
sim
detecção de perda de víd eo
sim
título da câmara
até 6 caracter es
formato da hora no ecrã
AA/MM/DD, DD/MM/AA, MM/DD/AA, e desligado
consumo
< 42 W
7.5 Pesquisa
• Existem quatro formas de pesquisa de ficheiros gravados: po r registo de grava ções, registo de
movimen tos, registo de alarme ou registo d e ho ras.
• Para pesquisar uma ocorr ência, pressione o botão LIST no pai nel frontal (verifique se o painel de controlo
não está bl oquea do) . É exibid o um registo dos tipos de ficheiros gravados (AL A RME, MA NUAL, MO VIMENTO,
SISTEMA e LIS T A COMPLETA) .
• Seleccione a lista que pret ende e o ficheiro de gravaç ão contido na lista.
• Pressione ENTER para iniciar a reprodução .
8. Especificações
compress ão de víd eo H.264
sinal de vídeo composto 1 Vpp / 75 ohm BN C + VGA
(PAL)
armazenamento do disco rí gido
taxa de act ualiza ção 100 IPS para PAL
áudio I/O 4x entrada áudio, 1 x saída áudio (mono)
movimento
segurança
System - Si ste ma de Gest ão
Central)
compressão
vigilância por telemóvel smartphones:
- CIF: -
TB (disco rígido 500 GB incluído)
(Windows & Mac OS )
via Ethernet
acesso remoto a p artir de todas as plataform as para smartphone
(Apple, Android, BlackBerry, Nokia Symbian e Windows Mobile)
- software de visualização de vídeo para Win do ws e Mac
navegador: - Intern et Explorer, Firef o x, Google Chrome e Safari v i a J ava,
Quicktime ou VLC plug-in
controlo remoto IR controlo remoto DVR e PTZ ([product id=404710]DVRRC4[/product])
ajustes de vídeo tonalidad e / cor / contraste / bri l h o
alimentação 19 VDC
V. 02 – 21/08/2013 49 ©Velleman nv
Page 50

CCTVPROM16
horário de verão
sim
temperat ur a de funci on am ento
10-40 °C (50-104 °F)
recupera ção do si ste ma
recupera ção au to mát ica do sis tema a pós r eliga ção
dimensões
343 x 59 x 223 mm
elemento de imagem
sensor de cor CCD de 1/3
númer o de pi xei s
712 (H) x 582 (V) - PAL -
resolução
420 linhas TV
LEDs IR
14
amplitude (luz IR)
15 m
resistên cia à água
IP67
ângulo da lente
92.6°
controlo automático de ganho
sim
lente padrão
f3.6mm / F2.0
saída de vídeo
1,0 Vpp composto, 75 ohm
alimentação
DC 12 V ± 10 %
dimensões
Ø 60 x 91 mm
peso
250g (incluindo suporte)
câmaras a cores IR
iluminação mínima 0,05 lux (F2.0); 0 lux (IR acesos)
relação sinal/ruído > > 48 dB (CAG apagado)
shutter electrónico de 1/50 a 1/100 000 s
equilíbrio de brancos automático
(CAG)
consumo act ual 70 mA (IR desligado), 200 mA (IR ligado)
Utilize este aparelho apenas com acessórios originais. A Velleman NV não será responsável por
quaisquer danos ou lesões causados pelo uso (indevido) do aparelho.
Para mais informação sobre este produto e para aceder à versão mais recente deste manual do
utilizador, visite a nossa página www.velleman.eu.
Podem alterar-se as especificações e o conteúdo deste manual sem aviso prévio.
© DIREITOS DE AUTOR
A Velleman NV detem os direitos de autor deste manua l do utiliza dor. Tod os os direitos mun diais
reservados. É estrictamen te proíbi do reproduzir, tra duz ir, copiar, edit ar e gravar este manu al do util i z ador ou
partes dest e sem pr évia aut ori za ção escr ita por part e da detent or a dos dir eito s.
V. 02 – 21/08/2013 50 ©Velleman nv
Page 51

CCTVPROM16
Podczas instalacji należy zachować szczególną ostrożność:
dotknięcie przewodów pod napięciem może prowadzić do zagrażającego życiu porażenia prądem
Wyłącznie do użytku wewnątrz pomieszczeń
Chronić urządzenie przed nadmiernym gorącem. Otwory wentylacyjne nie mogą nigdy być
SKRÓCONA INSTRUKCJA INSTALACJI
1. Wstęp
Przeznaczona dla mieszkańców Unii Europejskiej.
Ważne informacje dotyczące środowiska.
Ten symbol umieszczony na urządzeniu bądź opakowaniu wskazuje, że wyrzucenie produktu może być
szkodliwe dla środowiska. Nie wyrzucaj urządzenia lub baterii do zbiorczego śmietnika, tylko do
specjalnie przeznaczonych do tego pojemników na urządzenia elektroniczne lub skontaktuj się z firmą
zajmującą się recyklingiem. Urządzenie możesz oddać dystrybutorowi lub firmie zajmującej się
recyklingiem. Postępuj zgodnie z zasadami bezpieczeństwa dotyczącymi środowiska.
Jeśli masz wątpliwości skontaktuj się z firmą zajmującą się utylizacją odpadów.
Dziękujemy za wybór produktu firmy Velleman! Prosimy o dokładne zapoznanie się z instrukcją obsługi przed
użyciem. Jeśli urządzenie zostało uszkodzone podczas transportu, prosimy o nie korzystanie z nie go i
skontaktowanie się ze sprzedawcą.
Uwagi
• Niniejszy dokument stanowi skróconą instrukcję instalacji. Bardziej szczegółowe informacje znajdują się w
pełnej instrukcji obsługi na załączonej płycie CD-ROM.
• Zdjęcia produktu zamieszczone zostały w celu zilustrowania opisywanych procedur. Produkt podlega
ciągłym modyfikacjom i usprawnieniom; z tego względu może on się różnić od przedstawionego na
zdjęciach.
Zawartość opakowania:
• 1x urządzenie DVR z wbudowanym złączem SATA: DVR4H3
• 4x kamery IR kolorowe CAMCOLBUL29
• 4 x 20 m kabel do kamery
• 1x zasilacz 19 V
• 1 x wysokiej wydajności przetwornik DC-DC do DVR i kamer
• Dysk twardy (wbudowany): HD500GB/S
• Pilot: DVRRC4
2. Instrukcje bezpieczeństwa
Chronić urządzenie przed dziećmi i nieupoważnionymi użytkownikami.
Uwaga: ryzyko porażenia prądem.
elektrycznym.
Jeżeli urządzenie nie jest użytkowane, a także podczas serwisowania i konserwacji, należy
odłączać zasilanie sieciowe. Kabel zasilający należy trzymać tylko za wtyczkę.
3. Inf ormacje ogóln e
Proszę zapoznać się z informacjami w części Velleman® usługi i gwarancja jakości na końcu niniejszej
instrukcji.
Chronić urządzenie przed deszczem, wilgocią, rozpryskami i skapywaniem cieczy. Nie
stawiać pojemników wypełnionych cieczą na urządzeniu.
Chronić urządzenie przed kurzem.
zablokowane. Aby zapewnić odpowiednią cyrkulację powietrza należy pozostawić
V. 02 – 21/08/2013 51 ©Velleman nv
przynajmni ej 2 ,5 cm wolnej przestrzeni przed otwora mi .
Chronić urządzenie przed wstrząsami i użytkować wyłącznie zgodnie z przeznaczeniem.
Podczas obsługi urządzenia unikać stosowania siły.
Page 52

CCTVPROM16
Dysk
Procesy odczy t u lub zapisu na dysku t w a rdym
TIMER
Czasowe nagrywanie włączone
POWER
Urządzenie jest włączone
Nacisnąć odpowiednią część przycisku nawigacji, aby przemieścić kursor w
szybkiego przewijania do tyłu
ENTER
Nacisnąć w celu zatwierdzenia ustawień
Wyświetlenie informacji na temat zapisanych plików
PLAY
Nacisnąć, aby odtworzyć nagrany materiał filmowy.
SLOW
Nacisnąć ten przycisk w trybie odtwarzania w celu rozpoczęcia odtwarzania w zwolnionym
4CH: Nacisnąć ten przycisk, aby przejść do trybu wyświetlania 4-kanałowego.
1 ~ 4
Nacisnąć przycisk, aby wybrać odpowiadający mu kanał.
SEARCH
Przejście do trybu wyszukiwania po czasie. Wpisać zakres czasowy i nacisnąć START, aby
= SLOW + ZOOM
PTZ
Do jednego z portów należy podłączyć pamięć USB do zapisywania kopii zapasowych filmów;
• Przed rozpoczęciem pracy z urządzeniem należy zapoznać się z jego funkcjami.
• Wprowadzanie zmian w urządzeniu jest zabronione ze względów bezpieczeństwa.
• Urządzenie należy używać jedynie zgodnie z przeznaczeniem. Używanie urządzenia niezgodnie z
przeznaczeniem spowoduje unieważnienie gwarancji.
• Gwarancja nie obejmuje uszkodzeń spowodowanych w wyniku nieprzestrzegania niniejszej instrukcji, a
sprzedawca nie p o nosi odpowiedzialności za wynikłe uszkodzenia lub problemy.
• NIE INSTALUJ I NIE KORZYSTAJ z kamery w celach nielegalnych oraz szanuj prawo do prywatności.
4. Przegląd
Patrz rysunki na stro nie 2 niniejszej instrukcji.
Panel przedni
twardy
ALARM Alarm został uaktywniony
Kontrolki LED
PLAY Urządzenie jest w trybie odtwarzania
górę
), w dół ( ), w lewo ( ) lub w prawo ( ).
(
NAVIGATE
MENU Nacisnąć, aby przejść do menu głównego.
LIST
ZOOM Nacisnąć ten przycisk w trybie odtwarzania lub prz ekazywa n ia obrazu w czasie rzeczywi st ym,
SEQ Nacisnąć ten przycisk, aby urządzenie zaczęło pokazywać wszystkie ekrany po kolei w trybie
QUICK SEARCH / RECORD / MOTION / ALARM / TIMER / FULL LIST
tempie.
aby powiększyć obraz na wybranym kanale.
pełnego ekranu. Nacisnąć ponownie, aby wyjść z tego trybu.
W trybie odtwarzania przycisków można użyć do uruchomienia
odtwarzania/pauzy (
( ) lub szybkiego przewija n ia do przodu ( ) danego pliku .
W trybie ustawień nacisnąć przycisk przewijania w górę (
), aby zmienić ustawienie w menu.
), zatrzymani a ( ),
) lub w dół (
wyświetlić wszystkie nagrania z tego zakresu.
AUDIO
(pan tilt zoom -
przesunięcie,
nachylenie,
zbliżenie)
Port USB
(2x)
V. 02 – 21/08/2013 52 ©Velleman nv
Nacisnąć jednocześnie przyciski SLOW i ZOOM, aby przełączać się pomiędzy odtwarzaniem
dźwięku, a przekazywaniem dźwięku w czasie rzeczywistym.
= SLOW +
Nacisnąć jednocześnie przyciski SLOW i , aby wejść w tryb PTZ lub z niego wyjść.
do drugiego – mysz USB.
Uwaga: nie podłączać dwóch pamięci USB lub dwóch myszy naraz.
Page 53

CCTVPROM16
Port LAN
Podłączając kabel sieciowy do tego portu można podłączyć DVR do sieci lokalnej.
VGA
Złącze do monitora (monitor nie wchodzi w skład zestawu)
AUDIO O UT
1 wyjście audio do połączenia z urządzeniem zewnętrznym, np. głośnikiem (mono).
VIDEO IN
4 kanały wejściowe wideo do podłączenia 4 zewnętrznych źródeł obrazu wideo, np. kamer.
VIDEO OUT
1 kanał wyjściowy wideo do połączenia DVR z monitorem głównym.
włącznik zasilania
19V DC
Wejście zasilania
Panel tylny
AUDIO IN 4 kanały wejściowe audio służące do podłączenia 4 zewnętrznych źródeł dźwięku, np. z
kamer nagrywających dźwięk.
EXTERNAL I/O Użyć 9-pinowego złącza DSUB do podłączenia sygnałów zewnętrznych, np. alarmu, PTZ...
5. Montaż sprzętu
Instalowanie dysku twardego (HDD)
DVR posiada wbudowany dysk twardy. Aby zainstalować kolejny dysk należy postępować według poniższych
instrukcji:
1. Pozyskać odpowiedni dysk (por. specyfikacje techniczne poniżej), typ SATA. Dysk musi być sformatowany.
2. Przed serwisowaniem należy odłączyć urządzenie od sieci. Nie dotykać żadnych obwodów elektronicznych,
gdyż grozi to porażeniem ładunkiem elektrostatycznym.
3. Odkręcić 6 wkrętów (po 1 z każdej strony i 4 z tyłu) przytwierdzających obudowę.
4. Unieść obudowę (zaczynając od tylnej części).
5. Wyjąć dysk twardy.
6. Przykręcić klamry montażowe do nowego dysku (wkręty w zestawie).
Podczas montażu dysku w urządzeniu obwód drukowany musi być zwrócony ku górze.
7. Podłączyć do dysku kabel przesyłowy SATA oraz zasilanie.
8. Przykręcić dysk do dolnej części obudowy DVR z obwodem drukowanym skierowanym ku górze za pomocą
załączonych wkrętów.
9. Zamknąć obudowę (poczynając od przedniej części) i przykręcić 6 wkrętami.
Podłączanie monitora
• Pozyskać odpowiedni monitor (brak w zestawie) i podłączyć do portu BNC lub USB z tyłu urządzenia DVR.
Podłączanie zasilania
1. Podłączyć złącze wyjściowe załączonego zasilacza do wejścia 19 V DC z tyłu urządzenia DVR.
UWAGA: używać wyłącznie załączonego zasilacza.
2. Podłączyć załączony kabel elektryczny do zasilacza, a wtyczkę do sieci. Nie włączać jeszcze urządzenia.
Podłączanie kamery
1. Zestaw CCVT zawiera 4 kamery. Każda kamera potrzebuje własnego zasilania.
2. Połączyć wyjście wideo kamery z dowolnym wejściem wideo z tyłu urządzenia DVR. Liczba przy złączu
wejściowym oznacza numer kanału. Typ połączenia to BNC.
Połączenie audio
1. Urządzenie DVR posiada 4 wejścia audio. Podłączyć wyjście audio danego źródła do wejścia audio w
urządzeniu DVR. Należy uważać, aby połączyć dany kanał audio z odpowiednim kanałem wideo. Typ
połączenia to BNC.
2. Urządzenie posiada również wyjście audio. Do wyjścia tego można w razie potrzeby podłączyć urządzenie
audio, np. głośnik. Typ połączenia to BNC.
Podłączanie do sieci lokalnej (LAN)
• Do podłączenia urządzenia do sieci lokalnej służy port kabla sieciowego z tyłu obudowy. Typ złącza to 8P8C
(RJ45). Konfiguracja odbywa się przez OSD.
V. 02 – 21/08/2013 53 ©Velleman nv
Page 54

CCTVPROM16
QUICK START
GENERAL - TIME SETUP
DATE SETUP
DATE INFO - DAYLIGHT
SYSTEM
TOOLS - SY ST EM INFO – BACKUP DATA – BACKUP LOG
EVENT
ADVANCED
CAMERA – DETECTION – ALERT – NETWORK – DISPLAY – RECORD - REMOTE
SCHEDULE
RECORD – DETECTION – ALARM
6. Ustawienia wstępne
Upewnić się, że podłączone kamery są włączone, a przełącznik zasilania z tyłu urządzenia jest w pozycji ON.
Uruchamianie urządzenia trwa ok. 15-30 sekund.
Przegląd menu
Aby pr zejść do listy menu należy nacisnąć przycisk MENU i wprowadzić hasło.
Uwaga: domyślne hasło administratora to “0000” (4 zera).
QUICK SEARCH - EVENT SEARCH - HDD INFO - EVENT LOG
Więcej informacji znajduje się w pełnej instrukcji obsługi na załączonej płycie CD-ROM.
Ustawianie dat y i godzin y
Przed rozpoczęciem użytkowania DVR należy ustawić datę i godzinę. Dzięki temu nagrania będą miały właściwą
sygnaturę czasową.
1. Aby przejść do listy menu należy nacisnąć przycisk MENU i wprowadzić hasło.
2. Wybrać menu QUICK START.
3. Użyć przycisku NAVIGATION, aby przejść do pozycji TIME SETUP. Wybrać ją, aby ustawić datę i godzinę.
Uwaga: nie zmieniać daty i godziny po rozpoczęciu nagrywania, ponieważ może to utrudnić późniejsze
wyszukiwanie zapisany ch pl ików.
Uwaga: po pierwszym włączeniu urządzenia DVR i ustawieniu daty i czasu powinno ono pozostać włączone
przez co najmn i ej 48 godzin.
INFORMATION
CONFIG
SETTING
Ustawianie hasła
1. Aby przejść do listy menu należy nacisnąć przycisk MENU i wprowadzić hasło.
2. Wybrać menu SYSTEM.
3. Przejść do pozycji TOOLS. Wybrać ADMIN PASSWORD (lub OPERATOR PASSWORD) i nacisnąć przycisk
ENTER, aby ustawić hasło.
Uwaga: operator nie może uzyskać dostępu do głównego menu – ma dostęp wyłącznie do paska szybkiego
dostępu (por. niżej).
4. naciskając przyciski przemieszczania kursora w górę (
przejść do następnego znaku; można też użyć do tego myszy. Czynność powtórzyć dla wszystkich czterech
V. 02 – 21/08/2013 54 ©Velleman nv
) lub w dół ( ), nacisnąć enter, aby zapisać i
Page 55

CCTVPROM16
A Data i czas systemowy
B Ogólny s tatus systemu
C Dostępne miejsce na dysku
D
Status kanału
Cyfrowy zoom włączony
cyfr.
Uwaga: domyślne hasło administratora to “0000” (4 zera).
Ustawienia nagrywania
1. Aby przejść do listy menu należy nacisnąć przycisk MENU i wprowadzić hasło.
2. Wybrać menu QUICK START.
3. Wybrać pozycję GENERAL przy pomocy przycisku NAVIGATION.
4. Wybrać rozmiar obrazu, jakość i liczbę klatek na sekundę.
5. Więcej szczegółów znajduje się w pełnej instrukcji obsługi na załączonej płycie CD-ROM.
Odtwarzanie audio
Aby wybrać żądany kanał audio nacisnąć jednocześnie przyciski SLOW i ZOOM lub użyć paska szybkiego
dostępu (por. niżej). Wybrany kanał audio jest oznaczony na pasku stanu.
Zmiana użytkownika
1. Dostęp do urządzenia jest możliwy w trybie administratora ( ) lub operatora ( ), oznaczone jest to
ikoną na pasku stanu.
2. Aby przełączać pomiędzy użytkownikami należy kliknąć ikonę użytkownika ( lub ) ( ).
3. ), aby zablokować bieżącą sesję ( ) , a następnie wprowadzić hasło żądanego profilu.
7. Obsługa urządzenia
7.1 Wyświetlacz
Poniżej pokazano układ informacji na ekranie.
Włączony przekaz audio w czasie
rzeczywistym z kanału 1 ... 4
Kanał audio wyłączony
twardym
Włączone odtwarzanie audio z kanału 1 ... 4
(żółty)
Nagryw anie cza sow e
V. 02 – 21/08/2013 55 ©Velleman nv
(żółty)/wyłączony
Podłączenie do sieci LAN/Internetu/Brak połączenia sieciowego
Podłączona pamięć USB
Blokada klawiatury włączona
Podłączona mysz USB
Nadpisyw an ie dany ch na dysk u twar dy m
(domyślnie)
Tryb PTZ
Page 56

CCTVPROM16
A
D
B
Sterowanie odtwarzaniem
E
Zamknąć
C
event searc h
F
Włączanie funkcji powtarzania A→B / otwarcie
Ikony w rzeczywistości widoczne na ekranie mogą się odrobinę różnić od pokazanych powyżej.
Tryb sekwencyjny
tryb nagrywania
Administrato r zal ogowany
Tryb ruchu
Tryb alarmu
Operator zalogowany
7.2 Pasek szybkiego dostępu
Uwaga: pasek jest dostępny tylko, jeżeli podłączono mysz USB.
Aby otworzyć pasek szybkiego dostępu przesunąć kursor w lewą stronę ekranu:
Otwarcie panelu zmiany kanałów.
Włączenie panelu ster o wania odtwarzaniem.
Tryb powiększania (przed przejściem do tego trybu wybrać żądany kanał).
Wybór kanału audio (w trybie czasu rzeczywistego można wybrać tylko aktywne kanały).
Wejście w tryb PTZ i uaktywnienie panelu sterowania PTZ
Kliknąć w celu uaktywnienia panelu wyłączania. Stąd można wyłączyć lub ponownie
uruchomić system.
7.3 Nagrywanie
• Upewnić się, że prawidłowo podłączono jedną lub więcej kamer, a w urządzeniu zamontowano dysk twardy.
• Jeżeli włączone są funkcje automatycznego nagrywania i wstępnego ostrzegania, urządzenie rozpocznie
nagrywanie.
• Ikona nagr ywania (
• Jeżeli włączone jest wykrywanie ruchu lub alarmu i wykryty zostanie ruch lub alarm, pokazuje się ikona
ruchu(
• Jeżeli włączone jest nagrywanie czasowe, pokazuje się ikona nagrywania czasowego ( ) i świeci się
odpowi ednia dioda.
• Domyślnie urządzenie ustawione jest na tryb nadpisywania danych na dysku i na ekranie wyświetla się
ikona ( ).
) lub alarmu ( ).
) jest domyślnie wyświetlana.
7.4 Odtwarzanie
Upewnić się, że panel sterowania nie jest zablokowany. Aby otworzyć panel odtwarzania nacisnąć przycisk PLAY
na panelu sterowania lub użyć paska szybkiego dostępu.
Pasek postępu
V. 02 – 21/08/2013 56 ©Velleman nv
Informacja
Page 57

CCTVPROM16
menu kopii zapasowej
Kompresja wideo
H.264
Wyjście wideo
zespolony sygnał wizji BNC + VGA 1 Vpp / 75 omów
maks. prędkość zapisu (PAL)
- rozmiar obrazu: 704x576 pik seli przy 100 IPS (PAL)
Ustawianie jakości obrazu
lepszy - najlepsza – wysoka – normalna
Zapis na dysku twar dym
wbudowany dysk typu SAT A, wsparcie dla 1 dysku o dopu szczalnej
Prędkość odświeżania
100 IPS dla trybu PAL
Audio we/wy
4 wejścia audio, 1 wyjście audio (mono)
Obszar wyk ry wania ru chu
siatka 16x12 dla każdego kanału
Nagrywanie w trybie wstępnego
8 MB
Centralny system zarządzania
zdalny nadzór nad 10 różnymi adresami IP (Windows & Mac OS)
Trasmi sja sieciow a/ format
H.264
monitoring przenośny
Smartfony:
Komputer:
Pilot na podczerwień
zdalne sterowanie DVR i PTZ (DVRRC4)
Uwaga: aby odtwarzanie działało prawidłowo, w filmie musi być przynajmniej 8192 zapisanych obrazów (np.
dla IPS = 30 nagranie musi mieć przynajmniej 273 sekundy).
• przewijania do przodu (
odtwarzania. Kilkukrotne naciśnięcie przycisku spowoduje zwiększenie/zmniejszenie prędkości do 4x, 8x,
16x lub 32x (maks.)
• Nacisnąć przycisk pauzy (
• Nacisnąć przycisk stop (
• Nacisnąć przycisk SLOW raz, aby ustawić prędkość odtwarzania na ¼ albo dwa razy, aby ustawić ją na 1/8.
) i do tyłu( ) powodują odpowiednio zwiększenie lub zmniejszenie prędkości
), aby czasowo zatrzymać odtwarzanie.
), aby powrócić do monitorowania w czasie rzeczywistym.
7.5 Wyszukiwanie
• Istnieją cztery metody wyszukiwania zapisanych plików: przy pomocy listy nagrań, listy wykrytych ruchów,
listy alarmów, lub listy czasowej.
• Aby rozpocząć wyszukiwanie nacisnąć przycisk LIST na panelu przednim (upewnić się, że panel sterowania
nie jest zablokowany). Pokazany zostanie przegląd zapisanych typów plików (ALARM, MANUAL, MOTION,
SYSTEM i FULL LIST).
• Wybrać żądaną listę i nagranie z tej listy.
• Nacisnąć ENTER, aby rozpocząć odtwarzanie.
8. Specyfikacja techniczna
Format wideo PAL
Wejście wideo 4 kanały, zespolony sygnał wizji BNC 1 Vpp / 75 omów
- CIF: 352x288 pikseli przy 100 IPS (PAL)
pojemności ponad 2 TB (załączono dysk 500 GB)
Tryb zapisu sterowanie ręczne/czasowe/sieciowe/ wyzwalane wykryciem ruchu/alarmu
Praca wiel ozadaniowa przekazywanie obrazu w c z asie rzeczywistym, nagrywanie, odtwarzanie,
zapisywan ie kopii zapasow ych i funkcje siecio we
Czułość wykrywania ruchu wysoka – normalna – niska
ostrzegania
Urządzenie do tworzenia kopii
zapasowej
kompresji
Ethernet 10/100BASE-T wsp ar cie zdaln ego stero wania oraz funk cj i LiveView przez
pamięć USB 2.0 (do kopii zapasowych i aktualizacji oprogramowania
sprzętowego)
Ethernet
EagleEyes oprogramowanie: zdalne logowanie przez wszystkie platformy
smartfonów
}(Apple, Android, BlackBerry, Nokia Symbian i Windows Mobile)
oprogramowanie do odtwarzania wideo dla Windows lub Mac.
- przeglądarki: Internet Explorer, Firefox, Google Chrome i Safari przy pomocy
wtyczek Java, Quicktime lub VLC
Podłączenie do sieci wsparcie funkcji T CP/IP, PPPoE, DH CP, DDNS
Sterowanie PTZ tak (przez RS-485)
V. 02 – 21/08/2013 57 ©Velleman nv
Page 58

CCTVPROM16
Alarmowe we/wy
4 wejścia/1 wyjście
Zoom cyfrowy
2x (dla przekazy w an ia obrazu w czasie rzeczywi stym l u b odtwarzania)
Blokada klawiatury
tak
Wykrywanie utraty materiału
tak
Ustawie n i a obrazu
odcień/kolor/kontrast/jasność
Format wyświetlania daty
RR/MM/DD, DD/MM/RR, MM/DD/RR lub wyłączone
Zasilanie
19 VDC
Uwzględnienie czasu
tak
Temperat u ra robocza
10-40 °C (50-104 °F)
Wymiary
343 x 59 x 223 mm
Element rejestrujący
Kolorowa matryc a CCD 1/3’’
Liczba pikseli
712 (H) x 582 (V) – PAL –
Min. natężenie oświetlenia
0,05 luksa (F2.0); 0 luksów (włączony tryb IR)
Diody IR LED
14
Zasięg (promieniowanie IR)
15 m
Wodoodporność
IP67
Migawka elektroniczna
1/50 do 1/100000 s
Kąt obiektywu
92.6°
Balans bieli
automatyczny
AGC
tak
Standardowy obiektyw
f3.6mm / F2.0
Zasilanie
DC 12 V ± 10%
Wymiary
Ø 60 x 91 mm
Masa
250 g (w tym mocowanie)
Nazwa k amery do 6 znaków
Zużycie energii < 42 W
letniego/zimowego
przywra canie systemu automatyczne przyw r acanie sy stemu po o dzyska niu zasilania
Kamera IR
Rozdzielczość 420 linii TV
Stosunek sygnału do szumu > 48 dB (AGC wyłączone)
Wyjście wideo 1,0 Vpp, zespolony sygnał wizji, 75 omów
Zużycie prądu 70 mA (IR wyłączone), 200 mA (IR włączone)
Używaj tylko oryginalnych akcesoriów. Velleman NV nie może być pociągnięty do odpowiedzialności
w przypadku uszkodzenia lub szkody wynikały z (błędne) korzystanie z tego urządzenia.
Aby uzyskać więcej informacji dotyczących tego produktu i najnowsza wersja tej instrukcji, odwiedź
naszą stronę internetową www.velleman.eu.
Informacje zawarte w niniejszej instrukcji obsługi mogą ulec zmianie bez wcześniejszego
powiadomienia.
© INFORMACJA O PRAWACH WŁASNOŚCI
Instrukcja ta jest własnością firmy Velleman NV i jest chroniona prawa mi autor s kimi. Wsz ystkie
prawa są zastrzeżone na całym świecie. Żadna część tej instrukcji nie może być kopiowana,
przedrukowywana, tłumaczona lub konwertowana na wszelkie nośniki elektronicznych lub w inny sposób, bez
uprze dni ej pi sem nej zgody właściciela praw autorskich.
V. 02 – 21/08/2013 58 ©Velleman nv
Page 59

Velleman® Service and Quality Warranty
Since its foundation in 1972, Velleman® acquired extensive experience in the
electronics world and currently distributes its products in over 85 countries.
All our products fulfil strict quality requirements and legal stipulations in the EU.
In order to ensure the quality, our products regularly go through an extra quality
check, both by an internal quality department and by specialized external
organisations. If, all precautionary measures notwithstanding, problems should
occur, please make appeal to our warranty (see guarantee conditions).
General Warranty Conditions Concerning Consumer Products
(for EU):
• All consumer products are subject to a 24-month warranty on production flaws
and defective material as from the original date of purchase.
• Velleman® can decide to replace an article with an equivalent article, or to
refund the retail value totally or partially when the complaint is valid and a free
repair or replacement of the article is impossible, or if the expenses are out of
proportion.
You will be delivered a replacing article or a refund at the value of 100% of the
purchase price in case of a flaw occurred in the first year after the date of
purchase and delivery, or a replacing article at 50% of the purchase price or a
refund at the value of 50% of the retail value in case of a flaw occurred in the
second year after the date of purchase and delivery.
• Not covered by warranty:
- all direct or indirect damage caused after delivery to the article (e.g. by
oxidation, shocks, falls, dust, dirt, humidity...), and by the article, as well as its
contents (e.g. data loss), compensation for loss of profits;
- consumable goods, parts or accessories that are subject to an aging process
during normal use, such as batteries (rechargeable, non-rechargeable, built-in or
replaceable), lamps, rubber parts, drive belts... (unlimited list);
- flaws resulting from fire, water damage, lightning, accident, natural disaster,
etc.…;
- flaws caused deliberately, negligently or resulting from improper handling,
negligent maintenance, abusive use or use contrary to the manufacturer’s
instructions;
- damage caused by a commercial, professional or collective use of the article
(the warranty validity will be reduced to six (6) months when the article is used
professionally);
- damage resulting from an inappropriate packing and shipping of the article;
- all damage caused by modification, repair or alteration performed by a third
party without written permission by Velleman®.
• Articles to be repaired must be delivered to your Velleman® dealer, solidly
packed (preferably in the original packaging), and be completed with the original
receipt of purchase and a clear flaw description.
• Hint: In order to save on cost and time, please reread the manual and check if
the flaw is caused by obvious causes prior to presenting the article for repair.
Note that returning a non-defective article can also involve handling costs.
• Repairs occurring after warranty expiration are subject to shipping costs.
• The above conditions are without prejudice to all commercial warranties.
The above enumeration is subject to modification according to the
article (see article’s manual).
Velleman® service- en kwaliteitsgarantie
Velleman® heeft sinds zijn oprichting in 1972 een ruime ervaring opgebouwd in
de elektronicawereld en verdeelt op dit moment producten in meer dan 85
landen. Al onze producten beantwoorden aan strikte kwaliteitseisen en aan de
wettelijke bepalingen geldig in de EU. Om de kwaliteit te waarborgen, ondergaan
onze producten op regelmatige tijdstippen een extra kwaliteitscontrole, zowel
door onze eigen kwaliteitsafdeling als door externe gespecialiseerde organisaties.
Mocht er ondanks deze voorzorgen toch een probleem optreden, dan kunt u
steeds een beroep doen op onze waarborg (zie waarborgvoorwaarden).
Algemene waarborgvoorwaarden consumentengoederen
(voor Europese Unie):
• Op alle consumentengoederen geldt een garantieperiode van 24 maanden op
productie- en materiaalfouten en dit vanaf de oorspronkelijke aankoopdatum.
• Indien de klacht gegrond is en een gratis reparatie of vervanging van een
artikel onmogelijk is of indien de kosten hiervoor buiten verhouding zijn, kan
Velleman® beslissen het desbetreffende artikel te vervangen door een
gelijkwaardig artikel of de aankoopsom van het artikel gedeeltelijk of volledig
terug te betalen. In dat geval krijgt u een vervangend product of terugbetaling
ter waarde van 100% van de aankoopsom bij ontdekking van een gebrek tot één
jaar na aankoop en levering, of een vervangend product tegen 50% van de
kostprijs of terugbetaling van 50 % bij ontdekking na één jaar tot 2 jaar.
• Valt niet onder waarborg:
- alle rechtstreekse of onrechtstreekse schade na de levering veroorzaakt aan
het toestel (bv. door oxidatie, schokken, val, stof, vuil, vocht...), en door het
toestel, alsook zijn inhoud (bv. verlies van data), vergoeding voor eventuele
winstderving.
- verbruiksgoederen, onderdelen of hulpstukken die onderhevig zijn aan
veroudering door normaal gebruik zoals bv. batterijen (zowel oplaadbare als
niet-oplaadbare, ingebouwd of vervangbaar), lampen, rubberen onderdelen,
aandrijfriemen... (onbeperkte lijst).
- defecten ten gevolge van brand, waterschade, bliksem, ongevallen,
natuurrampen, enz.
- defecten veroorzaakt door opzet, nalatigheid of door een onoordeelkundige
behandeling, slecht onderhoud of abnormaal gebruik of gebruik van het toestel
strijdig met de voorschriften van de fabrikant.
- schade ten gevolge van een commercieel, professioneel of collectief gebruik
van het apparaat (bij professioneel gebruik wordt de garantieperiode herleid tot
6 maand).
- schade veroorzaakt door onvoldoende bescherming bij transport van het
apparaat.
- alle schade door wijzigingen, reparaties of modificaties uitgevoerd door derden
zonder toestemming van Velleman®.
• Toestellen dienen ter reparatie aangeboden te worden bij uw Velleman®-
verdeler. Het toestel dient vergezeld te zijn van het oorspronkelijke
aankoopbewijs. Zorg voor een degelijke verpakking (bij voorkeur de originele
verpakking) en voeg een duidelijke foutomschrijving bij.
• Tip: alvorens het toestel voor reparatie aan te bieden, kijk nog eens na of er
geen voor de hand liggende reden is waarom het toestel niet naar behoren werkt
(zie handleiding). Op deze wijze kunt u kosten en tijd besparen. Denk eraan dat
er ook voor niet-defecte toestellen een kost voor controle aangerekend kan
worden.
• Bij reparaties buiten de waarborgperiode zullen transportkosten aangerekend
worden.
• Elke commerciële garantie laat deze rechten onverminderd.
Bovenstaande opsomming kan eventueel aangepast worden naargelang
de aard van het product (zie handleiding van het betreffende product).
Garantie de service et de qualité Velleman®
Depuis 1972, Velleman® a gagné une vaste expérience dans le secteur de
l’électronique et est actuellement distributeur dans plus de 85 pays.
Tous nos produits répondent à des exigences de qualité rigoureuses et à des
dispositions légales en vigueur dans l’UE. Afin de garantir la qualité, nous
soumettons régulièrement nos produits à des contrôles de qualité
supplémentaires, tant par notre propre service qualité que par un service qualité
externe. Dans le cas improbable d’un défaut malgré toutes les précautions, il est
possible d’invoquer notre garantie (voir les conditions de garantie).
Conditions générales concernant la garantie sur les produits
grand public (pour l’UE) :
• tout produit grand public est garanti 24 mois contre tout vice de production ou
de matériaux à dater du jour d’acquisition effective ;
• si la plainte est justifiée et que la réparation ou le remplacement d’un article
est jugé impossible, ou lorsque les coûts s’avèrent disproportionnés, Velleman®
s’autorise à remplacer ledit article par un article équivalent ou à rembourser la
totalité ou une partie du prix d’achat. Le cas échéant, il vous sera consenti un
article de remplacement ou le remboursement complet du prix d’achat lors d’un
défaut dans un délai de 1 an après l’achat et la livraison, ou un article de
remplacement moyennant 50% du prix d’achat ou le remboursement de 50% du
prix d’achat lors d’un défaut après 1 à 2 ans.
• sont par conséquent exclus :
- tout dommage direct ou indirect survenu à l’article après livraison (p.ex.
dommage lié à l’oxydation, choc, chute, poussière, sable, impureté…) et
provoqué par l’appareil, ainsi que son contenu (p.ex. perte de données) et une
indemnisation éventuelle pour perte de revenus ;
- toute pièce ou accessoire nécessitant un remplacement causé par un usage
normal comme p.ex. piles (rechargeables comme non rechargeables, intégrées
ou remplaçables), ampoules, pièces en caoutchouc, courroies… (liste illimitée) ;
- tout dommage qui résulte d’un incendie, de la foudre, d’un accident, d’une
catastrophe naturelle, etc. ;
- out dommage provoqué par une négligence, volontaire ou non, une utilisation
ou un entretien incorrect, ou une utilisation de l’appareil contraire aux
prescriptions du fabricant ;
- tout dommage à cause d’une utilisation commerciale, professionnelle ou
collective de l’appareil (la période de garantie sera réduite à 6 mois lors d’une
utilisation professionnelle) ;
- tout dommage à l’appareil qui résulte d’une utilisation incorrecte ou différente
que celle pour laquelle il a été initialement prévu comme décrit dans la notice ;
- tout dommage engendré par un retour de l’appareil emballé dans un
conditionnement non ou insuffisamment protégé.
- toute réparation ou modification effectuée par une tierce personne sans
l’autorisation explicite de SA Velleman® ; - frais de transport de et vers
Velleman® si l’appareil n’est plus couvert sous la garantie.
• toute réparation sera fournie par l’endroit de l’achat. L’appareil doit
nécessairement être accompagné du bon d’achat d’origine et être dûment
conditionné (de préférence dans l’emballage d’origine avec mention du défaut) ;
• tuyau : il est conseillé de consulter la notice et de contrôler câbles, piles, etc.
avant de retourner l’appareil. Un appareil retourné jugé défectueux qui s’avère
en bon état de marche pourra faire l’objet d’une note de frais à charge du
consommateur ;
• une réparation effectuée en-dehors de la période de garantie fera l’objet de
frais de transport ;
• toute garantie commerciale ne porte pas atteinte aux conditions
susmentionnées.
La liste susmentionnée peut être sujette à une complémentation selon le
type de l’article et être mentionnée dans la notice d’emploi.
Garantía de servicio y calidad Velleman®
Desde su fundación en 1972 Velleman® ha adquirido una amplia experiencia
como distribuidor en el sector de la electrónica en más de 85 países. Todos
nuestros productos responden a normas de calidad rigurosas y disposiciones
legales vigentes en la UE. Para garantizar la calidad, sometemos nuestros
productos regularmente a controles de calidad adicionales, tanto a través de
nuestro propio servicio de calidad como de un servicio de calidad externo. En el
caso improbable de que surgieran problemas a pesar de todas las precauciones,
es posible recurrir a nuestra garantía (véase las condiciones de garantía).
Condiciones generales referentes a la garantía sobre
productos de venta al público (para la Unión Europea):
• Todos los productos de venta al público tienen un período de garantía de 24
meses contra errores de producción o errores en materiales desde la adquisición
original;
• Si la queja está fundada y si la reparación o sustitución de un artículo no es
posible, o si los gastos son desproporcionados, Velleman® autoriza reemplazar
el artículo por un artículo equivalente o reembolsar la totalidad o una parte del
precio de compra. En este caso, usted recibirá un artículo de recambio o el
reembolso completo del precio de compra si encuentra algún fallo hasta un año
después de la compra y entrega, o un artículo de recambio al 50% del precio de
compra o el reembolso del 50% del precio de compra si encuentra un fallo
después de 1 año y hasta los 2 años después de la compra y entrega.
Por consiguiente, están excluidos entre otras cosas:
- todos los daños causados directa o indirectamente al aparato (p.ej. por
oxidación, choques, caída,...) y a su contenido (p.ej. pérdida de datos) después
de la entrega y causados por el aparato, y cualquier indemnización por posible
pérdida de ganancias;
- partes o accesorios, que estén expuestos al desgaste causado por un uso
normal, como por ejemplo baterías (tanto recargables como no recargables,
incorporadas o reemplazables), bombillas, partes de goma, etc. (lista ilimitada);
- defectos causados por un incendio, daños causados por el agua, rayos,
accidentes, catástrofes naturales, etc.;
- defectos causados a conciencia, descuido o por malos tratos, un mantenimiento
inapropiado o un uso anormal del aparato contrario a las instrucciones del
fabricante;
- daños causados por un uso comercial, profesional o colectivo del aparato (el
período de garantía se reducirá a 6 meses con uso profesional);
- daños causados por un uso incorrecto o un uso ajeno al que está previsto el
producto inicialmente como está descrito en el manual del usuario;
- daños causados por una protección insuficiente al transportar el aparato.
- daños causados por reparaciones o modificaciones efectuadas por una tercera
persona sin la autorización explícita de Velleman®;
- se calcula gastos de transporte de y a Velleman® si el aparato ya no está
cubierto por la garantía.
• Cualquier artículo que tenga que ser reparado tendrá que ser devuelto a su
distribuidor Velleman®. Devuelva el aparato con la factura de compra original y
transpórtelo en un embalaje sólido (preferentemente el embalaje original).
Incluya también una buena descripción del fallo;
• Consejo: Lea el manual del usuario y controle los cables, las pilas, etc. antes
de devolver el aparato. Si no se encuentra un defecto en el artículo los gastos
podrían correr a cargo del cliente;
• Los gastos de transporte correrán a carga del cliente para una reparación
efectuada fuera del período de garantía.
• Cualquier gesto comercial no disminuye estos derechos.
La lista previamente mencionada puede ser adaptada según el tipo de
artículo (véase el manual del usuario del artículo en cuestión).
Page 60

Velleman® Service- und Qualitätsgarantie
Seit der Gründung in 1972 hat Velleman® sehr viel Erfahrung als Verteiler in der
Elektronikwelt in über 85 Ländern aufgebaut.
Alle Produkte entsprechen den strengen Qualitätsforderungen und gesetzlichen
Anforderungen in der EU. Um die Qualität zu gewährleisten werden unsere
Produkte regelmäßig einer zusätzlichen Qualitätskontrolle unterworfen, sowohl
von unserer eigenen Qualitätsabteilung als auch von externen spezialisierten
Organisationen. Sollten, trotz aller Vorsichtsmaßnahmen, Probleme auftreten,
nehmen Sie bitte die Garantie in Anspruch (siehe Garantiebedingungen).
Allgemeine Garantiebedingungen in Bezug auf Konsumgüter
(für die Europäische Union):
• Alle Produkte haben für Material- oder Herstellungsfehler eine Garantieperiode
von 24 Monaten ab Verkaufsdatum.
• Wenn die Klage berechtigt ist und falls eine kostenlose Reparatur oder ein
Austausch des Gerätes unmöglich ist, oder wenn die Kosten dafür
unverhältnismäßig sind, kann Velleman® sich darüber entscheiden, dieses
Produkt durch ein gleiches Produkt zu ersetzen oder die Kaufsumme ganz oder
teilweise zurückzuzahlen. In diesem Fall erhalten Sie ein Ersatzprodukt oder eine
Rückzahlung im Werte von 100% der Kaufsumme im Falle eines Defektes bis zu
1 Jahr nach Kauf oder Lieferung, oder Sie bekommen ein Ersatzprodukt im Werte
von 50% der Kaufsumme oder eine Rückzahlung im Werte von 50 % im Falle
eines Defektes im zweiten Jahr.
• Von der Garantie ausgeschlossen sind:
- alle direkten oder indirekten Schäden, die nach Lieferung am Gerät und durch
das Gerät verursacht werden (z.B. Oxidation, Stöße, Fall, Staub, Schmutz,
Feuchtigkeit, ...), sowie auch der Inhalt (z.B. Datenverlust), Entschädigung für
eventuellen Gewinnausfall.
- Verbrauchsgüter, Teile oder Zubehörteile, die durch normalen Gebrauch dem
Verschleiß ausgesetzt sind, wie z.B. Batterien (nicht nur aufladbare, sondern
auch nicht aufladbare, eingebaute oder ersetzbare), Lampen, Gummiteile,
Treibriemen, usw. (unbeschränkte Liste).
- Schäden verursacht durch Brandschaden, Wasserschaden, Blitz, Unfälle,
Naturkatastrophen, usw.
- Schäden verursacht durch absichtliche, nachlässige oder unsachgemäße
Anwendung, schlechte Wartung, zweckentfremdete Anwendung oder
Nichtbeachtung von Benutzerhinweisen in der Bedienungsanleitung.
- Schäden infolge einer kommerziellen, professionellen oder kollektiven
Anwendung des Gerätes (bei gewerblicher Anwendung wird die Garantieperiode
auf 6 Monate zurückgeführt).
- Schäden verursacht durch eine unsachgemäße Verpackung und
unsachgemäßen Transport des Gerätes.
- alle Schäden verursacht durch unautorisierte Änderungen, Reparaturen oder
Modifikationen, die von einem Dritten ohne Erlaubnis von Velleman®
vorgenommen werden.
• Im Fall einer Reparatur, wenden Sie sich an Ihren Velleman®-Verteiler. Legen
Sie das Produkt ordnungsgemäß verpackt (vorzugsweise die Originalverpackung)
und mit dem Original-Kaufbeleg vor. Fügen Sie eine deutliche
Fehlerbeschreibung hinzu.
• Hinweis: Um Kosten und Zeit zu sparen, lesen Sie die Bedienungsanleitung
nochmals und überprüfen Sie, ob es keinen auf de Hand liegenden Grund gibt,
ehe Sie das Gerät zur Reparatur zurückschicken. Stellt sich bei der Überprüfung
des Gerätes heraus, dass kein Geräteschaden vorliegt, könnte dem Kunden eine
Untersuchungspauschale berechnet.
• Für Reparaturen nach Ablauf der Garantiefrist werden Transportkosten
berechnet.
• Jede kommerzielle Garantie lässt diese Rechte unberührt.
Die oben stehende Aufzählung kann eventuell angepasst werden gemäß
der Art des Produktes (siehe Bedienungsanleitung des Gerätes).
Velleman ® usługi i gwarancja jakości
Od czasu założenia w 1972, Velleman® zdobył bogate doświadczenie w
dziedzinie światowej elektroniki. Obecnie firma dystrybuuje swoje produkty w
ponad 85 krajach.
Wszystkie nasze produkty spełniają surowe wymagania jakościowe oraz
wypełniają normy i dyrektywy obowiązujące w krajach UE. W celu zapewnienia
najwyższej jakości naszych produktów, przechodzą one regularne oraz
dodatkowo wyrywkowe badania kontroli jakości, zarówno naszego wewnętrznego
działu jakości jak również wyspecjalizowanych firm zewnętrznych. Pomimo
dołożenia wszelkich starań czasem mogą pojawić się problemy techniczne,
prosimy odwołać się do gwarancji (patrz warunki gwarancji).
Ogólne Warunki dotyczące gwarancji:
• Wszystkie produkty konsumenckie podlegają 24-miesięcznej gwarancji na
wady produkcyjne i materiałowe od daty zakupu.
• W przypadku, gdy usterka jest niemożliwa do usunięcia lub koszt usunięcia jest
nadmiernie wysoki Velleman ® może zdecydować o wymianie artykułu na nowy,
wolny od wad lub zwrócić zapłaconą kwotę. Zwrot gotówki może jednak nastąpić
z uwzględnieniem poniższych warunków:
- zwrot 100% ceny zakupu w przypadku, gdy wada wystąpiła w ciągu pierwszego
roku od daty zakupu i dostawy
- wymiana wadliwego artykułu na nowy, wolny od wad z odpłatnością 50% ceny
detalicznej lub zwrot 50% kwoty ceny nabycia w przypadku gdy wada wystąpiła
w drugim roku od daty zakupu i dostawy.
• Produkt nie podlega naprawie gwarancyjnej:
- gdy wszystkie bezpośrednie lub pośrednie szkody spowodowane są działaniem
czynników środowiskowych lub losowych (np. przez utlenianie, wstrząsy, upadki,
kurz, brud, ...), wilgotności;
- gwarant nie ponosi odpowiedzialności za szkody wynikających z utraty danych;
- produkty konsumenckie, części zamienne lub akcesoria podatne na process
starzenia, wynikającego z normalnego użytkowania, np: baterie (ładowalne,
nieładowalne, wbudowane lub wymienne),
elementy napędowe... (nieograniczona lista);
- usterka wynika z działania pożaru, zalania wszelkimi cieczami, uderzenia
pioruna, upadku lub klęski żywiołowej, itp.;
- usterka wynika z zaniedbań eksploatacyjnych tj. umyślne bądź nieumyślne
zaniechanie czyszczenia, konserwacji, wymiany materiałów ekspolatacyjnych,
niedbalstwa lub z niewłaściwego obchodzenia się lub niezgodnego użytkowania z
instrukcją producenta;
- szkody wynikające z nadmiernego użytkowania gdy nie jest do tego celu
przeznaczony tj. działalność komerycjna, zawodowa lub wspólne użytkowanie
przez wiele osób - okres obowiązywania gwarancji zostanie obniżony do 6
(sześć) miesięcy;
- Szkody wynikające ze źle zabezpieczonej wysyłki produktu;
- Wszelkie szkody spowodowane przez nieautoryzowaną naprawę, modyfikację,
przeróbkę produktu przez osoby trzecie jak również bez pisemnej zgody firmy
Velleman ®.
• Uszkodzony produkt musi zostać dostarczony do sprzedawcy ® Velleman,
solidnie zapakowany (najlepiej w oryginalnym opakowaniu), wraz z
wyposażeniem z jakim produkt został sprzedany. W przypadku wysyłki towaru w
opakowaniu innym niż oryginalnym ryzyko usterki produktu oraz tego skutki
przechodzą na właściciela produktu. Wraz z niesprawnym produktem należy
dołączyć jasny i szczegółowy opis jego usterki, wady;
• Wskazówka: Aby zaoszczędzić na kosztach i czasie, proszę szczegółowo
zapoznać się z instrukcja obsługi; czy przyczyną wady są okoliczności techniczne
czy też wynikaja wyłącznie z nieznajomości obsługi produktu. W przypadku
wysyłki sprawnego produktu do serwisu nabywca może zostać obciążony kosztmi
obsługi oraz transportu.
żarówki, paski napędowe, gumowe
• W przypadku napraw pogwarancyjnych lub odpłatnych klient ponosi dodatkowo
koszt wysyłki produktu do i z serwisu.
wymienione wyżej warunki są bez uszczerbku dla wszystkich komercyjnych
gwarancji.
Powyższe postanowienia mogą podlegać modyfikacji w zależności od
wyrobu (patrz art obsługi).
Garantia de serviço e de qualidade Velleman®
Desde a sua fundação em 1972 Velleman® tem adquirido uma amplia
experiencia no sector da eletrónica com uma distribuição em mais de 85 países.
Todos os nossos produtos respondem a exigências rigorosas e a disposições
legais em vigor na UE. Para garantir a qualidade, submetemos regularmente os
nossos produtos a controles de qualidade suplementares, com o nosso próprio
serviço qualidade como um serviço de qualidade externo. No caso improvável de
um defeito mesmo com as nossas precauções, é possível invocar a nossa
garantia. (ver as condições de garantia).
Condições gerais com respeito a garantia sobre os produtos
grande público (para a UE):
• qualquer produto grande público é garantido 24 mês contra qualquer vício de
produção ou materiais a partir da data de aquisição efectiva;
• no caso da reclamação ser justificada e que a reparação ou substituição de um
artigo é impossível, ou quando os custo são desproporcionados, Velleman®
autoriza-se a substituir o dito artigo por um artigo equivalente ou a devolver a
totalidade ou parte do preço de compra. Em outro caso, será consentido um
artigo de substituição ou devolução completa do preço de compra no caso de um
defeito no prazo de 1 ano depois da data de compra e entrega, ou um artigo de
substituição pagando o valor de 50% do preço de compra ou devolução de 50%
do preço de compra para defeitos depois de 1 a 2 anos.
• estão por consequência excluídos:
- todos os danos directos ou indirectos depois da entrega do artigo (p.ex. danos
ligados a oxidação, choques, quedas, poeiras, areias, impurezas…) e provocado
pelo aparelho, como o seu conteúdo (p.ex. perca de dados) e uma indemnização
eventual por perca de receitas;
- consumíveis, peças ou acessórios sujeitos a desgaste causado por um uso
normal, como p.ex. pilhas (recarregáveis, não recarregáveis, incorporadas ou
substituíveis), lâmpadas, peças em borracha correias… (lista ilimitada);
- todos os danos que resultem de um incêndio, raios, de um acidente, de una
catastrophe natural, etc.;
- danos provocados por negligencia, voluntária ou não, uma utilização ou
manutenção incorrecta, ou uma utilização do aparelho contrária as prescrições
do fabricante;
- todos os danos por causa de uma utilização comercial, profissional ou colectiva
do aparelho ( o período de garantia será reduzido a 6 meses para uma utilização
profissional);
- todos os danos no aparelho resultando de uma utilização incorrecta ou
diferente daquela inicialmente prevista e descrita no manual de utilização;
- todos os danos depois de uma devolução não embalada ou mal protegida ao
nível do acondicionamento.
- todas as reparações ou modificações efectuadas por terceiros sem a
autorização de SA Velleman®;
- despesas de transporte de e para Velleman® se o aparelho não estiver coberto
pela garantia.
• qualquer reparação será fornecida pelo local de compra. O aparelho será
obrigatoriamente acompanhado do talão ou factura de origem e bem
acondicionado (de preferência dentro da embalagem de origem com indicação do
defeito ou avaria);
• dica: aconselha-mos a consulta do manual e controlar cabos, pilhas, etc. antes
de devolver o aparelho. Um aparelho devolvido que estiver em bom estado será
cobrado despesas a cargo do consumidor;
• uma reparação efectuada fora da garantia, será cobrado despesas de
transporte;
• qualquer garantia comercial não prevalece as condições aqui mencionadas.
A lista pode ser sujeita a um complemento conforme o tipo de artigo e
estar mencionada no manual de utilização.
Legen Heirweg 33, 9890 Gavere, Belgium
Imported by Velleman nv
Made in PRC
www.velleman.eu
 Loading...