

Page 1
CCTVPROM15
CCTV
-
PACK PUSH VIDEO EAGL
E EYES: H.264 FULL F
RAME DVR + 4 SONY
CCTV
-
PACK PUSH VIDEO EAGL
E EYES: H.264 FULL F
RAME DVR + 4 SONY
PACK VIDÉOSURVEILLAN
CE 'PUSH VIDEO' EAGL
E EYES: ENREGISTREUR
JUEGO DE VIGILANCIA
'PUSH VIDEO' 'EAGLE
EYES': H.264
CCTV
-
PROMOPACK PUSH VIDEO
EAGLE EYES: H.264 FU
LL FRAME DVR + 4
EFFIO IR CAMERAS + ACCESSORIES + 500GB HARD DISK
EFFIO IR-CAMERA'S + ACCESSOIRES + HARDE SCHIJF 500GB
VIDÉO H.264 PLEIN ÉCRAN + 4 CAMERAS IR SONY EFFIO + ACCESSOIRES
+ DISQUE DUR 500GO
VIDEOGRABADORA FULL FRAME + 4 CÁMARAS IR 'SONY EFFIO' +
ACCESORIOS + DISCO DURO 500GB
SONY EFFIO IR-KAMERAS + ZUBEHÖR + FESTPLATTE 500GB
QUICK INSTALLATION GUIDE 4
BEKNOPTE INSTALLATIEHANDLEIDING 14
GUIDE D’INSTALLATION RAPIDE 24
GUÍA RÁPIDA 34
SCHNELLEINSTIEG 44
Page 2
CCTVPROM15
4 x
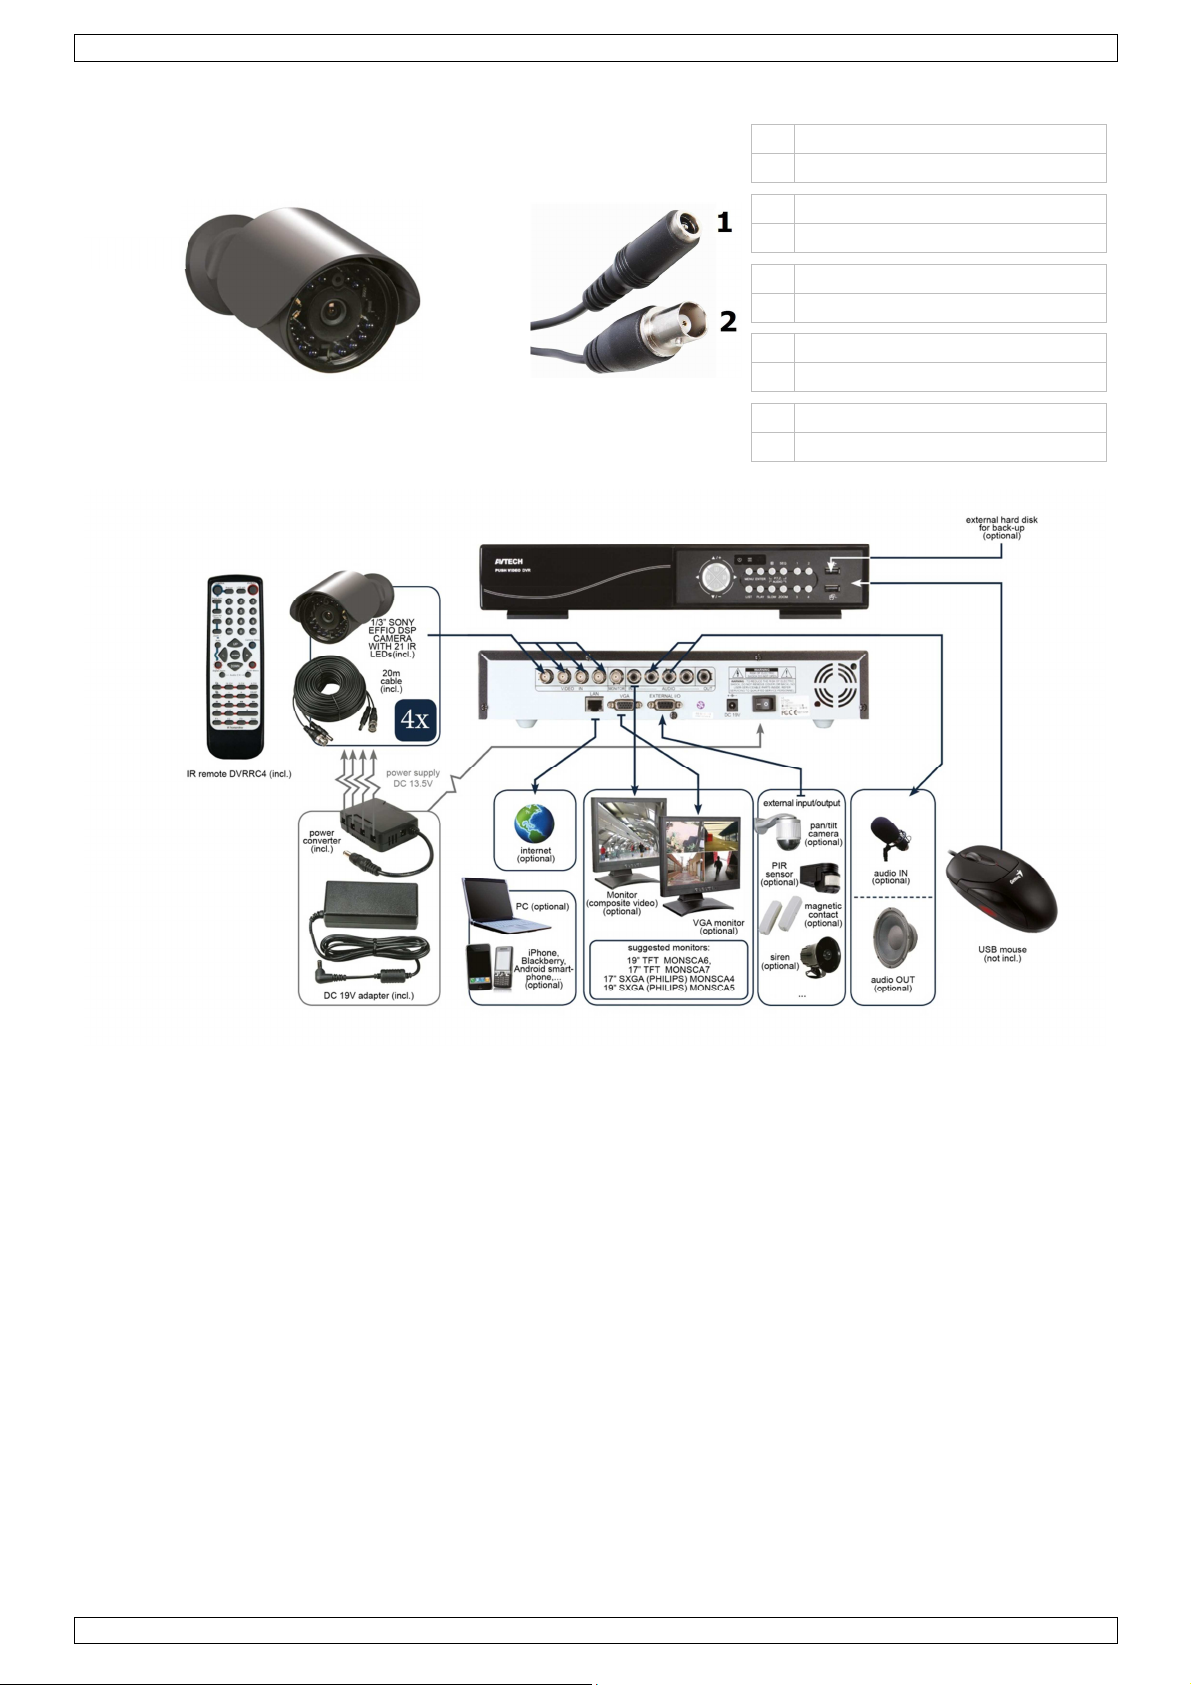
Note: images in this manual are for illustrative purposes only.
1 DC 12V input terminal
2 Video output connector
1 DC 12V ingangsaansluiting
2 Video-uitgangsaansluiting
1 Connexion d’entrée CC 12V
2 Connexion de sortie vidéo
1 Conexión de entrada CC 12V
2 Conexión de salida de vídeo
1 DC 12V-Eingangsanschluss
2 Video-Ausgangsanschluss
V. 1.0 – 07/12/2012 2 ©Velleman nv
Page 3
CCTVPROM15
• Due to constant product improvements the actual product appearance might differ from the shown images.
• We streven voortdurend naar verbetering van onze producten. Daarom kan dit product verschillen van de
afbeeldingen.
• Dans le souci d’une amélioration constante de nos produits, il se peut que l’esthétique de l’article diffère
légèrement des images.
• En el esfuerzo de una mejora constante de nuestros productos, es posible que el aspecto exterior del
producto difiera ligeramente de las imágenes.
• Wir streben ständig nach Verbesserung unserer Produkte. Deshalb könnte dieses Produkt äußerlich von den
Abbildungen abweichen.
© COPYRIGHT NOTICE
The copyright to this manual is owned by Velleman nv. All worldwide rights reserved.
No part of this manual or may be copied, reproduced, translated or reduced to any electronic medium or
otherwise without the prior written consent of the copyright holder.
© AUTEURSRECHT
Velleman nv heeft het auteursrecht voor deze handleiding. Alle wereldwijde rechten voorbehouden. Het
is niet toegestaan om deze handleiding of gedeelten ervan over te nemen, te kopiëren, te vertalen, te
bewerken en op te slaan op een elektronisch medium zonder voorafgaande schriftelijke toestemming van de
rechthebbende.
© DROITS D’AUTEUR
SA Velleman est l’ayant droit des droits d’auteur pour cette notice. Tous droits mondiaux réservés.
Toute reproduction, traduction, copie ou diffusion, intégrale ou partielle, du contenu de cette notice par quelque
procédé ou sur tout support électronique que se soit est interdite sans l’accord préalable écrit de l’ayant droit.
© DERECHOS DE AUTOR
Velleman NV dispone de los derechos de autor para este manual del usuario.
Todos los derechos mundiales reservados. Está estrictamente prohibido reproducir, traducir, copiar, editar y
guardar este manual del usuario o partes de ello sin previo permiso escrito del derecho habiente.
© URHEBERRECHT
Velleman NV besitzt das Urheberrecht für diese Bedienungsanleitung.
Alle weltweiten Rechte vorbehalten. Ohne vorherige schriftliche Genehmigung des Urhebers ist es nicht
gestattet, diese Bedienungsanleitung ganz oder in Teilen zu reproduzieren, zu kopieren, zu übersetzen, zu
bearbeiten oder zu speichern.
V. 1.0 – 07/12/2012 3 ©Velleman nv
Page 4
CCTVPROM15
s. Never put objects
QUICK INSTALLATION GUIDE
1. Introduction
To all residents of the European Union
Important environmental information about this product
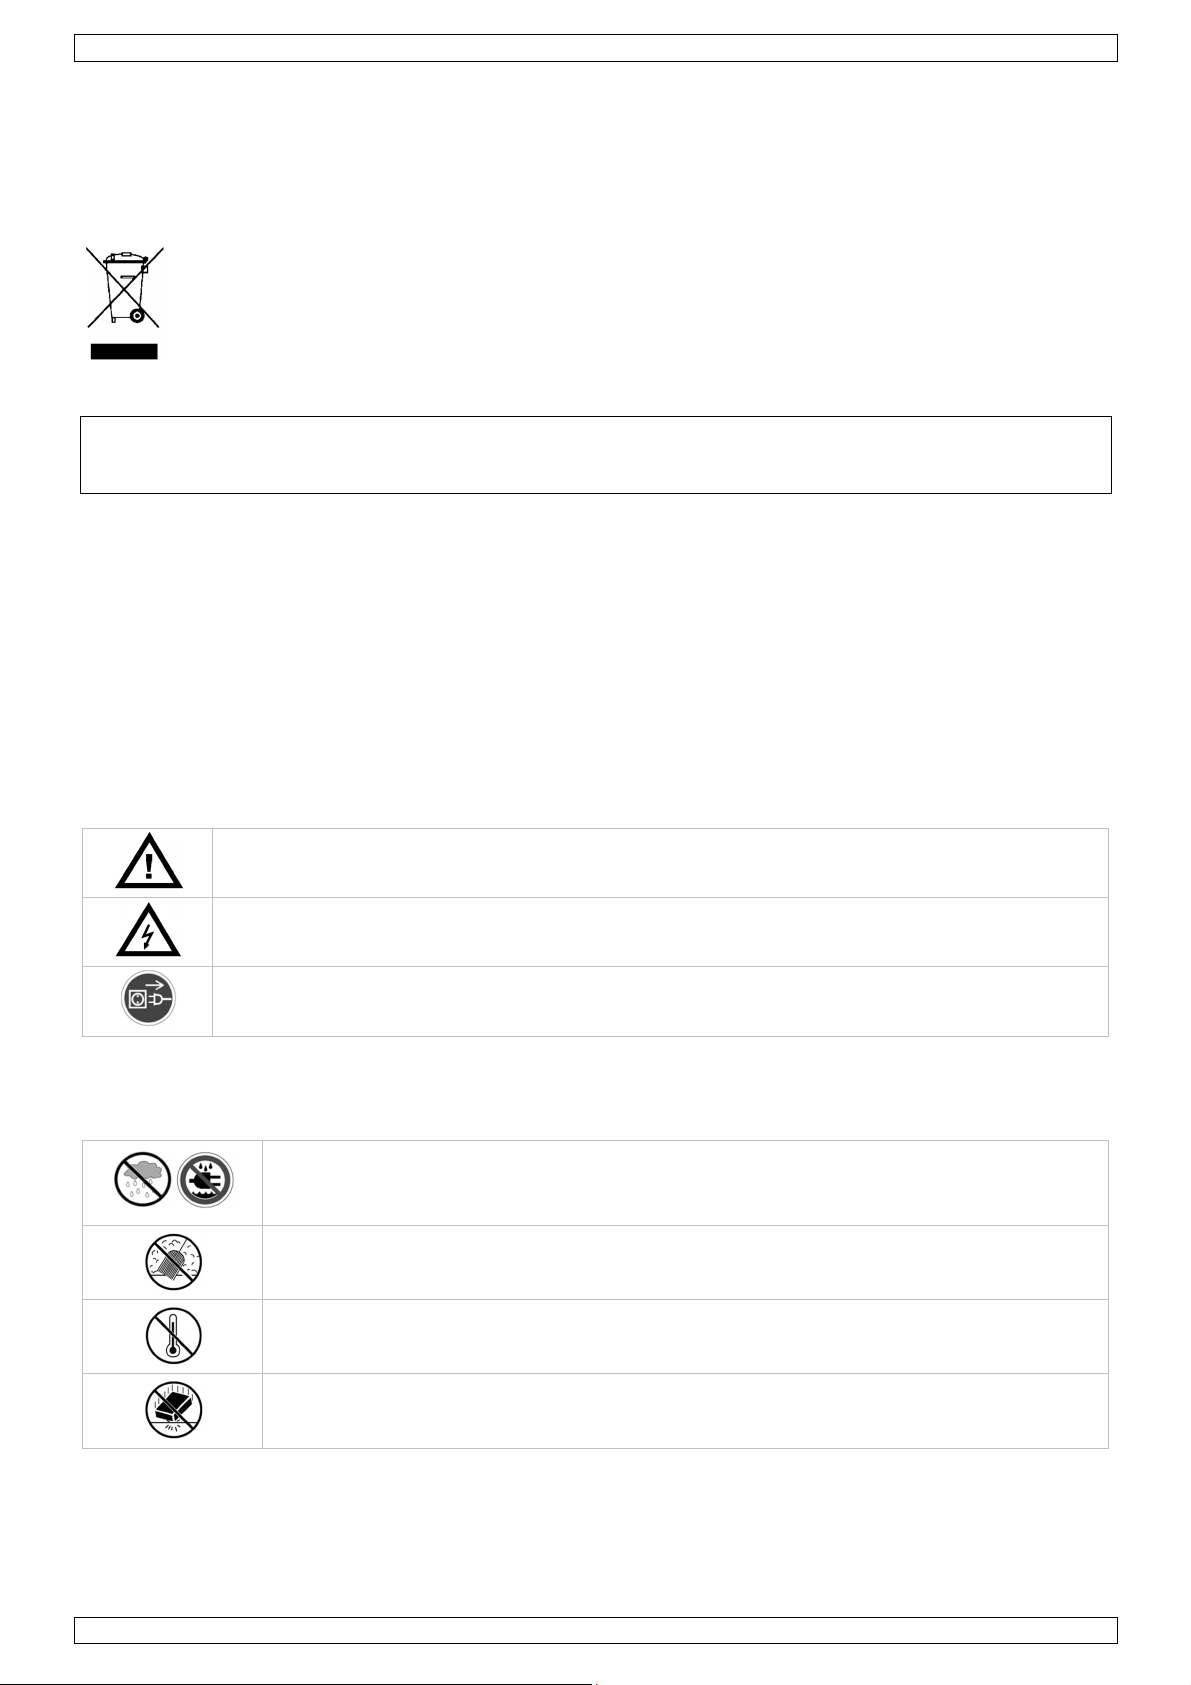
This symbol on the device or the package indicates that disposal of the device after its lifecycle could
harm the environment. Do not dispose of the unit (or batteries) as unsorted municipal waste; it
should be taken to a specialized company for recycling. This device should be returned to your
distributor or to a local recycling service. Respect the local environmental rules.
If in doubt, contact your local waste disposal authorities.
Thank you for choosing Velleman! Please read the manual thoroughly before bringing this device into service. If
the device was damaged in transit, don't install or use it and contact your dealer.
NOTICE:
This document is a Quick installation guide. For more details, refer to the full user manual which can be found
on the included CD-ROM.
Package content:
• 1 x full frame DVR with push video function
• 4 x HR IR colour cameras with Sony EFFIO DSP: CAMCOLBUL27
• 4 x 20 m camera cables: DVR4/CAB
• 1 x power adaptor 100-240VAC 50/60Hz to 19VDC 3.42A
• 1 x high-efficiency DC-DC converter for DVR and cameras
• 1 x remote control: DVRRC4
• 1 x hard disk 500GB: HD500GB/S
• 1 x CD-ROM containing the full user manual.
2. Safety Instructions
Keep the device away from children and unauthorised users.
Risk of electroshock when opening the cover. Touching live wires can cause life-threatening
electroshocks.
Always disconnect mains power when the device is not in use or when servicing or maintenance
activities are performed. Handle the power cord by the plug only.
3. General Guidelines
Refer to the Velleman® Service and Quality Warranty on the last pages of this manual.
Indoor use only
Keep this device away form rain, moisture, splashing and dripping liquid
filled with liquid on top.
Keep this device away from dust.
Keep this device away from extreme heat. Make sure the ventilation openings are clear at
all times. For sufficient air circulation, leave at least 1" (±2.5 cm) in front of the openings.
• Familiarise yourself with the functions of the device before actually using it.
• All modifications of the device are forbidden for safety reasons.
• Only use the device for its intended purpose. Using the device in an unauthorised way will void the
warranty.
V. 1.0 – 07/12/2012 4 ©Velleman nv
Protect this device from shocks and abuse. Avoid brute force when operating the device.
Page 5
CCTVPROM15
• Damage caused by disregard of certain guidelines in this manual is not covered by the warranty and the
dealer will not accept responsibility for any ensuing defects or problems.
• Do not use this product to violate privacy laws or perform other illegal activities.
4. Features
• Full D1 (or Frame) in real-time recording on all channels
• mobile surveillance via free EagleEyes software: iPhone, iPad, Android:
o push video notification (within 5 sec.): supports sending a push notification to your
iPhone/iPad/Android for instant event notification when an alarm entry is triggered
o alarm entry
• other smart phones: BlackBerry, Win Mobile, Symbian: remote surveillance
• mobile phone connection via GPRS, 3G data or wifi
• GUI (Graphical User Interface) display and USB mouse control
• automatic integrated Dynamic Domain Name Service (DDNS): free service
• not included:
o composite video & VGA monitor: MONSCA6, MONSCA7
o VGA & DVI monitor: MONSCA4, MONSCA5
o computer mouse
5. Overview
Refer to the illustrations on page 2 of this manual.
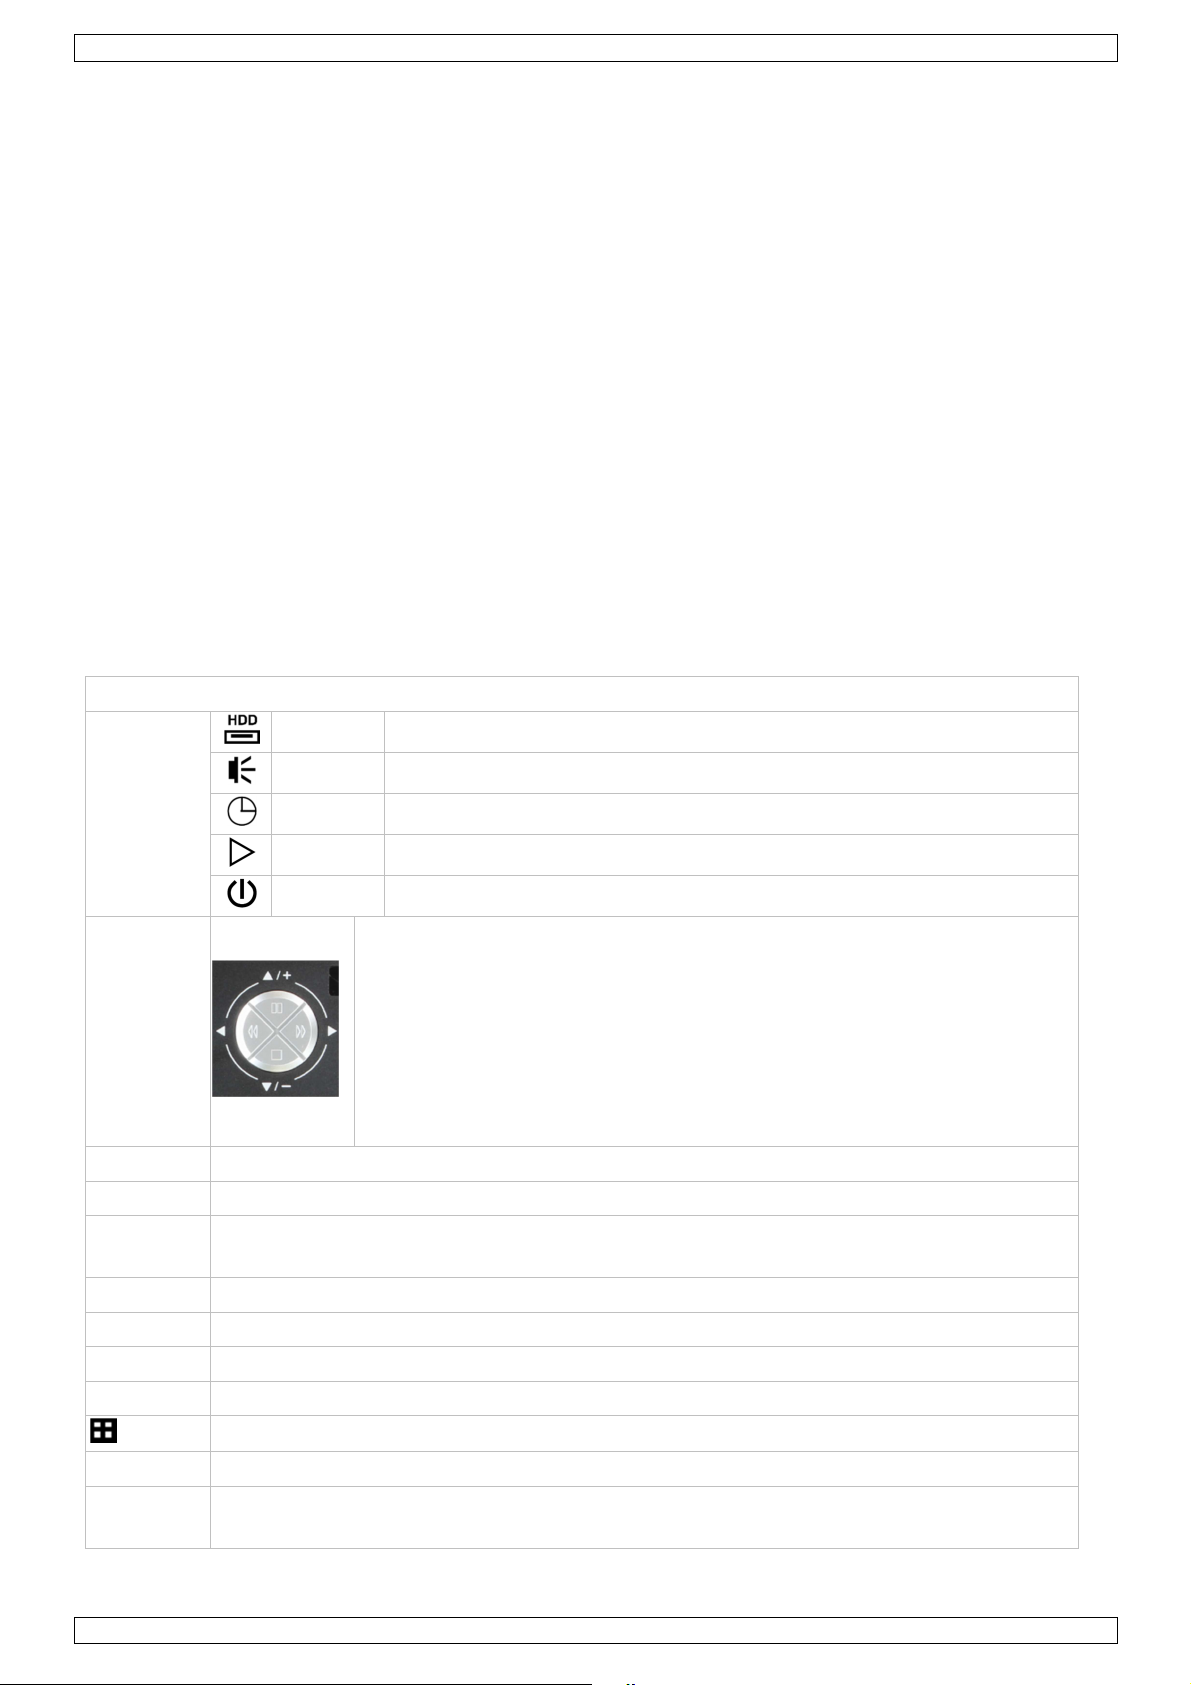
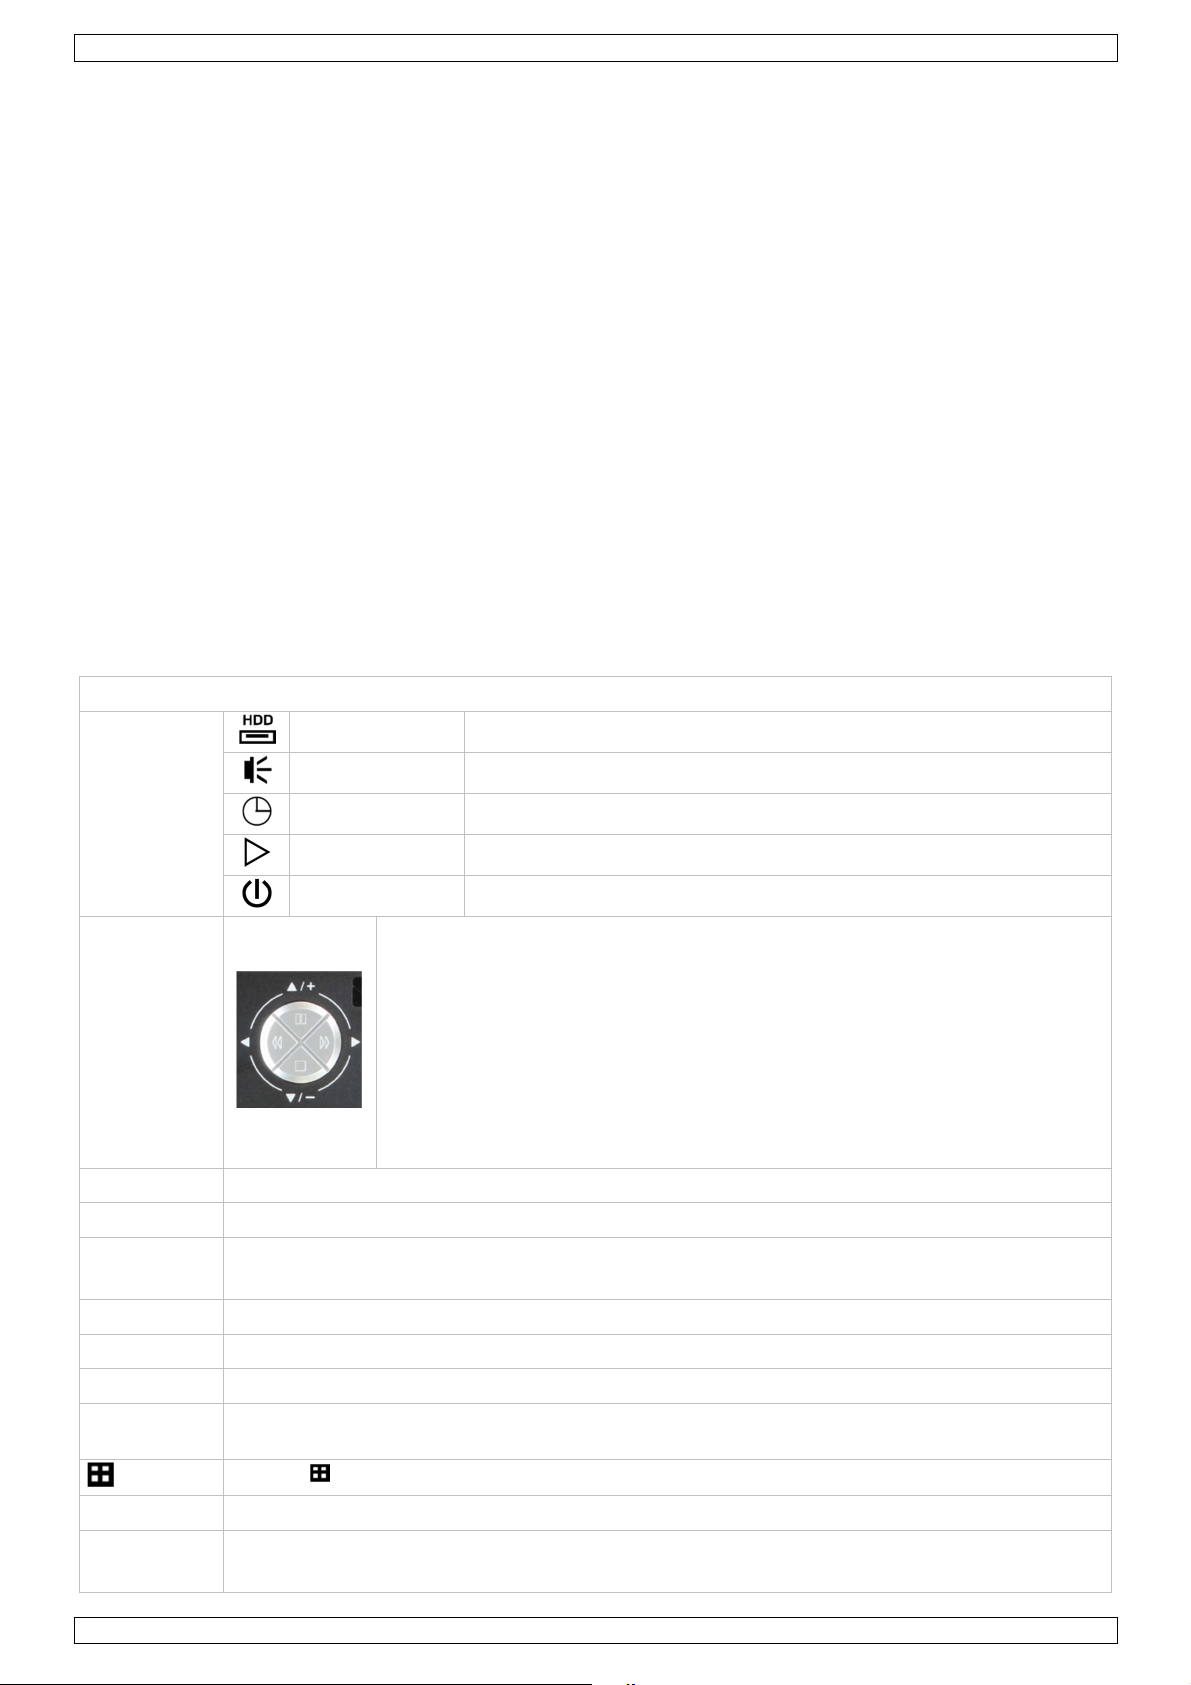
Front panel
HDD reading or recording activities on the hard disk
ALARM an alarm was triggered
LED
indications
TIMER timed recording is enabled
PLAY the DVR is in playing mode
POWER DVR power is on
In settings mode:
Press ▲ / ▼ / ◄ / ► to move the cursor accordingly.
When changing a setting, press + or – to increase or decrease the setting.
Navigation
button
In playback mode:
Press to pause playback.
Press to stop playback.
Press to fast forward.
Press to fast rewind.
MENU Press to enter the main menu.
ENTER Press to confirm settings
LIST
List the information of the recorded files.
QUICK SEARCH / RECORD / MOTION / ALARM / TIMER / FULL LIST
PLAY Press to play the recorded video.
SLOW In playback mode, press to play the recorded file slowly.
ZOOM In live or playback mode, press to enlarge the image of the selected channel.
SEQ Press to show all screens sequentially in full screen mode. Press again to quit.
4CH: Press to show the 4 channel display mode.
1 ~ 4 Press a button to select the corresponding channel.
AUDIO
V. 1.0 – 07/12/2012 5 ©Velleman nv
= SLOW + ZOOM
Press SLOW and ZOOM simultaneous to select live or play-back sounds.
Page 6
CCTVPROM15
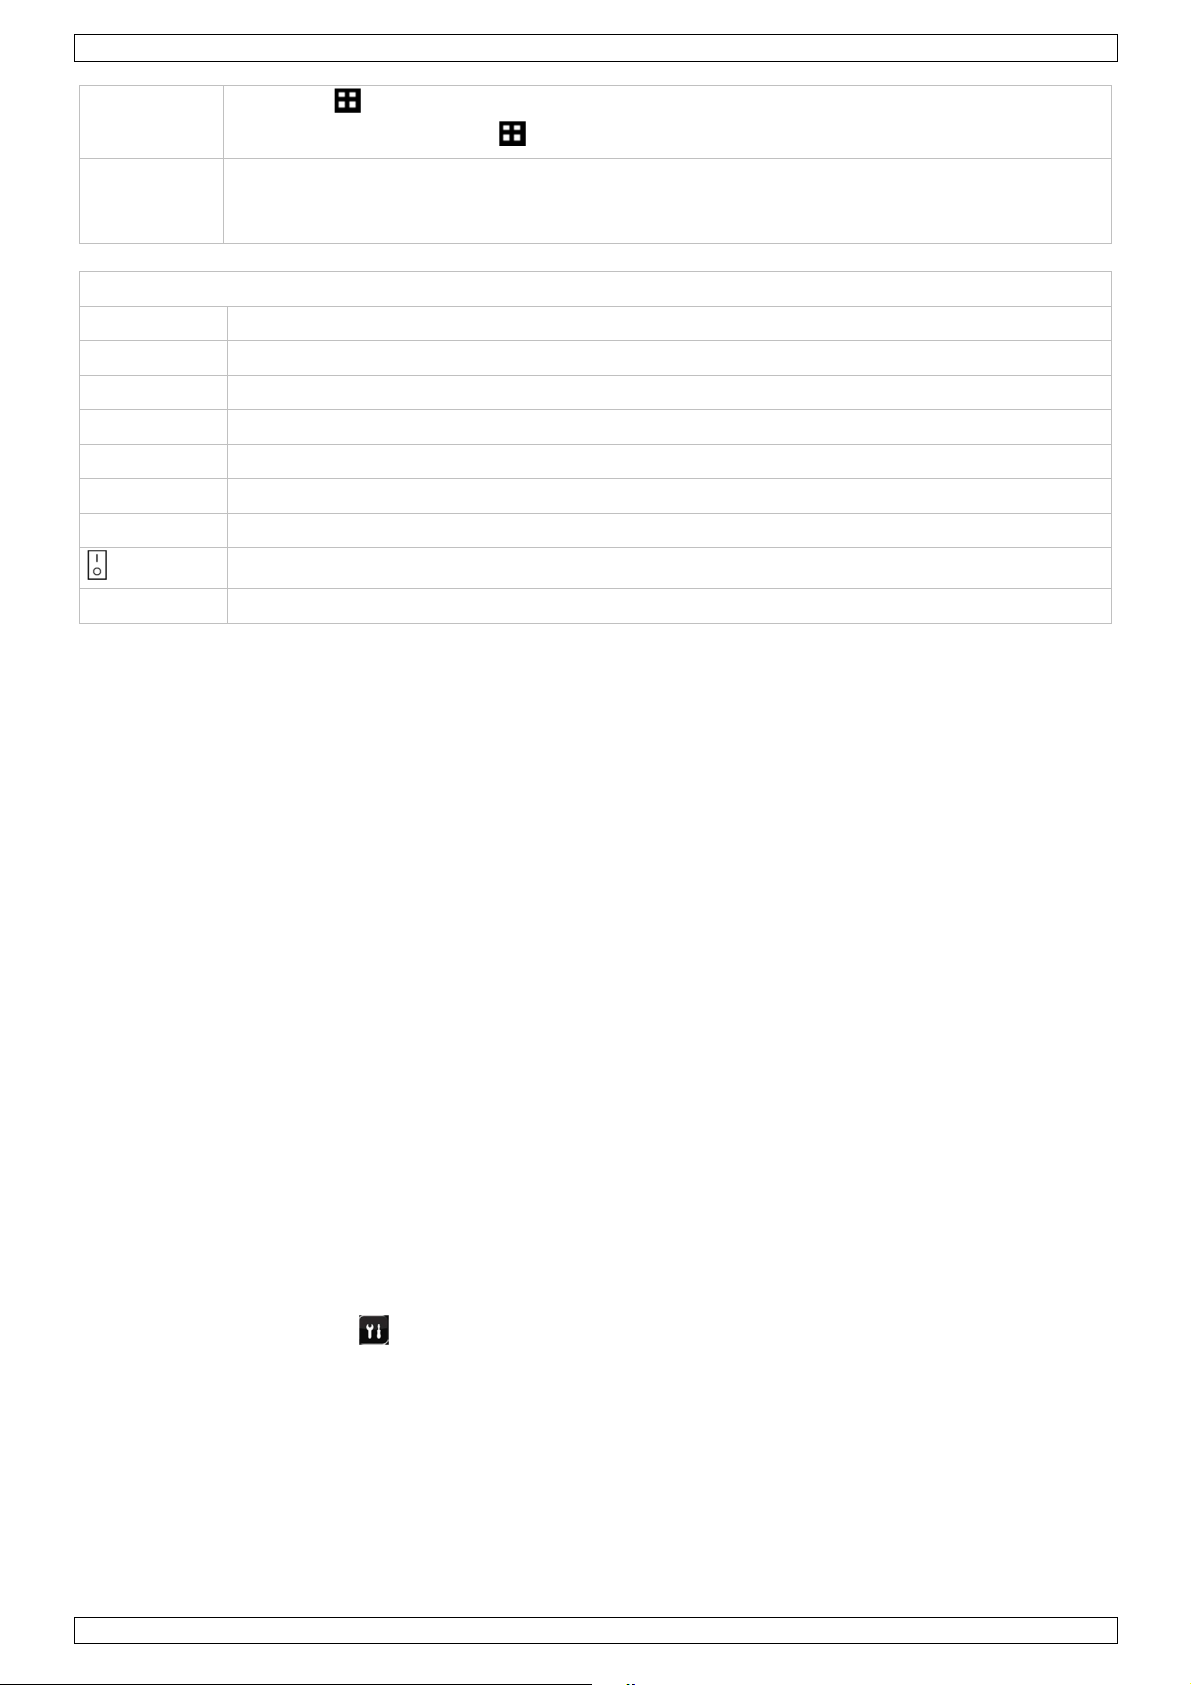
P.T.Z.
USB port
(2x)
rear panel
LAN port Connect the DVR to a local network by plugging a network cable into this port.
VGA connector for video monitor (not included)
AUDIO IN 4 audio input channels to connect four external audio sources e.g. from cameras with
AUDIO OUT 1 audio output to connect to an audio device, e.g. a speaker (mono).
VIDEO IN 4 video input channels to connect 4 external video sources e.g. cameras.
MONITOR 1 video output channel to connect the DVR to the main monitor.
EXTERNAL I/O use a 9 pin DSUB connector to connect external signals e.g. alarm, PTZ…
19V DC Power supply input
= SEQ +
Press SLOW and simultaneous to enter or exit PTZ control mode.
Connect a USB flash drive for video backup to one USB port; connect a USB mouse to the
other.
Note: do not connect two USB flash drives or USB mice at the same time.
audio.
power switch
6. Hardware setup
Refer to the illustrations on page 2 of this manual.
Connecting a video monitor
Obtain a suitable monitor (not included) and connect it to the BNC or VGA video output port on the back of
the DVR.
Connecting the power supply
1. Plug the DC output connector of the included power adaptor into the 19VDC power input at the back of
the DVR.
WARNING: only use the included adaptor.
2. Plug the included power cable into the adaptor input connector and plug the other end into the mains.
Do not switch the DVR on yet.
Connecting a camera
1. You can connect up to four suitable cameras (included). Each camera needs its own power supply.
2. Connect the video output of the camera to either video input at the back of the DVR. The number next to
the input connectors represents the channel number. Connector type is BNC (cables included)
Connecting audio
1. The DVR supports four audio inputs. Connect the audio output of an audio source to an audio input of the
DVR. Make sure to connect the audio channel to the corresponding video channel. Connector type is BNC.
2. There is also an audio output connector. Connect an audio device e.g. a speaker to this connector when
desired. Connector type is BNC.
Connecting Local Area Network (LAN)
Connect the DVR to a local network by plugging a network cable into the LAN port at the back of the DVR.
Connector type is 8P8C (RJ45). To setup the network connection, press the Menu button and select . Refer
to the full manual on the included cd for details.
V. 1.0 – 07/12/2012 6 ©Velleman nv
Page 7
CCTVPROM15
7. Preliminary settings
• Make sure the connected cameras are powered on.
• Set the power switch of the DVR at the back of the device to ON.
It takes about 15 to 30 seconds to start up.
Menu overview
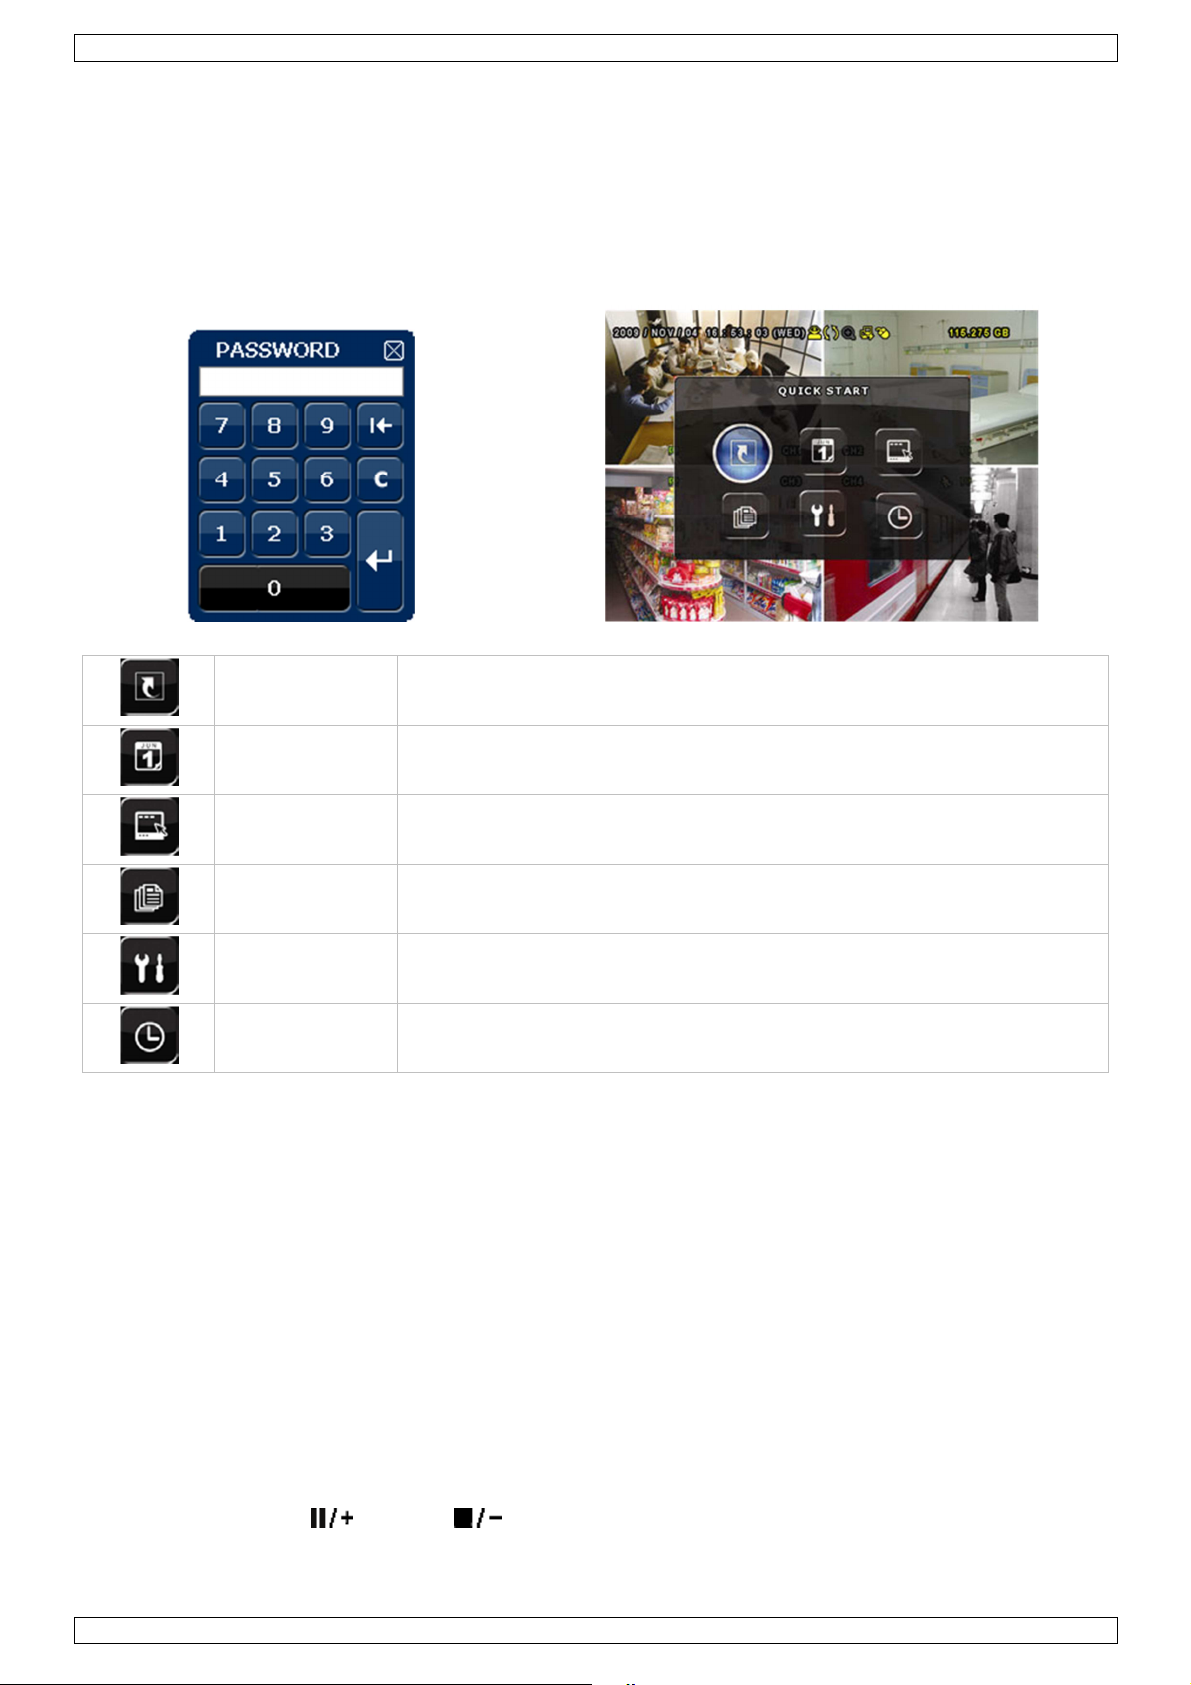
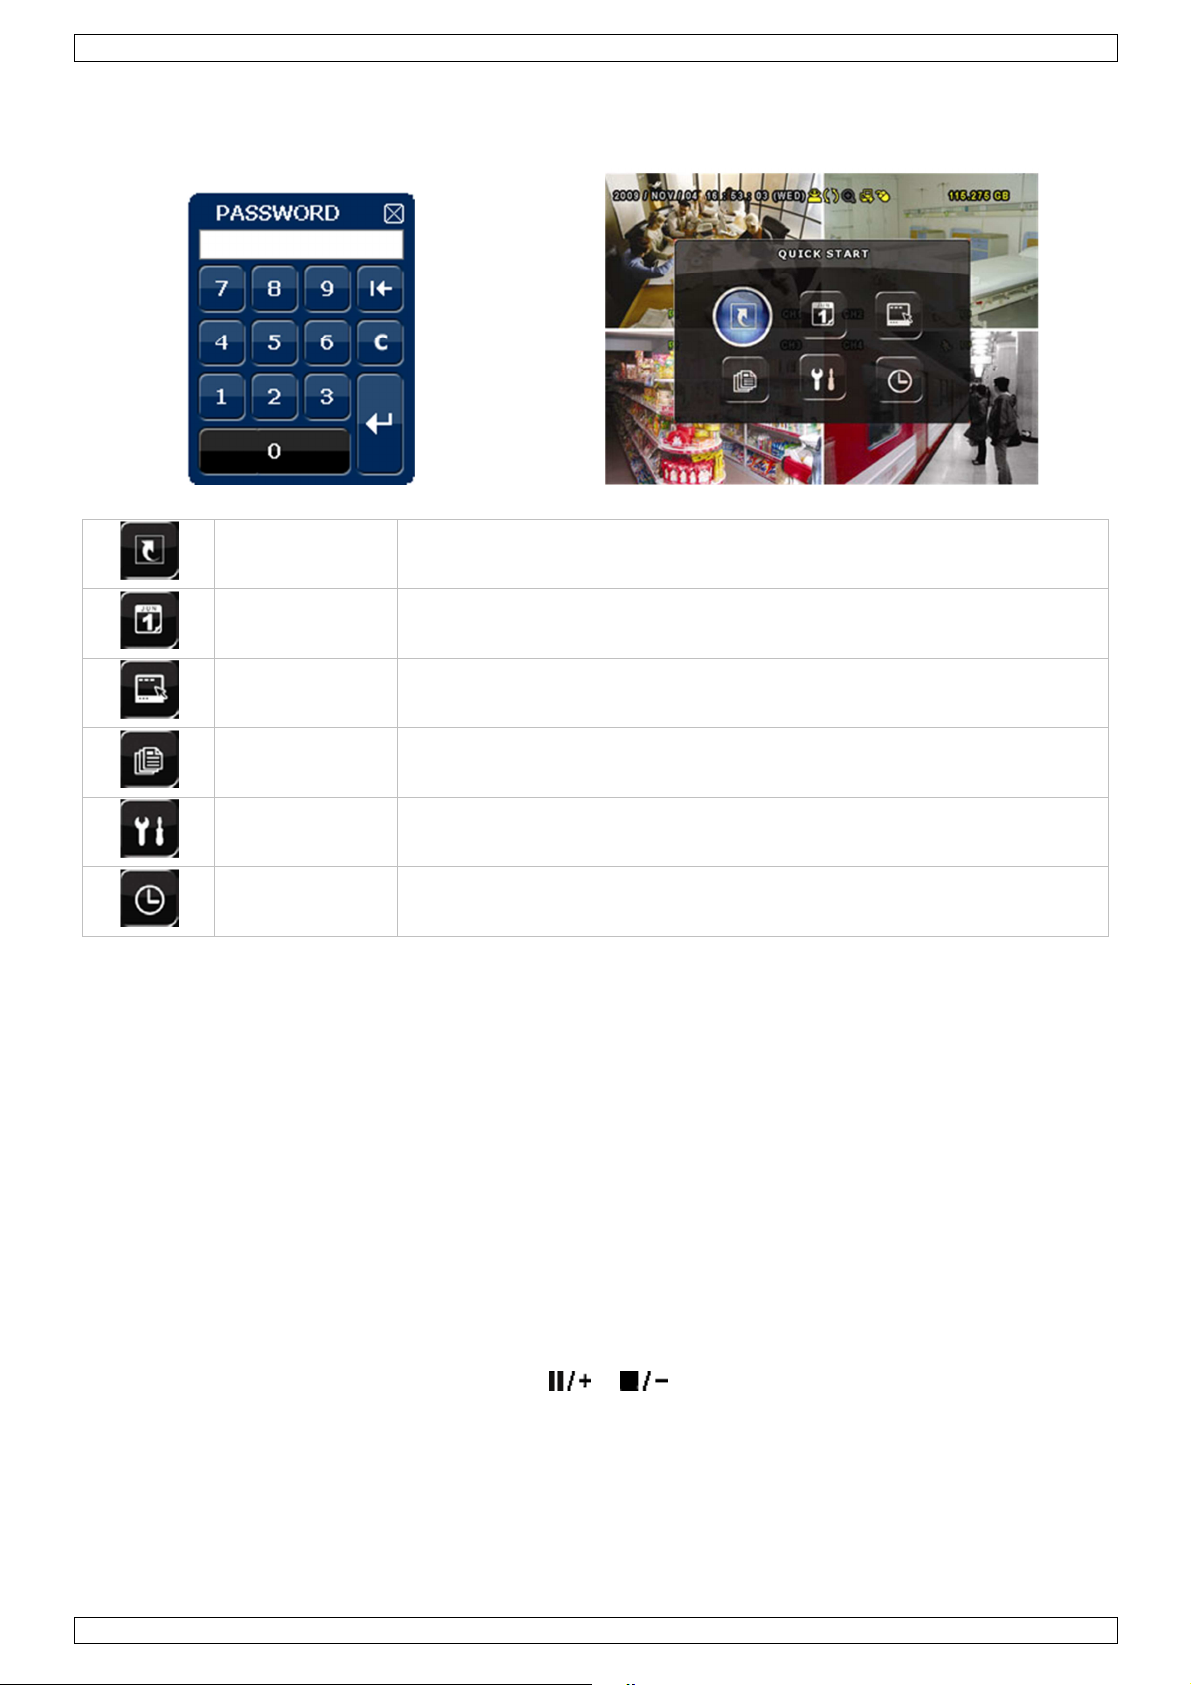
Press the MENU button and enter the password to go into the menu list.
Note: default admin password is “0000” (4 times zero).
QUICK START GENERAL - TIME SETUP
DATE SETUP DATE INFO - DAYLIGHT
SYSTEM ACCOUNT TOOLS - SYSTEM INFO – BACKUP DATA – BACKUP LOG
EVENT
QUICK SEARCH - EVENT SEARCH - HDD INFO - EVENT LOG – BACKUP LIST
INFORMATION
ADVANCED
CONFIG
CAMERA – DETECTION – ALERT – NETWORK – DISPLAY – RECORD –
DEVICES NOTIFY
SCHEDULE
RECORD – DETECTION – ALARM
SETTING
Refer to the full user manual on the included CD-ROM for more details.
Setting date and time
Before using the DVR the time and date should be set to get a valid time stamp.
1. Press the MENU button and enter the admin password to go into the menu list.
2. Select the QUICK START menu item.
3. Use the navigation button to move to the TIME SETUP menu item. Select it to set date and time.
Note: once recording started, do not change date or time as this will make it very difficult to find back the
recorded files.
Note: when using the DVR for the first time and the correct time is set, leave it on for at least 48 hours.
Password setting
1. Press the MENU button and enter the password to go into the menu list.
2. Select the SYSTEM menu item.
3. Go to TOOLS. Select ADMIN PASSWORD (or OPERATOR PASSWORD) and press the ENTER button to set the
password.
Note: an operator can not access the main menu, only the quick menu bar (see below).
4. Press the cursor up (
) or down ( ) button to select the value of the first number and press enter to
save and go to the next character, or use the mouse to select the desired value. Repeat this for all four
password numbers.
Note: default admin password is 0000 (4 times zero).
V. 1.0 – 07/12/2012 7 ©Velleman nv
Page 8

CCTVPROM15
Record settings
1. Press the MENU button and enter the password to go into the menu list.
2. Select the QUICK START menu item.
3. Select the GENERAL menu item using the navigation button.
4. Set the image size, image quality and images per second for recording.
5. Refer to the full user manual on the included CD-ROM for more details.
Audio playback
Press the SLOW and ZOOM button simultaneously to select the desired audio channel or use the quick menu
bar (see below). The current audio channel is indicated in the status bar.
Switch users
1. The DVR can be accessed as administrator ( ) or operator ( ), icons are indicated in the status bar.
2. To switch between users, click on the user icon ( or ) to lock the current session ( ).
3. Press on the key lock icon ( ) than enter the password of the desired profile.
8. Push video configuration
If you have iPhone, iPad or Android mobile device, you can use the DVR's push video function: the DVR will
send a notification to your device when an alarm event occurs.
To do so, you need to install an app called EagleEyes on your mobile device (see Installing the EagleEyes app
below).
Note: Only certain alarm-in pins support the push video function.
8.1 PIN Connection
An I/O board is supplied with this DVR to help you quickly know which pin supports push video (see table
below).
PIN Corresponding video channel
4CH Model PIN1 CH1
Connect the alarm sensor (for example as magnetic contacts), to the I/O pin supporting push video. You can
use any type of sensor provided it has a dry contact.
V. 1.0 – 07/12/2012 8 ©Velleman nv
Page 9
CCTVPROM15
8.2 Installing the EagleEyes app
Prerequisites
Before installing EagleEyes to your mobile phone for remote surveillance, make sure you have checked the
following:
• You have subscribed to and you can access mobile internet services for your mobile phone.
• Note: You might be charged for internet access via wireless or 3G networks. For the internet access rate
details, please check with your local network operator or service provider.
• You have noted down the IP address, port number, user name and password used to access your network
camera from the internet.
Where to download
1. Connect to www.eagleeyescctv.com from your mobile device, and sign in.
Please do not try to download EagleEyes from your computer.
o For Android, select the download link from the website to start downloading.
o For iPhone and iPad, two versions of EagleEyes are available: EagleEyesHD Plus (at a fee), and
EagleEyesHD Lite (free).
2. Select the version you want, and you will be directed to the App Store to download the application.
3. When the download is completed, EagleEyes will install automatically to the default location or any location
you choose.
Note: For more details about configuring and operating EagleEyes, please visit our official website
www.avtech.com.tw.
8.3 Configuration
Before configuring push video, make sure:
1. The DVR system is set up as described in point 3 Connection and Setup in the full manual on the included
CD-ROM.
2. The DVR is connected to the internet.
3. The EagleEyes app is installed on your mobile device (see Installing the EagleEyes app above).
Steps
1. On the DVR, right click to display the main menu.
Go to Advanced Config. > Notify.
Set Guard to On and configure your alarm sensor type (N.C. or N.O.).
2. Open EagleEyes, and add this DVR to the EagleEyes address book.
For more details about EagleEyes operation, please visit www.eagleeyescctv.com.
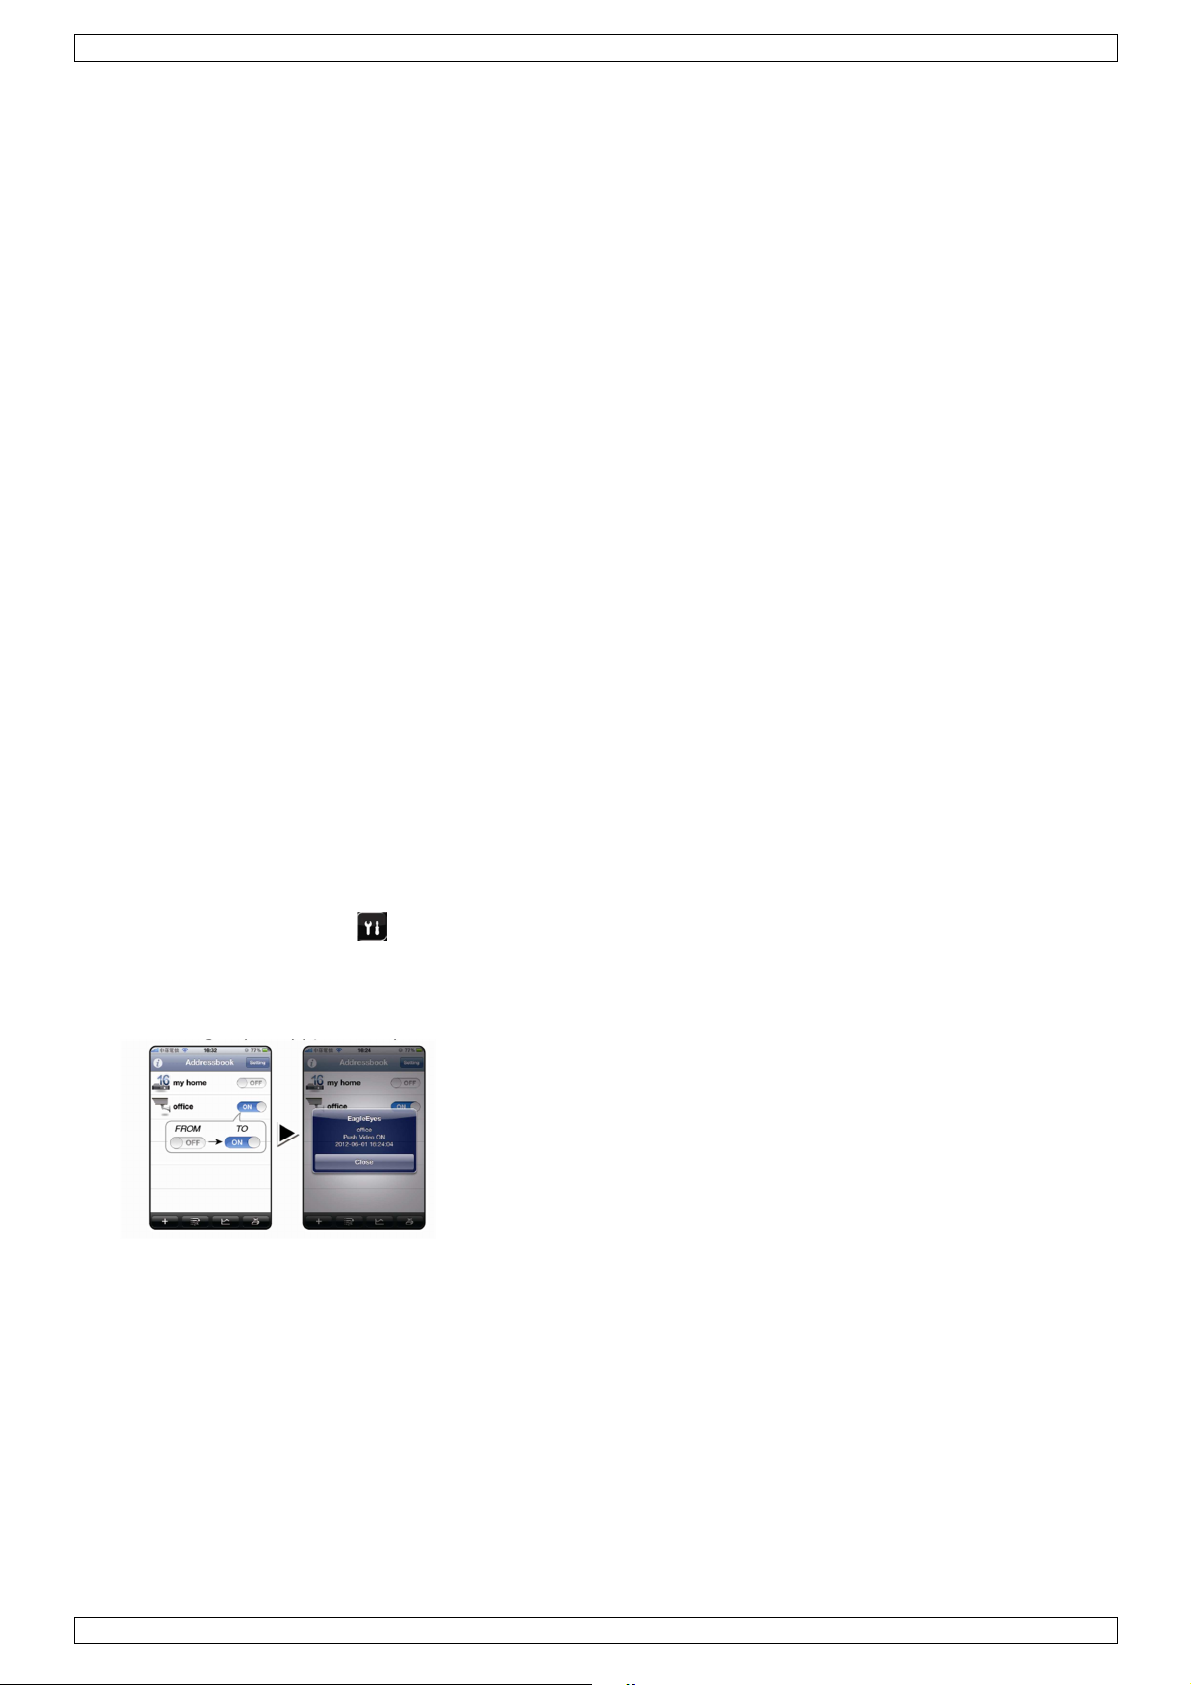
3. In the EagleEyes app, enable push video as described below.
4. Trigger the alarm sensor to see if you successfully receive push video.
V. 1.0 – 07/12/2012 9 ©Velleman nv
Page 10
CCTVPROM15
9. Operation
Display
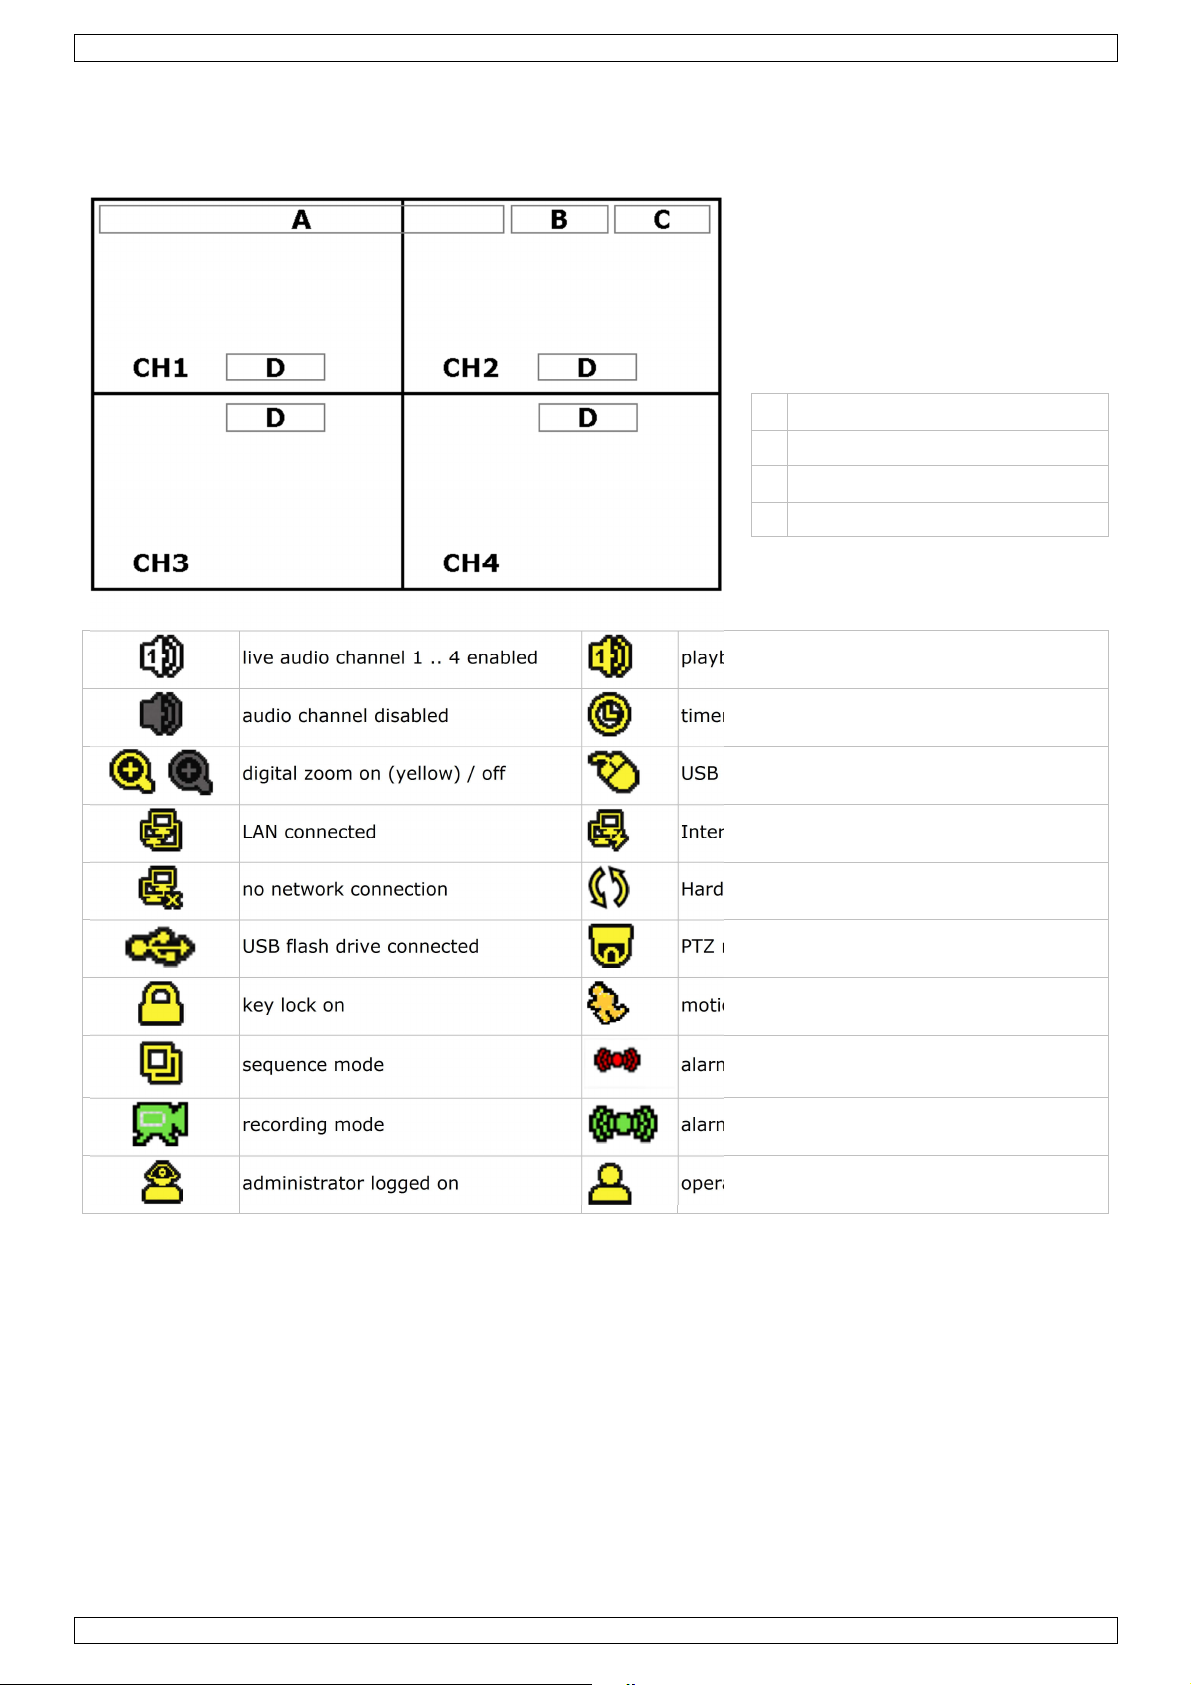
The following image shows the screen layout.
A system date and time
B general system status
C available HDD capacity
D channel status
live audio channel 1 .. 4 enabled
audio channel disabled
digital zoom on (yellow) / off
LAN connected
no network connection
USB flash drive connected
key lock on
sequence mode
recording mode
administrator logged on
playback audio channel 1 .. 4 enabled (yellow)
timer recording
USB mouse connected
Internet connected
Hard disk overwrite (default)
PTZ mode
motion mode
alarm
alarm mode
operator logged on
Note that actual screen icons might differ slightly from the ones shown above.
V. 1.0 – 07/12/2012 10 ©Velleman nv
Page 11
CCTVPROM15
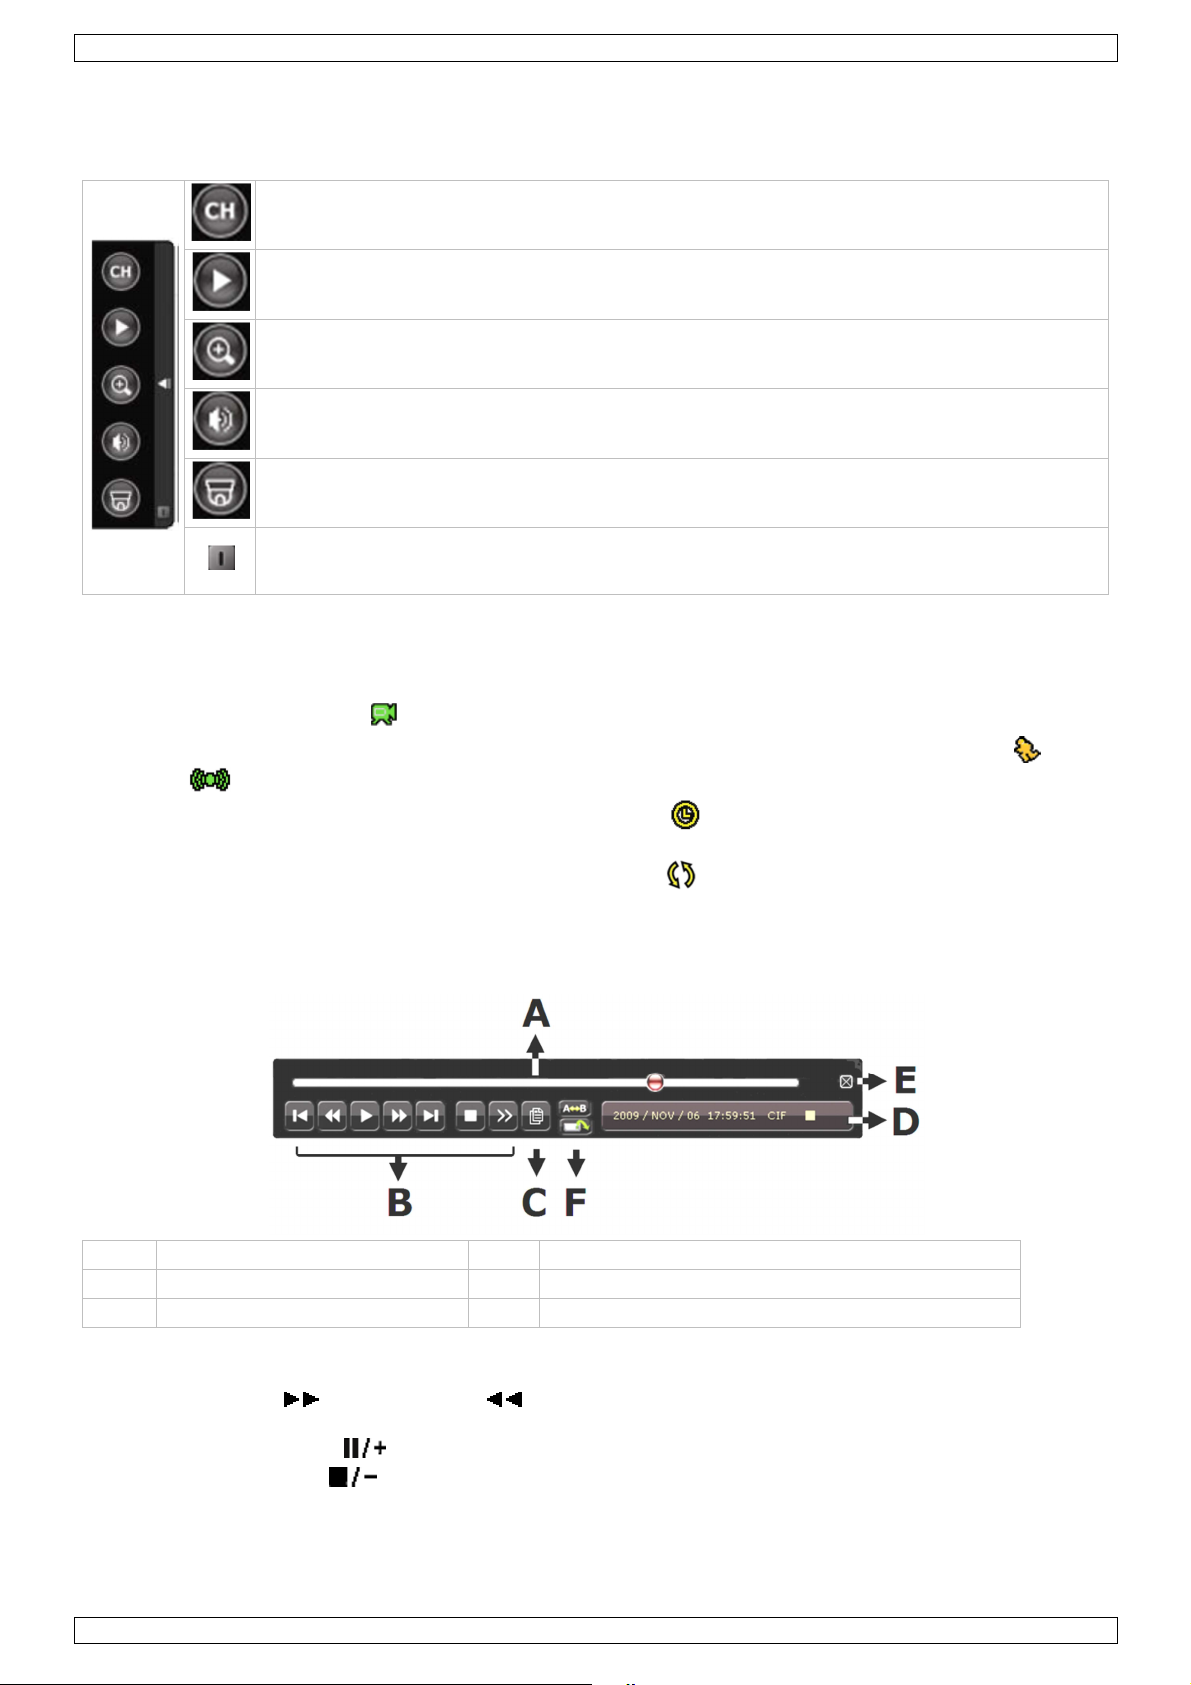
set repeat function A
B / open backup menu
Quick menu bar
Note: only available when USB mouse is connected.
Move the pointer towards the left of the monitor to open the quick menu bar:
Open channel switch panel.
Show playback control panel.
Zoom-in mode (select desired channel first before entering zoom-mode).
Select audio channel (live mode only live channels can be selected).
Enter PTZ mode and show PTZ control panel
Click to show the power off panel to either halt or reboot the system.
Recording
• Check whether the camera or cameras are properly connected.
• When the auto-recording and pre-alarm functions are enabled, the device will start recording images.
• Default the recording icon ( ) is shown.
• In case the motion or alarm detection is activated and a motion or alarm is detected, the motion ( ) resp.
alarm ( ) icon is shown.
• When timed recording is enabled, the timed recording icon ( ) is shown and the timed recording LED
is on.
• Default, the device is in HDD overwrite mode and the icon ( ) is shown.
Play-back
Make sure the control panel is not locked and press the PLAY button on the control panel or use the quick menu
bar to open the playback control panel:
A progress bar D information
B playback control E close
C event search F
Note: play-back needs at least 8192 recorded images to work properly (e.g. with images per second set to 30,
the recording must be at least 273 seconds long).
• The fast forward ( ) and fast rewind ( ) buttons will increase resp. decrease the play-back speed.
Repeatedly pressing the button will increase/decrease speed to 4x, 8x 16x or 32x (max.).
• Press the pause button ( ) to temporary suspend video play-back.
• Press the stop button (
• Press the SLOW button once to set play-back speed to 1/4
V. 1.0 – 07/12/2012 11 ©Velleman nv
) to return to live monitoring.
→
th
and twice for 1/8th.
Page 12

CCTVPROM15
Search
• To search an event, press the LIST button on the front panel.
The system displays an overview of recorded file types.
• You can search the recordings by file type. Available types are ALARM, MANUAL, MOTION, SYSTEM and
FULL LIST.
• Select a list and recording from this list.
• Press ENTER to start play-back.
Note: the recorded files can also be searched via the included Video Viewer software.
10. Technical specifications
DVR
video format PAL
video compression H.264
video input 4 channels, composite video signal 1 Vpp / 75 ohms BNC
video output composite video signal 1 Vpp / 75 ohms BNC + VGA
video loop out maximum recording rate (PAL) frame/D1: 704 x 576 pixels with 100 IPS (PAL)
image quality setting super best - best - high - normal
hard disk storage built-in SATA type, supports 1 x HDD, supports HDD capacity over 2 TB
(HDD not incl.)
HDD quick cleaning quick cleanup the "index system" of the recorded files. 1 TB under 2
seconds
recording mode manual / timer / motion / network / alarm controlled
refresh rate 100 IPS for PAL
multiplex operation live display, record, playback, backup and network
audio I/O 4 x audio in, 1 x audio out (mono)
motion detection area 16 x 12 grids per channel
motion detection sensitivity high - normal - low
pre-alarm recording 8 MB
backup device USB 2.0 flash drive (for backup and firmware updates)
Ethernet 10/100 Base-T, supports remote control and LiveView via Ethernet
network connection supports TCP/IP, PPPoE, DHCP and DDNS function
mobile surveillance Smartphones: EagleEyes software:
- push video: on iPad, iPod Touch, iPhone and Android phone
- remote login via all smartphone platforms (Apple, Android, Blackberry,
Nokia Symbian and Window Mobile)
Computer:
- video viewer software on Windows and Mac:
- web browser: Internet Explorer, Firefox, Google Chrome and Safari via
Java, QuickTime or VLC plug-in
IR remote control remote control DVR and PTZ (DVRRC4 incl.)
PTZ control yes (via RS-485)
alarm I/O 4 in / 1 out
digital zoom 2 x (live & playback)
key lock yes
video loss detection yes
camera title up to 6 characters
video adjustments hue / colour / contrast / brightness
date display format YY/MM/DD, DD/MM/YY, MM/DD/YY, and off
power source 19 Vdc
power consumption < 40 W
daylight saving yes
operating temperature 10 °C ~ 40 °C (50 °F ~ 104 °F)
V. 1.0 – 07/12/2012 12 ©Velleman nv
Page 13

CCTVPROM15
system recovery system auto recovery after power reconnected
dimensions 345 x 223 x 59 mm
CAMERAS
IP rating IP67
pick-up element 1/3" HR colour CCD image sensor with SONY Effio DSP
number of pixels 753 (H) x 582 (V) - PAL resolution 600 TV lines
min. illumination 0.1 lux
IR LEDs 21
max. IR projection distance 15 m
S/N ratio > 48 dB (AGC off)
electronic shutter 1/50 to 1/100 000 sec
lens f 3.6 mm / F 2.0
lens angle 92.6°
Colour Rolling Suppress yes
AGC yes
white balance automatic
video output 1.0 Vpp composite, 75 ohms
audio no
power supply 12 Vdc
current consumption 70 mA (IR off), 270 mA (IR on)
operating temperature 0 °C ~ 45 °C
dimensions 140 x 56 x 80 mm
weight 285 g
Use this device with original accessories only. Velleman nv cannot be held responsible in the event
of damage or injury resulted from (incorrect) use of this device.
For more info concerning this product, please visit our website www.velleman.eu.
The information in this manual is subject to change without prior notice.
V. 1.0 – 07/12/2012 13 ©Velleman nv
Page 14

CCTVPROM15
BEKNOPTE INSTALLATIEHANDLEIDING
1. Inleiding
Aan alle ingezetenen van de Europese Unie
Belangrijke milieu-informatie betreffende dit product
Dit symbool op het toestel of de verpakking geeft aan dat, als het na zijn levenscyclus wordt
weggeworpen, dit toestel schade kan toebrengen aan het milieu. Gooi dit toestel (en eventuele
batterijen) niet bij het gewone huishoudelijke afval; het moet bij een gespecialiseerd bedrijf
terechtkomen voor recyclage. U moet dit toestel naar uw verdeler of naar een lokaal recyclagepunt
brengen. Respecteer de plaatselijke milieuwetgeving.
Hebt u vragen, contacteer dan de plaatselijke autoriteiten betreffend de verwijdering.
Dank u voor uw aankoop! Lees deze handleiding grondig voor u het toestel in gebruik neemt. Werd het toestel
beschadigd tijdens het transport, installeer het dan niet en raadpleeg uw dealer.
OPMERKING:
Dit document is een beknopte installatiehandleiding. Raadpleeg de volledige handleiding op de cd-rom voor
meer informatie (enkel beschikbaar in het Engels, Frans, Duits en Spaans).
Inhoud:
• 1 x full frame digitale videorecorder met push video
• 4 x hoge resolutie kleurencamera's met Sony EFFIO DSP en IR-leds: CAMCOLBUL27
• 4 x camerakabels van 20 m
• 1 x 19 V voedingsadapter
• 1 x high-efficiency DC-DC converter voor de DVR en de camera's
• 1 x afstandsbediening: DVRRC4
• 1 x harde schijf: HD500GB/S.
• 1 x CD-ROM met de volledige handleiding.
2. Veiligheidsinstructies
Houd buiten het bereik van kinderen en onbevoegden.
Elektrocutiegevaar bij het openen van het toestel. Raak geen kabels aan die onder stroom staan
om dodelijke elektroshocks te vermijden.
Trek de stekker uit het stopcontact (trek niet aan de kabel!) voordat u het toestel reinigt en als u
het niet gebruikt.
3. Algemene richtlijnen
Raadpleeg de Velleman® service- en kwaliteitsgarantie achteraan deze handleiding.
Enkel voor gebruik binnenshuis.
Bescherm dit toestel tegen regen, vochtigheid en opspattende vloeistoffen. Plaats geen
object gevuld met vloeistof op het toestel.
Bescherm tegen stof.
Bescherm tegen extreme hitte. Zorg dat de verluchtingsopeningen niet verstopt geraken.
Voorzie een ruimte van minstens 2,5 cm tussen het toestel en elk ander object.
Bescherm tegen schokken en vermijd brute kracht tijdens de bediening.
• Leer eerst de functies van het toestel kennen voor u het gaat gebruiken.
• Om veiligheidsredenen mag u geen wijzigingen aanbrengen.
• Gebruik het toestel enkel waarvoor het gemaakt is. Bij onoordeelkundig gebruik vervalt de garantie.
V. 1.0 – 07/12/2012 14 ©Velleman nv
Page 15
CCTVPROM15
• De garantie geldt niet voor schade door het negeren van bepaalde richtlijnen in deze handleiding en uw
dealer zal de verantwoordelijkheid afwijzen voor defecten of problemen die hier rechtstreeks verband mee
houden.
• Leef bij gebruik van dit toestel de wetgeving betreffende de privacy na.
4. Eigenschappen
• volledige D1 (of frame) bij real-time opnames op alle kanalen
• mobiele videobewaking dankzij de gratis EagleEyes-software: iPhone, iPad, Android
o push-bericht (binnen de 5 s.): informeert u via iPhone/iPad/Android van zodra een alarm afgaat
o alarmingang
• andere smartphones: BlackBerry, Win Mobile, Symbian: videobewaking op afstand
• aansluiting met de gsm via GPRS, 3G of Wi-Fi
• bediening via GUI (Graphical User Interface) en USB-muis
• automatische geïntegreerde dynamische domeinnaamservice (DDNS): gratis dienst
• optioneel (niet meegelev.):
o composiet video en VGA-monitor: MONSCA6, MONSCA7
o VGA- en DVI-monitor: MONSCA4, MONSCA5
o muis niet meegeleverd
5. Omschrijving
Raadpleeg de figuren op pagina 2 van deze handleiding.
Frontpaneel
HDD De harde schijf leest of neemt data op.
ALARM Het alarm werd ingeschakeld.
Leds
TIMER De geprogrammeerde opnamefunctie is ingeschakeld.
PLAY De DVR speelt de opname af.
POWER De DVR is ingeschakeld.
In instellingenmodus:
Druk op ▲ / ▼ / ◄ / ► om de cursor te verplaatsen.
Bij het wijzigen van een instelling, druk op + of – om de instellingswaarde te
verhogen/verlagen.
NAVIGATIE
In afspeelmodus:
Druk op om het afspelen te onderbreken.
Druk op om het afspelen te stoppen.
Druk op om snel vooruit te spoelen
Druk op om snel terug te spoelen.
MENU Druk op MENU om het menu weer te geven.
ENTER Druk op ENTER om te bevestigen.
LIST
Lijst van de opnamebestanden.
QUICK SEARCH / RECORD / MOTION / ALARM / TIMER / FULL LIST
PLAY Druk op PLAY om de opname af te spelen.
SLOW Druk op SLOW om het afgespeelde bestand traag af te spelen.
ZOOM Druk op ZOOM om het beeld in het geselecteerde kanaal te vergroten.
SEQ Druk op SEQ om alle kanalen achtereenvolgens op het volledige scherm weer te geven. Druk
opnieuw om de functie te verlaten.
Druk op om de 4-kanaals display weer te geven.
1 ~ 4 Druk op een cijfertoets om het desbetreffende kanaal te selecteren.
AUDIO
V. 1.0 – 07/12/2012 15 ©Velleman nv
= SLOW + ZOOM
Druk gelijktijdig op SLOW en ZOOM om de geluidsopties te selecteren.
Page 16
CCTVPROM15
P.T.Z.
USB-poort
(2x)
Achterpaneel
LAN-poort Aansluiting voor een LAN-netwerk.
VGA Aansluiting voor videomonitor (niet meegeleverd)
AUDIO IN 4 audio-ingangen voor 4 externe audiobronnen, bv. camera met audio.
AUDIO OUT 1 audio-uitgang naar een audiotoestel, bv. luidspreker (mono).
VIDEO IN 4 video-ingangen voor 4 externe videobronnen, bv. camera’s.
MONITOR 1 video-uitgang naar de hoofdmonitor.
EXTERNAL I/O Sluit een extern signaal aan, zoals een alarm of PTZ-camera, via een 9-pin DSUB-stekker.
DC 19V Voedingsingang.
= SLOW +
Druk gelijktijdig op SLOW en om de PTZ-functie in of uit te schakelen.
Sluit een USB flashdrive aan op een USB-poort voor back-upopnames. Sluit een USB-muis aan
op de andere USB-poort.
Opmerking: Sluit geen twee flashdrives of muizen aan op de USB-poorten.
Voedingsschakelaar.
6. Installatie van de hardware
Raadpleeg de figuren op pagina 2 van deze handleiding.
Aansluiting van een videomonitor
Sluit een compatibele monitor (niet meegeleverd) aan de BNC of VGA video-uitgang achteraan uw DVR.
Aansluiting van de voedingsadapter
1. Steek de DC-stekker van de adapter in de 19 VDC-ingang achteraan de DVR.
WAARSCHUWING: Gebruik enkel de meegeleverde voedingsadapter.
2. Koppel de voedingskabel aan de adapter en koppel de adapter vervolgens aan het lichtnet. Schakel de DVR
nog niet in.
Aansluiting van een camera
1. Deze DVR is geschikt voor gebruik met 4 compatibele camera’s (niet meegeleverd). Elke aangesloten
camera heeft een eigen voeding nodig.
2. Sluit de video-uitgang van de camera aan de BNC video-ingang achteraan de DVR. Het nummer naast de
aansluiting duidt op het kanaalnummer.
Audioaansluiting
1. De DVR heeft vier audio-ingangen. Sluit de audio-uitgang van de audiobron aan de audio-ingang van de
DVR. Zorg ervoor dat u het audiokanaal aansluit op het correcte videokanaal. Gebruik hiervoor een stekker
van het type BNC.
2. De DVR heeft ook een BNC audio-uitgang naar een extern audiotoestel, bv. een luidspreker.
Aansluiting op een LAN-netwerk
Voor een aansluiting op een LAN-netwerk, sluit de DVR via een netwerkkabel aan op een LAN-poort achteraan
de DVR. Gebruik hiervoor een stekker van het type 8P8C (RJ45). Om de netwerkaansluiting in te stellen, druk
op de menuknop en selecteer . Voor meer details, raadpleeg de volledige handleiding op de meegeleverde
CR-ROM
7. Basisinstellingen
• Zorg ervoor dat de aangesloten camera's zijn ingeschakeld.
• Om de DVR in te schakelen, zet de voedingsschakelaar achteraan het toestel op ON.
Het duurt 15 tot 30 seconden om op te starten.
V. 1.0 – 07/12/2012 16 ©Velleman nv
Page 17
CCTVPROM15
Menuoverzicht
Druk op MENU en geef het wachtwoord in om het menu weer te geven.
Opmerking: Het standaard admin wachtwoord is 0000 (4x nul).
QUICK START GENERAL - TIME SETUP
DATE SETUP DATE INFO - DAYLIGHT
SYSTEM TOOLS - SYSTEM INFO - BACKUP DATA – BACKUP LOG
EVENT
QUICK SEARCH - EVENT SEARCH - HDD INFO - EVENT LOG – BACKUP LIST
INFORMATION
ADVANCED
CONFIG
CAMERA – DETECTION – ALERT – NETWORK – DISPLAY – RECORD –
DEVICES NOTIFY
SCHEDULE
RECORD – DETECTION - ALARM
SETTING
Raadpleeg de uitgebreide handleiding op de meegeleverde CD-ROM voor meer details.
Instellen van het uur en de datum
Stel voor het eerste gebruik de datum en het uur in.
1. Druk op MENU en geef het administratorwachtwoord in om het menu weer te geven.
2. Selecteer QUICK START.
3. Verplaats met de navigatietoetsen de cursor naar het submenu TIME SETUP.
Opmerking: Het is aan te raden de ingestelde datum en het uur niet meer te wijzigen eens een opname is
gestart.
Opmerking: Laat een pas ingestelde DVR gedurende 48 uur ingeschakeld.
Instellen van een wachtwoord
1. Druk op MENU en geef het wachtwoord in om het menu weer te geven.
2. Selecteer het submenu SYSTEM.
3. Ga naar TOOLS. Selecteer ADMIN PASSWORD (of OPERATOR PASSWORD) en druk op ENTER.
Opmerking: Een gewone gebruiker heeft geen toegang tot het hoofdmenu, enkel tot de menubalk (zie
hieronder).
4. Stel het nieuwe wachtwoord in met de toetsen of , en bevestig met ENTER. U kunt de gewenste
digit ook met de muis selecteren. Herhaal voor de resterende digits.
Opmerking: Het standaard admin wachtwoord is 0000 (4x nul).
Instellen van de opnamefunctie
1. Druk op MENU en geef het wachtwoord in om het menu weer te geven.
2. Selecteer het submenu QUICK START.
3. Selecteer het submenu GENERAL met de navigatietoetsen.
4. Stel beeldgrootte, beeldkwaliteit en aantal beelden per seconde in.
V. 1.0 – 07/12/2012 17 ©Velleman nv
Page 18

CCTVPROM15
5. Raadpleeg de uitgebreide handleiding op de meegeleverde cd-rom voor meer details.
Afspelen van audio
Druk gelijktijdig op SLOW en ZOOM om het audiokanaal te selecteren of gebruik de menubalk (zie hieronder).
Het geselecteerde audiokanaal staat in de statusbalk weergegeven.
Selecteren van de gebruiker
1. De DVR kan door een administrator ( ) of een gebruiker ( ) bediend worden. Het symbool staat in de
statusbalk weergegeven.
2. Klik op het gewenste symbool ( of ) om als administrator of gebruiker in te loggen ( ).
3. Druk op en geef het wachtwoord van het gewenste profiel in.
8. Configuratie Pushbericht
Met een iPhone, iPad of Android-toestel, kunt u de functie pushbericht van de DVR gebruiken: de DVR stuurt
een bericht naar uw toestel van zodra een alarm afgaat.
Hiervoor dient u de EagleEyes-applicatie installeren op uw mobiele toestel (zie De EagleEyes-applicatie
installeren hierna).
Opmerking: Enkel bepaalde alarm-in pinnen ondersteunen pushberichten.
8.1 PIN-aansluiting
Een I/O-kaart wordt met deze DVR meegeleverd om snel te bepalen welke aansluiting pushberichten
ondersteunt (zie tabel hieronder).
PIN Overeenkomstig videokanaal
4CH-model PIN1 CH1
Sluit de alarmsensor (bv. zoals magnetische contacten) aan op de I/O-aansluiting die pushberichten
ondersteunt. U kunt eender welk type sensor gebruiken maar deze moet voorzien zijn van een droog contact.
8.2 De EagleEyes-applicatie installeren
Vereisten
Voordat u EagleEyes voor bewaking op afstand installeert op uw mobiele telefoon, zorg ervoor dat u het
volgende hebt gecontroleerd:
• Mobiele internetdiensten zijn ingeschreven en beschikbaar om te gebruiken voor uw mobiele telefoon.
• Opmerking: De kosten voor internettoegang via draadloze of 3G-netwerken kunnen mogelijk in rekening
worden gebracht. Voor details over de toegangstarieven tot het internet, neem contact op met uw lokale
netwerk- of serviceprovider.
• U hebt het IP-adres, poortnummer, gebruikersnaam en wachtwoord genoteerd om uw DVR- of
netwerkcamera via het internet te benaderen.
V. 1.0 – 07/12/2012 18 ©Velleman nv
Page 19

CCTVPROM15
Waar te downloaden
1. Maak verbinding met www.eagleeyescctv.com vanaf uw mobiele telefoon en log in.
Probeert niet om EagleEyes vanaf uw computer te downloaden.
o Voor Android, selecteer de download-link van de website om het downloaden te starten.
o Voor iPhone and iPad, zijn twee versies van EagleEyes beschikbaar: EagleEyesHD Plus (tegen
betaling), en EagleEyesHD Lite (gratis).
2. Selecteer de gewenste versie, en u wordt naar de "App Store" doorgestuurd om de applicatie te
downloaden.
3. Wanneer het downloaden voltooid is, zal EagleEyes automatisch worden geïnstalleerd op de locatie waar
alle toepassingen standaard in uw telefoon zijn opgeslagen, of waar u opgeeft.
Opmerking: Voor meer details over de configuratie en het gebruik van dit programma, raadpleeg onze officiële
website www.avtech.com.tw.
8.3 Configuratie
Voordat u pushberichten configureert, zorg ervoor dat:
1. Het DVR-systeem is ingesteld zoals beschreven in punt 3 Aansluiting en instelling van de volledige
handleiding op de meegeleverde CD-ROM.
2. De DVR is aangesloten op het internet.
3. De EagleEyes-applicatie is geïnstalleerd op uw mobiele toestel (zie De EagleEyes-applicatie installeren
hierboven).
Stappen
1. Op de DVR, klik met de rechtermuisknop om het hoofdmenu weer te geven.
Ga naar Advanced Config. > Notify.
Zet Guard op On en configureer uw alarmsensor (N.C. of N.O.).
2. Open EagleEyes, en voeg deze DVR toe aan het EagleEyes-adresboek.
Voor meer details over het gebruik van EagleEyes, raadpleeg de website www.eagleeyescctv.com.
3. In de EagleEyes-applicatie, activeer pushberichten zoals beschreven hieronder.
4. Trigger de alarmsensor om na te gaan of u pushberichten ontvangt.
V. 1.0 – 07/12/2012 19 ©Velleman nv
Page 20

CCTVPROM15
9. Gebruik
Display
De figuur hieronder geeft de displaylay-out weer.
A datum en uur
B algemene status
C beschikbare ruimte
D kanaalstatus
afspelen live audiokanaal 1~4
audiokanaal uitgeschakeld
digitale zoom in-
(geel)/uitgeschakeld
LAN-aansluiting
geen netwerkaansluiting
USB flashdrive aangesloten
vergrendeling
sequentiefunctie
opname
afspelen audiokanaal 1~4 (geel)
geprogrammeerde opname
USB-muis aangesloten
internetaansluiting
overschrijven harde schijf (standaard)
PTZ-functie
beweging waargenomen
alarm
alarm-modus
ingelogd als administrator
ingelogd als gebruiker
De iconen kunnen verschillen met de iconen op uw scherm.
V. 1.0 – 07/12/2012 20 ©Velleman nv
Page 21

CCTVPROM15
kies herhaalfunctie A
B / open backup menu
Menubalk
Opmerking: Enkel zichtbaar indien er een USB-muis aangesloten is.
Verplaats de muiscursor naar de linkerkant van het scherm om de menubalk weer te geven:
kanaalpaneel openen
afspeelpaneel openen
zoomfunctie (selecteer eerst het kanaal)
audiokanaal
PTZ-functie
Klik om het systeem uit te schakelen of te herstarten.
Opname
• Sluit eerst de camera(’s) en de HDD correct aan op de DVR.
• De DVR start de opname indien de automatische opname- en de prealarmfunctie ingeschakeld zijn.
• De icoon verschijnt automatisch op de display.
• Bij een bewegingswaarneming of alarm (functie is ingeschakeld) wordt de icoon of weergegeven.
• Bij een geprogrammeerde opname verschijnt de icoon en licht de opnameled op.
• Standaard staat de DVR in overschrijfmodus en wordt weergegeven.
Weergave
Schakel de toetsvergrendeling uit en druk op PLAY of open het afspeelpaneel met de muis.
A afspeelbalk D informatie
B bedieningstoetsen E sluiten
C zoekfunctie F
→
Opmerking: Het bestand moet minstens 8192 beelden bevatten (bv. ips = 30, de opname moet minstens 273
seconden lang zijn).
• Druk op om de opname verder te spoelen of op om de opname terug te spoelen. Druk meermaals
op de toets om de spoelsnelheid aan te passen: 4x, 8x 16x of 32x (max.).
• Druk op om de opname te pauzeren.
• Druk op om naar de liveweergave terug te keren.
• Druk eenmaal op SLOW om de opname aan 1/4 afspeelsnelheid af te spelen, of druk tweemaal om de
opname aan 1/8 afspeelsnelheid af te spelen.
V. 1.0 – 07/12/2012 21 ©Velleman nv
Page 22

CCTVPROM15
Zoekfunctie
• Om een event op te zoeken, druk op de knop LIST op het frontpaneel.
Het systeem toont een lijst met de opgenomen bestandstypes.
• U kunt de opnames opzoeken via het bestandstype. Beschikbare types zijn ALARM, MANUAL, MOTION,
SYSTEM en FULL LIST.
• Kies een lijst en opname uit deze lijst.
• Druk op ENTER om het afspelen te starten.
• Opmerking: de opgenomen bestanden kunnen eveneens worden opgezocht via de meegeleverde Video
Viewer-software.
10. Technische specificaties
videoformaat PAL
formaat videocompressie H.264
video-ingang 4 kanalen, composiet videosignaal 1 Vpp / 75 ohm BNC
video-uitgang composiet videosignaal 1 Vpp / 75 ohm BNC + VGA
video loopuitgang max. opnamefrequentie (PAL) frame/D1: 704 x 576 pixels aan 100 IPS (PAL)
regeling beeldkwaliteit super best - best - high - normal
opslag harde schijf ingebouwd SATA type, ondersteunt 1 x HDD, capaciteit van HDD is meer
dan 2 TB (harde schijf niet meegelev.)
snelwisfunctie van de harde schijf snel wissen van het "indexsysteem" van de opgenomen beelden, 1 TB in
minder dan 2 seconden
opnamemodus manueel, timer, beweging, alarm, netwerkgestuurd
beeldfrequentie 100 IPS voor PAL
mutliplex-functies directe weergave, opname, weergave, kopiëren en netwerk
audio I/O 4 audio-ingang, 1 audio-uitgang (mono)
zone voor bewegingsdetectie rooster 16 x 12 per kanaal
gevoeligheid bewegingsdetectie hoog - normaal - laag
opname pre-alarm 8 MB
back-uptoestel USB 2.0 flash drive (voor back-up en updates van firmware)
Ethernet 10/100 Base-T (ondersteunt afstandsbediening en LiveView via Ethernet)
netwerkverbinding ondersteunt TCP/IP, PPPoE, DHCP en DDNS
mobiele bewaking smartphones: EagleEyes software
- push video: op iPad, iPod Touch, iPhone en Android-telefoon
- toegang op afstand vanaf alle smartphoneplatforms (Apple, Android,
Blackberry, Nokia Symbian en Window Mobile)
computer: video viewer software op Windows en Mac
webbrowser: Internet Explorer, Firefox, Google Chrome en Safari via
Java, Quicktime of VLC plug-in
afstandsbediening bediening op afstand van de DVR en PTZ-functies (DVRRC4 meegelev.)
PTZ-besturing ja (via RS-485)
alarm I/O 4 in / 1 out
digitale zoom 2 x (liveweergave & playback)
toetsvergrendeling ja
detectie beeldverlies ja
cameratitels tot 6 karakters
videoregelingen kleurschakering / kleur / contrast / helderheid
formaat tijdsweergave JJ/MM/DD, DD/MM/JJ, MM/DD/JJ en OFF
voeding 19 Vdc
verbruik < 40 W
zomertijd (DST) ja
werktemperatuur 10 °C ~ 40 °C (50 °F ~ 104 °F)
systeemherstel automatisch systeemherstel na herinschakeling van de voeding
V. 1.0 – 07/12/2012 22 ©Velleman nv
Page 23

CCTVPROM15
afmetingen 345 x 223 x 59 mm
CAMERAS
IP-norm IP67
opneemelement 1/3" HR kleuren-CCD met SONY Effio DSP
aantal pixels 753 (H) x 582 (V) - PAL resolutie 600 tv-lijnen
min. verlichting 0.1 lux
IR LEDs 21
max. bereik IR 15 m
S/R verhouding > 48 dB (AGC uit)
elektronische sluiter 1/50 tot 1/100 000 s.
lens f 3.6 mm / F 2.0
lenshoek 92.6°
Colour Rolling Suppress ja
automatische
ja
versterkingsregeling
witbalans automatisch
video-uitgang 1.0 Vpp composiet, 75 ohm
audio neen
voeding 12 Vdc
verbruik 70 mA (IR-leds aan), 270 mA (IR-leds uit)
werktemperatuur 0 °C ~ 45 °C
afmetingen 140 x 56 x 80 mm
gewicht 285 g
Gebruik dit toestel enkel met originele accessoires. Velleman nv is niet aansprakelijk voor schade of
kwetsuren bij (verkeerd) gebruik van dit toestel.
Voor meer informatie over dit product, zie www.velleman.eu.
De informatie in deze handleiding kan te allen tijde worden gewijzigd zonder voorafgaande
kennisgeving.
V. 1.0 – 07/12/2012 23 ©Velleman nv
Page 24

CCTVPROM15
GUIDE D’INSTALLATION RAPIDE
1. Introduction
Aux résidents de l'Union européenne
Des informations environnementales importantes concernant ce produit
Ce symbole sur l'appareil ou l'emballage indique que l’élimination d’un appareil en fin de vie peut
polluer l'environnement. Ne pas jeter un appareil électrique ou électronique (et des piles éventuelles)
parmi les déchets municipaux non sujets au tri sélectif ; une déchèterie traitera l’appareil en question.
Renvoyer les équipements usagés à votre fournisseur ou à un service de recyclage local. Il convient de
respecter la réglementation locale relative à la protection de l’environnement.
En cas de questions, contacter les autorités locales pour élimination.
Nous vous remercions de votre achat ! Lire la présente notice attentivement avant la mise en service de
l’appareil. Si l’appareil a été endommagé pendant le transport, ne pas l’installer et consulter votre revendeur.
REMARQUE :
Ce document est un guide d’installation rapide. Pour plus de détails, se reporter à la notice d’emploi
complète sur le cédérom.
Contenu :
• 1 x enregistreur vidéo plein écran avec la fonction 'push video'
• 4 x caméras couleur haute résolution à LED à LED infrarouges: CAMCOLBUL27
• 4 x câble de caméra de 20 m
• 1 x adaptateur secteur de 19 V
• 1 x convertisseur CC-CC haute performance pour le DVR et les caméras
• 1 x télécommande: DVRRC4
• 1 x disque dur : HD500GB/S
• 1 x cédérom contenant la notice d’emploi complète.
2. Consignes de sécurité
Garder hors de la portée des enfants et des personnes no autorisées.
Risque d’électrocution lors de l’ouverture du boîtier. Toucher un câble sous tension peut
causer des électrochocs mortels.
Débrancher l’appareil s’il n’est pas utilisé ou pour le nettoyer. Tirer la fiche pour débrancher
l'appareil ; non pas le câble.
3. Directives générales
Se référer à la garantie de service et de qualité Velleman® en fin de notice.
Pour usage à l’intérieur uniquement.
Protéger contre la pluie, l’humidité et les projections d’eau. Ne jamais placer d’objet
contenant un liquide sur l’enregistreur.
Protéger contre la poussière.
Protéger contre la chaleur extrême. Veiller à ce que les fentes de ventilation ne soient pas
bloquées. Laisser une distance de minimum 2,5 cm entre l’enregistreur et tout autre objet.
Protéger contre les chocs. Traiter l’appareil avec circonspection pendant l’opération.
• Se familiariser avec le fonctionnement avant l’emploi.
• Toute modification est interdite pour des raisons de sécurité.
• N’utiliser qu’à sa fonction prévue. Un usage impropre annule d'office la garantie.
V. 1.0 – 07/12/2012 24 ©Velleman nv
Page 25

CCTVPROM15
• La garantie ne s’applique pas aux dommages survenus en négligeant certaines directives de cette notice et
votre revendeur déclinera toute responsabilité pour les problèmes et les défauts qui en résultent.
• Utiliser cet appareil en respectant les directives sur la protection de la vie privée.
4. Caractéristiques
• D1 integral (ou image) lors d'enregistrements en temps réel sur tous les canaux
• vidéosurveillance mobile grâce au logiciel gratuit EagleEyes: iPhone, iPad, Android:
o notification 'push' (dans les 5s.): vous informe par iPhone/iPad/Android dès qu'une alarme se
déclenche
o entrée d'alarme
• autres smartphones: BlackBerry, Win Mobile, Symbian : vidéosurveillance à distance
• connexion avec le téléphone mobile via GPRS, 3G ou WiFi
• pilotage GUI (interface graphique) et souris USB
• service de noms de domaine dynamiques automatiquement intégré (DDNS): service gratuit
• option (non incl.):
o moniteur vidéo composite et VGA: MONSCA6, MONSCA7
o moniteur VGA et DVI: MONSCA4, MONSCA5
o souris pas livrée
5. Description
Se référer aux illustrations en page 2 de cette notice.
Panneau frontal
Lecture ou enregistrement en cours.
Alarme déclenchée.
Enregistrement programmé.
Lecture en cours.
L’enregistreur est allumé.
DEL
HDD
ALARM
TIMER
PLAY
POWER
En mode réglages:
Appuyer sur ▲ / ▼ / ◄ / ► pour déplacer le curseur.
Pour ajuster un réglage, appuyer sur + ou – pour augmenter ou diminuer la
valeur de réglage.
NAVIGATION
En mode lecture:
Appuyer sur pour interrompre la lecture.
Appuyer sur pour arrêter la lecture.
Appuyer sur pour avancer rapidement.
Appuyer sur pour reculer rapidement.
MENU Accès au menu.
ENTER Confirmation.
LIST
Liste d’information des fichiers d’enregistrement.
QUICK SEARCH / RECORD / MOTION / ALARM / TIMER / FULL LIST
PLAY Lecture de l’enregistrement.
SLOW Lecture ralentie de l’enregistrement.
ZOOM Agrandissement de l’image en mode de monitorage en direct ou de lecture.
SEQ Affichage séquentiel plein écran de tous les canaux. Renfoncer pour quitter la fonction.
Mode d’affichage 4 canaux.
1 ~ 4 Sélection du canal.
AUDIO
V. 1.0 – 07/12/2012 25 ©Velleman nv
= SLOW + ZOOM
Enfoncer simultanément pour sélectionner le mode audio.
Page 26

CCTVPROM15
P.T.Z.
USB port
(2x)
Panneau arrière
port LAN Port de connexion du réseau LAN.
VGA connecteur pour moniteur vidéo (non inclus)
AUDIO IN 4 entrées audio pour la connexion d’une source audio externe, p.ex. une caméra avec audio.
AUDIO OUT 1 sortie audio pour la connexion d’un appareil audio, p.ex. un haut-parleur (mono).
VIDEO IN 4 entrées vidéo pour la connexion de sources vidéo externes, p.ex. des caméras.
MONITOR 1 sortie vidéo pour la connexion de l’enregistreur au moniteur principal.
EXTERNAL I/O Connecter un signal externe, p.ex. une alarme, caméra PTZ, à l’aide d’une fiche DSUB à 9
DC 19V Prise d’entrée d’alimentation.
= SLOW +
Enfoncer simultanément pour accéder au/quitter le mode de pilotage PTZ.
Connecter une clé USB de sauvegarde à un des ports ; connecter une souris USB au deuxième
port.
Remarque : Ne pas connecter deux clés USB ou deux souris USB simultanément.
broches.
Interrupteur d’alimentation.
6. Installation du matériel
Se référer aux illustrations à la page 2 de cette notice.
Connexion d’un moniteur
Connecter un moniteur compatible (non inclus) au port vidéo BNC ou VGA à l’arrière de l’enregistreur.
Connexion de l’alimentation
1. Insérer la fiche de l’alimentation dans la prise d’alimentation 19 VCC à l’arrière de l’appareil.
AVERTISSEMENT : N’utiliser que l’alimentation incluse.
2. Connecter le câble à l’alimentation. Connecter l’alimentation au réseau. Ne pas encore allumer
l’enregistreur.
Connexion d’une caméra
1. Cet enregistreur fonctionne avec un maximum de 4 caméras (non incluses). Chaque caméra nécessite sa
propre alimentation.
2. Connecter la sortie vidéo de la caméra à la prise d’entrée vidéo BNC à l’arrière de l’enregistreur. Le numéro
à côté de la connexion indique le canal.
Connexion audio
1. Le DVR intègre 4 entrées audio. Connecter la sortie audio de la caméra à une prise d’entrée audio BNC à
l’arrière de l’enregistreur. Veiller à connecter le canal audio au canal vidéo correspondant.
2. Le DVR est également muni d’une sortie audio BNC pour la connexion d’un appareil audio externe, p.ex. un
haut-parleur.
Connexion au réseau LAN
Pour une connexion au réseau LAN, connecter un câble réseau au port LAN situé à l'arrière du DVR. Utiliser une
fiche de type 8P8C (RJ45). Pour établir une connexion réseau, appuyer sur le bouton de menu et sélectionner
. Pour plus d'informations, se référer à la notice complète sur le cédérom inclus.
7. Configuration de base
• S'assurer que les caméras connectées soient allumées.
• Régler l'interrupteur d'alimentation du DVR situé à l'arrière de l'appareil sur ON.
Cela prend environ 15 à 30 secondes pour démarrer.
Aperçu du menu
Enfoncer la touche MENU et saisir le mot de passe pour afficher le menu.
V. 1.0 – 07/12/2012 26 ©Velleman nv
Page 27

CCTVPROM15
Remarque : Le mot de passe par défaut et le 0000 (4 x zéro).
QUICK START GENERAL - TIME SETUP
DATE SETUP DATE INFO - DAYLIGHT
SYSTEM TOOLS - SYSTEM INFO– BACKUP DATA – BACKUP LOG
EVENT
QUICK SEARCH - EVENT SEARCH - HDD INFO - EVENT LOG – BACKUP LIST
INFORMATION
ADVANCED
CONFIG
CAMERA – DETECTION – ALERT – NETWORK – DISPLAY – RECORD –
DEVICES NOTIFY
SCHEDULE
RECORD – DETECTION - ALARM
SETTING
Se reporter à la notice complète pour plus de détails.
Réglage de l’heure et de la date
Il est nécessaire de configurer l’heure et le date avant le premier emploi.
1. Enfoncer la touche MENU et saisir le mot de passe administrateur.
2. Sélectionner le sous-menu QUICK START.
3. Déplacer le curseur avec les touches de navigation et sélectionner le sous-menu TIME SETUP.
Remarque : Il est conseillé de ne plus modifier l’heure et la date une fois un enregistrement commencé.
Remarque : Laisser l’enregistreur allumé pendant 48 heures après la configuration de l’heure et de la date.
Configuration d’un mot de passe
1. Enfoncer la touche MENU et saisir le mot de passe.
2. Sélectionner le sous-menu SYSTEM.
3. Accéder au sous-menu TOOLS. Sélectionner le sous-menu ADMIN PASSWORD (ou OPERATOR PASSWORD)
et enfoncer la touche ENTER pour modifier le mot de passe.
Remarque : Un utilisateur autre que l’administrateur n’est pas autorisé à accéder au menu principal. Il
n’aura accès qu’à la barre menu (voir ci-dessous).
4. Modifier le premier digit avec les touches et et confirmer avec la touche ENTER ou sélectionner le
digit avec la souris. Répéter cette procédure pour les chiffres restants.
Remarque : Le mot de passe par défaut et le 0000 (4 x zéro).
Configuration d’enregistrement
1. Enfoncer la touche MENU et saisir le mot de passe.
2. Sélectionner le sous-menu QUICK START.
3. Déplacer le curseur avec les touches de navigation et sélectionner le sous-menu GENERAL.
4. Configurer la taille de l’image, la qualité de l’image et le nombre d’images par seconde.
5. Se reporter à la notice d’emploi complète sur le cédérom pour plus de détails.
V. 1.0 – 07/12/2012 27 ©Velleman nv
Page 28

CCTVPROM15
Lecture audio
Enfoncer simultanément les touches SLOW et ZOOM ou utiliser la barre menu (voir ci-dessous) pour
sélectionner le canal audio. Le canal sélectionné est indiqué dans la barre d’état.
Connexion et choix de l’utilisateur
1. Il est possible de se connecter à l’enregistreur comme administrateur ( ) ou comme utilisateur ( ).
L’icône s’affiche dans la barre d’état.
2. Commuter d’un utilisateur à l’autre en sélectionnant l’icône ( ou ). La sélection est verrouillée ( ).
3. Enfoncer l’icône et saisir le mot de passe du profil.
8. Configuration de la notification 'push'
Avec un iPhone, iPad ou Android, il est possible d'utiliser la fonction notification 'push' du DVR: le DVR envoie
une notification à votre appareil lorsqu'un événement survient.
Pour cela, installer l'application EagleEyes sur votre appareil mobile (voir Installer l'application EagleEyes ciaprès).
Remarque: Seul certaines broches d'entrée d'alarme supportent la notification 'push'.
8.1 Connexion PIN
Une carte I/O est livrée avec ce DVR pour savoir rapidement quelle broche supporte la notification 'push' (voir
table ci-dessous).
PIN Canal vidéo correspondant
Modèle 4CH PIN1 CH1
Connecter le capteur d'alarme (p.ex. comme des contacts magnétiques), à la broche I/O supportant la
notification 'push'. N'importe quel type de capteur peut être utilisé à condition que celui-ci soit pourvu d'un
contact sec.
V. 1.0 – 07/12/2012 28 ©Velleman nv
Page 29

CCTVPROM15
8.2 Installer l'application EagleEyes
Conditions préalables
Avant d'installer EagleEyes sur votre téléphone mobile pour la vidéosurveillance mobile, s'assurer de vérifier les
points suivants:
• Les services d'Internet mobile sont souscrits et accessibles pour votre téléphone mobile.
• Remarque: Il est possible d'être facturé pour l'accès à l'Internet par les réseaux 3G ou sans fil. Pour les
détails sur la vitesse d'accès à Internet, consulter votre gestionnaire de réseau local ou votre fournisseur
d'accès.
• Noter l'adresse IP, le numéro du port, le nom d'utilisateur et le mot de pas utilisés pour accéder à votre
DVR ou votre caméra réseau depuis l'Internet.
Où télécharger
1. Se connecter au site www.eagleeyescctv.com depuis votre téléphone mobile, et s'identifier.
Veuiller ne pas essayer de télécharger EagleEyes depuis votre ordinateur.
o Pour Android, sélectionner le lien de téléchargement depuis le site web pour démarrer le
téléchargement.
o Pour iPhone et iPad, deux versions d'EagleEyes sont disponibles: EagleEyesHD Plus (contre
paiement), et EagleEyesHD Lite (gratuit).
2. Sélectionner la version souhaitée, et vous serez redirigé vers " App Store" pour télécharger l'application.
3. Après le téléchargement, EagleEyes sera installé automatiquement à l'emplacement par défaut ou à
l'emplacement indiqué.
Remarque: Pour plus d'informations sur la configuration et le fonctionnement d'EagleEyes, consulter notre site
web officiel www.avtech.com.tw.
8.3 Configuration
Avant de configurer la notification 'push', s'assurer que:
1. Le système DVR system soit réglé comme décrit en point 3 Connection and Setup dans la notice d’emploi
complète sur le cédérom inclus.
2. Le DVR soit connecté à l'Internet.
3. L'application EagleEyes soit installée sur votre appareil mobile (voir Installer l'application EagleEyes ci-
dessus).
Etapes
1. Sur le DVR, cliquer avec le bouton droit de votre souris pour afficher le menu principal.
Aller à Advanced Config. > Notify.
Régler Guard sur On et configurer le type de votre capteur d'alarme (N.C. ou N.O.).
2. Ouvrir EagleEyes, et ajouter ce DVR au carnet d'adresses d'EagleEyes.
Pour plus d'informations sur le fonctionnement d'EagleEyes, consulter le site web www.eagleeyescctv.com.
3. Dans l'application EagleEyes, activer la notification 'push' comme décrit ci-après.
4. Déclencher le capteur d'alarme pour vérifier si vous recevez des notifications 'push'.
V. 1.0 – 07/12/2012 29 ©Velleman nv
Page 30

CCTVPROM15
9. Emploi
Affichage
L’illustration ci-dessous représente la disposition d’affichage.
A date et heure
B état général du système
C espace disponible sur le disque
dur
D état du canal
lecture canal audio direct 1~4
audio désactivé
zoom numérique activé (jaune) /
Les icônes représentés peuvent différer légèrement de la réalité.
désactivé
connexion LAN/connexion Internet/pas de connexion réseau
clé USB connectée
verrouillage des touches
mode séquentiel
enregistrement
connexion comme administrateur
lecture canal audio 1~4 (jaune)
enregistrement programmé
souris USB connectée
écrasement des données sur le disque dur (par
défaut)
pilotage PTZ
détection de mouvement
alarme
connexion comme utilisateur
V. 1.0 – 07/12/2012 30 ©Velleman nv
Page 31

CCTVPROM15
Sélectionner la fonction répétition A
B / ouvrir le
Barre menu
Remarque : Uniquement disponible lorsqu’une souris USB est connectée.
Déplacer le pointeur de la souris vers la gauche de l’écran :
menu des canaux
menu de lecture
fonction zoom (sélectionner d’abord le canal)
sélection du canal audio
menu du pilotage PTZ
Cliquez pour éteindre ou redémarrer le système.
Enregistrement
• S’assurer de la bonne connexion des caméras à l’enregistreur et vérifier la présence du disque dur.
• L’appareil démarre un enregistrement lorsque les fonctions d’auto-enregistrement et de pré-alarme sont
activées.
• L’icône s’affiche.
• L’icône ou s’affiche après une détection de mouvement ou une alarme (à condition que le mode
en question soit activé).
• L’icône s’affiche et la DEL s’allume en mode d’enregistrement programmé.
• L’enregistreur se met automatiquement en mode d’écrasement. L’icône s’affiche.
Lecture d’un enregistrement
Enfoncer la touche PLAY ou accéder à la barre menu pour démarrer la lecture d’un fichier d’enregistrement.
A barre de progression D Information
B touches de commande E Fermer
C fonction de recherche F
menu de sauvegarde
→
Remarque : Le fichier doit contenir un minimum de 8192 images (p.ex. IPS = 30, l’enregistrement doit avoir
une durée minimale de 273 secondes).
• Enfoncer la touche pour une avance rapide de l’enregistrement ; enfoncer la touche pour un recul
rapide de l’enregistrement. Enfoncer la touche à plusieurs reprises pour sélectionner la vitesse : 4x, 8x 16x
ou 32x (max.).
• Enfoncer la touche pour interrompre la lecture de l’enregistrement.
• Enfoncer la touche pour revenir au monitorage en direct.
• Enfoncer une fois la touche SLOW pour lire l’enregistrement à 1/4 de la vitesse de lecture normale ;
enfoncer la touche une deuxième fois pour lire l’enregistrement à 1/8 de la vitesse de lecture normale.
V. 1.0 – 07/12/2012 31 ©Velleman nv
Page 32

CCTVPROM15
La fonction de recherche
• Pour rechercher un événement, appuyer sur le bouton LIST sur le panneau frontal.
Le système affiche une liste de types d'enregistrements.
• Il est possible de rechercher des enregistrements par type. Les types disponibles sont ALARM, MANUAL,
MOTION, SYSTEM et FULL LIST.
• Sélectionner une liste et enregistrement depuis cette liste.
• Appuyer sur ENTER pour commencer la lecture.
Remarque : Le DVR intègre une fonction de recherche depuis le logiciel Video Viewer inclus.
10. Spécifications techniques
format vidéo PAL
format de compression vidéo H.264
entrée vidéo 4 canaux, signal vidéo composite 1 Vpp / 75 ohms BNC
sortie vidéo signal vidéo composite 1 Vpp / 75 ohms BNC + VGA
sortie vidéo en boucle résolution d'enregistrement max.
(PAL)
qualité d'image super best - best - high - normal
capacité disque dur type SATA intégré, 1 x HDD, capacité de plus de 2 TB (disque dur non
effacement rapide du contenu sur le
disque dur
mode d'enregistrement manuel, programmé, alarme, par détection de mouvement, depuis
taux de rafraîchissement 100 IPS pour PAL
multiplexage affichage en direct, enregistrement, repassage des images, copie de
audio I/O 4 entrée audio, 1 sortie audio (mono)
surface de détection de mouvement grille 16 x 12 par canal
sensibilité de la détection de
mouvement
enregistrement pré-alarme 8 Mo
système de sauvegarde USB 2.0 flash drive (pour la sauvegarde et les mises à jour du
Ethernet 10/100 Base-T (supporte le contrôle à distance et LiveView via Ethernet)
connexion réseau supporte TCP/IP, PPPoE, DHCP et DDNS
surveillance mobile Smartphones: Logiciel EagleEyes: push vidéo sur iPad, iPod Touch,
gestion à distance depuis toutes les plateformes du smartphone (Apple,
ordinateur logiciel vidéo sous licence sur Windows et Mac
navigateur web: Internet Explorer, Firefox, Google Chrome et Safari
télécommande commande à distance de l'enregistreur et des fonctions PTZ (DVRRC4
contrôle PTZ oui (via RS-485)
I/O alarme 4 in / 1 out
zoom numérique 2 x (image directe & lecture)
dispositif de verrouillage oui
détection de perte de l'image oui
titre de la caméra jusqu'à 6 caractères
réglages de l'image teint / couleur / contraste / luminosité
affichage de la date AA/MM/JJ, JJ/MM/AA, MM/JJ/AA et OFF
alimentation 19 Vcc
consommation < 40 W
frame/D1: 704 x 576 pixels à 100 IPS (PAL)
incl.)
nettoyage rapide du système d'indexation des fichiers enregistrés, 1 TB
sous les 2 secondes
réseau
sauvegarde et réseau
haute - normale - basse
micrologiciel)
iPhone et téléphone Android
Android, Blackberry, Nokia Symbian et Window Mobile)
depuis Java, Quicktime ou plugin VLC
incl.)
V. 1.0 – 07/12/2012 32 ©Velleman nv
Page 33

CCTVPROM15
heure d'été (DST) oui
température de service 10 °C ~ 40 °C (50 °F ~ 104 °F)
rétablissement du système rétablissement automatique du système après la remise sous tension
dimensions 345 x 223 x 59 mm
CAMERAS
indice de protection IP67
capteur capteur d'image CCD à couleur de 1/3" avec SONY Effio DSP
nombre de pixels 753 (H) x 582 (V) - PAL résolution 600 lignes TV
éclairement min. 0.1 lux
LEDs IR 21
portée max. de l'IR 15 m
rapport S/B > 48 dB (AGC éteint)
obturateur électronique de 1/50 à 1/100 000 s.
objectif f 3.6 mm / F 2.0
angle de l'objectif 92.6°
Colour Rolling Suppress oui
contrôle automatique de gain oui
balance des blancs automatique
sortie vidéo 1.0 Vpp composite, 75 ohms
audio non
alimentation 12 Vcc
consommation 70 mA (LEDs IR allumées), 270 mA (LEDs IR éteintes)
température de travail 0 °C ~ 45 °C
dimensions 140 x 56 x 80 mm
poids 285 g
N’employer cet appareil qu’avec des accessoires d’origine. SA Velleman ne sera aucunement
responsable de dommages ou lésions survenus à un usage (incorrect) de cet appareil.
Pour plus d’informations concernant cet article et la dernière version de cette notice, visiter notre
site web www.velleman.eu.
Toutes les informations présentées dans cette notice peuvent être modifiées sans notification
préalable.
V. 1.0 – 07/12/2012 33 ©Velleman nv
Page 34

CCTVPROM15
GUÍA RÁPIDA
1. Introducción
A los ciudadanos de la Unión Europea
Importantes informaciones sobre el medio ambiente concerniente a este producto
Este símbolo en este aparato o el embalaje indica que, si tira las muestras inservibles, podrían dañar
el medio ambiente.
No tire este aparato (ni las pilas, si las hubiera) en la basura doméstica; debe ir a una empresa
especializada en reciclaje. Devuelva este aparato a su distribuidor o a la unidad de reciclaje local.
Respete las leyes locales en relación con el medio ambiente.
Si tiene dudas, contacte con las autoridades locales para residuos.
¡Gracias por haber comprado la CCTVPROM15! Lea atentamente las instrucciones del manual antes de usarla.
Si el aparato ha sufrido algún daño en el transporte no lo instale y póngase en contacto con su distribuidor.
NOTA:
Este documento es una guía rápida. Para más informaciones, véase el manual del usuario completo en el
CD-ROM.
Incluye:
• 1 x videograbadora 'full frame' con función 'push'
• 4 x cámara color de alta resolución con Sony EFFIO DSP y LEDs IR: CAMCOLBUL27
• 4 x cable de cámara de 20 m
• 1 x adaptador de red de 19 V
• 1 x convertidor DC-DC de alto rendimiento para DVR y las cámaras
• 1 x mando a distancia IR: DVRRC4
• 1 x disco duro: HD500GB/S
• 1 x CD-ROM con el manual del usuario completo.
2. Instrucciones de seguridad
Mantenga el aparato lejos del alcance de personas no capacitadas y niños.
Riesgo de descargas eléctricas al abrir la caja. Puede sufrir una peligrosa descarga eléctrica al
tocar un cable conectado a la red eléctrica.
Desconecte siempre el aparato si no va a usarlo durante un largo período de tiempo o antes de
limpiarlo. Tire siempre del enchufe para desconectar el cable de red, nunca del propio cable.
3. Normas generales
Véase la Garantía de servicio y calidad Velleman® al final de este manual del usuario.
Sólo para el uso en interiores.
No exponga este equipo a lluvia, humedad, ni a ningún tipo de salpicadura o goteo. Nunca
ponga un objeto con líquido, p.ej. un florero, en el aparato.
No exponga este equipo a polvo.
No exponga este equipo a temperaturas extremas. Asegúrese de que los orificios de
ventilación no estén bloqueados. Deje una distancia de mín. 2,5cm entre el aparato y
cualquier otro objeto.
No agite el aparato. Evite usar excesiva fuerza durante el manejo y la instalación
• Familiarícese con el funcionamiento del aparato antes de utilizarlo.
• Por razones de seguridad, las modificaciones no autorizadas del aparato están prohibidas.
• Utilice sólo el aparato para las aplicaciones descritas en este manual. Su uso incorrecto anula la garantía
completamente.
V. 1.0 – 07/12/2012 34 ©Velleman nv
Page 35

CCTVPROM15
• Los daños causados por descuido de las instrucciones de seguridad de este manual invalidarán su garantía
y su distribuidor no será responsable de ningún daño u otros problemas resultantes.
• Respete la legislación en relación con la protección de la vida privada al utilizar este aparato.
4. Características
• D1 (imagen) completa en caso de grabaciones en tiempo real para todos los canales
• videovigliancia móvil: iPhone, iPad, Android
o notificación 'push' (dentro de los 5 seg.) le informa por iPhone/iPad/Android en cuanto una
alarm esté activada
o entrada de alarma
• otros smartphones BlackBerry, Win Mobile, Symbian: videovigilancia a distancia
• conexión con móvil por GPRS, 3G o WiFi
• control GUI (Graphical User Interface) y ratón USB
• sistema dinámico de nombres de dominio (DDNS) gratuito
• opción (no incl.)
o monitor vídeo compuesto & VGA: MONSCA6, MONSCA7
o monitor VGA y DVI: MONSCA4, MONSCA5
o ratón
5. Descripción
Véase las figuras en la página 2 de esta guía rápida.
Panel frontal
HDD Reproducción o grabación.
ALARM Se ha activado la alarma.
LED
NAVEGACIÓN
MENÚ Acceso al menú.
ENTER Confirmación.
TIMER Grabación programada.
PLAY Reproducción.
POWER La videograbadora está activada.
En el modo de configuración:
Pulse ▲ / ▼ / ◄ / ► para desplazar el cursor hacia arriba/abajo/la izquierda/la
derecha.
Si quiere modificar un ajuste, pulse + o – para aumentar o disminuir el valor.
En el modo de reproducción:
Pulse para pausar la reproducción.
Pulse para parrar la reproducción.
Pulse para avanzar de forma rápida.
Pulse para retroceder de forma rápida.
LIST
PLAY Reproducción de la grabación.
SLOW Reproducción de la grabación a cámara lenta.
ZOOM Ampliar la imagen en el modo de vigilancia en directo o en el modo de reproducción.
SEQ Pulse SEQ para visualizar todos los canales sucesivamente en pantalla completa. Vuelva a
1 ~ 4 Selección del canal.
AUDIO
V. 1.0 – 07/12/2012 35 ©Velleman nv
Lista con los ficheros grabados.
QUICK SEARCH / RECORD / MOTION / ALARM / TIMER / FULL LIST
pulsar para salir de esta función.
Modo de visualización 4 canales.
= SLOW + ZOOM
Pulsar simultáneamente para seleccionar el modo audio.
Page 36

CCTVPROM15
P.T.Z.
USB port
(2x)
Panel trasera
puerto LAN Puerto de conexión de la red LAN.
VGA conector para monitor de vídeo (no incluido)
AUDIO IN 4 entradas de audio para conectar 4 fuentes de audio externas, p.ej. una cámara con
AUDIO OUT 1 salida de audio para conectar un aparato audio, p.ej. un altavoz (mono).
VIDEO IN 4 entradas de vídeo para conectar fuentes de vídeo externas, p.ej. cámaras.
MONITOR 1 salida vídeo para conectar la videograbadora al monitor principal.
EXTERNAL I/O Conecte una señal externa, p.ej. una alarma, cámara PTZ, con un conector DSUB de 9
DC 19V Entrada de alimentación.
= SLOW +
Pulse simultáneamente SLOW y para entrar en o salir del modo de control PTZ.
Conecte una memoria USB a uno de los puertos USB para ; conecte un ratón USB al segundo
puerto.
Nota: No conecte dos memorias USB o dos ratones USB simultáneamente.
audio.
polos.
Interruptor ON/OFF
6. Instalar el hardware
Véase las figuras en la página 2 de esta guía rápida.
Conectar un monitor
Conecte un monitor compatible (no incl.) al puerto de vídeo BNC o VGA de la parte trasera de la
videograbadora.
Conectar la alimentación
1. Introduzca el conector de alimentación en la entrada alimentación de 19 VCC de la parte trasera del
aparato.
¡OJO!: Utilice sólo la alimentación incluida.
2. Conecte el cable a la alimentación. Conecte la alimentación a la red. Todavía no active la videograbadora.
Conectar una cámara
1. Este aparato funciona con máx. 4 cámaras (no incl.). Cada cámara necesita su propia alimentación.
2. Conecte la salida de vídeo de la cámara a la entrada de vídeo BNC de la parte trasera de la videograbadora.
El número al lado de la conexión indica el canal.
Conexión de audio
1. La DVR incluye 4 entradas de audio. Conecte la salida de audio de la cámara a la entrada audio BNC de la
parte trasera de la videograbadora. Asegúrese de que conecte el canal audio al canal vídeo
correspondiente.
2. La DVR también está equipada con una salida de audio BNC para conectar un aparato de audio externo,
p.ej. un altavoz.
Conexión a la red LAN
Conecte el DVR a una red local al conectar un cable de red al puerto LAN de la parte trasera del DVR. Utilice un
conector 8P8C (RJ45). Para configurar la conexión de red, pulse la tecla MENU y seleccione . Consulte el
amplio manual del usuario para más informaciones (CD incluido).
7. Configuración básica
• Asegúrese de que las cámaras conectadas estén activadas.
• Coloque el interruptor ON/OFF de la parte trasera del DVR en la posición ON.
Toma aproximadamente de 15 a 30 segundos para iniciarse.
V. 1.0 – 07/12/2012 36 ©Velleman nv
Page 37

CCTVPROM15
Vista general del menú
Pulse la tecla MENU e introduzca la contraseña para visualizar el menú.
Nota: La contraseña por defecto es 0000 (4 x cero).
QUICK START GENERAL - TIME SETUP
DATE SETUP DATE INFO - DAYLIGHT
SYSTEM TOOLS - SYSTEM INFO– BACKUP DATA – BACKUP LOG
EVENT
QUICK SEARCH - EVENT SEARCH - HDD INFO - EVENT LOG – BACKUP LIST
INFORMATION
ADVANCED
CONFIG
CAMERA – DETECTION – ALERT – NETWORK – DISPLAY – RECORD –
DEVICES NOTIFY
SCHEDULE
RECORD – DETECTION - ALARM
SETTING
Para más informaciones, véase el manual del usuario completo.
Ajustar la hora y la fecha
Es necesario configurar la hora y la fecha antes del primer uso.
1. Pulse la tecla MENÚ e introduzca la contraseña.
2. Seleccione el submenú QUICK START.
3. Desplace el cursor con las teclas de navegación y seleccione el submenú TIME SETUP.
Nota: ya no modifique la hora ni la fecha después de que haya empezado una grabación.
Nota: Deje que la videograbadora quede activada durante 48 horas después de haber configurado la hora y
la fecha.
Configurar la contraseña
1. Pulse la tecla MENU e introduzca la contraseña.
2. Seleccione el submenú SYSTEM.
3. Entre en el submenú TOOLS. Seleccione el submenú ADMIN PASSWORD (u OPERATOR PASSWORD) y pulse
la tecla ENTER para modificar la contraseña.
Nota: Sólo el administrador puede entrar en el menú principal. Los demás usuarios sólo tienen acceso a la
barra de menú (véase abajo).
4. Modifique el primer dígito con las teclas y y confirme con la tecla ENTER. Repita este
procedimiento para las cifras restantes.
Nota: La contraseña por defecto es 0000 (4 x cero).
Configurar la función de grabación
1. Pulse la tecla MENÚ e introduzca la contraseña.
2. Seleccione el submenú QUICK START.
3. Mueve el cursor con las teclas de navegación y seleccione el submenú GENERAL.
V. 1.0 – 07/12/2012 37 ©Velleman nv
Page 38

CCTVPROM15
4. Configure el formato de la imagen, la calidad de la imagen y el número de imágenes por segundo.
5. Para más informaciones, véase el manual del usuario completo en el CD-ROM.
Reproducir audio
Pulse simultáneamente las teclas SLOW y ZOOM o utilice la barra de menú (véase a continuación) para
seleccionar el canal audio. El canal seleccionado se indica en la barra de estado.
Seleccionar el usuario
1. Es posible conectarse a la videograbadora no sólo como administrador ( ) sino también como
usuario ( ). El icono se visualiza en la barra de estado.
2. Conmute de un usuario a otro al seleccionar el icono ( o ). La selección está bloqueada ( ).
3. Pulse el icono e introduzca la contraseña del perfil.
8. Configurar la función « Push video »
Si tiene un iPhone, iPad o teléfono móvil Android, puede utilizar la función « push video » del DVR: el DVR
enviará una notificación a su aparato en cuanto se active la alarma.
Para esto, instale la app « EagleEyes » en su teléfono móvil (consulte Instalar la aplicación « EagleEyes » a
continuación).
Observación: Sólo algunos pines alarm-in soportan la función « push video ».
8.1 Conexión PIN
El DVR incluye una placa E/S para ayudarle a conocer de forma rápida los pines que soportan « push video »
(véase la lista a continuación).
PIN canal de vídeo correspondiente
Modelo CH4 PIN1 CH1
Conecte el sensor de alarma (p.ej. contacto magnético) al pin E/S que soporta « push video ». Puede utilizar
cualquier tipo de sensor con contacto seco.
8.2 Instalar la aplicación « EagleEyes »
Prerrequisitos
Antes de instalar EagleEyes en el teléfono móvil para la vigilancia a distancia, asegúrese de que ha comprobado
lo siguiente:
• Tiene suscritos y disponibles para utilizar servicios de Internet en su teléfono móvil.
• Observación: El acceso a Internet a través de Wireless o redes 3G le costará dinero. Consulte el detalle de
las tarifas de acceso a Internet con su proveedor de red.
• Tiene anotados la dirección IP, el número de puerto, el nombre de usuario y la contraseña que necesita
para acceder a su cámara de red a través de internet.
V. 1.0 – 07/12/2012 38 ©Velleman nv
Page 39

CCTVPROM15
Dónde descargar el software
1. Conéctese a la página web www.eagleeyescctv.com desde su teléfono y regístrese
No intente descargar EagleEyes desde su ordenador.
o Para Android, seleccione el enlace de descarga que puede encontrar en la página web para
iniciar la descarga.
o Para iPhone y iPad, existen dos versiones: EagleEyesHD Plus (versión de pago) y EagleEyesHD
Lite (versión gratuita).
2. Seleccione la versión que quiera y se abre la “App Store” para descargar la aplicación.
3. Cuando la descarga se haya completado, EagleEyes se instalará automáticamente en la ubicación por
defecto en la que se guardan todas las aplicaciones en su teléfono móvil, o bien donde usted especifique.
Observación: Para más informaciones sobre la configuración y el uso de EagleEyes, visite la página web oficial
www.avtech.com.tw.
8.3 Configuración
Antes de configurar la función « push video », asegúrese de que:
1. haya configurado el DVR de manera correcto (consulte Conexión y Configuración del manual del usuario
amplio en el CD-ROM incluido).
2. el DVR esté conectado a internet.
3. la app EagleEyes esté instalado en el teléfono móvil (consulte Instalar la aplicación « EagleEyes » arriba).
Pasos
1. En el DVR, haga clic con el botón derecho del ratón para visualizar el menú principal.
Vaya a Advanced Config. > Notify.
Coloque Guard en la posición On y configure el tipo de sensor de alarma (N.C. o N.A.).
2. Abra EagleEyes y añada este DVR a la libreta de direcciones EagleEyes.
Para más informaciones sobre el uso de EagleEyes, visite www.eagleeyescctv.com.
3. En la app EagleEyes, active « push video » (véase abajo.
4. Active la alarma para ver
si recibe un aviso de notificación
9. Uso
Display
La siguiente figura representa la disposición de visualización.
.
A fecha y hora
B estado general del sistema
C espacio disponible en el disco duro
D estado del canal
V. 1.0 – 07/12/2012 39 ©Velleman nv
Page 40

CCTVPROM15
reproducción directa del canal
audio 1~4
audio desactivado
zoom digital activado (amarillo) /
desactivado
conexión LAN
no hay una conexión con la red
está conectada una llave USB
bloqueo de las teclas
modo secuencial
grabación
conexión como administrador
reproducción del canal audio 1~4 (amarillo)
grabación programada
está conectado ratón USB
conexión Internet
sobre-escribir los datos del disco duro (por
defecto)
control PTZ
detección de movimientos
Alarma
Alarm mode
conexión como usuario
Los iconos representados pueden diferir ligeramente de la realidad.
Barra de menú
Nota: Está sólo disponible si está conectado un ratón USB.
Mueve el puntero del ratón hacia la izquierda de la pantalla:
menú de los canales
menú de reproducción
función zoom (primero, seleccione el canal)
selección del canal audio
menú de control PTZ
Haga clic para desactivar o reiniciar el sistema
Grabación
• Asegúrese de que las cámaras y el disco duro están conectados correctamente a la videograbadora.
• El aparato empieza una grabación si las funciones de grabación automática y de prealarma están activadas.
• El icono se visualiza.
• Se visualiza el icono o después de la detección de movimientos o una alarma (si el modo en
cuestión está activado).
• Se visualiza el icono y el LED se ilumina en el modo de grabación programada.
• La videograbadora se pone automáticamente en el modo ‘sobre-escribir’. Se visualiza el icono .
V. 1.0 – 07/12/2012 40 ©Velleman nv
Page 41

CCTVPROM15
seleccionar la función de repetición A
B / abrir el
tección de movimientos, alarma, por
Reproducir una grabación
Pulse la tecla PLAY o entre en la barra de menú para activar la reproducción de un fichero de grabación.
A barra de progreso D información
B teclas de control E cerrar
C función de búsqueda F
menú copia de seguridad
→
Nota: El fichero debe incluir mín. 8192 imágenes (p.ej. IPS = 30, la grabación debe tener una duración mín. de
273 segundos).
• Pulse la tecla para avanzar la grabación de manera rápida; pulse la tecla para retroceder la
grabación de manera rápida. Pulse la tecla varias veces para seleccionar la velocidad: 4x, 8x 16x o 32x
(máx.).
• Pulse la tecla para interrumpir la reproducción de la grabación.
• Pulse la tecla para volver a la vigilancia en directo.
• Pulse la tecla SLOW una vez para reproducir la grabación a 1/4 de la velocidad de la reproducción normal;
pulse la tecla una segunda vez para reproducir la grabación a 1/8 de la velocidad de la reproducción
normal.
La función de búsqueda
• Hay cuatro funciones de búsqueda: según la grabación, según la hora de la grabación, según la alarma y
según la detección de movimientos.
• Búsqueda según la lista: Pulse la tecla LIST para visualizar una lista con todos los tipos de grabación
(ALARM, MANUAL, MOTION, SYSTEM y FULL LIST).
• Seleccione el tipo y pulse la tecla ENTER para activar la reproducción.
Nota: La DVR incluye una función de búsqueda por el software Video Viewer incl.
10. Especificaciones
DVR
sistema de vídeo PAL
formato de compresión vídeo H.264
entrada de vídeo 4 canales, señal de vídeo compuesto 1 Vpp / 75 ohm BNC
salida de vídeo señal de vídeo compuesto 1 Vpp / 75 ohm BNC + VGA
salida de vídeo de bucle frecuencia máx. de grabación (PAL) frame/D1: 704 x 576 píxeles con 100 IPS (PAL)
ajuste de la calidad de imagen Super Best (súper mejor), Best (mejor), High (alta) y Normal
(normal)
capacidad disco duro tipo SATA incl., soporta 1 x HDD, soporta cada la capacidad HDD
de más de 2 TB (HDD no incl.)
función 'borrar el disco duro de manera
rápida'
modo de grabación manual, temporizador, por de
frecuencia de actualización de las imágenes 100 IPS para PAL
funciones multiplex reproducción en directa, grabación, reproducción, copia de
audio E/S 4 entrada de audio, 1 salida de audio (mono)
zona de detección de movimiento rejilla 16 x 12 por canal
sensibilidad de detección de movimientos alta - media - baja
limpiar rápidamente el "sistema índice" de los ficheros grabados,
1 TB en menos de 2 segundos
la red
seguridad y red
V. 1.0 – 07/12/2012 41 ©Velleman nv
Page 42

CCTVPROM15
grabación prealarma 8 MB
aparato 'backup' USB 2.0 flash drive (para la copia de seguridad y las
actualizaciones del firmware)
Ethernet 10/100 Base-T (soporta el control a distancia y LiveView por
Ethernet)
conexión de red soporta TCP/IP, PPPoE, DHCP y DDNS
vigilancia a distancia por el móvil smartphones: software EagleEyes
push video: iPad, iPod Touch, iPhone y móviles Android
conexión a distancia por cualquier plataforma de smartphone
(Apple, Android, Blackberry, Nokia Symbian y Window Mobile)
ordenador: software 'video viewer' en windows y Mac
navegador: Internet Explorer, Firefox, Google Chrome y Safari
mediante Java, Quicktime o plug-in VLC
mando a distancia IR la videograbadora y las funciones PTZ se manejan a distancia
(DVRRC4 incl.)
PTZ sí (por RS-485)
alarma E/S 4 in / 1 out
zoom de la imagen 2 x (imagen en directo & reproducción)
bloqueo del teclado sí
detección de pérdida de la señal sí
título de la cámara máx. 6 caracteres
ajustes de vídeo matiz, color, contraste, brillo
formato de la visualización del tiempo AA/MM/DD, DD/MM/AA, MM/DD/AA y OFF
alimentación 19 Vdc
consumo < 40 W
horario de verano (DST) sí
temperatura de funcionamiento 10 °C ~ 40 °C (50 °F ~ 104 °F)
restablecimiento restablecimiento automático del sistema después de haber
activado la alimentación de nuevo
dimensiones 345 x 223 x 59 mm
CÁMARA
grado de protección IP IP67
elemento de imagen sensor de imagen CCD a color de 1/3" con SONY Effio DSP, alta
resolución
número de píxeles 753 (H) x 582 (V) - PAL resolución 600 líneas TV
iluminación mínima 0.1 lux
LEDs IR 21
alcance IR máx. 15 m
relación señal / ruido > 48 dB (AGC desactivado)
shutter electrónico de 1/50 a 1/100.000 seg.
óptica f 3.6 mm / F 2.0
ángulo de visión 92.6°
Colour Rolling Suppress sí
control automático de ganancia (AGC) Si
balance de blancos automático
salida de vídeo 1.0 Vpp compuesto, 75 ohm
audio no
alimentación 12 Vdc
consumo 70 mA (LEDs IR encendidos), 270 mA (LEDs IR apagados)
temperatura de funcionamiento 0 °C ~ 45 °C
dimensiones 140 x 56 x 80 mm
peso 285 g
V. 1.0 – 07/12/2012 42 ©Velleman nv
Page 43

CCTVPROM15
Utilice este aparato sólo con los accesorios originales. Velleman NV no será responsable de daños ni
lesiones causados por un uso (indebido) de este aparato.
Para más información sobre este producto y la versión más reciente de este manual del usuario,
visite nuestra página www.velleman.eu.
Se pueden modificar las especificaciones y el contenido de este manual sin previo aviso.
V. 1.0 – 07/12/2012 43 ©Velleman nv
Page 44

CCTVPROM15
nicht blockiert werden. Beachten Sie eine minimale Entfernung von 2.5cm zwischen dem Gerät
SCHNELLEINSTIEG
1. Einführung
An alle Einwohner der Europäischen Union
Wichtige Umweltinformationen über dieses Produkt
Dieses Symbol auf dem Produkt oder der Verpackung zeigt an, dass die Entsorgung dieses Produktes
nach seinem Lebenszyklus der Umwelt Schaden zufügen kann. Entsorgen Sie die Einheit (oder
verwendeten Batterien) nicht als unsortiertes Hausmüll; die Einheit oder verwendeten Batterien
müssen von einer spezialisierten Firma zwecks Recycling entsorgt werden. Diese Einheit muss an den
Händler oder ein örtliches Recycling-Unternehmen retourniert werden. Respektieren Sie die örtlichen
Umweltvorschriften.
Falls Zweifel bestehen, wenden Sie sich für Entsorgungsrichtlinien an Ihre örtliche Behörde.
Wir bedanken uns für den Kauf des CCTVPROM15! Lesen Sie diese Bedienungsanleitung vor Inbetriebnahme
sorgfältig durch. Überprüfen Sie, ob Transportschäden vorliegen. Sollte dies der Fall sein, verwenden Sie das
Gerät nicht und wenden Sie sich an Ihren Händler.
BEMERKUNG:
Dieses Dokument ist ein Schnelleinstieg. Für mehr Informationen, siehe die vollständige Bedienungsanleitung
auf CD-ROM.
Lieferumfang:
• 1 x DVR 'full frame' mit Push-Funktion
• 4 x hochauflösende Farbkamera mit Sony EFFIO DSP und IR-LEDs: CAMCOLBUL27
• 4 x Kamerakabel von 20 m
• 1 x 19 V-Netzteil
• 1 x Hochleistungs-DC-DC-Umwandler für DVR und 4 Kameras
• 1 x IR-Fernbedienung: DVRRC4
• 1 x Festplatte: HD500GB/S
• 1 x CD-ROM mit der vollständigen Bedienungsanleitung
2. Sicherheitshinweise
Halten Sie Kinder und Unbefugte vom Gerät fern.
Stromschlaggefahr beim Öffnen des Gehäuses. das Berühren von unter Spannung stehenden
Leitungen könnte zu lebensgefährlichen elektrischen Schlägen führen.
Trennen Sie das Gerät bei Nichtbenutzung und vor jeder Reinigung vom Netz. Fassen Sie dazu den
Netzstecker an der Grifffläche an und ziehen Sie nie an der Netzleitung.
3. Allgemeine Richtlinien
Siehe Velleman® Service- und Qualitätsgarantie am Ende dieser Bedienungsanleitung.
Nur für die Anwendung im Innenbereich.
Schützen Sie das Gerät vor Regen und Feuchte. Setzen Sie das Gerät keiner Flüssigkeit wie
z.B. Tropf- oder Spritzwasser, aus. Stellen Sie keine mit Flüssigkeit befüllten Gegenstände,
wie z.B. eine Vase, auf das Gerät.
Schützen Sie das Gerät vor Staub.
Schützen Sie das Gerät vor extremen Temperaturen. Beachten Sie, dass die Lüftungsschlitze
und jedem anderen Gegenstand.
Vermeiden Sie Erschütterungen. Vermeiden Sie rohe Gewalt während der Installation und
Bedienung des Gerätes.
• Nehmen Sie das Gerät erst in Betrieb, nachdem Sie sich mit seinen Funktionen vertraut gemacht haben.
V. 1.0 – 07/12/2012 44 ©Velleman nv
Page 45

CCTVPROM15
• Eigenmächtige Veränderungen sind aus Sicherheitsgründen verboten.
• Verwenden Sie das Gerät nur für Anwendungen beschrieben in dieser Bedienungsanleitung sonst kann dies
zu Schäden am Produkt führen und erlischt der Garantieanspruch.
• Bei Schäden, die durch Nichtbeachtung der Bedienungsanleitung verursacht werden, erlischt der
Garantieanspruch. Für daraus resultierende Folgeschäden übernimmt der Hersteller keine Haftung.
• Respektieren Sie die Gesetzgebung hinsichtlich der Intimsphäre bei Anwendung dieses Gerätes.
4. Eigenschaften
• vollständiges D1 (Bild) bei Echtzeit-Aufnahmen für alle Kanäle
• mobile Video-Überwachung: iPhone, iPad, Android:
o Push-Benachrichtigung (innerhalb von 5 Sek.): informiert Sie über iPhone/iPad/Android sobald
ein Alarm ausgelöst wird
o Alarmeingang
• andere Smartphones: BlackBerry, Win Mobile, Symbian¦Video-Überwachung auf Abstand
• Anschluss mit Handy über GPRS, 3G oder Wi-Fi
• Bedienung über GUI (Graphical User Interface) und USB-Maus
• Dynamischer Domain-Name-System-Eintrag (DDNS): gratis
• Option (nicht mitgeliefert):
o kompositer Video- und VGA-Monitor: MONSCA6, MONSCA7
o VGA- und DVI-Monitor: MONSCA4, MONSCA5
o Maus nicht mitgeliefert
5. Umschreibung
Siehe Abbildungen, Seite 2 dieser Bedienungsanleitung.
Frontplatte
HDD Die Festplatte spielt Daten ab oder nimmt diese auf.
ALARM Der Alarm wurde eingeschaltet.
LEDs
NAVIGATION
TIMER Die programmierte Aufnahmefunktion ist eingeschaltet.
PLAY Das Gerät spielt de Aufnahme ab.
POWER Das Gerät ist eingeschaltet.
Im Einstellmodus:
Drücken Sie ▲ / ▼ / ◄ / ► um den Cursor nach oben/unten/links/rechts zu
bewegen.
Um eine Einstellung zu ändern, drücken Sie + oder – um den Wert zu erhöhen
oder zu verringern.
Im Wiedergabemodus:
Drücken Sie um die Wiedergabe zu pausieren.
Drücken Sie um die Wiedergabe zu stoppen.
Drücken Sie für einen schnellen Vorlauf.
Drücken Sie für einen schnellen Rücklauf.
MENÜ Drücken Sie MENÜ um das Menü anzuzeigen.
ENTER Drücken Sie ENTER um zu bestätigen.
LIST
Liste der Aufnahmedateien.
QUICK SEARCH / RECORD / MOTION / ALARM / TIMER / FULL LIST
PLAY Drücken Sie PLAY um die Aufnahme abzuspielen.
SLOW Drücken Sie SLOW um die abgespielte Datei langsam abzuspielen.
ZOOM Drücken Sie ZOOM um das Bild im ausgewählten Kanal zu vergrößern.
SEQ Drücken Sie SEQ um alle Kanäle nacheinander im ganzen Bildschirm anzuzeigen. Drücken Sie
wieder, um die Funktion zu verlassen.
V. 1.0 – 07/12/2012 45 ©Velleman nv
Drücken Sie um das 4-Kanal-Display anzuzeigen.
Page 46

CCTVPROM15
1 ~ 4 Drücken Sie eine dieser Taste, um den entsprechenden Kanal auszuwählen.
AUDIO
P.T.Z.
USB port
(2x)
Rückseite
LAN-Port Anschluss für ein LAN-Netz.
VGA Anschluss für Videomonitor (nicht enthalten)
AUDIO IN 4 Audio-Eingänge für 4 externe Audioquellen, z.B. Kamera mit Audio.
AUDIO OUT 1 Audio-Ausgang zu einem Audiogerät, z.B. Lautsprecher (mono).
VIDEO IN 4 Video-Eingänge für 4 externe Videoquellen, z.B. Kameras.
MONITOR 1 Video-Ausgang zu Hauptmonitor.
EXTERNAL I/O Schließen Sie ein externes Signal, wie z.B. Alarm oder PTZ-Kamera, über einen 9-pol. DSUB-
DC 19V Netzeingang.
= SLOW + ZOOM
Drücken Sie gleichzeitig auf SLOW und ZOOM um die verschiedene Töne auszuwählen.
= SLOW +
Drücken Sie SLOW und gleichzeitig, um die PTZ-Funktion ein- oder auszuschalten.
Verbinden Sie einen Memorystick mit einem USB-Anschluss. Verbinden Sie eine USB-Maus mit
einem anderen USB-Anschluss.
Bemerkung: Verbinden Sie keine zwei Memorysticks oder Mäuse mit den USB-Anschlüssen.
Stecker, an.
EIN/AUS-Schalter
6. Die Hardware installieren
Siehe Abbildungen, Seite 2 dieser Bedienungsanleitung.
Einen Videomonitor anschließen
Verbinden Sie einen kompatiblen Monitor (nicht mitgeliefert) mit dem BNC oder VGA Video-Ausgang auf der
Rückseite des Gerätes.
Ein Netzteil anschließen
1. Stecken Sie den DC-Stecker des Netzteils in den 19 VDC-Eingang auf der Rückseite des Gerätes.
WARNUNG: Verwenden Sie nur das mitgelieferte Netzteil.
2. Verbinden Sie das Netzkabel mit dem Netzteil und verbinden Sie das Netzteil danach mit dem Netz.
Schalten Sie das Gerät noch nicht ein.
Eine Kamera anschließen
1. Das Gerät eignet sich für die Anwendung mit 4 kompatiblen Kameras (nicht mitgeliefert). Jede
angeschlossene Kamera braucht ein eigenes Netzteil.
2. Verbinden Sie den Video-Ausgang der Kamera mit dem BNC Video-Eingang auf der Rückseite des Gerätes.
Die Nummer neben dem Anschluss zeigt die Kanalnummer an.
Audio-Anschluss
1. Das Gerät hat 4 Audio-Eingänge. Verbinden Sie den Audio-Ausgang der Audioquelle mit dem Audio-Eingang
des Gerätes. Make sure to connect the audio channel to the corresponding video channel. Verwenden Sie
hierfür einen BNC-Stecker.
2. Das Gerät hat auch einen BNC Audio-Ausgang zu einem externen Audiogerät, z.B. Lautsprecher.
Anschluss an ein LAN-Netz
Verbinden Sie den DVR mit einem lokalen Netzwerk, indem Sie ein Netzwerkkabel mit dem LAN-Port auf der
Rückseite des DVR verbinden. Verwenden Sie einen 8P8C-Anschluss (RJ45). Um eine Netzwerkverbindung
einzustellen, drücken Sie MENU und wählen Sie . Siehe die ausführliche Bedienungsanleitung auf der CDROM für mehr Informationen.
7. Basiskonfiguration
• Beachten Sie, dass die angeschlossenen Kameras eingeschaltet sind.
V. 1.0 – 07/12/2012 46 ©Velleman nv
Page 47

CCTVPROM15
• Stellen Sie den EIN/AUS-Schalter auf der Rückseite des DVR auf ON.
Es dauert ungefähr 15 bis 30 Sekunden, um zu starten.
Menü-Übersicht
Drücken Sie MENU und geben Sie das Passwort ein, um das Menü anzuzeigen.
Bemerkung: Das Standardpasswort ist 0000 (4x Null).
QUICK START GENERAL - TIME SETUP
DATE SETUP DATE INFO - DAYLIGHT
SYSTEM TOOLS - SYSTEM INFO– BACKUP DATA – BACKUP LOG
EVENT
QUICK SEARCH - EVENT SEARCH - HDD INFO - EVENT LOG – BACKUP LIST
INFORMATION
ADVANCED
CONFIG
CAMERA – DETECTION – ALERT – NETWORK – DISPLAY – RECORD –
DEVICES NOTIFY
SCHEDULE
RECORD – DETECTION - ALARM
SETTING
Für mehr Informationen, siehe die ausführliche Bedienungsanleitung.
Die Uhrzeit und das Datum einstellen
Stellen Sie das de Datum und die Uhrzeit vor der ersten Inbetriebnahme ein.
1. Drücken Sie MENÜ und geben Sie das Passwort ein, um das Menü anzuzeigen.
2. Wählen Sie das Submenü QUICK START aus.
3. Gehen Sie zum Submenü TIME SETUP.
Bemerkung: Ändern Sie das eingestellte Datum und die Uhrzeitniet nicht mehr wenn die Aufnahme
gestartet ist.
Bemerkung: Lassen Sie ein neu eingestelltes Gerät 48 Stunden eingeschaltet.
Ein Passwort einstellen
1. Drücken Sie MENÜ und geben Sie das Passwort ein, um das Menü anzuzeigen.
2. Wählen Sie das Submenü SYSTEM aus.
3. Gehen Sie zu TOOLS. Wählen Sie ADMIN PASSWORD (oder OPERATOR PASSWORD) aus und drücken Sie
ENTER.
Bemerkung: Ein normaler Benutzer hat keinen Zugang zum Hauptmenü, nur zur Menüleiste (siehe unten).
4. Geben Sie das neue Passwort mit den Tasten oder ein, und bestätigen Sie mit ENTER. Sie
können die gewünschte Ziffer auch mit der Maus auswählen. Wiederholen Sie für die übrigen Ziffern.
Bemerkung: das Standardpasswort ist 0000 (4x Null).
Die Aufnahmefunktion einstellen
1. Drücken Sie MENÜ und geben Sie das Passwort ein, um Menü anzuzeigen.
V. 1.0 – 07/12/2012 47 ©Velleman nv
Page 48

CCTVPROM15
2. Wählen Sie das Submenü QUICK START.
3. Wählen Sie das Submenü GENERAL mit den Tasten aus.
4. Stellen Sie die Bildgröße, die Bildqualität und die Anzahl Bilder pro Sekunden ein.
5. Für mehr Informationen, siehe die vollständige Bedienungsanleitung auf dem CD-ROM.
Audio abspielen
Drücken Sie gleichzeitig auf SLOW und ZOOM um den Audiokanal auszuwählen oder verwenden Sie die
Menüleiste (siehe unten). Der ausgewählte Audiokanal wird in der Statusleiste angezeigt.
Den Benutzer auswählen
1. Nicht nur ein Administrator ( ) sondern auch ein Benutzer ( ) kann das Gerät bedienen. Das Symbol
wird in der Statusleiste angezeigt.
2. Klicken Sie auf das gewünschte Symbol ( of ) um als Administrator oder Benutzer einzuloggen ( ).
3. Drücken Sie auf und geben Sie das Passwort des gewünschten Profils ein.
8. Push Video-Konfiguration
Haben Sie einen iPhone, iPad oder ein Android-Smartphone, dann können Sie die Push Video-Funktion
verwenden: Der DVR sendet dem iPhone und Android-Smartphones sofort eine Meldung wenn ein spezifiziertes
Ereignis ausgelöst wird.
Laden Sie die EagleEyes-Software auf Ihr Mobilgerät herunter (siehe unten, Die EagleEyes-App installieren).
Bemerkung: Nur bestimmte Alarm-In-Pins unterstützen die Push-Video-Funktion.
8.1 PIN-Anschluss
Der DVR wird mit einer I/O-Platte geliefert, um Sie zu helfen, schnell zu wissen welcher Pin Push Video
unterstützt (siehe nachfolgende Liste).
PIN entsprechender Videokanal
4CH-Modell PIN1 CH1
Verbinden Sie den Alarmsensor (z.B. Magnetkontakte) mit dem I/O-Pin, der Push Video unterstützt. Sie können
jeden Sensortyp mit einem trockenen Kontakt verwenden.
8.2 Die EagleEyes-App installieren
Vorbedingungen
Vor der Installation von EagleEyes zur Fernüberwachung auf Ihrem Handy, überprüfen Sie folgendes:
• Mobile Internetdienste sind abonniert und zur Nutzung auf Ihrem Handy verfügbar.
Bemerkung: Internetzugang über Drahtlos- oder 3G-Netzwerke wird möglicherweise berechnet. Für
Einzelheiten zum Internetzugang wenden Sie sich bitte an Ihren örtlichen Netzwerk- oder Dienstanbieter.
• Sie haben IP-Adresse, Portnummer, Benutzername und Passwort zum Zugriff auf Netzwerkkamera vom
Internet notiert.
V. 1.0 – 07/12/2012 48 ©Velleman nv
Page 49

CCTVPROM15
Die Software herunterladen
1. Navigieren Sie auf Ihrem Handy zu www.eagleeyescctv.com und melden Sie sich an.
Laden Sie EagleEyes nicht auf Ihren Computer herunter.
o Für Android wählen Sie den Download-Link auf der Website.
o Für iPhone and iPad sind zwei Versionen von EagleEyes verfügbar: EagleEyesHD Plus (nicht
kostenlos) und EagleEyesHD Lite (kostenlos).
2. Wählen Sie die gewünschte Version und Sie werden zum App Store zum Download der Anwendung geführt.
3. Nach dem Download wird EagleEyes automatisch an der Speicherstelle installiert, an der auf Ihrem Handy
standardgemäß alle Anwendungen gespeichert werden oder gemäß Ihren Spezifikationen.
Bemerkung: Für weitere Einzelheiten zur Konfiguration und Benutzung dieses Programms, besuchen Sie unsere
offizielle Website www.avtech.com.tw.
8.3 Konfiguration
Bevor Sie Push Video programmieren, beachten Sie, dass:
1. das DVR-System eingestellt ist, wie beschrieben in 3 Anschluss und Einstellung (ausführliche
Bedienungsanleitung auf der mitgelieferten CD-ROM.
2. der DVR mit Internet verbunden ist.
3. die EagleEyes-App auf Ihrem Handy installiert ist (siehe oben Die EagleEyes-App installieren).
Schritte
1. Auf dem DVR, klicken Sie mit der rechten Maustaste, um das Hauptmenü anzuzeigen.
Gehen Sie zu Advanced Config. > Notify.
Stellen Sie Guard auf On und konfigurieren Sie den Alarmsensortyp (N.C. oder N.O.).
2. Öffnen Sie EagleEyes und add this DVR to the EagleEyes address book.
For more details about EagleEyes operation, please visit www.eagleeyescctv.com.
3. In der EagleEyes app, schalten Sie Push Video ein (siehe unten).
4. Lösen Sie den Alarmsensor aus und schauen Sie nach, ob Sie darüber informiert werden.
9. Anwendung
Display
Folgende Abbildung zeigt das Display-Layout an.
A Datum und Uhrzeit
B allgemeiner Status
C Verfügbarer Platz
D Kanalstatus
V. 1.0 – 07/12/2012 49 ©Velleman nv
Page 50

CCTVPROM15
Live-Audio Kanal 1~4 einschalten
Audiokanal ausgeschaltet
digitales Zoom eingeschaltet (gelb) /
ausgeschaltet
LAN-Anschluss/Internetanschluss/keine Netzverbindung
Audiokanal 1~4 (gelb) abspielen
programmierte Aufnahme
USB-Maus angeschlossen
USB Flashdrive angeschlossen
Verriegelung
Sequenzfunktion
Aufnahme
als Administrator eingeloggt
Festplatte überschreiben (Standard)
PTZ-Funktion
es wird eine Bewegung wahrgenommen
Alarm
als Benutzer eingeloggt
Diese Symbole können sich von den Symbolen auf Ihrem Display unterscheiden.
Menüleiste
Bemerkung: Nur sichtbar wenn eine USB-Maus angeschlossen ist.
Bewegen Sie den Cursor nach links, um die Menüleiste anzuzeigen:
Kanalmenü öffnen
Abspielmenü öffnen
Zoomfunktion (Wählen Sie zuerst den Kanal aus)
Audiokanal
PTZ-Funktion
Klicken Sie, um das System auszuschalten oder neu zu starten
Aufnahme
• Verbinden Sie die Kamera(s) und die Festplatte korrekt mit dem Gerät.
• Das Gerät startet die Aufnahme wenn die automatische Aufnahme- und die Prealarm-Funktion eingeschaltet
sind.
• Das Symbol erscheint im Display.
• Bei Bewegungsdetektion oder Alarm (Funktion ist eingeschaltet) wird das Symbol oder angezeigt.
• Bei einer programmierten Aufnahme erscheint das Symbol und leuchtet die Aufnahme-LED.
• Standard befindet sich das Gerät im Überschreiben-Modus und wird angezeigt.
V. 1.0 – 07/12/2012 50 ©Velleman nv
Page 51

CCTVPROM15
Wählen Sie die Wiederholfunktion A
B aus / öffnen
Anzeige
Drücken Sie PLAY oder öffnen Sie das Abspielmenü mit der Maus, um die Aufnahme zurückzuspulen.
A Abspielleiste D Information
B Bedienungstasten E schließen
C Suchfunktion F
Sie das Backup-Menü
→
Bemerkung: Die Datei soll mindestens 8192 Bilder enthalten (z.B. ips = 30, die Aufnahme soll mindestens 273
Sekunden lang sein).
• Drücken Sie um die Aufnahme vorzuspulen oder drücken Sie um die Aufnahme zurückzuspulen.
Drücken Sie mehrmals auf die Taste um die Geschwindigkeit anzupassen: 4x, 8x 16x oder 32x (max.).
• Drücken Sie um die Aufnahme zu pausieren.
• Drücken Sie um zur Live-Anzeige zurückzukehren.
• Drücken Sie SLOW ein Mal, um die Aufnahme mit 1/4 Abspielgeschwindigkeit abzuspielen, oder drücken Sie
zwei Mal, um die Aufnahme mit 1/8 Abspielgeschwindigkeit abzuspielen.
Suchfunktion
• Um ein Ereignis zu suchen, drücken Sie LIST auf der Frontplatte.
• eine Übersicht aller aufgenommenen Dateiformate erscheint.
• Sie können via Dateityp suchen (ALARM, MANUAL, MOTION, SYSTEM und FULL LIST).
• Wählen Sie eine Liste und eine Aufnahme aus.
• Drücken Sie ENTER um die Wiedergabe zu starten.
Bemerkung: Beim DVR können die Dateien über Video Viewer aufgesucht werden.
V. 1.0 – 07/12/2012 51 ©Velleman nv
Page 52

CCTVPROM15
10. Technische Daten
DVR
Videosystem PAL
Videokompressionsformat H.264
Video-Eingang 4 Kanäle, Komposit-Videosignal 1 Vpp / 75 Ohm BNC
Video-Ausgang "composite" Videosignal 1 Vpp / 75 Ohm BNC + VGA
Video Loop-Ausgang max. Aufnahmefrequenz (PAL) Frame/D1: 704 x 576 Pixel mit 100 IPS (PAL)
Regelung Bildqualität super best - best - high - normal
Festplattenspeicherplatz SATA-Typ (eingebaut), unterstützt 1 x HDD, unterstützt HDD-Kapazität
über 2 TB (HDD nicht mitgeliefert)
Funktion 'die Festplatte schnell
löschen'
Aufnahmemodus manuell, Timer, Bewegung, Alarm, über das Netz gesteuert
Bildwiederholrate 100 IPS für PAL
Multiplex-Betrieb Live Display, Aufnahme, Wiedergabe, Datensicherung und Netzwerk
Audio I/O 4 Audio-Eingang, 1 Audio-Ausgang (Mono)
Erfassungsbereich Gitter 16 x 12 pro Kanal
Erfassungsempfindlichkeit hoch - normal - niedrig
Pre-Alarm-Aufzeichnung 8 MB
Backup-Geräte USB 2.0 flash drive (für Sicherungskopie und Aktualisierungen der
Ethernet 10/100 Base-T (unterstützt Fernbedienung und Livebild über Ethernet)
Netzwerkverbindung unterstützt TCP/IP, PPPoE, DHCP und DDNS
Fernüberwachung über Handy Smartphones: EagleEyes Software
Push Video: iPad, iPod Touch, iPhone und Android-Smartphone
Login über alle Smartphone-Plattforme möglich (Apple, Android,
Rechner: 'Video Viewer'-Software auf Windows und Mac
Webbrowser: Internet Explorer, Firefox, Google Chrome und Safari über
IR-Fernbedienung Fernbedienung des DVR und der PTZ-Funktionen (DVRRC4 mitgeliefert)
PTZ ja (über RS-485)
Alarm I/O 4 in / 1 out
Bild-Zoom 2 x (Live-Anzeige & Wiedergabe)
Tastensperre ja
Detektion Bildverlust ja
Kameratitel bis zu 6 Zeichen
Videoregelungen Farbton, Farbe, Kontrast, Helligkeit
Format der Datumsanzeige JJ/MM/TT, TT/MM/JJ, MM/TT/JJ und Aus
Stromversorgung 19 Vdc
Stromverbrauch < 40 W
Sommerzeit (DST) ja
Betriebstemperatur 10 °C ~ 40 °C (50 °F ~ 104 °F)
Systemwiederherstellung automatische Systemwiederherstellung nach Stromunterbrechung
Abmessungen 345 x 223 x 59 mm
KAMERA
IP-Schutzart IP67
Aufnahme-Element 1/3" hochauflösende CCD-Farbkamera mit SONY Effio DSP
Pixelanzahl 753 (H) x 582 (V) - PAL Auflösung 600 TV-Zeilen
Mindestbeleuchtung 0.1 lux
Schnellfreigabe des "Datei-Index" der aufgenommenen Dateien
Firmware)
Blackberry, Nokia Symbian und Window Mobile)
Java, Quicktime oder VLC Plug-in
V. 1.0 – 07/12/2012 52 ©Velleman nv
Page 53

CCTVPROM15
IR-LEDs 21
max. IR-Bereich 15 m
Signal/Rauschabstand > 48 dB (AGC aus)
elektronischer Verschluss 1/50 bis 1/100 000 seg.
Objektiv f 3.6 mm / F 2.0
Blickwinkel 92.6°
Colour Rolling Suppress ja
automatische Verstärkungsregelung (AGC) yes
Weißabgleich automatisch
Video-Ausgang 1.0 Vpp Komposite, 75 Ohm
Audio nein
Stromversorgung 12 Vdc
Stromverbrauch 70 mA (IR-LEDs ein), 270 mA (IR-LEDs aus)
Betriebstemperatur 0 °C ~ 45 °C
Abmessungen 140 x 56 x 80 mm
Gewicht 285 g
Verwenden Sie dieses Gerät nur mit originellen Zubehörteilen.
Velleman NV übernimmt keine Haftung für Schaden oder Verletzungen bei (falscher) Anwendung
dieses Gerätes. Für mehr Informationen zu diesem Produkt und die neueste Version dieser
Bedienungsanleitung, siehe www.velleman.eu.
Alle Änderungen ohne vorherige Ankündigung vorbehalten.
V. 1.0 – 07/12/2012 53 ©Velleman nv
Page 54

Velleman® Service and Quality Warranty
Since its foundation in 1972, Velleman® acquired extensive
experience in the electronics world and currently distributes its
products in over 85 countries.
All our products fulfil strict quality requirements and legal stipulations
in the EU. In order to ensure the quality, our products regularly go
through an extra quality check, both by an internal quality
department and by specialized external organisations. If, all
precautionary measures notwithstanding, problems should occur,
please make appeal to our warranty (see guarantee conditions).
General Warranty Conditions Concerning Consumer Products
(for EU):
• All consumer products are subject to a 24-month warranty on
production flaws and defective material as from the original date of
purchase.
• Velleman® can decide to replace an article with an equivalent
article, or to refund the retail value totally or partially when the
complaint is valid and a free repair or replacement of the article is
impossible, or if the expenses are out of proportion.
You will be delivered a replacing article or a refund at the value of
100% of the purchase price in case of a flaw occurred in the first
year after the date of purchase and delivery, or a replacing article at
50% of the purchase price or a refund at the value of 50% of the
retail value in case of a flaw occurred in the second year after the
date of purchase and delivery.
• Not covered by warranty:
- all direct or indirect damage caused after delivery to the article
(e.g. by oxidation, shocks, falls, dust, dirt, humidity...), and by the
article, as well as its contents (e.g. data loss), compensation for loss
of profits;
- consumable goods, parts or accessories that are subject to an aging
process during normal use, such as batteries (rechargeable, nonrechargeable, built-in or replaceable), lamps, rub ber parts, drive
belts... (unlimited list);
- flaws resulting from fire, water damage, lightning, accident, natural
disaster, etc.…;
- flaws caused deliberately, negligently or resulting from improper
handling, negligent maintenance, abusive use or use contrary to the
manufacturer’s instructions;
- damage caused by a commercial, professional or collective use of
the article (the warranty validity will be reduced to six (6) months
when the article is used professionally);
- damage resulting from an inappropriate packing and shipping of the
article;
- all damage caused by modification, repair or alteration performed
by a third party without written permission by Velleman®.
• Articles to be repaired must be delivered to your Velleman® dealer,
solidly packed (preferably in the original packaging), and be
completed with the original receipt of purchase and a clear flaw
description.
• Hint: In order to save on cost and time, please reread the manual
and check if the flaw is caused by obvious causes prior to presenting
the article for repair. Note that returning a non-defective article can
also involve handling costs.
• Repairs occurring after warranty expiration are subject to shipping
costs.
• The above conditions are without prejudice to all commercial
warranties.
The above enumeration is subject to modification according to
the article (see article’s manual).
Velleman® service- en kwaliteitsgarantie
Velleman® heeft sinds zijn oprichting in 1972 een ruime ervaring
opgebouwd in de elektronicawereld en verdeelt op dit moment
producten in meer dan 85 landen. Al onze producten beantwoorden
aan strikte kwaliteitseisen en aan de wettelijke bepalingen geldig in
de EU. Om de kwaliteit te waarborgen, ondergaan onze producten op
regelmatige tijd stippen een extra kwaliteitscontro le, zowel door onze
eigen kwaliteitsafdeling als door externe gespecialiseer de
organisaties. Mocht er ondanks deze voorzorgen toch een probleem
optreden, dan kunt u steeds een beroep doen op onze waarborg (zie
waarborgvoorwaarden).
Algemene waarborgvoorwaarden consumentengoederen
(voor Europese Unie):
• Op alle consumentengoederen geldt een garantieperiode van 24
maanden op productie- en materiaalfouten en dit vanaf de
oorspronkelijke aankoopdatum.
• Indien de klacht gegrond is en een gratis reparatie of vervanging
van een artikel onmogelijk is of indien de kosten hiervoor buiten
verhouding zijn, kan Velleman® beslissen het desbetreffende artikel
te vervangen door een gelijkwaardig artikel of de aankoopsom van
het artikel gedeeltelijk of volledig terug te betalen. In dat geval krijgt
u een vervangend product of terugbetaling ter waarde van 100% van
de aankoopsom bij ontdekking van een gebrek tot één jaar na
aankoop en levering, of een vervangend product tegen 50% van de
kostprijs of terugbetaling van 50 % bij ontdekking na één jaar tot 2
jaar.
• Valt niet onder waarborg:
- alle rechtstreekse of onrechtstreekse schade na de levering
veroorzaakt aan het toestel (bv. door oxidatie, schokken, val, stof,
vuil, vocht...), en door het toestel, alsook zijn inhoud (bv. verlies van
data), vergoeding voor eventuele winstderving.
- verbruiksgoederen, onderdelen of hulpstukken die onderhevig zijn
aan veroudering door normaal gebruik zoals bv. batterijen (zowel
oplaadbare als niet-oplaadbare, ingebouwd of vervangbaar), lampen,
rubberen onderdelen, aandrijfriemen... (onbep erkte lijst).
- defecten ten gevolge van brand, waterschade, bliksem, ongevallen,
natuurrampen, enz.
- defecten veroorzaakt door opzet, nalatigheid of door een
onoordeelkundige behandeling, slecht onderhoud of abnormaal
gebruik of gebruik van het toestel strijdig met de voorschriften van
de fabrikant.
- schade ten gevolge van een commercieel, prof essioneel of collectief
gebruik van het apparaat (bij professioneel gebruik wordt de
garantieperiode herleid tot 6 maand).
- schade veroorzaakt door onvoldoende bescherming bij transport
van het apparaat.
- alle schade door wijzigingen, reparaties of modificaties uitgevoerd
door derden zonder toestemming van Velleman®.
• Toestellen dienen ter reparatie aangeboden te worden bij uw
Velleman®-verdeler. Het toestel dient vergezeld te zijn van het
oorspronkelijke aankoopbewijs. Zorg voor een degelijke verpakking
(bij voorkeur de originele verpakking) en voeg een duidel ijke
foutomschrijving bij.
• Tip: alvorens het toestel voor reparatie aan te bieden, kijk nog
eens na of er geen voor de hand liggende reden is waarom het
toestel niet naar behoren werkt (zie handleiding). Op deze wijze kunt
u kosten en tijd besparen. Denk eraan dat er ook voor niet-defecte
toestellen een kost voor controle aangerekend kan worden.
• Bij reparaties buiten de waarborgperiode zullen transportkosten
aangerekend worden.
• Elke commerciële garantie laat deze rechten onverminderd.
Bovenstaande opsomming kan eventueel aangepast worden
naargelang de aard van het product (zie handleiding van het
betreffende product).
Garantie de service et de qualité Velleman®
Depuis 1972, Velleman® a gagné une vaste expérience dans le
secteur de l’électronique et est actuellement distributeur dans plus de
85 pays.
Tous nos produits répondent à des exigences de qualité rigoureuses
et à des dispositions légales en vigueur dans l’UE. Afin de garantir la
qualité, nous soumettons régulièrement nos produits à des c ontrôles
de qualité supplémentaires, tant par notre propre service qualité que
par un service qualité externe. Dans le cas improbable d’un défaut
malgré toutes les précautions, il est possible d’invoquer notre
garantie (voir les conditions de garantie).
Conditions générales concernant la garantie sur les produits
grand public (pour l’UE) :
• tout produit grand public est garanti 24 mois contre tout vice de
production ou de matériaux à dater du jour d’acquisition effective ;
• si la plainte est justifiée et que la réparation ou le remplacement
d’un article est jugé impossible, ou lorsque les coûts s’avèrent
disproportionnés, Velleman® s’autorise à remplacer ledit article par
un article équivalent ou à rembourser la totalité ou une partie du prix
d’achat. Le cas échéant, il vous sera consenti un article de
remplacement ou le remboursement complet du prix d’achat lors
d’un défaut dans un délai de 1 an après l’achat et la livraison, ou un
article de remplacement moyennant 50% du prix d’achat ou le
remboursement de 50% du prix d’achat lors d’un défaut après 1 à 2
ans.
• sont par conséquent exclus :
- tout dommage direct ou indirect survenu à l’article après livraison
(p.ex. dommage lié à l’oxydation, choc, chute, poussière, sable,
impureté…) et provoqué par l’appareil, ainsi que son contenu (p.ex.
perte de données) et une indemnisation éventuelle pour perte de
revenus ;
- toute pièce ou accessoire nécessitant un remplacement causé par
un usage normal comme p.ex. piles (rechargeables comme non
rechargeables, intégrées ou remplaçables), ampoules, pièces en
caoutchouc, courroies… (liste illimitée) ;
- tout dommage qui résulte d’un incendie, de la foudre, d’un
accident, d’une catastrophe naturelle, etc. ;
- out dommage provoqué par une négligence, volontaire ou non, une
utilisation ou un entretien incorrect, ou une utilisation de l’appareil
contraire aux prescriptions du fabricant ;
- tout dommage à cause d’une utilisation commerciale,
professionnelle ou collective de l’appareil (la période de garantie ser a
réduite à 6 mois lors d’une utilisation professionnelle) ;
- tout dommage à l’appareil qui résulte d’une utilisation incorrecte ou
différente que celle pour laquelle il a été initialeme nt prévu comme
décrit dans la notice ;
- tout dommage engendré par un retour de l’appareil emballé dans
un conditionnement non ou insuffisamment protégé.
- toute réparation ou modification effectuée par une tierce personne
sans l’autorisation explicite de SA Velleman® ; - frais de transport de
et vers Velleman® si l’appareil n’est plus couvert sous la garantie.
• toute réparation sera fournie par l’endroit de l’achat. L’appareil doit
nécessairement être accompagné du bon d’achat d’origine et être
dûment conditionné (de préférence dans l’emballage d’origine avec
mention du défaut) ;
• tuyau : il est conseillé de consulter la notice et de contrôler câbles,
piles, etc. avant de retourner l’appareil. Un appareil retourné jugé
défectueux qui s’avère en bon état de marche pourra faire l’objet
d’une note de frais à charge du consommateur ;
• une réparation effectuée en-dehors de la période de garantie fera
l’objet de frais de transport ;
• toute garantie commerciale ne porte pas atteinte aux conditions
susmentionnées.
La liste susmentionnée peut être sujette à une
complémentation selon le type de l’article et être mentionnée
dans la notice d’emploi.
Page 55

Garantía de servicio y calidad Velleman®
Desde su fundación en 1972 Velleman® ha adquirido una amplia
experiencia como distribuidor en el sector de la electrónica en más de
85 países. Todos nuestros productos responden a normas de calidad
rigurosas y disposiciones legales vigentes en la UE. Para garantizar la
calidad, sometemos nuestros productos regularmente a controles de
calidad adicionales, tanto a través de nuestro propio servicio de
calidad como de un servicio de calidad externo. En el caso
improbable de que surgieran problemas a pesar de todas las
precauciones, es posible recurrir a nuestra garantía (véase las
condiciones de garantía).
Condiciones generales referentes a la garantía sobre
productos de venta al público (para la Unión Europea):
• Todos los productos de venta al público tienen un período de
garantía de 24 meses contra errores de producción o errores en
materiales desde la adquisición original;
• Si la queja está fundada y si la reparación o sustitución de un
artículo no es posible, o si los gastos son desproporcionados,
Velleman® autoriza reemplazar el artículo por un artículo equivalente
o reembolsar la totalidad o una parte del precio de compra. En este
caso, usted recibirá un artículo de recambio o el reembolso completo
del precio de compra si encuentra algún fallo hasta un año después
de la compra y entrega, o un artículo de recambio al 50% del precio
de compra o el reembolso del 50% del precio de compra si encuentra
un fallo después de 1 año y hasta los 2 años después de la compra y
entrega.
Por consiguiente, están excluidos entre otras cosas:
- todos los daños causados directa o indirectamente al aparato (p.ej.
por oxidación, choques, caída,...) y a su contenido (p.ej. pérdida de
datos) después de la entrega y causados por el aparato, y cualquier
indemnización por posible pérdida de ganancias;
- partes o accesorios, que estén expuestos al desgaste causad o por
un uso normal, como por ejemplo baterías (tanto recargables como
no recargables, incorporadas o reemplazables), bombillas, partes de
goma, etc. (lista ilimitada);
- defectos causados por un incendio, daños causados por el agua,
rayos, accidentes, catástrofes naturales, etc.;
- defectos causados a conciencia, descuido o por malos tratos, un
mantenimiento inapropiado o un uso anormal del aparato contrario a
las instrucciones del fabricante;
- daños causados por un uso comercial, profesional o colectivo del
aparato (el período de garantía se reducirá a 6 meses con uso
profesional);
- daños causados por un uso incorrecto o un uso ajeno al que está
previsto el producto inicialmente como está descrito en el manual del
usuario;
- daños causados por una protección insuficiente al transportar el
aparato.
- daños causados por reparaciones o modificaciones efectuadas por
una tercera persona sin la autorización explícita de Velleman®;
- se calcula gastos de transporte de y a Velleman® si el aparato ya
no está cubierto por la garantía.
• Cualquier artículo que tenga que ser reparado tendrá que ser
devuelto a su distribuidor Velleman®. Devuelva el aparato con la
factura de compra original y transpórtelo en un embalaje sólido
(preferentemente el embalaje original). Incluya también una buena
descripción del fallo;
• Consejo: Lea el manual del usuario y controle los cables, las pilas,
etc. antes de devolver el aparato. Si no se encuentra un defecto en el
artículo los gastos podrían correr a cargo del cliente;
• Los gastos de transporte correrán a carga del cliente para una
reparación efectuada fuera del período de garantía.
• Cualquier gesto comercial no disminuye estos derechos.
La lista previamente mencionada puede ser adaptada según el
tipo de artículo (véase el manual del usuario del artículo en
cuestión).
Velleman® Service- und Qualitätsgarantie
Seit der Gründung in 1972 hat Velleman® sehr viel Erfahrung als
Verteiler in der Elektronikwelt in über 85 Ländern aufgebaut.
Alle Produkte entsprechen den strengen Qualitätsforderungen und
gesetzlichen Anforderungen in der EU. Um die Qualität zu
gewährleisten werden unsere Produkte regelmäßig einer zusätzlichen
Qualitätskontrolle unterworfen, sowohl von unserer eigenen
Qualitätsabteilung als auch von externen spezialisierten
Organisationen. Sollten, trotz aller Vorsichtsmaßnahmen, Probleme
auftreten, nehmen Sie bitte die Garantie in Anspruch (siehe
Garantiebedingungen).
Allgemeine Garantiebedingungen in Bezug auf Konsumgüter
(für die Europäische Union):
• Alle Produkte haben für Material- oder Herstellungsfehler eine
Garantieperiode von 24 Monaten ab Verkaufsdatum.
• Wenn die Klage berechtigt ist und falls eine kostenlose Reparatur
oder ein Austausch des Gerätes unmöglich ist, oder wenn die Kosten
dafür unverhältnismäßig sind, kann Velleman® sich darüber
entscheiden, dieses Produkt durch ein gleiches Produkt zu ersetzen
oder die Kaufsumme ganz oder teilweise zurückzuzahlen. In diesem
Fall erhalten Sie ein Ersatzprodukt oder eine Rückzahlung im Werte
von 100% der Kaufsumme im Falle eines Defektes bis zu 1 Jahr nach
Kauf oder Lieferung, oder Sie bekommen ein Ersatzprodukt im Werte
von 50% der Kaufsumme oder eine Rückzahlung im Werte von 50 %
im Falle eines Defektes im zweiten Jahr.
• Von der Garantie ausgeschlossen sind:
- alle direkten oder indirekten Schäden, die na ch Lieferung am Gerät
und durch das Gerät verursacht werden (z.B. Oxidation, Stöße, Fall,
Staub, Schmutz, Feuchtigkeit, ...), sowie auch der Inhalt (z.B.
Datenverlust), Entschädigung für eventuellen Gewinnausfall.
- Verbrauchsgüter, Teile oder Zubehörteile, die durch normalen
Gebrauch dem Verschleiß ausgesetzt sind, wie z.B. Batterien (nicht
nur aufladbare, sondern auch nicht aufladbare, eingebaute oder
ersetzbare), Lampen, Gummiteile, Treibriemen, usw. (unbeschränkte
Liste).
- Schäden verursacht durch Brandschaden, Wasserschaden, Blitz,
Unfälle, Naturkatastrophen, usw.
- Schäden verursacht durch absichtliche, nachlässige oder
unsachgemäße Anwendung, schlechte Wartung, zweckentfremdet e
Anwendung oder Nichtbeachtung von Benutzerhinweisen in der
Bedienungsanleitung.
- Schäden infolge einer kommerziellen, professionellen oder
kollektiven Anwendung des Gerätes (bei gewerblicher Anwendung
wird die Garantieperiode auf 6 Monate zurückgeführt).
- Schäden verursacht durch eine unsachgemäße Verpackung und
unsachgemäßen Transport des Gerätes.
- alle Schäden verursacht durch unautorisierte Änderungen,
Reparaturen oder Modifikationen, die von einem Dritten ohne
Erlaubnis von Velleman® vorgenommen werden.
• Im Fall einer Reparatur, wenden Sie sich an Ihren Velleman®Verteiler. Legen Sie das Produkt ordnungsgemäß verpackt
(vorzugsweise die Originalverpackung) und mit dem OriginalKaufbeleg vor. Fügen Sie eine deutliche Fehlerbeschreibung hinzu.
• Hinweis: Um Kosten und Zeit zu sparen, lesen Sie d ie
Bedienungsanleitung nochmals und überprüfen Sie, ob es keinen auf
de Hand liegenden Grund gibt, ehe Sie das Gerät zur Reparatur
zurückschicken. Stellt sich bei der Überprüfung des Gerätes heraus,
dass kein Geräteschaden vorliegt, könnte dem Kunden eine
Untersuchungspauschale berechnet.
• Für Reparaturen nach Ablauf der Garantiefrist werden
Transportkosten berechnet.
• Jede kommerzielle Garantie lässt diese Rechte unberührt.
Die oben stehende Aufzählung kann eventuell angepasst
werden gemäß der Art des Produktes (siehe
Bedienungsanleitung des Gerätes).
Legen Heirweg 33, 9890 Gavere, Belgium
Imported by Velleman nv
Made in Taiwan
www.velleman.eu
 Loading...