

Velleman CCTVPROM11 Quick Installation Manual
C
S
ECCPAJU4
C
C
Q
U
B
EGUGUSC
CT
V
CURIT
Y
TV-PA
C
CK VI
D
EGO D
E
CÁMAR
A
TV-PR
O
ICK INST
A
KNOPTE I
N
IDE D’INS
T
A RÁPID
A
HNELLEIN
S
PR
O
PACK:
H
K: H.26
4
OSUR
V
VIGIL
A
S IR +
A
MOPAC
K
LLATION
G
STALLATI
E
T
ALLATIO
N
TIEG
M1
1
.264 D
V
DVR +
EILLAN
C
NCIA M
U
CCESO
R
: H.26
4
UIDE
HANDLEI
D
RAPIDE
R + 4
I
4 IR-C
A
E: DVR
LTIFU
N
IOS
DVR +
ING
R BULL
E
MERA'S
H.264
+
CIÓN:
V
4 IR-KA
4
1
1182532
T CAME
+ ACCE
4 CAM
É
IDEOG
R
MERAS
+
RAS +
A
SSOIRE
S
RAS IR
ABADO
R
ZUBE
H
CCESSO
+ ACCE
S
A H.26
4
ÖR
RIES
SOIRE
S
+
All manuals and user guides at all-guides.com
all-guides.com

V.
03 - 17/01/2012
* not incl. - niet
m
C
C
eegelev.
TVPROM
2
Note: imag
e
- non incl.
11
e
s in this m
a
1 D
2 V
i
1 D
2 V
i
1 C
o
2 C
o
1 D
2 V
i
1 C
o
2 C
o
- no incl. -
nual are fo
r
C 12V input
deo output
C 12V inga
n
deo-uitgan
g
nnexion d’
e
nnexion de
C 12V-Eing
a
deo-Ausga
n
nexión de
e
nexión de
s
nicht mitg
illustrative
terminal
connector
gsaansluiti
n
saansluitin
g
ntrée CC 1
2
sortie vidé
o
ngsanschlu
s
gsanschlus
s
ntrada CC
1
alida de ví
d
eliefert
©Vellema
n
purposes o
n
g
V
s
2V
eo
nv
ly.
All manuals and user guides at all-guides.com
CCTVPROM11
V. 03 - 17/01/2012 ©Velleman nv
3
• Due to constant product improvements the actual product appearance might differ from the shown images.
• We streven voortdurend naar verbetering van onze producten. Daarom kan dit product verschillen van de
afbeeldingen.
• Dans le souci d’une amélioration constante de nos produits, il se peut que l’esthétique de l’article diffère
légèrement des images.
• En el esfuerzo de una mejora constante de nuestros productos, es posible que el aspecto exterior del
producto difiera ligeramente de las imágenes.
• Wir streben ständig nach Verbesserung unserer Produkte. Deshalb könnte dieses Produkt äußerlich von
den Abbildungen abweichen.
© COPYRIGHT NOTICE
The copyright to this manual is owned by Velleman nv. All worldwide rights reserved.
No part of this manual or may be copied, reproduced, translated or reduced to any electronic medium or
otherwise without the prior written consent of the copyright holder.
© AUTEURSRECHT
Velleman nv heeft het auteursrecht voor deze handleiding. Alle wereldwijde rechten voorbehouden. Het
is niet toegestaan om deze handleiding of gedeelten ervan over te nemen, te kopiëren, te vertalen, te
bewerken en op te slaan op een elektronisch medium zonder voorafgaande schriftelijke toestemming van de
rechthebbende.
© DROITS D’AUTEUR
SA Velleman est l’ayant droit des droits d’auteur pour cette notice. Tous droits mondiaux réservés.
Toute reproduction, traduction, copie ou diffusion, intégrale ou partielle, du contenu de cette notice par quelque
procédé ou sur tout support électronique que se soit est interdite sans l’accord préalable écrit de l’ayant droit.
© DERECHOS DE AUTOR
Velleman NV dispone de los derechos de autor para este manual del usuario.
Todos los derechos mundiales reservados. Está estrictamente prohibido reproducir, traducir, copiar, editar y
guardar este manual del usuario o partes de ello sin previo permiso escrito del derecho habiente.
© URHEBERRECHT
Velleman NV besitzt das Urheberrecht für diese Bedienungsanleitung.
Alle weltweiten Rechte vorbehalten. Ohne vorherige schriftliche Genehmigung des Urhebers ist es nicht
gestattet, diese Bedienungsanleitung ganz oder in Teilen zu reproduzieren, zu kopieren, zu übersetzen, zu
bearbeiten oder zu speichern.
All manuals and user guides at all-guides.com

V.
1
.
T
oIm
Th
th
edis
re
s
N
O
Th
fo
uPaOp
2
.3.
Re
•
•
•
•
•
4
.
•
•
•
03 - 17/01/2
0
Introd
u
all reside
n
portant e
n
This s
y
harm
t
be tak
e
a local
If in
d
ank you for
device wa
s
regard of c
e
ponsibility
f
TICE:
is documen
t
nd on the i
n
ckage con
t
•
•
•
•
•
•
•
tional (no
t
•
•
•
•
•
Safety
I
Keep
t
Risk
o
electr
o
Alway
s
activit
Genera
fer to the V
e
Familiarise
All modific
a
Only use t
h
Damage ca
dealer will
n
Do not us
e
Featur
e
GUI (Grap
h
mail integr
a
local and r
e
12
ction
ts of the
E
vironmen
t
mbol on th
e
he environ
m
n to a spe
c
recycling s
e
oubt, cont
a
choosing V
e
damaged i
n
rtain guidel
or any ens
u
is a Quick
cluded CD-
ent:
1 x DVR w
i
4 x IR bull
e
2 x 20m c
a
1 x 19V P
S
1 x high-e
f
remote co
n
1x CD-RO
M
incl.):
hard disk:
composite
VGA & DV
I
Router: E
M
USB mous
e
nstruct
he device a
w
f electros
h
shocks.
disconnec
t
ies are perf
o
l Guidel
i
lleman®
S
Indoor us
e
Keep this d
e
with liquid
o
Keep this d
e
Keep this d
e
times. For s
Protect this
yourself wit
tions of the
e device fo
r
used by dis
r
ot accept r
e
this produ
c
s
ical User In
t
tion: supp
o
mote contr
o
Q
uropean U
n
al informa
t
device or t
ent. Do no
t
ialized com
p
rvice. Resp
e
ct your lo
c
lleman! Ple
a
transit, d
o
ines in this
m
ing defects
installatio
n
ROM.
th built-in
S
t colour ca
m
mera cable
s
U
ficiency DC
-
trol: DVRR
C
containing
HD500GB/
S
video & VG
A
monitor: M
4542, EM4
5
: GE31010
8
ions
ay from c
h
ock when
o
mains pow
e
rmed. Han
d
nes
ervice an
d
only
vice away
f
n top.
vice away
f
vice away
f
ufficient air
device from
h the functi
o
device are
f
its intende
d
egard of ce
r
sponsibilit
y
t to violate
erface) dis
p
rts notificat
i
l completel
y
C
C
uick in
ion
ion about
t
he package
dispose of
t
any for rec
y
ct the local
al waste
d
se read th
e
not install
o
anual is n
o
or problems
guide. Fo
r
ATA connec
eras
DC convert
e
5
the full use
, HD1TB/S
monitor:
M
ONSCA4, M
O
53, EM457
0
26101, GE
3
ildren and
u
pening the
r when the
le the pow
e
Quality
W
orm rain, m
rom dust.
rom extrem
e
circulation,
shocks and
ns of the d
e
orbidden fo
purpose.
U
tain guideli
n
for any en
s
privacy law
s
lay and US
B
on through
independe
TVPROM
4
stallati
t
his produ
c
indicates th
t
he unit (or
cling. This
d
environme
n
isposal au
t
manual th
o
r use it an
d
t covered b
.
more deta
i
tion: DVR4
L
r for DVR a
r manual
ONSCA6,
M
NSCA5
10110391
0
nauthorise
d
cover. Touc
h
device is n
o
r cord by th
arranty on
oisture, spl
a
e
heat. Mak
e
leave at lea
s
abuse. Avo
vice before
r safety rea
s
sing the de
v
es in this
m
uing defect
s
or perform
mouse co
n
any mail se
r
nt
11
on gui
d
t
a
t disposal
o
batteries) a
s
evice shoul
tal rules.
horities.
roughly bef
o
contact yo
u
y the warra
n
ls, refer to
t
6
nd cameras
ONSCA7
0, GE3103
0
users.
ing live wir
t in use or
w
e plug only.
the last pa
g
shing and d
sure the v
e
t 1” (±2.5
c
id brute for
c
actually usi
ons.
ice in an u
n
anual is no
t
or proble
m
other illega
trol
ver and an
y
e
f the devic
e
s
unsorted
m
d be return
e
o
re bringing
r dealer. D
a
ty and the
he full user
414100
es can caus
e
hen servici
es of this
m
ripping liqui
e
ntilation o
p
m) in front
e when ope
ng it.
authorised
covered b
y
s.
l activities.
other mail
after its lif
e
unicipal w
a
d to your d
this device
mage caus
e
dealer will
n
manual whi
life-threat
e
ng or maint
e
anual.
ds. Never p
u
enings are
c
of the open
rating the d
e
way will voi
d
the warran
support
©Vellema
n
cycle could
ste; it shou
istributor or
into service
d by
ot accept
ch can be
ning
nance
t object fill
e
lear at all
ings.
e
vice.
the warra
n
ty and the
nv
ld
to
. If
d
ty.
All manuals and user guides at all-guides.com
CCTVPROM11
V. 03 - 17/01/2012 ©Velleman nv
5
• H.264 video compression technology
o highly improves video quality for live viewing and recording
o recording file size is minimized for longest recording time
o lower bit rate required for fastest network transfer
• Multiplex: allows live display, recording, playback, backup and network operation at the same time
• supports video output for composite & VGA simultaneously
• backup function: supports USB 2.0 flash drive backup and network backup
• mobile surveillance via web browsers on iPhone, BlackBerry, Win Mobile, Symbian and Android phones
• remote surveillance on PC
o for operating systems: compatible with Windows & MAC operating system
o for web browsers: compatible with Internet Explorer, Mozilla Firefox, Google Chrome & Safari
o for CMS software: company-developed and free software "Video Viewer, on both Windows and MAC
operating systems
o also via Apple's media player, QuickTime
• intelligent motion trigger recording
o advanced motion detection
o scheduled motion detection recording (with 1 adjustable parameter)
o quick search function (time/motion/alarm)
o only the channel with an event will be recorded to effectively save a significant amount of hard disc space
• A/V support: supports 1 audio input and 1 audio output for sound recording
• multi-language OSD: English, French, Dutch, German, Portuguese, Spanish, Czech, Hungarian, Greek,
Italian, Arabic, Polish, Vietnamese and Chinese
• quick start manual: English, Dutch, French, Spanish, German
• full user manual: English
• supports SATA HDD
• supports daylight-saving function
• PTZ control: supports PELCO-D protocol
• alarm I/O: 4 inputs, 1 output
• supports TCP/IP, PPPoE, DHCP and DDNS network connection
• supports manual / timer / motion / network recording functions
• system auto recovery after power reconnected
• IR remote control: DVRRC5 (incl.)
• optional monitor (not incl.): MONSCA4, MONSCA5
•
optional router (not incl.): EM4542, EM4553, EM4570
• USB mouse (not incl.): GE31010826101, GE31011039100, GE31030414100
5. Overview
Refer to the illustrations on page 2 of this manual.
Front panel
LED
indications
HDD reading or recording activities on the hard disk
POWER DVR power is on
1 ~4 Press a button to select the corresponding channel.
4CH: Press to show the 4 channel display mode.
PLAY Press to play the recorded video.
LIST
List the information of the recorded files.
QUICK SEARCH / RECORD / MOTION / ALARM / TIMER / FULL LIST
ENTER Press to confirm settings
MENU Press to enter the main menu.
SLOW In playback mode, press to play the recorded file slowly.
ZOOM Press to enlarge the image of the selected channel.
AUDIO
= SLOW + ZOOM
Press SLOW and ZOOM simultaneous to select live or play-back sounds.
SEQ Press to show all screens sequentially in full screen mode. Press again to quit.
PAUSE
S / +
Press to pause, press again to continue playback.
Press to move up (S) or increase value (+)
STOP
T / -
Press to stop playback.
Press to move down (T) or decrease value (-)
REW e Press to rewind.
Press to move left (e).
FF
f
Press for fast forward.
Press to move right (f).
USB
Connect a USB flash drive for video backup to this USB port.
Connect a USB mouse to this USB port.
Note: do not connect two USB flash drives or USB mice at the same time.
All manuals and user guides at all-guides.com
V.
re
aVIDMOAUAU
LA
V
GEX
19
6
.
In
•
•
•
•
•
•
•
•
C
o
•
C
o• W
•
C
o
•
C
o
•
•
C
o
03 - 17/01/2
0
a
r panel
EO IN
NITOR
DIO IN
DIO OUT
N port
A
TERNAL I/O
V DC
Hardw
a
stalling th
e
Obtain a s
u
be formatt
e
Make sur
e
to avoid el
e
Unscrew th
Lift the cov
Screw the
m
Note: th
e
Connect th
e
Screw the
H
Close the c
o
A
power
nnecting
a
Obtain a s
u
Note: whe
n
force
nnecting t
h
Plug the D
C
ARNING:
Plug the in
c
not switch
nnecting
a
Connect th
e
Note: vide
o
befo
nnecting
a
The DVR s
u
DVR. Conn
e
There is al
s
desired. Co
nnecting
L
12
4 vide
o
conne
c
1 audi
o
1 audi
o
Conne
c
conne
c
use a
9
Power
re setu
p
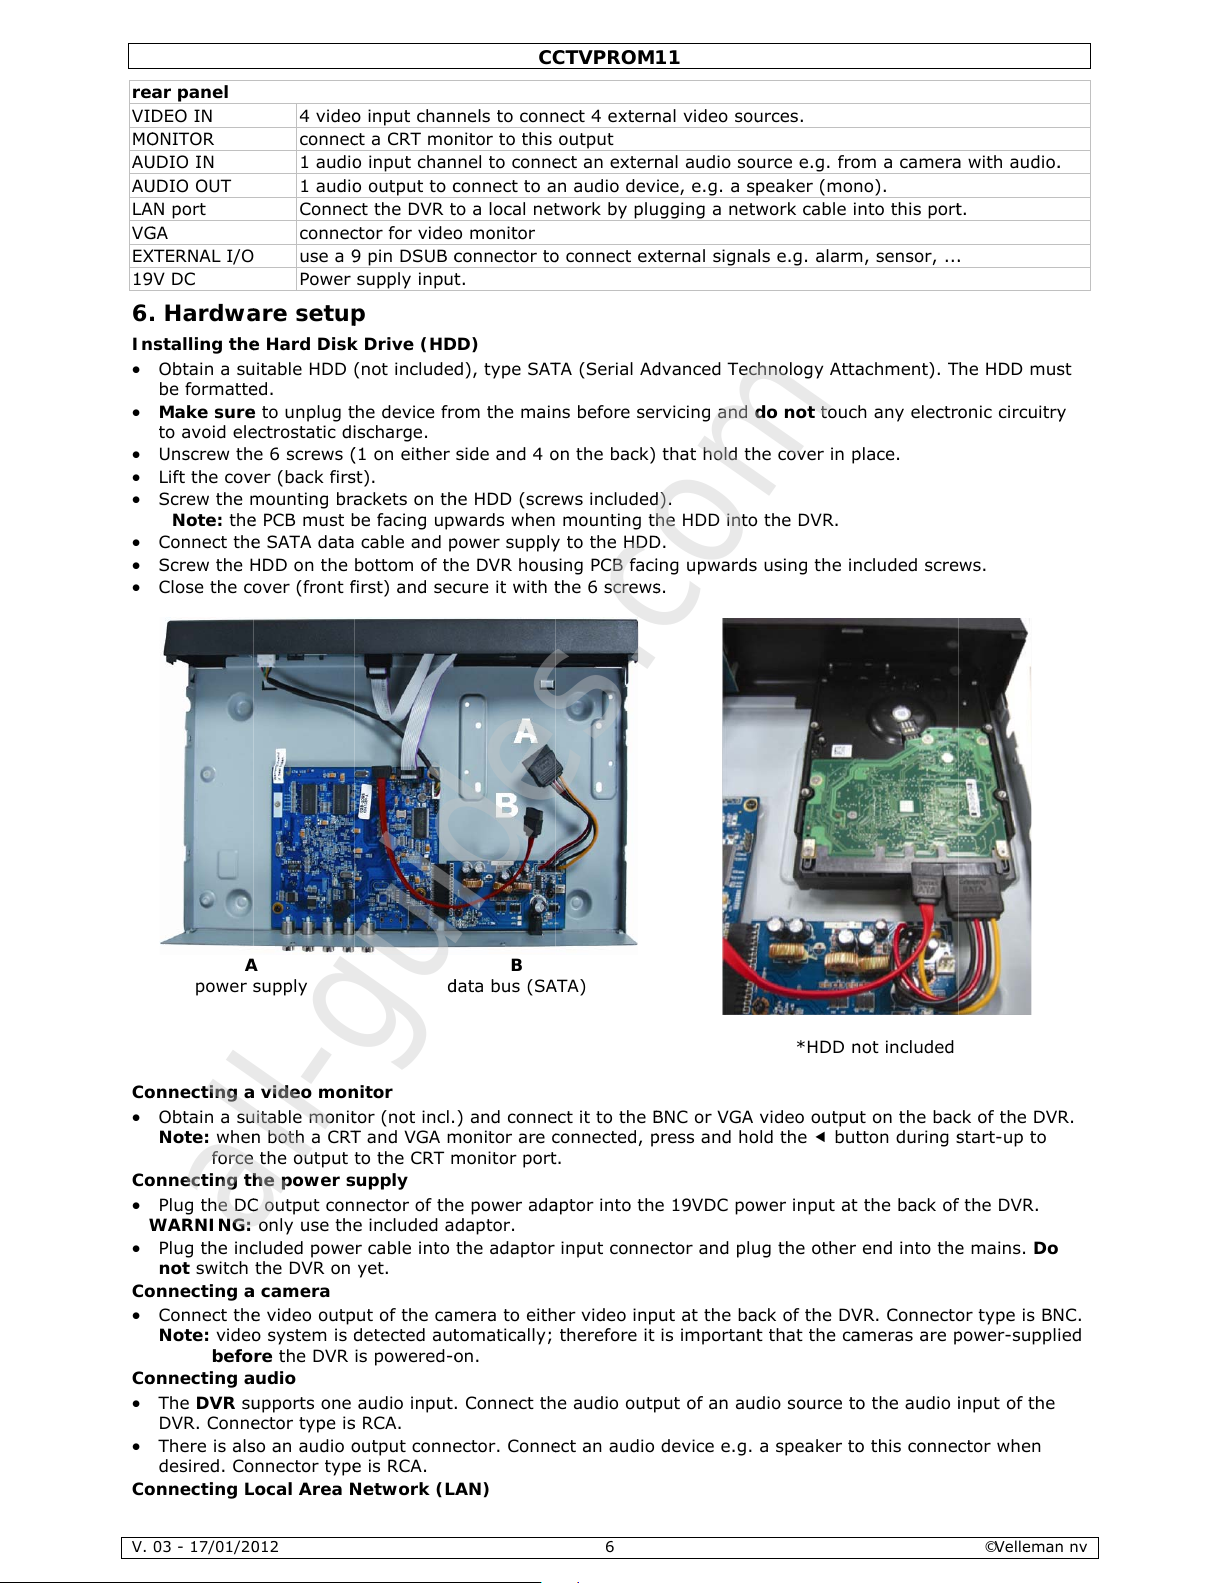
Hard Dis
k
itable HDD
d.
to unplug
t
ctrostatic d
i
e 6 screws
(
er (back fir
s
ounting br
a
PCB must
b
SATA data
DD on the
ver (front
f
supply
video mo
n
itable moni
t
both a CR
T
the output
e power
s
output con
only use th
e
luded powe
the DVR on
camera
video out
p
system is
d
re the DVR
udio
pports one
ctor type i
s
o an audio
o
nnector typ
e
ocal Area
N
input cha
n
t a CRT mo
input cha
n
output to
c
t the DVR
t
tor for vide
o
pin DSUB
c
supply inpu
t
Drive (H
D
(not include
d
he device fr
scharge.
1 on either
t).
ckets on t
h
e facing up
cable and
p
bottom of t
h
irst) and se
c
d
itor
or (not incl.
and VGA
m
to the CRT
m
upply
nector of th
included a
r cable into
yet.
ut of the ca
etected au
t
is powered-
o
audio input
RCA.
utput conn
e
is RCA.
etwork (L
C
C
nels to con
n
nitor to this
nel to conn
e
onnect to a
o a local ne
t
monitor
onnector t
o
.
D)
), type SA
T
om the mai
n
side and 4
o
e HDD (scr
e
wards when
ower suppl
y
e DVR hou
s
ure it with
t
B
ata bus (S
A
) and conn
e
onitor are
c
onitor por
t
e power ad
a
daptor.
the adaptor
mera to eit
h
omatically;
n.
. Connect th
ctor. Conn
e
AN)
TVPROM
6
ect 4 exter
n
output
ct an exter
n
n audio dev
work by pl
u
connect e
x
A (Serial A
d
s before se
n the back)
ws include
d
mounting t
to the HD
D
ing PCB fac
i
he 6 screw
s
TA)
ct it to the
B
onnected,
p
.
ptor into th
e
input conn
e
er video in
p
therefore it
e audio out
p
ct an audio
11
al video so
u
al audio so
ice, e.g. a s
p
gging a net
w
ternal signa
vanced Tec
rvicing and
d
that hold t
h
).
he HDD int
o
.
ng upwards
.
NC or VGA
ress and h
o
19VDC po
w
ctor and pl
u
ut at the ba
is importan
t
ut of an au
d
device e.g.
rces.
urce e.g. fr
o
eaker (mo
n
ork cable i
ls e.g. alar
m
hnology Att
a
o not touc
e cover in
p
the DVR.
using the i
n
*HDD
n
video outp
u
ld the e bu
t
er input at
g the other
ck of the D
V
that the c
a
io source t
o
a speaker t
o
m a camer
a
o).
nto this por
t
, sensor, ..
.
chment). T
h any electr
lace.
cluded scre
ot included
t on the ba
c
ton during
s
the back o
f
end into th
e
R. Connect
o
meras are
p
the audio
i
this conne
©Vellema
n
with audio
.
.
he HDD mu
s
onic circuitr
y
ws.
k of the DV
R
tart-up to
the DVR.
mains. Do
r type is B
N
ower-suppl
i
nput of the
ctor when
nv
t
.
C.
ed
All manuals and user guides at all-guides.com
all-guides.com
CCTVPROM11
V. 03 - 17/01/2012 ©Velleman nv
7
• Connect the DVR to a local network by plugging a network cable into the LAN port at the back of the DVR.
Connector type is 8P8C (RJ45). Setup is done through the OSD.
7. Preliminary settings
• Make sure the connected cameras are on and set the power switch at the rear of the device to the on-
position. It takes about 15 to 30 seconds to start up.
Menu overview
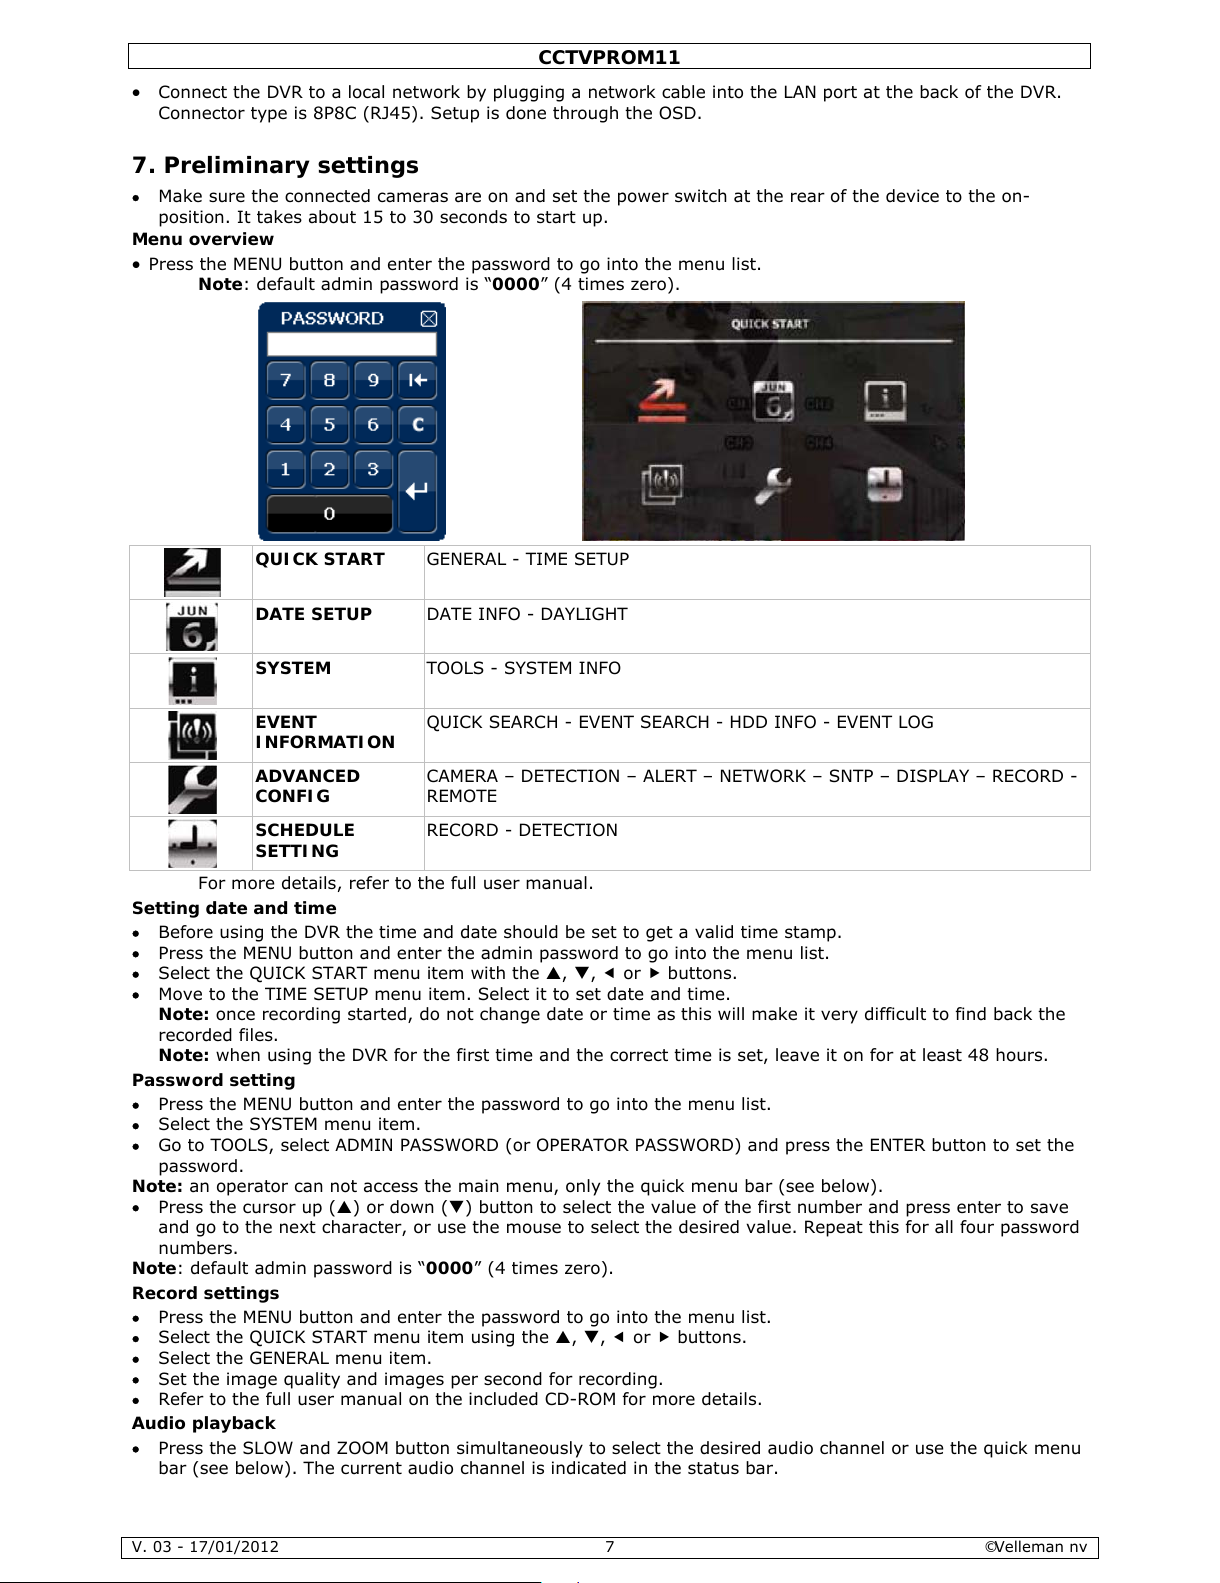
• Press the MENU button and enter the password to go into the menu list.
Note: default admin password is “0000” (4 times zero).
QUICK START GENERAL - TIME SETUP
DATE SETUP DATE INFO - DAYLIGHT
SYSTEM TOOLS - SYSTEM INFO
EVENT
INFORMATION
QUICK SEARCH - EVENT SEARCH - HDD INFO - EVENT LOG
ADVANCED
CONFIG
CAMERA – DETECTION – ALERT – NETWORK – SNTP – DISPLAY – RECORD -
REMOTE
SCHEDULE
SETTING
RECORD - DETECTION
For more details, refer to the full user manual.
Setting date and time
• Before using the DVR the time and date should be set to get a valid time stamp.
• Press the MENU button and enter the admin password to go into the menu list.
• Select the QUICK START menu item with the S, T, e or f buttons.
• Move to the TIME SETUP menu item. Select it to set date and time.
Note: once recording started, do not change date or time as this will make it very difficult to find back the
recorded files.
Note: when using the DVR for the first time and the correct time is set, leave it on for at least 48 hours.
Password setting
• Press the MENU button and enter the password to go into the menu list.
• Select the SYSTEM menu item.
• Go to TOOLS, select ADMIN PASSWORD (or OPERATOR PASSWORD) and press the ENTER button to set the
password.
Note: an operator can not access the main menu, only the quick menu bar (see below).
• Press the cursor up (S) or down (T) button to select the value of the first number and press enter to save
and go to the next character, or use the mouse to select the desired value. Repeat this for all four password
numbers.
Note: default admin password is “0000” (4 times zero).
Record settings
• Press the MENU button and enter the password to go into the menu list.
• Select the QUICK START menu item using the S, T, e or f buttons.
• Select the GENERAL menu item.
• Set the image quality and images per second for recording.
• Refer to the full user manual on the included CD-ROM for more details.
Audio playback
• Press the SLOW and ZOOM button simultaneously to select the desired audio channel or use the quick menu
bar (see below). The current audio channel is indicated in the status bar.
All manuals and user guides at all-guides.com
CCTVPROM11
V. 03 - 17/01/2012 ©Velleman nv
8
User profile selection
• It is possible to log on to the system as administrator ( ) or regular user ( ). An icon is shown in the
status bar.
• Switch between user profiles by clicking on the icon ( or ). The lock-icon ( ) is now displayed.
• Click on the lock-icon and enter the password of the desired user profile.
Video output
• On both VGA and monitor outputs the video signal is present simultaneously.
• To switch to the other display, go to ADVANCED CONFIG and set the DISPLAY OUTPUT PATH.
Note: the DVR must be reset for the setting to take effect.
• It is also possible to select a display at start-up of the DVR. Press the left key (
) on the front panel
during start-up to use the CRT monitor; press the right key (
) during set-up to use the VGA output.
8. Operation
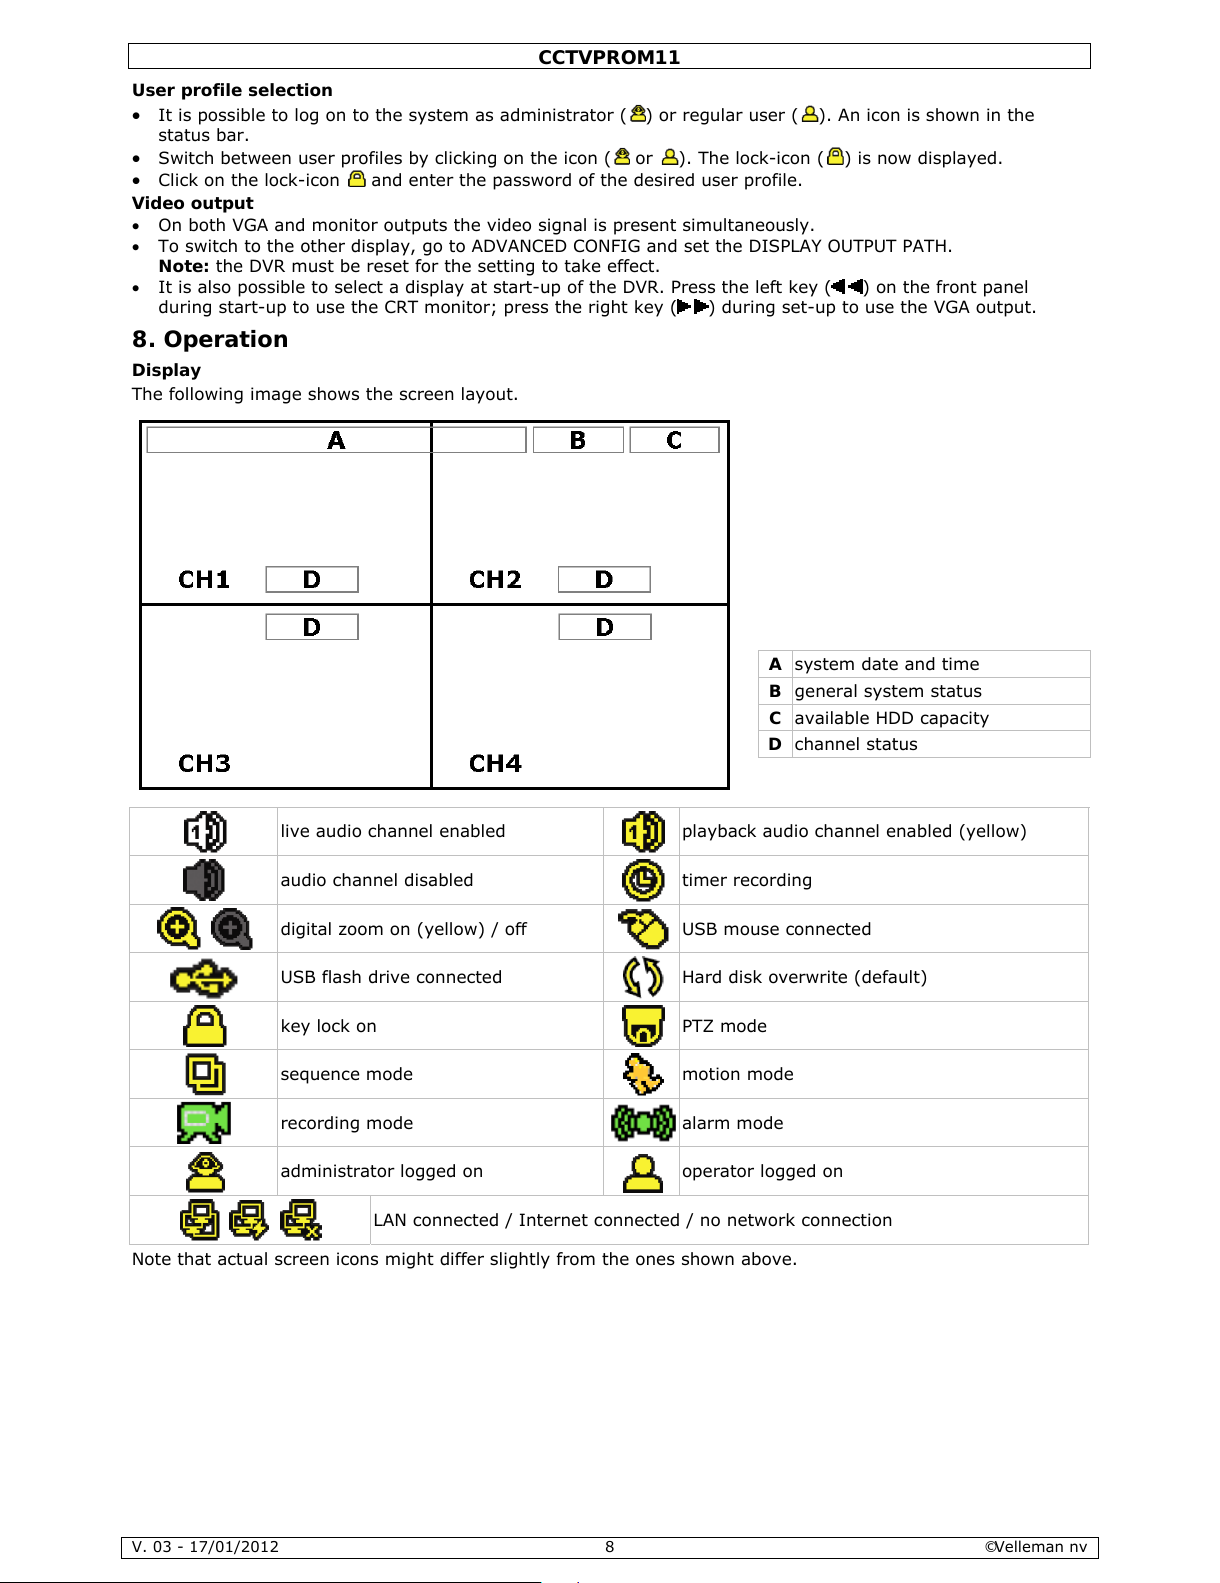
Display
The following image shows the screen layout.
A system date and time
B general system status
C available HDD capacity
D channel status
live audio channel enabled
playback audio channel enabled (yellow)
audio channel disabled
timer recording
digital zoom on (yellow) / off
USB mouse connected
USB flash drive connected
Hard disk overwrite (default)
key lock on
PTZ mode
sequence mode
motion mode
recording mode alarm mode
administrator logged on
operator logged on
LAN connected / Internet connected / no network connection
Note that actual screen icons might differ slightly from the ones shown above.
All manuals and user guides at all-guides.com
CCTVPROM11
V. 03 - 17/01/2012 ©Velleman nv
9
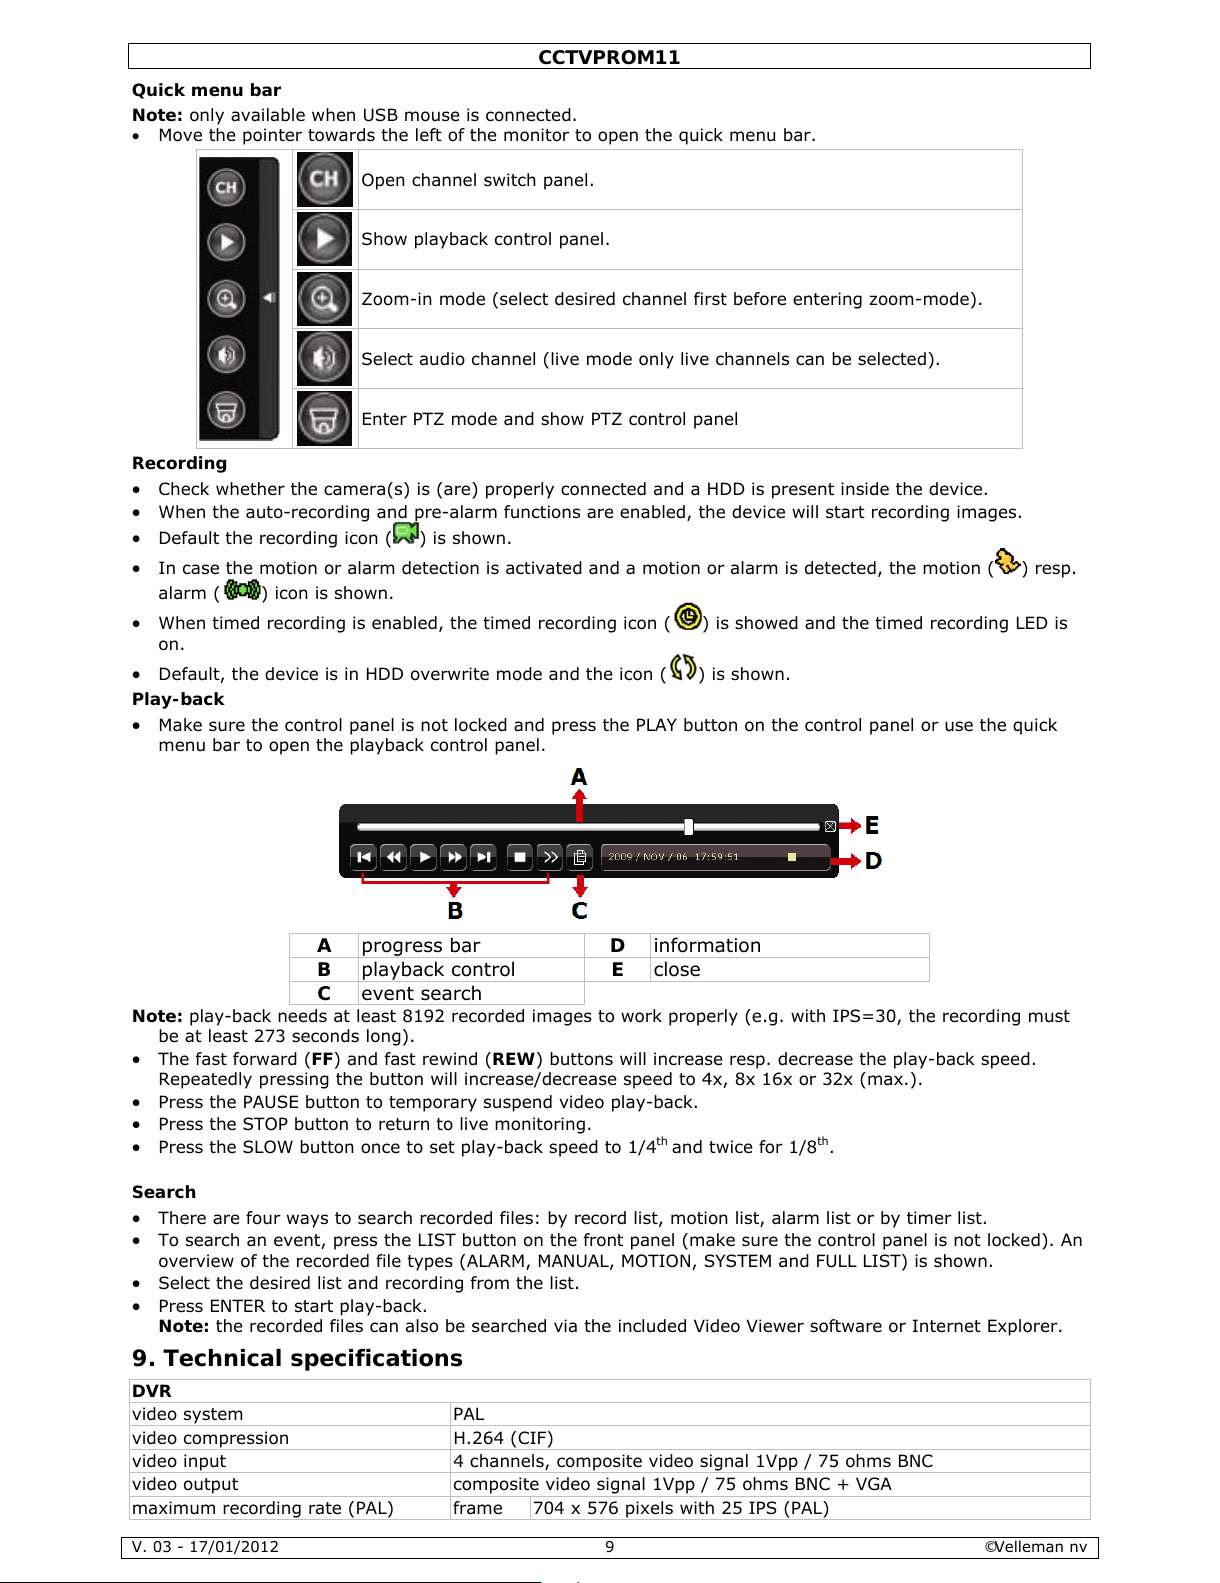
Quick menu bar
Note: only available when USB mouse is connected.
• Move the pointer towards the left of the monitor to open the quick menu bar.
Open channel switch panel.
Show playback control panel.
Zoom-in mode (select desired channel first before entering zoom-mode).
Select audio channel (live mode only live channels can be selected).
Enter PTZ mode and show PTZ control panel
Recording
• Check whether the camera(s) is (are) properly connected and a HDD is present inside the device.
• When the auto-recording and pre-alarm functions are enabled, the device will start recording images.
• Default the recording icon ( ) is shown.
• In case the motion or alarm detection is activated and a motion or alarm is detected, the motion ( ) resp.
alarm ( ) icon is shown.
• When timed recording is enabled, the timed recording icon ( ) is showed and the timed recording LED is
on.
• Default, the device is in HDD overwrite mode and the icon ( ) is shown.
Play-back
• Make sure the control panel is not locked and press the PLAY button on the control panel or use the quick
menu bar to open the playback control panel.
A progress bar D information
B playback control E close
C event search
Note: play-back needs at least 8192 recorded images to work properly (e.g. with IPS=30, the recording must
be at least 273 seconds long).
• The fast forward (FF) and fast rewind (REW) buttons will increase resp. decrease the play-back speed.
Repeatedly pressing the button will increase/decrease speed to 4x, 8x 16x or 32x (max.).
• Press the PAUSE button to temporary suspend video play-back.
• Press the STOP button to return to live monitoring.
• Press the SLOW button once to set play-back speed to 1/4
th
and twice for 1/8th.
Search
• There are four ways to search recorded files: by record list, motion list, alarm list or by timer list.
• To search an event, press the LIST button on the front panel (make sure the control panel is not locked). An
overview of the recorded file types (ALARM, MANUAL, MOTION, SYSTEM and FULL LIST) is shown.
• Select the desired list and recording from the list.
• Press ENTER to start play-back.
Note: the recorded files can also be searched via the included Video Viewer software or Internet Explorer.
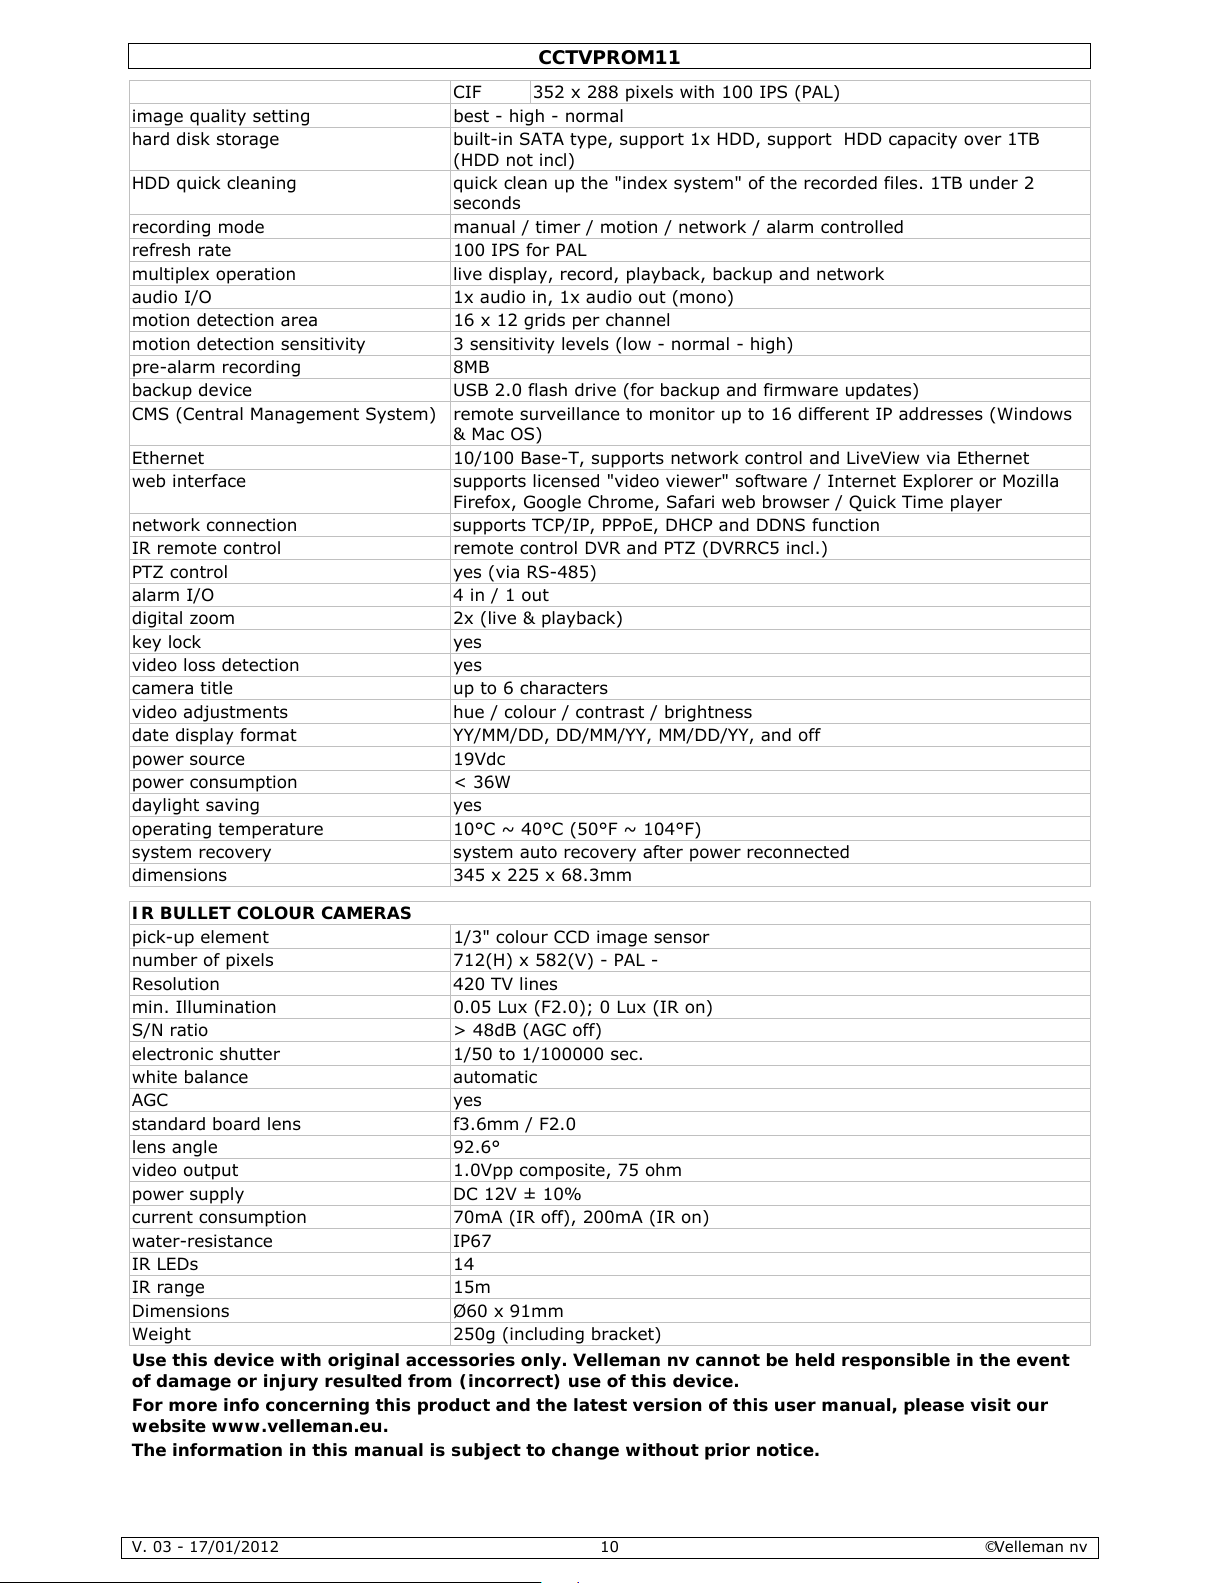
9. Technical specifications
DVR
video system PAL
video compression H.264 (CIF)
video input 4 channels, composite video signal 1Vpp / 75 ohms BNC
video output composite video signal 1Vpp / 75 ohms BNC + VGA
maximum recording rate (PAL) frame 704 x 576 pixels with 25 IPS (PAL)
All manuals and user guides at all-guides.com
CCTVPROM11
V. 03 - 17/01/2012 ©Velleman nv
10
CIF 352 x 288 pixels with 100 IPS (PAL)
image quality setting best - high - normal
hard disk storage built-in SATA type, support 1x HDD, support HDD capacity over 1TB
(HDD not incl)
HDD quick cleaning quick clean up the "index system" of the recorded files. 1TB under 2
seconds
recording mode manual / timer / motion / network / alarm controlled
refresh rate 100 IPS for PAL
multiplex operation live display, record, playback, backup and network
audio I/O 1x audio in, 1x audio out (mono)
motion detection area 16 x 12 grids per channel
motion detection sensitivity 3 sensitivity levels (low - normal - high)
pre-alarm recording 8MB
backup device USB 2.0 flash drive (for backup and firmware updates)
CMS (Central Management System) remote surveillance to monitor up to 16 different IP addresses (Windows
& Mac OS)
Ethernet 10/100 Base-T, supports network control and LiveView via Ethernet
web interface supports licensed "video viewer" software / Internet Explorer or Mozilla
Firefox, Google Chrome, Safari web browser / Quick Time player
network connection supports TCP/IP, PPPoE, DHCP and DDNS function
IR remote control remote control DVR and PTZ (DVRRC5 incl.)
PTZ control yes (via RS-485)
alarm I/O 4 in / 1 out
digital zoom 2x (live & playback)
key lock yes
video loss detection yes
camera title up to 6 characters
video adjustments hue / colour / contrast / brightness
date display format YY/MM/DD, DD/MM/YY, MM/DD/YY, and off
power source 19Vdc
power consumption < 36W
daylight saving yes
operating temperature 10°C ~ 40°C (50°F ~ 104°F)
system recovery system auto recovery after power reconnected
dimensions 345 x 225 x 68.3mm
IR BULLET COLOUR CAMERAS
pick-up element 1/3" colour CCD image sensor
number of pixels 712(H) x 582(V) - PAL -
Resolution 420 TV lines
min. Illumination 0.05 Lux (F2.0); 0 Lux (IR on)
S/N ratio > 48dB (AGC off)
electronic shutter 1/50 to 1/100000 sec.
white balance automatic
AGC yes
standard board lens f3.6mm / F2.0
lens angle 92.6°
video output 1.0Vpp composite, 75 ohm
power supply DC 12V ± 10%
current consumption 70mA (IR off), 200mA (IR on)
water-resistance IP67
IR LEDs 14
IR range 15m
Dimensions Ø60 x 91mm
Weight 250g (including bracket)
Use this device with original accessories only. Velleman nv cannot be held responsible in the event
of damage or injury resulted from (incorrect) use of this device.
For more info concerning this product and the latest version of this user manual, please visit our
website www.velleman.eu.
The information in this manual is subject to change without prior notice.
All manuals and user guides at all-guides.com
V.
1
.
A
aBeHeDa
be
O
PDitmedie
In
O
p
2
.
3
.
Ra
•
•
•
•
•
4
.
•
•
•
•
03 - 17/01/2
0
Inleidi
n
n alle ing
e
langrijke
m
Dit sy
m
wegg
e
batter
i
terech
breng
e
bt u vrage
nk u voor u
w
schadigd tij
d
MERKING:
document
i
er informat
nen enkel t
e
houd:
•
•
•
•
•
•
•
tioneel (n
i
•
•
•
•
•
Veiligh
e
Houd
Elekt
r
dodeli
j
Trek
d
niet g
e
Algem
e
adpleeg de
V
Leer eerst
d
Om veiligh
e
Gebruik he
t
De garanti
e
dealer zal
d
houden.
Leef bij ge
b
Eigens
c
GUI-displa
y
geïntegree
r
afzonderlij
k
videocomp
r
o verbete
r
12
zetenen v
a
ilieu-info
r
bool op he
worpen, dit
jen) niet bij
tkomen voo
n. Respect
e
n, contact
e
aankoop!
ens het tra
s een bekn
ie (enkel be
r illustratie
1 x DVR m
4x IR kleu
r
2 x camer
a
1 x 19V v
o
1 x high-e
f
Afstandsb
e
1x cd-rom
et meegel
e
harde schi
j
composiet
VGA- en D
optionele
r
USB muis:
idsinst
r
buiten het b
ocutiegev
a
ke elektros
h
e stekker u
i
bruikt.
ne rich
t
elleman
®
Enkel voor
Bescherm d
gevuld met
Bescherm t
e
Bescherm t
e
een ruimte
v
Bescherm t
e
e functies
v
idsredenen
toestel en
k
geldt niet
v
e verantwo
o
ruik van di
t
happen
(Graphical
de mail: on
d
e lokale en
essie H.26
4
de videokw
a
Bekn
o
n de Euro
p
matie bet
r
t toestel of
d
toestel sch
a
het gewon
e
r recyclage.
er de plaat
s
er dan de
Lees deze
h
nsport, inst
a
opte instal
schikbaar in
.
et ingebou
w
encamera
kabels van
edingsadap
t
ficiency DC
-
diening: D
V
met volledi
g
v.):
f: HD500G
B
video en V
G
VI-monitor:
outer: EM4
5
GE310108
2
ucties
ereik van ki
ar bij het
o
ocks te ve
r
t het stopc
o
lijnen
service- e
gebruik bi
it toestel te
g
vloeistof op
gen stof.
gen extre
m
an minste
n
gen schok
k
an het toes
t
mag u gee
n
el waarvoo
r
oor schade
rdelijkheid
toestel de
w
User Interf
a
ersteunt b
e
afstandsbe
d
liteit voor
m
C
C
pte in
s
ese Unie
effende di
t
e verpakki
n
de kan toe
b
huishoudel
U moet dit
t
elijke milie
u
plaatselijk
e
andleiding
g
lleer het da
latiehandl
e
het Engels,
de SATA-a
a
20m
er
DC convert
e
RRC5
e handleidi
n
/S, HD1TB
/
A-monitor:
MONSCA4,
42, EM455
3
6101, GE3
1
nderen en o
penen van
h
mijden.
ntact (trek
n
n kwaliteit
nnenshuis
.
en regen,
v
het toestel.
e hitte. Zor
g
s 2,5 cm tu
s
en en verm
i
el kennen
v
wijziginge
n
het gemaa
k
door het ne
afwijzen vo
o
etgeving b
e
ce) en bedi
e
richtgeving
iening
onitoring
e
TVPROM
11
tallati
e
product
g geeft aa
n
rengen aan
ijke afval;
h
oestel naar
wetgeving.
autoritei
t
rondig voo
r
n niet en ra
a
iding. Raa
d
Frans, Duit
nsluiting: D
V
r voor de
D
g
S
MONSCA6,
MONSCA5
, EM4570
011039100
nbevoegde
n
et toestel.
R
iet aan de
k
sgarantie
a
ochtigheid
e
dat de ve
r
sen het to
e
jd brute kra
oor u het g
a
aanbrenge
t is. Bij on
o
geren van
b
r defecten
o
treffende d
ning via U
S
via eender
w
n opnames
11
handl
e
dat, als he
t
het milieu.
et moet bij
uw verdele
r
en betreff
e
u het toest
e
dpleeg uw
pleeg de v
o
en Spaan
s
R4L6
VR en de c
a
MONSCA7
, GE310304
.
aak geen
k
abel!) voo
r
chteraan d
e
n opspatte
n
luchtingsop
e
stel en elk
a
cht tijdens
d
at gebruik
e
n.
ordeelkund
i
epaalde ric
h
f probleme
e privacy n
a
B-muis
elke web
m
iding
na zijn lev
e
Gooi dit toe
s
een gespeci
of naar ee
n
nde de ve
r
l in gebrui
k
dealer.
lledige han
d
). De afbeel
mera's
14100
abels aan d
dat u het to
handleidin
g
de vloeisto
f
ningen nie
t
nder object
e bedienin
g
n.
g gebruik v
e
tlijnen in d
e
n die hier r
e
.
ailserver
nscyclus w
o
tel (en eve
n
aliseerd be
d
lokaal rec
y
wijdering.
neemt. W
e
leiding op
d
dingen in d
e
ie onder str
o
estel reinigt
.
fen. Plaats
g
verstopt g
e
.
.
rvalt de ga
ze handleid
chtstreeks
v
©Vellema
n
rdt
tuele
rijf
clagepunt
rd het toest
e cd-rom v
o
ze handleid
om staan o
en als u he
t
een object
raken. Voo
r
antie.
ing en uw
erband me
e
nv
el
or
ing
m
zie
All manuals and user guides at all-guides.com
all-guides.com
CCTVPROM11
V. 03 - 17/01/2012 ©Velleman nv
12
o langere opnameduur dankzij een verminderde bestandgrootte
o snellere transfer via netwerk met lagere bitsnelheid
• multiplexing: simultane liveweergave, opname, playback, back-up en gebruik via netwerk
• ondersteunt simultane composiet- en VGA-video uitgang
• back-upfunctie: ondersteunt back-up via USB 2.0 flash drive en via het netwerk
• bewaking op afstand via iPad, iPhone, BlackBerry, Win Mobile, Symbian en Android
• bewaking op afstand via PC
o voor besturingssystemen: compatibel met Windows & MAC
o voor webbrowsers: compatibel met Internet Explorer, Mozilla Firefox, Google Chrome & Safari
o voor CMS software: bedrijfsontwikkelde en gratis software "Video Viewer", zowel op Windows als op MAC
besturingssystemen
o ook via Apple's media player, QuickTime
• opname door bewegingswaarneming
o geavanceerde opname door bewegingswaarneming
o opname door bewegingswaarneming met geprogrammeerde starttijd (1 instelbare parameter)
o snelzoekfunctie (tijdstip/bewegingswaarneming/alarm)
o de opname start enkel op het kanaal met de gebeurtenis om het geheugen op de harde schijf op de
meest doeltreffende manier te benutten
• audio/video: opname met geluid langs 1 audio-ingang en 1 audio-uitgang
• meertalige OSD: Engels, Frans, Nederlands, Duits, Portugees, Spaans, Tsjechisch, Hongaars, Grieks,
Italiaans, Arabisch, Pools, Vietnamees en Chinees
• gids voor een snelle start: Engels, Nederlands, Frans, Spaans, Duits
• uitgebreide handleiding: Engels
• ondersteunt SATA harde schijven
• overschakeling naar zomer- of wintertijd
• PTZ-besturing: ondersteunt PELCO-D protocol
• alarm I/O: 4 ingangen/1 uitgang
• ondersteunt TCP/IP, PPPoE, DHCP en DDNS netwerkaansluiting
• opnamemodi: manueel / timer / beweging / via netwerk
• automatisch herstel van het systeem nadat de voeding opnieuw is aangesloten
• IR afstandsbediening: DVRRC5 (meegelev.)
• optionele monitor (niet meegelev.): MONSCA4, MONSCA5
•
optionele router (niet meegelev.): EM4542, EM4553, EM4570
• USB muis (niet meegelev.): GE31010826101, GE31011039100, GE31030414100
5. Omschrijving
Raadpleeg de figuren op pagina 2 van deze handleiding.
Frontpaneel
Leds
HDD De harde schijf leest of neemt data op.
POWER De DVR is ingeschakeld.
1 ~ 4 Druk op een cijfertoets om het desbetreffende kanaal te selecteren.
Druk op om de 4-kanaals display weer te geven.
PLAY Druk op PLAY om de opname af te spelen.
LIST
Lijst van de opnamebestanden.
QUICK SEARCH / RECORD / MOTION / ALARM / TIMER / FULL LIST
ENTER Druk op ENTER om te bevestigen.
MENU Druk op MENU om het menu weer te geven.
SLOW Druk op SLOW om het afgespeelde bestand traag af te spelen.
ZOOM Druk op ZOOM om het beeld in het geselecteerde kanaal te vergroten
AUDIO
= SLOW + ZOOM
Druk gelijktijdig op SLOW en ZOOM om de geluidsopties te selecteren.
SEQ Druk op SEQ om alle kanalen achtereenvolgens op het volledige scherm weer te geven. Druk
opnieuw om de functie te verlaten.
PAUSE
S / +
Druk om te pauzeren of verder af te spelen.
Druk om u naar omhoog te verplaatsen (S) of de waarde te verhogen (+).
STOP
T / -
Druk om et bestand te stoppen.
Druk om u naar omlaag te verplaatsen (T)of de waarde te verlagen (-).
REW
e
Druk om terug te spoelen.
Druk om u naar links te verplaatsen (e).
FF
f
Druk om verder te spoelen.
Druk om u naar rechts te verplaatsen (f).
USB
Sluit een USB flashdrive aan op deze USB-poort voor back-upopnames.
Sluit een USB-muis aan op de deze USB-poort.
Opmerking: Sluit geen twee flashdrives of muizen aan op de USB-poorten.
All manuals and user guides at all-guides.com
 Loading...