


Carpet washer
Vax model number:
V-125
Vax careline 0870 6061248
instruction manual
Please read carefully before using this cleaner. www.vax.co.uk Always fully extend the mains cable before use.
Retain for future reference.
www.vax.co.uk
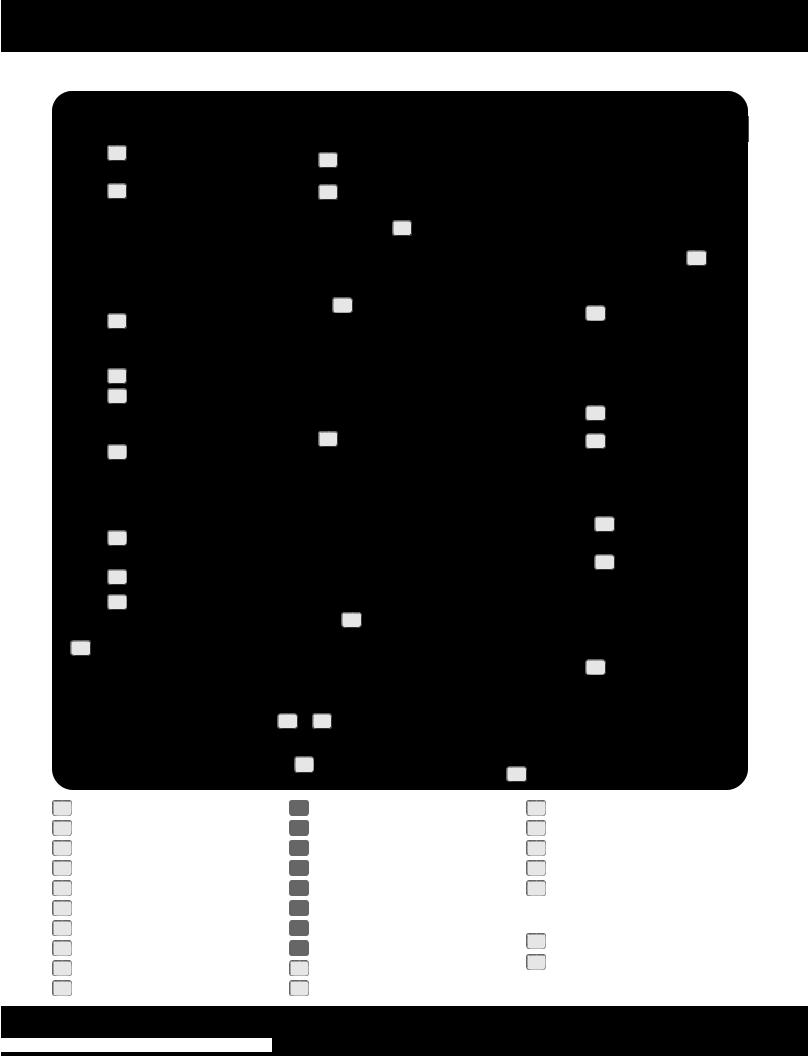
1. Diagram
V-125
1
2
3 |
4 |
18
19
5
6
7
9
8
10
11
17
12
16
|
|
13 |
14 |
Fig.1/1 |
15 |
|
|
|
|
||
1 |
Handle grip |
11 |
Recovery tank |
2 |
Solution trigger |
12 |
Recovery tank latches |
3 |
On/off switch |
13 |
SpinScrub mode selector |
4 |
Rinse setting switch |
14 |
Solution tube connection port |
5 |
SpinScrub hand tool |
15 |
Edge cleaners |
6 |
Carry handle |
16 |
Nozzle |
7 |
Solution tank handle |
17 |
Hose connection port |
8 |
Solution tank |
18 |
Cord hook |
9 |
Solution container |
19 |
Hose |
10 |
Recovery tank handle |
20 |
Hose/tool caddy |
25
20
21
22
26
27
23
24
21Stair/upholstery tool
22Hard floor squeegee
23Cord/hose hook
24Handle release pedal
25Hard floor brush assembly
(white bristles). Not intended for use on carpet or rugs
26Vax carpet cleaning solution
27Vax hard floor cleaning solution
2 parts overview

Vax Careline 0870 606 1248
2. Safety Information
FOR HOUSEHOLD USE ONLY.
When using the carpet washer, basic safety precautions should always be observed, including the following:
1.Do not leave the carpet washer unattended when plugged in. Unplug it from socket when not in use.
2.To prevent electric shock do not use outdoors.
3.Not to be used as a toy. Children should be supervised to ensure that they do not play with the appliance.
21.Using improper voltage may result in damage to the motor and possible injury to the user. The correct voltage is listed on the rating label.
22.A hazard may occur if the carpet washer runs over the power supply cord.
23.To prevent dirty water from running into motor, do not hold the appliance upside-down or lay on its side. Use appliance in normal vacuuming position.
24.Use extra care when cleaning on stairs.
25.Do not carry appliance while motor is running.
4.This appliance is not intended for use by persons NOTE: Carpets should be dry vacuumed thoroughly
(including children) with reduced physical, sensory or mental capabilities, or lack of experience and knowledge, unless they have been given supervision or instruction concerning the use of the appliance by a person responsible for their safety.
5.Use only as described in this manual.
6.Do not use with a damaged cord or plug. If the supply cord and/or plug is damaged, they must be replaced by the manufacturer, a Vax Service Agent or similarly qualified persons in order to avoid hazard.
7.Do not pull or carry by the cord, use the cord as a handle, allow the cord to come into contact with hot or sharp surfaces or close a door on the cord.
8.Do not unplug by pulling on the cord.
9.Do not handle the plug or carpet washer with wet hands.
10.Do not put any objects into openings or operate with openings blocked, keep them free of anything that may reduce airflow.
11.Keep hair, loose clothing, fingers and all parts of the body away from openings and moving parts.
12.Do not use the carpet washer on any glowing, burning or smoking particles.
13.Do not use without the solution tank and dirty water tank in place.
14.Do not use the carpet washer without the dust bag in place.
15.Turn off all controls before unplugging.
16.Do not use to pick up flammable or combustible liquids such as petrol, or use in areas where they may be present.
17.Keep the unit on the floor.
18.Do not use an extension cord.
19.Do not attempt to remove blockages with sharp objects as they may cause damage.
20.Store indoors put away after use to prevent tripping accidents.
before washing.
NOTE: The unit must be unplugged from the mains socket outlet after use, and before cleaning or maintaining the unit.
! |
IMPORTANT: This unit is not intended for |
commercial use. |
PLEASE KEEP THESE INSTRUCTIONS FOR FURTHER USE.
safety information 3

www.vax.co.uk
3. Assembly
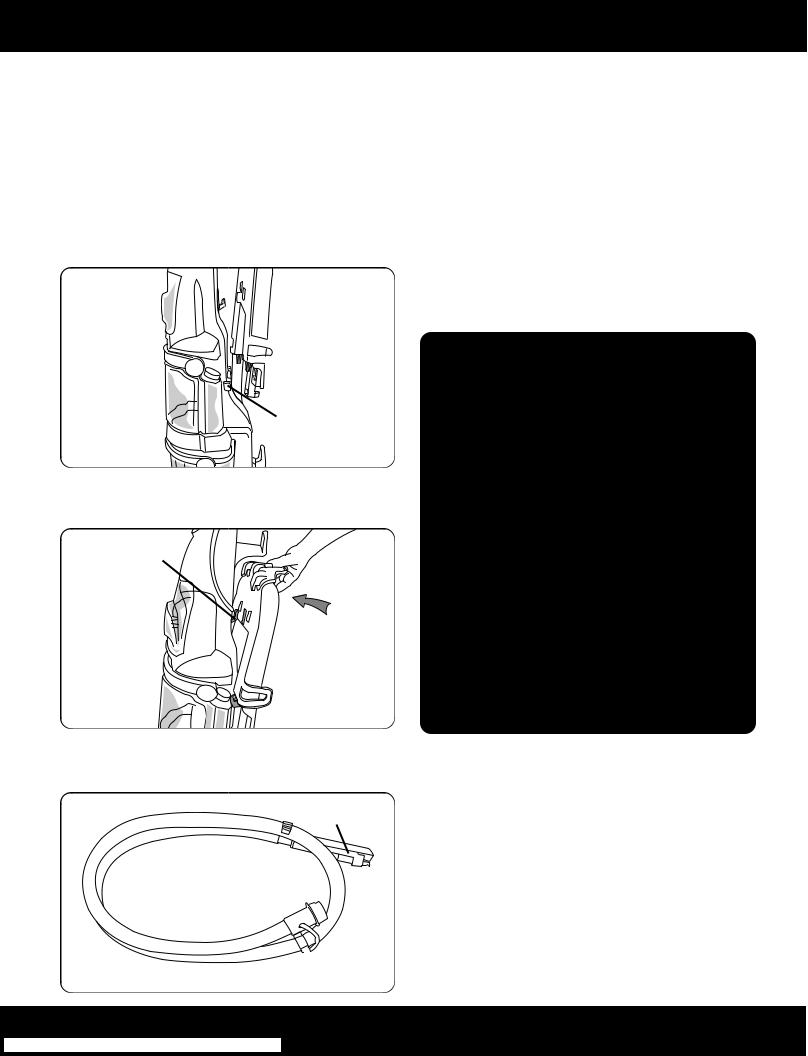
Attach Upper Handle
Remove clean water tank (upper tank) from cleaner (Fig.3/1).
Fig.3/1
NOTE: If the cord protector (A) on back of handle should become dislodged during unpacking, make sure it is repositioned properly before continuing with assembly of your cleaner.
With the arrow (B) on the cord protector pointing down, press groove (C) in the cord protector into slot in the lower handle (Fig.3/2).
C
A
B
Fig.3/2 
With cord hook to back of cleaner, push upper handle down onto lower handle (Fig.3/3).
Fig.3/3
4 assembly
Push bolts into holes on front of handle. If bolts will not go through hole easily, handle is not pushed completely down. Place nuts in recessed areas on back of the handle. Hold each nut in place while tightening each bolt securely (from the front of the handle) with a Phillips screw driver (Fig.3/4).
Fig.3/4
NOTE: Only two nuts are needed on this model. The extra nut is not required but has been provided for your convenience.
Replace clean water tank (upper tank) by positioning bottom first. Press tank into place (Fig.3/5)
Fig.3/5
Attach Hose/Cord Hook
Insert tabs on hook into slots on back of cleaner. Snap hook onto cleaner (Fig.3/6).
Fig.3/6
Attach Hose/Tool Caddy
The hose/tool caddy is designed to be used either on the cleaner for easy access to the tools and hose, or if the tools are not going to be used, it can be removed and hung for storage.
If you do not want to attach the caddy to the cleaner at this time, proceed to the “Storing Hose and Tools” section for proper hose placement on the caddy.
Slide tabs (A) on caddy into slots (B) on back of cleaner (Fig.3/7).
 A
A
B
Fig.3/7
Rotate top of caddy toward cleaner handle. Slide caddy down so notch (A) on caddy rests in hook (B) on cleaner (Fig.3/8).
A
 B
B
Fig.3/8
Identify the hose parts before storing hose (Fig.3/9):
A.Nozzle connector end
B.Solution tube
A

 B
B
Fig.3/9
Vax Careline 0870 606 1248
Storing Hose and Tools
Press hose, a few centimetres from nozzle connector end, into caddy. Bring hose up and over top of caddy.
Press hose into opposite side of caddy. Loop hose at bottom of cleaner and press into top of hook.
Loop hose over top of caddy again. Slide hose clip toward end of hose. Snap tab on hose connector into hose clip. Repeat on other end of hose.
Press solution tube into opposite side of clip.
Snap stair/upholstery tool onto caddy.
Insert top of hard floor squeegee through "loop" on caddy. Slide squeegee down into place.
Fig.3/10
assembly 5
www.vax.co.uk
4. Operation
Before You Begin Cleaning
Vacuum thoroughly - For carpet, use a Vax vacuum cleaner with an brushbar for best results. Vacuum upholstery with a vacuum cleaner with cleaning tool attachments. Use a crevice tool to reach into tufts and folds. Do not use the Dual V cleaner as a dry vacuum cleaner. For upholstery, always check the manufacturers guidelines before washing.
Test for colorfastness - Wet a white absorbent cloth with the solution. In a small, hidden area, gently rub the surface with the dampened cloth. Wait ten minutes and check for colour removal or bleed with white paper towel or cloth. If surface has more than one colour, check all colours.
When cleaning entire floor, move furniture out of area to be cleaned (may not be necessary if only high traffic areas are to be cleaned). For furniture too heavy to move, place aluminum foil or wax paper under legs. This will prevent wood finishes from staining carpet. Pin up furniture skirts and curtains.
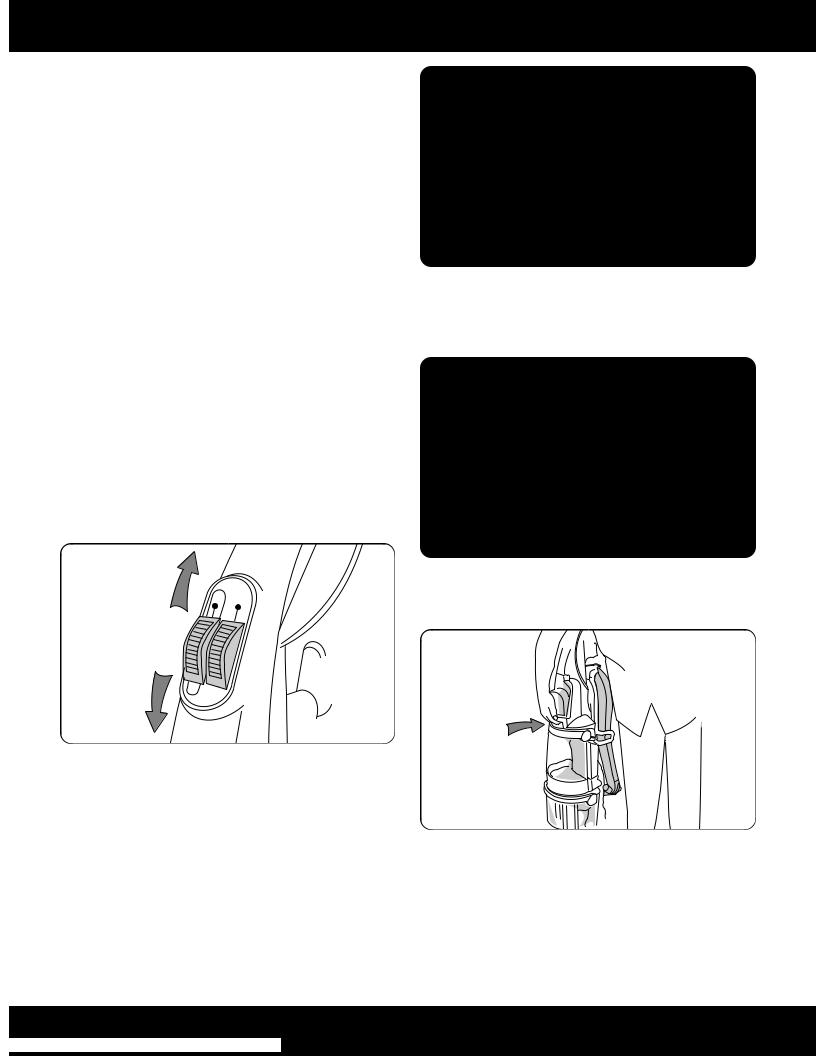
On/Off Switch
To turn cleaner ON, push switch down. To turn cleaner OFF, push switch up (Fig.4/1).
|
NSEI |
|
OFF |
UTORA |
|
ASHW |
||
|
NO |
nseiR |
|
Fig.4/1
Handle Release Pedal
Step on pedal to lower handle to operating position. Handle does not lock into a single position but “floats” to allow convenient operation (Fig.4/2).
Fig.4/2
To Transport
To move your cleaner from room to room, put handle in upright and locked position, tilt cleaner back on wheels and push forward (Fig.4/3).
Fig.4/3
Carrying Handle
The cleaner may also be lifted by placing a hand above the upper clean solution tank handle as shown (Fig.4/4).
Fig.4/4
Automatic Shut Off
When the recovery tank (lower tank) is full the automatic shutoff mechanism will shut off the cleaner suction (suction will be noticeably reduced).
At that time, the yellow float disk will rise to the top of the recovery tank lid (A) (Fig.4/5).
6 operation
 Loading...