

user manual POWER ATREUS 3P
052116 08 • 2011 © Copyrigh t VAUDE Spor t GmbH & Co. KG
1
GAL_TENT_Power_Atreus_3P.indd 1 08.08.2011 11:53:42
VAUDE.COM
POWER ATREUS 3P SIZES AND WEIGHT
2
B
C
A
X
Weight max:
1
4.900 g
140
130
70
200
175
220
110
Water column groundsheet:
Packing size:
59 x 22 cm
10.000 mm
Water column fly:
3.000 mm
Y
D
2
Z
GAL_TENT_Power_Atreus_3P.indd 2 08.08.2011 11:53:43
DEUTSCH
Grenzenlose Freiheit, Abenteuer und Gipfelglück.
Weit und breit nur Berge und Natur.
Stille und Herzklopfen.
Das ist der Spi rit of Mountain Sport s.
Wir bei VAUDE leben Bergsport. Unsere ganze Leidenschaft für die Berge ndet
sich in jedem VAUDE Pro dukt wieder.
Als modernes Familienunternehmen nehmen wir unsere Verantwortung für
Mensch und Natur wahr: Seit 2008 sind wir bluesign® Mitglied, dem strengsten
Industrie-Umweltstandard. Als erster europäischer Outdoor-Ausrüster verbessern
wir stetig unsere Umweltleistung durch die EMAS – Zertizierung, dem Öko-Audit
der EU.
Wir sehen uns in den Bergen …
Antje von Dewitz
PL ATZWA HL:
• Zelten Sie an einem ebenen, windgeschützten Ort und nicht in Mulden,
da sich dor t Wasser ansammeln kann.
• Das Zelt in geeigneter Windrichtung aufstellen - Eingang im Windschatten.
• Bedenken Sie, dass sich in Wassernähe mehr Kondensfeuchtigkeit in
Ihrem Zelt niederschlagen kann.
• Zelten Sie nicht an gefährlichen Orten, wie z.B. in Schluchten, unterhalb
von Felsen, in der Nähe von gletschergespeisten Flüssen, an Feuerstellen
oder im Wald.
• Entfernen Sie spitze oder scharfkantige Gegenstände, die den Zeltboden
beschädigen könnten.
• Zum Schutz des Zeltbodens empehlt sich eine Zeltbodenunterlage.
• Soll das Zelt längere Zeit an einem Ort aufgebaut bleiben, sollte es im
Schatten oder Halbschatten stehen.
• UV-Strahlung beschleunigt die Alterung von Gewebe und Beschichtung.
POWER ATREUS 3P
DEUTSCH
3
GAL_TENT_Power_Atreus_3P.indd 3 08.08.2011 11:53:44

• Be im Campieren im Schnee und großer Kälte ka nn in der Apsis ein „Kältegraben“ ausgehoben werden, in dem sich die Kaltluft sammelt.
• Ent fernen Sie evtl . angehäufte Schn eelasten rechtzeitig vom Ze lt.
• Kochen im Zelt ist wegen Brand- und Erstickungsgefahr zu vermeiden.
Sollte es dennoch nötig sein, unbedingt auf ausreichende Luftzufuhr
achten und den Kocher möglichst weit entfernt von den Zeltwänden
platzieren. Dazu kann das Inn enzelt teilweise aus gehängt und zurück
geschlagen werden.
AUFBAU ALLGEMEINE HINWEISE:
VAUDE Zelte lassen sich leicht und einfach aufbauen. Empnden Sie einen
Aufbauschritt als schwergängig, wenden Sie keine Gewalt an, sondern
machen Sie den Fehler ausndig.
1. Zelt am Boden auslegen (Innen- und Außenzelt werden zusammenhängend ausgeliefer t). Bei Wind empehlt es sich, das Zelt zu sichern, z.B. an
einem Rucksack , Stein, o. ä.
2. Gestänge auslegen und zusammenstecken, nicht werfen. Darauf achten,
dass alle Segmente lückenlos ineinander fassen, sonst können sie bei
Biegung b rechen. In den Ges tängekanälen sollte das Gestänge mö glichst
geschoben werden und nicht gezogen.
3. Stellen Sie das Zelt so auf, dass keine zu hohe Zuglast auf den Eingangsreißverschluss wirkt, dies verringert die Lebensdauer deutlich. Nutzen Sie
die Entlastungsschließen oder Haken unten am Eingang.
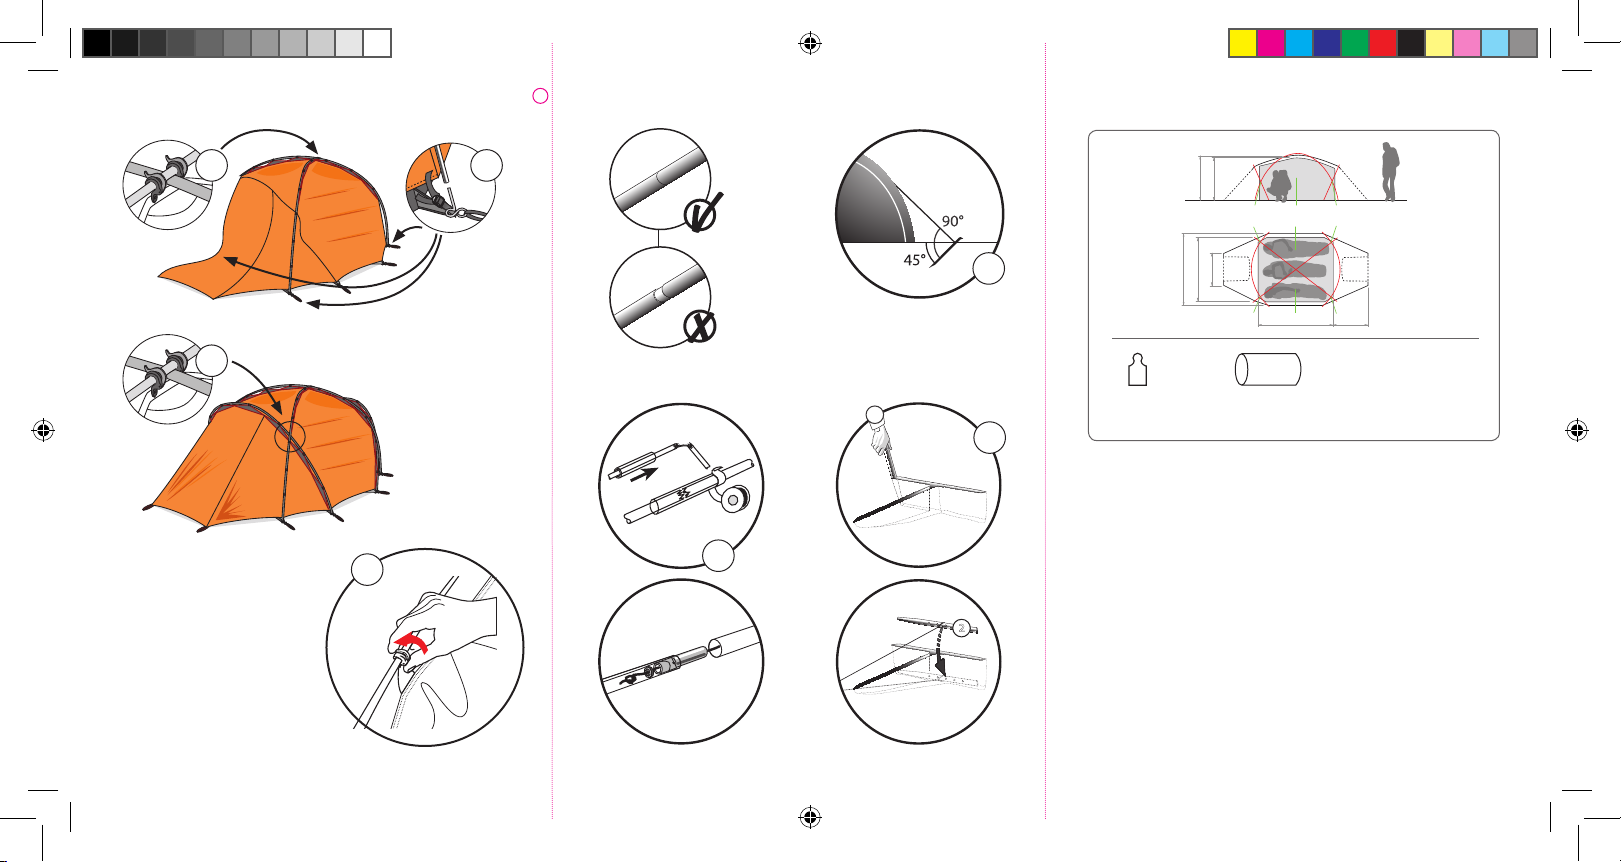
4. Heringe sollten in einem Winkel von 45° eingesteckt werden (X).
Die mitgelieferten VAUDE Y-Heringe sind sehr biegesteif und eignen sich
besonders für härtere Böden und Gras. Für ganz harte Böden empfehlen
sich Zeltnägel. Für sehr weiche Böden, Schnee oder Sand bietet VAUDE
einen Spezialhering an. Vertikal eingesteckt eignet er sich für weiche
Böden, horizontal vergraben für Sand und frisch gefallenen Schnee (Y).
AUFBAU „MODELLSPEZIFISCH“:
Bitte ge hen Sie Punkt für Punk t vor, die Reihenfolg e ist wichtig.
1. Aufstellplatz von spitzen Gegenständen befreien (evtl. Zeltunterlage verwenden).
2. Zelt am Boden auslegen. Hinweis: Innenzelt und Außenzelt werden ab
4
GAL_TENT_Power_Atreus_3P.indd 4 08.08.2011 11:53:44

Werk zusammenhängend ausgeliefert.
3. Gestänge auslegen und zusammenstecken.
4. Die beiden langen Gestänge in die Stifthaken an den Zeltecken ein-
stecken (A). Darauf achten , dass die Haken nicht verdreht sind.
Achtung: Das obere mittige Kraftdreieck hat zwei Befestigungsclips.
Das Gestänge, das damit befestigt wird, muss oben liegen, das andere
Gestänge darunter (B).
5. Von diesem mittigen Kraftdreieck ausgehend nun die Befestigungsclips
auf das Gestänge clippen. Die roten Klemmbügel erst ganz zum Schluss
schließ en, damit das Zelt g gf. noch am Gestä nge ausgericht et werden kann.
6. Die beiden kürzeren Gestänge an vorderer und hinterer Apsis durch
die Doppelclips führen und die Gestängeenden in die Stifthaken am
Fußpunkt einstecken (C). Die Clips mittig beginnend auf das Gestänge
clippen.
7. Zelt an allen Eckpunkten mit einem Hering befestigen und ggf. die
Webbänder am Fußpunkt auf Spannung bringen. Apsiden und ggf.
Sturmleinen abspannen.
8. Die roten Klemmbügel an allen Clips schließen (D). Das Zelt wird dadurch
am Gestänge xier t und die Kraftdreiecke soren für maximale Windstabilität.
9. Belüf tungshutzen freihalten und für ausreichende Luftzufuhr sorgen, z.B.
durch teilweises Önen der Eingänge.
ABBAU ALLGEMEINE HINWEISE:
• Entfernen Sie alle Gegenstände aus dem Zelt.
• Sel bsttragend e Konstruktio nen lassen sich le icht ausschütte ln und sich so
von Blättern, Sand und dergleichen befreien.
• Das Zelt noch eine Weile zum Trocknen mit dem Zeltboden nach oben
liegen lassen.
• Wenn man keine Möglichkeit hat, das Zelt gleich zu trocknen, sollte dies
innerhalb von 12 Stunden nachgeholt werden, um Schimmelbildung und
Stockecken zu vermeiden.
• Auch beim Zeltabbau die Stangen nie durch die Gestängekanäle ziehen,
sondern schieben.
• Beim Verstauen in den Packsack bitte darauf achten, dass Heringe oder
POWER ATREUS 3P
DEUTSCH
5
GAL_TENT_Power_Atreus_3P.indd 5 08.08.2011 11:53:44

Zeltstangen keine Druckstellen bilden, die die Zeltwand beschädigen
könnten.
• Vor dem Abbau alle Reißverschlüsse schließen und die Abspannleinen
zusammenrollen. Dadurch müssen sie bei dem nächsten Aufbau nicht
erst entwirrt werden und er geht wieder schnell und leicht von der Hand.
ABBAU „MODELLSPEZIFISCH“:
1. Heringe an den Fußpunkten lösen, Clips vom Gestänge lösen und Zelt in
sich zusammensacken lassen.
2. Gestänge zusammenlegen und mit dem Zelt handlich zusammenrollen.
Das Gestänge nicht nachträglich in den gefüllten Packsack hineinzwängen, da sonst Packsack und Zelt beschädigt werden können.
LAGERUNG/PFLEGE/REPARATUREN:
• Sofern das Zelt trocken und sauber ist, kann es im Packsack an einem
trockenen, kühlen Ort aufbewahrt werden. Bitte lagern Sie das Zelt nicht
in der Nähe von Farben, Lacken, Kleb-, Kraf t- oder Kunst- und Schmierstoen. Ausdünstungen können die Lebensdauer der Beschichtungen
beeinussen.
• Reißverschlüsse sind immer eine Schwachstelle. Sollten sie verschmutzt
sein, so säubern Sie diese mit einer (Zahn-)Bürste und pegen sie mit
Graphit (B leistiftmi ne), Silikon- oder Näh maschinenöl. Trage n Sie dies vorsichtig auf u nd entfernen Sie üb erschüssiges Öl mit einem wei chen Tuch.
• Lagern Sie Ihr Zelt im nassen Zustand nie über längere Zeit. Entpacken
Sie es sofort nach der Tour und trocknen es an einem gut belüf teten Ort.
Trennen Sie dazu das Innen- vom Außenzelt oder schieben Sie die
Gestänge ein, um Abstand zwischen den Materialien zu halten.
• Gestänge nicht auswerfen und Segmente zusammenschnellen lassen.
Dies kann zur Beschädigung der Gestängeenden und der Eloxierung
führen. Die Gestänge sollten regelmäßig überprüft werden. Es dürfen
keine Haarrisse sichtbar sein. Bei auftretender Korrosion (z.B. durch Salzwasser) die Gestänge abwaschen und mit Silikonspray pegen.
• VAUDE setzt ausschließlich Gestänge der renommierten Hersteller DAC
und Yunan ein. Diese erfahren durch den Gebrauch eine leichte Biegung,
welche die Bruchanfälligkeit vermindert. Versuchen Sie nicht, diese
6
GAL_TENT_Power_Atreus_3P.indd 6 08.08.2011 11:53:44

zurückzuformen. Trotz der hervorragenden Elastizität des Aluminiums
kann es zum Gestängebruch kommen. Eine passende Reparaturhülse
liegt je dem VAUDE Zelt bei. Schie ben Sie diese mit tig über die Bruchs telle
und xieren sie mit Klebeband (Z).
• Reinigung ausschließlich von Hand, mit weichem Tuch und lauwarmem
Wasser. Reinigungsmittel können die Beschichtung und Imprägnierung
beschädigen. Bei hartnäckigen Verschmutzungen kann Nikwax Tech
Wash im Verhältnis 1:4 mit Wasser vermischt werden und der Schmutz
vorsichtig abgerieben werden. Danach die Stelle großächig mit Nikwax
Tent & Gear Sol arproof nachimprägnieren.
• Einen R iss im Zelt können Sie b ehelfsmäßig mi t Reparaturban d versiegeln
und von innen mit PU- oder Silikonnahtdichter abdichten. Der Riss sollte
jedoch baldmöglichst fachmännisch repariert werden, um ein Weiterreißen zu vermeiden. Wenden Sie sich dazu bitte an den Fachhandel.
• Die G estänge können b ei Bedarf (be i großer Kälte od er altersbedin gt lässt
die Gummispannung nach) selbst nachgespannt werden. Dazu Endkappe
herausziehen und Knoten lösen. An entsprechend weiter hinten liegender Stelle wieder verknoten.
TECHNISCHE DETAILS:
Je nach Mod ell weisen VAUDE Zelte folg ende Funktionen auf:
FE ATURES:
Siliconized:
• Um 20% erhöhte Lebensdauer - die 3-fache Beschichtung reektiert
schädliche UV-Strahlung deutlich stärker als herkömmliche Ausrüstungen.
• 8-fach erhöhte Reißfestigkeit - silikonisierte Stoe erreichen eine Weiterreißfest igkeit von 8-11 kg gegenüber 1,3 kg bei PU -Beschichtung en.
• Bestes Abperlverhalten - Wassertropfen perlen einfach ab.
• Nachspannen - das Nylon Trägermaterial quillt bei Feuchtigkeit. Das Zelt
muss bei einsetzendem Regen/Schnee etwas nachgespannt werden.
• Abkleben - Silikonisierte Materialien können nicht nahtbandversiegelt
werden (Ausnahme VAUDE Silicone Seam Seal). Beim Einsatz in regenreichen Regionen empfehlen wir das manuelle Abdichten mit Silikonnahtdichter.
POWER ATREUS 3P
DEUTSCH
7
GAL_TENT_Power_Atreus_3P.indd 7 08.08.2011 11:53:44
AUSSENZELT:
Reißfestes 40D Polyamid Ripstop 240T SI/SI; Wassersäule 3.000 mm.
• Hohe Reißfestigkeit durch zugfestes Polyamidgarn mit eingewebten Verstärkungsfäden.
• Dreifach-Silikonbeschichtung der Außen- und Innenseite für maximale
Reißfestigkeit und Abperleekt, sowie erhöhte UV-Beständigkeit.
INNENZELT:
30D Polye ster Ripstop 28 5T.
Dicht gewebtes Ripstop-Polyester wind-, sand- und treibschneedicht
bei hoher Reißfestigkeit und Atmungsaktivität.
BODEN:
40D Polyamid Ripstop 240T, PU laminated, Wassersäule 10.000 mm.
Dicht gewebter, durch Verstärkungsfäden reißfester Polyamid Boden mit
einer Wassersäule von 10.000 mm dank auaminierter PU-Membran.
SICHERHEITSHINWEISE:
• Beachten Sie die Sicherheitshinweise jeglicher im Zelt verwendeter Geräte.
• Ha lten Sie Durch- und Ausgänge sowi e Belüftungsö nungen immer frei .
• Erkundigen Sie sich nach den Vorschriften auf dem Gelände und beachten
Sie die Vorsichtsmaßre geln gegen Feuer.
• Vermeiden Sie gesundheitsgefährdende Stoe im Zelt, wie z.B. Kocheroder Autoabgase (z.B. bei den Modellen Drive Base/Van).
• Tragen Sie Schuhe. Heringe oder andere Verankerungen sind teilweise
scharfkantig.
• Sp annen Sie die Abspan nleinen nicht auf Fußwe gen ab, in der Dunkelh eit
werden sie schnell zu Stolperfallen.
8
GAL_TENT_Power_Atreus_3P.indd 8 08.08.2011 11:53:44

ENGLISH
Endless freedom, adventure and summit thrills.
Mountains and n ature as far as the eye can see.
Peace and excite ment all in one.
That is the Spir it of Mountain Sport s.
We here at VAUDE are passionate about mountain sports. This passion can be
found in ever y single one of our VAUDE pro ducts.
As a modern fa mily business we take our so cial and environmenta l responsibility
very serio usly: we have been a blu esign member since 20 08, one of the mos t stringent ecological standards in the world. And as the rst European outdoor outtter we are also constantly improving our environmental performance through
EMAS certication, the EU’s eco-management and audit scheme.
So hope to see yo u soon up in the mountains…
Antje von Dewitz
CHOOSING YOUR SITE:
• Pitch you r tent on level ground, i n an area protected f rom wind and not in
a hollow, where water can qu ickly collect wh en it rains.
• Take into account wind direction when pitching your tent – face the
entrance downwind and sheltered if possible.
• Take into account that camping near water sources could lead to condensation build up on your tent and belongings.
• Don‘t pitch your tent in dangerous places. This includes gorges, underneath cli s or rocks, near gla cier-fed rivers, in f orests or near re sp ots.
• Re move all pointy or sha rp objects that cou ld damage the tent oo r.
• Use a tent footpr int or groundsheet to protect t he tent oor.
• If you are planning on camping in one spot for a longer period of time,
make sure to pitch in shade or half shade – UV radiation accelerates the
aging pro cess of tent fabrics an d coatings.
• When camp ing on snow and in free zing conditions , dig a pit in front of th e
tent door or in the vestibule in which cold air can co llect.
POWER ATREUS 3P
ENGLISH
9
GAL_TENT_Power_Atreus_3P.indd 9 08.08.2011 11:53:44

• Avoi d snow build up by regul arly clearing snow o the surface of the te nt.
• Cooking inside your tent should be avoided whenever possible due to
the danger of re or carbon dioxide poisoning. If you need to make an
exceptio n, make sure to ensure su cient ventilatio n and keep the stove as
far from the tent walls as possible. This might mean having to detach the
inner tent and fold it ba ck.
SET UP GENERAL INSTRUCTIONS:
VAUDE tents are well known for their simple set up. If any step in the process
seems di cult, do not use force; t ake the time to nd out wh at the problem is.
1. Spread out the tent on the ground. (Inner and outer tent are delivered
attach ed to each other.) In win dy conditions you s hould stake out t he tent.
Use guy lines to anchor it , for example, to a rock , backpack, etc.
2. Sort the p oles and assemble the sections by sliding them into each other.
Do not whip out the pole sections so they snap together. Make sure that
each pole section is fully inserted into the next section; otherwise they
may crack or break under pressure. Gently slide the poles through the
pole sle eves. Do not pull them through.
3. Erect the tent and make sure that the entrance zip is not under undue
tension or s train which could ea sily damage the zip. Us e the releasing loc k
or hook at th e bottom of the entra nce.
4. Stakes sho uld be driven in at a 45° angl e away from the tent (X).
The VAUDE Y-stakes that come with our tents are very durable and resis-
tant to bending and especially suited for hard ground and grass. For
extremely hard ground, we recommend the use of tent pegs or spikes.
VAUDE oers special stakes for very soft ground, snow or sand. Hammer
them in ver tically for soft soil or bur y them horizontally to anchor in s and
or fresh po wder snow (Y).
SETTING UP “MODELSPECIFIC”:
Please follow these instruct ions step by step, the order is impor tant.
1. Clear the ground of any sharp objects (The use of a groundsheet may be
appropriate).
2. Spread out the tent on the ground. Please note: the inner and outer tent
are delive red attached to each other.
10
GAL_TENT_Power_Atreus_3P.indd 10 08.08.2011 11:53:44

3. Lay out the poles and assemble them.
4. Connec t both long poles to the pegs in the tent corners (A). Please make
sure that the p egs are not twisted.
Caution: There is a reinforced triangle in the middle at the top to which
one of the poles will be secured with two clips. The pole thus secured
must go over, whilst the other pole must p ass underneath (B).
5. Extending out from this central reinforced triangle are the clips which are
to be atta ched to the pole to se cure it. The red clam ping brackets are o nly
to be fasten at the very end so that the tent, where necessary, can still be
aligned with the poles.
6. The two short poles of the front and back porch should be fed through
the double clips and the pole ends connected to the pegs at the base (C ).
Fasten the clip s to the poles beginn ing in the middle of the te nt.
7. Secure each corner of the tent with a tent peg and, where necessar y, use
the webbing straps to tension the base. Anchor the porch and, where
necessary, use guy rop es to secure the tent.
8. Fasten the red clamping bracket of each clip (D). The tent is now secured
to the pole s and the reinforced tr iangle ensures maxi mum wind stabilit y.
9. Keep the air vents clear and ensure that there is sucient ventilation, for
example through partially opened entrances.
TAKE DOWN GENE RAL INSTRUCTIONS:
• Remove everything from the tent’s interior.
• Freestanding tents can be gently shaken out to remove leaves, sand, and
other debris.
• Turn th e tent over with oor f acing upward and allo w it to dry a bit longe r.
• I f it’s not possible to d ry the tent comple tely before pack ing it, this should
be done wi thin 12 hours to pr event the risk of mold and mildew grow th.
• As in the tent set up, never pull the poles out of the pole sleeves; rather
push them through.
• W hen storing a tent in it s stu sack, make su re that stakes and pol es don’t
press agai nst the tent fabric and damage it.
• Before taking down your tent, close all zips and roll up the guy lines.
That way you won’t have to untangle them when it comes time to set the
tent up again , and pitching is that much easier.
POWER ATREUS 3P
ENGLISH
11
GAL_TENT_Power_Atreus_3P.indd 11 08.08.2011 11:53:44

DISMANTLING “MODELSPECIFIC”:
1. Remove the te nt pegs from the b ase, unfasten th e clips from the po les and
let the tent f old in on itself.
2. Fold up the poles and roll them up with the tent, if possible. Do not force
the poles into the stor age bag, if it is full, as t his may cause damage to the
storage bag and tent.
STORAGE/CARE/REPAIRS:
• As soon as the tent is dry and clean it can be stored in its pack sack in
a well-ventilated, cool and dry place. Please do not store the tent near
paints, adhesives, oils, plastics, or fuels (gas canisters, etc.)! The gasses
emitted from these materials contain plasticizers that can damage your
tent over time.
• Zips are always a weak point in a tent’s structure. If they get dirty, clean
them with a (tooth) brush and lubricate them with graphite (pencil lead),
silicon or se wing machine oil. A pply carefully a nd remove excess oil wi th a
soft cloth.
• Never store your tent when it’s wet for a longer period of time. Unpack
it as soon as you arrive and dry it out in a well-ventilated place. To do so,
separate the inner and outer tents or use the poles to create space between the t wo.
• Do not whip out tent poles and snap the sections together. This can
damage the pole ends as well as the anodization. Check the poles
regularly for crack s or other potential damage. Wash the poles and use
silicon spr ay at any sign of corrosion (fr om salt water, for example)
• VAUDE only uses poles from the renowned manufacturers DAC and
Yunan. These tend to become slightly bent with use, helping to reduce
fracturing. Please do not attempt to bend these back into shape.
Although aluminum is extremely exible this might damage or even
break the poles. Ever y VAUDE tent comes with a Pole Doctor or repair
sleeve. If a tent pole breaks while out on a trip, simply slide the repair
sleeve over the broken se ction and then use t ape to attach it (Z).
• The t ent should only be c leaned by hand, n ever in a washing mach ine! Use
a soft cl oth and luke warm wate r. Detergents or cle aning agents may ha rm
the tent’s coating and waterproong.
12
GAL_TENT_Power_Atreus_3P.indd 12 08.08.2011 11:53:44
Use a brush to rub Nikwax Tech Wash in a 1:4 ratio with water on stub-
born stains. Follow up with Nikwax Tent & Gear Solarproof waterproong, applying generously to the area cleaned.
• When on the road, repair tears in the tent wall with repair tape and seal
from the ins ide with a PU or silicon se am sealer. The seam shou ld however
be correc tly repaired as soon as possible in order to prevent further
tearing. Pl ease contact your re tailer to do this.
• Tent pole shock cords can be retightened if necessary (elasticity can wear
out in ver y cold conditions o r due to aging). To do this rst re move the end
cap and the n untie the knot in the cor d. Retie the knot fu rther up the cord
and replace the cap.
TECHNICAL DETAILS:
Depending on tent models, VAUDE tents feature the following:
FE ATURES:
Siliconized:
• Increases te nt life by 20% - a triple co ating reects d amaging UV radiat ion
to a much greater degree than standard treatme nts.
• 8-times gr eater tear resistanc e – siliconized fabri cs attain a tear resis tance
of 8-11 kg compared to 1.3 kg of PU coated fabrics.
• Excellent water beadin g properties – water simply b eads on the surface.
• Retensioning – the nylon carrier material swells up when damp or wet.
The tent ne eds to be retensed if ra in/snow initiate.
• Sealing – siliconized materials cannot be factory seam sealed (exception:
VAUDE Silicon Seam Seal). When camping in extremely rainy conditions
we recomme nd sealing all seams by hand with a sili con seam sealer.
FLY:
Tear-resistant 40D polyamide ripstop 240T SI/SI;
waterp roof to 3,000 mm .
• High resist ance to tearing due to te nsile polyamid e fabric embed ded with
reinforcing bres.
• Triple silicon coating to the outer and inner surfaces for maximum tearresistan ce and water run o, as well as in creased UV-resistance.
POWER ATREUS 3P
ENGLISH
13
GAL_TENT_Power_Atreus_3P.indd 13 08.08.2011 11:53:44

INNER TENT:
30D Polyester Ripstop 285T.
285T – tightl y woven ripstop poly ester. Wind, sand and sn ow proof with high
tear resistance and breathability.
FLOOR:
40D Polyamide Ripstop 240T, PU laminated, water column 10,000 mm.
Tightly woven with reinforced cross threads, tear resistant polyamide oor
with a lamin ated PU membrane; wate rproof up to 10,000 mm.
SAFETY GUIDELINES:
• Please heed safety guide lines for all applian ces used in the tent.
• Always ke ep exits and throughways as well as ve nt openings accessible.
• Find out what the rules and regulations are for the campsite you are on
and heed re safet y precautions.
• Avoid hazardous materials inside the tent, such as stove or automobile
fumes (for e xample in the Drive B ase/Van).
• Wear your shoes around the tent. Stakes and other anchors can be ver y
sharp.
• Do not stake out the guy lines over paths or trails. These can be easily
tripped over in the dar k.
14
GAL_TENT_Power_Atreus_3P.indd 14 08.08.2011 11:53:44
FRANÇAIS
Liberté sa ns frontière, aventure e t ascensions au sommet.
Plus que la montag ne, la nature et vous !
Le silence et vos ba ttements de cœur !
C’est ça, le Spirit o f Mountain Sports .
Nous, chez VAUDE, nous vivons le sport de montagne au quotidien. Toute notre
passion pou r la montagne se retrouve da ns chacun des produit s VAUDE.
En tant qu’entreprise familiale moderne, nous prenons très au sérieux notre
engagement pour l’homme et la nature : depuis 2008, nous sommes membre
de bluesign®, le label industriel le plus draconien en matière de protection de
l’environnement. En tant que premier fabricant européen d’équipement pour
l’outdoor, nous améliorons par ailleurs constamment nos performances environnementales grâce à la certication EMAS, l’audit écologique de l’UE.
A bientôt, quelque part dans les montagnes…
Antje von Dewitz
CHOIX DE L’EMPLACEMENT :
• Installez votre tente dans un endroit plane et à l’abri du vent. Evitez les
cuvette s car en cas de pluie, l’eau s’y accumule.
• Or ientez votre tente en fonction du vent – l’entrée doit être dos au vent.
• Notez que la proximité de l’eau peut accentuer l’apparition de condensa-
tion dans votre tente.
• Ne plantez jamais votre tente à des endroits exposés ou dangereux tels
que des gor ges, en dessous de ro chers, près d’un co urs d’eau alimenté par
un glacier, prè s d’un feu ou dans la forêt.
• Débarrassez votre emplacement de tout objet pointu ou coupant qui
pourrait endommager le sol de votre tente.
• Pour protéger le sol de votre tente, vous po uvez utiliser une bâche.
• Si vous comptez rester au même endroit pendant plus d’une nuit, pensez
à installer votre tente le plus possible à l’ombre.
• Les rayons UV accélèrent le vi eillissement des tissus et des revê tements.
POWER ATREUS 3P
FRANÇAIS
15
GAL_TENT_Power_Atreus_3P.indd 15 08.08.2011 11:53:44
 Loading...