

Page 1
OPERATING INSTRUCTIONS
Vanguard Instruments Company, Inc.
for the
ATO-400 and ATO-600
10-400/600 Amperes
Digital Micro-Ohm Meters
1710 Grevillea Court
Ontario, California 91761
TEL: (909) 923-9390 May 2005
FAX: (909) 923-9391 Rev. 1
Page 2

ATO-400 / ATO-600 Operating Procedures
SAFETY SUMMARY
NOTICE
This manual applies to Models ATO-400, and ATO-600. The operating procedures are
virtually the same for all models; any differences are clearly described in the step-by-step
procedures.
Follow Exact Operating Procedures
Any deviation from the procedures described in this operator’s manual may create one or more
safety hazards, damage the ATO, or cause errors in the test results; Vanguard Instruments Co.,
Inc. assumes no liability for unsafe or improper use of the ATO.
The following safety precautions must be observed during all phases of test set-up, test hookups,
testing, and test-lead disconnects.
SAFETY WARNINGS AND CAUTIONS
This device shall be used only by trained operators.
All circuit breakers under test shall be off line and fully isolated.
Do Not Modify Test Equipment
Because of the risk of introducing unknown hazards, do not install substitute parts or perform
any unauthorized modification to any Model ATO Test Unit. To ensure that all designed safety
features are maintained, it is recommended that repairs be performed only by Vanguard
Instruments Co. factory personnel or by an authorized repair service. Unauthorized
modifications can cause serious safety hazards and will nullify the manufacturer's warranty.
2
Page 3

ATO-400 / ATO-600 Operating Procedures
Table of Contents
1.0 INTRODUCTION ...............................................................................................................6
1.1 Applicability .....................................................................................................................6
1.2 General Description...........................................................................................................6
1.3 Functional Description......................................................................................................6
1.4 Furnished Test Accessories ...............................................................................................6
1.5 Optional Accessories.........................................................................................................7
2.0 ATO SPECIFICATIONS.....................................................................................................9
2.1 ATO-400 Specifications....................................................................................................9
2.2 ATO-600 Specifications..................................................................................................10
3.0 CONTROL AND DISPLAY..............................................................................................11
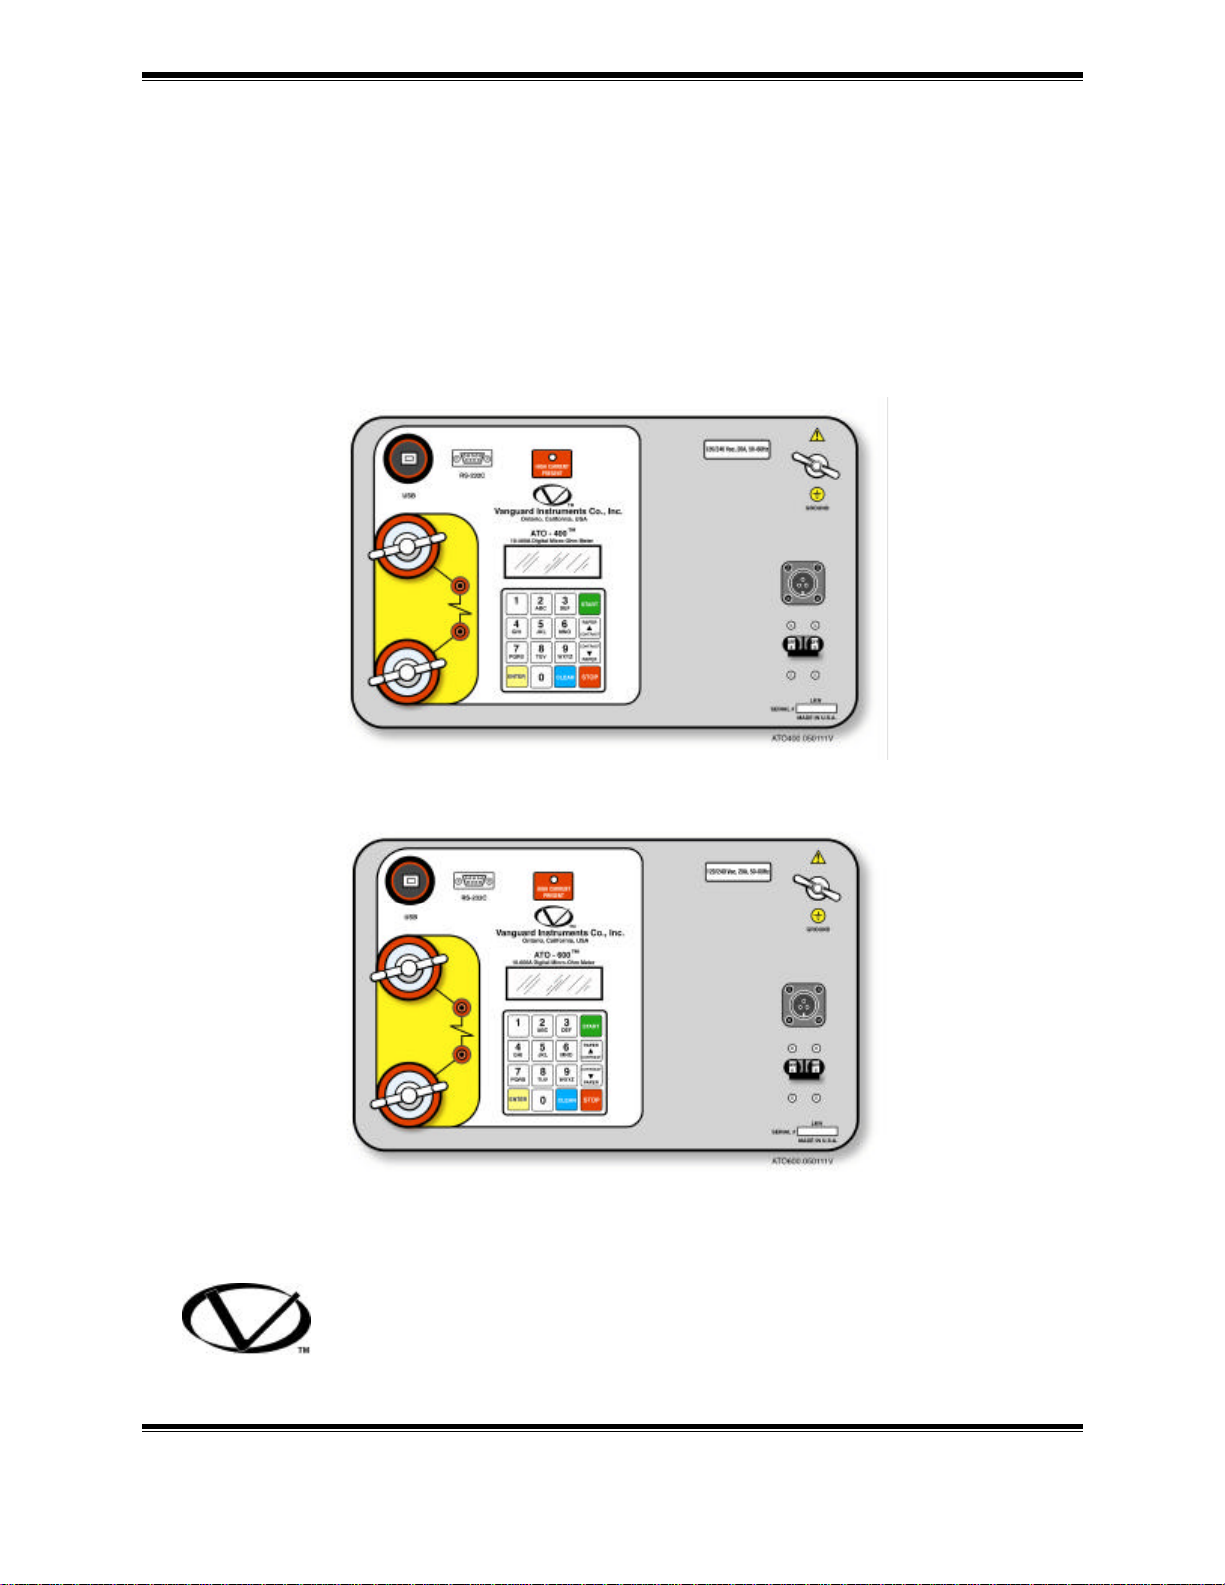
3.1 ATO-400 Front Panel......................................................................................................11
3.2 ATO-600 Front Panel......................................................................................................13
4.0 ATO IMPORTANT FEATURES.......................................................................................15
4.1 Operating Voltages..........................................................................................................15
4.2 ATO RS-232C Serial Interface.......................................................................................15
4.3 ATO USB Interface........................................................................................................15
4.4 ATO LCD Contrast Adjustment.....................................................................................15
5.0 ATO CABLE CONNECTION...........................................................................................16
6.0 OPERATING PROCEDURES...........................................................................................17
6.1 Step-by-Step Procedures ................................................................................................17
6.1.1 Precautions...................................................................................................................17
6.1.2 Preparations..................................................................................................................17
6.2 Operating Overview........................................................................................................17
6.2.1 Entering Alpha/Numeric Characters.............................................................................18
6.3 Run Normal Test Procedure............................................................................................21
6.4 Run Automatic Test Procedure........................................................................................25
6.5 Enter Record ID Procedure..............................................................................................28
6.6 Review Record Procedure...............................................................................................30
6.7 Restore Record Procedure...............................................................................................31
6.8 Erase Test Record Procedure...........................................................................................33
6.9 Computer Control............................................................................................................34
6.10 Set ATO Clock Procedure.............................................................................................35
6.11 Calibration Test Procedure............................................................................................36
6.12 Diagnostic Check Procedure..........................................................................................40
3
Page 4

ATO-400 / ATO-600 Operating Procedures
List of Figures
Figure 1 ATO Current Cable......................................................................................................7
Figure 2 ATO Sensing cable ......................................................................................................8
Figure 3 C-Clamp Cable ............................................................................................................8
Figure 4 ATO-400 Control-Panel Controls and Display ...........................................................11
Figure 5 ATO-600 Control-Panel Controls and Display ...........................................................13
Figure 6 ATO-400 Connection Diagram ..................................................................................16
Figure 7 ATO-600 Connection Diagram ..................................................................................16
Figure 8 START Menu ............................................................................................................17
Figure 9 SETUP Menu.............................................................................................................18
Figure 10 Step-by Step Procedures for for ATO Operations.....................................................19
Figure 11 Diagnostic Test Cable Connection............................................................................41
4
Page 5

ATO-400 / ATO-600 Operating Procedures
List of Tables
Table 1.0 ATO-400 Specifications.............................................................................................9
Table 2.0 ATO-600 Specifications...........................................................................................10
Table 3.0 Functional Description of ATO-400 Controls and Display........................................12
Table 4.0 Functional Description of ATO-600 Controls and Display........................................14
Table 5.0 Run Test Procedure (Measure an Unknown Resistance) ...........................................21
Table 6.0 Run Automatic Test Procedure (Measure an Unknown Resistance)..........................25
Table 7.0 Enter Record ID Procedure (test-record, site, and equipment identification) .............28
Table 8.0 Review Record Procedure ........................................................................................30
Table 9.0 Restore Record Procedure ........................................................................................31
Table 10.0 Erase Test Record Procedure..................................................................................33
Table 11.0 Set ATO Real Time Clock Procedure.....................................................................35
Table 12.0 Calibration Test Procedure .....................................................................................36
Table 13.0 Diagnostic Check Procedure...................................................................................40
5
Page 6

ATO-400 / ATO-600 Operating Procedures
1.0 INTRODUCTION
1.1 Applicability
This manual applies to the Model ATO-400™ and Model ATO-600™ (hereafter, ATO), made
by Vanguard Instruments Company, Inc.
1.2 General Description
The ATO-400/600 are third generation micro-ohmmeters made by Vanguard Instruments
Company. The ATO-400/600 feature high accuracy microprocessor-controlled measurement of
very low resistances, ranging from 1 micro-ohm to 300 milli-ohms. The ATO is field-portable,
rugged, and is easily operated by first-time users having a minimum of training. It features a 16key push button keypad for entering test parameters and control functions and a 4-line by 20character LCD alpha/numeric readout for displaying control-option menus, measured resistance
values, and related data. The operation requires little more than connecting test leads to an
unknown resistance and selecting the desired functions and its options. Operators select the test
current (10 to 400 amperes for the ATO-400 or 10 to 600 amperes for the ATO-600) and test
time (5 to 60 seconds). Measured resistance data is displayed on the ATO’s LCD. The
measured resistance data can also be stored (up to 63 records of 96 readings each) in FLASH
EEPROM memory. Operators can recall the stored resistance measurements and related data at a
later time for review or down loading to the PC. Down loading test records is accomplished by
using the ATO’s built-in RS-232C or USB ports.
1.3 Functional Description
The ATO’s operation is based on the electrical relationship described by Ohm’s law: R=V/I,
where I is a known current and V is the dc voltage measured across the unknown resistance
(typically, a circuit breaker’s contacts). Since the current (user selected) through the unknown
resistance is known and the voltage across the unknown resistance is measured by a precision
voltmeter, the resistance displayed on the LCD is calculated using Ohm’s law. The ATO test
voltage is supplied by an unfiltered DC power supply. A regulated constant-current source
outputs the preset current selected by the user.
The DC test current is selectable from 10 to 400 amperes for the ATO-400 and from 10 to 600
amperes for ATO-600. Since the ATO-400 and ATO-600 use unfiltered DC current supplies,
there is the possibility of inductively tripping a circuit breaker bus differential relay. Each
ATO is supplied with a set of current cables and voltage sensing cables. Voltage sensing test
cables are separate from the current-carrying test cables to the resistive load. Thus, voltages are
measured at the terminals of the resistance being tested, eliminating any I•R voltage drop error in
the current cables. These ATO features make very precise micro-ohm measurements possible
without having to compensate for current-lead resistance errors.
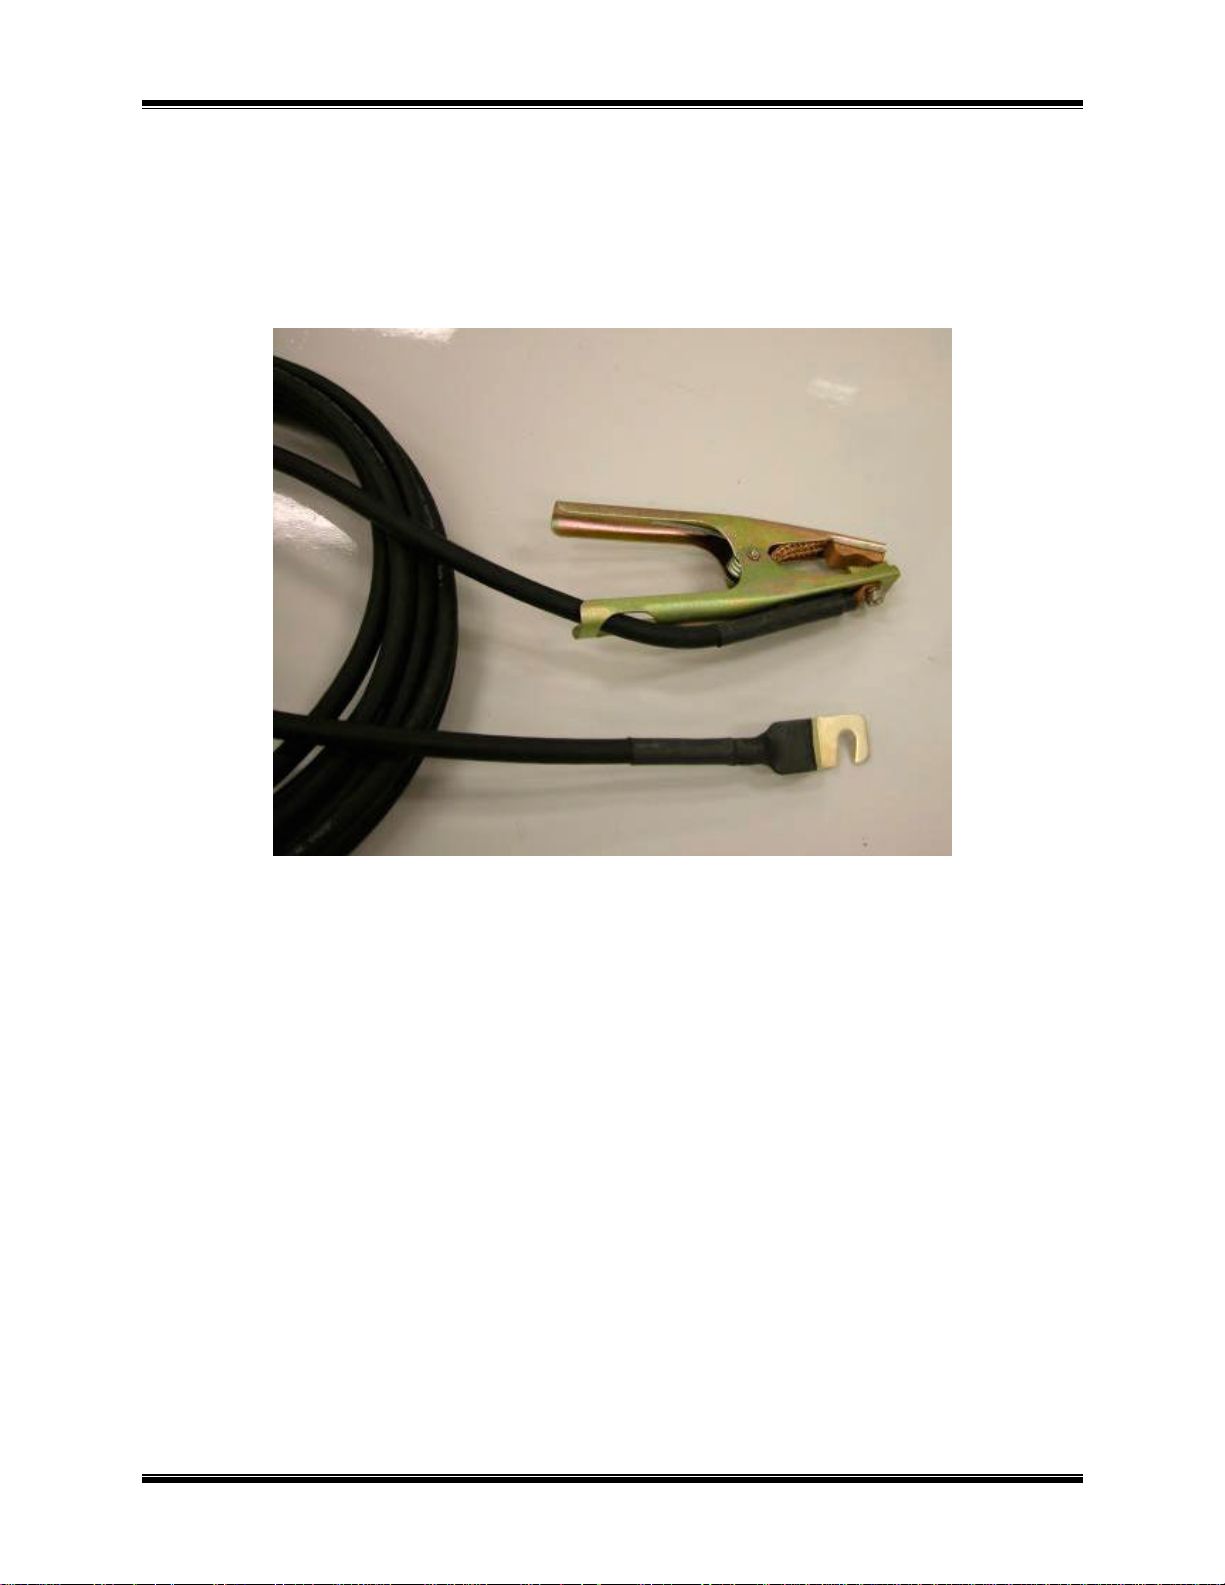
1.4 Furnished Test Accessories
The ATO is supplied with two 15-foot (#1/0 AWG) test cables with heavy-duty alligator clamps
and two 15-foot voltage-sensing cables with alligator clamps. A ground cable and power cord is
also included with each ATO.
6
Page 7
ATO-400 / ATO-600 Operating Procedures
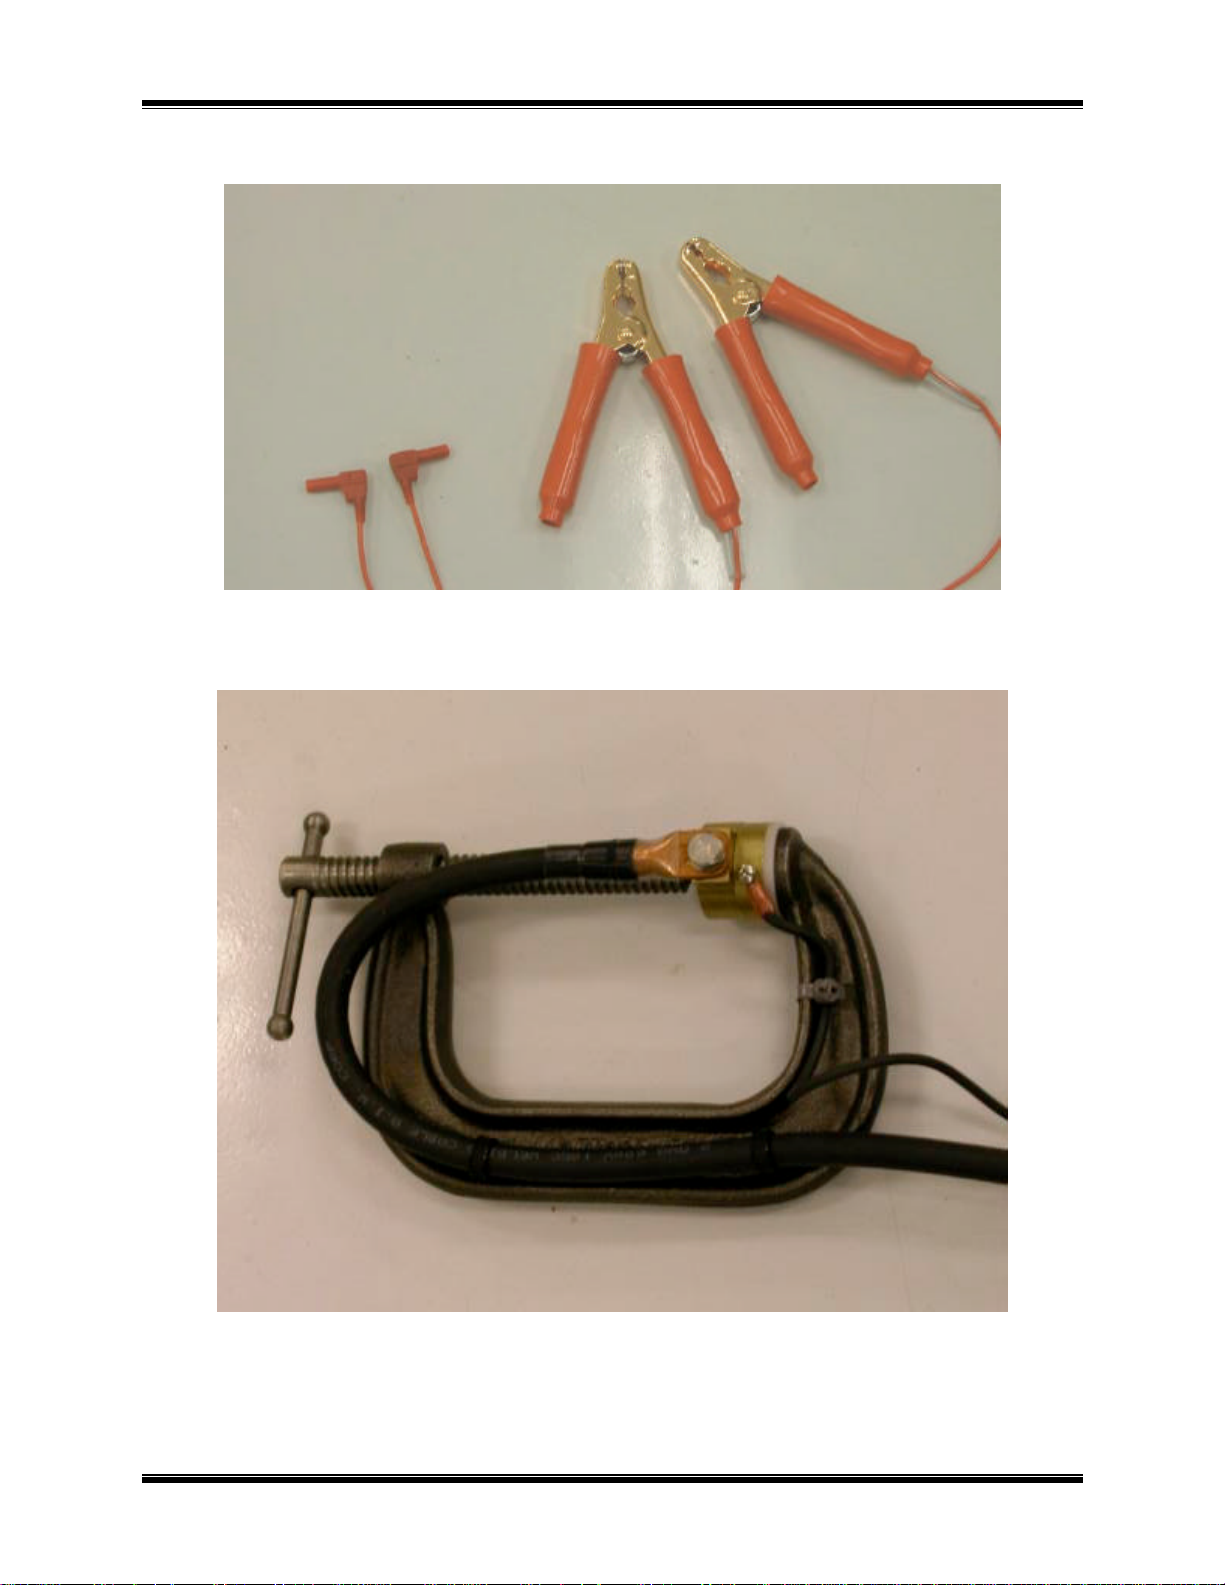
1.5 Optional Accessories
1. Heavy-duty welding-type C-clamps (Figure 3) are available as optional accessories. These C-
clamps allow test lead connections to a wide variety of bushing sizes, bus bars, and
conductors that require low-resistance test-lead contacts.
2. An optional shipping case (which holds the ATO and its cables) is also available.
Figure 1 ATO Current Cable
7
Page 8
ATO-400 / ATO-600 Operating Procedures
Figure 2 ATO Sensing cable
Figure 3 C-Clamp Cable
8
Page 9

ATO-400 / ATO-600 Operating Procedures
2.0 ATO SPECIFICATIONS
2.1 ATO-400 Specifications
ATO-400 specifications and leading particulars are listed in Table 1.0
Table 1.0 ATO-400 Specifications
MODEL.......................ATO-400
TYPE............................Special-Purpose Test Equipment, Portable, Low Resistance-Ohmmeter
CONFIGURATION...... Third-generation (improved design, superseding original model)
SIZE (inches)..............16.8 Wide by 12.6 High by 10.6 Deep (42.7 Cm x 32 Cm x 30.5 Cm)
WEIGHT.......................43 pounds (19.5 Kg)
TEST CURRENT
RANGE ........................10 Amperes to 400 Amperes, selectable in 1 ampere steps
RESISTANCE
RANGE ........................1 micro-ohm to 300 milli-ohms
ACCURACY................ ± 1 % Reading, ± 1 Count
MEMORY.....................63 records of 96 reading each
DISPLAY......................Backlit LCD, 4-lines high by 20 characters wide
CONTROL...................Keypad: 10 number keys and 6 function keys
INPUT POWER...........20 amps, 90-230 Vac, 50/60 Hz, with built in 25A circuit breaker
UNIT PROTECTION...Thermal-overload sensor and cutoff
INTERFACE................ RS-232C and USB Ports for PC Interface
ENVIRONMENT.......... Operating: -10°C to 50°C (15?F to 122?F)
Storage: -30°C to 70°C (-22?F to 158?F)
FURNISHED ITEMS... One power cord, one ground cable, 15-ft.(#1/0 AWG) current test
cables, 15-ft. sensing test cables
WARRANTY................ One-Year Parts & Labor (Post-Warranty Service Contracts Available)
ATO-400 SPECIFICATIONS ARE SUBJECT TO UPGRADES AND MAY BE CHANGED WITHOUT PRIOR NOTICE.
9
Page 10

ATO-400 / ATO-600 Operating Procedures
2.2 ATO-600 Specifications
ATO-600 specifications and leading particulars are listed in Table 2.0
Table 2.0 ATO-600 Specifications
MODEL.......................ATO-600
TYPE............................Special-Purpose Test Equipment, Portable, Low Resistance-Ohmmeter
CONFIGURATION...... Third-generation (improved design, superseding original model)
SIZE (inches)..............16.8 Wide by 12.6 High by 10.6 Deep (42.7 Cm x 32 Cm x 30.5 Cm)
WEIGHT.......................43 pounds (19.5 Kg)
TEST CURRENT
RANGE ........................10 Amperes to 600 Amperes, selectable in 1 ampere steps
RESISTANCE
RANGE ........................1 micro-ohm to 300 milli-ohms
ACCURACY................ ± 1 % Reading, ± 1 Count
MEMORY.....................63 records of 96 reading each
DISPLAY......................Backlit LCD, 4-lines high by 20 characters wide
CONTROL...................Keypad: 10 number keys and 6 function keys
INPUT POWER...........20 amps, 90-230 Vac, 50/60 Hz, with built in 25A circuit breaker
UNIT PROTECTION...Thermal-overload sensor and cutoff
INTERFACE................ RS-232C and USB Ports for PC Interface
ENVIRONMENT.......... Operating: -10°C to 50°C (15?F to 122?F)
......................................Storage: -30°C to 70°C (-22?F to 158?F)
FURNISHED ITEMS... One power cord, one ground cable, 15-ft. (#1/0 AWG) current test lead
......................................cables, 15-ft. sensing test lead cables
WARRANTY................ One-Year Parts & Labor (Post-Warranty Service Contracts Available)
ATO-600 SPECIFICATIONS ARE SUBJECT TO UPGRADES AND MAY BE CHANGED WITHOUT PRIOR NOTICE.
10
Page 11
ATO-400 / ATO-600 Operating Procedures
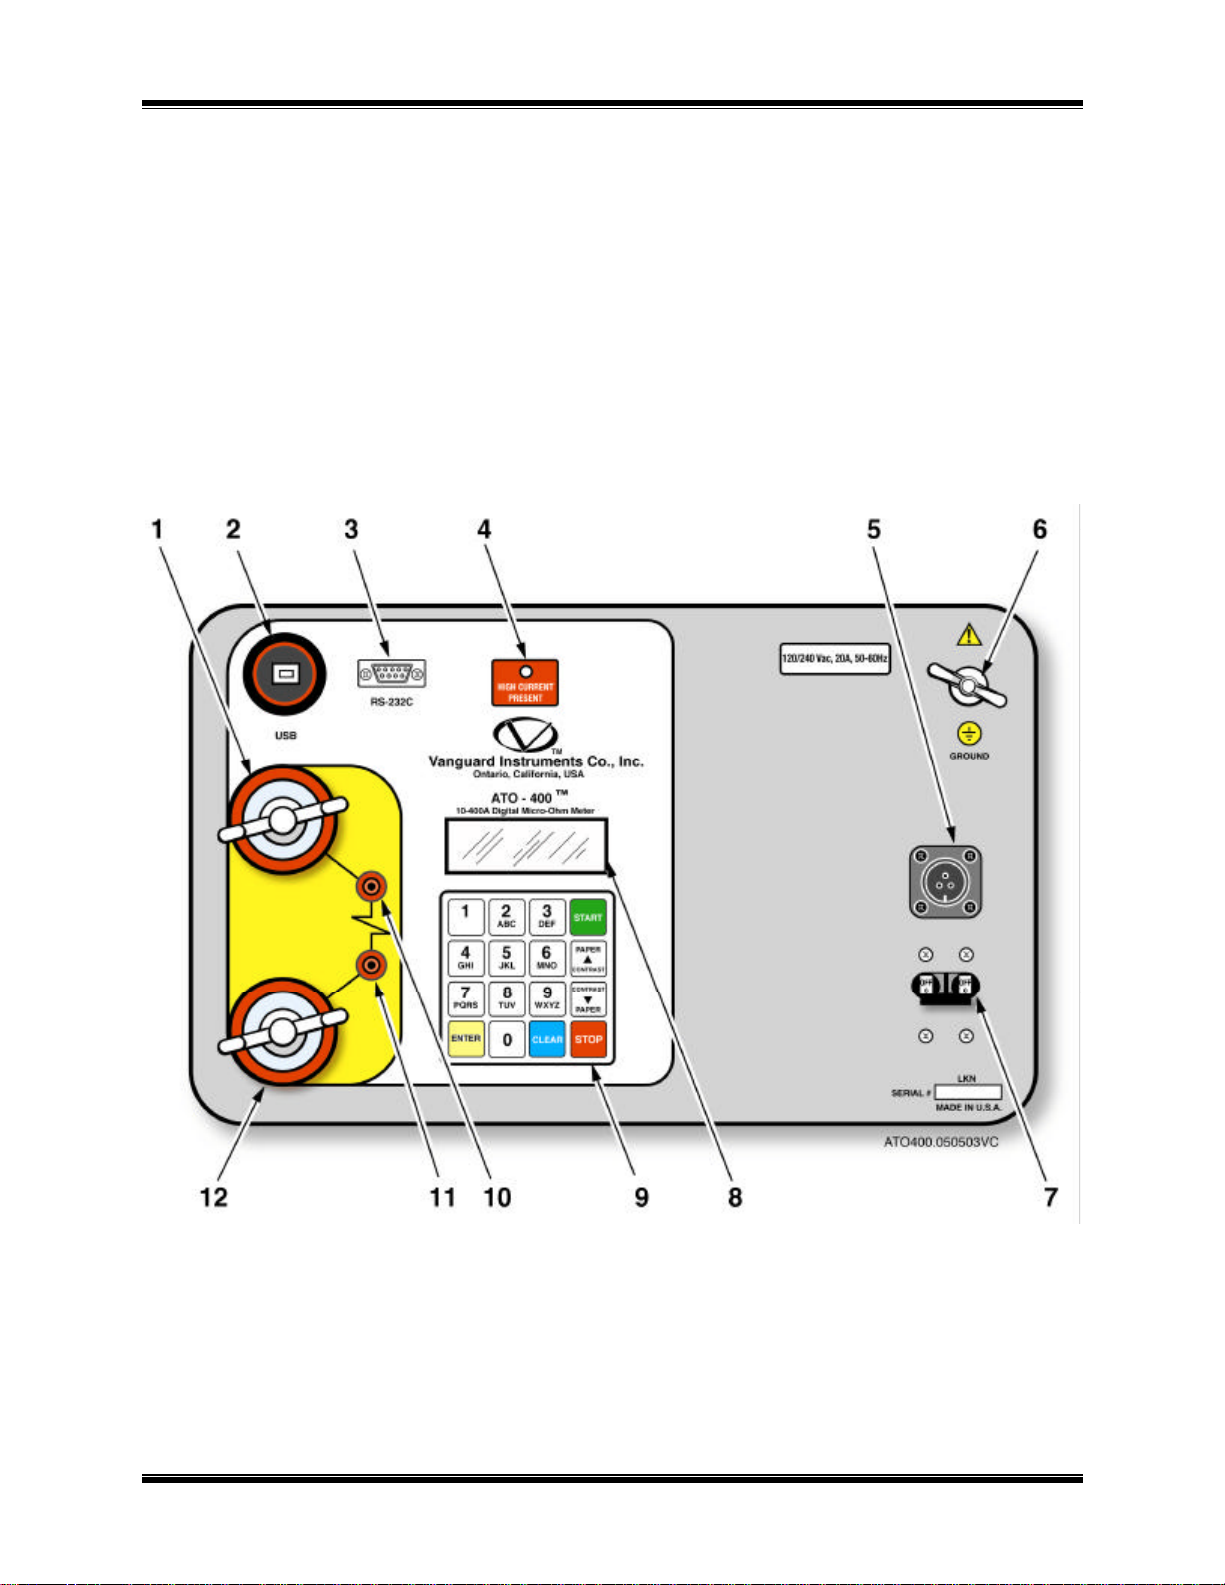
3.0 CONTROL AND DISPLAY
3.1 ATO-400 Front Panel
The ATO-400 controls and displays are shown in the control-panel illustration, Figure 4.
Pointing leader lines reference each item with an index number. Each index number is crossreferenced to a functional description in Table 3, which describes the function and purpose of
each item on the control panel. Although the purpose of these controls and the display may seem
obvious and intuitive, users should become familiar with them before attempting to use the
ATO-400. First-time users should also review and become familiar with the Safety Summary on
the front page.
Figure 4 ATO-400 Control-Panel Controls and Display
11
Page 12

ATO-400 / ATO-600 Operating Procedures
Table 3.0 Functional Description of ATO-400 Controls and Display
Figure 1
Index #
1 & 12 (Wing Nut) Current lead connectors.
2 USB USB connector. USB port is for factory
3
4 HIGH CURRENT
Adjacent Panel Marking Functional Description
calibration, firmware updates, and interfacing
with the software program supplied with each
unit.
RS-232C
PRESENT
RS-232C interface port; 9-pin connector;
female DB type. The data are set to 115,200
baud, 1 start bit, 8 data bits, and no parity bit;
PIN ...............SIGNAL
2 Rx
3 Tx
5 Signal Gnd
This serial port is for factory calibration,
firmware updates, and interfacing with the
software program supplied with each unit.
LED indicator, red; Lights when test current
is flowing through the current test leads.
5 No Marking Input power connector with third-wire safety
ground.
6 GROUND
(Wing Nut)
7 No Marking
8
No marking
9
No marking
10 & 11 (Resistor Symbol) Voltage-sensing connector jacks (red).
ATO-400 ground stud. Connect ground stud
to substation ground using provided cable.
Circuit breaker, 25A.
LCD; 4-line by 20-character; back-lighted;
displays menus of selections, operator entries,
and test-measurement results.
Operating key-pad controls, 10 alpha-numeric
keys and 6 function keys (START, STOP,
CLEAR, ENTER, & CONTRAST/PAPER
positioning ? & ?).
12
Page 13
ATO-400 / ATO-600 Operating Procedures
3.2 ATO-600 Front Panel
The ATO-600 controls and displays are shown in the control-panel illustration, Figure 5.
Pointing leader lines reference each item with an index number. Each index number is crossreferenced to a functional description in Table 4, which describes the function and purpose of
each item on the control panel. Although the purpose of these controls and the display may seem
obvious and intuitive, users should become familiar with them before attempting to use the
ATO-600. First-time users should also review and become familiar with the Safety Summary on
the front page.
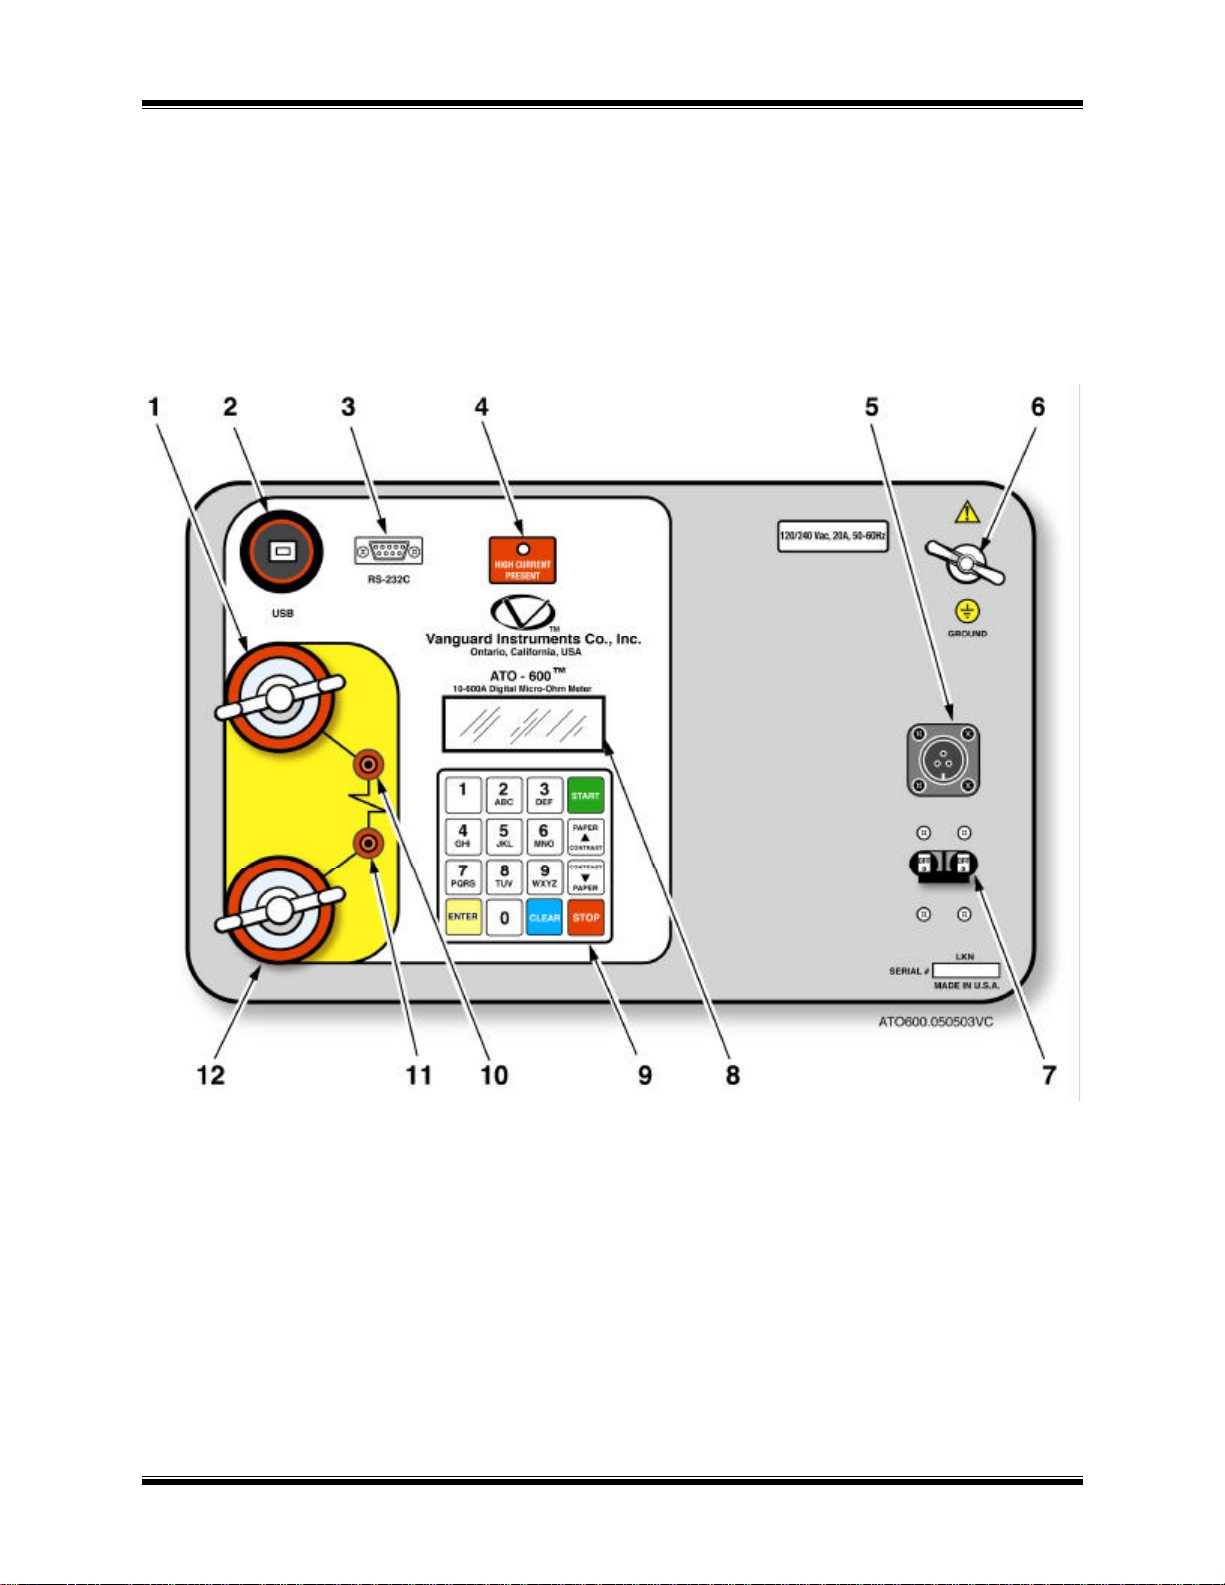
Figure 5 ATO-600 Control-Panel Controls and Display
13
Page 14

ATO-400 / ATO-600 Operating Procedures
Table 4.0 Functional Description of ATO-600 Controls and Display
Figure 1
Index #
1 & 12 (Wing Nut) Current lead connectors.
2 USB USB connector. USB port is for factory
3
4 HIGH CURRENT
Adjacent Panel Marking Functional Description
calibration, firmware updates, and interfacing
with the software program supplied with each
unit.
RS-232C
PRESENT
RS-232C interface port; 9-pin connector;
female DB type. The data are set to 115,200
baud, 1 start bit, 8 data bits, and no parity bit;
PIN ...............SIGNAL
2 Rx
3 Tx
5 Signal Gnd
This serial port is for factory calibration,
firmware updates, and interfacing with the
software program supplied with each unit.
LED indicator, red; Lights when test current
is flowing through the current test leads.
5 No Marking Input power connector with third-wire safety
ground.
6 GROUND
(Wing Nut)
7 No Marking
8
No marking
9
No marking
10 & 11 (Resistor Symbol) Voltage-sensing connector jacks (red).
ATO-600 ground stud. Connect ground stud
to substation ground using provided cable.
Circuit breaker, 25A.
LCD; 4-line by 20-character; back-lighted;
displays menus of selections, operator entries,
and test-measurement results.
Operating key-pad controls, 10 alpha-numeric
keys and 6 function keys (START, STOP,
CLEAR, ENTER, & CONTRAST/PAPER
positioning ? & ?).
14
Page 15

ATO-400 / ATO-600 Operating Procedures
4.0 ATO IMPORTANT FEATURES
4.1 Operating Voltages
The ATO operates with voltages between 90-240Vac, 50/60Hz.
4.2 ATO RS-232C Serial Interface
A built-in, RS-232C port permits the ATO to be interfaced with an IBM-compatible personal
computer. An IBM PC software package supplied with each ATO allows the user to retrieve test
records stored in the ATO’s memory. The software is compatible with Windows XP.
The RS-232C port is also used to calibrate the ATO at the factory.
4.3 ATO USB Interface
A built-in, USB port permits the ATO to be interfaced with an IBM-compatible personal computer.
An IBM PC software package supplied with each ATO allows the user to retrieve test records stored
in the ATO’s memory. The software is compatible with Windows XP.
The USB port is also used to calibrate the ATO at the factory.
4.4 ATO LCD Contrast Adjustment
The purpose of this procedure is to adjust the contrast level of the alpha-numeric characters
shown on the LCD display, in order to produce the best readability for the ambient light in the
testing area. To darken the LCD contrast, press and hold the Contrast/Paper ? key for more than
1 second. To lighten the LCD contrast, press and hold the Contrast/Paper ? key for more than 1
second. Release the key when desired contrast level is obtained. The ATO saves this LCD
contrast setting level in memory.
15
Page 16

ATO-400 / ATO-600 Operating Procedures
5.0 ATO CABLE CONNECTION
The ATO is supplied with 15-foot (#1/0 AWG) current-carrying cables and 15-foot voltagesensing cables. Both cables are terminated with heavy-duty alligator clamps to connect to the
device being tested. A typical cable connection for the ATO to a device under test is shown in
figure 6 and figure 7. To protect the ATO against static discharge in the substation, always
connect the unit’s ground stud to the substation ground. It is also highly recommended to ground
one side of the circuit breaker bushing during testing to eliminate any static discharge through
the ATO.
NOTE
The sense input is not polarity sensitive. The sense cables may be
connected to either input without affecting circuit operation.
Figure 6 ATO-400 Connection Diagram
Figure 7 ATO-600 Connection Diagram
16
Page 17

ATO-400 / ATO-600 Operating Procedures
1. RUN
TEST 04/30/05
3. DIAGNOSTIC
6.0 OPERATING PROCEDURES
Review Figure 10 before proceeding with the step-by-step procedures that follow.
6.1 Step-by-Step Procedures
6.1.1 Precautions
Do not measure the resistance of inductive devices. This can generate unsafe high-voltage spikes
(created by a collapsing magnetic field) if the test current is interrupted by detaching a test lead
during a test. Do not touch or disconnect any test lead that is connected to a device under test
while current is being conducted. Failure to heed this warning can cause injury to the user
and or damage to the ATO. The ATO measures low, non-inductive resistances (e.g., breaker
contacts and bus-bar junctions). If the resistance of an inductive device needs to be measured,
then the use of an instrument designed for that purpose is recommended (such as the WRM made
by Vanguard Instruments Company).
6.1.2 Preparations
a. Ground ATO to Substation ground.
b. Plug the ATO power cable into a power outlet.
c. Connect the current-cable lugs and the voltage-sensing cable plugs to control-panel (Figures 4
& 5).
d. Attach the current test-cable clamps to opposite terminals of the resistive load being tested
(Figures 6 & 7).
e. Attach the voltage-sensing clamps to the terminals of the resistive load. The sensing voltage
clamps should be inside the current clamps.
f. Turn on ATO power, by pressing the rocker switch to ON.
6.2 Operating Overview
Procedures for operating the ATO are presented in tabular format, with a different table for each
of the operations available. All operations are described in step-by-step sequences. Each step is
indexed by number and indicates an operator action, followed by a description of what should be
observed on the ATO display to confirm the action. All operations begin with the START menu
(shown below):
2. SETUP 12:25:00
Figure 8 START Menu
Item 1 (RUN TEST) is a menu of functions and options available for measuring an unknown
resistance. Item 2 (SETUP) is for record manipulation in the ATO. Item 2 (SETUP) expands
into a menu of support functions. Item 3 (DIAGNOSTIC) is a performance-verification
operation for checking key circuit functions.
17
Page 18

ATO-400 / ATO-600 Operating Procedures
1. ENTER RECORD ID
2. REVIEW RECORD
3. RESTORE RECORD
4. NEXT PAGE
Figure 9 SETUP Menu
The SETUP MENU lists 4 user options:
Item 1 (ENTER RECORD ID) is used to input identification information for each stored data
record (see 7.1.7).
Item 2 (REVIEW RECORD) is used to review stored records (see 7.1.8).
Item 3 (RESTORE RECORD) is used to erase or restore test records or to scroll through records
in stored memory (see 7.1.9).
Item 4 (NEXT PAGE) is used to set the ATO’s real time clock and perform calibration test.
6.2.1 Entering Alpha/Numeric Characters
Entering alpha/numeric characters is done via the keypad (similar to a telephone keypad – see
item 9 of Figures 4 & 5). To input characters, press the key once to select the number marked on
the key. Press the key a second time to select the first letter marked on the key. Press the key a
third time to select the second letter marked on the key. Press the key a fourth time to select the
third letter marked on the key.
Additional key presses will repeat the selection cycle (e.g., 2, A, B, C, 2 . . .).
When the character of choice is selected, press the ? key to advance to next character space.
Press the ? key to go back one character space. Press CLEAR to delete a selected character (the
cursor must be under the character to be deleted).
Again, press the “ENTER” key to load all character selections and move to the next input screen.
If no information is needed in a particular input screen, press the “ENTER” key and the display
will advance to the next screen without entering any data.
18
Page 19

ATO-400 / ATO-600 Operating Procedures
Figure 10 Step-by Step Procedures for for ATO Operations
19
Page 20

ATO-400 / ATO-600 Operating Procedures
20
Page 21

ATO-400 / ATO-600 Operating Procedures
SELECT TEST CURRENT:
SELECT TEST CURRENT:
SELECT BURN-IN TIME:
ENTER TEST CURRENT
ENTER TEST CURRENT
1.NORMAL TEST
6.3 Run Normal Test Procedure
The following procedure describes the steps to measure an unknown resistance.
NOTE
The red HIGH CURRENT PRESENT indicator will flash while test current is applied to the
resistive load.
Table 5.0 Run Test Procedure (Measure an Unknown Resistance)
STEP ACTION ATO DISPLAY
5-1
Begin RUN TEST procedure:
Press key # 1 on START MENU.
A menu of test options appears.
2. AUTOMATIC TEST
5-2
5-3
5-3a
Select Normal Test by pressing key #1.
“SELECT TEST CURRENT” menu
appears.
Select a test current:
Press key a (1 to 7) for the desired test
current. The SELECT BURN-IN TIME
menu appears. Go to step 5-4. For this
example, a 600A test current was selected.
For a user-defined (CUSTOM) test current,
press key # 8 and go to step 5-3a.
Custom test current levels (in 1 amp steps)
are entered via the keypad. When finished
entering the value press the “ENTER” key
and go to step 5-4. For this example, we
entered 95A test current.
1. 10A 2. 25A 3. 50A
4. 100A 5. 200A 6. 300A
7. 400A 8. CUSTOM
Or
1. 10A 2. 25A 3. 50A
4. 100A 5. 200A 6. 300A
7. 600A 8. CUSTOM
1. 5 SEC 2. 10 SEC
3. 20 SEC 4. 30 SEC
5. 60 SEC
(10 to 100)
95 AMPS
or
NOTE
“INVALID ENTRY” will appear on the
display if an invalid value is entered.
21
(10 to 200)
95 AMPS
Page 22

ATO-400 / ATO-600 Operating Procedures
CURRENT: 600 AMPS
PLEASE WAIT
CURRENT: 600.4 AMPS
FINAL RESISTANCE
KEEP THIS READING?
2. NO
CURRENT: 600
AMPS
Table 5.0 Run Test Procedure (Measure an Unknown Resistance Continued)
STEP ACTION ATO DISPLAY
5-4
Select burn-in time by pressing key (1 -5)
that corresponds to the desired burn-in time
(see display on step 5-3). A display of
BURN-IN: 5 SEC
“START” TO RUN TEST
selected test current and burn-in time
appears.
NOTE
A 5-second burn-in time was selected in this
example.
5-5
Press the START key to run a resistance
measurement test. The ramping current and
percent of ramp level displays with the
notice TEST IN PROGRESS. When the
RAMPING CURRENT 10%
TEST IN PROGRESS
test current has ramped up to the specified
level (current is at 100%), the test result
display appears automatically.
5-6
Automatic, no operator action required.
Current, burn-in time, and resistance
measurement changes appear on the display
during burn-in. At the end of the burn-in
BURN-IN: 5 SEC
200.3 MICRO-OHMS
PLEASE WAIT
time, the current returns to zero.
5-7
Automatic, no operator action required. At
the end of the burn-in time the final
resistance measurement displays. Press the
I= 600.4 AMPS
200.3 MICRO-OHMS
“ENTER” key to go to next display.
5-8
5-9
The “KEEP THIS READING?” menu
displays on the LCD.
If the test resistance measurement is to be
stored in the meomory, press key #1 (YES).
If the test is not to be stored in memory,
then press key #2 (NO).
1. YES
TEST SAVED
22
Page 23

ATO-400 / ATO-600 Operating Procedures
ARE YOU SURE?
1. RUN TEST 04/11/05
RECORD NUMBER 2
SAVE THIS TEST RECORD?
SELECT TEST CURRENT:
RUN ANOTHER TEST?
Table 5.0 Run Test Procedure (Measure an Unknown Resistance Continued)
STEP ACTION ATO DISPLAY
5-10
“RUN ANOTHER TEST?” displays.
1. YES
2. NO
5-11
5-12
5-13
5-14
5-15
If another test is required, press key #1
(YES). The SELECT TEST CURRENT
menu will appear.Go to step 5-12.
If another test is not required, then press
key #2 (NO) and go to step 5-15.
Return to step 5-2 to setup for another test
Repeat the sequence from step 5-2 to step
5-10.
“SAVE THIS RECORD?” displays when
another test was not selected in step 5-12.
The test record contains all the readings
taken in this test.
To save this record, press key #1 (YES). If
the test record is not to be saved, press key
#2 (NO) and go to step 5-16.
NOTE
A test record is saved in Flash
EEPROM. A record number
will be automatically assigned
to the record by the ATO.
(The Test record was assigned
#2 in this example).
When the record is saved the RECORD
NUMBER “x” shows on display. Press
ENTER to return to the START MENU.
1. 10A 2. 25A 3. 50A
4. 100A 5. 200A 6. 300A
7. 400A 8. CUSTOM
Step 5-2 thru 5-10 displays repeat.
1. YES
2. NO
HAS BEEN SAVED!
2. SETUP 12:24:01
3. DIAGNOSTIC
5-16
Pressing key #2 (NO) on SAVE THIS
TEST RECORD (see step 5-14) causes the
ARE YOU SURE? prompt (shown at
right).
23
DATA WILL BE LOST!
1. DO NOT SAVE RECORD
2. SAVE RECORD
Page 24

ATO-400 / ATO-600 Operating Procedures
1. RUN TEST 04/11/05
Table 5.0 Run Test Procedure (Measure an Unknown Resistance Continued)
ITEM ACTION ATO DISPLAY
5-17
If key #1 is pressed, the test record will be
erased from memory and the display
returns to the “START MENU”. If key
2. SETUP 12:24:01
3. DIAGNOSTIC
#2 is pressed, the test record will be saved
in Flash EEPROM. The test record
number assigned to this record will be
displayed. Exit the RECORD SAVED
display by pressing ENTER, which
returns the display to the START MENU.
This ends the RUN NORMAL TEST procedure.
24
Page 25

ATO-400 / ATO-600 Operating Procedures
ENTER TEST CURRENT
ENTER TEST CURRENT
CURRENT: 100
AMPS
1.NORMAL TEST
SELECT TEST CURRENT:
SELECT TEST CURRENT:
6.4 Run Automatic Test Procedure
Automatic Test Mode allows the user to initiate a test by applying the sense cables across the
resistive load. This feature is handy when the user wants to take multiple resistance readings of
the same load or of different loads in the same current path.
The burn-in time for Automatic Test is set for 5 seconds. The resistance reading is stored in the
ATO’s working memory. The user can save up to 96 readings per test record. The ATO Flash
EEPROM can store 63 test records.
The following procedure describes the steps to measure an unknown resistance using the
Automatic Test Mode.
NOTE
The current cables should be connected across the resistive load to establish the current path.
Removing and reconnecting one or both sense cables starts a new test.
Table 6.0 Run Automatic Test Procedure (Measure an Unknown Resistance)
STEP ACTION ATO DISPLAY
6-1
Begin RUN TEST procedure: Press key #1
on START MENU.
2. AUTOMATIC TEST
6-2
6-3
Select Automatic test by pressing key #2.
The “SELECT TEST CURRENT” menu
appears.
Press key 1 to 7 for desired test current.
For this example, 100A test current was
selected.
For a user-defined (CUSTOM) test current,
press key # 8 and go to step 6-3.
NOTE
Burn-in time is set for 5 seconds in
Automatic Test.
NOTE
For this example, 100A custom test current
was selected.
1. 10A 2. 25A 3. 50A
4. 100A 5. 200A 6. 300A
7. 400A 8. CUSTOM
or
1. 10A 2. 25A 3. 50A
4. 100A 5. 200A 6. 300A
7. 600A 8. CUSTOM
(10 to 400)
100 AMPS
or
(10 to 600)
100 AMPS
6-4
The Auto test mode START menu will
display the selected test current.
25
BURN-IN: AUTO
“START” TO RUN TEST
Page 26

ATO-400 / ATO-600 Operating Procedures
AUTO TEST MODE
AUTO TEST MODE
FINAL RESISTANCE
SAVE THIS RECORD?
RECORD NUMBER 2
1. RUN TEST 04/11/05
Table 6.0 Run Test Procedure (Measure an Unknown Resistance Continued)
STEP ACTION ATO DISPLAY
6-5
Press the START key to run a resistance
measurement test. Percent of ramp level
displays with the notice TEST IN
PROGRESS. When the test current has
RAMPING CURRENT 10%
TEST IN PROGRESS
PLEASE WAIT
ramped up to the specified level (current is
at 100%), the test result displays
automatically.
6-6
Automatic, no operator action required.
Current, burn-in time, and resistance
measurement changes appear on the display
during burn-in. At the end of the burn-in
BURN-IN: AUTO
500.5 MICRO-OHMS
PLEASE WAIT
time, the current returns to zero.
6-7
6-8
6-9
6-10
Automatic, no operator action required. At
the end of the burn-in time the final
resistance displays.
To initiate another test, disconnect then
reconnect one or both sense cables, steps 65 to 6-7 will be repeated (witout having to
press the START key in step 6-5).
To end Automatic test mode, press the
STOP key.
Pressing the STOP key will end the
Automatic test mode and the “SAVE THIS
RECORD” message is displayed.
To save this record, press key #1 (YES). If
the test record is not to be saved, press key
#2 (NO) and go to step 6-11.
NOTE
A test record is saved in Flash
EEPROM. A record number
will be automatically assigned
to the record by the ATO. (The
Test record was assigned #2 in
this example).
When a record is saved (the record #
assigned shows on display), press ENTER
to return to the START MENU.
I= 100 AMPS
500.5 MICRO-OHMS
AUTO TEST MODE
1. YES
2. NO
HAS BEEN SAVED!
2. SETUP 12:24:01
3. DIAGNOSTIC
26
Page 27

ATO-400 / ATO-600 Operating Procedures
ARE YOU SURE?
1. RUN TEST 04/11/05
Table 6.0 Run Test Procedure (Measure an Unknown Resistance Continued)
STEP ACTION ATO DISPLAY
6-11
Pressing key #2 (NO) on SAVE THIS
TEST RECORD (see step 6-8) causes the
ARE YOU SURE? prompt to be displayed
(shown at right).
DATA WILL BE LOST!
1. DO NOT SAVE RECORD
2. SAVE RECORD
6-12
If key #1 is pressed, the test record will be
erased from the memory and the display
returns to the “START MENU”. If key #2
is pressed, the test record will be saved in
Flash EEPROM. The test record number
assigned to this record will be displayed.
Exit the RECORD SAVED display by
pressing ENTER, which returns to the
START MENU.
This ends the RUN AUTOMATIC TEST procedure.
2. SETUP 12:24:01
3. DIAGNOSTIC
27
Page 28

ATO-400 / ATO-600 Operating Procedures
1. ENTER RECORD ID
COMPANY:
STATION:
“ENTER” TO ACCEPT
CIRCUIT:
“ENTER” TO ACCEPT
MANUFACTURER:
MODEL:
6.5 Enter Record ID Procedure
This procedure allows the user to enter the equipment identification data to the test record.
Table 7.0 Enter Record ID Procedure (test-record, site, and equipment identification)
STEP ACTION ATO DISPLAY
7-1
Press key # 2 on the START MENU to go
to the SETUP MENU shown at right.
Note: Setup options 2 thru 4 go to the
following procedural tables:
2. REVIEW RECORD
3. RESTORE RECORD
4. NEXT PAGE
2. REVIEW RECORD procedures in
Table 8.0
3. RESTORE RECORD Procedures in
Table 9.0
4. NEXT PAGE procedures in Table 12.0.
7-2
On the SETUP MENU, press key #1
(ENTER ID) to begin entering
identification data begining with the
“COMPANY” input screen.
UP/DOWN TO POSITION
“ENTER” TO ACCEPT
Note: See Section 7.1.4 for instructions on
entering alpha/numeric characters with the
keypad.
7-3
Enter the utility COMPANY name using
the alpha/numeric keypad. Press
“ENTER” to load the entered characters
and advance to the “STATION” input
UP/DOWN TO POSITION
screen.
7-4
7-5
7-6
Enter the utility STATION name using the
alpha/numeric keypad. Press “ENTER” to
load the entered characters and advance to
the “CIRCUIT” input screen.
Enter the test CIRCUIT name using the
alpha/numeric keypad. Press “ENTER” to
load the entered characters and advance to
the “MANUFACTURER” input screen.
Enter the test item’s MANUFACTURER
name using the alpha/numeric keypad.
Press “ENTER” to load the entered
characters and advance to the “MODEL”
input screen.
UP/DOWN TO POSITION
UP/DOWN TO POSITION
“ENTER” TO ACCEPT
UP/DOWN TO POSITION
“ENTER” TO ACCEPT
28
Page 29

ATO-400 / ATO-600 Operating Procedures
SERIAL NUMBER:
KVA RATING:
OPERATOR:
1. RUN TEST 06/11/04
Table 7.0 Enter Record ID Procedure (continued)
STEP ACTION ATO DISPLAY
7-7
Enter the test item’s MODEL using the
alpha/numeric keypad. Press “ENTER” to
load the entered characters and advance to the
“SERIAL NUMBER” input screen.
UP/DOWN TO POSITION
“ENTER” TO ACCEPT
7-8
Enter the test item’s SERIAL NUMBER
using the alpha/numeric keypad. Press
“ENTER” to load the entered characters and
advance to the “KVA RATING” input screen.
7-9
Enter the test item’s KVA RATING using the
alpha/numeric keypad. Press “ENTER” to
load the entered characters and advance to the
“OPERATOR” input screen.
7-10
Enter the test OPERATOR name, using the
alpha/ numeric keypad. Press “ENTER” to
load the entered characters and return to the
START MENU display.
This completes the ENTER ID procedure.
UP/DOWN TO POSITION
“ENTER” TO ACCEPT
UP/DOWN TO POSITION
“ENTER” TO ACCEPT
2. SETUP 12:26:01
3. DIAGNOSTIC
29
Page 30

ATO-400 / ATO-600 Operating Procedures
1. ENTER ID
RECORD ID INFO:
2 TESTS
TEST NUMBER: 1
TEST NUMBER: 2
6.6 Review Record Procedure
This procedure describes the steps for reviewing a test record residing in the ATO’s working
memory. The user can view the record on the LCD display.
This feature is useful when the user wants to review a test record stored in the ATO’s Flash
EEPROM in the field or in the office.
NOTE
To review a test record stored in Flash EEPROM, the user must first restore the test record from
Flash EEPROM to working memory (see paragraph 7.1.9 Restore Record Procedures).
Table 8.0 Review Record Procedure
STEP ACTION ATO DISPLAY
8-1
On the START MENU, press key #2
(SETUP) to select the SETUP MENU (shown
at right).
2. REVIEW RECORD
3. RESTORE RECORD
4. NEXT PAGE
8-2
8-3
8-4
8-5
Press key #2 (REVIEW RECORD).
The user can scroll through the test record by
using the ^ and ? keys.
Part of the selected record’s ID appears
displaying the record number,
MANUFACTURER, and MODEL. Press the
“ENTER” key to display the number of tests
in the record, the date, and the time of the
selected tests.
Pressing the “ENTER” key will list all test
data: Test current, burn-in time, and the
measured resistance value.
NOTE
The test record in this example contains 2
tests.
Press ? key to advance to next test. Press ?
key to return to previous test.
1710
VIC
ABC
04/11/05 17:27:00
TEST CURRENT: 100A
BURN - IN TIME: 5 Sec
500.3 MICRO-OHMS
TEST CURRENT: 50A
BURN - IN TIME: 5 Sec
500.1 MICRO-OHMS
This completes the Review Record Procedure.
8-6
Press STOP to return to START MENU. Display returns to START MENU.
30
Page 31

ATO-400 / ATO-600 Operating Procedures
1. ENTER ID
1. RESTORE RECORD
RESTORE RECORD
RESTORE RECORD
RECORD RESTORED!
RECORDS DIRECTORY
#1 04/11/05 17:27:00
6.7 Restore Record Procedure
This procedure describes the steps to recall a test record stored in the ATO Flash memory to
working memory.
Table 9.0 Restore Record Procedure
STEP ACTION ATO DISPLAY
9-1
On the START MENU, press key #2
(SETUP) to display the SETUP MENU.
2. REVIEW RECORD
3. RESTORE RECORD
4. NEXT PAGE
9-2
9-3
9-4
9-5
9-6
On the SETUP MENU, press key #3
(RESTORE RECORD) to display a menu of
options (Restore Record, Directory, Erase
Record).
Press key #1 (RESTORE RECORD) to
display a menu of restore records options.
Option 1 allows a user to restore a record
when the record’s number is known, Option
2 allows the user to scroll throught the
stored records to slect the correct one.
OPTION 1:
Press key #1 (ENTER RECORD
NUMBER) to display a prompt to enter the
record number to restore.
When the record’s number has been entered,
press the “ENTER” key to restore the
selected record. A confirmation “RECORD
RESTORED !” indicates that the record has
been restored. Press “ENTER” key will then
return to the REVIEW RECORD options
menu (resume the procedure at step 8-2 in
Table 8.0).
OPTION 2:
Press key #2 (SCROLL TO SELECT) in the
RESTORE RECORD menu to display the
Records Directory.
2. DIRECTORY
3. ERASE RECORD
1. ENTER RECORD NUMBER
2. SCROLL TO SELECT
NUMBER:
“UP TO SCROLL FWD
“DWN” TO SCROLL RVS
9-7
In the Records Directory, use the ? and ?
keys to scroll through the directory listings
of the test records. When the test record of
interest displays, press the “ENTER” key to
restore the test record.
31
1710
VIC
Page 32

ATO-400 / ATO-600 Operating Procedures
RECORD RESTORED!
Table 9.0 Restore record Procedure (continued)
STEP ACTION ATO DISPLAY
9-8
The “RECORD RESTORED!” message is
displayed. Press the ”ENTER” key again
to return to the REVIEW RECORD menu
(resume the procedure at step 8-2 in Table
8.0).
This completes the Restore Record Procedure.
32
Page 33

ATO-400 / ATO-600 Operating Procedures
ERASE RECORD
ERASE RECORD
RECORD NUMBER: XX
ERASE ALL RECORDS!
ERASING RECORDS
RECORDS ERASED!
6.8 Erase Test Record Procedure
This procedure describes the steps to delete a single test record or all the test records stored in the
ATO Flash EEPROM.
Table 10.0 Erase Test Record Procedure
STEP ACTION ATO DISPLAY
10-1
On the RESTORE RECORD display (step 9-
2), press key #3 (ERASE RECORD) to
display the ERASE RECORD menu of
1. ERASE SINGLE RECORD
2. ERASE ALL RECORDS
options (shown at right).
10-2
10-3
10-4
10-5
On the ERASE RECORD menu display,
press key #1 to erase a single record.
Enter the record number to be deleted then
press the “ENTER” key to confirm. Press
the “ENTER” key again to return to the main
menu.
NOTE
Press the “STOP” key to abort.
Press key #2 to erase all the stored records in
EEPROM.
NOTE
Press the “STOP” key to abort.
Press the “ENTER” key to confirm.
NUMBER: XX
ERASED!
Are you SURE?
“ENTER” TO CONTINUE
PLEASE WAIT
10-6
Press the “ENTER” key to return to the main
menu.
33
Page 34

ATO-400 / ATO-600 Operating Procedures
6.9 Computer Control
A PC program is provided with each ATO allowing the user to down load the test records stored
in ATO Flash EEPROM to a PC. Test records can be stored on any media the PC is capable of
handling. This allows the user to store and archive test records for reviewing at any time. Test
records can also be printed from the PC through any printer to which it has access.
Down loading test records is accomplished by using the ATO’s RS-232C or USB port.
NOTE
The ATO will interface with a PC when a command is received through the ATO’s RS-232C or
USB port.
34
Page 35

ATO-400 / ATO-600 Operating Procedures
1. ENTER RECORD ID
1. SET TIME
ENTER
_
ENTER
1. RUN TEST 04/11/05
6.10 Set ATO Clock Procedure
This procedure allows the user to set the ATO real time clock.
Table 11.0 Set ATO Real Time Clock Procedure
STEP ACTION ATO DISPLAY
11-1
Press key # 2 on the START MENU to go
to the SETUP MENU shown at right.
2. REVIEW RECORD
3. RESTORE RECORD
4. NEXT PAGE
11-2
11-3
11-4
11-5
On the SETUP MENU, press key #4
(NEXT PAGE).
2. CALIBRATE UNIT
Press key #1 to select “SET TIME”.
MM-DD-YY HH:MM:SS
Enter month, date, year, hour, minute, and
second.
MM-DD-YY HH:MM:SS
05/10/05 20:05:00
After the date and time is entered, the
ATO will return to the START MENU.
2. SETUP 12:26:01
3. DIAGNOSTIC
35
Page 36

ATO-400 / ATO-600 Operating Procedures
1. ENTER RECORD ID
1. SET TIME
CALIBRATION-SPECIFIC
CURRENT: 10.0 AMP
FINAL RESISTANCE
CURRENT: 100.0 AMP
FINAL RESISTANCE
6.11 Calibration Test Procedure
This procedure describes the steps to verify the ATO mesurement accuracy and generates a
calibration report. Five different calibration shunts are required for this test: 50micro-ohm, 100
micro-ohm, 500 micro-ohm, 1000 micro-ohm, 1900 micro-ohm. These test shunts shall be 0.1%
accuracy or better.
Table 12.0 Calibration Test Procedure
STEP ACTION ATO DISPLAY
12-1
Press key # 2 on the START MENU to go
to the SETUP MENU shown at right.
2. REVIEW RECORD
3. RESTORE RECORD
4. NEXT PAGE
12-2
12-3
12-4
12-5
12-6
On the SETUP MENU, press key #4
(NEXT PAGE).
Press key #2 to select “CALIBRATE
UNIT”.
Press “ENTER” key to continue.
Connect the 50 micro-ohm shunt to ATO.
Press “ENTER” key to start test.
The ATO will measure the 50 ?-ohm shunt
using 10A test current.
Observe test results on LCD.
2. CALIBRATE UNIT
SHUNTS ARE REQUIRED!
“ENTER” TO CONTINUE
CONNECT 50 ?-OHM
0.1% SHUNT NOW….
“ENTER” TO CONTINUE
BURN IN: 02 SEC
50 ?-OHM TEST
I= 9.9 AMPS
50.5 MICRO-OHM
ANY KEY TO CONTINUE
12-7
12-8
Press “ENTER” key to continue.
The ATO will measure 50 ?-ohm shunt
using 100A test current.
Observe test results. Press “ENTER” key to
continue.
36
BURN IN: 02 SEC
50 ?-OHM TEST
I= 100.0 AMPS
50.4 MICRO-OHM
ANY KEY TO CONTINUE
Page 37

ATO-400 / ATO-600 Operating Procedures
CURRENT: 10.0 AMP
FINAL RESISTANCE
CURRENT: 100.0 AMP
FINAL RESISTANCE
CURRENT: 10.0 AMP
FINAL RESISTANCE
Table 12.0 Calibration Test Procedure (Continued)
STEP ACTION ATO DISPLAY
12-9
Connect the 100 micro-ohm shunt to ATO.
Press “ENTER” key to start test.
CONNECT 100 ?-OHM
0.1% SHUNT NOW….
“ENTER” TO CONTINUE
12-10
12-11
12-12
12-13
The ATO will measure the 100 ?-ohm shunt
using 10A test current.
Observe test results. Press the “ENTER”
key to continue.
The ATO will measure the 100 ?-ohm shunt
using 100A test current.
Observe test results. Press “ENTER” key to
continue.
BURN IN: 02 SEC
100 ?-OHM TEST
I= 10.0 AMPS
100.1 MICRO-OHM
ANY KEY TO CONTINUE
BURN IN: 02 SEC
100 ?-OHM TEST
I= 100.0 AMPS
100.1 MICRO-OHM
ANY KEY TO CONTINUE
12-14
12-15
12-16
Connect the 500 micro-ohm shunt to ATO.
Press “ENTER” key to start test.
The ATO will measure the 500 ?-ohm shunt
using 10A test current.
Observe test results. Press “ENTER” key to
continue.
37
CONNECT 500 ?-OHM
0.1% SHUNT NOW….
“ENTER” TO CONTINUE
BURN IN: 02 SEC
500 ?-OHM TEST
I= 10.0 AMPS
500.1 MICRO-OHM
ANY KEY TO CONTINUE
Page 38

ATO-400 / ATO-600 Operating Procedures
CURRENT: 10.0 AMP
FINAL RESISTANCE
CURRENT: 100.0 AMP
FINAL RESISTANCE
CURRENT: 100.0 AMP
FINAL RESISTANCE
Table 12.0 Calibration Test Procedure (Continued)
STEP ACTION ATO DISPLAY
12-17
The ATO will measure the 500 ?-ohm shunt
using 100A test current.
BURN IN: 02 SEC
500 ?-OHM TEST
12-18
12-19
12-20
12-21
12-22
Observe test results. Press “ENTER” key to
continue.
Connect the 1000 micro-ohm shunt to ATO.
Press “ENTER” key to start test.
The ATO will measure 1000 ?-ohm shunt
using 10A test current.
Observe test results. Press “ENTER” key to
continue.
The ATO will measure the 1000 ?-ohm
shunt using 100A test current.
I= 100.0 AMPS
500.1 MICRO-OHM
ANY KEY TO CONTINUE
CONNECT 1000 ?-OHM
0.1% SHUNT NOW….
“ENTER” TO CONTINUE
BURN IN: 02 SEC
1000 ?-OHM TEST
I= 9.8 AMPS
1000.1 MICRO-OHM
ANY KEY TO CONTINUE
BURN IN: 02 SEC
1000 ?-OHM TEST
12-23
12-24
Observe test results. Press “ENTER” key to
continue.
Connect the 1900 micro-ohm shunt to ATO.
Press “ENTER” key to start test.
38
I= 99.9 AMPS
1000.1 MICRO-OHM
ANY KEY TO CONTINUE
CONNECT 1900 ?-OHM
0.1% SHUNT NOW….
“ENTER” TO CONTINUE
Page 39

ATO-400 / ATO-600 Operating Procedures
1. RUN TEST 04/11/05
FINAL RESISTANCE
FINAL RESISTANCE
CURRENT: 100.0 AMP
CURRENT: 10.0 AMP
Table 12.0 Calibration Test Procedure (Continued)
STEP ACTION ATO DISPLAY
12-25
The ATO will measure the 1900 ?-ohm
shunt using 10A test current.
BURN IN: 02 SEC
1900 ?-OHM TEST
12-26
12-27
12-28
12-29
Observe test results. Press “ENTER” key to
continue.
The ATO will measure the 1900 ?-ohm
shunt using 100A test current.
Observe test results. Press “ENTER” key to
continue.
The ATO returns to the START MENU.
I= 9.9 AMPS
1900.1 MICRO-OHM
ANY KEY TO CONTINUE
BURN IN: 02 SEC
1900 ?-OHM TEST
I= 99.9 AMPS
1900.1 MICRO-OHM
ANY KEY TO CONTINUE
2. SETUP 12:26:01
3. DIAGNOSTIC
39
Page 40

ATO-400 / ATO-600 Operating Procedures
DIAGNOSTIC CHECK
RUNNING DIAG CHECK…
RUNNING DIAG CHECK…
RUNNING DIAG CHECK…
RUNNING DIAG CHECK…
RUNNING DIAG CHECK…
RUNNING DIAG CHECK…
6.12 Diagnostic Check Procedure
This procedure describes the steps to perform the diagnostic check on the ATO.
Table 13.0 Diagnostic Check Procedure
STEP ACTION ATO DISPLAY
13-1
The diagnostic check is a functional
verification self-test of the ATO . This
procedure begins by pressing key #3 on the
START MENU, which displays a
CONNECT SHORTING BAR
“ENTER” TO CONTINUE
calibration check prompt to attach the test
leads to a shorting bar (See Figure 11).
13-2
When the test leads are attached to a
shorting bar, press the “ENTER” key to
start the self-test process. The self-test
RAMPING CURRENT: xx%
feature checks ramping current and displays
a percent of ramp level as it ramps to full
current. When the ramp reaches full
current, the remaining self-check functions
automatically sequence without operator
control. If any circuit fails (does not pass),
then do not use the ATO unit to measure
any resistance until the problem has been
corrected.
13-3
Automatic, no operator action required.
13-4
13-5
13-6
13-7
CURRENT RAMP CKT
“PASS”
Automatic, no operator action required.
ZERO CKT CHECK
“PASS”
Automatic, no operator action required.
FSCALE CKT CHECK
“PASS”
Automatic, no operator action required.
MEAS CKT CHECK
“PASS”
Automatic, no operator action required.
RAMPING CURRENT: xx%
40
Page 41

ATO-400 / ATO-600 Operating Procedures
DIAG CHECK COMPLETE
Table 13.0 Calibration Check Procedure (Continued)
STEP ACTION ATO DISPLAY
13-8
Automatic, no operator action required.
PRESS ANY KEY
13-9
Press any key to end DIAG CHECK. Display returns to START MENU.
Figure 11 Diagnostic Test Cable Connection
41
Page 42

ATO-400 / ATO-600 Operating Procedures
APPENDIX A
Troubleshooting Guide
Item Symptom Possible Problem Solution
1 Reading is incorrect. 1. Poor connection at the test
clips.
2 “Cable Error” Message. 1. No test current going
through the device under test.
2. Sensing cables problem.
1. Check connections to ensure teeth
of voltage-sensing and current clips
are firmly in contact with the device
under test.
2. Verify that the sense cables are
connected on the inside of the
current cables. See Figures 6 & 7.
1. Check current cable connections to
the device under test.
2. Check sensing cable connections.
3. Run Calibration Test.
42
Page 43

ATO-400 / ATO-600 Operating Procedures
1710 Grevillea Court. Ontario, CA 91761, USA
Phone 909-923- 9390 Fax 909-923-9391
Web site: http//www.vanguard-instruments.com
ATO-400/600 May 2005
43
 Loading...