

Page 1

USER'S GUIDE
Vaisala HUMICAP® Humidity Module
HMM100
M211024EN-C
Page 2

PUBLISHED BY
Vaisala Oyj Phone (int.): +358 9 8949 1
P.O. Box 26 Fax: +358 9 8949 2227
FI-00421 Helsinki
Finland
Visit our Internet pages at www.vaisala.com
© Vaisala 2013
No part of this manual may be reproduced, published or publicly displayed in any form
or by any means, electronic or mechanical (including photocopying), nor may its
contents be modified, translated, adapted, sold or disclosed to a third party without prior
written permission of the copyright holder. Translated manuals and translated portions
of multilingual documents are based on the original English versions. In ambiguous
cases, the English versions are applicable, not the translations.
The contents of this manual are subject to change without prior notice.
This manual does not create any legally binding obligations for Vaisala towards
customers or end users. All legally binding obligations and agreements are included
exclusively in the applicable supply contract or the General Conditions of Sale and
General Conditions of Service of Vaisala.
Page 3

_________________________________________________________________________________
Table of Contents
CHAPTER 1
GENERAL INFORMATION ............................................................................ 5
About This Manual ................................................................... 5
Contents of This Manual ....................................................... 5
Version Information ............................................................... 6
Related Manuals ................................................................... 6
Documentation Conventions ................................................. 6
Safety ......................................................................................... 7
ESD Protection ...................................................................... 7
Recycling .................................................................................. 7
Regulatory Compliances ......................................................... 8
Patent Notice ............................................................................ 8
Trademarks ............................................................................... 8
License Agreement .................................................................. 8
Warranty .................................................................................... 9
CHAPTER 2
PRODUCT OVERVIEW ................................................................................ 11
Introduction to HMM100 Series Humidity Modules ............ 11
Basic Features and Options .................................................. 12
Probe Types ............................................................................ 13
Filter Types ............................................................................. 14
Catalytic VHP Filter ............................................................. 15
Installation Accessories ........................................................ 16
Probe Mounting Flange ....................................................... 16
Mounting Bracket with Lid ................................................... 17
Module Housing (IP65) ....................................................... 18
Probe Mounting Clamp ....................................................... 19
CHAPTER 3
INSTALLATION ............................................................................................ 21
Dimensions ............................................................................. 21
Installing the Module .............................................................. 22
Installing the Probe ................................................................ 23
Wiring ...................................................................................... 24
2-wire Output ....................................................................... 24
3-wire Output ....................................................................... 24
Verifying the Installation........................................................ 25
CHAPTER 4
OPERATION ................................................................................................. 27
Using the Service Port ........................................................... 27
Installing the Driver for the USB Cable ............................... 27
VAISALA _________________________________________________________________________ 1
Page 4

User's Guide _______________________________________________________________________
Terminal Application Settings .............................................. 28
List of Serial Commands ....................................................... 30
Device Information and Status .............................................. 31
Show Device Information..................................................... 31
Show Quantities .................................................................. 32
Show Calibration Info .......................................................... 32
Show Analog Output Status ................................................ 32
Show Firmware Version ...................................................... 33
Serial Line Output Commands .............................................. 33
Start Measurement Output .................................................. 33
Stop Measurement Output .................................................. 33
Set Output Interval ............................................................... 34
Output a Reading Once ....................................................... 34
Calibration Commands .......................................................... 35
Calibrate Temperature Measurement ................................. 35
Calibrate Humidity Measurement ........................................ 36
View User Adjustment Parameters ..................................... 37
Set User Adjustment Parameters ........................................ 37
Zero the Trimmers ............................................................... 38
Calibrate Analog Output ...................................................... 39
Configuring Serial Line Operation ........................................ 40
Set Serial Line Settings ....................................................... 40
Set Terminal Echo ............................................................... 40
Set Module Address ............................................................ 41
Set Serial Interface Mode .................................................... 41
Configuring Measurement Parameters ................................ 42
Set Environmental Compensation Values ........................... 42
Set Temporary Pressure Compensation Value ................... 43
Configuring Analog Output ................................................... 44
Set Analog Output Mode ..................................................... 44
Select Analog Output Quantity and Scaling ........................ 45
Test the Analog Output........................................................ 45
Other Commands.................................................................... 47
Display Command List......................................................... 47
Enable Advanced Commands ............................................. 47
Display the Currently Active Errors ..................................... 47
Connecting to the Module in POLL Mode ........................... 48
Closing the Connection in POLL Mode ............................... 48
Save Changed Settings ....................................................... 48
Restore Saved Settings ....................................................... 49
Reset the Module ................................................................ 49
Restore Factory Settings ..................................................... 49
CHAPTER 5
MAINTENANCE ............................................................................................ 51
Changing the Filter ................................................................. 51
Changing the Sensor ............................................................. 51
Calibration ............................................................................... 53
Calibration and Adjustment Using Trimmers ...................... 54
Calibration and Adjustment Using Serial Line .................... 55
Temperature Calibration (CT) ............................................. 56
Humidity Calibration (CRH) ................................................. 58
2 ____________________________________________________________________ M211024EN-C
Page 5

_________________________________________________________________________________
CHAPTER 6
TROUBLESHOOTING ................................................................................. 61
Analog Output Error Notification .......................................... 61
Solving Typical Problems...................................................... 62
Technical Support .................................................................. 63
Product Returns ..................................................................... 63
CHAPTER 7
TECHNICAL DATA ...................................................................................... 65
Specifications ......................................................................... 65
Performance ........................................................................ 65
Relative Humidity ........................................................... 65
Dewpoint Temperature .................................................. 65
Operating Environment ....................................................... 66
Inputs and Outputs .............................................................. 66
Mechanics ........................................................................... 67
Options and Accessories ...................................................... 68
VAISALA _________________________________________________________________________ 3
Page 6

User's Guide _______________________________________________________________________
List of Figures
Figure 1 HMM100 Humidity Module with Probe ..................................... 12
Figure 2 Probe Types ............................................................................. 13
Figure 3 Filter Types ............................................................................... 14
Figure 4 Optional Probe Mounting Flange .............................................. 16
Figure 5 Mounting Bracket with Lid ........................................................ 17
Figure 6 Optional Module Housing ......................................................... 18
Figure 7 Aligning Mounting Clamp Slots ................................................. 19
Figure 8 Sliding the Lower Clamp Part ................................................... 19
Figure 9 Securing the Upper Clamp Part ................................................ 20
Figure 10 Tightening the Lower Clamp Part ............................................. 20
Figure 11 HMM100 Dimensions ............................................................... 21
Figure 12 Component Board (3-wire version)........................................... 22
Figure 13 Wiring for 2-wire Output ............................................................ 24
Figure 14 Wiring for 3-wire Output ............................................................ 24
Figure 15 PuTTY Terminal Application ..................................................... 29
Figure 16 Changing the Sensor ................................................................ 52
Figure 17 Trimmers for Offset and Gain ................................................... 54
Figure 18 Loop Supply Voltage Versus Loop Resistance ........................ 67
List of Tables
Table 1 Manual Revisions ....................................................................... 6
Table 2 Related Manuals ......................................................................... 6
Table 3 Quantities Measured by HMM100 ............................................ 11
Table 4 Filter Properties ........................................................................ 14
Table 5 HMM100 Default Serial Interface Setting ................................. 28
Table 6 Basic Serial Commands ........................................................... 30
Table 7 Advanced Serial Commands .................................................... 31
Table 8 Error Levels for Analog Output Modes ..................................... 61
Table 9 Troubleshooting Table .............................................................. 62
Table 10 HMM100 3-wire Model Current Consumption .......................... 66
4 ____________________________________________________________________ M211024EN-C
Page 7

Chapter 1 _________________________________________________________ General Information
CHAPTER 1
GENERAL INFORMATION
This chapter provides general notes for the manual and the product.
About This Manual
This manual provides information for installing, operating, and
maintaining Vaisala HUMICAP® Humidity Module HMM100.
Contents of This Manual
This manual consists of the following chapters:
- Chapter 1, General Information, provides general notes for the manual
and the product.
- Chapter 2, Product Overview, introduces the features, advantages, and
the product nomenclature of the HMM100.
- Chapter 3, Installation, provides you with information that is intended
to help you install the HMM100.
- Chapter 4, Operation, contains information that is needed to operate
the HMM100.
- Chapter 5, Maintenance, provides information that is needed in basic
maintenance of the HMM100.
- Chapter 6, Troubleshooting, describes the analog output error
notification behavior, some common problems, their probable causes
and remedies, and provides contact information for technical support.
- Chapter 7, Technical Data, provides the technical data of the
HMM100.
VAISALA _________________________________________________________________________ 5
Page 8

User's Guide _______________________________________________________________________
Manual Code
Description
M211024EN-C
November 2013. Removed RHCAL command.
automatically.
M211024EN-B
October 2012. Previous version. Added VHP filter
specifications.
Manual Code
Manual Name
M211002EN
HMM100 Quick Reference Guide
M211078EN
Module Housing for Humidity Module HMM10
Quick Reference Guide
M211079EN
Mounting Bracket for Humidity Module HMM10
Quick Reference Guide
M211080EN
Mounting Flange for Humidity Probes
Quick Reference Guide
Version Information
Table 1 Manual Revisions
Added information on which parameter changes
must be saved separately and which are saved
option and new pictures to the installation
instructions, edited commands and technical
Related Manuals
Table 2 Related Manuals
WARNING
CAUTION
NOTE
Documentation Conventions
Throughout the manual, important safety considerations are highlighted
as follows:
Warning alerts you to a serious hazard. If you do not read and follow
instructions very carefully at this point, there is a risk of injury or even
death.
Caution warns you of a potential hazard. If you do not read and follow
instructions carefully at this point, the product could be damaged or
important data could be lost.
Note highlights important information on using the product.
6 ____________________________________________________________________ M211024EN-C
Page 9

Chapter 1 _________________________________________________________ General Information
Ground the product, and verify installation grounding periodically to
minimize shock hazard.
Do
or lead to malfunction.
Recycle all applicable material.
Dispose of the unit
with regular household refuse.
Safety
The HMM100 module delivered to you has been tested for safety and
approved as shipped from the factory. Note the following precautions:
WARNING
CAUTION
not modify the unit. Improper modification can damage the product
ESD Protection
Electrostatic Discharge (ESD) can cause immediate or latent damage to
electronic circuits. Vaisala products are adequately protected against
ESD for their intended use. However, it is possible to damage the product
by delivering electrostatic discharges when touching exposed
components.
To make sure you are not delivering high static voltages yourself:
- Handle ESD sensitive components on a properly grounded and
protected ESD workbench. When this is not possible, ground yourself
to the equipment chassis before touching the boards. Ground yourself
with a wrist strap and a resistive connection cord. When neither of the
above is possible, touch a conductive part of the equipment chassis
with your other hand before touching the boards.
- Always hold the boards by the edges and avoid touching the
component contacts.
Recycling
according to statutory regulations. Do not dispose of
VAISALA _________________________________________________________________________ 7
Page 10

User's Guide _______________________________________________________________________
Regulatory Compliances
The HMM100 is in conformity with the provisions of the following EU
directive(s):
- RoHS Directive
- WEEE Directive
The electromagnetic compatibility of the HMM100 has been tested
according to the following product family standard:
EN61326-1 Electrical equipment for measurement, control and
laboratory use - EMC requirements - for use in light industrial
environments.
The Electrostatic Discharge test (EN 61000-4-2) was not applied to the
open frame module. In the final product the module PC-board should be
installed in a user restricted location / enclosure for continued ESD
protection.
Patent Notice
The HMM100 is protected by the following patents and patent
applications and their corresponding national rights:
Finnish patent 98861, French patent 6650303, German patent 69418174,
Japanese patent 3585973, UK patent 0665303, U.S. patent 5607564.
Trademarks
Vaisala HUMICAP® is a registered trademark of Vaisala Oyj.
Windows® is a registered trademark of Microsoft Corporation in the
United States and/or other countries.
License Agreement
All rights to any software are held by Vaisala or third parties. The
customer is allowed to use the software only to the extent that is provided
by the applicable supply contract or Software License Agreement.
8 ____________________________________________________________________ M211024EN-C
Page 11

Chapter 1 _________________________________________________________ General Information
Warranty
Visit our Internet pages for standard warranty terms and conditions:
www.vaisala.com/warranty.
Please observe that any such warranty may not be valid in case of
damage due to normal wear and tear, exceptional operating conditions,
negligent handling or installation, or unauthorized modifications. Please
see the applicable supply contract or Conditions of Sale for details of the
warranty for each product.
VAISALA _________________________________________________________________________ 9
Page 12

User's Guide _______________________________________________________________________
This page intentionally left blank.
10 ___________________________________________________________________ M211024EN-C
Page 13

Chapter 2 ___________________________________________________________ Product Overview
Quantity
Range
Relative humidity (RH)
0 ... 100%
Dewpoint (Td)
-20 ... +100 ºC (-4 ... +212 ºF)
CHAPTER 2
PRODUCT OVERVIEW
This chapter introduces the features, advantages, and the product
nomenclature of the HMM100.
Introduction to HMM100 Series Humidity Modules
The HMM100 series humidity measurement modules are open frame
modules intended for integration into environmental chambers and other
chambers where high temperature tolerance is important. The modules
provide a single analog output channel for relative humidity (RH) or
dewpoint (Td). Dewpoint is the recommended quantity if the
measurement environment has significant temperature differences.
Table 3 Quantities Measured by HMM100
All HMM100 modules include automatic temperature compensation
across the operating temperature range using an integrated PT1000
sensor. No external temperature compensation should be applied to the
output.
HMM100 modules do not incorporate probe heating or chemical purge
functionality. If the measurement environment is prone to condensation,
or likely to cause chemical contamination of the sensor, other Vaisala
instruments may be more suitable to the application.
The cable and probe of the HMM100 are attached at the factory. They
should remain connected to the module at all times; do not cut and reconnect the cable.
VAISALA ________________________________________________________________________ 11
Page 14

User's Guide _______________________________________________________________________
0905-042
Figure 1 HMM100 Humidity Module with Probe
Basic Features and Options
- Vaisala HUMICAP® 180R humidity sensor
- Plastic or stainless steel probe
- Analog output options:
- 4 ... 20 mA loop powered (2-wire output model)
- 0 ... 20 mA or 0 ... 1 / 5 / 10 V (3-wire output model,
user-configurable using service port)
- Cable lengths:
- 0.65 m, 1.55 m, or 2.9 m for plastic probe
- 1.55 m or 2.9 m for stainless steel probe
- Various filter types: see section Filter Types on page 14
- Optional installation accessories:
- Probe mounting flange
- Probe mounting clamp
- Mounting bracket with lid
- Module housing (IP65)
- Service port for maintenance
- Optional USB cable for easy access
12 ___________________________________________________________________ M211024EN-C
Page 15

Chapter 2 ___________________________________________________________ Product Overview
Probe Types
The HMM100 can be ordered with a plastic or stainless steel probe. The
plastic probe is suitable for most applications.
Both probe types have the same operational temperature range. Note that
the operational temperature range is also affected by the filter; see section
Filter Types on page 14.
Figure 2 below shows the plastic probe with a membrane filter (top), and
the stainless steel probe with a sintered stainless steel filter (bottom).
Figure 2 Probe Types
0909-021
VAISALA ________________________________________________________________________ 13
Page 16

User's Guide _______________________________________________________________________
No.
Filter
Diameter
Pore Size
Temperature Range
1
Plastic grid filter
(fastest response time)
12 mm
-
-20 ... +80 ºC
(-4 ... +176 ºF)
2
Membrane filter
12 mm
0.2 µm
-20 ... +80 ºC
(-4 ... +176 ºF)
3
Porous PTFE filter
(general purpose)
12 mm
8 µm
-70 ... +180 ºC
(-94 ... +356 ºF)
4
Stainless steel
sintered filter
12 mm
38 µm
-70 ... +180 ºC
(-94 ... +356 ºF)
5
Catalytic VHP filter
(VHP applications)
12 mm
38 µm
-70 ... +180 ºC
(-94 ... +356 ºF)
Filter Types
The available filters for HMM100 are shown in Figure 3 below. All
filters are 12 mm in diameter, and can be used in both the plastic and
stainless steel probe. Note the operational temperature range of each
filter.
For order codes, see section Options and Accessories on page 68.
1204-001
Figure 3 Filter Types
Table 4 Filter Properties
The catalytic VPH filter is recommended for environments where
vaporized hydgoren peroxide (VHP) is used. It is mechanically similar to
the stainless steel sintered filter, but it can be identified by the line that
has been machined to its base; see Figure 3 above. For more
information, see section Catalytic VHP Filter on page 15.
14 ___________________________________________________________________ M211024EN-C
Page 17

Chapter 2 ___________________________________________________________ Product Overview
Catalytic VHP Filter
Vaporized hydrogen peroxide (VHP) is a gaseous form of hydrogen
peroxide that is commonly used in decontamination and sterilization of
environmental chambers. Hydrogen peroxide has relatively low
saturation pressure which increases the possibility of saturation when
used in humid conditions. When saturation conditions occur, liquid
hydrogen peroxide will form on surfaces in the decontaminated space.
Vaisala HUMICAP® sensor is compatible with direct VHP exposure
even at high concentrations and hundreds of VHP cycles up to saturation.
The long term performance is very good at concentrations higher than
typically used for sterilization. However, for the applications where full
saturation is possible, Vaisala recommends using the catalytic VHP filter
to protect the sensor and extend the calibration interval.
The catalytic filter is based on a generally known method where the H2O2
is split to H2O and O2. This reaction is produced by the catalyst layer that
has been applied to the filter. As the filter prevents the VHP from
reaching the humidity sensor, the sensor responds to humidity only. The
catalytic filter affects the reading approximately +1 %RH at 300 pmm
VHP, or +3 %RH at 900 ppm VHP (at 23 °C / 73.4 °F).
VAISALA ________________________________________________________________________ 15
Page 18

User's Guide _______________________________________________________________________
Installation Accessories
For order codes of the installation accessories, see section Options and
Accessories on page 68.
Probe Mounting Flange
The probe mounting flange is used to seal the cable pass-through in the
chamber wall. The flange can also be used to hold the probe itself, in
case the probe cannot be mouted on the chamber wall otherwise. This
mounting is not ideal since leaving the probe cable completely outside
the measurement environment may cause heat conduction that affects the
measurement.
0911-109
Figure 4 Optional Probe Mounting Flange
16 ___________________________________________________________________ M211024EN-C
Page 19

Chapter 2 ___________________________________________________________ Product Overview
Mounting Bracket with Lid
The optional mounting bracket includes a metal backplate and a plastic
lid for the component board. The bracket does not provide IP rated
protection. The bracket can be installed on a DIN rail.
Figure 5 Mounting Bracket with Lid
0911-105
VAISALA ________________________________________________________________________ 17
Page 20

User's Guide _______________________________________________________________________
Module Housing (IP65)
The optional module housing is an IP65 rated housing. The module is
installed inside the housing in a mounting bracket (provided with the
housing). The housing has two cable glands. A coaxial plug is provided
for sealing the gland for the probe cable.
0911-096
Figure 6 Optional Module Housing
18 ___________________________________________________________________ M211024EN-C
Page 21
Chapter 2 ___________________________________________________________ Product Overview
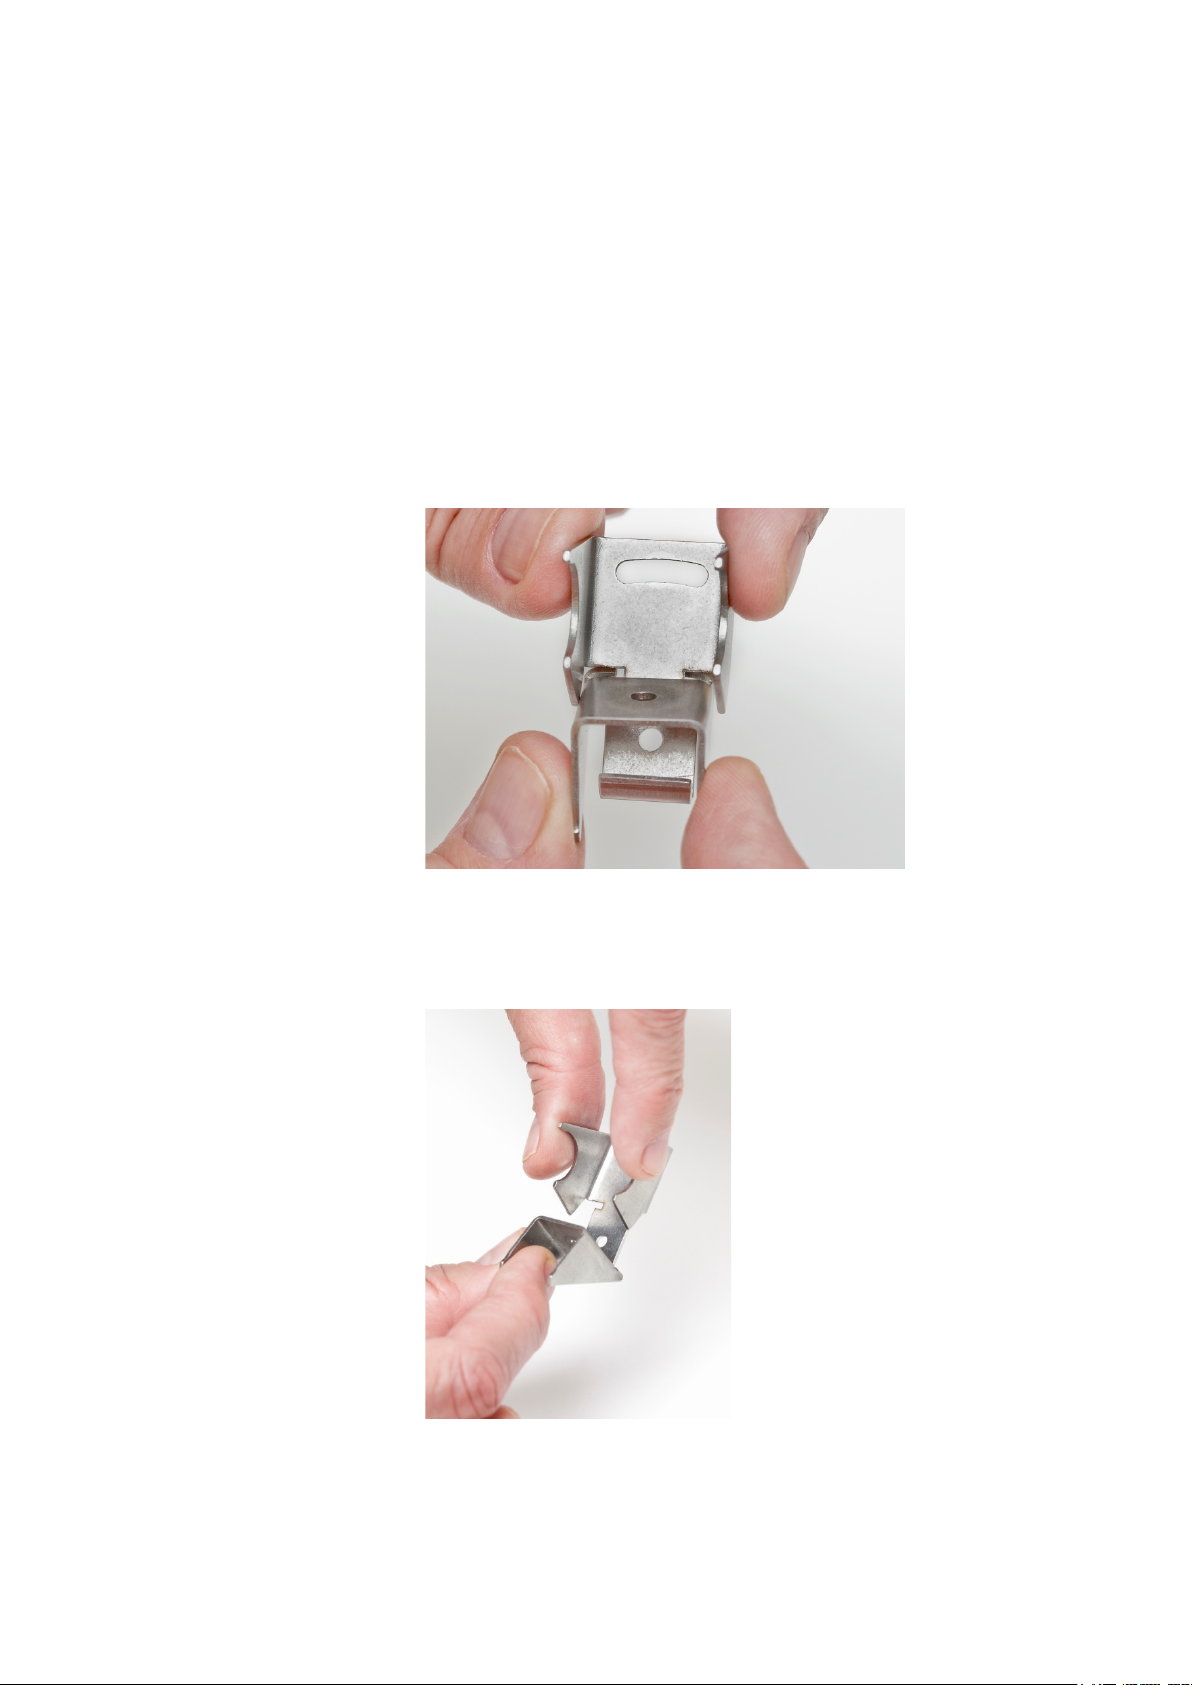
Probe Mounting Clamp
The optional mounting clamp makes it easy to install the probe on the
wall of the measurement environment. The probe can be detached for
calibration simply by loosening the lower screw.
Installing the entire probe in the measurement environment prevents heat
conduction to the sensor, and is the recommended installation method.
To mount the HMM100 probe to the mounting clamp:
1. Align the slots on the clamp parts as shown in Figure 7 below.
1209-001
Figure 7 Aligning Mounting Clamp Slots
2. Slide the lower clamp part over to the bottom end of the upper part
as shown in Figure 8 below.
1209-002
Figure 8 Sliding the Lower Clamp Part
VAISALA ________________________________________________________________________ 19
Page 22

User's Guide _______________________________________________________________________
3. Place the clamp to the intended location and secure the upper
clamp part with a screw. See Figure 9 below.
1209-003
Figure 9 Securing the Upper Clamp Part
4. Place the probe in the clamp.
5. Tighten the lower clamp part with a screw as shown in Figure 10
below.
1209-004
Figure 10 Tightening the Lower Clamp Part
20 ___________________________________________________________________ M211024EN-C
Page 23

Chapter 3 ________________________________________________________________ Installation
CHAPTER 3
INSTALLATION
This chapter provides you with information that is intended to help you
install the HMM100.
Dimensions
Figure 11 HMM100 Dimensions
VAISALA ________________________________________________________________________ 21
0905-044
Page 24

User's Guide _______________________________________________________________________
Installing the Module
NOTE
NOTE
The measurement probe with cable is attached to the component board at
Vaisala. Do not disconnect and reconnect the cable.
1. Attach the module securely using the mounting holes on the
corners of the component board. Use the optional mounting bracket
(Vaisala order code 225979) if needed.
2. Make sure that the module has a good earth connection from the
plated mounting hole. See Figure 12 below.
The installation holes on the component board are compatible with
Vaisala HMM22 and HMM30 humidity modules. Remember to disable
temperature compensation (if any) in the measurement system when
replacing an old module with the HMM100. The temperature
compensation in the HMM100 is always enabled.
0905-043
Figure 12 Component Board (3-wire version)
22 ___________________________________________________________________ M211024EN-C
Page 25

Chapter 3 ________________________________________________________________ Installation
If
sealant that releases acetic acid when curing. Acetic acid may damage the
HUMICAP
Installing the Probe
1. Select the mounting location for the probe:
- The probe should be entirely in the measurement environment, with
sufficient distance to the outer walls of the chamber or duct. Air
should flow freely around the probe.
- The probe location should represent well the environmental or
process conditions, and it should be as clean as possible.
2. Install the probe in the location. Use the probe mounting clamp
(Vaisala order code 226067) if needed. Insert enough cable to the
same space with the probe in order to prevent heat conduction, and
to make it easy to move the probe when performing a calibration.
If you cannot install the probe entirely in the measurement
environment, you can use the probe mounting flange (Vaisala order
code 226061) to mount the probe through the chamber wall. This
installation method is not recommended due to possible heat
conduction.
CAUTION
3. Seal the cable pass-through using the probe mounting flange or
silicone sealant.
you seal the cable pass-through using silicone sealant, do not use a
® sensor in the probe.
VAISALA ________________________________________________________________________ 23
Page 26

User's Guide _______________________________________________________________________
Wiring
2-wire Output
See Figure 13 below. Provide a 24 VDC supply voltage (see Figure 18 on
page 67).
0905-047
Figure 13 Wiring for 2-wire Output
3-wire Output
See Figure 14 below. Provide the required supply voltage according to
the output type:
10 ... 35 VDC or 19.2 ... 28.8 VAC for 0 ... 20 mA, 1 / 5 V output
15 ... 35 VDC or 19.2 ... 28.8 VAC for 0 ... 10 V output
0905-048
Figure 14 Wiring for 3-wire Output
When using the 3-wire output module, you may also connect a fourth
wire to the "Out -" terminal. It is internally connected to the "Vin -"
terminal. This connection is recommended when using the 0 ... 1 V
output.
24 ___________________________________________________________________ M211024EN-C
Page 27

Chapter 3 ________________________________________________________________ Installation
Verifying the Installation
To verify that the module has been installed correctly:
- Power up the module and check the output reading, preferably using a
humidity reference.
- Optional: connect to the service port and use the ATEST command to
set the analog output to desired voltage or current. Verify that your
measurement system shows the correct reading. See section Select
Analog Output Quantity and Scaling on page 45.
Note that ATEST is one of the advanced serial commands that must
be activated using the PASS command.
VAISALA ________________________________________________________________________ 25
Page 28

User's Guide _______________________________________________________________________
This page intentionally left blank.
26 ___________________________________________________________________ M211024EN-C
Page 29

Chapter 4 _________________________________________________________________ Operation
The service port is intended for short
permanent installation, use the analog output.
CHAPTER 4
OPERATION
This chapter contains information that is needed to operate the HMM100.
Using the Service Port
The HMM100 has an RS-232 interface on the component board for
service use. You can connect to it through the 4-pin M8 service port
connector on the module. Vaisala offers an optional USB cable (Vaisala
order code 226068) for connecting the module to your PC.
NOTE
-term use such as calibration. For
The cable does not provide operation power to the module; you must
power it normally through the screw terminals.
If you have not used the HMM100 USB cable before, install the driver
that came with the cable. Refer to section Installing the Driver for the
USB Cable below for detailed instructions.
Installing the Driver for the USB Cable
Before taking the USB cable into use, you must install the provided USB
driver on your PC. When installing the driver, you must acknowledge
any security prompts that may appear.
1. Check that the USB cable is not connected. Disconnect the cable if
you have already connected it.
2. Insert the media that came with the cable, or download the driver
from www.vaisala.com.
3. Execute the USB driver installation program (setup.exe), and
accept the installation defaults. The installation of the driver may
take several minutes.
4. After the driver has been installed, connect the USB cable to a USB
VAISALA ________________________________________________________________________ 27
port on your PC. Windows will detect the new device, and use the
driver automatically.
Page 30

User's Guide _______________________________________________________________________
Property
Description / Value
Baud rate
19200
Parity
None
Data bits
8
Stop bits
1
Flow control
None
5. The installation has reserved a COM port for the cable. Verify the
port number, and the status of the cable, using the Vaisala USB
Instrument Finder program that has been installed in the
Windows Start menu.
Windows will recognize each individual cable as a different device, and
reserve a new COM port. Remember to use the correct port in the
settings of your terminal program.
There is no reason to uninstall the driver for normal use. However, if you
wish to remove the driver files and all Vaisala USB cable devices, you
can do so by uninstalling the entry for Vaisala USB Instrument Driver
from the Add or Remove Programs (Programs and Features in
Windows Vista) in the Windows Control Panel.
Terminal Application Settings
The default settings of the HMM100 serial interface are presented in
Table 5.
Table 5 HMM100 Default Serial Interface Setting
The steps below describe how to connect to the HMM100 using the
PuTTY terminal application for Windows (available for download at
www.vaisala.com) and a USB serial interface cable:
1. Connect the USB cable between your PC and the service port of the
HMM100.
2. Start the PuTTY application.
3. Select the Serial settings category, and check that the correct COM
port is selected in the Serial line to connect to field.
Note: You can check which port the USB cable is using with the
Vaisala USB Instrument Finder program that has been installed
in the Windows Start menu.
28 ___________________________________________________________________ M211024EN-C
4. Check that the other serial settings are correct for your connection,
and change if necessary. Flow control should be set to None unless
you have a reason to change it.
5. Click the Open button to open the connection window and start
using the serial line.
Note: If PuTTY is unable to open the serial port you selected, it
Page 31

Chapter 4 _________________________________________________________________ Operation
will show you an error message instead. If this happens, restart
PuTTY and check the settings.
6. You may need to adjust the Local echo setting in the Terminal
category to see what you are typing on the serial line. To access the
configuration screen while a session is running, click the right
mouse button over the session window, and select Change
Settings... from the pop-up menu.
Figure 15 PuTTY Terminal Application
0807-004
VAISALA ________________________________________________________________________ 29
Page 32

User's Guide _______________________________________________________________________
Command
Description
?
Show module information
??
Show module information (when in poll
mode)
ADDR [0 ... 99]
Set the module address (for POLL mode)
CALCS
Show measured quantities
CLOSE
Close the temporary connection (returns to
POLL mode)
ECHO [ON/OFF]
Set terminal echo
ENV
Set environmental parameters
ERRS
Display active errors
HELP
List available commands
INTV [0 ... 255 S/MIN/H]
Set the continuous output interval
(for RUN mode)
OPEN [0 ... 99]
Open a temporary connection to a POLL
mode device
PASS [passcode]
Access advanced commands (requires
passcode)
R
Start the continuous outputting
RESET
Resets the module
RESTORE
Restores the latest saved settings
(overwrites unsaved settings)
S
Stop the continuous outputting
SAVE
Save changed settings to memory
SEND [0 ... 99]
Output the reading once
SERI [baud p d s]
User Port settings (Default: 19200 N 8 1)
baud: 300 ... 115200
STATUS
Show analog output status
SYSTEM
Show module information and build date
VERS
Show software version of the module
XPRES
Set the value for pressure compensations,
temporarily
List of Serial Commands
All commands can be issued either in uppercase or lowercase.
The notation <cr> refers to pressing the carriage return (ENTER) key on
your computer keyboard. Enter a <cr> to clear the command buffer
before starting to enter commands.
Table 6 Basic Serial Commands
30 ___________________________________________________________________ M211024EN-C
Page 33

Chapter 4 _________________________________________________________________ Operation
Command
Description
ACAL
Calibrate analog output
AMODE
Set/show analog output mode
ASEL [RH/TD]
Set/show analog output quantities and
scaling
ATEST
Test analog output; forces the output ot the
given value
CALINFO
Set/show calibration info
CRH
Calibrate humidity measurement after
CT
Calibrate temperature measurement
FRESTORE
Restore all module settings to factory
defaults
L
Show user adjustment parameters
LI
Set user adjustment parameters
SMODE [STOP/RUN/POLL]
Set the serial interface mode
ZERO
Set correction by trimmers to zero
Table 7 Advanced Serial Commands
Device Information and Status
Show Device Information
The ? command outputs a listing of device information.
?<cr>
Example:
>?
Device Name : HMM100
SW Name : HM100
SW model : VAISALA
SW version : 1.1.10.3031
Serial number :
Calibrated :
Address : 0
Operating mode : 3W
Status : ON
>
If the module is in poll mode, but a connection has not been opened using
the OPEN command, issue the ?? command. For a description of the
serial interface modes, see section Set Serial Interface Mode on page 41.
??<cr>
VAISALA ________________________________________________________________________ 31
Page 34

User's Guide _______________________________________________________________________
where
notification
=
If specified, enables or disables the analog output
error notification. Allowed values ON and OFF.
level
=
Error notification level. Allowed values are 0 … 30.
Show Quantities
The CALCS command shows the abbreviations of the quantities
measured by HMM100:
CALCS<cr>
Example:
>calcs
RH Td T
>
Show Calibration Info
Use the CALINFO command to show or set the calibration info field.
CALINFO ["location"]
Examples:
>calinfo
Calibration location: "VAISALA HELSINKI"
>
>calinfo "Calibration lab 2"
Calibration location: "Calibration lab 2"
>
Show Analog Output Status
The STATUS command shows the following information:
- Current analog output state (ON for normal, ERROR if an error is
active)
- Status of analog channel error notification (ON for enabled, OFF for
disabled). See section Analog Output Error Notification on page 61.
- Scaling of the selected output quantity (low and high values)
- Error notification level for the current analog output mode
STATUS [notification] [level]<cr>
32 ___________________________________________________________________ M211024EN-C
Page 35

Chapter 4 _________________________________________________________________ Operation
Example (analog output in error state, output quantity RH, analog output
mode 0 ... 10V):
>status
Channel 0:
Status : ERROR
Notification : ON
Level Lo : 0
Level Hi : 100
Error level : 0.000000
Show Firmware Version
VERS<cr>
Example:
>vers
HMM100 / HM100 / VAISALA / 1.1.10.3031
>
Serial Line Output Commands
Start Measurement Output
Use the R command to start the continuous outputting of measurement
values as an ASCII text string to the serial line. The output always
includes the readings of the currently selected analog output quantity
(RH or Td) and temperature. The format is fixed.
R<cr>
Example:
>r
RH= 25.10% T= 24.77'C
RH= 25.12% T= 24.96'C
RH= 25.17% T= 25.20'C
…
Outputting the results continues in intervals issued with the command
INTV. You can stop the output by entering the S command.
Stop Measurement Output
Use the S command to stop the continuous measurement output:
S<cr>
VAISALA ________________________________________________________________________ 33
Page 36

User's Guide _______________________________________________________________________
where
n = Time interval in range 1 ... 255
xxx
=
time unit = "S", "MIN", or "H"
where
aa = Module address (0 ... 99). Must be specified if the module is
in POLL mode, and a line has not been opened using the
OPEN command.
Set Output Interval
Use the INTV command to show or set the output interval of the serial
line measurement messages (applies when R command or RUN mode is
used). The shortest output interval is one second. This command has no
effect on the operation of the analog output.
NOTE
Remember to save the changes!
INTV [n xxx]<cr>
Example:
>intv 1 s
Value : 1
Unit : S
>save
Saving settings...done
>
Output a Reading Once
Use the SEND command to output a single measurement reading from
the module.
SEND [aa]<cr>
Example:
>send
RH= 25.12 % T= 24.91 'C
>
34 ___________________________________________________________________ M211024EN-C
Page 37

Chapter 4 _________________________________________________________________ Operation
Remember to save the changes!
Calibration Commands
Commands that have to do with calibration on the serial line are
described below. For the calibration procedures, see section Calibration
on page 53.
Calibrate Temperature Measurement
Use the CT command to perform a one-point or two-point temperature
(T) calibration.
CT<cr>
When performing a one-point calibration, you need to place the probe in
a single temperature reference. Run the command and enter the exact
temperature of the reference after the measurement has stabilized. Exit
the command by pressing the ESC key before proceeding to the second
point (see example 1 below). To update the value, press ENTER without
inputting a value.
NOTE
For two-point calibration, the second reference point must be at least
20 ºC warmer than the first. The measurement reading for the second
point will appear when this requirement is met.
Example: one-point calibration
>ct
T 21.9827 Ref1 ? 22
Press any key when ready
OK
>
Example: two-point calibration
>ct
T 22.0007 Ref1 ? 22
Press any key when ready ...
T 44.9847 Ref2 ? 45
OK
>
VAISALA ________________________________________________________________________ 35
Page 38

User's Guide _______________________________________________________________________
Calibrate Humidity Measurement
Use the CRH command to perform a one-point or two-point correction to
the humidity measurement of the module. This command changes the
offset and gain of the measured capacitance, and therefore affects
humidity measurement over the entire temperature range. Take care
when making this adjustment, and ensure you make a note of the existing
values before adjusting them.
CRH<cr>
When performing a one-point calibration, you need to place the probe in
a single humidity reference with RH < 50%. Run the command and enter
the exact RH of the reference after the measurement has stabilized. Exit
the command by pressing the ESC key before proceeding to the second
point (see example 1 below).
For two-point calibration, the first point requires a RH < 50% humidity
reference, the second point must be RH > 50%. There must also be at
least 30 percentage points of difference between the references.
Example: one-point calibration
>crh
RH: 11.29915720 Ref1 ? 11.3
Press any key when ready
>
Example: two-point calibration
>crh
RH: 11.29915720 Ref1 ? 11.3
Press any key when ready
RH: 75.04306440 Ref2 ? 75
OK
>
36 ___________________________________________________________________ M211024EN-C
Page 39

Chapter 4 _________________________________________________________________ Operation
Remember to save the changes!
View User Adjustment Parameters
Use the L command to view the current user adjustment parameters and
trimmer adjustment. This command is useful for checking the currently
applied correction.
L<cr>
The output values are as follows:
- Cp offset and gain: capacitance, calibrated using the CRH command
- RH trimmer offset and gain: correction by the trimmers
- RH offset and gain: calibrated using the CRH command
- T offset and gain: calibrated using the CT command
Example (shows default values, no user calibration done):
>l
Cp offset : 0
Cp gain : 1
RH offset trimmer : 0
RH gain trimmer : 1
RH offset : 0
RH gain : 1
T offset : 0
T gain : 1
>
NOTE
Set User Adjustment Parameters
Use the LI command to set the user adjustment parameters directly. This
command is useful for restoring the desired adjustments, and removing
the effects of calibration without having to perform the factory reset.
LI<cr>
After entering the command, you will be prompted to enter new values
one at a time. Press ENTER without giving a value to move to the next
parameter.
VAISALA ________________________________________________________________________ 37
Page 40

User's Guide _______________________________________________________________________
Example (shows default values):
>li
Cp offset : 0 ?
Cp gain : 1 ?
RH offset : 0 ?
RH gain : 1 ?
T offset : 0 ?
T gain : 1 ?
>save
Saving settings...done
>
Zero the Trimmers
After physically turning the trimmers to zero, use the ZERO command
to set the correction by trimmers to exactly zero. It is easy to introduce a
small, unwanted correction even if trying to zero the trimmers exactly.
This command eliminates the unwanted correction.
ZERO<cr>
NOTE
Remember to save the changes!
Example:
>zero
Trimmer positions set to zero.
>save
Saving settings...done
>
38 ___________________________________________________________________ M211024EN-C
Page 41

Chapter 4 _________________________________________________________________ Operation
Calibrate Analog Output
Use the ACAL command to calibrate the currently active analog output
mode. You must use this command if you change the analog output mode
using the AMODE command.
ACAL<cr>
After you give this command, the analog output of the module is set to
the low limit of the selected output (voltage or current). Measure the
output and enter the measured value. After entering the low limit, you
must measure and enter the high limit also.
Example (analog output in 4 ... 20 mA mode):
>acal
I1 (mA) ? 3.981
I2 (mA) ? 20.002
2.00985160E+03 a0
1.12789450E+03 a1
0.00000000E+00 a2
OK
>
Example (analog output in 0 ... 1 V mode):
>acal
V1 (V) ? 0
V2 (V) ? 0.998
5.45999950E+02 a0
1.64128260E+03 a1
0.00000000E+00 a2
OK
>
VAISALA ________________________________________________________________________ 39
Page 42

User's Guide _______________________________________________________________________
where
B = baud rate (9600, 19200, 38400, 76800, 115200)
P = parity (n = none, e = even, o = odd)
D = data bits (7 or 8)
S = stop bits (1 or 2)
Configuring Serial Line Operation
Set Serial Line Settings
Use the SERI command to show or set the serial line settings. Use the
SAVE command after changing the settings to store them. The new
settings will be taken into use when the module is reset or powered up.
SERI [b p d s]<cr>
Examples:
>seri
Baud P D S : 19200 N 8 1
>
>seri 9600 e 7 1
Baud rate : 9600
Parity : E
Data bits : 7
Stop bits : 1
>save
Saving settings...done
>
Set Terminal Echo
To show or set the terminal echo status, use the ECHO command.
ECHO [ON/OFF]<cr>
NOTE
40 ___________________________________________________________________ M211024EN-C
Remember to save the changes!
Examples:
>echo
Echo : ON ?
>
>echo on
Echo : ON
>save
Saving settings...done
>
Page 43

Chapter 4 _________________________________________________________________ Operation
where
nn = address (0 ... 99)
Remember to save the changes!
where
xxx
=
STOP, RUN, or POLL
Set Module Address
To operate in the POLL mode, the module must have an address. If
multiple modules share the same serial line, each module must have a
different address.
For a description of the serial interface modes, see section Set Serial
Interface Mode below.
ADDR [nn]<cr>
NOTE
Example:
>addr 1
Address : 1
>save
Saving settings...done
>
Set Serial Interface Mode
Use the SMODE command to show or set the serial interface mode. Note
that a separate SAVE command is not needed to store the new serial
interface mode setting.
SMODE [xxx]<cr>
In STOP mode: outputting only when command is issued, any command
can be used.
VAISALA ________________________________________________________________________ 41
In RUN mode: outputting automatically, only command S can be used.
In POLL mode: outputting only when command is issued, any command
can be used after the line has been opened using the OPEN command.
Page 44

User's Guide _______________________________________________________________________
where
x.xxxx
=
Absolute pressure in the measuring environment.
The default is 1.013. The pressure unit is bar.
The polling mode can be used when more than one module is connected
to one serial bus. When set to POLL state, the modules communicate one
at a time when the specific module address is called on the serial line.
See descriptions of the commands ADDR on page 41 and OPEN on
page 48.
Examples:
>smode stop
Output mode : STOP
>
>smode run
Output mode : RUN
>
>smode poll
Output mode : POLL
>
Configuring Measurement Parameters
Set Environmental Compensation Values
Use the ENV command to show or set the environmental compensation
values. In HMM100, the humidity measurement can be compensated for
ambient pressure. The value set using ENV command is a permanent
value which will survive a restart. Use the command XPRES instead if
the value is changed frequently; see section Set Temporary Pressure
Compensation Value on page 43.
ENV [x.xxxx]<cr>
Example:
>env
Pressure (bar) : 1.013
>
>env 0.980
Pressure (bar) : 0.98
>save
Saving settings...done
>
42 ___________________________________________________________________ M211024EN-C
Page 45

Chapter 4 _________________________________________________________________ Operation
You can use the Vaisala Humidity Calculator to simulate the effect of
pressure change to dewpoint. The Humidity Calculator can be found at:
www.vaisala.com/humiditycalculator
where
x.xxxx
=
Absolute pressure in the measuring environment.
The pressure unit is bar.
Remember to s
NOTE
Set Temporary Pressure Compensation Value
Use the XPRES command to show or set the temporary ambient pressure
value for pressure compensation. This value is cleared to 0.0 at reset.
XPRES [x.xxxx]<cr>
NOTE
ave the changes!
Example:
>xpres
Pressure (bar) : 0
>
>xpres 1.029
Pressure (bar) : 1.029
>save
Saving settings...done
>
VAISALA ________________________________________________________________________ 43
Page 46

User's Guide _______________________________________________________________________
where
mode
=
Analog output mode. Modes for 3-wire output model:
0..1V
0..5V
0..10V
0..20
4..20mA
Modes for 2
4..20
Configuring Analog Output
Set Analog Output Mode
Use the AMODE command to show or set the operation mode of the
analog output. This command is only useful with the 3-wire output
module, as the output on the 2-wire model is always 4 ... 20 mA (loop
powered).
NOTE
NOTE
If you change the analog output mode, you must calibrate the new mode
using the ACAL command. See section Calibrate Analog Output on page
39.
AMODE [mode]<cr>
mA
-wire output model:
mA
Remember to save the changes!
Example (show current mode):
>amode
Ch1 : 0..10V
>save
Saving settings...done
>
Example (set mode to 0...20 mA):
>amode 0..20ma
Ch1 : 0..20MA
>save
Saving settings...done
>
44 ___________________________________________________________________ M211024EN-C
Page 47

Chapter 4 _________________________________________________________________ Operation
Where
xx = Analog channel output quantity
low
=
Low limit of scaling
high
=
High limit of scaling
Remember to save the changes!
Select Analog Output Quantity and Scaling
Use the ASEL command to show or select the quantity output by the
analog channels, and the scaling that is used. If you do not enter scaling
limits, default values are used.
ASEL [xx] [low high]<cr>
NOTE
Examples:
>asel
Quantity : RH
Level Lo : 0
Level Hi : 100
>save
Saving settings...done
>
>asel td
Quantity : TD
Level Lo : -40
Level Hi : 60
>save
Saving settings...done
>
>asel td -10 60
Quantity : TD
Level Lo : -10
Level Hi : 60
>save
Saving settings...done
>
VAISALA ________________________________________________________________________ 45
Test the Analog Output
Use the ATEST command to test the analog output. The ATEST
command will force the output to the given value, which can then be
measured with a calibrated multimeter. The command uses the currently
Page 48

User's Guide _______________________________________________________________________
where
xxx
=
Analog channel output value (V or mA)
selected analog output mode (voltage or current) so you do not have to
specify the unit.
Before testing, check the currently set analog output mode using the
AMODE command. After testing the output, give the ATEST command
again to exit the test mode.
ATEST [xxx]<cr>
Example:
>atest 2.5
2.500000, 587f
>
>atest
>
46 ___________________________________________________________________ M211024EN-C
Page 49

Chapter 4 _________________________________________________________________ Operation
where
passcode
=
Use "1300" to enable the advanced commands.
Other Commands
Display Command List
Use the HELP command to display a list of the currently available
commands. If the PASS command has not been used, only the basic
commands are available.
HELP<cr>
Enable Advanced Commands
Use the PASS command to enable the advanced commands.
PASS [passcode] <cr>
Example:
>pass 1300
>
Display the Currently Active Errors
Use the ERRS command to display the currently active error codes. For
troubleshooting active errors, see Table 9 on page 62.
ERRS<cr>
Example (no active errors):
>errs
No errors.
>
VAISALA ________________________________________________________________________ 47
Page 50

User's Guide _______________________________________________________________________
where
aa = address (0 ... 99)
Connecting to the Module in POLL Mode
Use the OPEN command to connect to a module that is in POLL mode.
OPEN [aa]<cr>
Example:
>open 1
HMM100: 1 line opened for operator commands
>
Closing the Connection in POLL Mode
The CLOSE command closes the connection to the module.
NOTE
CLOSE<cr>
Example:
>close
line closed
>
Save Changed Settings
Use the SAVE command to save changed settings to the module
memory. Most settings have to be saved or the changes are lost at the
next reset or power down.
The SMODE command saves the new serial mode immediately;
a separate SAVE command is not needed.
SAVE<cr>
Example:
>save
Saving settings...done
>
48 ___________________________________________________________________ M211024EN-C
Page 51

Chapter 4 _________________________________________________________________ Operation
Restore Saved Settings
Use the RESTORE command to restore saved settings to the module.
All unsaved changes will be lost.
RESTORE<cr>
Example:
>restore
Restoring default settings...done
>
Reset the Module
Use the RESET command to reset the module. Upon reset or power-up,
the module? enters the serial mode that has been set with the SMODE
command.
RESET<cr>
Example (module set to serial mode STOP, will output module software
version at reset):
>reset
HMM100 / VAISALA / 1.1.10.3031
>
Restore Factory Settings
Use the FRESTORE command to restore the factory settings to the
module. All user settings, including the analog output mode and userperformed calibration corrections, will be lost. The module will revert
back to the factory calibrated settings.
FRESTORE<cr>
Example:
>frestore
Restoring factory defaults...done
>
VAISALA ________________________________________________________________________ 49
Page 52

User's Guide _______________________________________________________________________
This page intentionally left blank.
50 ___________________________________________________________________ M211024EN-C
Page 53

Chapter 5 _______________________________________________________________ Maintenance
Replacing
normal operation. If the accuracy of the
within specification,
calibration and adjustment, and not sensor replacement. Refer to
Calibration
CHAPTER 5
MAINTENANCE
This chapter provides information that is needed in basic maintenance of
the HMM100.
Changing the Filter
The filter on the probe should be replaced when it is damaged or dirty.
Do not attempt to clean the filter using compressed air, solvents, or
mechanical action. Wiping the filter may block its pores and/or deposit
residue on the filter.
1. Turn the filter counter-clockwise to loosen it.
2. Remove the filter from the probe. Be careful not to touch the
sensors with the filter. Without the filter in place, the sensors are
easily damaged – handle the probe carefully.
3. Check that the O-ring is undamaged and in place.
4. Install a new filter on the probe, and tighten it so it is finger-tight.
Make sure the filter sits straight and meets the threads properly.
New filters can be ordered from Vaisala. For available filters, see section
Filter Types on page 14. The order codes of the filters are listed in
section Options and Accessories on page 68.
Changing the Sensor
The user can replace the HUMICAP180R sensor with a new one. The
new sensor must be of the HUMICAP180R type. Do not attempt to use a
different sensor type.
NOTE
the sensor is repair maintenance, and it is not necessary in
it is more likely that the module is in need of
on page 53.
module does not seem to be
section
VAISALA ________________________________________________________________________ 51
Page 54

User's Guide _______________________________________________________________________
The following numbers refer to Figure 16 above:
1 = The HUMICAP 180R sensor
2 = Pt1000 sensor (do not touch)
1. Remove the filter from the probe by turning it counter-clockwise.
2. Remove the damaged sensor and insert a new one. Handle the new
sensor by the plastic socket. DO NOT TOUCH THE SENSOR
PLATE.
3. Perform a calibration and adjustment using the CRH command as
instructed in section Humidity Calibration (CRH) on page 58.
4. Attach a new filter on the probe. When using the stainless steel
filter, take care to tighten the filter properly (recommended force
5 Nm).
Figure 16 Changing the Sensor
1209-033
52 ___________________________________________________________________ M211024EN-C
Page 55

Chapter 5 _______________________________________________________________ Maintenance
If you have changed the HUMICAP® sensor, center the trimmers, and
perform
You can only calibrate the humidity measurement (RH)
measurement (T)
values.
Calibration
The recommended calibration interval is one year. You should also
perform a calibration if the HMM100 does not appear to be within the
specified accuracy.
The HMM100 can be adjusted in two ways:
- Using the onboard trimmers. This method requires no serial
connection, only a small Phillips head screwdriver and a suitable
humidity reference. The trimmers can adjust up to ± 5% of reading.
- Using serial commands. This method requires a connection to the
service port of the HMM100 module. For this, you need the USB
cable (Vaisala order code: 226068) and a PC with a terminal
application. You also need a humidity reference and a Phillips head
screwdriver for zeroing the trimmers.
As a humidity reference, you can use, for example, the Vaisala Humidity
Calibrator HMK15.
NOTE
NOTE
Installing the probe properly will also help with the calibration. Ideally
the probe should be placed completely in the environment, with enough
cable to prevent heat conduction, and to allow the probe to be moved
during calibration (placed in the HMK15 calibrator, for example).
a calibration and adjustment using the serial command CRH.
and temperature
. The module calculates the dewpoint using RH and T
VAISALA ________________________________________________________________________ 53
Page 56

User's Guide _______________________________________________________________________
Calibration and Adjustment Using Trimmers
HMM100 series modules have two trimmers mounted on the component
board. These trimmers allow for easy adjustment of the offset and gain of
the humidity measurement.
The modules are shipped with the trimmers centered. Turning the
trimmer counter-clockwise will decrease the offset or gain, and turning
clockwise will increase it. The adjustment range is ± 5% for both offset
and gain.
Offset correction requires a < 50 %RH reference. Offset and gain
correction requires additionally a > 50 %RH reference, with over 30
%RH difference between the two points.
NOTE
The trimmers will only turn 135 degrees each way, less than half a
rotation. Do not force the trimmer past the stopping point.
0905-045
Figure 17 Trimmers for Offset and Gain
The procedure on page 55 provides an example adjustment of offset and
gain using the Vaisala Humidity Calibrator HMK15, which is a saturated
salt calibrator. It is assumed that the module is powered and you can
measure the analog output reading.
NOTE
54 ___________________________________________________________________ M211024EN-C
For best results, use the ACAL command to calibrate the currently active
analog output mode before using the trimmers. For instructions on how
to do this, see section Calibrate Analog Output on page 39.
Page 57

Chapter 5 _______________________________________________________________ Maintenance
It i
output reading. Note that the USB cable does not supply operation power
to the module. You must power it normally through the screw terminals.
For detailed information on using the service port, USB cable, and the
serial line commands, see
1. Note the current position of the trimmers.
2. Insert the probe in the LiCl salt chamber of the humidity calibrator
(11 %RH), and wait for 20 – 40 minutes for the reading to stabilize.
3. If necessary, adjust the offset trimmer using a small Phillips head
screwdriver to achieve the output reading that corresponds to
11 %RH.
For 4 ... 20 mA output, the reading should be 5.76 mA.
For 0 ... 5 V output, the reading should be 0.55 V.
4. Insert the probe in the NaCl salt chamber (75 %RH) and wait for
the reading to stabilize.
5. If necessary, adjust the gain trimmer to achieve the output reading
that corresponds to 75 %RH.
For 4 ... 20 mA output, the reading should be 16 mA.
For 0 ... 5 V output, the reading should be 3.75 V.
6. Optional: repeat steps 2 – 4 to check the adjustment result. If you
want to undo the adjustment, return the trimmers to their original
position.
Calibration and Adjustment Using Serial Line
The following provide steps for performing calibrations on the serial
line.
NOTE
NOTE
s assumed that the module is powered and you can measure the analog
Chapter 4 on page 27.
VAISALA ________________________________________________________________________ 55
Page 58

User's Guide _______________________________________________________________________
Temperature Calibration (CT)
The procedure below describes a temperature (T) measurement
calibration using serial line commands. You can use the procedure to do
a one-point calibration (offset) or a two-point calibration (offset and
gain). For two-point calibration, the second reference point must be at
least 20 ºC warmer than the first.
Temperature measurement is not controlled by the trimmers, so do not
adjust them during temperature calibration.
1. Connect the USB cable to the service port on the module, and to a
USB port on your PC.
2. Start a terminal application and set the correct connection settings.
The default serial settings are 19200 8 N 1. Remember to check
which COM port the USB cable is using.
3. Verify that the connection works by giving the ? command:
>?
If the module does not respond with device information:
- Check that the module is powered
- Try the ?? command in case the module is in POLL state, open the
line using OPEN command if necessary
- Check your serial line settings and cable connections
- Power off the module, unplug the USB cable, restart the terminal
application, and try again.
4. When your serial connection is working, use the L command to see
the current user adjustment parameters and the status of the
trimmers. Write down the T offset and gain values so you can
restore them manually using the LI command, if necessary.
>l
5. Use the ERRS command to see that no errors are active:
>errs
6. Use the PASS command to enable the advanced commands:
>pass 1300
7. Insert the probe in the temperature reference and wait for 20 – 40
minutes for the reading to stabilize.
56 ___________________________________________________________________ M211024EN-C
Page 59

Chapter 5 _______________________________________________________________ Maintenance
8. Give the CT command. The output from the command shows the
currently measured T value, and prompts you to enter the value of
the reference 1. This is the reference on the colder end, which
produces the offset correction for the measurement.
9. You now have three choices:
- To apply the correction, type the temperature of the reference in
degrees celcius and press ENTER.
- To exit the CT command without adjusting the measurement, press
the ESC key and exit this procedure.
- To refresh the measured value without typing in the correction,
press ENTER.
10. If you only want to perform a one-point calibration (offset
correction), press the ESC key after entering the correction. The
CT command will exit, and you can move to step 14.
>ct
T 21.9847 Ref1 ? 22
Press any key when ready
OK
>
To continue with the calibration of the warmer end (gain
correction), press ENTER.
11. Insert the probe in the second temperature refence and wait for 20 –
40 minutes for the reading to stabilize. The measurement reading
for the second point will appear when the measured temperature is
at least 20 ºC warmer than the first reference point.
12. Type the temperature of the second reference point and press
ENTER to apply the correction.
T 44.9847 Ref2 ? 45
OK
>
The CT command is now finished and both adjustments have been
applied.
13. Use the L command to verify that the new user adjustment
parameters are in use:
>l
14. Measure the value of the analog output to verify that the
measurement is OK.
VAISALA ________________________________________________________________________ 57
Page 60

User's Guide _______________________________________________________________________
Humidity Calibration (CRH)
Adjusting the capacitance measurement affects humidity measurement
accuracy across the entire temperature range. Take care when making
this adjustment.
CAUTION
Be sure to write down the current capacitance adjustment parameters
(visible with the L command) so that you can restore them manually if
necessary.
The procedure below provides a calibration procedure using the serial
line commands and the Vaisala Humidity Calibrator HMK15. You can
use the procedure to do a one-point calibration (offset) or a two-point
calibration (offset and gain).
- One-point calibration requires a < 50 %RH reference
- Two-point calibration requires additionally a > 50 %RH reference,
with over 30 %RH difference between the two points.
1. Connect the USB cable to the service port on the module, and to a
USB port on your PC.
2. Start a terminal application and set the correct connection settings.
The default serial settings are 19200 8 N 1. Remember to check
which COM port the USB cable is using.
3. Verify that the connection works by giving the ? command:
>?
If the module does not respond with device information:
- Check that the module is powered
- Try the ?? command in case the module is in POLL state, open the
line using OPEN command if necessary
- Check your serial line settings and cable connections
- Power off the module, unplug the USB cable, restart the terminal
application, and try again.
4. When your serial connection is working, use the L command to see
the current user adjustment parameters and the status of the
trimmers. Write down the Cp offset and gain values so you can
restore them manually using the LI command, if necessary.
>l
5. Use the ERRS command to see that no errors are active:
>errs
58 ___________________________________________________________________ M211024EN-C
Page 61

Chapter 5 _______________________________________________________________ Maintenance
6. Use the PASS command to enable the advanced commands:
>pass 1300
7. Turn both trimmers to zero using the Phillips head screwdriver, and
use the ZERO command to set their correction to exactly zero:
>zero
8. Insert the probe in the LiCl salt chamber of the humidity calibrator
(11 %RH), and wait for 20 – 40 minutes for the reading to stabilize.
9. Give the CRH command. The output from the command shows the
currently measured RH value, and prompts you to enter the value
of the reference 1. This is the reference on the dry end, which
produces the offset correction for the measurement.
>crh
RH: 10.97112003 Ref1 ?
10. You now have three choices:
- To apply the correction, type 11 and press ENTER (assuming you
are using the HMK15 and the LiCl salt).
- To exit the CRH command without adjusting the measurement,
press the ESC key and exit this procedure.
- To refresh the measured value without typing in the correction,
press ENTER.
11. If you only want to perform a one-point calibration (offset
correction), press the ESC key after entering the correction. The
CRH command will exit, and you can move to step 14.
RH: 11.0800360 Ref1 ? 11
Press any key when ready
>
To continue with the calibration of the wet end (gain correction),
press ENTER.
12. Insert the probe in the NaCl salt chamber (75 %RH) and wait for
20 – 40 minutes for the reading to stabilize.
13. Type 75 and press ENTER to apply the correction (assumes you are
using the HMK15 and the NaCl salt).
RH: 75.00134550 Ref2 ? 75
OK
>
The CRH command is now finished and both adjustments have
been applied.
VAISALA ________________________________________________________________________ 59
Page 62

User's Guide _______________________________________________________________________
14. Use the L command to verify that the new user adjustment
parameters are in use:
>l
15. Measure the value of the analog output to verify that the
measurement is OK.
60 ___________________________________________________________________ M211024EN-C
Page 63

Chapter 6 ____________________________________________________________ Troubleshooting
Analog Output
Mode
Default Error Level
Maximum Value
0 ... 1 V
0 V
2 V
0 ... 5 V
0 V
6 V
0 ... 10 V
0 V
12 V
0 ... 20 mA
0 mA
30 mA
4 ... 20 mA
3.8 mA
30 mA
If the error state voltage exceeds the normal output range, t
required
voltage to get one additional volt from the signal.
66
For example, for a 0 … 5 V output,
supply voltage.
CHAPTER 6
TROUBLESHOOTING
This chapter describes the analog output error notification behavior,
some common problems, their probable causes and remedies, and
provides contact information for technical support.
Analog Output Error Notification
If the module is unable to measure due to an error, the analog output will
be set to an error level. The error level depends on the currently selected
analog output mode; see Table 8 below.
NOTE
Table 8 Error Levels for Analog Output Modes
You can check the current status of the analog output via the serial
interface by using the STATUS command. You can also disable this
error notification behavior; see section Show Calibration Info on page 32.
he minimum
supply voltage is higher. As a rule, add one volt to the supply
See Table 10 on page
.
a 6 V error state needs an 11 V
VAISALA ________________________________________________________________________ 61
Page 64

User's Guide _______________________________________________________________________
Problem or Message
Likely Causes and Solutions
Measurement not working,
out of range
- Sensor(s) damaged or missing. Open the filter
Humidity measurement
- Check for condensation on the probe and
- Calibration is not done. Calibrate the module.
The following error is active:
- Sensor broken
command.
Measurement stops, with
(ATEST)
You are testing the analog output using ATEST
Serial line command not
command."
- Mistyped or unknown command
command first
Solving Typical Problems
You can check the error message via the serial interface by using the
ERRS command. In case of constant error, please contact Vaisala
technical support. See section Technical Support on page 63.
Table 9 Troubleshooting Table
any of the following errors
active:
- Temperature sensor open
circuit/not calibrated
- Humidity sensor open
circuit/not calibrated
- Temperature sensor values
appears to be wrong. The
following errors may be
active:
- RH reading too high
- RH reading too low
- Capacitance out of range
and check.
- Calibration is not done. Calibrate the module.
- Check the supply voltage of the module.
- Check the analog output mode using the
AMODE command.
sensor.
- Check that you are not applying temperature
compensation in the measurement system
(HMM100 has its own).
- Check for heat conduction through the cable.
Place more cable in the chamber if needed.
- Check the position of the trimmers.
- Use the L command to check the currently
applied calibration correction.
- Sensor disconnected
- Sensor pins twisted and touching
- Wrong sensor type inserted
- Sensor replaced but capacitance not adjusted.
Perform a humidity adjustment using CRH
following errors active:
- Analog output test on, no
measurements done
- MeasTask not calculating
working, outputs "Unknown
62 ___________________________________________________________________ M211024EN-C
command. This is normal; type ATEST to stop the
test and remove this error.
- Command not available without using the PASS
Page 65

Chapter 6 ____________________________________________________________ Troubleshooting
Problem or Message
Likely Causes and Solutions
Cannot connect to serial line,
Perform the following steps to connect:
1. Set your terminal settings to 19200 8 N 1 (the
Any of the following errors is
- Resistance measurement
Internal error. Perform the following steps:
current serial settings of the
module are unknown.
active:
- Program checksum error
- Parameter storage
checksum error
- Sensor coefficient checksum
error
- Current settings checksum
error
- Default settings checksum
error
- Log corrupted
default settings of the module).
2. Connect to the service port of the module.
2. Power up the module, and type "z" on the serial
line at least five times.
4. The module will come online with the default
settings, and with the text SERVICE MODE.
5. Use the SERI command to set the desired
serial settings, and use the SAVE command to
save them.
1. Reset or power cycle the module. Check if the
error is gone.
2. Return the module to factory settings using the
FRESTORE command. Check again.
3. If the error is still active, contact a Vaisala
service center.
Technical Support
Product Returns
For technical questions, contact the Vaisala technical support by e-mail at
helpdesk@vaisala.com. Provide at least the following supporting
information:
- Name and model of the product in question
- Serial number of the product
- Name and location of the installation site
- Name and contact information of a technically competent person who
can provide further information on the problem.
If the product must be returned for service, see www.vaisala.com/returns.
For contact information of Vaisala Service Centers, see
www.vaisala.com/servicecenters.
VAISALA ________________________________________________________________________ 63
Page 66

User's Guide _______________________________________________________________________
This page intentionally left blank.
64 ___________________________________________________________________ M211024EN-C
Page 67

Chapter 7 _____________________________________________________________ Technical Data
CHAPTER 7
TECHNICAL DATA
This chapter provides the technical data of the HMM100.
Specifications
Performance
Relative Humidity
Measurement range 0 ... 100 %RH
Accuracy (including non-linearity,
hysteresis, and repeatability)
Temperature range -20 ... +40 ºC (-4 ... +104 ºF)
0…90 %RH ±2 %RH
90…100 %RH ±3 %RH
Temperature range -40 ... -20 ºC (-40 ... -4 ºF),
+40 ... +180 ºC (+104 ... +356 ºF)
0…90 %RH ±2.5 %RH
90…100 %RH ±3.5 %RH
Factory calibration uncertainty (+20 °C) ±1.5 %RH
Humidity sensor Vaisala HUMICAP 180R
Dewpoint Temperature
Measurement range -20 ... +100 ºC (-4 ... +212 ºF) Td
Accuracy (including non-linearity,
hysteresis, and repeatability) when
dewpoint depression <20 °C
(Ambient temperature - dew point) ±2 °C T
VAISALA ________________________________________________________________________ 65
d
Page 68

User's Guide _______________________________________________________________________
Output DC
Supply
Voltage DC
Supply
Voltage AC
Load
Resistance
Typ. Current
Consumption
Max. Current
Consumption
0 ... 1 V
10 ... 35 VDC
9 ... 24 VAC
≥ 10 kΩ
6 mA
10 mA
0 ... 5 V
10 ... 35 VDC
9 ... 24 VAC
≥ 10 kΩ
6 mA
10 mA
0 ... 10 V
15 ... 35 VDC
14 ... 24 VAC
≥ 10 kΩ
6 mA
10 mA
0 ... 20 mA
10 ... 35 VDC
9 ... 24 VAC
0 Ω
6 ... 26 mA*
10 ... 30 mA*
0 ... 20 mA
20 ... 35 VDC
17 ... 24 VAC
500 Ω
6 ... 26 mA*
10 ... 30 mA*
Operating Environment
Operating temperature range
Component board -5 ... +55 ºC (+23 ... +131 ºF)
Plastic probe -70 ... +180 ºC (-94 ... +356 ºF)
Stainless steel probe -70 ... +180 ºC (-94 ... +356 ºF)
Plastic grid filter -20 ... +80 ºC (-4 ... +176 ºF)
Membrane filter -20 ... +80 ºC (-4 ... +176 ºF)
Porous PTFE filter -70 ... +180 ºC (-94 ... +356 ºF)
Stainless steel sintered filter -70 ... +180 ºC (-94 ... +356 ºF)
Probe mounting flange -70 ... +180 ºC (-94 ... +356 ºF)
Electromagnetic compatibility Complies with EMC standard EN61326-1,
light industrial level
Inputs and Outputs
Analog output types (1 output selectable)
2-wire model 4 ... 20 mA (loop powered)
3-wire model 0 ... 20 mA, 0 ... 1V/5V/10V
Service port M8 connector for USB cable
Operating voltage
2-wire model 24 VDC with 800 ohm load resistance
(see Figure 18 on page 67).
3-wire model 10 ... 35 VDC or 19.2 ... 28.8 VAC
15 ... 35 VDC or 19.2 ... 28.8 VAC
when 0 ... 10 V output is used.
Typical power consumption 6 mA, see Table 10 below.
Table 10 HMM100 3-wire Model Current Consumption
66 ___________________________________________________________________ M211024EN-C
* Current consumption depends on the output current.
Page 69

Chapter 7 _____________________________________________________________ Technical Data
1210-006
Figure 18 Loop Supply Voltage Versus Loop Resistance
Mechanics
Service cable connector M8 series 4-pin (male)
Wire size for screw terminals 0.5 ... 1.5 mm
Probe cable lengths
Plastic probe 0.65 m, 1.55 m, 2.9 m
Stainless steel probe 1.55 m, 2.9 m
Materials
Plastic probe PPS
Stainless steel probe AlSI316/PPS
Probe mounting clamp AISI316
Probe mounting flange Silicone/ AISI316
Mounting bracket bottom plate Al
Mounting bracket lid ABS/PC
Module housing ABS/PC
2
VAISALA ________________________________________________________________________ 67
Page 70

User's Guide _______________________________________________________________________
Description
Item code
Humidity sensor
HUMICAP180R
Membrane filter
10159HM
Plastic grid filter
6221
Porous PTFE filter
219452SP
Stainless steel sintered filter
HM47280SP
Catalytic VHP filter
231865
Mounting bracket with lid
225979
Module housing (IP65)
226060
Probe mounting flange
226061
Probe mounting clamp set (10 pcs)
226067
USB cable
226068
Options and Accessories
68 ___________________________________________________________________ M211024EN-C
Page 71

*M211024EN*
www.vaisala.com
 Loading...