

Page 1
V2 S.p.A.
Corso Principi di Piemonte, 65/67
12035 RACCONIGI (CN) ITALY
tel. +39 01 72 81 24 11 - fax +39 01 72 84 050
info@v2home.com - www.v2home.com
WALLY-R
IL n. 166
EDIZ. 06/12/2010
Fig. 1
Page 2
Il nuovo ricevitore supereterodina garantisce sempre un corretto
funzionamento in ambienti disturbati: la buona sensibilità e l’alta
selettività lo rendono immune ai disturbi presenti nell’intorno
della frequenza di ricezione.
Il nuovo sistema di programmazione ad autoapprendimento,
ITALIANO
permette la memorizzazione dei trasmettitori della serie ROYAL e
ROYAL PLUS.
PROGRAMMAZIONE
Il sistema di programmazione ad autoapprendimento permette la
memorizzazione del codice e l’impostazione dei seguenti modi di
funzionamento:
MONOSTABILE: attiva il relè corrispondente per tutto il tempo
di trasmissione del trasmettitore; quando la trasmissione si
interrompe il relè si disattiva automaticamente.
BISTABILE: attiva il relè corrispondente con la prima trasmissione
del trasmettitore, il relè si disattiva con la seconda trasmissione.
PROGRAMMAZIONE DELLA FUNZIONE
TIMER
Per memorizzare la funzione TIMER sul primo canale procedere
come segue:
1. Impostare sul dip switch del trasmettitore il codice desiderato.
2. Premere e tenere premuto il tasto SW1 del ricevitore:
il led L1 (relativo al primo canale) si accende per qualche
secondo.
3. Quando il led L1 si spegne, rilasciare il tasto SW1. Il led L1
comincia una serie di lampeggi a bassa velocità (1 Iampeggio
al secondo). Il numero di lampeggi corrisponde ad un tempo
impostabile come indicato nella tabella.
4. Contare il numero di lampeggi del led L1 corrispondente al
tempo che si desidera impostare, quindi premere il tasto del
ricevitore durante il lampeggio desiderato: la serie di
ampeggi si interrompe e il led L1 rimane acceso.
l
5. Entro 5 secondi premere e tenere premuto il tasto del
trasmettitore: lo spegnimento del led L1 del ricevitore indica
che il codice è stato memorizzato correttamente.
TIMER: la trasmissione del telecomando attiva il relè
corrispondente il quale si disattiva dopo il tempo impostato (max
7,5 minuti).
PROGRAMMAZIONE DELLA FUNZIONE
MONOSTABILE
Per entrare nella programmazione procedere come segue:
1. Impostare sul dip switch del trasmettitore il codice desiderato.
2. Premere e rilasciare il pulsante SW1 del ricevitore per N volte
come indicato nella seguente tabella, al fine di selezionare il
canale che si desidera programmare con la funzione
monostabile.
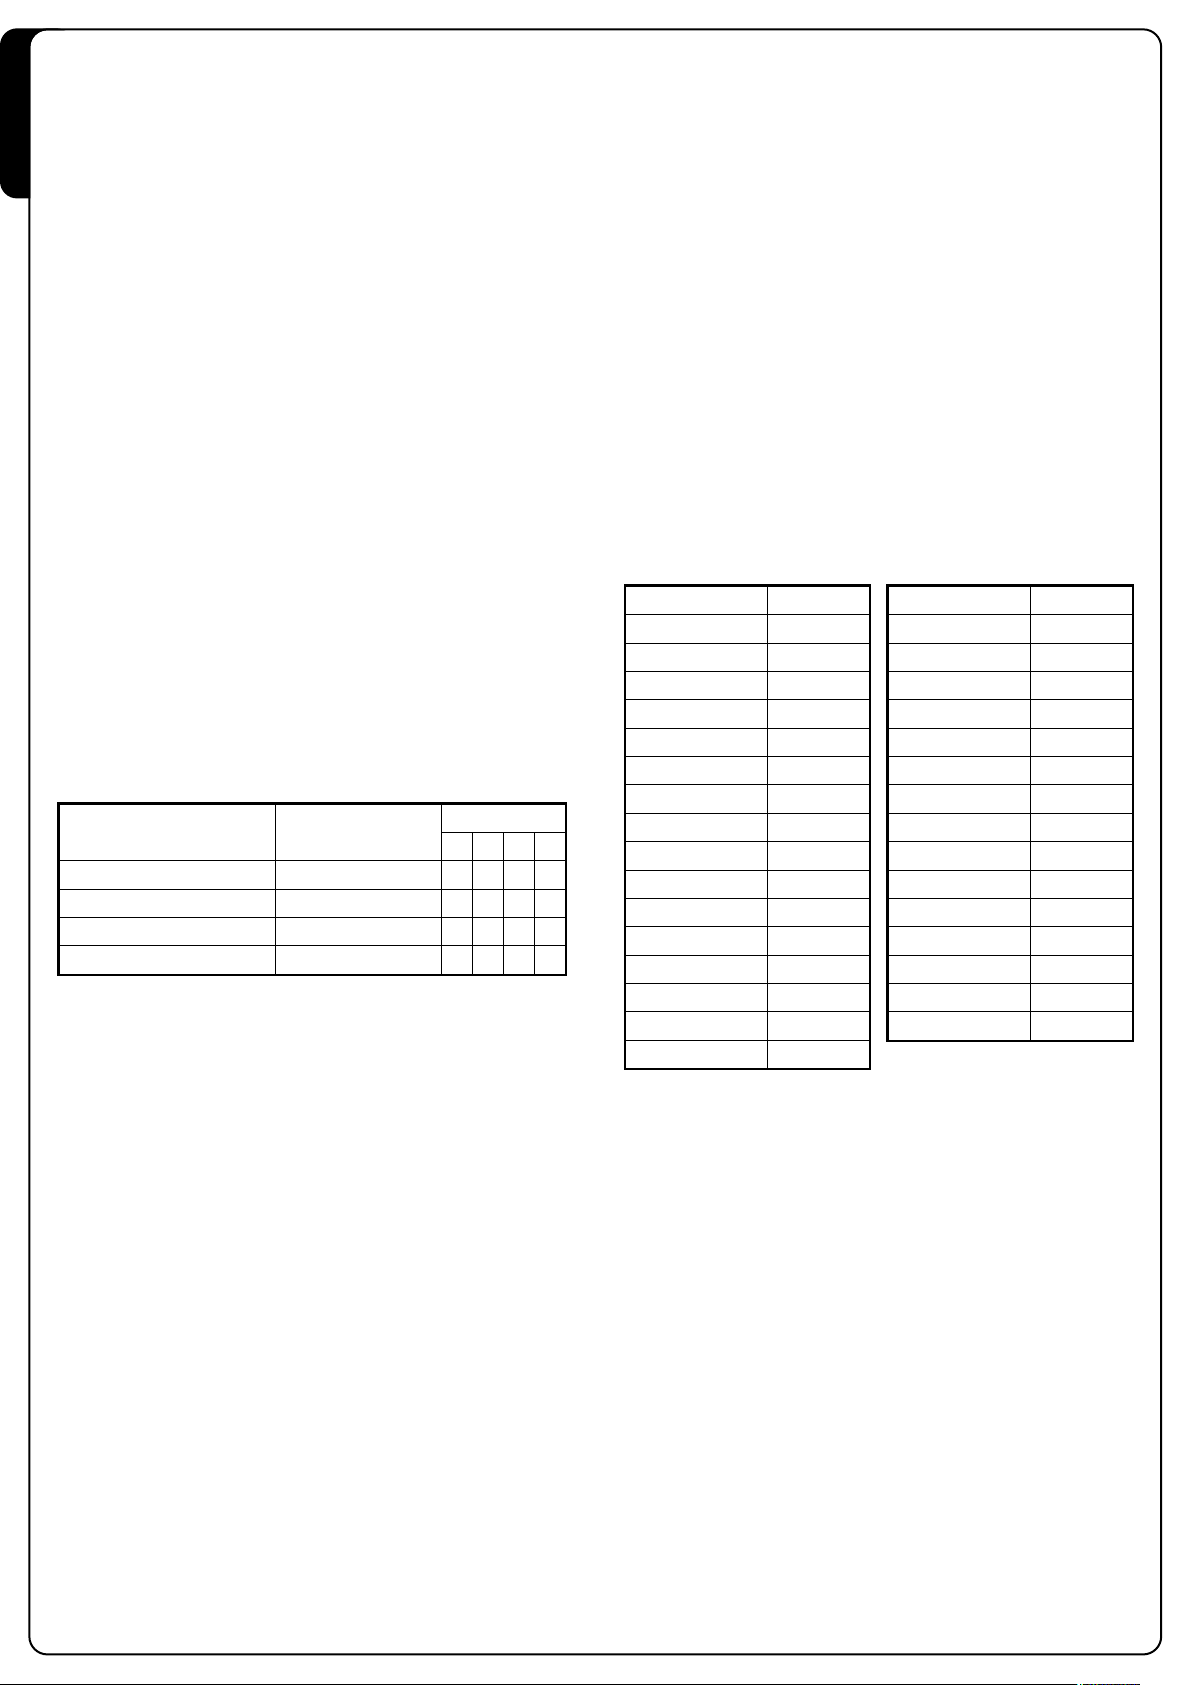
CANALE SELEZIONATO N°IMPULSI SW1
CANALE 1 MONOSTABILE 1
CANALE 2 MONOSTABILE 2
CANALE 3 MONOSTABILE 3
CANALE 4 MONOSTABILE 4
3. Premere e tenere premuto il tasto del trasmettitore:
lo spegnimento del led del ricevitore indica che il codice
inviato è stato memorizzato correttamente.
LED ACCESO
L1 L2 L3 L4
•
•
•
•
Per programmare i canali 2,3 e 4 ripetere i passi 2,3,4 sopra
citati, tenendo come riferimento i led L2,L3 o L4 a seconda
del canale selezionato.
N° Lampeggi Tempo
1 01 sec.
2 02 sec.
3 03 sec.
4 04 sec.
5 05 sec.
6 06 sec.
7 07 sec.
8 08 sec.
9 09 sec.
10 10 sec.
11 11 sec.
12 12 sec.
13 13 sec.
14 14 sec.
15 15 sec.
16 30 sec.
N° Lampeggi Tempo
17 1 min.
18 1,5 min.
19 2 min.
20 2,5 min.
21 3 min.
22 3,5 min.
23 4 min.
24 4,5 min.
25 5 min.
26 5,5 min.
27 6 min.
28 6,5 min.
29 7 min.
30 7,5 min.
31 BISTABILE
IMPORTANTE: per memorizzare correttamente il codice è
necessario mantenere una distanza minima di 1,5 metri tra
il trasmettitore e l’antenna del ricevitore.
PROGRAMMAZIONE DELLA FUNZIONE
BISTABILE
Per memorizzare la funzione bistabile sul primo canale procedere
come segue:
1. Impostare sul dip switch del trasmettitore il codice desiderato.
2. Premere e tenere premuto il tasto SW1 del ricevitore :
il led L1 (relativo al primo canale) si accende per qualche
secondo.
3. Quando L1 si spegne, rilasciare il tasto SW1; L1 comincia una
serie di lampeggi a bassa velocità (1 Iampeggio al secondo).
Terminati i 30 lampeggi della funzione timer, il led L1 rimane
acceso.
4. Entro 5 secondi premere e tenere premuto il tasto del
trasmettitore: lo spegnimento del led L1 del ricevitore indica
che il codice inviato è stato memorizzato correttamente.
Per programmare i canali 2,3 e 4 ripetere i passi 2,3,4 sopra
citati, tenendo come riferimento i led L2,L3 o L4 a seconda
del canale selezionato.
Page 3
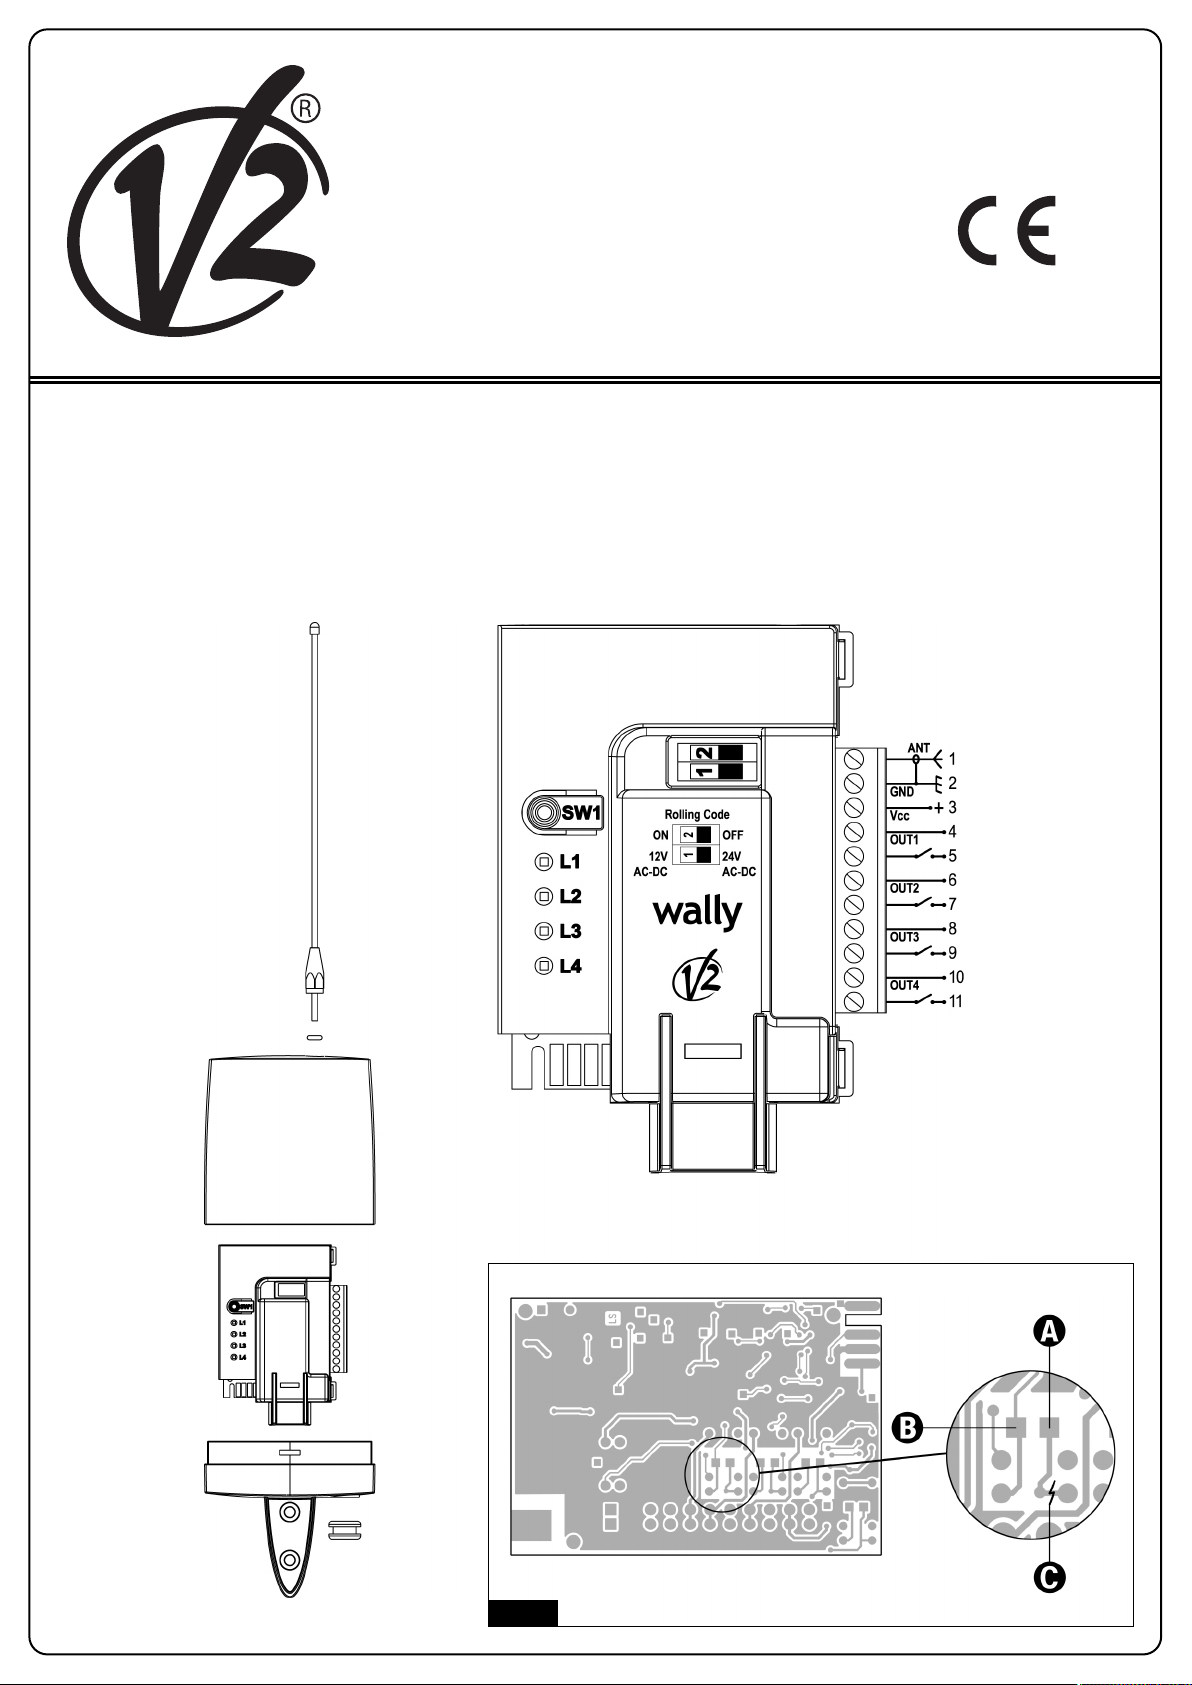
CONTATTI RELÉ
I contatti alla morsettiera relativi ai quattro relè sono del tipo
normalmente aperto; è possibile modificare il contatto alla
morsettiera desiderato affinché funzioni come contatto
normalmente chiuso: cortocircuitare il punto A con il punto B e
tagliare la pista nel punto C (Fig.1).
ATTENZIONE! Se ALIMENTATE IL RICEVITORE CON
24 VAC-VDC, non attivate più di 2 relè
contemporaneamente
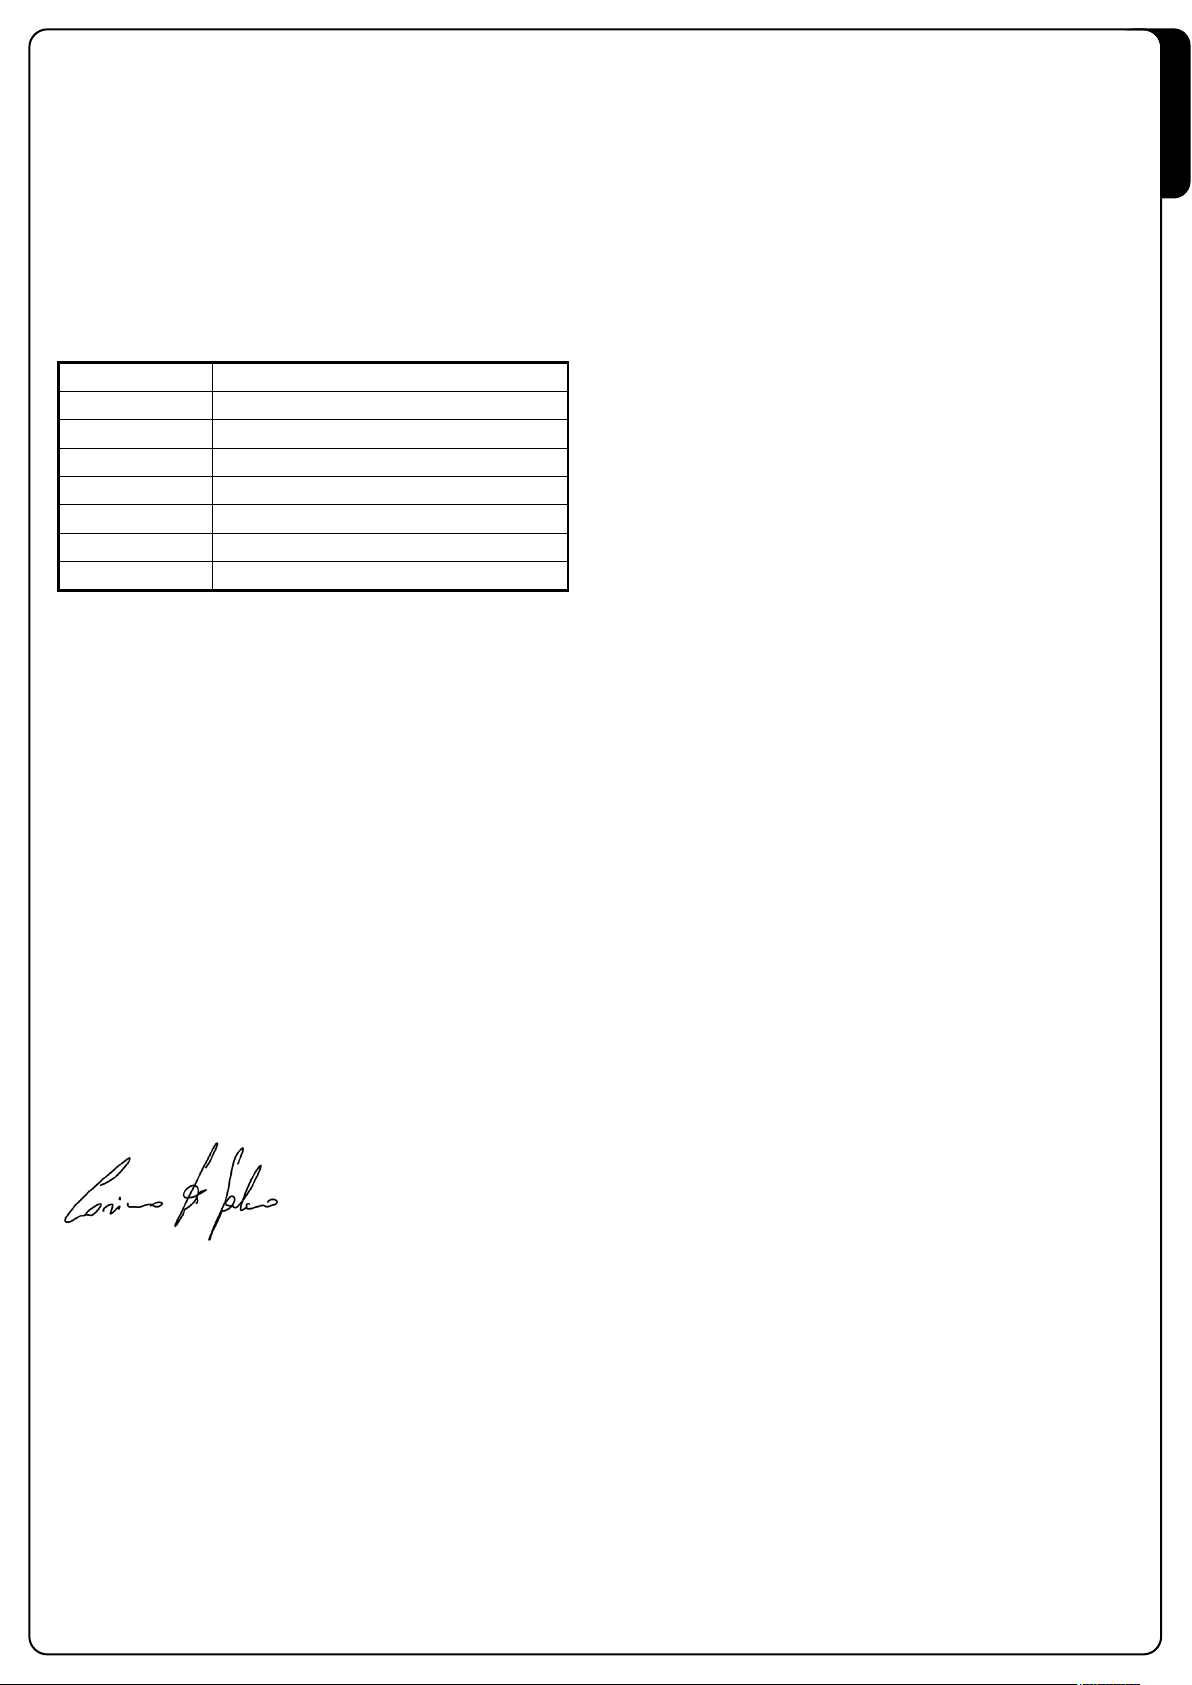
CARATTERISTICHE TECNICHE
Alimentazione 12 Vac/dc (DIP 1 ON) / 24 Vac/dc (DIP 1 OFF)
Contatti relè 1A / 30Vdc
emperatura
T
Consumo 17mA stand by
Sensibilità ≥ -103 dBm
S/N > 17dB @ 100dBm m=100%
Dimensioni 132 x 26 x 74 mm
Protezione IP55
20 ÷ +60°C
-
ITALIANO
AVVERTENZE
Questa apparecchiatura è conforme alla norme FCC Part 15. La
messa in servizio è oggetto delle seguenti due condizioni: (1)
questa apparecchiatura non può causare interferenze dannose e
(2) ammette ogni interferenza ricevuta, incluse interferenze che
possono causare operazioni indesiderate. Cambiamenti o
modifiche non espressamente approvate dal detentore del
certificato di compatibilità alle norme possono invalidare il diritto
del utente all'utilizzo dell'apparecchiatura.
CONFORMITA’ ALLA DIRETTIVA 99/05/CE
I ricevitori modello WALLY-R sono conformi ai requisiti essenziali
fissati dalla Direttiva 99/05/CE. Sono state applicate le seguenti
Norme tecniche per verificarne la conformità:
EN 60950-1, EN 301 489-1, EN 301 489-3, EN 300 220-3
Racconigi, 12/01/2010
Il rappresentante legale della V2 SPA
Cosimo De Falco
Page 4
The new superheterodyne receiver always guarantees a correct
functioning in disturbed environments: its good sensitivity and
high selectivity make it immune from most disturbances around
the frequency reception area.
The new self-learning programming system enables the
memorization of the ROYAL and ROYAL PLUS series transmitters.
PROGRAMMING
The self-learning programming system enables the code
memorization and the setting of the following functioning
modes:
ENGLISH
MONOSTABLE: it activates the corresponding relay through the
time of tx transmission. When the transmission stops, the relay
goes automatically off.
ISTABLE: it activates the corresponding relay on the first tx
B
transmission. The relay goes off on the second transmission.
TIMER: the tx transmission activates the corresponding relay
which goes off after the set time (max 7,5 minutes).
PROGRAMMING OF THE TIMER FUNCTION
To memorize the TIMER function on the first channel, proceed as
follows:
1. Set any code on the transmitter dip switches.
2. Press and keep pressed the SW1 button of the receiver :
the led L1 (relating to the first channel) lights up for a few
seconds.
3. When led L1 goes off, release the SW1 button. Led L1 starts
a sequence of flashings at low speed (1 flash per second).
The number of flashing corresponds to the time which can
be set as shown in the table.
4. Count the number of led L1 flashings corresponding to the
time you wish to set. Press the rx button SW1 during the
wished flashing: the sequence of flashings stops and led L1
remains on.
5. Press and keep pressed the transmitter button within
5 seconds: if the receiver led L1 goes off, it means the
ransmitted code has been correctly memorized.
t
To programme channels no. 2, 3 and 4, repeat the above
mentioned steps no. 2, 3 and 4, taking into consideration
leds L2, L3 or L4 in accordance with the selected channel.
PROGRAMMING OF THE MONOSTABLE
FUNCTION
To start programming, please proceed as follows:
1. Set the wished code on the tx dip switches.
2. Press and release the SW1 rx button for a number of times as
shown in the following table, in order to select the channel
you wish to program with monostable function.
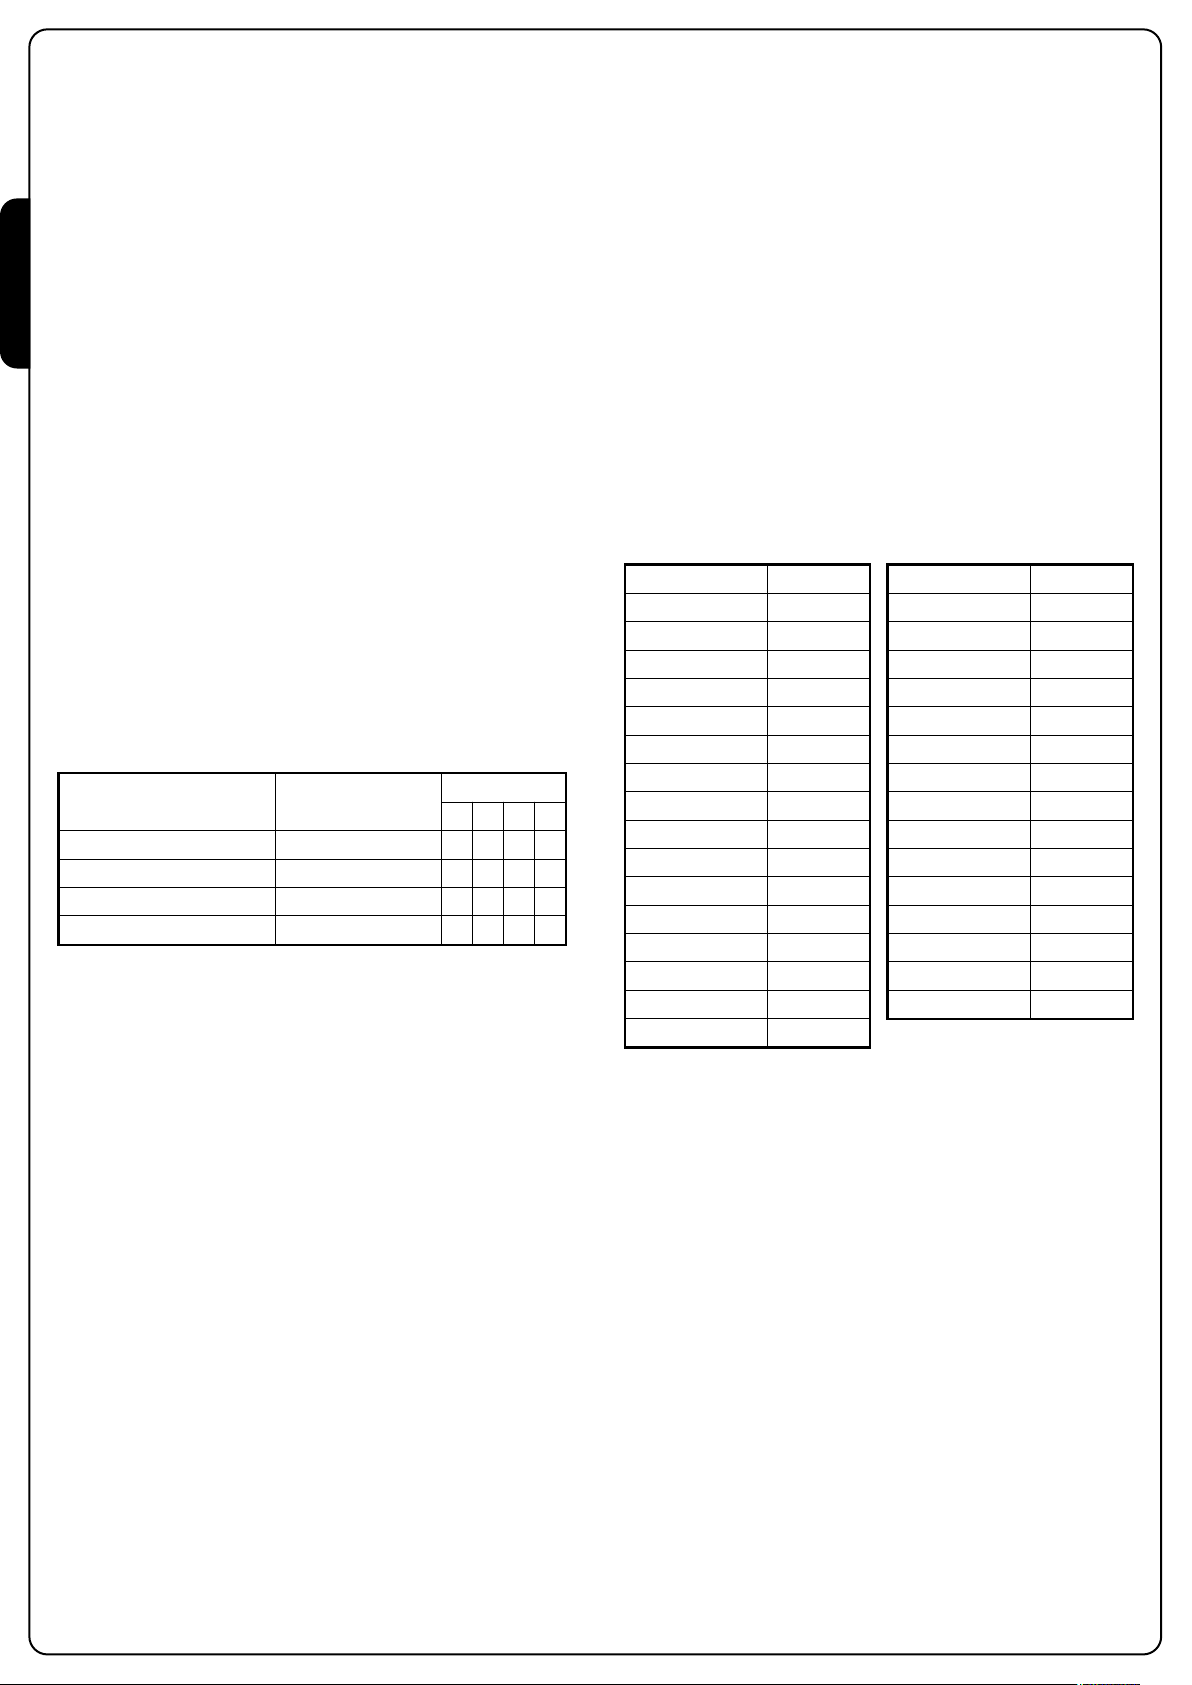
SELECTED CHANNEL N°IMPULSES SW1
CHANNEL 1 MONOSTABLE 1
CHANNEL 2 MONOSTABLE 2
CHANNEL 3 MONOSTABLE 3
CHANNEL 4 MONOSTABLE 4
3. Press and keep pressed the transmitter button: if the receiver
led goes off, it means the transmitted code has been
correctly memorized.
IMPORTANT: to memorize the code in the correct way it is
necessary to keep a minimum distance of 1,5 metres
between the transmitter and the receiver's antenna.
LED ON
L1 L2 L3 L4
•
•
•
•
N° Flashing Time
1 01 sec.
2 02 sec.
3 03 sec.
4 04 sec.
5 05 sec.
6 06 sec.
7 07 sec.
8 08 sec.
9 09 sec.
10 10 sec.
11 11 sec.
12 12 sec.
13 13 sec.
14 14 sec.
15 15 sec.
16 30 sec.
N° Flashing Time
17 1 min.
18 1,5 min.
19 2 min.
20 2,5 min.
21 3 min.
22 3,5 min.
23 4 min.
24 4,5 min.
25 5 min.
26 5,5 min.
27 6 min.
28 6,5 min.
29 7 min.
30 7,5 min.
31 BISTABLE
PROGRAMMING OF THE BISTABLE
FUNCTION
To memorize the bistable function on the first channel, proceed
as follows:
1. Set the wished code on the transmitter dip switches.
2. Press and keep pressed the receiver SW1 button : led L1
(relating to the first channel) lights up for a few seconds.
3. When led L1 goes off, release SW1 button; led L1 starts
flashing at low speed (1 flash per second). When the 30
flashings of the timer function are over, led L1 remains on.
4. Press and keep pressed the transmitter button within
5 seconds: if led L1 goes off it means the transmitted code
has been memorized in the correct way.
To programme channels no. 2, 3 and 4, repeat the above
mentioned steps no. 2, 3 and 4, taking into consideration
leds L2, L3 or L4 in accordance with the selected channel.
Page 5

RELAY CONTACT
The four output relay contacts are normally open type; it is
possible to change it as normally closed type. Refering to fig. 1
connect point A with point B and cut the trace at point C (Fig.1).
WARNING! IF THE RECEIVER IS SUPPLIED BY 24 VAC-VDC,
DO NOT ACTIVE MORE THAN 2 RELAYS SIMULTANEOUSLY
TECHNICAL DATA
Power supply 12 Vac/dc (DIP 1 ON) / 24 Vac/dc (DIP 1 OFF)
elay contacts
R
Temperature -20 ÷ +60°C
onsumption
C
Sensibility ≥ -103 dBm
S/N > 17dB @ 100dBm m=100%
Size 132 x 26 x 74 mm
Protection degree IP55
A / 30Vdc
1
7mA stand by
1
IMPORTANT REMARKS
"This device complies with Part 15 of the FCC Rules. Operation is
subject to the following two conditions: (1) this device may not
cause harmful interference, and (2) this device must accept any
interference received, including interference that may cause
undesired operation."
"Changes or modifications not expressly approved by the party
responsible for compliance could void the user's authority to
operate the equipment."
ENGLISH
99/05/CE DIRECTIVE CONFORMITY
The WALLY-R are in conformity with the provisions of the
following EC directive(s) (including all applicable amendments)
and that the standards referenced here below:
EN 60950-1, EN 301 489-1, EN 301 489-3, EN 300 220-3
Racconigi, 12/01/2010
V2 SPA legal representative
Cosimo De Falco
Page 6

Le récepteur superhéterodine garantis toujours un correct
fonctionnement en ambiences où il y a des interférences: la
sensibilité et l’haute sélectivité le rendent immunisé aux
interférences présentes autour de la fréquence de réception.
Le nouveau système de programmation à autoapprentissage,
permet la mémorisation des émetteurs de la serie ROYAL et
ROYAL PLUS.
PROGRAMMATION
Le système de programmation à autoapprentissage permet la
mémorisation du code et l’impostation des fonctions suivantes:
MONOSTABLE: active le rèlai correspondant pendant tout le
temps de transmission de l’émetteur, quand la transmission
termine le rèlai se desactive automatiquement
ISTABLE: active le rèlai correspondant par la première
B
transmission de l’émetteur, le rèlai se desactive par la seconde
transmission
FRANÇAIS
TIMER: la transmission de l’émetteur active le rèlai
correspondant qui se desactive après le temps établit (maximum
7,5 minuts).
PROGRAMMATION DE LA FONCTION
MONOSTABLE
Pour entrer dans la programmation proceder comme il suit:
1. Établir sur le dip switch de l’émetteur le code desiré.
2. Appuyer et relacher la touche SW1 du récepteur pour N fois
comme indiqué dans le schema qui suit, aubut de
sélectionner le canal qu’on desire programmer avec la
fonction monostable.
CANAL SELECTIONNE
CANAL 1 MONOSTABLE 1
CANAL 2 MONOSTABLE 2
CANAL 3 MONOSTABLE 3
CANAL 4 MONOSTABLE 4
N°IMPULSIONS
SW1
LED ALLUME
L1 L2 L3 L4
•
PROGRAMMATION DE LA FONCTION TIMER
Pour mémoriser la fonction TIMER sur le premier canal proceder
comme il suit:
1. établir sur le dip switch de l’émetteur n’importe quel code.
2. Appuyer et maintenir la touche SW1 du récepteur : le led L1
(du premier canal) s’allume pendant quelque second.
3. Quand le led s’éteigne, relacher la touche SW1. Le led L1
commence une serie d’éclaires à vitesse reduite
(1 éclaire/second). Le numero d’éclaires correspond à un
temps qu’on peut établir comme indiqué dans le schema.
4. Compter le numero d’éclaires du led L1 correspondant au
temps qu’on desire établir; appuyer la touche SW1 du
récepteur pendant l’éclaire desiré: la serie d’éclaires
s’interrompe et le led L1 reste allumé.
5. Dans 5 seconds appuyer maintenir la touche de l’émetteur:
quand le led L1 du récepteur s’éteigne le code a été
mémorisé correctement.
Pour programmer les canaux 2,3 e 4 repeter les pas 2,3,4
audessus faisant réference aux leds L2,L3,L4 selon le canal
selectionné.
N° Eclaires Temp
1 01 sec.
2 02 sec.
3 03 sec.
4 04 sec.
5 05 sec.
6 06 sec.
7 07 sec.
8 08 sec.
9 09 sec.
10 10 sec.
11 11 sec.
12 12 sec.
•
•
•
13 13 sec.
14 14 sec.
15 15 sec.
16 30 sec.
N° Eclaires Temp
17 1 min.
18 1,5 min.
19 2 min.
20 2,5 min.
21 3 min.
22 3,5 min.
23 4 min.
24 4,5 min.
25 5 min.
26 5,5 min.
27 6 min.
28 6,5 min.
29 7 min.
30 7,5 min.
31 BISTABLE
3. Appuyer et maintenir la touche de l’émetteur: quand le led
du récepteur s’éteigne le code a été mémorisé correctement.
IMPORTANT: pour mémoriser correctement le code il est
nécessaire maintenir une distance minimum de 1,5 m.
entre l’émetteur et l’antenne du récepteur.
PROGRAMMATION DE LA FONCTION
BISTABLE
Pour mémoriser la fonction bistable sur le premier canal proceder
comme il suit:
1. établir sur le dip switch de l’émetteur le code desiré.
2. Appuyer et maintenir la touche SW1 du récepteur :
le led L1 (du premier canal) s’allume pendant quelque second.
3. Quand le led L1 s’éteigne, relacher la touche SW1; le led L1
commence une serie d’écleires à vitesse reduite
(1 éclaire/second). Terminés les 30 éclaires de la fonction
timer, le led L1 reste allumé.
4. Dans 5 seconds appuyer et maintenir la touche de l’émetteur:
quand le led L1 du récepteur s’éteigne le code a été
mémorisé correctement.
Pour programmer les canaux 2,3 e 4 repeter les pas 2,3,4
audessus faisant réference aux leds L2,L3,L4 selon le canal
selectionné.
Page 7

CONTACTS RELAIS
Les enclenchements au bornier relatifs aux 4 rélais sont le
modéle normalment ouvert; il est possible de modifier
l‚enclanchements pour le faire functionner comme s‚il était
normalement fermé: provoquer un court circuit entre les points A
et B et couper la piste dans le point C (Fig.1).
ATTENTION! SI LE RECEPTEUR EST ALIMENTE AVEC
24 VAC-VDC, NEPAS ACTIVER PLUS DE 2 RELAIS AU MEME
TEMPS
CARACTÉRISTIQUES TECHNIQUES
Alimentation 12 Vac/dc (DIP 1 ON) / 24 Vac/dc (DIP 1 OFF)
Contacts relais 1A / 30Vdc
Température -20 ÷ +60°C
onsommation
C
Sensibilité ≥ -103 dBm
S/N > 17dB @ 100dBm m=100%
Dimensions 132 x 26 x 74 mm
Protection IP55
7mA stand by
1
AVERTISSEMENTS
Cette appareillage est conforme aux normes FCC Part 15. La
mise en service est objet des suivantes deux conditions: (1) cette
appareillage ne peut pas provoquer des mauvaises interférences
et (2) permet chaque interférence que reçoit, incluse les
interférences que peuvent provoquer operations non souhaitées.
Changements ou modifications pas expressement approuvées
par le détenteur du certificat de compatibilité aux normes
peuvent invalider le droit de l'usager à l'emploi de l'appareillage.
CONFORMITE’ A LA DIRECTIVE 99/05/CE
Les récepteurs WALLY-R sont conformes aux qualités requises par
la Directive 99/05/CE. Ils ont été appliqués les Normes techniques
suivantes pour en vérifier la conformité:
FRANÇAIS
EN 60950-1, EN 301 489-1, EN 301 489-3, EN 300 220-3
Racconigi, 12/01/2010
Le représentant dûment habilité V2 SPA
Cosimo De Falco
Page 8

El nuevo receptor superheterodina garantiza siempre un correcto
funcionamiento incluso en ambientes con interferencias: la
buena sensibilidad y la alta selectividad lo hacen hinmune a las
interferencias presentes en el entorno de la frecuencia de recepción.
El nuevo sistema de programación de autoaprendizaje, permite la
memorización de los emisores de la serie ROYAL en ROYAL PLUS.
PROGRAMACIÓN
El sistema de programación de autoaprendizaje permite la
memorización del código y la programación de los siguientes
modos de funcionamiento:
MONOESTABLE: este tipo de programación activa el relé
correspondiente durante todo el tiempo de transmisión del
emisor, cuando la transmisión se interrumpe el relé se desactiva
automáticamente.
BIESTABLE: este tipo de programación activa el relé
correspondiente con la primera transmisión del emisor, el relé se
desactiva con la segunda transmisión.
TIMER: con este tipo d programación, la transmisión del emisor
activa el relé correspondiente el cual se desactiva después del
tiempo programado (máx. 7,5 Min.).
PROGRAMACION DE LA FUNCION
ESPAÑOL
MONOESTABLE
Para entrar en la programación proceder como sigue:
1. Programar en el dip switch del emisor el código deseado.
2. Pulsar y soltar el pulsador SW1 del receptor N veces como se
indica en la siguiente tabla, con el fin de seleccionar el canal
que se desea programar con la función monoestable.
CANAL SELECCIONADO N°IMPULSOS SW1
CANAL 1 MONOESTABLE 1
CANAL 2 MONOESTABLE 2
CANAL 3 MONOESTABLE 3
CANAL 4 MONOESTABLE 4
3. Pulsar y mantener pulsada la tecla del emisor: el apagado del
led del receptor indica que el código enviado ha sido
memorizado correctamente.
LED ENCENDIDO
L1 L2 L3 L4
•
PROGRAMACIÓN DE LA FUNCIÓN
TEMPORIZADOR
Para memorizar la función TEMPORIZADOR en el primer canal,
proceder como sigue:
1. Programar en el dip switch del emisor un código cualquiera.
2. Pulsar y mantener pulsada la tecla SW1 del receptor :
el led L1 (relativo al primer canal) se enciende durante
algunos segundos.
3. Cuando el led se apaga, soltar la tecla SW1. El led L1 inicia
una serie de destellos a poca velocidad (1 destello al
segundo). El número de destellos corresponde a un tiempo
programable como se indica en la tabla.
4. Contar el número de destellos del led L1 correspondiente al
tiempo que se desea programar; pulsar la tecla SW1 del
receptor durante el destello deseado: la serie de destellos se
nterrumpe y el led L1 permanece encendido.
i
5. Dentro de 5 segundos pulsar y mantener pulsada la tecla del
emisor: el apagado del led L1 del receptor indica que el
código enviado ha sido memorizado correctamente.
Por programar los canales 2,3 y 4 repetir paso 2,3,4 arriba
y considerar como referencia los led L2,L3, o L4 segun el
canal selectionado.
N° Destellos Tiempo
1 01 seg.
2 02 seg.
3 03 seg.
4 04 seg.
5 05 seg.
6 06 seg.
7 07 seg.
8 08 seg.
9 09 seg.
•
•
•
10 10 seg.
11 11 seg.
12 12 seg.
13 13 seg.
14 14 seg.
15 15 seg.
16 30 seg.
N° Destellos Tiempo
17 1 min.
18 1,5 min.
19 2 min.
20 2,5 min.
21 3 min.
22 3,5 min.
23 4 min.
24 4,5 min.
25 5 min.
26 5,5 min.
27 6 min.
28 6,5 min.
29 7 min.
30 7,5 min.
31 BIESTABLE
IMPORTANTE: para memorizar correctamente el código es
necesario mantener una distancia mínima de 1,5 metros
entre el emisor y la antena del receptor.
PROGRAMACIÓN DE LA FUNCIÓN BIESTABLE
Para memorizar la función biestable en el primer canal, proceder
como sigue:
1. Programar en el dip switch del emisor el código deseado.
2. Pulsar y mantener pulsada la tecla SW1 del receptor :
el led L1 (relativo al primer canal) se enciende durante
algunos segundos.
3. Cuando el led L1 se apague, soltar la SW1. El led L1 empieza
una serie de destellos a poca velocidad (1 destello al
segundo). Terminados los 30 destellos de la función
temporizador, el led L1 permanece encendido.
4. Pulsar y mantener pulsada la tecla del emisor: el apagado del
led L1 del receptor indica que el código enviado ha sido
memorizado correctamente.
Por programar los canales 2,3 y 4 repetir paso 2,3,4 arriba
y considerar como referencia los led L2,L3, o L4 segun el
canal selectionado.
Page 9

CONTACTOS RELÉ
Los contactos de los bornes relativos a los cuarto réles son del
tipo normalmente abierto; es posible modificar el contacto de los
bornes deseado para que funcione en normalmente cerrado:
cortocircuitar el punto A con el punto B, cortar lapista en
el punto C (Fig.1).
ATENCION! SI EL RECEPTOR ES ALIMENTADO CON 24 VACVDC, NON ACTIVAR MAS DE 2 RELE AL MISMO TIEMPO
CARACTERISTICAS TÉCNICAS
limentación
A
Contactos relé 1A / 30Vdc
Temperatura -20 ÷ +60°C
Consumo 17mA stand by
Sensibilidad ≥ -103 dBm
/N
S
Dimensiones 132 x 26 x 74 mm
Protección IP55
2 Vac/dc (DIP 1 ON) / 24 Vac/dc (DIP 1 OFF)
1
17dB @ 100dBm m=100%
>
ADVERTENCIAS
Este aparato esta conforme con las normas FCC Part 15. La
puesta en servicio está sujeta a las dos siguientes condiciones: (1)
este aparato no puede causar interferencias dañinas y (2) admite
cualquier interferencia recibida, incluyendo interferencias que
pueden causar operaciones no deseadas.
Cambios o modificaciones no aprobadas expresamente por el
propietario del certificado de compatibilidad a las normas
pueden invalidar el derecho a la utilización por parte del usuario
del aparato.
CONFORMIDAD A LA DIRECTIVA 99/05/CE
Los receptores WALLY-R están conformes con los requisitos
esenciales fijados por la Directiva 99/05/CE. Han sido aplicadas
las siguientes Normas técnicas para verificar la conformidad:
ESPAÑOL
EN 60950-1, EN 301 489-1, EN 301 489-3, EN 300 220-3
Racconigi, 12/01/2010
El representante legal de V2 SPA
Cosimo De Falco
Page 10

Der neue Überlagerungsempfänger garantiert eine konstant
korrekte Funktion, auch in gestörter Umgebung: Die hohe
Sensibilität und Abstimmschärfe sichern seine Immunität gegen
Störungen im Umfeld der Empfangsfrequenz. Das neue System
der Programmierung mit Selbstlernfähigkeit des Geräts
ermöglicht das Speichern von Fernbedienungen der Serie ROYAL
und ROYAL PLUS.
PROGRAMMIERUNG
Das selbstlernfähige System für die Programmierung gestattet
das Speichern des Codes, sowie di Einstellung der folgenden
Funktionsmodi:
MONOSTABIL: Aktiviert das entsprechende Relais während der
gesamten Übertragungszeit der Fernbedienung. Wird die
Übertragung unterbrochen, deaktiviert dich das Relais
utomatisch.
a
DOPPELSTABIL: Aktiviert das entsprechende Relais mit dem
ersten Übertragungsvorgang durch die Fernbedienung, mit dem
zweiten wird es deaktiviert.
TIMER: Die Übertragung durch die Fernbedienung aktiviert das
entsprechende Relais. Die Deaktivierung erfolgt nach
Verstreichen der eingestellten Zeit (max. 7,5 Minuten).
PROGRAMMIERUNG DES MONOSTABILEN
FUNKTIONSMODUS'
Um in den Programmierungsmodus zu gelangen, gehen Sie bitte
wie folgt vor:
1. Stellen Sie am DIP Schalter des Senders den gewünschten
Code ein.
2. Drücken Sie die Taste SW1 des Empfängers wie in der
DEUTSCH
folgenden Tabelle beschrieben N mal, um den Kanal
auszuwählen, der mit der monostabilen Funktion
programmiert werden soll.
AUSGEWÄHLTER KANAL N°IMPULSE SW1
KANAL 1 MONOSTABIL 1
KANAL 2 MONOSTABIL 2
KANAL 3 MONOSTABIL 3
KANAL 4 MONOSTABIL 4
3. Halten Sie die Taste der Fernbedienung gedrückt:
Das Erlöschen des LEDs am Empfänger zeigt an, dass der
übertragene Code korrekt gespeichert wurde.
ACHTUNG: Für die korrekte Programmierung des Codes ist
es erforderlich, dass der Abstand zwischen dem Sender
und der Antenne des Empfängers mindestens 1.5 m
beträgt.
LEUCHTENDE LED
L1 L2 L3 L4
•
4. Halten Sie die Taste an der Fernbedienung gedrückt: Das
Erlöschen des LEDs L1 am Empfänger zeigt an, dass der
übertragene Code korrekt gespeichert wurde.
Um die Kanäle Nr. 2, 3 und 4 zu programmieren, bitte
wiederholen Sie die obengenannten Punkte Nr. 2, 3 und 4,
mit Bezug auf LED L2, L3 oder L4, gemäß dem
ausgewählten Kanal.
PROGRAMMIERUNG DER FUNKTION TIMER
Zum Speichern der Timerfunktion auf dem ersten Kanal gehen
Sie bitte wie folgt vor:
1. Stellen Sie am DIP Schalter des Senders einen beliebigen
Code ein.
2. Halten Sie die Taste SW1 des Empfängers gedrückt: Das LED
L1 (entspricht Kanal 1) leuchtet für einige Sekunden auf.
. Lassen Sie die Taste SW1 los, wenn das LED erlischt. Das LED
3
L1 beginnt mit der Anzeige einer Reihe von Blinksignalen
niedriger Frequenz (ca. 1 Blinksignal pro Sekunde).
Die Anzahl der Blinksignale entspricht der einstellbaren Zeit,
wie in Tabelle dargestellt wird.
4. Zählen Sie die Anzahl der Blinksignale des LEDs L1 in
Übereinstimmung mit der Zeit, die eingestellt werden soll.
Drücken Sie die Taste SW1 des Empfängers während des
gewünschten Blinksignals: Das Blinken wird unterbrochen
und das LED L1 bleibt an.
5. Binnen 5 Sekunden halten Sie die Taste der Fernbedienung
gedrückt: Das Erlöschen des LEDs L1 am Empfänger zeigt an,
dass der übertragene Code korrekt gespeichert wurde.
Um die Kanäle Nr. 2, 3 und 4 zu programmieren, bitte
wiederholen Sie die obengenannten Punkte Nr. 2, 3 und 4,
mit Bezug auf LED L2, L3 oder L4, gemäß dem
ausgewählten Kanal.
Nr. Blinken Zeit
1 01 Sek.
2 02 Sek.
3 03 Sek.
4 04 Sek.
•
•
•
5 05 Sek.
6 06 Sek.
7 07 Sek.
8 08 Sek.
9 09 Sek.
10 10 Sek.
11 11 Sek.
12 12 Sek.
13 13 Sek.
14 14 Sek.
15 15 Sek.
16 30 Sek.
Nr. Blinken Zeit
17 1 Min.
18 1,5 Min.
19 2 Min.
20 2,5 Min.
21 3 Min.
22 3,5 Min.
23 4 Min.
24 4,5 Min.
25 5 Min.
26 5,5 Min.
27 6 Min.
28 6,5 Min.
29 7 Min.
30 7,5 Min.
31 BISTABILEN
PROGRAMMIERUNG DES BISTABILEN
MODUS'
Um den bistabilen Modus auf dem ersten Kanal zu
programmieren, gehen Sie bitte wie folgt vor:
1. Stellen Sie am DIP Schalter des Senders den gewünschten
Code ein.
2. Halten Sie die Taste SW1 des Empfängers gedrückt: Das LED
L1 (entspricht Kanal 1) leuchtet für einige Sekunden auf.
3. Lassen Sie die Taste SW1 los, wenn das LED L1 erlischt.
Das LED L1 beginnt mit der Anzeige einer Reihe von
Blinksignalen niedriger Frequenz (ca. 1 Blinksignal pro
Sekunde). Nach Beendigung der 30 Blinksignale der
Timerfunktion bleibt das LED L1 an.
Page 11

RELAISKONTAKTE
Es sind 4 Relaiskontakte des Typs NO (normal offen); es ist
möglich den gewünschten Relaiskontakt zu modifizieren, sodass
er als NC (normal geschlossen) funktionieren kann: verbinden Sie
den Punkt A mit dem Punkt B und durchtrennen Sie die
Leiterbahn im Punkt C (Fig. 1).
ACHTUNG! WENN DER EMPFÄNGER MIT 24 VAC-VDC
GESPEIST IST, BITTE BETÄTIGEN SIE NICHT MEHR ALS 2
RELAIS GLEICHZEITIG.
TECHNISCHE EIGENSCHAFTEN
Stromversorgung 12 Vac/dc (DIP 1 ON) / 24 Vac/dc (DIP 1 OFF)
Relaiskontakte 1A / 30Vdc
Temperatur -20 ÷ +60°C
Verbrauch 17mA stand by
Empfindlichkeit ≥ -103 dBm
S/N > 17dB @ 100dBm m=100%
Abmessungen 132 x 26 x 74 mm
Schutzart IP55
BEMERKUNGEN
Dieses Gerät entspricht den Normen FCC, Teil 15. Wenn man die
Inbetriebnahme einmal gemacht hat, (1) verursacht dieses Gerät
keine schädlichen Störungen und (2) es nimmt alle Störungen an,
auch wenn sie unerwünschte Bedienungen verursachen könnten.
Wenn der Benutzer Änderungen vornimmt, obwohl diese vom
Konformitätsbescheinigungsbesitzer nicht ausdrücklich zugelassen
sind, kann er das Recht auf die Gerätsbenutzung verlieren.
DEUTSCH
KONFORMITÄTSERKLÄRUNG
Die Empfängermodelle WALLY-R entsprechen den durch die
EG-Richtlinie 99/05/EWG festgelegten wesentlichen
Erfordernissen. Für die Konformitätskontrolle wurden die
folgenden technischen Normen angewandt:
EN 60950-1, EN 301 489-1, EN 301 489-3, EN 300 220-3
Racconigi, 12/01/2010
Der Rechtsvertreter der V2 SPA
Cosimo De Falco
Page 12

 Loading...