


V2 SPA
Corso Principi di Piemonte, 65/67 - 12035 RACCONIGI (CN) ITALY tel. +39 01 72 81 24 11 - fax +39 01 72 84 050 info@v2home.com - www.v2home.com
IL n. 156
EDIZ. 04/03/2009
MR1
P1 L1
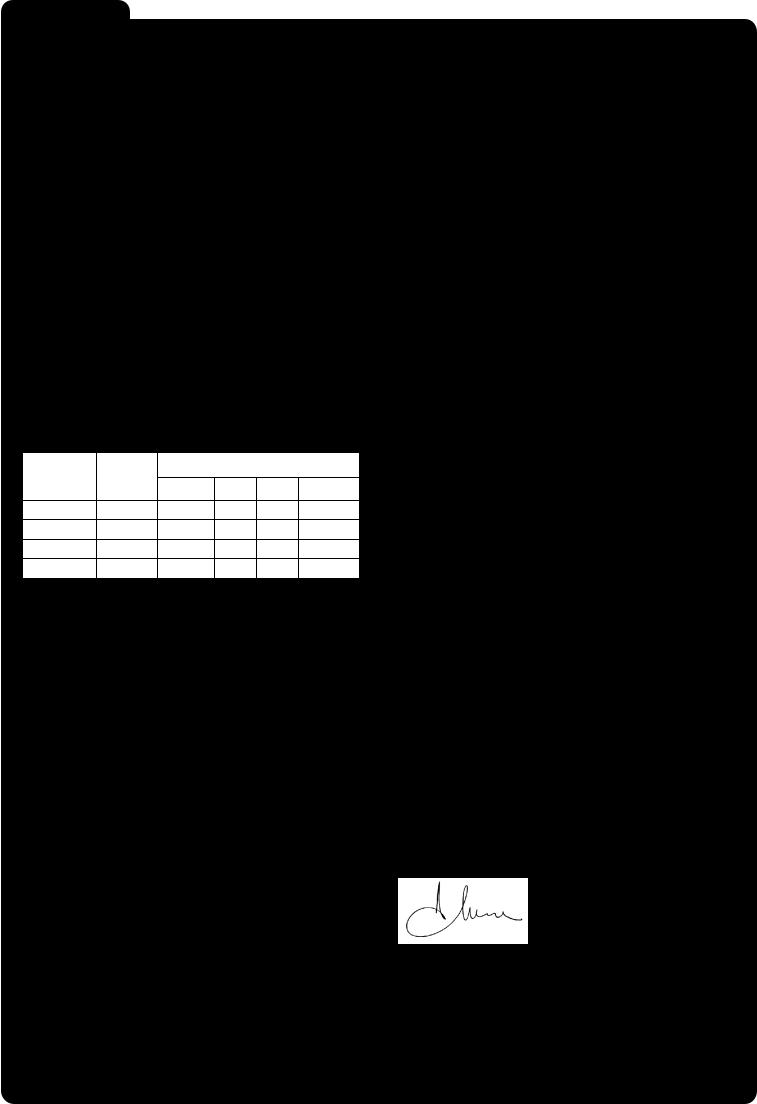
Modello |
Frequenza |
Temperatura |
Sensibilità |
|
Dimensioni |
Model |
Frequency |
Temperature |
Sensibility |
|
Size |
Modèle |
Fréquence |
Température |
Sensibilité |
|
Dimensions |
Modelo |
Frecuencia |
Temperatura |
Sensibilidad |
S/N |
Dimensiones |
Modelo |
Frequência |
Température |
Sensibilidad |
|
Dimensões |
Modell |
Frequenz |
Temperatur |
Empfindlichkeit |
|
Abmessungen |
Model |
Frequentie |
Temperatuur |
Gevoeligheid |
|
Afmetingen |
|
|
|
|
|
|
MR1 - MR1PLUS |
433,92 MHz |
|
|
> 17dB |
|
|
|
-20 ÷ +60°C |
≥ -103 dBm |
52 x 35 x 15 mm |
|
|
|
@ 100dBm |
|||
|
|
||||
MR1/868 - MR1/868P |
868,3 MHz |
|
|
m=100% |
|
|
|
|
|
||
|
|
|
|
|
|

ITALIANO
Il nuovo ricevitore supereterodina garantisce sempre un corretto funzionamento in ambienti disturbati: la buona sensibilità e l’alta selettività lo rendono immune ai disturbi presenti nell’intorno della frequenza di ricezione. Il nuovo sistema di programmazione ad autoapprendimento, permette la memorizzazione dei trasmettitori della serie PERSONAL PASS.
•Possibilità di memorizzare da 240 (MR1, MR1/868) a
1008 (MR1PLUS, MR1/868P) codici diversi in autoapprendimento.
•Gestione autoapprendimento trasmettitori via radio.
•Abilitare o disabilitare la modalità ROLLING CODE.
•Gestione trasmettitore sostitutivo.
•Segnalazione di memoria piena: il ricevitore emette 15 lampeggi.
•Può essere collegato al programmatore portatile PROG2 (ver. 3.6 o superiori), grazie al quale è possibile:
-Gestire i dispositivi tramite WINPPCL (ver. 2.1 o superiori)
-Programmare le funzioni BISTABILE e TIMER sui quattro canali.
ATTENZIONE: Utilizzare il ricevitore MR1 solo con apparecchiature V2.
PROGRAMMAZIONE DELLA FUNZIONE MONOSTABILE
•Premere il pulsante P1 del ricevitore: il led L1 si accende.
•Rilasciare il pulsante, il led si spegne ed emette una serie di lampeggi singoli per 5s:il numero di lampeggi brevi indica il canale selezionato.
•Per selezionare i canali successivi premere e rilasciare il pulsante P1 entro i 5s, il led cambia tipo di lampeggio in base alla tabella seguente:
CANALE |
N° |
|
Lampeggio |
|
||
IMPULSI |
|
|
|
|
||
SELEZIONATO |
|
|
|
|
||
P1 |
singolo |
doppio |
triplo |
quadruplo |
||
|
||||||
CANALE 1 |
1 |
• |
|
|
|
|
CANALE 2 |
2 |
|
•• |
|
|
|
CANALE 3 |
3 |
|
|
••• |
|
|
CANALE 4 |
4 |
|
|
|
•••• |
|
•Selezionato il canale desiderato, premere e tenere premuto il tasto del trasmettitore entro 5 secondi.
•Il LED del ricevitore si spegne e si riaccende: il codice è stato memorizzato e il ricevitore rimane in attesa per 5 sec. di un nuovo codice da memorizzare.
APPRENDIMENTO RADIO A DISTANZA
Questa procedura permette di memorizzare nuovi trasmettitori via radio, in modo sequenziale e senza rimuovere il ricevitore dall’installazione. Il trasmettitore che permette di abilitare la programmazione via radio deve essere già memorizzato.
Tutti i trasmettitori memorizzati via radio avranno la stessa logica tasti del trasmettitore che ha attivato la programmazione.
Esempio:
Trasmettitore TX A memorizzato con la seguente logica tasti: Tasto 1 sul primo canale in configurazione monostabile. Tasto 2 sul terzo canale in configurazione timer 10s.
Tasto 3 sul quarto canale in configurazione bistabile.
Trasmettitore TX B da memorizzare.
•Premere per almeno 5 secondi i tasti 1+2 o 1+3 del TX A.
•Rilasciare entrambi i tasti.
•Premere, entro 5 secondi, il tasto del TX B desiderato.
•Rilasciare e premere, entro 5 secondi, un altro tasto del TX B che si desidera memorizzare; ripetere questa operazione per altri eventuali trasmettitori.
•Per uscire dall’autoapprendimento attendere almeno 5 secondi.
La logica dei tasti del trasmettitore TX B e di eventuali trasmettitori memorizzati con questa procedura sarà la medesima del trasmettitore A.
MODALITÀ ROLLING CODE
È possibile abilitare o disabilitare la modalità ROLLING CODE (disabilitato di default) che rende impossibile qualunque tentativo di duplicazione del codice Personal Pass.
•Premere e mantenere premuto il pulsante P1 per 8 secondi.
•Trascorsi gli 8 secondi il led L1 si spegne, rilasciare il pulsante.
•Il Led L1 inizia una serie di lampeggi per 5 secondi:
Lampeggi singoli ROLLING CODE disabilitato Lampeggi doppi ROLLING CODE abilitato
•Per modificare le impostazioni premere il pulsante P1 entro 5 secondi da quando inizia la serie di lampeggi; il LED L1 lampeggierà in base alle nuove impostazioni.
TRASMETTITORE SOSTITUTIVO
Il trasmettitore SOSTITUTIVO, generato solamente tramite WINPPCL, permette di sostituire via radio un trasmettitore memorizzato nel ricevitore. è sufficiente trasmettere una volta, in prossimità del ricevitore, con il TX SOSTITUTIVO appositamente programmato: il codice del trasmettitore viene sostituito con il nuovo senza rimuovere il ricevitore dall’installazione.
Per sincronizzare il rolling code trasmettere 2 volte con tutti tasti del TX SOSTITUTIVO.
Esempio: Trasmettitore TX A memorizzato.
Si possono avere al massimo tre sostituzioni per codice, quindi per TX
A potrò avere: |
|
TX B che sostituisce TX A |
(TX A non è più attivo) |
TX C che sostituisce TX B |
(TX B non è più attivo) |
TX D che sostituisce TX C |
(TX C non è più attivo) |
CANCELLAZIONE TOTALE DEI CODICI
Per eseguire una cancellazione totale dei codici procedere come segue:
•Disattivare l’alimentazione della centrale di comando su cui è innestato il modulo ricevitore MR1.
•Premere e tenere premuto il tasto P1 del ricevitore.
•Contemporaneamente riattivare l’alimentazione. Il LED del ricevitore si accende: rilasciare il tasto P1.
Le zone di memoria sono ora vuote e disponibili per una nuova programmazione.
Per effettuare una cancellazione parziale dei codici è necessario l'ausilio del programmatore portatile PROG2.
BLOCCO PROGRAMMAZIONE
La funzione di BLOCCO PROGRAMMAZIONE è impostabile solo tramite WINPPCL. Questa funzione impedisce una qualsiasi riprogrammazione del ricevitore, sia tramite il tasto P1 che via radio. Il ricevitore può essere riprogrammato solo tramite WINPPCL.
CONFORMITA’ ALLA DIRETTIVA 99/05/CE
Il ricevitore modello MR1 è conforme ai requisiti essenziali fissati dalla Direttiva 99/05/CE. Sono state applicate le seguenti Norme tecniche per verificarne la conformità:
EN 60950-1, EN 301 489-1, EN 301 489-3, EN 300 220-3
Racconigi, 12/01/2009
Il rappresentante legale della V2 SPA
Antonio Cristina
ENGLISH
The new superheterodyne receiver always guarantees a correct functioning in disturbed environments: its good sensitivity and high selectivity make it immune from most disturbances around the frequency reception area. The new self-learning programming system enables the memorization of the PERSONAL PASS series transmitters.
•It is possible to store up to 240 (MR1, MR1/868) or 1008 (MR1PLUS, MR1/868P) different codes with self-learning mode.
•Self-learning of transmitters managed by radio.
•To enable or disable the ROLLING CODE mode.
•Management of the substitutive transmitter.
•Memory full warning: the receiver blinks 15 times.
•It can be connected to the PROG2 portable programmer (version 3.6 or newer), which allows:
-To manage devices by means of WINPPCL (version 2.1 or newer)
-To programme 4 channels with bi-stable and timer functions.
ATTENTION: Use the receiver MR1 only with V2 equipments.
PROGRAMMING OF THE MONOSTABLE FUNCTION
•Press P1 push-button of the receiver: L1 led switches on.
•Release the push-button, the led switches off and it sends out a sequence of single flashings for 5 seconds: the number of short flashings shows the selected channel.
•To select the further channels press and release the P1 push-button within 5 seconds, the led changes type of flashing according to the following table:
SELECTED |
N° |
|
Flashing |
|
||
Impulses |
|
|
|
|
||
CHANNEL |
|
|
|
|
||
P1 |
single |
double |
triple |
quadruple |
||
|
||||||
CHANNEL 1 |
1 |
• |
|
|
|
|
CHANNEL 2 |
2 |
|
•• |
|
|
|
CHANNEL 3 |
3 |
|
|
••• |
|
|
CHANNEL 4 |
4 |
|
|
|
•••• |
|
•Choose the channel you want to memorize and within 5 seconds press and hold the push-button of the transmitter.
•The LED of the receiver switches off and it switches on again: this means that the code has been memorized and the receiver will wait for a further code to memorize for a maximum time of 5 seconds.
REMOTE RADIO LEARNING
This procedure allows to memorize new transmitters by radio, in sequence and without removing the receiver from the installation. The transmitter which allows to enable the programming by radio must be memorized in advance. All transmitters programmed by radio will share the same key configuration as the transmitter which activated the programming.
Example:
TX A transmitter memorized with the following key configuration: Key 1 on the first channel in monostable mode.
Key 2 on the third channel in timer mode. Key 3 on the fourth channel in bistable mode.
TX B transmitter to memorize.
•Hold for 5 seconds minimum the keys 1+2 or 1+3 of TX A.
•Release both keys.
•Press, within 5 seconds, the required key of TX B.
•Release and press within 5 seconds on the TX B another key to be memorized. Repeat this operation for other transmitters.
•To exit the self-learning mode wait for at least 5 seconds.
The key configuration of TX B transmitter and other transmitters, set with this procedure, will be the same as TX A transmitter.
ROLLING CODE FUNCTION
It is possible to enable and to disable the ROLLING CODE function (normally disabled) , that will avoid any risk of Personal Pass code duplication.
•Press P1 push-button, holding it for 8 seconds.
•L1 led will switch off after 8 seconds. Release the push-button.
•L1 led starts a sequence of flashing for 5 seconds:
Single flashings ROLLING CODE is disabled Double flashings ROLLING CODE is enabled
•To modify the parameters press the P1 push-button within 5 seconds after the first flashing of the sequence; L1 led will flash according to the new parameters.
SUBSITUTIVE TRANSMITTER
The substitutive transmitter, generated only by means of WINPPCL, allows to replace by radio a transmitter stored in the receiver.
A single transmition with the specially programmed SUBSTITUTIVE TX, nearby the receiver, replaces the transmitter code with the new one without removing the receiver from the installation.
To synchronise the rolling code transmit twice with each key of the SUBSTITUTIVE TX.
Example memorized TX A transmitter
It is possible to make three replacements maximum per code, so for TX A you can find:
TX B replaces TX A (TX A is no longer operative) TX C replaces TX B (TX B is no longer operative) TX D replaces TX C (TX C is no longer operative)
FULL CODE ERASING
To perform a full code erasing do the following:
•Switch off the power supply of the control unit where the MR1 receiver is connected.
•Press and hold pressed the P1 key of the receiver
•At the same time turn on the power again. The receiver LED goes on: release the P1 key.
The memory spaces are empty and available for a new programming. To perform a partial code erasing the PROG2 portable programmer is required.
PROGRAMMING LOCK
The PROGRAMMING LOCK function can be done only by means of WINPPCL. This function inhibits to programme again the receiver, either with P1 key or by radio. The receiver can be programmed again only by means of WINPPCL.
99/05/CE DIRECTIVE CONFORMITY
The MR1 is in conformity with the provisions of the following EC directive(s) (including all applicable amendments) and that the standards referenced here below:
EN 60950-1, EN 301 489-1, EN 301 489-3, EN 300 220-3
Racconigi, 12/01/2009
V2 SPA legal representative
Antonio Cristina
 Loading...