

Page 1

V2 S.p.A.
Corso Principi di Piemonte, 65/67
12035 RACCONIGI (CN) ITALY
tel. +39 01 72 81 24 11 - fax +39 01 72 84 050
info@v2home.com - www.v2home.com
Wally2-230V
Wally2-120V
L n. 343
I
DIZ. 28/03/2012
E
I
GB
F
E
P
RICEVITORE BICANALE ALIMENTATO A 230V / 120V CON
POSSIBILITÀ DI COMANDO CARICHI FINO A 1500W
230V / 120V DUAL CHANNEL RECEIVER, CAPABLE TO
CONTROL LOADS UP TO 1500 W
RÉCEPTEUR BICANAL ALIMENTÉ EN 230V AVEC POSSIBILITÉ
DE COMMANDE DE CHARGES JUSQU’À 1500W
RECEPTOR BICANAL DE 230V CON POSIBILIDAD DE
CONTROL DE CARGAS HASTA 1500W
RECEPTOR DE DOIS CANAIS DE 230V COM POSSIBILIDADE
DECOMANDO CARGAS ATÉ 1500W
D
NL
2-KANAL 230V-EMPFÄNGER MIT DER MÖGLICHKEIT,
LASTEN BIS 1500W ZU STEUERN
TWEEKANAALSONTVANGER VOEDING 230V / 120V MET
MOGELIJKHEID OM LADINGEN TOT 1500W TE BESTUREN
Page 2
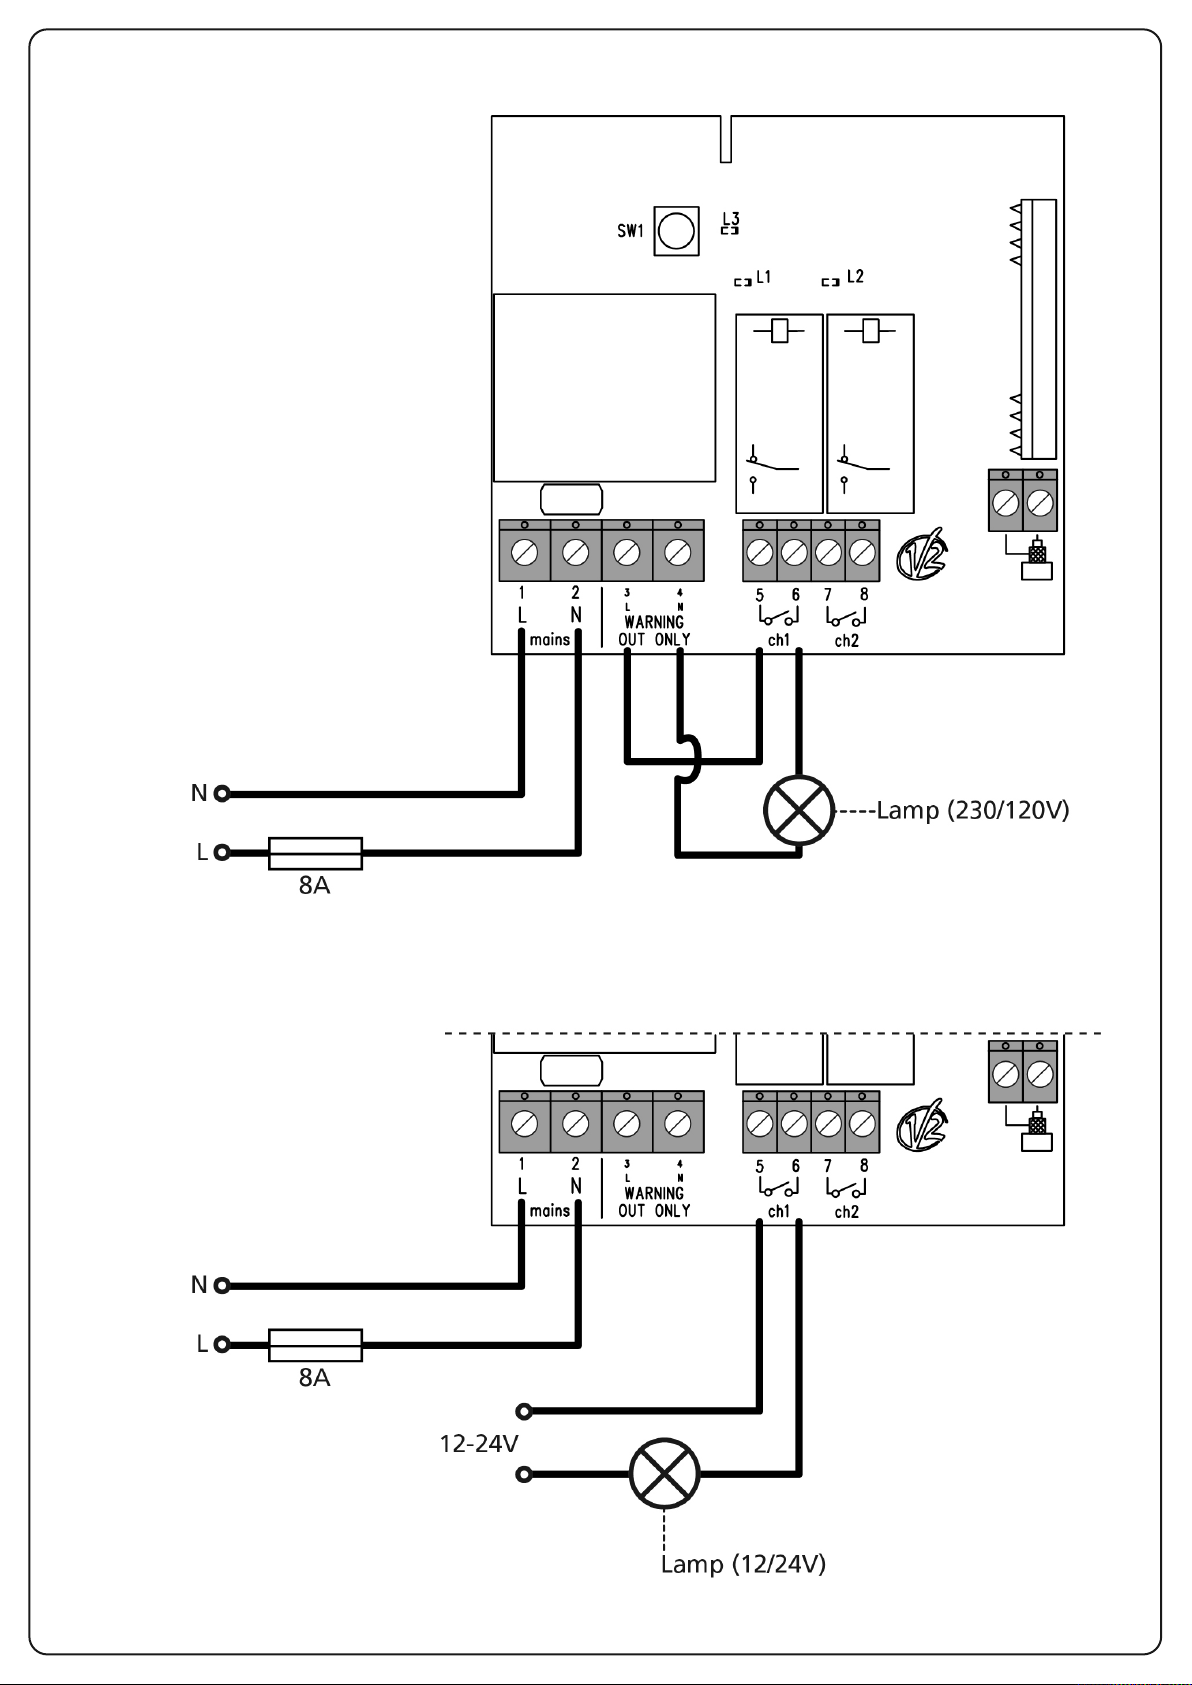
OLLEGAMENTI ELETTRICI
C
LECTRICAL CONNECTIONS
E
RANCHEMENTS ÉLECTRIQUES
B
CONEXIONES ELÉCTRICAS
LIGAÇÕES ELÉCTRICAS
ELEKTRISCHE ANSCHLÜSSE
ELEKTRISCHE AANSLUITINGEN
Fig. 1
Page 3
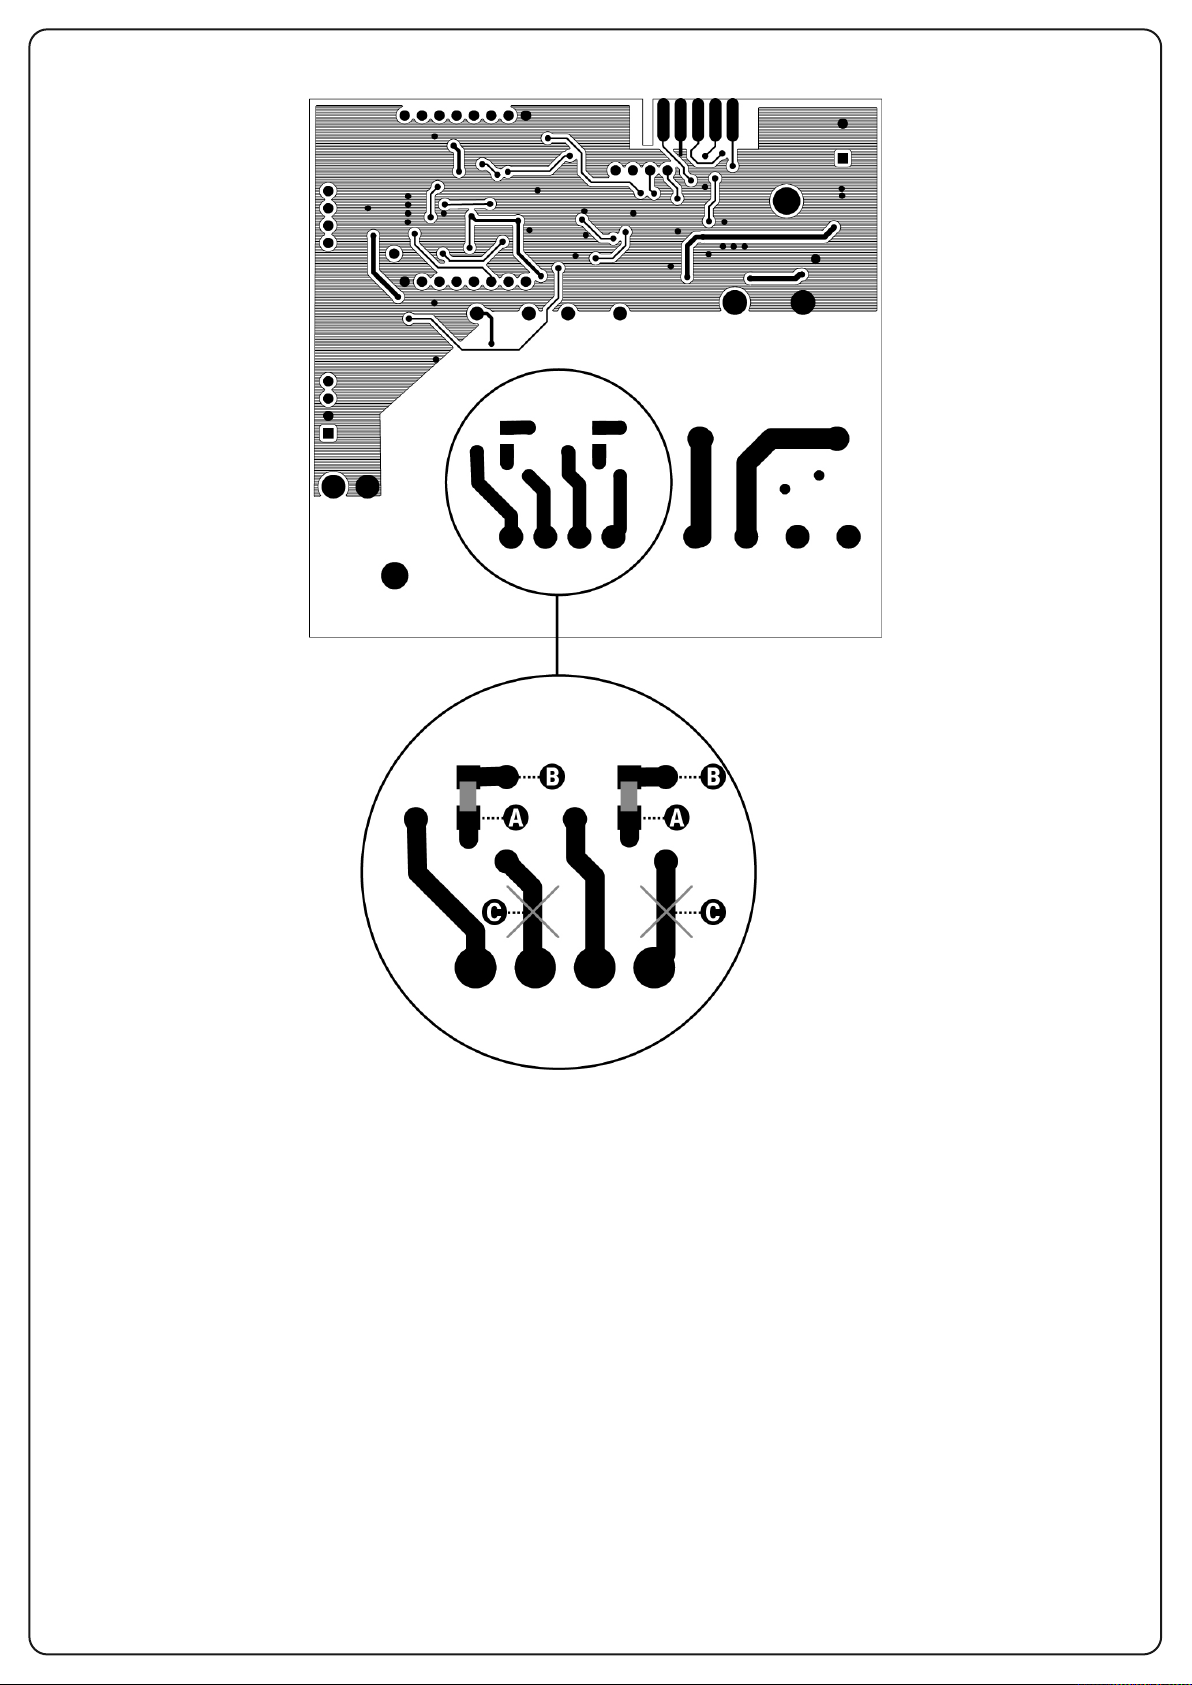
Fig. 2
Page 4

VVERTENZE IMPORTANTI
A
Per chiarimenti tecnici o problemi di installazione la V2 S.p.A.
dispone di un servizio di assistenza clienti attivo durante le ore di
fficio TEL. (+39) 01 72 81 24 11
u
ITALIANO
V2 S.p.A. si riserva il diritto di apportare eventuali modifiche al
prodotto senza preavviso; inoltre declina ogni responsabilità per
danni a persone o cose dovuti ad un uso improprio o ad
un’errata installazione.
DATI TECNICI Modelli 230V Modelli 120V
Alimentazione 230Vac - 50Hz 120Vac - 60Hz
Contatti relè 10A / 250Vac 10A / 120Vac
Frequenza di lavoro 433,92 - 868,30 Mhz
Temperatura di lavoro -20 ÷ +60 °C
Consumo 20 mA standby
m Leggere attentamente il seguente manuale di
istruzioni prima di procedere con l'installazione e la
programmazione del dispositivo.
• Il presente manuale di istruzioni è destinato solamente a
personale tecnico qualificato nel campo delle installazioni.
• Qualsiasi operazione di manutenzione o di programmazione
deve essere eseguita esclusivamente da personale qualificato.
• L'installatore deve provvedere all'installazione di un dispositivo
di protezione automatico e di un fusibile.
La normativa richiede una separazione dei contatti di
almeno 3 mm in ciascun polo (EN 60335-1).
L’interruttore automatico deve assicurare il sezionamento
onnipolare dell’alimentazione del sistema.
La corrente di intervento dei dispositivi di protezione
non deve essere superiore a 8A.
• I cavi di collegamento devono essere adatti per la posa in
ambiente esterno umido
• Per garantire il grado di protezione IP55 del contenitore è
necessario utilizzare cavi di dimensioni adatte al passacavo
utilizzato
DICHIARAZIONE DI CONFORMITÀ
V2 SPA dichiara che i prodotti:
WALLY2-230V, WALLY2-120V
sono conformi alle seguenti direttive:
99/05/CEE Direttiva radio
2006/95/CEE Direttiva sicurezza elettrica
2004/108/CE Direttiva compatibilità elettromagnetica
Sono state applicate le seguenti norme tecniche
per verificarne la conformità:
EN 60335-1, EN 55014-1, EN 55014-2, EN 301 489-1,
EN 301 489-3, EN 300 220 - 3
Racconigi, lì 29/07/2010
Rappresentante legale V2 SPA
Cosimo De Falco
Sensibilità ≥ -103 dBm
S/N > 17dB @ 100dBm m=100%
Dimensioni 113 x 113 x 57 mm
Peso 200g
Protezione IP55
Ricevitore bicanale alimentato a 230V / 120V
con possibilità di comando carichi fino a
1500W
• Funzionamento con trasmettitori serie Royal o Personal Pass:
il primo telecomando che viene memorizzato determina la
modalità di funzionamento Royal o Personal Pass.
• La versione Personal Pass permette di memorizzare fino a
240 telecomandi diversi.
• Logica di funzionamento monostabile, bistabile o timer.
• Programmazione BASE tramite pulsante SW1 o AVANZATA
tramite programmatore PROG2 e software WINPPCL
PROGRAMMAZIONE
Il sistema di programmazione ad auto-apprendimento permette la
memorizzazione del codice e l’impostazione dei seguenti modi di
funzionamento:
MONOSTABILE: attiva il relè corrispondente per tutto il tempo di
trasmissione; quando la trasmissione si interrompe il relè si
disattiva automaticamente.
BISTABILE: attiva il relè corrispondente con la prima trasmissione;
il relè si disattiva con la seconda trasmissione.
TIMER: la trasmissione attiva il relè corrispondente il quale si
disattiva dopo il tempo impostato (max 7,5 minuti).
NOTA: il primo telecomando che viene memorizzato
determina la modalità di funzionamento Royal o
Personal Pass.
Per modificare la modalità di funzionamento è necessario
effettuare una CANCELLAZIONE TOTALE e memorizzare il
nuovo telecomando.
m IMPORTANTE: per memorizzare correttamente il codice
è necessario mantenere una distanza minima di 1,5 metri
tra il trasmettitore e l’antenna del ricevitore.
4
Page 5
ELEZIONE DEL CANALE E DELLA LOGICA DI
S
FUNZIONAMENTO MONOSTABILE /
BISTABILE
Selezionare canale e logica di funzionamento facendo riferimento
alla seguente tabella:
N°IMPULSI
SW1
CANALE 1 MONOSTABILE 1
CANALE 1 BISTABILE 2
CANALE 2 MONOSTABILE 3
ANALE 2 BISTABILE
C
1. Premere il pulsante SW1 del ricevitore per N volte come
indicato sopra: il led interessato si accende
2. Entro 5 secondi premere e tenere premuto il tasto del
trasmettitore:
- se il
- se il
3. Il led del ricevitore si spegne per indicare che il codice è
stato memorizzato correttamente
4. Il led del ricevitore si spegne e si riaccende: il codice è stato
memorizzato e il ricevitore rimane in attesa per 5 sec. di un
nuovo codice da memorizzare
5. Memorizzare tutti i trasmettitori desiderati
6. Trascorsi 5 secondi senza nessuna trasmissione valida il led
si spegne e il ricevitore torna in funzionamento normale
trasmettitore è ROYAL la procedura termina con il
punto 3
trasmettitore è PERSONAL PASS passare al punto 4 e
seguire la procedura fino alla fine del paragrafo
4
LED ACCESO
L1 L2 L3
•
• •
•
• •
PROGRAMMAZIONE DELLA FUNZIONE TIMER
Per memorizzare un trasmettitore sul canale 1 associandolo alla
funzione TIMER procedere come segue:
1. Premere e tenere premuto il tasto SW1 del ricevitore:
il led L1 (relativo al primo canale) si accende
2. Dopo 4 secondi il led L1 si spegne
3. Rilasciare il tasto SW1: il led L1 comincia una serie di
lampeggi a bassa velocità (1 Iampeggio al secondo).
Il numero di lampeggi corrisponde ad un tempo impostabile
come indicato nella tabella:
N° Lampeggi Tempo
1 01 sec.
2 02 sec.
3 03 sec.
4 04 sec.
5 05 sec.
6 06 sec.
7 07 sec.
8 08 sec.
9 09 sec.
10 10 sec.
11 11 sec.
12 12 sec.
13 13 sec.
14 14 sec.
15 15 sec.
16 30 sec.
N° Lampeggi Tempo
17 1 min.
18 1,5 min.
19 2 min.
20 2,5 min.
21 3 min.
22 3,5 min.
23 4 min.
24 4,5 min.
25 5 min.
26 5,5 min.
27 6 min.
28 6,5 min.
29 7 min.
30 7,5 min.
. Contare il numero di lampeggi del led L1 corrispondente al
4
tempo che si desidera impostare
5. Premere il tasto SW1 del ricevitore durante il lampeggio
desiderato: la serie di lampeggi si interrompe e il led L1
rimane acceso
6. Entro 5 secondi premere e tenere premuto il tasto del
telecomando:
- se il telecomando è ROYAL
punto 7
- se il telecomando è PERSONAL PASS
seguire la procedura fino alla fine del paragrafo
7. Il led L1 del ricevitore si spegne per indicare che il codice è
stato memorizzato correttamente
8. Il led L1 del ricevitore si spegne e si riaccende: il codice è stato
memorizzato e il ricevitore rimane in attesa per 5 sec. di un
nuovo codice da memorizzare
9. Memorizzare tutti i telecomandi desiderati
10. Trascorsi 5 secondi senza nessuna trasmissione valida il led L1
si spegne e il ricevitore torna in funzionamento normale
Per memorizzare un trasmettitore sul canale 2 associandolo alla
funzione TIMER procedere come segue:
1. Premere e rilasciare il tasto SW1: si accende il led L1
2. Premere e rilasciare il tasto SW1: si accende anche il led L3
3. Premere e tenere premuto il tasto SW1: i led L1 e L3 si
spengono e il led L2 si accende
4. Trascorsi 4 secondi il led L2 si spegne
5. Rilasciare il tasto SW1: il led L1 comincia una serie di
lampeggi a bassa velocità (1 Iampeggio al secondo).
Il numero di lampeggi corrisponde ad un tempo impostabile
come indicato nella tabella.
6. Contare il numero di lampeggi del led L1 corrispondente al
tempo che si desidera impostare
7. Premere il tasto SW1 del ricevitore durante il lampeggio
desiderato: la serie di lampeggi si interrompe e il led L1
rimane acceso
8. Entro 5 secondi premere e tenere premuto il tasto del
telecomando:
- se il telecomando è ROYAL
punto 9
- se il telecomando è PERSONAL PASS passare al punto 10 e
seguire la procedura fino alla fine del paragrafo
9. Il led L1 del ricevitore si spegne per indicare che il codice è
stato memorizzato correttamente
10. Il led L1 del ricevitore si spegne e si riaccende: il codice è stato
memorizzato e il ricevitore rimane in attesa per 5 sec. di un
nuovo codice da memorizzare
11. Memorizzare tutti i telecomandi desiderati
12. Trascorsi 5 secondi senza nessuna trasmissione valida il led L1
si spegne e il ricevitore torna in funzionamento normale
la procedura termina con il
passare al punto 8 e
la procedura termina con il
ITALIANO
5
Page 6

ODALITÀ ROLLING CODE
M
(solo sistema Personal Pass)
Il ricevitore gestisce il rolling code del sistema Personal Pass.
Questa funzione di default è disabilitata.
ITALIANO
È possibile attivare la modalità rolling code tramite WinPPCL o con
l tasto di programmazione SW1.
i
• Premere e mantenere premuto il pulsante SW1
• Dopo 4 secondi il led L1 si spegne
• Dopo 10 secondi il led L3 si accende
• Rilasciare il pulsante: il Led L3 inizia una serie di lampeggi
per 5 secondi:
Lampeggi singoli
Lampeggi doppi
• Per modificare le impostazioni premere il pulsante SW1 entro
5 secondi da quando inizia la serie di lampeggi; il LED L3
lampeggierà in base alle nuove impostazioni.
• Attendere 5s dall’ultima pressione che ha selezionato il
lampeggio desiderato, il led L3 si spenge e la configurazione è
memorizzata.
ROLLING CODE disabilitato
ROLLING CODE abilitato
APPRENDIMENTO RADIO A DISTANZA
(solo sistema Personal Pass)
Questa procedura permette di memorizzare nuovi trasmettitori via
radio, in modo sequenziale e senza rimuovere il ricevitore
dall’installazione.
Il trasmettitore che permette di abilitare la programmazione via
radio deve essere già memorizzato.
Tutti i trasmettitori memorizzati via radio avranno la stessa logica
tasti del trasmettitore che ha attivato la programmazione.
Esempio:
Trasmettitore TX A memorizzato con la seguente logica tasti:
Tasto 1 in configurazione monostabile.
Tasto 2 in configurazione timer 10s.
Tasto 3 in configurazione bistabile.
Trasmettitore TX B da memorizzare.
• Premere per almeno 5 secondi i tasti 1+2 o 1+3 del TX A:
il led L1 del ricevitore si accende
• Rilasciare entrambi i tasti.
• Premere, entro 5 secondi, il tasto del TX B desiderato:
il led L1 del ricevitore si spegne e si riaccende per indicare che il
codice è stato memorizzato
• Trasmettere, entro 5 secondi, un altro tasto del TX B
che si desidera memorizzare; ripetere questa operazione per
altri eventuali trasmettitori.
• Per uscire dall’autoapprendimento attendere almeno 5 secondi.
RASMETTITORE SOSTITUTIVO
T
(solo sistema Personal Pass)
Il trasmettitore SOSTITUTIVO, generato solamente tramite
WINPPCL, permette di sostituire via radio un trasmettitore
memorizzato nel ricevitore.
sufficiente trasmettere una volta, in prossimità del ricevitore, con
È
il TX SOSTITUTIVO appositamente programmato: il codice del
trasmettitore viene sostituito con il nuovo senza rimuovere il
ricevitore dall’installazione.
Si possono avere al massimo tre sostituzioni per codice, se ho il
trasmettitore TX A memorizzato potrò avere:
TX B che sostituisce TX A (TX A non è più attivo)
TX C che sostituisce TX B (TX B non è più attivo)
TX D che sostituisce TX C (TX C non è più attivo)
SOSTITUZIONE DEL CODICE
(solo sistema Royal)
Il codice trasmettitore memorizzato, può essere sostituito da un
codice nuovo seguendo lo stesso procedimento utilizzato per la
memorizzazione. In tale modo il codice nuovo sarà memorizzato
cancellando il precedente.
CANCELLAZIONE TOTALE DEI CODICI
Per eseguire una cancellazione totale dei codici procedere come
segue:
• Togliere alimentazione al ricevitore.
• Premere e tenere premuto il tasto SW1 del ricevitore.
• Contemporaneamente alimentare il ricevitore.
Il led L1 del ricevitore si accende: rilasciare il tasto SW1.
• Le zone di memoria sono ora vuote e disponibili per una nuova
programmazione.
Per effettuare una cancellazione parziale dei codici è
necessario l'ausilio del programmatore portatile PROG2 e
del software WINPPCL.
CONTATTI RELÉ
Il contatto sui morsetti del carico è del tipo normalmente aperto;
è possibile modificare il contatto affinché funzioni come contatto
normalmente chiuso: cortocircuitare il punto A e il punto B con
un saldatore a stagno e fare un taglio netto della pista nel
punto C (Fig.2).
La logica dei tasti del trasmettitore TX B e di eventuali
trasmettitori memorizzati con questa procedura sarà la
medesima del trasmettitore A.
6
Page 7

MPORTANT REMARKS
I
For technical information or any installation problem, you can call
our customer service during office hours
EL. (+39) 01 72 81 24 11
T
TECHNICAL DATA 230V models 120V models
Alimentation 230Vac - 50Hz 120Vac - 60Hz
Relay contact 10A / 250Vac 10A / 120Vac
V2 S.p.A. has the right to modify the product without
previous notice; it also declines any responsibility to
damage or injury to people or things caused by improper
use or wrong installation.
m Please read this instruction manual very carefully
before installing and programming your devoce..
• This instruction manual is only for qualified technicians, who
specialize in installations.
• Every programming and/or every maintenance service should
be done only by qualified technicians.
• The installer should make arrangements for installation of an
automatic protection device and a fuse.
The standards require a breaker spacing of at least 3 mm for
each pole (EN 60335-1).
The automatic breaker should guarantee omnipolar system
power isolation.
The protection device trip current should not exceed 8A.
• The connection cables should be suitable for installation in
wet outdoor environments
• It is essential to use cables of the proper size for the cable
duct used to guarantee a protection level of IP55 for the
casing.
Nominal Frequency 433,92 - 868,30 Mhz
Working temperature -20 ÷ +60 °C
ENGLISH
Consumption 20 mA standby
Sensibility ≥ -103 dBm
S/N > 17dB @ 100dBm m=100%
Size 113 x 113 x 57 mm
Weight 200g
Protection IP55
230V dual channel receiver, capable to
control loads up to 1500W
• Operates with Royal or Personal Pass series transmitters:
the first remote control to be memorised determines the
mode of operation; Royal or Personal Pass.
• The Personal Pass version allows up to 240 different remote
controls to be memorised.
• Monostable, bistable or timer operating logoc.
• Basic programming using button SW1 or advanced
programming using the PROG2 programming device and
WINPPCL software
DECLARATION OF CONFORMITY
V2 SpA hereby declares that the products:
WALLY2-230V, WALLY2-120V
comply with the following directives:
99/05/CEE radio
2006/95/CEE electrical safety
2004/108/CE electromagnetic compatibility
To verify compliance, the following technical standards
have been applied:
EN 60335-1, EN 55014-1, EN 55014-2, EN 301 489-1,
EN 301 489-3, EN 300 220 - 3
Racconigi, 29/07/2010
V2 S.p.A. legal representative
Cosimo De Falco
PROGRAMMING
The self learning programming system enables the code
memorization and the setting of the following functioning
modes:
MONOSTABLE: it activates the corresponding relay through the
time of TX transmission. When the transmission stops, the relay
goes automatically off.
BISTABLE: it activates the corresponding relay on the first TX
transmission. The relay goes off on the second transmission.
TIMER: the tx transmission activates the corresponding relay
which goes off after the set time (max 7,5 minutes).
NOTE: the first remote control to be memorised determines
the mode of operation; Royal or Personal Pass.
To change the operating mode, it is essential to perform a
COMPLETE CANCELLATION and then memorise the new
remote control.
m IMPORTANT: to memorize the code in the correct way
it is necessary to keep a minimum distance of 1,5 metres
between the transmitter and the receiver's antenna.
7
Page 8
ELECTING THE CHANNEL AND THE
S
MONOSTABLE / BISTABLE OPERATION LOGIC
Select the channel and the operating logic by referring to the
following table:
°IMPULSES
N
CHANNEL 1 MONOSTABLE 1
CHANNEL 1 BISTABLE 2
CHANNEL 2 MONOSTABLE 3
ENGLISH
CHANNEL 2 BISTABLE 4
SW1
L1 L2 L3
•
• •
LED ON
•
• •
. The number of flashes for LED L1 corresponds to the period
4
of time it is desired be set.
5. Press button SW1 on the receiver during the desired period of
flashing: the series of flashes in interrupted and LED L1
remains on
6. Within 5 seconds, press and hold the button on the remote
control:
- if the remote control unit is a ROYAL version
procedure ends at point 7
- if the remote control unit is a PERSONAL PASS version
to point 8 and follow the procedure until the end of the
section
7. LED L1 on the receiver is turned off to indicate the code has
been memorised correctly
, the
, go
1. Press the SW1 key of the receiver N times, as indicated
above: the relevant led goes on
2. Within 5 seconds, press and hold the button on the remote
control.
- if the remote control unit is a ROYAL version
procedure ends at point 3
- if the remote control unit is a PERSONAL PASS version, go
to point 4 and follow the procedure until the end of the
section
3. LED on the receiver is turned off to indicate the code has
been memorised correctly
4. The led of the receiver goes out and goes on again: the code
has been memorised and the receiver remains standby for 5 s
with a new code to be memorised
5. Memorise all the remote control units necessary
6. After 5 seconds without a valid transmission, LED L1 is turned
off and the receiver returns to normal operating mode
, the
PROGRAMMING THE TIMER FUNCTION
To memorise a transmitter on channel 1, associating it with the
TIMER function, proceed as follows:
1. Press and hold the SW1 key on the receiver:
LED L1 (associated with the first channel) comes on
2. After 4 seconds, LED L1 is turned off
3. When led L1 goes off, release the SW1 button. Led L1 starts
a sequence of flashings at low speed (1 flash per second).
The number of flashing corresponds to the time which can
be set as shown in the table.
N° Flashing Time
1 01 sec.
2 02 sec.
3 03 sec.
4 04 sec.
5 05 sec.
6 06 sec.
7 07 sec.
8 08 sec.
9 09 sec.
10 10 sec.
11 11 sec.
12 12 sec.
13 13 sec.
14 14 sec.
15 15 sec.
16 30 sec.
N° Flashing Time
17 1 min.
18 1,5 min.
19 2 min.
20 2,5 min.
21 3 min.
22 3,5 min.
23 4 min.
24 4,5 min.
25 5 min.
26 5,5 min.
27 6 min.
28 6,5 min.
29 7 min.
30 7,5 min.
8. LED L1 on the receiver is turned off and then comes on again:
the code has been memorised and the receiver remains
standby for 5 s with a new code to be memorised
9. Memorise all the remote control units necessary
10. After 5 seconds without a valid transmission, LED L1 is turned
off and the receiver returns to normal operating mode
To memorise a transmitter on channel 2, associating it with the
TIMER function, proceed as follows:
1. Press and release the SW1 key: LED L1 comes on
2. Press and release the SW1 key: LED L3 also comes on
3. Press and hold the SW1 key: LEDs L1 and L3 are turned off
and LED L2 comes on
4. After 4 seconds, LED L2 is turned off
5. When led L1 goes off, release the SW1 button. Led L1 starts
a sequence of flashings at low speed (1 flash per second).
The number of flashing corresponds to the time which can
be set as shown in the table.
6. The number of flashes for LED L1 corresponds to the period
of time it is desired be set.
7. Press button SW1 on the receiver during the desired period of
flashing: the series of flashes in interrupted and LED L1
remains on
8. Within 5 seconds, press and hold the button on the remote
control:
- if the remote control unit is a ROYAL version
procedure ends at point 9
- if the remote control unit is a PERSONAL PASS version
to point 10 and follow the procedure until the end of the
section
9. LED L1 on the receiver is turned off to indicate the code has
been memorised correctly
10. LED L1 on the receiver is turned off and then comes on again:
the code has been memorised and the receiver remains
standby for 5 s with a new code to be memorised
11. Memorise all the remote control units necessary
12. After 5 seconds without a valid transmission, LED L1 is turned
off and the receiver returns to normal operating mode
, the
, go
8
Page 9
OLLING CODE MODE
R
(Personal Pass system only)
The receiver manages the rolling code for the Personal Pass
ystem. This function is disabled by default.
s
Rolling code mode may be activated by WinPPCL or by using the
SW1 programming button.
• Press and hold the SW1 key on the receiver:
• After 4 seconds, LED L1 is turned off
• After 10 seconds, LED L3 comes on
• Release the key: LED L3 starts to flash for 5 seconds:
Single flashes
Double flashes ROLLING CODE enabled
• To change the settings, press button SW1 within 5 seconds of
the flashing starting; LED L1 will flash in accordance with the
new settings.
• Wait 5 s from pressing the last button selecting the desired
flashing, LED L1 is turned off and the new configuration is
memorised.
ROLLING CODE disabled
REMOTE RADIO LEARNING
(Personal Pass system only)
This procedure allows to memorize new transmitters by radio, in
sequence and without removing the receiver from the
installation.
The transmitter which allows to enable the programming by
radio must be memorized in advance.
All transmitters programmed by radio will share the same key
configuration as the transmitter which activated the
programming.
Example:
TX A transmitter memorized with the following key configuration:
Key 1 in monostable configuration.
Key 2 in 10 s timer configuration.
Key in bistable configuration.
TX B transmitter to memorize.
• Hold for 5 seconds minimum the keys 1+2 or 1+3 of TX A
• Release both keys
• Press, within 5 seconds, the required key of TX B:
LED L1 on the receiver is turned off and then comes on again
to indicate the code has been memorised correctly
• Within 5 seconds, transmit using the other key on TX B that it
is desired to memorise; repeat this operation for any other
transmitters.
• To exit the self-learning mode wait for at least 5 seconds
UBSITUTIVE TRANSMITTER
S
(Personal Pass system only)
The substitutive transmitter, generated only by means of
WINPPCL, allows to replace by radio a transmitter stored in the
receiver.
single transmition with the specially programmed
A
SUBSTITUTIVE TX, nearby the receiver, replaces the transmitter
code with the new one without removing the receiver from the
installation.
Three code substitutions are permitted, if transmitter TX A is
memorised, the options are::
TX B replaces TX A (TX A is no longer operative)
TX C replaces TX B (TX B is no longer operative)
TX D replaces TX C (TX C is no longer operative)
CODE REPLACEMENT
(Royal system only)
The memorized transmitter code can be replaced by a new code
by following the same procedure for the memorization.
In this way the new code will be memorized and the previous
one cancelled.
FULL CODE ERASING
To perform a full code erasing do the following:
• Remove the power to the receiver.
• Press and hold the SW1 key on the receiver.
• At the same time, power-up the receiver.
The receiver LED goes on: release the SW1 key
• The memory spaces are empty and available for a new
programming.
To perform a partial code erasing the PROG2 portable
programmer is required.
RELAY CONTACTS
The contact on the load terminal board is the normally open
type; it is possible to modify the contact to make it work as a
normally closed contact: short-circuit jumper A and jumper B
using tin-based solder and make a sharp cut in the jumper C
circuit (Fig.2).
ENGLISH
The key configuration of TX B transmitter and other
transmitters, set with this procedure, will be the same as
TX A transmitter.
9
Page 10

ONSEILS IMPORTANTS
C
Pour tout précision technique ou problème d’installation
V2 S.p.A. dispose d’un service d’assistance clients actif pendant
es horaires de bureau TEL. (+39) 01 72 81 24 11
l
V2 S.p.A. se réserve le droit d’apporter d’éventuelles
modifications au produit sans préavis; elle décline en outre toute
responsabilité pour tous types de dommages aux personnes ou
aux choses dus à une utilisation imporopre ou à une mauvaise
installation.
ARACTERISTIQUES
C
TECHNIQUES
limentation
A
Contacts relais 10A / 250Vac 10A / 120Vac
Fréquence de travail 433,92 - 868,30 Mhz
Température d’ exercice -20 ÷ +60 °C
Consommation 20 mA standby
Modèle 230V Modèle 120V
30Vac - 50Hz120Vac - 60Hz
2
m Avant de proceder avec l'installation et la
rogrammation, lire attentivement les notices.
p
• Ce manuel d'instruction est destiné à des techniciens qualifiés
dans le domain des installationes.
• Tous operations de maintenance ou programation doivent
être faites à travers de techniciens qualifiés.
• L'installateur doit se charger de l'installation d'un dispositif de
FRANÇAIS
protection automatique et d'un fusible.
La norme requiert une séparation des contacts d'au moins
3 mm pour chaque pôle (EN 60335-1).
L'interrupteur automatique doit assurer le sectionnement de
type unipolaire de l'alimentation du système.
Le courant d'intervention des dispositifs de protection ne doit
pas être supérieur à 8A.
• Les câbles de branchement doivent être indiqués pour la pose
en environnement extérieur humide
• Pour garantir le degré de protection IP55 du coffret il est
nécessaire d'utiliser des câbles ayant les dimensions indiquée
au passe-câble utilisé.
DECLARATION DE CONFORMITÉ
V2 SPA déclare que les produits:
WALLY2-230V, WALLY2-120V
sont conformes aux directives suivantes:
99/05/CEE Directive radio
2006/95/CEE Directive sécurité électrique
2004/108/CE Directive compatibilité electromagnétique
Les normes techniques suivantes ont été appliquées pour en
vérifier la conformité:
EN 60335-1, EN 55014-1, EN 55014-2, EN 301 489-1,
EN 301 489-3, EN 300 220 - 3
Racconigi, lì 29/07/2010
Le représentant dument habilité V2 S.p.A.
Cosimo De Falco
Sensibilité ≥ -103 dBm
S/N > 17dB @ 100dBm m=100%
Dimensions 113 x 113 x 57 mm
Poids 200g
Indìce de protection IP55
Récepteur bicanal alimenté en 230V avec
possibilité de commande de charges jusqu’à
1500W
• Fonctionnement avec émetteurs séries Royal ou
Personal Pass: la première télécommande qui est mémorisée
détermine le mode de fonctionnement Royal ou Personal Pass.
• La version Personal Pass est en mesure de mémoriser jusqu'à
240 télécommandes.
• Logique de fonctionnement monostable, bistable ou
minuteur.
• Programmation base au moyen de la touche SW1 ou avancée
par l'intermédiaire du programmateur PROG2 et logiciel
WINPPCL
PROGRAMMATION
Le système de programmation à auto apprentissage permet la
mémorisation du code et l’établissement des fonctions suivantes:
MONOSTABLE: active le relais correspondant pendant tout le
temps de transmission de l’émetteur, quand la transmission
termine le relais se désactive automatiquement.
BISTABLE: active le relais correspondant par la première
transmission de l’émetteur, le relais se désactive par la seconde
transmission.
TIMER: la transmission de l’émetteur active le relais
correspondant qui se désactive après le temps établit (maximum
7,5 minutes).
REMARQUE: la première télécommande qui est mémorisée
détermine le mode de fonctionnement Royal ou Personal
Pass.
Pour modifier le mode de fonctionnement il est nécessaire
d'effectuer un EFFACEMENT TOTAL et mémoriser la
nouvelle télécommande.
m IMPORTANT: pour mémoriser correctement le code il
est nécessaire maintenir une distance minimum de 1,5 m.
entre l’émetteur et l’antenne du récepteur.
10
Page 11

ÉLECTION DU CANAL ET DE LA LOGIQUE DE
S
FONCTIONNEMENT MONOSTABLE / BISTABLE
Sélectionner le canal et la logique de fonctionnement en se
référant au tableau suivant :
N°IMPULSIONS
SW1
CANAL 1 MONOSTABLE 1
ANAL 1 BISTABLE
C
CANAL 2 MONOSTABLE 3
CANAL 2 BISTABLE 4
2
LED ALLUME
L1 L2 L3
•
• •
•
• •
. Compter le nombre de clignotements de la DEL L1 qui
4
correspond au temps que l’on désire configurer.
5. Presser la touche SW1 du récepteur pendant le clignotement
souhaité: la série de clignotements s'interrompt et la DEL L1
reste allumée
6. Dans un intervalle de 5 secondes presser et maintenir pressé
la touche de la télécommande :
- si la télécommande est ROYAL
le point 7
- si la télécommande est PERSONAL PASS
et suivre la procédure jusqu'à la fin du paragraphe
7. La DEL L1 du récepteur s'éteint pour indiquer que le code a
correctement été mémorisé
la procédure termine avec
passer au point 8
1. Appuyer la touche SW1 du récepteur pour N fois comme
indiqué au-dessus: le led correspondent s’allume.
2. Dans un intervalle de 5 secondes presser et maintenir pressé
la touche de la télécommande :
- si la télécommande est ROYAL
le point 3
- si la télécommande est PERSONAL PASS passer au point
4 et suivre la procédure jusqu'à la fin du paragraphe
3. La DEL du récepteur s'éteint pour indiquer que le code a
correctement été mémorisé
4. La DEL du récepteur s'éteint et se rallume: le code a été
mémorisé sur le récepteur reste en attente pendant
5 secondes d'un nouveau code à mémoriser
5. Mémoriser toutes les télécommandes souhaitées
6. Après avoir attendu 5 secondes sans aucune émission valide
la DEL L1 s'éteint et le récepteur retourne en fonctionnement
normal
la procédure termine avec
PROGRAMMATION DE LA FONCTION
MINUTEUR
Pour mémoriser un transmetteur sur le canal 1 en l'associant à la
fonction TIMER, procéder de la façon suivante :
1. Appuyer et maintenir enfoncée la touche SW1 du récepteur :
la DEL L1 (correspondant au premier canal) s'allume
2. Après 4 secondes la DEL L1 s'éteint
3. Quand le led s’éteigne, relacher la touche SW1.
Le led L1 commence une serie d’éclaires à vitesse reduite
(1 éclaire/second). Le numero d’éclaires correspond à un
temps qu’on peut établir comme indiqué dans le schema
N° Eclaires Temp
1 01 sec.
2 02 sec.
3 03 sec.
4 04 sec.
5 05 sec.
6 06 sec.
7 07 sec.
8 08 sec.
9 09 sec.
10 10 sec.
11 11 sec.
12 12 sec.
13 13 sec.
14 14 sec.
15 15 sec.
16 30 sec.
N° Eclaires Temp
17 1 min.
18 1,5 min.
19 2 min.
20 2,5 min.
21 3 min.
22 3,5 min.
23 4 min.
24 4,5 min.
25 5 min.
26 5,5 min.
27 6 min.
28 6,5 min.
29 7 min.
30 7,5 min.
8. La DEL L1 du récepteur s'éteint et se rallume: Le code a été
mémorisé sur le récepteur reste en attente pendant
5 secondes d'un nouveau code à mémoriser
9. Mémoriser toutes les télécommandes souhaitées
10. Après avoir attendu 5 secondes sans aucune émission valide
la DEL L1 s'éteint et le récepteur retourne en fonctionnement
normal
Pour mémoriser un transmetteur sur le canal 2 en l'associant à la
fonction TIMER, procéder de la façon suivante :
1. Appuyer et relâcher la touche SW1 : la DEL L1 s’allume
2. Appuyer et relâcher la touche SW1 : la DEL L3 s’allume
également
3. Appuyer et maintenir enfoncée la touche SW1 : les DEL L1 et
L3 s'éteignent et la DEL L2 s'allume
4. Après 4 secondes la DEL L2 s'éteint
5. Quand le led s’éteigne, relacher la touche SW1.
Le led L1 commence une serie d’éclaires à vitesse reduite
(1 éclaire/second). Le numero d’éclaires correspond à un
temps qu’on peut établir comme indiqué dans le schema
6. Compter le nombre de clignotements de la DEL L1 qui
correspond au temps que l’on désire configurer.
7. Presser la touche SW1 du récepteur pendant le clignotement
souhaité: la série de clignotements s'interrompt et la DEL L1
reste allumée
8. Dans un intervalle de 5 secondes presser et maintenir pressé
la touche de la télécommande :
- si la télécommande est ROYAL
le point 9
- si la télécommande est PERSONAL PASS passer au point
10 et suivre la procédure jusqu'à la fin du paragraphe
9. La DEL L1 du récepteur s'éteint pour indiquer que le code a
correctement été mémorisé
10. La DEL L1 du récepteur s'éteint et se rallume: Le code a été
mémorisé sur le récepteur reste en attente pendant
5 secondes d'un nouveau code à mémoriser
11. Mémoriser toutes les télécommandes souhaitées
12. Après avoir attendu 5 secondes sans aucune émission valide
la DEL L1 s'éteint et le récepteur retourne en fonctionnement
normal
la procédure termine avec
FRANÇAIS
11
Page 12

ODALITÉ ROLLING CODE
M
(uniquement système Personal Pass)
Le récepteur gère le rolling code du système Personal Pass.
Cette fonction de défaut est désactivée.
Il est possible d'activer le mode rolling code par WinPPCL ou avec
a touche de programmation SW1.
l
• Appuyer et maintenir enfoncée la touche SW1 du récepteur :
• Après 4 secondes la DEL L1 s'éteint
• Après 10 secondes la DEL L3 s'allume
• Relâcher la touche : la DEL L3 commence à clignoter pendant
5 secondes :
Clignotements uniques:
Clignotements doubles:
ROLLING CODE désactivé
ROLLING CODE activé
METTEUR SUBSTITUTIF
E
(uniquement système Personal Pass)
L’émetteur SUBSTITUTIF, produit seulement par WINPPCL, permet
de remplacer via radio un émetteur mémorisé dans le récepteur.
Ça suffit transmettre une fois, en proximité du récepteur, avec le
X SUBSTITUTIF exprèssement programmé: le code de l’émetteur
T
est remplacé avec le nouveau sans enlever le récepteur de
l’installation.
Il est possible d'avoir au maximum trois remplacements par code,
si j'ai l'émetteur TX A mémorisé je pourrai avoir:
TX B que remplace TX A (TX A n’est plus actif)
TX C que remplace TX B (TX B n’est plus actif)
TX D que remplace TX C (TX C n’est plus actif)
• Pour modifier les configurations presser la touche SW1 d'ici
5 secondes dès le commencement de la série de clignotements;
La DEL L1 clignotera en fonction des nouvelles configurations.
• Attendre 5s de la dernière pression qui a sélectionné le
FRANÇAIS
clignotement souhaité, la DEL L1 s'éteint et la configuration est
mémorisée.
APPRENTISSAGE RADIO À DISTANCE
(uniquement système Personal Pass)
Cette procédure permet de mémoriser des nouveaux émetteurs
via radio, de façon séquentielle et sans enlever le récepteur de
l’installation.
L’émetteur que permet d’habiliter la programmation via radio
doit être déjà mémorisé.
Tous les émetteurs mémorisés via radio auront la même logique
touches de l’émetteur que a activé la programmation.
Exemple:
Emetteur TX A mémorisé avec la logique touches suivante:
Touche 1 en configuration monostable.
Touche 2 en configuration minuteur 10s.
Touche 3 en configuration bistable.
Emetteur TX B à mémoriser.
• Appuyer pour au moins 5 seconds les touches 1+2 ou 1+3
du TX A.
• Relâcher les deux touches.
• Appuyer, dans 5 seconds, le touche du TX B souhaité:
la DEL L1 du récepteur s'éteint et se rallume pour indiquer que
le code a correctement été mémorisé
• Transmettre, d'ici 5 secondes, avec une autre touche du TX B
que l'on souhaite mémoriser; répéter cette opération pour
d'autres émetteurs éventuels.
• Pour sortir de l’autoapprentissage attendre au moins
5 seconds.
REMPLACEMENT DU CODE
(uniquement système Royal)
Le code télécommande mémorisé peut être remplacé par un
nouveau code en appliquant le même procédé que pour la
mémorisation. De cette manière le nouveau code sera mémorisé
en effaçant le précédent.
EFFACEMENT TOTAL DES CODES
Pour faire un’ effacement total des codes procéder comme il
suive:
• Couper l’alimentation du récepteur.
• Appuyer et maintenir la touche SW1 du récepteur.
• En même temps re-activer l’alimentation. Le LED L1 du
récepteur s’allume: relâcher la touche SW1.
• Les zones de mémoire maintenant sont vides et disponibles
pour une nouvelle programmation.
Pour effectuer un’ effacement partiel des codes il faut
utiliser le Programmateur portatif PROG2.
CONTACTS RELAIS
Le contact sur les bornes de la charge est de type normalement
ouvert ; il est possible de modifier le contact afin qu'il fonctionne
comme contact normalement fermé : court-circuiter le point A et
le point B avec un fer à souder avec apport d’étain et faire une
coupe nette de la piste dans le point C (Fig.2).
La logique des touches de l’émetteur TX B et des autres
éventuellement mémorisés avec cette procédure, sera la
même de l’émetteur A.
12
Page 13

DVERTENCIAS IMPORTANTES
A
Por cualquier problema técnico ponerse en contacto con el
servicio asistencia V2 S.p.A. TEL. (+39) 01 72 81 24 11
La V2 S.p.A. se reserva el derecho de aportar eventuales
modificaciones al producto sin previo aviso; ademmás, no se hace
responsable de danos a personas o cosas debidos a un uso
improprio o a una instalación errónea.
m Antes de proceder en las installacion y la
programmacion es aconsejable leer bien las instrucciones.
Dicho manual es destinado exclusivamente a técnicos
•
calificados en las installacion.
• Cualquiera operacion de manutencion y programacion tendrà
que ser hecha para técnicos calificados en las installacione de
automatismos.
• El instalador debe proceder a la instalación de un dispositivo de
protección automático y de un fusible.
La normativa requiere una separación de los contactos de al
menos 3 mm en cada polo (EN 60335-1).
El interruptor automático debe asegurar el seccionamiento
omnipolar de la alimentación del sistema.
La corriente de intervención de los dispositivos de protección
no debe ser superior a 8A.
• Los cables de conexión deben ser adecuados para su
colocación en un exterior húmedo
• Para garantizar el grado de protección IP55 del contenedor es
necesario utilizar cables de dimensiones adecuadas para el
pasacable utilizado.
ARACTERISTICAS
C
TÉCNICAS
limentación
A
Contactos relé 10A / 250Vac 10A / 120Vac
Frecuencia de trabajo 433,92 - 868,30 Mhz
Temperatura de ejercicio -20 ÷ +60 °C
Consumo 20 mA standby
Sensibilidad ≥ -103 dBm
S/N > 17dB @ 100dBm m=100%
Dimensiones 113 x 113 x 57 mm
Peso 200g
Indìce de protection IP55
Modelos 230V Modelos 120V
30Vac - 50Hz120Vac - 60Hz
2
Receptor bicanal de 230V con posibilidad de
control de cargas hasta 1500W
• Funcionamiento con transmisores serie Royal o Personal Pass:
el primer mando a distancia que es memorizado determina el
modo de funcionamiento Royal o Personal Pass.
• La versión Personal Pass permite memorizar hasta
240 mandos a distancia diferentes.
• Lógica de funcionamiento monoestable, biestable o timer
(temporizador)
• Programación base mediante botón SW1 o avanzada
mediante programador PROG2 y software WINPPCL
ESPAÑOL
CONFORMIDAD A LAS NORMATIVAS
V2 SPA declara que los productos:
WALLY2-230V, WALLY2-120V
son conformes con las siguientes directivas:
99/05/CEE Directiva radio
2006/95/CEE Directiva seguridad electrica
2004/108/CE Directiva compatibilidad electromagnetica
Las siguientes normas técnicas han sido aplicadas
para verificar su conformidad:
EN 60335-1, EN 55014-1, EN 55014-2, EN 301 489-1,
EN 301 489-3, EN 300 220 - 3
Racconigi, lì 29/07/2010
El representante legal de V2 SPA
Cosimo De Falco
PROGRAMACIÓN
El sistema de programación de autoaprendizaje permite la
memorización del código y la programación de los siguientes
modos de funcionamiento:
MONOESTABLE: este tipo de programación activa el relé
correspondiente durante todo el tiempo de transmisión del
emisor, cuando la transmisión se interrumpe el relé se desactiva
automáticamente.
BIESTABLE: este tipo de programación activa el relé
correspondiente con la primera transmisión del emisor, el relé se
desactiva con la segunda transmisión.
TIMER: con este tipo d programación, la transmisión del emisor
activa el relé correspondiente el cual se desactiva después del
tiempo programado (máx. 7,5 Min.).
NOTA: el primer mando a distancia que es memorizado
determina el modo de funcionamiento Royal o
Personal Pass.
Para modificar el modo de funcionamiento es necesario
efectuar un BORRADO TOTAL y memorizar el nuevo mando
a distancia.
m IMPORTANTE: para memorizar correctamente el código
es necesario mantener una distancia mínima de 1,5 metros
entre el emisor y la antena del receptor.
13
Page 14

ELECCIÓN DEL CANAL Y DE LA LÓGICA DE
S
FUNCIONAMIENTO MONOESTABLE /
BIESTABLE
Seleccionar el canal y la lógica de funcionamiento remitiéndose al
siguiente cuadro:
N°IMPULSOS
SW1
CANAL 1 MONOESTABLE 1
CANAL 1 BIESTABLE 2
CANAL 2 MONOESTABLE 3
CANAL 2 BIESTABLE 4
1. Pulsar la tecla SW1 del receptor durante N veces como se
indica en la tabla de arriba: el led interesado se enciende
2. Antes de 5 segundos pulse y mantenga pulsado el botón del
mando a distancia:
- si el mando a distancia es ROYAL
en el punto 3
- si el mando a distancia es PERSONAL PASS
4 y soga el procedimiento hasta el final del apartado
3. El led del receptor se apaga para indicar que el código ha
sido memorizado correctamente
ESPAÑOL
4. El led del receptor se apaga y se vuelve a encender:
el código ha sido memorizado y el receptor permanece en
espera durante 5 s de un nuevo código para memorizar
5. Memorice todos los mandos a distancia que desee
6. Pasados 5 segundos sin ninguna transmisión válida el led L1
se apaga y el receptor vuelve al funcionamiento normal
el procedimiento acaba
LED ENCENDIDO
L1 L2 L3
•
• •
pase al punto
PROGRAMACIÓN DE LA FUNCIÓN TIMER
(TEMPORIZADOR)
Para memorizar un transmisor en el canal 1 asociándolo con la
función TIMER (TEMPORIZADOR) proceder como sigue:
1. Pulsar y mantener pulsada la tecla SW1 del receptor:
el led L1 (correspondiente al primer canal) se enciende
2. Pasados 4 segundos el led L1 se apaga
3. Cuando el led se apaga, soltar la tecla SW1.
El led L1 inicia una serie de destellos a poca velocidad
(1 destello al segundo). El número de destellos corresponde a
un tiempo programable como se indica en la tabla.
N° Destellos Tiempo
1 01 seg.
2 02 seg.
3 03 seg.
4 04 seg.
5 05 seg.
6 06 seg.
7 07 seg.
8 08 seg.
9 09 seg.
10 10 seg.
11 11 seg.
12 12 seg.
13 13 seg.
14 14 seg.
15 15 seg.
16 30 seg.
N° Destellos Tiempo
17 1 min.
18 1,5 min.
19 2 min.
20 2,5 min.
21 3 min.
22 3,5 min.
23 4 min.
24 4,5 min.
25 5 min.
26 5,5 min.
27 6 min.
28 6,5 min.
29 7 min.
30 7,5 min.
•
• •
. Cuente el número de parpadeos del led L1 correspondiente al
4
tiempo que se desea programar.
5. Pulse el botón SW1 del receptor durante el parpadeo
deseado: la serie de parpadeos se interrumpe y el led L1
permanece encendido
6. Antes de 5 segundos pulse y mantenga pulsado el botón del
mando a distancia:
- si el mando a distancia es ROYAL
termina en el punto 7
- si el mando a distancia es PERSONAL PASS
8 y siga el procedimiento hasta el final del apartado
7. El led L1 del receptor se apaga para indicar que el código ha
sido memorizado correctamente
8. El led L1 del receptor se apaga y se vuelve a encender:
el código ha sido memorizado y el receptor permanece en
espera durante 5 s de un nuevo código para memorizar
9. Memorice todos los mandos a distancia que desee
10. Pasados 5 segundos sin ninguna transmisión válida el led L1
se apaga y el receptor vuelve al funcionamiento normal
Para memorizar un transmisor en el canal 2 asociándolo con la
función TIMER (TEMPORIZADOR) proceder como sigue:
1. Pulsar y soltar la tecla SW1: se enciende el led L1
2. Pulsar y soltar la tecla SW1: se enciende también el led L3
3. Pulsar y mantener pulsada la tecla SW1: los led L1 y L3 se
apagan y el led L2 se enciende
4. Pasados 4 segundos el L2 se apaga
5. Cuando el led se apaga, soltar la tecla SW1.
El led L1 inicia una serie de destellos a poca velocidad
(1 destello al segundo). El número de destellos corresponde a
un tiempo programable como se indica en la tabla.
6. Cuente el número de parpadeos del led L1 correspondiente al
tiempo que se desea programar.
7. Pulse el botón SW1 del receptor durante el parpadeo
deseado: la serie de parpadeos se interrumpe y el led L1
permanece encendido
8. Antes de 5 segundos pulse y mantenga pulsado el botón del
mando a distancia:
- si el mando a distancia es ROYAL
termina en el punto 9
- si el mando a distancia es PERSONAL PASS
10 y siga el procedimiento hasta el final del apartado
9. El led L1 del receptor se apaga para indicar que el código ha
sido memorizado correctamente
10. El led L1 del receptor se apaga y se vuelve a encender:
el código ha sido memorizado y el receptor permanece en
espera durante 5 s de un nuevo código para memorizar
11. Memorice todos los mandos a distancia que desee
12. Pasados 5 segundos sin ninguna transmisión válida el led L1
se apaga y el receptor vuelve al funcionamiento normal
el procedimiento
pase al punto
el procedimiento
pase al punto
14
Page 15

ODO ROLLING CODE
M
(solo sistema Personal Pass)
El receptor gestiona el rolling code del sistema Personal Pass.
Esta función por defecto está inhabilitada.
Es posible activar el modo rolling code mediante WinPPCL o con el
otón de programación SW1.
b
• Pulsar y mantener pulsada la tecla SW1 del receptor:
• Pasados 4 segundos el led L1 se apaga
• Pasados 10 segundos el led L3 se enciende
• Soltar el pulsador: el Led L3 comienza una serie de parpadeos
durante 5 segundos:
Parpadeos únicos
Parpadeos dobles
ROLLING CODE inhabilitado
ROLLING CODE habilitado
MISOR SUSTITUTIVO
E
(solo sistema Personal Pass)
El emisor SUSTITUTIVO, generado solamente mediante WINPPCL,
permite sustituir vía radio un emisor memorizado en el receptor.
Es suficiente transmitir una vez, en proximidad al receptor, con el
X SUSTITUTIVO expresamente programado: el código del emisor
T
viene sustituido con el nuevo sin necesidad de quitar o manipular
el receptor de la instalación.
Se pueden realizar como máximo tres sustituciones por código, si
tengo el transmisor TX A memorizado podré tener:
TX B que sustituye TX A (TX A ya no es activo)
TX C que sustituye TX B (TX B ya no es activo)
TX D que sustituye TX C (TX C ya no es activo)
• Para modificar las configuraciones pulse el botón SW1 antes de
5 segundos desde que comienza la serie parpadeos; el LED L1
parpadeará en base a las nuevas configuraciones.
• Espere 5 s desde la última vez que haya pulsado el botón para
seleccionar el parpadeo deseado, el led L1 se apaga y la
configuración es memorizada.
APRENDIZAJE RADIO A DISTANCIA
(solo sistema Personal Pass)
Este procedimiento permite memorizar nuevos emisores vía
radio, de forma secuencial y sin quitar el receptor de la
instalación.
El emisor que permite habilitar la programación vía radio tiene
que estar ya memorizado.
Todos los emisores memorizados vía radio tendrán la misma
lógica de las teclas del emisor que ha activado la programación.
Ejemplo:
Emisor TX A memorizado con la siguiente lógica teclas:
Botón 1 en configuración monoestable.
Botón 2 en configuración timer 10 s.
Botón 3 en configuración biestable.
Emisor TX B a memorizar.
• Pulsar durante al menos 5 segundos las teclas 1+2 o 1+3
del TX A
• Soltar ambas teclas
• Pulsar antes de que pasen 5 segundos, la tecla del TX B
deseado: el led L1 del receptor se apaga y se vuelve a encender
para indicar que el código ha sido memorizado correctamente
• Transmita, antes de de 5 segundos, con otra botón del TX B
que se desea memorizar; repita esta operación para otros
eventuales transmisores.
• Para salir del autoaprendizaje esperar un mínimo de
5 segundos
SUSTITUCION DEL CODIGO
(solo sistema Royal)
El código emisor memorizado, puede ser sustituido por un código
nuevo siguiendo el mismo procedimiento que para la
memorización. En tal caso el código nuevo será memorizado
cancelando el precedente.
ESPAÑOL
CANCELACIÓN TOTAL DE LOS CÓDIGOS
Para ejecutar una cancelación total de los códigos proceder de la
siguiente forma:
• Quite la alimentación al receptor.
• Pulse y mantenga pulsado el botón SW1 del receptor.
• Al mismo tiempo de alimentación al receptor.
El LED del receptor se enciende: soltar la tecla SW1.
• Las zonas de memoria ahora están vacías y disponibles para
una nueva programación.
Para efectuar una cancelación parcial de los códigos es
necesario el auxilio del programador portátil PROG2.
CONTACTOS DEL RELÉ
El contacto en los bornes de la carga es tipo normalmente
abierto; es posible modificar el contacto para que funcione como
contacto normalmente cerrado: cortocircuite el punto A y el
punto B con un soldador de estaño y haga un corte limpio de la
pista en el punto C (Fig.2).
La lógica de las teclas del emisor TX B y de eventuales
emisores memorizados con este procedimiento, será la
misma del emisor A.
15
Page 16

VISOS IMPORTANTES
A
Para esclarecimentos técnicos ou problemas de instalação a
V2 SPA dispõe de um serviço de assistência clientes activo em
orário de abertura. TEL. (+39) 01 72 81 24 11
h
V2 SPA reserva-se o direito de efectuar eventuais alterações ao
produto sem aviso prévio; declina ainda qualquer
responsabilidade pelos danos a pessoas ou coisas originados por
uso impróprio ou instalação errada.
m Ler atentamente o seguinte manual de instruções
antes de proceder à instalação.
ARACTERÍSTICAS
C
TÉCNICAS
limentação
A
Contactos relé 10A / 250Vac 10A / 120Vac
Frequência de trabalho 433,92 - 868,30 Mhz
Temperatura de trabalho -20 ÷ +60 °C
Consumo 20 mA standby
Sensibilidade ≥ -103 dBm
Modelos 230V Modelos 120V
30Vac - 50Hz120Vac - 60Hz
2
• O presente manual de instruções destina-se exclusivamente
ao pessoal técnico qualificado no sector das instalações de
automações.
• Qualquer operação de manutenção ou de programação deve
ser realizada exclusivamente por pessoal qualificado.
• O instalador deve providenciar a instalação de um dispositivo
de protecção automático e de um fusível.
• A normativa requer uma separação dos contactos de pelo
menos 3 mm em cada pólo (EN 60335-1).
• O interruptor automático deve garantir o seccionamento
omnipolar da alimentação do sistema.
• A corrente de intervenção dos dispositivos de protecção não
deve ser superior a 8A.
• Os cabos de conexão devem ser idóneos para a colocação em
ambiente externo húmido
• Para garantir o grau de protecção IP55 do recipiente, é
necessário utilizar cabos de tamanhos compatíveis com o
passador de cabos utilizado
DECLARAÇÃO DE CONFORMIDADE
V2 SPA declara que os produtos:
PORTUGUÊS
WALLY2-230V, WALLY2-120V
São conformes às seguintes directivas:
99/05/CEE Directiva Rádio
2006/95/CEE Directiva segurança eléctrica
2004/108/CE Directiva compatibilidade electromagnética
Para verificar dita conformidade foram aplicadas as seguintes
normas técnicas:
EN 60335-1, EN 55014-1, EN 55014-2, EN 301 489-1,
EN 301 489-3, EN 300 220 - 3
Racconigi, aos 29/07/2010
Representante legal V2 S.p.A.
Cosimo De Falco
S/N > 17dB @ 100dBm m=100%
Dimensões 113 x 113 x 57 mm
Peso 200g
Grau de protecção IP55
Receptor de dois canais de 230V com
possibilidade de comando cargas até 1500W
• Funcionamento com transmissores série Royal ou
Personal Pass: o primeiro telecomando memorizado
estabelece a modalidade de funcionamento Royal ou
Personal Pass.
• A versão Personal Pass permite de memorizar até
240 telecomandos diferentes.
• Lógica de funcionamento monoestável, biestável ou timer.
• Programação básica através do botão SW1 ou avançada
através de programador PROG2 e software WINPPCL
PROGRAMAÇÃO
O sistema de programação com auto-aprendizagem permite a
memorização do código e a definição dos seguintes modos de
funcionamento:
MONOESTÁVEL: Activa o respectivo relé pelo tempo em que
dura a transmissão; ao interromper-se a transmissão o relé
desactivase automaticamente.
BIESTÁVEL: activa o respectivo relé na primeira transmissão; o
relé desactiva-se na segunda transmissão.
TEMPORIZADOR: A transmissão activa o respectivo relé, o qual
desactiva-se após o prazo definido (no máximo 7,5 minutos).
NOTA: o primeiro telecomando memorizado estabelece a
modalidade de funcionamento Royal ou Personal Pass.
Para modificar a modalidade de funcionamento é
necessário efectuar um CANCELAMENTO TOTAL e
memorizar o novo telecomando.
m IMPORTANTE: para memorizar correctamente o código
é necessário manter uma distância mínima de 1,5 metros
entre o transmissor e a antena do receptor.
16
Page 17
ELEÇÃO DO CANAL E DA LÓGICA DE
S
FUNCIONAMENTO MONOESTÁVEL /
BIESTÁVEL
Selecionar o canal e lógica de funcionamento consultando a
seguinte tabela:
N°IMPULSOS
SW1
CANAL 1 MONOESTÁVEL 1
CANAL 1 BIESTÁVEL 2
CANAL 2 MONOESTÁVEL 3
ANAL 2 BIESTÁVEL
C
1. Premir o botão SW1 do receptor N vezes, como indicado
acima: o led interessado se acende
2. Dentro de 5 segundos premir e manter premida a tecla do
telecomando:
- se o telecomando for ROYAL
ponto 3
- se o telecomando for PERSONAL PASS
e continuar o processo até o final do parágrafo
3. O led do receptor apaga para indicar que o código foi
memorizado correctamente
4. O led do receptor apaga e volta a acender: o código foi
memorizado e o receptor aguarda por 5 segundos novo
código a ser memorizado
5. Memorizar todos os telecomandos desejados
6. Passados 5 segundos sem ocorrência de nenhuma
transmissão válida, o led L1 apaga e o receptor volta ao
funcionamento normal
4
o processo termina com o
LED ACESO
L1 L2 L3
•
• •
•
• •
passar ao ponto 4
PROGRAMAÇÃO DA FUNÇÃO TIMER
Para memorizar um transmissor no canal 1 associando-o à função
TIMER, proceder da seguinte forma:
1. Premir e manter premida a tecla SW1 do receptor:
o led L1 (relativo ao primeiro canal) acende
2. Após 4 segundos o led L1 apaga
3. Quando o led L1 se apaga, soltar a tecla SW1. O led L1 inicia
uma série de piscadas a baixa velocidade (1 piscada por
segundo). O número de piscadas corresponde ao tempo que
pode ser configurado como indicado na tabela:
N° Piscadas Tempo
1 01 seg.
2 02 seg.
3 03 seg.
4 04 seg.
5 05 seg.
6 06 seg.
7 07 seg.
8 08 seg.
9 09 seg.
10 10 seg.
11 11 seg.
12 12 seg.
13 13 seg.
14 14 seg.
15 15 seg.
16 30 seg.
N° Piscadas Tempo
17 1 min.
18 1,5 min.
19 2 min.
20 2,5 min.
21 3 min.
22 3,5 min.
23 4 min.
24 4,5 min.
25 5 min.
26 5,5 min.
27 6 min.
28 6,5 min.
29 7 min.
30 7,5 min.
. Contar o número de piscadas do led L1 correspondente ao
4
tempo que se deseja seleccionar.
5. Premir a tecla SW1 do receptor durante a piscada desejada:
interrompe-se a série de piscadas e o led L1 permanece ligado
6. dentro de 5 segundos premir e manter premida a tecla do
telecomando:
- se o telecomando for ROYAL
ponto 7
- se o telecomando for PERSONAL PASS
e continuar o processo até o final do parágrafo
7. O led L1 do receptor apaga para indicar que o código foi
memorizado correctamente
8. O led L1 do receptor apaga e volta a acender: o código foi
memorizado e o receptor aguarda por 5 segundos novo
código a ser memorizado
9. Memorizar todos os telecomandos desejados
10. Passados 5 segundos sem ocorrência de nenhuma
transmissão válida o led L1 apaga e o receptor volta ao
funcionamento normal.
Para memorizar um transmissor no canal 2 associando-o à função
TIMER, proceder da seguinte forma:
1. Premir e soltar a tecla SW1: o led L1 acende
2. Premir e soltar a tecla SW1: o led L3 também acende
3. Premir e soltar a tecla SW1: os led L1 e L3 apagam e o
led L2 acende
4. Após 4 segundos o led L2 apaga
5. Quando o led L1 se apaga, soltar a tecla SW1. O led L1 inicia
uma série de piscadas a baixa velocidade (1 piscada por
segundo). O número de piscadas corresponde ao tempo que
pode ser configurado como indicado na tabela
6. Contar o número de piscadas do led L1 correspondente ao
tempo que se deseja seleccionar.
7. Premir a tecla SW1 do receptor durante a piscada desejada:
interrompe-se a série de piscadas e o led L1 permanece ligado
8. dentro de 5 segundos premir e manter premida a tecla do
telecomando:
- se o telecomando for ROYAL
ponto 9
- se o telecomando for PERSONAL PASS
e continuar o processo até o final do parágrafo
9. O led L1 do receptor apaga para indicar que o código foi
memorizado correctamente
10. O led L1 do receptor apaga e volta a acender: o código foi
memorizado e o receptor aguarda por 5 segundos novo
código a ser memorizado
11. Memorizar todos os telecomandos desejados
12. Passados 5 segundos sem ocorrência de nenhuma
transmissão válida o led L1 apaga e o receptor volta ao
funcionamento normal.
17
o processo termina com o
passar ao ponto 8
o processo termina com o
passar ao ponto 10
PORTUGUÊS
Page 18

ODALITÀ ROLLING CODE
M
(somente sistema Personal Pass)
O receptor administra o rolling code do sistema Personal Pass.
Esta função de default é desabilitada.
É possível activar a modalidade rolling code através do WinPPCL
u com a tecla de programação SW1.
o
• Premir e manter premida a tecla SW1 do receptor
• Após 4 segundos o led L1 apaga
• Após 10 segundos o led L3 apaga
• Soltar o botão : o Led L3 inicia uma série de piscadas durante
5 segundos:
Piscadas singulares
Piscadas duplas
• Para modificar as selecções premir o botão SW1 dentro de 5
segundos desde o início da série de piscadas; o LED L1 piscará
na base das novas selecções.
• Aguardar 5 segundos desde a última pressão que seleccionou a
piscada desejada, o led L1 apaga e a configuração é
memorizada.
ROLLING CODE desabilitado
ROLLING CODE habilitado
MISSOR SUBSTITUTO
E
(somente sistema Personal Pass)
O emissor substituto, criado especificamente para o winppcl,
permite substituir via rádio um emissor memorizado no receptor.
Basta transmitir uma única vez, em proximidade do receptor,
om o TX substituto codificado : o código do emissor é
c
substituído pelo novo sem retirar o receptor da instalação.
É possível ter no máximo três substituições para cada código,
tendo o transmissor TX A memorizado pode-se ter:
TX B a substituir o TXA ( TX A desactivado)
TX C a substituir o TXB ( TX B desactivado)
TX D a substituir o TXC ( TX C desactivado)
SUBSTITUIÇÃO DO CÓDIGO
(somente sistema Royal)
O código transmissor memorizado pode ser substituído com um
código novo aplicando o mesmo processo utilizado para a
memorização. Desta forma o novo código será memorizado
cancelando o precedente.
APRENDIZAGEM REMOTA RÁDIO
(somente sistema Personal Pass)
Este processo permite memorizar novos transmissores via rádio,
de modo sequencial e sem remover o receptor da instalação.
O transmissor que permite habilitar a programação via rádio deve
já estar memorizado.
Todos os transmissores memorizados via rádio terão a mesma
lógica de teclas do transmissor que activou a programação.
PORTUGUÊS
Exemplo:
Transmissor TX A memorizado com a seguinte lógica de teclas:
Tecla 1 em configuração monoestável.
Tecla 2 em configuração timer 10 segundos.
Tecla 3 em configuração biestável.
Transmissor TX B a ser memorizado.
• Premir durante pelo menos 5 segundos as teclas 1+2 ou 1+3
do TX A.
• Soltar ambas as teclas.
• Premir, em até 5 segundos, a tecla do TX B desejado: o led L1
do receptor e volta a acender apaga para indicar que o código
foi memorizado correctamente
• Transmitir dentro de 5 segundos, com outra tecla do TX B que
se deseja memorizar; repetir esta operação para outros
eventuais transmissores.
• Para sair da aprendizagem automática esperar pelo menos
5 segundos.
CANCELAMENTO TOTAL DOS CÓDIGOS
Para executar um cancelamento total dos códigos deve-se
proceder como indicado a seguir:
• Retirar a alimentação do receptor.
• Premir e manter premida a tecla SW1 do receptor.
• Simultaneamente alimentar o receptor.
O LED do receptor se acende: soltar a tecla SW1.
• As áreas de memória estão agora vazias e disponíveis para
uma nova programação.
Para apagar parcialmente certos códigos é preciso utilizar o
programador portátil PROG2
CONTACTOS RELÉ
O contacto relé nos bornes da carga é do tipo normalmente
aberto; é possível modificar o contacto para que funcione como
contacto normalmente fechado: cortocircuitar o ponto A e o
ponto B com um soldador de estanho e fazer um corte exacto da
pista no ponto C (Fig.2).
A lógica das teclas do transmissor TX B e de eventuais
transmissores memorizados com este processo será a
mesma do transmissor A.
18
Page 19

ICHTIGE HINWEISE
W
Für tecnische Erläuterungen oder Installtionsprobleme verfügt die
Firma V2 S.p.A. über einen Kundendienst, der zu Bürozeiten unter
er Telefonnummer (+39) 01 72 81 24 11 erreicht werden kann.
d
Die Firma V2 S.p.A. behält sich das Recht vor, das Produkt ohne
vorherige Ankündigungen abzuändern; die Übernahme der
Haftung für Schäden an Personen oder Sachen, die auf einen
unsachgemäßen Gebrauch oder eine fehlerhafte Installation
zurückzuführen sind, wird abgelehnt.
ECHNISCHE
T
EIGENSCHAFTEN
tromversorgung
S
Relaiskontakte 10A / 250Vac 10A / 120Vac
Frequenz 433,92 - 868,30 Mhz
Betriebstemperatur -20 ÷ +60 °C
Verbrauch 20 mA standby
Model 230V Model 120V
30Vac - 50Hz120Vac - 60Hz
2
m Um die Vorrichtung fehlerfrei zu installieren und
rogrammieren zu können, lesen Sie bitte diese
p
Bedienungsanleitung sehr aufmerksam durch.
• Diese Bedienungsanleitung ist nur für Fachtechniker, die auf
Installationen von Toren spezialisiert sind.
• Jede Programmierung und/oder jede Wartung sollte nur von
geschulten Technikern vorgenommen werden.
• Der Installateur muss eine automatische Schutzvorrichtung
und eine Sicherung installieren.
Die Bestimmungen verlangen eine Trennung der Kontakte von
mindestens 3 mm an jedem Pol (EN 60335-1).
Der automatische Schalter muss eine omnipolare Trennung
der Systemversorgung garantieren.
Der Auslösestrom der Schutzvorrichtungen darf 8A nicht
überschreiten.
• Die Anschlusskabel müssen sich für eine Verlegung in
feuchter Außenumgebung eignen.
• Um den Schutzgrad IP55 des Gehäuses zu garantieren, ist es
notwendig, Kabel zu verwenden, die für den verwendeten
Kabeldurchgang geeignet sind.
VERKLARING VAN OVEREENSTEMMING
V2 SPA erklärt, dass die Produkte:
WALLY2-230V, WALLY2-120V
folgenden Richtlinien entsprechen:
99/05/CEE Radiorichtlinie
2006/95/CEE Niederspannungsrichtlinie
2004/108/CE EMC-Richtlinie
Zur Prüfung der Konformität der Produkte wurden folgende
technische Normen angewendet:
EN 60335-1, EN 55014-1, EN 55014-2, EN 301 489-1,
EN 301 489-3, EN 300 220 - 3
Racconigi, 29/07/2010
Der Gesetzlicher Vertreter der V2 S.p.A.
Cosimo De Falco
Empfindlichkeit ≥ -103 dBm
S/N > 17dB @ 100dBm m=100%
Abmessungen 113 x 113 x 57 mm
Gewicht 200g
Schutzart IP55
2-Kanal 230V-Empfänger mit der
Möglichkeit, Lasten bis 1500W zu steuern
• Betrieb mit Sendern der Reihe Royal oder Personal Pass:
die erste Fernbedienung, die gespeichert wird, bestimmt den
Betriebsmodus Royal oder Personal Pass.
• Version Personal Pass ermöglicht es, bis zu 240
unterschiedliche Fernbedienungen zu speichern.
• Monostabile, bistabile oder Timer-Betriebslogik.
• Basis-Programmierung mittels Taste SW1 oder erweiterte
Programmierung mittels Programmierer PROG2 und Software
WINPPCL.
PROGRAMMIERUNG
Das selbstlernfähige System für die Programmierung gestattet das
Speichern des Codes, sowie di Einstellung der folgenden
Funktionsmodi:
MONOSTABIL: Aktiviert das entsprechende Relais während der
gesamten Übertragungszeit der Fernbedienung. Wird die
Übertragung unterbrochen, deaktiviert dich das Relais
automatisch.
DOPPELSTABIL: Aktiviert das entsprechende Relais mit dem
ersten Übertragungsvorgang durch die Fernbedienung, mit dem
zweiten wird es deaktiviert.
TIMER: Die Übertragung durch die Fernbedienung aktiviert das
entsprechende Relais. Die Deaktivierung erfolgt nach Verstreichen
der eingestellten Zeit (max. 7,5 Minuten).
DEUTSCH
BEACHTE: die erste Fernbedienung, die gespeichert wird,
bestimmt den Betriebsmodus Royal oder Personal Pass.
Zum Ändern des Betriebsmodus ist es notwendig, eine
VOLLSTÄNDIGE LÖSCHUNG vorzunehmen und die neue
Fernbedienung zu speichern.
m WICHTIG: Für die korrekte Programmierung des Codes
ist es erforderlich, dass der Abstand zwischen dem Sender
und der Antenne des Empfängers mindestens 1.5 m
beträgt.
19
Page 20

AHL DES KANALS DER
W
MONOSTABILEN/BISTABILEN BETRIEBSLOGIK
Kanal und Betriebslogik unter Beachtung folgender Tabelle
wählen:
°IMPULSE
N
SW1
KANAL 1 MONOSTABIL 1
KANAL 1 BISTABILEN 2
KANAL 2 MONOSTABIL 3
KANAL 2 BISTABILEN 4
LEUCHTENDE LED
L1 L2 L3
•
• •
•
• •
. Die Anzahl der Blinkzeichen von LED L1 zählen, die der Zeit
4
entspricht, die man einstellen möchte.
5. Taste SW1 des Empfängers während des gewünschten
Blinkens drücken: die Blinkserie stoppt und LED L1 bleibt
eingeschaltet
6. Innerhalb von 5 s die Taste der Fernbedienung drücken und
gedrückt halten:
- wenn die Fernbedienung ROYAL ist
mit Punkt 7
- wenn die Fernbedienung PERSONAL PASS ist
8 gehen und die Prozedur bis zum Ende des Abschnitts
fortsetzen
7. LED L1 des Empfängers schaltet sich ab, um anzuzeigen, dass
der Code korrekt gespeichert wurde
, endet die Prozedur
, zum Punkt
1. Drücken Sie die Taste SW1 des Empfängers mehrmals, wie
oben angegeben: die rote LED schaltet sich ein
2. Innerhalb von 5 Sekunden Taste der Fernbedienung drücken
und gedrückt halten:
- wenn die Fernbedienung ROYAL ist
mit Punkt 3
- wenn die Fernbedienung PERSONAL PASS ist, zu Punkt 4
weitergehen und die Prozedur bis zum Ende des
Abschnitts fortsetzen
3. LED des Empfängers schaltet sich aus, um anzuzeigen,
dass der Code korrekt gespeichert wurde
4. LED des Empfängers schaltet sich aus und wieder ein: der
Code wurde gespeichert und der Empfänger bleibt 5 s lang in
Erwartung eines neuen zu speichernden Codes
5. Alle gewünschten Fernbedienungen speichern
6. Nach Ablauf von 5 s ohne neue gültige Übertragung schaltet
sich LED L1 aus und der Empfänger kehrt in den
Normalbetrieb zurück
, endet die Prozedur
PROGRAMMIERUNG DER TIMER-FUNKTION
Zum Speichern eines Senders auf Kanal 1 und dessen Zuordnung
zur TIMER Funktion wie folgt vorgehen:
1. Taste SW1 des Empfängers drücken und gedrückt halten:
DEUTSCH
LED L1 (für den ersten Kanal) schaltet sich ein
2. Nach 4 Sekunden schaltet sich LED L1 aus
3. Lassen Sie die Taste SW1 los, wenn das LED erlischt.
Das LED L1 beginnt mit der Anzeige einer Reihe von
Blinksignalen niedriger Frequenz (ca. 1 Blinksignal pro
Sekunde). Die Anzahl der Blinksignale entspricht der
einstellbaren Zeit, wie in Tabelle dargestellt wird:
Nr. Blinken Zeit
1 01 Sek.
2 02 Sek.
3 03 Sek.
4 04 Sek.
5 05 Sek.
6 06 Sek.
7 07 Sek.
8 08 Sek.
9 09 Sek.
10 10 Sek.
11 11 Sek.
12 12 Sek.
13 13 Sek.
14 14 Sek.
15 15 Sek.
16 30 Sek.
Nr. Blinken Zeit
17 1 Min.
18 1,5 Min.
19 2 Min.
20 2,5 Min.
21 3 Min.
22 3,5 Min.
23 4 Min.
24 4,5 Min.
25 5 Min.
26 5,5 Min.
27 6 Min.
28 6,5 Min.
29 7 Min.
30 7,5 Min.
8. LED L1 des Empfängers schaltet sich aus und wieder ein:
der Code wurde gespeichert und der Empfänger bleibt 5 s in
Erwartung eines neuen zu speichernden Codes
9. Alle gewünschten Fernbedienungen speichern
10. Nach Ablauf von 5 s ohne gültige Übertragung schaltet sich
LED L1 aus und der Empfänger kehrt in den Normalbetrieb
zurück
Zum Speichern eines Senders auf Kanal 2 und dessen Zuordnung
zur TIMER Funktion wie folgt vorgehen:
1. Taste SW1 drücken und gedrückt halten: LED L1 schaltet sich
ein
2. Taste SW1 drücken und gedrückt halten: LED L3 schaltet sich
ebenfalls ein
3. Taste SW1 drücken und gedrückt halten: die LEDs L1 und L3
schalten sich aus und LED L2 schaltet sich ein
4. Nach 4 Sekunden schaltet sich LED L2 aus
5. Lassen Sie die Taste SW1 los, wenn das LED erlischt.
Das LED L1 beginnt mit der Anzeige einer Reihe von
Blinksignalen niedriger Frequenz (ca. 1 Blinksignal pro
Sekunde). Die Anzahl der Blinksignale entspricht der
einstellbaren Zeit, wie in Tabelle dargestellt wird
6. Die Anzahl der Blinkzeichen von LED L1 zählen, die der Zeit
entspricht, die man einstellen möchte.
7. Taste SW1 des Empfängers während des gewünschten
Blinkens drücken: die Blinkserie stoppt und LED L1 bleibt
eingeschaltet
8. Innerhalb von 5 s die Taste der Fernbedienung drücken und
gedrückt halten:
- wenn die Fernbedienung ROYAL ist
mit Punkt 9
- wenn die Fernbedienung PERSONAL PASS ist, zum Punkt
10 gehen und die Prozedur bis zum Ende des Abschnitts
fortsetzen
9. LED L1 des Empfängers schaltet sich ab, um anzuzeigen, dass
der Code korrekt gespeichert wurde
10. LED L1 des Empfängers schaltet sich aus und wieder ein:
der Code wurde gespeichert und der Empfänger bleibt 5 s in
Erwartung eines neuen zu speichernden Codes
11. Alle gewünschten Fernbedienungen speichern
12. Nach Ablauf von 5 s ohne gültige Übertragung schaltet sich
LED L1 aus und der Empfänger kehrt in den Normalbetrieb
zurück
20
, endet die Prozedur
Page 21

OLLING CODE BETRIEB
R
(nur bei System Personal Pass)
Der Empfänger steuert den Rolling Code des Personal Pass
Systems. Diese Defaultfunktion ist deaktiviert.
Es ist möglich, den Rolling Code Betrieb mittels WinPPCL oder
rogrammiertaste SW1 zu aktivieren.
P
• Taste SW1 des Empfängers drücken und gedrückt halten
• Nach 4 Sekunden schaltet sich LED L1 aus
• Nach 10 Sekunden schaltet sich LED L3 ein
• Taste loslassen: LED L3 beginnt 5 Sekunden lang zu blinken:
Einzelblinkzeichen
Doppelblinkzeichen ROLLING CODE aktiviert
• Um die Einstellungen zu ändern, Taste SW1 innerhalb von 5
Sekunden ab Beginn der Blinkzeichenserie drücken; LED L1
blinkt auf der Grundlage der neuen Einstellungen.
• Ab dem letzten Drücken, mit dem das gewünschte Blinken
aktiviert wurde, 5 s warten; danach schaltet sich LED L1 aus
und die Konfiguration ist gespeichert.
ROLLING CODE deaktiviert
AANLEREN RADIO OP AFSTAND
(nur bei System Personal Pass)
Met deze procedure is het mogelijk om nieuwe zenders via de
radio in het geheugen te bewaren, in sequentie, en zonder de
ontvanger van de installatie weg te hoeven nemen.
De zender die de inschakeling van de programmering via radio
mogelijk maakt, moet reeds in het geheugen bewaard zijn.
Alle via radio bewaarde zenders zullen dezelfde toetsenlogica
hebben van de zender die de programmering geactiveerd heeft.
Voorbeeld:
Zender TX A bewaard met de volgende toetsenlogica:
Taste 1 in monostabiler Konfiguration.
Taste 2 in 10s-Timer-Konfiguration.
Taste 3 in bistabiler Konfiguration.
Te bewaren zender TX B.
• Druk minstens 5 seconden op de toetsen 1+2 of 1+3 van
TX A en houd de toetsen ingedrukt.
• Laat beide toetsen los.
• Druk binnen 5 seconden op de gewenste toets van de TX B:
LED L1 des Empfängers schaltet sich ab, und anzuzeiget, dass
der Code korrekt gespeichert wurde
• Innerhalb von 5 s mit einer anderen Taste des TX B, den man
speichern möchte, senden; diese Operation für andere
eventuelle Sender wiederholen.
• Minstens 5 seconden wachten om de automatische aanlering
te verlaten.
ERVANGENDE ZENDER
V
(nur bei System Personal Pass)
De VERVANGENDE zender, die alleen via WINPPCL gegenereerd
wordt, maakt het mogelijk om via radio een in de ontvanger
bewaarde zender te vervangen.
et volstaat om één keer in de nabijheid van de ontvanger uit te
H
zenden met de speciaal geprogrammeerde VERVANGENDE TX:
de code van de zender wordt vervangen door de nieuwe, zonder
dat de ontvanger uit de installatie hoeft worden weggenomen.
Man kann maximal 3 Austauschvorgänge pro Code durchführen.
Wenn der Sender TX A gespeichert ist, hat man folgende
Möglichkeiten:
TX B vervangt Tx A (TX A is niet meer actief)
TX C vervangt TX B (TX B is niet meer actief)
TX D vervangt TX C (TX C is neit meer actief)
ERSETZEN DES CODES
(nur bei System ROYAL)
Der gespeicherte Code der Fernbedienung kann durch einen
neuen ersetzt werden, indem wie bei der ersten Programmierung
verfahren wird, der neue Code ersetzt automatisch den
vorhergehenden.
VOLELDIG WISSEN VAN DE CODES
Ga als volgt te werk om de codes volledig te wissen:
• Deactiveer de voeding van de ontvanger.
• Druk op toets SW1 van de ontvanger en houd de toets
ingedrukt.
• Activeer gelijktijdig opnieuw de voeding. De LED van de
ontvanger gaat aan: laat toets SW1 los.
• De geheugenzones zijn nu leeg en beschikbaar voor een
nieuwe programmering.
Om de codes gedeeltelijk te wissen heeft men de
draagbare programmeerunit PROG2 nodig.
RELAIS-KONTAKTE
Der Kontakt an den Klemmen der Last ist vom Typ normal offen;
man kann den Kontakt ändern, damit dieser als normal
geschlossener Kontakt arbeitet: Punkt A und Punkt B mit einem
Zinnlötkolben kurzschließen und einen klaren Schnitt der Piste in
Punkt C durchführen (Fig.2).
DEUTSCH
De toetsenlogica van de zender TX B en van eventuele
andere zenders die met deze procedure bewaard worden,
zal identiek zijn aan die van zender A.
21
Page 22

ELANGRIJKE WAARSCHUWINGEN
B
Voor technische ophelderingen of installatieproblemen beschikt
V2 SPA over een assistentiedienst voor klanten die actief is
ijdens kantooruren TEL. (+32) 93 80 40 20.
t
V2 SPA behoudt zich het recht voor om zonder voorgaande
kennisgeving eventuele wijzigingen aan het product aan te
brengen; het wijst bovendien elke vorm van aansprakelijkheid af
voor persoonlijk letsel of materiële schade wegens een oneigenlijk
gebruik of een foutieve installatie.
TECHNISCHE KENMERKEN Model 230V Model 120V
oeding
V
Relaiscontacten 10A / 250Vac 10A / 120Vac
Werkfrequentie 433,92 - 868,30 Mhz
Werktemperatuur -20 ÷ +60 °C
Verbruik 20 mA standby
30Vac - 50Hz120Vac - 60Hz
2
m Lees met aandacht de volgende handleiding met
nstructies voordat u tot de installatie overgaat.
i
• Deze handleiding met instructies is uitsluitend bestemd voor
technisch personeel dat gekwalificeerd is op het gebied van
installaties van automatische systemen.
• Alle werkzaamheden met betrekking tot het onderhoud of de
programmering moet uitsluitend uitgevoerd worden door
gekwalificeerd personeel.
• De installateur moet voor de installatie van een automatische
beveiliging en een zekering zorgen.
De norm vereist een scheiding van de contacten van minstens
3 mm in elke pool (EN 60335-1).
De automatische schakelaar moet de universele afsluiting van
de voeding van het systeem verzekeren.
De interventiestroom van de beveiligingen mag niet groter
zijn dan 8A.
• De verbindingskabels moeten geschikt zijn om in een vochtige
buitenomgeving gelegd te worden.
• Ter garantie van beschermklasse IP55 van de kast, moeten
kabels gebruikt hebben waarvan de afmetingen geschikt zijn
voor de gebruikte kabeldoorgang.
VERKLARING VAN OVEREENSTEMMING
V2 SPA verklaart dat de producten:
WALLY2-230V, WALLY2-120V
conform zijn aan de volgende richtlijnen:
99/05/CEE radiorichtlijn
2006/95/CEE elektrische veiligheid
2004/108/CE elektromagnetische compatibiliteit
De volgende technische normen ter controle van de conformiteit
zijn toegepast:
EN 60335-1, EN 55014-1, EN 55014-2, EN 301 489-1,
EN 301 489-3, EN 300 220 - 3
Racconigi, lì 29/07/2010
De rechtsgeldig vertegenwoordiger van V2 SPA
NEDERLANDS
Cosimo De Falco
Gevoeligheid ≥ -103 dBm
S/N > 17dB @ 100dBm m=100%
Afmetingen 113 x 113 x 57 mm
Gewicht 200g
Beveiligingsgraad IP55
Tweekanaalsontvanger gevoed met
230V / 120V met mogelijkheid tot bediening
ladingen tot 1500 W
• Werking met zenders van de serie Royal of Personal Pass:
de eerste afstandsbediening die opgeslagen wordt, bepaalt
de werkwijze Royal dan wel Personal Pass.
• De Personal Pass versie maakt het mogelijk tot 240
verschillende afstandsbedieningen te bewaren.
• Monostabiele, bistabiele werklogica of timer.
• Basisprogrammering via knop SW1, of geavanceerde
programmering via programmeereenheid PROG2 en software
WINPPCL
PROGRAMMERING
Het systeem voor de programmering met automatische aanlering
maakt het mogelijk om de code in het geheugen te bewaren en
om de volgende werkwijzen in te stellen:
MONOSTABIEL: activeert het overeenkomstige relais gedurende
de gehele zendtijd; wanneer de uitzending onderbroken wordt,
wordt het relais automatisch gedeactiveerd.
BISTABIEL: activeert het overeenkomstige relais met de eerste
uitzending: het relais wordt gedeactiveerd met de tweede
uitzending.
TIMER: de uitzending activeert het overeenkomstige relais dat
gedeactiveerd wordt na het verstrijken van de ingestelde tijd (max
7,5 minuten).
N.B.: de eerste afstandsbediening die opgeslagen wordt,
bepaalt de werkwijze Royal dan wel
Personal Pass.
Om de werkwijze te wijzigen, moet een VOLLEDIGE
ANNULERING uitgevoerd worden en moet de nieuwe
afstandsbediening opgeslagen worden.
m BELANGRIJK: om de code correct te bewaren, is het
noodzakelijk om een minimumafstand van 1,5 meter tussen
de zender en de antenne van de ontvanger in acht te
nemen.
22
Page 23

ELECTIE VAN HET KANAAL EN VAN DE
S
MONOSTABIELE / BISTABIELE WERKING
Selecteer kanaal en werklogica aan de hand van onderstaande
tabel:
°IMPULSE
N
SW1
KANAAL 1 MONOSTABIELE 1
KANAAL 1 BISTABIELE 2
ANAAL 2 MONOSTABIELE
K
KANAAL 2 BISTABIELE 4
1. Druk N keer op knop SW1 van de ontvanger, zoals hierboven
aangeduid wordt: de betreffende led gaat branden
2. Druk binnen 5 seconden op de toets van de
afstandsbediening en houd de toets ingedrukt:
- als de afstandsbediening ROYAL is
met punt 3
- als de afstandsbediening PERSONAL PASS is, gaat u naar
punt 4 en volgt u de procedure tot het einde van de
paragraaf
3. Led van de ontvanger gaat uit om aan te geven dat de code
correct bewaard is
4. Led van de ontvanger gaat uit en opnieuw aan: de code is
bewaard en de ontvanger blijft 5 sec in afwachting van een
nieuwe code die bewaard moet worden
5. Bewaar alle gewenste afstandsbedieningen
6. 5 seconden nadat geen enkele geldige zending
plaatsgevonden heeft, gaat led L1 uit en keert de ontvanger
terug naar de gewone werking
3
LEUCHTENDE LED
L1 L2 L3
•
• •
•
• •
, eindigt de procedure
PROGRAMMERING VAN DE TIMERFUNCTIE
Handel als volgt om een zender op kanaal 1 te bewaren door
deze aan de TIMER-functie toe te kennen:
1. Druk op de knop SW1 van de ontvanger en houd de knop
ingedrukt: led L1 (van het eerste kanaal) gaat branden
2. Na 4 seconden gaat led L1 uit
3. Wanneer led L1 uitgaat, toets SW1 loslaten. Led L1 begint nu
bij lage snelheid te knipperen (1 keer per seconde).
Het aantal keren knipperen komt overeen met een instelbare
tijd, die in de tabel aangeduid wordt:
N° Knipperen Tijd
1 01 sec.
2 02 sec.
3 03 sec.
4 04 sec.
5 05 sec.
6 06 sec.
7 07 sec.
8 08 sec.
9 09 sec.
10 10 sec.
11 11 sec.
12 12 sec.
13 13 sec.
14 14 sec.
15 15 sec.
16 30 sec.
N° Knipperen Tijd
17 1 min.
18 1,5 min.
19 2 min.
20 2,5 min.
21 3 min.
22 3,5 min.
23 4 min.
24 4,5 min.
25 5 min.
26 5,5 min.
27 6 min.
28 6,5 min.
29 7 min.
30 7,5 min.
. Tel het aantal keren dat led L1 knippert dat overeenkomt met
4
de tijd die u wenst in te stellen.
5. Druk op de toets SW1 van de ontvanger tijdens het gewenste
aantal keren knipperen: de knipperreeks wordt onderbroken
en led 1 blijft branden
6. Druk binnen 5 seconden op de toets van de
afstandsbediening en houd de toets ingedrukt:
- als de afstandsbediening ROYAL is
met punt 7
- als de afstandsbediening PERSONAL PASS is
punt 8 en volgt u de procedure tot het einde van de
paragraaf
7. Led 1 van de ontvanger gaat uit om aan te geven dat de code
correct bewaard is
8. Led 1 van de ontvanger gaat uit en opnieuw aan: de code is
bewaard en de ontvanger blijft 5 sec in afwachting van een
nieuwe code die bewaard moet worden
9. Bewaar alle gewenste afstandsbedieningen
10. 5 seconden nadat geen enkele geldige uitzending
plaatsgevonden heeft, gaat led L1 uit en keert de ontvanger
terug naar de gewone werking
Handel als volgt om een zender op kanaal 2 te bewaren door
deze aan de TIMER-functie toe te kennen:
1. Op de toets SW1 drukken en loslaten: led L1 gaat branden
2. Op de toets SW1 drukken en loslaten: led L3 gaat ook
branden
3. Op de toets SW1 drukken en ingedrukt houden: de leds L1
en L3 gaan uit en de led L2 gaat branden
4. Na 4 seconden gaat led L2 uit
5. Wanneer led L1 uitgaat, toets SW1 loslaten. Led L1 begint nu
bij lage snelheid te knipperen (1 keer per seconde).
Het aantal keren knipperen komt overeen met een instelbare
tijd, die in de tabel aangeduid wordt:
6. Tel het aantal keren dat led L1 knippert dat overeenkomt met
de tijd die u wenst in te stellen.
7. Druk op de toets SW1 van de ontvanger tijdens het gewenste
aantal keren knipperen: de knipperreeks wordt onderbroken
en led 1 blijft branden
8. Druk binnen 5 seconden op de toets van de
afstandsbediening en houd de toets ingedrukt:
- als de afstandsbediening ROYAL is
met punt 9
- als de afstandsbediening PERSONAL PASS is, gaat u naar
punt 10 en volgt u de procedure tot het einde van de
paragraaf
9. Led 1 van de ontvanger gaat uit om aan te geven dat de code
correct bewaard is
10. Led 1 van de ontvanger gaat uit en opnieuw aan: de code is
bewaard en de ontvanger blijft 5 sec in afwachting van een
nieuwe code die bewaard moet worden
11. Bewaar alle gewenste afstandsbedieningen
12. 5 seconden nadat geen enkele geldige uitzending
plaatsgevonden heeft, gaat led L1 uit en keert de ontvanger
terug naar de gewone werking
, eindigt de procedure
, gaat u naar
, eindigt de procedure
NEDERLANDS
23
Page 24

OLLING CODE MODALITEIT
R
(alleen Personal Pass systeem)
De ontvanger beheert de rolling code van het Personal Pass
systeem. De functie is als default uitgeschakeld.
De rolling code modaliteit kan worden ingeschakeld via WinPPCL
f met de programmeertoets SW1.
o
• Druk op de knop SW1 van de ontvanger en houd de knop
ingedrukt
• Na 4 seconden gaat led L1 uit
• Na 10 seconden gaat led L3 aan
• Laat de toets los: led L3 begint een knipperreeks die
5 seconden duurt:
Enkelvoudig knipperen
Dubbel knipperen
ROLLING CODE uitgeschakeld
ROLLING CODE ingeschakeld
ERVANGENDE ZENDER
V
(alleen Personal Pass systeem)
De VERVANGENDE zender, die alleen via WINPPCL gegenereerd
wordt, maakt het mogelijk om via radio een in de ontvanger
bewaarde zender te vervangen.
et volstaat om één keer in de nabijheid van de ontvanger uit te
H
zenden met de speciaal geprogrammeerde VERVANGENDE TX:
de code van de zender wordt vervangen door de nieuwe, zonder
dat de ontvanger uit de installatie hoeft worden weggenomen.
Er kunnen maximaal drie vervangingen per code plaatsvinden. Als
ik zender TX A bewaard heb, kan ik de volgende situaties hebben:
TX B vervangt Tx A (TX A is niet meer actief)
TX C vervangt TX B (TX B is niet meer actief)
TX D vervangt TX C (TX C is neit meer actief)
• Om de instellingen te veranderen, binnen 5 seconden op de
knop SW1 drukken vanaf het moment waarop de knipperreeks
begint. Led L1 zal op grond van de nieuwe instellingen
knipperen.
• Wacht 5 sec na de laatste druk op de toets die het gewenste
aantal keren knipperen geselecteerd heeft, led L1 gaat uit en
de configuratie is bewaard.
AANLEREN RADIO OP AFSTAND
(alleen Personal Pass systeem)
Met deze procedure is het mogelijk om nieuwe zenders via de
radio in het geheugen te bewaren, in sequentie, en zonder de
ontvanger van de installatie weg te hoeven nemen.
De zender die de inschakeling van de programmering via radio
mogelijk maakt, moet reeds in het geheugen bewaard zijn.
Alle via radio bewaarde zenders zullen dezelfde toetsenlogica
hebben van de zender die de programmering geactiveerd heeft.
Voorbeeld:
Zender TX A bewaard met de volgende toetsenlogica:
Toets 1 in monostabiele configuratie.
Toets 2 in configuratie timer 10s.
Toets 3 in bistabiele configuratie.
Te bewaren zender TX B.
• Druk minstens 5 seconden op de toetsen 1+2 of 1+3 van
TX A en houd de toetsen ingedrukt.
• Laat beide toetsen los.
• Druk binnen 5 seconden op de gewenste toets van de TX B:
Led 1 van de ontvanger gaat uit om aan te geven dat de code
correct bewaard is
NEDERLANDS
• Zend binnen 5 seconden met een andere toets van zender TX B
uit, die men wenst te bewaren. Herhaal deze handeling voor
eventuele andere zenders.
• Minstens 5 seconden wachten om de automatische aanlering
te verlaten.
VERVANGING VAN DE CODE
(alleen Royal systeem)
De bewaarde zendercode kan vervangen worden door een
nieuwe code door hetzelfde procédé te gebruiken die voor de
opslag ervan gebruikt werd. Zo wordt de nieuwe code bewaard
en de vorige gewist.
VOLELDIG WISSEN VAN DE CODES
Ga als volgt te werk om de codes volledig te wissen:
• Neem de voeding naar de ontvanger weg.
• Druk op de knop SW1 van de ontvanger en houd de knop
ingedrukt.
• Schakel op hetzelfde moment de voeding naar de ontvanger
in. De LED van de ontvanger gaat aan: laat toets SW1 los.
• De geheugenzones zijn nu leeg en beschikbaar voor een
nieuwe programmering.
Om de codes gedeeltelijk te wissen heeft men de
draagbare programmeerunit PROG2 nodig.
RELAISCONTACTEN
Het contact op de klemmen van de lading is van het normaal
geopende type. Het is mogelijk een contact te wijzigen zodat het
als een normaal gesloten contact werkt. Veroorzaak kortsluiting
op punt A e punt B met een tinsoldeerder en snij de baan in punt
C door (Fig.2).
De toetsenlogica van de zender TX B en van eventuele
andere zenders die met deze procedure bewaard worden,
zal identiek zijn aan die van zender A.
24
Page 25

Page 26

Page 27

Page 28

 Loading...