

Page 1
PD1
IL n.021
EDIZ. 20/11/02
V2 ELETTRONICA SPA
Corso Principi di Piemonte, 63
12035 RACCONIGI (CN) ITALY
tel. +39 01 72 81 24 11
fax +39 01 72 84 050
info@v2elettronica.com
www.v2elettronica.com
CENTRALE DI COMANDO DIGITALE PER CANCELLI A SINGOLA E DOPPIA ANTA
DIGITAL CONTROL UNIT FOR ONE AND TWO LEAF SWING GATES
ARMOIRE DE COMMANDE DIGITALE POUR PORTAILS À BATTANT SIMPLE OU DOUBLE
DIGITALE STEUERUNGEN FÜR TORE MIT EIN UND ZWEI FLÜGELN
CUADRO DE MANIOBRAS ELECTRÓNICO DIGITAL PARA CANCELAS DE UNA O DOS HOJAS
I
GB
F
D
E
Page 2

PD1
ISTRUZIONI . . . . . . . . . . . . . . . . . . . . . . . . . . . . . . . . . . . . . . . . . . . . . . .1
INSTRUCTIONS . . . . . . . . . . . . . . . . . . . . . . . . . . . . . . . . . . . . . . . . . . . . .15
NOTICES . . . . . . . . . . . . . . . . . . . . . . . . . . . . . . . . . . . . . . . . . . . . . . . . .29
ANLEITUNGEN . . . . . . . . . . . . . . . . . . . . . . . . . . . . . . . . . . . . . . . . . . . . . .43
INSTRUCCIONES . . . . . . . . . . . . . . . . . . . . . . . . . . . . . . . . . . . . . . . . . . . .57
I
GB
F
D
E
Page 3

1
SOMMARIO
AVVERTENZE . . . . . . . . . . . . . . . . . . . . . . . . . . . . . . . . . . . . . . . . . . . . . . . . . . . . . . . . . . . . . . . . . . . . . . . . . .2
CONFORMITÀ ALLE NORMATIVE . . . . . . . . . . . . . . . . . . . . . . . . . . . . . . . . . . . . . . . . . . . . . . . . . . . . . . . . . . . . .2
DESCRIZIONE DELLA CENTRALE . . . . . . . . . . . . . . . . . . . . . . . . . . . . . . . . . . . . . . . . . . . . . . . . . . . . . . . . . . . .2
CARATTERISTICHE TECNICHE . . . . . . . . . . . . . . . . . . . . . . . . . . . . . . . . . . . . . . . . . . . . . . . . . . . . . . . . . . . . . .3
COLLEGAMENTI ALLA MORSETTIERA . . . . . . . . . . . . . . . . . . . . . . . . . . . . . . . . . . . . . . . . . . . . . . . . . . . . . . . . .3
INTERPRETAZIONE DELLA LAMPADA SPIA (WARNING LIGHT) . . . . . . . . . . . . . . . . . . . . . . . . . . . . . . . . . . . . . . . . .3
PANNELLO DI CONTROLLO . . . . . . . . . . . . . . . . . . . . . . . . . . . . . . . . . . . . . . . . . . . . . . . . . . . . . . . . . . . . . . . .4
PROGRAMMAZIONE . . . . . . . . . . . . . . . . . . . . . . . . . . . . . . . . . . . . . . . . . . . . . . . . . . . . . . . . . . . . . . . . . . . . .4
FUNZIONE DEI TASTI MENU, UP, DOWN . . . . . . . . . . . . . . . . . . . . . . . . . . . . . . . . . . . . . . . . . . . . . . . . . . . . . . .4
PROGRAMMAZIONE STANDARD (DEFAULT) . . . . . . . . . . . . . . . . . . . . . . . . . . . . . . . . . . . . . . . . . . . . . . . . . . . . .5
TEMPO APERTURA ANTA 1 . . . . . . . . . . . . . . . . . . . . . . . . . . . . . . . . . . . . . . . . . . . . . . . . . . . . . . . . . . . . . . . .5
TEMPO APERTURA ANTA 2 . . . . . . . . . . . . . . . . . . . . . . . . . . . . . . . . . . . . . . . . . . . . . . . . . . . . . . . . . . . . . . . .5
TEMPO APERTURA ANTA PEDONALE . . . . . . . . . . . . . . . . . . . . . . . . . . . . . . . . . . . . . . . . . . . . . . . . . . . . . . . . . .5
TEMPO CHIUSURA ANTA 1 . . . . . . . . . . . . . . . . . . . . . . . . . . . . . . . . . . . . . . . . . . . . . . . . . . . . . . . . . . . . . . . .5
TEMPO CHIUSURA ANTA 2 . . . . . . . . . . . . . . . . . . . . . . . . . . . . . . . . . . . . . . . . . . . . . . . . . . . . . . . . . . . . . . . .5
TEMPO CHIUSURA ANTA PEDONALE . . . . . . . . . . . . . . . . . . . . . . . . . . . . . . . . . . . . . . . . . . . . . . . . . . . . . . . . . .5
TEMPO DI CHIUSURA ANTA 2 DURANTE CICLO PEDONALE . . . . . . . . . . . . . . . . . . . . . . . . . . . . . . . . . . . . . . . . . .5
RITARDO D’ANTA IN APERTURA . . . . . . . . . . . . . . . . . . . . . . . . . . . . . . . . . . . . . . . . . . . . . . . . . . . . . . . . . . . . .6
RITARDO D’ANTA IN CHIUSURA . . . . . . . . . . . . . . . . . . . . . . . . . . . . . . . . . . . . . . . . . . . . . . . . . . . . . . . . . . . . .6
TEMPO SERRATURA . . . . . . . . . . . . . . . . . . . . . . . . . . . . . . . . . . . . . . . . . . . . . . . . . . . . . . . . . . . . . . . . . . . . .6
TEMPO ANTICIPO SERRATURA . . . . . . . . . . . . . . . . . . . . . . . . . . . . . . . . . . . . . . . . . . . . . . . . . . . . . . . . . . . . . .6
TEMPO COLPO D’ARIETE . . . . . . . . . . . . . . . . . . . . . . . . . . . . . . . . . . . . . . . . . . . . . . . . . . . . . . . . . . . . . . . . . .6
TEMPO PRELAMPEGGIO . . . . . . . . . . . . . . . . . . . . . . . . . . . . . . . . . . . . . . . . . . . . . . . . . . . . . . . . . . . . . . . . . .6
TEMPO RALLENTAMENTO . . . . . . . . . . . . . . . . . . . . . . . . . . . . . . . . . . . . . . . . . . . . . . . . . . . . . . . . . . . . . . . . .6
TEMPO CHIUSURA VELOCE DOPO RALLENTAMENTO IN CHIUSURA . . . . . . . . . . . . . . . . . . . . . . . . . . . . . . . . . . . . .7
POTENZA DEI MOTORI . . . . . . . . . . . . . . . . . . . . . . . . . . . . . . . . . . . . . . . . . . . . . . . . . . . . . . . . . . . . . . . . . . .7
SPUNTO . . . . . . . . . . . . . . . . . . . . . . . . . . . . . . . . . . . . . . . . . . . . . . . . . . . . . . . . . . . . . . . . . . . . . . . . . . . . .7
START IN APERTURA . . . . . . . . . . . . . . . . . . . . . . . . . . . . . . . . . . . . . . . . . . . . . . . . . . . . . . . . . . . . . . . . . . . .7
START IN CHIUSURA . . . . . . . . . . . . . . . . . . . . . . . . . . . . . . . . . . . . . . . . . . . . . . . . . . . . . . . . . . . . . . . . . . . .7
START IN PAUSA . . . . . . . . . . . . . . . . . . . . . . . . . . . . . . . . . . . . . . . . . . . . . . . . . . . . . . . . . . . . . . . . . . . . . . .7
START PEDONALE IN APERTURA . . . . . . . . . . . . . . . . . . . . . . . . . . . . . . . . . . . . . . . . . . . . . . . . . . . . . . . . . . . .8
FOTOCELLULA IN PAUSA . . . . . . . . . . . . . . . . . . . . . . . . . . . . . . . . . . . . . . . . . . . . . . . . . . . . . . . . . . . . . . . . . .8
CHIUSURA AUTOMATICA . . . . . . . . . . . . . . . . . . . . . . . . . . . . . . . . . . . . . . . . . . . . . . . . . . . . . . . . . . . . . . . . . .8
LUCI DI CORTESIA . . . . . . . . . . . . . . . . . . . . . . . . . . . . . . . . . . . . . . . . . . . . . . . . . . . . . . . . . . . . . . . . . . . . . .8
LAMPEGGIATORE IN PAUSA . . . . . . . . . . . . . . . . . . . . . . . . . . . . . . . . . . . . . . . . . . . . . . . . . . . . . . . . . . . . . . . .9
LAMPEGGIATORE CON INTERMITTENZA . . . . . . . . . . . . . . . . . . . . . . . . . . . . . . . . . . . . . . . . . . . . . . . . . . . . . . . .9
FUNZIONE TIMER . . . . . . . . . . . . . . . . . . . . . . . . . . . . . . . . . . . . . . . . . . . . . . . . . . . . . . . . . . . . . . . . . . . . . . .9
ANTISLITTAMENTO MOTORI . . . . . . . . . . . . . . . . . . . . . . . . . . . . . . . . . . . . . . . . . . . . . . . . . . . . . . . . . . . . . . . .9
INGRESSO STOP . . . . . . . . . . . . . . . . . . . . . . . . . . . . . . . . . . . . . . . . . . . . . . . . . . . . . . . . . . . . . . . . . . . . . . .10
INGRESSO FOTO 1 . . . . . . . . . . . . . . . . . . . . . . . . . . . . . . . . . . . . . . . . . . . . . . . . . . . . . . . . . . . . . . . . . . . . . .10
INGRESSO FOTO 2 . . . . . . . . . . . . . . . . . . . . . . . . . . . . . . . . . . . . . . . . . . . . . . . . . . . . . . . . . . . . . . . . . . . . . .10
TEST DI FUNZIONAMENTO DELLE FOTOCELLULE . . . . . . . . . . . . . . . . . . . . . . . . . . . . . . . . . . . . . . . . . . . . . . . . .10
INGRESSI RADIO . . . . . . . . . . . . . . . . . . . . . . . . . . . . . . . . . . . . . . . . . . . . . . . . . . . . . . . . . . . . . . . . . . . . . . .11
INSERIMENTO IN MEMORIA DEI CODICI DESIDERATI . . . . . . . . . . . . . . . . . . . . . . . . . . . . . . . . . . . . . . . . . . . . . .11
FINE PROGRAMMAZIONE . . . . . . . . . . . . . . . . . . . . . . . . . . . . . . . . . . . . . . . . . . . . . . . . . . . . . . . . . . . . . . . . .11
TABELLA FUNZIONI PD1 . . . . . . . . . . . . . . . . . . . . . . . . . . . . . . . . . . . . . . . . . . . . . . . . . . . . . . . . . . . . . . . . . .12
Page 4

2
AVVERTENZE IMPORTANTI
Per chiarimenti tecnici o problemi di installazione la
V2 ELETTRONICA dispone di un servizio di assistenza clienti
attivo durante le ore di ufficio TEL. (+39) 01 72 81 24 11
V2 ELETTRONICA si riserva il diritto di apportare eventuali
modifiche al prodotto senza preavviso; inoltre declina ogni
responsabilità per danni a persone o cose dovuti ad un uso
improprio o ad un’errata installazione.
Leggere attentamente il seguente manuale di
istruzioni prima di procedere con l'installazione e la
programmazione della centrale di comando.
• Il presente manuale di istruzioni è destinato solamente
a personale tecnico qualificato nel campo delle
installazioni di automazioni.
• Nessuna delle informazioni contenute all'interno del
manuale può essere interessante o utile per l'utilizzatore
finale.
• Qualsiasi operazione di manutenzione o di
programmazione deve essere eseguita esclusiavamente
da personale qualificato.
La centrale di comando PD1 è destinata al comando di uno
o due attuatori elettromeccanici per l'automazione di porte
e cancelli a battente. Qualsiasi altro impiego è ritenuto improprio quindi non conforme alle normative vigenti.
L’AUTOMAZIONE DEVE ESSERE REALIZZATA IN
CONFORMITÀ VIGENTI NORMATIVE EUROPEE:
EN 60204–1 (Sicurezza del macchinario, equipaggiamento
elettrico delle macchine, parte 1: regole generali).
EN 12445 (Sicurezza nell'uso di chiusure
automatizzate, metodi di prova).
EN 12453 (Sicurezza nell'uso di chiusure
automatizzate, requisiti).
•L'installatore deve provvedere all'installazione di un
dispositivo (es. interruttore magnetotermico) che
assicuri il sezionamento onnipolare del sistema dalla
rete di alimentazione.
La normativa richiede una separazione dei contatti di
almeno 3 mm in ciascun polo (EN 60335-1).
• Per la connessione di tubi rigidi e flessibili o passacavi
utilizzare raccordi conformi al grado di protezione IP44
o superiore.
•L’installazione richiede competenze in campo elettrico
e meccanico; deve essere eseguita solamente da
personale qualificato in grado di rilasciare la
dichiarazione di conformità di tipo A sull’installazione
completa (Direttiva macchine 89/392 CEE, allegato IIA).
• E’ obbligo attenersi alle seguenti norme per chiusure
veicolari automatizzate: EN 12453, EN 12445,
EN 12978 ed alle eventuali prescrizioni nazionali.
• Anche l’impianto elettrico a monte dell’automazione
deve rispondere alle vigenti normative ed essere
eseguito a regola d’arte.
• La regolazione della forza di spinta dell’anta deve essere
misurata con apposito strumento e regolata in accordo
ai valori massimi ammessi dalla normativa EN 12453.
• Consigliamo di utilizzare un pulsante di emergenza da
installare nei pressi dell’automazione (collegato
all’ingresso STOP della scheda di comando) in modo
che sia possibile l’arresto immediato del cancello in
caso di pericolo.
• Collegare il conduttore di terra dei motori all'impianto di
messa a terra della rete di alimentazione.
CONFORMITÀ ALLE NORMATIVE
V2 ELETTRONICA SPA dichiara che la PD1 è conforme ai
requisiti essenziali fissati dalle Direttive 93/68/EEC,
73/23/EEC. Sono state applicate le seguenti Norme
tecniche per verificarne la conformità:
EN 60335–1: Sicurezza elettrica
EN 50081–1, EN 50081–2: Compatibilità elettromagnetica
Racconigi, lì 15 / 10 / 01
Il rappresentante legale della V2 ELETTRONICA SPA
A.Livio Costamagna
DESCRIZIONE DELLA CENTRALE
La centrale digitale PD1 è un innovativo prodotto
V2 ELETTRONICA, che garantisce sicurezza ed affidabilità
per l'automazione di cancelli ad una o due ante.
La progettazione della PD1 ha mirato alla realizzazione di un
prodotto che si adatta a tutte le esigenze, ottenendo una
centrale estremamente versatile che soddisfa tutti i requisiti
necessari per un'installazione funzionale ed efficiente.
La PD1 è dotata di un display il quale permette, oltre che
una facile programmazione, il costante monitoraggio dello
stato degli ingressi; inoltre la struttura a menù permette
una semplice impostazione dei tempi di lavoro e delle
logiche di funzionamento.
Nel rispetto delle normative europee in materia di sicurezza
elettrica e compatibilità elettromagnetica (EN 60335-1,
EN 50081-1 e EN 50082-1) è caratterizzata dal completo
isolamento elettrico tra la parte di circuito digitale e quella
di potenza.
Altre caratteristiche:
• Controllo automatico per la commutazione dei relè a
correnti nulle.
• Regolazione della potenza con parzializzazione d'onda.
• Uscita lampada spia che indica in quale stato si trova il
cancello.
• Relè ausiliario con logica programmabile per luci di
cortesia o altro utilizzo.
La presenza a bordo di un connettore ad inserimento rapido
permette l'innesto di un ricevitore modulare della serie
MT433 con architettura supereterodina ad elevata sensibilità.
Page 5
3
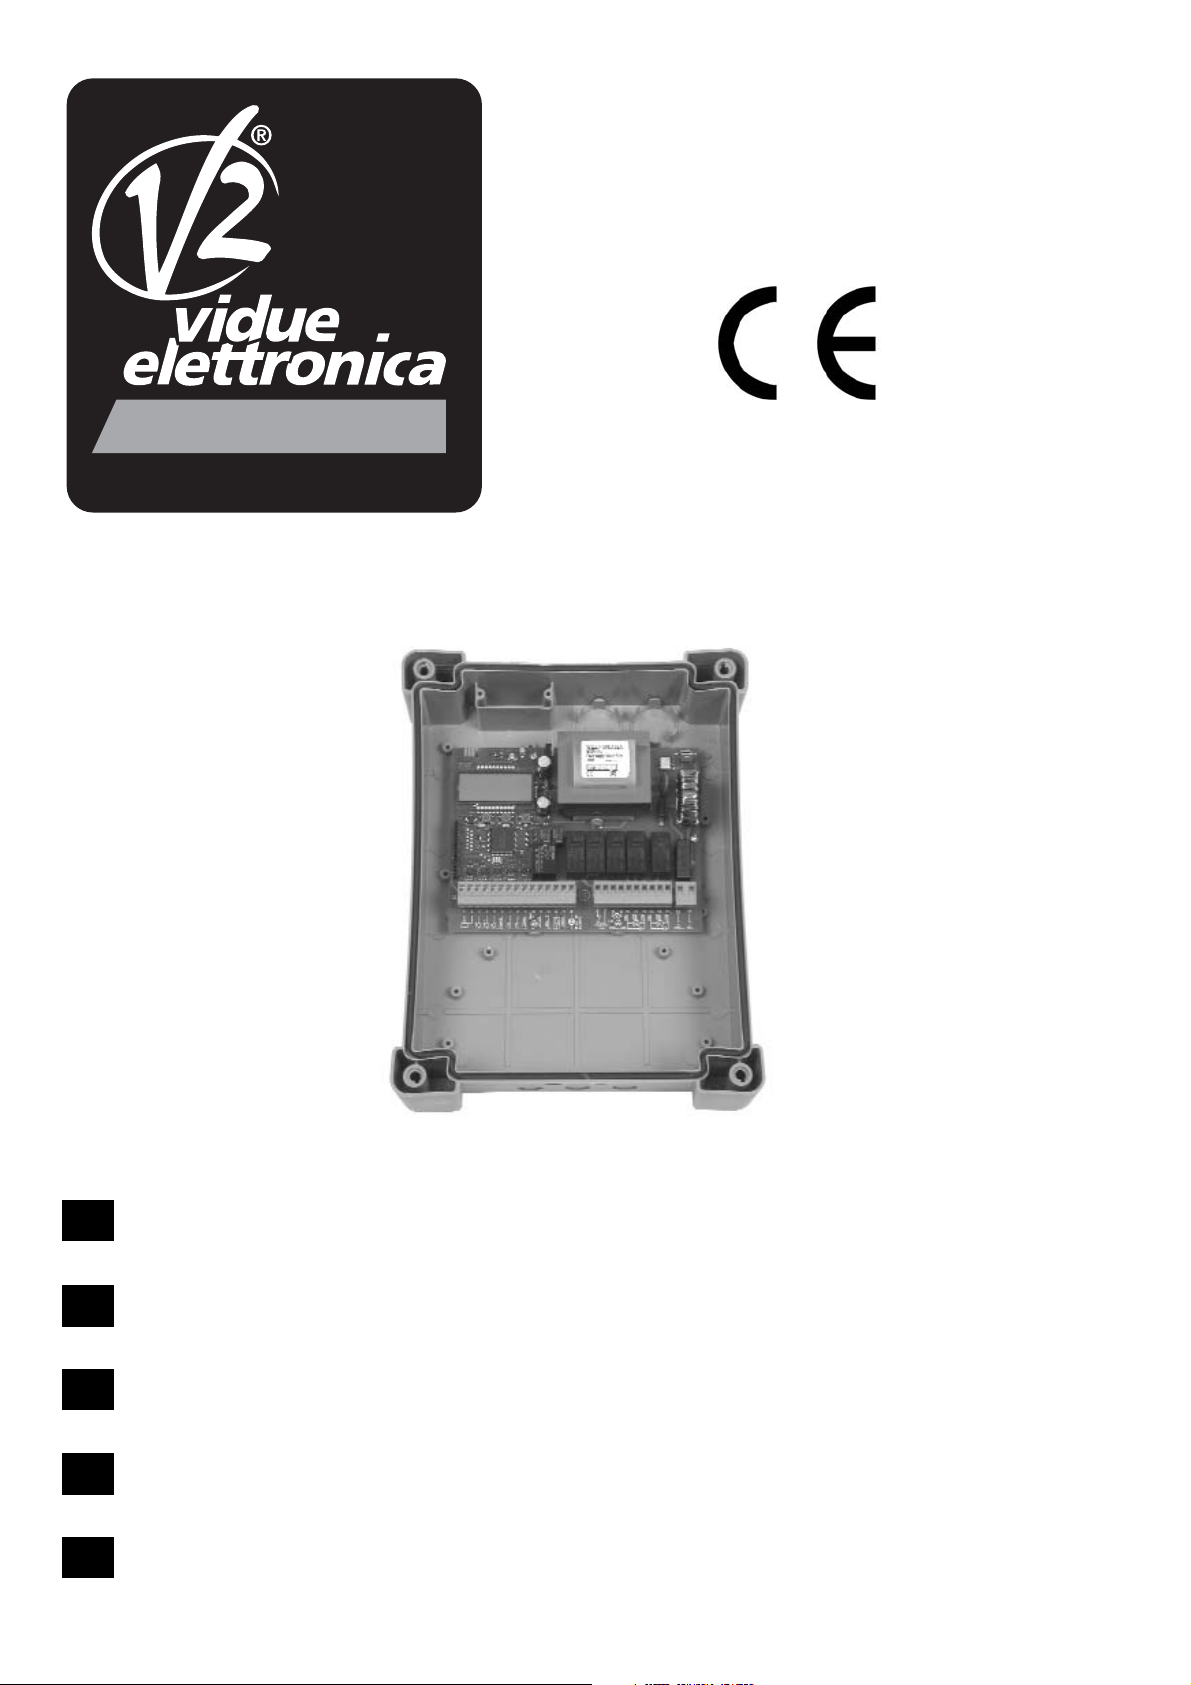
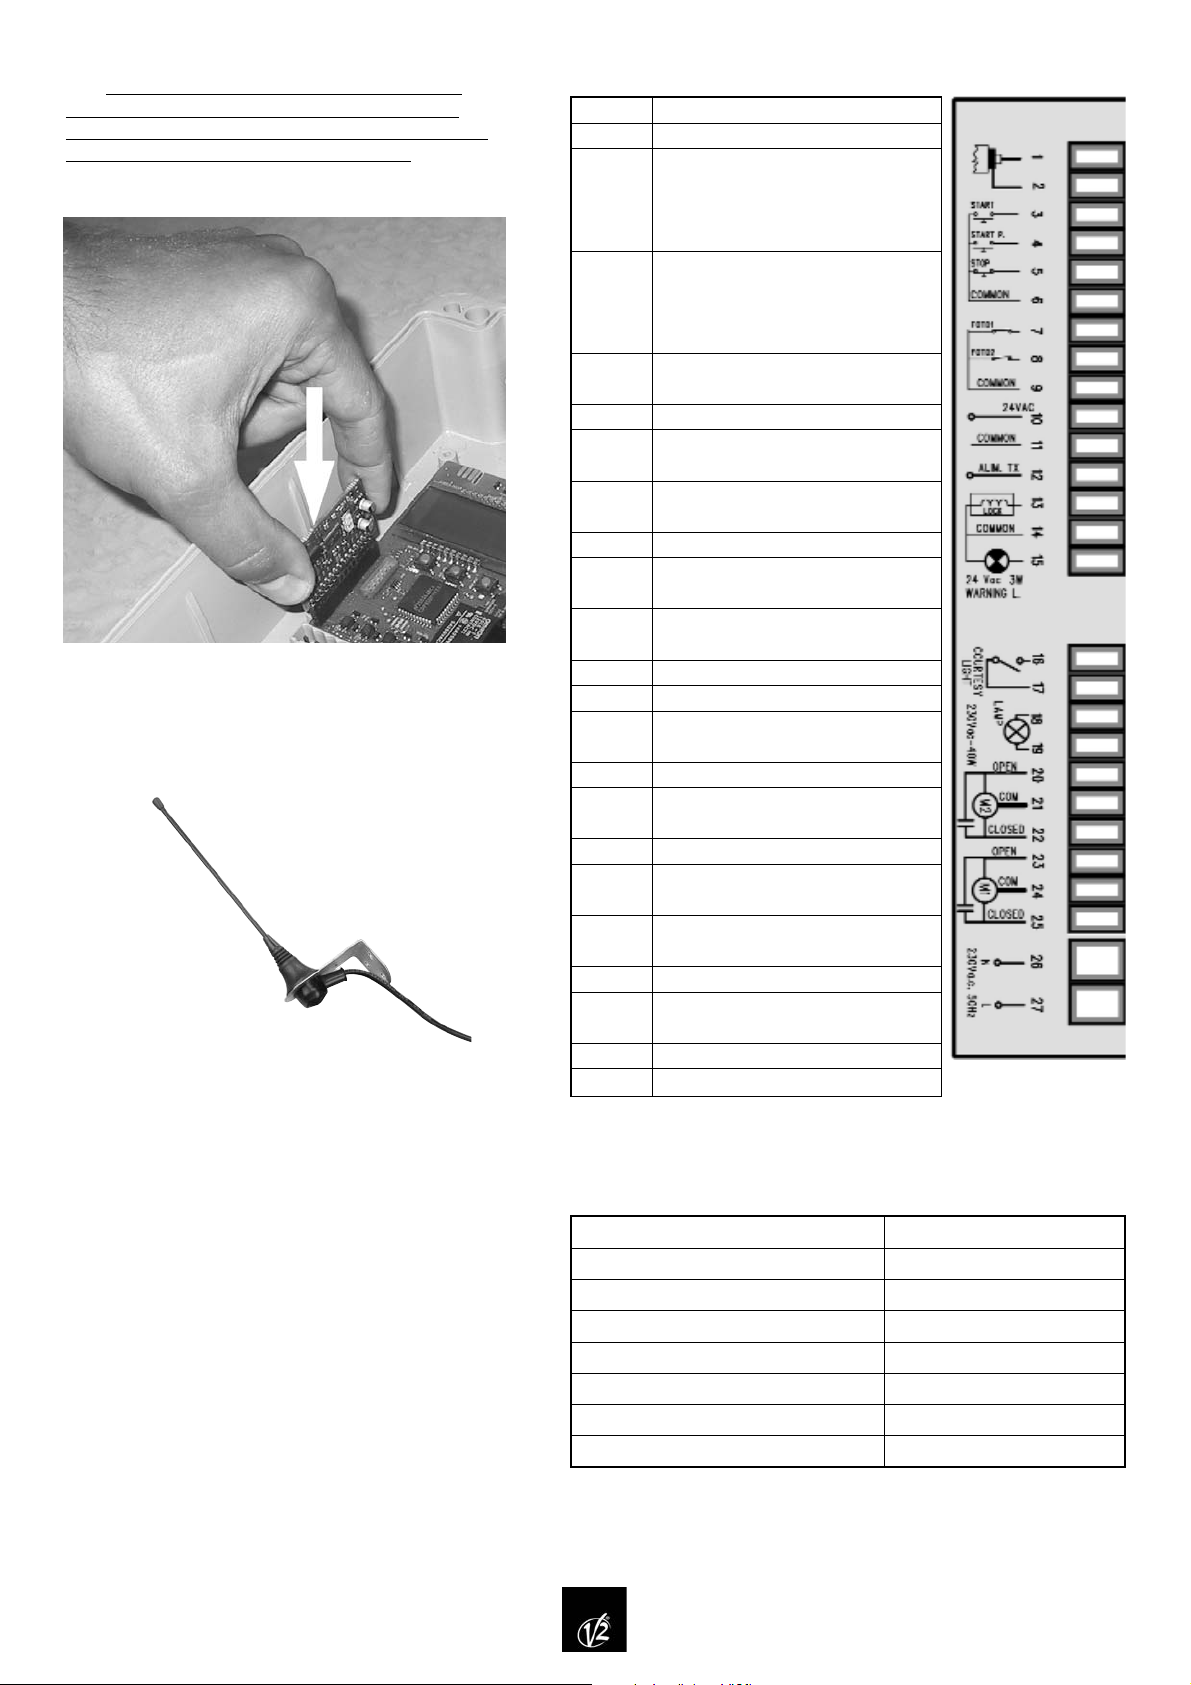
ATTENZIONE: Prima di eseguire le seguenti
operazioni disalimentare la centrale di comando.
Porre la massima attenzione al verso di innesto dei
moduli estraibili.
INNESTO MODULO RICEVITORE MT433
INTERPRETAZIONE DELLA
LAMPADA SPIA (WARNING LIGHT)
La lampada spia (warning light), quando installata
indica in tempo reale lo stato del cancello, il tipo di
lampeggio indica le quattro condizioni possibili:
FERMO luce spenta
IN PAUSA la luce è sempre accesa
IN APERTURA la luce lampeggia lentamente (2Hz)
IN CHIUSURA la luce lampeggia velocemente (4Hz)
COLLEGAMENTI ALLA MORSETTIERA
CARATTERISTICHE TECNICHE
Alimentazione 230 VAC 50 / 60 Hz
Carico max motori 700 W
Carico max accessori 24 V 10 W
Temperatura di lavoro -20°C / 60°C
Fusibili di protezione F1 = 5 A per linea 230 VAC
Dimensioni 295 x 230 x 100 mm
Peso 1600 g
Protezione IP 55
1.
2.
3.
4.
5.
6.
7.
8.
9.
10.–11.
11.–12.
13.–14.
14.–15.
16.–17.
18.–19.
20.
21.
22.
23.
24.
25.
26.
27.
Centrale antenna
Schermatura antenna
Comando di apertura per il
collegamento di dispositivi
tradizionali con contatto N.A,
TTNC, VRD
Comando di apertura pedonale
per il collegamento di dispositivi
tradizionali con contatto N.A.,
TTNC, VRD
Comando di STOP
Contatto normalmente chiuso
Comune (-)
Fotocellula 1
Contatto normalmente chiuso
Fotocellula 2
Contatto normalmente chiuso
Comune (-)
Uscita alimentazione 24VAC per
fotocellule ed altri accessori
Alimentazione TX fotocellule per
Test funzionale
Elettroserratura 12VAC
Lampada spia 24VAC 3W
Contatto per luce di cortesia
230VAC 10A
Lampeggiatore 230VAC 40W
Uscita alimentazione 230VAC per
motore 2 in fase di apertura
Comune motore 2
Uscita alimentazione 230VAC per
motore 2 in fase di chiusura
Uscita alimentazione 230VAC per
motore 1 in fase di apertura
Comune motore 1
Uscita alimentazione 230VAC per
motore 1 in fase di chiusura
Neutro alimentazione 230VAC
Fase alimentazione 230VAC
ATTENZIONE: si consiglia di utilizzare l'antenna
esterna modello ANS433 per garantire la massima
portata radio.
Page 6
4
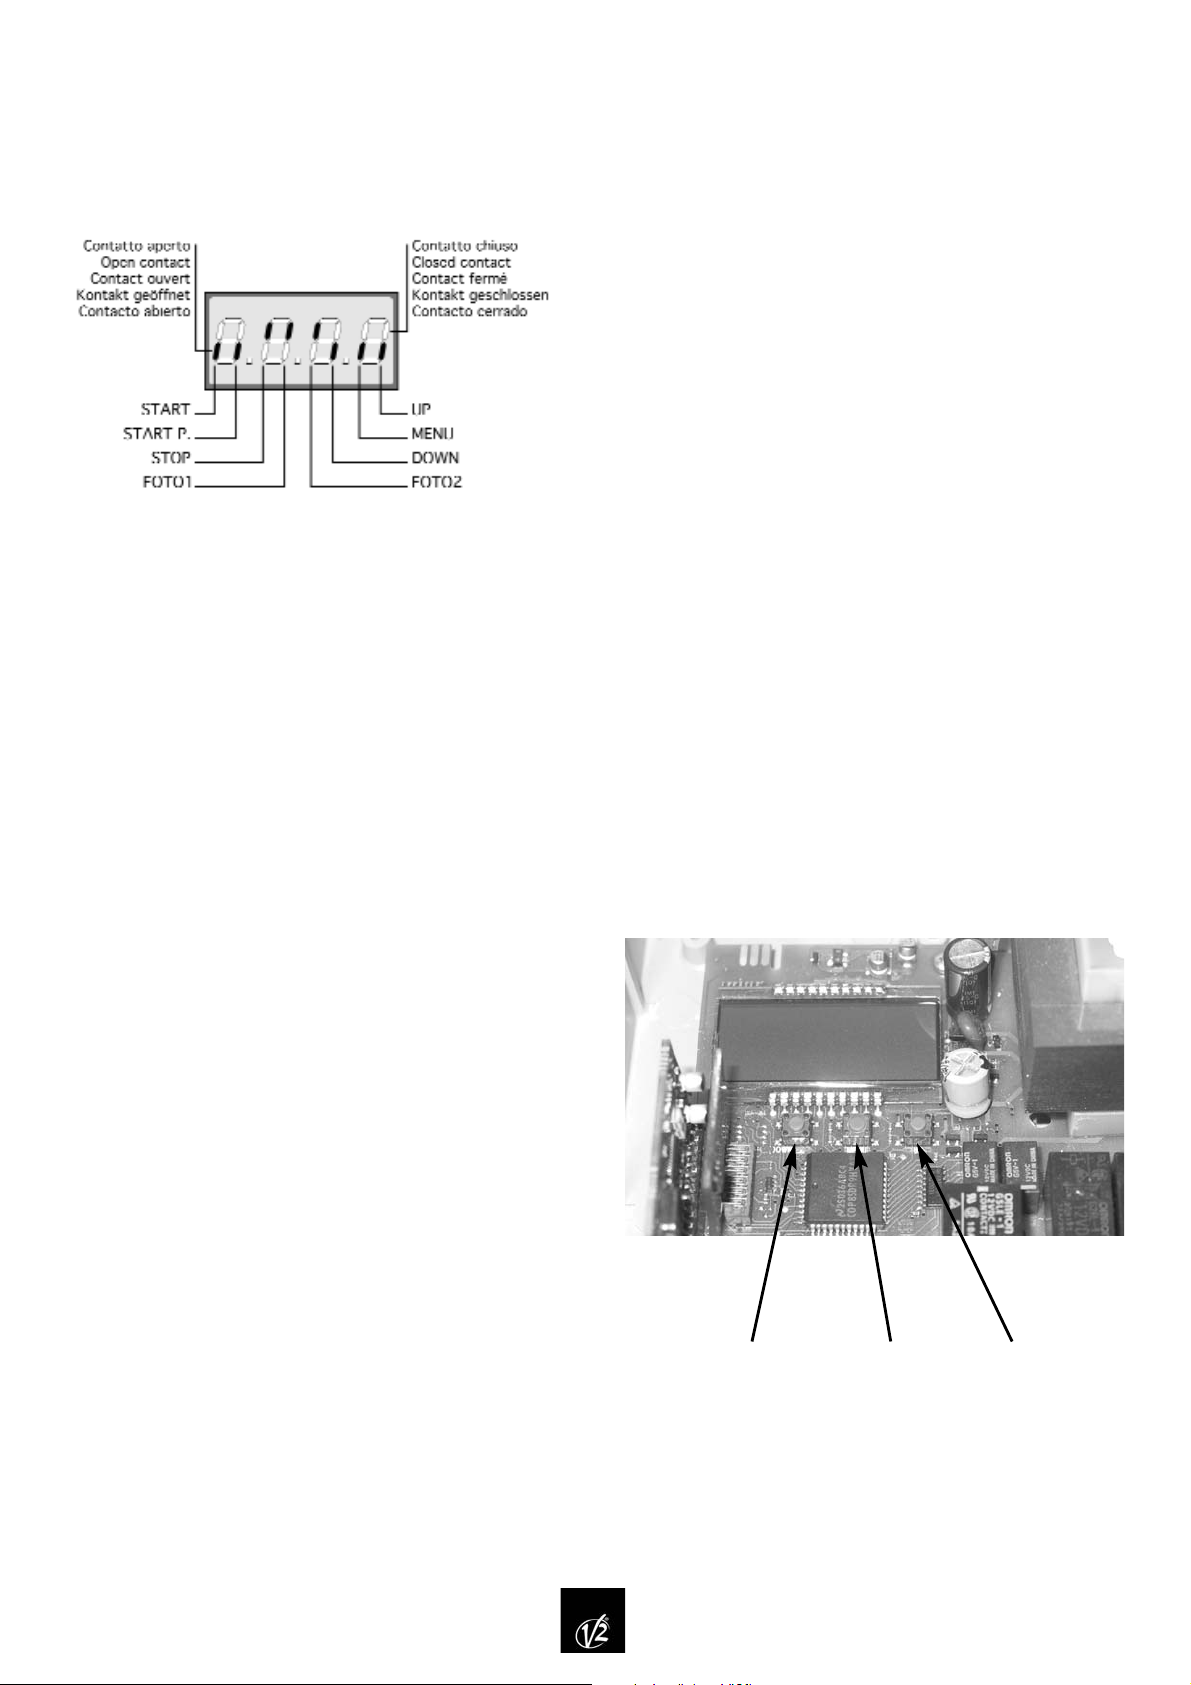
PANNELLO DI CONTROLLO
Eseguire i collegamenti elettrici alla morsettiera, quindi
alimentare il sistema: la centrale verifica il corretto
funzionamento del display accendendo tutti i segmenti per
1,5sec. 8.8.8.8 , nell’istante successivo sul display
compare la versione del firmware per 1,5 secondi, ad
esempio Pr 2.8.
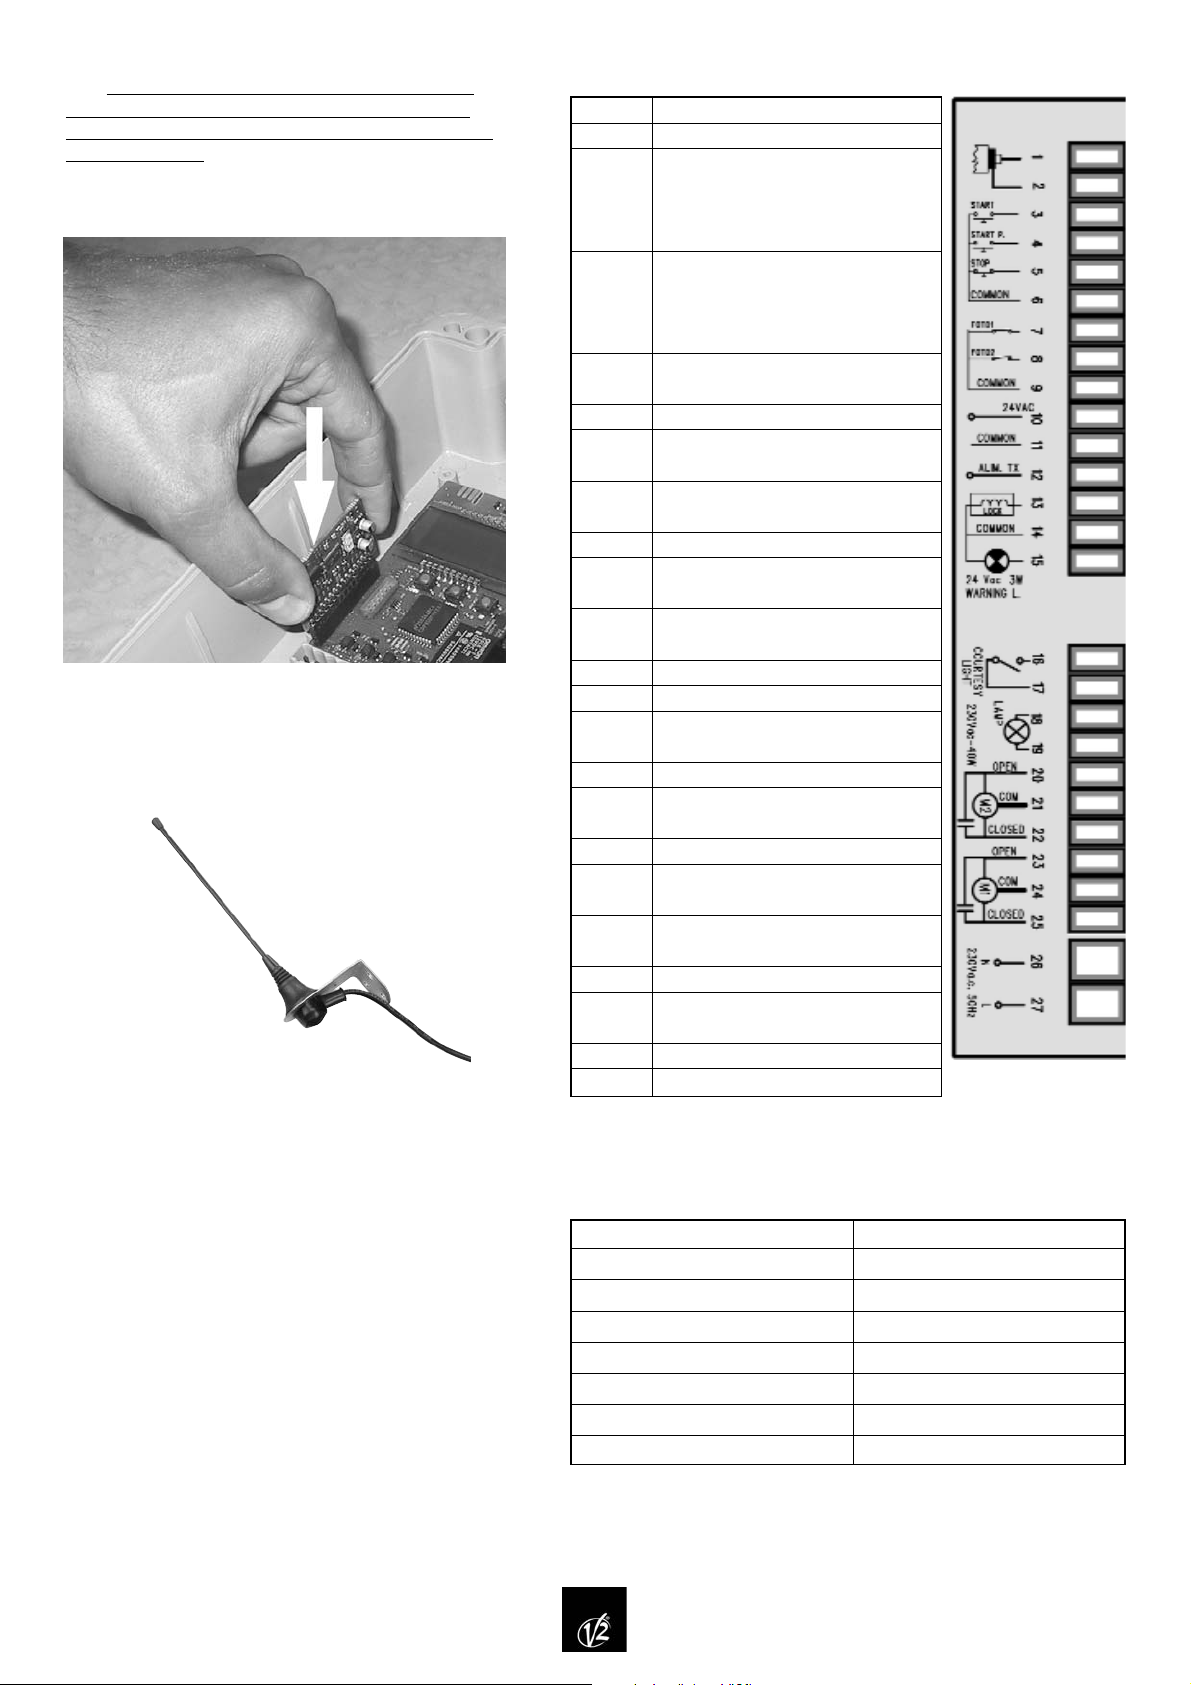
ll display visualizza il pannello di controllo:
Il pannello di controllo indica lo stato fisico dei contatti alla
morsettiera e dei tasti di programmazione: se è acceso il
segmento verticale in alto, il contatto è chiuso; se è acceso
il segmento verticale in basso, il contatto è aperto (il
disegno sopra indicato illustra il caso in cui gli ingressi:
START, START P, FOTO1, FOTO2 e STOP sono stati tutti
collegati correttamente).
FUNZIONE AUTO POWER-OFF in fase di programmazione,
dopo 50 secondi dall'ultimo intervento, il display va in
stand-by. Si riaccende alla prima variazione di uno degli
ingressi (START, START P, FOTO1, FOTO2, STOP) e alla
prima ricezione radio di un codice in memoria. Se premo
uno qualsiasi dei tre tasti (MENU, UP, DOWN) il display
rimane acceso per 50 secondi.
PROGRAMMAZIONE
La centrale PD1 presenta una struttura di
programmazione a menù, ognuno dei quali corrisponde ad
una funzione della centrale (menù funzione) o all'impostazione
di un tempo di lavoro (menù tempo).
I menù tempo permettono la regolazione dei tempi di lavoro
della centrale (Es.: tempo di apertura o di chiusura
dell'anta, tempo di serratura, tempo di prelampeggio, ecc.)
e sono impostabili da 0 a 120 secondi con una scansione
di ±0,5 sec.
Invece i menù funzione permettono di attivare le funzioni
desiderate (es. luci di cortesia temporizzate, FOTO1 attiva
come costa mobile, FOTO2 disattivata, ecc.).
Esistono dei menù tempo dipendenti da determinati menù
funzione (Es.: se la CHIUSURA AUTOMATICA è attivata, è
necessario impostare un TEMPO DI PAUSA, se non è attivata
non è necessario impostarlo); quindi per semplificare la
programmazione, questi menù tempo sono stati inseriti
all'interno dei menù funzione dai quali dipendono.
In particolare i menù: CHIUSURA AUTOMATICA (Ch.AU),
ANTISLITTAMENTO (ASM) e FOTOCELLULA IN PAUSA (Ft.PA)
presentano tra le opzioni selezionabili dei “menù tempo”.
FUNZIONE DEI TASTI
MENU, UP, DOWN
Per attivare la programmazione procedere come segue.
•Alimentata la centrale, il display deve visualizzare il
pannello di controllo (controllare quindi che i
collegamenti effettuati siano corretti).
•Tenere premuto il tasto MENU fino a quando sul display
compare dEF.
A questo punto la programmazione è attivata: se entro 1
minuto non si effettua alcuna operazione, la centrale esce
automaticamente dalla programmazione e visualizza
nuovamente il pannello di controllo.
Quando la funzione di programmazione è attivata, premere il
tasto UP o il tasto DOWN per selezionare i menù,
effettuando uno scorrimento avanti o indietro (per uno
scorrimento veloce tenere il tasto premuto). Premere il
tasto MENU per accedere alle impostazioni che si possono
così modificare premendo i tasti UP e DOWN.
•Premendo il tasto UP si scorre all’interno del menù
funzioni dal basso verso l’alto.
•Premendo il tasto DOWN si scorre all’interno del menù
funzioni dall’alto verso il basso.
•Premendo il tasto MENU si può accedere alle eventuali
impostazioni da modificare e confermare ripremendo lo
stesso tasto.
ATTENZIONE: quando la funzione di programmazione non è
attivata, la pressione del tasto UP corrisponde al comando
di START, la pressione del tasto DOWN corrisponde al
comando di START PEDONALE: è così possibile per
l’installatore effettuare il collaudo e la messa a punto.
È possibile definire il funzionamento della centrale PD1 con
due diverse modalità di programmazione:
PROGRAMMAZIONE PREDEFINITA (DEFAULT) o
PROGRAMMAZIONE PERSONALIZZATA.
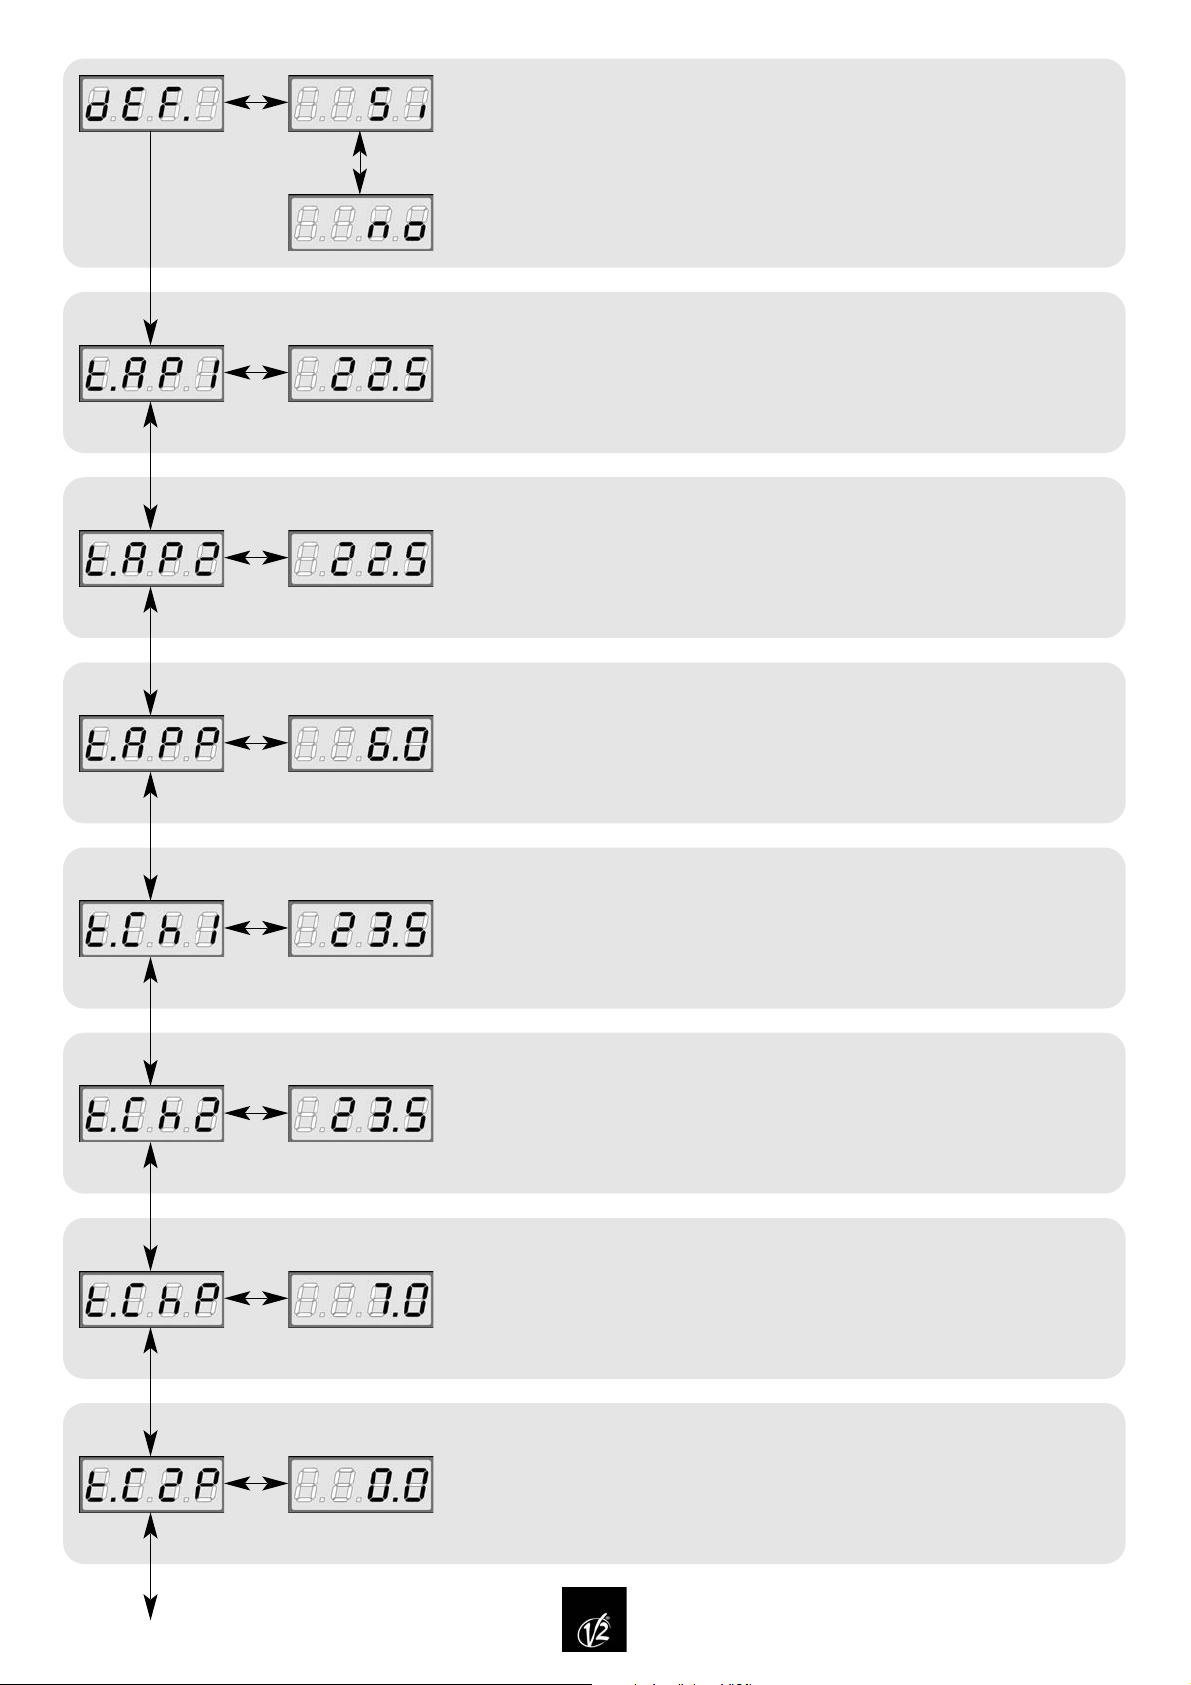
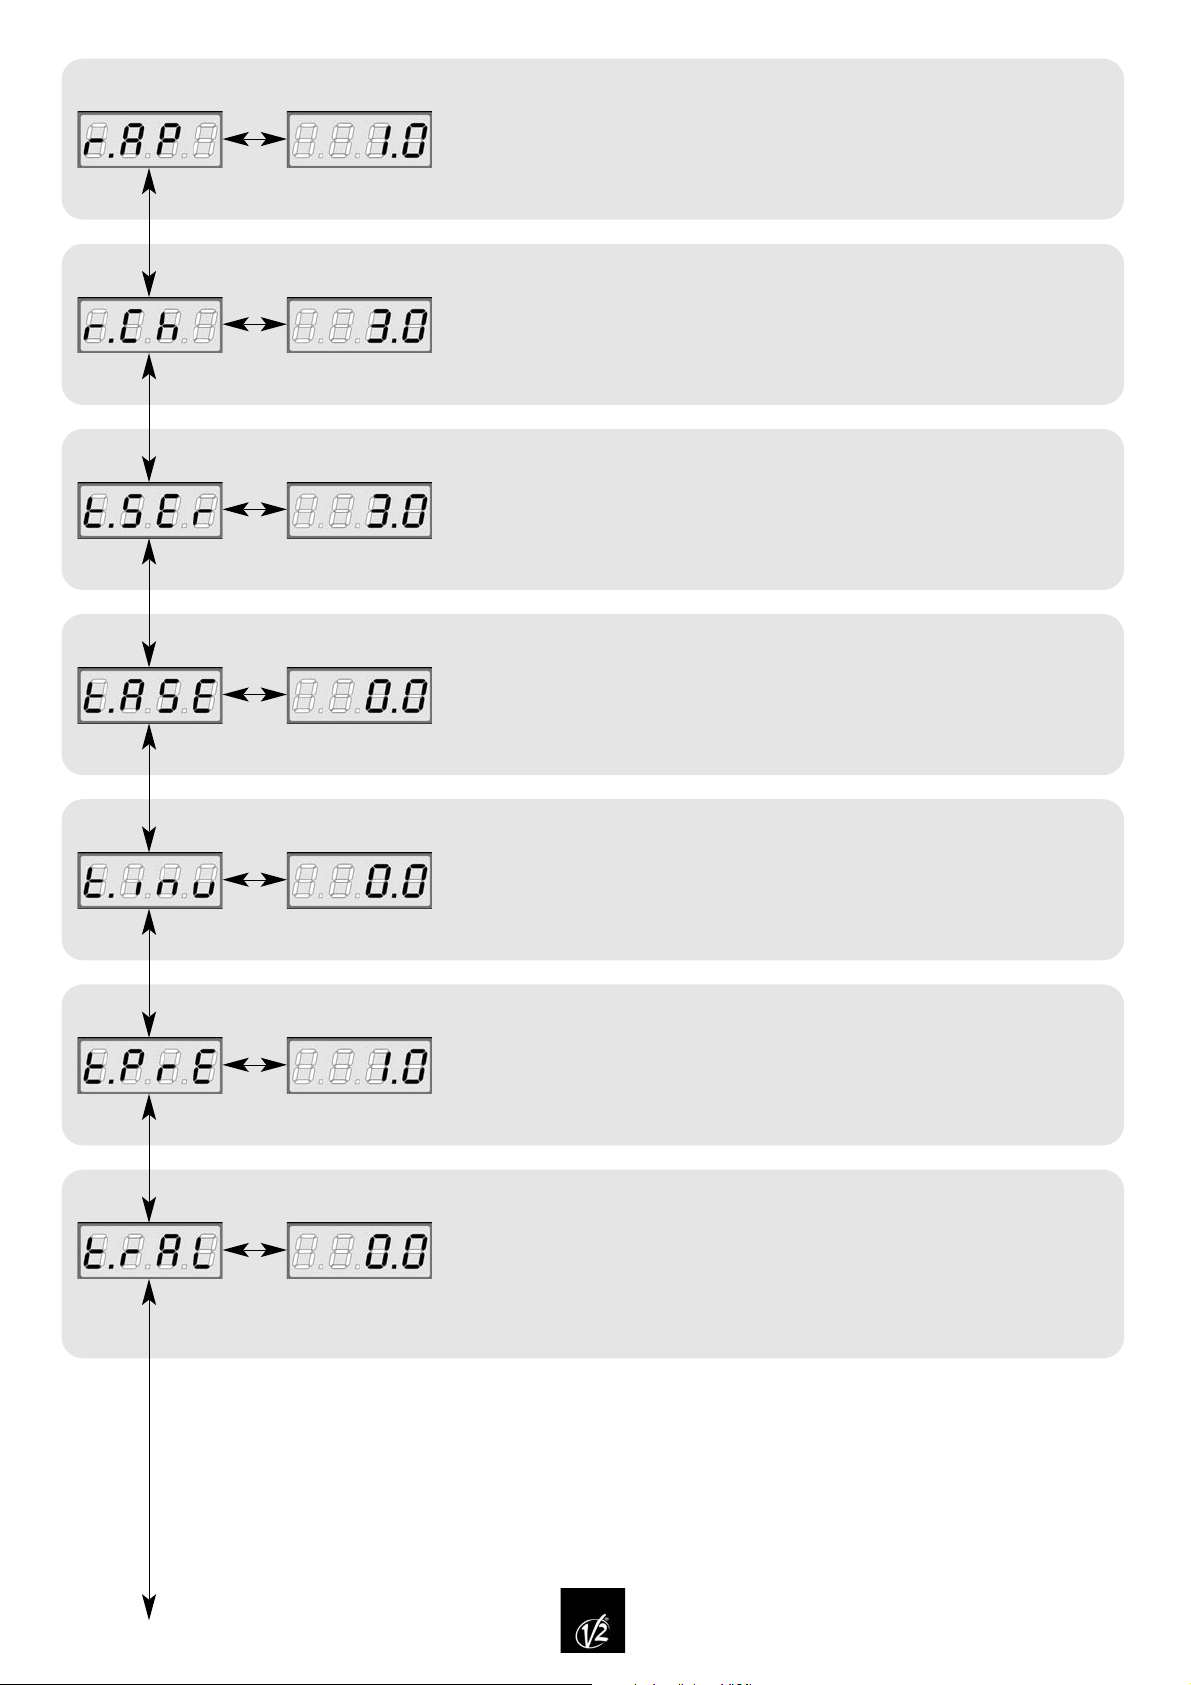
Nelle pagine seguenti viene rappresentato il diagramma
delle funzioni della PD1 con relativa descrizione.
Il diagramma va interpretato nel seguente modo:
•Premendo il tasto DOWN sul pannello di controllo si
scorre il diagramma dall'alto verso il basso ovvero
compariranno le funzioni dEF, t.AP1, t.AP2 ecc.
•Premendo il tasto UP si scorre il diagramma dal basso
verso l'alto.
•Premendo il tasto MENU si scorre il diagramma in
senso orizzontale; se per esempio sia sta visualizzando
la funzione t.ChP, la pressione del tasto MENU fa
comparire il numero 7.0. Quest'ultimo può essere
incrementato mediante il tasto UP e decrementato
mediante il tasto DOWN. La successiva pressione del
tasto MENU fa nuovamente visualizzare la funzione t.ChP.
DOWN MENU UP
Page 7
5
Questo tipo di programmazione permette di caricare in memoria i
dati di Default V2 ELETTRONICA: i dati sono indicati nella tabella
riassuntiva allegata al fondo (colonna DATI DI DEFAULT).
Selezionare l'opzione desiderata tramite i tasti UP e DOWN,
quindi premere MENU per confermare.
TEMPO DI APERTURA ANTA 1
Questo menù è regolabile da 0 a 120 secondi (±0,5) e determina
il tempo per cui l’anta 1 sia apre.
TEMPO DI APERTURA ANTA 2
Questo menù è regolabile da 0 a 120 secondi (±0,5) e determina
il tempo per cui l’anta 2 sia apre.
TEMPO DI APERTURA ANTA PEDONALE
Questo menù è regolabile da 0 secondi a t.AP1 (±0,5) e
determina il tempo per cui l’anta pedonale sia apre.
TEMPO CHIUSURA ANTA 1
Questo menù è regolabile da 0 a 120 secondi (±0,5) e determina
il tempo per cui l’anta 1 si chiude. Per evitare che l’anta non si
chiuda completamente, è consigliabile impostare un tempo più
lungo di quello di apertura t.AP1.
TEMPO CHIUSURA ANTA 2
Questo menù è regolabile da 0 a 120 secondi (±0,5) e determina
il tempo per cui l’anta 2 si chiude. Per evitare che l’anta non si
chiuda completamente, è consigliabile impostare un tempo più
lungo di quello di apertura t.AP2.
TEMPO CHIUSURA ANTA PEDONALE
Questo menù è regolabile da 0 secondi a t.Ch1 (±0,5) e
determina il tempo per cui l’anta pedonale si chiude. Per evitare
che l’anta non si chiuda completamente, è consigliabile impostare
un tempo più lungo di quello di apertura t.APP.
TEMPO DI CHIUSURA ANTA 2 DURATE CICLO PEDONALE
Permette una regolazione da 0 secondi a t.ChP (±0,5) e
determina il tempo per cui l’anta 2 si chiude durante la fase di
chiusura dell’anta pedonale.
Page 8
6
RITARDO D’ANTA IN APERTURA
Per evitare che le ante possano entrare in collisione durante
l’apertura, è necessario introdurre il tempo di ritardo r.AP ,
regolabile da 0 a 120 secondi (±0,5). In questo modo l’apertura
dell’anta 2 viene ritardata rispetto all’anta 1 del tempo impostato.
RITARDO D’ANTA IN CHIUSURA
Per evitare che le ante possano entrare in collisione durante la
chiusura, è necessario introdurre il tempo di ritardo r.Ch ,
regolabile da 0 a 120 secondi (±0,5). In questo modo l’apertura
dell’anta 1 viene ritardata rispetto all’anta 2 del tempo impostato.
TEMPO SERRATURA
Nell’istante in cui il cancello comincia l’apertura, la centrale deve
eccitare l’elettroserratura al fine di sganciarla e permettere il
movimento del cancello. Il tempo t.SEr determina la durata
dell’eccitazione, ed è regolabile da 0 a 120 secondi (±0,5).
TEMPO ANTICIPO SERRATURA
Questo menù permette di anticipare l’eccitazione della serratura
di un tempo regolabile da 0 secondi a t.SEr (±0,5).
Durante il tempo di anticipo serratura il cancello non effettua
nessun movimento così da garantire sempre lo sganciamento
dell’elettroserratura.
TEMPO COLPO D’ARIETE
Per evitare che il cancello inizi la fase di apertura prima che
l’elettroserratura si sia sganciata, è possibile introdurre un tempo
d’inversione regolabile da 0 a 120 secondi (±0,5). In questo
modo durante l’apertura le ante invertono il moto per il tempo
impostato, permettendo lo sganciamento dell’elettroserratura.
TEMPO PRELAMPEGGIO
Questo menù permette l’introduzione di un prelampeggio che
precede ogni movimento del cancello sia in apertura sia in
chiusura: il tempo di prelampeggio è regolabile da 0 a 120
secondi (±0,5).
TEMPO RALLENTAMENTO
Questo menù permette di abilitare la funzione di rallentamento
del cancello per un tempo impostabile tra 0 e 120 s (±1,5 s).
Per impostare il rallentamento procedere come segue: lasciare il
tempo di rallentamento a 0 e verificare che il cancello apra e
chiuda correttamente. Successivamente impostare il tempo di
rallentamento (ad esempio 5 o 6 s).
Page 9
7
TEMPO CHIUSURA VELOCE DOPO RALLENTAMENTO IN CHIUSURA
Qualora venga impostato un tempo di rallentamento diverso da 0,
è possibile che la velocità del cancello non sia sufficiente a far
scattare la serratura durante la chiusura. Per questo motivo, dopo
che si è conclusa la fase di rallentamento, è possibile far chiudere
il cancello ad una velocità normale (senza rallentamento) per un
tempo impostabile tra 0 e 120 s (±0,5).
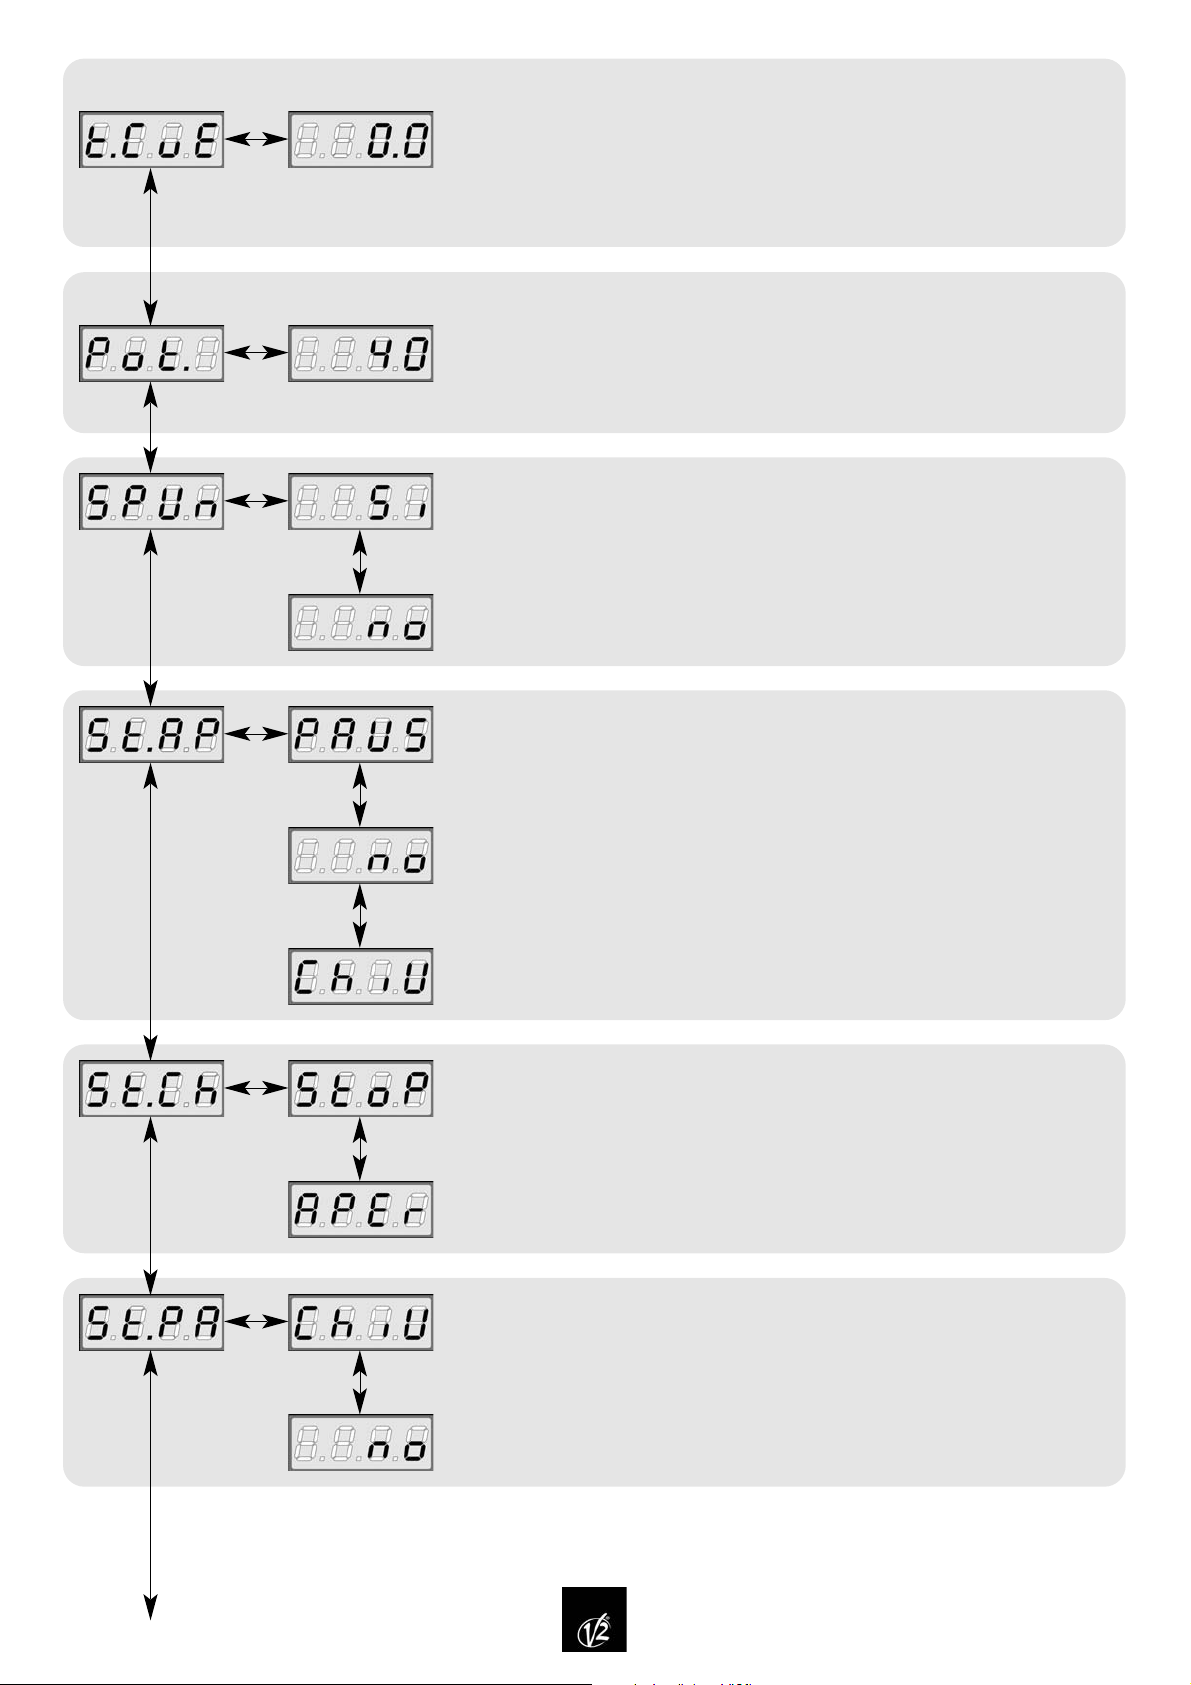
POTENZA DEI MOTORI
Questo menù permette la regolazione della potenza dei motori da
30 a 100% con scansione ±5.
SPUNTO
Quando il cancello è fermo e si appresta ad entrare in movimento,
viene contrastato dall'inerzia iniziale, di conseguenza se il cancello
è molto pesante c'è il rischio che le ante non si muovano.
Attivando la funzione SPUNTO, è possibile vincere l'inerzia iniziale
grazie all'avvio dei motori al massimo della potenza per un tempo
di 2 secondi.
START IN APERTURA
Questo menù permette di selezionare le funzioni del comando di
START durante la fase di apertura.
PAUS il comando di START ferma il cancello che entra in fase
di PAUSA.
no il comando di START non è sentito.
ChiU il comando di START richiude il cancello.
START IN CHIUSURA
Questo menù permette di selezionare le funzioni del comando di
START durante la fase di chiusura.
StoP il comando di START ferma il cancello concludendo così il
ciclo.
APEr il comando di START riapre il cancello.
START IN PAUSA
Questo menù permette di selezionare le funzioni del comando di
START durante la fase di pausa.
ChiU il comando di START richiude il cancello.
no il comando di START non è sentito. Questa funzione non
deve essere selezionata quando la chiusura automatica
non è attiva (menu Ch.AU).
Page 10

8
START PEDONALE IN APERTURA
Questo menù permette di selezionare le funzioni del comando di
START P. durante la fase di apertura.
PAUS il comando di START PEDONALE ferma il cancello che
entra in fase di pausa.
no il comando di START PEDONALE non è sentito.
ChiU il comando di START PEDONALE richiude il cancello.
FOTOCELLULA IN PAUSA
Questo menù permette di determinare il funzionamento
delle due fotocellule durante la fase di pausa.
rPAU l'oscuramento della fotocellula blocca il
conteggio del tempo di pausa: al suo disimpegno
la centrale ricarica il tempo di pausa.
t.PCh l'oscuramento della fotocellula blocca il
conteggio del tempo di pausa: al suo disimpegno
il cancello richiude dopo un tempo impostabile
da 0 a 120 sec.
Se la funzione selezionata è t.PCh sul display compare
5.0, impostare il tempo desiderato premendo il tasto
UP o DOWN.
CHIUSURA AUTOMATICA
Permette la selezione tra funzionamento semiautomatico
o automatico. Con il funzionamento semiautomatico il
comando di START o START PEDONALE apre il cancello,
ad apertura ultimata il cancello rimane fermo fino al
successivo comando di apertura, che richiude.
Diversamente, in modo automatico il comando di
START o START PEDONALE inizia un ciclo: il cancello
apre per il tempo di apertura, si ferma e resta in fase
di pausa per il tempo impostato (t.PAU), quindi richiude per il tempo di chiusura.
no la chiusura automatica non è attiva, il cancello funziona in modo semiautomatico.
t.PAU la chiusura automatica è attiva, il tempo di pausa è impostabile da 0 a 999 secondi.
Se la funzione selezionata è t.PAU, sul display compare 10.0, impostare il tempo desiderato premendo UP o DOWN.
IMPORTANTE: Se la chiusura automatica non è stata attivata è necessario abilitare il comando di star t in
pausa (menu St.PA)
LUCI DI CORTESIA
Grazie all’uscita COURTESY LIGHT
la centrale PD5 permette il
collegamento di un utilizzatore (ad
esempio la luce di cortesia o le luci
da giardino), che viene comandato
in modo automatico o tramite
azionamento dall’apposito tasto
trasmettitore.
Page 11
9
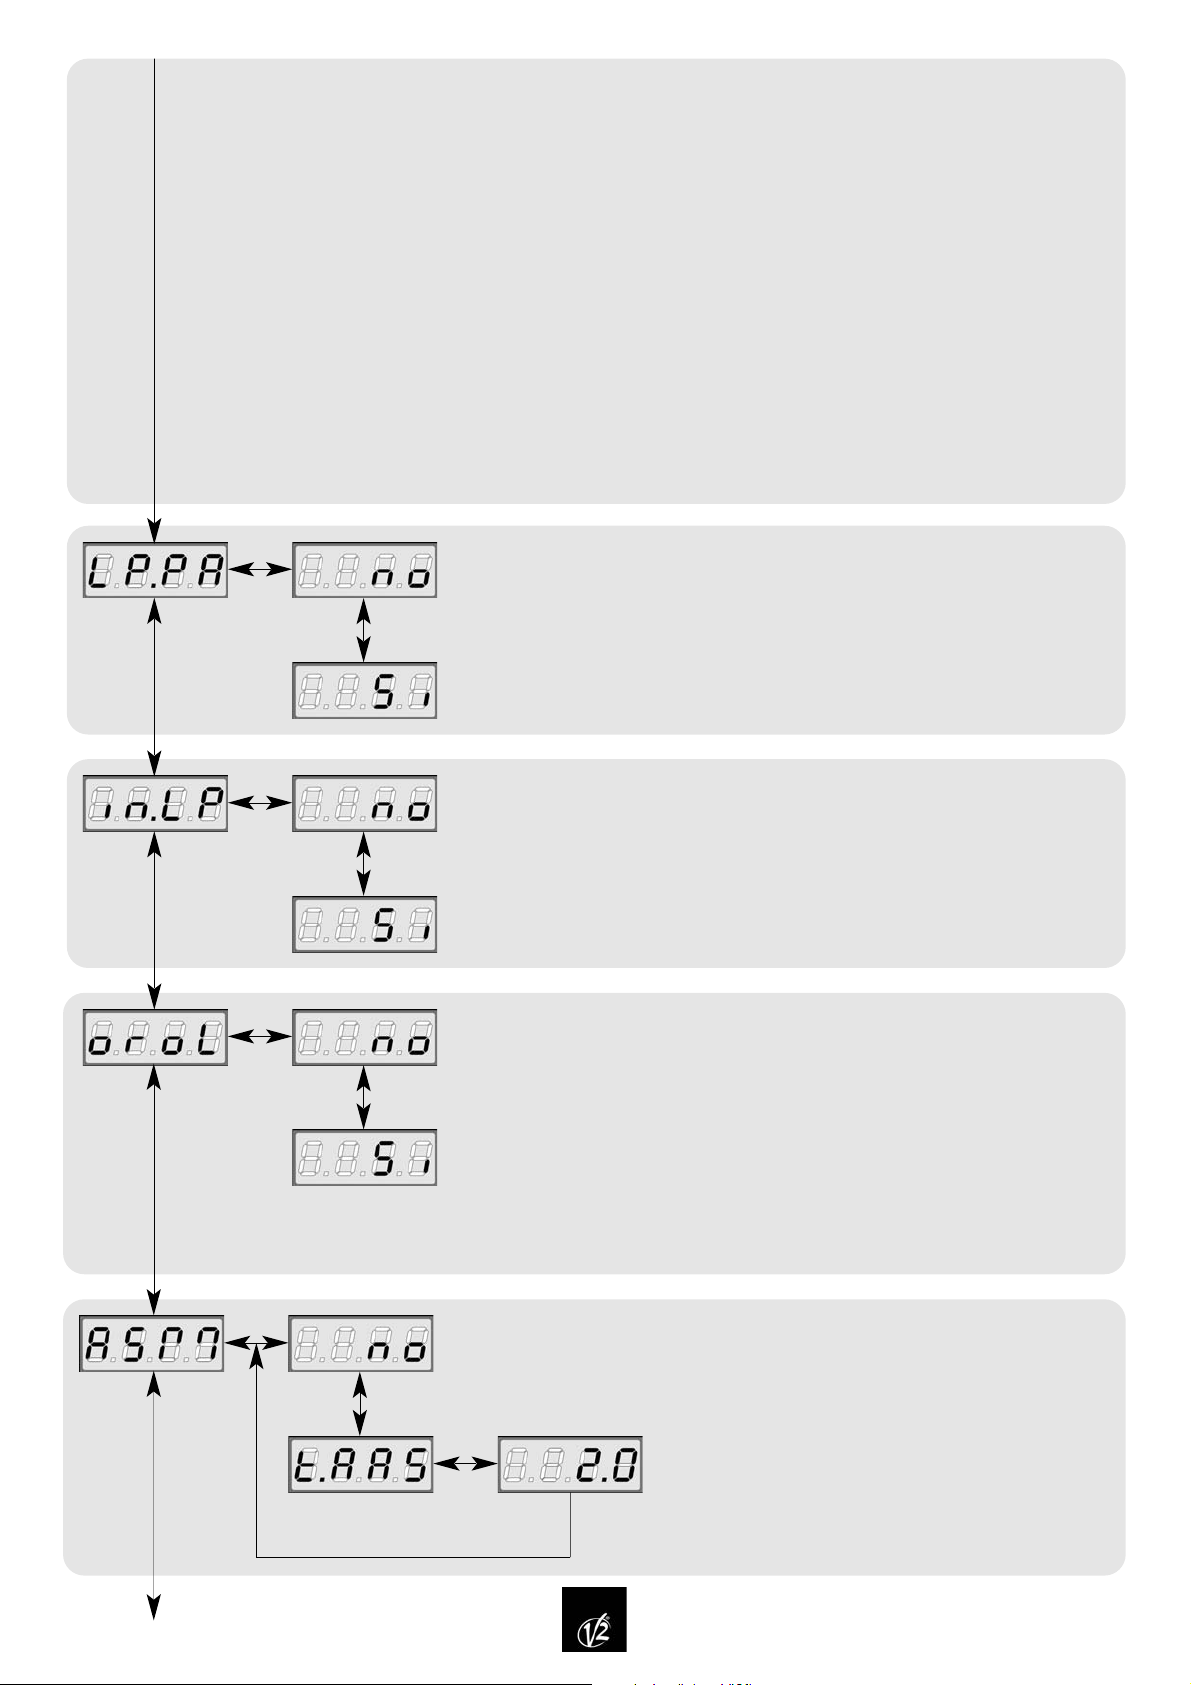
FUNZIONE TIMER
Questa funzione permette di programmare, nell’arco del giorno, le
fasce orarie di apertura e chiusura del cancello. E’ necessario
collegare un timer 24h con contatto normalmente aperto in
parallelo all’ingresso START o START PEDONALE. Quando il contatto
del timer si chiude, il cancello entra in fase di apertura e rimane
aperto fino a quando il contatto del timer si apre causando la
richiusura del cancello.
IMPORTANTE: per un corretto funzionamento è necessario
attivare la richiusura automatica (menu Ch.AU)
LAMPEGGIATORE CON INTERMITTENZA
La centrale PD5 - PD7 permette il collegamento di un lampeggiatore
con o senza intermittenza. Se il lampeggiatore ha l'intermittenza
al suo interno, è necessario selezionare l'opzione "Si"; invece se
non ha l'intermittenza al suo interno, è necessario selezionare
l'opzione "no" affinché possa lampeggiare.
LAMPEGGIATORE IN PAUSA
Questo menù permette di attivare o disattivare il lampeggiante
durante il tempo di pausa.
Nel primo caso la chiusura del contatto N.a. , è possibile con un comando di START o di START
PEDONALE (sia con chiave sia con trasmettitore); nel secondo è possibile azionando il trasmettitore
memorizzato sull’ingresso radio tEL4; in quest’ultimo caso l’uscita COURTESY LIGHT diventa
un’uscita ausiliaria alla quale è possibile associare una delle seguenti logiche di funzionamento:
monostabile: attiva il relè d’uscita per tutto il tempo di trasmissione del trasmettitore, quando la
trasmissione si interrompe il relè si disattiva.
bistabile: attiva il relè con la prima trasmissione del trasmettitore, il relè si disattiva con la
seconda trasmissione.
timer: la trasmissione del trasmettitore attiva il relè, il quale si disattiva automaticamente
dopo un tempo impostabile da 0 a 999 secondi.
t.LUC le luci di cortesia si accendono per un tempo impostabile da 0 a 999 sec.
CiCL le luci di cortesia si accendono per tutta la durata del ciclo
AUS uscita ausiliaria con logica di funzionamento impostabile
Se la funzione selezionata è AUS, sul display compare una delle tre scritte:
tiM uscita ausiliaria temporizzata (tempo impostabile da 0 a 999 sec.)
biSt relè dell’uscita ausiliaria con funzionamento bistabile
Mon relè dell’uscita ausiliaria con funzionamento monostabile
ANTISLITTAMENTO MOTORI
La funzione di antislittamento impedisce che la ripetuta
interruzione del ciclo di aper tura e chiusura generi dei
tempi più lunghi di quelli necessari al completamento
del ciclo.
no la funzione di antislittamento motori non è
attiva.
t.AAS la funzione di antislittamento motori è attiva
con un tempo aggiunto, in apertura o in chiusura,
regolabile da 0 a 120 secondi.(±0,5)
Page 12
10
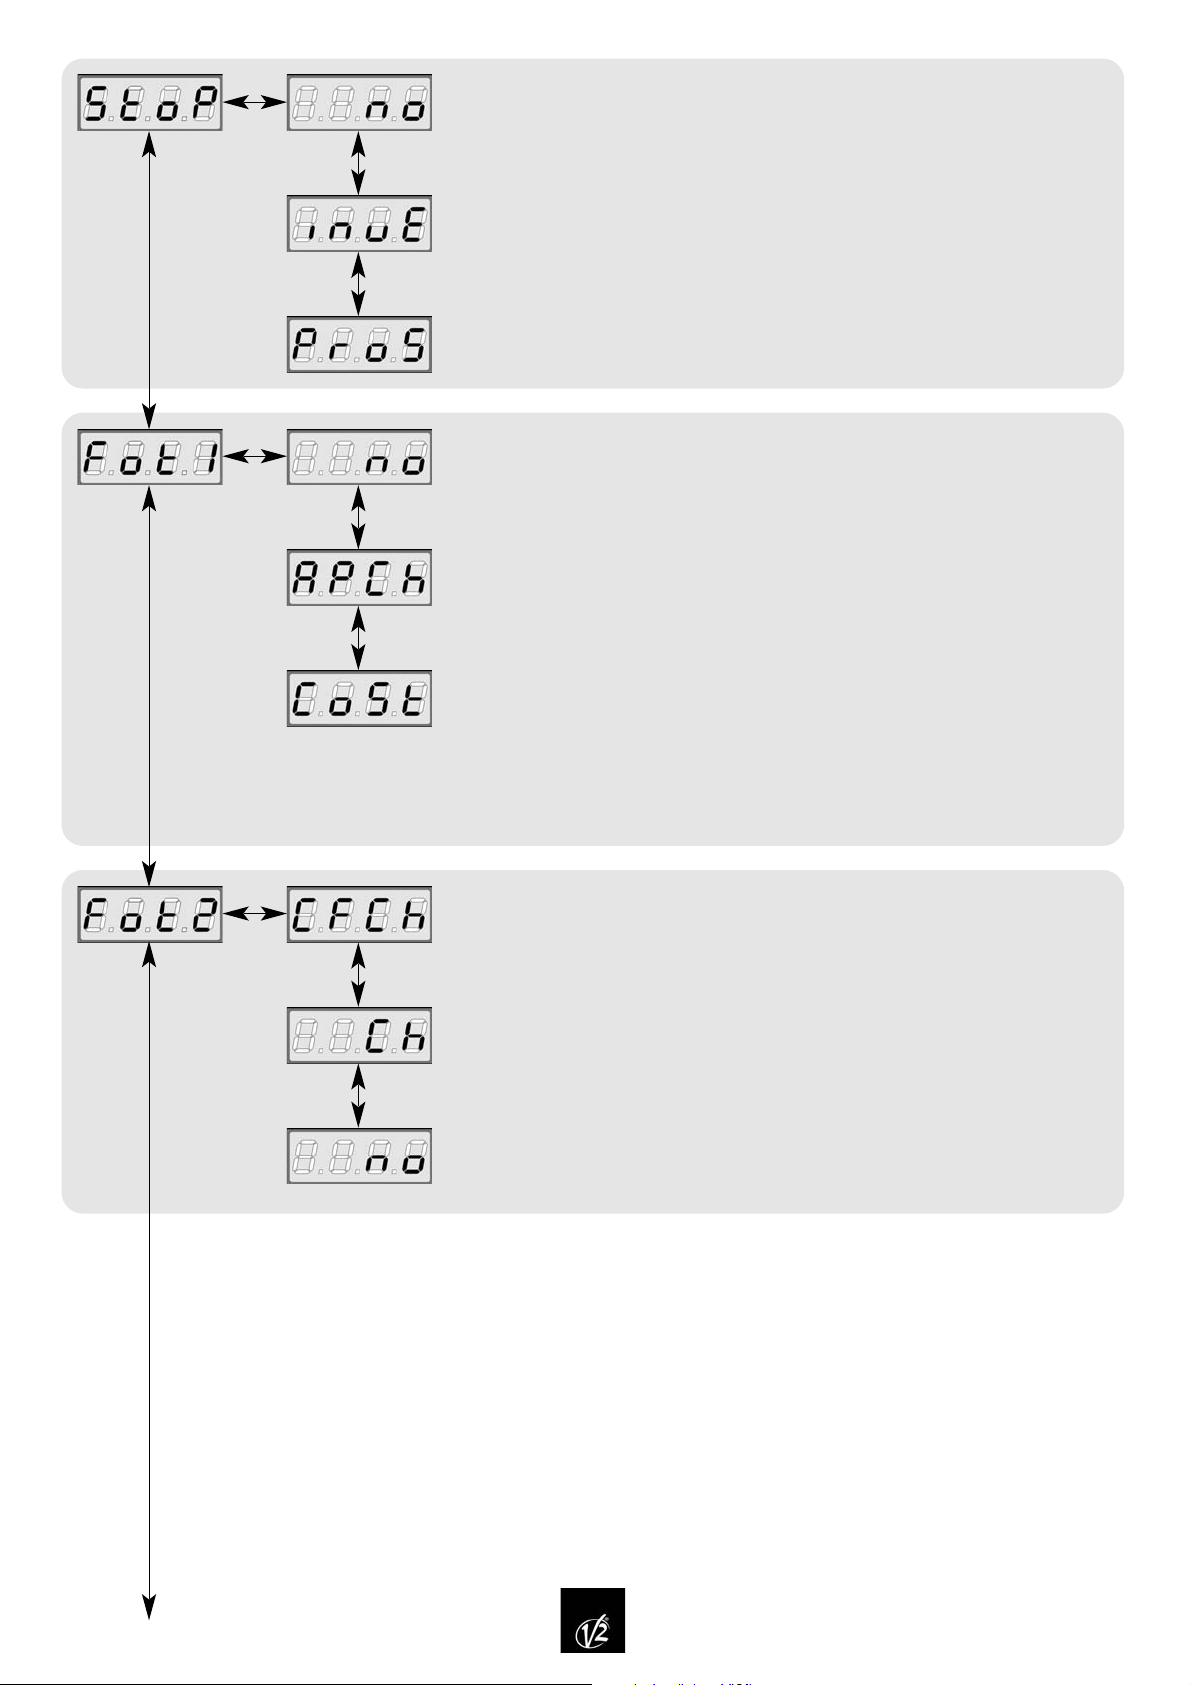
INGRESSO STOP
Questo menù permette di selezionare le funzioni associate al
comando di STOP.
no ingresso STOP è disabilitato
ProS il comando di STOP ferma il cancello: al successivo
comando di START il cancello riprende il moto nella
direzione precedente.
invE il comando di STOP ferma il cancello: al successivo
comando di START il cancello riprende il moto nella
direzione opposta alla precedente
NOTA: durante la pausa il comando di STOP ferma il cancello, il
successivo comando di START richiuderà sempre il cancello.
INGRESSO FOTO 1
Questo ingresso può essere abilitato per il collegamento di due
sicurezze diverse: la fotocellula o la costa. La costa (contatto
normalmente chiuso) è una sicurezza attiva in apertura e in
chiusura (non attiva durante il colpo di ariete): il suo intervento
durante l'apertura ferma il cancello, inverte il moto per 4 sec.
senza sfalsamento delle ante. Diversamente l'intervento della
costa in chiusura ferma il cancello, inverte il moto per 4s con
sfalsamento delle ante.
La fotocellula 1 (contatto normalmente chiuso) è una sicurezza attiva
in apertura e in chiusura : l'intervento della fotocellula durante la
chiusura ferma il cancello, al suo disimpegno il cancello inverte il
moto. Diversamente l'intervento della fotocellula in apertura blocca
il cancello, al suo disimpegno il cancello riprende il moto di apertura.
INGRESSO FOTO 2
La fotocellula 2 è attiva in chiusura: se è oscurata durante la
chiusura ferma il cancello e ne inverte il moto. L'opzione CFCh
attiva la fotocellula anche quando il cancello è fermo: per cancello
fermo si intende che non ha ricevuto nessun comando, che è in
pausa oppure che ha ricevuto un comando di STOP. In questo caso,
per tutto il tempo di oscuramento della fotocellula, la centrale non
sente nessun comando di abilitazione a qualsiasi ciclo di
apertura/chiusura.
no l'ingresso FOTO2 è disabilitato.
CFCh l'ingresso FOTO2 è abilitato: la fotocellula 2 e attiva in
chiusura e anche quando il cancello è fermo.
Ch l'ingresso FOTO 2 è abilitato: la fotocellula 2 è attiva solo
in chiusura.
È necessario installare la fotocellula 1 in modo opportuno, affinché copra lo spazio d'azione del cancello.
no l'ingresso FOTO1 è disabilitato.
APCh l'ingresso FOTO1 è abilitato per il collegamento della fotocellula 1.
CoSt l'ingresso FOTO1 è abilitato per il collegamento della costa.
Page 13
11
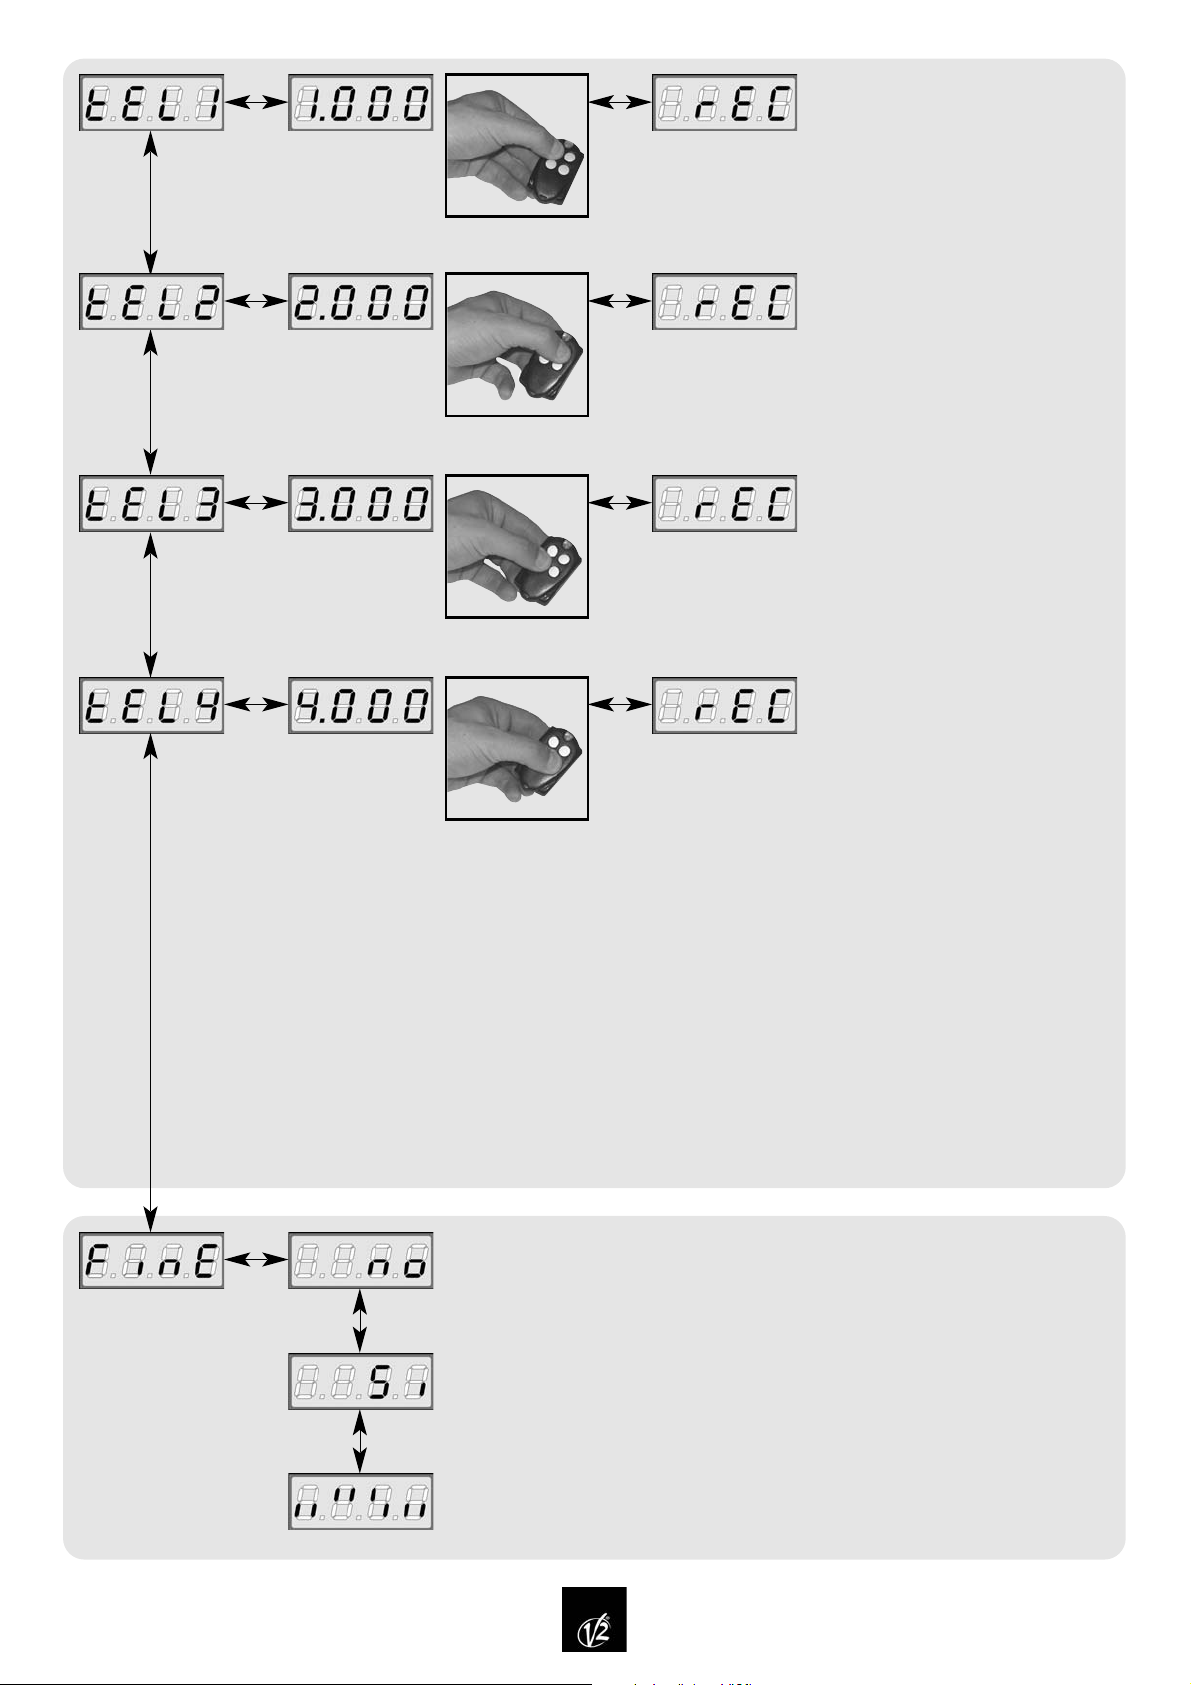
INGRESSI RADIO
Ad ogni codice memorizzato è
associato uno dei quattro ingressi
disponibili, al fine di impartire alla
centrale il comando desiderato;
inoltre con operazioni semplici e
veloci, è possibile eseguire la
cancellazione parziale o totale dei
codici presenti in memoria.
L’innesto di un ricevitore modulare,
super-eterodina o quarzato permette
l’utilizzo dei quattro canali radio,
tEL1, tEL2, tEL3, tEL4, ad ognuno
dei quali è associato un comando
della centrale:
tEL1 START: trasmettendo il
codice associato a tEL1, la centrale
riceve un comando di START.
tEL2 START PEDONALE:
trasmettendo il codice associato a
tEL2, la centrale riceve un comando
di START PEDONALE.
tEL3 STOP: trasmettendo il
codice associato a tEL3, la centrale
riceve un comando di STOP.
tEL4 LUCI DI CORTESIA:
trasmettendo il codice associato a
tEL4, la centrale attiva l’uscita
LUCI DI CORTESIA.
FINE PROGRAMMAZIONE
Questo menù permette di terminare la programmazione (sia
predefinita che personalizzata) salvando in memoria i dati
modificati.
no ulteriori modifiche da effettuare, non uscire dalla
programmazione.
Si modifiche terminate: fine programmazione, il display
visualizza il pannello di controllo.
I DATI IMPOSTATI SONO STATI SALVATI IN MEMORIA :
LA CENTRALE È ORA PRONTA PER L'UTILIZZO.
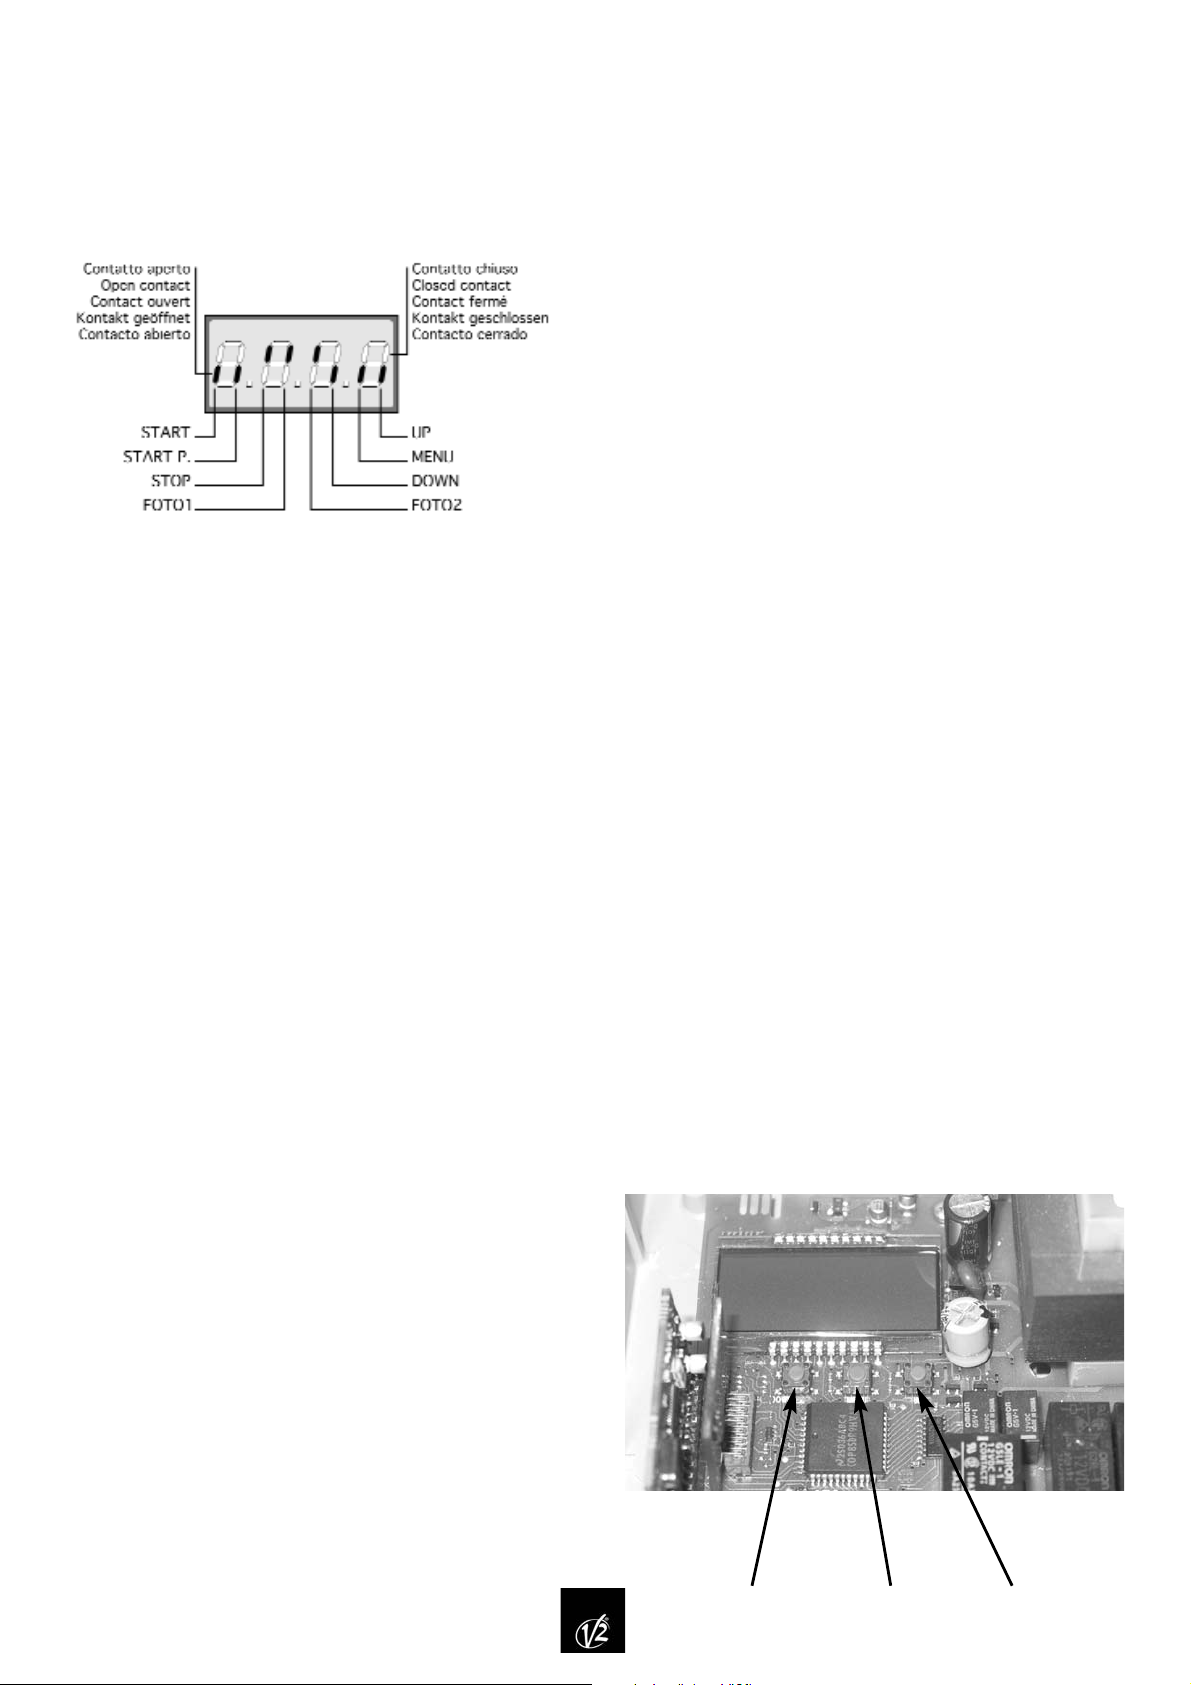
INSERIMENTO IN MEMORIA DEI CODICI DESIDERATI
Per memorizzare i codici dei telecomandi desiderati seguire attentamente le seguenti istruzioni.
•Premere il tasto UP o DOWN e selezionare l'ingresso radio desiderato, il display visualizza (esempio):
tEL1
•Premere il tasto MENU, sul display compare trAS
La centrale è pronta per l’apprendimento radio:
•Premere il tasto del telecomando desiderato fino a quando sul display compare rEC.
• Rilasciare il tasto del telecomando.
La centrale è ora pronta per l’apprendimento di nuovi codici.
SOSTITUZIONE DI UN CODICE
Per sostituite un codice precedentemente memorizzato è sufficiente ripetere il normale procedimento di
memorizzazione con il nuovo codice. Il nuovo codice andrà a sovrascrivere il precedente.
Page 14

12
DISPLAY DATI DESCRIZIONE DATI DI MEMO
DEFAULT DATI
dEF no/Si Carica dati standard V2 ELETTRONICA no
t.AP1 0 ÷ 120 s Tempo apertura anta 1 22.5
t.AP2 0 ÷ 120 s Tempo apertura anta 2 22.5
t.APP 0 ÷ t.AP1 Tempo apertura anta pedonale 6.0
t.Ch1 0 ÷ 120 s Tempo chiusura anta 1 23.5
t.Ch2 0 ÷ 120 s Tempo chiusura anta 2 23.5
t.ChP 0 ÷ t.Ch1 Tempo chiusura anta pedonale 7.0
t.C2P 0 ÷ t.ChP Tempo chiusura anta 2 durante la richiusura pedonale 0.0
r.AP 0 ÷ 120s Ritardo d’anta in apertura 1.0
r.Ch 0 ÷ 120s Ritardo d’anta in chiusura 3.0
t.SEr 0 ÷ 120s Tempo serratura 3.0
t.ASE 0 ÷ t.SEr Tempo anticipo serratura 0.0
t.inv 0 ÷ 120s Tempo colpo d’ariete 0.0
t.PrE 0 ÷ 120s Tempo prelampeggio 1.0
t.rAL 0 ÷ 120s Tempo rallentamento 0.0
t.CvE 0 ÷ 120s Tempo chiusura veloce dopo rallentamento in chiusura 0.0
Pot. 30 ÷ 100% Potenza motori % 40
SPUn no/Si Avvio dei motori al massimo della potenza Si
St.AP Start in apertura PAUS
no - Il comando START non è sentito
ChiU - Il cancello richiude
PAUS - Il cancello va in pausa
St.Ch Star t in chiusura StoP
Stop - Il cancello conclude il ciclo
APEr -Il cancello riapre
St.PA Start in pausa ChiU
no - Il comando di START non è sentito
ChiU - Il cancello richiude
SP.AP Start pedonale in apertura PAUS
no - Il comando di START P. non è sentito
ChiU - Il cancello richiude
PAUS - Il cancello va in pausa
Ft.PA Fotocellula in pausa r.PAU
r.PAU -Ricarica il tempo di pausa.
t.PCh - Il cancello richiude dopo il tempo impostato (da 0 a 120 s)
Ch.AU Richiusura automatica no
no - Non è attiva
t.PAU - La richiusura automatica è attiva, con tempo impostabile (0 ÷ 999 s)
LUCi Luci di cortesia t.LUC=60s
CiCL - Accese per tutta la durata del ciclo
t.LUC -Temporizzate (da 0 a 999 s)
AUS - Uscita ausiliaria
tiM - Uscita ausiliaria relè temporizzata da 0 a 999 s
biSt - Uscita ausiliaria relè bistabile
Mon - Uscita ausiliaria relè monostabile
LP.PA no/Si Lampeggiatore in pausa no
In.LP no/Si Lampeggiatore con intermittenza no
OroL no/Si Funzione timer no
TABELLA FUNZIONI PD1
Page 15

13
TABELLA FUNZIONI PD1
DISPLAY DATI DESCRIZIONE DATI DI MEMO
DEFAULT DATI
ASM Antislittamento motori t.AAS=2.0s
no - Non è attivo
t.AAS - Antislittamento attivo con tempo regolabile (0 ÷ 120 s)
StoP Ingresso di STOP no
no -L’ingresso è disabilitato: il comando di STOP non è sentito
invE - Il comando di STOP ferma il cancello: lo START successivo inverte il moto
ProS - Il comando di STOP ferma il cancello: lo START successivo non inverte il moto
Fot 1 Ingresso FOTO 1 no
no - Disabilitato
APCh - Fotocellula attiva in apertura e in chiusura
CoSt - Funziona come costa mobile
Fot 2 Ingresso FOTO 2 CFCh
no - Disabilitato
CFCh - Funziona come fotocellula attiva in chiusura e con il cancello fermo.
Ch - Funziona come fotocellula attiva solo in chiusura
tEL 1 Ingresso radio associato al comando START
tEL 2 Ingresso radio associato al comando START PEDONALE
tEL 3 Ingresso radio associato al comando STOP
tEL 4 Ingresso radio associato alle luci di cortesia
Fine no/Si Fine programmazione no
Page 16

14
NOTE
Page 17

15
INDEX
IMPORTANT REMARKS . . . . . . . . . . . . . . . . . . . . . . . . . . . . . . . . . . . . . . . . . . . . . . . . . . . . . . . . . . . . . . . . . . .16
CONFORMITY TO REGULATIONS . . . . . . . . . . . . . . . . . . . . . . . . . . . . . . . . . . . . . . . . . . . . . . . . . . . . . . . . . . . . .16
DESCRIPTION OF THE CONTROL UNIT . . . . . . . . . . . . . . . . . . . . . . . . . . . . . . . . . . . . . . . . . . . . . . . . . . . . . . . . .16
TECHNICAL SPECIFICATIONS . . . . . . . . . . . . . . . . . . . . . . . . . . . . . . . . . . . . . . . . . . . . . . . . . . . . . . . . . . . . . . .17
TERMINAL CONNECTIONS . . . . . . . . . . . . . . . . . . . . . . . . . . . . . . . . . . . . . . . . . . . . . . . . . . . . . . . . . . . . . . . . .17
WARNING LIGHT DESCRIPTION . . . . . . . . . . . . . . . . . . . . . . . . . . . . . . . . . . . . . . . . . . . . . . . . . . . . . . . . . . . . .17
CONTROL PANEL . . . . . . . . . . . . . . . . . . . . . . . . . . . . . . . . . . . . . . . . . . . . . . . . . . . . . . . . . . . . . . . . . . . . . . .18
PROGRAMMING . . . . . . . . . . . . . . . . . . . . . . . . . . . . . . . . . . . . . . . . . . . . . . . . . . . . . . . . . . . . . . . . . . . . . . . .18
FUNCTION OF THE BUTTONS, MENU, UP AND DOWN . . . . . . . . . . . . . . . . . . . . . . . . . . . . . . . . . . . . . . . . . . . . . .18
STANDARD PROGRAMMING (DEFAULT) . . . . . . . . . . . . . . . . . . . . . . . . . . . . . . . . . . . . . . . . . . . . . . . . . . . . . . . .19
GATE 1 OPENING TIME . . . . . . . . . . . . . . . . . . . . . . . . . . . . . . . . . . . . . . . . . . . . . . . . . . . . . . . . . . . . . . . . . . .19
GATE 2 OPENING TIME . . . . . . . . . . . . . . . . . . . . . . . . . . . . . . . . . . . . . . . . . . . . . . . . . . . . . . . . . . . . . . . . . . .19
OPENING TIME OF PEDESTRIAN GATE . . . . . . . . . . . . . . . . . . . . . . . . . . . . . . . . . . . . . . . . . . . . . . . . . . . . . . . . .19
CLOSING TIME GATE 1 . . . . . . . . . . . . . . . . . . . . . . . . . . . . . . . . . . . . . . . . . . . . . . . . . . . . . . . . . . . . . . . . . . .19
CLOSING TIME GATE 2 . . . . . . . . . . . . . . . . . . . . . . . . . . . . . . . . . . . . . . . . . . . . . . . . . . . . . . . . . . . . . . . . . . .19
CLOSING OF PEDESTRIAN GATE . . . . . . . . . . . . . . . . . . . . . . . . . . . . . . . . . . . . . . . . . . . . . . . . . . . . . . . . . . . . .19
CLOSING TIME GATE 2 DURING PEDESTRIAN CYCLE . . . . . . . . . . . . . . . . . . . . . . . . . . . . . . . . . . . . . . . . . . . . . .19
GATE DELAY DURING OPENING . . . . . . . . . . . . . . . . . . . . . . . . . . . . . . . . . . . . . . . . . . . . . . . . . . . . . . . . . . . . .20
GATE DELAY DURING CLOSING . . . . . . . . . . . . . . . . . . . . . . . . . . . . . . . . . . . . . . . . . . . . . . . . . . . . . . . . . . . . .20
LOCK TIME . . . . . . . . . . . . . . . . . . . . . . . . . . . . . . . . . . . . . . . . . . . . . . . . . . . . . . . . . . . . . . . . . . . . . . . . . . .20
LOCK ADVANCE TIME . . . . . . . . . . . . . . . . . . . . . . . . . . . . . . . . . . . . . . . . . . . . . . . . . . . . . . . . . . . . . . . . . . . .20
BACKLASH TIME . . . . . . . . . . . . . . . . . . . . . . . . . . . . . . . . . . . . . . . . . . . . . . . . . . . . . . . . . . . . . . . . . . . . . . .20
PRE-FLASHING TIME . . . . . . . . . . . . . . . . . . . . . . . . . . . . . . . . . . . . . . . . . . . . . . . . . . . . . . . . . . . . . . . . . . . . .20
SLOWING DOWN TIME . . . . . . . . . . . . . . . . . . . . . . . . . . . . . . . . . . . . . . . . . . . . . . . . . . . . . . . . . . . . . . . . . . .20
FAST CLOSING TIME AFTER SLOWING DOWN DURING CLOSING . . . . . . . . . . . . . . . . . . . . . . . . . . . . . . . . . . . . . . .20
MOTOR POWER . . . . . . . . . . . . . . . . . . . . . . . . . . . . . . . . . . . . . . . . . . . . . . . . . . . . . . . . . . . . . . . . . . . . . . . .20
START OFF . . . . . . . . . . . . . . . . . . . . . . . . . . . . . . . . . . . . . . . . . . . . . . . . . . . . . . . . . . . . . . . . . . . . . . . . . . .21
START IN OPENING . . . . . . . . . . . . . . . . . . . . . . . . . . . . . . . . . . . . . . . . . . . . . . . . . . . . . . . . . . . . . . . . . . . . .21
START IN CLOSING . . . . . . . . . . . . . . . . . . . . . . . . . . . . . . . . . . . . . . . . . . . . . . . . . . . . . . . . . . . . . . . . . . . . .21
START IN PAUSE . . . . . . . . . . . . . . . . . . . . . . . . . . . . . . . . . . . . . . . . . . . . . . . . . . . . . . . . . . . . . . . . . . . . . . .21
PEDESTRIAN START IN OPENING . . . . . . . . . . . . . . . . . . . . . . . . . . . . . . . . . . . . . . . . . . . . . . . . . . . . . . . . . . . .22
THE PHOTOCELL IN PAUSE . . . . . . . . . . . . . . . . . . . . . . . . . . . . . . . . . . . . . . . . . . . . . . . . . . . . . . . . . . . . . . . .22
AUTOMATIC CLOSING . . . . . . . . . . . . . . . . . . . . . . . . . . . . . . . . . . . . . . . . . . . . . . . . . . . . . . . . . . . . . . . . . . . .22
COURTESY LIGHTS . . . . . . . . . . . . . . . . . . . . . . . . . . . . . . . . . . . . . . . . . . . . . . . . . . . . . . . . . . . . . . . . . . . . .22
FLASHLIGHT IN PAUSE . . . . . . . . . . . . . . . . . . . . . . . . . . . . . . . . . . . . . . . . . . . . . . . . . . . . . . . . . . . . . . . . . . .23
FLASHLIGHT WITH INTERMITTENCE . . . . . . . . . . . . . . . . . . . . . . . . . . . . . . . . . . . . . . . . . . . . . . . . . . . . . . . . . .23
TIMER FUNCTION . . . . . . . . . . . . . . . . . . . . . . . . . . . . . . . . . . . . . . . . . . . . . . . . . . . . . . . . . . . . . . . . . . . . . . .23
MOTOR ANTI – SKID . . . . . . . . . . . . . . . . . . . . . . . . . . . . . . . . . . . . . . . . . . . . . . . . . . . . . . . . . . . . . . . . . . . . .23
INPUT STOP . . . . . . . . . . . . . . . . . . . . . . . . . . . . . . . . . . . . . . . . . . . . . . . . . . . . . . . . . . . . . . . . . . . . . . . . . .24
INPUT PHOTO 1 . . . . . . . . . . . . . . . . . . . . . . . . . . . . . . . . . . . . . . . . . . . . . . . . . . . . . . . . . . . . . . . . . . . . . . . .24
INPUT PHOTO 2 . . . . . . . . . . . . . . . . . . . . . . . . . . . . . . . . . . . . . . . . . . . . . . . . . . . . . . . . . . . . . . . . . . . . . . . .24
PHOTOCELL OPERATIONAL TEST . . . . . . . . . . . . . . . . . . . . . . . . . . . . . . . . . . . . . . . . . . . . . . . . . . . . . . . . . . . .24
RADIO INPUTS . . . . . . . . . . . . . . . . . . . . . . . . . . . . . . . . . . . . . . . . . . . . . . . . . . . . . . . . . . . . . . . . . . . . . . . . .25
STORING NEW CODES . . . . . . . . . . . . . . . . . . . . . . . . . . . . . . . . . . . . . . . . . . . . . . . . . . . . . . . . . . . . . . . . . . .25
END OF PROGRAMMING . . . . . . . . . . . . . . . . . . . . . . . . . . . . . . . . . . . . . . . . . . . . . . . . . . . . . . . . . . . . . . . . . .25
FUNCTION TABLE PD1 . . . . . . . . . . . . . . . . . . . . . . . . . . . . . . . . . . . . . . . . . . . . . . . . . . . . . . . . . . . . . . . . . . .26
Page 18

16
IMPORTANT REMARKS
For any installation problems please contact V2 ELETTRONICA
TEL. (+39) 01 72 81 24 11
V2 ELETTRONICA has the right to modify the product
without previous notice; it also declines any responsibility
to damage or injury to people or things caused by
improper use or wrong installation.
Please read this instruction manual very carefully
before installing and programming your PD1 control unit.
• This instruction manual is only for qualified technicians,
who specialize in installations and automations.
• The contents of this instruction manual do not concern
the end user.
• Every programming and/or every maintenance service
should be done only by qualified technicians.
The PD1 control unit can drive one or more
electromechanical actuators for the automation of swing
doors and swing gates. Any other utilization is not in
specification.
AUTOMATION MUST BE IMPLEMENTED IN COMPLIANCE
WITH THE EUROPEAN REGULATIONS IN FORCE:
EN 60204–1 (Machinery safety. electrical equipment of
machines, part 1: general rules)
EN 12445 (Safe use of automated locking devices,
test methods)
EN 12453 (Safe use of automated locking devices,
requirements)
• The installer must provide for a device
(es. magnetotermical switch) ensuring the omnipolar
sectioning of the equipment from the power supply.
The standards require a separation of the contacts of at
least 3 mm in each pole (EN 60335-1).
• Installation requires mechanical and electrical skills,
therefore it shall be carried out by qualified personnel
only, who can issue the Compliance Certificate
concerning the whole installation (EEC Machine
Directive 89/392, Annex IIA).
• The automated vehicular gates shall comply with the
following rules: EN 12453, EN 12445, EN 12978 as
well as any local rule in force.
• Also the automation upstream electric system shall
comply with the laws and rules in force and be carried
out workmanlike.
• The door thrust force adjustment shall be measured by
means of a proper tool and adjusted according to the
max. limits, which EN 12453 allows.
•We recommend to make use of an emergency button, to
be installed by the automation (connected to the
control unit STOP input) so that the gate may be
immediately stopped in case of danger.
• Please connect the ground wire of motors to the
grounding.
CONFORMITY TO REGULATIONS
V2 ELETTRONICA SPA declares that PD1 is in
conformity with the provisions of the followings 93/68/EEC,
73/23/EEC, and with the standards referenced here below:
EN 60335–1: Electrical safety
EN 50081–1, EN 50081–2: Electromagnetic compatibility
Racconigi, 15 / 10 / 01
V2 ELETTRONICA SPA legal representative.
A.Livio Costamagna
DESCRIPTION OF THE CONTROL UNIT
The digital station PD1 is an innovative V2 ELETTRONICA
product that guarantees a safe and reliable automation of
one- and two-shutter gates.
The design of PD1 has been designed to realize a product
that meets all kind of requirements, with a highly versatile
station that satisfies all the necessary requirements for a
functional and efficient installation.
PD1 is provided with a display that, not only makes
programming simple, but also allows a continuous
monitoring of the input statuses; in addition, thanks to a
menu structure, the working schedule and the operation
logic can be set easily.
With regard to the European regulations concerning
electrical safety and electromagnetic compatibility
(EN 60335-1, EN 50081-1, and EN 50082-1), PD1 is
characterized by a complete isolation between the digital
circuit and the power circuit.
Other characteristics:
• Automatic relay zero-current switching control.
•Wave choke power adjustment.
•Warning light showing the status of the gate.
•Programmable logic auxiliary relay for courtesy lights or
other use.
A specially provided plug-in connector allows insertion of a
MT433 series receiver, having a high sensitivity super
heterodyne architecture.
Page 19
17
ATTENTION: it is necessary to turn off the
control unit power before doing the operations
mentioned here below. Please pay attention to the
way you connect the removable modules.
PLUGGING THE RECEIVER MODULE IN
WARNING LIGHT DESCRIPTION
The warning light shows in real time the state of the
gate:
STOP light off
IN PAUSE light always on
DURING OPENING the light flashes slowly (2 Hz)
DURING CLOSING the light flashes rapidly (4 Hz)
TERMINAL CONNECTION
TECHNICAL SPECIFICATIONS
Power supply 230 VAC 50 / 60 Hz
Max motors load 700 W
Max accessories load powered 24V 10 W
Working temperature -20°C ÷ +60°C
Protection fuse F1 = 5 A for line 230 VAC
Dimensions 295 x 230 x 100 mm
Weight 1600 g
IP protection 55
1.
2.
3.
4.
5.
6.
7.
8.
9.
10.–11.
11.–12.
13.–14.
14.–15.
16.–17.
18.–19.
20.
21.
22.
23.
24.
25.
26.
27.
Antenna
Antenna shield.
Opening control for the connection
of: control devices with normally
open contact, TTNC, VRD
Opening controls for pedestrian
access for the connection of:
control devices with normally open
contact, TTNC, VRD
Stop command
Contact normally closed
Common (-)
Photoelectric cell 1
Contact normally closed
Photoelectric cell 2
Contact normally closed
Common (-)
Power output 24 VAC for
photocells and other accessories
Photocell TX power supply for
functional tests
Electric lock or bolt 12 VAC
Warning light 24 VAC 3W
Contact for area lighting
230 VAC 10 A
Flashing light 230 VAC 40 W
Power output 230 VAC for motor
2 in opening phase
Common motor 2
Power output 230V for motor 2 in
closing phase
Power output 230 VAC for motor 1
in opening phase
Common motor 1
Power output 230 VAC for motor 1
in closing phase
Neutral 230 VAC
Power phase 230 VAC
WARNING: we suggest to use the external aerial
(model: ANS433) in order to guarantee the maximal
range.
Page 20
18
CONTROL PANEL
Perform the electrical connections to the terminal board,
then supply power to the system: the unit will check the
operation status of the display, by turning all the segments on
for 1,5 seconds (8.8.8.8); after this, the display will show the
firmware version for 1,5 seconds, for instance Pr 2.8.
Now, the display will show a control panel:
The control panel represents the physical status of the
terminal board contacts and of the program mode keys: if
the upper vertical segment is on, the contact is closed; if
the lower vertical segment is on, the contact is open (the
above picture shows an instance where the inputs START,
START P, PHOTO1, PHOTO2, and STOP have all been
correctly connected).
AUTO POWER-OFF FUNCTION:, after 50 seconds from the
last intervention the display goes off. It goes on again at
the first change of any input (START, START P, FOTO1,
FOTO2, STOP) or at the first radio reception of a stored
code. If you push one of the three push buttons (MENU, UP,
DOWN) the display will stay on for 50 seconds.
PROGRAMMING
The PD1 unit presents a programming structure with
menus, each of which corresponds to a function in the unit
(function menu) or to a working time setting (time menu).
Time menus allow adjusting the unit working times (e.g.:
leaf opening or closing time, locking time, preflashing time,
etc.), which can be set from 0 to 120 seconds with a ±0,5
seconds interval.
On the other side, the function menu are used to activate
the required functions (e.g. timed lights, PHOTO1 active as
a travelling edge, PHOTO2 inactive, etc.).
Some time menus depend on certain function menus (e.g.:
if the AUTOMATIC CLOSING is activated – but only in this
case – a TIME-OUT need to be set); then, to simplify the
programming, these time menus have been placed in the
function menus on which they depend. Specifically, menus
AUTOMATIC CLOSING (Ch.AU), ANTISKID (ASM), and
PHOTOCELL TIME-OUT (Ft.PA) offer some “time menus”
among the selectable options.
FUNCTION OF KEYS
MENU, UP, DOWN
To activate the program mode, proceed as follows.
• After powering the unit, the display should show the
control panel (therefore, check that the connections
made are correct).
•Press and hold key MENU until the display shows dEF.
Now the program mode is activated: if no action is performed
within 1 minute, the unit will exit the program mode and show
the control panel again.
When the program mode function is activated, press key UP
or DOWN to select the menus, thus performing a forward or
backward shift (for a fast shift, press and hold).
Press key MENU to access the settings in order to change
them through keys UP and DOWN.
•Pressing the UP key, the menu functions can be scrolled
from below.
•Pressing the DOWN key, the menu functions can be
scrolled from above.
•Pressing the MENU key, the settings to be changed can
be accessed and selected by pressing again.
ATTENTION: when the program mode function is not
activated, pressing of the UP key corresponds to the START
command, pressing of the DOWN key corresponds to the
PEDESTRIAN START command: this way, the service
engineer is enabled to perform the test and the set-up.
The PD1 unit can be set up in two different program modes:
DEFAULT PROGRAM MODE or CUSTOM PROGRAM MODE.
In the following pages you can find a functions diagram with
information concerning PD5.
For the use of the function chart proceed as follow:
•Press DOWN key to flow the chart from the top to the
bottom. The functions dEF, t.AP1, t.AP2 etc.. will be
appear.
•Press UP key to flow the chart from the bottom to the
top.
•Press MENU key to flow the chart horizontally; for
example, if the t.ChP function is displayed, by pressing
the MENU key the number 7.0 will be dispayed.
Increase the number pressing UP or DOWN. Press
MENU to display function t.ChP again.
DOWN MENU UP
Page 21

19
This type of programming allows loading the V2 ELETTRONICA
default program in the memory: the standard data that will be
inserted automatically are shown in the table below (in the
column DEFAULT DATA).
Set the wished function pressing the up or DOWN keys and press
MENU key to confirm.
GATE 1 OPENING TIME
This menu is adjustable from 0 to 120 seconds (±0,5) and
determines the time of opening of gate 1.
GATE 2 OPENING TIME
This menu is adjustable from 0 to 120 seconds (±0,5) and
determines the time of opening of gate 2.
OPENING TIME OF PEDESTRIAN GATE
This menu is adjustable from 0 seconds to t.AP1 (±0,5) and
determines the opening time of pedestrian gate.
CLOSING TIME GATE 1
This menu is adjustable from 0 to 120 seconds (±0,5) which is
the closing time for gate 1.To avoid the uncompleted closing of
the gate, we suggest to set a longer opening time of t.AP1.
CLOSING TIME GATE 2
This menu is adjustable from 0 to 120 seconds (±0.5) which is
the closing time for gate 2. To be sure of the per fect closing of
the gate, we suggest to set a longer opening time t.AP2.
CLOSING OF PEDESTRIAN GATE
This menu is adjustable from 0 to t.Ch1 (±0.5) and determines
the closing time of gate 1. In order to avoid the uncompleted
closing of the gate, we suggest to set a longer opening time of
t.APP.
CLOSING TIME GATE 2 DURING PEDESTRIAN CYCLE
Enables the adjustment from 0 to tChP (±0.5) and determines the
time through which gate 2 will close during the closing phase of
the pedestrian gate.
Page 22

20
GATE DELAY DURING OPENING
In order to avoid any collision of the gate during the opening
phase, the time of delay should be introduced r.AP, which is
adjustable from 0 to 120 seconds (±0,5) .In such a case the
opening time of gate 2 is delayed in comparison to the gate 1.
GATE DELAY DURING CLOSING
In order to avoid the colliding of gate's during the closing the time
of delay should de introduced r.Ch, which is adjustable from 0 to
120 seconds (±0,5).In such a case the closing time of gate1 is
delayed in comparison to the gate2.
LOCK TIME
When the gate starts the opening phase, the control unit must
excite the electro lock in order to hook it out and enable the
opening of the gate. The time t.SEr determines the duration of
excitation, and is adjustable from 0 to 120 seconds (±0,5).
LOCK ADVANCE TIME
This menu permits to anticipate the excitation of the lock on a set
time from 0 to t.SEr (with a scanning of ±0,5). During the advance
locking time the gate does not move so to always guarantee the
unhooking of the electrical lock.
BACKLASH TIME
To avoid that the gate star ts the opening phase before the
electrical locks is unhooked, it is possible to introduce a time of
inversion adjustable from 0 to 120 seconds (± 0,5). In this way
during the opening phase, the gate inverts the motion through the
set time permitting the unhooking of the electrical lock.
PRE-FLASHING TIME
This menu permits the introduction of a pre-flashing that occurs
before any movement of the gate either in opening or in closing
phase: the time of pre-flashing can be adjusted from 0 to 120
seconds (± 0,5).
SLOWING DOWN TIME
This menu permits the activation of the gate slowing down
function for a time to be set between 0 and 120 s(± 1,5 s). To
set the slowing down function proceed as follows: leave a slowing
down time at 0 and make sure that the gate opens and closes
correctly. After that, set the slowing down time (for ex. 5 or 6 s).
Page 23

21
FAST CLOSING TIME AFTER SLOWING DOWN DURING CLOSING
When a slowing down time different from 0 s is set, it is possible
that the gate speed is not sufficient to trigger the lock during
closing. For this reason, after the end of the slowing down phase,
it is possible to close the gate at a normal speed (without slowing
down) for a time to be set between 0 and 120 s (± 0,5).
MOTOR POWER
This menu permits to adjust the motor power from 30 to 100%
with a scanning of ±0,5.
START OFF
When the gate is at a standstill and is going to move, it is
contrasted by the starting inertia. As a consequence of this, if the
gate is very heavy the gates might not move. By activating the
start off function, it is possible to win the initial inertia thanks to
the motor start to the maximum of the power for 2 seconds.
START IN OPENING
This menu permits to select the functions of start during the
opening phase.
no the command START is not available.
ChiU the command START close the gate.
PAUS the command START stop the gate and goes into in
PAUSE.
START IN CLOSING
This menu permits to select the functions of start during the closing phase.
StoP the command START stop the gate.
APEr the command START open the gate
START IN PAUSE
This menu permits to select the functions of the command start
during the standstill.
ChiU the command START closes the gate.
no the command START is not available. This function cannot
be selected until the automatic closing has been activated
(menu Ch.AU).
Page 24

22
PEDESTRIAN START IN OPENING
This menu permits to select the functions of the command of
START P. during the opening phase.
PAUS the command PEDESTRIAN START stops the gate and
goes in pause.
no the command PEDESTRIAN START is not available.
ChiU the command PEDESTRIAN START closes the gate.
THE PHOTOCELL IN PAUSE
This menu permits to determine the functioning of two
photocells during the pause phase.
rPAU the interruption of the photocell's ray causes
the top of the pause time; when the
photocells work again, the pause time restart
from zero.
t.PCh the interruption of the photocell's ray causes
the top of the pause time; when the
photocells work again, the gate stops for a
time to be set between 0 to 120 sec.
If the function is t.PCh, the display shows 5.0: set the
wished functions pressing the UP or DOWN keys.
AUTOMATIC CLOSING
Permits the selection between the semiautomatic or
automatic functioning. By the semiautomatic
functioning the command of START or PEDESTRIAN
START opens the gate, when the opening is complete
the gate remains still until the successive command
of opening, which will reclose it. On the other hand, it
stops automatically and remains in pause phase for
the set time (t.PAU), then it closes again through the
set closing time.
no the automatic reclosing is not available, the gate is semiautomatic.
t.PAU the reclosing is available, the standstill time is set from 0 to 999.
If the function is t.PAU, the display shows 10.0: set the wished time pressing the UP or DOWN keys.
IMPORTANT: If the automatic reclosing is not available, is necessar y to enable the start command in
pause(menu St.PA)
COURTESY LIGHTS
Thanks to the connection "courtesy
light" the PD1 control unit enables
the connection of the courtesy
lights (I.E. garden lights), which can
work automatically (lights on for the
whole cycle) or timed (lights on for a
time adjustable from 0 to 999
seconds).
Page 25

23
TIMER FUNCTION
This function permits to program the time bands of opening and
closing. It is necessary to connect a 24h timer with a contact
normally open in parallel with the START or PEDESTRIAN START
input. When the timer contact is closed, the gate gets into
opening phase and remains opened until the contact of the timer
opens causing the re-closing of the gate.
IMPORTANT: for a correct functioning it is necessary to
activate the automatic closing (menu Ch.AU.)
FLASHLIGHT WITH INTERMITTENCE
The control unit PD1 permits the connection of a flashlight with or
without intermittence. If the flashlight is equipped with an inner
intermittence effect, it is necessary to select the option "Si", but
if it has no inner intermittence, it is necessary to select the
option "no" in order to make it flash.
FLASHLIGHT IN PAUSE
This menu permits to activate or to disable the flashlight during
the pause time.
The lights turn on with a START or PEDESTRIAN START control. It is also possible to control this
connection using the code memorized in the radio input tEL4, in this last case the connection
"courtesy light" becomes an auxiliary connection to which it is possible to match one of the
following functional logics:
monostable: it activates the output relay through all the tx transmission time, when the
transmission ends the relay is disconnected.
bistable: it activates the relay with the tx first transmission, the relay disconnects with the
second transmission.
timer: the tx transmission triggers the relay which disconnects automatically after a time
adjustable between 0 and 999 seconds.
t.LUC the courtesy lights start from a time adjustable from 0 to 999 seconds.
CiCL the courtesy lights are on through the whole cycle.
AUS auxiliary exit with adjustable logical functioning.
If the function selected is AUS, one of the following will appear on the display:
tiM timed auxiliary exit (time adjustable from 0 to 999 seconds)
biSt auxiliary output relay with bistable functioning
Mon auxiliary output relay with monostable functioning
MOTOR ANTI-SKID
The anti-skid function prevents that the repeated
ùinterruption of the opening and closing cycle causes
delays in the cycle completion.
no the antiskid function is not activated
t.AAS the antiskid function is active, with an additio-
nal time in opening and in closing adjustable from
0 to 120 seconds (±0,5).
Page 26

24
INPUT STOP
This menu permits to select the functions associated to the
command of STOP.
no the input STOP is not available
ProS the input STOP stops the gate: pressing the command
START the gate continues the motion
invE the command STOP stops the gate: at the next START the
gate starts moving in the opposite direction.
NOTE: During the pause STOP stops the gate: pressing the
command START will always re-closing the gate.
INPUT PHOTO 1
This input can be activated for the connection of two different
safety devices: the photocell or the rib. The rib (contact normally
closed) is an active safety device in opening and closing (now
active during the backlash): its intervention during the opening
phase stops the gate, inverts the motion for 4 s, without offsetting
the doors. On the other hand, the intervention of the rib in closing
phase stops the gate, inverts the motion with the offset of the
doors. The photocell 1 (contact normally closed) is an active
security in opening and closing: the intervention of the photocell
during the closing stops the gate, at its disengagement the gate
inverts the motion.
Differently the intervention of the photocell in opening stops the
gate, at its disengagement the gate starts opening again.
INPUT PHOTO 2
The photocell 2 is active in closing: if it is dimmed during the
closing it stops the gate and inverts the motion. The option CFCh
activates the photocell even when the gate is still: closed gate
means that no impulse has been given, either it is in pause or it
has received a STOP command. In this case through all the time
of the darkening of the photocell the control unit does not receive
any command of activation at any opening / closing cycle.
no the input PHOTO 2 is not available
CFCh the input PHOTO 2 is available: the photocell is active in
closing and also when the gate is still
Ch the input PHOTO 2 is available: the photocell is active
only during the closing
It is necessary to install the photocell 1 properly, in order to cover the action space of the gate.
no the opening of PHOTO1 is not available
APCh the opening of PHOTO 1 is available for the connection of the photocell
Cost the opening of PHOTO 1 is available for the connection of the rib.
Page 27

25
RADIO INPUTS
To each memorized code one of
the available four radio inputs is
associated, in order to give the
control unit the wished command;
furthermore with simple and fast
operations it is possible to carry
out the partial or total clearing of
the codes present in memory.
The connection of a modular super
heterodyne receiver, allows the
use of the four radio channels,
tEL1 tEL2 tEL3 tEL4, to each a
command of the control unit is
associated:
tEL1 START: transmitting the
code associated to tEL1, the
control unit receives a START
tEL2 PEDESTRIAN START:
transmitting the code associated
to tEL2, the control unit receives a
PEDESTRIAN START
tEL3 STOP: transmitting the
code associated to tEL3, the
control unit receives a STOP
tEL4 COURTESY LIGHTS:
transmitting the code associated
to tEL4, the control unit activates
the COURTESY LIGHTS output.
END OF PROGRAMMING
This menu allows to finish the programming (both default and
personalized) saving the modified data into memory.
no further corrections to carr y out: do not quit the
programming
Si end of programming
THE INSERTED DATA HAVE BEEN MEMORIZED: THE CONTROL
UNIT IS READY TO BE USED.
INSERTING THE WISHED CODES INTO THE MEMORY
To memorize the wished TX codes follow carefully the instructions.
•Press the UP or DOWN keys and select the wished radio input, the display will show (Example) tEL1
•Press the MENU key, the display will show trAS
The control unit is ready for the radio learning
•Press the wished remote control key until the display shows rEC
• Release the remote control key.
The control unit is now ready to learn new codes.
SUBSTITUTION OF A SINGLE CODE
To substitute a single code already memorized, it's sufficient proceed as explained above.
Page 28

26
DISPLAY DATA DESCRIPTION DEFAULT MEMO
DATA DATA
dEF no/Si no
t.AP1 0 ÷ 120 s 22.5
t.AP2 0 ÷ 120 s 22.5
t.APP 0 ÷ t.AP1 6.0
t.Ch1 0 ÷ 120 s 23.5
t.Ch2 0 ÷ 120 s 23.5
t.ChP 0 ÷ t.Ch1 7.0
t.C2P 0 ÷ t.ChP 0.0
r.AP 0 ÷ 120s 1.0
r.Ch 0 ÷ 120s 3.0
t.SEr 0 ÷ 120s 3.0
t.ASE 0 ÷ t.SEr 0.0
t.inv 0 ÷ 120s 0.0
t.PrE 0 ÷ 120s 1.0
t.rAL 0 ÷ 120s 0.0
t.CvE 0 ÷ 120s 0.0
Pot. 30 ÷ 100% 40
SPUn no/Si Si
St.AP PAUS
no
ChiU
PAUS
St.Ch StoP
Stop
APEr
St.PA ChiU
no
ChiU
SP.AP PAUS
no
ChiU
PAUS
Ft.PA r. PAU
r.PAU
t.PCh
Ch.AU no
no
t.PAU
LUCi t.LUC=60s
CiCL
t.LUC
AUS
tiM
biSt
Mon
LP.PA no/Si no
In.LP no/Si no
OroL no/Si no
FUNCTION TABLE PD1
Load V2 ELETTRONICA standard data
Gate 1 opening time
Gate 2 opening time
Opening time of pedestrian gate
Gate 1 closing time
Gate 2 closing time
Closing time of pedestrian gate
Closing time gate 2 during pedestrian cycle
Gate delay during opening
Gate delay during closing
Lock time
Lock advance time
Backlash time
Pre – flashing time
Slowing down time (PD5 only)
Fast closing time after slowing down during closing
Motor power
Start off
Start in opening
- Start command is not available
- Command close gate
- Stop the gate and goes in pause
Start in closing
- Start command stop the gate
- Start command open the gate
Start in pause
- Start command is not available
- Start command closes the gate
Pedestrian in opening
- Pedestrian start command is not available
- Pedestrian start command closes the gate
- Gate goes in pause
Photocell in pause
- Pause time recharged
- Gate stop for a time to be set between 0 to 120 s
Automatic closing
- Automatic closing not available
- Reclosing is available, the standstill time is set from 0 to 999 s
Courtesy Light
- Lights are on trough the whole cycle
- Lights start time adjustable from 0 to 999 s
- Auxiliary output
- Timed aux out (from 0 to 999 s)
- Aux out relay with bistable functioning
- Aux out relay with monostable functioning
Flashlight in pause
Flashlight with intermittence
Timer function
Page 29

27
FUNCTION TABLE PD1
DISPLAY DATA DESCRIPTION DEFAULT MEMO
DATA DATA
ASM t.AAS=2.0s
no
t.AAS
StoP no
no
invE
ProS
Fot 1 no
no
APCh
CoSt
Fot 2 CFCh
no
CFCh
Ch
tEL 1
tEL 2
tEL 3
tEL 4
Fine no/Si no
Motor antiskid
- Antiskid function is not active
- Antiskid function active with additional time adjustable from 0 to 120 s
Input STOP
- Input STOP not available
- STOP com. stops the gate: START com. starts moving in the opposite direction
- Input STOP stops the gate: pressing the START com. gate continues the motion
Input PHOTO 1
- Not available
- Input is available for the connection of the photocell
- Input is available for the connection of the rib
Input PHOTO 2
- Not available
- Input available : photocell is active in closing and also when the gate is still
- Input available : photocell active during the closing
Radio input associated to START command
Radio input associated to Ped. START command
Radio input associated to STOP command
Radio input associated to courtesy light
End of programming
Page 30

28
NOTE
Page 31

29
INDEX
CONSEILS IMPORTANTS . . . . . . . . . . . . . . . . . . . . . . . . . . . . . . . . . . . . . . . . . . . . . . . . . . . . . . . . . . . . . . . . . .30
CONFORMITÉ AUX DISPOSITIFS NORMATIFS . . . . . . . . . . . . . . . . . . . . . . . . . . . . . . . . . . . . . . . . . . . . . . . . . . . .30
DESCRIPTION DE LA CENTRALE . . . . . . . . . . . . . . . . . . . . . . . . . . . . . . . . . . . . . . . . . . . . . . . . . . . . . . . . . . . . .30
CARACTERISTIQUES TECHNIQUES . . . . . . . . . . . . . . . . . . . . . . . . . . . . . . . . . . . . . . . . . . . . . . . . . . . . . . . . . . .31
BRANCHEMENTS AU BORNER . . . . . . . . . . . . . . . . . . . . . . . . . . . . . . . . . . . . . . . . . . . . . . . . . . . . . . . . . . . . . .31
INTERPRETATION DU VOYANT (WARNING LIGHT) . . . . . . . . . . . . . . . . . . . . . . . . . . . . . . . . . . . . . . . . . . . . . . . . . .31
PANNEAU DE CONTRÔLE . . . . . . . . . . . . . . . . . . . . . . . . . . . . . . . . . . . . . . . . . . . . . . . . . . . . . . . . . . . . . . . . .32
PROGRAMMATION . . . . . . . . . . . . . . . . . . . . . . . . . . . . . . . . . . . . . . . . . . . . . . . . . . . . . . . . . . . . . . . . . . . . . .32
FONCTION DES TOUCHES MENU, UP, DOWN . . . . . . . . . . . . . . . . . . . . . . . . . . . . . . . . . . . . . . . . . . . . . . . . . . . .32
PROGRAMMATION PREDEFINIE (DEFAULT) . . . . . . . . . . . . . . . . . . . . . . . . . . . . . . . . . . . . . . . . . . . . . . . . . . . . . .33
DUREE D’ OUVERTURE DU BATTANT 1 . . . . . . . . . . . . . . . . . . . . . . . . . . . . . . . . . . . . . . . . . . . . . . . . . . . . . . . .33
DUREE D’ OUVERTURE DU BATTANT 2 . . . . . . . . . . . . . . . . . . . . . . . . . . . . . . . . . . . . . . . . . . . . . . . . . . . . . . . .33
DUREE D’ OUVERTURE DU BATTANT PIETON . . . . . . . . . . . . . . . . . . . . . . . . . . . . . . . . . . . . . . . . . . . . . . . . . . . .33
DUREE DE FERMETURE DU BATTANT 1 . . . . . . . . . . . . . . . . . . . . . . . . . . . . . . . . . . . . . . . . . . . . . . . . . . . . . . . .33
DUREE DE FERMETURE DU BATTANT 2 . . . . . . . . . . . . . . . . . . . . . . . . . . . . . . . . . . . . . . . . . . . . . . . . . . . . . . . .33
DUREE DE FERMETURE DU BATTANT PIETON . . . . . . . . . . . . . . . . . . . . . . . . . . . . . . . . . . . . . . . . . . . . . . . . . . . .33
DUREE DE FERMETURE DU BATTANT 2 PENDANT LE CYCLE PIETON . . . . . . . . . . . . . . . . . . . . . . . . . . . . . . . . . . . .33
DELAI DU BATTANT PENDANT LA PHASE D’ OUVERTURE . . . . . . . . . . . . . . . . . . . . . . . . . . . . . . . . . . . . . . . . . . . .34
DELAI DU BATTANT PENDANT LA PHASE DE FERMETURE . . . . . . . . . . . . . . . . . . . . . . . . . . . . . . . . . . . . . . . . . . .34
DUREE DE BLOCAGE . . . . . . . . . . . . . . . . . . . . . . . . . . . . . . . . . . . . . . . . . . . . . . . . . . . . . . . . . . . . . . . . . . . .34
DUREE ANTICIPATION BLOCAGE . . . . . . . . . . . . . . . . . . . . . . . . . . . . . . . . . . . . . . . . . . . . . . . . . . . . . . . . . . . . .34
DUREE COUPS DE BELIER . . . . . . . . . . . . . . . . . . . . . . . . . . . . . . . . . . . . . . . . . . . . . . . . . . . . . . . . . . . . . . . .34
DUREE DE PRE - CLIGNOTEMENT . . . . . . . . . . . . . . . . . . . . . . . . . . . . . . . . . . . . . . . . . . . . . . . . . . . . . . . . . . . .34
TEMPS DE RALENTISSEMENT . . . . . . . . . . . . . . . . . . . . . . . . . . . . . . . . . . . . . . . . . . . . . . . . . . . . . . . . . . . . . .34
TEMPS FERMETURE RAPIDE APRES RALENTISSEMENT EN FERMETURE . . . . . . . . . . . . . . . . . . . . . . . . . . . . . . . . .35
PUISSANCE DES MOTEURS . . . . . . . . . . . . . . . . . . . . . . . . . . . . . . . . . . . . . . . . . . . . . . . . . . . . . . . . . . . . . . . .35
DEMARRAGE RAPIDE . . . . . . . . . . . . . . . . . . . . . . . . . . . . . . . . . . . . . . . . . . . . . . . . . . . . . . . . . . . . . . . . . . . .35
DEMARRAGE A L’ OUVERTURE . . . . . . . . . . . . . . . . . . . . . . . . . . . . . . . . . . . . . . . . . . . . . . . . . . . . . . . . . . . . .35
DEMARRAGE A LA FERMETURE . . . . . . . . . . . . . . . . . . . . . . . . . . . . . . . . . . . . . . . . . . . . . . . . . . . . . . . . . . . . .35
DEMARRAGE EN PAUSE . . . . . . . . . . . . . . . . . . . . . . . . . . . . . . . . . . . . . . . . . . . . . . . . . . . . . . . . . . . . . . . . . .35
DEMARRAGE PIETON EN OUVERTURE . . . . . . . . . . . . . . . . . . . . . . . . . . . . . . . . . . . . . . . . . . . . . . . . . . . . . . . . .36
CELLULE PHOTOELECTRIQUE EN PAUSE . . . . . . . . . . . . . . . . . . . . . . . . . . . . . . . . . . . . . . . . . . . . . . . . . . . . . . .36
FERMETURE AUTOMATIQUE . . . . . . . . . . . . . . . . . . . . . . . . . . . . . . . . . . . . . . . . . . . . . . . . . . . . . . . . . . . . . . . .36
LUMIERES DE SERVICE . . . . . . . . . . . . . . . . . . . . . . . . . . . . . . . . . . . . . . . . . . . . . . . . . . . . . . . . . . . . . . . . . .36
CLIGNOTANT EN PAUSE . . . . . . . . . . . . . . . . . . . . . . . . . . . . . . . . . . . . . . . . . . . . . . . . . . . . . . . . . . . . . . . . . .37
CLIGNOTANT INTERMITTENT . . . . . . . . . . . . . . . . . . . . . . . . . . . . . . . . . . . . . . . . . . . . . . . . . . . . . . . . . . . . . . .37
FONCTION TIMER . . . . . . . . . . . . . . . . . . . . . . . . . . . . . . . . . . . . . . . . . . . . . . . . . . . . . . . . . . . . . . . . . . . . . . .37
ANTIPANAGE MOTEUR . . . . . . . . . . . . . . . . . . . . . . . . . . . . . . . . . . . . . . . . . . . . . . . . . . . . . . . . . . . . . . . . . . .37
ENTREE STOP . . . . . . . . . . . . . . . . . . . . . . . . . . . . . . . . . . . . . . . . . . . . . . . . . . . . . . . . . . . . . . . . . . . . . . . . .38
ENTREE CELLULE 1 . . . . . . . . . . . . . . . . . . . . . . . . . . . . . . . . . . . . . . . . . . . . . . . . . . . . . . . . . . . . . . . . . . . . .38
ENTREE CELLULE 2 . . . . . . . . . . . . . . . . . . . . . . . . . . . . . . . . . . . . . . . . . . . . . . . . . . . . . . . . . . . . . . . . . . . . .38
TEST DE FONCTIONNEMENT DES CELLULES PHOTOÉLECTRIQUES . . . . . . . . . . . . . . . . . . . . . . . . . . . . . . . . . . . . .38
ENTREES RADIO . . . . . . . . . . . . . . . . . . . . . . . . . . . . . . . . . . . . . . . . . . . . . . . . . . . . . . . . . . . . . . . . . . . . . . .39
INSERTION DANS LA MEMOIRE DES CODES SOUHAITÉS . . . . . . . . . . . . . . . . . . . . . . . . . . . . . . . . . . . . . . . . . . .39
FIN DE PROGRAMMATION . . . . . . . . . . . . . . . . . . . . . . . . . . . . . . . . . . . . . . . . . . . . . . . . . . . . . . . . . . . . . . . . .39
TABLEAU FONCTIONS PD1 . . . . . . . . . . . . . . . . . . . . . . . . . . . . . . . . . . . . . . . . . . . . . . . . . . . . . . . . . . . . . . . .40
Page 32

30
CONSEILS IMPORTANTS
Pour tout précision technique ou problème d’installation
V2 ELETTRONICA dispose d’un service d’assistance clients
actif pendant les horaires de bureau
TEL. (+39) 01 72 81 24 11
V2 ELETTRONICA se réserve le droit d’apporter
d’éventuelles modifications au produit sans préavis; elle
décline en outre toute responsabilité pour tous types de
dommages aux personnes ou aux choses dus à une
utilisation imporopre ou à une mauvaise installation.
Avant de proceder avec l'installation et la
progarmmation, lire attentivement les notices.
• Ce manuel d'instruction est destiné à des techniciens
qualifiés dans le domain des automatismes.
• Aucune des informations contenues dans ce livret
pourra être utile pour le particulier.
•Tous operations de maintenance ou programation
doivent être faites à travers de techniciens qualifiés.
L'armoire de commande PD1 sert pour portails
battant à un ou deux ventails. Tous emploi differents serons
considerés ps en conformité des normes en vigueur.
L’AUTOMATION DOIT ÊTRE RÉALISÉE CONFORMÉMENT
AUX DISPOSITIFS NORMATIFS EUROPÉENS EN VIGUEUR:
EN 60204–1 (Sécutité de la machinerie. Équipement
électriquedes machines, partie 1: régles générales).
EN 12445 (Sécutité dans lìutilisation de fermetures
automatisées, méthodes d'essai).
EN 12453 (Sécurité dans l'utilisation de fermetures
automatisées, conditions requises).
• L'installateur doit pourvoir à l'installation d'un dispositif
(ex. interrupteur magnétothermique) qui assure la coupure
omnipolaire de l'équipement du réseau d'alimentation.
La norme requiert une séparation des contacts
d'au moins 3 mm pour chaque pôle (EN 60335-1).
•L’installation requiert des compétences en matière
d’électricité et mécaniques; doit être faite exclusivement
par techniciens qualifiés en mesure de délivrer
l’attestation de conformité pour l’installation (Directive
89/392 CEE, - IIA).
• Il est obligatoire se conformer aux normes suivantes
pour fermetures véhiculaires automatisées: EN 12453,
EN 12445, EN 12978 et à toutes éventuelles
prescriptions nationales.
• Même l’installation électrique ou on branche
l’automatisme doit répondre aux normesen vigueur et
être fait à règles de l’art.
• La régulation de la force de poussée du vantail doit être
mesurée avec outil spécial et réglée selon les valeurs
maxi admis par la norme EN 12453.
• Nous conseillons d’utiliser un poussoir d’urgence à
installer près de l’automatisme (branché à l’entrée
STOP de l’armoire de commande de façon qui soit
possible l’arrêt immédiat du portail en cas de danger.
• Brancher le conducteur de terre des moteurs à
l'installation de mise à terre du reseau d'alimentation
CONFORMITÉ AUX NORMATIFS
V2 ELETTRONICA SPA déclare que la centrale PD1 est
conforme aux qualités requises par les Directives:
93/68/EEC, 73/23/EEC Ils ont été appliqués les Normes
techniques suivantes pour en vérifier la conformité:
EN 60335 – 1: Sécurité électrique
EN 50081–1, EN 50081–2: Compatibilité electromagnétique
Racconigi, le 15 / 10 / 01
Le représentant dûment habilité V2 ELETTRONICA SPA
A.Livio Costamagna
DESCRIPTION DE LA CENTRALE
La centrale numérique PD1 est un produit innovant
V2 ELETTRONICA, qui garantit sécurité et fiabilité pour
l'automation de portails à un ou à deux volets.
La conception de projet de la PD1 a visé réalisation d'un
produit qui soit en mesure de correspondre à toutes les exigences, parvenant à une centrale extrêmement
capable de s'adapter et qui satisfait à toutes les conditions
requises nécessaires pour une installation fonctionnelle et
performante.
La PD1 est dotée d'un affichage qui permet, en plus d'une
programmation aisée, le monitoring constant de l'état des
entrées; de surcroît la structure à menus permet de poser
de manière simple les temps de travail et les logiques de
fonctionnement.
Dans le respect des dispositifs normatifs européens en
matière de sécurité électrique et de compatibilité
électromagnétique (EN 60335-1, EN 50081-1 et EN 50082-1)
se caractérise par l'isolement électrique complet entre la
partie du circuit numérique et celle du circuit de puissance.
Autres caractéristiques:
• Contrôle automatique pour la commutation des relais à
courants nuls.
• Régulation de la puissance avec partialisation d'onde.
• Sortie voyant qui signale dans quel état se trouve le
portail.
• Relais auxiliaire avec logique programmable pour
éclairage de courtoisie ou autre utilisation.
La présence à bord d'un connecteur à insertion rapide permet
le branchement d'un récepteur modulaire de la série MT433
avec architecture superhétérodyne de haute sensibilité.
Page 33

31
ATTENTION: Avant de faire ces opérations,
couper l'alimentation à la centrale de commande.
Faire bien attention au vers de branchement des
modules extraibles.
INSERTION MODULE RÉCEPTEUR
INTERPRETATION DU VOYANT
(WARNING LIGHT)
Le voyant warning light, lorsqu'il est installé, indique
en temps réel l'état du portail, le type de clignotement
indique les quatre possibilités:
IMMOBILE lumière éteinte
EN PAUSE la lumière est toujours allumée
EN OUVERTURE la lumière clignote lentement (2Hz)
EN FERMETURE la lumière clignote rapidement (4Hz)
BRANCHEMENTS AU BORNIERE
CARACTÉRISTIQUES TECHNIQUES
Alimentation 230 VAC 50 / 60 Hz
Charge max moteurs 700 W
Charge max accessoires à 24V 10 W
Température ambiance travail -20°C ÷ 60°C
Fusible de protection 5 A per linea 230 VAC
Dimensions 295 x 230 x 100 mm
Poids 1600 g
Protection IP55
1.
2.
3.
4.
5.
6.
7.
8.
9.
10.–11.
11.–12.
13.–14.
14.–15.
16.–17.
18.–19.
20.
21.
22.
23.
24.
25.
26.
27.
Centrale antenne
Blindage antenne
Commande d'ouverture pour le
branchement de: commande
traditionnels avec contact
normalement ouvert, TTNC, VRD
Commande d'ouverture piéton
pour le branchement de commande
traditionnels avec contact
normalement ouvert, TTNC, VRD
Commande d'arrêt
Contact normalement fermé
Commun (-)
Photocellules 1
Contact normalement fermé
Photocellules 2
Contact normalement fermé
Commun (-)
Sortie alimentation 24 VAC pour
Photocellules et autres acces
Alimentation TX Photocellules
pour Test de fonctionnement
Electro-blockage 12 VAC
Voyant 24 VAC 3W
Contact pour lumière de service
230 VAC 10A
Clignotant 230 VAC 40 W
Sortie alimentation 230 VAC pour
moteur 2 en phase d'ouverture
Commun moteur 2
Sortie alimentation 230 VAC pour
moteur 2 en phase de fermeture
Sortie alimentation 230 VAC pour
moteur 1 en phase d'ouverture
Commun moteur 1
Sortie alimentation 230 VAC pour
moteur 1 en phase de fermeture
Alimentation neutre 230 VAC
Alimentation phase 230 VAC
ATTENTION: on conseille d'utiliser l'antenne
externe model ANS433 pour pouvoir garantir la
portée maximal
Page 34

32
PANNEAU DE CONTRÔLE
Exécuter les raccordements électriques à la plaque à bornes,
alimenter ensuite le système: la centrale vérifie le bon
fonctionnement de l'affichage en branchant tous les
segments pendant 1,5 sec. 8.8.8.8, dans l'instant suivant
sur l'affichage apparaît la version des microprogrammes
pendant 1,5 secondes, par exemple Pr 2.8.
L'affichage visualise le panneau de contrôle:
Le panneau de contrôle signale l'état physique des contacts
à la plaque à bornes et des touches de programmation: si
le segment vertical en haut est allumé, le contact est
fermé; si le segment vertical en bas est allumé, le contact
est ouvert (le dessin indiqué ci-dessus illustre le cas où les
entrées: START , START P, PHOTO1, PHOTO2 et STOP ont
été toutes raccordées correctement).
FONCTION AUTO POWER-OFF: en phase de programmation,
après 50 seconds du de la dernier intervention, l'écran se
pose en stand-by. Se re-allume à la premiere variation
d'une des entrées (START, START P, FOTO1, FOTO2, STOP)
et à la premiere réception radio d'un code en memoire.
S'on appuye n'importe quel des trois touches (MENU, UP,
DOWN) l'écran reste allumé pour 50 seconds.
PROGRAMMATION
La centrale PD1 présente une structure de
programmation par menus, chacun desquels correspond à
une fonction de la centrale (menu fonction) ou à la mise en
place d'un temps de travail (menu temps).
Les menus temps permettent la régulation des temps de
travail de la centrale (P.ex.: temps d'ouverture ou de
fermeture du volet, temps de serrage, temps de
préclignotement, ecc.) et peuvent être posés de 0 à 120
secondes avec un balayage de ±0,5 sec.
En revanche les menus fonction permettent d'amorcer les
fonctions souhaitées (p.ex. éclairage de courtoisie
temporisé, PHOTO1 amorcé comme côte mobile, PHOTO2
désamorcée, ecc.).
Il existe des menus temps dépendant de menus fonction
donnés (P.ex.: si la FERMETURE AUTOMATIQUE est
amorcée, il est nécessaire de poser un TEMPS DE PAUSE,
si elle n'est pas amorcée il n'est pas nécessaire de le poser);
donc pour simplifier la programmation, ces menus temps
ont été insérés à l'intérieur des menus fonction dont ils
dépendent. En particulier les menus: FERMETURE
AUTOMATIQUE (Ch.AU), ANTIDÉRAPAGE (ASM) et CELLULE
PHOTOÉLECTRIQUE EN PAUSE (Pht.PA) présentent parmi
leurs options sélectionnables des "menus temps”.
FONCTION DES TOUCHES
MENU, UP, DOWN
Pour amorcer la programmation, procéder de la manière
suivante.
• Après avoir alimenté la centrale, l'affichage doit
visualiser le panneau de contrôle (contrôler donc que
les raccordements effectués soient bien corrects).
• Maintenir la pression sur la touche MENU jusqu'au
moment où sur l'affichage apparaît dEF.
À ce stade la programmation est amorcée: si au bout de 1
minute aucune opération n'est effectuée, la centrale sort
automatiquement de la programmation et visualise à
nouveau le panneau de contrôle.
Lorsque la fonction de programmation est amorcée, appuyer
sur la touche UP ou sur la touche DOWN pour sélectionner
les menus, en effectuant un défilement en avant ou en
arrière (pour un défilement rapide maintenir la pression sur
la touche). Appuyer sur la touche MENU pour accéder aux
paramètres posés que l'on peut ainsi modifier en appuyant
sur les touches UP et DOWN
• En appuyant sur la touche UP l'on défile à l'intérieur du
menu fonctions de bas en haut.
• En appuyant sur la touche DOWN l'on défile à
l'intérieur du menu fonctions de haut en bas.
• En appuyant sur la touche MENU l'on peut accéder aux
éventuels paramètres posés à modifier et à confirmer
en appuyant à nouveau sur la même touche.
ATTENTION: lorsque la fonction de programmation n'est pas
amorcée, la pression sur la touche UP correspond à la
commande de START , la pression sur la touche DOWN
correspond à la commande de START PIÉTONNIER: il est
ainsi possible pour l'installateur d'effectuer l'essai et la
mise au point.
Il est possible de définir le fonctionnement de la centrale
PD1 selon deux différentes modalités de programmation:
PROGRAMMATION PRÉDÉFINIE (DEFAULT) ou
PROGRAMMATION PERSONNALISÉE.
Dans les pages suivantes se trouve le diagramme des
fonctions de la PD1 et sa description.
Pour lire le diagramme suivre les instructions suivantes:
• Appuyer sur la touche DOWN pour parcourir le diagramme
de haut en bas; il va apparaître les fonctions dEF, t.AP1,
t.AP2 ecc. sur l'écran de contrôle.
• Appuyer sur la touche UP pour parcourir le diagramme
de bas en haut.
• Appuyer sur la touche MENU pour parcourir le diagramme
en horizontal; si par exemple sur l'écran de contrôle on lit
t.ChP, en appuyant sur la touche MENU apparaît le
numéro 7.0. Le numéro peut être modifié en appuyant
sur la touche UP ou DOWN. En appuyant de nouveau sur
la touche MENU apparaître la fonction t.ChP.
DOWN MENU UP
Page 35

33
Ce type de programmation permet de charger dans la mémoire le
programme de Default prédéfini par V2 ELETTRONICA: les données
standard qui seront insérés automatiquement sont indiquées sur le
tableau récapitulatif ci-dessous (colonne DONNÉES DE DEFAULT).
Appuyer sur la touche UP ou DOWN pour sélectionner la fonction
désirée et appuyer sur la touche MENU pour valider.
DUREE D' OUVERTURE DU BATTANT 1
Ce menu est réglable de 0 à 120 secondes (±0,5) et détermine
la durée nécessaire à l'ouverture du battant 1.
DUREE D'OUVERTURE DU BATTANT 2
Ce menu est réglable de 0 a 120 secondes (±0,5) et détermine
la durée nécessaire à l'ouverture du battant 2.
DUREE D'OUVERTURE DU BATTANT PIETON
Ce menu est réglable de 0 secondes à t.AP1 (±0,5) et détermine
la durée nécessaire à l'ouverture du battant piéton (battant 1).
DUREE DE FERMETURE DU BATTANT 1
Permet un réglage de 0 à 120 secondes (±0,5) de la durée
nécessaire à la fermeture du battant 1. Pour éviter que le battant
ne reste ouvert, il est conseillé d'insérer une durée plus élevée
que celle de l'ouverture t.AP1.
DUREE DE FERMETURE DU BATTANT 2
Permet un réglage de 0 à 120 secondes (±0,5) de la durée
nécessaire à la fermeture du battant 2. Pour éviter que le battant
ne reste ouvert, il est conseillé d'insérer une durée plus élevée
que celle de l'ouverture t.AP2.
DUREE DE FERMETURE DU BATTANT PIETON
Permet un réglage de 0 secondes à t.Ch1 (±0,5) et détermine la
durée nécessaire à la fermeture du battant piéton (battant 1). Pour
éviter que le battant ne reste ouvert, il est conseillé d'insérer une
durée plus élevée que celle de l'ouverture t.APP.
DUREE DE FERMETURE DU BATTANT 2 PENDANT LE CYCLE
PIETON
Permet un réglage de 0 à tChP (±0,5) et détermine la durée
nécessaire à la fermeture du battant 2 pendant la phase de
fermeture du battant piéton.
Page 36

34
DELAI DU BATTANT PENDANT LA PHASE D'OUVERTURE
Pour éviter que les battant n'entrent en collision pendant
l'ouverture, il est nécessaire d'introduire le délai r.AP, réglable de
0 a 120 secondes (±0,5). De cette manière l'ouverture du battant
2 est retardée contrairement à celle du battant 1 qui suit la durée
réglée.
DELAI DU BATTANT PENDANT LA PHASE DE FERMETURE
Pour éviter que les battants n'entrent en collision pendant la
fermeture, il est nécessaire d'introduire le délai r.Ch, réglable de 0
à 120 secondes (±0,5). De cette manière la fermeture du battant
1 est retardée contrairement à celle du battant 2 qui suit la durée
réglée.
DUREE DE BLOCAGE
Quand le portail commence à s'ouvrir, la centrale doit solliciter
l'électro - blocage afin de la débloquer et permettre ainsi le
mouvement du portail. La durée t.SEr détermine la durée de
sollicitation et il est réglable de 0 à 120 secondes (± 0,5).
DUREE ANTICIPATION BLOCAGE
Ce menu permet d'anticiper la sollicitation du blocage d'une durée
réglable de 0 secondes à t.SEr (avec une scansion de ±0,5).
Pendant la durée d'anticipation blocage le portail n'effectue aucun
mouvement garantissant ainsi toujours le déblocage de
l'électro - blocage.
DUREE COUPS DE BELIER
Afin d'éviter que le portail amorce la phase d'ouverture avant que
la serrure électronique ne se débloque, il est possible d'introduire
une durée d'inversion réglable de 0 à 120 secondes (±0,5). Ainsi,
pendant l'ouverture, les battants invertissent le mouvement
pendant la durée pré-réglé, permettant le déblocage de la serrure
électronique.
DUREE DE PRE-CLIGNOTEMENT
Ce menu permet l'introduction d'un clignotement précédant
chaque mouvement du portail aussi bien à l'ouverture qu'à la
fermeture : la durée de pré-clignotement est réglable de 0 a 120
secondes ±0,5.
TEMPS DE RALENTISSEMENT
Ce menu permet de conférer la fonction de ralentissement du
portail pour un temps établi entre 0 et 120 seconde (±1,5 s).
Pour établir le ralentissement procéder comme suite: laisser le
temps de ralentissement à 0 s et vérifier que ouvre et ferme
proprement.
Après établir le temps de ralentissement (pour exemple: 5 ou 6 s).
Page 37

35
TEMPS FERMETURE RAPIDE APRES RALENTISSEMENT EN
FERMETURE
Dans le cas on établit un temps de ralentissement différent de 0
s, est possible que la vitesse du portail ne soit pas suffisant à
faire déclencher la serrure pendant la fermeture. Pour cette
raison, après la phase de ralentissement, est possible fermer le
portail a une vitesse normale (sans ralentissement) pour un
temps établi entre 0 et 120 seconde (±1,5 s).
PUISSANCE DES MOTEURS
Ce menu permet de régler la puissance des moteurs de 30 a
100 % avec scansion ±5.
DEMARRAGE RAPIDE
Quand le portail est arrêté et s'apprête à entrer en mouvement, il
entre en opposition avec l'inertie initiale, par conséquent, si le
portail est très lourd, il existe un risque que les battants ne
bougent pas. En activant la fonction "démarrage rapide", il est
possible de vaincre l'inertie initiale grâce au démarrage des
moteurs au maximum de la puissance disponible pendant 2
secondes.
DEMARRAGE A L'OUVERTURE
Ce menu permet de sélectionner les fonctions de commande du
démarrage pendant la phase d'ouverture.
no la commande de démarrage n'est pas captée.
ChiU la commande de démarrage referme le portail.
PAUS la commande de démarrage ferme le por tail qui se met
en PAUSE.
DEMARRAGE A LA FERMETURE
Ce menu permet de sélectionner la fonction de la commande de
démarrage pendant la phase de fermeture.
StoP la commande de démarrage arrête le portail concluant
ainsi le cycle.
APEr la commande de démarrage
DEMARRAGE EN PAUSE
Ce menu permet de sélectionner les fonctions de la commande
de démarrage pendant la phase de pause.
no la commande de démarrage n'est pas captée. Cette
fonction ne doit pas entre sélectionne quand la fermeture
automatique n'est pas activée menu Ch.AU.
ChiU la commande de démarrage referme le portail.
Page 38

36
DEMARRAGE PIETON EN OUVERTURE
Ce menu permet de sélectionner les fonctions de la commande
de démarrage piéton pendant la phase d'ouverture.
PAUS la commande de démarrage piéton arrête le por tail qui
entre en phase de pause.
no la commande de démarrage piéton n'est pas captée.
ChiU la commande de démarrage piéton referme le portail.
CELLULE PHOTOELECTRIQUE EN PAUSE
Ce menu permet de déterminer le fonctionnement des
deux cellules photoélectriques pendant la phase de pause.
rPAU l'occultation de la cellule photoélectrique
bloque le décompte de la durée de pause:
dès lors qu'elle n'est plus sollicitée la centrale
recharge la durée de pause.
t.PCh l'occultation de la cellule photoélectrique
bloque le décompte de la durée de pause:
dès lors qu'elle n'est plus sollicitée la centrale
referme le portail après une durée réglable de
0 a 120 secondes.
Si la fonction sélectionnée est t.PCh, sur l'écran
apparaît 5.0
FERMETURE AUTOMATIQUE
Elle permet de choisir entre fonctionnement semiautomatique et automatique. Avec le fonctionnement
semi-automatique, la commande de démarrage ou de
démarrage piéton ouvre le portail; lorsque l'ouverture
est complète, le portail reste ouvert jusqu'à la
commande d'ouverture suivante qui le referme.
En mode automatique, en revanche, la commande de
démarrage ou de démarrage piéton débute un cycle: le
portail s'ouvre, s'arrête et se met en pause pendant la
durée pré-réglée (t.PAU); le portail se referme.
no la fermeture automatique est activée, le portail fonctionne en mode semi-automatique.
t.PAU la fermeture automatique est activée, la durée de pause est réglable de 0 a 999 secondes.
Si la fonction sélectionnée est no, l'inscription Ch.AU apparaît sur l'écran. Si la refermeture automatique
n'a pas été activée, il est nécessaire d'activer la commande de démarrage en pause (menu St.PA).
LUMIERES DE SERVICE
Grâce à la sortie "courtesy light" la
centrale PD5 permet de
brancher des points lumineux (ex:
lumières de jardin ou lumière de
service), qui peuvent fonctionner de
façon automatique ou de façon
émetteur.
Page 39

37
FONCTION TIMER
Cette fonction permet de programmer, pour une journée, les
phases d'ouverture et de fermeture du portail. Il est nécessaire
de brancher une timer 24h avec contact normalement ouvert en
parallèle à l'entrée START ou START PIETON. Lorsque le contact
du timer se ferme, le portail entre en phase d'ouverture et reste
ouvert jusqu'à ce que le contact du timer s'ouvre à nouveau
causant ainsi la fermeture du portail.
IMPORTANT: pour un fonctionnement correct il est nécessaire
d'activer la refermeture automatique (menu Ch.AU).
CLIGNOTANT INTERMITTENT
La centrale PD1 permet de relier un clignotant intermittent ou
non.
Si le clignotant est doté d'un dispositif intermittent interne, il est
nécessaire de sélectionner l'option "Si"; dans le cas contraire, il
est nécessaire de sélectionner l'option "no" afin qu'il puisse
clignoter.
CLIGNOTANT EN PAUSE
Ce menu permet de d'activer ou de désactiver le clignotant
pendant le durée de pause.
Dans le premier cas, la fermeture du contact N.A. est rendue possible grâce à une commande de
démarrage ou de démarrage piéton (aussi bien avec clé qu'avec télécommande). Dans le second il
est possible d'actionner la télécommande mémorisée sur l'entrée radio tEL4; dans ce cas, la
sortie "courtesy light " devient une sor tie auxiliaire à laquelle il est possible d'associer une des
logiques de fonctionnement suivantes:
monostable: active le relais de sortie pour toute la durée de transmission de la télécommande,
quand la transmission de la télécommande s'interrompt le relais se désactive.
bistable: active le relais avec la première transmission de la télécommande, le relais est
désactivé avec la seconde transmission.
timer: la transmission de la télécommande active le relais, lequel se désactive
automatiquement après une durée pré réglable de 0 a 999 secondes.
t.LUC les lumières de service s'allument pour une durée pré-réglable de 0 a 999 s.
CiCL les lumières de courtoisie s'allument pour toute la durée du cycle.
AUS sortie auxiliaire avec logique de fonctionnement pré-réglable.
Si la fonction sélectionnée est AUS, une des trois inscriptions suivantes apparaît sur l'écran:
tiM sortie auxiliaire temporisée (durée pré-réglable de 0 a 999 sec.).
biSt relais de la sortie auxiliaire avec fonctionnement bi-stable.
Mon relais de la sortie auxiliaire avec fonctionnement mono-stable.
ANTIPATINAGE MOTEUR
La fonction d'antipatinage empêche que l'interruption
du cycle d'ouverture et de fermeture ne génère des
durées plus longues que celles qui sont normalement
nécessaires à l'accomplissement du cycle.
no la fonction d'antipatinage moteurs est inactive.
t.AAS la fonction d'antipatinage moteurs est active
avec une durée ajoutée, en ouverture ou en
fermeture, réglable de 0 a 120 secondes.
Page 40

38
ENTREE STOP
Ce menu permet de sélectionner le fonctions associées à la
commande de STOP.
no l'entrée STOP est désactivé.
ProS la commande de STOP arrête le portail: lors de la
commande de DEMARRAGE suivante le portail reprend le
mouvement dans la direction précédente.
invE la commande de STOP arrête le portail: lors de la
commande de DEMARRAGE suivante le portail reprend le
mouvement dans la direction opposée à la précédente.
ENTREE CELLULE 1
Cette entrée peut être activée pour le branchement de deux
sécurités différentes: la cellule photoélectrique ou la cellule
mobile. La cellule mobile (contact normalement fermé) est une
sécurité active en ouverture et en fermeture (inactive pendant le
coups du bélier): son intervention pendant l'ouverture immobilise
le portail, inverti le mouvement sans décalage des battants.
L'intervention de la cellule mobile pendant la fermeture du portail,
en revanche, inverti le mouvement pendant 4 s avec décalage des
battants. La cellule photoélectrique 1 (contact normalement
fermé) est une sécurité active en ouverture et en fermeture:
l'intervention de la cellule photoélectrique pendant la fermeture
immobilise le portail, lorsqu'elle n'est plus sollicitée le portail
inverse le mouvement.
ENTREE CELLULE 2
La cellule photoélectrique 2 est active pendant la fermeture: si elle
est occultée pendant la fermeture, elle arrête le portail et en inver ti
le mouvement. L'option CFCh active la cellule photoélectrique même
quand le portail est immobile: par immobile, on entend qu'il n'a
reçu aucune commande, qu'il est en pause ou bien qu'il a reçu une
commande d'arrêt. Dans ce cas, pour toute la durée d'occultation
de la cellule photoélectrique, la centrale ne capte aucune
commande d'activation quelque soit le cycle d'ouverture/fermeture.
no l'entrée FOTO 2 est désactivée.
CFCh l'entrée FOTO 2 est activée: la cellule photoélectrique est
activée en fermeture et quand le portail est immobile.
Ch l'entrée FOTO 2 est activée: la cellule photoélectrique 2 est
active uniquement à la fermeture.
Il est nécessaire d'installer la cellule photoélectrique 1 de façon opportune, afin qu'elle couvre le champs
d'action du portail.
no the opening of PHOTO1 is not available
APCh the opening of PHOTO 1 is available for the connection of the photocell
Cost the opening of PHOTO 1 is available for the connection of the rib.
Page 41

39
ENTREES RADIO
A chaque code mémorisé est
associée l'une des quatre entrées
radio disponibles, afin de conférer
la commande désirée à la centrale;
de plus, à l'aide d'opérations
simples et rapides, il est possible
d'effacer partiellement ou
totalement les codes présents en
mémoire.
Le branchement d'un récepteur
modulaire superhétérodyne permet
l'utilisation des quatre canaux
radio, tEL1 tEL2 tEL3 tEL4
auxquels il est possible d'associer
une commande de la centrale:
tEL1 DEMARRAGE: avec la
transmission du code associé à
tEL1, la centrale reçoit une
commande de DEMARRAGE.
tEL2 DEMARRAGE PIETON: avec
la transmission du code associé à
tEL2, la centrale reçoit une
commande de DEMARRAGE PIETON.
tEL3 STOP: avec la transmission
du code associé à tEL3, la centrale
reçoit une commande de STOP.
tEL4 SORTIE LUMIERES DE
SERVICE: avec la transmission du
code associé à tEL4, la centrale
active la sortie LUMIERES DE
SERVICE.
FIN DE PROGRAMMATION
Ce menu permet de terminer la programmation (aussi bien prédéfinie
que personnalisée) en mémorisant les données modifiées.
no modifications ultérieures à effectuer, ne pas sortir de la
programmation.
Si modifications terminées: fin de programmation.
LES DONNEES PREREGLEES ONT ETE MEMORISEES:
LA CENTRALE EST DESORMAIS PRETE POUR L'UTILISATION.
MEMORISATION DES CODES DESIRES
Pour mémoriser les codes des télécommandes désirés, veuillez suivre avec attention les
instructions suivantes.
• Appuyer sur la touche UP ou DOWN et sélectionner l'entrée radio désirée, sur l'écran apparaît
(exemple): tEL1
• Appuyer sur la touche MENU, sur l'écran apparaît trAS
La centrale est prête pour l'apprentissage radio:
• Appuyer sur la touche de la télécommande désirée jusqu'à ce qu'apparaisse sur l'écran rEC.
• Relâcher la touche de la télécommande.
La centrale est désormais prête pour mémoriser les nouveaux codes.
REMPLACEMENT D'UN CODE
Pour remplacer un code précédemment mémorisé, il est suffisant de renouveler la procédure de
programmation normale avec le nouveau code. Le nouveau code remplacera ainsi le précédent.
Page 42

40
DISPLAY DONNÉES DESCRIZIONE DONNÉES MEMO
DEFAULT DONNÉES
dEF no/Si no
t.AP1 0 ÷ 120 s 22.5
t.AP2 0 ÷ 120 s 22.5
t.APP 0 ÷ t.AP1 6.0
t.Ch1 0 ÷ 120 s 23.5
t.Ch2 0 ÷ 120 s 23.5
t.ChP 0 ÷ t.Ch1 7.0
t.C2P 0 ÷ t.ChP 0.0
r.AP 0 ÷ 120s 1.0
r.Ch 0 ÷ 120s 3.0
t.SEr 0 ÷ 120s 3.0
t.ASE 0 ÷ t.SEr 0.0
t.inv 0 ÷ 120s 0.0
t.PrE 0 ÷ 120s 1.0
t.rAL 0 ÷ 120s 0.0
t.CvE 0 ÷ 120s 0.0
Pot. 30 ÷ 100% 40
SPUn no/Si Si
St.AP PAUS
no
ChiU
PAUS
St.Ch StoP
Stop
APEr
St.PA ChiU
no
ChiU
SP.AP PAUS
no
ChiU
PAUS
Ft.PA r. PAU
r.PAU
t.PCh
Ch.AU no
no
t.PAU
LUCi t.LUC=60s
CiCL
t.LUC
AUS
tiM
biSt
Mon
LP.PA no/Si no
In.LP no/Si no
OroL no/Si no
TABLEAU FONCTIONS PD1
Chargement données standard V2 ELETTRONICA
Durée ouverture battant 1
Durée ouverture battant 2
Durée ouverture battant piéton
Durée fermeture battant 1
Durée fermeture battant 2
Durée fermeture battant piéton
Durée fermeture battant 2pendant la fermeture piéton
Retard de battant à l’ouverture
Retard de battant à la fermeture
Durée de blocage
Durée anticipation blocage
Durée coup de bélier
Durée pré- clignotement
Durée de ralentissement
Durée fermeture rapide après avec ralentissement en fermeture
Puissance moteur
Démarrage rapide
Démarrage en ouverture
- Le command START n’est pas captée
- Le portail se referme
- Le portail se met en pause
Démarrage en fermeture
- Le portail conclut le cycle
- Le portail s’ouvre à nouveau
Démarrage en pause
- La commande de démarrage n’est pas captée
- Le portail se referme
Démarrage piéton en ouverture
- La commande de START P. n’est pas reçue
- Le portail se referme
- Le portail entre en pause
Cellule photoélectrique en pause
- Recharge la durée de pause
- Le portail se referme après la durée pré-réglé 0 – 120 s
Refermeture automatique
- N’est pas activée
- La refermeture automatique est activée, avec pause 0 – 999 s
Lumières de service
- Allumé pendant toute la durée du cycle
- Tempo Sées 0 – 999 s
- Sortie auxiliaire
- Sortie auxiliaire relais temporisée 0 - 999 s
- Sortie auxiliaire relais bi-stable
- Sortie auxiliaire relais mono-stable
Clignotant en pause
Clignotant à intermittence
Fonction timer
Page 43

41
TABLEAU FONCTIONS PD1
DISPLAY DONNÉES DESCRIZIONE DONNÉES MEMO
DEFAULT DONNÉES
ASM t.AAS=2.0s
no
t.AAS
StoP no
no
invE
ProS
Fot 1 no
no
APCh
CoSt
Fot 2 CFCh
no
CFCh
Ch
tEL 1
tEL 2
tEL 3
tEL 4
Fine no/Si no
Antipanage moteurs
- Non activé
- Antipanage activé avec temps ajouté réglable 0 – 120 s.
Entrée de STOP
- L’entrée est désactivée: la commande d’ arrêté n’est pas captée
- La commande d'arrêt arrêté le por tail: le START suivant inverse le mouvement
- La commande d’ arrêt arrêté le por tail: le START suivant n’inverse pas le
mouvement
Entrée photo 1
- Désactivé
- Fonctionne comme cellule photoélectrique active en ouverture ou fermeture
- Fonctionne comme barre palpeuse
Entrée photo 2
- Désactivé
- Fonctionne cellule photoélectrique active en fermeture et avec portail arrêté
- Fonctionne cellule photoélectrique active uniquement en fermeture
Entrée radio associée à la commande START
Entrée radio associée à la commande START P.
Entrée radio associée à la commande STOP
Entrée radio associée aux lumières de service
Fin programmation
Page 44

42
NOTA
Page 45

43
INHALT
WICHTIGE HINWEISE . . . . . . . . . . . . . . . . . . . . . . . . . . . . . . . . . . . . . . . . . . . . . . . . . . . . . . . . . . . . . . . . . . . .44
ÜBEREINSTIMMUNG MIT DEN NORMEN . . . . . . . . . . . . . . . . . . . . . . . . . . . . . . . . . . . . . . . . . . . . . . . . . . . . . . .44
BESCHREIBUNG DER STEUERZENTRALE . . . . . . . . . . . . . . . . . . . . . . . . . . . . . . . . . . . . . . . . . . . . . . . . . . . . . . .44
TECHNISCHE EIGENSCHAFTEN . . . . . . . . . . . . . . . . . . . . . . . . . . . . . . . . . . . . . . . . . . . . . . . . . . . . . . . . . . . . .45
ANSCHLÜSSE AM KLEMMENBRETT . . . . . . . . . . . . . . . . . . . . . . . . . . . . . . . . . . . . . . . . . . . . . . . . . . . . . . . . . .45
INTERPRETATION DER LEUCHTANZEIGE (WARNING LIGHT) . . . . . . . . . . . . . . . . . . . . . . . . . . . . . . . . . . . . . . . . . . .45
STEUERTAFEL . . . . . . . . . . . . . . . . . . . . . . . . . . . . . . . . . . . . . . . . . . . . . . . . . . . . . . . . . . . . . . . . . . . . . . . . .46
PROGRAMMIERUNG . . . . . . . . . . . . . . . . . . . . . . . . . . . . . . . . . . . . . . . . . . . . . . . . . . . . . . . . . . . . . . . . . . . . .46
FUNKTION DER TASTEN MENÜ, UP, DOWN . . . . . . . . . . . . . . . . . . . . . . . . . . . . . . . . . . . . . . . . . . . . . . . . . . . . .46
VOREINGESTELLTE PROGRAMMIERUNG (DEFAULT) . . . . . . . . . . . . . . . . . . . . . . . . . . . . . . . . . . . . . . . . . . . . . . . .47
ZEIT DER ÖFFNUNG FLÜGEL 1 . . . . . . . . . . . . . . . . . . . . . . . . . . . . . . . . . . . . . . . . . . . . . . . . . . . . . . . . . . . . . .47
ZEIT DER ÖFFNUNG FLÜGEL 2 . . . . . . . . . . . . . . . . . . . . . . . . . . . . . . . . . . . . . . . . . . . . . . . . . . . . . . . . . . . . . .47
ZEIT DER ÖFFNUNG DES FUSSGÄNGERDURCHGANGS . . . . . . . . . . . . . . . . . . . . . . . . . . . . . . . . . . . . . . . . . . . . .47
ZEIT DES SCHLIESSENS FLÜGEL 1 . . . . . . . . . . . . . . . . . . . . . . . . . . . . . . . . . . . . . . . . . . . . . . . . . . . . . . . . . .47
ZEIT DES SCHLIESSENS FLÜGEL 2 . . . . . . . . . . . . . . . . . . . . . . . . . . . . . . . . . . . . . . . . . . . . . . . . . . . . . . . . . .47
ZEIT DES SCHLIESSENS DES FUSSGÄNGERDURCHGANGS . . . . . . . . . . . . . . . . . . . . . . . . . . . . . . . . . . . . . . . . . .47
ZEIT DES SCHLIESSENS FLÜGEL 2 IM FUSSGÄNGERZYKLUS . . . . . . . . . . . . . . . . . . . . . . . . . . . . . . . . . . . . . . . .47
VERZÖGERUNG DES FLÜGELS BEIM ÖFFNEN . . . . . . . . . . . . . . . . . . . . . . . . . . . . . . . . . . . . . . . . . . . . . . . . . . .48
VERZÖGERUNG DES FLÜGELS BEIM SCHLIESSEN . . . . . . . . . . . . . . . . . . . . . . . . . . . . . . . . . . . . . . . . . . . . . . . .48
ZEITEINSTELLUNG SPERRE . . . . . . . . . . . . . . . . . . . . . . . . . . . . . . . . . . . . . . . . . . . . . . . . . . . . . . . . . . . . . . . .48
ZEITEINSTELLUNG VORLAUF SPERRE . . . . . . . . . . . . . . . . . . . . . . . . . . . . . . . . . . . . . . . . . . . . . . . . . . . . . . . . .48
ZEITEINSTELLUNG WIDDERSTOSS . . . . . . . . . . . . . . . . . . . . . . . . . . . . . . . . . . . . . . . . . . . . . . . . . . . . . . . . . . .48
ZEITEINSTELLUNG VORZEITIGES BLINKSIGNAL . . . . . . . . . . . . . . . . . . . . . . . . . . . . . . . . . . . . . . . . . . . . . . . . . .48
BREMSZEIT . . . . . . . . . . . . . . . . . . . . . . . . . . . . . . . . . . . . . . . . . . . . . . . . . . . . . . . . . . . . . . . . . . . . . . . . . . .48
ZEIT FÜR SCHNELLES SCHLIESSEN NACH DEM BREMSEN IN DER SCHLIESSPHASE . . . . . . . . . . . . . . . . . . . . . . . .49
MOTORENLEISTUNG . . . . . . . . . . . . . . . . . . . . . . . . . . . . . . . . . . . . . . . . . . . . . . . . . . . . . . . . . . . . . . . . . . . . .49
ANLAUF . . . . . . . . . . . . . . . . . . . . . . . . . . . . . . . . . . . . . . . . . . . . . . . . . . . . . . . . . . . . . . . . . . . . . . . . . . . . .49
START IN DER ÖFFNUNGSPHASE . . . . . . . . . . . . . . . . . . . . . . . . . . . . . . . . . . . . . . . . . . . . . . . . . . . . . . . . . . . .49
START IN DER SCHLIESSPHASE . . . . . . . . . . . . . . . . . . . . . . . . . . . . . . . . . . . . . . . . . . . . . . . . . . . . . . . . . . . . .49
START IM MODUS PAUSE . . . . . . . . . . . . . . . . . . . . . . . . . . . . . . . . . . . . . . . . . . . . . . . . . . . . . . . . . . . . . . . .49
START FUSSGÄNGERDURCHGANG IN ÖFFNUNGSPHASE . . . . . . . . . . . . . . . . . . . . . . . . . . . . . . . . . . . . . . . . . . . .50
FOTOZELLE IM MODUS PAUSE . . . . . . . . . . . . . . . . . . . . . . . . . . . . . . . . . . . . . . . . . . . . . . . . . . . . . . . . . . . . . .50
AUTOMATISCHES SCHLIESSEN . . . . . . . . . . . . . . . . . . . . . . . . . . . . . . . . . . . . . . . . . . . . . . . . . . . . . . . . . . . . .50
BELEUCHTUNG . . . . . . . . . . . . . . . . . . . . . . . . . . . . . . . . . . . . . . . . . . . . . . . . . . . . . . . . . . . . . . . . . . . . . . . .50
BLINKSIGNAL IM MODUS PAUSE . . . . . . . . . . . . . . . . . . . . . . . . . . . . . . . . . . . . . . . . . . . . . . . . . . . . . . . . . . . .51
BLINKSIGNAL . . . . . . . . . . . . . . . . . . . . . . . . . . . . . . . . . . . . . . . . . . . . . . . . . . . . . . . . . . . . . . . . . . . . . . . . .51
TIMER . . . . . . . . . . . . . . . . . . . . . . . . . . . . . . . . . . . . . . . . . . . . . . . . . . . . . . . . . . . . . . . . . . . . . . . . . . . . . .51
GLEITSCHUTZ MOTOREN . . . . . . . . . . . . . . . . . . . . . . . . . . . . . . . . . . . . . . . . . . . . . . . . . . . . . . . . . . . . . . . . .51
EINGANG STOP . . . . . . . . . . . . . . . . . . . . . . . . . . . . . . . . . . . . . . . . . . . . . . . . . . . . . . . . . . . . . . . . . . . . . . . .52
EINGANG FOTO 1 . . . . . . . . . . . . . . . . . . . . . . . . . . . . . . . . . . . . . . . . . . . . . . . . . . . . . . . . . . . . . . . . . . . . . . .52
EINGANG FOTO 2 . . . . . . . . . . . . . . . . . . . . . . . . . . . . . . . . . . . . . . . . . . . . . . . . . . . . . . . . . . . . . . . . . . . . . . .52
FUNKTIONSTEST DER FOTOZELLEN . . . . . . . . . . . . . . . . . . . . . . . . . . . . . . . . . . . . . . . . . . . . . . . . . . . . . . . . . .52
EINGÄNGE FUNK . . . . . . . . . . . . . . . . . . . . . . . . . . . . . . . . . . . . . . . . . . . . . . . . . . . . . . . . . . . . . . . . . . . . . . .53
EINGABE DER GEWÜNSCHTEN CODES IN DEN SPEICHER . . . . . . . . . . . . . . . . . . . . . . . . . . . . . . . . . . . . . . . . . . .53
ÄNDERN EINES CODES . . . . . . . . . . . . . . . . . . . . . . . . . . . . . . . . . . . . . . . . . . . . . . . . . . . . . . . . . . . . . . . . . .53
ENDE PROGRAMMIERUNG . . . . . . . . . . . . . . . . . . . . . . . . . . . . . . . . . . . . . . . . . . . . . . . . . . . . . . . . . . . . . . . .53
FUNKTIONSÜBERSICHT PD1 . . . . . . . . . . . . . . . . . . . . . . . . . . . . . . . . . . . . . . . . . . . . . . . . . . . . . . . . . . . . . .54
Page 46

44
WICHTIGE HINWEISE
Für tecnische Erläuterungen oder Installtionsprobleme
verfügt die Firma V2 ELETTRONICA über einen
Kundendienst, der zu Bürozeiten unter der Telefonnummer
(+39) 01 72 81 24 11 erreicht werden kann.
Die Firma V2 ELETTRONICA behält sich das Recht vor, das
Produkt ohne vorherige Ankündigungen abzuändern; die
Übernahme der Haftung für Schäden an Personen oder
Sachen, die auf einen unsachgemäßen Gebrauch oder eine
fehlerhafte Installation zurückzuführen sind, wird abgelehnt.
Um die Steuerung PD1 fehlerfrei zu installieren und
programmieren zu können, lesen Sie bitte diese
Bedienungsanleitung sehr aufmerksam durch.
•Diese Bedienungsanleitung ist nur für Fachtechniker, die
auf Installationen und Automationen von Toren spezialisier t sind.
• Keine Information dieser Bedienungsanleitung ist für
den Endbenutzer nützlich.
• Jede Programmierung und/oder jede Wartung sollte nur
von geschulten Technikern vorgenommen werden.
Die Steuerung PD1 treibt elektromechanische Antriebe (ein
oder zwei) für Schwingtore und Schwingtüren an. Jedwelche
andere Nutzung ist nicht vorgesehen oder beabsichtigt.
DIE AUTOMATISIERUNG MUSS IN ÜBEREINSTIMMUNG MIT
DEN GELTENDEN EUROPÄISCHEN NORMEN ERFOLGEN:
EN 60204 –1 (Sicherheit der Maschine elektrische
Ausrüstungen von Maschinen, Teil 1: allgemeine
Anforderungen)
EN 12445 (Nutzungssicherheit kraftbetätigter Tore
prüfverfahren)
EN 12453 (Nutzungssicherheit kraftbetätigter Tore
Anforderungen)
• Der Installateur muss eine Vorrichtung (z.B.
thermomagn. Schalter) anbringen, die die Trennung aller
Pole des Geräts zum Versorgungsnetz garantiert.
Die Norm verlangt eine Trennung der Kontakte von
mindestens 3 mm an jedem Pol (EN 60335-1).
• Für den Anschluss von Rohren und Schläuchen oder
Kabeldurchgängen sind Verbindungen zu verwenden, die
dem Sicherungsgrad IP44 entsprechen.
• Die Installation erfordert Kenntnisse auf den Gebieten
der Elektrik und Mechanik; sie darf ausschließlich von
kompetentem Personal durchgeführt werden, welches
berechtigt ist, eine vollständige Konformitätserklärung
vom Typ A auszustellen (Maschinenrichtlinie
89/392EWG, Anlage IIA).
• Für automatisch betriebene Rolltore ist die Einhaltung
der folgenden Normen obligatorisch: EN 12453,
EN 12445, EN 12978 und alle eventuell geltenden,
regionalen Vorschriften.
• Auch die elektrische Anlage der Automatik muss den
geltenden Normen genügen, und fachgerecht installiert
werden.
•Die Schubkraft des Torflügels muss mit Hilfe eines
geeigneten Instruments gemessen, und entsprechend
den in Richtlinie EN 12453 definierten Höchstwerten
eingestellt werden.
• Es wird empfohlen, in der Nähe der Automatik einen
Notaus-Schalter zu installieren (mit Anschluss an en
Eingang STOP der Steuerkarte), so dass bei Gefahr ein
unverzügliches Halten des Tors bewirkt werden kann.
•Verbinden Sie den Erdungsdraht der Antriebe mit der
Erdleitung der Zuleitung.
ÜBEREINSTIMMUNG MIT DEN NORMEN
Die V2 ELETTRONICA SPA erklärt die EC-Konformität der
Steuerung PD1 mit der durch die EG-Richtlinie 93/68/EEC,
73/23/EEC, festgelegten wesentlichen Erfordernissen. Für
die Konformität-skontrolle wurden die
folgenden technischen Normen angewandt:
EN 60335–1: SICHERHEIT ELEKTRIK
EN 50081–1, EN 50081–2: ELEKTROMAGNETISCHE
KOMPATIBILITÄT
Racconigi, den 15.10.01
Der Rechtsvertreter der V2 ELETTRONICA SPA
A.Livio Costamagna
BESCHREIBUNG DER STEUERZENTRALE
Die digitale Zentrale PD1 ist ein innovatives Produkt der
V2 ELETTRONICA, welches Sicherheit und Zuverlässigkeit für
die Automatisierung von Toren mit einem oder zwei Flügeln
garantiert. In der Planungsphase der Zentrale PD1
zielte man auf die Realisierung eines Produkts ab, das sich
an jeden Bedarf indiV2ll anpasst und so konnte eine Zentrale
realisiert werden, die sich durch eine außerordentliche Vielfalt
auszeichnet, sowie allen Anforderungen für eine zweckmäßige
und effiziente Installation gerecht wird.
Die PD1 ist mit einem Display ausgerüstet, welches außer
der erleichterten Programmierung eine konstante
Statusüberwachung der Eingänge gestattet; der Aufbau mit
Menüstruktur ermöglicht ferner die anwenderfreundliche
Einstellung der Betriebszeiten und der einzelnen Funktionen.
In Konformität mit den EU-Richtlinien bezüglich der
Sicherheit elektrischer Anlagen und elektromagnetischer
Kompatibilität (EN 60335-1, EN 50081-1 e EN 50082-1)
verfügt die Zentrale über die vollständige elektrische
Isolierung der Digitalschaltung vom Kraftstromkreis.
Weitere Charakteristiken:
• Automatische Kontrolle der stromlosen Kommmutation
der Relais'.
• Leistungsregelung mit Frequenznivellierung.
• Ausgang für Leuchtanzeige des aktuellen Arbeitsstatus
des Tores.
•Hilfsrelais mit programmierbarer Logik für
Innenbeleuchtung und andere Verwendungen.
Das Vorhandensein einer Buchse mit chnellsteckverbindung
gestattet den Anschluss eines Empfängermoduls der Serie
MT 433 mit hochsensiblem Überlagerungsempfang.
Page 47

45
ACHTUNG: Vor den folgenden Operationen
trennen Sie bitte die Steuerung vom Stromnetz.
Achten Sie auf die Richtung, in der Sie die ausziehbaren Module einfügen.
EINSTECKEN DES EMPFANGSMODULS MT433
INTERPRETATION DER
LEUCHTANZEIGE (WARNING LIGHT)
Die Leuchtanzeige (warning light), wenn installiert,
zeigt den Status des Tores in Echtzeit an, durch die
Art des jeweiligen Blinksignals werden die vier
verschiedenen Zustände unterschieden:
STOP Anzeige ausgeschaltet
IN PAUSE Anzeige leuchtet dauerhaft
ÖFFNUNG langsames Blinksignal (2Hz)
SCHLIESSEN schnelles Blinksignal (4Hz)
ANSCHLÜSSE AM KLEMMENBRETT
TECHNISCHE EIGENSCHAFTEN
Versorgung 230 VAC 50 / 60 Hz
Maximale Motorbelastung 700 W
Max. Belastung des Zubehörs mit 24V 10 W
Betriebstemperatur -20°C ÷ 60°C
Schutzsicherungen F1 = 5 A for line 230 VAC
Ausmaße 295 x 230 x 100 mm
Gewicht 1600 g
Schutzart IP55
1.
2.
3.
4.
5.
6.
7.
8.
9.
10.–11.
11.–12.
13.–14.
14.–15.
16.–17.
18.–19.
20.
21.
22.
23.
24.
25.
26.
27.
Zentrale Antenne.
Entstörung Antenne.
Öffnungsbefehl für die Anschlüsse
der traditioneller
Steuervorrichtungen mit
Öffnungskontakt, TTNC, VRD.
Öffnungsbefehl Fußgängerdurchgang für die Anschlüsse der
traditioneller Steuervorrichtungen
mit Öffnungskontakt, TTNC, VRD.
Befehl STOP. Kontakt i.d.R.
geschlossen
Allgemein (-).
Fotozelle 1. Kontakt i.d.R.
geschlossen
Fotozelle 2. Kontakt i.d.R.
geschlossen
Allgemein (-).
Versorgungsausgang 24 VAC für
Fotozellen und anderes Zubehör
Versorgung TX Fotozellen für den
Funktionstest
Elektrosperre 12 VAC
Leuchtanzeige 24 VAC 3 W
Kontakt für Beleuchtung 230 VAC
10 A
Warnleuchte 230 VAC 40 W
Versorgungsausgang 230 VAC für
Motor 2 in Öffnungsphase
Allgemein Motor 2.
Versorgungsausgang 230 VAC für
Motor 2 in Schließphase
Versorgungsausgang 230 VAC für
Motor 1 in Öffnungsphase
Allgemein Motor 1
Versorgungsausgang 230 VAC für
Motor 1 in Schließphase
Nulleiter Versorgung 230 VAC
Phase Versorgung 230 VAC
ACHTUNG: um die maximale Funkübertragung zu
versichern, ist es ratsam, die äußere Antenne
ANS433 zu benutzen.
Page 48

46
STEUERTAFEL
Stellen Sie bitte alle Verbindungen am Klemmenbrett her
und schalten Sie die Stromversorgung ein: Die Zentrale
prüft daraufhin das korrekte Funktionieren des Displays,
sichtbar durch das Aufleuchten aller Segmente für 1,5
Sekunden 8.8.8.8 , sofort im Anschluss wird auf dem
Display die Version der Firmware für deine Dauer von 1,5
Sekunden, zum Beispiel Pr 2.8, angezeigt. Das Display
visualisiert die Steuertafel:
Die Steuertafel zeigt den Status der Kontakte am
Klemmenbrett, sowie der Programmiertasten an: Leuchtet
das vertikale Segment rechts oben, ist der Kontakt
geschlossen; leuchtet das vertikale Segment unten, ist er
geöffnet (die obenstehende Zeichnung veranschaulicht den
Fall, in dem die Eingänge START, START P, FOTO1, FOTO2
und STOP alle korrekt angeschlossen sind).
FUNKTION „AUTO POWER-OFF": während der
Programmierung; 50 Sekunden nach dem letztem
Dazwischentreten geht das Display aus (Stand-by).
Bei der ersten Änderung eines der Eingänge (START, START P,
FOTO1, FOTO2, STOP) und bei dem ersten Radioempfang
eines Codes, schaltet das Display sich ein.
Wenn man eine der drei Tasten (MENU, UP, DOWN) drückt,
bleibt das Display für 50 Sekunden eingeschaltet.
PROGRAMMIERUNG
Die Zentrale PD1 ermöglicht die Programmierung mit
Menüstruktur, wobei jedes Menü einer Funktion der Zentrale
(Funktionsmenü) entspricht oder der Einstellung einer
Betriebszeit (Zeitmenü) dient.
Die Zeitmenüs gestatten die Regulierung der Betriebszeiten
der Zentrale (zum Beispiel: Zeit für das Öffnen und Schließen
der Flügel, Zeit für die Sperrung oder das vorzeitige
Blinksignal, usw.) und können zwischen 0 und 120
Sekunden mit einem Takt von jeweils ±0,5 Sekunden
reguliert werden.
Die Funktionsmenüs hingegen ermöglichen die Aktivierung
der gewünschten Funktionen (zum Beispiel taktgesteuerte
Innenleuchten, FOTO 1 aktiv als mobile Schranke, FOTO 2
deaktiviert, usw.).
Einige der Zeitmenüs hängen direkt von den Einstellungen
der Funktionsmenüs ab (zum Beispiel wenn das AUTOMATISCHE
SCHLIESSEN aktiviert ist, ist die Einstellung einer
PAUSENDAUER erforderlich, ist die Funktion nicht aktiv,
erübrigt sich die zugehörige Zeiteinstellung). Um die
Programmierung zu vereinfachen, wurden die Zeitmenüs als
Unterkategorien in die Funktionsmenüs integriert, von denen
sie abhängen. Insbesondere die Menüs AUTOMATISCHES
SCHLIESSEN (Ch.AU), GLEITSCHUTZ (ASM) und FOTOZELLE
PAUSE (Ft.PA) sind unter den wählbaren Optionen der
"Zeitmenüs" zu finden.
FUNKTION DER TASTEN
MENU, UP, DOWN
Um den Programmiermodus zu aktivieren, gehen Sie bitte
wie folgt vor:
• Ist die Zentrale an die Spannungsversorgung
angeschlossen, zeigt das Display die Steuertafel
(überzeugen Sie sich, dass alle Anschlüsse korrekt sind).
• Halten Sie die Taste MENÜ so lange gedrückt, bis auf
dem Display die Anzeige dEF erscheint.
Der Programmiermodus ist somit aktiviert: Wird innerhalb der
folgenden Minute keine Operation ausgeführt, kehrt die
Zentrale automatisch zur Anzeige der Steuertafel zurück.
When the program mode function is activated, press key UP
or DOWN to select the menus, thus performing a forward or
backward shift (for a fast shift, press and hold).
Wenn der Programmierungsmodus aktiv ist, drücken Sie die
Taste UP oder die Taste DOWN zur Auswahl des Menüs,
wobei Sie sich schrittweise jeweils um ein Menü vor oder
zurück bewegen (für einen schnellen Vorlauf halten Sie bitte
die Taste gedrückt). Drücken Sie die Taste MENÜ, um auf
die jeweiligen Einstellungen zuzugreifen, die dann wiederum
mittels der Tasten UP und DOWN modifiziert werden können.
• Durch Drücken der Taste UP bewegen Sie sich innerhalb
des Funktionsmenüs von unten nach oben.
• Durch Drücken der Taste DOWN bewegen Sie sich
innerhalb der Funktionen von oben nach unten .
• Durch Drücken der Taste MENÜ können Sie auf die
jeweils zu ändernden Einstellungen zugreifen und die
neuen Werte durch erneuten Druck auf die Taste bestätigen.
ACHTUNG: Ist der Programmiermodus nicht aktiv, entspricht
der Druck auf die Taste UP dem Befehl START und der
Druck auf die Taste DOWN dem Befehl START
FUSSGÄNGERDURCHGANG: Auf diese Weise kann der
Installateur die Prüfung und Feinregulierung vornehmen.
Die Funktion der Zentrale PD1 kann in zwei
verschiedenen Modalitäten definiert werden:
VOREINGESTELLTE PROGRAMMIERUNG (DEFAULT) oder
BENUTZERDEFINIERTE PROGRAMMIERUNG.
In den folgenden Seiten finden Sie ein Schaubild mit
Funktionen der Steuerung PD1 und weitere technischen
Informationen. Wenden Sie das Schaubild wie folgt an:
•Wenn Sie die Taste „DOWN“ drücken, können Sie das
Schaubild von oben nach unten überfliegen und finden
Sie die Funktionen Def, t.AP1, t.AP2 usw.
• Mit der Taste „UP“ kann man das Schaubild von unten
nach oben überfliegen.
•Mit der Taste „MENU“ kann man das Schaubild horizontal
überfliegen. ZUM BEISPIEL: wenn die Funktion t.ChP
visualisiert ist, können Sie beim Druck der Taste mit der
Taste UP inkrementieren oder mit der Taste DOWN
dekrementieren. Mit einem weiteren Druck der Taste
„MENU“ wird die Funktion t.ChP nochmals visualisiert.
DOWN MENU UP
Page 49

47
Diese Art der Programmierung gestattet, das vordefinierte
Programm der V2 ELETTRONICA in den Speicher zu laden: Die
automatisch eingegebenen Standarddaten sind in der
zusammenfassenden Übersicht in der Anlage unten aufgezählt
(Spalte DEFAULT-DATEN).
• Drücken Sie die Taste MENU, auf dem Display erscheint no.
• Drücken Sie UP oder DOWN, auf dem Display erscheint si.
• Drücken Sie die Taste MENU zur Bestätigung, auf dem Display
erscheint dEF.
ZEIT DER ÖFFNUNG FLÜGEL 1
Dieser Wert ist von 0 bis 120 Sekunden einstellbar (±0,5) und
bestimmt die Zeit in der sich der Flügel 1 öffnet.
ZEIT DER ÖFFNUNG FLÜGEL 2
Dieser Wert ist von 0 bis 120 Sekunden einstellbar (±0,5) und
bestimmt die Zeit in der sich der Flügel 2 öffnet.
ZEIT DER ÖFFNUNG DES FUSSGÄNGERDURCHGANGS
Dieser Wert ist von 0 Sekunden bis t.AP1 (±0,5) einstellbar und
bestimmt die Zeit in der sich das Tor des Fußgängerdurchgangs
öffnet.
ZEIT DES SCHLIESSENS FLÜGEL 1
Dieser Wert ist von 0 bis 120 Sekunden einstellbar (±0,5) und
bestimmt die Zeit in der sich der Flügel 1 schließt.
Um zu verhindern, dass der Flügel nicht vollständig schließt, sollte
die eingestellte Zeit länger als die der Öffnung t.AP1 sein.
ZEIT DES SCHLIESSENS FLÜGEL 2
Dieser Wert ist von 0 bis 120 Sekunden einstellbar (±0,5) und
bestimmt die Zeit, in der sich der Flügel 1 schließt.
Um zu verhindern, dass der Flügel nicht vollständig schließt, sollte
die eingestellte Zeit länger als die der Öffnung t.AP2 sein.
ZEIT DES SCHLIESSENS DES FUSSGÄNGERDURCHGANGS
Dieser Wert ist von 0 Sekunden bis t.Ch1 (±0,5) einstellbar und
bestimmt die Zeit, in der sich der Fußgängerdurchgang schließt.
Um zu verhindern, dass der Flügel nicht vollständig schließt, sollte
die eingestellte Zeit länger als die der Öffnung t.APP sein.
ZEIT DES SCHLIESSENS FLÜGEL 2 IM FUSSGÄNGERZYKLUS
Dieser Wert ist von 0 Sekunden bis t.ChP (±0,5) einstellbar und
bestimmt die Zeit, in der der Flügel 2 sich während der
Schließphase des Fußgängerdurchgangs schließt.
Page 50

48
VERZÖGERUNG DES FLÜGELS BEIM ÖFFNEN
Um ein Zusammenstoßen der Flügel in der Öffnungsphase zu
vermeiden, ist die Verzögerungszeit r.AP einzustellen. Der Wert ist
von 0 bis 120 Sekunden (±0,5) regulierbar. Auf diese Weise wird
die Öffnung von Flügel 2 im Vergleich zu Flügel 1 um die
eingestellte Zeit verzögert.
VERZÖGERUNG DES FLÜGELS BEIM SCHLIESSEN
Um ein Zusammenstoßen der Flügel in der Schließphase zu
vermeiden, ist die Verzögerungszeit r.Ch einzustellen. Der Wert ist
von 0 bis 120 Sekunden (±0,5) regulierbar. Auf diese Weise wird
das Schließen von Flügel 1 im Vergleich zu Flügel 2 um die
eingestellte Zeit verzögert.
ZEITEINSTELLUNG SPERRE
Im Augenblick, in dem die Öffnungsphase des Tors beginnt, regt
die Zentrale die Elektrosperre an, um diese zu lösen und die
Bewegung des Tors zu ermöglichen. Der Wert t.SEr bestimmt die
Dauer des Triggervorgangs, und kann zwischen 0 und 120
Sekunden (±0,5) eingestellt werden.
ZEITEINSTELLUNG VORLAUF SPERRE
Mit diesem Menü kann der Triggervorgang der Elektrosperre um
eine Zeit zwischen 0 Sekunden und t.SEr (±0,5) vorgezogen
werden. Während dieser vorzeitigen Anregungsphase bewegt sich
das Tor nicht, so dass das Lösen der Elektrosperre konstant
möglich ist.
ZEITEINSTELLUNG WIDDERSTOSS
Um zu vermeiden, dass das Tor zur Öffnungsphase übergeht
bevor die Elektrosperre gelöst ist, kann eine Inversionszeit von 0
bis 120 Sekunden (±0,5) eingestellt werden. Auf diese Weise wird
die Bewegungsrichtung der Flügel in Öffnungsphase für die
eingestellte Zeit umgekehrt und das Lösen der Sperre ermöglicht.
ZEITEINSTELLUNG VORZEITIGES BLINKSIGNAL
Mit diesem Menü kann ein vorzeitiges Blinksignal eingestellt
werden, das jeder Bewegung des Tores, sowohl in der Öffnungs, als
auch in der Schließphase vorangeht. Die Dauer des vorzeitigen
Blinksignals kann von 0 bis 120 Sekunden (±0,5) reguliert werden.
BREMSZEIT
Mit diesem Menü kann die Bremszeit des Tores von 0 bis 120
Sekunden (±1,5 s) eingestellt werden. Zur Einstellung gehen Sie
bitte wie folgt vor: Belassen Sie die Bremszeit zunächst auf dem
Wert 0 und überzeugen Sie sich, dass sich das Tor korrekt öffnet
und schließt. Anschließend stellen Sie die Bremszeit ein (zum
Beispiel 5 oder 6 Sekunden).
Page 51

49
ZEIT FÜR SCHNELLES SCHLIESSEN NACH DEM BREMSEN IN
DER SCHLIESSPHASE
Wird eine Bremszeit mit einem Wert ≠ 0 eingestellt, könnte die
Geschwindigkeit des Tores u.U. nicht ausreichend sein, um die
Sperre beim Schließen einrasten zu lassen. Aus diesem Grund
besteht die Möglichkeit, das Tor im Anschluss an die Bremsphase
mit normaler Geschwindigkeit (ohne Verlangsamung) in einer von 0
bis 120 Sekunden (±0,5) einstellbaren Zeit schließen zu lassen.
MOTORENLEISTUNG
Dieses Menü gestattet die Regulierung der Motorleistung von 30
bis 100% mit einem Takt von ±5 %.
ANLAUF
Beim Übergang des Tores vom Stillstand zur Bewegung muss eine
gewisse Anfangsträgheit überwunden werden. Ist das Tor sehr
schwer, kann dies dazu führen, dass die Bewegung nicht möglich
ist. Durch Aktivierung der Funktion ANLAUF kann die Anlaufträgheit
durch den Start der Motoren für 2 Sekunden auf Höchstpotenz
überwunden werden.
START IN DER ÖFFNUNGSPHASE
Mithilfe dieses Menüs können die Funktionen des Befehls START
in der Öffnungsphase festgelegt werden.
no der Befehl START wird ignoriert.
ChiU der Befehl START schlisst das Tor wieder.
PAUS der Befehl START stoppt das Tor und belässt es im Modus
PAUSE.
START IN DER SCHLIESSPHASE
Mithilfe dieses Menüs können die Funktionen des Befehls START
in der Schließphase festgelegt werden.
StoP der Befehl START stoppt das Tor und beendet so den
Zyklus.
APEr der Befehl START öffnet das Tor wieder.
START IM MODUS PAUSE
Mithilfe dieses Menüs können die Funktionen des Befehls START
im Modus Pause festgelegt werden.
ChiU der Befehl START schließt das Tor.
no der Befehl START wird ignoriert. Diese Einstellung dar f
nicht ausgewählt werden, wenn die Funktion des
automatischen Schließens nicht aktiv ist (Menü Ch.AU).
Page 52

50
START FUSSGÄNGERDURCHGANG IN ÖFFNUNGSPHASE
Mithilfe dieses Menüs können die Funktionen des Befehls START
P. in der Öffnungsphase festgelegt werden.
PAUS der Befehl START FUSSGÄNGER stoppt das Tor und bringt
es in den Modus Pause.
no der Befehl START FUSSGÄNGER wird ignoriert.
ChiU der Befehl START FUSSGÄNGER schließt das Tor.
FOTOZELLE IM MODUS PAUSE
Mithilfe dieses Menüs kann die Funktion der zwei
Fotozellen im Pausenmodus bestimmt werden.
rPAU das Verdunkeln der Fotozelle unterbricht die
Messung der Pausenzeit: Bei der Freigabe
beginnt die Zentrale erneut mit der Messung
der Zeit.
t.PCh das Verdunkeln der Fotozelle unterbricht die
Messung der Pausenzeit: Bei der Freigabe
schließt sich das Tor nach Ablauf einer von 0
bis 120 Sekunden einstellbaren Zeit.
Bei Auswahl der Funktion t.PCh erscheint auf dem
Display die Anzeige 5.0, stellen Sie die gewünschte
Zeit mithilfe der Tasten UP oder DOWN ein.
AUTOMATISCHES SCHLIESSEN
Diese Funktion gestattet die Auswahl zwischen halb und
vollautomatischem Arbeitsmodus. Im halbautomatischen
Modus verursacht der Befehl START oder START
FUSSGÄNGER die Öffnung des Tors, nach vollständiger
Öffnung bleibt das Tor unbeweglich bis zum nächsten
Startbefehl, der es wieder schließt. Im vollautomatischen
Modus beginnt mit dem Befehl START oder START
FUSSGÄNGER ein Zyklus: Das Tor öffnet sich für die
eingestellte Zeitdauer, stoppt dann und verbleibt im
BELEUCHTUNG
Der Ausgang COURTESY LIGHT der
Zentrale PD5 gestattet den
Anschluss einer Zusatzanwendung
(zum Beispiel die Beleuchtung der
Auffahrt oder des Gartens) die
automatisch durch Druck auf die
dafür vorgesehene Taste auf der
Fernbedienung aktiviert wird.
Modus Pause für die vorher regulierte Dauer (t.PAU), danach schließt es in der voreingestellten Zeit.
no die automatische Schließfunktion ist nicht aktiv, das Tor arbeitet im halbautomatischen Modus.
t.PAU die automatische Schließfunktion ist aktiv, die Dauer der Pause ist regulierbar von 0 bis 999 Sekunden.
WICHTIG: Wenn der automatische Schließvorgang nicht aktiviert ist, muss der Startbefehl im Modus Pause
freigegeben werden (Menü St.PA).
Page 53

51
TIMER
Mithilfe dieser Funktion können über die Dauer eines Tages
bestimmte Zeitintervalle vorprogrammiert werden, in denen sich
das Tor öffnen und schließen soll. Hierzu ist der Anschluss eines
24-Stunden-Timers an den i.d.R. offenen Kontakt in
Parallelschaltung zum START oder START FUSSGÄNGER
erforderlich. Schließt der Kontakt des Timers, geht das Tor in die
Öffnungsphase über und bleibt geöffnet, bis sich der Kontakt des
Timers öffnet und so den Schließvorgang des Tores auslöst.
WICHTIG: für die korrekte Funktion muss die Funktion des
automatischen Schließens aktiviert (Menü Ch.AU)
BLINKSIGNAL
Die Zentrale PD1 gestattet den Anschluss einer Warnleuchte, mit
oder ohne Blinksignal. Verfügt die Leuchte bereits über eine eigene Blinksignalfunktion, muss die Option "Si" ausgewählt werden;
ist dies nicht der Fall, wählen Sie bitte "no" um das Blinken zu
ermöglichen.
BLINKSIGNAL IM MODUS PAUSE
Mithilfe dieses Menüs kann die Blinkleuchte im Modus Pause
aktiviert oder deaktiviert werden.
Im ersten Fall kann das Schließen des Kontaktes N.a. durch den Befehl START oder START
FUSSGÄNGER (sowohl mittels Schlüssel, als auch mit der Fernbedienung) erfolgen; im zweiten Fall
durch Betätigen der auf dem Funkeingang tEL4 gespeicherten Fernbedienung, wobei der COURTESY
LIGHT zu einem Hilfsoutput wird, dem eine der folgenden Funktionen zugeordnet werden kann:
monostabile: aktiviert das Ausgangsrelais über die gesamte Zeitdauer der Übertragung durch die
Fernbedienung, wird diese unterbrochen, deaktiviert sich das Relais.
bistabile: aktiviert das Relais mit der ersten Signalübertragung durch die Fernbedienung, mit
der zweiten Übertragung wird es deaktiviert.
timer: Das Signal der Fernbedienung aktiviert das Relais, welches im Anschluss automatisch
nach einer von 0 bis 999 Sekunden regulierbaren Zeit wieder deaktiviert wird.
t.LUC die Beleuchtung schaltet sich für die einstellbare Dauer von 0 bis 999 Sekunden ein.
CiCL die Beleuchtung schaltet sich für die gesamte Zyklusdauer ein.
AUS Hilfsoutput mit einstellbarer Funktionslogik.
Wurde die Funktion AUS gewählt, erscheint auf dem Display eine der folgenden Anzeigen:
tiM Hilfsoutput mit Timer (Zeit einstellbar von 0 bis 999 Sek.).
biSt Relais des Hilfsoutputs mit bistabiler Funktion.
Mon Relais des Hilfsoutputs mit monostabiler Funktion,
GLEITSCHUTZ MOTOREN
Die Gleitschutzfunktion verhindert, dass die wiederholte
Unterbrechung des Arbeitszyklus beim Öffnen und
Schließen zu lange Zeiten für die Vervollständigung
des Zyklus zur Folge hat.
no Die Gleitschutzfunktion der Motoren ist nicht
aktiv.
t.AAS Die Gleitschutzfunktion der Motoren ist mit
einer von 0 bis 120 Sekunden regulierbaren
Zusatzzeit in der Öffnungs- oder Schließphase
aktiv.
Page 54

52
EINGANG STOP
Mithilfe dieses Menüs können die Funktionen festgelegt werden, die dem
Befehl STOP zugeordnet werden sollen.
no der Eingang STOP ist gesperrt.
ProS der Befehl STOP hält das Tor an, beim nächsten Befehl
START nimmt das Tor die Bewegung in der gleichen
Richtung wieder auf.
invE der Befehl STOP hält das Tor an, beim nächsten Befehl
START nimmt das Tor die Bewegung in der entgegenge
setzten Richtung auf.
ANMERKUNG: Im Modus Pause hält der Befehl STOP das Tor an, beim
nächsten Befehl START wird das Tor geschlossen.
EINGANG FOTO 1
Dieser Eingang kann für den Anschluss von zwei verschiedenen
Sicherheitsfunktionen verwendet werden: Eine Fotozelle oder Lichtschranke.
Die Lichtschranke (Kontakt i.d.R. geschlossen) ist eine Sicherheitsfunktion,
die während der Öffnungs und Schließphase des Tores aktiv ist (nicht
aktiv beim Widderstoß): Bei Signalempfang in der Öffnungsphase wird das
Tor gestoppt und die Laufrichtung der Motoren für eine Dauer von 4
Sekunden ohne Versetzen der Flügel invertiert. In der Schließphase
stoppt die Schranke das Tor und die Laufrichtung der Motoren für eine
Dauer von 4 Sekunden ohne Versetzen der Flügel invertiert. Die Fotozelle
1 (Kontakt i.d.R. geschlossen) ist eine Sicherheitsfunktion, die während
der Öffnungs- und Schließphase des Tores aktiv ist: Ein Signalempfang
der Fotozelle während der Schließphase stoppt das Tor, empfängt sie kein
Signal mehr, invertiert das Tor die Bewegungsrichtung.
EINGANG FOTO 2
Die Fotozelle 2 ist während des Schließvorgangs aktiv: Empfängt sie ein
Signal während das Tor sich schließt, wird dieses gestoppt und die
Bewegungsrichtung invertiert. Die Option CFCh aktivier t die Fotozelle
auch, wenn sich das Tor im Stillstand befindet: Stillstand versteht sich
derart, dass das Tor keinerlei Befehle empfangen hat, sich im
Pausenmodus befindet, bzw. nach Empfang des Befehls STOP. In diesem
Fall ignoriert die Zentrale während der gesamten Zeitdauer, in der die
Fotozelle verdunkelt wird, für alle Zyklen jeden Aktivierungsbefehl.
no der Eingang FOTO 2 ist gesperrt.
CFCh der Eingang FOTO 2 ist freigegeben, die Fotozelle 2 ist im
Schließvorgang und bei Stillstand des Tores aktiv.
Ch der Eingang FOTO 2 ist aktiv, die Fotozelle ist nur für den
Schließvorgang aktiv.
Bei der Öffnung stoppt ein Signalempfang der Fotozelle das Tor, empfängt sie kein Signal mehr, wird der
Öffnungsvorgang wieder aufgenommen.
no der Eingang FOTO 1 ist gesperrt.
APCh der Eingang FOTO 1 ist für den Anschluss der Fotozelle 1 freigegeben.
CoSt der Eingang FOTO 1 ist für den Anschluss der Lichtschranke freigegeben.
Page 55

53
EINGÄNGE FUNK
Jedem der gespeicherten Codes
wird einer der vier verfügbaren
Eingänge zugeordnet, so dass an
die Zentrale direkt der gewünschte
Befehl übermittelt werden kann.
Weiterhin besteht mittels einfacher
und schneller Einstellungsoptionen
die Möglichkeit, den Speicherinhalt
teilweise oder vollständig zu
löschen. Die Integration eines
modularen Empfängers, vom Typ
Super oder Quarz, gestattet die
Verwendung der vier Funkkanäle
tEL1, tEL2, tEL3, und tEL4, wobei
jedem von diesen ein Befehl der
Zentrale zugeordnet wird:
tEL1 START: Wird der zugehörige
Befehl an tEL1 übertragen, empfängt
die Zentrale einen Befehl START.
tEL2 START FUSSGÄNGER: Wird
der zugehörige Befehl an tEL2
übertragen, empfängt die Zentrale
einen Befehl START FUSSGÄNGER.
tEL3 STOP: Wird der zugehörige
Befehl an tEL3 übertragen
empfängt die Zentrale einen Befehl
STOP.
tEL4 BELEUCHTUNG: Wird der
zugehörige Befehl an tEL4
übertragen, aktiviert die Zentrale
den Ausgang BELEUCHTUNG.
ENDE DER PROGRAMMIERUNG
Mit diesem Menü kann der Programmiermodus verlassen
(voreingestellt oder benutzerdefiniert), und alle vorgenommenen
Änderungen gespeichert werden.
no weitere Änderungen vornehmen, die Programmierung nicht
beenden.
Si Änderungen abgeschlossen: Ende Programmierung.
DIE EINSTELLUNGEN WERDEN GESPEICHERT:
DIE ZENTRALE IST BETRIEBSBEREIT
EINGABE DER GEWÜNSCHTEN CODES IN DEN SPEICHER
Zum Speichern der Codes der zu verwendenden Fernbedienungen, beachten Sie bitte genau die folgende
Anleitung:
• Drücken Sie UP oder DOWN und wählen Sie den gewünschten Funkeingang, auf dem Display erscheint
die Anzeige (Beispiel): tEL1
• Drücken Sie die Taste MENU, auf dem Display erscheint die Anzeige trAS
Die Zentrale ist für den Funkempfang betriebsbereit:
• Drücken Sie die Taste der gewünschten Fernbedienung, bis auf dem Display die Anzeige rEC erscheint
und lassen sie daraufhin die Taste an der Fernbedienung los.
Die Zentrale ist bereit für die Eingabe neuer Codes.
ÄNDERN EINES CODES
Um einen zuvor gespeicherten Code durch einen anderen zu ersetzen, ist es hinreichend, die normale
Speicherprozedur mit einem neuen Code zu wiederholen. Der alte Code wird mit dem neuen überschrieben.
Page 56

54
DISPLAY DATEN BESCHREIBUNG DATEN MEMO
DEFAULT DATEN
dEF no/Si no
t.AP1 0 ÷ 120 s 22.5
t.AP2 0 ÷ 120 s 22.5
t.APP 0 ÷ t.AP1 6.0
t.Ch1 0 ÷ 120 s 23.5
t.Ch2 0 ÷ 120 s 23.5
t.ChP 0 ÷ t.Ch1 7.0
t.C2P 0 ÷ t.ChP 0.0
r.AP 0 ÷ 120s 1.0
r.Ch 0 ÷ 120s 3.0
t.SEr 0 ÷ 120s 3.0
t.ASE 0 ÷ t.SEr 0.0
t.inv 0 ÷ 120s 0.0
t.PrE 0 ÷ 120s 1.0
t.rAL 0 ÷ 120s 0.0
t.CvE 0 ÷ 120s 0.0
Pot. 30 ÷ 100% 40
SPUn no/Si Si
St.AP PAUS
no
ChiU
PAUS
St.Ch StoP
Stop
APEr
St.PA ChiU
no
ChiU
SP.AP PAUS
no
ChiU
PAUS
Ft.PA r. PAU
r.PAU
t.PCh
Ch.AU no
no
t.PAU
LUCi t.LUC=60s
CiCL
t.LUC
AUS
tiM
biSt
Mon
LP.PA no/Si no
In.LP no/Si no
OroL no/Si no
FUNKTIONSÜBERSICHT PD1
Laden der Standarddaten V2 ELETTRONICA
Öffnungszeit Flügel 1
Öffnungszeit Flügel 2
Öffnungszeit Fußgängerdurchgang
Schließzeit Flügel 1
Schließzeit Flügel2
Schließzeit Fußgängerdurchgang
Schließzeit Flügel 2 während des Schließens des Fußgängerdurchgangs
Ver zögerung des Flügels in Öffnungsphase
Ver zögerung des Flügels in Schließphase
Zeit für Sperren
Zeit für Voreilung der Sperrung
Zeit Widderstoß
Dauer des vorzeitigen Blinksignals
Bremszeit
Schnelles Schließen nach Verlangsamung während des Schließvorgangs
Motorleistung
Start der Motoren mit Höchstleistung
Start bei Öffnen
- Der Befehl START wird ignoriert
- Das Tor schließt sich
- Das Tor verbleibt im Modus Pause
Start bei Schließen
- Das Tor vollendet den Zyklus
- Das Tor öffnet sich
Start in Pause
- Der Befehl START wird ignoriert
- Das Tor schließt sich
Start Fußgängerdurchgang bei Öffnen
- Der Befehl START FUSSGÄNGER wird ignoriert
- Das Tor schließt sich
- Das Tor verbleibt im Modus Pause
Fotozelle im Modus Pause
- Dauer Pause neu laden
- Das Tor schließt sich nach Ablauf der eingestellten Zeit (0–120 s)
Automatisches Schließen
- Nicht aktiv
- Automatisches Schließen aktiv mit Pause 0 bis 999 Sek.
Beleuchtung
- Für den gesamten Zyklus eingeschaltet
- Mit Timer von 0 bis 999 s
- Hilfsoutput
- Hilfsoutput Relais mit Timer von 0 bis 999 s
- Hilfsoutput Relais doppelstabil
- Hilfsoutput Relais monostabil
Blinkleuchte in Pause
Intermittenleuchte
TIMER
Page 57

55
FUNKTIONSÜBERSICHT PD1
DISPLAY DATEN BESCHREIBUNG DATEN MEMO
DEFAULT DATEN
ASM t.AAS=2.0s
no
t.AAS
StoP no
no
invE
ProS
Fot 1 no
no
APCh
CoSt
Fot 2 CFCh
no
CFCh
Ch
tEL 1
tEL 2
tEL 3
tEL 4
Fine no/Si no
Gleitschutz Motoren
- Nicht aktiv
- Gleitschutz aktiv mit Zusatzzeit in Öffnungs- oder Schließphase, regulierbar
von 0 bis 120 Sek.
Input STOP
- Der Eingang ist gesperrt: Der Befehl STOP wird ignoriert
- Der Befehl STOP stoppt das Tor: der folgende START invertiert die
Bewegungsrichtung
- Der Befehl STOP stoppt das Tor: Der folgende START invertiert die
Bewegungsrichtung nicht
Input FOTO 1
- Gesperrt
- Fotozelle bei Öffnen und Schließen aktiv
- Fotozelle nur bei Schließen aktiv
Input FOTO 2
- Gesperrt
- Fotozelle bei Schließen und Stillstand des Tores aktiv
- Fotozelle nur bei Schließen aktiv
Funkeingang für Befehl START
Funkeingang für Befehl START P.
Funkeingang für Befehl STOP
Funkeingang für Befehl Beleuchtung
Ende der Programmierung
Page 58

56
BEMERKUNGEN
Page 59

57
ÍNDICE
ADVERTENCIAS IMPORTANTES . . . . . . . . . . . . . . . . . . . . . . . . . . . . . . . . . . . . . . . . . . . . . . . . . . . . . . . . . . . . .58
CONFORMIDAD A LAS NORMATIVAS . . . . . . . . . . . . . . . . . . . . . . . . . . . . . . . . . . . . . . . . . . . . . . . . . . . . . . . . . .58
DESCRIPCION DEL CUADRO . . . . . . . . . . . . . . . . . . . . . . . . . . . . . . . . . . . . . . . . . . . . . . . . . . . . . . . . . . . . . . .58
CARACTERÍSTICAS TÉCNICAS . . . . . . . . . . . . . . . . . . . . . . . . . . . . . . . . . . . . . . . . . . . . . . . . . . . . . . . . . . . . . .59
CONEXIONES DE LAS REGLETAS . . . . . . . . . . . . . . . . . . . . . . . . . . . . . . . . . . . . . . . . . . . . . . . . . . . . . . . . . . . .59
LA LÁMPARA PILOTO (warning ligth) . . . . . . . . . . . . . . . . . . . . . . . . . . . . . . . . . . . . . . . . . . . . . . . . . . . . . . . . . .59
PANEL DE CONTROL . . . . . . . . . . . . . . . . . . . . . . . . . . . . . . . . . . . . . . . . . . . . . . . . . . . . . . . . . . . . . . . . . . . . .60
PROGRAMACIÓN . . . . . . . . . . . . . . . . . . . . . . . . . . . . . . . . . . . . . . . . . . . . . . . . . . . . . . . . . . . . . . . . . . . . . . .60
FUNCIÓN DE LAS TECLAS MENÚ, UP, DOWN . . . . . . . . . . . . . . . . . . . . . . . . . . . . . . . . . . . . . . . . . . . . . . . . . . .60
PROGRAMACIÓN POR DEFECTO (DEFAULT) . . . . . . . . . . . . . . . . . . . . . . . . . . . . . . . . . . . . . . . . . . . . . . . . . . . . .61
TIEMPO APERTURA HOJA 1 . . . . . . . . . . . . . . . . . . . . . . . . . . . . . . . . . . . . . . . . . . . . . . . . . . . . . . . . . . . . . . . .61
TIEMPO APERTURA HOJA 2 . . . . . . . . . . . . . . . . . . . . . . . . . . . . . . . . . . . . . . . . . . . . . . . . . . . . . . . . . . . . . . . .61
TIEMPO APERTURA HOJA PEATONAL . . . . . . . . . . . . . . . . . . . . . . . . . . . . . . . . . . . . . . . . . . . . . . . . . . . . . . . . . .61
TIEMPO CIERRE HOJA 1 . . . . . . . . . . . . . . . . . . . . . . . . . . . . . . . . . . . . . . . . . . . . . . . . . . . . . . . . . . . . . . . . . .61
TIEMPO CIERRE HOJA 2 . . . . . . . . . . . . . . . . . . . . . . . . . . . . . . . . . . . . . . . . . . . . . . . . . . . . . . . . . . . . . . . . . .61
TIEMPO CIERRE HOJA PEATONAL . . . . . . . . . . . . . . . . . . . . . . . . . . . . . . . . . . . . . . . . . . . . . . . . . . . . . . . . . . . .61
TIEMPO DE CIERRE HOJA 2 DURANTE CICLO PEATONAL . . . . . . . . . . . . . . . . . . . . . . . . . . . . . . . . . . . . . . . . . . . .61
RETRASO DE LA HOJA EN APERTURA . . . . . . . . . . . . . . . . . . . . . . . . . . . . . . . . . . . . . . . . . . . . . . . . . . . . . . . . .62
RETRASO DE LA HOJA EN CIERRE . . . . . . . . . . . . . . . . . . . . . . . . . . . . . . . . . . . . . . . . . . . . . . . . . . . . . . . . . . .62
TIEMPO ELECTROCERRADURA . . . . . . . . . . . . . . . . . . . . . . . . . . . . . . . . . . . . . . . . . . . . . . . . . . . . . . . . . . . . . .62
TIEMPO ADELANTO ELECTROCERRADURA . . . . . . . . . . . . . . . . . . . . . . . . . . . . . . . . . . . . . . . . . . . . . . . . . . . . . .62
TIEMPO GOLPE DE INVERSIÓN . . . . . . . . . . . . . . . . . . . . . . . . . . . . . . . . . . . . . . . . . . . . . . . . . . . . . . . . . . . . .62
TIEMPO DE PREDESTELLO . . . . . . . . . . . . . . . . . . . . . . . . . . . . . . . . . . . . . . . . . . . . . . . . . . . . . . . . . . . . . . . .62
PARO SUAVE . . . . . . . . . . . . . . . . . . . . . . . . . . . . . . . . . . . . . . . . . . . . . . . . . . . . . . . . . . . . . . . . . . . . . . . . . .62
TIEMPO DE CIERRE RAPIDO DESPÚES DEL PARO SUAVE EN CIERRE . . . . . . . . . . . . . . . . . . . . . . . . . . . . . . . . . . .63
POTENCIA DE LOS MOTORES . . . . . . . . . . . . . . . . . . . . . . . . . . . . . . . . . . . . . . . . . . . . . . . . . . . . . . . . . . . . . .63
ARRANQUE . . . . . . . . . . . . . . . . . . . . . . . . . . . . . . . . . . . . . . . . . . . . . . . . . . . . . . . . . . . . . . . . . . . . . . . . . . .63
START EN APERTURA . . . . . . . . . . . . . . . . . . . . . . . . . . . . . . . . . . . . . . . . . . . . . . . . . . . . . . . . . . . . . . . . . . . .63
START EN CIERRE . . . . . . . . . . . . . . . . . . . . . . . . . . . . . . . . . . . . . . . . . . . . . . . . . . . . . . . . . . . . . . . . . . . . . .63
START EN PAUSA . . . . . . . . . . . . . . . . . . . . . . . . . . . . . . . . . . . . . . . . . . . . . . . . . . . . . . . . . . . . . . . . . . . . . . .63
START PEATONAL EN APERTURA . . . . . . . . . . . . . . . . . . . . . . . . . . . . . . . . . . . . . . . . . . . . . . . . . . . . . . . . . . . .64
FOTOCÉLULA EN PAUSA . . . . . . . . . . . . . . . . . . . . . . . . . . . . . . . . . . . . . . . . . . . . . . . . . . . . . . . . . . . . . . . . . .64
CIERRE AUTOMÁTICO . . . . . . . . . . . . . . . . . . . . . . . . . . . . . . . . . . . . . . . . . . . . . . . . . . . . . . . . . . . . . . . . . . . .64
LUCES DE GARAJE . . . . . . . . . . . . . . . . . . . . . . . . . . . . . . . . . . . . . . . . . . . . . . . . . . . . . . . . . . . . . . . . . . . . . .64
LÁMPARA DE SEÑALIZACIÓN EN PAUSA . . . . . . . . . . . . . . . . . . . . . . . . . . . . . . . . . . . . . . . . . . . . . . . . . . . . . . .65
LÁMPARA DE SEÑALIZACIÓN CON INTERMITENCIA . . . . . . . . . . . . . . . . . . . . . . . . . . . . . . . . . . . . . . . . . . . . . . . .65
FUNCIÓN TIMER . . . . . . . . . . . . . . . . . . . . . . . . . . . . . . . . . . . . . . . . . . . . . . . . . . . . . . . . . . . . . . . . . . . . . . .65
ANTIPATINAMIENTO MOTORES (Descuento de tiempo) . . . . . . . . . . . . . . . . . . . . . . . . . . . . . . . . . . . . . . . . . . . . .65
ENTRADA STOP . . . . . . . . . . . . . . . . . . . . . . . . . . . . . . . . . . . . . . . . . . . . . . . . . . . . . . . . . . . . . . . . . . . . . . . .66
ENTRADA FOTOCÉLULA 1 . . . . . . . . . . . . . . . . . . . . . . . . . . . . . . . . . . . . . . . . . . . . . . . . . . . . . . . . . . . . . . . . .66
ENTRADA FOTOCÉLULA 2 . . . . . . . . . . . . . . . . . . . . . . . . . . . . . . . . . . . . . . . . . . . . . . . . . . . . . . . . . . . . . . . . .66
TEST DE FUNCIONAMIENTO DE LAS FOTOCELULAS . . . . . . . . . . . . . . . . . . . . . . . . . . . . . . . . . . . . . . . . . . . . . . .66
ENTRADAS RADIO . . . . . . . . . . . . . . . . . . . . . . . . . . . . . . . . . . . . . . . . . . . . . . . . . . . . . . . . . . . . . . . . . . . . . .67
INSERCIÓN EN MEMORIA DE LOS CÓDIGOS DESEADOS . . . . . . . . . . . . . . . . . . . . . . . . . . . . . . . . . . . . . . . . . . . .67
FIN PROGRAMACIÓN . . . . . . . . . . . . . . . . . . . . . . . . . . . . . . . . . . . . . . . . . . . . . . . . . . . . . . . . . . . . . . . . . . . .67
TABLA FUNCIÓN PD1 . . . . . . . . . . . . . . . . . . . . . . . . . . . . . . . . . . . . . . . . . . . . . . . . . . . . . . . . . . . . . . . . . . . .68
Page 60

58
ADVERTENCIAS IMPORTANTES
Por cualquier problema técnico ponerse en contacto con el
servicio asistencia V2 ELETTRONICA TEL. (+39) 01 72 81 24 11
La V2 ELETTRONICA se reserva el derecho de aportar
eventuales modificaciones al producto sin previo aviso;
ademmás, no se hace responsable de danos a personas o
cosas debidos a un uso improprio o a una instalación errónea.
Antes de proceder en las installacion y la
programmacion es aconsejable leer bien las instrucciones.
• Dicho manual es destinado exclusivamente a técnicos
calificados en las installacione de automatismos.
• Ninguna de las informacciones contenidas en dicho
manual puede ser de utilidad para el usuario final.
• Cualquiera operacion de manutencion y programacion
tendrà que ser hecha para técnicos calificados en las
installacione de automatismos.
La PD1 es un cuadro de maniobra para cancelas
batientes de una o dos hojas. Todos otros empleos seran
considerados abusivos y entonces non conformes a las
normas vigentes.
LA AUTOMATIZACION DEBE SER REALIZADA EN
CONFORMIDAD A LAS VIGENTES NORMATIVAS EUROPEAS:
EN 60204–1 (Seguridad de la maquinaria. Equipamiento
electrico de las maquinas, partes 1: reglas generales).
EN 12445 (Seguridad en el uso de cierres
automatizados, metodos de prueba)
EN 12453 (Seguridad en el uso de cierres
automatizados, requisitos)
• El instalador debe proveer la instalación de un dispositivo
(ej. interruptor magnetotérmico) que asegure el
seccionamiento omnipolar del aparato de la red de
alimentación. La normativa requiere una separación de
los contactos de almenos 3 mm en cada polo (EN 60335-1).
• La instalación requiere competencias en el campo
eléctrico y mecánico; debe ser realizada únicamente por
personal cualificado en grado de expedir la declaración
de conformidad en la instalación (Directiva máquinas
89/392 CEE, anexo IIA).
• Es obligatorio atenerse a las siguientes normas para
cierres automatizados con paso de vehículos: EN 12453,
EN 12445, EN 12978 y a las eventuales prescripciones
nacionales.
• Incluso la instalación eléctrica antes de la automatización
debe responder a las vigentes normativas y estar
realizada correctamente.
• La regulación de la fuerza de empuje de la hoja debe
medirse con un instrumento adecuado y regulada de
acuerdo con los valores máximos admitidos por la
normativa EN 12453.
• Aconsejamos utilizar un pulsador de emergencia e
instalarlo en proximidad a la automatización (conectado
a la entrada STOP de la placa de comando) de modo que
sea posible el paro inmediato de la puerta en caso de
peligro.
• Conectar el cable de tierra de los motores a la tierra de
la red de alimentación.
CONFORMIDAD A LAS NORMATIVAS
V2 ELETTRONICA SPA declara que PD1 estan
conformes con los requisitos esenciales fijados por las
Directivas: 93/68/EEC, 73/23/EEC. Han sido aplicadas las
siguientes Normas técnicas para verificar la conformidad:
EN 60335–1: Seguridad Electrica
EN 50081–1, EN 50081–2: Compatibilidad
Electromagnetica
Racconigi, a 15 / 10 / 01
El representante legal de V2 ELETTRONICA SPA
A.Livio Costamagna
DESCRIPCION DEL CUADRO
El cuadro de maniobras digital PD1 es un innovador producto
V2 ELETTRONICA, que garantiza seguridad y fiabilidad para la
automatización de cancelas de una o dos hojas.
La proyectación del PD1 se ha dirigido a la realización de un
producto que se adapta a todas las exigencias,
obteniendo una cuadro extremamente versátil que satisface
todos los requisitos necesarios para una instalación
funcional y eficiente.
El PD1 está dotado de un display el cual permite, además
de una fácil programación, la constante visualización del
estado de las entradas; además la estructura con menús
permite una simple programación de los tiempos de trabajo
y de las lógicas de funcionamiento.
En el respeto de las normativas europeas en materia de
seguridad eléctrica y compatibilidad electromagnética
(EN 60335-1, EN 50081-1 y EN 50082-1) se caracteriza por
el completo aislamiento eléctrico entre el circuito digital y el
de potencia.
Otras características:
• Control electrónico automático, conmutación de las
salidas con corrientes nulas.
• Regulación de la potencia con parcialización de la onda
senoidal.
• Salida lámpara piloto que indica el estado en que se
encuentra la puerta.
• Relé auxiliar con lógica programable para luces de
garaje u otra utilización.
La presencia a bordo de un conector de inserción rápida
permite enchufar un receptor modular de la serie MT433
con tecnología superheterodina y elevada sensibilidad.
Page 61

59
ATENCION: Antes de hacer estas operacciones,
llevar l'electricidad del cuadro de maniobra. Ser
cuidado en la direccion de la conexion del modulo
extraible.
INSERCION MODULO RECEPTOR MT433
LÁMPARA PILOTO (warning ligth)
La lámpara piloto (warning ligth) indica en tiempo
real el estado de la cancela:
PARADA luz apagada
EN PAUSA la luz está siempre encendida
EN APERTURA la luz destella lentamente (2 Hz)
EN CIERRE la luz destella rápidamente (4 Hz)
CONEXIONES DE LAS REGLETAS
CARACTERISTICAS TÉCNICAS
Alimentación 230 VAC 50 / 60 Hz
Carga máx motores 700 W
Carga máx accesorios alimentados 24V 10W
Temperatura ambiente de trabajo -20°C / 60°C
Fusibles de protección F1=5A para línea 230 VAC
Dimensiones 295 x 230 x 100 mm
Peso 1600 g
IP 55
1.
2.
3.
4.
5.
6.
7.
8.
9.
10.–11.
11.–12.
13.–14.
14.–15.
16.–17.
18.–19.
20.
21.
22.
23.
24.
25.
26.
27.
Positivo antena.
Malla antena.
Comando de apertura para la
conexión de dispositivos
tradicionales de comando
normalmente abierto, TTNC, VRD.
Comando de apertura peatonal
para la conexión de: dispositivos
tradicionales de comando
normalmente abierto, TTNC, VRD.
Comando de stop. Contacto
normalmente cerrado.
Común (-).
Fotocélula 1. Contacto
normalmente cerrado.
Fotocélula 2. Contacto
normalmente cerrado.
Común (-).
Salida alimentación 24 VAC para
fotocélulas y otros accesorios.
Alimentación TX fotocélulas para
Test funcional.
Electrocerradura 12 VAC.
Lámpara piloto 24 VAC 3W.
Contacto para luces de garaje
230VAC 10A.
Lámpara de señalización 230VAC 40W
Salida alimentación 230 VAC para
motor 2 en fase de apertura.
Común motor 2.
Salida alimentación 230 VAC para
motor 2 en fase de cierre.
Salida alimentación 230 VAC para
motor 1 en fase de apertura.
Común motor 1.
Salida alimentación 230 VAC para
motor 1 en fase de cierre.
Neutro alimentación 230 VAC
Fase alimentación 230 VAC
ATENCION: se aconseja el empleo de un'antena
externa modelo ANS433 para poder garantizar el
maximo alcance.
Page 62

60
PANEL DE CONTROL
Realizar las conexiones eléctricas a los bornes, luego
alimentar el sistema: el cuadro verifica el correcto
funcionamiento del display encendiendo todos los segmentos
durante 1,5seg. 8.8.8.8 , en el instante sucesivo en el
display aparece la versión del programa durante 1,5seg.,
por ejemplo Pr 2.8. El display visualiza el panel de control:
El panel de control indica el estado físico de los contactos
en los bornes y de las teclas de programación: si está
encendido el segmento vertical de arriba, el contacto está
cerrado; si está encendido el segmento vertical de abajo, el
contacto está abierto (el dibujo arriba indicado ilustra el
caso en el que las entradas: START, START P, FOTO1,
FOTO2 y STOP han sido todos conectadas correctamente).
FONCION AUTO POWER-OFF: en fase de programaciòn,
después 50 segundos de l'ultima intervenciòn, el display se
pone en stand-by. Se re-activa en la primera variaccion de
una de las salidas (START, START P, FOTO1, FOTO2, STOP) y
con la primera recepciòn radio de un codigo en memoria. Si
presiona un cualquier de los butones (MENU, UP, DOWN) el
display queda encendido por 50 segundos.
PROGRAMACION
El cuadro PD1 presenta una estructura de programación con
menús, cada uno de los cuales corresponde a una
función del cuadro (menú función) o a la programación de
un tiempo de trabajo (menú tiempo).
Los menús tiempo permiten la regulación de los tiempos de
trabajo del cuadro (ej.: tiempo de apertura o de cierre de la
hoja, tiempo de cerradura, tiempo de predestello, etc.) y
son programables de 0 a 120 segundos con un intervalo de
±0,5 seg. En cambio, los menús función permiten activar las
funciones deseadas (ej.: antipatinamiento motores, FOTO1
activa como banda móvil, FOTO2 desactivada, etc.).
Existen unos menús de tiempo que dependen de determinados
menús función (ej.: si el CIERRE AUTOMATICO está activado,
es necesario programar un TIEMPO DE PAUSA, si no está
activado no es necesario programarlo); por eso, para
simplificar la programación, estos menús tiempo han sido
insertados en el interior de los menús función de los cuales
dependen. En particular los menús: CIERRE AUTOMATICO
(Ch.AU), ANTIPATINAMIENTO (ASM) y FOTOCELULA EN
PAUSA (Ft.PA) presentan entre las opciones seleccionables
unos “menús tiempo”.
FUNCION DE LAS TECLAS
MENU, UP, DOWN
Para activar la programación proceder como sigue.
• Alimentado el cuadro, el display debe visualizar el panel
de control (controlar pues, que las conexiones
efectuadas sean correctas).
• Mantener pulsada la tecla MENU hasta que en el display
aparece dEF.
À ce stade la programmation est amorcée: si au bout de 1
minute aucune opération n'est effectuée, la centrale sort
automatiquement de la programmation et visualise à
nouveau le panneau de contrôle.
Cuando la función de programación está activada, pulsar la
tecla UP o la tecla DOWN para seleccionar los menús,
efectuando un desplazamiento hacia delante o hacia atrás
(para un desplazamiento rápido, mantener la tecla pulsada).
Pulsar la tecla MENU para acceder a las programaciones
que se pueden así modificar pulsando las teclas UP y
DOWN.
• Pulsando la tecla UP se desplaza por el interior de los
menús función de abajo hacia arriba.
• Pulsando la tecla DOWN se desplaza por el interior de los
menús función de arriba hacia abajo.
• Pulsando la tecla MENU se puede acceder a las
eventuales programaciones para modificar y confirmar
volviendo a pulsar la misma tecla.
ATENCION: cuando la función de programación no está
activada, la presión de la tecla UP corresponde al comando
de START, la presión de la tecla DOWN corresponde al
comando de START PEATONAL: es, por lo tanto, posible
para el instalador efectuar la prueba de la puesta a punto.
Es posible definir el funcionamiento del cuadro PD1 con dos
modalidades distintas de programación:
PROGRAMACION PREDEFINIDA (DEFAULT) o PROGRAMACION
PERSONALIZADA.
En las paginas siguientes se encuentra el diagrama de las
funciones de la PD1 y las descriccion relativa.
Hay que interpretar el diagrama de esta forma:
• Empuyando la tecla DOWN en el cuadro de maniobra se
desfila el diagrama de l'alto en bajo, y aparecen las
funciones dEF, t.AP1, t.AP2 ecc.
• Empuyando la tecla UP se desfila el diagrama de bajo en
alto.
• Empuyando la tecla MENU se desfila el diagrama en
horizontal; si por ejemplo visualiza la funcion t.CHP,
empujando la tecla MENU aparece el numero 7.0. Este
numero puede ser aumentado tramite la tecla UP y
bajado tramite la tecla DOWN.
La siguiente presion de la tecla MENU visualiza
nuevamente la funcion t.CHP.
DOWN MENU UP
Page 63

61
Este tipo de programación permite cargar en memoria el programa
de Default por defecto de la V2 ELETTRONICA: los datos standard
que vienen insertados automáticamente están indicados en la
tabla adjunta al final (columna DATOS POR DEFECTO).
• Pulsar la tecla MENU, en el display aparece no.
• Pulsar la tecla UP o DOWN, en el display aparece si
• Pulsar la tecla MENU para convalidar, en el display aparece la
sigla: dEF.
TIEMPO APERTURA HOJA 1
Este menú es regulable de 0 a 120 segundos (±0,5) y determina
el tiempo de apertura de la hoja 1.
TIEMPO APERTURA HOJA 2
Este menú es regulable de 0 a 120 segundos (±0,5) y determina
el tiempo de apertura de la hoja 2.
TIEMPO APERTURA HOJA PEATONAL
Este menú es regulable de 0 segundos a t.AP1 (±0,5) y determina
el tiempo de apertura de la hoja peatonal (hoja 1).
TIEMPO CIERRE HOJA 1
Permite una regulación de 0 a 120 segundos (±0,5) del tiempo
de cierre de la hoja 1. Para evitar que la hoja no se cierre
completamente, es aconsejable programar un tiempo más largo
que el de apertura t.AP1.
TIEMPO CIERRE HOJA 2
Permite una regulación de 0 a 120 segundos (±0,5) del tiempo
de cierre de la hoja 2. Para asegurarse de que la hoja se cierre
completamente, es aconsejable programar un tiempo más largo
que el de apertura tAP2.
TIEMPO CIERRE HOJA PEATONAL
Permite una regulación de 0 segundos a t.Ch1 (±0,5) y determina
el tiempo de cierre de la hoja peatonal (hoja 1). Para evitar que la
hoja no se cierre completamente, es aconsejable programar un
tiempo más largo que el de apertura t.APP.
TIEMPO DE CIERRE HOJA 2 DURANTE CICLO PEATONAL
Permite una regulación de 0 a tChP (±0,5) y determina el tiempo
de cierre de la hoja 2 durante la fase de cierre de la hoja peatonal.
Page 64

62
RETRASO DE LA HOJA EN APERTURA
Para evitar que las hojas puedan colisionar durante la apertura,
es necesario introducir el tiempo de retraso r.AP, regulable de 0 a
120 segundos (±0,5). De este modo la apertura de la hoja 2 se
retrasa respecto a la hoja 1 por el tiempo programado.
RETRASO DE LA HOJA EN CIERRE
Para evitar que las hojas puedan colisionar durante el cierre, es
necesario introducir el tiempo de retraso r.Ch, regulable de 0 a
120 segundos (±0,5). De este modo el cierre de la hoja 1 se
retrasa respecto a la hoja 2 por el tiempo programado.
TIEMPO ELECTROCERRADURA
En el momento en el que la cancela empieza la apertura, el cuadro
debe excitar la electrocerradura con el fin de desengancharla y
permitir a la cancela moverse. El tiempo t.SEr determina la duración
de la excitación, y es regulable de 0 a 20 segundos (±0,5).
TIEMPO ADELANTO ELECTROCERRADURA
Este menú permite adelantar la excitación de la electrocerradura
con un tiempo regulable de 0 segundos a t.SEr (con un intervalo
de ±0,5). Durante el tiempo de adelanto de la electrocerradura,
la cancela no efectúa ningún movimiento con el fin de garantizar
siempre el desenganche de la electrocerradura.
TIEMPO GOLPE DE INVERSIÓN
Para evitar que la cancela inicie la fase de apertura antes de que
la electrocerradura se haya desenganchado, es posible introducir
un tiempo de inversión regulable de 0 a 120 segundos (±0,5). De
este modo durante la apertura, las hojas invierten el movimiento
durante el tiempo programado, permitiendo el desenganche de la
electrocerradura.
TIEMPO DE PREDESTELLO
Este menú permite la introducción de un predestello que precede
cada movimiento de la cancela, ya sea en apertura como en cierre:
el tiempo de predestello es regulable de 0 a 120 segundos (±0,5).
PARO SUAVE
Este menú permite habilitar la función de ralentización al final
del recorrido de la puerta con un tiempo programable entre 0 y
120 seg. (± 1,5 seg.). Para programar el paro suave, proceder de
la siguiente forma: dejar el tiempo de ralentización a 0 seg. y
comprobar que la puerta abra y cierre correctamente.
Seguidamente programar el tiempo de ralentización ( ej: 5 o 6
seg.).
Page 65

63
TIEMPO DE CIERRE RAPIDO DESPÚES DEL PARO SUAVE EN CIERRE
En el caso de que se programe un tiempo de ralentización diferente
de 0 seg., cabe la posibilidad que la velocidad de la puerta en fase
de cierre no sea suficiente para que la cerradura encaje
correctamente. Por esta razón, acabada la ralentización, es posible
cerrar la puerta a una velocidad normal (sin ralentización) durante
un tiempo programable entre 0 y 120 seg. (± 0,5 seg.).
POTENCIA DE LOS MOTORES
Este menú permite la regulación de la potencia de los motores
del 30 al 100% (con intervalo ±5).
ARRANQUE
Cuando la cancela está parada y se dispone a entrar en movimiento,
queda contrarrestada por la inercia inicial, por eso si la cancela es
muy pesada, cabe el riesgo de que las hojas no se muevan.
Activando la función ARRANQUE, es posible vencer la inercia inicial
gracias al arranque de los motores al máximo de la potencia por un
tiempo de 2 segundos.
START EN APERTURA
Este menú permite seleccionar las funciones del comando de
START durante la fase de apertura.
PAUS el comando de START para la cancela que entra en fase
de PAUSA.
no el comando de START no se acepta.
ChiU el comando de START vuelve a cerrar la puerta.
START EN CIERRE
Este menú permite seleccionar las funciones del comando de
START durante la fase de cierre.
StoP el comando de START para la cancela concluyendo así el
ciclo.
APEr el comando de START vuelve a abrir la cancela.
START EN PAUSA
Este menú permite seleccionar las funciones del comando de
START durante la fase de pausa.
ChiU el comando de START vuelve a cerrar la cancela.
no el comando de START no lo acepta. Esta función no debe
ser seleccionada cuando el cierre automático no está
activado (menú Ch.AU).
Page 66

64
START PEATONAL EN APERTURA
Este menú permite seleccionar las funciones del comando de
START P. durante la fase de apertura.
PAUS el comando de START PEATONAL para la cancela que
entra en fase de pausa.
no el comando de START PEATONAL no se acepta.
ChiU el comando de START PEATONAL vuelve a cerrar la
cancela.
FOTOCÉLULA EN PAUSA
Este menú permite determinar el funcionamiento de
las dos fotocélulas durante la fase de pausa.
rPAU la interrupción del rayo de la fotocélula, para la
cuenta del tiempo de pausa : a su restableci
miento el cuadro carga de nuevo el tiempo de
pausa.
t.PCh la interrupción del rayo de la fotocélula, para la
cuenta del tiempo de pausa : a su restablecimiento la cancela vuelve a cerrar después de
un tiempo programable de 0 a 120 segundos.
CIERRE AUTOMÁTICO
Permite la selección entre el funcionamiento semiautomático
o automático. Con el funcionamiento semiautomático el
comando de START o START PEATONAL abre la cancela,
finaliza la apertura, la cancela permanece parada hasta
el siguiente comando de apertura, que cierra. En
cambio, en modo automático el comando de START o
START PEATONAL inicia un ciclo: la cancela abre durante
el tiempo de apertura, se para y se queda en fase de
pausa durante el tiempo programado (t.PAU), luego
vuelve a cerrar durante el tiempo de cierre.
Si el ciclo ha empezado con un START, el cuadro ignora el comando START P hasta la conclusión del ciclo.
no el cierre automático no está activado, la cancela funciona en modo semiautomático.
t.PAU el cierre automático está activado, el tiempo de pausa es programable de 0 a 999 segundos.
ATENCION: si el cierre automático no ha sido activado, es necesario habilitar el comando de start en
pausa (menú St.PA).
LUCES DE GARAJE
Gracias a la salida "courtesy light"
el cuadro PD5 permite la conexión
de las luces de garaje (Ej. luces del
jardín), que pueden
funcionar en modo automático
(luces encendidas durante toda la
duración del ciclo) o temporizado
(luces encendidas durante un tiempo
regulable de 0 a 999 segundos).
Page 67

65
FUNCIÓN TIMER
Esta función permite programar, a lo largo del día, las bandas
horarias de apertura y cierre de la cancela. Es necesario conectar
un reloj temporizador 24 h (TIMER 24 h) con contacto normalmente
abierto en paralelo a la entrada START o START PEATONAL.
Cuando el contacto del temporizador se cierra, la cancela entra
en fase de apertura y permanece abierta hasta que el contacto
del temporizador se abra causando el cierre de la cancela.
ATENCION: para un correcto funcionamiento es necesario
activar el cierre automático (menú Ch.AU).
LÁMPARA DE SEÑALIZACIÓN CON INTERMITENCIA
El cuadro de maniobras PD1 permite la conexión de una lámpara
de señalización con o sin intermitencia. Si la lámpara de
señalización tiene la intermitencia en su interior, es necesario
seleccionar la opción "Si"; en cambio, si no tiene la intermitencia
en su interior, es necesario seleccionar la opción "no" a fin de
que pueda destellar.
LÁMPARA DE SEÑALIZACIÓN EN PAUSA
Este menú permite activar o desactivar la lámpara de señalización durante el tiempo de pausa.
Las luces se encienden con el comando de START o de START PEATONAL. Además, es posible
comandar esta salida con el código memorizado en la entrada radio tEL4 , en este último caso la
salida "courtesy light " se convierte en una salida auxiliar a la cual es posible asociar una de las
siguientes lógicas de funcionamiento:
monoestable: activa el relé de salida para todo el tiempo de transmisión del emisor, cuando la
transmisión se interrumpe el relé se desactiva.
biestable: activa el relé con la primera transmisión del emisor, el relé se desactiva con la
segunda transmisión.
timer: la transmisión del emisor activa el relé, el cual se desactiva automáticamente
después de un tiempo programable de 0 a 999 segundos.
t.LUC las luces de garaje se encienden durante un tiempo programable de 0 a 999 segundos.
CiCL las luces de garaje se encienden durante toda la duración del ciclo.
AUS Salida auxiliar con lógica de funcionamiento programable.
Si la función seleccionada es AUS, en el display aparece una de estas tres siglas:
tiM Salida auxiliar temporizada (tiempo programable de 0 a 999 s).
biSt relé de la salida auxiliar con funcionamiento biestable.
Mon relé de la salida auxiliar con funcionamiento monoestable.
ANTIPATINAMIENTO MOTORES (Descuento de tiempo)
La función de antipatinamiento impide que la repetida
interrupción del ciclo de aper tura y cierre genere
tiempos más largos de lo necesario para completar el
ciclo.
no la función de antipatinamiento de los motores
no está activa.
t.AAS la función de antipatinamiento de los motores
está activa con un tiempo añadido, en
apertura o en cierre, regulable de 0 a 120
segundos.
Page 68

66
ENTRADA STOP
Este menú permite seleccionar las funciones asociadas al
comando de STOP.
no la entrada STOP está deshabilitada.
ProS el comando de STOP para la cancela: al siguiente comando
de START la cancela reemprende el movimiento en la
dirección precedente.
invE el comando de STOP para la cancela: al siguiente comando
de START la cancela reemprende el movimiento en la
dirección opuesta a la precedente.
ATENCION : durante la pausa, el comando de STOP para la
cancela: el siguiente comando de START volverá ha cerrar la
cancela.
ENTRADA FOTOCÉLULA 1
Esta entrada puede ser habilitada para la conexión de dos
seguridades diferentes: la fotocélula o la banda neumática. La
banda neumática (contacto normalmente cerrado) es una seguridad
activa en apertura y en cierre (no activa durante el golpe de
inversión): su intervención durante la apertura para la cancela,
invierte el movimiento durante 4 seg. sin desfase de las hojas. Por
el contrario, la intervención de la banda neumática en cierre para
la cancela, invierte el movimiento durante 4 seg. con desfase de
las hojas. La fotocélula 1 (contacto normalmente cerrado) es una
seguridad activa en apertura y en cierre: la intervención de la
fotocélula durante el cierre para la cancela, en su desempeño la
cancela invierte el movimiento. Por el contrario, la intervención de
la fotocélula en apertura bloquea la cancela, en su desempeño la
cancela reemprende el movimiento de apertura.
ENTRADA FOTOCÉLULA 2
La fotocélula 2 está activa en cierre: si se le interrumpe el rayo
durante el cierre para la cancela e invierte el movimiento. La opción
CFCh activa la fotocélula incluso cuando la cancela está parada:
por cancela parada se entiende que no ha recibido ningún
comando, que está en pausa, o bien, que ha recibido un comando
de STOP. En este caso, durante todo el tiempo de interrupción del
rayo de la fotocélula, el cuadro no siente ningún comando de
habilitación en cualquier ciclo de apertura/cierre.
no la entrada FOTO 2 está deshabilitada.
CFCh la entrada FOTO 2 está habilitada: la fotocélula 2 está
activa en cierre y también cuando la cancela está parada.
Ch la entrada FOTO 2 está habilitada: la fotocélula 2 está
activa sólo en cierre.
no la entrada FOTO 1 está deshabilitada.
APCh la entrada FOTO 1 está habilitada para la conexión de la fotocélula 1.
CoSt la entrada FOTO 1 está habilitada para la conexión de la banda neumática.
Page 69

67
ENTRADAS RADIO
A cada código memorizado está
asociado uno de los cuatro ingresos
radio disponibles, con el fin de
impartir al cuadro el comando
deseado; además, con operaciones
simples y veloces, es posible
efectuar la cancelación parcial o
total de los códigos presentes en
memoria.
La inserción de un receptor modular
superheterodina, permite la
utilización de los cuatro canales
radio, tEL1 tEL2 tEL3 tEL4, a cada
uno de los cuales está asociado un
comando del cuadro de maniobras:
tEL1 START: transmitiendo el
código asociado a tEL1, el cuadro
recibe un comando de START.
tEL2 START PEATONAL:
transmitiendo el código asociado a
tEL2, el cuadro recibe un comando
de START PEATONAL.
tEL3 STOP: transmitiendo el
código asociado a tEL3, el cuadro
recibe un comando de STOP.
tEL4 SALIDA LUCES DE GARAJE:
transmitiendo el código asociado a
tEL4, el cuadro activa la salida
LUCES DE GARAJE.
INSERCIÓN EN MEMORIA DE LOS CÓDIGOS DESEADOS
Para memorizar los códigos de los emisores deseados seguir atentamente las siguientes instrucciones.
• Pulsar la tecla UP o DOWN y seleccionar la entrada radio deseada, el display visualiza (Ejemplo) tEL1.
• Pulsar la tecla MENÚ, en el display aparece trAS.
• El cuadro está listo para el aprendizaje radio, pulsar la tecla del emisor deseado hasta que el display
visualice rEC.
CANCELACIÓN INDIVIDUAL DE LOS CÓDIGOS
Seguir las instrucciones del menú inserción en memoria de los códigos deseados.
FIN PROGRAMACIÓN
Este menú permite terminar la programación (ya sea por defecto
o personalizada) grabando en memoria los datos modificados.
no ulteriores modificaciones a efectuar, no salir de la
programación.
Si modificaciones terminadas: fin programación.
LOS DATOS PROGRAMADOS HAN SIDO GRABADOS EN
MEMORIA: EL CUADRO DE MANIOBRAS ESTÁ AHORA LISTO
PARA SU UTILIZACIÓN.
Page 70

68
DISPLAY DONNÉES DESCRIZIONE DONNÉES MEMO
DEFAULT DONNÉES
dEF no/Si no
t.AP1 0 ÷ 120 s 22.5
t.AP2 0 ÷ 120 s 22.5
t.APP 0 ÷ t.AP1 6.0
t.Ch1 0 ÷ 120 s 23.5
t.Ch2 0 ÷ 120 s 23.5
t.ChP 0 ÷ t.Ch1 7.0
t.C2P 0 ÷ t.ChP 0.0
r.AP 0 ÷ 120s 1.0
r.Ch 0 ÷ 120s 3.0
t.SEr 0 ÷ 120s 3.0
t.ASE 0 ÷ t.SEr 0.0
t.inv 0 ÷ 120s 0.0
t.PrE 0 ÷ 120s 1.0
t.rAL 0 ÷ 120s 0.0
t.CvE 0 ÷ 120s 0.0
Pot. 30 ÷ 100% 40
SPUn no/Si Si
St.AP PAUS
no
ChiU
PAUS
St.Ch StoP
Stop
APEr
St.PA ChiU
no
ChiU
SP.AP PAUS
no
ChiU
PAUS
Ft.PA r. PAU
r.PAU
t.PCh
Ch.AU no
no
t.PAU
LUCi t.LUC=60s
CiCL
t.LUC
AUS
tiM
biSt
Mon
LP.PA no/Si no
In.LP no/Si no
OroL no/Si no
TABLA DE FUNCIÓN PD1
Programación standard V2 ELETTRONICA
Tiempo apertura hoja 1
Tiempo apertura hoja 2
Tiempo apertura hoja peatonal
Tiempo cierre hoja 1
Tiempo cierre hoja 2
Tiempo cierre hoja peatonal
Tiempo cierre hoja 2 durante el cierre peatonal
Retraso de la hoja en apertura
Retraso de la hoja en cierre
Tiempo electrocerradura
Tiempo anticipo electrocerradura
Tiempo golpe de inversión
Tiempo predestello
Paro suave
Tiempo de cierre rápido después del paro suave en cierre
Potencia motores
Arranque de los motores al máximo de la potencia
Start en apertura
- El comando START no la admite
- La puerta se cierra
- La puerta entra en pausa
Start en cierre
- La puerta concluye el ciclo
- La puerta se abre
Start en pausa
- El comando de START no lo admite
- La puerta se cierra
Start peatonal en apertura
- El comando de START P. no lo admite
- La puerta se cierra
- La puerta entra en pausa
Fotocélula en pausa
- Vuelve a contar el tiempo de pausa
- La puerta se cierra después del tiempo programado (de 0 a 120 s)
Cierre automático
- No está activado
- Cierre automático activado, con el tiempo de pausa programable (0 ÷ 999s)
Tiempo salida relé luces de garaje
- Encendidas durante toda la duración del ciclo
- Temporizadas (de 0 a 999 s)
- Salida auxiliar
- Salida auxiliar relé temporizada (de 0 a 999 s)
- Salida auxiliar relé biestable
- Salida auxiliar relé monoestable
Lámpara de señalización en pausa
Lámpara de señalización con intermitencia
Función TIMER
Page 71

69
TABLA DE FUNCIÓN PD1
DISPLAY DONNÉES DESCRIZIONE DONNÉES MEMO
DEFAULT DONNÉES
ASM t.AAS=2.0s
no
t.AAS
StoP no
no
invE
ProS
Fot 1 no
no
APCh
CoSt
Fot 2 CFCh
no
CFCh
Ch
tEL 1
tEL 2
tEL 3
tEL 4
Fine no/Si no
Función antipatinamiento motores
- No está activada
- Antipatinamiento activado con tiempo añadido en apertura o cierre
regulable (de 0 a 120 s)
Entrada de STOP
- La entrada está deshabilitada: el comando de STOP no se admite
- El comando de STOP para la puerta: el siguiente impulso de START invierte el movimiento
- El comando de STOP para la puerta: el siguiente impulso de START no
invierte el movimiento
Entrada FOTO 1
- Deshabilitada
- Funciona como fotocélula activa en apertura y en cierre
- Funciona como banca neumática móvil
Entrada FOTO 2
- Deshabilitada
- Funciona como fotocélula activa en cierre y con la puerta parada
- Funciona como fotocélula activa sólo en cierre
Entrada radio asociada al comando START
Entrada radio asociada al comando START P.
Entrada radio asociada al comando STOP
Entrada radio asociada a las luces de garaje
Fin programación
Page 72

70
NOTA
 Loading...