

Page 1

U.S. Robotics 56K Internal Voice
Faxmodem
Quick Installation Guide for
Microsoft Windows® 95, 98, 2000, Me, XP
Operating Systems
English
Français
Italiano
Deutsch
Инструкции по установке см. в руководстве пользователя на устано вочном компакт-диске.
Kurulum talimatlarõ için Kurulum CD-ROM'unda bulunan Kullanõm Kõlavuzu'na başvurun.
R24.0636.00
rev 1.2
Page 2

Page 3

Table of Contents
English ............................................................................1
Français.........................................................................15
Italiano......................................................................... 29
Deutsch........................................................................ 43
.....................................................................59
Page 4

Page 5

U.S. Robotics Corporation
935 National Parkway
Schaumburg, Illinois
60173-5157
USA
No part of this documentation may be reproduced in any form or by any means or used to make any
derivative work (such as a translation, transformation, or adaptation) without written permission from
U.S. Robotics Corporation. U.S. Robotics Corporation reserves the right to revise this documentation
and to make changes in the products and/or content of this document from time to time without obligation to provide notification of such revision or change. U.S. Robotics Corporation provides this documentation without warranty of any kind, either implied or expressed, including, but not limited to,
implied warranties of merchantability and fitness for a particular purpose. If there is any software on
removable media described in this documentation, it is furnished under a license agreement included
with the product as a separate document, in the hard copy documentation, or on the removable media
in a directory file named LICENSE.TXT or !LICENSE.TXT. If you are unable to locate a copy, please contact U.S. Robotics and a copy will be provided to you.
UNITED STATES GOVERNMENT LEGEND If you are a United States government agency, then this documentation and the software described herein are provided to you subject to the following:
All technical data and computer software are commercial in nature and developed solely at private
expense. Software is delivered as “Commercial Computer Software” as defined in DFARS 252.2277014 (June 1995) or as a “commercial item” as defined in FAR 2.101(a) and as such is provided with only
such rights as are provided in U.S. Robotics standard commercial license for the Software. Technical
data is provided with limited rights only as provided in DFAR 252.227-7015 (Nov 1995) or FAR 52.22714 (June 1987) whichever is applicable. You agree not to remove or deface any portion of any legend
provided on any licensed program or documentation contained in, or delivered to you in conjunction
with, this Quick Installation Guide.
Copyright © 2006 U.S. Robotics Corporation. All rights reserved. U.S. Robotics and the U.S. Robotics
logo are registered trademarks of U.S. Robotics Corporation. Other product names are for identification purposes only and may be trademarks of their respective companies. Product specifications subject to change without notice.
English
Page 6

Page 7
Installation for All Operating Systems:
Before You Begin: Prepare for installation.
NOTE: Before you begin, we recommend you uninstall any other
modems you have in your system and unplug all telephone cords
connected to these modems. Refer to your previous modem's
documentation for instructions.
Write down your new USRobotics modem's serial number, which is located on
the white bar code sticker on the modem and on the modem's box, in the space
below. If you ever need to call our Technical Support department, you will need
this number plus your model number, which is 2884C, to receive assistance. If
you need to get assistance or download drivers from the Web site, you will need
your product ID number.
Product ID Number Serial Number
2884C
Step 1: Insert the modem into an empty PCI expansion slot.
Turn off and unplug your computer and all peripherals. Remove the computer’s
cover. (If you do not know how to do this, refer to your computer’s
documentation.)
WARNING: To avoid risk of electrical shock, make sure your computer
and all peripheral devices are turned off and unplugged from
electrical outlets and that any telephone cords have been removed
from existing modems and their wall jacks.
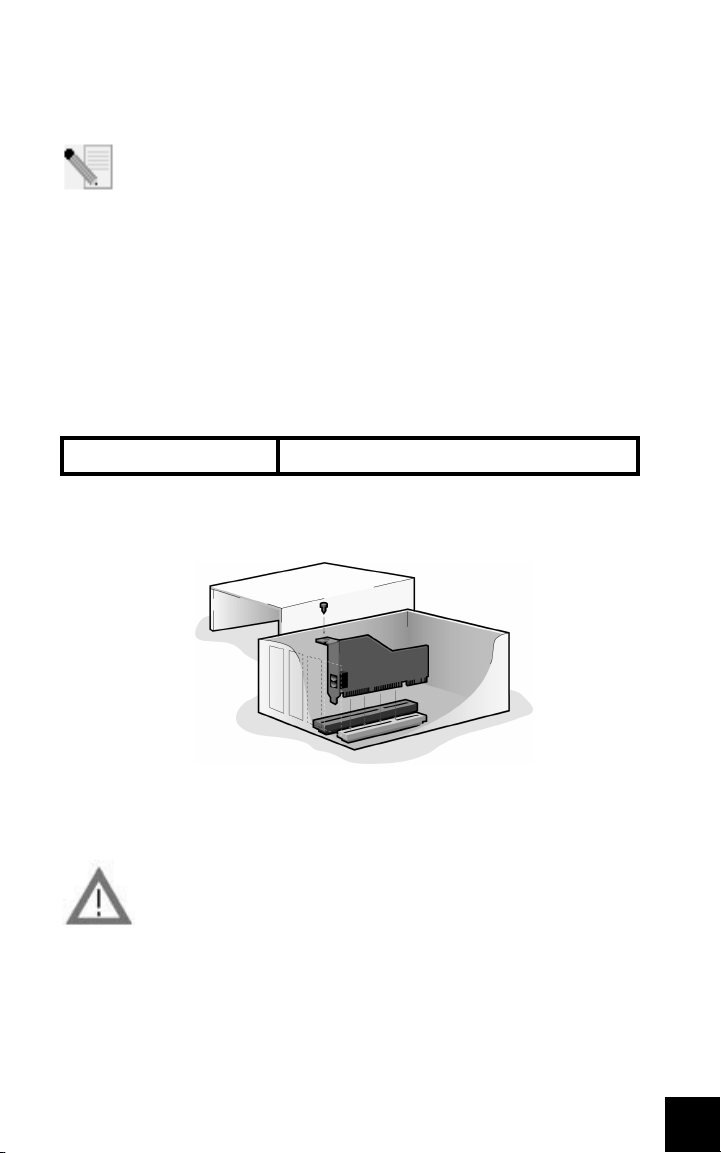
Remove the expansion slot cover at the back of an empty PCI expansion slot. PCI
slots are 3.5 inches long and are usually white plastic lined with metal. The slot
cover is on the back of the computer and covers an opening on the computer’s
case. Some slot covers are held in place with a screw. Insert the modem, gold
edge first, into the slot. You will need to press the modem in firmly so that it is
3
Page 8

seated properly in its slot. When the modem is installed correctly, you will no
longer see any part of the gold edge. Be careful to place the modem in the slot
properly, with the end bracket of the modem lined up properly in your computer.
The modem’s metal bracket will cover the opening on the back of the computer.
If you removed a screw from the slot cover, secure the modem with the screw.
Replace the computer’s cover.
Plug one end of the phone cord into the jack on the modem labelled and
plug the other end into an analogue phone wall jack. If there is an adapter
included with your modem, attach that to the phone cord before inserting it into
the wall jack.
NOTE: You can also attach a microphone to the jack and a set of
speakers into the jack to use your modem with the optional voice
software. Alternately, you can attach a headset to these jacks.
Step 2: Install the modem drivers.
NOTE: If at any time during the installation you are prompted to select
the location of your installation drivers, the following is the correct
location on the Installation CD-ROM (assuming D: is your CD-ROM
drive).
Windows Me/98/95 drivers -- D:\
Windows XP/2000 drivers -- D:\Win2K_XP
NOTE: Windows XP/2000 users must be logged in using an account with
administrative privileges before attempting to install the modem
drivers. Windows XP home users have administrative privileges by
default.
Windows XP Users: Control Panel: Category View
Turn on your computer. Insert your Installation CD-ROM into your drive before
you log in or Windows opens. Windows will install the hardware with in-built
drivers. After it has finished, click Windows Start, Control Panel, Network and
Internet Connections. Click Phone and Modem Options. Enter the requested
dialing information; click OK. Select the Modems tab. Click Properties. Select the
Driver tab. Click Update Driver. Select Install from a list or specific location
(Advanced) and click Next. Select Don’t search. I will choose the driver to install
and click Next. Select Have Disk. Click Browse and select your CD-ROM drive.
Select Win2K_XP and select the driver most appropriate to your modem. Click
Next. A Digital Signature Not Found message may appear*. Click Continue
Anyway. Click Finish to complete the installation.
4
Page 9

Windows XP Users: Control Panel: Classic View
Turn on your computer. Insert your Installation CD-ROM into your drive before
you log in or Windows opens. Windows will install the hardware with in-built
drivers. After it has finished, click Windows Start, Control Panel. Double-click
Phone and Modem Options. Enter the requested dialing information; click OK.
Select the Modems tab. Click Properties. Select the Driver tab. Click Update
Driver. Select Install from a list or specific location (Advanced) and click Next.
Select Don’t search. I will choose the driver to install and click Next. Select Have
Disk. Click Browse and select your CD-ROM drive. Select Win2K_XP and select
the driver most appropriate to your modem. Click Next. A Digital Signature Not
Found message may appear*. Click Continue Anyway. Click Finish to complete
the installation.
Windows 2000 Users
Turn on your computer. Insert your Installation CD-ROM into your drive before
you log in. When the Found New Hardware screen appears, click Next. Select
Search for a suitable driver for my device (recommended). Click Next. Select
CD-ROM drives. Click Next. A Digital Signature Not Found message may appear*.
Click Yes. Click Finish to complete the installation.
* USRobotics has thoroughly tested this driver in conjunction with the supported hardware and has
verified compatibility with Windows XP/2000.
Windows Me Users
Turn on your computer. Insert your Installation CD-ROM into your drive before
Windows opens. When the Add New Hardware Wizard appears, select Automatic
search for a better driver (Recommended), and click Next. Click Finish to
complete the installation.
Windows 98 Users
Turn on your computer. Insert your Installation CD-ROM into your drive before
Windows opens. When the Add New Hardware Wizard appears, click Next. Select
Search for the best driver for your device (Recommended), and click Next.
Select Specify a location and click Browse. Select your CD-ROM drive; click OK.
Click Next. When the driver is found, click Next. Click Finish. When the Add New
Hardware Wizard appears, click Next. Select Search for the best driver for your
device (Recommended), and click Next. Select Specify a location and click
Browse. Select your CD-ROM drive; click OK. Click Next. When the driver is
found, click Next. Click Finish to complete the installation.
Windows 95 Users
Turn on your computer. Insert your Installation CD-ROM into your drive before
Windows opens. When the Update Device Driver Wizard appears, click Next. If
the Wizard is unable to locate the driver, click Other Locations. Click Browse and
select your CD-ROM drive. Click OK. Click Finish. At this point you may get an
Insert Disk notice. Click OK. The Copying Files screen will open. Click Browse and
select your CD-ROM drive. Click OK. The Copying Files screen will appear again.
5
Page 10

When the Update Device Driver Wizard appears, click Next. If the Wizard is
unable to locate the driver, click Other Locations. Click Browse and select your
CD-ROM drive. Click OK. Click Finish to complete the installation.
Step 3: Verify that the modem is properly installed.
Windows XP
Click Windows Start, and click Control Panel. Click Network and Internet
Connections, Phone and Modem Options, and then click the Modems tab. You
should see a description of your modem, USRobotics V.92 Voice Win Int, and a
COM port setting. If you do not see a description of your modem, see the Note
after this section. If you do see the description, click Modem, highlight the
description of your new modem, and click Properties. Click the Diagnostics tab.
Click the Query Modem button. You should see a series of commands and
responses from the modem. This means that the installation was a success. If
you do not see commands and responses, see the Note after this section.
Windows 2000
Click Windows Start, Settings, and then Control Panel. Double-click the Phone
and Modem Options icon. Click the Modems tab. Make sure that the correct
modem is highlighted, USRobotics V.92 Voice Win Int. If you do not see a
description of your modem, see the Note after this section. If you do see the
description, click the Properties button. Click the Diagnostics tab. Click the
Query Modem button. You should see a series of commands and responses from
the modem. This means that the installation was a success. If you do not see
commands and responses, see the Note after this section.
Windows Me/98/95
Click Windows Start, Settings, and then Control Panel. Double-click the Modems
icon. In the Modems Properties screen, you should see a description for your
modem, USRobotics V.92 Voice Win Int. If you do not see a description of your
modem, see the Note after this section. If you do see the description, click the
Diagnostics tab. Make sure that the correct COM Port (modem) is highlighted.
Click the More Info button. You should see a series of commands and responses
from the modem. This means that the installation was a success. If you do not
see commands and responses, see the Note after this section.
NOTE: If your modem is not listed and/or you do not see a series of
commands and responses, make sure that your internal modem is
physically installed correctly in your computer. With the power off,
press the modem in firmly so that it is seated properly in its slot. When
the modem is installed correctly, you will no longer see any part of the gold edge.
If your modem still does not work, you may need to remove it and reinstall it in
another available slot. Shut down and restart your PC. Check your modem again
using Control Panel as described previously.
6
Page 11
Step 4: Install software and register your modem.
Eject and re-insert the Installation CD-ROM. The installation utility should start
automatically. The Setup Wizard on the CD-ROM guides you through installing
the program group (including Internet Call Notification, ControlCenter, and
optional voice faxmodem software) and registering your modem.
NOTE: If the Installation CD-ROM interface does not run automatically,
click Windows Start and then click Run. In the “Run” dialogue box, type
D:\setup.exe. If your CD-ROM drive uses a different letter, type that
letter in place of “D.”
NOTE: If you would like to use the voice functionality of this modem, you
must install the voice software. This software can be found on the
Installation CD-ROM in the Software section.
Register your modem.
• At the Installation CD-ROM interface, click the Support link.
• Follow the on-screen instructions to register your modem and to
view the warranty information. If the Installation CD-ROM interface
does not run automatically, click Windows Start and
then click Run. In the “Run” dialog box, type D:\setup.exe. If
your CD-ROM drive uses a different letter, type that letter in
place of “D.”
• You can also register your modem online by visiting
http://www.usr.com/productreg
Troubleshooting
Having trouble with your modem? Try these basic troubleshooting
steps first.
1) Is your phone cord properly connected? The phone cord should be plugged
into the jack on the modem and into the wall phone jack. Use the phone cord
included in your modem’s box. If there was an adapter included with your
modem, attach that to the phone cord before inserting it into the wall jack.
2) Is your modem properly installed in your computer? Refer to the “Verify that
the modem is properly installed” section of this guide for possible solutions
based on your particular operating system.
7
Page 12

My computer isn’t recognizing my modem.
If Plug and Play fails to find the modem as new hardware, you need to check
the following:
• Confirm that the modem is firmly seated in the PCI slot. The modem
should sit evenly in the slot with no part of the gold edge showing.
• Try installing the modem in another PCI slot.
• Check your computer manual to make sure that the PCI slot is
configured properly.
My modem appeared to install correctly but seems to be performing erratically.
Possible solution: Although PCI devices can share IRQs, there are devices
on the market that do not share IRQs properly. If the modem has been
assigned to an IRQ which shares with one of these devices, the modem may
perform erratically.
Windows Me/98/95: Right-click the My Computer icon on your desktop.
Click Properties, and then the Device Manager tab. Double-click the
Computer icon at the top of the device list. You will see a listing of your
system’s IRQs and the devices to which they are assigned. Locate your
modem and the IRQ which it is assigned. If this IRQ is being used by any
other devices, it may be causing the modem to work improperly. Either your
modem or the device which shares an IRQ with your modem will have to be
reassigned to another IRQ in order to resolve your conflict. You may want to
try installing the modem in another PCI slot, or refer to the sharing device’s
documentation for more information about removing, disabling, or
relocating it.
My software isn’t recognizing my modem.
Possible solution: Your communications software may not function
properly if you have more than one version of the software installed, you
are using an older version, or you have more than one communications
application installed on your system. We highly recommend using the
communications software provided with your modem on the Installation
CD-ROM.
Possible solution: Your software’s COM port settings may be incorrect.
There should be a place in the Setup section of your software that
addresses port settings. Make sure the software’s port settings match
those for your modem. To check which COM port your modem is using, click
Windows Start, Settings, and Control Panel. Double-click Modems, select
your modem, and select Properties. Check your communication software’s
documentation for instructions about adjusting the port settings in your
software.
8
Page 13

Possible solution: You may not have the correct modem type selected in
your software or in Windows. Click Windows Start, Settings, and Control
Panel. When Control Panel opens, click Modems. You will see a list of
installed modems. You can also add, remove, or view the properties of
modems from this window. The USRobotics modem you have installed
should be present in the list of installed modems. If none of the modem
descriptions in the list matches your USRobotics modem or no modems are
listed, your modem is not installed properly. Try reinstalling your modem.
Possible solution: If you are using software that uses a Windows modem
description and you had a previous modem installed, you may need to
update your software’s setting to reflect the use of the USRobotics V.92
Voice Win Int.
My modem won’t dial out or doesn’t answer incoming calls.
FOR BOTH DIALING AND ANSWERING PROBLEMS:
Possible solution: You may have a bad phone cord connection to your
mo dem. T he pho ne cor d shou ld be pl ugged int o the j ack on t he mod em
and into the wall phone jack. Use the phone cord included in your modem’s
box if possible. If there was an adapter included with your modem, attach
that to the phone cord before inserting it into the wall jack.
Possible solution: You may have devices between the modem and the
phone jack. There should be no line splitters, fax machines, or other devices
between the modem and the wall jack.
OFFICE USERS:
Possible solution: You may have plugged your modem’s phone cord into a
digital line. Contact the department responsible for your phone system if
you are unsure whether or not your phone line is digital.
If your phone system requires dialing “9” to access an outside line, be sure
to add “9” before the number you are dialing.
VOICE MAIL USERS:
Possible solution: If you have voice mail provided by your local phone
company, your dial tone may be altered when messages are waiting.
Retrieve your voice mail to restore your normal dial tone.
My modem sounds like it’s trying to connect to another modem but fails.
Possible solution: You may have a poor connection. All calls are routed
differently, so try placing the call again.
I’m having problems with my fax or voice software.
9
Page 14

Possible solution: See the electronic help files, which are found within the
fax or voice software itself.
My modem isn’t achieving a 56K Internet connection.
The V.92 and V.90 protocols allow for download speeds of up to 56K and
the V.92 protocol adds upload speeds of up to 48K, but line conditions may
affect the actual speeds during a given connection. Due to unusual
telephone line configurations, some users will not be able to take full
advantage of V.92 or V.90 technology at this time. In order to achieve a V.92
or V.90 connection:
• The server you’re dialing in to must support and provide a digital V.92
or V.90 signal. Your ISP can provide you with a list of dial-up
connections and information on what those connections currently
support.
• The telephone line between your ISP and your modem must be capable
of supporting a 56K connection and contain only one digital-toanalogue conversion. The 56K signal from your ISP begins as a digital
signal. Somewhere between the ISP and your modem, there will be a
digital-to-analogue signal conversion so that your modem can receive
the data. There must be no more than one digital-to-analogue signal
conversion in the path from your ISP to your modem. If more than one
analogue-to-digital conversion occurs, your connect speed will default
to V.34 (33.6 Kbps). There may also be impairments on the local lines
between your ISP and your modem. These impairments can prevent or
limit V.92 or V.90 connection speeds. All telephone calls are routed
differently, so you should try making your connection several times.
One way to test this is to dial into a long distance location. Long
distance lines are often much clearer than local lines. It is important to
note that telephone companies are constantly upgrading their
systems. Lines that do not support 56K today may support 56K in the
near future.
• Your modem must be connecting to a V.92 or V.90 server. A pair of 56K
modems will not connect to each other at 56K speeds.
Support Resources
If you have not fixed your problem after trying the suggestions in the
“Troubleshooting” section, you can receive additional help via one of these
convenient resources:
1. Visit the USRobotics Web site
Many of the most common difficulties users experience have been
addressed in the FAQ and Troubleshooting Web pages for your specific
product. Your product ID is 2884C. You may need to know this to obtain
10
Page 15

information on the USRobotics Web site. Go to:
http://www.usr.com/support
2. Contact the USRobotics Technical Support Department
Technical questions about USRobotics modems can also be answered by
technical support specialists.
Country Telephone Online
UK 0870 844 4546 www.usr.com/emailsupport/uk
France 0825 070 693 www.usr.com/emailsupport/fr
Germany 0180 567 1548 www.usr.com/emailsupport/de
Italy 800 979 266 www.usr.com/emailsupport/it
Russia
Middle East
8 800 200 20 01
870 844 4546
www.usr.com/emailsupport/ru
www.usr.com/emailsupport/me
Regulatory Information
CE Compliance
We, U.S. Robotics Corporation of 935 National Parkway, Schaumburg, Illinois, 60173-5157 USA, declare
under our sole responsibility that the product, U.S. Robotics 56K Internal Voice Faxmodem, Model
2884C, to which this declaration relates, is in conformity with the following standards and/or other
normative documents.
EN60950
EN55022
EN55024
We hereby declare that the above named product is in compliance with the essential requirements and
other relevant provisions of Directive 1999/5/EC.
The conformity assessment procedure referred to in Article 10(3) and detailed in Annex II of Directive
1999/5/EC has been followed.
An electronic copy of the original CE Declaration of Conformity is available at the U.S. Robotics website:
www.usr.com
Network Compatibility Declaration
This equipment is designed to work satisfactorily on all European Union PSTNs (Public Switched
Telephone Networks).
This equipment is supplied with a suitable PSTN connector for the country in which it was supplied. If it
is required to use this equipment on a different network to the one for which it was supplied, the user
is advised to contact the vendor for guidance regarding connection.
11
Page 16

U.S. Robotics Corporation Limited Warranty
1.0 GENERAL TERMS:
1.1 This Limited Warranty is extended only to the original end-user purchaser (CUSTOMER)
1.2 No agent, reseller, or business partner of U.S. Robotics Corporation (U.S. ROBOTICS) is
1.3 This Limited Warranty expressly excludes any product that has not been purchased as
1.4 This Limited Warranty is only applicable in the country or territory where the product is
1.5 U.S. ROBOTICS warrants to the CUSTOMER that this product will be free from defects in
1.6 U.S. ROBOTICS sole obligation under this warranty shall be, at U.S. ROBOTICS sole discre-
1.7 U.S. ROBOTICS warrants any replacement product or part for NINETY (90) DAYS from the
1.8 U.S. ROBOTICS makes no warranty or representation that this product will meet CUS-
1.9 U.S. ROBOTICS makes no warranty or representation that the operation of the software
1.10 U.S. ROBOTICS shall not be responsible for any software or other CUSTOMER data or
2.0 CUSTOMER OBLIGATIONS
2.1 CUSTOMER assumes full responsibility that this product meets CUSTOMER specifications
2.2 CUSTOMER is specifically advised to make a backup copy of all software provided with
2.3 CUSTOMER assumes full responsibility to properly install and configure this product and
2.4 CUSTOMER must furnish U.S. ROBOTICS a dated Proof of Purchase (copy of original pur-
3.0 OBTAINING WARRANTY SERVICE:
3.1 CUSTOMER must contact U.S. ROBOTICS Technical Support or an authorised U.S. ROBOT-
3.2 Customer must provide Product Model Number, Product Serial Number and dated Proof of
3.3 For information on how to contact U.S. ROBOTICS Technical Support or an authorised U.S.
3.4 CUSTOMER should have the following information / items readily available when contact-
and is not transferable.
authorised to modify the terms of this Limited Warranty on behalf of U.S. ROBOTICS.
new from U.S. ROBOTICS or its authorised reseller.
intended for use (As indicated by the Product Model Number and any local telecommunication approval stickers affixed to the product).
workmanship and materials, under normal use and service, for TWO (2) YEARS from the
date of purchase from U.S. ROBOTICS or its authorised reseller.
tion, to repair the defective product or part with new or reconditioned parts; or to
exchange the defective product or part with a new or reconditioned product or part that is
the same or similar; or if neither of the two foregoing options is reasonably available, U.S.
ROBOTICS may, at its sole discretion, provide a refund to the CUSTOMER not to exceed
the latest published U.S. ROBOTICS recommended retail purchase price of the product,
less any applicable service fees. All products or parts that are exchanged for replacement
will become the property of U.S. ROBOTICS.
date the product or part is shipped to Customer.
TOMER requirements or work in combination with any hardware or software products provided by third parties.
products provided with this product will be uninterrupted or error free, or that all defects
in software products will be corrected.
information contained in or stored on this product.
and requirements.
this product.
to ensure proper installation, configuration, operation and compatibility with the operating environment in which this product is to function.
chase receipt from U.S. ROBOTICS or its authorised reseller) for any warranty claims to be
authorised.
ICS Service Centre within the applicable warranty period to obtain warranty service authorisation.
Purchase (copy of original purchase receipt from U.S. ROBOTICS or its authorised reseller)
to obtain warranty service authorisation.
ROBOTICS Service Centre, please see the U.S ROBOTICS corporate Web site at:
www.usr.com
ing U.S. ROBOTICS Technical Support:
·Product Model Number
12
Page 17

·Product Serial Number
·Dated Proof of Purchase
·CUSTOMER contact name & telephone number
·CUSTOMER Computer Operating System version
·U.S. ROBOTICS Installation CD-ROM
4.0 WARRANTY REPLACEMENT:
4.1 In the event U.S. ROBOTICS Technical Support or its authorised U.S. ROBOTICS Service
4.2 Any product or part returned to U.S. ROBOTICS without an RMA issued by U.S. ROBOTICS
4.3 CUSTOMER agrees to pay shipping charges to return the product or part to the authorised
4.4 Responsibility for loss or damage does not transfer to U.S. ROBOTICS until the returned
4.5 Authorised CUSTOMER returns will be unpacked, visually inspected, and matched to the
4.6 Once a CUSTOMER return has been unpacked, visually inspected, and tested U.S. ROBOT-
4.7 U.S. ROBOTICS will make reasonable effort to ship repaired or replaced product or part to
CUSTOMER, at U.S. ROBOTICS expense, not later than TWENTY ONE (21) DAYS after U.S.
Return Centre.
4.8 U.S. ROBOTICS shall not be liable for any damages caused by delay in delivering or fur-
5.0 LIMITATIONS
5.1 THIRD-PARTY SOFTWARE: This U.S. ROBOTICS product may include or be bundled with
5.2 DAMAGE DUE TO MISUSE, NEGLECT, NON-COMPLIANCE, IMPROPER INSTALLATION, AND/
·U.S. ROBOTICS Installation Guide
Centre determines the product or part has a malfunction or failure attributable directly to
faulty workmanship and/or materials; and the product is within the TWO (2) YEAR warranty term; and the CUSTOMER will include a copy of the dated Proof of Purchase (original
purchase receipt from U.S. ROBOTICS or its authorised reseller) with the product or part
with the returned product or part, then U.S. ROBOTICS will issue CUSTOMER a Return
Material Authorisation (RMA) and instructions for the return of the product to the authorised U.S. ROBOTICS Drop Zone.
or its authorised U.S. ROBOTICS Service Centre will be returned.
U.S. ROBOTICS Return Centre; to insure the product or assume the risk of loss or damage
which may occur in transit; and to use a shipping container equivalent to the original
packaging.
product or part is received as an authorised return at an authorised U.S. ROBOTICS Return
Centre.
Product Model Number and Product Serial Number for which the RMA was authorised. The
enclosed Proof of Purchase will be inspected for date of purchase and place of purchase.
U.S. ROBOTICS may deny warranty service if visual inspection of the returned product or
part does not match the CUSTOMER supplied information for which the RMA was issued.
ICS will, at its sole discretion, repair or replace, using new or reconditioned product or
parts, to whatever extent it deems necessary to restore the product or part to operating
condition.
ROBOTICS receives the authorised CUSTOMER return at an authorised U.S. ROBOTICS
nishing repaired or replaced product or part.
third-party software, the use of which is governed by separate end-user license agreements provided by third-party software vendors. This U.S. ROBOTICS Limited Warranty
does not apply to such third-party software. For the applicable warranty refer to the enduser license agreement governing the use of such software.
OR ENVIRONMENTAL FACTORS: To the extent permitted by applicable law, this U.S.
ROBOTICS Limited Warranty does not apply to normal wear and tear; damage or loss of
data due to interoperability with current and/or future versions of operating system or
other current and/or future software and hardware; alterations (by persons other than
U.S. ROBOTICS or authorised U.S. ROBOTICS Service Centres); damage caused by operator error or non-compliance with instructions as set out in the user documentation or
other accompanying documentation; damage caused by acts of nature such as lightning,
storms, floods, fires, and earthquakes, etc. Products evidencing the product serial number has been tampered with or removed; misuse, neglect, and improper handling; damage
caused by undue physical, temperature, or electrical stress; counterfeit products; damage
or loss of data caused by a computer virus, worm, Trojan horse, or memory content corruption; failures of the product which result from accident, abuse, misuse (including but
13
Page 18

not limited to improper installation, connection to incorrect voltages, and power points);
failures caused by products not supplied by U.S. ROBOTICS; damage cause by moisture,
corrosive environments, high voltage surges, shipping, abnormal working conditions; or
the use of the product outside the borders of the country or territory intended for use (As
indicated by the Product Model Number and any local telecommunication approval stick-
5.3 TO THE FULL EXTENT ALLOWED BY LAW, THE FOREGOING WARRANTIES AND REMEDIES
5.4 LIMITATION OF LIABILITY. TO THE FULL EXTENT ALLOWED BY LAW, U.S. ROBOTICS ALSO
6.0 DISCLAIMER: Some countries, states, territories or provinces do not allow the exclusion
7.0 GOVERNING LAW: This Limited Warranty shall be governed by the laws of the State of Illi-
ers affixed to the product).
ARE EXCLUSIVE AND ARE IN LIEU OF ALL OTHER WARRANTIES, TERMS, OR CONDITIONS,
EXPRESS OR IMPLI ED, EITHER I N FACT OR BY OPERATION OF LAW, STATUTORY OR OTHERWISE, INCLUDING WARRANTI ES, TERMS, OR CONDITIONS OF MERCHANTABILITY, FITNESS
FOR A PARTICULAR PURPOSE, SATISFACTORY QUALITY, CORRESPONDENCE WITH
DESCRIPTION, AND NON-INFRINGEMENT, ALL OF WHICH ARE EXPRESSLY DISCLAIMED.
U.S. ROBOTICS NEITHER ASSUMES NOR AUTHORISES ANY OTHER PERSON TO ASSUME
FOR IT ANY OTHER LIABILITY IN CONNECTION WITH THE SALE, INSTALLATION, MAINTENANCE, WARRANTY, OR USE OF ITS PRODUCTS.
EXCLUDES FOR ITSE LF AND ITS SUPPLIERS AN Y LIABILITY, WHET HER BASED IN CONTRACT
OR TORT (INCLUDING NEGLIGENCE), FOR INCIDENTAL, CONSEQUENTIAL, INDIRECT, SPECIAL, OR PUNITIVE DAMAGES OF ANY KIND, OR FOR LOSS OF REVENUE OR PROFITS, LOSS
OF BUSINE SS, LOSS OF INFORMATION OR DATA, OR OTHER FINA NCIAL LOSS ARISING OUT
OF OR IN CONNECTION WITH THE SALE, INSTALLATION, MAINTENANCE, USE, PERFORMANCE, FAILURE, OR INTERRUPTION OF ITS PRODUCTS, EVEN IF U.S. ROBOTICS OR ITS
AUTHORISED RESELLER HAS BEEN ADVISED OF THE POSSIBILITY OF SUCH DAMAGES,
AND LIMITS ITS LIABILITY TO REPAIR, REPLACEMENT, OR REFUND OF THE PURCHASE
PRICE PAID, AT U.S. ROBOTICS OPTION. THIS DISCLAIMER OF LIABILITY FOR DAMAGES
WILL NOT BE AFFECTED IF ANY REMEDY PROVIDED HEREIN SHALL FAIL OF ITS ESSENTIAL
PURPOSE.
or limitation of implied warranties or the limitation of incidental or consequential damages for certain products supplied to consumers, or the limitation of liability for personal
injury, so the above limitations and exclusions may be limited in their application to CUSTOMER. When the implied warranties are not allowed by law to be excluded in their
entirety, they will be limited to the TWO (2) YEAR duration of this written warranty. This
warranty gives CUSTOMER specific legal rights, which may vary depending on local law.
nois, U.S.A. excluding its conflicts of laws principles and excluding the United Nations
Convention on Contracts for the International Sale of Goods.
14
U.S. Robotics Corporation
935 National Parkway
Schaumburg, IL, 60173
U.S.A
Page 19

U.S. Robotics Corporation
935 National Parkway
Schaumburg, Illinois
60173-5157
Etats-Unis
Il est interdit de reproduire cette documentation, que ce soit en tout ou en partie, sous quelque forme
ou par quelque moyen que ce soit en vue d'effectuer des travaux dérivés (tels que traduction, transformation ou adaptation) sans la permission écrite de U.S. Robotics Corporation. U.S. Robotics Corporation se réserve le droit de revoir cette documentation et de modifier le produit et/ou le contenu de ce
document de temps en temps et sans préavis. U.S. Robotics Corporation fournit cette documentation
sans garantie implicite ou explicite d'aucune sorte, et notamment sans aucune garantie de commercialisation et d'adaptation à un usage particulier. Si cette documentation décrit un logiciel sur support
amovible, ce dernier est soumis à un accord de licence inclus avec le produit sur un document séparé,
soit sur la documentation écrite soit sur le support amovible, dans un fichier répertoire appelé
LICENSE.TXT ou !LICENSE.TXT. Si vous ne parvenez pas à localiser un exemplaire, veuillez contacter
U.S. Robotics qui vous en fera parvenir un.
GOUVERNEMENT DES ETATS-UNIS. Si vous êtes une agence du gouvernement des Etats-Unis, cette
documentation et le logiciel qu'elle décrit vous sont fournis aux termes des conditions suivantes :
Toutes les données techniques et les logiciels informatiques sont par nature commerciaux et développés uniquement sur des fonds privés. Le logiciel est fourni en tant que «Logiciel informatique
commercial », comme défini dans DFARS 252.227-7014 (juin 1995) ou en tant qu'« objet commercial »,
comme défini dans FAR 2.101(a) et est donc fourni avec les mêmes droits que ceux énumérés dans la
licence commerciale standard de logiciels U.S. Robotics. Les données techniques sont fournies avec
des droits limités, comme défini dans DFAR 252.227-7015 (nov 1995) ou FAR 52.227-14 (juin 1987), suivant les cas. Vous vous engagez à ne pas retirer ou dégrader toute légende fournie sur un programme
ou une documentation sous licence contenu(e) dans ou livré(e) avec ce Guide d'installation rapide.
Copyright © 2006 U.S. Robotics Corporation. Tous droits réservés. U.S. Robotics et le logo U.S.
Robotics sont des marques déposées de U.S. Robotics Corporation. Tous les autres noms de produits
sont utilisés à des fins d’identification uniquement et sont susceptibles d’être des marques de leurs
sociétés respectives. Les spécifications des produits peuvent être modifiées sans préavis.
Français
Page 20

16
Page 21
Installation pour tous les systèmes d’exploitation :
Avant de commencer : préparation de l'installation
REMARQUE : avant de commencer, nous vous recommandons de
désinstaller tout autre modem installé sur votre système et de
débrancher tous les cordons téléphoniques reliés à ces modems.
Reportez-vous au manuel de votre ancien modem pour connaître les
instructions de désinstallation.
Notez le numéro de série de votre nouveau modem USRobotics ; ce numéro se
trouve sur le code barre blanc autocollant sur le modem et sur sa boîte, dans
l'espace ci-dessous. Si vous devez appeler notre service d'assistance technique,
vous aurez besoin de ce numéro et de votre numéro de modèle, le 2884C. Si
vous avez besoin d'aide ou si vous devez télécharger des pilotes à partir du site
Web, il vous faudra l'ID de produit (voir ci-dessous).
ID de produit Numéro de série
2884C
Etape 1 : insérez le modem dans un emplacement d'extension PCI vide.
Eteignez et débranchez votre ordinateur et tous les périphériques. Retirez le
boîtier de l'ordinateur. Si vous ne savez pas comment procéder, reportez-vous à
la documentation de votre ordinateur.
ATTENTION : pour éviter tout risque de choc électrique, assurez-vous
que votre ordinateur et tous ses périphériques sont éteints et
débranchés de la prise électrique et que tous les cordons
téléphoniques sont déconnectés des modems et de leur prise murale.
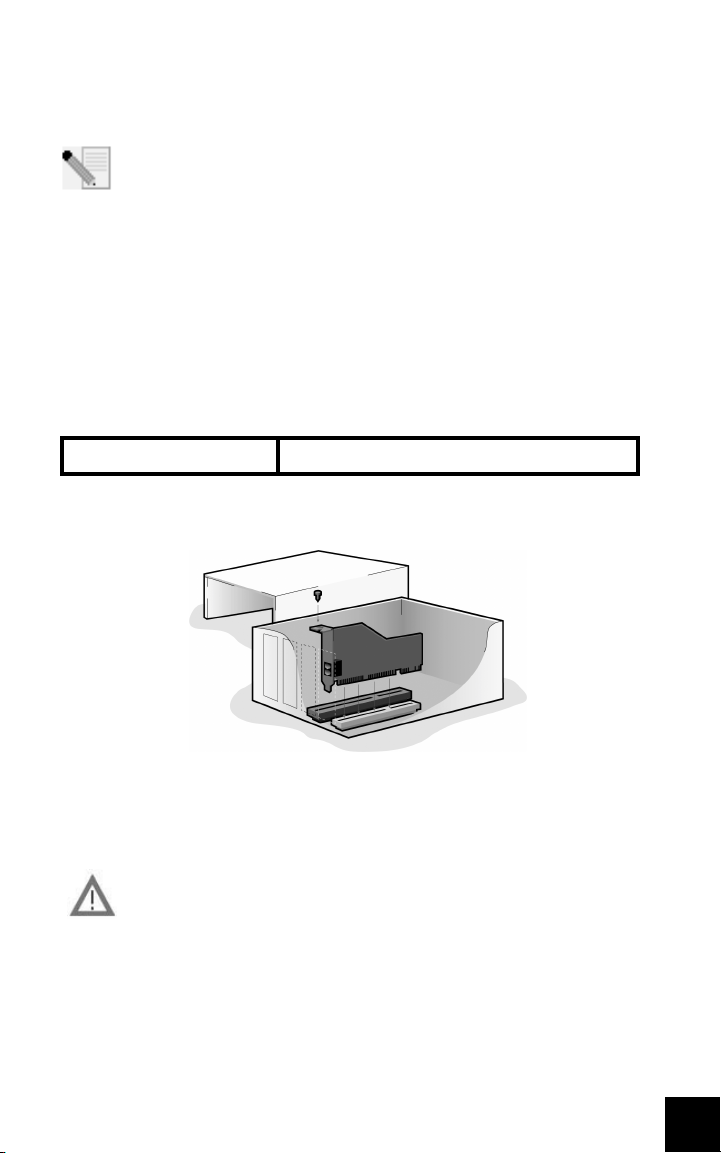
Retirez le cache de l'emplacement d'extension placé derrière un emplacement
d'extension PCI vide. Ceux-ci mesurent environ 9 cm et sont en général en plastique
blanc avec des bordures de métal. Le cache de l'emplacement est situé à l'arrière
de l'ordinateur et recouvre une zone ouverte dans le coffre de l'ordinateur. Certains
caches sont vissés. Placez le modem, partie dorée en premier, dans l'emplacement
17
Page 22

PCI. Vous devrez fermement enfoncer le modem de manière à ce qu'il ne puisse pas
bouger dans l'emplacement. Si le modem est correctement installé, vous ne
devriez plus voir la bordure dorée et l'enveloppe du modem devrait être alignée
dans votre ordinateur. L'enveloppe métallique recouvrira l'ouverture à l'arrière de
l'ordinateur. Si vous aviez retiré une vis du cache, n'oubliez pas de la remettre pour
empêcher le modem de bouger. Replacez le cache de l'ordinateur.
Branchez une extrémité du cordon téléphonique fourni dans la prise du
modem et l'autre dans une prise téléphonique murale analogique. Si votre
modem a été livré avec un adaptateur, branchez-le au cordon téléphonique
avant de l'insérer dans la prise murale.
REMARQUE : vous pouvez également brancher un microphone dans la
prise et des haut-parleurs dans la prise afin d'utiliser le
logiciel de communication vocale facultatif livré avec votre modem.
Vous pouvez aussi brancher un casque à ces jacks.
Etape 2 : installez les pilotes du modem.
REMARQUE : s'il vous est demandé, lors de l'installation, de choisir
l'emplacement de vos pilotes d'installation, précisez l'emplacement
suivant sur le CD-ROM d'installation (en supposant que D: est votre
lecteur CD-ROM).
Pilotes Windows Me/98/95 -- D:\
Pilotes Windows XP/2000 -- D:\Win2K_XP
REMARQUE : les utilisateurs de Windows XP/2000 doivent se connecter
en utilisant un compte bénéficiant de privilèges administratifs avant de
commencer à installer les pilotes du modem. Ces privilèges sont
accordés par défaut aux utilisateurs domestiques de Windows XP.
Utilisateurs de Windows XP : Panneau de configuration : Affichage par catégorie
Allumez votre ordinateur. Insérez le CD-ROM d'installation dans votre lecteur avant
de vous connecter ou que Windows ne s'ouvre. Windows installera le matériel avec
les pilotes intégrés. Une fois cette étape terminée, cliquez sur Démarrer, Panneau
de configuration, Connexions réseau et Internet. Cliquez sur Options de modems
et téléphonie. Saisissez les informations de numérotation demandées ; cliquez sur
OK. Sélectionnez l'onglet Modems. Cliquez sur Propriétés. Sélectionnez l'onglet
Pilote. Cliquez sur Mettre le pilote à jour. Sélectionnez Installer à partir d'une liste
ou emplacement spécifié (avancé) et cliquez sur Suivant. Sélectionnez Ne pas
rechercher, je vais choisir le pilote à installer et cliquez sur Suivant. Sélectionnez
Disquette fournie. Cliquez sur Parcourir et sélectionnez votre lecteur de CD-ROM.
Sélectionnez Win2K_XP et ensuite le lecteur le plus adapté à votre modem. Cliquez
sur Suivant. Il est possible qu'un message indiquant que la signature numérique
est introuvable apparaisse*. Cliquez sur Continuer. Pour achever le processus
d'installation, cliquez sur Terminer.
Utilisateurs de Windows XP : Panneau de configuration : Affichage classique
18
Page 23

Allumez votre ordinateur. Insérez le CD-ROM d'installation dans votre lecteur
avant de vous connecter ou que Windows ne s'ouvre. Windows installera le
matériel avec les pilotes intégrés. Une fois cette étape terminée, cliquez sur
Démarrer, Panneau de configuration. Double-cliquez sur Options de modems et
téléphonie. Saisissez les informations de numérotation demandées ; cliquez sur
OK. Sélectionnez l'onglet Modems. Cliquez sur Propriétés. Sélectionnez l'onglet
Pilote. Cliquez sur Mettre le pilote à jour. Sélectionnez Installer à partir d'une
liste ou emplacement spécifié (avancé) et cliquez sur Suivant. Sélectionnez Ne
pas rechercher, je vais choisir le pilote à installer et cliquez sur Suivant.
Sélectionnez Disquette fournie. Cliquez sur Parcourir et sélectionnez votre
lecteur de CD-ROM. Sélectionnez Win2K_XP et ensuite le lecteur le plus adapté
à votre modem. Cliquez sur Suivant. Il est possible qu'un message indiquant que
la signature numérique est introuvable apparaisse*. Cliquez sur Continuer. Pour
achever le processus d'installation, cliquez sur Terminer.
Utilisateurs de Windows 2000
Allumez votre ordinateur. Insérez le CD-ROM d'installation dans votre lecteur
avant de vous connecter. Quand l'écran d'Assistant Nouveau matériel apparaît,
cliquez sur Suivant. Sélectionnez Rechercher un pilote approprié pour mon
périphérique (recommandé). Cliquez sur Suivant. Sélectionnez
Lecteurs de CD-ROM. Cliquez sur Suivant. Il est possible qu'un message
indiquant que la signature numérique est introuvable apparaisse*. Cliquez sur
Oui. Pour achever le processus d'installation, cliquez sur Terminer.
* USRobotics a procédé à des tests complets sur les équipements pris en charge et s'est assuré de la
compatibilité avec Windows XP/2000.
Utilisateurs de Windows Me
Allumez votre ordinateur. Insérez le CD-ROM d'installation dans votre lecteur
avant que Windows ne s'ouvre. Quand l'écran d'Assistant Nouveau matériel
apparaît, sélectionnez Recherche automatique d'un meilleur lecteur
(recommandé), et cliquez sur Suivant. Pour achever le processus d'installation,
cliquez sur Terminer.
Utilisateurs de Windows 98
Allumez votre ordinateur. Insérez le CD-ROM d'installation dans votre lecteur
avant que Windows ne s'ouvre. Quand l'écran d'Assistant Nouveau matériel
apparaît, cliquez sur Suivant. Sélectionnez Rechercher le meilleur pilote pour
votre périphérique (recommandé) et cliquez sur Suivant. Sélectionnez Définir un
emplacement et cliquez sur Parcourir. Sélectionnez votre lecteur CD-ROM ; cliquez
sur OK. Cliquez sur Suivant. Une fois que le pilote est détecté, cliquez sur Suivant.
Cliquez sur Terminer. Quand l'écran d'Assistant Nouveau matériel apparaît,
cliquez sur Suivant. Sélectionnez Rechercher le meilleur pilote pour votre
périphérique (recommandé) et cliquez sur Suivant. Sélectionnez Définir un
emplacement et cliquez sur Parcourir. Sélectionnez votre lecteur CD-ROM ; cliquez
sur OK. Cliquez sur Suivant. Une fois que le pilote est détecté, cliquez sur Suivant.
Pour achever le processus d'installation, cliquez sur Terminer.
Utilisateurs de Windows 95
19
Page 24

Allumez votre ordinateur. Insérez le CD-ROM d'installation dans votre lecteur
avant que Windows ne s'ouvre. Quand l'écran d'Assistant de mise à jour de
pilote de périphérique apparaît, cliquez sur Suivant. Si l'Assistant est incapable
de localiser le pilote, cliquez sur Autres emplacements. Cliquez sur Parcourir et
sélectionnez votre lecteur de CD-ROM. Cliquez sur OK. Cliquez sur Terminer. A
ce stade, il est possible que vous soyez invité à insérer un disque. Cliquez sur
OK. L'écran de Copie de fichiers s'affichera. Cliquez sur Parcourir et sélectionnez
votre lecteur de CD-ROM. Cliquez sur OK. L'écran de Copie de fichiers s'affichera
à nouveau. Quand l'écran d'Assistant de mise à jour de pilote de périphérique
apparaît, cliquez sur Suivant. Si l'Assistant est incapable de localiser le pilote,
cliquez sur Autres emplacements. Cliquez sur Parcourir et sélectionnez votre
lecteur de CD-ROM. Cliquez sur OK. Pour achever le processus d'installation,
cliquez sur Terminer.
Etape 3 : vérifiez que le modem fonctionne bien.
Windows XP
Cliquez sur Démarrer, puis Panneau de configuration. Cliquez sur Connexions
réseau et Internet, Options de modems et téléphonie puis cliquez sur l'onglet
Modems. Vous devriez voir une description de votre modem, USRobotics V.92
Voice Win Int et un paramètre de port COM. Si ce n'est pas le cas, reportez-vous
à la remarque qui suit cette section. Si la description apparaît, cliquez sur
Modem, mettez la description de votre nouveau modem en surbrillance et
cliquez sur Propriétés. Cliquez sur l’onglet Diagnostics. Cliquez sur le bouton
Interroger le modem. Vous devriez voir une série de commandes et de réponses
provenant du modem. Cela signifie que l'installation a réussi. Si ce n'est pas le
cas, reportez-vous à la remarque qui suit cette section.
Windows 2000
Cliquez sur Démarrer, Paramètres et enfin sur Panneau de configuration.
Double-cliquez sur l'icône Options de modems et téléphonie. Cliquez sur
l'onglet Modems. Assurez-vous que le bon modem est en surbrillance,
USRobotics V.92 Voice Win Int. Si ce n'est pas le cas, reportez-vous à la
remarque qui suit cette section. Si la description apparaît, cliquez sur le bouton
Propriétés. Cliquez sur l’onglet Diagnostics. Cliquez sur le bouton Interroger le
modem. Vous devriez voir une série de commandes et de réponses provenant du
modem. Cela signifie que l'installation a réussi. Si ce n'est pas le cas, reportezvous à la remarque qui suit cette section.
Windows Me/98/95
Cliquez sur Démarrer, Paramètres et enfin sur Panneau de configuration.
Double-cliquez sur l'icône Modems. A l'écran des propriétés du modem, vous
devriez voir une description de votre modem, USRobotics V.92 Voice Win Int. Si
ce n'est pas le cas, reportez-vous à la remarque qui suit cette section. Si la
description apparaît, cliquez sur l'onglet Diagnostics. Assurez-vous que le bon
port COM (modem) est en surbrillance. Cliquez sur le bouton Informations
20
Page 25

complémentaires. Vous devriez voir une série de commandes et de réponses
provenant du modem. Cela signifie que l'installation a réussi. Si ce n'est pas le
cas, reportez-vous à la remarque qui suit cette section.
Remarque : si votre modem ne se trouve pas dans la liste et/ou si vous
ne voyez pas la série de commandes et de réponses, assurez-vous que
votre modem interne est bien physiquement installé dans votre
ordinateur. Enfoncez fermement le modem éteint de manière à ce qu'il
ne puisse pas bouger dans l'emplacement. Si le modem est correctement installé,
vous ne devriez plus voir la bordure dorée. Si votre modem ne fonctionne toujours
pas, il vous faudra peut-être le retirer et le réinstaller dans un autre emplacement
disponible. Eteignez votre PC puis rallumez-le. Vérifiez de nouveau votre modem
dans le Panneau de configuration, en suivant la procédure décrite plus haut.
Etape 4: installez le logiciel et enregistrez le modem.
Ejectez le CD-ROM d'installation de votre lecteur CD-ROM, puis insérez-le de
nouveau. L'utilitaire d'installation devrait se lancer automatiquement.
L'assistant d'installation du CD-ROM vous guide lors de l'installation du groupe
de programmes (y compris Internet Call Notification, ControlCenter et le logiciel
facultatif de communication vocale faxmodem) et de l'enregistrement de votre
modem.
REMARQUE : si l'interface du CD-ROM d'installation ne s'affiche pas
automatiquement, cliquez sur Démarrer, puis sur Exécuter. Dans la
boîte de dialogue « Exécuter », tapez D:\setup.exe. Si la lettre
correspondant à votre CD-ROM n'est pas « D », tapez la lettre
appropriée.
REMARQUE : si vous désirez utiliser les fonctions vocales de ce
modem, vous devez installer le logiciel de communication vocale. Vous
trouverez ce logiciel sur le CD-ROM d'installation à la section Logiciel.
Enregistrer votre modem.
• A l'interface du CD-ROM d'installation, cliquez sur le lien Support.
• Suivez les instructions à l'écran pour enregistrer votre modem et voir
les informations de garantie. Si l'interface du CD-ROM d'installation ne
s'affiche pas automatiquement, cliquez sur Démarrer, puis sur
Exécuter. Dans la boîte de dialogue « Exécuter », tapez D:\setup.exe.
Si la lettre correspondant à votre CD-ROM n'est pas « D », tapez la
lettre appropriée.
• Vous pouvez également enregistrer votre modem en ligne à l'adresse :
http://www.usr.com/productreg
21
Page 26

Dépannage
Votre modem vous pose quelques problèmes ? Essayez de suivre ces
conseils de dépannage élémentaire.
1) Votre cordon téléphonique est-il bien branché ? Le cordon téléphonique doit
être branché dans la prise du modem et dans la prise téléphonique murale.
Utilisez le cordon téléphonique fourni avec votre modem. Si votre modem a été
livré avec un adaptateur, branchez-le au cordon téléphonique avant de l'insérer
dans la prise murale.
2) Votre modem est-il correctement installé sur votre ordinateur ? Reportezvous à la section « vérifiez que le modem fonctionne bien » du guide. Vous y
trouverez des solutions spécifiques à votre système d'exploitation.
Mon ordinateur ne reconnaît pas mon modem.
Si Plug and Play ne détecte pas votre modem, vérifiez les points suivants :
• Vérifiez que le modem est fermement enfoncé dans l'emplacement
PCI. Le bord doré ne doit pas être visible.
• Essayez d'installer le modem dans un autre emplacement PCI.
• Consultez le manuel de votre ordinateur pour vous assurer que
l'emplacement PCI est correctement configurée.
L'installation de mon modem n'a posé aucun problème. Pourtant, ses
performances semblent limitées.
Solution possible : bien que les appareils PCI puissent partager les IRQ
(requêtes d'interruptions), certains ne procèdent pas correctement au
partage. Si une IRQ a été assignée à votre modem par le biais de l'un de ces
appareils, les performances de votre modem peuvent s'en trouver
affectées.
22
Windows Me/98/95 : avec le bouton droit de la souris, cliquez sur l’icône
Poste de travail de votre bureau. Cliquez sur Propriétés puis sur l'onglet
Gestionnaire de périphériques. Double-cliquez sur l'icône Ordinateur
située en haut de la liste de périphériques. La liste indique toutes les IRQ
de votre système ainsi que les périphériques auxquelles elles sont
assignées. Localisez votre modem et son IRQ. Si cette IRQ est utilisée par
un autre périphérique, elle peut créer un conflit avec votre modem. Pour
résoudre ce problème, il suffit de réassigner une IRQ différente à votre
modem ou à l'autre périphérique. Vous pouvez essayer d'installer le
modem dans un autre emplacement PCI. Pour plus d'informations
concernant le retrait, la désactivation ou la relocalisation de l'autre
périphérique, reportez-vous à son manuel.
Page 27

Mon logiciel ne reconnaît pas mon modem.
Solution possible : votre logiciel de communication ne fonctionne peut-être
pas correctement si plusieurs versions du logiciel sont installées sur votre
ordinateur, si vous utilisez une version plus ancienne ou si plusieurs
logiciels de communication différents sont installés sur votre ordinateur.
Nous vous recommandons vivement d'utiliser le logiciel de communication
fourni avec votre modem sur le CD-ROM d'installation.
Solution possible : les paramètres du port COM de votre logiciel sont peutêtre incorrects. Votre logiciel devrait comporter une section Setup
(Configuration) traitant de la configuration des ports. Assurez-vous que les
réglages des ports du logiciel correspondent à ceux de votre modem. Pour
savoir quel port COM votre modem utilise, cliquez sur Démarrer,
Paramètres et Panneau de configuration. Double-cliquez sur Modems,
sélectionnez votre modem et cliquez sur Propriétés. Consultez la
documentation de votre logiciel de communication pour savoir comment
régler les paramètres du port avec votre logiciel.
Solution possible : le type de modem sélectionné dans Windows ou votre
logiciel n'est peut-être pas correct. Cliquez sur Démarrer, Paramètres et
Panneau de configuration. Lorsque le Panneau de configuration s'ouvre,
cliquez sur Modems. Une liste des modems installés s'affichera. Vous
pouvez ajouter, supprimer ou voir les propriétés des modems à partir de
cette fenêtre. Le modem USRobotics que vous avez installé doit être
répertorié dans la liste des modems. Si aucune description n'y correspond
ou qu'aucun modem n'est répertorié, cela signifie que votre modem n'est
pas installé correctement. Essayez de le réinstaller.
Solution possible : si votre logiciel utilise une description de modem
Windows et qu'un modem différent était installé sur votre ordinateur, une
mise à jour des paramètres de votre logiciel actuel sera peut-être
nécessaire pour refléter l'utilisation du USRobotics V.92 Voice Win Int.
Mon modem ne compose pas de numéro ou ne répond pas aux appels entrants.
POUR LES PROBLEMES D'APPEL ET DE REPONSE :
Solution possible : le cordon téléphonique n'a peut-être pas été connecté
correctement à votre modem. Le cordon téléphonique doit être branché
dans la prise du modem et dans la prise téléphonique murale. Si
possible, utilisez le cordon téléphonique fourni avec votre modem. Si votre
modem a été livré avec un adaptateur, branchez-le au cordon téléphonique
avant de l'insérer dans la prise murale.
Solution possible : des périphériques peuvent se trouver entre le modem et
la prise téléphonique. Aucun répartiteur de ligne, télécopieur ou autre
dispositif ne doit se trouver entre le modem et la prise murale.
23
Page 28

DANS LES ENTREPRISES :
Solution possible : vous avez peut-être raccordé le cordon téléphonique de
votre modem à une ligne numérique. Contactez le service responsable de votre
système téléphonique pour savoir si la ligne est analogique ou numérique.
Si vous devez composer le « 9 » pour accéder aux lignes extérieures,
n'oubliez pas d'ajouter un « 9 » au numéro que vous composez.
UTILISATEURS DE MESSAGERIES VOCALES :
Solution possible : si votre opérateur téléphonique local vous fournit un
service de boîte vocale, votre tonalité changera peut-être lorsque vous
aurez des messages en attente. Accédez à votre boîte vocale pour retrouver
la tonalité habituelle.
Mon modem semble essayer de se connecter à un autre modem sans y parvenir.
Solution possible : votre connexion est peut-être de mauvaise qualité. Tous
les appels étant acheminés différemment, renouvelez votre appel.
Mon logiciel de fax ou de communication vocale me pose problème.
Solution possible : consultez les fichiers d'aide électroniques, au sein
même du logiciel de fax ou de communication vocale.
Mon modem n'atteint pas une vitesse de connexion Internet de 56 Kbits/s.
24
Les protocoles V.92 et V.90 permettent d'atteindre des vitesses de
réception de 56 Kbits/s et le protocole V.92 permet d'atteindre des vitesses
d'émission de 48 Kbits/s. Cependant, l'état de la ligne peut affecter la
vitesse d'une connexion donnée. En raison de configurations inhabituelles
de la ligne téléphonique, certains utilisateurs ne seront pas en mesure de
profiter pleinement de la technologie V.92 ou V.90. Pour obtenir une
connexion V.92 ou V.90 :
• Le serveur avec lequel vous essayez d'établir une connexion doit
prendre en charge et fournir un signal numérique V.92 ou V.90. Votre
FAI peut vous fournir une liste de connexions et vous renseigner sur les
connexions actuellement prises en charge.
• La ligne téléphonique entre votre FAI et votre modem doit prendre en
charge une connexion 56K et comprendre une seule conversion
numérique-analogique. Le signal 56K de votre FAI doit être tout d'abord
un signal numérique. Entre votre FAI et votre modem doit se trouver une
conversion de signal numérique-analogique pour que votre modem
puisse recevoir les données. Il doit n'y avoir qu'une conversion de signal
numérique-analogique entre votre FAI et votre modem. S'il y en a
plusieurs, votre vitesse de connexion tombera par défaut à V.34
(33,6 Kbits/s). Les lignes locales entre votre FAI et votre modem sont
Page 29

peut-être endommagées. Ces défauts peuvent empêcher les connexions
V.92 ou V.90 ou limiter leur vitesse. Tous les appels téléphoniques sont
acheminés différemment ; essayez d'établir votre connexion plusieurs
fois de suite. Vous pouvez tester la connexion en composant un numéro
longue distance. Les lignes longue distance sont souvent moins
encombrées que les lignes locales. Il est important de se souvenir que
les opérateurs téléphoniques mettent régulièrement leurs systèmes à
niveau. Les lignes qui ne prennent pas encore en charge la technologie
56K le feront peut-être prochainement.
• Votre modem doit se connecter à un serveur V.92 ou V.90. Deux
modems 56K ne se connecteront pas à des vitesses de 56K.
Assistance
Si votre problème n'est toujours pas réglé malgré les suggestions indiquées
dans la section « Dépannage », vous pouvez obtenir des renseignements
supplémentaires en consultant les ressources suivantes :
1. Visitez le site Web de USRobotics.
Vous trouverez la réponse à la plupart des problèmes rencontrés par les
utilisateurs dans les pages Web FAQ et Dépannage consacrées à votre produit. Votre ID de produit est 2884C. Vous en aurez peut-être besoin pour
obtenir des informations sur le site Web de USRobotics. Rendez-vous à
l'adresse : http://www.usr.com/support
2. Contactez le service d'assistance technique de USRobotics.
Nos spécialistes répondront à toutes vos questions techniques sur les
modems USRobotics.
Pays Téléphone En ligne
Royaume-Uni 0870 844 4546 www.usr.com/emailsupport/uk
France 0825 070 693 www.usr.com/emailsupport/fr
Informations légales
Conformité CE
Nous, U.S. Robotics Corporation, sis au 935 National Parkway, Schaumburg, Illinois, 60173-5157, EtatsUnis, déclarons (et assumons l'entière responsabilité de cette déclaration) que le modem U.S. Robotics
56K Internal Voice Faxmodem, modèle 2884C, auquel se rapporte la présente déclaration, est conforme
aux normes ou autres documents normatifs suivants.
EN60950
EN55022
EN55024
Nous déclarons que le produit nommé ci-dessus est conforme aux spécifications essentielles et autres
dispositions de la Directive 1999/5/EC.
Nous avons respecté la procédure d'établissement de conformité visée à l'article 10(3) et détaillée en
annexe II de la Directive 1999/5/EC.
25
Page 30

La version électronique de la déclaration de conformité CE est disponible sur le site Web
d'U.S. Robotics à l'adresse : www.usr.com
Déclaration de compatibilité réseau
Cet équipement a été conçu pour fonctionner correctement sur tous les réseaux RTPC de l'Union
Européenne.
Cet équipement est fourni avec un connecteur RTPC adapté au pays dans lequel il a été acheté. Si
l'utilisateur souhaite utiliser cet équipement sur un réseau différent, il doit contacter son détaillant
pour obtenir des instructions de connexion.
Garantie limitée d'U.S. Robotics Corporation
1.0 CONDITIONS GENERALES :
1.1 Cette garantie limitée ne s'applique qu'à l'acheteur d'origine (le CLIENT) et n'est pas transférable.
1.2 Aucun agent, revendeur ou partenaire commercial d'U.S. Robotics Corporation (U.S. ROBOTICS) n'est
1.3 Cette garantie limitée exclut expressément tout produit n'ayant pas été acheté neuf auprès d'U.S.
1.4 Cette garantie limitée ne s'applique que dans le pays ou le territoire destiné à l'utilisation du produit (tel
1.5 U.S. ROBOTICS garantit au CLIENT que ce produit est dénué de défauts et vices de fabrication, dans des
1.6 Dans le cadre de cette garantie, la seule obligation d'U.S. ROBOTICS sera, à sa discrétion, de réparer le
1.7 U.S. ROBOTICS garantit tout produit ou pièce de remplacement pour une période de QUATRE-VINGT-DIX
1.8 U.S. ROBOTICS ne garantit ni ne déclare que ce produit répondra aux exigences du CLIENT ou fonction-
1.9 U.S. ROBOTICS ne garantit ni ne déclare que le fonctionnement des logiciels fournis avec ce produit sera
1.10 U.S. ROBOTICS ne saurait être responsable des données logicielles ou informations du CLIENT contenues
2.0 OBLIGATIONS DU CLIENT
2.1 Il est de la responsabilité du CLIENT de vérifier que ce produit répond à ses attentes et à ses exigences.
2.2 Nous conseillons au CLIENT de créer une copie de sauvegarde de tous les logiciels fournis avec ce pro-
2.3 Il est de la responsabilité du CLIENT d'installer et de configurer correctement ce produit et de s'assurer
2.4 Pour que sa demande de garantie soit acceptée, le CLIENT doit, dans tous les cas, fournir à
3.0 POUR OBTENIR UN SERVICE DE GARANTIE :
3.1 Le CLIENT doit contacter un centre d'assistance U.S. ROBOTICS ou un service après-vente agréé U.S.
3.2 Pour obtenir une autorisation de service de garantie, le client do it fournir le numéro de modèle du pro-
3.3 Pour savoir comment contacter le service d'assistance technique ou un service après-vente agréé U.S.
3.4 Lorsqu'il contacte le service d'assistance technique U.S. ROBOTICS, le CLIENT doit avoir les informations
autorisé à modifier les conditions de cette garantie limitée au nom d'U.S. ROBOTICS.
ROBOTICS ou de l'un de ses revendeurs agréés.
qu'indiqué par le numéro de modèle du produit ou par toute autre étiquette d'homologation locale
apposée sur le produit).
conditions normales d'utilisation et d'exploitation, pour une durée de DEUX (2) ANS à compter de la date
d'achat auprès d'U.S. ROBOTICS ou d'un revendeur agréé.
produit ou la pièce défectueuse avec des pièces neuves ou remises à neuf, d'échanger le produit ou la
pièce défectueuse avec des pièces neuves ou remises à neuf ou, si aucune des deux options précédentes
n'est applicable, U.S. ROBOTICS peut, à sa seule discrétion, rembourser au CLIENT le prix acquitté, sans
dépasser le dernier prix d'achat commercial recommandé par U.S. ROBOTICS pour le produit, moins
toutes les charges
de services applicables. Tous les produits ou composants remplacés deviendront la propriété d'U.S.
ROBOTICS.
(90) JOURS à partir de la date d'expédition du produit ou de la pièce au client.
nera en association avec tout produit logiciel ou matériel fourni par des tiers.
ininterrompu ou sans erreur, ou que tous les défauts de ces logiciels seront corrigés.
ou stockées dans ce produit.
duit.
que son installation, sa configuration et son fonctionnement sont adaptés et compatibles avec l'environnement d'exploitation de ce produit.
U.S. ROBOTICS une preuve d'achat datée (original du ticket de caisse d'U.S. ROBOTICS ou d'un
de ses revendeurs agréés).
ROBOTICS pendant la période de garantie applicable afin d'obtenir une autorisation de service de garantie.
duit, le numéro de série du produit et une preuve d'achat datée (original du ticket de caisse d'U.S.
ROBOTICS ou d'un de ses revendeurs agréés).
ROBOTICS, veuillez visiter le site Web de la société U.S. ROBOTICS à l'adresse suivante : www.usr.com
suivantes à portée de main :
26
Page 31

·Numéro de modèle du produit
·Numéro de série du produit
·Preuve d'achat datée
·Nom et numéro de téléphone du CLIENT
·Version du système d'exploitation de l'ordinateur du CLIENT
·CD-ROM d'installation U.S. ROBOTICS
·Guide d'installation U.S. ROBOTICS
4.0 REMPLACEMENT SOUS GARANTIE :
4.1 Dans l'éventualité où le service technique U.S. ROBOTICS ou un service après-vente agréé
4.2 Toute pièce ou tout produit retourné à U.S. ROBOTICS sans RMA délivré par U.S. ROBOTICS ou par un ser-
4.3 Le CLIENT accepte de payer les frais d'expédition nécessaires au retour du produit ou de la pièce au cen-
4.4 Le transfert de responsabilité pour tout dommage ou perte à U.S. ROBOTICS ne sera effectif que lorsque
4.5 Les retours CLIENTS autorisés seront déballés, inspectés et comparés au numéro de modèle et au
4.6 Une fois le retour CLIENT déballé, inspecté et testé, U.S. ROBOTICS s'engage, à sa seule discrétion, à le
4.7 U.S. ROBOTICS fera son maximum pour expédier au CLIENT les pièces ou produits réparés ou remplacés,
4.8 U.S. ROBOTICS ne sera en aucun cas responsable des dommages provoqués par un retard de livraison
U.S. ROBOTICS constaterait que le produit ou la pièce présente un dysfonctionnement ou un problème
attribuable directement à un défaut matériel ou un vice de fabrication, si le produit est dans sa période
de garantie de DEUX (2) ANS et si le CLIENT joint à la pièce ou au produit retourné un exemplaire de la
preuve d'achat datée (original du ticket de caisse d'U.S. ROBOTICS ou d'un de ses revendeurs agréés),
U.S. ROBOTICS enverra au CLIENT une RMA (Return Material Authorisation - Autorisation de Retour de
Matériel) et des instructions de retour du produit vers le dépôt U.S. ROBOTICS autorisé.
vice après-vente agréé U.S. ROBOTICS sera renvoyé.
tre de retour agréé U.S. ROBOTICS, d'assurer le produit ou d'assumer les risques de perte ou de dommage encourus lors de l'expédition et d'utiliser un emballage d'expédition équivalent à l'emballage
d'origine.
la pièce ou le produit retourné sera reçu et accepté par un centre de retour agréé
U.S. ROBOTICS.
numéro de série du produit pour lequel un RMA a été émis. La preuve d'achat jointe sera inspectée pour
vérification de la date et du lieu d'achat. U.S. ROBOTICS se réserve le droit de refuser tout ser vice de
garantie si l'inspection du composant ou du produit retourné ne correspond pas aux renseignements
fournis par le CLIENT et pour lesquels le RMA a été attribué.
réparer ou le remplacer, au moyen de pièces ou produits neufs ou remis à neuf, dans les limites que la
société juge nécessaires pour remettre ce produit ou cette pièce en état de fonctionnement.
aux frais d'U.S. ROBOTICS, dans les VINGT-ET-UN (21) JOURS suivant la réception par U.S. ROBOTICS du
retour CLIENT autorisé à un centre de retour agréé U.S. ROBOTICS.
des pièces ou des produits réparés ou remplacés.
5.0 LIMITATIONS
5.1 LOGICIEL DE TI ERS : il est possible que ce produit U.S. ROBOTICS comprenne un logiciel de tiers ou soit
5.2 DOMMAGE S RESULTANTS D'UN MAUVAIS USAGE, D'U NE NEGLIGENCE, D'UN NON R ESPECT DES
livré avec un tel logiciel, dont l'utilisation est régie par des accords de licence utilisateur séparés fournis
par des revendeurs de logiciels de tiers. La présente garantie limitée
d'U.S. ROBOTICS ne couvre pas de tels logiciels. Pour la garantie applicable, veuillez vous reporter à
l'accord de licence utilisateur correspondant à ces logiciels.
INSTRUCTIONS, D'UN E MAUVAISE INSTALLATION ET / OU DE FACTEURS ENVI RONNEMENTAUX : dans les
limites de la loi en vigueur, la présente garantie limitée d'U.S. ROBOTICS ne s'applique pas à l'usure normale ; aux données perdues ou endommagées en raison d'une interopérabilité avec des versions actuelles et / ou futures du système d'exploitation ou d'autres logiciels et matériels actuels et / ou futurs ;
aux modifications (par des personnes n'appartenant pas à
U.S. ROBOTICS ou à un service après-vente agréé U.S. ROBOTICS) ; aux dommages provoqués par une
erreur de manipulation ou par le non respect des instructions décrites dans la documentation de l'utilisateur ou dans toute documentation annexe ; aux dommages provoqués par des catastrophes naturelles
telles que les éclairs, les tempêtes, les inondations, les incendies ou les tremblements de terre ; aux produits dont le numéro de série a été volontairement falsifié ou effacé ; à une mauvaise utilisation, une
négligence ou une mauvaise manipulation ; aux dommages provoqués par des accidents imprévisibles
de nature électrique, physique ou de température ; aux contrefaçons ; aux données perdues ou endommagées en raison d'un virus informatique, d'un ver ou d'un cheval de Troie, ou d'une corruption du contenu de la mémoire ; aux défaillances du produit liées à un accident, un abus ou une mauvaise utilisation
(notamment une mauvaise installation ou une connexion à une tension ou à une prise inappropriée) ; aux
défaillances provoquées par des produits non fournis par U.S. ROBOTICS ; aux dommages liés aux environnements humides ou corrosifs, à une surtension, à l'expédition ou à des conditions d'utilisation inappropriées ; ou à l'utilisation du produit en dehors des frontières du pays ou du territoire destiné à son
utilisation (tel qu'indiqué par le numéro de modèle du produit ou par toute étiquette d'homologation
locale apposée sur le produit).
27
Page 32

5.3 DAN S LA MESURE OU LA LOI LE PERM ET, LES GARANTI ES ET LES RECOURS PRECEDE MMENT CITES SONT
5.4 LIMITATION DE RESPONSABILITE. DANS LA MESURE OU LA LOI LE PERMET, U.S. ROBOTICS REJETTE, AU
6.0 REJET DE RESPONSABILITE : certains pays, états ou provinces n'autorisent pas l'exclusion ou la
7.0 LOI APPLICABLE : la présente garantie limitée est régie par la législation de l'état de l'Illinois, Etats-
EXCLUSIFS ET RE MPLACENT LES AUTRES GARANTIES , TERMES OU CONDITIONS, EXPLICITES OU IMPLICITES, DE FACTO OU DE JURE, STATUTAIRES OU AUTRES, NOTAMMENT LES GARANTI ES, TERMES OU CONDITIONS DE COMMERCIALI SATION, D'ADAPTATION A UN USAGE PARTICULIER, DE QUALITE
SATISFAISANTE, DE CORRESPONDANCE A LA DE SCRIPTION FOURNIE ET DE NON-IN FRACTION, QUI SONT
TOUS EXPRESSEMENT REJETE S. U.S. ROBOTICS N'ASSUME NI N'AUTORISE AUCUNE PERSON NE A
ASSUME R EN SON NOM TOUTE AUTRE RESPONSABILITE E N RAPPORT AVEC LA VENTE, L'I NSTALLATION,
L'ENTRETIEN, LA GARA NTIE OU L'UTILISATION DE SES PRODUI TS.
NOM DE LA SOCIETE ET DE SES FOURNISSEURS, TOUTE RESPONSABILITE, CONTRACTUELLE OU DE
DROIT CIVIL (Y COMPRIS LA NEGLIGENCE), POUR LES DOMMAGES ACCESSOI RES, INDIRECTS, PARTICULIERS OU PU NITIFS DE QUELQUE NATURE QUE CE SOIT, AINSI QUE TOUTE RESPONSABI LITE DECOULANT
DE TOUT MANQUE A GAGNER, PERTE D'ACTIVITE, PERTE D'INFORMATIONS OU DE DONNEES OU AUTRE
PERTE FINANCIE RE RESULTANT DE OU LIEE A LA VENTE, L'INSTALLATION, L'ENTRETIEN, L'UTILISATION,
LES PERFORMANCE S, LA PANNE OU L'I NTERRUPTION DE FONCTIONNEMENT DE SES PRODUITS, MEME
SI U.S. ROBOTICS OU SES REVENDEURS AGREES ONT ETE INFORME S DE L'EVENTUALITE DE TELS DOMMAGES. U.S. ROBOTICS LIMITE SA RESPONSABILITE A LA R EPARATION, A U REMP LACEME NT OU AU REMBOURSEMENT DU PRIX ACQUITTE, A SA DISCRET ION. CETTE LIMITATION DE RESPONSABILITE LIEE AU X
DOMMAGES RESTERA INCHANGEE MEME SI LES SOLUTIONS PROPOSEES DANS LA PRESENTE S'AVERENT INEFFICACES.
limitation des garanties implicites ou la limitation de responsabilité quant aux dommages accessoires ou
indirects pour certains produits fournis aux clients, ou encore la limitation de responsabilité en cas de
blessure, de sorte que les limitations et exclusions énoncées ci-dessus peuvent n e pas s'appliquer au
CLIENT. Lorsque les garanties implicites ne peuvent pas être exclues dans leur intégralité, elles seront
limitées à la durée de DEUX (2) ANS de la présente garantie écrite. Cette garantie confère au CLIENT des
droits légaux spécifiques qui peuvent varier en fonction de la loi locale.
Unis, à l'exception de ses conflits de principes de droit et à l'exception de la Convention des Nations
Unies sur les contrats de vente internationale de marchandises.
U.S. Robotics Corporation
935 National Parkway
Schaumburg, IL 60173
Etats-Unis
28
Page 33

U.S. Robotics Corporation
935 National Parkway
Schaumburg, Illinois
60173-5157
USA
Questa documentazione non può essere né parzialmente né interamente riprodotta in alcuna forma o
utilizzata per ottenere opere derivate (quali traduzioni, trasformazione o adattamento) senza l'autorizzazione scritta di U.S. Robotics Corporation. U.S. Robotics Corporation si riserva il diritto di revisionare
la presente documentazione e di apportare modifiche periodiche ai prodotti e/o al contenuto di
questo documento senza alcun obbligo di notifica. U.S. Robotics Corporation fornisce la presente documentazione senza alcuna garanzia, implicita o esplicita, ivi comprese, ma non a titolo esclusivo,
garanzie implicite di commerciabilità e idoneità a scopi particolari. Se la presente documentazione
descrive del software su supporto rimovibile, esso viene fornito ai sensi di un contratto di licenza
accluso al prodotto come documento separato, nella documentazione permanente o sul supporto
rimovibile in un file chiamato LICENSE.TXT o !LICENSE.TXT. Qualora sia impossibile individuare una
copia della suddetta documentazione, rivolgersi a U.S. Robotics.
LEGENDA DELLA NORMATIVA DEGLI STATI UNITI La documentazione e il software descritti nel presente
accordo sono forniti agli enti governativi degli Stati Uniti con le restrizioni riportate di seguito.
Tutti i dati tecnici e il software per computer sono di natura commerciale e sono stati sviluppati esclusivamente con fondi privati. Il software viene commercializzato come "Commercial Computer Software" secondo la definizione data in DFARS 252.227-7014 (giugno 1995) o come "articolo
commerciale" secondo la definizione data in FAR 2.101(a) e come tale la sua fruizione è consentita solo
nei limiti dei diritti espressamente attribuiti nella licenza commerciale standard di U.S.Robotics per il
software. I dati tecnici vengono forniti con diritti limitati secondo quanto stabilito in DFAR 252.2277015 (novembre 1995) o FAR 52.227-14 (giugno 1987) laddove applicabile. L'utente si impegna a non
rimuovere od obliterare alcuna porzione di qualsiasi legenda presente in qualsiasi programma concesso in licenza o documentazione contenuta nella guida rapida all'installazione o fornita con essa.
Copyright © 2006 U.S. Robotics Corporation. Tutti i diritti riservati. U.S. Robotics ed il logo U.S. Robotics sono marchi registrati di U.S. Robotics Corporation. Gli altri nomi di prodotti sono usati esclusivamente a scopo identificativo e possono essere marchi delle rispettive società. Le specifiche del prodotto sono soggette a modifica senza preavviso.
Italiano
Page 34

30
Page 35

Installazione con tutti i sistemi operativi
Prima di iniziare la procedura di installazione
NOTA: prima di iniziare, si consiglia di disinstallare eventuali altri
modem installati nel sistema e scollegare tutti i cavi telefonici ad essi
collegati. Consultare la documentazione fornita con il vecchio modem
per ulteriori informazioni.
Annotare qui sotto il numero di serie del modem USRobotics, riportato
sull'etichetta bianca con il codice a barre presente sul modem e sulla sua
confezione. Per ottenere assistenza dal supporto tecnico, è necessario disporre
di questo numero e del numero di modello, che è 2884C. In caso si desideri
ottenere assistenza o scaricare driver dal sito Web, è necessario disporre del
numero ID del prodotto.
Numero ID prodotto Numero di serie
2884C
Fase 1. Inserimento del modem in uno slot di espansione PCI vuoto.
Spegnere e scollegare il computer e tutte le periferiche. Rimuovere la copertura
del cabinet. ConsuItare la documentazione del computer per ottenere istruzioni
a riguardo.
ATTENZIONE: per evitare il rischio di scosse elettriche, assicurarsi che
il computer e tutte le periferiche siano spenti e scollegati dalla rete di
alimentazione e che i cavi telefonici siano stati rimossi dai modem
esistenti e dalle rispettive prese a muro.
Rimuovere la copertura di uno slot di espansione PCI vuoto. Gli slot PCI sono
solitamente in plastica bianca, rivestiti di metallo e lunghi circa 9 cm. La copertura
dello slot si trova nella parte posteriore del computer e copre un'apertura del
cabinet. Alcune coperture sono fissate mediante una vite. Inserire il modem nello
slot dalla parte del bordo dorato. Premere il modem con fermezza per assicurarsi
31
Page 36

che sia inserito correttamente nello slot. Quando il modem è installato
correttamente, il bordo dorato non deve essere visibile. Assicurarsi di avere
posizionato il modem nello slot in modo appropriato, con la staffa allineata
correttamente al computer. La staffa di metallo del modem deve coprire l'apertura
nella parte posteriore del computer. Se si era rimossa una vite dalla copertura
dello slot, utilizzarla per fissare il modem. Ricollocare la copertura del cabinet.
Inserire un'estremità del cavo telefonico nella presa del modem e l'altra
estremità in una presa telefonica analogica a muro. Se con il modem è stato
fornito un adattatore, collegarlo al cavo telefonico prima di inserirlo nella presa
a muro.
NOTA: collegando un microfono alla presa e un paio di altoparlanti
alla presa è inoltre possibile utilizzare il modem con il software
vocale opzionale. In alternativa, è possibile collegare una cuffia a
queste prese.
Fase 2. Installazione dei driver del modem.
NOTA: se durante la procedura di installazione viene richiesto di
selezionare la posizione dei driver di installazione, utilizzare la
posizione indicata qui sotto (dove D: è la lettera assegnata all'unità
CD-ROM in uso).
Driver per Windows Me/98/95 -- D:\
Driver per Windows XP/2000 -- D:\Win2K_XP
NOTA: prima di installare i driver del modem, è necessario che gli
utenti di Windows XP/2000 accedano al sistema mediante un account
con privilegi amministrativi. Gli utenti domestici di Windows XP
possiedono privilegi amministrativi per impostazione predefinita.
Utenti Windows XP: Pannello di controllo: Vista a categorie
Accendere il computer. Inserire il CD-ROM di installazione nell'unità CD-ROM
prima dell'avvio del sistema o dell'apertura di Windows. Windows installerà
l'hardware con i driver incorporati. Al termine di questa procedura, fare clic su
Start, Pannello di controllo, quindi Rete e Connessioni Internet. Fare clic su
Opzioni modem e telefono. Immettere i necessari dati di connessione e fare clic
su OK. Selezionare la scheda Modem. Fare clic su Proprietà. Selezionare la
scheda Driver. Fare clic su Aggiorna driver. Selezionare Installa da elenco o
posizione specifica (proprietà avanzate) e fare clic su Avanti. Selezionare Non
cercare. Selezione manuale del driver da installare e fare clic su Avanti.
Selezionare Disco driver. Fare clic su Sfoglia e selezionare l'unità CD-ROM.
Selezionare Win2K_XP e il driver più appropriato per il modem. Fare clic su
Avanti. È possibile che venga visualizzato il messaggio Firma digitale non
trovata*. Fare clic su Continua. Fare clic su Fine per completare l'installazione.
32
Page 37

Utenti Windows XP: Pannello di controllo: Vista classica
Accendere il computer. Inserire il CD-ROM di installazione nell'unità CD-ROM
prima dell'avvio del sistema o dell'apertura di Windows. Windows installerà
l'hardware con i driver incorporati. Al termine di questa procedura, fare clic su
Start e Pannello di controllo. Fare doppio clic su Opzioni modem e telefono.
Immettere i necessari dati di connessione e fare clic su OK. Selezionare la
scheda Modem. Fare clic su Proprietà. Selezionare la scheda Driver. Fare clic su
Aggiorna driver. Selezionare Installa da elenco o posizione specifica (proprietà
avanzate) e fare clic su Avanti. Selezionare Non cercare. Selezione manuale del
driver da installare e fare clic su Avanti. Selezionare Disco driver. Fare clic su
Sfoglia e selezionare l'unità CD-ROM. Selezionare Win2K_XP e il driver più
appropriato per il modem. Fare clic su Avanti. È possibile che venga visualizzato
il messaggio Firma digitale non trovata*. Fare clic su Continua. Fare clic su Fine
per completare l'installazione.
Utenti Windows 2000
Accendere il computer. Inserire il CD-ROM di installazione nell'unità prima di
avviare il sistema. Quando compare la videata Trovato nuovo hardware, fare clic
su Avanti. Selezionare Cerca un driver adatto alla periferica (scelta consigliata).
Fare clic su Avanti. Selezionare Unità CD-ROM. Fare clic su Avanti. È possibile
che venga visualizzato il messaggio Firma digitale non trovata*. Fare clic su Sì.
Fare clic su Fine per completare l'installazione.
* USRobotics ha eseguito test approfonditi del driver con l'hardware supportato, verificando la
compatibilità con Windows XP/2000.
Utenti Windows Me
Accendere il computer. Inserire il CD-ROM di installazione nell'unità prima
dell'apertura di Windows. Quando compare l'Installazione guidata Nuovo
hardware, selezionare Cercare un driver migliore (scelta consigliata) e fare clic
su Avanti. Fare clic su Fine per completare l'installazione.
Utenti Windows 98
Accendere il computer. Inserire il CD-ROM di installazione nell'unità prima
dell'apertura di Windows. Quando compare l'Installazione guidata Nuovo
hardware, fare clic su Avanti. Selezionare Cerca il miglior driver per la periferica
(scelta consigliata) e fare clic su Avanti. Selezionare Specificare un percorso e
fare clic su Sfoglia. Selezionare l'unità CD-ROM e fare clic su OK. Fare clic su
Avanti. Una volta rilevato il driver, fare clic su Avanti. Fare clic su Fine. Quando
compare l'Installazione guidata Nuovo hardware, fare clic su Avanti. Selezionare
Cerca il miglior driver per la periferica (scelta consigliata) e fare clic su Avanti.
Selezionare Specificare un percorso e fare clic su Sfoglia. Selezionare l'unità CDROM e fare clic su OK. Fare clic su Avanti. Una volta rilevato il driver, fare clic su
Avanti. Fare clic su Fine per completare l'installazione.
33
Page 38

Utenti Windows 95
Accendere il computer. Inserire il CD-ROM di installazione nell'unità prima
dell'apertura di Windows. Quando compare l'Aggiornamento guidato driver di
periferica, fare clic su Avanti. Se il programma di aggiornamento guidato non
rileva il driver, fare clic su Altre posizioni. Fare clic su Sfoglia e selezionare
l'unità CD-ROM. Fare clic su OK. Fare clic su Fine. A questo punto potrebbe
essere richiesto di inserire il disco. Fare clic su OK. Verrà visualizzata la videata
Copia file in corso. Fare clic su Sfoglia e selezionare l'unità CD-ROM. Fare clic su
OK. Verrà nuovamente visualizzata la videata Copia file in corso. Quando
compare l'Aggiornamento guidato driver di periferica, fare clic su Avanti. Se il
programma di aggiornamento guidato non rileva il driver, fare clic su Altre
posizioni. Fare clic su Sfoglia e selezionare l'unità CD-ROM. Fare clic su OK. Fare
clic su Fine per completare l'installazione.
Fase 3. Verifica della corretta installazione del modem.
Windows XP
Fare clic su Start, quindi su Pannello di controllo. Fare clic su Rete e Connessioni
Internet, Opzioni modem e telefono, quindi selezionare la scheda Modem. Verrà
visualizzata una descrizione del modem USRobotics V.92 Voice Win Int e
un'impostazione della porta COM. Se non viene visualizzata alcuna descrizione
del modem, consultare la nota al termine di questa sezione. Se la descrizione
viene visualizzata, fare clic su Modem, evidenziare la descrizione del nuovo
modem e fare clic su Proprietà. Fare clic sulla scheda Diagnostica. Fare clic sul
pulsante Interroga modem. Verrà visualizzata una serie di comandi e risposte
del modem. Ciò indica che l'installazione è riuscita. Se i comandi e le risposte
non vengono visualizzati, consultare la nota al termine di questa sezione.
Windows 2000
Fare clic su Start, Impostazioni e scegliere Pannello di controllo. Fare doppio clic
sull'icona Opzioni modem e telefono. Fare clic sulla scheda Modem. Assicurarsi
che sia evidenziato il modem corretto: USRobotics V.92 Voice Win Int. Se non
viene visualizzata alcuna descrizione del modem, consultare la nota al termine
di questa sezione. Se la descrizione viene visualizzata, fare clic sul pulsante
Proprietà. Fare clic sulla scheda Diagnostica. Fare clic sul pulsante Interroga
modem. Verrà visualizzata una serie di comandi e risposte del modem. Ciò indica
che l'installazione è riuscita. Se i comandi e le risposte non vengono visualizzati,
consultare la nota al termine di questa sezione.
Windows Me/98/95
Fare clic su Avvio/Start, Impostazioni e scegliere Pannello di controllo. Fare
doppio clic sull'icona Modem. Nella videata relativa alle proprietà del modem,
apparirà una descrizione del modem USRobotics V.92 Voice Win Int. Se non
viene visualizzata alcuna descrizione del modem, consultare la nota al termine
di questa sezione. Se la descrizione viene visualizzata, fare clic sulla scheda
Diagnostica. Assicurarsi che sia evidenziata la corretta porta COM (modem).
34
Page 39

Fare clic sul pulsante Ulteriori informazioni. Verrà visualizzata una serie di
comandi e risposte del modem. Ciò indica che l'installazione è riuscita. Se i
comandi e le risposte non vengono visualizzati, consultare la nota al termine di
questa sezione.
NOTA: se il modem non compare nell'elenco e/o non viene visualizzata
una serie di comandi e risposte, controllare che il modem interno sia
inserito nel computer in modo corretto. Spegnere il computer e premere
il modem con fermezza per assicurarsi che sia inserito correttamente
nello slot. Quando il modem è installato correttamente, il bordo dorato non deve
essere visibile. Se si continuano a riscontrare problemi, potrebbe essere
necessario rimuovere il modem e installarlo in un altro slot disponibile. Spegnere
e riavviare il PC. Controllare nuovamente il modem mediante il Pannello di
controllo seguendo le indicazioni descritte in precedenza.
Fase 4. Installazione del software e registrazione del modem.
Rimuovere e reinserire il CD-ROM di installazione. La procedura di installazione
dovrebbe avviarsi automaticamente. L'installazione guidata contenuta nel CDROM illustra la procedura di installazione del gruppo di programmi (tra cui
Internet Call Notification, ControlCenter e il software vocale opzionale) e la
registrazione del modem.
NOTA: se l'interfaccia del CD-ROM di installazione non compare
automaticamente, fare clic su Avvio/Start di Windows e selezionare
Esegui. Nella finestra di dialogo Esegui, digitare D:\setup.exe. Se l'unità
CD-ROM utilizza una lettera diversa, digitare tale lettera invece di "D".
NOTA: se si desidera utilizzare la funzionalità vocale del modem, è
necessario installare il software vocale. Tale software si trova nella
sezione Software del CD-ROM di installazione.
Registrazione del modem
• Fare clic sul link Support (Supporto) dall'interfaccia del CD-ROM di
installazione.
• Seguire le istruzioni a video per registrare il modem e visualizzare le
informazioni sulla garanzia. Se l'interfaccia del CD-ROM di
installazione non compare automaticamente, fare clic su Avvio/Start
di Windows e selezionare Esegui. Nella finestra di dialogo Esegui,
digitare D:\setup.exe. Se l'unità CD-ROM utilizza una lettera diversa,
digitare tale lettera invece di "D".
• È inoltre possibile registrare il modem online visitando l'indirizzo
http://www.usr.com/productreg
35
Page 40

Risoluzione di problemi
Si riscontrano problemi con il modem? Consultare questi passi fondamentali per la risoluzione di problemi.
1) Il cavo telefonico è collegato in modo corretto? Il cavo telefonico deve essere
collegato alla presa del modem e alla presa telefonica a muro. Utilizzare il cavo
telefonico incluso nella confezione del modem. Se con il modem è stato fornito
un adattatore, collegarlo al cavo telefonico prima di inserirlo nella presa a muro.
2) Il modem è installato nel sistema in modo corretto? Consultare la sezione di
questa guida che illustra come verificare la corretta installazione del modem per
ottenere possibili soluzioni basate sui diversi sistemi operativi.
Il computer non riconosce il modem.
Se Plug and Play non rileva il modem come nuovo hardware, è necessario
controllare le seguenti condizioni.
• Assicurarsi che il modem sia inserito correttamente nello slot PCI. Il
modem deve essere inserito nello slot in modo che il bordo dorato non
sia visibile.
• Provare ad installare il modem in un altro slot PCI.
• Consultare il manuale del computer per assicurarsi che lo slot PCI sia
configurato in modo appropriato.
Il modem è installato correttamente ma presenta problemi di funzionamento.
Soluzione possibile: sebbene i dispositivi PCI supportino la condivisione di
IRQ, sul mercato ve ne sono alcuni che non sono in grado di farlo in modo
appropriato. Se il modem è stato assegnato a un IRQ in condivisione con
uno di tali dispositivi, può presentare problemi di funzionamento.
36
Windows Me/98/95: fare clic con il pulsante destro del mouse sull'icona
Risorse del computer sul desktop. Fare clic su Proprietà e selezionare la
scheda Gestione periferiche. Fare doppio clic sull'icona Computer in cima
all'elenco delle periferiche. Verrà visualizzato un elenco degli IRQ del
sistema e le periferiche a cui sono assegnati. Trovare il modem e l'IRQ ad
esso assegnato. Se questo IRQ è utilizzato da altre periferiche, si
potrebbero verificare problemi di funzionamento del modem. Per risolvere
il problema, sarà necessario assegnare un altro IRQ al modem o alla
periferica con cui il modem condivide l'IRQ. Provare ad installare il modem
in un altro slot PCI o consultare la documentazione della periferica
condivisa per ulteriori informazioni sulla sua rimozione, disattivazione o
spostamento.
Page 41

Il software non riconosce il modem.
Soluzione possibile: il software di comunicazione potrebbe non funzionare
correttamente se sono state installate più versioni dello stesso software, se
si sta utilizzando una versione precedente oppure se nel sistema sono stati
installati più software di comunicazione. Si consiglia di utilizzare il software
di comunicazione contenuto nel CD-ROM di installazione del modem.
Soluzione possibile: le impostazioni del software relative alla porta COM
potrebbero non essere corrette. La sezione del software relativa alle
impostazioni deve contenere le informazioni relative alle porte. Assicurarsi
che le impostazioni del software relative alla porta coincidano con quelle
del modem. Per individuare la porta COM utilizzata dal modem, fare clic su
Avvio/Start, Impostazioni e Pannello di controllo. Fare doppio clic su
Modem, selezionare il modem in uso, quindi Proprietà. Consultare la
documentazione del software di comunicazione per istruzioni sulla
regolazione delle impostazioni delle porte.
Soluzione possibile: è possibile che nel software o in Windows non sia stato
selezionato il tipo corretto di modem. Fare clic su Avvio/Start,
Impostazioni, quindi su Pannello di controllo. Una volta aperto il Pannello
di controllo, fare clic su Modem. Verrà visualizzato un elenco dei modem
installati. In questa finestra è possibile anche aggiungere, eliminare o
visualizzare le proprietà dei modem. Il modem USRobotics installato deve
essere incluso nell'elenco dei modem installati. Se nessuna delle
descrizioni dell'elenco corrisponde al modem USRobotics in uso oppure se
l'elenco è vuoto, il modem non è stato installato correttamente. In tal caso,
ripetere l'installazione.
Soluzione possibile: se si utilizza un software che prevede una descrizione
di modem Windows e si è installato un modem precedente, potrebbe essere
necessario aggiornare le impostazioni del software per adattarle all'uso di
USRobotics V.92 Voice Win Int.
Il modem non effettua chiamate in uscita o non risponde alle chiamate in arrivo.
PROBLEMI CON LE CHIAMATE IN USCITA E IN ARRIVO
Soluzione possibile: è possibile che il cavo telefonico non sia stato
collegato correttamente al modem. Il cavo telefonico deve essere collegato
alla presa del modem contrassegnata con e alla presa telefonica a
muro. Se possibile, utilizzare il cavo telefonico incluso nella confezione del
modem. Se con il modem è stato fornito un adattatore, collegarlo al cavo
telefonico prima di inserirlo nella presa a muro.
Soluzione possibile: è possibile che siano presenti altri dispositivi tra il
modem e la presa telefonica a muro. Non devono esserci sdoppiatori di
linea, fax o altri dispositivi tra il modem e la presa telefonica a muro.
37
Page 42

UTENTI AZIENDALI
Soluzione possibile: è possibile che si sia collegato il cavo telefonico del
modem a una linea digitale. In caso di dubbio, contattare il dipartimento
responsabile del sistema telefonico per verificare se si utilizza una linea
telefonica digitale.
Se il sistema telefonico in uso richiede la digitazione del “9” per accedere a
una linea esterna, inserire il “9” prima del numero che si sta digitando.
UTENTI DI POSTA VOCALE
Soluzione possibile: se la compagnia telefonica utilizzata offre il servizio di
posta vocale, il tono di libero potrebbe venire modificato nel caso vi siano
messaggi in attesa. Scaricare i messaggi in attesa per ripristinare il normale
tono di libero.
Il modem sembra cercare invano di connettersi a un altro modem.
Soluzione possibile: la qualità della connessione potrebbe non essere
buona. Ogni chiamata viene instradata in modo diverso, quindi riprovare ad
effettuare la chiamata.
Si riscontrano problemi con il software per fax o voce.
Soluzione possibile: consultare la guida elettronica disponibile all'interno
del software stesso.
Il modem non raggiunge una connessione Internet a 56K.
38
I protocolli V.92 e V.90 consentono velocità di download fino a 56K e il
protocollo V.92 permette velocità di upload fino a 48K, ma le condizioni
della linea possono influenzare le effettive velocità durante le singole
connessioni. A causa di particolari configurazioni delle linee telefoniche,
alcuni utenti potrebbero non essere in grado di usufruire a pieno della
tecnologia V.92 o V.90. Al fine di ottenere una connessione V.92 o V.90:
• Il server a cui ci si collega deve supportare e fornire un segnale digitale
V.92 o V.90. Il proprio provider di servizi Internet potrà fornire un
elenco di connessioni remote completo di informazioni relative alle
funzioni da esse supportate.
• La linea telefonica che collega provider e modem deve essere in grado
di supportare una connessione a 56K e richiedere una sola
conversione di segnale da digitale ad analogico. Il segnale a 56K
proveniente dal provider è un segnale digitale. Nel tragitto tra provider
e modem si verifica una conversione di segnale da digitale ad
analogico che consente al modem di ricevere i dati. È di fondamentale
importanza che in questo tragitto non si verifichi più di una
conversione di segnale da digitale ad analogico. In caso contrario,
infatti, la velocità della connessione passerà a V.34 (33,6 Kbps) per
impostazione predefinita. È inoltre possibile che impedimenti sulle
Page 43

linee telefoniche locali che collegano provider e modem impediscano
o limitino il raggiungimento delle velocità di connessione V.92 o V.90.
Ogni chiamata viene instradata in modo diverso, quindi è consigliabile
effettuare più tentativi per ottenere la connessione. Una modalità di
verifica consiste nel connettersi a una località che richieda una
chiamata interurbana: le linee interurbane, infatti, sono solitamente
meno intasate di quelle locali. È inoltre importante ricordare che le
compagnie telefoniche effettuano continuamente operazioni di
aggiornamento dei propri sistemi. Le linee che attualmente non
supportano connessioni a 56K potrebbero farlo nel prossimo futuro.
• Il modem deve essere connesso a un server V.92 o V.90. Due modem
a 56K non si connettono tra loro con velocità a 56K.
Supporto tecnico
Se la sezione "Risoluzione di problemi" non ha contribuito all'eliminazione del
problema, è possibile ottenere ulteriore assistenza mediante una delle seguenti
risorse.
1. Sito Web di USRobotics
La maggior parte dei problemi riscontrati dagli utenti sono trattati nelle
pagine del sito Web che riportano le domande frequenti (FAQ) e la
risoluzione dei problemi per un dato prodotto. Il codice ID di questo
prodotto è 2884C. Per ricevere informazioni sul sito Web di USRobotics,
potrebbe essere necessario conoscere il numero di modello. Accedere a:
http://www.usr.com/support
2. Assistenza tecnica USRobotics
Gli specialisti addetti all'assistenza sono in grado di rispondere a quesiti di
natura tecnica circa i modem USRobotics.
Paese Telefono Online
Regno Unito 0870 844 4546 www.usr.com/emailsupport/uk
Italia 800 979 266 www.usr.com/emailsupport/it
Informazioni di conformità
Conformità CE
U.S. Robotics Corporation (935 National Parkway, Schaumburg, Illinois, 60173-5157, USA) dichiara sotto
la propria responsabilità che il prodotto U.S. Robotics 56K Internal Voice Faxmodem, modello 2884C, a
cui si riferisce questa dichiarazione, è conforme ai seguenti standard e/o ad altra documentazione
normativa rilevante.
EN60950
EN55022
EN55024
Si dichiara che il suddetto prodotto è conforme ai requisiti essenziali e ad altre norme rilevanti della
direttiva europea 1999/5/EC.
39
Page 44

È stata seguita la procedura di accertamento di conformità citata nell'Articolo 10(3) e descritta
nell'Allegato II della direttiva 1999/5/EC.
Una copia elettronica della Dichiarazione di conformità CE è disponibile sul sito Web di U.S. Robotics
alla pagina: www.usr.com
Dichiarazione di compatibilità di rete
Questo apparecchio è stato progettato per funzionare in modo corretto con tutte le reti PSTN dei Paesi
appartenenti all'Unione Europea.
Il presente modem è fornito di connettore PSTN idoneo per il Paese in cui è stato acquistato. Se si
necessita di utilizzare questo apparecchio su una rete diversa da quella per cui è stato acquistato, si
consiglia di contattare il fornitore per ottenere assistenza sulla connessione.
Garanzia limitata di U.S. Robotics Corporation
1.0 CONDIZIONI GENERALI
1.1 La presente garanzia limitata è concessa esclusivamente all'utente/acquirente originale (CLIENTE) e non
1.2 Nessun agente, rivenditore o partner commerciale di U.S. Robotics Corporation (U.S. ROBOTICS) è autor-
1.3 La presente garanzia limitata esclude espressamente ogni prodotto che non sia stato acquistato come
1.4 La presente garanzia limitata è applicabile esclusivamente nel Paese o territorio in cui è previsto l'uso del
1.5 U.S. ROBOTICS garantisce al CLIENTE che questo prodotto è esente da difetti di fabbricazione e materiali,
1.6 Nel rispetto della presente garanzia, U.S. ROBOTICS si impegna, a propria discrezione, a riparare il pro-
1.7 U.S. ROBOTICS garantisce i prodotti o componenti sostituiti in garanzia per NOVANTA (90) GIORNI a
1.8 U.S. ROBOTICS non garantisce né afferma che il prodotto sarà rispondente alle necessità del CLIENTE o
1.9 U.S. ROBOTICS non garantisce né afferma che il funzionamento del software fornito con il presente pro-
1.10 U.S. ROBOTICS non è responsabile di eventuale software o dati contenuti o memorizzati dal CLIENTE nel
2.0 OBBLIGHI DEL CLIENTE
2.1 Il CLIENTE si assume ogni responsabilità riguardo alla corrispondenza del prodotto a specifiche ed esi-
2.2 Si raccomanda al CLIENTE di creare una copia di backup di tutto il software fornito con il presente pro-
2.3 Il CLI ENTE si assume ogni responsabilità riguardo alla corretta installazione e configurazione del pre-
2.4 Il CLIENTE deve fornire a U.S. ROBOTICS una prova di acquisto datata (copia della ricevuta originale di
3.0 SERVIZIO IN GARANZIA
3.1 Il CLIE NTE deve rivolgersi al supporto tecnico U.S. ROBOTICS o a un centro di assistenza U.S. ROBOTICS
3.2 Il cliente deve fornire i numeri di modello e di serie del prodotto e una prova di acquisto datata (copia
3.3 Per maggiori informazioni su come contattare il supporto tecnico U.S. ROBOTICS o un centro di assis-
è trasferibile.
izzato a modificare i termini della garanzia per conto di U.S. ROBOTICS.
nuovo presso U.S. ROBOTICS o un rivenditore autorizzato.
prodotto (come indicato dal numero di modello e da eventuali etichette di approvazione delle telecomunicazioni locali affisse sul prodotto).
in normali condizioni di uso e servizio, per DUE (2) ANNI a partire dalla data di acquisto presso U.S.
ROBOTICS o un rivenditore autorizzato.
dotto o componente difettoso con componenti nuovi o revisionati oppure sostituire il prodotto o componente difettoso con un prodotto o componente nuovo o revisionato; qualora le due suddette opzioni non
siano possibili, U.S. ROBOTICS potrà, a propria discrezione, rimborsare il CLIENTE con una somma non
superiore al più recente prezzo di acquisto al dettaglio pubblicato da U.S. ROBOTICS per il prodotto, con
la detrazione di eventuali tariffe di commis sione. Tutti i prodotti o componenti sostituiti diventano di proprietà di U.S. ROBOTICS.
partire dalla data in cui il prodotto o componente viene inviato al Cliente.
funzionerà in combinazione con qualsiasi prodotto hardware o software di altre case.
dotto sarà ininterrotto ed esente da errori o che tutti i difetti dei prodotti software verranno corretti.
presente prodotto.
genze del CLIENTE stesso.
dotto.
sente prodotto ed è tenuto a garantire installazione, funzionamento e configurazione corretti, nonché
compatibilità con l'ambiente operativo in cui il prodotto verrà utilizzato.
acquisto presso U.S. ROBOTICS o un rivenditore autorizzato) per ottenere l'autorizzazione di ogni intervento in garanzia.
autorizzato entro il periodo di garanzia applicabile per ricevere l'autorizzazione al servizio in garanzia.
della ricevuta originale di acquisto presso U.S. ROBOTICS o un rivenditore autorizzato) per ottenere
l'autorizzazione dell'intervento in garanzia.
40
Page 45

3.4 Quando contatta il supporto tecnico U.S. ROBOTICS, il CLIENTE deve assicurarsi di avere a disposizione i
tenza U.S. ROBOTICS autorizzato, visitare il sito Web di U.S ROBOTICS all'indirizzo www.usr.com.
seguenti dati/elementi:
· Numero di modello del prodotto
· Numero di serie del prodotto
· Prova di acquisto datata
· Nome di contatto e numero telefonico del CLIENT E
· Versione del sist ema operativo in uso
· CD-ROM di installazione U.S. ROBOTICS
· Guida all'installazione U.S. ROBOTICS
4.0 SOSTITUZIONE IN GARANZIA
4.1 Nel caso in cui il supporto tecnico U.S. ROBOTICS o il centro di assistenza U.S. ROBOTICS autorizzato
4.2 I prodotti o componenti inviati a U.S. ROBOTICS senza un numero RMA fornito da U.S. ROBOTICS o da un
4.3 Il CLIE NTE si impegna a sostenere le spese di spedizione per l'invio del prodotto al centro restituzioni
4.4 U.S. ROBOTICS non si assume alcuna responsabilità per la perdita o il danneggiamento del pacco fino al
4.5 I prodotti resi su autorizzazione verranno disimballati, ispezionati e confrontati con i numeri di modello e
4.6 Una volta che l'articolo restituito è stato disimballato, ispezionato e testato, U.S. ROBOTICS, a propria
4.7 U.S. ROBOTICS si impegna a fare il possibile per restituire al CLIENTE il prodotto o componente sostituito
4.8 U.S. ROBOTICS non sarà responsabile di eventuali danni causati da ritardi nella restituzione di prodotti o
determini che il prodotto o componente presenti un problema direttamente attribuibile a difetti di fabbri cazione e/o materiali e il prodotto sia ancora nel periodo di garanzia di DUE (2) ANNI, U.S. ROBOTICS
fornirà al CLIENTE un numero RMA (Return Material Authorisation) e le istruzioni per la restituzione del
prodotto alla sede di recapito U.S. ROBOTICS autorizzata, a condizione che il CLIENTE includa una copia
della prova di acquisto datata (ricevuta originale di acquisto presso U.S. ROBOTICS o un rivenditore
autorizzato) insieme al prodotto o componente restituito.
centro di assistenza U.S. ROBOTICS autorizzato verranno immediatamente restituiti.
U.S. ROBOTICS autorizzato, ad assicurare il pacco inviato o ad assumersi il rischio di perdita o danneggiamento durante la spedizione e ad utilizzare un imballaggio equivalente alla confezione originale.
momento del ricevimento dell'articolo da parte di un centro restituzioni U.S. ROBOTICS
autorizzato.
di serie del prodotto per cui il numero RMA era stato autorizzato. La data e il luogo di acquisto indicati
nella prova di acquisto allegata verranno verificati. U.S. ROBOTICS si riserva il diritto di negare il servizio
in garanzia nel caso in cui l'ispezione del prodotto o componente restituito non corrisponda alle informazioni fornite dal CLIENTE e sulla base delle quali è stata autorizzata la restituzione.
discrezione, provvederà a ripararlo o sostituirlo utilizzando prodotti o componenti nuovi o revisionati,
fino a ripristinare le condizioni operative del prodotto.
o riparato, a spese di U.S. ROBOTICS, entro VENTUNO (21) GIORNI dalla data di ricevimento dell'articolo
presso il centro restituzioni U.S. ROBOTICS autorizzato.
componenti sostituiti o riparati.
5.0 LIMITAZIONI
5.1 SOFTWARE DI TERZE PARTI: questo prodotto U.S. ROBOTICS può includere software di terze parti oppure
5.2 SOFTWAR E DI TERZE PARTI: questo prodotto U.S. ROBOTICS può includere software di terze parti oppure
5.3 NEI LIM ITI CONSENTITI DALLA LEGGE, LE SUDDETTE GARANZIE E I SUDDETTI RIMEDI SONO ESCLUSIVI E
5.4 LI MITAZION E DELLA GARANZIA. FATTE SALVE LE DISPOSIZIONI PREVISTE DALLA LEGGE, U.S . ROBOTICS E
esservi allegato; l'uso di tali software è regolato da un distinto contratto di licenza per l'utente finale fornito dai produttori del software. La presente garanzia limitata U.S. ROBOTICS non si applica a tali prodotti software di altre case. Fare riferimento al contratto di licenza per l'utente finale che regola l'uso di
tali prodotti software per la relativa garanzia.
SOSTITUISCONO TUTTE LE ALTRE GARANZIE O CONDIZIONI, ESPRESSE O IMPLICITE, DI FATTO O AI SENSI
DELLA LEGGE, STATUTARI E O DI ALTRA NATURA, COMPRESE LE GARA NZIE O LE CONDIZIONI DI COMMERCIABILITÀ, IDONEITÀ A SCOPI PARTICOLARI, QUALITÀ SODDISFACENTE, CORRISPONDENZA ALLA
DESCRIZIONE E NON VIOL AZIONE, RISPETTO ALLE QUALI SI DECLINA OGN I RESPONSABILITÀ. U.S.
ROBOTICS NON SI ASSUME NÉ AUTORIZZA ALTRE PERSONE AD ASSUMERE PER SUO CONTO ULTERIORI
RESPONSABILITÀ I N RELAZIONE ALLA VENDITA, ALL'INSTALLAZIONE, ALLA MANUTENZIONE, ALLA
GARANZIA O ALL'USO DEI PROPRI PRODOTTI.
I SUOI FORN ITORI NON POTRANNO ESSERE RITEN UTI RESPONSABILI PE R INADEMPIMENTO O ATTO
ILLECITO, COMPRESA LA NEGLIGENZA, DI QUALSIASI DANNO CONSEQUENZIALE, INDIRETTO, SPECIFICO
O PUNITIVO DI QUALSIA SI TIPO O DELLA PERDITA DI INTROITI, PROFITTI O AFFARI, DE LLA PERDITA DI
INFORMAZIONI O DATI O DI ALTRE PERDITE FINANZIARIE DOVUTE O COLLEGATE ALLA VENDITA,
ALL'INSTALLAZIONE, ALLA MANUTENZIONE, ALL'USO, ALLE PRESTAZIONI, AL GUASTO O ALL'INTERRUZI-
41
Page 46

ONE DI SERVIZIO DEI SUOI PRODOTTI, ANCHE QUALORA U.S. ROBOTICS O UNO DEI SUOI RIVENDITORI
AUTORIZZATI SIA STATO AVVERTITO DELLA POSSIBILITÀ DI TALI DANNI. LA RESPONSABILITÀ DI U.S.
ROBOTICS È LIMITATA ALLA RIPARAZIONE, ALLA SOSTITUZIONE O AL RIMBORSO DEL PREZZO DI
ACQUISTO DEL PRODOTTO, A SUA DISCREZ IONE. ROBOTICS OPTION. QUESTA LIMITAZIONE DI RESPONSABILITÀ PER DANN I NON VIENE MODIFICATA QUALORA I RIMEDI DESCRITTI NON CONSEGUANO IL LORO
6.0 LIMITAZIONE DELLA GARANZIA: alcuni Paesi, Stati, territori o regioni non autorizzano l'esclusione
7.0 DIRITTO APPLICABILE: la presente garanzia limitata è soggetta alle leggi in vigore nello stato dell'Illi-
SCOPO FONDAMENTALE.
o la limitazione delle garanzie implicite o la limitazione dei danni incidentali o consequenziali per alcuni
prodotti forniti ai consumatori o la limitazione della responsabilità per danni personali; pertanto, le suddette limitazioni o esclusioni potrebbero non essere applicabili o essere applicabili solo parzialmente.
Nei casi in cui per legge non sia consentito escludere del tutto le garanzie implicite, le stesse saranno limitate ai DUE (2) ANN I di durata della presente garanzia scritta. La presente garanzia attribuisce al CLIENTE diritti legali specifici che possono variare da Paese a Paese.
nois, Stati Uniti, esclusi i relativi principi sui conflitti di legge e l'applicazione della Convenzione delle
Nazioni Unite sui Contratti sulla Vendita Internazionale di Beni.
U.S. Robotics Corporation
935 National Parkway
Schaumburg, IL, 60173
U.S.A
42
Page 47

U.S. Robotics Corporation
935 National Parkway
Schaumburg, Illinois
60173-5157
USA
Kein Teil dieser Dokumentation darf ohne schriftliche Genehmigung der U.S. Robotics Corporation in
irgendeiner Form oder mit irgendwelchen Mitteln vervielfältigt oder für irgendwelche Weiterbearbeitung (beispielsweise eine Übersetzung, Konvertierung oder Anpassung) verwendet werden. Die U.S.
Robotics Corporation behält sich das Recht vor, diese Dokumentation von Zeit zu Zeit zu überarbeiten
und Veränderungen an den Produkten und/oder dem Inhalt dieser Dokumentation vorzunehmen,
ohne eine solche Überarbeitung bzw. Änderung mitteilen zu müssen. Die U.S. Robotics Corporation
liefert diese Dokumentation ohne jegliche Garantie, weder stillschweigend noch ausdrücklich, einschließlich, jedoch nicht beschränkt auf stillschweigende Garantien der handelsüblichen Qualität und
Eignung für einen bestimmten Zweck. Software, die wie in dieser Dokumentation beschrieben auf
Wechselspeichermedien geliefert wird, unterliegt einem Lizenzvertrag. Dieser liegt dem Produkt als
eigenes Dokument, als gedruckte Dokumentation oder auf dem Wechselspeichermedium in einer
Datei namens LICENSE.TXT oder !LICENSE.TXT bei. Falls Ihnen kein Exemplar vorliegt, können Sie
eines von U.S. Robotics anfordern.
HINWEISE FÜR BEHÖRDEN DE R VEREINIGTEN STAATEN Für eine Verwendung bei Behörden der Vereinigten Staaten muss bezüglich der Dokumentation und der hierin beschriebenen Software Folgendes
beachtet werden:
Alle technischen Daten und die Computer-Software sind gewerblicher Natur. Die Entwicklung wurde
rein aus privater Hand finanziert. Die Software wird als „Computer-Handelssoftware“ gemäß Definition
in DFARS 252.227-7014 (Juni 1995) oder als „Handelsartikel“ gemäß Definition in FAR 2.101(a) ausgeliefert. Insofern beinhaltet sie nur die in der standardmäßigen Handelslizenz für die Software von U.S.
Robotics vorgesehenen Rechte. Die technischen Daten unterliegen, je nach Anwendbarkeit, nur den in
DFAR 252.227-7015 (Nov 1995) oder FAR 52.227-14 (Juni 1987) niedergelegten eingeschränkten
Rechten. Sie verpflichten sich, keinen Teil einer Vorschrift, die mit einem lizenzierten Programm oder
der Dokumentation, die mit diesem Programm oder zusammen mit dieser Installationsanleitung ausgeliefert wird, zu löschen oder zu streichen.
Copyright © 2006 U.S. Robotics Corporation. Alle Rechte vorbehalten. U.S. Robotics und das U.S.
Robotics Logo sind eingetragene Marken der U.S. Robotics Corporation. Alle weiteren Produktbezeichnungen werden nur zur Identifizierung verwendet und sind möglicherweise Marken der jeweiligen Hersteller. Produktspezifische Angaben können ohne vorherige Ankündigung geändert werden.
Deutsch
Page 48

44
Page 49

Installation für alle Betriebsysteme
Vorbereitung der Installation
HINWEIS: Vor der Installation empfehlen wir Ihnen, zunächst alle
anderen Modems in Ihrem System zu deinstallieren und sämtliche an
diese Modems angeschlossenen Telefonkabel herauszuziehen.
Befolgen Sie hierzu die Anweisungen in der Dokumentation Ihres
Modems.
Notieren Sie die Seriennummer Ihres neuen USRobotics Modems (diese
befindet sich auf dem weißen Strichcode-Aufkleber auf dem Modem sowie auf
der Verpackung im Feld unter "SERIAL NUMBER"). Wenn Sie sich an unseren
Technischen Support wenden, müssen Sie diese Nummer sowie Ihre
Modellnummer - diese lautet 2884C - angeben, damit wir Ihnen helfen können.
Wenn Sie Hilfe brauchen oder Treiber von der Website herunterladen möchten,
benötigen Sie Ihre Produktnummer.
Produktnummer Seriennummer
2884C
Schritt 1: Einstecken des Modems in einen freien PCI-Steckplatz
Schalten Sie Ihren Computer und alle Peripheriegeräte aus. Ziehen Sie das
Netzkabel des Computers aus der Steckdose, und entfernen Sie das
Computergehäuse. (Wenn Sie nicht wissen, wie das geht, lesen Sie in der
Dokumentation zu Ihrem Computer nach.)
ACHTUNG: Vergewissern Sie sich, dass Ihr Computer und alle
Peripheriegeräte ausgeschaltet und nicht an das Stromnetz
angeschlossen sind und dass sämtliche Telefonkabel aus bestehenden
Modems und aus den Wandbuchsen gezogen wurden, um einen
Stromschlag zu vermeiden.
45
Page 50

Entfernen Sie die Abdeckung eines freien PCI-Steckplatzes. PCI-Steckplätze sind
normalerweise knapp 9 cm lang, aus weißem Kunststoff und innen mit Metall
beschichtet. Die Abdeckung befindet sich an der Rückseite des Computers über
einer Gehäuseöffnung. Manche Abdeckungen sind mit einer Schraube befestigt.
Stecken Sie das Modem mit der goldenen Seite zuerst in den Steckplatz ein. Sie
müssen das Modem fest hineindrücken, damit es im Steckplatz richtig sitzt.
Wenn das Modem richtig angeschlossen ist, können Sie den goldenen Rand der
Steckverbindung nicht mehr sehen. Achten Sie darauf, das Modem sorgfältig in
den Steckplatz einzuschieben, sodass die Abdeckung des Modems bündig mit
Ihrem Computer abschließt. Die Metallabdeckung des Modems verschließt die
Öffnung auf der Rückseite des Computers. Wenn Sie eine Schraube aus der
Abdeckung entfernt haben, befestigen Sie das Modem mit dieser Schraube.
Montieren Sie das Computergehäuse wieder.
Stecken Sie ein Ende des Telefonkabels in die Buchse des Modems und
das andere Ende in einen analogen Telefonanschluss. Wenn Ihr Modem mit
einem Adapter geliefert wird, müssen Sie diesen an das Telefonkabel
anschließen, bevor es in den Wandanschluss gesteckt wird.
HINWEIS: Sie können auch ein Mikrofon an die Buchse und zwei
Lautsprecher an die Buchse anschließen, um Ihr Modem
gemeinsam mit der optionalen Sprachsoftware zu verwenden. Auch
Kopfhörer lassen sich an diese Buchsen anschließen.
Schritt 2: Installation der Modemtreiber
HINWEIS: Wenn Sie während der Installation aufgefordert werden, die
Position Ihrer Installationstreiber zu wählen, gilt die folgende Quelle auf
der Installations-CD-ROM (vorausgesetzt, dass D: Ihr CD-ROM-Laufwerk
ist).
Windows Me/98/95-Treiber: D:\
Windows XP/2000-Treiber: D:\Win2K_XP
HINWEIS: Benutzer von Windows XP/2000 müssen sich vor der
Installation eines Modemtreibers über ein Administrator-Konto
anmelden. Wenn Sie Windows XP daheim benutzen, haben Sie
automatisch ein Administrator-Konto.
46
Page 51

Benutzer von Windows XP: Systemsteuerung: Kategorieansicht
Schalten Sie Ihren Computer ein. Legen Sie die Installations-CD in Ihr CD-ROMLaufwerk ein, bevor Sie sich anmelden oder Windows geöffnet wird. Windows
installiert die Hardware mit integrierten Treibern. Klicken Sie nach Abschluss
dieses Vorgangs auf Windows Start, Systemsteuerung, Netzwerk- und
Internetverbindungen. Klicken Sie auf Telefon- und Modemoptionen. Geben Sie
die erforderlichen Wählinformationen ein; klicken Sie auf OK. Wählen Sie die
Registerkarte Modems. Klicken Sie auf Eigenschaften. Wählen Sie die
Registerkarte Treiber. Klicken Sie auf Treiber aktualisieren. Wählen Sie Von
einer Liste oder bestimmten Position installieren (Erweitert) und klicken Sie auf
Weiter. Wählen Sie die Option Nicht suchen, sondern den zu installierenden
Treiber selbst wählen und klicken Sie auf Weiter. Wählen Sie Datenträger.
Klicken Sie auf Durchsuchen und wählen Sie Ihr CD-ROM-Laufwerk. Wählen Sie
Win2K_XP und dann den geeignetsten Treiber für Ihr Modem. Klicken Sie auf
Weiter. Möglicherweise wird die Meldung "Digitale Signatur nicht gefunden"
angezeigt.* Klicken Sie auf Trotzdem fortfahren. Klicken Sie auf Fertig stellen,
um die Installation abzuschließen.
Benutzer von Windows XP: Systemsteuerung: Klassische Ansicht
Schalten Sie Ihren Computer ein. Legen Sie die Installations-CD in Ihr CD-ROMLaufwerk ein, bevor Sie sich anmelden oder Windows geöffnet wird. Windows
installiert die Hardware mit integrierten Treibern. Klicken Sie nach Abschluss
dieses Vorgangs auf Windows Start, Systemsteuerung. Doppelklicken Sie auf
Telefon- und Modemoptionen. Geben Sie die erforderlichen Wählinformationen
ein; klicken Sie auf OK. Wählen Sie die Registerkarte Modems. Klicken Sie auf
Eigenschaften. Wählen Sie die Registerkarte Treiber. Klicken Sie auf Treiber
aktualisieren. Wählen Sie Von einer Liste oder bestimmten Position installieren
(Erweitert) und klicken Sie auf Weiter. Wählen Sie die Option Nicht suchen,
sondern den zu installierenden Treiber selbst wählen und klicken Sie auf
Weiter. Wählen Sie Datenträger. Klicken Sie auf Durchsuchen und wählen Sie Ihr
CD-ROM-Laufwerk. Wählen Sie Win2K_XP und dann den geeignetsten Treiber
für Ihr Modem. Klicken Sie auf Weiter. Möglicherweise wird die Meldung
"Digitale Signatur nicht gefunden" angezeigt.* Klicken Sie auf
Trotzdem
fortfahren. Klicken Sie auf Fertig stellen, um die Installation abzuschließen.
Benutzer von Windows 2000
Schalten Sie Ihren Computer ein. Legen Sie die Installations-CD-ROM in Ihr
Laufwerk ein, bevor Sie sich anmelden. Klicken Sie auf Weiter, wenn der
Bildschirm "Neue Hardware gefunden" erscheint. Wählen Sie Nach einem
passenden Treiber für das Gerät suchen (empfohlen). Klicken Sie auf Weiter.
Wählen Sie
CD-ROM-Laufwerke. Klicken Sie auf Weiter. Möglicherweise wird die Meldung
"Digitale Signatur nicht gefunden" angezeigt.* Klicken Sie auf Ja. Klicken Sie auf
Fertig stellen, um die Installation abzuschließen.
* USRobotics hat diesen Treiber in Verbindung mit der unterstützten Hardware sorgfältig überprüft und
bestätigt die Kompatibilität mit Windows XP/2000.
47
Page 52

Benutzer von Windows Me
Schalten Sie Ihren Computer ein. Legen Sie die Installations-CD in Ihr CD-ROMLaufwerk ein, bevor Windows geöffnet wird. Wählen Sie auf dem Bildschirm
"Hardware-Assistent" Automatisch nach dem besten Treiber suchen
(Empfohlen) und klicken Sie auf Weiter. Klicken Sie auf Fertig stellen, um die
Installation abzuschließen.
Benutzer von Windows 98
Schalten Sie Ihren Computer ein. Legen Sie die Installations-CD in Ihr CD-ROMLaufwerk ein, bevor Windows geöffnet wird. Klicken Sie auf Weiter, wenn der
"Hardware-Assistent" erscheint. Wählen Sie Nach dem besten Treiber für das
Gerät suchen (Empfohlen) und klicken Sie auf Weiter. Wählen Sie Andere Quelle
angeben und klicken Sie auf Durchsuchen. Wählen Sie Ihr CD-ROM-Laufwerk;
klicken Sie auf OK. Klicken Sie auf Weiter. Klicken Sie auf Weiter, wenn der
richtige Treiber gefunden wurde. Klicken Sie auf Fertig stellen. Klicken Sie auf
Weiter, wenn der "Hardware-Assistent" erscheint. Wählen Sie Nach dem besten
Treiber für das Gerät suchen (Empfohlen) und klicken Sie auf Weiter. Wählen Sie
Andere Quelle angeben und klicken Sie auf Durchsuchen. Wählen Sie Ihr CD-
ROM-Laufwerk; klicken Sie auf OK. Klicken Sie auf Weiter. Klicken Sie auf
Weiter, wenn der richtige Treiber gefunden wurde. Klicken Sie auf Fertig stellen,
um die Installation abzuschließen.
Benutzer von Windows 95
Schalten Sie Ihren Computer ein. Legen Sie die Installations-CD in Ihr CD-ROMLaufwerk ein, bevor Windows geöffnet wird. Klicken Sie auf Weiter, wenn der
Assistent für Gerätetreiber-Updates erscheint. Wenn der Assistent den Treiber
nicht finden kann, klicken Sie auf Andere Position. Klicken Sie auf Durchsuchen
und wählen Sie Ihr CD-ROM-Laufwerk. Klicken Sie auf OK. Klicken Sie auf Fertig
stellen. Nun kann die Aufforderung Datenträger einlegen erscheinen. Klicken Sie
auf OK. Daraufhin wird der Bildschirm "Dateien kopieren" geöffnet. Klicken Sie
auf Durchsuchen und wählen Sie Ihr CD-ROM-Laufwerk. Klicken Sie auf OK. Nun
erscheint wieder der Bildschirm "Dateien kopieren". Klicken Sie auf Weiter,
wenn der Assistent für Gerätetreiber-Updates erscheint. Wenn der Assistent den
Treiber nicht finden kann, klicken Sie auf Andere Position. Klicken Sie auf
Durchsuchen und wählen Sie Ihr CD-ROM-Laufwerk. Klicken Sie erneut auf OK.
Klicken Sie auf Fertig stellen, um die Installation abzuschließen.
48
Page 53

Schritt 3: Überprüfen der korrekten Installation Ihres Modems
Windows XP
Klicken Sie unter Windows auf Start und Systemsteuerung. Klicken Sie auf
Netzwerk- und Internetverbindungen, Telefon- und Modemoptionen und dann
auf die Registerkarte Modems. Es sollte eine Beschreibung Ihres Modems,
USRobotics V.92 Voice Winmodem Internal, sowie ein COM-Anschluss angezeigt
werden. Wenn Sie keine Beschreibung Ihres Modems sehen, lesen Sie den
Hinweis nach diesem Abschnitt. Wenn die Beschreibung erscheint, klicken Sie
auf Modem, markieren Sie die Beschreibung des neuen Modems und klicken Sie
auf Eigenschaften. Klicken Sie auf die Registerkarte Diagnose. Klicken Sie auf
die Schaltfläche Modem abfragen. Daraufhin sollte eine Reihe von Befehlen und
Antworten vom Modem kommen. Das bedeutet, dass die Installation erfolgreich
war. Wenn Sie keine Befehle und Antworten sehen, lesen Sie den Hinweis nach
diesem Abschnitt.
Windows 2000
Klicken Sie unter Windows auf Start, Einstellungen und dann auf
Systemsteuerung. Doppelklicken Sie auf das Symbol Telefon- und
Modemoptionen. Klicken Sie auf die Registerkarte Modems. Vergewissern Sie
sich, dass das richtige Modem markiert ist, das USRobotics V.92 Voice
Winmodem Internal. Wenn Sie keine Beschreibung Ihres Modems sehen, lesen
Sie den Hinweis nach diesem Abschnitt. Wenn die Beschreibung erscheint,
klicken Sie auf die Schaltfläche Eigenschaften. Klicken Sie auf die Registerkarte
Diagnose. Klicken Sie auf die Schaltfläche Modem abfragen. Daraufhin sollte
eine Reihe von Befehlen und Antworten vom Modem kommen. Das bedeutet,
dass die Installation erfolgreich war. Wenn Sie keine Befehle und Antworten
sehen, lesen Sie den Hinweis nach diesem Abschnitt.
Windows Me/98/95
Klicken Sie unter Windows auf Start, Einstellungen und dann Systemsteuerung.
Doppelklicken Sie auf das Symbol Modems. Im Fenster "Eigenschaften von
Modems" sollten Sie eine Beschreibung Ihres Modems sehen, des USRobotics
V.92 Voice Winmodem Internal. Wenn Sie keine Beschreibung Ihres Modems
sehen, lesen Sie den Hinweis nach diesem Abschnitt. Wenn die Beschreibung
erscheint, klicken Sie auf die Schaltfläche Diagnose. Stellen Sie sicher, dass der
korrekte COM-Anschluss (Modem) markiert ist. Klicken Sie auf die Schaltfläche
Details. Daraufhin sollte eine Reihe von Befehlen und Antworten vom Modem
kommen. Das bedeutet, dass die Installation erfolgreich war. Wenn Sie keine
Befehle und Antworten sehen, lesen Sie den Hinweis nach diesem Abschnitt.
49
Page 54

HINWEIS: Wenn Ihr Modem nicht aufgeführt wird und/oder keine
Abfolge von Befehlen und Antworten erscheint, überprüfen Sie, ob Ihr
internes Modem ordnungsgemäß in Ihren Computer eingesteckt ist. Sie
müssen das Modem bei ausgeschaltetem Computer fest hineindrücken, damit
es im Steckplatz richtig sitzt. Wenn das Modem richtig angeschlossen ist,
können Sie den goldenen Rand der Steckverbindung nicht mehr sehen. Wenn Ihr
Modem immer noch nicht funktioniert, müssen Sie es möglicherweise entfernen
und in einem anderen verfügbaren Steckplatz neu installieren. Fahren Sie Ihren
PC herunter und starten Sie ihn neu. Überprüfen Sie Ihr Modem erneut über die
Systemsteuerung, wie weiter oben beschrieben.
Schritt 4: Installation der Software und Registrierung Ihres
Modems
Nehmen Sie die Installations-CD-ROM heraus und legen Sie sie neu ein. Das
Installationsprogramm sollte automatisch starten. Der Setup-Assistent auf der
CD-ROM führt Sie durch die Installation der Programmgruppe (einschließlich
Internet-Anrufbenachrichtigung [ICN], ControlCenter und optionaler Voice
Faxmodem-Software) und die Registrierung Ihres Modems.
HINWEIS: Falls die Installations-CD nicht automatisch ausgeführt wird,
klicken Sie unter Windows auf Start und dann auf Ausführen. Geben Sie
D:\setup.exe in das Dialogfeld "Ausführen" ein. Wenn Ihr CD-ROMLaufwerk einen anderen Buchstaben verwendet, geben Sie diesen Buchstaben
anstelle von "D" ein.
HINWEIS: Wenn Sie die Sprachfunktionen dieses Modems nutzen
möchten, müssen Sie die Sprachsoftware installieren. Sie finden sie im
Software-Bereich der Installations-CD-ROM.
50
Registrieren Sie Ihr Modem.
• Klicken Sie auf dem beim Start der Installations-CD angezeigten
Bildschirm auf die Support-Verknüpfung.
• Folgen Sie den Anweisungen auf dem Bildschirm, um Ihr Modem zu
registrieren und die Garantieinformationen anzuzeigen. Falls die
Installations-CD nicht automatisch ausgeführt wird, klicken Sie unter
Windows auf Start und dann auf Ausführen. Geben Sie in das
Dialogfeld "Ausführen" D:\setup.exe ein. Wenn Ihr CD-ROM-Laufwerk
einen anderen Buchstaben verwendet, geben Sie diesen Buchstaben
anstelle von "D" ein.
• Sie können Ihr Modem auch online unter folgender Adresse registrieren:
http://www.usr.com/productreg
Page 55

Fehlerbehebung
Haben Sie Schwierigkeiten mit Ihrem Modem? Dann versuchen Sie es
erst mit den folgenden Schritten zur Fehlerbehebung.
1) Ist Ihr Telefonkabel richtig angeschlossen? Das Telefonkabel sollte in die
Buchse des Modems und in den Wandanschluss gesteckt werden. Verwenden
Sie das mitgelieferte Telefonkabel. Wenn Ihr Modem mit einem Adapter geliefert
wurde, müssen Sie diesen an das Telefonkabel anschließen, bevor es in den
Wandanschluss gesteckt wird.
2) Ist Ihr Modem vorschriftsmäßig in Ihrem Computer installiert? Schlagen Sie
im Abschnitt zur Überprüfung der korrekten Installation Ihres Modems in dieser
Anleitung nach, wo Sie mögliche Lösungen zu Ihrem jeweiligen Betriebssystem
finden.
Mein Computer erkennt das Modem nicht.
Wenn das Modem mit Plug & Play nicht als neue Hardware erkannt wird,
müssen Sie Folgendes überprüfen:
• Vergewissern Sie sich, dass das Modem fest im PCI-Steckplatz sitzt.
Das Modem sollte gerade eingesteckt sein, so dass der goldene Rand
nicht mehr zu sehen ist.
• Probieren Sie das Modem in einem anderen PCI-Steckplatz aus.
• Überprüfen Sie anhand Ihres Computerhandbuchs, dass der
PCI-Steckplatz richtig konfiguriert ist.
Mein Modem scheint richtig installiert worden zu sein, funktioniert aber nicht
richtig.
Lösungsvorschlag: PCI-Geräte können IRQs gemeinsam nutzen, es gibt
jedoch Geräte auf dem Markt, bei denen diese gemeinsame Nutzung nicht
richtig funktioniert. Wenn dem Modem derselbe IRQ zugewiesen wurde wie
einem dieser Geräte, funktioniert das Modem möglicherweise nicht richtig.
Windows Me/98/95: Klicken Sie auf dem Desktop mit der rechten
Maustaste auf das Symbol Arbeitsplatz. Klicken Sie auf Eigenschaften und
dann auf die Registerkarte Geräte-Manager. Doppelklicken Sie auf das
Computer-Symbol oben in der Geräteliste. Sie sehen nun eine Liste der IRQs
Ihres Systems und der Geräte, denen diese zugewiesen sind. Suchen Sie Ihr
Modem und den IRQ, dem es zugewiesen ist. Wenn dieser IRQ von anderen
Geräten benutzt wird, kann dies zu Betriebsproblemen des Modems führen.
Entweder Ihrem Modem oder dem Gerät, mit dem es den IRQ teilt, muss ein
anderer IRQ zugewiesen werden, um den Konflikt zu beheben. Versuchen
Sie das Modem in einem anderen PCI-Steckplatz zu installieren, oder lesen
Sie in der Dokumentation des anderen Gerätes nach, wie es entfernt,
deaktiviert oder verlegt werden kann.
51
Page 56

Meine Software erkennt das Modem nicht.
Lösungsvorschlag: Ihre Kommunikationssoftware funktioniert
möglicherweise nicht richtig, wenn Sie mehr als eine Version der Software
installiert haben, eine ältere Version verwenden oder mehr als eine
Kommunikationsanwendung auf Ihrem Computer installiert haben. Sie
sollten unbedingt die auf der Installations-CD enthaltene
Kommunikationssoftware verwenden, die im Lieferumfang Ihres Modems
enthalten ist.
Lösungsvorschlag: Die Einstellungen des COM-Anschlusses können falsch
sein. Im Setup-Bereich müsste es einen Bereich für die Einstellungen Ihres
COM-Anschlusses geben. Stellen Sie sicher, dass die AnschlussEinstellungen der Software mit denen für Ihr Modem übereinstimmen. Um
zu überprüfen, welchen COM-Anschluss Ihr Modem verwendet, klicken Sie
unter Windows auf Start, Einstellungen und Systemsteuerung.
Doppelklicken Sie auf Modems und wählen Sie zuerst Ihr Modem und dann
Eigenschaften. In der Dokumentation zu Ihrer Kommunikationssoftware
finden Sie Anweisungen zum Anpassen der Anschluss-Einstellungen Ihrer
Software.
Lösungsvorschlag: Eventuell haben Sie in Ihrer Software oder in Windows
nicht den richtigen Modemtyp gewählt. Klicken Sie auf Windows Start,
Einstellungen und Systemsteuerung. Sobald die Systemsteuerung
erscheint, klicken Sie auf Modems. Sie sehen eine Liste der installierten
Modems. In diesem Fenster können Sie auch Modems hinzufügen und
entfernen oder sich die Eigenschaften der Modems ansehen. Das von Ihnen
installierte USRobotics-Modem müsste in der Liste installierter Modems
erscheinen. Sollte keine der Modembeschreibungen Ihrem USRoboticsModem entsprechen oder sollten überhaupt keine Modems aufgelistet
sein, haben Sie Ihr Modem nicht korrekt installiert. Installieren Sie Ihr
Modem in diesem Fall erneut.
Lösungsvorschlag: Wenn Sie eine Software benutzen, die eine WindowsModembeschreibung verwendet, und Sie bereits ein Modem installiert
hatten, müssen Sie möglicherweise die Einstellungen für Ihre Software
aktualisieren, damit sie zum USRobotics V.92 Voice Winmodem Internal
passen.
Mein Modem stellt keine externen Verbindungen her oder nimmt keine
eingehenden Anrufe entgegen.
PROBLEME MIT DEM WÄHLEN UND ANTWORTEN:
Lösungsvorschlag: Eventuell ist das Telefonkabel nicht richtig an Ihr
Modem angeschlossen. Das Telefonkabel sollte in die Buchse des
Modems und in den Wandanschluss gesteckt werden. Verwenden Sie
möglichst das mitgelieferte Telefonkabel. Wenn Ihr Modem mit einem
Adapter geliefert wurde, müssen Sie diesen an das Telefonkabel
anschließen, bevor es in den Wandanschluss gesteckt wird.
52
Page 57

Lösungsvorschlag: Möglicherweise sind Geräte zwischen das Modem und
den Telefonanschluss geschaltet. Es dürfen sich keine Verteiler, Faxgeräte
oder anderen Geräte zwischen dem Modem und dem Wandanschluss
befinden.
VERWENDUNG IM BÜRO:
Lösungsvorschlag: Möglicherweise haben Sie das Telefonkabel Ihres
Modems an eine digitale Leitung angeschlossen. Setzen Sie sich im
Zweifelsfalle mit der Abteilung in Verbindung, die für Ihr Telefonsystem
verantwortlich ist.
Wenn Sie in Ihrem Telefonsystem zur Herstellung einer externen
Verbindung eine "9" wählen müssen, wählen Sie vor der gewünschten
Nummer unbedingt die "9".
VERWENDUNG IN VERBINDUNG MIT VOICE MAIL:
Lösungsvorschlag: Wenn Ihre Telefongesellschaft Voice Mail anbietet,
ändert sich Ihr Wählton eventuell, wenn Sie Nachrichten haben. Hören Sie
Ihre Voice Mail ab, um wieder den normalen Wählton zu erhalten.
Mein Modem scheint mit einem anderen Modem Verbindung aufzunehmen,
aber ohne Erfolg.
Lösungsvorschlag: Vielleicht ist die Verbindung schlecht. Da alle Anrufe
anders geleitet werden, sollten Sie es erneut versuchen.
Ich habe Probleme mit meiner Fax- bzw. Sprachsoftware.
Lösungsvorschlag: Lesen Sie die elektronischen Hilfe-Dateien, die zur
Fax- oder Sprachsoftware gehören.
Mein Modem stellt keine 56K-Internetverbindung her.
Das V.92- und V.90-Protokoll lässt Download-Geschwindigkeiten von bis zu
56 Kbps zu und das V.92-Protokoll ermöglicht Upload-Geschwindigkeiten
von bis zu 48 Kbps, doch die tatsächliche Übertragungsgeschwindigkeit
hängt von der Qualität der jeweiligen Leitung ab. Aufgrund ungewöhnlicher
Telefonleitungskonfigurationen können einige Anwender die V.92- oder
V.90-Technologie zu diesem Zeitpunkt nicht voll ausnutzen. Folgendes ist
zur Herstellung einer V.92- oder V.90-Verbindung notwendig:
• Der Server, den Sie anwählen, muss das digitale V.92- oder V.90Signal unterstützen und bereitstellen. Ihr ISP kann Ihnen eine Liste mit
DFÜ-Verbindungen sowie Informationen darüber zur Verfügung
stellen, was derzeit von diesen Verbindungen unterstützt wird.
• Die Telefonleitung zwischen Ihrem ISP und Ihrem Modem muss eine
56K-Verbindung unterstützen und darf nur eine Digital-zu-AnalogKonvertierung enthalten. Das 56K-Signal von Ihrem ISP beginnt als
digitales Signal. Zwischen Ihrem ISP und Ihrem Modem werden
digitale Signale in analoge Signale konvertiert, so dass Ihr Modem die
Daten empfangen kann. Im Pfad von Ihrem ISP zu Ihrem Modem dürfen
digitale Signale nur einmal in analoge konvertiert werden. Wenn mehr
53
Page 58

als eine Konvertierung stattfindet, wird Ihre
Verbindungsgeschwindigkeit auf die standardmäßige Einstellung V.34
(33,6 Kbps) gesetzt. Die Lokalleitungen zwischen Ihrem ISP und Ihrem
Modem können auch beeinträchtigt werden. Durch diese
Beeinträchtigungen können V.92- oder V.90Verbindungsgeschwindigkeiten verhindert oder eingeschränkt
werden. Alle Telefonanrufe werden anders geleitet, deshalb sollten Sie
mehrmals versuchen, Ihre Verbindung herzustellen. Durch Einwählen
in eine Fernverbindung können Sie dies testen. Fernleitungen sind oft
viel klarer als Lokalleitungen. Telefongesellschaften aktualisieren ihre
Systeme ständig. Sollte eine Leitung heute noch keine Unterstützung
für 56K bieten, kann sich dies in Kürze ändern.
• Sie müssen Ihr Modem mit einem V.92- oder V.90-Server verbinden.
Zwei 56K-Modems können nicht mit Geschwindigkeiten von 56K
miteinander verbunden werden.
Support-Quellen
Wenn Sie Ihr Problem mit den Vorschlägen im Abschnitt "Fehlerbehebung" nicht
lösen konnten, erhalten Sie an folgenden Stellen weitere Informationen:
1. Besuchen Sie die USRobotics-Website
Viele der gängigsten Schwierigkeiten, die Benutzer erleben, werden in den
FAQ (Häufig gestellte Fragen) und den Webseiten zur Fehlerbehebung für
Ihr Produkt angesprochen. Ihre Produktnummer lautet 2884C. Sie müssen
sie kennen, um Informationen von der USRobotics-Website zu erhalten.
Gehen Sie zu: http://www.usr.com/support
2. Wenden Sie sich an den Technischen Support von USRobotics.
Technische Fragen zu USRobotics-Modems werden dort von Experten
beantwortet.
Land Telefon Online
Großbritannien 0870 844 4546 www.usr.com/emailsupport/uk
Deutschland 0180 567 1548 www.usr.com/emailsupport/de
Hinweise zu Vorschriften
CE-Konformität
Wir, die U.S. Robotics Corporation, 935 National Parkway, Schaumburg, Illinois, 60173-5157, USA,
bestätigen auf eigene Verantwortung, dass das Produkt U.S. Robotics 56K Internal Voice Faxmodem,
Model 2884C, auf das sich diese Erklärung bezieht, folgende Standards und/oder anderen Vorschriften
erfüllt:
EN60950
EN55022
EN55024
54
Page 59

Wir erklären hiermit, dass das oben erwähnte Produkt alle wesentlichen Anforderungen und sonstigen
relevanten Vorschriften der Richtlinie 1999/5/EC erfüllt.
Das in Artikel 10(3) genannte und in Anhang II der Richtlinie 1999/5/EC beschriebene Verfahren zur
Bewertung der Konformität ist befolgt worden.
Eine elektronische Version der CE-Erklärung zur Einhaltung von Richtlinien ist auf der U.S. RoboticsWebsite erhältlich: www.usr.com
Erklärung zur Netzwerk-Kompatibilität
Dieses Gerät wurde für den zufriedenstellenden Betrieb in allen öffentlichen Telefonnetzen innerhalb
der Europäischen Union entwickelt.
Dieses Gerät weist einen geeigneten Anschluss für das öffentliche Telefonnetz des Landes auf, in das
es geliefert wird. Wenn der Einsatz dieses Gerätes an einem anderen als dem Netz notwendig ist, für
welches es geliefert wurde, wird dem Benutzer empfohlen, sich zur Beratung hinsichtlich des
Anschlusses an den Händler zu wenden.
Begrenzte Garantie der U.S. Robotics Corporation
1.0 ALLGEMEINE BEDINGUNGEN:
1.1 Diese begrenzte Garantie gilt nur für den ursprünglichen Käufer und Endbenutzer (den KUNDEN) und ist
1.2 Kein Vertreter, Händler oder Geschäftspartner der U.S. Robotics Corporation (U.S. ROBOTICS) ist dazu
1.3 Jegliche Produkte, die nicht fabrikneu von U.S. ROBOTICS oder einem seiner Vertragshändler erworben
1.4 Diese begrenzte Garantie ist nur in dem Land oder Gebiet gültig, in dem das Produkt zur Benutzung
1.5 U.S. ROBOTICS garantiert dem KUNDEN, dass dieses Produkt bei normaler Verwendung für ZWEI (2)
1.6 Die Verpflichtung von U.S. ROBOTICS unter dieser ausdrücklichen Garantie beschränkt sich nach alleini-
1.7 U.S. ROBOTICS gewährt fü r jedes ersetzte Produkt oder Teil eine Garantie von NEUNZIG (90) TAGEN ab
1.8 U.S. ROBOTICS gibt keine Zusicherung oder Erklärung dafür ab, dass dieses Produkt die Anforderungen
1.9 U.S. ROBOTICS gibt keine Zusicherung oder Erklärung dafür ab, dass der Betrieb des mit diesem Produkt
1.10 U.S. ROBOTICS übernimmt keine Verantwortung für jegliche Software oder andere Daten oder Informa-
2.0 VERPFLICHTUNGEN DES KUNDEN
2.1 Der KU NDE trägt die alleinige Verantwortung dafür, dass dieses Produkt die Spezifi kationen und
2.2 Dem KUN DEN wird insbesondere angeraten eine Sicherungskopie sämtlicher mit diesem Produkt gelief-
2.3 Der KUN DE trägt die alleinige Verantwortung für die korrekte Installation und Konfiguration dieses
2.4 Der KU NDE muss U.S. ROBOTICS einen datierten Kaufbeleg (eine Kopie der Original-Kaufquittung von
nicht übertragbar.
berechtigt die Bedingungen dieser begrenzten Garantie im Namen von U.S. ROBOTICS zu modifizieren.
wurden, sind ausdrücklich von dieser begrenzten Garantie ausgeschlossen.
vorgesehen ist (wie durch die Modellnummer des Produktes und am Produkt angebrachte Aufkleber für
örtliche Telekommunikationssysteme angezeigt).
JAHRE ab dem Datum des Kaufs bei U.S. ROBOTICS oder einem autorisierten Händler keine Verarbeitungs- und Materialmängel aufweist.
gem Ermessen von U.S. ROBOTICS darauf, das defekte Produkt oder Teil mit neuen oder überholten
Ersatzteilen zu reparieren; oder das defekte Produkt oder Teil durch ein gleiches oder gleichwertiges,
neues oder überholtes Produkt oder Teil zu ersetzen; oder U.S. ROBOTICS kann, falls keine der vorstehenden Möglichkeiten mit angemessenen Bemühungen durchführbar ist, dem KUNDEN nach alleinigem
Ermessen den Kaufpreis erstatten, dessen Höhe die aktuelle Preisempfehlung von U.S. ROBOTICS für das
Produkt unter Abzug anwendbarer Gebühren nicht überschreitet. Alle ersetzten Produkte oder Teile
gehen in den Besitz von U.S. ROBOTICS über.
dem Versanddatum des Produktes oder Teils an den KUN DEN.
des KUNDEN erfüllt oder in Kombination mit jeglichen Hardware- oder Softwareprodukten von Drittanbietern funktioniert.
gelieferten Softwareproduktes ununterbrochen oder störungsfrei abläuft oder dass jegliche Defekte von
Softwareprodukten behoben werden.
tionen des KUNDEN, die in diesem Produkt enthalten oder darin gespeichert sind.
Anforderungen des KUNDEN erfüllt.
erter Software zu erstellen.
Produktes sowie für die vorschriftsmäßige Installation, Konfiguration, den Betrieb und die Kompatibilität
mit dem Betriebssystem, unter dem das Produkt betr ieben werden soll.
55
Page 60

U.S. ROBOTICS oder einem seiner Vertragshändler) vorlegen, um einen Garantieanspruch geltend zu
machen.
3.0 WAS IM GARANTIEFALL ZU TUN IST:
3.1 Der KUNDE muss sich zur Wahrnehmung seines Garantieanspruchs innerhalb der gültigen Garantiezeit
3.2 De r KUNDE muss die Modellnummer und die Seriennummer des Produktes sowie einen datierten Kauf-
3.3 Informationen dazu, wie Sie Kontakt zum Technischen Support von U.S. ROBOTICS oder einem offiziellen
3.4 Der KUN DE sollte bei der Kontaktaufnahme mit dem Technischen Support von U.S. ROBOTICS die fol-
mit dem Technischen Support von U.S. ROBOTICS oder einem offiziellen Vertrags-Servicecenter von U.S.
ROBOTICS in Verbindung setzen.
beleg (eine Kopie der Original-Kaufquittung von U.S. ROBOTICS oder einem seiner Vertragshändler) vorlegen, um einen Garantieanspruch geltend zu machen.
Vertrags-Servicecenter von U.S. ROBOTICS aufnehmen, finden Sie auf der Firmen-Website von U.S
ROBOTICS unter: www.usr.com
genden Informationen/Artikel bereithalten:
·Modellnummer des Produktes
·Seriennummer des Produktes
·Datierter Kaufbeleg
·Name und Telefonnummer des KUNDEN
·Version des Betriebssystems des KUNDEN
·U.S. ROBOTICS Installations-CD-ROM
·U.S. ROBOTICS Installationsanleitung
4.0 ERSATZ IM RAHMEN DER GARANTIE:
4.1 Falls der Technische Support von U.S. ROBOTICS oder ein offizielles Vertrags-Servicecenter von U.S.
4.2 Jedes Produkt oder Teil, das ohne RMA von U.S. ROBOTICS oder einem offiziellen Vertrags-Servicecenter
4.3 Der KU NDE erklärt sich bereit, die Portokosten für die Rücksendung des Produktes oder Teils an das offi-
4.4 Die Verantwortung für Verlust oder Beschädigung geht nicht auf U.S. ROBOTICS über, bis das zurückge-
4.5 Autorisierte Rücksendungen des KU NDEN werden ausgepackt, begutachtet und mit der Modell- und Seri-
4.6 Nach dem Auspacken, Begutachten und Testen einer Rücksendung des KUNDEN kann U.S. ROBOTICS
4.7 U.S. ROBOTICS unternimmt alle angemessenen Anstrengungen, das reparierte oder ersetzte Produkt
4.8 U.S. ROBOTICS kann nicht für Schäden haftbar gemacht werden, die durch Verzögerungen bei der Liefer-
ROBOTICS feststellt, dass die Fehlfunktion oder das Versagen eines Produktes oder Teils direkt auf Material- und/oder Verarbeitungsfehler zurückzuführen ist; und dieser Fehler innerhalb des Garantiezeitraums von ZWEI (2) JAHREN auftritt; und der KUNDE dem Produkt oder Teil eine Kopie des datierten
Kaufbelegs (der Original-Kaufquittung von U.S. ROBOTICS oder einem seiner Vertragshändler) beilegt,
erhält der KUNDE von U.S. ROBOTICS eine Materialrückgabenummer (RMA) und Anweisungen zur Rückgabe des Produktes oder Teils an die offizielle Rücksendeadresse von U.S. ROBOTICS.
von U.S. ROBOTICS an U.S ROBOTICS zurückgeschickt wird, geht an den Absender zurück.
zielle Vertrags-Servicecenter von U.S. ROBOTICS zu übernehmen; das Produkt zu versichern oder das
Risiko von Verlust oder Beschädigung beim Transport einzugehen; und einen Transportbehälter zu verwenden, der der Originalverpackung entspricht.
sandte Produkt oder Teil als autorisierte Rücksendung an einer offiziellen Rücksendeadresse von U.S.
ROBOTICS eintrifft.
ennummer des Produktes verglichen, für die die RMA ausgegeben wurde. Der beigelegte Kaufbeleg wird
auf Kaufdatum und Namen des Händl ers überprüft. U.S. ROBOTICS kann den Garantiedienst verweigern,
wenn das zurückgesandte Produkt oder Teil nach der Begutachtung nicht den Informationen des
KUNDEN entspricht, nach denen die RMA vergeben wurde.
das Produkt oder Teil nach eigenem Ermessen unter Verwendung neuer oder überholter Produkte oder
Teile in dem Umfang reparieren oder ersetzen, der erforderlich ist, um das Produkt oder Teil wieder in
einen betriebsbereiten Zustand zu versetzen.
oder Teil auf Kosten von U.S. ROBOTICS spätestens EIN UNDZWANZIG (21) TAGE nach Empfang der
autorisierten Rücksendung durch den KUNDEN an einer offiziellen Rücksendeadresse von U.S. ROBOTICS an den KUNDEN zurückzuschicken.
ung oder Übergabe reparierter oder ersetzter Produkte oder Teile entstehen.
5.0 EINSCHRÄNKUNGEN
5.1 SOFTWARE VON DRITTANBIETERN: Dieses U.S. ROBOTICS-Produkt kann Software von Drittanbietern,
5.2 BE SCHÄDIGUNG AUFGRUND VON MISSBRAUCH, VER NACHLÄSSIGUNG, MISSACHTUNG VON VOR-
deren Verwendung durch einen separaten Lizenzvertrag eines Drittanbieters von Software geregelt wird,
beinhalten bzw. mit solcher gebündelt sein. Diese begrenzte U.S. ROBOTICS-Garantie gilt nicht für derartige Software von Drittanbietern. Hinsichtlich der anwendbaren Garantie informieren Sie sich bitte im
Endbenutzer-Lizenzvertrag, der die Benutzun g derartiger Software regelt.
SCHRIFTEN, FEHLERHAFTER INSTALLATION UND/ODER UMGEBUNGSEINFLÜSSEN: Im gesamten gesetzlich zulässigen Umfang gilt diese begrenzte U.S. ROBOTICS-Garantie nicht für normale
Abnutzungserscheinungen; Beschädigung oder Verlust von Daten aufgrund der Interoperabilität mit
aktuellen und/oder zukünftigen Betriebssystem-Versionen oder anderer aktueller und/oder zukünftiger
Software und Hardware; Änderungen (durch Personen außerhalb von U.S. ROBOTICS oder offiziellen Ver-
56
Page 61

trags-Servicecentern von U.S. ROBOTICS); Schäden durch Bedienungsfehler oder Nichtbefolgung der
Anweisungen in der Benutzerdokumentation oder anderen dazugehörigen Dokumentationen; Schäden
durch höhere Naturgewalten wie Blitzschlag, Sturm oder Gewitter, Überflutung, Feuer und Erdbeben
usw.; Produkte, deren Seriennummer verändert oder entfernt wurde; Missbrauch, Vernachlässigung und
falsche Behandlung; Schäden durch übermäßige physikalische, temperaturbedingte oder elektrische
Beanspruchung; gefälschte Produkte; Beschädigung oder Verlust von Daten durch einen Computervirus,
Wurm, ein Trojanisches Pferd oder Speicherschäden; Fehler des Produktes, die auf Unfälle, Missbrauch,
falschen Gebrauch (einschließlich, aber nicht beschränkt auf fehlerhafte Installation oder Anschluss an
die falsche Spannungsquelle bzw. Steckdose) zurückzuführen sind; Fehler, die durch Produkte hervorgerufen wurden, die nicht von U.S. ROBOTICS bereitgestellt wurden; Schäden durch Feuchtigkeit, Korrosion in der Umgebung, Hochspannungsströme, Transport oder ungewöhnliche Arbeitsbedingungen; oder
die Verwendung des Produktes außerhalb der Grenzen des für die Verwendung vorgesehenen Landes
oder Gebietes (wie durch die Modellnummer des Produktes und am Produkt angebrachte Aufkleber für
5.3 DI ESE GARANTIEN UND E NTSCHÄDIGUNGEN ERSETZEN IM GESAMTEN GESETZLICH ZULÄSSIGEN RAH-
5.4 HAFTUNGSUMFANG. IM GESAMTEN GE SETZLICH ZULÄSSIGEN U MFANG SCHLIESST U.S. ROBOTICS JEG-
6.0 HAFTUNGSAUSSCHLUSS: Einige Länder, Staaten, Gebiete oder Provinzen gestatten keine Bes-
7.0 ANWENDBARES RECHT: Diese begrenzte Garantie unterliegt den Gesetzen des Staates Illinois, USA,
örtliche Telekommunikationssysteme angezeigt).
MEN ALLE SONSTIGEN AUSDRÜCKLICHEN UND STILLSCHWEIGENDEN GARANTI EN, OB DE FACTO ODER
DURCH DIE ANWENDUNG DES GEWOHNHEITSRECHTS ODER GESETZES, EI NSCHLIESSLICH JEDWEDER
GARANTIEN, KONDITION EN ODER BEDINGUNGE N DER HANDELSÜBLICHEN QUAL ITÄT, EIGNU NG FÜR
EINEN B ESTIMMTEN ZWECK, ZUFRIEDENSTE LLENDEN QUALITÄT, ÜBEREINSTIMMUNG MIT DER
PRODUKTBESCHR EIBUNG UND R ECHTMÄSSIGKEIT, DIE HIERMIT AU SDRÜCKLICH ABGELEHNT WERDEN.
WEDER U.S. ROBOTICS SELBST NOCH EIN VON U.S. ROBOTICS BERECHTIGTE R DRITTER ÜBERNI MMT IM
ZUSAMMENHA NG MIT VERKAUF, INSTALLATION, WARTUNG, GARANTIE UND VERWENDUNG DIES ER
PRODUKTE EINE ANDER E HAFTUNG, IN WELCHER FORM AUCH IMMER.
LICHE HAFTUNG SEINERSEITS ODER SEINER ZULIEFERER FÜR BEGLEIT-, FOLGE-, INDIREKTE ODER
ANDERWEITIG E SCHÄDEN SOWIE BUSSGELDER, EI NKOMMENS- ODER GEWINNAUSFALL, GE SCHÄFTSAUSFALL, VERLUST VON INFORMATIONEN ODE R DATEN ODER AN DERWEITIGE FINANZIE LLE SCHÄDEN
AUS, DIE IN VERBIN DUNG MIT VERKAUF, INSTALLATION, WARTUNG, ANWENDU NG, LEISTUNG ODER
DIENSTUNTERBRECHUNG SEINER PRODUKTE ENTSTANDEN SIND, OB VERTRAGS- ODER ANDERWEITIG
ZIVILRECHTLICH (EINSCHLIESSLICH FAHRLÄSSIGKEIT) UND SELBST WENN U.S. ROBOTICS ODER SEINE
VERTRAGSHÄNDLER AUF DIE MÖGLICH KEIT DERARTIGER SCHÄDEN HING EWIESEN WURDEN. U.S.
ROBOTICS BEGRENZT SEI NE HAFTUNG AUF REPARATUR, ERSATZ ODER ERSTATTUNG DES KAUFPREI SES
IM ERMESSEN VON U.S. ROBOTICS. DER HAFTUNGSAUSSCHLUSS BLEIBT AUCH DANN BESTEHEN,
WENN EI NE IM RAHMEN DER GARANTI E GELEISTETE ABHILFE IH REN ZWECK NICHT ERFÜLLT.
chränkung oder Begrenzung stillschweigend mit eingeschlossener Garantien oder die Beschränkung von
Begleit- oder Folgeschäden für bestimmte an Verbraucher gelieferte Produkte oder die Haftungsbegrenzung für Personenschäden, wodurch die vorgenannten Beschränkungen und Ausschlüsse möglicherweise nur begrenzt auf den KUNDEN zutreffen. Falls der vollständige Ausschluss der stillschweigenden
Garantien gesetzlich nicht zulässig ist, gilt auch für sie die Frist von ZWEI (2) JAHREN entsprechend dieser
schriftlichen Garantie. Diese Garantie gewährt dem KUNDEN spezielle gesetzliche Rechte, die von Land
zu Land unterschiedlich sein können.
mit Ausnahme des internationalen Privatrechts und der Konvention der Vereinten Nationen zu Verträgen
für den Handel zwischen verschiedenen Ländern.
U.S. Robotics Corporation
935 National Parkway
Schaumburg, IL, 60173
USA
57
Page 62

58
Page 63

Page 64

Page 65

Page 66

Page 67

Page 68

Page 69

Page 70

Page 71

Page 72

Page 73

Page 74

Page 75

Page 76

Page 77

Page 78

Page 79

Page 80

Printed in XXXXXXXXXXXXXXXXXXXX
 Loading...