

UR
UR
UR
UR
UR
-104AN
-314ANv2
-344AN4G
-344AN4G+
-354AN4G
ADSL2/2+ Routers
English Español Deutsch Русский Français
Page 3 Página15 Seite 26 Cтр. 37 Page 48

UPVEL ADSL Modem Router
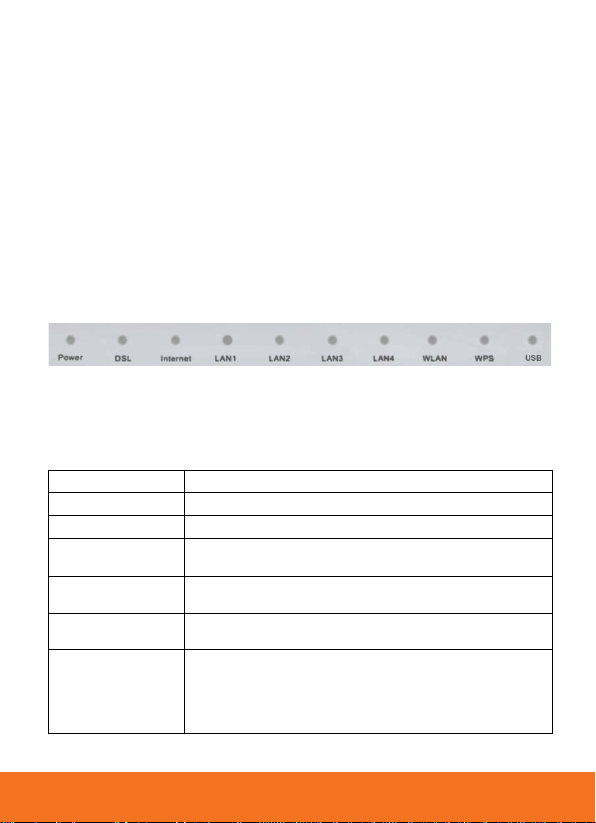
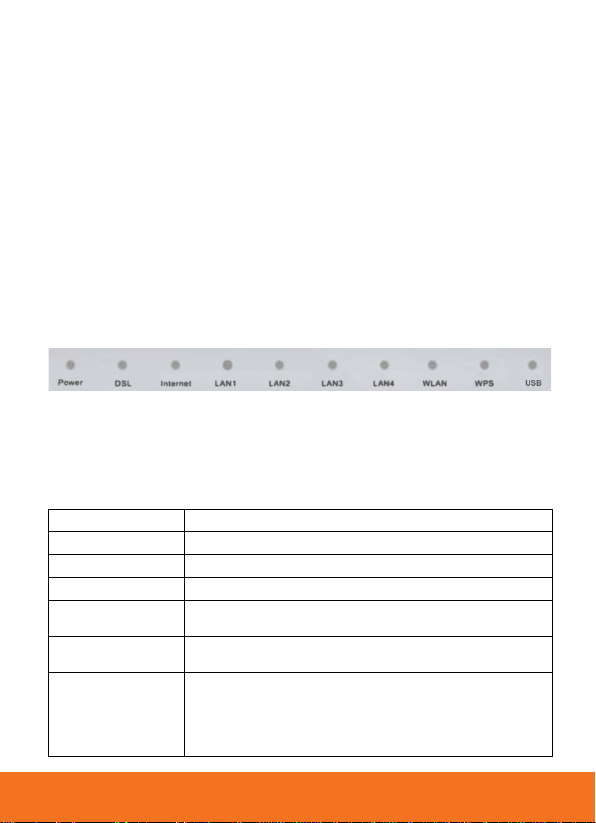
Power
Power
DSL
DSL connection
Internet
Internet connection
Connection to LAN1~LAN4 ports (PCs or oth er net work
devices)
WLAN (all except
UR-104AN)
WPS (all except UR-
104AN)
Package contents
• ADSL2/2+ Modem Router
• Quick Installation gui de
• CD-ROM (Utility and User’s Guide)
• Power Adapter (external)
• Network cable (Twisted Pair Cat.5 1,5m/5ft)
• Telephone cable
• ADSL-splitter with telephone cable
Status LEDs
Depending on your ADSL Modem Router model, features will differ, and
some LEDs may not be available as described below. This User Manual
provides you wit h notes (in italic), when certain features are only
available in specific models.
LAN1~LAN4
Wireless network
Wi-Fi Protected Setup function e xecution
USB (UR-344AN4G,
UR-344AN4G+ & UR-
345AN4G)
Connection to USB port (3G/4G modem or external
storage device)
3

Power is
supplied
Power is not
supplied
Connected to
DSLAM
Not connected to
DSLAM
Public IP
been obtained
Public IP address
obtained
Device has been
connected
Data is being
transmitted
Device is not
detected
WLAN (all
104AN)
Waiting for WPS
connect (2 min)
3G/4G modem
connected
LED description
LED Solid Blinking Off
Power
DSL
Internet
LAN1~LAN4
except UR-
WPS (all
except UR-
104AN)
USB (UR-
344AN4G, UR-
344AN4G+ &
UR-345AN4G)
address has
Wireless unit
is on
–
or external hard
drive is
–
Data is being
transmitted
Data is being
transmitted
function to be
activated on the
remote device you
are going to
Data is being
transmitted
WPS function is not
–
hasn’t been
Wireless unit
is off
being used
USB port is not
being used
4
UPVEL ADSL Modem Router
WiFi
UR-104AN)
USB (UR-
345AN4G)
RJ-45 ports to connect PCs and other device to your local
area network
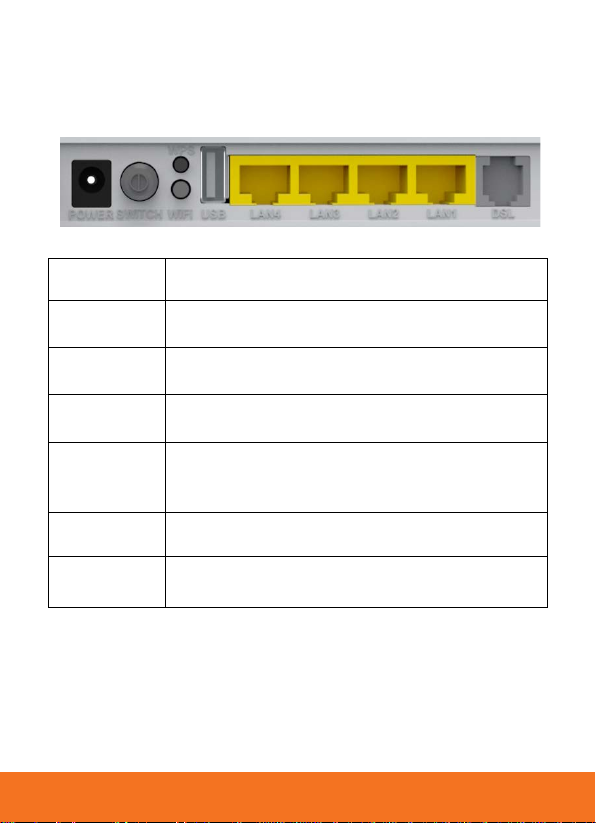
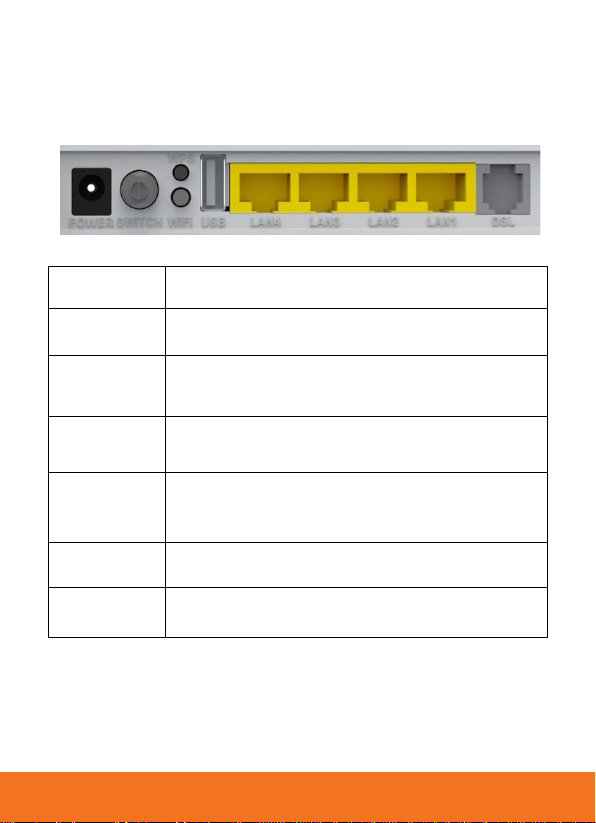
Functionality of all Ports and Buttons
POWER
SWITCH
WPS (all except
UR-104AN)
(all except
344AN4G, UR-
344AN4G+ & UR-
LAN 1 ~ LAN4
DSL
Power cable port
Power On/Off button
Wi-Fi Protected Setup activation
Wireless unit activation/deactivation
Port to connect 3G/4G modem or external hard drive
RJ-11 telephone cable port
5
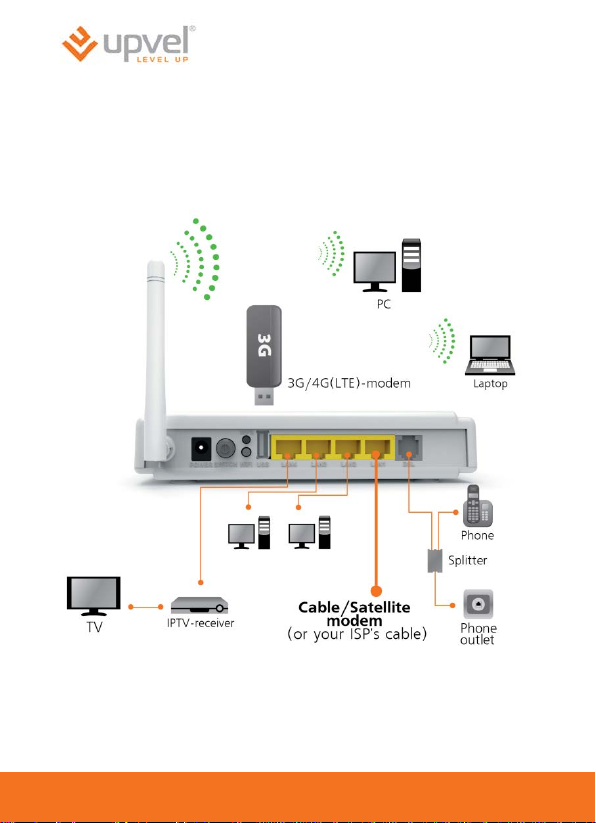
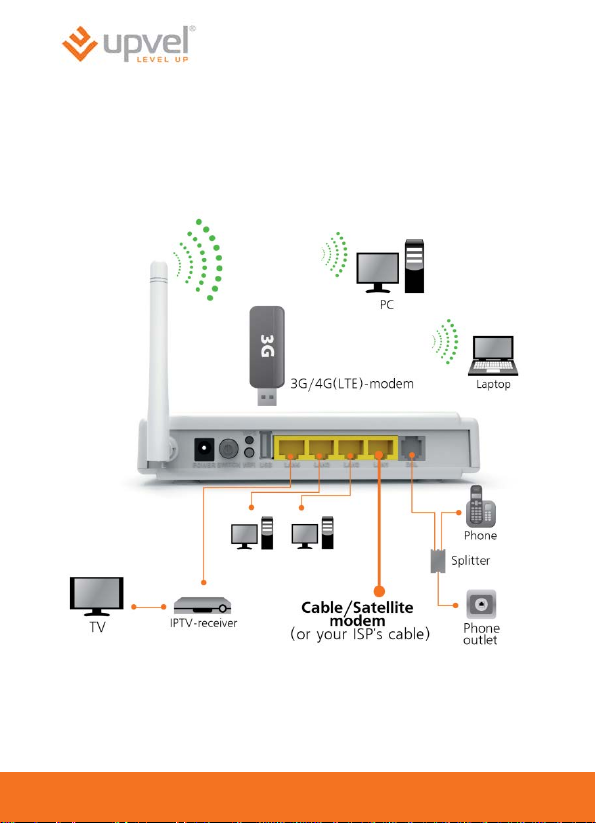
STEP 1
Router installation (example UR-344AN4G)
6

UPVEL ADSL Modem Router
(A) If you connect to the Internet via built-in ADSL Modem:
1. Using the network cable from the package, con nect your computer to
LAN2, LAN3 or LAN4 on the r outer. (LAN1 port is res erved fo r a c able,
satellite, VDSL or other broadband connection)
2. Disconnect the phone cable from the outlet and connect in to the
PHONE port of the splitter. Then connect the splitter to your phone
outlet. Usi ng the phone cable from the package, connect your router’s
DSL port and splitter’s MODEM port.
3. Plug in the power adapter a nd connect the power c able to the POWER
plug. Push the SWITCH button to tu rn on your router. The p ower LED
activates and your router starts to load.
4. After loading is com plete your router assigns a n IP address to the PC
you are using. On the fro nt panel the r elevant LAN LED activates an d a
notification appe ars in the Windows System Tray, inform ing you tha t the
LAN connection has been established succe s sful l y.
(B) If you connect to the Internet via Cable/Satellite/Fiber
Modem or use Ethernet cable connection:
(UR-314AN, UR-344AN4G, UR-344AN4G+ & UR-345AN4G)
1. Using the network ca ble from the package, co nnect your computer to
LAN2, LAN3 or LAN4 on the router.
2. Connect your external modem or Ethernet cable to LAN1
3. Plug in the power adapte r and c onnect the p ower ca ble to the POWER
plug. Push the SWITCH button to t urn on your router. The power LED
activates and your router starts to load.
(C) If you connect to the Internet via 3G/4G modem:
(UR-344AN4G, UR-344AN4G+ & UR-345AN4G)
1. Using the network cable from the package, con nect your computer to
LAN2, LAN3 or LAN4 port of the router. LAN1 port is reserved for
optional IPTV receiver connection.
2. Plug the 3G/4G modem to the USB port on the back side of your router.
3. Plug in the power adapter a nd connect the power c able to the POWER
plug. Push the SWITCH button to tu rn on your router. The p ower LED
activates and your router starts to load.
.
7
STEP 2
Configuration
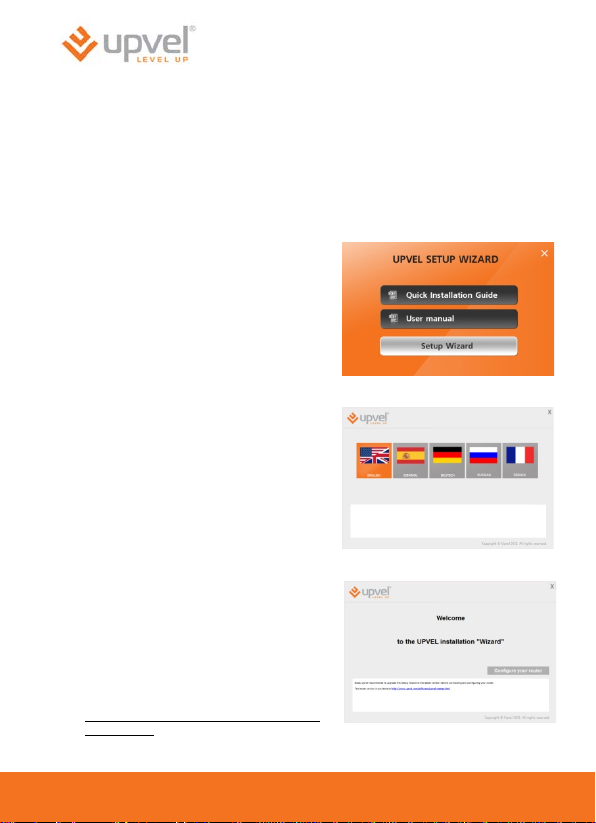
1. Insert the CD from the package into your CD-ROM driv e.
2. The configuration utility will start automatically and the window
represented belo w will appear. If it doesn’t, it most lik ely indicates that
CD Autorun func tion of your operating system is off. In th at case ple ase
launch Explorer, open your CD drive and then launch Autorun.exe.
3. Click Start configuration wizard
button.
4. Please select your language.
5. In the following window click
Configure your router.
Note. Upvel recommends to upgrade the
Setup Wizard to the latest version before
connecting and configuring the router. If
Internet connection is established utility will
update automatically. The latest version is
available at:
http://www.upvel.com/support/software/upve
l-master.html
8
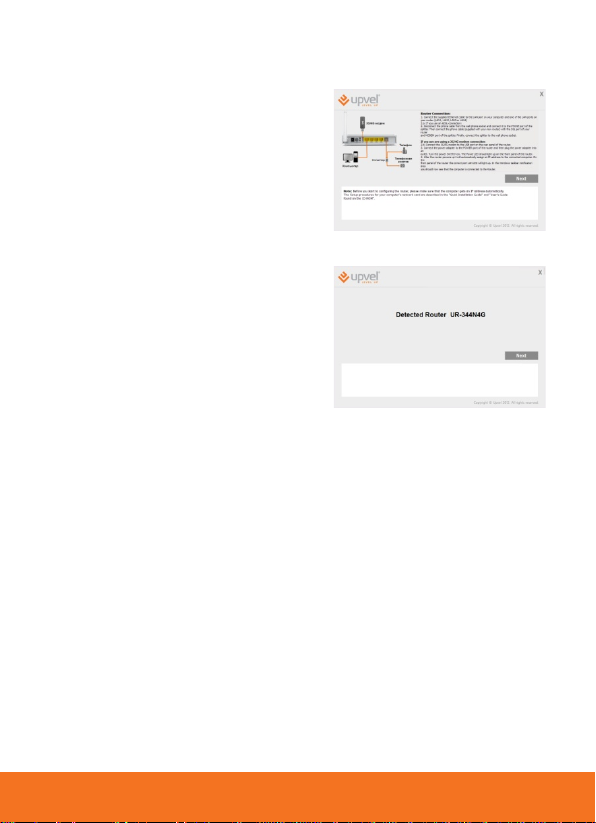
6. Establish all the connections
according to instructions in the
window represent ed to the ri ght and
click Next.
7. In the following window please cl ick
Next.
UPVEL ADSL Modem Router
9
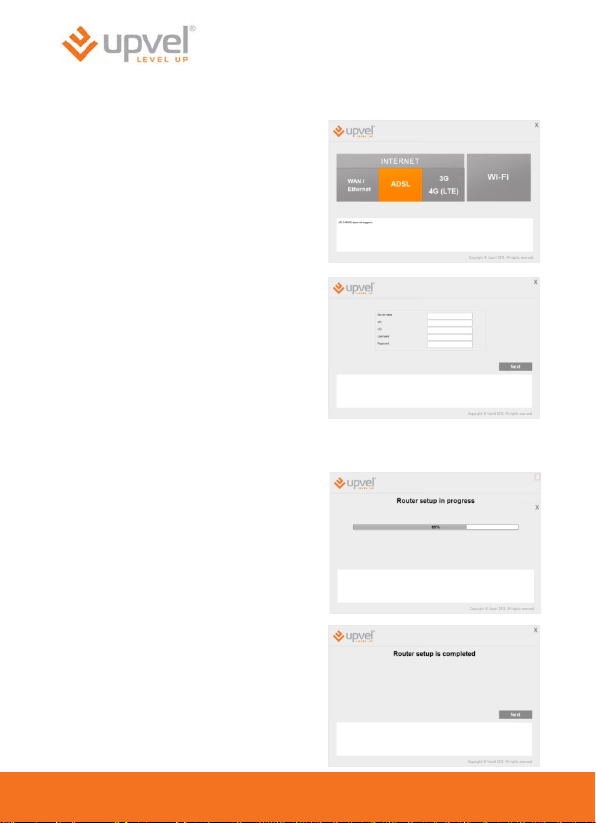
Connecting to the Internet via ADSL
1. Please click the ADSL button.
2. Enter the data from the agreement
with your ISP and click Next.
(Hint: Server Name usually remains
blank. In many cases VPI is 0 and
VCI is 35. Contact your ISP for
exact values)
Note: For more advanced ADSL connection options please enter http://192.168.10.1 into
your web browser address line, followed by entering “admin” for username and “admin”
for password. Once you see the routers webpage, click on the QUICK START button on
the top bar and follow the instructions.
3. Please wait until the ro uter setup is
completed.
4. The Internet connection setup is
now completed. Click the Next
button. (The ADSL connection
should be live within 30-60
seconds)
10
UPVEL ADSL Modem Router
Connecting to the Internet via external modem or Ethernet
cable (using port LAN1)
(only UR-314AN, UR-344AN4G, UR-344AN4G+ & UR-345AN4G)
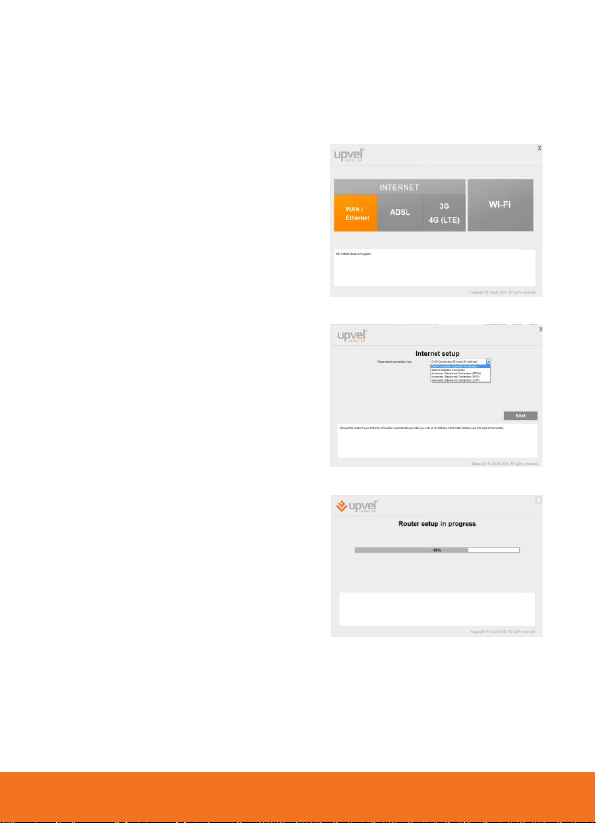
1. Please click the WAN/Ethernet
button
2. Enter the data from the agreem ent
with your ISP and click Next.
(note: most cable and satellite
modems as well as hotel
broadband assign your router with
an IP address – choose DHCP
connection in this case)
3. Please wait until the rout er setup i s
completed.
4. The Internet connection setup is now completed. Click the Next button.
11
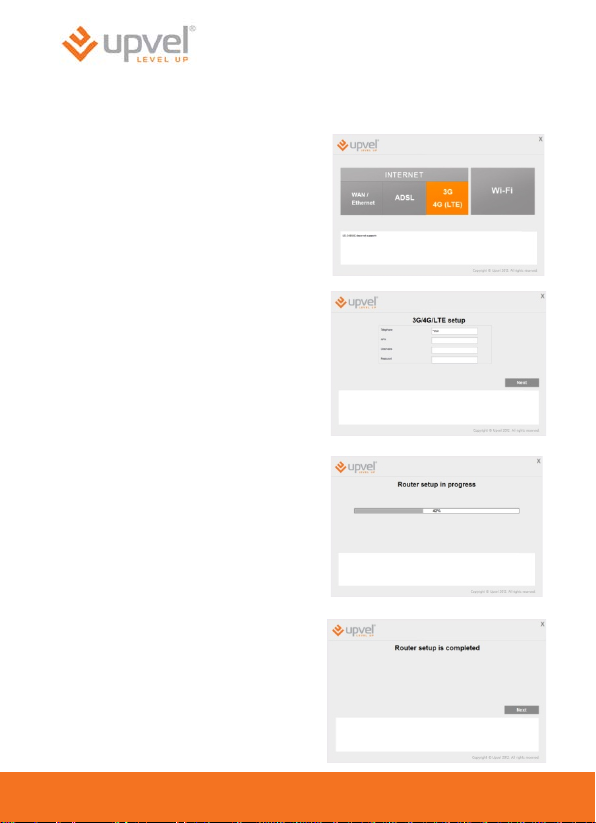
Connecting to the Internet via 3G/4G
(only UR-344AN4G, UR-344AN4G+ & UR-345AN4G)
5. Please click the 3G/4G button.
6. Enter the data from the agreement
with your ISP and click Next.
7. Please wait until the router s etup is
completed.
8. The Internet connection setup is
now completed. Click the Next
button.
12
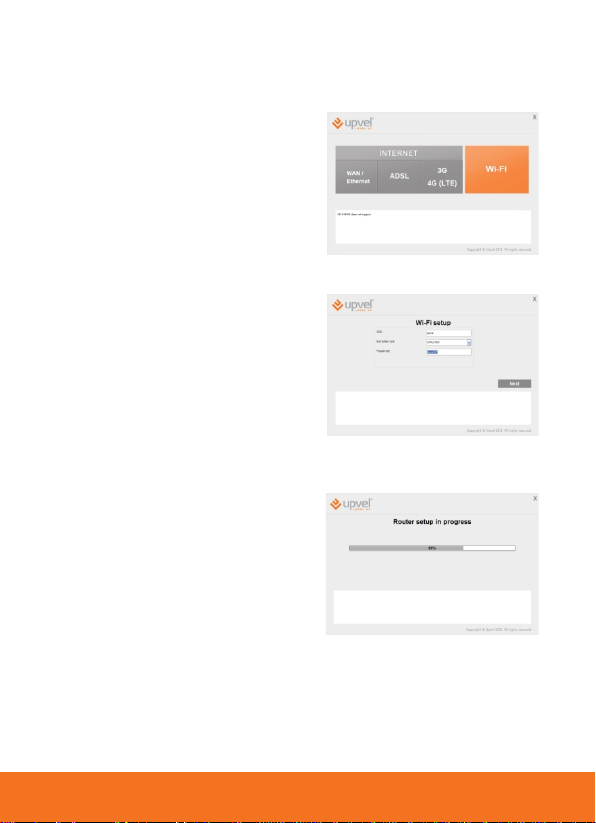
Wireless network configuration
(all models except UR-104AN)
1. Please click on Wi-Fi button.
2. Please specify the SSID (your
network’s name). Upvel is the
default SSID.
3. Select the encryp tion type (WPA2PSK is recommended).
4. Specify the passphras e (the def aul t
passphrase is upvel123).
5. Then click Next.
6. Please wait until the wireless setup
is completed.
UPVEL ADSL Modem Router
13
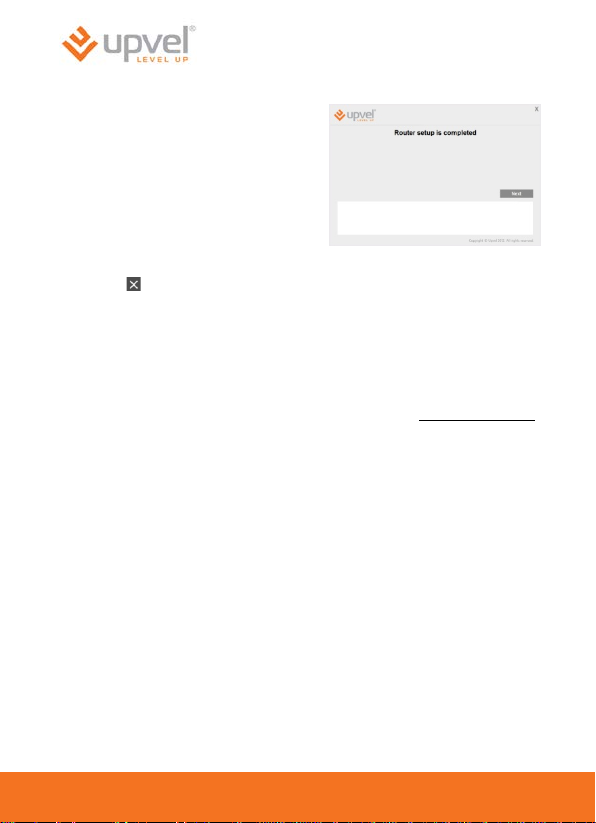
7. Wi-Fi setup is completed. Please
click Next.
8. Click button to exit.
Congratulations! Your new ADSL Router is now operational. You can run
the installation CD anytime to make changes to your Router’s settings.
Note: You can change additional settings by entering http://192.168.10.1
into your Web browser address line, and enter “admin” for username and
“admin” for password. More detailed explanations are in the user manual
on your CD ROM.
14
Power
LED de Corriente
DSL
Conexión DSL
Internet
Conexión de Internet
LAN1~LAN4
LAN1~LAN4 conexión (PC u otros dispositivos de red)
WLAN (todo excepto
UR-104AN)
WPS (
UR-104AN)
UPVEL ADSL Modem Router
Contenido de paquete
• Enrutador ADSL2/2+
• Guía de instalación rápida
• CD-ROM (Utilidad y Guía de Us u ario )
• Adaptador de Corriente
• Cable de Red (Twisted Pair Cat5 1,5m/5ft)
• Cable de teléfono
• ADSL-divisor con cable de teléfono
Indicadores de LED
Dependiendo del su modelo de Enrutador de modem ADSL, opciones serán
diferente y algunas de las LED descritas no estarán disponibles. Esta guía
de usuario proporciona notas (en cursiva), cuando ciertas opciones
solamente están disponibles para ciertos mod elos.
Conexión inalámbrico
todo excepto
USB (UR-344AN4G,
UR-344AN4G+ & UR-
345AN4G)
Función Wi-Fi Protected Setup (WPS)
La conexión al puerto USB (modem 3G/4G o un
dispositivo de almacenamiento externo)
15
Se suministra
alimentación
No se suministra
alimentación
Conectado con
el DSLAM
No conectado con
el DSLAM
Dirección IP
obtenido
El dispositivo ha
sido conectado
Los datos están
fluyendo
El dispositivo no se
ha conectado
Función
WPS esta en
minutos)
Modem 3G/4G o
conectado
Descripción de los LED
Luz Encendido Titilando Apagado
Power
DSL
Internet
LAN1~LAN4
WLAN (todos
excepto UR-
104AN)
WPS (todos
excepto UR-
104AN)
USB (UR-
344AN4G, UR-
344AN4G+ &
UR-345AN4G)
pública se ha
inalámbrica esta
prendida
–
un disco duro
externo
–
Los datos están
fluyendo
Los datos están
fluyendo
modo de
detección (LED
titila por un
máximo de 2
Los datos están
fluyendo
Dirección IP pública
no se ha obtenido
Función inalámbrica
está apagada
Función WPS no se
está utilizando
El puerto USB no
está siendo
–
utilizado
16
Botón que activan el WPS (Wi-Fi Protected Setup).
la guía del usuario.
WiFi (todos
104AN)
USB (UR-
345AN4G)
Puertos RJ-45 para conectar PCs y otros dispositivos a su
red de área local
UPVEL ADSL Modem Router
Funcionalidad de los puertos y botones
POWER
SWITCH
WPS (todos
excepto UR-
104AN
excepto UR-
344AN4G, UR-
344AN4G+ & UR-
LAN 1 ~ LAN4
DSL
Puerto para cable de alimentación
Interruptor de prendido y apa ga do
Descripción completa de función de WPS esta descrito en
Activación inalámbrica / desactivación
Puerto para conectar modem 3G/4G o un disco duro
externo
Puerto RJ-11 para cable telefónico
17
Primer Paso
Instalación del enrutador
18

UPVEL ADSL Modem Router
Si se conecta a Internet a través de ADSL:
1. Usando el cable de red que viene incluido en el paquete, conecte s u
computadora a uno de los tres puertos (LAN2, LAN3 o LAN4) del
enrutador. El puerto LAN1 está reserv ado para la conexión d el modem
cable/satélite/fibra o conexión hotel.
2. Desconecte el cable de teléfono de la toma telefónica y conéctelo a al
puerto de PHONE del divisor.
3. Conecte el cable de t eléfono (sum inistr ado con s u nuevo enr utador) co n
el puerto DSL de su enrutador y puerto MODEM del divisor.
4. Conecte el divisor a la toma telefónica.
5. Conecte el cable de alimentación a la toma de corriente POWER y
conecte el adaptado r de corriente. Presione el botó d e interruptor a la
posición de ON po sition. Verifi que que el LED de c orriente que es ta de
frente este iluminada de verde.
6. Después de que la unidad sea cargada completamente, su enrutador le
asignara una dirección IP a la PC que esté usando. En la parte frontal la
LED de LAN correspondiente será activada y una notificación aparecerá
en el Windows System Tray, informando a usted que la conexión de
LAN se ha establecido satisfactoriamente.
Si se conecta a Internet a través de 3G/4G:
(UR-344AN4G, UR-344AN4G+ & UR-345AN4G)
1. Usando el cable de red que viene incluido en el paquete, conecte s u
computadora a uno de los tres puertos (LAN2, LAN3 o LAN4) del
enrutador. El puerto LAN1 está reserv ado para la conexión d el modem
cable/satélite/fibra o conexión hotel.
2. Conecte el modem 3G/4G al puerto USB de su enrutador.
3. Conecte el cable de alimentación ala toma de corriente POWER y
conecte el adaptado r de corriente. Presione el botó d e interruptor a la
posición de ON po sition. Verifi que que el LED de c orriente que es ta de
frente este iluminada de verde
4. Después de que la u nidad sea cargada com pletame nte, su enrut ador le
asignara una direcci ó n IP a la PC que esté usando. En la parte frontal la
LED de LAN correspon diente s erá activ ada y una notif icació n aparece rá
en el Windows System Tray, informando a usted que la con exión de
LAN se ha establecido satisfactoriamente.
19
 Loading...