


 Loading...
CONTENTS |
|
Product overview .................................................................................................... |
3 |
Package contents ................................................................................................... |
4 |
Status LEDs............................................................................................................ |
4 |
LEDs description .................................................................................................... |
5 |
Ports and buttons functionality................................................................................ |
6 |
Router Installation................................................................................................... |
7 |
Configuring your router with Setup Wizard ............................................................. |
9 |
Connecting to the Internet via ADSL ................................................................. |
11 |
Connecting to the Internet via Ethernet ............................................................. |
12 |
Connecting to the Internet via 3G/4G ................................................................ |
13 |
Wireless network configuration.......................................................................... |
14 |
Connection to your wireless network.................................................................... |
16 |
Windows Vista, 7 and 8 ..................................................................................... |
16 |
Windows XP ...................................................................................................... |
18 |
Tips on wireless performance optimization........................................................... |
20 |
Configuring your router through Web-interface .................................................... |
21 |
Quick Installation .................................................................................................. |
22 |
Web-interface guide ............................................................................................. |
28 |
Connecting to the Internet via ADSL ................................................................. |
29 |
Connecting to the Internet via Ethernet ............................................................. |
35 |
Connecting to the Internet via 3G...................................................................... |
39 |
Interface setup > LAN........................................................................................ |
40 |
Interface setup > Wireless................................................................................. |
41 |
IPTV setup......................................................................................................... |
43 |
Maintenance > Administration ........................................................................... |
47 |
Maintenance > Time zone ................................................................................. |
48 |
Maintenance > Firmware................................................................................... |
50 |
Maintenance > SysRestart ................................................................................ |
51 |
Status > System Log ......................................................................................... |
52 |
Status > Statistics.............................................................................................. |
54 |
Possible troubles while connecting and configuring the router............................. |
55 |
Setting up your network adapter........................................................................... |
56 |
For Windows Vista, 7 and 8............................................................................... |
56 |
For Windows XP................................................................................................ |
59 |
For Mac OS X.................................................................................................... |
63 |
Specification ......................................................................................................... |
66 |
FCC/CE Disclaimer .............................................................................................. |
69 |
GPL/LGPL Information ......................................................................................... |
72 |

Product overview
UR-104AN |
4 ports ADSL2/2+ Router |
10/100 Mbps Ethernet, IPTV and |
|
|
|
Ipv6 support |
|
|
|
|
|
UR-314AN |
Wireless N 4 ports ADSL2/2+ |
150 Mbps 802.11n Wi-Fi, 10/100 |
|
v2 |
Router 1x1 |
Mbps Ethernet, IPTV and Ipv6 |
|
|
|
support |
|
|
|
|
|
UR- |
Wireless N 4 ports ADSL2/2+ |
3G/4G, 150 Mbps 802.11n Wi-Fi, |
|
344AN4G |
Router 1x1 + USB host with |
10/100 Mbps Ethernet, IPTV and |
|
|
3/4G Failover |
Ipv6 support, 3G/4G backup, Samba |
|
|
|
|
|
UR- |
Wireless N 4 ports ADSL2/2+ |
3G/4G, 150 Mbps 802.11n Wi-Fi, |
|
344AN4G+ |
Router 1x1 + USB host w |
10/100 Mbps Ethernet, IPTV and |
|
|
3/4G Failover + 5dBi |
Ipv6 support, 3G/4G backup, |
|
|
antenna |
Samba, 5 dBi antenna |
|
|
|
|
|
UR- |
Wireless N 4 ports ADSL2/2+ |
3G/4G, 300 Mbps 802.11n Wi-Fi, |
|
354AN4G |
Router 2x2 + USB host with |
10/100 Mbps Ethernet, IPTV and |
|
|
3/4G Failover |
Ipv6 support, 3G/4G backup, Samba |
|
|
|
|
3

UPVEL ADSL Modem Router
Package contents
•ADSL2+ Modem Router
•Quick Installation guide
•CD-ROM (Utility and User’s Guide)
•Power Adapter (please go to page 63 for specifications)
•Network Cable (Twisted Pair Cat5 1,5m/5ft)
•Telephone cable (x2)
•ADSL-splitter
•Warranty certificate
Status LEDs
Depending on your ADSL Modem Router model, features will differ, and some LEDs may not be available as described below. This User Manual provides you with notes (in italic), when certain features are only available in specific models.
Power |
Power |
|
|
DSL |
DSL connection |
|
|
Internet |
Internet connection |
|
|
LAN1~LAN4 |
Connection to LAN1~LAN4 ports (PCs or other network devices) |
|
|
WLAN |
Wireless network |
(all except |
|
UR-104AN) |
|
|
|
WPS |
Wi-Fi Protected Setup function execution |
(all except |
|
UR-104AN) |
|
|
|
USB |
|
(UR-44AN4G, |
Connection to USB port (3G/4G modem or external storage |
UR-344AN4G+ |
device) |
& UR-45AN4G) |
|
|
|
4

LEDs description
LED |
Solid |
Blinking |
Off |
|
|
|
|
|
|
Power |
Power is supplied |
– |
Power is not |
|
supplied |
||||
|
|
|
||
|
|
|
|
|
DSL |
Connected to |
Not connected to |
– |
|
DSLAM |
DSLAM |
|||
|
|
|||
|
|
|
|
|
Internet |
Public IP address |
Data is being |
Public IP address |
|
hasn’t been |
||||
has been obtained |
transmitted |
|||
|
obtained |
|||
|
|
|
||
|
|
|
|
|
LAN1~LAN4 |
Device has been |
Data is being |
Device is not |
|
connected |
transmitted |
detected |
||
|
||||
|
|
|
|
|
WLAN |
Wireless unit |
Data is being |
Wireless unit |
|
(all except |
||||
is on |
transmitted |
is of |
||
UR-104AN) |
||||
|
|
|
||
|
|
|
|
|
|
|
Waiting for WPS |
|
|
WPS |
|
function to be |
WPS function is not |
|
– |
activated on the |
|||
(all except |
||||
remote device you |
being used |
|||
UR-104AN) |
|
|||
|
are going to connect |
|
||
|
|
|
||
|
|
(2 min) |
|
|
|
|
|
|
|
USB |
|
|
|
|
(UR-344AN4G, |
3G/4G modem or |
Data is being |
USB port is not |
|
UR-344AN4G+ |
external hard drive |
|||
transmitted |
being used |
|||
& |
is connected |
|||
|
|
|||
UR-345AN4G) |
|
|
|
|
|
|
|
|
5

UPVEL ADSL Modem Router
Ports and buttons functionality
POWER |
Power cable port |
|
|
|
|
SWITCH |
Power On/Off button |
|
|
|
|
WPS |
Wi-Fi Protected Setup activation |
|
(all except |
||
UR-104AN) |
|
|
|
|
|
WiFi |
Wireless unit activation/deactivation |
|
(all except |
||
UR-104AN) |
|
|
|
|
|
USB |
|
|
(UR-344AN4G, |
Port to connect 3G/4G modem or external hard drive |
|
UR-344AN4G+ & |
||
UR-345AN4G) |
|
|
|
|
|
LAN 1 ~ LAN4 |
RJ-45 ports to connect PCs and other device at your local |
|
area network |
||
|
||
|
|
|
DSL |
RJ-11 telephone cable port |
|
|
|
6

Router Installation
7

UPVEL ADSL Modem Router
If you connect to the Internet via ADSL:
1.Using the network cable from the package, connect your computer to LAN2 or LAN3 port of the router. LAN4 port is for IPTV receiver connection.
2.Disconnect the phone cable from the outlet and connect in to the PHONE port of the splitter.
3.Connect the splitter to your phone outlet.
4.Using the phone cable from the package, connect your router’s DSL port and splitter’s MODEM port.
5.Plug in the power adapter and connect the power cable to the DC plug. Push the SWITCH button to turn on your router. The power LED activates and your router starts to load.
6.After loading is complete your router assigns an IP address to the PC you are using. On the front panel the relevant LAN LED activates and a notification appears in Windows tray, informing you that LAN connection established successfully.
If you connect to the Internet via 3G/4G modem:
(UR-344AN4G, UR-344AN4G+ & UR-345AN4G)
1.Using the network cable from the package, connect your computer to LAN2 or LAN3 port of the router. LAN4 port is for IPTV receiver connection.
2.Plug the 3G/4G modem to the USB port on the back side of your router.
3.Plug in the power adapter and connect the power cable to the DC plug. Push the SWITCH button to turn on your router. The power LED activates and your router starts to load.
4.After loading is complete your router assigns an IP address to the PC you are using. On the front panel the relevant LAN LED activates and a notification appears in Windows tray, informing you that LAN connection established successfully.
If you connect to the Internet via cable/satellite modem or dedicated Ethernet connection:
1.Using the network cable from the package, connect your computer to LAN2 or LAN3 port of the router. LAN4 port is for IPTV receiver connection.
2.Connect your cable/satellite modem or your ISP's network cable to LAN1 port of your router.
3.Plug in the power adapter and connect the power cable to the DC plug. Push the SWITCH button to turn on your router. The power LED activates and your router starts to load.
4.After loading is complete your router assigns an IP address to the PC you are using. On the front panel the relevant LAN LED activates and a notification appears in Windows tray, informing you that LAN connection established successfully.
8

Configuring your router with Setup Wizard
1.Insert the CD from the package into your CD-ROM drive.
2.The configuration utility will start automatically and the window represented below will appear. If it doesn’t, it most likely indicates that CD Autorun function of your operating system is off. In that case please launch Explorer, open your CD drive and then launch Autorun.exe.
3.Click Start configuration wizard button.
.
4. Please select your language.
5.In the following window click Configure your router.
Note. Upvel recommends to upgrade the Setup Wizard to the latest version before connecting and configuring the router. If Internet connection is established utility will update automatically. The latest version is available at: http://www.upvel.com/support/software/u pvel-master.html
9

UPVEL ADSL Modem Router
6. Establish all the connections according to instructions in the window represented to the right and click Next.
7. In the following window please click Next.
10
Connecting to the Internet via ADSL
1.Please click ADSL modem / WAN / Ethernet button.
2.Enter the data from the agreement with your ISP and click Next.
These settings can be clarified at your ISP's support.
3.Please wait until the router setup is completed.
4. The Internet connection setup is now completed. Click the Next button..
11
UPVEL ADSL Modem Router
Connecting to the Internet via Ethernet
1.Please click the WAN/Ethernet button.
2.Select your connection type, enter all the necessary data from the agreement with your ISP and click
Next.
These settings can be clarified at your ISP's support.
3.Please wait until the router setup is completed.
4.The Internet connection setup is now completed. Click the Next button.
12
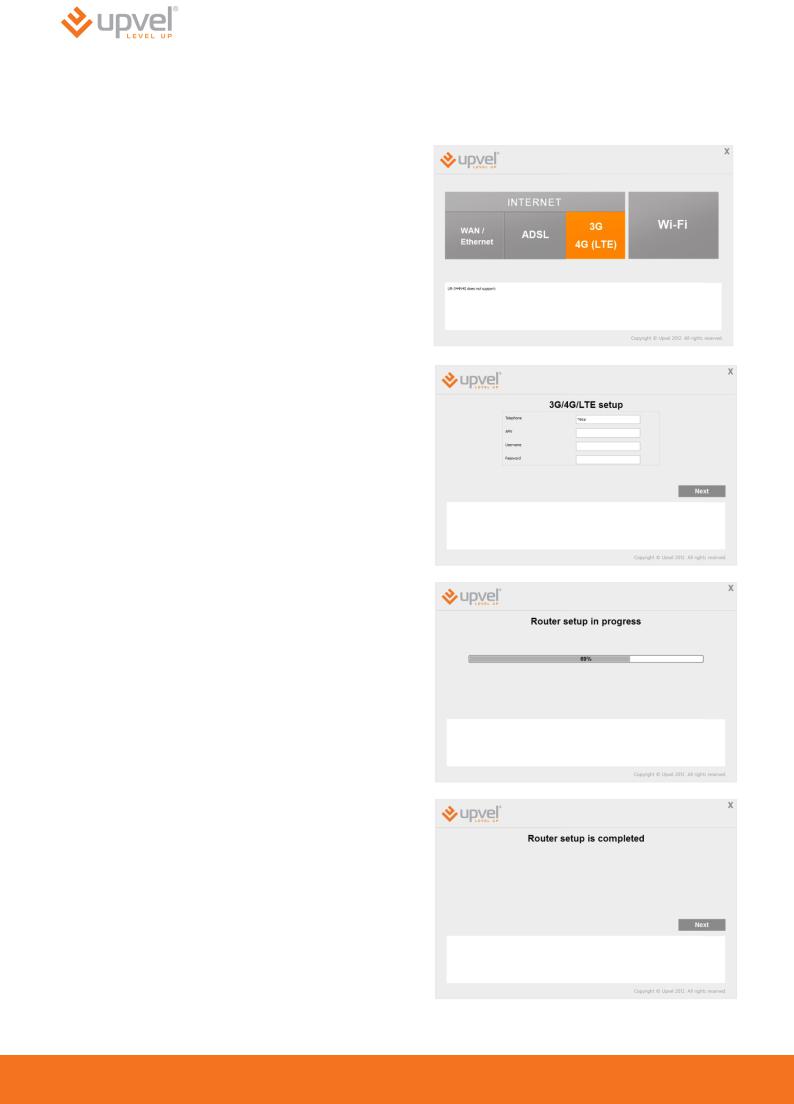
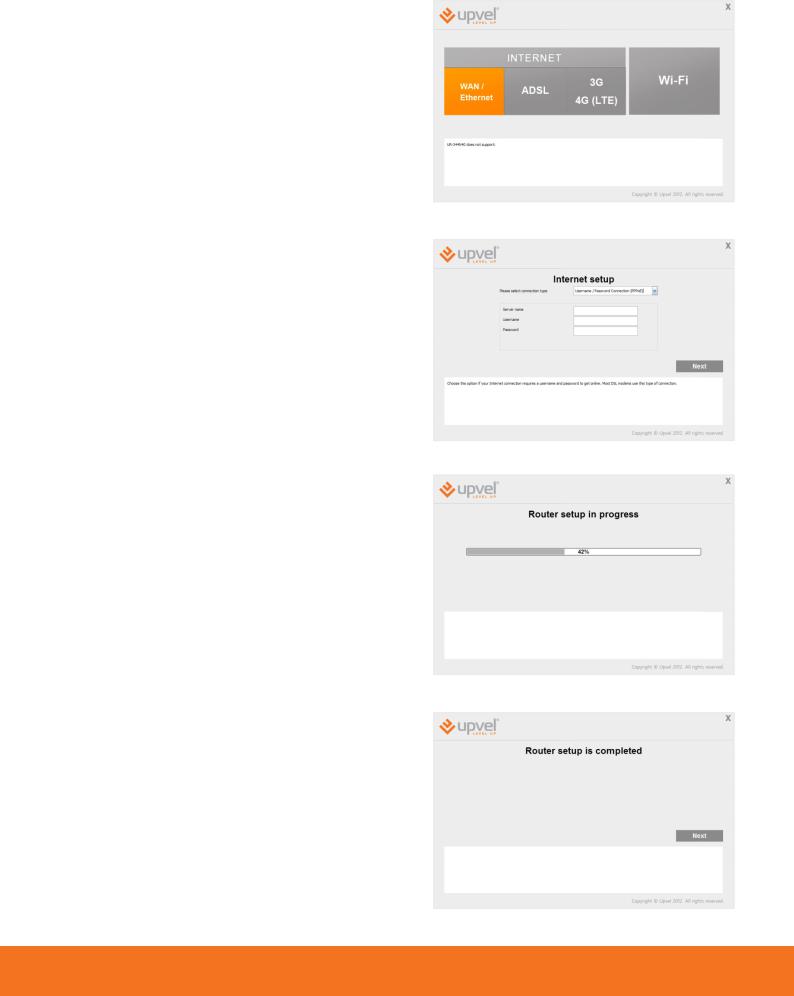
Connecting to the Internet via 3G/4G
(UR-344AN4G, UR-344AN4G+ & UR-345AN4G)
1. Please click 3G/4G (LTE) button.
2.Enter the data from the agreement with your ISP and click Next.
These settings can be clarified at your ISP's support.
3.Please wait until the router setup is completed.
4.The Internet connection setup is now completed. Click the Next button..
13

UPVEL ADSL Modem Router
Wireless network configuration
1. Please click on Wi-Fi button.
2.Please specify the SSID (your network’s name).
3.Select the encryption type (WPA2-PSK is recommended).
4.Specify the passphrase.
5.Then click Next.
6.Please wait until the wireless setup is completed.
14

7.Wi-Fi setup is completed. Please click Next.
8.Click  button to exit.
Congratulations! Your new Router is now operational. You can run the installation CD anytime to make changes to your Router’s settings.
Note: You can change additional settings by entering http://192.168.10.1 into your Web browser address line, and enter “admin” for username and “admin” for password. More detailed explanations are in the user manual on your
CD ROM.
15

UPVEL ADSL Modem Router
Connection to your wireless network
Windows Vista, 7 and 8
1. Start ->ControlPanel ->Network and Internet ->Connect to a network
2.Or left-click on network connection button in Windows tray.
3.In the next window choose Wi-Fi network with the name you have specified, and click Connect.
16

4. Enter the network key you have specified to the input box and click OK.
17
UPVEL ADSL Modem Router
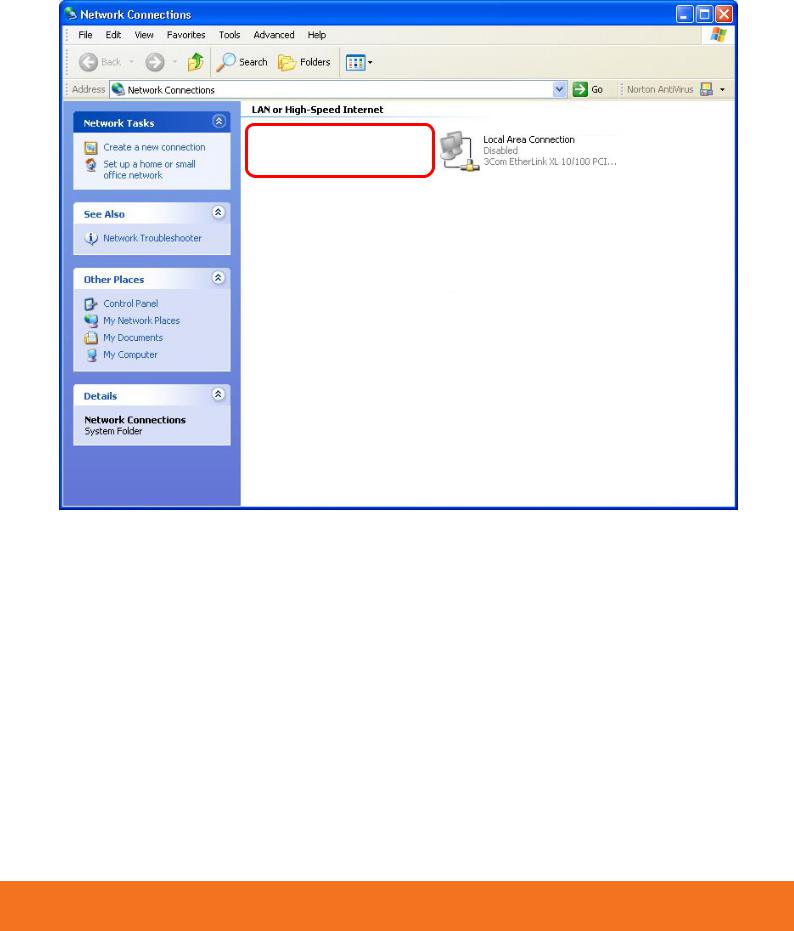
Windows XP
1.Click the Start button, then follow to Control Panel. Double-click the Network
Connections.
2.Double-click on Wireless Network Connection
18

3.In the next window choose Wi-Fi network with the name you have specified, and click Connect.
4.Enter the network key you have specified to the both input boxes and click
Connect.
19

UPVEL ADSL Modem Router
Tips on wireless performance optimization
A set of various factors can impact the range of wireless devices.
1.Adjust your wireless devices so that the signal is traveling in a straight path, rather than at an angle. The more material the signal has to pass through the more signal you will lose.
2.Keep the number of obstructions to a minimum. Each obstruction can reduce the range of a wireless device. Position the wireless devices in a manner that will minimize the amount of obstructions between them.
3.Building materials can have a large impact on your wireless signal. In an indoor environment, try to position the wireless devices so that the signal passes through less dense material such as dry wall. Dense materials like metal, solid wood, glass or even furniture may block or degrade the signal.
4.Antenna orientation can also have a large impact on your wireless signal. Use the wireless adapter’s site survey tool to determine the best antenna orientation for your wireless devices.
5.Interference from devices that produce RF (radio frequency) noise can also impact your signal. Position your wireless devices away from anything that generates RF noise, such as microwaves, radios and baby monitors.
6.Any device operating on the 2.4GHz frequency will cause interference. Devices such as 2.4GHz cordless phones or other wireless remotes operating on the 2.4GHz frequency can potentially drop the wireless signal. Although the phone may not be in use, the base can still transmit wireless signals. Move the phone’s base station as far away as possible from your wireless devices.
If you are still experiencing low or no signal, consider repositioning the wireless devices or installing additional access points.
20
Configuring your router through Web-interface
Besides using the Configuration Wizard you are able to set up your router using Web-interface.
Open your Web browser and go to http://192.168.10.1
Your router will prompt you for a user name and password.
Enter the default user name and password and then click Login.
Default User Name: admin
Default Password: admin
21

UPVEL ADSL Modem Router
Quick Installation
For quick installation through the router’s web-interface go to the main (Status) page and click Quick Start tab .
22

Then click RUN WIZARD.
Click NEXT.
23
Loading...