


 Loading...
Network Cameras
User Manual
Manual Version:2.06

Thank you for purchasing our product. If there are any questions, or requests, please do not hesitate to contact the dealer.
Copyright
Copyright 2015-2017 Zhejiang Uniview Technologies Co., Ltd. All rights reserved. No part of this manual may be copied, reproduced, translated, or distributed in any form or by any means without prior consent in writing from our company.
Trademark Acknowledgement
 and other Uniview's trademarks and logos are the property of Zhejiang Uniview Technologies Co.,
Ltd. Other trademarks, company names and product names contained in this manual are the property of their respective owners.
Disclaimer
CAUTION!
The default password is used for your first login. To ensure account security, please change the password after your first login. You are recommended to set a strong password (no less than eight characters).
To the maximum extent permitted by applicable law, the product described, with its hardware, software, firmware and documents, is provided on an “as is” basis.
Best effort has been made to verify the integrity and correctness of the contents in this manual, but no statement, information, or recommendation in this manual shall constitute formal guarantee of any kind, expressed or implied. We shall not be held responsible for any technical or typographical errors in this manual. The contents of this manual are subject to change without prior notice. Update will be added to the new version of this manual.
Use of this manual and the subsequent result shall be entirely on the user’s own responsibility. In no event shall we be reliable to you for any special, consequential, incidental, or indirect damages, including, among others, damages for loss of business profits, business interruption, or loss of data or documentation in connection with the use of this product.
Video and audio surveillance can be regulated by laws that vary from country to country. Check the law in your local region before using this product for surveillance purposes. We shall not be held responsible for any consequences resulting from illegal operations of the device.
The illustrations in this manual are for reference only and may vary depending on the version or model. The screenshots in this manual may have been customized to meet specific requirements and user preferences. As a result, some of the examples and functions featured may differ from those displayed on your monitor.
This manual is a guide for multiple product models and so it is not intended for any specific product.
Due to uncertainties such as physical environment, discrepancy may exist between the actual values and reference values provided in this manual. The ultimate right to interpretation resides in our company.
Environmental Protection
This product has been designed to comply with the requirements on environmental protection. For the proper storage, use and disposal of this product, national laws and regulations must be observed.
Symbols
The symbols in the following table may be found in this manual. Carefully follow the instructions indicated by the symbols to avoid hazardous situations and use the product properly.
Symbol |
Description |
|
|
Contains important safety instructions and indicates situations that could cause bodily
WARNING! injury.
|
Means reader be careful and improper operations may cause damage or malfunction |
CAUTION! |
to product. |
|
|
NOTE! |
Means useful or supplemental information about the use of product. |
|
|
|
|
Contents
1Network Connection·························································································································1
2Login··················································································································································1
Preparation ················································································································································1 Logging In to the Web Interface ················································································································3 Introduction to the Web Interface·············································································································4 Initial Configuration ···································································································································5
3Configuring Parameters····················································································································5
Local Parameters········································································································································5 Network Configuration ······························································································································7 Ethernet··············································································································································7 Port···················································································································································10 FTP ····················································································································································10 E-Mail················································································································································12 Port Mapping····································································································································13 DNS ···················································································································································14 DDNS·················································································································································14 EZCloud·············································································································································14 802.1x ···············································································································································15 Image Configuration ································································································································15 Image Adjustment ····························································································································15 OSD Setting·······································································································································25 Privacy Mask·····································································································································27 Audio and Video Configuration················································································································28 Video Configuration ·························································································································28 Audio Configuration ·························································································································29 Snapshot···········································································································································30 ROI ····················································································································································31 Media Stream Configuration············································································································31 Intelligent Alarm Configuration ···············································································································33 Smart Settings ··································································································································33 Cross Line Detection·························································································································34 Intrusion Detection ··························································································································35 Face Detection··································································································································36 People Counting ·······························································································································37 Auto Tracking····································································································································38 Defocus Detection····························································································································39 Scene Change Detection···················································································································40 Advanced Settings ····························································································································40 Common Alarm Configuration ·················································································································41 Configuring Motion Detection Alarm·······························································································41 Configuring Tampering Alarm ··········································································································45 Configuring Audio Detection Alarm ·································································································45 Configuring Alarm Input ···················································································································47
i
Configuring Alarm Output ················································································································48 Memory Card Storage······························································································································49 Setting Edge Storage ························································································································49 Setting Cache Post Recording···········································································································52 System Maintenance ·······························································································································53 Security·············································································································································53 Setting the System Time···················································································································56 Setting Servers··································································································································57 Serial Port Mode Configuration········································································································58 Wiper Control···································································································································60 Viewing Device Status ······················································································································61 Photo Storage Status························································································································61 Upgrading the Device ·······················································································································62 Restarting the System ······················································································································63 Importing and Exporting System Configuration File ········································································63 Collecting Diagnosis Information ·····································································································64 Focus Configuration··························································································································64 Device Mounting Height···················································································································64 Fisheye Camera Parameter ··············································································································65
4Live View ·········································································································································66
Live View Toolbar·····································································································································67 Viewing Certain Area of Images···············································································································68 Using Digital Zoom ···························································································································68 Using Area Focus ······························································································································69 Using 3D Positioning·························································································································70 Live View of Fisheye Cameras··················································································································70
5Video Playback and Download with Edge Storage ·········································································73
Video Playback ·········································································································································73 Download·················································································································································73
6PTZ Control ·····································································································································74
PTZ Control Toolbar ·································································································································74 Setting Patrol by Presets··························································································································75 Setting Presets··································································································································75 Setting Patrol····································································································································76 Setting Home Position ·····························································································································80 Remote Control PTZ·································································································································81 PTZ Limit···················································································································································81 Resume Patrol··········································································································································82
Appendix A Glossary ··························································································································83
Appendix B FAQ ·································································································································84
ii

1 Network Connection
Before accessing a network camera (also known as IP Camera or IPC) from a PC, you need to connect the network camera to the PC directly with a network cable or via a switch or router.
Network cable
IPC |
PC |
Use a Shielded Twisted Pair (STP) cable to connect the network interfaces of the network camera and the PC.
Network cable |
Network cable |
|
|
|
|
IPC |
Switch or Router |
PC |
Use Shielded Twisted Pair (STP) cables to connect the network interfaces of the camera and the switch or router.
2 Login
Preparation
After you have completed the installation in accordance with the quick guide, connect the camera to power to start it. After the camera is started, you can access the camera from a PC client installed with a web browser or the client software EZStation. Internet Explorer (IE) is a recommended web browser. For more information about EZStation, refer to the EZStation User Manual.
The following takes IE on a Microsoft Windows 7.0 operating system as an example.
Check before login
The camera is operating correctly.
The network connection between the PC and the camera is normal. The PC is installed with Internet Explorer 8.0 or higher.
(Optional) The resolution is set to 1440 x 900.
1

Add the IP address as a trusted site
 1
1
 2
2
|
http://192.168.0.13 |
3 |
5 |
|
4
Clear the check box
6
7
2

NOTE!
The IP address 192.168.0.13/192.168.1.13 in this example is the default IP address. Please replace it with the actual address of your camera if it has been changed.
(Optional) Modify user access control settings
Before you access the camera, follow the steps to set User Account Control Settings to Never notify.
2
3
4
 1
1
Logging In to the Web Interface
The default static IP address of the camera is 192.168.1.13 or 192.168.0.13, and the default subnet mask is 255.255.255.0.
DHCP is turned on by default. If a DHCP server is used in the network, the IP address of your camera may be assigned dynamically, and you need to use the correct IP address to log in. Use the EZStation client to view the dynamic IP address of your camera.
The following takes IE as an example to describe the login procedure.
1.Browse to the login page by entering the correct IP address of your camera in the address bar.
2.If you log in for the first time, follow system prompts and install the ActiveX. You need to close your browser to complete the installation.
3

NOTE!
To manually load the ActiveX, type http://IP address/ActiveX/Setup.exe in the address bar and press Enter.
The default password is used for your first login. To ensure account security, please change the password after your first login. You are recommended to set a strong password (no less than eight characters).
The camera protects itself from illegal access by limiting the number of failed login attempts. If login fails six times consecutively, the camera locks automatically for ten minutes.
3.Enter the username and password, and then click Login. For the first login, use the default username “admin” and password “123456”.
If you log in with Live View selected, live video will be displayed when you are logged in. Otherwise, you need to start live video manually in the live view window.
If you log in with Save Password selected, you do not need to enter the password each time when you log in. To ensure security, you are not advised to select Save Password.
To clear the Username and Password text boxes and the Save Password check box, click Reset.
Introduction to the Web Interface
By default the live view window is displayed when you are logged in to the Web interface. The following shows an example.
1
2
3
4
No. |
Description |
|
|
1Menu
PTZ control area
2Note:
This area is available for PTZ dome cameras and PTZ cameras.
3Live view window
4Live view toolbar
4

Initial Configuration
After you log in to the device, please perform the following initial configuration.
|
Item |
|
Description |
|
|
|
|
1. |
Set the TCP/IP address for the device. |
|
Reconfigure the device IP and network parameters based on |
|
the actual networking. |
||
|
|
|
|
|
|
|
|
2. |
Log out and log in again to the Web |
- |
|
|
using the new IP address. |
|
|
|
|
|
|
3. |
Set the system time. |
|
Set the system time based on the actual situation. |
|
|
|
|
4. |
(Optional) Set the management |
|
Set the management server based on the actual networking. |
|
server. |
|
|
|
|
|
|
5. |
(Optional) Set the server for storing |
|
Set the server for storing photos based on the actual |
|
photos. |
|
networking. |
|
|
|
|
6. |
Set OSD. |
|
Set the information displayed on the screen as needed, for |
|
example, time. |
||
|
|
|
|
|
|
|
|
7. |
(Optional) Manage users. |
|
Change the default password and add common users as |
|
needed. |
||
|
|
|
|
|
|
|
|
You can watch the live video after finishing the initial configuration. Please configure other parameters as needed.
NOTE!
The displayed live view interface, parameters displayed and value ranges may vary with models. Please see the actual Web interface for details.
The parameters that are grayed out cannot be modified. For the actual settings, see the Web interface.
It is recommended that you change the password when you are logged in the first time. For details about how to change a password, see Security.
3 Configuring Parameters
Local Parameters
Set local parameters for your PC.
NOTE!
The local parameters may vary with models. Please see the actual Web interface for details.
1.Select Setup > Common > Local Settings.
5
2.Modify the settings as required. The following table describes some major parameters.
Parameter |
|
|
Description |
|
|
|
|
|
|
Intelligent |
Untriggered |
|
|
When enabled, the camera will display an on-screen mark on the target (e.g., |
Mark |
Target |
|
|
face when face detection is enabled) and track it. |
|
|
|
|
|
|
|
|
|
Real-Time Priority: Recommended if the network is in good condition. |
|
Processing Mode |
|
|
Fluency Priority: Recommended if you want short time lag for live video. |
Video |
|
|
|
Ultra-low Latency: Recommended if you want the minimum time lag for |
|
|
|
|
live video. |
|
|
|
|
|
|
Protocol |
|
|
Set the protocol used to transmit media streams to be decoded by the PC. |
|
|
|
|
|
|
|
|
|
Subsection By Time: Duration of recorded video for each recording file on |
|
Recording |
|
|
the computer. For example, 2 minutes. |
|
|
|
Subsection By Size: Size of each recording file stored on the computer. For |
|
|
|
|
|
|
Record |
|
|
|
example, 5M. |
and |
|
|
|
Overwrite: When the assigned storage space on the computer is used up, |
Snapshot |
Record |
|
|
the camera deletes the existing recording files to make room for the new |
|
|
|
recording file. |
|
|
Overwrite |
|
|
|
|
|
|
Full Stop: When the assigned storage space on the computer is full, |
|
|
|
|
|
|
|
|
|
|
recording stops automatically. |
|
|
|
|
|
3.Click Save.
6
Network Configuration
Ethernet
Modify communication settings such as the IP address for the camera so that the camera can communicate with other devices.
NOTE!
After you have changed the IP address, you need to use the new IP address to log in.
The configurations of DNS (Domain Name System) server are applicable when the device is accessed by domain name.
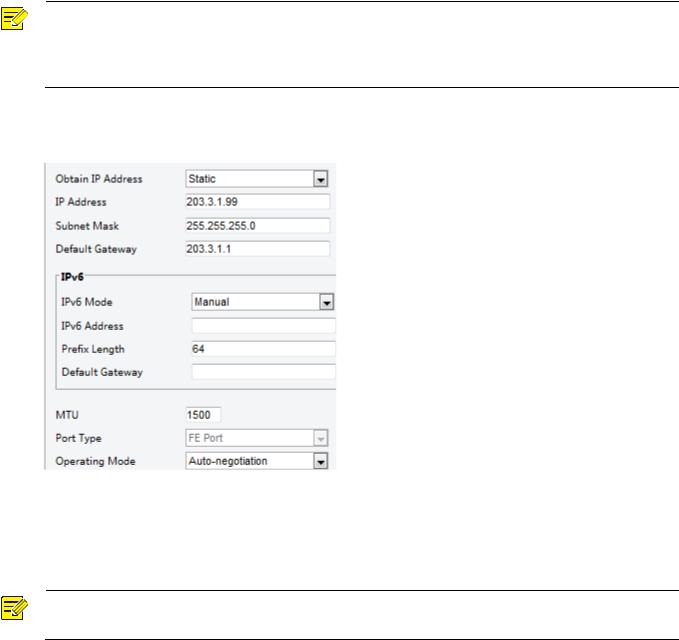
Static Address
1.Click Setup > Network > Network.
2.Select Static from the Obtain IP Address drop-down list.
3.Enter the IP address, subnet mask, and default gateway address. Make sure that the IP address of the camera is unique in the network.
4.Click Save.
PPPoE
NOTE!
This function is not supported by some models. Please see the actual model for details.
If the camera is connected to the network through Point to Point over Ethernet (PPPoE), you need to select PPPoE as the IP obtainment mode.
1.Click Setup > Network > Network.
7

2.Select PPPoE from the Obtain IP Address drop-down list.
3.Enter the username and password provided by your internet Service Provider (ISP).
4.Click Save.
DHCP
The Dynamic Host Configuration Protocol (DHCP) is enabled by default when the camera is delivered. If a DHCP server is deployed in the network, the camera can automatically obtain an IP address from the DHCP server.
To manually configure DHCP, follow the steps below:
1.Click Setup > Network > Network.
2.Select DHCP from the Obtain IP Address drop-down list.
3.Click Save.
IPv6
1.Click Setup > Network > Network.
8

2.By default the IPv6 mode is set to Manual.
3.Enter the IPv6 address, set the prefix length and default gateway. The IP address must be unique on the network.
4.Click Save.
Wi-Fi
NOTE!
This function is not supported by some models, please see the actual model for details.
1.Click Setup > Network > Network. Click the Wi-Fi tab.
2.Select Sniffer.
3.Click Save.
Some devices can search for Wi-Fi networks and connect.
1.Select Setup > Network > Network. Select Wi-Fi for Wi-Fi Mode.
2.Signal strength is displayed. Turn on Adaptive Streams. The page shows that there are other Wi-Fi networks. To search for Wi-Fi networks again, click Search.
3.Click an SSID in the Wi-Fi Network list. Information about the corresponding network is displayed.
4.Click Save.
9

5.When Wi-Fi Mode is set to Wi-Fi Hotspot, the camera can function as a Wi-Fi hotspot for other devices.
6.Click Save.
Port
NOTE!
This function is not supported by some models. Please see the actual model for details.
1.Click Setup > Network > Port.
2.Configure relevant port numbers.
3.Click Save.
FTP
After the configuration of FTP, you will be able to upload snapshots from network cameras to the specified FTP server.
General
1.Click Setup > Storage > FTP. Go to General tab.
10
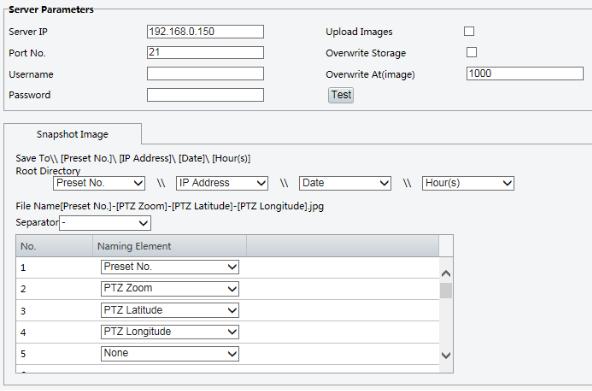
2.Set the IP address and port for the FTP server, username and password used to upload images to the FTP server, select Upload Images, Overwrite Storage and set Overwrite At (threshold for overwriting images). Some camera models support FTP test. You may test FTP after completing FTP settings correctly.
3.Set the path for saving snapshots on the FTP server and the file name format. For example, set path as Preset No.\\IP Address\\Date\\Hour(s), and set file name as Preset No.-PTZ Zoom-PTZ Latitude-PTZ Longitude.jpg.
4.Click Save.
Smart
This function is used to store snapshots taken for smart functions such as face recognition and people counting.
1.Click Setup > Storage > FTP. Go to Smart tab.
11
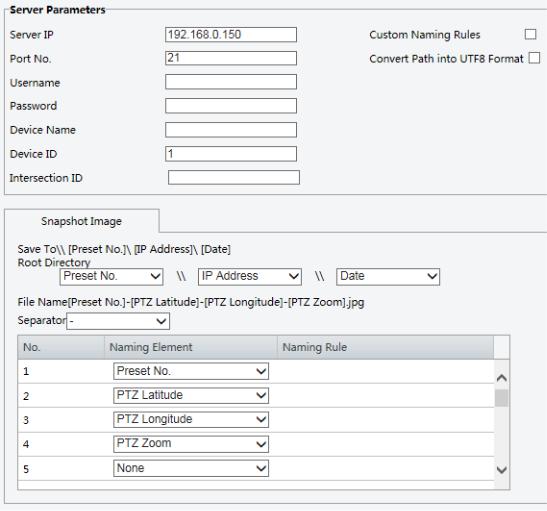
2.Set the IP address and port of the FTP server, username and password used to upload images to the FTP server.
3.Set the path for saving snapshots on the FTP server and the file name format. For example, set path as Preset No.\\IP Address\\Date, and set file name as Preset No.-PTZ Latitude-PTZ Longitude-PTZ Zoom.jpg.
4.Click Save.
After the configuration of E-mail, when alarms are triggered, you will be able to send messages to the specified E-mail address.
1.Click Setup > Network > E-mail.
12

2.Configure relevant parameters of the sender and the recipient. Some camera models support Email test. You may test email after setting the recipient address. The following table describes some major parameters.
Parameter |
Description |
|
|
When enabled, the e-mail will be encrypted using TLS (Transport Layer Security) or Secure
Socket Layer (SSL) to protect privacy.
TLS/SSL
First it tries to send through an SSL connection. If the SMTP server supports SSL, the e-mail will be sent through the SSL connection; otherwise, it tries to send using STARTTLS.
Attach Image
When enabled, the e-mail will contain 3 instant snapshots as attachment according to the Capture Interval.
3.Click Save.
Port Mapping
1. Click Setup > Network > Port. Go to Port Mapping tab.
13

2.Enable Port Mapping and select mapping type. If Manual is selected, then external ports must be configured (external IP is obtained automatically by the camera). If the configured port is occupied, then the Status will show Inactive.
3.Click Save.
DNS
1.Click Setup > Network > DNS.
2.Set DNS server addresses.
3.Click Save.
DDNS
NOTE!
This function is not supported by some models. Please see the actual model for details.
1.Click Setup > Network > DDNS.
2.Enable DDNS Service.
3.Select a DDNS type: DynDNS, NO-IP, or EZDDNS.
4.Complete other settings including server address, domain name, username and password.
5.Click Save.
EZCloud
NOTE!
This function is not available to all models.
This function is displayed as P2P for some devices.
1.Click Setup > Network > EZCloud.
14

2.Select On to enable cloud service.
3.Click Save.
802.1x
802.1x provides authentication to devices (e.g., cameras) trying to connect to a network. Only the authenticated devices can connect the network. This enhances security.
1.Click Setup > Network > 802.1x.
2.Select On and then complete other settings.
3.Click Save.
Image Configuration
Image Adjustment
NOTE!
The image parameters displayed and value ranges allowed may vary with camera model. For the actual parameters and value ranges of your camera, see the Web interface. You may move the sliders to adjust settings or enter values in the text boxes directly.
Clicking Default will restore all the default image settings.
Setting the Scene
Set image parameters to achieve the desired image effects based on live video in different scenes.
Click Setup > Image > Image.
The scene management page for some models is displayed as follows, you can select the desired scene in the drop-down list.
15
The scene management page of some models is displayed as follows, you can take the following steps to configure the scene.
1.Click Scenes.
2.Select a scene, and then set scene switching parameters. The following table describes some major parameters.
Column |
Description |
|
|
Indicates the scene that is being used.
|
Note: |
|
|
||
Current |
Select an option button to switch to the scene and display the corresponding image |
||||
|
parameters for the scene. |
|
|||
|
|
|
|||
|
The camera switches the current scene automatically when Enable Auto Switching is |
||||
|
|
selected. |
|
||
|
|
||||
|
Name of the current scene. The device provides several preset scene modes. When you |
||||
|
select a scene, the corresponding image parameters are displayed. You can adjust image |
||||
|
settings according to actual needs. |
||||
|
Common: recommended for outdoor scenes. |
||||
|
Indoor: recommended for indoor scenes. |
||||
Scene Name |
High Sensitivity: recommended for low light environment. |
||||
|
Highlight Compensation: can |
suppress strong light such as headlights on roads and |
|||
|
|
||||
|
|
spotlight in parks. Recommended for capturing vehicle license plates. |
|||
|
|
WDR: recommeded for scenes with high-contrast lighting, such as window, corridor, |
|||
|
|
front door or other scenes that are bright outside but dim inside. |
|||
|
Custom: set a scene name as needed. |
||||
|
Face: Capture faces in motion in complicated scenes. |
||||
|
Indicates whether to add a scene to the auto-switching list. |
||||
Auto |
Note: |
|
|
||
If Auto Switching is selected, the system switches to a scene automatically when the |
|||||
Switching |
|||||
|
condition for switching to the scene is met. By default the auto-switching list includes the |
||||
|
default scene. |
|
|||
|
|
|
|||
|
Click |
to set conditions for auto-switching, including schedule, illumination, and current |
|||
|
elevation (angle between the |
PTZ and the horizontal direction). It means that |
|||
Setup |
auto-switching is triggered only when illumination and the current elevation during the set |
||||
|
time period meet the set conditions. A condition is invalid if both the start and end values |
||||
|
are set to 0. |
|
|||
|
|
|
|
|
|
16

3.Select a scene and then click  to set it as the default scene.
4.If auto-switching is enabled, the camera can switch to the scene automatically when the condition for switching to a non-default scene is met. Otherwise, the camera remains in the default scene. When auto-switching is not enabled, the camera remains in the current scene.
NOTE!
If Auto Switching is enabled (scene settings will be unavailable), the device will switch between the set scenes. If not, the device will stay at the current scene. The device will stay at default scenes unless the non-default scenes are triggered.
If multiple non-default scenes are triggered, then the device will switch to the scene with the minimum number (starts from 1 to 5).
Image Enhancement
NOTE!
This function may vary with models. Please see actual Web interface for details.
1.Click Setup > Image > Image and then click Image Enhancement.
2.Use the sliders to change the settings. You may also enter values directly. The following table describes some major parameters.
Item |
Description |
|
|
Set the degree of brightness of images.
Brightness
Low brightness High brightness
The amount of a hue contained in a color.
Saturation
Low saturation |
High saturation |
17

Item |
Description |
|
|
Set the degree of difference between the blackest pixel and the whitest pixel.
Contrast
Low contrast High contrast
Contrast of boundaries of objects in an image.
Sharpness
|
|
Low sharpness |
High sharpness |
|
|
|
|
2D |
Noise |
Reduce the noise of images. The function may cause image blurring. |
|
Reduction |
|
|
|
|
|
|
|
3D |
Noise |
Reduce the noise of images. The function may cause motion blur (or ghosting in some |
|
Reduction |
applications). |
|
|
|
|
|
|
|
|
Rotation of the image. |
|
Image |
|
|
Rotation |
Normal |
Flip Vertical |
Flip Horizontal |
180° |
18

Item |
Description |
|
|
90°Clockwise |
90°Anti-clockwise |
3.To restore default settings in this area, click Default.
Exposure
NOTE!
This function may vary with models. Please see actual Web interface for details.
The default settings are scene-adaptive. Use default settings unless modification is necessary.
1.Click Setup > Image > Image and then click Exposure.
For some camera models, the page is displayed as follows.
19
2.Set the parameters as required. The following table describes some major parameters.
Parameter |
|
|
Description |
|
|
|
|
|
|
|
Select the correct exposure mode to achieve the desired exposure effect. |
|
|
|
Automatic: The camera automatically adjusts exposure according to the environment. |
|
|
|
Custom: The user sets exposure as needed. |
Exposure |
|
|
Indoor 50Hz: Reduce stripes by limiting shutter frequency. |
Mode |
|
|
Indoor 60Hz: Reduce stripes by limiting shutter frequency. |
|
|
|
|
|
|
|
Manual: Finetune image quality by setting shutter, gain and iris manually. |
|
|
|
Low Motion Blur: Control the minimum shutter to reduce motion blur in faces captured |
|
|
|
in motion. |
|
|
|
|
|
|
|
Shutter is used to control the light that comes into the lens. A fast shutter speed is ideal for |
|
|
|
scenes in quick motion. A slow shutter speed is ideal for scenes that change slowly. |
Shutter (s) |
|
|
Note: |
|
|
You can set a shutter speed when Exposure Mode is set to Manual or Shutter Priority. |
|
|
|
|
|
|
|
|
If Slow Shutter is set to Off, the reciprocal of the shutter speed must be greater than the |
|
|
|
frame rate. |
|
|
|
|
|
|
|
Control image signals so that the camera outputs standard video signals according to the |
Gain (dB) |
|
|
light condition. |
|
|
Note: |
|
|
|
|
|
|
|
|
You can set this parameter only when Exposure Mode is set to Manual or Gain Priority. |
|
|
|
|
|
|
|
Improves image brightness in low light conditions. |
Slow Shutter |
|
|
Note: |
|
|
You can set this parameter only when Exposure Mode is not set to Shutter Priority and |
|
|
|
|
|
|
|
|
when Image Stabilizer is disabled. |
|
|
|
|
Slowest |
|
|
Set the slowest shutter speed that the camera can use during exposure. |
|
|
Note: |
|
Shutter |
|
|
|
|
|
You can set this parameter only when Slow Shutter is set to On. |
|
|
|
|
|
|
|
|
|
|
|
|
Adjust the compensation value as required to achieve the desired effects. |
Compensation |
|
|
Note: |
|
|
|
You can set this parameter only when Exposure Mode is not set to Manual. |
|
|
|
|
|
|
|
Set the way the camera measures the intensity of light. |
|
|
|
Center-Weighted Average Metering: Measure light mainly in the central part of images. |
|
|
|
Evaluative Metering: Measure light in the customized area of images. |
Metering |
|
|
Highlight compensation: Ignore the brightness of the overexposed area of images. But |
|
|
selecting this setting will decrease the overall brightness of the image. |
|
Control |
|
|
|
|
|
Face Metering: Adjust image quality in poor lighting conditions by controlling the |
|
|
|
|
|
|
|
|
brightness of captured face in Face scene. |
|
|
|
Note: |
|
|
|
You can set this parameter only when Exposure Mode is not set to Manual. |
|
|
|
|
|
|
|
Automatic: The camera outputs the optimum images according to the light condition. In |
Day/Night |
|
|
this mode, the camera can switch between night mode and day mode automatically. |
Mode |
|
|
Night: The camera provides high-quality black and white images using the existing light |
|
|
|
Day: The camera provides high-quality color images using the existing light. |
|
|
|
Light threshold for switching between day mode and night mode. A higher sensitivity means |
Day/Night |
|
|
that the camera is more sensitive to the change of light and becomes more easily to switch |
Sensitivity |
|
|
between day mode and night mode. |
|
|
|
Note: |
|
20 |
||

Parameter |
|
Description |
|
|
|
|
|
You can set this parameter only when Day/Night Mode is set to Automatic. |
|
|
|
|
|
Set the length of time before the camera switches between day mode and night mode after |
Day/Night |
|
the conditions for switching are met. |
Switching(s) |
|
Note: |
|
|
You can set this parameter only when Day/Night Mode is set to Automatic. |
|
|
|
|
|
Enable WDR to distinguish the bright and dark areas in the same image. |
WDR |
|
Note: |
|
You can set this parameter only when Exposure Mode is neither Customize nor Manual and |
|
|
|
|
|
|
when Image Stabilizer is disabled. |
|
|
|
|
|
After enabling the WDR function, you can improve the image by adjusting the WDR level. |
WDR Level |
|
Note: |
|
Use level 7 or higher when there is a high contrast between the bright and dark areas of the |
|
|
|
|
|
|
scene. In the case of low contrast, it is recommended to disable WDR or use level 1-6. |
|
|
|
Suppress WDR |
|
When enabled, the camera can automatically adjust slow shutter frequency according to |
Stripes |
|
the frequency of light to minimize stripes that may appear in images. |
|
|
|
3.To restore the default settings, click Default.
Smart Illumination
NOTE!
This function may vary with models. Please see actual Web interface for details.
1.Click Setup > Image > Image and then click Smart Illumination.
2.Select the correct IR control mode and set the parameters. The following table describes some major parameters.
Parameter |
|
|
Description |
|
|
|
|
|
|
|
|
|
Infrared: The camera uses infrared light illumination. |
|
Lighting Type |
|
|
White Light: The camera uses white light illumination. |
|
|
|
Note: |
|
|
|
|
|
|
|
|
|
|
When Control Mode is set to Manual, camera can set illumination level from 0~1000. |
|
|
|
|
|
|
21

Global Mode: The camera adjusts IR illumination and exposure to achieve balanced image effects. Some areas might be overexposed if you select this option. This option is recommended if monitored range and image brightness are your first priority.
Overexposure Restrain: The camera adjusts IR illumination and exposure to avoid regional overexposure. Some areas might be dark if you select this option. This option is recommended if clarity of the central part of the image and overexposure control are
Control Mode |
your first priority. |
|
Road: This mode offers strong illumination in whole and is recommended for monitoring wide-ranging scenes, for example, road.
Park: This mode offers uniform light and is recommended for monitoring small range scenes with many obstacles, for example, industrial parks.
Manual: This mode allows you to manually control the intensity of IR illumination.
Indoor: This mode is recommended for application in indoor scenes.
|
Set the intensity level of the IR light. The greater the value, the higher the intensity. 0 |
|
|
means that the IR light is turned off. |
|
|
|
Near-illumination Level: You are recommended to set this parameter first for a |
|
|
wide-angle scene. |
Illumination |
|
Mid-illumination Level: You are recommended to set this parameter first if the scene |
Level |
|
requires an intermediate focal length. |
|
Far-illumination Level: You are recommended to set this parameter first if the scene |
|
|
|
requires a telephoto view. |
|
Note: |
|
|
You can set this parameter only when Control Mode is set to Manual. |
|
|
|
|
3.To restore the default settings, click Default.
Focus
NOTE!
This function may vary with models. Please see actual models for details.
1.Click Setup > Image > Image and then click Focus.
2.Select the focus mode as required.
Parameter |
|
|
Description |
|
|
|
|
|
|
|
Auto Focus: The camera focuses automatically according to the current light condition. |
|
|
|
Manual Focus: Manually adjust camera focus as required. |
Focus Mode |
|
|
One-Click Focus: The camera is triggered to focus once when rotating, zooming or going |
|
|
to a preset. |
|
|
|
|
|
|
|
|
One-Click Focus (IR): In a low light condition such as during night hours or in a dark |
|
|
|
house, this focus mode achieves better effects with the IR light turned on. |
|
|
|
|
|
|
|
Normal: Used for common scenes, such as road and industrial park. |
Scene |
|
|
Long Distance: Used for long-distance monitoring on a road. For example, when the |
|
|
|
camera is installed over 30 meters high to monitor a distant road intersection. |
|
|
|
|
22
Loading...