

Operating Manual
For Easy Clicker
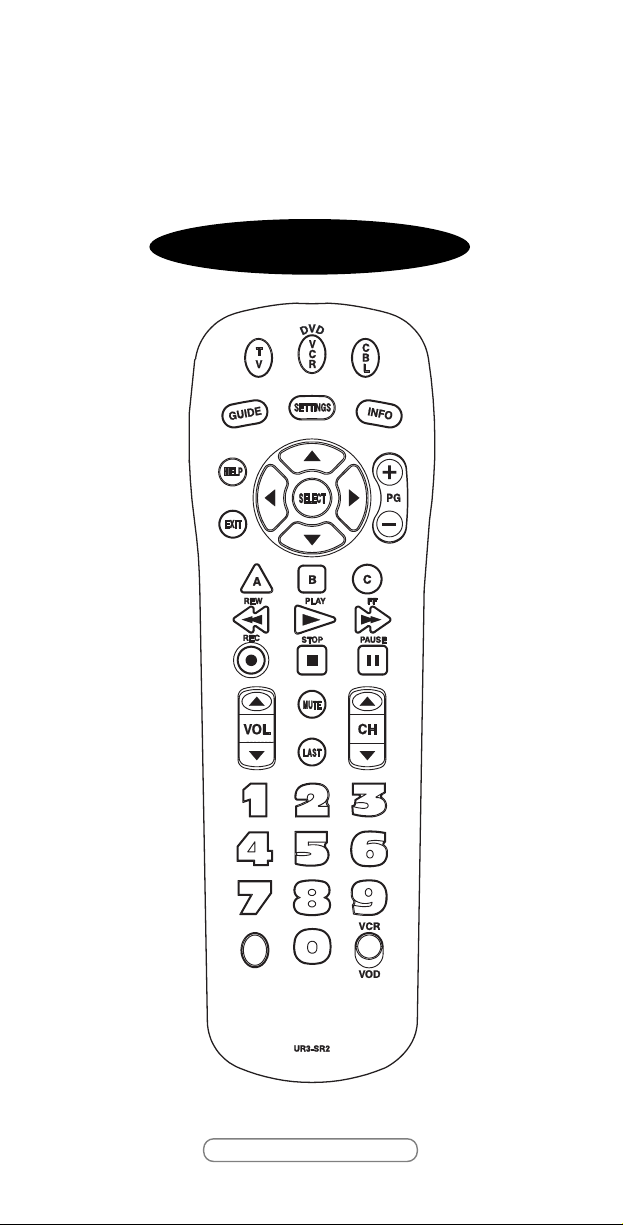
UR3-SR2
Universal Remote Control, Inc.
www.universalremote.com


Introduction
Install two
AAA alkaline batteries
as shown here
1
This remote control is designed to operate most Digital
and Analog Cable Boxes, as well as TVs, and a VCR or
DVD player.
Replacing Batteries
2
Before you program or operate the remote control, you
must install two new AAA alkaline batteries.
STEP1 Remove the battery compartment cover from the
back of your remote control.
STEP2 Check battery polarity carefully, and install the
batteries as shown in the illustration below.
STEP3 Replace the battery compartment cover.
1

Button Functions
3
Programming the Remote Control.
4
*Note : In this section, when you are instructed to press a
[DEVICE] button, that means you should press either
the CBL, TV, or VCR button, depending on which
device you are programming the remote to operate.
A. Manual Pr
A. Manual Pr
The remote control can be programmed by entering a threedigit code number that corresponds to particular brands and
models of equipment. The three-digit code numbers are listed
in the code tables sections of this instruction manual.
ogramming
ogramming
2

STEP1 Turn on the equipment that you want the remote
control to operate Cable Box, TV and VCR(DVD).
STEP2 Press the [DEVICE] button and the [SELECT]
button simultaneously for three seconds. The
corresponding device LED will turn on indicating
that it is ready to be programmed. The LED will
remain on for 20 seconds. The next step must be
entered while the LED is on.
STEP3 Point the remote control toward the equipment
and enter the three-digit code number assigned
to your brand from the code tables. If there are
more than one three-digit number listed for your
brand, try one code number at a time until your
equipment turns off.
*Note : You can verify that you have selected the correct
code by pressing the [MUTE] button. The
equipment should turn on or off.
STEP4 Store the three-digit code by pressing the same
[DEVICE] button once again. The device LED will
blink twice to confirm that the code has been
stored.
*Note : Try all the functions on the remote control. If any
of the functions do not operate as they should,
repeat the instructions from Step 2 using the next
three-digit code number from the same brand list.
B. Auto Sear
B. Auto Sear
If none of the three digit code numbers assigned to your
brand of equipment works, or the code table does not list
your brand, you can use the Auto Search Method to find the
correct three-digit code number for your equipment by
following steps:
ch Method
ch Method
STEP1 Turn on the equipment that you want the remote
control to operate (Cable Box, TV, VCR, or DVD).
3

STEP2 Press the [DEVICE] button and the [SELECT]
button simultaneously for three seconds. The
device LED will turn on indicating that it is ready
to be programmed. The LED will remain on for 20
seconds. The next step must be entered while
the LED is on.
STEP3
*Note : You can verify that you selected the correct code
Press the [CH+] or [CH-] button one at a time or
keep it pressed. The remote will emit a series of
Power ON/OFF code signals. Release the [CH+] or
[CH-] button as soon as the equipment turns off.
by pressing the [MUTE] button. The equipment
should turn On or Off.
STEP4 Press the same [DEVICE] button to store the
code. The Device LED will blink twice to confirm
that the code has been stored.
C. TT
o find the Thr
C.
o find the Thr
ogrammed using the Auto Searchch
PrProgrammed using the Auto Sear
Method
Method
ee-Digit Code that Wasas
ee-Digit Code that W
STEP1 Press the appropriate [DEVICE] button and the
[SELECT] button simultaneously for three
seconds. The device LED will turn on for 20
seconds. The next step must be performed while
the LED is on.
STEP2 Press the [INFO] button. The device LED will blink
a number of times indicating the number of each
digit for the code. Each digit is separated by a
one second interval of the LED being off.
Example : One blink, then three blinks, then eight blinks
indicates the code number 138.
*Note : Ten blinks indicates the number 0.
4

D. PrPr
ogramming a Second TV to the VCR
D.
ogramming a Second TV to the VCR
Button
Button
STEP1 Press the [VCR] button and the [SELECT] button
simultaneously for 3 seconds. The VCR LED will
turn on for 20 seconds. The next step must be
performed while the LED is on.
STEP2 Press the [TV] button.
STEP3 Point the remote control toward the TV and enter
the three-digit code for your TV from the TV
codes table.
STEP4 Store the three-digit code by pressing the [VCR]
button. The device LED will blink twice to confirm
that the code has been stored.
E. PrPr
ogramming for Advanced Functions.
E.
ogramming for Advanced Functions.
In the CABLE device mode, the A,B,C and blank macro
buttons can be programmed to act as macro buttons to
send out up to 10 commands with one button press. In this
section, when you’re instructed to press a [MACRO]
button, you need to press either the A, B, C or blank macro
button (depending on which button you are attempting to
program).
*Note : The A, B, and C buttons are not programmable if
you have a Digital Cable Box made by Pace,
Pioneer, or Scientific-Atlanta.
STEP1 Press the [CBL] button to select the CABLE
mode.
STEP2 Press a [MACRO] button and the [SELECT] button
simultaneously for 3 seconds. The CBL device
LED will turn on for 20 seconds. The next step
must be performed while the LED is on.
STEP3 Press up to 10 buttons you wish to store. The CBL
device LED will blink once for each command
entered.
5

STEP4 Press the [CH+] button to store the functions that
are selected. The CBL device LED will blink twice
to confirm the storage of functions.
To erase the Macro programming and return to the
original function:
STEP1 Press the [CBL] button to select the CABLE mode.
STEP2 Press a [MACRO] button and the [SELECT] button
simultaneously for 3 seconds. The CBL device
LED will turn on for 20 seconds. The next step
must be performed while the LED is on.
STEP3 Press the [CH+] button to erase the functions
stored in the button. The CBL device LED will blink
twice to confirm that the memory button has
been erased.
.
Assigning the V
FF.
Assigning the V
Dif
fer
Dif
ent Device
fer
ent Device
olume and Mute keys to a
olume and Mute keys to a
By default, the VOL+, VOL- and MUTE keys operate
through your TV. If you would like those keys to operate
those functions on a different device, follow these
steps.
STEP1 Press the [SELECT] button and [CBL] button
simultaneously for three seconds. The device
LED will turn on for 20 seconds. The next step
must be performed while the LED is on.
STEP2 Press the [VOL +] button. The device LED will
blink.
STEP3 Press the [DEVICE] button corresponding to the
device that you would like the volume and mute
buttons to control. The device LED will blink
twice to confirm the programming.
6

Example : If you wish to have the volume and mute keys
operate your Cable Box, press the [CBL]
button in Step3.
G.
Assigning the Channel keys to a
G.
Assigning the Channel keys to a
Dif
fer
Dif
By default, the CH+, CH-, NUMERIC and LAST keys
operate through your Cable Box. If you would like those
keys to operate those functions on a different device,
follow these steps.
ent Device
fer
ent Device
STEP1 Press the [SELECT] button and [CBL] button
simultaneously for three seconds. The device
LED will turn on for 20 seconds. The next step
must be performed while the LED is on.
STEP2 Press the [VOL -] button. The device LED will
blink.
STEP3 Press the [TV] button. The device LED will blink
twice to confirm the programming.
*Note : If you wish to have the channel keys operate your
Cable Box, press the [CBL] button instead of the
[TV] button in Step 3.
H. Low Batter
H. Low Batter
When the battery is low (2.3V-2.0V) and needs to be
replaced with fresh batteries, device LED will blink 2 times
in sequence whenever a [DEVICE] button is pressed to
turn on equipment.
I. Memor
I. Memor
This remote control is designed to retain programmed
memory for 10 years — even after batteries are removed
from the remote control.
y Warar
y W
y Lock System.
y Lock System.
ning
ning
7

Set-up Code Tables
5
CABLE TV
MAKER(BRAND) NAME
SCIENTIFIC ATLANTA EXPLORER Series 001 007
8600X 011
8600 021
8540,8570,8590 022
8500 023
IPN Series 051
MOTOROLA DCT Series (DVR Model) 008
VIP Series 053
GENERAL INSTRUMENT DCT Series,DCH Series, CFT2200 002
DL4,DQNV/DRX,DPBB,DPV/DP/DQN,DRZ
JERROLD BMC9012/BMC9022 006
DSR470 005
CFT2000 012
DRZ 024
DL4,DP(V),DQN(V),DPBB 025
DRX 002
Some Model 048
DL4,DQNV/DRX,DPBB,DPV/DP/DQN,DRZ
ADB ADB Series 054 055
ADB5810WX 115
AMINO AmiNET Series 049
AT&T U-VERSE 051
CISCO RNG200 113
IPN Series 051
COMCAST RNG200 113
DIGEO 2056-MSX 153
DIRECTV HR20,HR21 229
HAMLIN CR6000 042
CR6600,6800,CR83 043
CRX5000 044
MOXI MOXI MEDIA CENTER 006
MOXI HD DVR 052
2056-MSX 153
MYRIO Evo Series 054 055
NFUSION
NOW TV NOWTV 114
NSC IM781R 046
OAK SIGMAONE, P1,P2,P3, SIGMA 2000 037
PACE 500 Series 001 007
NUVENIO SD PHOENIX, NUVENIO HD,
SOLARIS, NOVA
IM781 047
RTC56,RKDM 038
SIGMA 2001,2002 039
SIGMA 450,500,550 040
TDC Series 008
DTA Series 113
CONVERTER
CODE No
027
027
192
8

CABLE TV
MAKER(BRAND) NAME
510 004
PANASONIC 140,145,170,175 030
110,120,130,150,160 031
PIONEER VOYAGER Series 001 007
BA9000 013
BA4100,4200,4500 028
BA-V1000 029
REGENCY ALL MODELS 045
SAMSUNG OCAP MODELS 001 007
SKY SKY+HD 230
SKY HD 204
SONY DHG-M55CV 003
TOCOM 5507 035
5503A 036
WEGENER SMD 515 050
ZENITH MN2500 032
PM 033
Z-TAC 034
CONVERTER
CODE No
130
9

TV
MAKER(BRAND) NAME
ADMIRAL 072 081 160 161 096
ADVENT 147
AIWA 141 145
AKAI 070 146 004 148 124 226 104 108
AKIO 103
ALARON 028
AMARK 112 127
AMERICA ACTION 043
AMPRO 073 167
ANAM 043 054 056 080 112 131
AOC 058 070 004 112
APEX DIGITAL 015 150 037
AQUAVISION 097 100
AUDIOVOX 076 103 043 035 078 224
AVION 223
BAYSONIC 043
BELL&HOWELL 072
BRADFORD 043
BROKSONIC 096 170
CAIRN 162
CANDLE 070 002 003 004
CAPEHART 058
CARVER 164
CELEBRITY 001
CETRONIC 043
CINERAL 103 120
CITIZEN 070 002 003 004 101 103 127
CLASSIC 043
CONCERTO 004
CONTEC 043 051
CORONADO 127
CRAIG 043 054 028
CROSLEY 164
CROWN 043 127
CURTIS MATHES 070 004 101 011 072 081 120 164 127
CXC 043
DAEWOO 076 103 112 004 127 016 043 044 125 120
DAYTRON 004 127
DELL 041
DENON 011
DIGITAL PROJECTION
DUMONT 004 073
DWIN 131 132 161
CODE NUMBER (3 DIGIT) LIST
090
10

TV
MAKER(BRAND) NAME
DYNASTY 043
DYNATECH 062
FISHER 007 057
ELECTROBAND 001
ELECTROHOME 024 076 127
ELEMENT 004 110
EMERSON 005 028 043 048 076 096 155 004 051 151 153 154
ENVISION 070
EPSON 087 228
ESA 031
FUJITSU 164 197 028 157 149 066 217
FUNAI 028 043 052 168
FUTURETECH 043
GATEWAY 165 031
GE 070 073 130 144 160 161 004 008 009 034 056 074
GEM 031
GIBRALTER 004 073
GOLDSTAR 004 106 112 127
GRUNPY 028 043
HAIER 004 116
HALL MARK 004
HANNSPREE 099
HARLEY DAVIDSON
HARMAN KARDON 164
HARVARD 043
HISENSE 198 021
HITACHI 004 007 009 011 072 010 012 023 075 158 127 174
HP 027 039 098
HUMAX 122
HYUNDAI 049 067
ILO 055
INFINITY 164
INFOCUS 046 215 225
INKEL 129
INSIGNIA 068 069 078 096 164 168
INTEQ 073
JBL 164
JCB 001
JCPENNEY 004 008 024 030 065 070 101 160 156 127
JENSEN 013
JVC 038 001 034 083 195 159 227
CODE NUMBER (3 DIGIT) LIST
127 121
091 155 081 120
028
11

TV
MAKER(BRAND) NAME
KENWOOD 070 001
KLEGG 220
KLOSS 002 059
KREISEN 202
KTV 070 043 154 127
LG 004 106 112 127 086
LODGENET 072
LOEWE 196 164
LOGIK 072
LUXMAN 004
LXI 007 015 052 081 160 164
MAGNAVOX 070 003 004 022 059 060 061 063 064 127 164 094
MAJESTIC 072
MARANTZ 164 070 143 169
MATSUI 164
MATSUSHITA 080
MAXENT 165
MEGATRON 004
MEMOREX 004 007 072 028 096
METZ 088
MGA 024 070 004 042
MIDLAND 073
MINERVA 088
MINTEK 077
MINUTZ 008
MITSUBISHI 109 024 042 004 040 146 028 124 081 200
MOTOROLA 081
MTC 070 004 062 101
MULTITECH 043
NAD 015 025
NEC 070 130 134 040 056 007 019 024 004 182 140
NIKEI 043
NIKKO 103
NIKO 175
NORCENT 211
NTC 103
NUVISION 084
OLEVIA 219 004 161 144 160
ONKING 043
ONWA 043
OPTIMUS 080
OPTOMA 029 032
CODE NUMBER (3 DIGIT) LIST
160 056 028 035 211 205 218 050 138
12

TV
MAKER(BRAND) NAME
OPTONICA 019 081
ORION 096 201 203 204 205 028
PANASONIC 034 056 080 164 190 230 248
PHILCO 070 003 004 024 056 059 060 063 064 127 164
PHILIPS 164 005 038 093 127 070 003 004 059 199 218 161
PIONEER 023 025 135 176 004 018 070 183 191 208 214 182
POLAROID 026 118 119 006
PORTLAND 004 103 127
PRISM 034
PROSCAN 144 160 161 167
PROTON 004 058 171 173 193 127 163
PROTRON 102 213 004 115
PROVIEW 110
PROX 092
QUASAR 034 056
RADIO SHACK 004 019 127 043
RCA
REALISTIC 007 019
REVOLUTION HD 220
RUNCO 072 073 130 179 180 181 182 216 194
SAMPO 070 004 058 165
SAMSUNG 004 101 127 133 160 089 105 070 184 185 192
SANSEI 120
SANSUI 096
SANYO 007 053 057 082 020
SCEPTRE 036
SCOTCH 004
SCOTT 004 005 028 043 048 127 113
SEARS 004 007 015 028 030 057 082 094 160 052 164 127
SELECO 189
SEMIVOX 043
SEMP 015
SHARP 081 014 019 028 004 022 127
SHERWOOD 128
SIGNATURE 072
SOLE 177 178
SONY 001 085 126 139
SOUNDESIGN 003 004 028 043
SOYO 163
SPECTRICON 112
SPECTRONIQ 004
SQUAREVIEW 052
SSS 004 043
CODE NUMBER (3 DIGIT) LIST
160 161 144 156 065 070 004 023 024 056 074 152 081 209
13

TV
MAKER(BRAND) NAME
STARLITE 043
SUPRE MACY 002
SUPREME 001
SVA 046
SYLVANIA 070 003 059 060 063 064 127 160 164 044 056 168
SYMPHONIC 052 168
SYNTAX OLEVIA 219 004 161 144 160
TANDY 081
TATUNG 056 062
TECHNICS 034 080
TECHNOL ACE 028
TECHVIEW 246
TECHWOOD 004
TEKNIKA 002 003 004 024 028 043 072 101 103 164 127
TELERENT 072
TERA 172
THOMPSON 166
TNCI 073
TMK 004
TOSHIBA 015 030 007 040 062 101 142 045 137
TOTEVISION 127
TRUTECH 212
UNIVERSAL 008 009
VIDEO CONCEPTS 146
VIDIKRON 188 164 182
VIDTECH 004
VIEWSONIC 210 211
VIORE 055
VISCO 110
VIZIO 004 031
WARDS 004 064 164 008 009 019 028 060 061 063 072 074
WESTINGHOUSE 076 036 221 222 001
WINBOOK 079
YAMAHA 004 070 206 207
YORK 004
YUPITERU 043
ZENITH 011 072 073 095 103 096
ZONDA 112
CODE NUMBER (3 DIGIT) LIST
121
070 127
14

VCR
MAKER(BRAND) NAME
ADMIRAL 025 053
AIKO 117
AIWA 034 101 163
AKAI 016 043 046 124 142 146
AMERICA ACTION 117
AMERICAN HIGH 031
AMPRO 072
ANAM 031
ASHA 040
AUDIO DYNAMICS 012 023 039 043
AUDIOVOX 101
BEAUMARK 040
BROKSONIC 035 037 044 046 153 231 025
CALIX 101
CANON 028 031
CAPEHART 108
CCE 024 117
CINERAL 117
CITIZEN 101 117
COLT 024
CRAIG 003 040 022 024 101
CURTIS MATHES 031 041 156
CYBERNEX 040
DAEWOO 117 005 116 007 010 108 110 017
DAYTRON 108
DIMENSIA 156
DBX 012 023 039 043
DYNATECH 034 053
ELECTROHOME 059 101
ELECTROPHONIC 101
EMERSON 006 035 025 027 034 036 037 046 101 131 138 017
FISHER 003 008 009 010
FUJI 031
FUNAI 034
GARRARD 034
GE 031 072 144 147 063 107 109 156 232 233 040 053
GO VIDEO 040 132 136
GOLDSTAR 101 123 012 013 114
HARLEY DAVIDSON
HARMAN KARDON 012 045
HARWOOD 024
HITACHI 013 026 034 063 137 047 156 031
CODE NUMBER (3 DIGIT) LIST
231 031 044 037 153 157 231 117
034
15

VCR
MAKER(BRAND) NAME
HQ 034
HUGHES 013
INSTANTREPLAY 031
JCL 031
JCPENNEY 012 013 040 101 156 066 031 234
JENSEN 043
JVC 048 050 043 130 060 012 031 047 055 158
KEC 101 117
KENWOOD 014 034 047 048 023
KLH 024
KODAK 031 101
LG 101 123 012 013 114
LLOYD 034
LOGIK 024
LXI 034 003 009 017 101
MAGIN 040
MAGNASONIC 117
MAGNAVOX 067 031 034 041 068 154 160
MARANTZ 067 069 031 012 023
MARTA 101
MATSUI 027 030
MATSUSHITA 031
MEI 031
MEMOREX
MGA 045 046 059 040
MGN TECHNOLOGY
MINOLTA 013 156
MITSUBISHI 059 061 046 051 142 013 045 162 232 053
MOTOROLA 031 053
MTC 034 040
MULTITECH 024 034
NEC 012 023 043 048 039
NIKKO 101
NOBLEX 040
NORDMENDE 043
OLYMPUS 031
OPTIMUS 053 101
OPTONICA 053 054
ORION 153 231 025
PANASONIC 070 133 031 066 160 161 234
PENTAX 013 031 063 156
PHILCO 031 034 067 025
PHILIPS 031 067 034 101 054 071
CODE NUMBER (3 DIGIT) LIST
101 003 010 014 031 034 053 072 139 134 234 025 040
040
16

VCR
MAKER(BRAND) NAME
PILOT 101
PIONEER 021 013 048
PORTLAND 108
PROFITRONIC 040
PROTEC 024
QUARTZ 002 014
QUASAR 070 133 161 031 066 160 234
RADIO SHACK 123 034
RADIX 101
RANDEX 101
RCA 107 109 144 147 013 041 034 040 156 031 140 232
REALISTIC 003 008 010 014 031 034 040 053 054 101
RICO 058 078
SALORA 014
SAMSUNG 040 032 107 109 017 113 115 124 122 159
SANKY 053
SANSUI 043 048 022 034 153 025
SANYO 003 010 007 014 134 040
SCOTT 037 044 046 131 017 159
SEARS 003 008 009 010 013 014 017 081 101 031 034
SHARP 031 054 053 143
SHINTOM 024
SHOGUN 040
SIGNATURE 034
SINGER 024
SONY 001 057 058 003 052 149 031 155 034
SOUNDESIGN 034
STS 013
SYLVANIA 031 059 034 067
SYMPHONIC 034
TANDY 010 034
TATUNG 039 043 023
TEAC 034 039 043 023
TECHNICS 031 070
TEKNIKA 031 019 034 101
THOMAS 034
TMK 006 040
TOSHIBA 017 008 131 047 059 082 013 042
TOTEVISION 040 101
UNITECH 040
VECTOR RESEARCH
VIDEO CONCEPTS 012 046 034 141
CODE NUMBER (3 DIGIT) LIST
233 053
012
17

VCR
MAKER(BRAND) NAME
VIDEOSONIC 040
WARDS 003 013 024 031 034 040 053 054 017 131
WESTING HOUSE 024 025
XR-1000 024 031 034
YAMAHA 012 043 034 039
ZENITH 072 080 001 048 034 101 058 025
*Note : For TV/VCR & TV/DVD combination units,
Please use following steps to operate the volume
control.
CODE NUMBER (3 DIGIT) LIST
STEP1 Press the [CBL] button and the [SELECT] button
simultaneously for 3 seconds. The device LED
will turn on for 20 seconds. The next step must
be performed while the LED is on.
STEP2 Press the [VOL+] button.
STEP3 Press the [VCR] button. The CBL device LED will
blink twice to confirm the programming.
18

DVD (VCR)
MAKER(BRAND) NAME
ADCOM 203
AIWA 210 214
AKAI 239
ALPINE 179
APEX DIGITAL 240 197 247 248 196
ARCAM 165 148
AUDIOVOX 075
BOSE 244 245
CAMBRIDGE AUDIO
CARY AUDIO DESIGN
CLASSE 242
COBY 206
CYBERHOME 170 212
DAEWOO 170
DENON 184 226 225
DURABRAND 235
EMERSON 235
ESA 235
FUNAI 235
GE 188 189
GOLDSTAR 182 194
GO VIDEO 228 182 252 253 254
GRADIENTE 243
HARMAN KARDON 217
HITACHI 181
HITEKER 197
INSIGNIA 078 235 085 182 178
INTEGRA 208 236 238 128
JVC 185
KENWOOD 166
KISS 237
KLH 230
KOSS 243
KRELL 218
LEXICON 216
LG 182 194
LITEON 150
MAGNAVOX 178 191 195 235
MARANTZ 176 177 135
MCINTOSH 167
MEMOREX 222
MERIDIAN 200
MINTEK 240 196
MITSUBISHI 186
CODE NUMBER (3 DIGIT) LIST
224 145
249 149
19

DVD (VCR)
MAKER(BRAND) NAME
MYRYAD 211
NAD 198 182
ONKYO 207 236 128
OPTIMUS 187
ORITRON 243
PANASONIC 076 173 184 219 192
PARASOUND 083
PHILIPS 074 164 176 177 191 195 209
PIONEER 175 180 187 221 223
POLAROID 075 084 085
PRIMARE 250 251
PROCEED 172
PROSCAN 188 189
RCA 188 189 086
SANSUI 201
SANYO 215
SAMSUNG 183 193 228 205 073 152 241
SENSORY SCIENCE
SHARP 174
SHERWOOD 083
SONY 077 168 190 213 118 119 120
SPECTRONIQ 088
SUPERSCAN 235
SV2000 235
SYLVANIA 235
SYMPHONIC 235
TAG McLaren 202
TECHNICS 173
THETA DIGITAL 187
TOSHIBA 169 171 191 206 227 201 236
TRUTECH 151
VENTURER 229
VINC 220 087
YAMAHA 199 204 246 184 192
ZENITH 182 194
CODE NUMBER (3 DIGIT) LIST
254 255
20

21

22

OCE-0009C
Rev 07
 Loading...