


1
The RF20 Remote
WELCOME
Congratulations!
Congratulations on purchasing Universal Remote Control’s MASTERCONTROL™ RF20 Pre-programmed and Learning Remote Control! You now have the power to control your entire home entertainment system with one easy-to-use remote. The RF20 can be used with thousands of audio/video Components because of the extensive code library pre-programmed into the remote. And, the RF20’s impressive lineup of special advanced features can automate and customize the operation of your system
in many ways. So... get ready to sit back, relax and simplify your home entertainment experience.
The Quick Setup DVD Program Guide supplied with the RF20 will assist you in programming your remote by guiding you through an easy step-by-step process. This Owner’s Manual is designed as a companion reference source to the DVD Guide, should you need to refer back to a particular section, or review certain instruction detail not covered in the DVD. However, if you are unable to watch the DVD Guide for some reason, everything you need to know about programming the RF20 is contained in this Manual.
500 Mamaroneck Avenue, Harrison, NY 10528
Phone: (914) 835-4484 Fax: (914) 835-4532
MASTERCONTROL™ RF20 Owner’s Manual
© 2006 Universal Remote Control, Inc.
The information in this manual is copyright protected. No part of this manual may be copied or reproduced in any form without prior written consent from Universal Remote Control, Inc. UNIVERSAL REMOTE CONTROL, INC. SHALL NOT BE LIABLE FOR OPERATIONAL, TECHNICAL OR EDITORIAL ERRORS / OMISSIONS MADE IN THIS MANUAL. The information in this manual may be subject to change without prior notice. MASTERCONTROL, PowerBlaster, MacroPower, and SimpleSound are trademarks of Universal Remote Control, Inc. All other brand or product names are trademarks or registered trademarks of their respective companies or organizations.
|
|
|
|
|
|
2 |
LOCATION OF |
Keypad Layout |
|
|
3 |
|
|
|
|
|
|
|||
CONTROLS |
|
|
|
|
|
|
|
|
|
|
|
|
The |
|
|
|
|
|
|
|
GETTING |
Overview |
|
|
4 |
|
|
STARTED |
Battery Installation |
|
4 |
|
RF20 |
|
Activating Component Commands |
5 |
|
||||
BASIC SETUP |
Overview |
|
|
7 |
|
Remote |
|
Light Button |
|
|
6 |
|
|
|
|
|
|
|
||
|
Pre-Programmed Code Method |
7 |
|
|
||
|
Learning Method |
|
|
15 |
|
|
|
Transmitting (Busy Signal) Icon. |
19 |
|
|
||
|
Child Lock Feature |
|
19 |
|
|
|
|
|
|
|
|
||
|
|
|
|
|
||
CUSTOMIZING |
Customizing the LCD Screen |
20 |
|
|
||
YOUR RF20 |
Favorite Channel Setup |
|
23 |
|
|
|
WITH SPECIAL |
MacroPower™ Setup |
|
26 |
|
|
|
ADVANCED |
SimpleSound™ Setup & |
|
30 |
|
|
|
FEATURES |
Other 'Punch Throughs' |
|
|
|
||
Setting Backlight Options |
32 |
|
|
|||
|
|
|
||||
|
Hiding & Adding Pages |
|
33 |
|
|
|
|
Recalling Pre-programmed |
|
|
|
||
|
Setup Code Numbers |
|
35 |
|
|
|
|
Cloning other RF20s |
|
36 |
|
|
|
|
|
|
|
|
|
|
|
|
|
|
|
|
|
ERASING |
Overview |
|
|
37 |
|
|
COMMANDS |
Erasing Learned Button, |
|
|
|
|
|
|
Macro or Favorite |
|
|
|
|
|
|
Channel Commands |
|
37 |
|
|
|
|
Re-setting RF20 to Original |
|
|
|
||
|
Factory Default Settings |
|
39 |
|
|
|
|
|
|
|
|
|
|
|
|
|
|
|
|
|
THE OPTIONAL |
PowerBlasterTM |
|
|
41 |
|
|
POWERBLASTERTM |
|
|
|
|
|
|
|
|
|
|
|
||
PREPROGRAMMED |
Pre Programmed Code Notes |
43 |
|
|
||
CODE NOTES |
|
|
|
|
|
CONTNETS |
|
|
|
|
|
|
|
PRE- |
Pre-Programmed Code Tables |
44 |
|
|||
|
|
|||||
TV |
45 |
SAT |
58 |
|
|
|
PROGRAMMED |
CABLE |
48 |
CD |
59 |
|
|
DVD |
50 |
DVR |
61 |
|
|
|
CODE TABLES |
|
|
||||
VCR |
53 |
AUX |
62 |
|
|
|
|
AUDIO |
55 |
NOTES |
64 |
|
|
|
|
|
|
|
|
|
OTHER |
FAQ |
|
|
65 |
|
|
INFO |
Warranty |
|
|
66 |
|
|
|
Specifications |
|
|
66 |
|
|
|
|
|
|
|
|
|
 RF20 User Manual")
3
Keypad Layout
CONTROL LOCATIONS
TITLE
FAVORITE CHANNEL
PAGE
BUTTONS
changes the page of buttons displayed
PAGE
NUMBERS
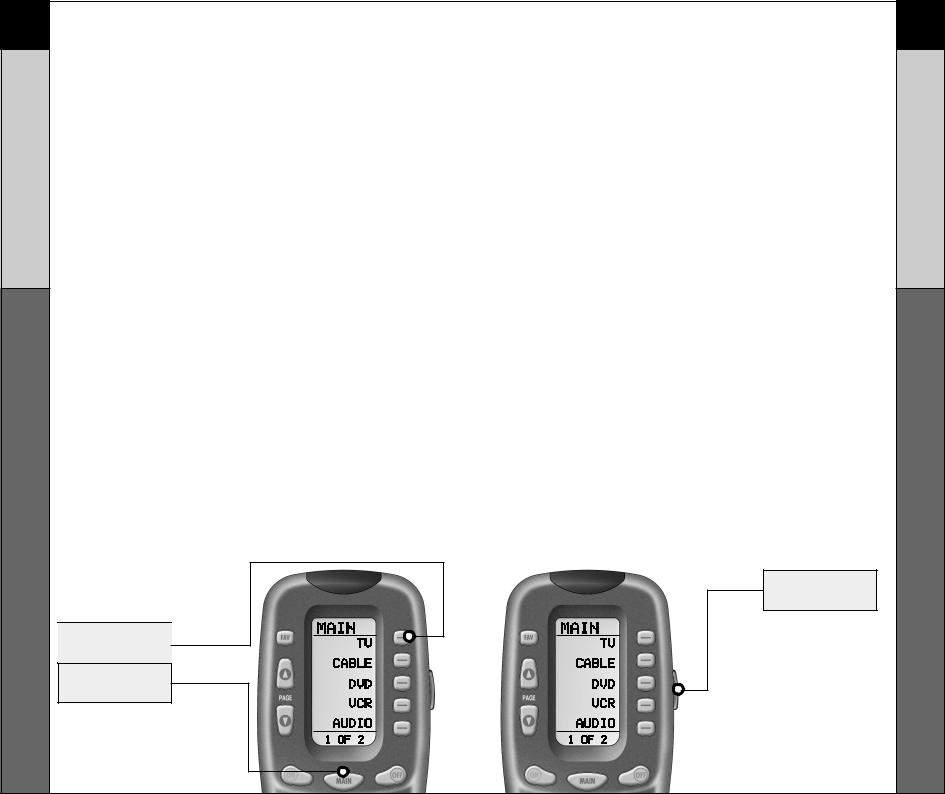
MAIN
BUTTON
takes you to the main menu
FUNCTION BUTTONS
LIGHT
BUTTON
SCREEN-LABELED DISPLAY BUTTONS
Getting Started-Overview
This is what MASTERCONTROL™ RF20 is all about!
The RF20 is designed to operate up to 10 different
Audio/Video Components and is pre-programmed to operate virtually all brands of TV, VCR, DVD and CD Players, Cable Set Top Boxes, Satellite Receivers, TiVo and other DVRs, Audio Components, Tape Decks, Multimedia PCs, XM Radio, Ipod, X-Box, Lighting Controls and other custom installation products. It also offers an impressive lineup of special features designed to provide you with many time-saving conveniences and enhance your overall entertainment experience. However, we strongly recommend that you fully complete all of the Basic Setup steps before proceeding to customize your RF20 with any of the special advanced features.
Battery Installation
The very first step is to insert the four AAA batteries that are included in the package into the battery compartment located in the back of the remote. Just press the tab and lift off the cover. Please be sure to insert the batteries correctly as you see in the diagram. Remember, there is a positive and negative end to each battery and you can
tell by the + (positive) and - (negative) symbols. Once the batteries are correctly
installed, replace the cover. Now you’re ready to start!
4
Installation Battery & Overview
STARTED GETTING
5
Activating Component Commands
GETTING STARTED
Activating Component Commands –
Simple, Easy, Intuitive
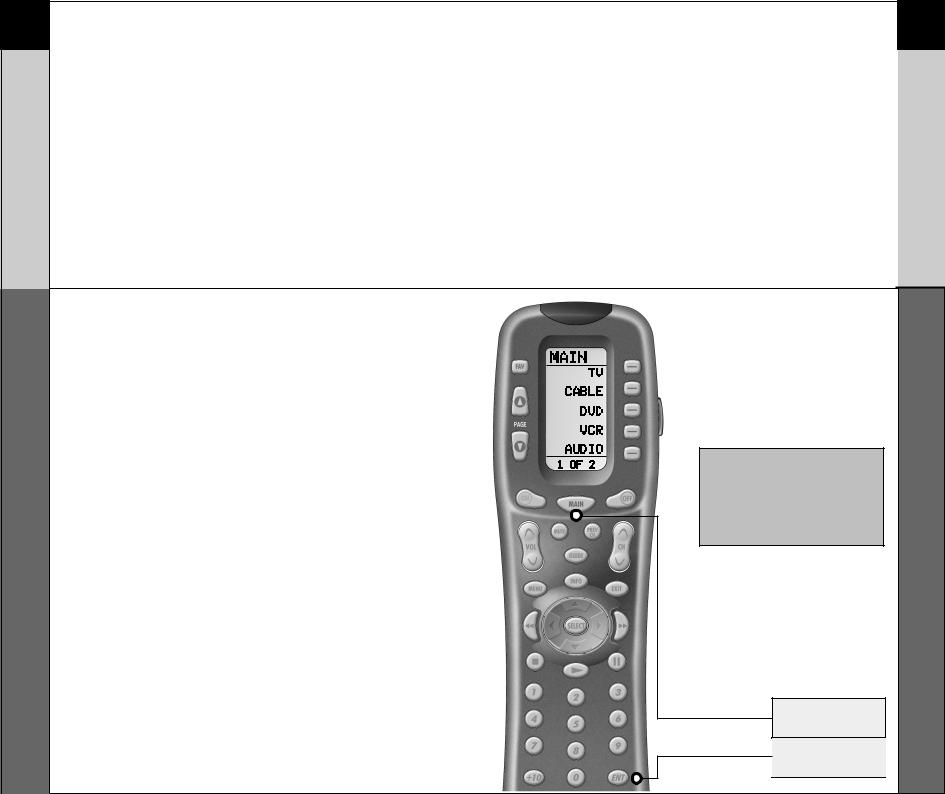
Once you’ve programmed RF20 for your Components, all you have to do to operate a specific Component is first, press the MAIN button. This will display Page 1 of the MAIN menu on the LCD screen. Page 1 of the MAIN menu displays five Components. Then, simply select the Component you want to operate by pressing the corresponding ScreenLabeled Component Display Button on the right side of the LCD Screen. As an example, if you press the TV Display Button, the display label at the top of the screen will change from MAIN to TV, and all the buttons on RF20 will work your TV. To operate another Component, simply press the MAIN button again to return to Page 1 of the
MAIN menu and select the next Component you want to operate.
If you don’t see the Component you want to control on Page 1 of the MAIN menu, just use the PAGE ( ) (
) ( ) buttons on the left side of the screen to bring up Page 2 of the MAIN menu which displays an additional five Components.
Each Component is provided with five pages of pre-labeled command display buttons (or space for additional command display buttons). Once again, simply use the PAGE
( ) (
) ( ) buttons to take you to the next command page, or return you to the previous command page.
TV DEVICE BUTTON
MAIN
BUTTON
Light Button
The fully backlit keypad makes the RF20 easy to use in the dark or dim lighting conditions. Simply press the LIGHT button to backlight all the keypad buttons and LCD screen. To turn off the backlight, press the LIGHT button again, or just wait ten seconds (the backlight automatically shuts itself off). Lights out!
Try it out!
LIGHT
BUTTON
6
BUTTON LIGHT
STARTED GETTING
7
&OverviewMethodCode
Programmed-Pre
BASIC SETUP
Basic Setup - Overview
There are two ways to program the RF20:
•The Pre-Programmed Code Method
•The Learning Method
The Pre-Programmed Code Method allows you to set up all the buttons at once, so it’s the fastest and easiest of the two methods. The Learning Method allows you to transfer functions from other remotes (old or new), one button at a time.
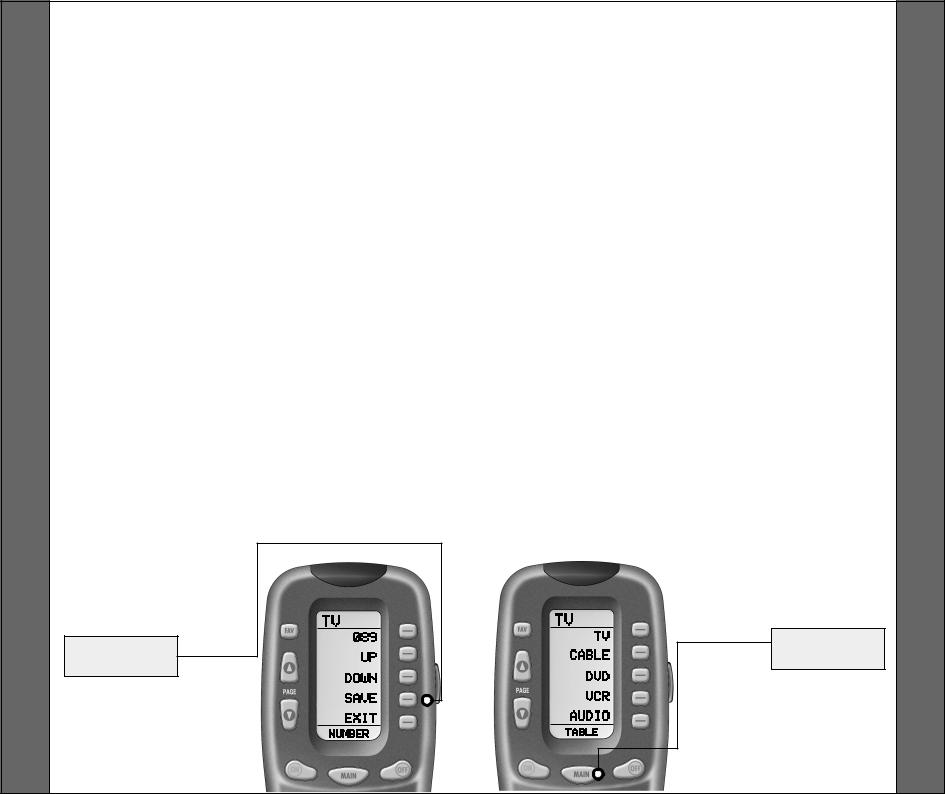
Pre-Programmed Code Method
STEP 1:
The pre-programmed 3-digit codes are found in the back of this Manual on page 44. The codes are listed by Component category (i.e., TV, VCR, DVD, etc.), then by brand name. For instance, if you want to locate a code for a Sony TV, first locate the TV category, and then look for the Sony brand.
Once you have located the 3-digit code (or in some cases, several code numbers) for the Component that you want to operate with your RF20, write them ALL down on a piece of note paper. It’s important that you write down all the codes because only one code is going to work for you.
STEP 2:
Now, turn on the Component you want to program... let’s say your TV to start. Look up your TV’s manufacturer setup code from your reference list.
STEP 3:
Press and hold the MAIN and ENT (Enter) buttons at the same time for approximately 3 seconds, until the word “SETUP” is displayed at the top of the LCD screen. This signals that you are now in setup mode.
IMPORTANT:
You now have 30 seconds to perform the next step while you are in SETUP mode. If you don’t press a button within 30 seconds, SETUP will disappear from the screen, signaling that you have exited setup mode and you will need to start over.
MAIN
BUTTON
ENTER
BUTTON
8
Method Code Programmed-Pre
SETUP BASIC
9 |
|
10 |
Pre-Programmed Code Method |
|
Method Code Programmed-Pre |
|
|
|
STEP 4: |
|
|
|
|
|
|
|
STEP 5: |
STEP 6: |
|||||||
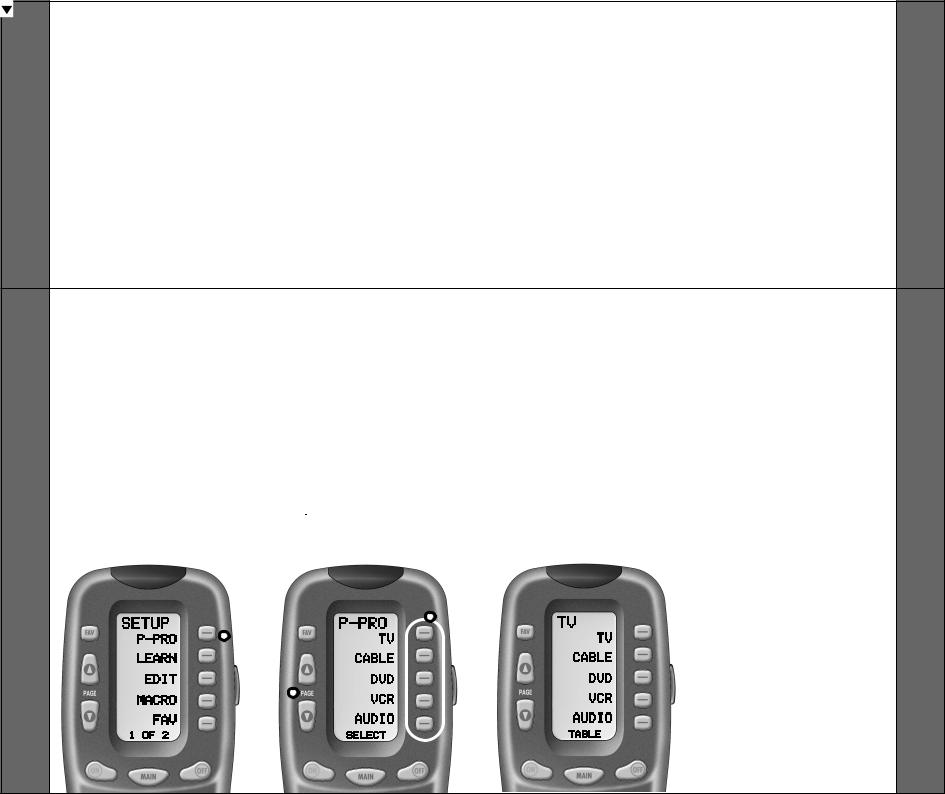
Press the P-PRO display button |
The screen will then display the |
Press the Component display |
In this step you verify the type |
|||||||||||||
to select the Pre-Programmed |
five Components from Page 1 of |
button you want to program. |
of component you plan to |
|||||||||||||
Method. |
the MAIN menu. |
For example: If you want to |
operate with this component |
|||||||||||||
|
|
|
|
|
|
|
|
|
|
|
|
|
setup the TV Component |
button. For example: If you plan |
||
|
|
|
|
|
|
To display Page 2 of the MAIN |
button, press the TV |
to operate the TV component |
||||||||
|
|
|
|
|
|
menu that lists an additional five |
Component display button. The |
with the TV button, simply press |
||||||||
|
|
|
|
|
|
Components, simply press the |
display at the bottom of the LCD |
the TV display button once |
||||||||
|
|
|
|
|
|
PAGE ( ) ( ) buttons. |
screen will flash |
again. However, if for example |
||||||||
|
|
|
|
|
|
|
|
|
|
|
|
|
“FROM - TABLE”. |
you are setting up AUX to |
||
|
|
|
|
|
|
|
|
|
|
|
|
|
|
|
|
operate a second DVD Player, |
|
|
|
|
|
|
|
|
|
FIRST FIVE |
|
|
|
|
you would first need to press |
||
|
|
|
|
|
|
|
|
|
DEVICE NAMES |
|
|
|
|
AUX in Step 5, and then DVD |
||
|
|
|
|
|
|
|
|
|
|
|
|
|
|
|
|
in Step 6. |
|
|
|
|
|
|
|
|
|
|
PAGE |
|
|
|
|
||
|
|
P-PRO |
|
|
|
|
|
|
|
|
|
|
|
|||
|
|
|
|
|
|
|
BUTTONS |
|
|
|
|
|
||||
|
BUTTON |
|
|
|
|
|
|
|
|
|
|
|||||
|
|
|
|
|
|
|
|
|
|
|
|
|
|
|||
|
|
|
|
|
|
|
|
|
|
|
|
|
|
|
|
SETUP BASIC |
BASIC SETUP |
|
|
|
|
|
|
|
|
|
|
|
|
|
|
||
|
|
|
|
|
|
|
|
|
|
|
|
|
|
|||
|
|
|
|
|
|
|
|
|
|
|
|
|
|
|||
|
|
|
|
|
|
|
|
|
|
|
|
|
|
|||
|
|
|
|
|
|
|
|
|
|
|
|
|
|
|||
|
|
|
|
|
|
|
|
|
|
|
|
|
|
|||
11 |
|
|
|
|
|
|
|
|
|
|
|
|
|
|
|
|
|
|
|
|
|
|
12 |
|||||||||
Programmed-PreCode Method |
|
Method on Page 15. |
|
|
|
|
|
|
|
|
|
|
|
|
|
|
|
|
|
|
|
|
|
|
|
|
|
MethodaCodeProgrammed-Pre |
||||
|
|
NOTE: |
|
|
|
|
|
|
|
|
|
|
|
|
|
|
|
|
|
|
|
|
|
|
|
|
|
|
||||
|
|
If the Component fails to turn off after you have |
|
|
|
|
|
|
|
|
|
|
|
|
||||||||||||||||||
|
|
entered all the code numbers listed for your brand, |
|
|
|
|
|
|
|
|
|
|
|
|
||||||||||||||||||
|
|
you can scan through all the other code numbers |
|
|
|
|
|
|
|
|
|
|
|
|
||||||||||||||||||
|
|
that are pre-loaded into the RF20 for that Component |
|
|
|
|
|
|
|
|
|
|
|
|
||||||||||||||||||
|
|
(in this case TV) by using the UP or DOWN display |
|
|
|
|
|
|
|
|
|
|
|
|
||||||||||||||||||
|
|
buttons on the screen. (There is a chance that your |
|
|
|
|
|
|
|
|
|
|
|
|
||||||||||||||||||
|
|
Component was actually manufactured by another |
|
|
|
|
|
|
|
|
|
|
|
|
||||||||||||||||||
|
|
brand.) However, most of the code tables are so |
|
|
|
|
|
|
|
|
|
|
|
|
||||||||||||||||||
|
|
large that it is usually faster to use the Learning |
|
|
|
|
|
|
|
|
|
|
|
|
||||||||||||||||||
|
|
|
|
|
|
|
|
|
|
|
|
|
||||||||||||||||||||
|
|
|
|
|
|
|
|
|
|
|
|
|||||||||||||||||||||
|
|
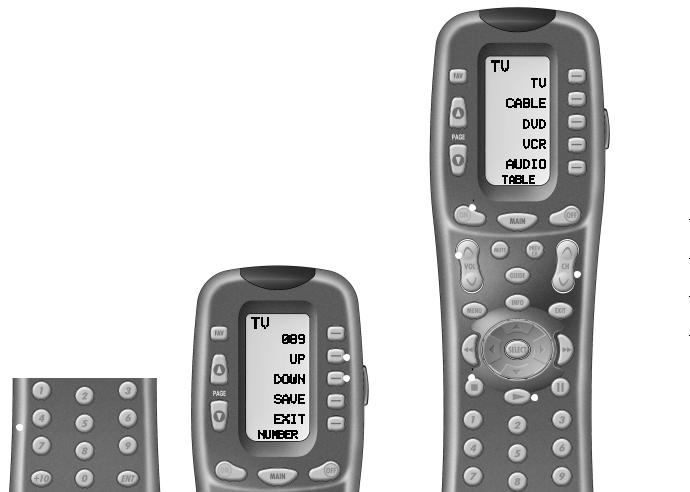
STEP 7: |
STEP 8: |
|
|
|
|
|
|
example, maybe your Sony TV |
|
|||||||||||||||||||||
|
|
Point the RF20 toward the |
When the Component turns off, |
|
|
|
|
|
|
turned off with code number 147, |
|
|||||||||||||||||||||
|
|
Component you want to |
press the ON button to turn the |
|
|
|
|
|
|
but the volume controls did not |
|
|||||||||||||||||||||
|
|
program, (in this example, TV), |
Component back on. Now you |
|
|
|
|
|
|
work properly. If this is the case, |
|
|||||||||||||||||||||
|
|
and punch in the 3-digit code |
can test the Volume and |
|
|
|
|
|
|
try the next code number listed |
|
|||||||||||||||||||||
|
|
that you wrote down for that |
Channel buttons (for TV), or |
|
|
|
|
|
|
for that Component until you find |
|
|||||||||||||||||||||
|
|
specific Component. Use the |
PLAY and STOP (for VCR and |
|
|
|
|
|
|
a perfect match. |
|
|||||||||||||||||||||
|
|
Number buttons 0-9 on the |
DVD) to make sure they all |
|
|
|
|
|
|
|
|
|
|
|
||||||||||||||||||
|
|
remote to punch in the code. |
work. If any of the buttons do |
|
|
|
|
|
|
|
|
|
|
|
||||||||||||||||||
|
|
If the 3-digit code number that |
not work properly, you need to |
|
|
|
|
|
|
|
|
|
|
|
||||||||||||||||||
|
|
you just punched in is correct, |
find a new correct code. For |
|
|
|
|
|
|
|
|
|
|
|
||||||||||||||||||
|
|
the Component will turn off. |
|
|
|
|
|
|
|
|
|
|
|
|
|
|
|
|
|
|
|
|
|
|
|
|
|
|
||||
|
|
|
|
|
|
|
|
|
|
|
|
|
|
|
|
|
|
|
|
|
|
|
|
|
ON |
|
|
|||||
|
|
If the Component does not turn |
|
|
|
|
|
|
|
|
|
|
|
|
|
|
|
|
|
|
|
|
|
|
|
|
|
|||||
|
|
|
|
|
|
|
|
|
|
|
|
|
|
|
|
|
|
|
|
|
|
|
|
|
BUTTON |
|
|
|||||
|
|
off, continue entering code |
|
UP & DOWN |
|
|
|
|
|
|
|
|
|
|
|
|
|
|
|
|
|
|
|
|
||||||||
|
|
numbers from your list until the |
|
|
|
|
|
|
|
|
|
|
|
|
|
|
VOLUME |
|
|
|||||||||||||
|
|
|
BUTTONS |
|
|
|
|
|
|
|
|
|
|
|
|
|
|
|
|
|
|
|
||||||||||
|
|
Component turns off. Some |
|
|
|
|
|
|
|
|
|
|
|
|
|
|
|
|
|
|
|
|
|
|
|
BUTTONS |
|
|
||||
|
|
|
|
|
|
|
|
|
|
|
|
|
|
|
|
|
|
|
|
|
|
|
|
|
|
|
||||||
SETUPBASIC |
|
brands have several possible |
|
|
|
|
|
|
|
|
|
|
|
|
|
|
|
|
|
|
|
|
|
|
|
CHANNEL |
|
SETUPBASIC |
||||
|
|
|
|
|
|
|
|
|
|
|
|
|
|
|
|
|
|
|
|
|
|
|
|
|
||||||||
|
code numbers. |
|
|
|
|
|
|
|
|
|
|
|
|
|
|
|
|
|
|
|
|
|
|
|
BUTTONS |
|
||||||
|
|
|
|
|
|
|
|
|
|
|
|
|
|
|
|
|
|
|
|
|
|
|
|
|
|
|
||||||
|
|
|
|
|
|
|
|
|
|
|
|
|
|
|
|
|
|
|
|
|
|
|
|
|
|
|
|
|
|
|
|
|
|
|
|
|
|
|
|
|
|
|
|
|
|
|
|
|
|
|
|
|
|
|
|
|
|
|
|
|
|
|
PLAY |
|
|
|
|
|
|
|
|
|
|
|
|
|
|
|
|
|
|
|
|
|
|
|
|
|
|
|
|
|
|
|
|
BUTTON |
|
|
|
|
|
|
|
NUMBER |
|
|
|
|
|
|
|
|
|
|
|
|
|
|
|
|
|
|
|
|
|
|
|
|
|
|
|
|
|
|
|
|
|
|
|
|
|
|
|
|
|
|
|
|
|
|
|
|
|
|
|
|
STOP |
|
|
|||||
|
|
|
|
|
BUTTONS |
|
|
|
|
|
|
|
|
|
|
|
|
|
|
|
|
|
|
|
|
|
|
|
|
BUTTON |
|
|
|
|
|
|
|
|
|
|
|
|
|
|
|
|
|
|
|
|
|
|
|
|
|
|
|
|
|
|
|
|
|
|
|
|
|
|
|
|
|
|
|
|
|
|
|
|
|
|
|
|
|
|
|
|
|
|
|
|
|
|
|
|
|
|
|
|
|
|
|
|
|
|
|
|
|
|
|
|
|
|
|
|
|
|
|
|
|
|
|
|
|
|
|
|
|
|
|
|
|
|
|
|
|
|
|
|
|
|
|
|
|
|
|
|
|
|
|
|
|
|
|
|
|
|
|
|
|
|
|
|
|
|
|
|
|
|
|
|
|
|
|
|
|
|
|
|
|
|
|
|
|
|
|
|
|
|
|
|
|
|
|
|
|
|
|
|
|
|
|
|
|
|
|
|
|
|
|
|
|
|
|
|
|
|
|
|
|
|
|
|
|
|
|
|
|
|
|
|
|
|
|
|
|
|
|
|
|
|
|
|
|
|
|
|
|
|
|
|
|
|
|
|
|
|
|
|
|
|
|
|
|
|
|
|
|
|
|
|
|
|
|
|
|
|
|
|
|
|
|
|
|
|
|
|
|
|
|
|
|
|
|
|
|
|
|
|
|
|
|
|
|
|
|
|
|
|
|
|
|
|
|
|
|
|
|
|
|
|
|
|
|
|
|
|
|
|
|
13 |
|
|
|
14 |
Pre-Programmed Code Method |
|
|
|
Methoda Code Programmed-Pre |
|
|
|
|
|
|
STEP 9: |
STEP 10: |
NOW, PROGRAM THE REST OF YOUR |
|
|
Once you have found the right |
Exit SETUP mode by pressing |
COMPONENTS BY REPEATING STEPS 1 |
|
|
THROUGH 9. IN MOST SYSTEMS,YOU |
|||
|
code, save the code number by |
the MAIN button two times. |
CAN FINISH BASIC SETUP IN JUST A |
|
|
pressing the SAVE display |
When the LCD screen displays |
FEW MINUTES AND PUT ALL YOUR OLD |
|
|
REMOTES AWAY. |
|||
|
button that appears on the LCD |
MAIN, you are back in normal |
IF YOU ARE STILL MISSING |
|
|
screen. The LCD screen will |
operating mode. |
||
|
COMMANDS TO CONTROL ANY OF |
|||
|
blink “SAVED” two times, |
|
YOUR COMPONENTS, USE THE |
|
|
signaling that the code number |
|
LEARNING METHOD |
|
|
|
ON PAGE 15. |
||
|
has been successfully saved. |
|
|
|
BASICSETUP |
|
SETUPBASIC |
|
SAVE |
MAIN |
|
BUTTON |
BUTTON |
|
|
15 |
|
|
|
Method |
Learning Method |
||
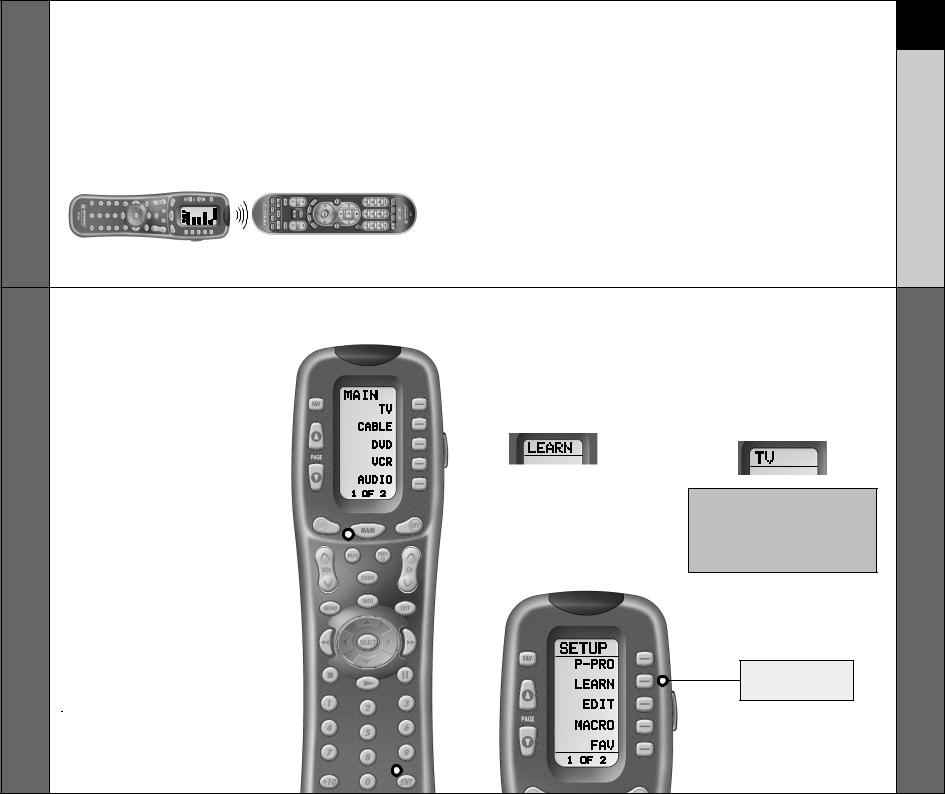
The RF20 can actually ‘learn’ commands from other remote |
|||
Learning |
controls (old or new), one-button-at-a-time, so it will never |
||
become obsolete. RF20 is the last remote you’ll ever need! |
|||
|
Just follow these simple steps: |
||
|
|
|
|
|
|
|
|
|
|
|
|
|
STEP 1: |
|
|
|
|
|
||
|
Line-up the RF20 with the other |
|
|
|
|
|
||
|
remote control, head-to-head, |
|
|
|
|
|
||
|
one or two inches apart. |
|
|
|
|
|
||
|
STEP 2: |
|
|
|
|
|
||
|
On the RF20, press and hold |
|
|
|
|
|
||
|
|
|
|
|
|
|||
|
the MAIN and ENT (Enter) |
|
|
|
|
|
||
|
buttons at the same time for |
|
|
|
|
|
||
|
approximately three seconds, |
|
|
|
|
|
||
|
until the word “SETUP” is |
|
|
|
|
|
||
|
displayed at the top of the LCD |
|
|
|
|
|
||
|
screen. This signals you are |
|
|
|
|
|
||
|
now in SETUP mode. |
|
|
|
|
|
||
|
|
|
|
|
|
|
|
|
|
IMPORTANT |
|
|
|
|
|
|
|
SETUP |
You now have 30 seconds to perform |
|
|
|
|
|
|
|
the next step while you are in SETUP |
|
|
|
|
|
|
||
mode. If you don’t press a button |
|
|
|
|
|
|
||
|
within 30 seconds, SETUP will disap- |
|
|
|
|
|
|
|
|
pear from the screen, signaling that |
|
|
|
|
|
|
|
|
you have exited setup mode and you |
|
|
|
|
|
|
|
|
will need to start over. |
|
|
|
|
|
|
|
|
|
|
|
|
|
|
|
|
BASIC |
MAIN |
|
|
|
|
|
|
|
BUTTON |
|
|
|
|
|
|
|
|
|
|
|
|
|
|
|
|
|
|
|
|
|
|
|
|
|
|
|
ENTER |
|
|
|
|
|
|
|
|
BUTTON |
|
|
|
|
|
|
|
|
|
|
|
|
|
|
|
|
|
|
|
|
|
|
|
|
|
STEP 3:
Press the LEARN display button on the LCD screen. The top of the screen will change to “LEARN” and display the five Components from Page 1 of the MAIN menu.
To display Page 2 of the MAIN menu that lists an additional five Components, simply press the PAGE ( ) (
) ( ) buttons.
STEP 4:
Select the Component you want to teach commands to by pressing that Component display button on the LCD screen (in this example, TV). The top of the TV screen will change to “TV”.
NOTE: If you want to teach any command to a Component button, press the desired Component display button once
the top of the screen displays “MAIN”, by pressing the PAGE button.The top of the screen wil change to “READY”. Then go to STEP 6.
LEARN BUTTON
16
Method Learning
SETUP BASIC
17
Learning Method
BASIC SETUP
STEP 5:
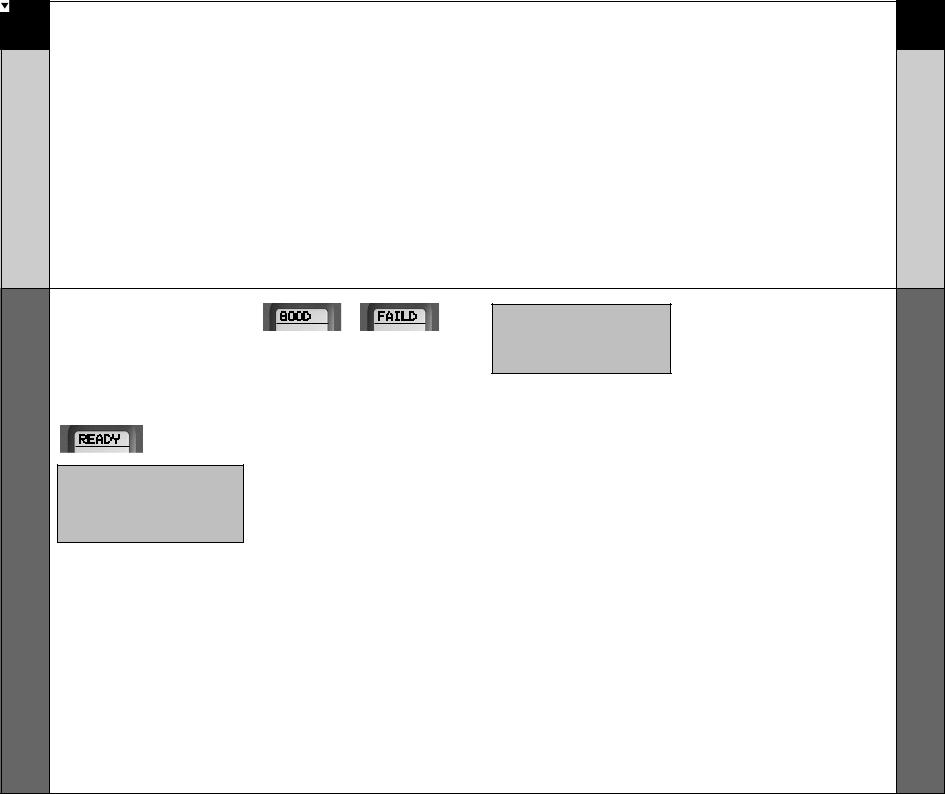
Press any button on the RF20 that you want to teach a command to. The top of the screen will change to “READY” and the bottom of the screen will display the button name you pressed.
NOTE: If you don't see the display button you would like to teach on the LCD screen, use the PAGE
( ) ( ) buttons. The only buttons you can't teach are the PAGE and MAIN buttons.
STEP 6:
Press and hold the button on the other remote control that you want to ‘teach’ to the RF20 until the LCD display on the RF20 changes to either “GOOD” or “FAILD”. If the “GOOD” label appears on top of the display, you were successful. If the “FAILD” label appears on top
of the display, try ‘teaching’ the same button to the RF20 once again by repeating STEPS 5 and 6.
STEP 7:
Now, continue to teach the RF20 any other commands from your other remotes by repeating STEPS 4 through 6 (to go
back to STEP 4, simply press MAIN once).
STEP 8:
Once you have completed teaching all the button commands to the RF20, return to normal operation by pressing the MAIN button twice.
NOTE: Test all your new commands. If any of them don’t work, try the Learning Method again, following these suggestions:
•Move to another room. Plasma TVs, sunlight, halogen or quartz lighting can interfere with the learning process.
•Even though the old remote seems to be working fine, put in fresh alkaline batteries.
•Gradually vary the distance between the remote controls. Try 1”, 2” and so on,
up to 4 feet.
•Try tapping the button on your old remote instead of pressing and holding it during the learning process.
Some additional Information regarding the Learning Process:
•Learned functions override any existing pre-programmed functions on the remote control.
•All buttons can be learned except for the PAGE, MAIN and LIGHT buttons.
•Learned functions are automatically erased when a new function is learned on the same button.
•Learned functions are retained even after a different Setup Code Number is programmed into the remote.
•To return to an original
pre-programmed function, a learned function must be erased.
18
Method Learning
SETUP BASIC
19
Transmitting (Busy Signal) Icon
BASIC SETUP
Transmitting (Busy Signal) Icon
When a command is being transmitted, an icon will appear in the upper right corner of the LCD screen. This indicates that a signal is being sent. This is particularly useful when setting up Macros and FAVs, since it flashes with every step of a sequence of commands.
CHILD LOCK FEATURE
This ‘child-lock’ feature prevents the unauthorized use of the remote control by children. It blocks all operations of the remote control.
To Activate:
Press the +10 and ENT (Enter) buttons simultaneously for
3 seconds. The bottom of the LCD will blink “LOCKED” three times and then display “LOCKED”.
To Return to Normal Operation:
Press the +10 and ENT (Enter) buttons simultaneously again for 3 seconds. The LCD will display the last use mode.
Customizing Your RF20 with Special Advanced Features
After you’ve finished all your basic setup, you can choose to make operation easier by customizing the RF20 just the way you want, using the Special Advanced Setup Features described in this section.
Customizing the LCD Screen
You can easily edit or change the name of any of the display buttons (including Favorite Channels) on the LCD screen by following these steps:
STEP 1:
Press and hold the MAIN and ENT (Enter) buttons at the same time for approximately 3 seconds, until the word “SETUP” is displayed at the top of the LCD screen. This signals that you are now in setup mode.
IMPORTANT:You now have 30 seconds to perform the next step while you are in SETUP mode. If you don’t press a button within 30 seconds, SETUP will disappear from the screen, signaling that you have exited setup mode and you will need to start over.
STEP 2:
Press the EDIT display button. The LCD display will change to the EDIT menu.
STEP 3:
Press the TEXT display button. The screen will display the list of Components and “EDIT” will appear at the top of the screen.
STEP 4:
Navigate to the Component and page where there is a button label you want to EDIT, selecting between the FAV, MAIN, COMPONENT display buttons; then using the PAGE button.
NOTE: If you wish to change the name of a Component button, press the Page ( ) Up button twice.The top of the display will change to MAIN, and you can navigate to MAIN page 1 or page 2 before going on to Step 5.
20
Screen LCD the Customizing
CUSTOMIZING
 Loading...