

Page 1
Owner’s Manual
TRG-200 Umotion Remote
Page 2

TRG-200 UMOTION REMOTE
This remote control was Custom Programmed for you by:
For questions about your Custom Programming call:
Custom Programming of a complex home theater and/or a multi-room
system is one of the most challenging tasks within an audio/video
installation. It involves an intimate knowledge of how the components
interact and exact details on the proper sequences of control.
Only a Total Control dealer has the requisite experience and training
to quickly and effectively customize a remote control for true
automated operation.
Congratulations on your choice!
TRG-200 Umotion Remote Owner's Manual © 2014
Universal Remote Control, Inc.
The information in this Owner’s Manual is copyright protected. No part of this manual
may be copied or reproduced in any form without prior written consent from Universal
Remote Control, Inc.
UNIVERSAL REMOTE CONTROL, INC. SHALL NOT BE LIABLE FOR OPERATIONAL,
TECHNICAL OR EDITORIAL ERRORS/OMISSIONS MADE IN THIS MANUAL.
The information in this Owner’s Manual may be subject to change without prior notice.
Total Control is a registered trademark of Universal Remote Control, Inc.
URC - Control the Experience is a registered trademark of Universal Remote Control, Inc.
All other brand or product names are trademarks or registered trademarks of their
respective companies or organizations.
500 Mamaroneck Avenue, Harrison, NY 10528
Phone: (914) 835-4484 Fax: (914) 835-4532
Page 3

TRG-200 UMOTION REMOTE
Congratulations! 1
Parts Guide 1
Using the TRG-200 Umotion Remote 2
Installing the Batteries 4
Maintaining Your TRG-200 Umotion Remote 5
Specifications 5
Limited Warranty Statement 6
End User Agreement 8
Federal Communication Commission
Interference Statement 9
Declaration of Conformity 10
Page 4
C
T
U
M
i
t
c
C
b
T
o
e
R
T
v
t
e
n
s
TRG-200 UMOTION REMOTE
o
n
g
r
a
t
u
l
a
t
i
o
n
s
!
h
a
n
k
y
o
u
f
o
r
p
u
r
c
h
a
s
i
n
g
t
h
e
T
o
t
a
l
C
o
n
t
r
o
l
T
R
G
-
2
0
0
m
o
t
i
o
n
R
e
m
o
t
e
.
T
h
e
T
R
G
-
2
0
0
w
o
r
k
s
t
o
c
o
n
t
r
o
l
t
h
e
R
X
-
2
0
A
d
v
a
n
c
e
d
N
e
t
w
o
r
k
S
y
s
t
e
m
C
o
n
t
r
o
l
l
e
r
’
s
u
s
e
r
n
t
e
r
f
a
c
e
.
V
i
e
w
a
n
d
c
o
n
t
r
o
l
y
o
u
r
c
o
n
n
e
c
t
e
d
d
e
v
i
c
e
s
h
r
o
u
g
h
o
u
t
y
o
u
r
h
o
m
e
w
i
t
h
t
h
e
u
s
e
r
i
n
t
e
r
f
a
c
e
v
i
a
a
o
n
n
e
c
t
e
d
H
D
T
V
.
o
n
t
r
o
l
t
h
e
o
n
-
s
c
r
e
e
n
i
n
t
e
r
f
a
c
e
w
i
t
h
t
h
e
r
e
m
o
t
e
’
s
u
i
l
t
i
n
g
y
r
o
s
c
o
p
i
c
m
o
t
i
o
n
h
e
T
R
G
-
2
0
0
’
s
b
u
i
l
t
-
i
n
g
y
r
o
s
c
o
p
i
c
m
o
t
i
o
n
a
l
l
o
w
s
f
o
r
n
-
s
c
r
e
e
n
c
o
n
t
r
o
l
a
n
d
s
e
l
e
c
t
i
o
n
o
f
a
l
l
y
o
u
r
c
o
n
n
e
c
t
-
d
d
e
v
i
c
e
s
.
F
“
N
o
R
u
l
e
s
”
O
p
e
r
a
t
i
o
n
h
e
T
R
G
-
2
0
0
c
o
m
m
u
n
i
c
a
t
e
s
d
i
r
e
c
t
l
y
t
o
t
h
e
M
R
X
-
2
0
i
a
U
R
C
’
s
p
r
o
p
r
i
e
t
a
r
y
U
m
o
t
i
o
n
R
F
.
T
h
i
s
g
i
v
e
s
t
h
e
T
R
G
-
2
0
0
t
h
e
a
b
i
l
i
-
y
t
o
c
o
n
t
r
o
l
y
o
u
r
s
y
s
t
e
m
w
i
t
h
o
u
t
b
e
i
n
g
i
n
d
i
r
e
c
t
l
i
n
e
o
f
s
i
g
h
t
o
f
t
h
e
q
u
i
p
m
e
n
t
.
U
s
e
t
h
e
o
p
t
i
o
n
a
l
T
R
F
-
G
E
1
t
o
e
x
t
e
n
d
t
w
o
-
w
a
y
c
o
m
m
u
-
i
c
a
t
i
o
n
b
e
t
w
e
e
n
a
T
R
G
r
e
m
o
t
e
a
n
d
a
n
M
R
X
-
2
0
w
i
t
h
i
n
a
l
a
r
g
e
p
a
c
e
.
R
C
I
N
c
P
T
h
W
O
i
P
T
1
2
e
q
u
i
r
e
s
M
R
X
-
2
0
o
r
c
o
m
p
a
t
i
b
l
e
M
R
X
A
d
v
a
n
c
e
d
N
e
t
w
o
r
k
S
y
s
t
e
m
o
n
t
r
o
l
l
e
r
n
c
o
m
b
i
n
a
t
i
o
n
w
i
t
h
a
n
M
R
X
-
2
0
o
r
c
o
m
p
a
t
i
b
l
e
M
R
X
A
d
v
a
n
c
e
d
e
t
w
o
r
k
S
y
s
t
e
m
C
o
n
t
r
o
l
l
e
r
,
t
h
e
T
R
G
-
2
0
0
U
m
o
t
i
o
n
R
e
m
o
t
e
c
a
n
o
n
t
r
o
l
y
o
u
r
h
o
m
e
s
y
s
t
e
m
v
i
a
t
h
e
o
n
-
s
c
r
e
e
n
i
n
t
e
r
f
a
c
e
.
r
o
g
r
a
m
m
a
b
l
e
o
n
l
y
b
y
U
R
C
C
e
r
t
i
f
i
e
d
P
r
o
f
e
s
s
i
o
n
a
l
P
r
o
g
r
a
m
m
e
r
o
f
u
l
l
y
a
u
t
o
m
a
t
e
y
o
u
r
a
u
d
i
o
/
v
i
d
e
o
s
y
s
t
e
m
,
t
h
e
p
r
o
g
r
a
m
m
e
r
m
u
s
t
a
v
e
d
e
t
a
i
l
e
d
k
n
o
w
l
e
d
g
e
o
f
e
a
c
h
c
o
m
p
o
n
e
n
t
,
L
A
N
c
o
n
f
i
g
u
r
a
t
i
o
n
,
i
-
F
i
o
p
t
i
m
i
z
a
t
i
o
n
a
n
d
h
o
w
t
h
e
s
y
s
t
e
m
i
s
c
o
n
n
e
c
t
e
d
a
n
d
o
p
e
r
a
t
e
d
.
n
l
y
a
t
r
a
i
n
e
d
a
n
d
c
e
r
t
i
f
i
e
d
p
r
o
f
e
s
s
i
o
n
a
l
a
u
d
i
o
/
v
i
d
e
o
i
n
s
t
a
l
l
e
r
c
a
n
n
s
t
a
l
l
a
T
R
G
-
2
0
0
U
m
o
t
i
o
n
r
e
m
o
t
e
i
n
a
t
i
m
e
l
y
a
n
d
e
f
f
i
c
i
e
n
t
m
a
n
n
e
r
.
a
r
t
s
G
u
i
d
e
h
e
T
R
G
-
2
0
0
U
m
o
t
i
o
n
r
e
m
o
t
e
i
n
c
l
u
d
e
s
:
-
T
R
G
-
2
0
0
U
m
o
t
i
o
n
r
e
m
o
t
e
-
A
A
B
a
t
t
e
r
i
e
s
Page 1
1
-
O
w
n
e
r
’
s
M
a
n
u
a
l
1
-
R
o
o
m
L
a
b
e
l
s
Page 5
TRG-200 UMOTION REMOTE
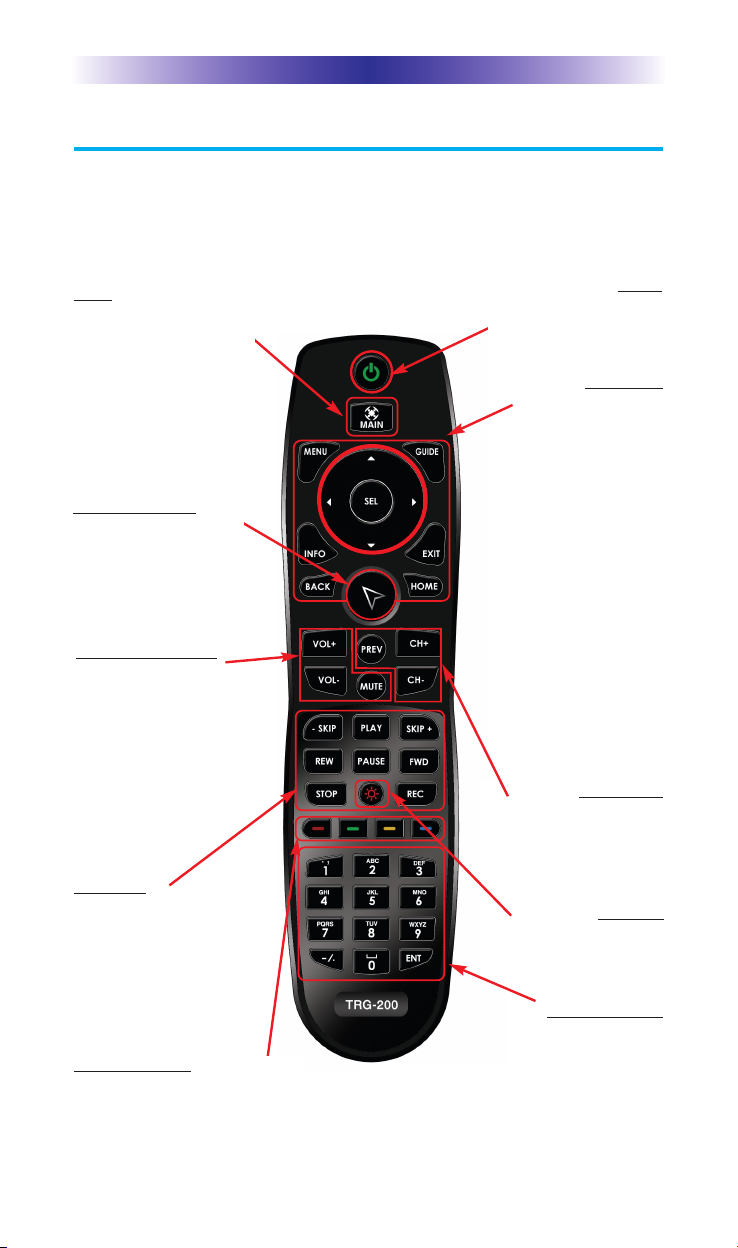
Using the TRG-200 Umotion Remote
The TRG-200 remote consists of basic buttons found on many other
remotes with the exception of the special Umotion button. Use these
functions to control your rooms and connected devices. All buttons
may vary based on your Custom Professional’s programming.
Main
Turns ON the
connected A/V devices
while displaying the
MRX-20’s System
menu. For further
details, refer to the
MRX-20 Owner’s
Manual.
Umotion Control
Opens the MRX-20’s
on-screen interface and
allows for motion con-
trol and button selec-
tion.
Volume +/- & Mute
Control the Volume
while viewing
connected devices like
Cable, Sat , DVD etc...
Also view the on-screen
volume status via a
display device.
Transport
The Transport buttons
(Skip-, Play, Skip+, REW,
Pause, FF, Stop and REC)
operate for the device
currently in use.
Colored Buttons
Use the Red, Green, Yellow and
Blue buttons for devices like
your Cable, SAT or Blu-Ray.
connected devices
in the room OFF.
l
While watching
Cable, DVD, Sat,
Left/Right, Up/Down
and Select buttons to
navigate through the
l
While in the Main
Left/Right/Up/Down
and Select buttons to
navigate via the on-
screen interface.
l
Use Menu/Guide/
Info/Exit/Back/Home
to access your device’s
on-screen displays.
Change Channels while
viewing connected
devices like Cable,
buttons for 8 seconds.
Number keypad
Enter numbers for the devices
you’ve selected. When
watching Cable TV, use
the number keypad to enter
channel numbers. When listening to a
CD, use the number keypad to
enter track numbers.
Page 2
Power
Turns the A/V
Navigation
devices such as
etc.., use the
device menu.
Menu, use the
Ch +/- Prev
Sat, DVD etc...
Backlight
Illuminates all
Page 6
TRG-200 UMOTION REMOTE
Using the TRG-200 Umotion Remote (cont...)
In addition to the basic options, it is important to know the additional features the buttons listed below provide, when controlling
an MRX-20 Advanced Network System Controller.
Power: Turns the connected devices in the room OFF.
l
When a room is ON: Pressing Power sends out a series of
commands to turn off all connected A/V devices in that
room,such as a display device or an optional SNP-1
music player.
l
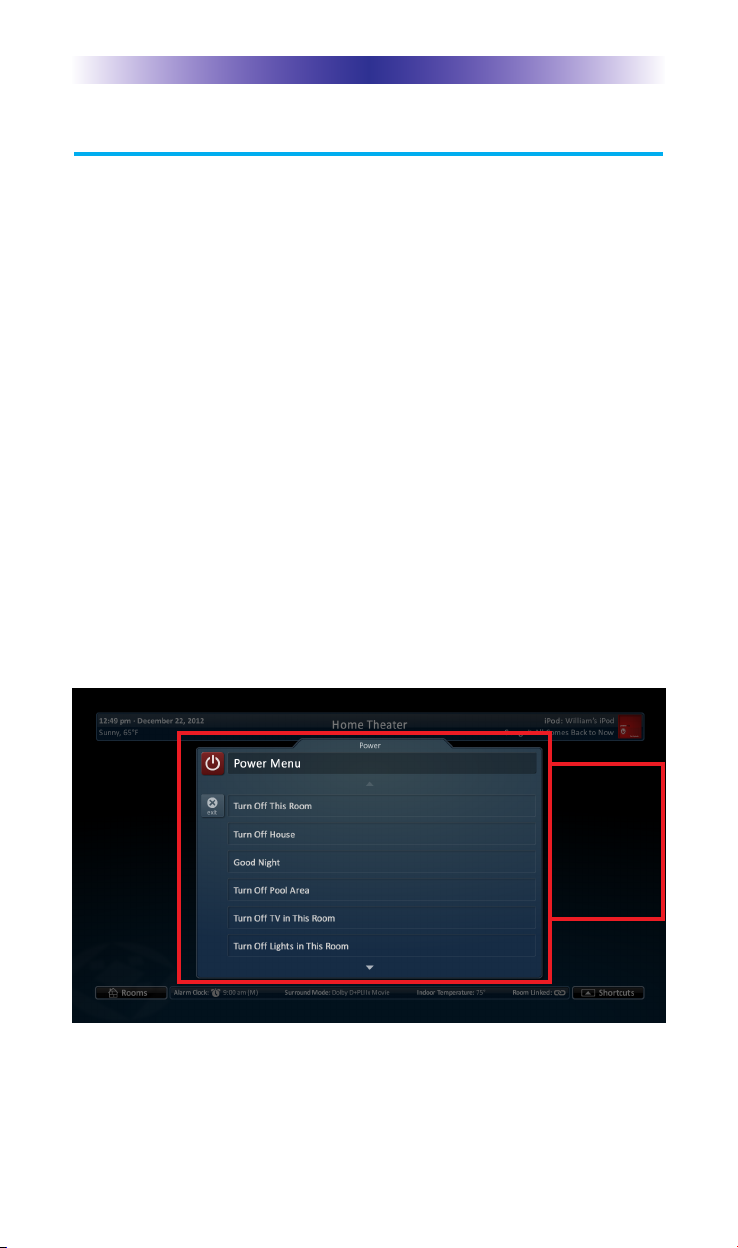
Pressing and holding the Power button for three seconds
displays a programmer customizable on-screen Power
menu. By default the options are: Turn OFF Room, Turn
OFF House. Other options may vary based on the programming. See Power Menu below.
Page 3
Press and
hold the
Power button
for three seconds to open
the Power
menu.
Page 7

TRG-200 UMOTION REMOTE
Main: Displays the MRX-20’s Main menu via a connected display device.
When a display device is OFF: Pressing Main sends out a
l
series of commands to turn ON all required devices to view
the on-screen interface.
l
When a display device is ON: Pressing Main, while the
display device is on, opens the Main menu of the MRX-20.
Umotion: Allows for motion control and button selection via
on-screen interface. While viewing a device, press the Umotion button
to activate on-screen control and open the Quick Bar menu. Point the
TRG-200 towards the television. As you move the remote, an
on-screen pointer will mimic your movements. To select a button,
hover over your selection and press the Umotion button again.
Pressing any button other than Umotion, exits the on-screen interface
and motion control.
Note: Using an Internet TV? Keep in mind, the on-screen interface
only works with devices connected to the MRX-20 Advanced Network
System Controller. If you are using the display device’s internal
sources, like Internet TV (Netflix, Hulu) or a directly connected device,
they will not operate with Umotion.
Installing the Batteries
Open the battery cover by pushing up on the spring
lock at the bottom of the cover. Remove the cover.
Observe the + and – polarity indicators inside the battery compartment and the batteries. Place two AA batteries into their positions inside the battery compartment.
Now, replace the battery cover and snap it into place.
Page 4
Page 8

TRG-200 UMOTION REMOTE
Maintaining Your TRG-200 Umotion Remote
The TRG-200 Umotion remote is not waterproof. Do not use it in
any location that is damp or wet. If you spill water on it, remove
the batteries and let the TRG-200 Umotion remote dry for 48 hours
before you try powering it up again. If you spill coffee or another
beverage on it, clean it with distilled water. Make sure no water
gets inside the TRG-200 Umotion remote. Keep it away from
extreme cold or heat. Be careful to not drop the TRG-200 Umotion
remote or slam it against anything.
Specifications
Microprocessor: ARM 32-bit Cortex™-M3
Memory: 16 Kbytes SRAM, 128 Kbytes Flash
RF Range(radio frequency): 50 to 100 feet, depending upon the environment
RF Freqency: 2.425~2.475 GHz
Weight: 4.1 oz
Size: 1.96” X 7.6” X 1.18”
Batteries: AA Battery 2EA
Page 5
Page 9

TRG-200 UMOTION REMOTE
Limited Warranty Statement
1. Limited Warranty and Disclaimers
Universal Remote Control, Inc. (“URC”) warrants that the URC equipment
shall be free from defects in material and workmanship under normal usage
for two (2) years from purchase when such is purchased from URC. This
limited warranty is valid only in the United States of America. URC warrants
that the software will substantially conform in any material respect to its
functional specifications at the time of delivery. URC SHALL NOT BE LIABLE
FOR OPERATIONAL, TECHNICAL OR EDITORIAL ERRORS AND/OR
OMISSIONS MADE IN THE URC DOCUMENTATION. URC DOES NOT
WARRANT THAT THE URC SOFTWARE IS BUG-FREE OR ERROR FREE
OR THAT THERE ARE NO ERRORS/BUGS IN THE URC SOFTWARE.
URC warrants that at the time of purchase the URC equipment and the URC
software complied with all applicable regulations and policies of the Federal
Communications Commissions (“FCC”) regarding electromagnetic
interference caused by electronic/computing devices and to the extent that the
URC equipment and/or the URC software fails to so comply, URC shall, at its
own expense, take all reasonable measures to promptly cause such to
comply.
URC equipment purchases from other than an authorized URC dealer or
distributor are without warranty.
THIS LIMITED WARRANTY DOES NOT COVER TECHNICAL ASSISTANCE
FOR HARDWARE OR SOFTWARE USAGE EXCEPT AS EXPRESSLY
PROVIDED FOR HEREIN, THE EQUIPMENT, SOFTWARE AND
DOCUMENTATION OF URC ARE SUPPLIED “AS IS” WITHOUT ANY
WARRANTY, EXPRESS, STATUTORY OR IMPLIED, OF ANY KIND. TO
THE MAXIMUM EXTENT PERMITTED BY APPLICABLE LAW, URC
EXPRESSLY DISCLAIMS ALL WARRANTIES, EXPRESS, STATUTORY OR
IMPLIED, INCLUDING BUT NOT LIMITED TO THE WARRANTIES OF
MERCHANTABILITY AND FITNESS FOR A PARTICULAR PURPOSE. URC
DOES NOT WARRANT, GUARANTEE, OR MAKE ANY
REPRESENTATIONS REGARDING THE USE OF, OR THE RESULTS OF THE
USE OF, THE EQUIPMENT, SOFTWARE OR DOCUMENTATION IN
TERMS OF CORRECTNESS, ACCURACY, RELIABILITY OR OTHERWISE.
EXCEPT AS EXPRESSLY PROVIDED FOR HEREIN, TECHNICAL SERVICES
ARE SUPPLIED “AS IS”, WITHOUT ANY WARRANTY, EXPRESS,
STATUTORY OR IMPLIED, OF ANY KIND. TO THE MAXIMUM EXTENT
PERMITTED BY APPLICABLE LAW, URC EXPRESSLY DISCLAIMS ALL
WARRANTIES, EXPRESS, STATUTORY OR IMPLIED, INCLUDING BUT
NOT LIMITED TO THE WARRANTIES OF QUALITY OR REASONABLE
Page 6
Page 10

TRG-200 UMOTION REMOTE
SKILL AND CARE, OR OUTCOME OR RESULTS.
WITHOUT IN ANY WAY LIMITING THE GENERALITY OF THE OTHER
PROVISIONS HEREIN, WARRANTY DOES NOT COVER: (I) DAMAGE
FROM MISUSE, NEGLECT OR ACTS OR NATURE, (II) MODIFICATIONS,
(III) INTEGRATION WITH THIRD PARTY CONTENT (IV) BEYOND THE
WARRANTY PERIOD AND/ OR FAILURE TO FOLLOW URC WARRANTY
CLAIM PROCEDURE.
The warranty limitations and warranty disclaimers may not apply to end user
in whole or in part, where such are restricted or excluded by applicable law
and such shall apply to the maximum extent permitted by applicable law.
In the event of any warranty claim, URC will, at its sole option, repair the URC
equipment using new or comparable rebuilt parts, or exchange the URC
equipment for new or rebuilt equipment. In the event of a defect, these are
the end user’s exclusive remedies.
All the URC equipment returned for service, exchange or repair require an
RGA number. To obtain an RGA number, you must complete a Return
Request Form which you may obtain by calling (914) 835-4484 or contacting
URC at returnrequest@universalremote.com. To obtain warranty service, end
user must deliver the URC equipment, freight prepaid, in its original packaging
or packaging affording adequate protection to URC at 420 Columbus Avenue,
Valhalla, NY 10595. It is end user’s responsibility to backup any macro
programming, artwork, software or other materials that may have been
programmed into the unit. It is likely that such data, software, or other
materials will be lost during service and URC will not be responsible for any
such damage or loss. A dated purchase receipt, bill of sale, installation contract
or other verifiable proof of purchase is required. For the URC equipment
support and other important information, please visit URC's website available
at www.universalremote.com or call the Customer Service Center at (914)
835-4484.
This limited warranty only covers the URC equipment issues caused by
defects in material or workmanship during ordinary consumer use. It does not
cover product issues caused by any other reason, including but not limited to
product issues due to commercial use, acts of God, third-party installation,
misuse, limitations of technology, or modification of or to any part of the URC
equipment. This limited warranty does not cover the URC equipment sold as
used, as is, refurbished, so called "B stock" or consumables (such as batteries).
This limited warranty is invalid if the factory applied serial number has been
altered or removed from the URC equipment. This limited warranty
specifically excludes the URC equipment sold by unauthorized resellers.
With the exception of URC’s IR-only, broad-based consumer remotes, none of
Page 7
Page 11

TRG-200 UMOTION REMOTE
URC’s PC programmable remotes or any of our Total Control® whole-house
equipment are authorized for online internet sales. Buying URC’s PC
programmable remotes or any of our Total Control® whole-house equipment
online means buying equipment that does not have a URC’s limited warranty.
Such equipment is not eligible for URC tech support or software support,
either.
2. URC’S Limitations of Liability
IN NO EVENT SHALL URC BE LIABLE FOR INDIRECT, SPECIAL,
INCIDENTAL, EXEMPLARY, PUNITIVE OR CONSEQUENTIAL DAMAGES
OF ANY KIND OR LOSS OF PROFITS OR BUSINESS OPPORTUNITY,
EVEN IF URC IS ADVISED OF THE POSSIBILITY OF SUCH DAMAGES.
IN NO EVENT SHALL URC BE LIABLE FOR LOSS OF OR DAMAGE TO
DATA, COMPUTER SYSTEMS OR COMPUTER PROGRAMS.
URC’S LIABILITY, IF ANY, FOR DIRECT DAMAGES OF ANY FORM SHALL
BE LIMITED TO ACTUAL DAMAGES, NOT IN EXCESS OF AMOUNTS
PAID BY END USER FOR THE URC EQUIPMENT.
IN NO EVENT SHALL URC BE LIABLE FOR ANY EVENTS BEYOND ITS
CONTROL, INCLUDING ANY INSTANCE OF FORCE MAJEURE.
IN NO EVENT SHALL URC BE LIABLE FOR THE ACTS OR OMISSIONS OF
END USER OR ANY THIRD PARTY.
THE LIMITATIONS OF LIABILITY MAY NOT APPLY TO END USER IN
WHOLE OR IN PART, WHERE SUCH ARE RESTRICTED LIMITED OR
EXCLUDED BY APPLICABLE LAW AND SUCH SHALL APPLY TO THE
MAXIMUM EXTENT PERMITTED BY APPLICABLE LAW.
URC SHALL NOT BE HELD RESPONSIBLE FOR THE STATEMENTS MADE
BY OTHERS.
SOME STATES OR JURISDICTIONS DO NOT ALLOW THE EXCLUSION
OR LIMITATION OF INCIDENTAL OR CONSEQUENTIAL DAMAGES, OR
ALLOW LIMITATIONS ON HOW LONG AN IMPLIED WARRANTY LASTS,
SO THE ABOVE LIMITATIONS OR EXCLUSIONS MAY NOT APPLY TO
END USER. THIS LIMITED WARRANTY GIVES END USER SPECIFIC LEGAL
RIGHTS AND END USER MAY HAVE OTHER RIGHTS WHICH VARY
FROM STATE TO STATE OR JURISDICTION TO JURISDICTION.
End User Agreement
The terms and conditions of the End User Agreement available at
www.universalremote.com/eua.php shall apply.
Page 8
Page 12

TRG-200 UMOTION REMOTE
Federal Communication Commission
Interference Statement
This equipment has been tested and found to comply with the limits for
aClass B digital device, pursuant to part 15 of the FCC Rules. These limits aredesigned to provide reasonable protection against harmful interference in
aresidential installation. This equipment generates, uses and can radiate
radiofrequency energy and, if not installed and used in accordance with the
instructions,may cause harmful interference to radio communications.
However, there isno guarantee that interference will not occur in a particular
installation. If thisequipment does cause harmful interference to radio or television reception,which can be determined by turning the equipment off and
on, the user isencouraged to try to correct the interference by one more of the
followingmeasures:
u Reorient or relocate the receiving antenna.
u Increase the separation between the equipment and receiver.
u Connect the equipment into an outlet on a circuit different from that
to which the receiver is connected.
u Consult the dealer or an experienced radio/TV technician for help.
Warning!
Changes or modifications not expressly approved by the manufacturer could
void the user's authority to operate the equipment.
Note : The manufacturer is not responsible for any Radio or TV interference
caused by unauthorized modifications to this equipment. Such modifications
could void the user's authority to operate the equipment.
FCC Caution
This device complies with Part 15 of the FCC Rules. Operation is subject
to the following two conditions: (1) this device may not cause harmful
interference, and (2) this device must accept any interference received,
including interference that may cause undesired operation.
Any changes or modifications not expressly approved by the party
responsible for compliance could void the authority to operate equipment.
Federal Communication Commission (FCC) Radiation Exposure Statement
This remote device is approved as a hand-held and hand-operated only
portable (relative to hand) device which is normally operated at 5 cm
from a person's body.
Page 9
Page 13

TRG-200 UMOTION REMOTE
Declaration of Conformity
Company Name : OH SUNG ELECTRONICS CO., LTD.
Company Address : #181 GONG DAN-DONG, GUMI, GYEONG BUK,
Contact Information :
rand Name : UNIVERSAL remote control
B
Product Name : RF Remote Controller
Model Name : TRG-200
This product herewith complies with the requirements of EMC Directive (2004/108/EC)
and R&TTE Directive(1995/5/EC) issued by the Commission of the European Community
Compliance with these directives implies conformity to the following European Community
n
EMC Directive
l EN 55022 (2010)
l EN 55024 (2010)
n
R&TTE Directive
l EN 60950-1 (2006) + A11 (2009) + A1 (2010) + A12 (2011)
l ETSI EN 301 489-1 V1.9.2 (2011), ETSI EN 301 489-17 V2.1.1 (2012)
l ETSI EN 300 328 V1.7.1 (2006)
REPUBLIC OF KOREA
hone: +82-54-468-7281, Fax: +82-54-461-8368
P
List of test reports and/or certificate verified compliance with the standards above
n
EMC Directive
l Report No.
l Testing Laboratory : Gumi College EMC Center
n
R&TTE Directive
l Certificate No.
l Certificate Body : SIEMIC (No. 2200)
Date of issue : March 16, 2012
Name and signature of authorized person :
Quality Assurance Team
OH SUNG ELECTRONICS CO., LTD.
Page 10
Page 14

NOTES
Page 11
Page 15

NOTES
Page 12
Page 16

NOTES
Page 13
Page 17

NOTES
Page 14
Page 18

500 Mamaroneck Avenue, Harrison, NY 10528
Phone: (914) 835-4484 Fax: (914) 835-4532
OCE-0135A Rev 01
www.universalremote.com
 Loading...