

Page 1
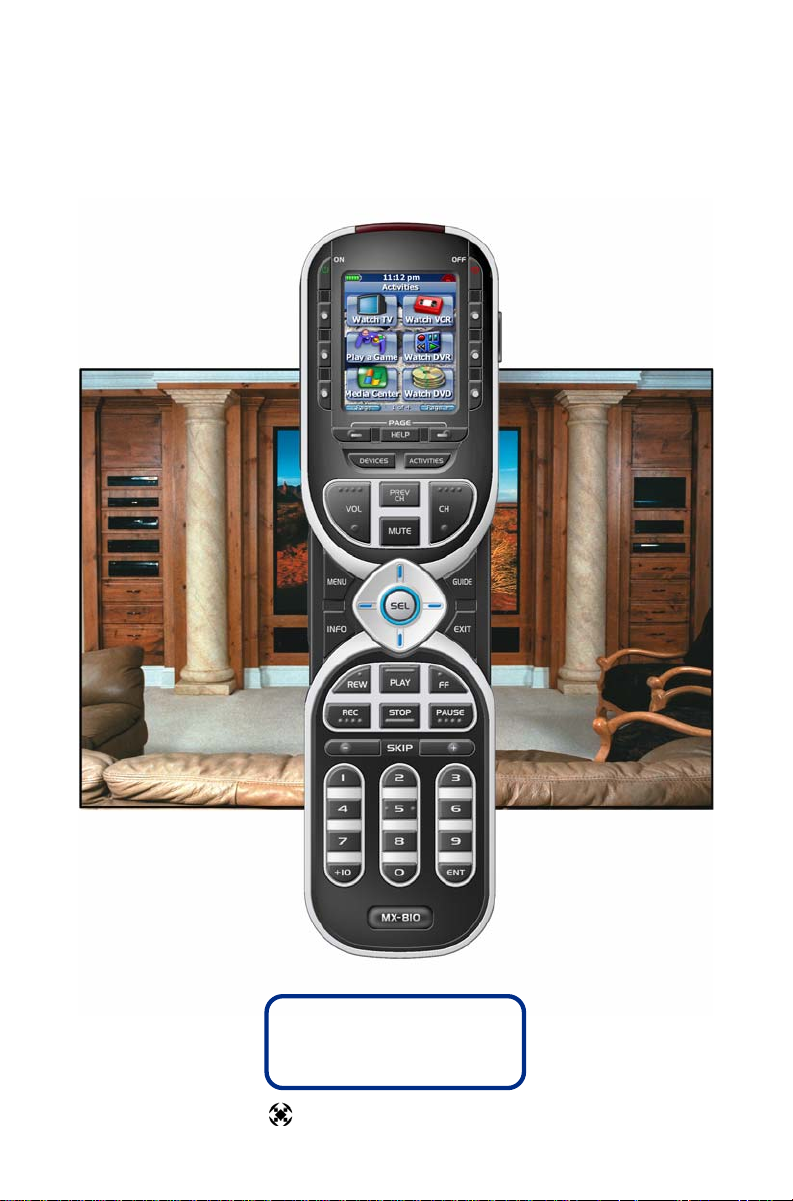
Operating Your System
With the MX-810
COMP L ETE
™
UniversalRemoteControl
®
CONTROL
COMP L ETE
Page 2
This remote control was
Custom Programmed for you by:
For questions about your Custom Programming call:
Custom Programming of a complex home theater and/or a multi-room
system is one of the most challenging tasks within an audio/video installation. It involves an intimate knowledge of how the components interact
and exact details on the proper sequences of control.
Only a Complete Control dealer has the requisite experience and training
to quickly and effectively customize a remote control for true automated
operation.
Congratulations on your choice!
MX-810 Owners Manual © 2007 Universal Remote Control, Inc.
Front Cover Photo courtesy of Robert Ridenour of Connected Technologies,
www
.connected-technologies.com
The information in this manual is copyright protected. No part of this manual may
be copied or reproduced in any form without prior written consent from Universal
Remote Control, Inc.
UNIVERSAL REMOTE CONTROL, INC. SHALL NOT BE LIABLE FOR OPERATIONAL,
TECHNICAL OR EDITORIAL ERRORS/OMISSIONS MADE IN THIS MANUAL.
The information in this manual may be subject to change without prior notice.
Complete Control is a registered trademark of Universal Remote Control, Inc.
Entertainment Made Simple is a trademark of Universal Remote Control, Inc.
All other brand or product names are trademarks or registered trademarks of their
respective companies or organizations.
Printed in Korea
Universal Remote Control, Inc.
500 Mamaroneck Avenue, Harrison, NY 10528
Phone: (914) 835-4484 Fax: (914) 835-4532
Page 3

TABLE OF CONTENTS
Introduction to the MX-810 1
Optional RF “No Rules” Operation 2
Installing and Charging the Battery 3
Programming the MX-810 4
Using the MX-810 to Manually Control a “Device” 5
Using the MX-810 to Automate an “Activity” 6
Using the Help System for Automated Activities 7
Accessing the MX-810’s Setup Menus 7
Selecting from the Setup Menus 8
Setting the Color Screen 8
Setting the Button Lighting 9
System Menu 10
Setting the Button Beep Volume 11
Date and Time Menus 12
Erasing and Resetting 13
USA Limited Warranty Statement 13
Specifications 14
Contact Us 14
Your Programming Notes - Devices 15
Your Programming Notes - Activities 16
Page 4
Page 1
MX-810 OWNERS MANUAL
Congratulations!
You’ve purchased a unique synthesis of hardware and software engineering,
the Complete Control MX-810. The MX-810 achieves a magnificent combination of power and flexibility, simplifying and automating operation of even the
most complex system.
User Configurable Screen and Button Lighting
A built in pick up sensor can be set to light the screen and/or the buttons
automatically. Additionally, a dedicated LIGHT button enables the user to
backlight the buttons if the pick up sensor is turned off.
Integrated Sound Signaling
The MX-810 incorporates a small speaker for beeps. Anytime you press a
button, the MX-810 signals that it has understood your command with a
beep sound.
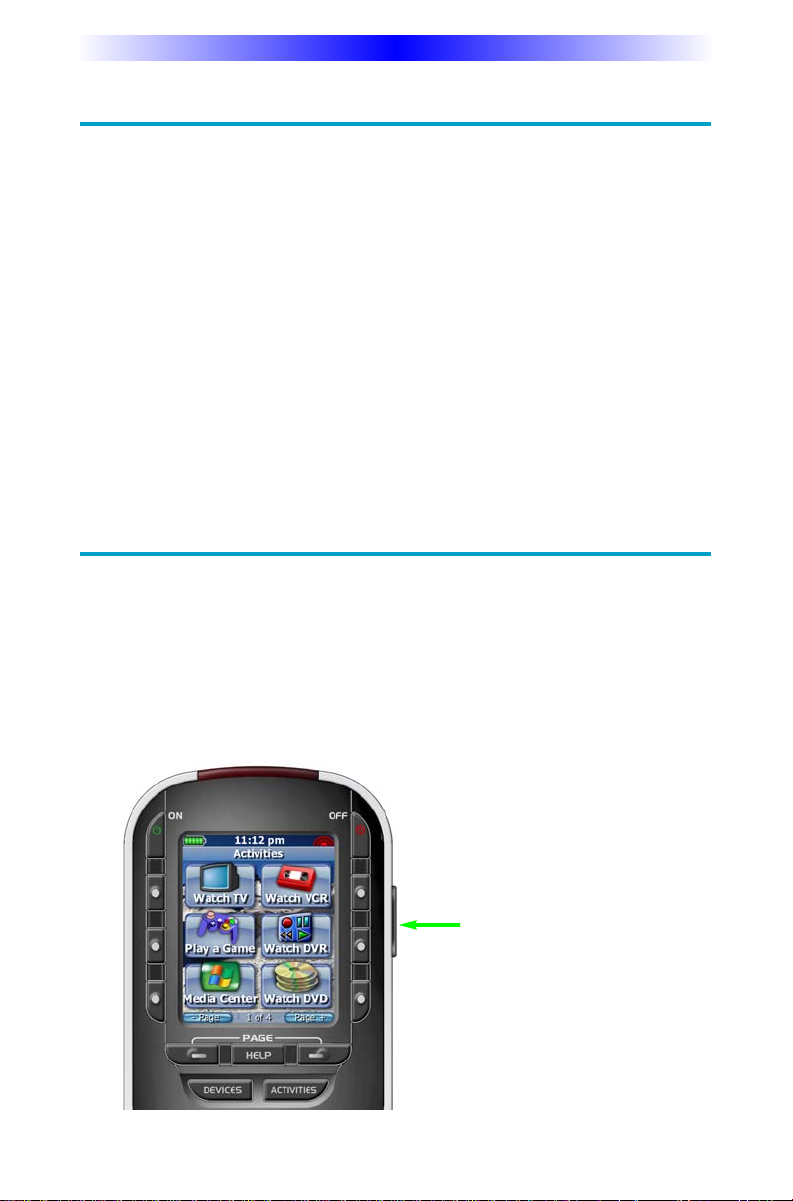
Custom Labeled Buttons
When you pick up the MX-810, it automatically lights up the color LCD
screen which labels the six buttons to either side of the screeen. These
button labels change based on what you are watching or listening to.
Thus, if you have selected Watch TV, you will see a list of buttons that
are useful to that activity, while if you select Watch DVD, the buttons
will control the DVD.
LIGHT Button
Press the Light button on the
side of the MX-810 to backlight all of the buttons. Of
course, you could opt to set
the buttons to light automatically via the pick up sensor.
Page 5
Page 2
MX-810 OWNERS MANUAL
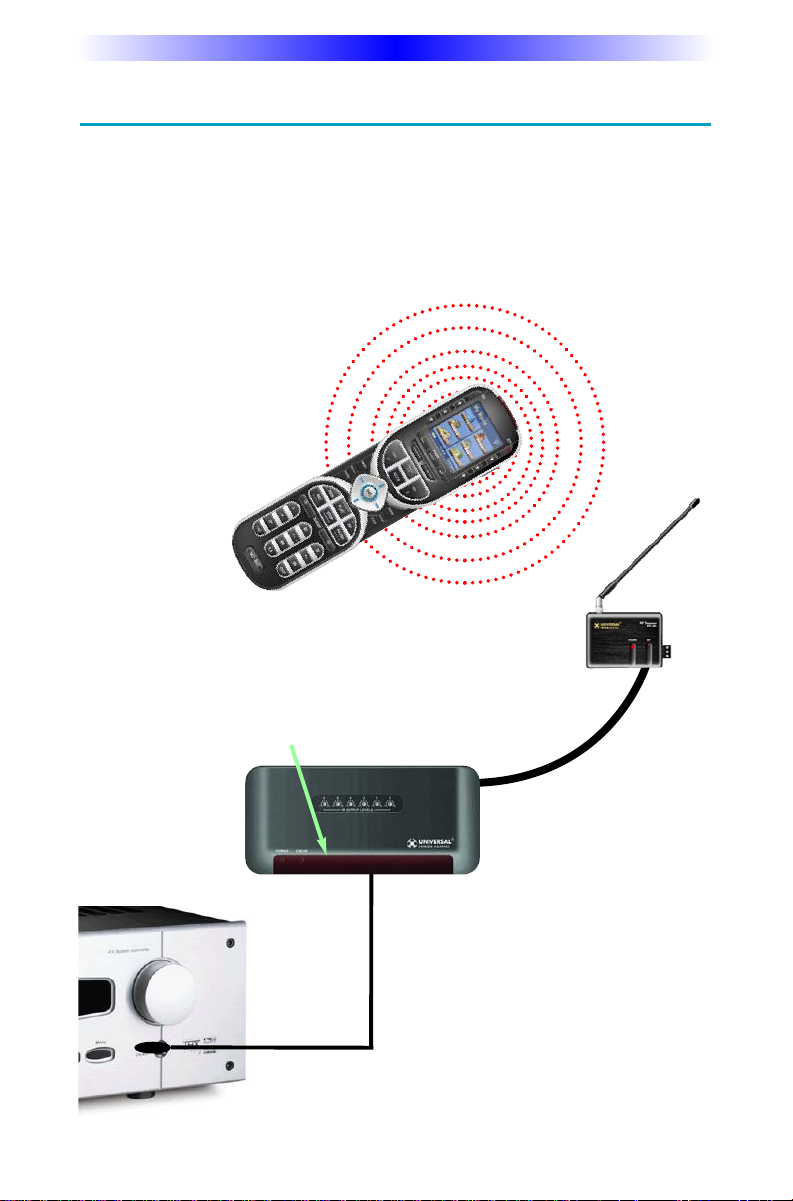
Optional RF “No Rules” Operation
In combination with a Complete Control RF Base Station, the MX-810 can
control your system without being in line-of-sight of the equipment.
Either the MRF-350 or the MRF-40 RF base station is compatible with the
MX-810. Both incorporate RF Addressing. RF Addressing gives you the ability
to control equipment locations throughout your home, even if they are concealed in other rooms or are behind closed doors.
4. Self-adhesive “Flashers” affix to the
Infrared sensors on the front panels of your
components. The Flashers relay commands
to components out of sight of the MRF-350’s
Front Blaster. The flashers plug in to the
MRF-350’s rear flasher line outputs via their
10 foot cables. Uniquely, the MRF-350 can
also connect to components with rear panel
IR Inputs via its adjustable IR Line Outputs.
3.The MRF-350’s built-in Front Blaster sends commands to
components in the same cabinet space as the MRF-350.
1.The MX-810 sends radio waves
in every direction, so you don’t
have to point the remote anymore!
2.The RFX-250 RF Sensor can be freely
positioned for optimal reception.
Page 6
Page 3
MX-810 OWNERS MANUAL
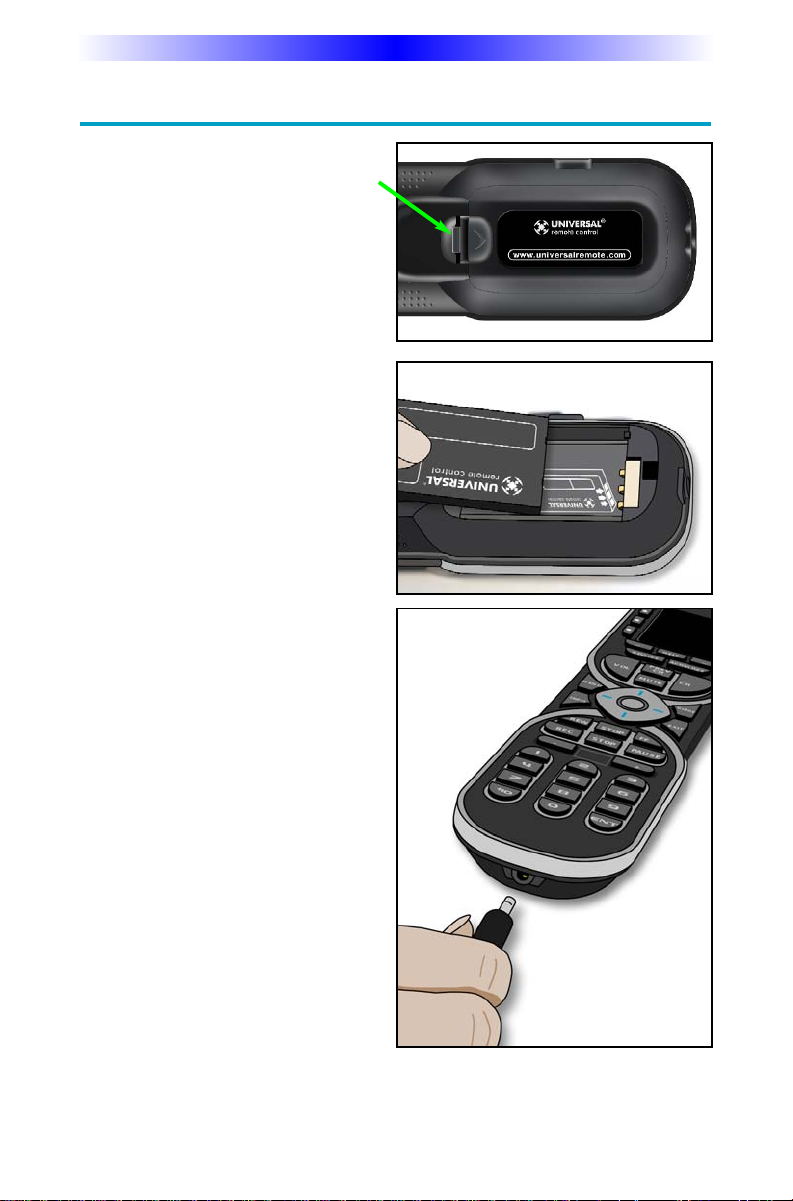
Installing and Charging the Battery
Open the battery cover by pressing
on the release clip and removing
the cover.
Note that the three contacts on the
battery must connect to the three
spring-loaded contacts in the MX-
810. Angle the battery into the battery compartment, contacts first,
then gently fit the rear of the battery
into the compartment as well.
Replace the battery cover by inserting the hinged end in first, then
snapping the cover back into place.
You can charge the Lithium Ion battery by simply plugging the included charger into the base of the
remote as shown here.
The MX-810 can be used while
charging.
Page 7

Page 4
MX-810 OWNERS MANUAL
Programming the MX-810
The MX-810 is programmed via a Windows PC equipped with a USB port
(programming cable included), using our proprietary software, MX-810
Setup. You can download this software from our website:
www
.universalremote.com
Basic setup takes only a few minutes with this software. However, to fully
automate an audio/video system the programmer must have a detailed
knowledge of each component and how the system is connected and
operated. We highly recommend that you use a professional audio/video
installer to program your MX-810 so you will be able to enjoy all the benefits of the MX-810 as well as one touch operation via Activities.
If you do opt to do some programming on your own, fill out the NOTES at
the end of this manual before beginning. This will greatly speed the
process of programming.
Page 8

Using the MX-810 to Manually Control a “Device”
Press the MX-810’s DEVICES
button to display all the devices
you can control with your MX-
810.
Your MX-810 can control up to
24 devices. If you have more
than six devices, press either of
the page buttons to display the
other devices in your system.
When you find the device you
want to control, press the corresponding button beside the
screen.
For example, if you press the
Sony VCR button on the screen
shown here, the MX-810 will
become a Sony VCR remote
control.
The MX-810 now displays the device you selected at the top of the screen. Below the title, the
LCD displays the customized names of any
special features you need for the device.
All the hard buttons of the MX-810
have now changed their functions to operate your device.
Page 5
MX-810 OWNERS MANUAL
Page 9

Page 6
MX-810 OWNERS MANUAL
Using the MX-810 to Automate an “Activity”
You select Activities in the same way that you select Devices. Simply press
the MX-810’s ACTIVITIES button to display all the Activities you can automate with your MX-810.
However, when
you select an activity, the MX-810 is
going to automatically reconfigure
your entire Audio
Video system.
For example, if you press Watch
DVD, a whole sequence of events
happens:
While the MX-810 is reconfiguring your
AV system, a status message on the MX-810 lets you
know that it is busy. This reconfiguration of your system can take ten to twenty
seconds on some systems.
When the Status message disappears, all of the
MX-810’s buttons and screens are optimized for
the activity you selected.
The Volume and Mute buttons control the
sound you hear.
The rest of the buttons on the remote have new
functions, so that the functions you need most
frequently are immediately available.
1. The TV turns ON.
2. The Audio system turns ON.
3. The DVD player turns ON.
4. The TV changes to the DVD
input.
5. The AUDIO system changes to the
DVD input.
6. The DVD player begins to PLAY.
Status Message
Page 10

Using the Help System for Automated Activities
After selecting an activity, if any of the devices or components don’t seem to
be on or are set incorrectly, use the Help button. There may be several help
screens to help you with your activity as shown here:
Accessing the MX-810’s Setup Menus
The MX-810 has internal setup menus that enable you to change the settings
that control your color screen, the button lighting, battery warnings and the
clock. To access these settings, you must press and hold two
buttons at the same time as shown here:
At the same time, press and
hold both the ACTIVITIES
button and the ENTER button. When the SETUP screen
appears, you can release the
two buttons.
MX-810 OWNERS MANUAL
Once the help screens appear, look at your system. If anything is off, use the buttons on the first screen to
power them on, then press NEXT (the PAGE button). The second and third screens enable you to correct an
input. Additional screens may appear if your system is custom. Exit help by pressing the HELP button again.
Page 7
Page 11

Selecting from the Setup Menus
There are two pages of settings on the Setup Menu. Use the page buttons to
view them. To select, simply press the corresponding button.
Setting the Color Screen
Although usage of the color screen will affect how frequently you have to
charge the battery, the screen does not drain the battery as quickly as the
button lighting does.
Setting Brightness
Use the buttons next to DIM and BRIGHT to adjust the brightness. You’ll
see the screen dim and brighten. When you have the right setting, press
SAVE. Pressing Cancel discards all changes.
Page 8
MX-810 OWNERS MANUAL
Select the setting you’d like to adjust by pressing the
button beside the screen.
Use the Page button to see other pages.
Exit the Setup Menus by pressing the Activities or
Devices button, or simply waiting (the setup menus
time out in 30 seconds).
Adjust the brightness of the screen to taste. In most
lighting conditions, 50% gives good results.
The Pick Up sensor senses motion, so it will keep
the screen on (and drain your battery charge) as
long as you are holding it in your hand. If you turn
off the Pick Up sensor you will extend battery life
(the screen will still light up when you press any
button).
Adjust how long the screen stays lit after you put it
down or stop using it here.
Use the DIM and BRIGHT buttons to adjust the
lighting of the color screen.
Press the SAVE button to save your setting.
Page 12

Page 9
MX-810 OWNERS MANUAL
Setting the Screen Pick Up Sensor
Use the buttons next to YES and NO. If you say YES, the color screen will
light as long as you are moving the MX-810. If you say NO, the screen
will light when you press any button.
Setting the Screen Auto Turn Off
Use the buttons next to LESS and MORE to adjust the amount of time the
screen will stay lit when you stop moving it (Pick Up Sensor ON) or when
you stop pressing buttons (Pick Up Sensor OFF).
Setting the Button Lighting
Note that button backlighting uses more battery charge than the screen.
So if you would like to extend the time between charges, lower the usage
of button lighting.
If you turn off Automatic On you will extend battery
life (the buttons will still light up when you press the
light button).
The buttons will stay lit for so many seconds after
you stop pressing buttons. Adjust to your preference
by pressing this button.
Use the YES and NO buttons to set the Pick Up sensor.
Press the SAVE button to save your setting.
Use the LESS and MORE buttons to set the Auto Turn
Off timing.
Press the SAVE button to save your setting.
Page 13

Page 10
MX-810 OWNERS MANUAL
Setting Button Lighting Automatic On
Use the buttons next to YES and NO. If you say YES, the buttons will light
whenever the LCD screen is on. If you say NO, the buttons will only light
when you press the LIGHT button.
Setting the Button Lighting Auto Turn Off
Use the buttons next to LESS and MORE to adjust the amount of time the
buttons will stay lit when you stop moving it (Pick Up Sensor ON) or
when you stop pressing buttons (Pick Up Sensor OFF).
System Menu
While you are using the MX-810 you can get a more accurate reading of
the exact power remaining by checking the System Menu. Additionally,
the System Info page offers a look at how much memory you have used.
Select Power Remaining to check your power
remaining or to set a new battery warning level.
To view the system info, press here.
Use the YES and NO buttons to set the button back
lighting to automatically turn on or not.
Press the SAVE button to save your setting.
Use the LESS and MORE buttons to set the Auto Turn
Off timing.
Press the SAVE button to save your setting.
Page 14

Page 11
MX-810 OWNERS MANUAL
Power Remaining and Battery Warning Settings
On this screen, you can see how much battery charge remains and you
can reset the “Low Battery” warning to either 10, 20 or 30 percent. The
battery indicator at the top left of the MX-810 screen will flash when your
low battery warning level is reached.
System Info
See how much memory you’ve used on this screen.
Setting the Button Beep Volume
Use the buttons next to OFF and LOUDEST to adjust how loud the beeps
are.
Use the OFF and LOUDEST buttons to set the Beep
volume.
Press the SAVE button to save your setting.
Use the LESS and MORE buttons to set the battery
warning.
Note the current remaining battery charge here.
Press the SAVE button to save your setting.
You cannot make any changes to the data displayed
on this screen. It is informational only.
Press the OK button to exit.
Page 15

Page 12
MX-810 OWNERS MANUAL
Date and Time Menus
Via the three menus for Date and Time you can set the date, set the time
and opt to display either the date or the time.
Setting Time
Tap the button beside hour or minutes then use the number keys to enter
the correct time. Set the AM/PM by toggling the button. When the time is
correct, press the SAVE button.
Setting Date
Tap the button beside day, month or year then use the number keys to
enter the correct date. When the date is correct, press the SAVE button.
Setting Display for Time or Date
The MX-810 can display either the time or the date, not both. Select what
you would like to be displayed and press SAVE.
Select either Time or Date display.
Press the SAVE button to save your setting.
Select the field you’d like to change, then use the
Number buttons on the MX-810 to enter the year,
the month and the day.
Press the SAVE button to save your setting.
Select the field you’d like to change, then use the
Number buttons on the MX-810 to enter hours or
minutes.
Press this button to change AM to PM or PM to AM.
Each press changes the setting. When it is correct,
press SAVE.
Press the SAVE button to save your setting.
Page 16

Page 13
MX-810 OWNERS MANUAL
Erasing and Resetting
You can erase your MX-810 (all of your work, all devices, all activities
will be lost) and reset it to the factory default configuration.
USA Limited Warranty Statement
Your Universal Remote Control, when delivered to you in new condition, is warranted
against defects in materials or workmanship as follows: UNIVERSAL REMOTE CONTROL,
INC. warrants this product against defects in material or workmanship for a period of one
(1) year and as set forth below. Universal Remote Control will, at its sole option, repair the
product using new or comparable rebuilt parts, or exchange the product for a comparable
new or rebuilt product. In the event of a defect, these are your exclusive remedies.
This Limited Warranty covers only the hardware components packaged with the Product. It
does not cover technical assistance for hardware or software usage and it does not cover
any software products whether or not contained in the Product; any such software is provided "AS IS" unless expressly provided for in any enclosed software Limited Warranty.
To obtain warranty service, you must deliver the product, freight prepaid, in its original
packaging or packaging affording adequate protection to Universal Remote Control at the
address provided in the Owner's Manual. It is your responsibility to backup any macro
programming, artwork, software or other materials that may have been programmed into
your unit. It is likely that such data, software, or other materials will be lost during service
and Universal Remote Control will not be responsible for any such damage or loss. A
dated purchase receipt, Bill of Sale, Installation Contract or other verifiable Proof of
Purchase is required. For product support and other important information visit Universal
Remote Control's website: http://www.UniversalRemoteControl.com or call the Universal
Remote Control Customer Service Center (914) 835-4484.
This Limited Warranty only covers product issues caused by defects in material or workmanship during ordinary consumer use. It does not cover product issues caused by any
other reason, including but not limited to product issues due to commercial use, acts of
God, third-party installation, misuse, limitations of technology, or modification of or to any
part of the Universal Remote Control product. This Limited Warranty does not cover
Universal Remote Control products sold as USED, AS IS, REFURBISHED, so-called "B
STOCK" or consumables (such as batteries). This Limited Warranty is invalid if the factory-
Use the CANCEL button to exit without erasing.
Press the ERASE button to erase all your work.
Page 17

Page 14
MX-810 OWNERS MANUAL
applied serial number has been altered or removed from the product. This Limited
Warranty is valid only in the United States of America. This Limited Warranty specifically
excludes products sold by unauthorized resellers.
UNIVERSAL REMOTE CONTROL SHALL NOT BE LIABLE FOR ANY INCIDENTAL OR
CONSEQUENTIAL DAMAGES FOR BREACH OF ANY EXPRESS OR IMPLIED WARRANTY
OR CONDITION ON THIS PRODUCT. EXCEPT TO THE EXTENT PROHIBITED BY
APPLICABLE LAW, THERE IS NO OTHER WARRANTY EXPRESSED OR IMPLIED. UNIVERSAL REMOTE CONTROL WILL NOT BE HELD RESPONSIBLE FOR STATEMENTS MADE
BY OTHERS CONCERNING THE MERCHANTABILITY OR FITNESS FOR A PARTICULAR
PURPOSE ON THIS PRODUCT. Some states or jurisdictions do not allow the exclusion or
limitation of incidental or consequential damages, or allow limitations on how long an
implied warranty lasts, so the above limitations or exclusions may not apply to you. This
Limited Warranty gives you specific legal rights and you may have other rights which vary
from state to state or jurisdiction to jurisdiction.
Specifications
Memory - 32 Megabits of Flash Memory Total (28 Megabits for User
Configuration)
Customization Capability - Up to 24 devices, 24 activities and up to 8
pages each for a total of 384 pages.
Learning Capability - Standard frequencies (15kHz to 460kHz)
Macro Capability - Up to 255 steps each
IR Range (Line of Sight via Infrared): 30-50 feet, depending on the environment
RF Range (radio frequency): 50 to 100 feet, depending upon the environment
RF Frequency: 418MHz
Weight: 6.9 ounces (with battery loaded)
Size: 8” H x 2.25” W x 1.25” D
Battery: Lithium Ion rechargeable battery included
Contact Us
Need assistance or have questions?
Our Customer Service Support Center is here to help.
Call (914) 835-4484 to speak with a customer service
representative or email us at techsupport@universalremote.com
500 Mamaroneck Avenue, Harrison, NY 10528
Phone: (914) 835-4484 Fax: (914) 835-4532
www
.universalremote.com
Page 18

Page 15
MX-810 SETUP NOTES
Your Devices
List any component or device you’d like to control with your MX-810:
Type of Device (TV, DVD, VCR etc.) Brand Model
Page 19

Page 16
MX-810 SETUP NOTES
Your Activities
Describe the inputs you must set to watch or listen to TV, DVD, CD, Radio
etc. in your home entertainment system.
Activity (Watch TV, Watch DVD etc.) TV Input Audio Input
Page 20

500 Mamaroneck Avenue, Harrison, NY 10528
Phone: (914) 835-4484 Fax: (914) 835-4532
www.universalremote.com
COMP L ETE
™
UniversalRemoteControl
®
CONTROL
COMP L ETE
 Loading...