

Page 1
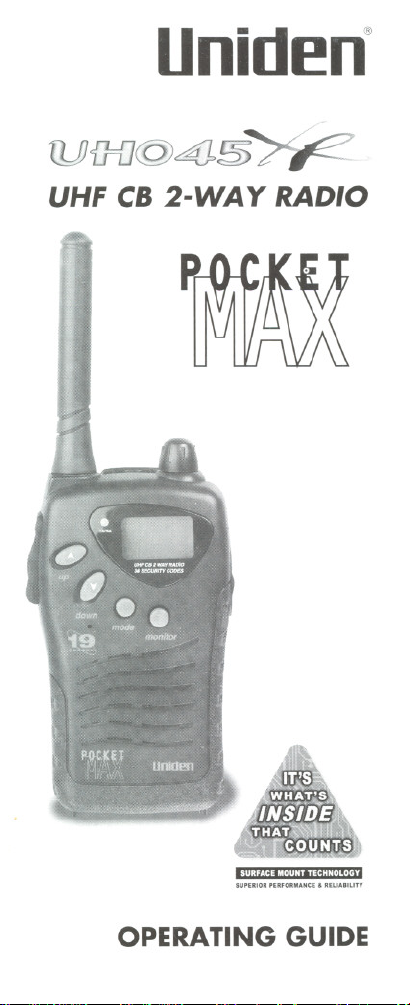
Unid~n.
tU{J=f](Q) c4iJ £»~
UHF CB 2-WAY RADIO
SURFACEMOUNTTECHNOLOGY
SUPERIOR PERFORMANCE' RELIABILITY
OPERATING GUIDE
Page 2
Please read carefully before
operating this radio.
Safety Information
. DO NOT operate the transmitter of any
radio equipment near electrical blasting
caps or in an explosive atmosphere.
. Have your radio equipment serviced by a
Uniden Service Agent.
Using Alkaline Batteries
. Do not charge the Alkaline batteries in this
equipment. Charging them will damage the
UH-O45XRand/or cause the battery to
explode.
Uniden@ is a registered trademark of Uniden
Corporation.
Features, Specifications and availability of
Optional Accessories are all subject to change
without notice.
THECITIZENSBAND RADIO
COMMUNICATION SERVICE(CBRS)IS UNDER
THEJURISDICTIONOF THEAUSTRALIAN
COMMUNICATION AUTHORITY(ACA).
ANY ADJUSTMENTOR ALTERATIONSWHICH
WILL CHANGE THE PERFORMANCEOF THE
UH-O45XRORIGINALACA TYPEACCEPTANCE
ISSTRICTLYPROHIBITED.
2
Page 3

CONTENTS
IMPORTANTSAFETYINFORMATION.. . . . .2
CONTENTS 3
INCLUDEDIN YOURPACKAGE. . . . . . . . .4
INTRODUCTION 5
FEATURES 5
CONTROLS& INDICATORS.. . . . . . . . . . .6
BATTERYINSTAllATION. . . . . . . . . . . . . .8
CHARGING THEUH045XRBATTERIES. . . .9
ANTENNA 9
BElTCLlP 10
OPERATION 10
SPECIAlFEATURES 12
OPTION SETTINGS 14
UHFCBCHANNELTABLE.. . . . . . . .. . .15
CTCSSCODEFREQ(Hz)TABLE.. . . . . . . .15
TROUBLESHOOTING 16
SPECIFICATIONS 17
WARRANTY 18
3
Page 4
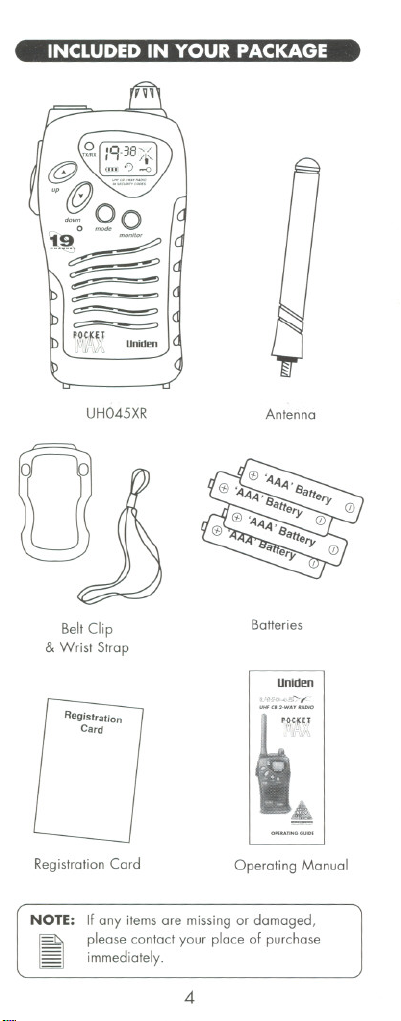
UHO45XR
0
0
Antenna
BeltClip
Batteries
& Wrist Strap
Unid~n
'.Jf"'<:>",,"~F
Registration
Card
Registration Card
"""""WAY""'"
Operating Manual
NOTE: If any items are missing or damaged,
~ please contact your place of purchase
~ immediately.
4
Page 5
INTRODUCTION
Congratulations on your purchase of the Uniden
UHO45XRPocket Max. This 19 Channel personal
2-Way Radio represents a great value in professional
portable communications. You will find that it provides
reliable, consistent performance for short distance
2-Way personal communications.
The UHO45XRseries are lightweight, palm sized
2-Way radios that can be used up to about 3km with
family or friends at sporting events, camping, hunting,
shopping malls or any other indoor or outdoor activity!
The UHO45XRoffers 19 UHF CB Channels, LCD
display, battery save mode, CTCSS (Continuous Tone
Coded Squelch System) private channel codes, acces-
sory connectors, battery recharge capability and more!
PleasE!r?ad this man\Jal thoroughly before operating
your radio to receive tne bestf=>erformoancepossible.
FEATURES
.19 Channels
. 400mW RFPower
. 38 CTCSS Code
. Speaker/Mic Jack
. Operates on rechargeable or standard AAA Batteries
.Backlit LCDDisplay
.Keypad Lock
NOTE:
Transmission range will vary depending on
terrain and environment. Range will be
greater in open areas, while reduced
[I
range will occur when operated within
around buildings or automobiles.
The use of the CTCSS feature when
transmitting should be limited to 3 seconds
only. This is an ACA requirement
(Australia only).
5
/
Page 6
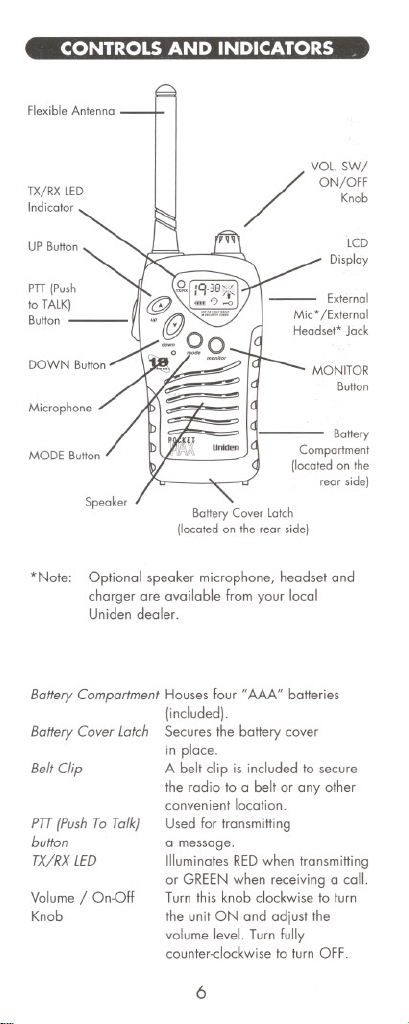
FlexibleAntenna
TX/RXLED
Indicator
UPButton
PTT(Push
to TALK)
Button
Microphone
MODE Button
Speaker
*Note:
Optional speaker microphone, headset and
charger are available from your local
Uniden dealer.
/
Battery Cover Latch
(located on the rear side)
VOl. SW!
ON/OFF
Knob
LCD
Display
MONITOR
Button
Battery
Compartment
(locatedon the
rear side)
Battery Compartment Houses four "AAA" batteries
BatteryCoverlatch Securesthe battery cover
lincluded).
BeltClip
PTT {Push To Talk}
button
TX/RXlED
Volume / On-Off
Knob
in place.
A belt clip is included to secure
the radio to a belt or any other
convenient location.
Used for transmitting
a message.
Illuminates RED when transmitting
or GREEN when receiving a call.
Turn this knob clockwise to turn
the unit ON and adjust the
volume level. Turn fully
counter-clockwise to turn OFF.
6
Page 7

MONITOR Button
MODE Button
UP(,£) and
DOWN (Y') Buttons
LCD PANEL DISPLAY
Channel
Number
..~. JO~/
,,-JU~k~
ID:!] 0 0
Allows you to listen in on a
channel for weak signals and
adjust the volume level.
Allows you to program channels,
privacy codes and other option
settings.
Used for changing channels,
privacy codes and option settings
during programming mode.
CTCSS Code
Transmit Symbol
Receive
Symbol
BatteryLevel!
Low Battery
Indicator
LCD Display
SpkMic/Headset
Connection Symbol
A multifunctional display which
shows channel, privacy codes,
and other radio status / icons.
NOTE: Optional speaker microphone, headset
~ microphone and charger are available
~ fromyour local Unidendealers.
7
Keylock
Symbol
Page 8

.. BATTERYINSTALLATION. . ..
1. Release the battery cover latch located on the rear
of the unit. (See Figure 1).
2. Liftup the battery cover from the battery
compartment.
3. Install four "AAA" type batteries following the
polarities shown in Figure 2.
4. Reinstallthe battery cover.
5. Lock the battery cover latch into position
(See Figure 3).
(Rear View)
\
.......
e eee
>- >- >- >-
'" '" '"
,ji ,ji
.. .. .. ..
......
(8 (8 (8 (8
(Figure 2)
,jiID
..
==i::(
(Figure 1)
Battery
Compartm
Cover
AAA Batte
Battery Cover
Latch
~I
NOTE:
* Alkaline batteries will give longer usage
than rechargeables.
* Conserve battery power by turning the
[I
unit off when not in use.
* On the UHO45XR, conserve the
batteries by turning ON the "Battery
Save" feature. (See "Option Settings"
later in this manual)
* Remove the batteries if the unit will not
be used for a number of days.
8
(Figure 3)
Page 9
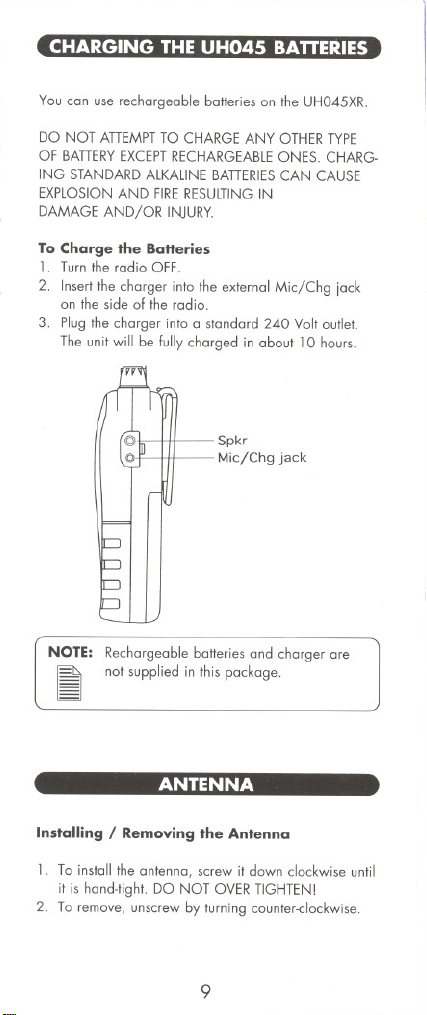
You can use rechargeable batteries on the UH045XR.
DO NOT ATTEMPT TO CHARGE ANY OTHER TYPE
OF BATTERYEXCEPT RECHARGEABLE ONES. CHARG-
ING STANDARD ALKALINE BATTERIES CAN CAUSE
EXPLOSION AND FIRE RESULTING IN
DAMAGE AND/OR INJURY.
To Charge the Batteries
1. Turn the radio OFF.
2. Insert the charger into the external Mic/Chg jack
on the side of the radio.
3. Plug the charger into a standard 240 Voltoutlet.
The unit will be fullycharged in about 10 hours.
Spkr
MicjChg jack
NOTE: Rechargeable batteries and charger are
11 not supplied in this package.
ANTENNA
Installing / Removing the Antenna
1. To install the antenna, screw itdown clockwise until
it is hand-tight. DO NOT OVERTIGHTEN!
2. To remove, unscrew by turning counter-clockwise.
9
Page 10

-, " 'BELT CLIP r, '-
Installing the belt clip:
1. Slide the belt clip into place in the belt clip slot as
shown in figure 4.
2. Ensure that the clip locks in place by listening
for a "click",
Removing the belt clip:
1. Pull the belt clip latch away from the unit as shown
in figure 5.
2. While pulling the latch, push up on the belt clip to
remove it from the radio.
Belt Clip latch
BeltClip
Belt Clip Slot
(Rear View)
(Figure4)
(Figure5)
OPERATION
Turning the unit ON I OFF
.Turn the Volume Knob clockwise. The unit will
"beep" and the display will appear.
.Turn the unit off by rotating the Volume knob
counter-clockwise until you hear a "click".
Adjusting the volume
.Press and hold the monitor button and adjust the
volume to desired level.
10
Page 11

OPERATION' . C. \~
Receiving a call
The unit is continuously in receive mode when the unit
is turned ON. When you receive a call, the TXjRXLED
will light up green and the Receive icon will be dis-
played.
Transmitting a call
1. Push and hold the PTTbutton to transmit. The LED
indicator will light up red and the TX icon will
appear on the LCDdisplay.
2. While pressing the PTTbutton, speak in a normal
voice about 2-3 inches away from the microphone.
3. Release the PTTbutton when you are finished
speaking and listen for a reply.
NOTE: In order for others to receive your message
they must be on the same channel that you
are using. See "Changing Channels"
I
for more information.
Changing Channels
The UHO45XRradio uses the first 19 channels of the
UHF CB Band.
To change channels;
1. Press and hold the MODE key until a beep is heard
and the channel number flashes on the display.
2. While the channel number is flashing,
.Press the UP (A.)key to increase the channel
number.
.Press the DOWN (T) key to decrease the
channel number.
3. Press the MODE key twice or the PTTbutton to
select the desired channel.
11
Page 12

... ,..,.' SPECIALFEATURES... .
Privacy codes (CTCSS)
The privacy code option allows you to hear only
specific users, effectively blocking out unwanted calls
from other users on the same channel you are using.
There are 38 CTCSS codes to choose from on each
channel. To set the code:
1. Press and hold the MODE key until the LCDchannel
number display flashes.
2. Press the MODE key again and the Code number
will begin to flash.
3. While it is flashing, press the UP (...) or
DOWN (T) key to change the code.
4. When the desired code is reached, press either the
PH switch or the MODE key to accept.
5. To turn the Privacy option OFF, select the code
number '0".
NOTE:
* When CTCSS is on, TX/RXLEDwill light
up orange when receiving a call.
* When the Privacy option is turned OFF,
[I
you will hear everyone that is
transmitting on the channel you are
currently using.
* The Privacy option is mainly used for
blocking unwanted calls over a crowed
channel. Other users can still hear you,
but you will not hear them unless they
have the same code number that you
have set.
Monitor
You can use the MONITOR feature to listen in for weak
signals on the current channel or for setting the speaker
volume.
. Press the MONITOR button for normal listening.
. Press and hold the MONITOR button for at least
three seconds for continuous monitoring.
12
Page 13

.'. .SPECIAL FEATURES. -' .',
Key Lock
This feature prevents accidental entries. Key Lock
temporarily disables the UP, DOWN and MODE keys
when turned ON.
. To turn Key LockON, press the MODE and
MONITOR keys at the same time until the Key Lock
Icon appears on the display.
. Repeat the above procedure to turn OFF.
NOTE: Only the PH and MONITOR buttons will
\I function during Key Lock mode.
Battery Level Indicator
. The LCDdisplays the relative battery power level
according to the number of squares inside the
battery symbol (3 squares = fullcharge).
.When the battery level is Iow, the icon will flash
indicating that the batteries need to be changed
or charged.
Sending Call Tones
You can use the call tones to alert other users or to
identify yourself, using two different tones. You can
also signal the beginning or ending of a transmission.
. Press and hold the PH button.
.While holding the PH, Press the UP (A) or DOWN
(T) keys. You can enter multiple Call Tones.
.Release the keys. Your call tones will be
transmitted.
13
Page 14

. - OPTION SEnlNGS
Time Out Timer (TOT)
,-",
.
--L'Lt
'-
This option limits the maximum transmission time (in
minutes) to conserve battery power. Factory default is
set to toO(disabled).
1. Turn off the radio.
2. Press and hold the MODE button while turning ON
the radio. The LCD will show "t-O".
3. Press the UP or DOWN keys to select the desired
limit (from 1 to 20 minutes).
Busy Channel Lockout (BCL)
. ,-.,
r-Lt,
-
. =-,-,
r-1- Lt
-
[b-oF ) boon
Thisoption prevents transmission while receiving a
message. Factory default is OFF.
1. Turn off the radio.
2. Press and hold the MODE button while turning
ON the radio.
3. Press the MODE button again until the display
reads "b-oF"
4. Press the UP or DOWN buttons to toggle between
ON (on) or OFF (oF).
Power Save
-
C
.
.
--01
, - p-on
This feature conserves the battery by "powering down"
the receiver momentarily when no message is being
received. This will NOT cause you to miss messages!
Factory default is OFF.
1. Turn the radio OFF.
2. Press and hold the MODE key while turning
ON the radio.
3. Press the MODE key until the display reads "P-oF".
4. Press the UP or DOWN buttons to toggle between
ON (on) or OFF (oF).
NOTE: To save the new settings simply switch off
I the radio.
14
Page 15

""""--'"
CH
1
FREQ(MHz)
476.425
2 476.450
CTCSSCHANNELS
38
38
3 476.475 38
4 476.500 38
5 476.525 38
6 476.550 38
7 476.575 38
8 476.600 38
9 476.625 38
10 476.650 38
11
12
476.675
476.700 38
38
13 476.725 38
14 476.750 38
15
4Z6.7Z5
38
16 476.800 38
17
476.825
38
18 476.850 38
19 476.875
38
CODE FREQ CODE FREQ
1
67.0
20 131.8
2 71.9 21 136.5
3 74.4
4
77.0 23 146.2
22
141.3
5 79.7 24 151.4
6 82.5 25 156.7
7
85.4
26 162.2
8 88.5 27 167.9
9 91.5 28 173.8
10
11
94.8
97.4 30 186.2
29 179.9
12 100 31 192.8
13 103.5 32 203.5
14
107.2 33 210.7
15 110.9 34 218.1
16
114.8
35 225.7
17 118.8 36 233.6
18 123.0 37
19
127.3 38 250.3
241.8
15
Page 16

TROUBLESHOOTING
PROBLEM SOLUTION
Doesnot . Check batteries.Ensurethat the
turn on
batteriesare installedproperly.
.Thebatteries may be weak.
Replaceold batteries
with four new 11AAA" batteries.
Reception
isweak clockwiseto increasevolume.
Cannotchange .To change channels, press and
channels
Cannot hear
other callers
on a channel
Range
is limited
.TurnVOL SW/ON-OFFknob
. The receiving signal may be
weak and out of range.
If this happens pressthe
MONITOR key.
hold the MODE key first until the
Channeldigit flashes on the LCD
panel.
Thenpressthe UPor DOWN
keysto change channels.
.TheCTCSScode featurecould
be active. Toturn off the crcss,
setthe CTCSScode tozero (0).
.Batteries may be weak. Replace
with new batteries if the battery
levelindicator is Iow.
.The maximum range will vary
depending on terrain and
environment.Open fields provide
the maximumrange, while
buildings and structuresmay limit
the range significantly.Try
movingto a different location.
Sound
distortion
problems
.If you are transmitting, speak in a
normal tone of voice, 2 to 3
inchesaway from the
microphone.
.If you are receiving, adjust the
volume to a comfortable level.
16
Page 17

SPECIFICATIONS
GENERAL
FrequencyControl
FrequencyRange
Numberof Channels
ChannelSpacing
OperatingTemperature
PowerSource
Size(Hx Dx W! in mm
(withoutAntenna)
Weight [with Batteries)
Speaker(impedanceand rating)
Microphone
Approval
TRANSMITTER
FrequencyToleranceat 25C
FrequencyStability
CarrierPower
~puriousEmission
ModulationFrequencyResponse
(1 kHz ref.)
500 Hz
2000 Hz
MicrophoneSensitivity
(@:t3 kHz Deviation)
Signalto NoiseRatio
MaximumDeviation
CurrentDrain(6V)
BatteryLife(5,5,90 DutyCycle)
on AlkalineBatteries
RECEIVER
Sensitivity@ 12 dBSINAD
Squelch(MonitorlSensitivity
Audio FrequencyResponse
AdjacentChannelSelectivity(:t 25 kHz)
ImageRejection(Ist and 2nd IF)
Humand Noise
THDat StandardPowerOutput
Audio Output Powerat 10%THD
MaximumAudio PowerOutput
Stand-ByCurrentDrain (PowerSaveOFF)
Stand-ByCurrentDrain (PowerSaveON)
CurrentDrainatMaximumAudio
PhaseLockedLoop(PLL)
476.425MHzto
476.875MHz
19
25kHz
0Cto55C
6V
103Hx 33 Dx53W
165g(withBattery)
8ohm
Built-inElectrettype
AS/NIS4365
:t 500 Hz (nominal)
:t 2.5PPM
0.4 Watt
-30 dBm
-5- -9dB
3- 7dB
10mV
40dB
:t5 kHz
280mA
24hours
0.25uV(nominal)
0.17uV(nominal)
:t6 dB500to2000Hz
65dB
60dB
40dB
3.5%
200mW
280mW
25mA
15mA
170mA
CHARGER(OPTIONAL)
ACAdaptor
Input
Output
ApprovalNumber
* Specifications,featuresandavailabilityofoptionalaccessoriesare
allsubjecttochangewithoutpriornotice.
230
-240VAC,50Hz
6VDC,70mA
V257
17
Page 18

. WARRANTY
One-Year limited Warranty
Important:Evidence of original purchase is required for
warranty service.
WARRANTOR: Uniden Australia Pty limited
ACN 001 865498
Uniden New Zealand limited
ELEMENTSOF WARRANTY: Uniden warrants to the
original retail owner for the duration of this warranty
its UH045XR (hereinafter referred to as the Product), to
be free from defects in materials and craftsmanship
with only the limitations or exclusions set out below.
WARRANTY DURATION: This warranty to the
original retail owner only, shall terminate and be of no
further effect 12 months after the date of original retail
sale. This warranty will be deemed invalid if the
product is: (A) Damaged or not maintained as
reasonable and necessary, (B)Modified, altered or
used as part of any conversion kits, subassemblies, or
any configurations not sold by Uniden, (C) Improperly
installed, (D)Repaired by someone other than an
authorised Uniden Repair Agent for a defect or
malfunction covered by this warranty, (E)Used in con-
junction with any equipment or parts or as a part of a
system not manufactured by Uniden.
PARTS COVERED: This warranty covers for one (1)
year, the UH045XR radio. All accessories (antenna,
belt clip and wrist strap), are covered for 90 days
only.
STATEMENTOF REMEDY: Inthe event that the
product does not conform to this warranty at any time
while this warranty is in effect, the warrantor, at its
discretion, will repair the defect or replace the product
and return it to you without charge for parts and
service.
THISWARRANTYDOES NOT COVEROR PROVIDE
FORTHEREIMBURSEMENTOR PAYMENTOF
INCIDENTALOR CONSEQUENTIALDAMAGES.
THISGUARANTEEISIN ADDITIONTO AND DOES
NOT IN ANY WAY AFFECTYOUR RIGHTSUNDER
THECONSUMERGUARANTEEACT.
18
Page 19

WARRANTY
WARRANTY CARD: If a Warranty Card has been
included with this Product, please complete and return
to us within 14 days of purchase. Your name and the
serial number of the Product will then be registered in
our database and this will help us process your claim
with greater speed and efficiency should you require
warranty service.
PROCEDURE FOR OBTAINING PERFORMANCE
OF WARRANTY: In the event that the product does
not conform to this warranty, the Product should be
shipped or delivered, freight pre-paid, with evidence of
original purchase (e.g. a copy of the sales docket) to
the warrantor at:
UNIDEN AUSTRALIAPTYLIMITED
SERVICEDIVISION
345 PrincesHighway, Rockdale,
Ph: (02) 9599 3577 Fax: (02) 9599 3278
FREECALL 1800632 789
Customersin other Statesshould ship or deliver the
Productfreight pre-paid to their nearestUniden
Authorised RepairCentre.(Contact Unidenfor the
nearestWarranty Agent to you)
UNIDEN NEW ZEALANDLIMITED
SERVICE DEPARTMENT
150 Harris Road, East Tamaki, Auckland
Ph: 0-9-273 8383 Fax: 0-9-2740009
Toll Free: 0800 4 U N I DEN
4864336
NSW2261
Customers in other areas should ship or deliver the
Product freight pre-paid to their nearest Uniden
Authorised Repair Centre. (Contact Uniden for the
nearest Warranty Agent to you)
19
Page 20

Unid~n.
CommunicationWithVision
UNIDEN"1999UnidenAnstralia Ply Lilnited 01999Uniden NewZealandLilnited
All Rights Reserved.
 Loading...