

Page 1
Uniden
UHF CB 2-WAY RADIO
INSIPEi
lUPERIOR PEKFWHUItE i RIEUPIIITT
OPERATING GUIDE
Page 2

IMPORTANT SAFETY INFORMATION
Please read carefully before
operating this radio.
Safety Information
• DO NOT operate the transmitter ol any
radio equipment near electrical blasting
caps or in an explosive atmosphere.
• Have your radio equipment serviced by a
Uniden Service Agent.
Using Alkaline Batteries
• Do not charge the Alkaline botteries in this
equipment. Charging them will damage the
UH-045)CR and/or cause the battery to
explode,
Uniden® is a registered trademark of Uniden
Corporation,
Features, Specifications and availability of
Optional Accessories are all subject to change
without notice.
THE CITIZENS BAND RADIO
COMMUNICATION SERVICE (CBRS) IS UNDER
THE JURISDICTION OF THE AUSTRALIAN
COMMUNICATION AUTHORITY (АСА).
ANY ADJUSTMENT OR ALTERATIONS WHICH
WILL CHANGE THE PERFORMANCE OF THE
UH-045XR ORIGINAL АСА TYPE ACCEPTANCE
IS STRICTLY PROHIBITED,
Page 3

CONTENTS
IMPORTANT SAFETY INFORMATION...................2
CONTENTS .............................................................3
INCLUDED IN YOUR PACKAGE
INTRODUCTION
FEATURES...............................................................5
CONTROLS & INDICATORS...................................6
BAHERY INSTALLATION
CHARGING THE UH045XR BATTERIES ... .9
ANTENNA.................................................................9
BELT CLIP .............................................................10
OPERATION ...........................................................10
.....................................................
...........................
.......................................
SPECIAL FEATURES.................................12
OPTION SEHINGS .................................................14
UHFCB CHANNEL TABLE
CTCSS CODE FREQ|Hz) TABLE..........................15
TROUBLESHOOTING ............................................16
SPECIFICATIONS..................................................17
....................................
15
4
5
8
WARRANTY
...........................................................
18
Page 4
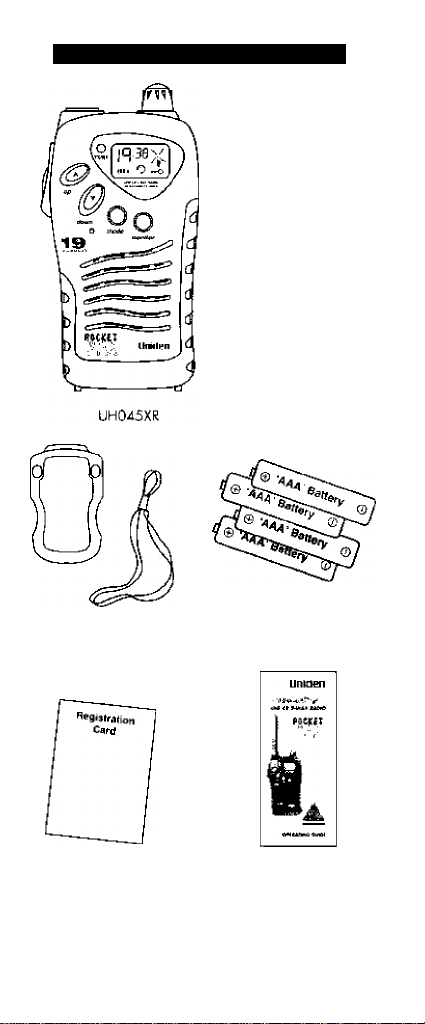
INCLUDED IN YOUR PACKAGE
Antenna
Belt clip
& Wrist Strap
RegiatroMon Card
NOTE: If any items are missing or damoged,
please contact your piece oF purchase
immediately.
Botter ¡e
Operating Manual
■
Page 5

INTRODUCTION
Corgfotulotions on your purcha$e of the Uniden
UHO^SXR Pockeh Max. Thi$ 19 Channel personal
2-Way Radio repre$ents a great value in professional
portable communicaKons. You will Find that it provides
reliable, consistent perFormonce For short distance
2’Way personal communications,
The UH045XR series are lightweight, palm sized
2-Woy radios that can be used up to about 3km with
Fornily or Friends at sporting events, camping, hunting,
shopping mafls or any other indoor or outdoor activity]
The UH045XR ofFers 19 UHF CB Channels, LCD
display, battery save mode, CTCSS (Continuous Tone
Coded Squelch System) private channel codes, occeasory connectors, battery rechorge capability and morel
Please read this manuol thoroughly before operoling
your radio to receive the best performance possible.
FEATURES
19 Channels
400mW RF Power
38 CTCSS Code
Speaker/Mic Jack
Operates on rechargeable
Backlit LCD Display
Keypad Lock
or standard AAA Batteries
Transmission range will vary depending on
terrain and environment. Range will be
greater in open areas, while reduced
range will occur when operated within /
around buildings or automobiles.
The use of the CTCSS feature when
transmitting should be limited to 3 seconds
only. This is on АСА requirement
(Auatrolia only}.
Page 6
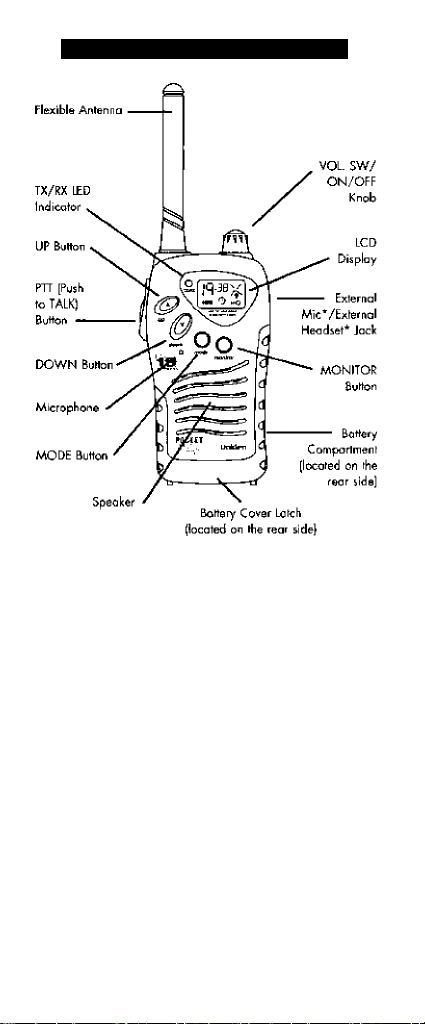
CONTROLS AND INDICATORS
*Note: Optional speaker microphone^ heodset and
charger are available from your local
Uniden dealer.
Battefy Compartment Houses four "AAA" batteries
(included).
Satfery Cover Latch Secures the bo Негу cover
in place.
Belt Clip A belt clip is included to secure
the radio to о belt or any other
convenient location.
PIT (Pitsh To Talk) Used for transmitting
button о message,
JX/RX LED Illuminates RED when transmitting
Of GREEN when receiving a coll.
Volume / On-Off Turn this knob clockwise to turn
Knob the unit ON and adjust the
volume level. Turn fully
counter-clockwise to turn OFF.
Page 7

CONTROLS AND INDICATORS
MONITOR Button
MODE Button
UP ¡A} and
DOWN (T) Buttons
LCD PANEL DISPLAY
Bottery Level/
Low Battery
I nd ¡color
LCD Display A multifurtctional display which
Allows you to listen in on o
channel for weak signals and
adjust the volume level.
Allows you to program channels,
privacy codes ond other option
settings.
Used for changing channels,
privacy codes and option settings
during programming mode.
CTCSS Code
Spk Mtc/Heodset
Connection Symbol
shows chonnelf privacy codes,
and other radio status / icons.
Transmit Symbol
Keylock
Symbol
NOTEj Optional speaker microphoner headset
microphone and charger are available
from your local Uniden dealers.
■
Page 8

BATTERY INSTALLATION
Release ihe battery cover latch located on the rear
of the unit. (See Figure 1].
Lift up the battery cover from the battery
comporlmenl.
Install four "AAA" type batteries Following the
polarities shown in Figure 2.
Reinstall the battery cover,
Lock the battery cover lotch into position
[See Figure 3),
1«
□
a
a
3
(Figure 3)
NOTE: * Alkaline batteries will give longer usage
tharr rechargeables,
* Conserve battery power by turning the
unit off when not in use.
■
* On the UH04SXR , conserve the
botteries by turning ON the '"’Battery
Save" feature. (See '"’Option Settings'"
later in this manual]
* Remove the botteries if the unit will not
be used for a number of days.
Page 9

CHARGING THE UH045 BATTERIES
You con use rediorgeoble batteries on ihe UHO^SXR.
DO NOT AHEMPT TO CHARGE ANY OTHER TYPE
OF BAHERY EXCEPT RECHARGEABLE ONES. CHARG
ING STANDARD ALKALINE BAHERIES CAN CAUSE
EXPLOSION AND FIRE RESULTING IN
DAMAGE AND/OR INJURY,
To Charge the Batteries
1. Turn the radio OFF.
2. Insert the charger into the external Mic/Chg jack
on the side oi ihe radio.
3. Plug the charger into a stendord 2AO Volt outlet.
The unit will be fully charged in about 10 hours.
-- Spkr
■ Mic/Chg Jack
NOTE; Rechargeable batteries ond charger (
1=^ nor supplied In this package.
ANTENNA
In^tcxlling / Removing the Antenna
K To insrall the aritenno^ screw i1 down clockwise until
it is hond-light. DO NOT OVER TJGHTENI
2. To remove, unscrew by turning counter-clockwise
Page 10

BELT CLIP
Installing the belt clip:
1. Slide ihe belt clip into place in the belt c\\p slot as
shown In figure 4,
2. Ensure that the dip locks in place by listening
for o ''dick".
Removing the belt clip:
1. Pull the belt dip lotcK away from the unit as shown
in figure 5,
2. While pulling the latch, push up on the belt dip to
remove it from the radio.
OPERATION
Turning the unit ON / OFF
* Turn the Volume Knob clockwise. The unit will
"beep" and the display will oppear
* Turn the unit off by rotating the Volume knob
counterclockwise until you hear a "click".
Adjusting the volume
* Press ond hold the monitor button and adjust the
volume to desired level.
10
Page 11

OPERATION
Receiving a call
The unit is continuously in receive mode when the unit
is turned ON When you receive о call ihe TX/RX LED
will light up green ond the Receive icon will be disployed,
Transmitting a call
1, Push and hold the PTT button to transmit. The LED
indicator wifi light up red ond the TX icon will
oppeor on the LCD disploy.
2- While pressing the PTT button^ speak in о normal
voice obout 2-3 inches away from the microphone.
3. Release the PTT button when you are finished
speaking and listen for о reply,
NOTE! In order for others to receive your messoge
they must be on the same chonnel that you
□re using. See "Changing Channels"
for more informotion.
■
Changing Channels
The UH045XR rodio uses the first 19 channels of the
UHF CB Band.
To change channels;
1. Press and hold the MODE key until a beep is heard
and the channel number flashes on the dispby.
2. While the channel number is floshing,
• Press the UP [▲) key to increase the channel
number.
* Press the DOWN (T) key to decrease ihe
chonnel number.
3. press the MODE key twice or the PTT button to
select the desired channel,
Page 12

SPECIAL FEATURES
Privacy codes (CTCSS)
The privocy code ophon allows you to heor only
specific usersj effectively blocking out unwanted colls
from other users on the some chorrnel you are using,
There are 38 CTCSS codes to choose from on eoch
channel, To set the code:
1, Press and hold the MODE key until the LCD channel
number display flashes,
2, Press the MODE key again and the Code number
will begin to flosh,
3, While it is Flashing, press the UP [A] or
DOWN (▼) key to change the code,
4, When the desired code is reached, press either the
PTT switch or the MODE key to accept
5, To turn the Privacy option OFF, select the code
number '0'^.
NOTE: * When CTCSS is on, TX/RX LED will light
up oronge when receiving o call,
* When the Privocy option is turned OFF,
■
you will hear everyone that is
tronsmitting on the channel you ore
currently using.
• * The Privacy option is mainly used for
blocking unwonted colls over o crowed
chamet. Other users can still hear you,
but you will not hear them unless they
have the some code number rfiot you
have set.
Monitor
You con use the MONITOR feature to listen in for weak
signals on the current channel or for setting the speaker
volume.
• Press the MONITOR button for normol listening.
• Press and hold the MONITOR button for ot least
three seconds for continuous monitoring.
12
Page 13

SPECIAL FEATURES
Key Lock
This feature prevenhs accidental entries, Key Lock
iempororily disables the UP, DOWN and MODE keys
when turned ON,
• To turn Key Lock ON^ press ihe MODE and
MONITOR keys q\ the same time until ihe Key lock
Icon appears on the display,
• Repeat the above procedure to turn OFF,
NOTE: Only the PTT and MONITOR buttons will
=L function during Key Lock mode.
Battery Level Irtdkator
• The LCD displays the relative battery power level
according to the number of squores inside the
boltery symbol (3 squares = fuH charge},
• When the battery level is low, the icon will Flash
indicating that the batteries need lo be changed
or chorged.
Sending Call Tones
You can use the call tones ta alert other users or to
identify yourselb using two different tones. You can
also signal the beginning or ending of o transmission,
• Press and hold the PTT button.
• While holding the PTT, Press the UP [A] or DOWN
(▼) keys. You can enter multiple Call Tones,
• Releose the keys. Your call tones will be
transmitted.
13
Page 14

OPTION SETTINGS
Time Out Timer (TOT)
on ’
--UU
n
s
_
This option limits the moKimum tronsmission time (in
minutes) to conserve battery power. Factory default is
set to t-0 (disabled).
1, Turn off the radio,
2, Press and hold the MODE button while turning ON
the radio. The LCD v/lll show "t-O“.
3, Press the UP or DOWN keys to select the desired
limit (From 1 to 20 minutes).
Busy Channel Lockout (BCL)
This option prevents transmission while receiving □
messoge. Foctory default is OFF,
1. Turn off the radio,
2. Press and hold the MODE button while turning
ON the radio,
3. Press the MODE button agoin until the display
reads ''b-oF"
4. Press the UP or DOWN buttons to toggle between
ON (on) or OFF (oF),
Power Save
J
fp-oF ' p-on ’
^
_________
This feature conserves the battery by '^powering down"
the receiver momentorily when no message is being
received. This will NOT cause you to miss messagesi
Factory default is OFF.
1, Turn the radio OFF.
2, Press and hold the MODE key while turning
ON the radio,
3, Press the MODE key until the display reads "P-oF".
4, Press the UP or DOWN buttons to toggle between
ON (on) or OFF (oF),
NOTE; To sa've the new settings simply switch off
->
the radio.
1 .
14
Page 15

FREQUENCY CHANNEL TABLE
CH FREQ (MHz) CTCSS CHANNELS
1
2 476.450 38
3 476.475 38
4 476.500 38
5 476.525 38
6 476.550 38
7 476.575 38
8 476.600 38
9
10
11 476.675
12 476.700 38
13 476.725 38
14 476,750 38
15 476,775 38
16 476,800 38
17 476,825 38
IS 476,850 38
19
CODE FREQ CODE FREQ
1
2 71.9 21 136.5
3 74.4 22 141.3
4 77.0 23 146.2
5 79,7 24 151.4
6 82,5 25 156,7
7 85.4
8 88.5 27 167.9
9 91.5 28 173.8
10 94.8
1 1 97.4
12 100 31 192.8
13 103.5 32 203.5
14 107.2 33 210.7
15 110.9 34 218.1
16 114,8 35 225.7
17
18 123.0 37 241 8
19 127.3 38 250.3
476.425 38
476.625 38
476.650 38
38
476,875 38
CTCSS CODE FREQ(Hz) TABLE
67,0 20 131.8
26 162.2
29
30
1 18.8 36 233.6
179 9
186.2
15
Page 16

TROUBLESHOOTING
PROBLfM SOLUTION
Does noi
^urn on
Reception
is week
Cannot change
channels
Cannot hear
other callers
on a channel
Range
is limited
• Check batteries.Ensure that the
batteries are installed properly.
♦ The batteries may be weolc.
Replace old batteries
with four new "AAA" batteries.
• Turn VOL SW/ONOFF knob
clockwise to increase volume.
* The receiving signal may be
weak and out of range,
If this happens press the
MONITOR key.
• To change channels, press and
hold the MODE key first until the
Channel digit Flashes on the LCD
panel.
Then press the UP or DOWN
keys to chonge channels,
♦ The CTCSS code feoture could
be active, To turn off the CTCSS,
set the CTCSS code to zero (0),
• Batteries may be weak, Replace
with new batteries if the battery
level indicotor is low.
• The moicimurn ronge will vary
depending on terrain and
environment. Open fields provide
the moximum ronge, while
buildings and structures may limit
the range significantly, Try
moving to a different location.
Sound
distortion
problems
♦ If you are transmitting, speak in a
normol tone of voice, 2 to 3
inches away from the
microphone.
• lF you are receiving, adjust the
volume to a comfortable level.
16
Page 17

SPECtFICATIONS
GENERAL
frequency Control
frequency Range 476.425MHz to
Number of Channels
Channel Spacing 25 kHz
Operating Temperature 0 C to 55 C
Power Source 6V
Size fH *. D ,* WJ in mrn
(without Afitenno]
Weight (with Batteries] 165g [witli Battery]
Speaker jimpedonce and rating]
Microphone Buih-in Eloctret type
Approval AS/MZS4365
TRANSMITTER
Frequency Tolerance at 25C ± 500 Hz (nominal]
Frequency Stability ± 2.5PPM
Carrier Power
Spurious Emisskin -30 dBm
Modulation Frequency Response
|1 kHz ref.)
500 Hz -5 - -9 dB
2000 Hz
Microphone Sensitivity
[@ ±3 kHz Deviafionl
Signal to Noise liatio 40 dB
Moxirnum Deviolion
Current Drain [ ÓV) 280 mA
Battery Life Duty Cycle)
on Alkoline Botteries
RECEIVER
Sensitivity @ 12 dB SINAD 0.25 uV (nominal]
Squelch (Monitor) Sensitivity
Audio Frequency Response
Adjacent Channel Selectivity |± 25 kHz[ 65 dB
Image Rejection ( 1 st and 2nd IF| 60 dB
Hum and Noise
THD at Standard Power Output 3.5%
Audio Output Power at 10% THD 200 rrtW
Moximum Audio Power Output 230 mW
Stand-By Current Drain [Power Save OFF] 25 mA
Stand-By Current Drain [Power Save ON)
Current Drain of Maximum Audio 170 mA
CHARGER (OPTIONAL)
AC Adopter
Input 230 - 240V AC, 50Hz
Output
Approval Number
Phase Locked Loop |PLL|
476.875MHz
19
103Hx33D^53W
8 ohm
0.4 Watt
3-7dB
10 mV
i 5tHz
24 hours
0.17 oV (nominol]
± 6 dB 500 to 2000 Hz
40 dB
15 mA
6V DC, 70 mA
V257
* SpecificoNons, features and availabifily of optionol ocoe^sories are
all subject to chonge without prior notice,
17
Page 18

WARRANTY
One-Year Liinited Warranty
Important;Evidence oi onginol purchase is required for
•warranty service,
WARRANTOR: Uniden Australia Pty Limited
ELEMENTS OF WARRANTY; Uniden warrants to the
original retail oi^vner for the duration of this warranty
its UH045XR [hereinafter referred to as the Product), to
be Free from defects in maleriols and craftsmanship
with oni'y the linnitations or exclusions set out betcw.
WARRANTY DURATION; This warranty to the
original retoil o'wner only, shall terminate and be of no
further effect 12 months after the date of original retail
sale. This •warranty will be deemed invalid if the
product is: (A) Damaged or nol maintained as
reasonable and necessary, (B) Modified, altered or
used as part of any conversion kits, subassemblies, or
any configurations not sold by Uniden, (C) Improperly
installed, (D} Repaired by someone other than an
authorised Uniden Repair Agent for o defect or
malfunction covered by this warranty, jE) Used in con
junction with any equipment or ports or as a part of □
system not manufactured by Uniden.
PARTS COVERED; This warranty covers for one \ 1 \
year, the UH045XR radio, A|f accessories {antenna,
belt clip ond wrist strap), are covered for 90 days
only,
STATEMENT OF REMEDY; In the event that the
product does not coniorm to this warranty at any time
while this warranty is in eiiect, the warrantor^ at its
discretion, will repair the delect or replace the product
ofid return it to you without charge For ports and
service.
ACN 001 865 498
Uniden New Zedond Limited
THIS WARRANTY DOES NOT COVER OR PROVIDE
FOR THE REIMBURSEMENT OR PAYMENT OF
INCIDENTAL OR CONSEQUENTIAL DAMAGES.
THIS GUARANTEE IS IN ADDITION TO AND DOES
NOT IN ANY WAY AEFECT YOUR RIGHTS UNDER
THE CONSUMER GUARANTEE ACT.
18
Page 19

WARRANTY
WARRANTY CARD: If a Warronly Card has been
mcluded wiih this ProducL please complete and rebrn
to U5 within M days of purchase. Your name and the
serial number of the Product will then be registered in
our dotobose and this will help us process your claim
with greeter speed and efficiency should you require
worronty service,
PROCEDURE FOR OBTAINING PERFORMANCE
OF WARRANTY; In the event that the product does
not conform to this warranty, the Product should be
shipped or delivered, freight pre-paid, with evidence of
originol purchase (e.g. a copy of the sales docket) to
the warrontor ot:
UNIDEN AUSTRALIA PTY LIMITED
SERVICE DIVISION
345 Princes Highway, Rockdale, NSW 2261
Ph: (02) 9599 3577 Fa^i: (02) 9599 3278
FREE CALL 1800 632 789
Customers in other Stotes should ship or deliver the
Product freight pre-poid to their nearest Uniden
Authorised Repair Centre.fContact Uniden for the
nearest Warronty Agent to you)
UNIDEN NEW ZEALAND LIMITED
SERVICE DEPARTMENT
150 Harris Road, East Tamaki, Auckland
Ph: 0-9-273 8383 Fox: 0-9^274 0009
Toll Free: 0800 4 U N I D E N
4964336
Customers in other areas should ship or deliver the
Product Freight pre-paid to their nearest Uniden
Authorised Repair Centre. [Contact Uniden for the
nearest Warranty Agent to you)
19
Page 20

Uniden
Communication With Vision
llfflDBi ^IWlmdHiAifclrilHPri'UtTilted ''19991'Jiklm SoiZealnid liiitilC'il
All W(ljns RcservwL
 Loading...