

Page 1
FP-100, FP-235 and FP-235AC/DC
Arc Welding System
Instruction Manual
FORM NO. 0056-1841 EFFECTIVE July 2001
Safety and Operating
Instructions
For Your Safety . . .
PLEASE READ
CAREFULLY!
Page 2

Page 3

Table of Contents
page
Introduction . . . . . . . . . . . . . . . . . . . . . . . . . . . . . . . . . . . . . . . . . . . . . . . . . . . . . . . . . . . . . . . . . . . . . . . . . . .1
Safety Profile . . . . . . . . . . . . . . . . . . . . . . . . . . . . . . . . . . . . . . . . . . . . . . . . . . . . . . . . . . . . . . . . . . . . . . . . . .1
Safety Information . . . . . . . . . . . . . . . . . . . . . . . . . . . . . . . . . . . . . . . . . . . . . . . . . . . . . . . . . . . . . . . . . . . . . .1
Safety Symbols . . . . . . . . . . . . . . . . . . . . . . . . . . . . . . . . . . . . . . . . . . . . . . . . . . . . . . . . . . . . . . . . . . . . . . . .1
General Welding Safety Instructions . . . . . . . . . . . . . . . . . . . . . . . . . . . . . . . . . . . . . . . . . . . . . . . . . . . . . . . .3
Location . . . . . . . . . . . . . . . . . . . . . . . . . . . . . . . . . . . . . . . . . . . . . . . . . . . . . . . . . . . . . . . . . . . . . . . . . . .3
Personal Protection . . . . . . . . . . . . . . . . . . . . . . . . . . . . . . . . . . . . . . . . . . . . . . . . . . . . . . . . . . . . . . . . . .3
Safety Instructions . . . . . . . . . . . . . . . . . . . . . . . . . . . . . . . . . . . . . . . . . . . . . . . . . . . . . . . . . . . . . . . . . . .3
Fire Prevention . . . . . . . . . . . . . . . . . . . . . . . . . . . . . . . . . . . . . . . . . . . . . . . . . . . . . . . . . . . . . . . . . . . . . .3
Ventilation . . . . . . . . . . . . . . . . . . . . . . . . . . . . . . . . . . . . . . . . . . . . . . . . . . . . . . . . . . . . . . . . . . . . . . . . .4
Electromagnetic Compatibility . . . . . . . . . . . . . . . . . . . . . . . . . . . . . . . . . . . . . . . . . . . . . . . . . . . . . . . . . .4
Health Hazards . . . . . . . . . . . . . . . . . . . . . . . . . . . . . . . . . . . . . . . . . . . . . . . . . . . . . . . . . . . . . . . . . . . . . .4
Electric Shock . . . . . . . . . . . . . . . . . . . . . . . . . . . . . . . . . . . . . . . . . . . . . . . . . . . . . . . . . . . . . . . . . . . . . .4
Welder Specifications . . . . . . . . . . . . . . . . . . . . . . . . . . . . . . . . . . . . . . . . . . . . . . . . . . . . . . . . . . . . . . . . . . .5
Welder Operating Characteristics . . . . . . . . . . . . . . . . . . . . . . . . . . . . . . . . . . . . . . . . . . . . . . . . . . . . . . . . . . .5
Internal Thermal Overload Protection (FP-100 ONLY) . . . . . . . . . . . . . . . . . . . . . . . . . . . . . . . . . . . . . . . . . .5
Specifications for FP-100 Arc(SMAW) Welding System (1443-0402) . . . . . . . . . . . . . . . . . . . . . . . . . . . .6
Specifications for FP-235 Arc(SMAW) Welding System (1443-0404) . . . . . . . . . . . . . . . . . . . . . . . . . . . .6
Specifications for FP-235 AC/DC Arc(SMAW) Welding System (1443-0406) . . . . . . . . . . . . . . . . . . . . . .6
Welder Installation . . . . . . . . . . . . . . . . . . . . . . . . . . . . . . . . . . . . . . . . . . . . . . . . . . . . . . . . . . . . . . . . . . . . . .7
Power Source Connection . . . . . . . . . . . . . . . . . . . . . . . . . . . . . . . . . . . . . . . . . . . . . . . . . . . . . . . . . . . . .7
Power Requirements . . . . . . . . . . . . . . . . . . . . . . . . . . . . . . . . . . . . . . . . . . . . . . . . . . . . . . . . . . . . . . .7
Connection to Power Source . . . . . . . . . . . . . . . . . . . . . . . . . . . . . . . . . . . . . . . . . . . . . . . . . . . . . . . . .7
Extension Cords (applies to FP-100 ONLY) . . . . . . . . . . . . . . . . . . . . . . . . . . . . . . . . . . . . . . . . . . . . .7
Welder Assembly . . . . . . . . . . . . . . . . . . . . . . . . . . . . . . . . . . . . . . . . . . . . . . . . . . . . . . . . . . . . . . . . . . . . . . .7
ARC Welding . . . . . . . . . . . . . . . . . . . . . . . . . . . . . . . . . . . . . . . . . . . . . . . . . . . . . . . . . . . . . . . . . . . . . . . . .8
Machine Operation . . . . . . . . . . . . . . . . . . . . . . . . . . . . . . . . . . . . . . . . . . . . . . . . . . . . . . . . . . . . . . . . . . . . .9
AC Output Connections (FP-235 and FP-235 AC/DC) . . . . . . . . . . . . . . . . . . . . . . . . . . . . . . . . . . . . . . . .9
DC Output Operations (FP-235 AC/DC) . . . . . . . . . . . . . . . . . . . . . . . . . . . . . . . . . . . . . . . . . . . . . . . . . .9
Selecting AC or DC Welding Output . . . . . . . . . . . . . . . . . . . . . . . . . . . . . . . . . . . . . . . . . . . . . . . . . . . . . . . .9
AC Current Welding . . . . . . . . . . . . . . . . . . . . . . . . . . . . . . . . . . . . . . . . . . . . . . . . . . . . . . . . . . . . . . . . . . . .9
Direct Current Welding . . . . . . . . . . . . . . . . . . . . . . . . . . . . . . . . . . . . . . . . . . . . . . . . . . . . . . . . . . . . . . . . .10
Adjusting Amperage/Increasing Amperage . . . . . . . . . . . . . . . . . . . . . . . . . . . . . . . . . . . . . . . . . . . . . . . . . . .10
Lowering the Amperage . . . . . . . . . . . . . . . . . . . . . . . . . . . . . . . . . . . . . . . . . . . . . . . . . . . . . . . . . . . . . .10
Preparations for Welding . . . . . . . . . . . . . . . . . . . . . . . . . . . . . . . . . . . . . . . . . . . . . . . . . . . . . . . . . . . . . . . .10
Welding Positions . . . . . . . . . . . . . . . . . . . . . . . . . . . . . . . . . . . . . . . . . . . . . . . . . . . . . . . . . . . . . . . . . . . . .11
Preparing the Joint . . . . . . . . . . . . . . . . . . . . . . . . . . . . . . . . . . . . . . . . . . . . . . . . . . . . . . . . . . . . . . . . . . . . .11
Ground Clamp Connection . . . . . . . . . . . . . . . . . . . . . . . . . . . . . . . . . . . . . . . . . . . . . . . . . . . . . . . . . . . . . . .12
Selecting the Electrode . . . . . . . . . . . . . . . . . . . . . . . . . . . . . . . . . . . . . . . . . . . . . . . . . . . . . . . . . . . . . . . . . .12
High vs. Low Voltage Electrodes . . . . . . . . . . . . . . . . . . . . . . . . . . . . . . . . . . . . . . . . . . . . . . . . . . . . . . .12
Selecting the Proper Amperage . . . . . . . . . . . . . . . . . . . . . . . . . . . . . . . . . . . . . . . . . . . . . . . . . . . . . . . . . . .13
Welding Parameters . . . . . . . . . . . . . . . . . . . . . . . . . . . . . . . . . . . . . . . . . . . . . . . . . . . . . . . . . . . . . . . . . . . .13
AC Welding . . . . . . . . . . . . . . . . . . . . . . . . . . . . . . . . . . . . . . . . . . . . . . . . . . . . . . . . . . . . . . . . . . . . . . .13
DC Straight Polarity Welding . . . . . . . . . . . . . . . . . . . . . . . . . . . . . . . . . . . . . . . . . . . . . . . . . . . . . . . . . .14
DC Reverse Polarity Welding . . . . . . . . . . . . . . . . . . . . . . . . . . . . . . . . . . . . . . . . . . . . . . . . . . . . . . . . . .14
Striking the Arc . . . . . . . . . . . . . . . . . . . . . . . . . . . . . . . . . . . . . . . . . . . . . . . . . . . . . . . . . . . . . . . . . . . . . . .15
Page 4

page
Learning to Weld . . . . . . . . . . . . . . . . . . . . . . . . . . . . . . . . . . . . . . . . . . . . . . . . . . . . . . . . . . . . . . . . . . . . . .15
Arc Welding Techniques . . . . . . . . . . . . . . . . . . . . . . . . . . . . . . . . . . . . . . . . . . . . . . . . . . . . . . . . . . . . . . . .15
Types of Commonly Used Weld Beads . . . . . . . . . . . . . . . . . . . . . . . . . . . . . . . . . . . . . . . . . . . . . . . . . . . . . .16
Stringer Bead . . . . . . . . . . . . . . . . . . . . . . . . . . . . . . . . . . . . . . . . . . . . . . . . . . . . . . . . . . . . . . . . . . . . . .16
Weave Bead . . . . . . . . . . . . . . . . . . . . . . . . . . . . . . . . . . . . . . . . . . . . . . . . . . . . . . . . . . . . . . . . . . . . . . .16
Finishing the Bead . . . . . . . . . . . . . . . . . . . . . . . . . . . . . . . . . . . . . . . . . . . . . . . . . . . . . . . . . . . . . . . . . . . . .16
Special Applications . . . . . . . . . . . . . . . . . . . . . . . . . . . . . . . . . . . . . . . . . . . . . . . . . . . . . . . . . . . . . . . . . . . .17
Burning Holes . . . . . . . . . . . . . . . . . . . . . . . . . . . . . . . . . . . . . . . . . . . . . . . . . . . . . . . . . . . . . . . . . . . . .17
Cutting . . . . . . . . . . . . . . . . . . . . . . . . . . . . . . . . . . . . . . . . . . . . . . . . . . . . . . . . . . . . . . . . . . . . . . . . . . .17
Recognizing Metals . . . . . . . . . . . . . . . . . . . . . . . . . . . . . . . . . . . . . . . . . . . . . . . . . . . . . . . . . . . . . . . . .17
Magnetic Test . . . . . . . . . . . . . . . . . . . . . . . . . . . . . . . . . . . . . . . . . . . . . . . . . . . . . . . . . . . . . . . . . . . . . .17
Color Test . . . . . . . . . . . . . . . . . . . . . . . . . . . . . . . . . . . . . . . . . . . . . . . . . . . . . . . . . . . . . . . . . . . . . . . .18
Spark Test . . . . . . . . . . . . . . . . . . . . . . . . . . . . . . . . . . . . . . . . . . . . . . . . . . . . . . . . . . . . . . . . . . . . . . . .18
Additional Safety Information . . . . . . . . . . . . . . . . . . . . . . . . . . . . . . . . . . . . . . . . . . . . . . . . . . . . . . . . . . . .18
Troubleshooting Information . . . . . . . . . . . . . . . . . . . . . . . . . . . . . . . . . . . . . . . . . . . . . . . . . . . . . . . . . . . . .20
Firepower Limited Warranty . . . . . . . . . . . . . . . . . . . . . . . . . . . . . . . . . . . . . . . . . . . . . . . . . . . . . . . . . . . . .29
Table of Illustrations
page
Figure 1: Wheel and Handle Installation . . . . . . . . . . . . . . . . . . . . . . . . . . . . . . . . . . . . . . . . . . . . . . . . . . . . .8
Figure 2: Welding Positions . . . . . . . . . . . . . . . . . . . . . . . . . . . . . . . . . . . . . . . . . . . . . . . . . . . . . . . . . . . . . .11
Figure 3: Workpiece Preparation . . . . . . . . . . . . . . . . . . . . . . . . . . . . . . . . . . . . . . . . . . . . . . . . . . . . . . . . . .11
Figure 4: Shielded Metal Arc Welding . . . . . . . . . . . . . . . . . . . . . . . . . . . . . . . . . . . . . . . . . . . . . . . . . . . . . .12
Figure 5: Bead Heat Requirement Samples . . . . . . . . . . . . . . . . . . . . . . . . . . . . . . . . . . . . . . . . . . . . . . . . . .13
Figure 6: Weld Angles . . . . . . . . . . . . . . . . . . . . . . . . . . . . . . . . . . . . . . . . . . . . . . . . . . . . . . . . . . . . . . . . . .15
Figure 7: Weld Appearance . . . . . . . . . . . . . . . . . . . . . . . . . . . . . . . . . . . . . . . . . . . . . . . . . . . . . . . . . . . . . .15
Figure 8: Stringer Bead . . . . . . . . . . . . . . . . . . . . . . . . . . . . . . . . . . . . . . . . . . . . . . . . . . . . . . . . . . . . . . . . .16
Figure 9: Weave Bead . . . . . . . . . . . . . . . . . . . . . . . . . . . . . . . . . . . . . . . . . . . . . . . . . . . . . . . . . . . . . . . . . .16
Figure 10: Triple Pass Cutaway . . . . . . . . . . . . . . . . . . . . . . . . . . . . . . . . . . . . . . . . . . . . . . . . . . . . . . . . . . .17
Figure 11: Triple Pass Welds . . . . . . . . . . . . . . . . . . . . . . . . . . . . . . . . . . . . . . . . . . . . . . . . . . . . . . . . . . . . .17
Figure 12: FP-100 Parts Breakdown . . . . . . . . . . . . . . . . . . . . . . . . . . . . . . . . . . . . . . . . . . . . . . . . . . . . . . . .21
Figure 13: FP-235 Parts Breakdown . . . . . . . . . . . . . . . . . . . . . . . . . . . . . . . . . . . . . . . . . . . . . . . . . . . . . . . .23
Figure 14: FP-235 AC/DC Parts Breakdown . . . . . . . . . . . . . . . . . . . . . . . . . . . . . . . . . . . . . . . . . . . . . . . . .25
Figure 15: FP-100 Wiring Diagram . . . . . . . . . . . . . . . . . . . . . . . . . . . . . . . . . . . . . . . . . . . . . . . . . . . . . . . .27
Figure 16: FP-235 Wiring Diagram . . . . . . . . . . . . . . . . . . . . . . . . . . . . . . . . . . . . . . . . . . . . . . . . . . . . . . . .27
Figure 17: FP-235 AC/DC Wiring Diagram . . . . . . . . . . . . . . . . . . . . . . . . . . . . . . . . . . . . . . . . . . . . . . . . . .28
Page 5

INTRODUCTION
This User’s Guide provides specific information about your Firepower Welding System. This guide provides
pertinent information needed to safely and effectively use your Firepower Welding System. The information in
this manual applies to specific Firepower Welding System models. It gives instructions on set-up, installation
and actual use of your Firepower Welding System.
SAFETY PROFILE
Tradesmen respect the tools and equipment with which they work. They are also aware that tools and equipment are dangerous if used improperly or abused.
Read this guide prior to using your welding system. It enables you to do a better and safer job. You will also
learn the machine’s application, limitations and the specific potential hazards related to welding.
SAFETY INFORMATION
The following safety information is provided to you as a guideline. Use it to operate your new Firepower
Welding System under the safest possible conditions. Any equipment that uses electrical power is potentially
dangerous to use when the safety or safe handling instructions are not known and/or are not followed. This
safety information gives you the necessary information for safe use and operation.
Items in this manual that significantly affect safety are identified with the following headings. Please read and
understand this manual. Pay special attention to items identified with these headings.
- Means there is a possibility of injury or death to yourself or others if the proper
safety precautions are not followed.
- Means there is the possibility of damage to the Firepower Welding System or
other property.
- Indicates points of interest for more efficient and convenient installation or opera-
tion. It may be used before or after a procedure to highlight or better explain the step.
READ ALL SAFETY AND WARNING INSTRUCTIONS CAREFULLY before attempting to install, operate or service this welding unit. Your failure to comply with the instructions could result in personal injury
and/or property damage.
RETAIN THESE INSTRUCTIONS FOR YOUR FUTURE REFERENCE.
SAFETY SYMBOLS
Familiarize yourself with the warning symbols listed on the following pages. These symbols identify important
safety messages in this manual. When you see one of these symbols, be alert to the possibility of personal
injury and carefully read the message that follows.
Indicates that the possibility of electric shock hazard exists during the operation of the step(s) that
follow.
Indicates that the possibility of fire hazard exists during the operation of the step(s) that follow.
Page 6

Indicates that the helmet must be worn during the step(s) that follow to protect against eye damage
and burns due to flash hazard.
Indicates that the possibility of toxic gas hazard exists during operation of the step(s) that follow.
Indicates that the possibility of being burned by hot slag exists during operation of the step(s) that
follow.
Indicates that eye protection should be worn to protect against flying debris in the following
step(s).
Indicates that the possibility of injury or death exist due to improper handling and maintenance of
compressed gas cylinders or regulators.
ELECTRIC SHOCK CAN KILL! Reduce the risk of death or serious injury from shock. Read,
understand and follow the following safety instructions. Additionally, make certain that anyone else
who uses this welding equipment, or who is a bystander in the welding area, understands and follows these safety instructions as well.
FIRE OR EXPLOSION CAN CAUSE DEATH, INJURY AND PROPERTY DAMAGE! Reduce
the risk of death, injury or property damage from fire or explosion. Read, understand and follow
the following safety instructions. Additionally, make certain that anyone else who uses this welding
equipment, or who is a bystander in the welding area, understands and follows these safety instructions as well. Remember, welding by nature produces sparks, hot spatter, molten metal drops, hot
slag and hot metal parts that can start fires, burn skin and damage eyes.
ARC RAYS CAN INJURE EYES AND BURN SKIN! Reduce the risk of injury from arc rays.
Read, understand and follow the following safety instructions. Additionally, make certain that anyone else who uses this welding equipment, or who is a bystander in the welding area, understands
and follows these safety instructions as well.
FUMES, GASSES AND VAPORS CAN CAUSE DISCOMFORT, ILLNESS AND DEATH!
Reduce the risk of discomfort, illness or death. Read, understand and follow the following safety
instructions. Additionally, make certain that anyone else who uses this welding equipment, or who
is a bystander in the welding area, understands and follows these safety instructions as well.
2
Page 7

IMPROPER HANDLING AND MAINTENANCE OF COMPRESSED GAS CYLINDERS AND
REGULATORS CAN RESULT IN SERIOUS INJURY OR DEATH! Reduce the risk of injury or
death from compressed gasses and equipment hazards. Read, understand and follow the following
safety instructions. Additionally, make certain that anyone else who uses this welding equipment, or
who is a bystander in the welding area, understands and follows these safety instructions as well.
GENERAL WELDING SAFETY INSTRUCTIONS
LOCATION
Welding processes of any kind can be dangerous not only to the operator but to
any person situated near the equipment, if safety and operating rules are not strictly observed.
PERSONAL PROTECTION
1. Wear closed, non-flammable protective clothing, without pockets or turned up trousers and pro-
tective gloves for welding.
2. Wear a non-flammable welding helmet to shield the neck, face and sides of the head. Keep the protective
lens clean. Replace the protective lens if broken or cracked. Position a transparent glass between the lens and
the welding area. Weld in a closed, well ventilated area that does not open into other working areas.
3. NEVER look at the arc without proper protection to the eyes.
4. Thoroughly clean metal of rust or paint to avoid producing harmful fumes. Parts degreased with a solvent
must dry before welding.
5. NEVER weld on metals or coated metals containing zinc, mercury, chromium, graphite, lead, cadmium or
beryllium unless the operator and the people standing in the same area use an air-supplied respirator.
SAFETY INSTRUCTIONS
For your safety, BEFORE connecting the power source to the line, follow these instructions:
1. Insert an adequate two-pole switch, equipped with time-delay fuses, before the main outlet.
2. Make the single-phase connection with a two-pole plug compatible with the above mentioned socket.
3. The two wires of the two-pole input cable are used for the connection with the single-phase line. The yel-
low/green wire is for the compulsory connection to the ground in the welding area.
4. When working in a confined space, keep the power source outside the welding area and fix the ground cable
to the workpiece. NEVER work in a damp or wet area.
5. DO NOT use damaged input or welding cables.
NEVER operate the power source without its panels in place. This could cause
serious injury to the operator and could damage the equipment.
FIRE PREVENTION
Welding operations use fire or combustion as a basic tool.
1. The work area MUST have a fireproof floor.
2. Work benches or tables used during welding operations MUST have fireproof tops. DO NOT weld on
wooden work benches.
3. Use heat-resistant shields or other approved material to protect nearby walls or unprotected flooring from
sparks and hot metal.
4. Keep an approved fire extinguisher of the proper size and type in the work area. Inspect it regularly to
ensure that it is in proper working order. Know how to use the fire extinguisher.
3
Page 8
5. Remove all combustible materials from the work site. If you can not remove them, protect them with fire-
proof covers.
NEVER perform welding operations on a container that has held toxic, combustible or flammable liquids or vapors. NEVER perform welding operations in an area containing combustible vapors, flammable liquids or explosive dust.
VENTILATION
Ventilate welding work areas adequately. Maintain sufficient air flow to prevent
accumulation of explosive or toxic concentrations of gases. Welding operations using certain combinations of metals, coatings and gases generate toxic fumes. Use respiratory
protection equipment in these circumstances. BEFORE welding, read and understand the
Material Safety Data Sheet for the welding alloy.
ELECTROMAGNETIC COMPATIBILITY
BEFORE installing a MIG power source, inspect the surrounding area checking the following points:
1. Make sure there are no other power supply cables, control lines, telephone cables or other devices close to
the power source.
2. Make sure that telephones, televisions, computers or other control systems are not in the working area.
3. People with pace-makers or hearing aides should keep far from the power source. In particular cases, special
protection measures may be required.
Reduce interference by following these suggestions:
1. If there is interference in the power source line, mount an E.M.T. filter between the power supply and the
power source.
2. Shorten the output cables of the power source, keep them together and connected to ground.
3. Securely fasten the panels of the power source in place after performing maintenance.
HEALTH HAZARDS
The welding process can be hazardous to your health. Therefore, follow these precautions:
1. ALWAYS wear protective clothing without pockets and cuffs. Wear a helmet, gloves and shoes with an
insulating sole.
2. ALWAYS use a welding mask or helmet with the properly tinted protective glass in the shade adequate to
the welding operation being performed and to the current intensity.
3. Make certain that bystanders in the welding area are also following these precautions.
4. ALWAYS keep the welding mask glass clean. Replace it if it is cracked or chipped.
5. NEVER weld in a damp area or come in contact with a moist or wet surface when welding.
6. If the welding area lacks proper ventilation, use fume extractors.
7. Clean the welding pieces from solvents or greases which develop toxic gases when exposed to heat.
ELECTRIC SHOCK
ELECTRIC SHOCK CAN KILL! Reduce the risk of death or serious injury from
shock. Read, understand and follow ALL safety instructions. Be sure that everyone who uses
this welding equipment or who is a bystander in the welding area understands and follows
ALL safety instructions as well.
4
Page 9

ELECTRIC SHOCK CAN BE FATAL. A person qualified in First Aid techniques should ALWAYS be present in the working area. If a person is unconscious and
electric shock is suspected, DO NOT touch the person if he or she is in contact with
cables. Disconnect power from the machine, then use First Aid. Use dry wood or other
insulating materials to move cables, if necessary, away from the person.
1. Never touch or come in physical contact with any part of the input current circuit and welding current circuit.
2. Frequently, check that the input cable and plug are in good condition.
3. Make sure that the welder is disconnected from the main power supply BEFORE attempting any repairs,
opening the side panels of the machine or repairing the input cable.
4. Fit the main line, BEFORE the distribution outlet, with a three-poles switch with adequate delayed fuses
(check the characteristics plate for fuse values).
5. DO NOT weld with cables, torch or earth clamp in poor shape.
6. DO NOT coil the torch or the earth cables around your body.
7. DO NOT aim the welding torch against yourself or against bystanders.
8. Should you feel the slightest electrical shock, STOP welding IMMEDIATELY. DO NOT use the welder
until the fault is found and resolved.
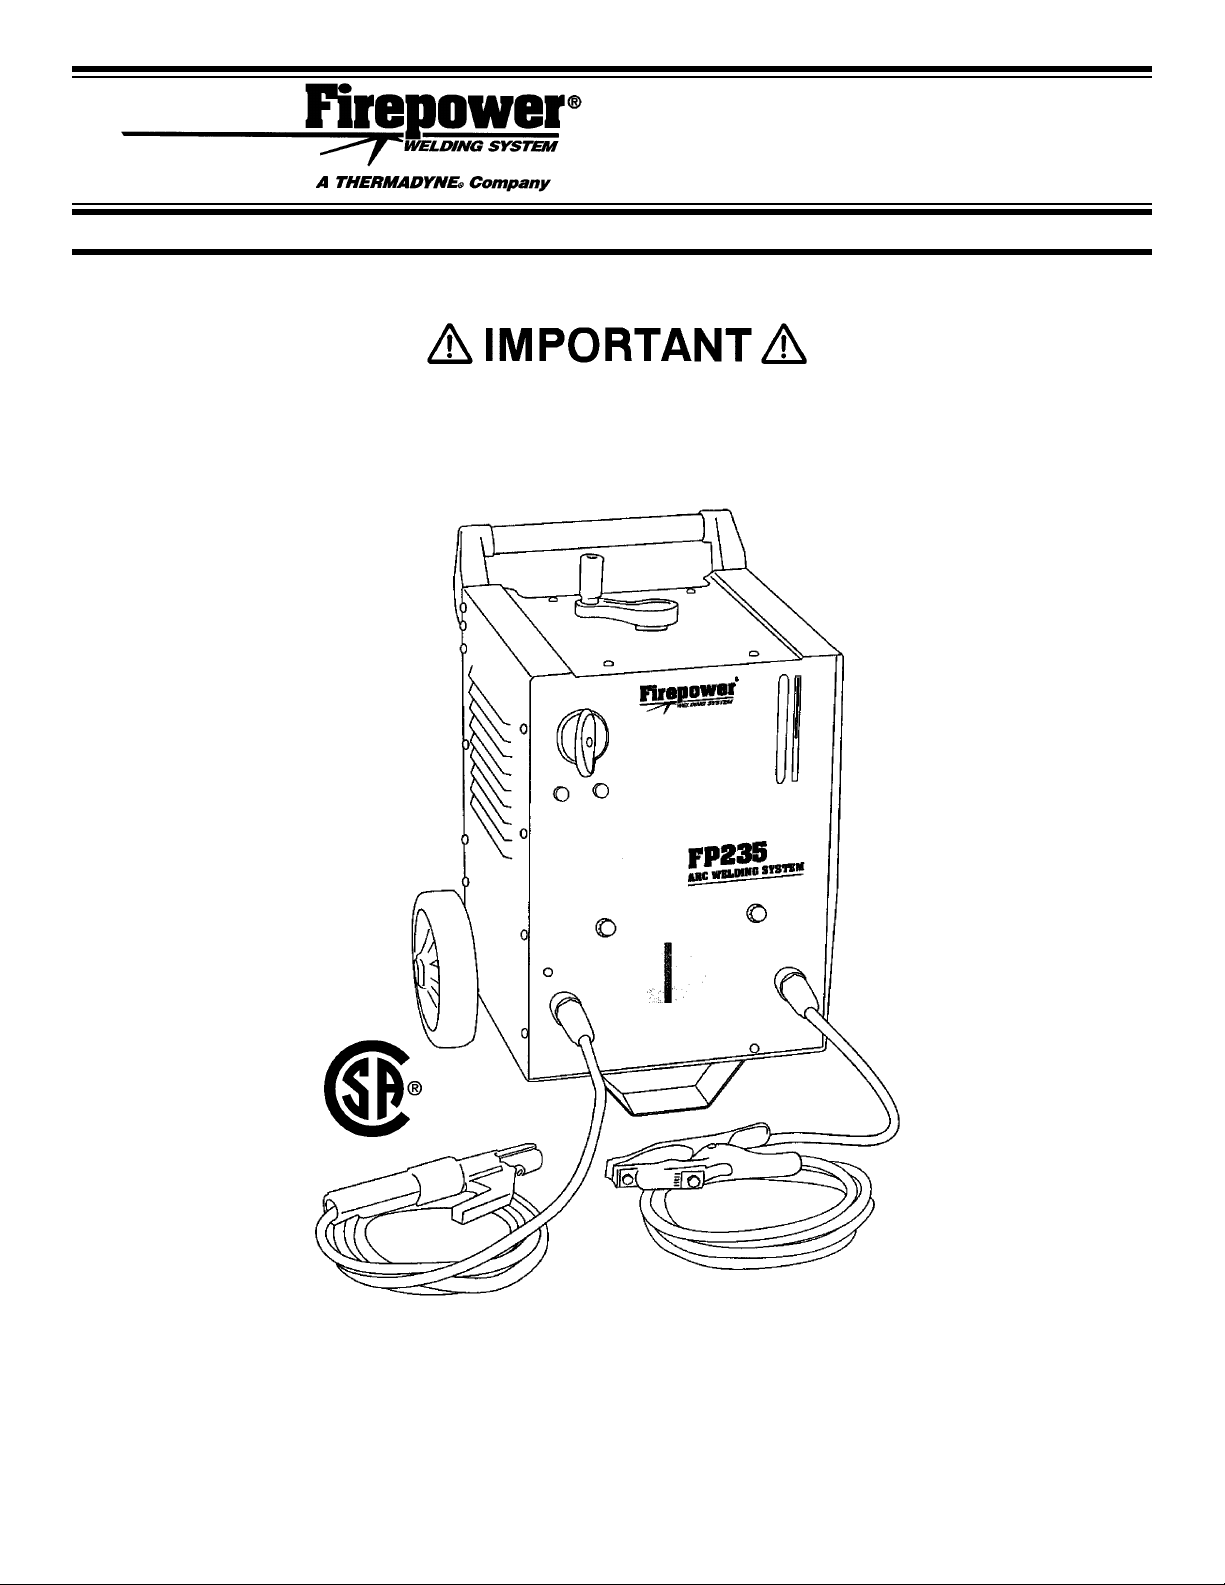
WELDER SPECIFICATIONS
Your new Firepower ARC (SMAW) Welding System is designed for maintenance and sheet metal fabrication.
The unit consists of a single-phase power transformer power source and arc stabilizer. This welding power
source is capable of welding with mild steel electrodes.
This unit is also capable of welding with high carbon steel, special alloy steel, cast iron, and nonferrous, such
as aluminum. The electrode material should correspond with the workpiece metal.
Flux coatings are made for use with either AC (Alternating Current), DC (direct current) reverse polarity, or
DC straight polarity, although some function well on both AC and DC current. Your welder is designed for
using electrodes made for AC.
Please refer to the instructions provided in this manual for proper machine setup.
WELDER OPERATING CHARACTERISTICS
The duty rating defines how long the welding system can be used before it must pause and cool down. Duty
Cycle ratings are expressed as a percentage of a ten-minute period. It represents the maximum welding time
allowed at the specified amperage setting. The remaining balance of a ten-minute period is required for cooling
off the unit.
Firepower 120 volt and 230 volt Welding Systems have duty cycle ratings based on 20 amp and 50 amp input
currents. Please refer to the data plate located on the front of the unit for the specific rating that applies to your
unit.
All Firepower 230 volt Welding Systems are rated at the required input amperage for proper operation. Please
refer to the data plate located on the front of the unit for the specific rating that applies to your unit.
INTERNAL THERMAL OVERLOAD PROTECTION(FP-100 ONLY)
DO NOT constantly exceed the duty cycle or damage could result to your welder.
If you do exceed the duty cycle of your welder, the internal thermal overload protection shuts
off all welder functions except the cooling fan. If this happens, DO NOT SHUT OFF THE
5
Page 10

6
WELDER. Leave the welder turned on and the fan running. After the welder is properly
cooled, the thermal protector automatically resets and your welder will function properly.
SPECIFICATIONS FOR FP 100 ARC(SMAW) WELDING SYSTEM (1443-0402)
Type . . . . . . . . . . . . . . . . . . . . . . . . . . . . . . . . . . . . . . . . . . . . . . . . . . . . . . . . .100 Amp ARC Welding System
Input Voltage . . . . . . . . . . . . . . . . . . . . . . . . . . . . . . . . . . . . . . . . . . . . . . . . . . . . . . . . . . . . . . .115 Volt (60Hz)
Rated Output . . . . . . . . . . . . . . . . . . . . . . . . . . . . . . . . . . . . . . . . . . . . . . . . . . . .70 Amps @ 20% Duty Cycle
Agency Approval . . . . . . . . . . . . . . . . . . . . . . . . . . . . . . . . . . . . . . . .CSA Rated 65 Amps @ 15% Duty Cycle
Maximum Output . . . . . . . . . . . . . . . . . . . . . . . . . . . . . . . . . . . . . . . . . . . . . . . . . . . . . . . .100 Amps AC Peak
Output Power Settings . . . . . . . . . . . . . . . . . . . . . . . . . . . . . . . . . . . . . . . . . . . . . . . . . . . . . .Shunt Adjustment
Power Switch . . . . . . . . . . . . . . . . . . . . . . . . . . . . . . . . . . . . . . . . . . . . . . . . . . . . . .Illuminated On/Off Switch
Power Cord . . . . . . . . . . . . . . . . . . . . . . . . . . . . . . . . . . . . . . . . . . . . . . . . . . . . . . . . .4 Ft 15 Amp Power Plug
Ground Cable & Clamp . . . . . . . . . . . . . . . . . . . . . . . . . . . . . . . . . . . . . . . . . . .6 Ft Ground Cable with Clamp
Ground Cable Connection . . . . . . . . . . . . . . . . . . . . . . . . . . . . . . . . . . . . . . . . . . . . . . . . . . .Fixed Connection
Welding Cable & Electrode Holder . . . . . . . . . . . . . . . . . . .6 Ft Welding Cable and 150 Amp Electrode Holder
Accessories . . . . . . . . . . . . . . . . . . . . . . . . . . . . . . . . . . . . . . . . . . . . . . . . . . . . . . . . . . . . . .Instruction Manual
SPECIFICATIONS FOR FP 235 ARC(SMAW) WELDING SYSTEM (1443-0404)
Type . . . . . . . . . . . . . . . . . . . . . . . . . . . . . . . . . . . . . . . . . . . . . . . . . . . . . . . . .235 Amp ARC Welding System
Input Voltage . . . . . . . . . . . . . . . . . . . . . . . . . . . . . . . . . . . . . . . . . . . . . . . . . . . . . . . . . . . . . . .230 Volt (60Hz)
Rated Output . . . . . . . . . . . . . . . . . . . . . . . . . . . . . . . . . . . . . . . . . . . . . . . . . . . .235 Amps @ 20% Duty Cycle
Agency Listing . . . . . . . . . . . . . . . . . . . . . . . . . . . . . . . . . . . . . . . . .CSA Rated 200 Amps @ 20% Duty Cycle
Maximum Output . . . . . . . . . . . . . . . . . . . . . . . . . . . . . . . . . . . . . . . . . . . . . . . . . . . . . . . .235 Amps AC Peak
Output Power Settings . . . . . . . . . . . . . . . . . . . . . . . . . . . . . . . . . . . . . . . . . . . . . . . . . . .Shunt (45-235 Amps)
Power Switch . . . . . . . . . . . . . . . . . . . . . . . . . . . . . . . . . . . . . . . . . . . . . . . . . . . . . .Illuminated On/Off Switch
Power Cord . . . . . . . . . . . . . . . . . . . . . . . . . . . . . . . . . . . . . . . . . . . . . . . . . . . . .6 Ft Power Cord without Plug
Welding Lead . . . . . . . . . . . . . . . . . . . . . . . . . . . . . . . . . .10 Ft Welding Cable and 300 Amp Electrode Holder
Ground Cable & Clamp . . . . . . . . . . . . . . . . . . . . . . . . . . . . . .10 Ft Ground Cable and 300 Amp Work Clamp
Ground Cable Connection . . . . . . . . . . . . . . . . . . . . . . . . . . . . . . . . . . . . . . . . . . . . . . . . . . .Fixed Connection
Accessories . . . . . . . . . . . . . . . . . . . . . . . . . . . . . . . . . . . . . . . . . . . . . . . . . . . . . . . . . . .Wheel Kit and Handle
Instruction Manual
SPECIFICATIONS FOR FP 235 AC/DC ARC(SMAW) WELDING SYSTEM (1443-0406)
Type . . . . . . . . . . . . . . . . . . . . . . . . . . . . . . . . . . . . . . . . . . . . . . . . . . .235 Amp AC/DC ARC Welding System
Input Voltage . . . . . . . . . . . . . . . . . . . . . . . . . . . . . . . . . . . . . . . . . . . . . . . . . . . . . . . . . . . . . . .230 Volt (60Hz)
Rated Output . . . . . . . . . . . . . . . . . . . . . . . . . . . . . . . . . . . . . . . . . . . . . . . . . . . .235 Amps @ 20% Duty Cycle
Agency Listing . . . . . . . . . . . . . . . . . . . . . . . . . . . . . . . . . . . . . .CSA Rated 200 Amps @ 20% Duty Cycle AC
CSA Rated 135 Amps @ 35% Duty Cycle DC
Maximum Output . . . . . . . . . . . . . . . . . . . . . . . . . . . . . . . . . . . . . . . .230 Amps AC Peak / 180 Amps DC Peak
Output Power Settings . . . . . . . . . . . . . . . . . . . . . . . . . . . . . . . . . . . . . . . . . . . . . . . . . . .Shunt (45-235 Amps)
Power Switch . . . . . . . . . . . . . . . . . . . . . . . . . . . . . . . . . . . . . . . . . . . . . . . . . . . . . .Illuminated On/Off Switch
Power Cord . . . . . . . . . . . . . . . . . . . . . . . . . . . . . . . . . . . . . . . . . . . . . . . . . . . . .6 Ft Power Cord without Plug
Welding Lead . . . . . . . . . . . . . . . . . . . . . . . . . . . . . . . . . .10 Ft Welding Cable and 300 Amp Electrode Holder
Ground Cable & Clamp . . . . . . . . . . . . . . . . . . . . . . . . . . . . . .10 Ft Ground Cable and 300 Amp Work Clamp
Ground Cable Connection . . . . . . . . . . . . . . . . . . . . . . . . . . . . . . . . . . . . . . . . . . . . . . . . . . .Dinse Connection
Accessories . . . . . . . . . . . . . . . . . . . . . . . . . . . . . . . . . . . . . . . . . . . . . . . . . . . . . . . . . . .Wheel Kit and Handle
Instruction Manual
Page 11

WELDER INSTALLATION
POWER SOURCE CONNECTION
Power Requirements
This welder (FP-100) is designed to operate on a properly grounded 120 volt, 60 HZ, single-phase alternating
current (AC) power source fused with a 20 amp time-delayed fuse or circuit breaker. (FP-235 and FP-235
AC/DC requires 230 Volt, 60 Hz, single phase AC with a 50 amp delayed fuse or circuit breaker. Please consult
local codes for proper plug and receptacle applications.) A qualified electrician should verify the ACTUAL
VOLTAGE at the receptacle into which the welder will be plugged and confirm that the receptacle is properly
grounded. The use of the proper circuit size can eliminate the nuisance of circuit breaker tripping when welding.
DO NOT OPERATE THE FP-100 WELDER if the ACTUAL power source voltage is less than 110 Volts
AC or greater than 132 Volts AC. Contact a qualified electrician if this problem exists. Improper performance
and/or damage to the welder will result if operated on inadequate or excessive power.
DO NOT OPERATE THE FP-235 OR FP-235 AC/DC WELDER if the ACTUAL power source voltage is
less than 220 Volts AC or greater than 240 Volts AC. Contact a qualified electrician if this problem exists.
Improper performance and/or damage to the welder will result if operated on inadequate or excessive power.
Connection to Power Source
High voltage danger from power source! Consult a qualified electrician for
proper installation of receptacle at the power source.
This welder must be grounded while in use to protect the operator from electrical shock. If you are not sure if your
outlet is properly grounded, have it checked by a qualified electrician. DO NOT cut off the grounding prong or alter
the plug in any way. DO NOT use any adapters between the welder’s power cord and the power source receptacle.
Make sure the POWER switch is OFF. Connect the welder's (FP-100) power cord
to a properly grounded 120 VAC, 60 Hz, single-phase outlet. Connect the FP-235 / FP-235
AC/DC to a properly grounded 230 VAC, single-phase outlet. Contact a qualified electrician if
a problem exists. Improper performance and/or damage to the welder results if operated on
inadequate or excessive power.
Extension Cords (Applies to FP-100 ONLY)
For optimum welder performance, an extension cord should not be used unless absolutely necessary. If necessary, care must be taken in selecting an extension cord appropriate for use with your specific welder.
Select a properly grounded extension cord that will mate directly with the ac power source receptacle and the
welder power cord without the use of adapters. Make certain that the extension cord is properly wired and in
good electrical condition (minimum gauge size 10/3 AWG).
WELDER ASSEMBLY
The following steps describe the assembly, installation, maintenance and operations of your new welder.
Be sure that the welder’s electrical power supply cord is not connected
while performing this procedure.
Avoid contacts with wires or parts. DO NOT work with the panels partially opened
or removed completely from the power source.
1. Tools required: Hammer, Flat Head Screwdriver, Allen Wrench (metric)
7
Page 12

2. Wheels and Pull Handle - Slide the axle through the opening in the bottom of the welder cabinet. Insert axle
into wheels. Use a hammer to attach pal nuts on the axle by simply tapping them into position.
3. Assemble the plastic handle as shown in Figure 1.
4. Amperage Adjustment Handle - Thread handle onto shunt control shaft at the top of the machine until it contacts locking nut (Be sure to install lock washer first). Thread crank handle into shunt handle. Tighten with a
flat blade screwdriver. Tighten lock nut against handle. Then, tighten the set screw.
5. Place the power source in a well ventilated area. DO NOT obstruct the air intake and output vents. A
reduced air flow can cause a reduced duty cycle and damage internal components.
6. Insure at least 6 feet of open space on each side of the welder.
ARC WELDING
ARC (SMAW - Shielded Metal-Arc Welding) welding metals are bonded by heating them with an electric arc
created between the electrode and the workpiece. There are two parts to electrodes used for SMAW welding.
1)The inner core is a metal rod or wire that should be similar in composition to the base metal. 2)The outer coat-
ing is called flux. There are various types of flux and each coating is used for a particular welding situation.
When the metal is molten, it can be contaminated by elements in the air. Because this contamination could
weaken the weld, the flux coating creates a protective barrier called slag that protects the molten metal from
contaminants.
When current (amperage) flows through the circuit to the electrode, an arc is formed between the end of the
electrode and the workpiece. The arc melts the electrode and the workpiece. The melted metal of the electrode
flows into the molten crater and forms a bond with the workpiece.
There are five basic choices you must make that affect your weld quality:
1. Electrode selection
2. Current setting
3. Weld angle
4. Arc length
5. Travel speed
ONLY experienced personnel should use the power sources.
IMPORTANT
Figure 1: Wheel and Handle Installation
8
Page 13

MACHINE OPERATION
AC OUTPUT CONNECTIONS (FP-235 AND FP-235 AC/DC)
This welder has two AC outlet plugs that are clearly marked with the electrode and ground clamp symbols.
NEVER reverse cable connections as this could cause injury to the user as well
as the equipment!)
Connect the electrode output cable to the electrode connections and the ground cable to the ground connection.
These connections are Dinse type connections and require that they be twisted into place in order to insure the
best connection. A slight twist is fine. You are now able to weld with 30 to 235 Amps of AC Power. The
open circuit voltage of the AC connections is approximately 72 Volts.
ELECTRIC SHOCK CAN KILL! Reduce the risk of death or serious
injury from shock. Read, understand and follow ALL safety instructions. Be sure that
everyone who uses this welding equipment or who is a bystander in the welding area
understands and follows ALL safety instructions as well.
ELECTRIC SHOCK CAN BE FATAL. A person qualified in First Aid
techniques should ALWAYS be present in the working area. If a person is uncon-
scious and electric shock is suspected, DO NOT touch the person if he or she is in
contact with commands. Disconnect power from the machine, then use First Aid.
Use dry wood or other insulating materials to move cables, if necessary, away from
the person.
DC OUTPUT CONNECTIONS (FP-235 AC/DC)
If you have purchased the FP 235 AC/DC Model, it has two DC outlet plugs marked DC+ and DC-. These
plugs can be connected in either the DC direct current position or in the DC reverse polarity position. The DC
connectors are Dinse type connections and require a slight twist in order to insure the best possible connection.
The open circuit voltage of the DC connectors is approximately 72 Volts.
ELECTRIC SHOCK CAN KILL! Reduce the risk of death or serious
injury from shock. Read, understand and follow ALL safety instructions. Be sure that
everyone who uses this welding equipment or who is a bystander in the welding area
understands and follows ALL safety instructions as well.
ELECTRIC SHOCK CAN BE FATAL. A person qualified in First Aid
techniques should ALWAYS be present in the working area. If a person is uncon-
scious and electric shock is suspected, DO NOT touch the person if he or she is in
contact with commands. Disconnect power from the machine, then use First Aid.
Use dry wood or other insulating materials to move cables, if necessary, away from
the person.
SELECTING AC OR DC WELDING OUTPUT
The use of the proper type of welding current is determined by the type of repair that needs to be made.
AC CURRENT WELDING
Alternating current (AC) welding is performed when the welding cables are connected to the AC electrode and
ground jacks. This type of welding current is ideal for heavy plate steel in flat position welding.
Most AC welding operations will be general purpose work on mild steel utilizing AWS rated 6011 and 7018
type electrodes.
9
Page 14

DIRECT CURRENT WELDING
Direct current DC welding is performed when the welding cables are connected to the DC+ (Positive) and DC(Negative) output receptacles. The FP 235 AC/DC offers you two DC welding options, straight or reverse
polarity.
To weld with straight polarity place the electrode cable plugged into the receptacle market DC negative and the
ground cable or work cable plugged into the receptacle marked DC positive.
STRAIGHT POLARITY DC welding is ideal for:
• Cutting steel;
• Hardfacing work;
• Build up work for heavy deposits.
Reverse current DC welding is performed with the electrode cable plugged into the receptacle marked DC positive and the ground cable or work cable plugged into the receptacle marked DC negative.
REVERSE POLARITY DC welding is ideal for:
• Overhead welding;
• Vertical welding;
• Cast Iron welding;
• Heavy Aluminum welding;
• Rivet welding;
• Sheet Metal welding;
• Low Hydrogen Electrode welding;
• Arc Bronze Electrode welding.
Most DC welding processes are performed in the reverse polarity position.
ADJUSTING AMPERAGE/INCREASING AMPERAGE
Simply crank the amperage adjustment handle on top of welder clockwise. As you crank the handle you will
see the amperage indicator located in the sight glass on the amperage setting scale move upward increasing the
amperage. Stop cranking when you have reached the desired amperage range.
LOWERING THE AMPERAGE
Simply crank the amperage adjustment handle on top of welder counter clockwise. As you crank the handle
you will see the amperage indicator located in the sight glass on the amperage setting scale move downward.
Stop cranking when you have reached the desired amperage range.
Be sure that the amperage adjustment handle is secured properly and that the
screw and nut are tight. Failure to do so will result in the inability to adjust amperage. Also be
careful not to over tighten the connections which could result in damage to the unit.
PREPARATIONS FOR WELDING
Your work should be performed in a safe, comfortable and organized area. The work area should be free of all
flammables with both a fire extinguisher and bucket of sand available for emergencies. To properly prepare
for welding follow these simple instructions:
1. Prepare an organized well lighted work area.
2. Follow the instructions for personal protection (page 1) for yourself as well as those around you.
3. Make sure you've studied all safety instructions found at the front of this manual.
4. Set up the workpiece and make the ground clamp connection.
10
Page 15

5. Select the appropriate electrode.
6. Turn on the power switch of your welder.
Arc rays can injure eyes and burn skin! Prolonged exposure to arc rays
can cause blindness and burns. NEVER strike an arc or begin welding without adequate eye and skin protection. Follow our Health Hazard safety instructions on
page 4 before welding.
WELDING POSITIONS
Arc welding can be performed from any of four basic positions
1. Flat - generally easier, faster, and allows for better penetration of the metal
2. Horizontal - generally easier, faster, and allows for better penetration of the metal
3. Vertical - usually used only when welding with DC welding capabilities
4. Overhead - considered the most difficult, usually used only when welding with DC welding capabilities
For best results, position the workpiece so that the bead will run on a flat surface.
PREPARING THE JOINT
For the most effective welding, surfaces to be joined must be free of dirt,
rust, scale, oil or paint. Welding on metals not properly cleaned will result
in brittle or porous welds.
If the base metal to be joined is thick or heavy, it may be necessary to bevel
the edges with a metal grinder directly at the point of contact. The angle of
the bevel should be approximately 60 degrees.
When grinding, ALWAYS wear goggles.
The grinder MUST also be inspected to verify it is in good condition.
For the types of Weld Joints, see Figure 2.
During the process of welding, workpieces will become very hot and tend to expand. This expansion may
cause the pieces to shift from the beginning position. If possible, workpieces should be clamped into position
required when the welding is completed.
11
Figure 3: Workpiece Preparation
Figure 2:Welding Positions
Page 16

GROUND CLAMP CONNECTION
Be certain you have a solid ground connection. The ground clamp connection is part of the current circuit. A
poor connection at the ground clamp will result in wasted power and heat. Scrape away any dirt, rust, scale, oil
or paint you may find on the workpiece. Make sure the ground clamp directly touches the metal surface.
SELECTING THE ELECTRODE
Welding electrode is a rod or wire of electrically conductive
metal, coated with a layer of flux. When welding, electrical
current flows between the electrode or "rod" and the
grounded metal workpiece. The intense heat of the arc
between the rod and grounded metal melts the wire and the
flux.
The rod wire joins with the base metal of the workpiece to
form the weld bead. Burning Flux forms a gas shield
around the arc, helping to control the flow of the fusing
metals that form the weld bead.
Type and thickness of the metal and the position of the
workpiece determines the electrode type and the amount of
heat needed to weld (see Figure 4). Heavier and thicker
metals require more heat or amperage.
Although there is no hard and fast rule that determines the
exact rod or heat setting required for any given situation,
you can check the rod requirements by referring to the rod
guide on your welder, then experiment on scrap metal.
HIGH VS. LOW VOLTAGE ELECTRODES
Be sure you have the best electrode for the welding job you are doing. Electrode manufacturers make most
standard welding electrodes in two basic types:
1. Designed to run on welders with High Open Circuit Voltage.
2. Designed to run on welders with Low Open Circuit Voltage.
Most welding is done with Low Open Circuit Voltage AC rods such as E-6013 or E07014 general purpose
rods. See Rod Table. Use rods of 1/16", 5/64" or 3/32" diameter.
High Open Circuit Voltage rods such as 6010, 6011, 7018, etc. will not work with most low power welders of
100 Amps or smaller.
Electrode manufacturers have adopted a uniform marking code for rods. Each electrode is marked with a prefix letter and four numbers. Each of the numbers has particular significance. For example, a commonly used
general purpose electrode is marked E-6013. The E signifies the electrode is for electric arc applications.
The first two digits in the number indicate the minimum tensile strength of the deposited metal, in thousands of
pounds per square inch. In this instance, 60 indicates the melting rod will have a minimum tensile strength of
60,000 p.s.i. The third number indicates the welding position for which the rod is intended. A number 1 indicates it is for use in any position.
Number 2 represents an electrode restricted to welding in horizontal and flat positions. Number 3 represents an
electrode intended for use in a flat position only. The fourth digit shows some specific characteristics of the
electrode such as weld quality, type of current or amount of penetration. For all practical purposes, the fourth
position marking will not affect the rod you would normally purchase.
12
Figure 4: Shielded Metal Arc Welding
Page 17

SELECTING THE PROPER AMPERAGE
The electrode type and thickness of the metal work-piece determine the
amount of heat needed in the welding process. See Figure 5 for bead examples
of heat based on rod size. Heavier and thicker metals require more heat or
amperage. Refer to a rod and amperage guide or experiment on scrap metal.
When you weld with proper rod your results will be:
1. Bead will lay smoothly over the workpiece without ragged edges.
2. Base metal puddle will be as deep as the bead that rises above it.
3. The welding operation will make a crackling sound similar to the sound of
frying eggs.
When you weld with rod that is too small your results will be:
1. Bead will be high and irregular.
2. Arc will be difficult to maintain
When you weld with rod that is too large your results will be:
1. Arc will burn through light metals.
2. Bead will undercut the work.
3. Bead will be flat and porous.
4. Rod may freeze or stick to the workpiece.
The rate of travel over the workpiece affects the weld. To ensure proper penetra-
tion and enough deposit of rod, move the arc slowly and evenly along the weld seam.
WELDING PARAMETERS
Following tables provide recommended welding parameters for various welding jobs using various welding types.
AC WELDING
Alternating current continuously changes polarity.
Ideal Current For:
• Down Hand Heavy Plate.
• Fast Fill.
ROD METAL
AWS ROD NO. USE SIZE AMPERAGE THICKNESS
E6013 Down Hand 1/16” Min. - 40 amps Min. - 1/8”
General Purpose Mild Steel 3/32” 30 - 80 amps 1/16” - 1/4”
General Purpose 1/8” 70 - 160 amps 1/8” - 1/2”
Work on Mild Steel 5/32” 120 - 180 amps 1/4” - Up
E7014 New Steel Fabrication 5/64” 30 - 100 amps Min. - 1/8”
General Purpose 3/32” 40 - 100 amps 1/16” - 1/4”
Iron Powder and All Build Up Worn Surfaces 1/8” 100 - 170 amps 1/8” - 1/2”
other AC Rods 5/32” 140 - 150 amps 1/4” - Up
E6011 Down Hand 1/8” 100 -150 amps 1/8” - 1/2”
General Purpose Mild Steel 5/32” 120 - 170 amps 1/4” - Up
General Purpose
Work on Mild Steel
13
Figure 5: Bead Heat Requirement
Samples
Page 18

DC STRAIGHT POLARITY WELDING
The electrode in DC straight polarity (DCSP) welding is negative and the work surface is
positive. The current flow is from the electrode to the work.
Ideal Current for:
• Hard Facing.
• Build Up - Heavy Deposits.
• Cutting Steel.
ROD METAL
AWS ROD NO. USE SIZE AMPERAGE THICKNESS
R52 Hard Surface
General Purpose Tillage Tools 1/8” 80 - 140 amps 1/16” - Up
Subject to Impact and Abrasion
R88 Tung Rod To Resist Serious Abrasion 1/8” 70 - 90 amps 1/16” - Up
ARC CUTTING Cutting and Drilling All Metals 1/8” 80 - Max. 1/16” - Up
Drilling All Metals
E6011 Deep 1/8” Maximum Dial Any Thickness
Penetrating 5/32” Setting
ARC GOUGING
E6011 Deep Arc Gouging 5/32” Maximum Dial Any Thickness
Penetrating
DC REVERSE POLARITY WELDING
The electrode in DC reverse Polarity (DCRP) welding is positive and the work surface is negative. The current
flow is from the work to the electrode.
Ideal Current For:
• Overhead.
• Vertical.
• Cast Iron Welding.
• Heavy Aluminum.
• Rivet Welding.
• Sheet Metal.
• Low Hydrogen Welding.
• Arc Bronze Rod.
ROD METAL
AWS ROD NO. USE SIZE AMPERAGE THICKNESS
E6011 Deep Overhead and Vertical 1/8” 80 - 150 amps 1/8” - 1/2”
Penetrating Welding or Rusty Metals 5/32” 100 - 170 amps 1/4” - Up
E7018 Low High Carbon Spring Steel 1/8” 80 - 140 amps 1/8” - 1/2”
Hydrogen or Cast Steel 5/32” 100 - 170 amps 1/4” - Up
ENiCl Nickel Cast Iron 3/32” 50 - 70 amps 1/16” - 1/4”
Machineable 1/8” 80 - 120 amps 1/8” - Up
E308-16 Cast Iron 3/32” 50 - 100 amps 1/16” - 1/4”
Stainless Steel Stainless Steel or Unknown
Metal Max. Strength 1/8” 90 - 150 amps 1/4” - Up
14
Page 19

15
E6013 Sheet Metal 1/16” Min. - 60 amps Min. - 1/16”
General Purpose 3/32” 30 - 80 amps 1/16” - 1/8”
E7014
General Purpose Sheet Metal 5/64” Min. - 100 amps Min. - 1/4”
Iron Powder
STRIKING THE ARC
Exposure to a welding arc is extremely harmful to
the eyes and skin. Prolonged exposure can cause blindness and burns.
NEVER strike an arc or begin welding until you have adequate protection.
Wear flameproof welding gloves, heavy long sleeved shirt, cuffless trousers,
high topped shoes and a welding helmet or shield.
To strike an arc, bring the tip of the rod in contact with the workpiece surface and quickly
raise it until there is about 1/8 inch (3.2) gap between the rod and workpiece.
The easiest way to strike an arc is to scratch the tip of the rod (for a short distance) on the
workpiece surface (as you would strike an match), then quickly lift it to the required 1/8
inch (3.2mm). It is important that the gap be maintained during the welding process and
that it be neither too wide or too narrow. If the gap becomes too narrow, the electrode will
freeze or stick to the workpiece.
Striking a proper arc and maintaining the gap between the electrode and the base metal
takes practice. Knowing when the arc is just right is a matter of experience. A good arc is
accompanied by a crisp, cracking sound (such as a frying egg).
To lay a weld bead, only 2 positions are possible (see Figure 6):
1. Downward angle (work angle);
2. In the direction the weld is to be laid (travel angle).
Always watch the weld puddle to keep the slag from flowing in front of it to prevent causing inclusions and
gas pockets.
LEARNING TO WELD
The self taught welder learns through a process of trial and error. The best way to teach yourself how to weld
is with short periods of practice at regular intervals. All practice welds should be done on scrap metal that can
be discarded. DO NOT attempt to make any repairs on valuable equipment until you have satisfied yourself
that your practice welds are of good appearance and free of slag or gas inclusions. What you fail to learn
through practice will be learned through mistakes and re-welds later on.
ARC WELDING TECHNIQUES
After learning how to establish and hold an arc, the next step is learning how to run a good
bead. Probably the first attempts in practice will fall short of acceptable weld beads. Too
long an arc will be held or the travel speed will vary from slow to fast (see Figure 7).
A. Weld speed is too fast.
B. Weld speed is too slow.
C. Arc is too long.
A solid weld bead requires that the electrode be moved slowly and steadily along the weld
seam. Moving the electrode rapidly or erratically prevents proper fusion or creates a
lumpy, uneven bead.
Figure 6: Weld Angles
Figure 7: Weld
Appearance
Page 20

Exposure to a Welding arc is extremely harmful to the eyes and skin.
Prolonged exposure can cause blindness and burns. NEVER strike an arc or begin
welding until you are adequately protected. Wear flameproof welding gloves, a heavy
long-sleeved shirt, cuffless trousers, high-topped shoes and a welding helmet.
To prevent ELECTRIC SHOCK, DO NOT perform any welding while
standing, kneeling or lying directly on the grounded work.
TYPES OF COMMONLY USED WELD BEADS
The following paragraphs discuss the most commonly used arc welding beads.
STRINGER BEAD
A string bead (see Figure 8) is formed by laying down a continuous strip of new metal in one steady, forward pass.
To lay a stringer bead:
1. Strike a short 1/8 inch (3.22 mm) arc and hold it at the starting point.
2. When a puddle is formed and the base of the bead begins to build, move the arc along the work without
weaving or oscillating.
3. Hold the electrode so that the holder is always slightly ahead of the arc.
4. The action will pile the molten metal just behind the arc. If the electrode motion is smooth and even, the
bead will be of consistent height and width with a uniform, closely spaced ripple.
WEAVE BEAD
The weave bead will deposit metal in a wider space than would
normally be possible with the string bead (see Figure 9).
The weave bead is accomplished by:
a. Weaving from one edge of the space to be filled in to the other
edge.
b. Continue this motion as well as the forward speed of travel.
Hesitate momentarily at each edge of the weave. This will provide the same heat at the edge of the weave as
in the middle.
FINISHING THE BEAD
As the coating on the outside of the electrode burns off, it forms an envelope of protective gasses around the
weld. This prevents air from reaching the molten metal and creating an undesirable chemical reaction.
The burning coating, however, forms slag. Slag formation appears as an accumulation of dirty metal scale on
the finished weld. The slag should be removed with a welding hammer or chisel, after it is cooled.
Peening the slag from a weld joint causes small chips of metal to fly
through the air. Metallic chips flying through the air can cause eye injury or injury to
other parts of the head, hands or exposed portions of the body. Wear eye glasses
with side shields and protect the hands and other exposed parts of the body with
protective garments or if possible work with a shield between the body and the
workpiece.
16
Figure 9: Weave Bead
Figure 8: Stringer Bead
Page 21

The intense heat produced at the arc
sets up strains in the metal joined by
welding. Peening the weld (striking the
weld with a welding hammer) not only
removes the scale left behind in the
welding but relieves the internal strains
developed by the heating and cooling
process.
A complete weld may require more
metal than can be deposited in a single
pass by either the stringer or weave
method. Very heavy beads can be built
up by making several passes along the
weld seam (see Figure 10 and Figure
11).When welds are to be laid one on
top of another, slag left from the previous pass must be thoroughly cleaned
away before the second pass is laid.
SPECIAL APPLICATIONS
In cutting or burning, the heat of the arc is used to melt or burn away the base metal. No attempt is made to
add metal from the melting electrode.
Special Cutting electrodes are available. If a general purpose rod is used for cutting, less of the electrode will
be consumed if it is soaked in water for a few minutes prior to use.
BURNING HOLES
Hot metal dripping from above can cause serious burns or start fires.
ALWAYS protect head, hands, feet and body when cutting or burning holes. DO
NOT cut or weld where hot metal can fall onto or into flammable materials.
When burning holes, the electrode is held perpendicular to the base metal and the arc is rotated in a small circle until the base metal becomes soft. Pushing or jabbing the electrode firmly through the base metal starts the
actual hole. Its size and shape are determined by directing the arc in larger circles. Holes in heavier metal may
be burned from the bottom, permitting the base metal to drop away from the hole.
CUTTING
The procedure used in cutting is very simple. The heat of the arc is used to melt away the base metal along the
cut line. Start the cut at the edge of the workpiece. Strike the arc and work it along the cut line. If the metal is
fairly thick, work the electrode up and down from the top to the bottom of the cut.
RECOGNIZING METALS
Because of the effect on the properties of steel from carbon content, temperature and time, the person welding
must be able to determine accurately the nature of the steel that is being worked.
The manufacturer’s specifications of the particular steel are most desirable. When specifications are not available, other methods may be used to determine the nature of the metal. The most common tests are:
MAGNETIC TEST
The magnetic test is a basic test used to identify ferrous (iron and steel) metals from nonferrous metals.
17
Figure 10: Triple Pass Cutaway
Figure 11: Triple Pass Welds
Page 22

Generally, all ferrous metals are affected by magnetism while the nonferrous metals are not. However, some
stainless steels are not magnetic.
COLOR TEST
The two main divisions of metal include the irons and steels which are indicated by their typical gray-white
color and the nonferrous metals which come in two general color classifications of yellow and white. Copper
may be easily identified due to its color (yellowish) as are brass and bronze. Aluminum, white metal, aluminum alloys, zinc and similar metals are all silver-gray (with shade variations) in color.
SPARK TEST
This method of identifying metals is widely used by welders to identify irons and steels. A power grinder is
used as the test equipment.
To help prevent eye injuries when grinding, you MUST ALWAYS wear
safety goggles. The grinder MUST be inspected to see that it is in good condition
BEFORE proceeding with the test.
When testing a metal sample, if you touch it to the rim of the revolving wheel lightly, the friction of the wheel
surface will heat the resulting metal particles to an incandescent and burning temperature.
The sparks resulting from contact with the grinding wheel contact will differ in character for different types of
steel. The lighter the contact, the better. Use a black background to better identify the sparks.
The theory of the spark test is that when a metal is heated, the different parts of each metal oxidize a different
rates and the oxidization colors are different.
Relatively pure iron, when heated by the grinding wheel, does not oxidize quickly. Therefore, the sparks are
long and fade out on cooling. As the carbon content of steel or cast iron increases, the compounds of carbon
and iron have different ignition temperatures. Consequently, the characteristics of the sparks differ.
Four characteristics of the spark generally tell the nature of the condition of the steel. Those characteristics are:
• spark color;
• spark length,
• the number of explosions (spurts) along the length of the individual sparks;
• and the shape of the explosions (forking or repeating).
ADDITIONAL SAFETY INFORMATION
Make sure you read and understand all of the information and instructions contained in this manual BEFORE
proceeding.
The National Electrical Code, Occupational Safety and Health Act (OSHA) regulations, local industrial codes
and local inspection requirements also provide a basis for equipment installation, use and service.
For additional information concerning welding safety, refer to the following standards and comply with them
as applicable.
• ANSI Standard Z49.1 - SAFETY IN WELDING AND CUTTING - obtainable from the American Welding
Society, 2051 N.W. 7th St. Miami, FL 33125 (305) 443-9353.
• ANSI Standard Z87.1 - SAFE PRACTICE FOR OCCUPATION AND EDUCATIONAL EYE AND FACE
PROTECTION - obtainable from the American National Standards Institute, 1430 Broadway, New York, NY
10018.
• NFPA Standard SIB - CUTTING AND WELDING PROCESSES - obtainable from the National Fire
Protection Association, 470 Atlantic Avenue, Boston, MA 02210.
18
Page 23

• CGA Pamphlet P-I - SAFE HANDLING OF COMPRESSED GASSES IN CYLINDERS - obtainable from
the Compressed Gas Association, 5005th Avenue, New York, NY 10038.
• OSHA Standard 29 CFR, Part 1910, Subpart 0. - WELDING, CUTTING AND BRAZING - obtainable from
your state OSHA office.
• CSA Standard W117.2 - CODE FOR SAFETY IN WELDING AND CUTTING - obtainable from Canadian
Standards Association, 178 Rexdale Blvd., Rexdale, Ontario Canada M9W 1R3.
• American Welding Society Standard A6.0 - WELDING AND CUTTING CONTAINERS WHICH HAVE
HELD COMBUSTIBLES - obtainable from the American Welding Society, 2051 N.W. 7th St., Miami, FL
33125 (305) 443-9353.
19
Page 24

Figure 12: FP-100
21
Page 25

ITEM NO. PART NO. DESCRIPTION QTY.
1 1443-0425 3 LOBES REGULATION HAND-WHEEL 1
2 1443-0426 SHUNT YOKE 1
3 1443-0427 HANDLE FOR WELDERS 1
4 1443-0428 THERMOSTAT 1
5 1443-0429 YELLOW PILOT-LIGHT SWITCH 16A 250V 1
6 1443-0430 WELDING CABLE 1
7 1443-0431 UPPER PANEL 1
8 1443-0432 LOWER PANEL 1
9 1443-0433 CABLE CLAMP 1
10 1443-0434 SHUNT 1
11 1443-0435 TRANSFORMER 60HZ 110V 1
12 1443-0015 ELECTRODE HOLDER 1
13 1443-0437 SJT CABLE 1
14 1443-0025 GROUND CLAMP 120A 1
15 1444-0724 GROUND CABLE 1
FP-100 PARTS LIST
22
Page 26

Figure 13: FP-235
23
Page 27

ITEM NO. PART NO. DESCRIPTION QTY.
1 1443-0450 BACK PANEL 1
2 1443-0451 FUSE HOLDER 2
3 1443-0452 FUSE 2A 250V 2
4 1443-0453 UPPER PANEL 1
5 1443-0454 REGULATION SCREW +WASHER 1
6 1443-0455 SHUNT YOKE 1
7 1443-0456 CABLE CLAMP 1
8 1443-0457 INPUT POWER CABLE 1
9 1443-0458 INCLINED-OVAL HANDLES 2
10 1443-0459 SWITCH KNOB 1
11 1443-0460 HANDLE 1
12 1443-0461 HAND-CRANK + KNOB 1
13 1443-0462 SWITCH 32 A 1
14 1443-0463 SHUNT 2
15 1443-0464 WHEELS-AXLE 1
16 1443-0465 GREEN PILOT-LAMP 220V 1
17 1443-0466 FRONT PANEL 1
18 1443-0467 DINSE PLUG 2
19 1443-0026 GROUND CLAMP 1
20 1443-0469 COVERING PANEL 1
21 1444-0535 GROUND CABLE 1
22 1443-0471 DINSE PLUG 2
23 1443-0472 TRANSFORMER 60HZ 230V 1
24 1443-0016 ELECTRODE HOLDER 1
25 1443-0474 COMPLETE FAN 220V 60HZ 1
26 1443-0484 WELDING CABLE 1
27 1443-0476 WHEEL 2
28 1443-0477 FOOT 1
29 1443-0478 LOWER PANEL 1
FP-235 PARTS LIST
24
Page 28

Figure 14: FP-235 AC/DC
25
Page 29

ITEM NO. PART NO. DESCRIPTION QTY.
1 1443-0450 BACK PANEL 1
2 1443-0451 FUSE HOLDER 2
3 1443-0452 FUSE 2A 250V 2
4 1443-0480 UPPER PANEL 1
5 1443-0454 SHUNT 2
6 1443-0455 SHUNT YOKE 1
7 1443-0456 REGULATION SCREW +WASHER 1
8 1443-0457 CABLE CLAMP 1
9 1443-0458 INCLINED-OVAL HANDLES 2
10 1443-0459 SWITCH KNOB 1
11 1443-0460 HANDLE 1
12 1443-0461 HAND-CRANK + KNOB 1
13 1443-0462 SWITCH 32 A 1
14 1443-0479 TRANSFORMER 60HZ 230V 1
15 1443-0481 CHOKE 1
16 1443-0465 WHEELS-AXLE 1
17 1443-0457 INPUT POWER CABLE 1
18 1443-0467 GREEN PILOT-LAMP 220V 1
19 1443-0469 FRONT PANEL 1
20 1443-0471 DINSE PLUG 4
21 1443-0026 GROUND CLAMP
22 1443-0469 COVERING PANEL 1
23 1444-0535 GROUND CABLE 1
24 1443-0467 DINSE PLUG 2
25 1443-0482 RECTIFIER 1
26 1443-0016 ELECTRODE HOLDER 300A 1
27 1443-0474 COMPLETE FAN 220V 60HZ 1
28 1443-0484 WELDING CABLE 1
29 1443-0476 WHEEL 2
30 1443-0477 FOOT 1
31 1443-0478 LOWER PANEL 1
FP-235 AC/DC PARTS LIST
26
Page 30

27
Figure 15: FP 100 Wiring Diagram
Figure 16: FP 235 Wiring Diagram
Page 31

28
Figure 17: FP-235 AC/DC Wiring Diagram
Page 32

29
FIREPOWER LIMITED WARRANTY
SCOPE OF LIMITED WARRANTY: Firepower, a division of Thermadyne Industries, Inc. (here-
inafter, "Seller") warrants that its products are free of defects in workmanship or material. If an authorized distributor or the customer of an authorized distributor (hereinafter, collectively, "Purchaser")
who purchases Seller's product, notifies Seller within the time set forth below that the product has a
defect in workmanship or material even though it has been stored, installed, operated, and maintained
in accordance with Seller's specifications, instructions, recommendations and in accordance with recognized standard industry practice, and the product was not misused, repaired, neglected, altered, or
damaged, the Seller may repair or replace, in its sole discretion, those parts of the product determined
by Seller to be defective in workmanship or material if said defect is not attributable to Purchaser's
acts or omissions.
THIS WARRANTY EXCLUDES ANY WARRANTY OF MERCHANTABILITY, FITNESS FOR
A PARTICULAR PURPOSE, OR OTHER WARRANTY OF QUALITY, WHETHER
EXPRESSED, IMPLIED OR STATUTORY.
LIMITED WARRANTY PERIOD: Except as otherwise limited below, this limited warranty is effec-
tive for twelve months from the date Seller sells the product to an authorized distributor, or for twelve
months after an authorized distributor sells the product to its customer, whichever is longer, except that
in no event will this warranty exceed eighteen months from the date the product is sold from Seller to
an authorized distributor.
Notwithstanding the foregoing,
• Firepower oxygen / acetylene products will be covered by a two-year product replacement warranty
• Firepower plasma cutting equipment will be covered by a one-year (parts & labor) warranty.
• Firepower electric welding machines will be covered by the Firepower 5-2-1 limited warranty.
• 5 years on the transformer
• 2 years on the welding unit
• 1 year on the MIG gun
• Firepower engine-driven welding machines will be covered by a one-year (parts & labor) warranty.
Engines will be covered by the manufacturer's warranty.
• Firepower ADF (auto-darkening) welding helmets will be covered by a one-year warranty. Any
ADF helmet claims must be made directly to Jackson / Morsafe products, Belmont, MI, 800-253-
7281.
• Firepower welding electrodes, MIG (& flux cored) wire, and brazing rods, although manufactured to
AWS Class specifications, are considered perishable items. As, such, these products are sold "as is"
and "with faults" and without warranty, either express or implied, including the warranties of merchant ability and fitness for a particular purpose.
• Products used in rental applications are warranted for one year from the date sold by the Seller to an
authorized distributor, without regard to when they were later sold by the authorized distributor.
Page 33

30
LIMITED WARRANTY CLAIM METHOD: To make a claim under this warranty, Purchaser must
notify Seller of the details of such claim within thirty days of discovering a defect in material or workmanship. If the claim is covered by this warranty, Seller will direct Purchaser to return the product to
an authorized warranty repair center. The Seller will not be responsible for transportation costs or
risks of any kind under this warranty. The Purchaser will be responsible for all such transportation
costs and risks.
LIMITATION OF LIABILITY: Seller shall not, under any circumstances, be liable for special, indirect, incidental or consequential damages (regardless of the form of action, whether in contract or in
tort including negligence), including, but not limited to, damage or loss of other property or equipment, loss of profits or revenue, cost of capital, cost of purchased or replacement goods, or claims of
Purchaser for service interruption. In no event will this warranty obligate Seller for any amount
exceeding the price of the goods upon which liability is based. Correction of non-conformities, in the
manner and time provided herein, constitutes fulfillment of all Seller's obligations to Purchaser with
respect to Purchaser's purchase of Seller's product.
This warranty is invalid if the product was sold by non-authorized entities. This warranty is invalid if
replacement parts or accessories were used that in Seller's sole opinion impaired the safety or performance of seller's product. This warranty supersedes all previous warranties.
Page 34

The quality system of the Denton and Abilene, Texas locations of Victor Equipment Company,
Victor de Mexico in Hermosillo, Mexico and Victor de Brazil in Rio de Janeiro, Brazil are registered by Det Norske Veritas (DNV) to meet the requirements of ISO-9001, 1994.
 Loading...