

Page 1
®
Wireless Desktop
& Mobile MeDia HeaDset
USER GUIDE
™
Page 2
Congratulations on your purchase of the EAR FORCE i60
headset from Turtle Beach.
Designed for Apple® products, the i60 supports music, movies, gaming and chat from Mac®, iPad®, iPhone® and
iPod touch® devices. Turtle Beach brings over 35 years of expertise to transforming your listening experience.
Welcome to Turtle Beach!
Download the Turtle Beach OSX and iOS apps to further enhance your experience:
http://www.Turtlebeach.com/i60
Page 3

In the Box
For our Knowledgebase and Technical Support please visit turtlebeach.com/support
A B
i60 Headset i60 Transmitter
D
C
Transmitter USB Cable
E F
Headset Charging Cable Cloth Carry Bag
G H I
6.3mm Adapter Plug Airline Adapter Plug
Mobile Adapter Cable
Turtle Beach Sticker
3
Page 4
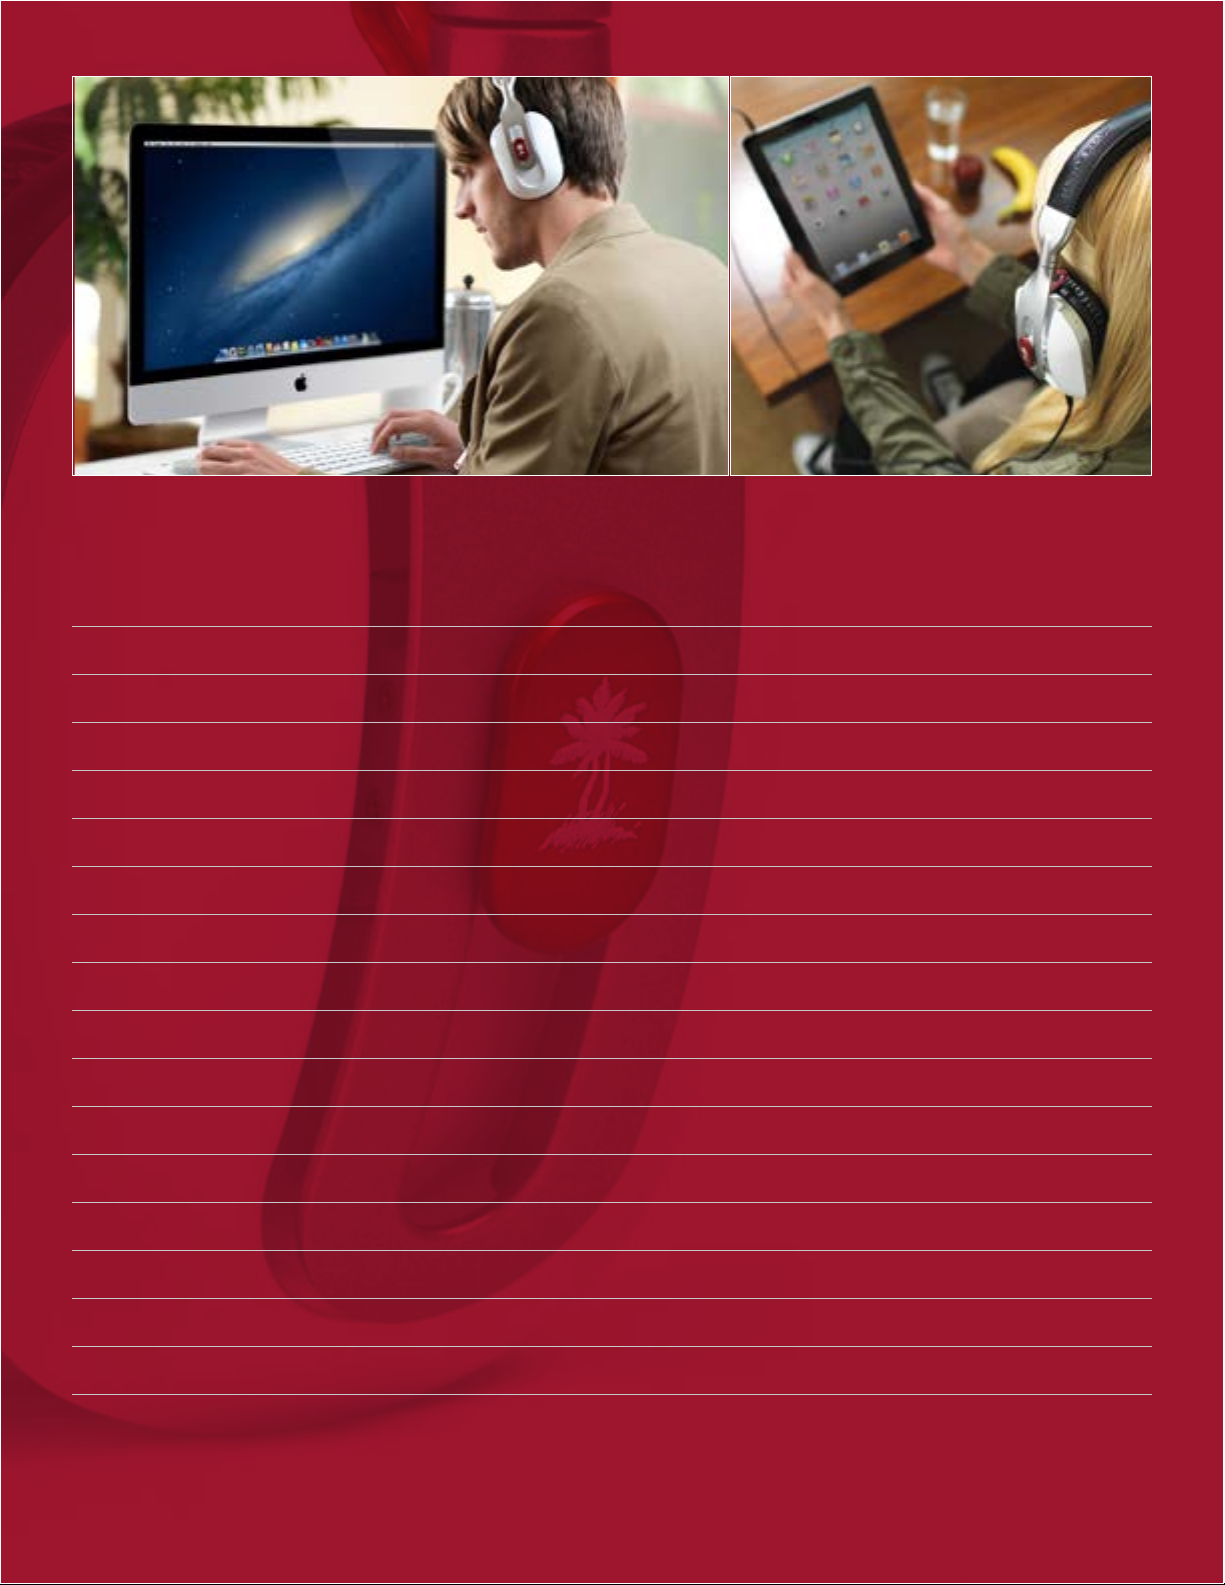
Table of Contents
About the i60 P5
Parts and Controls P6
Initial Setup P9
Mac OSX Setup P10
Windows PC Setup P13
Transmitter Pairing P17
Bluetooth Setup and Operation P18
Wired Setup P25
Adjusting Sound P26
Chat VoIP Setup P28
Charging the Headset P29
Bluetooth Reference Guide P30
Specifications P31
Troubleshooting Tips P32
Important Safety Information P34
Compliance / Conformity P35
Warranty P37
Page 5

About the i60
The i60 is a sophisticated media headset designed to unlock the audio potential of Apple® Mac® computers and iPad®,
iPhone® and iPod touch devices. To get the most from your i60, please take a few moments to review this introduction.
Overview
Hear your Mac, iPad, and iPhone as they were meant to be heard with the Turtle Beach Ear Force i60 media headset.
Dual-Band Wi-Fi Wireless supports media and chat audio from your computer while Bluetooth® technology enables you
to stream audio from your iPhone and iPad devices and answer mobile phone calls. You can even listen and talk with the
supplied mobile adapter cable.
· Wireless audio for Mac OSX.
Unlocks the audio potential of your Mac or Windows® computer, reproducing music with greater fidelity, movies with
greater immersion and games with greater impact.
· Simultaneous connection to iOS devices.
Answer calls or stream music without disconnecting from your computer. Pairs to iOS devices via Bluetooth or connects
via the supplied cable.
· Immersive surround sound. 7.1 and 5.1 Channel DTS® Headphone: X system puts you in the middle of the action.
· Superb fidelity. 50 mm speakers deliver pristine sound quality.
· Comfortable, lightweight design. Soft, padded ear cushions and headband for hours of comfort.
· Tap control for iOS devices. Via built-in accelerometer.
· Enhanced entertainment and communications.
The i60 delivers better sounding music, video, chat and internet calls from services like Pandora™, Netflix®, Skype®,
and more.
· Fully customizable audio presets. Via Turtle Beach app.
· Convenient voice prompts. To indicate system status.
· Invisible microphone. Instead of an obtrusive mic boom in front of your mouth, a dual mic array captures your voice with
noise filtering technology.
· Interference-free wireless. State-of-the-art, Dual-Band Wi-Fi Wireless scans for a clear connection.
· Long-life rechargeable battery. Built-in battery delivers up to 10 hours of continuous play. You can even charge
while playing.
· Independent Bluetooth volume control. Allows for personalized balancing of Mac and Bluetooth audio.
5
Page 6
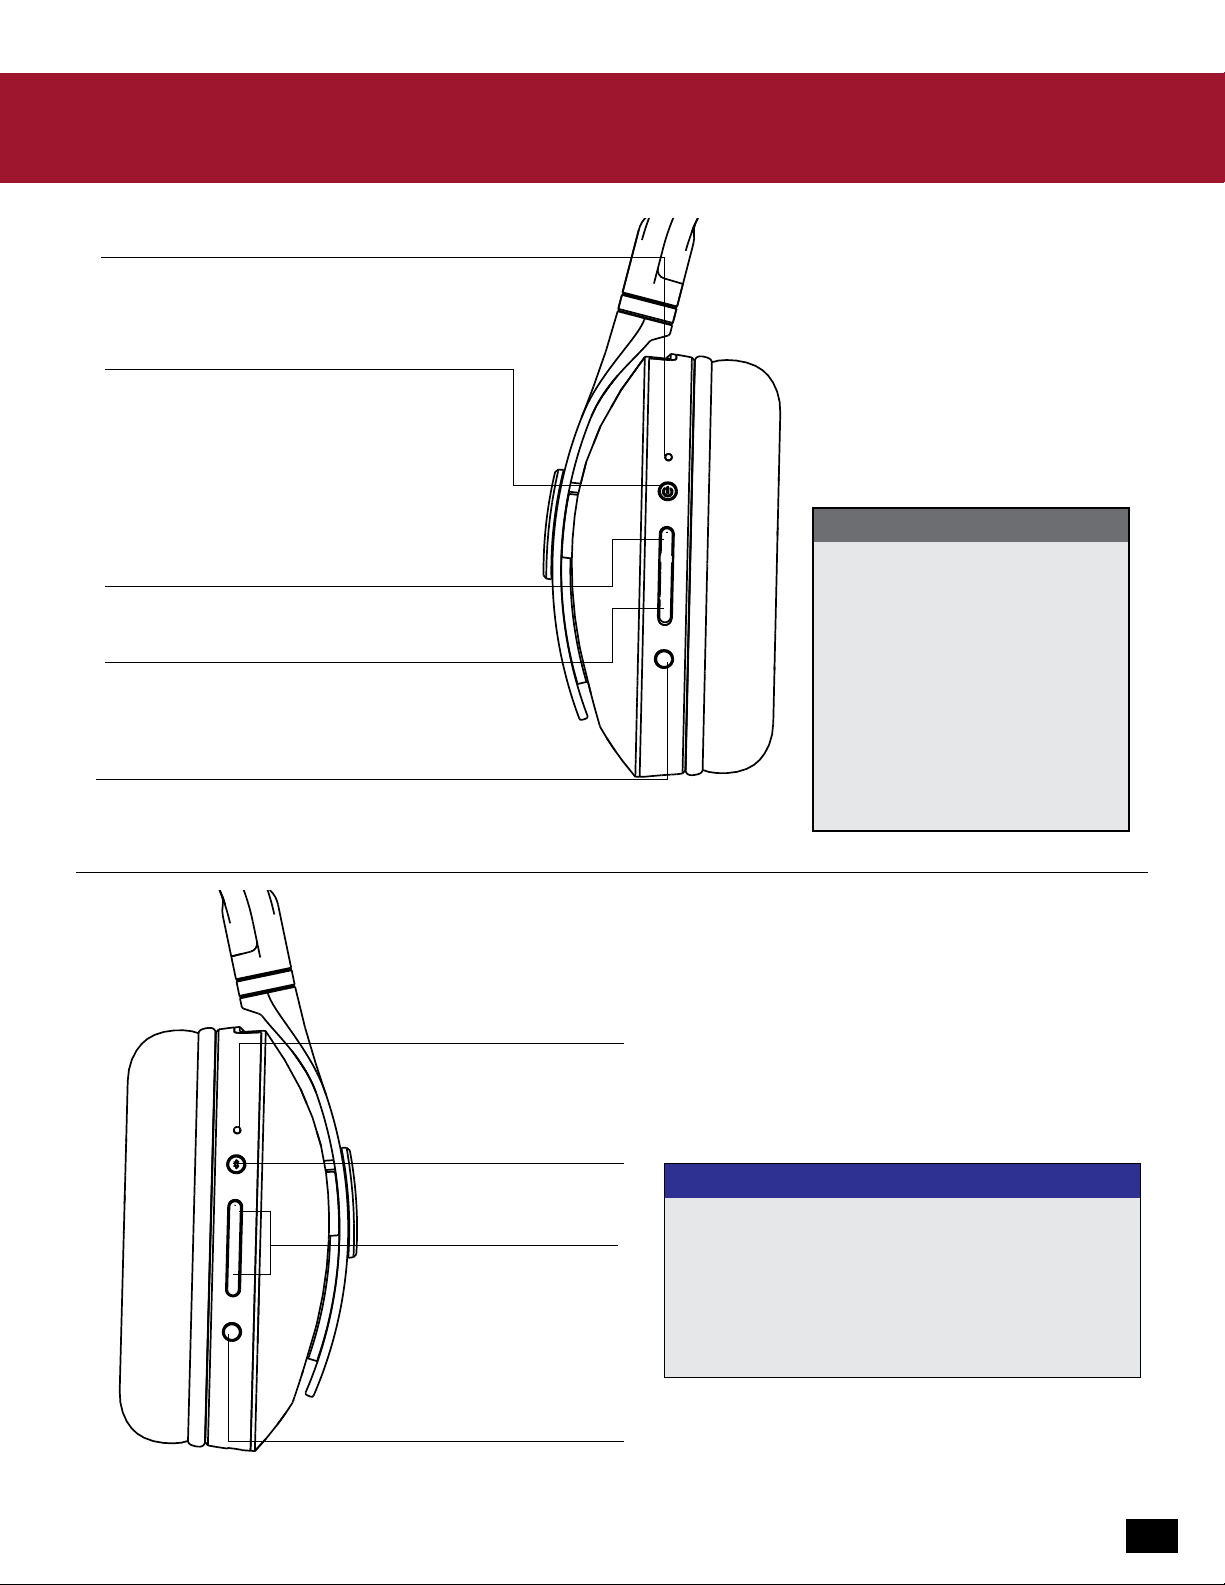
Parts and Controls
Status LED
Power Button
Short Press: Power On. Headset announces
“Powering On.”
Long Press: Power Off. Press and hold until
the headset announces “Powering Off.”
Pairing Mode: The Power Button also
initiates pairing between the headset
and transmitter.
(See “Transmitter Pairing” on pg. 17 for details.)
Off = Power off
Single Blink: Transmitter paired
Double Blink: Transmitter not paired.
Audio Preset Up
Cycles through audio presets, which the headset
announces. (See “Adjusting Sound” on pg 26 for details.)
Audio Preset Down
Cycles through audio presets, which the headset
announces. (See “Adjusting sound” on pg 26 for details.)
Mic Settings
Cycles through mic settings, which the headset announces.
(See “Adjusting Sound” on pg 27 for details.)
Bluetooth LED
Left Earcup
Right Earcup
Bluetooth Button
Bluetooth Volume Up
Increases volume of
connected Bluetooth device.
Bluetooth Volume Down
Decreases volume of
connected Bluetooth device.
Press to turn off the microphone.
Press again to turn it back on.
Mic Mute
Off = Bluetooth Off
Single flash = Bluetooth On
Blue/red flashing = Bluetooth pairing
(See table on right)
Preset 1: Flat
Preset 2: Bass Boost
Preset 3: Treble Boost
Preset 4: Bass and Treble Boost
Preset 5: Stereo Expander
(Surround Off)
Preset 6: Mid Boost
Preset 7: Footstep Focus
Preset 8: Superhuman Hearing
AUDIO PRESETS
Headset Status
Bluetooth Off
Bluetooth On
Bluetooth On/Incoming Call
Bluetooth On/In Call
Button Press
Single Press
Long Press
Single Press
Single Press
Function
Bluetooth On
Bluetooth Off
Call answer
End Call
BLUETOOTH BUTTON
(See “Bluetooth Reference Guide” on pg 30
for more details)
(See “Adjusting Sound”
on pg 27 for preset details)
6
Page 7
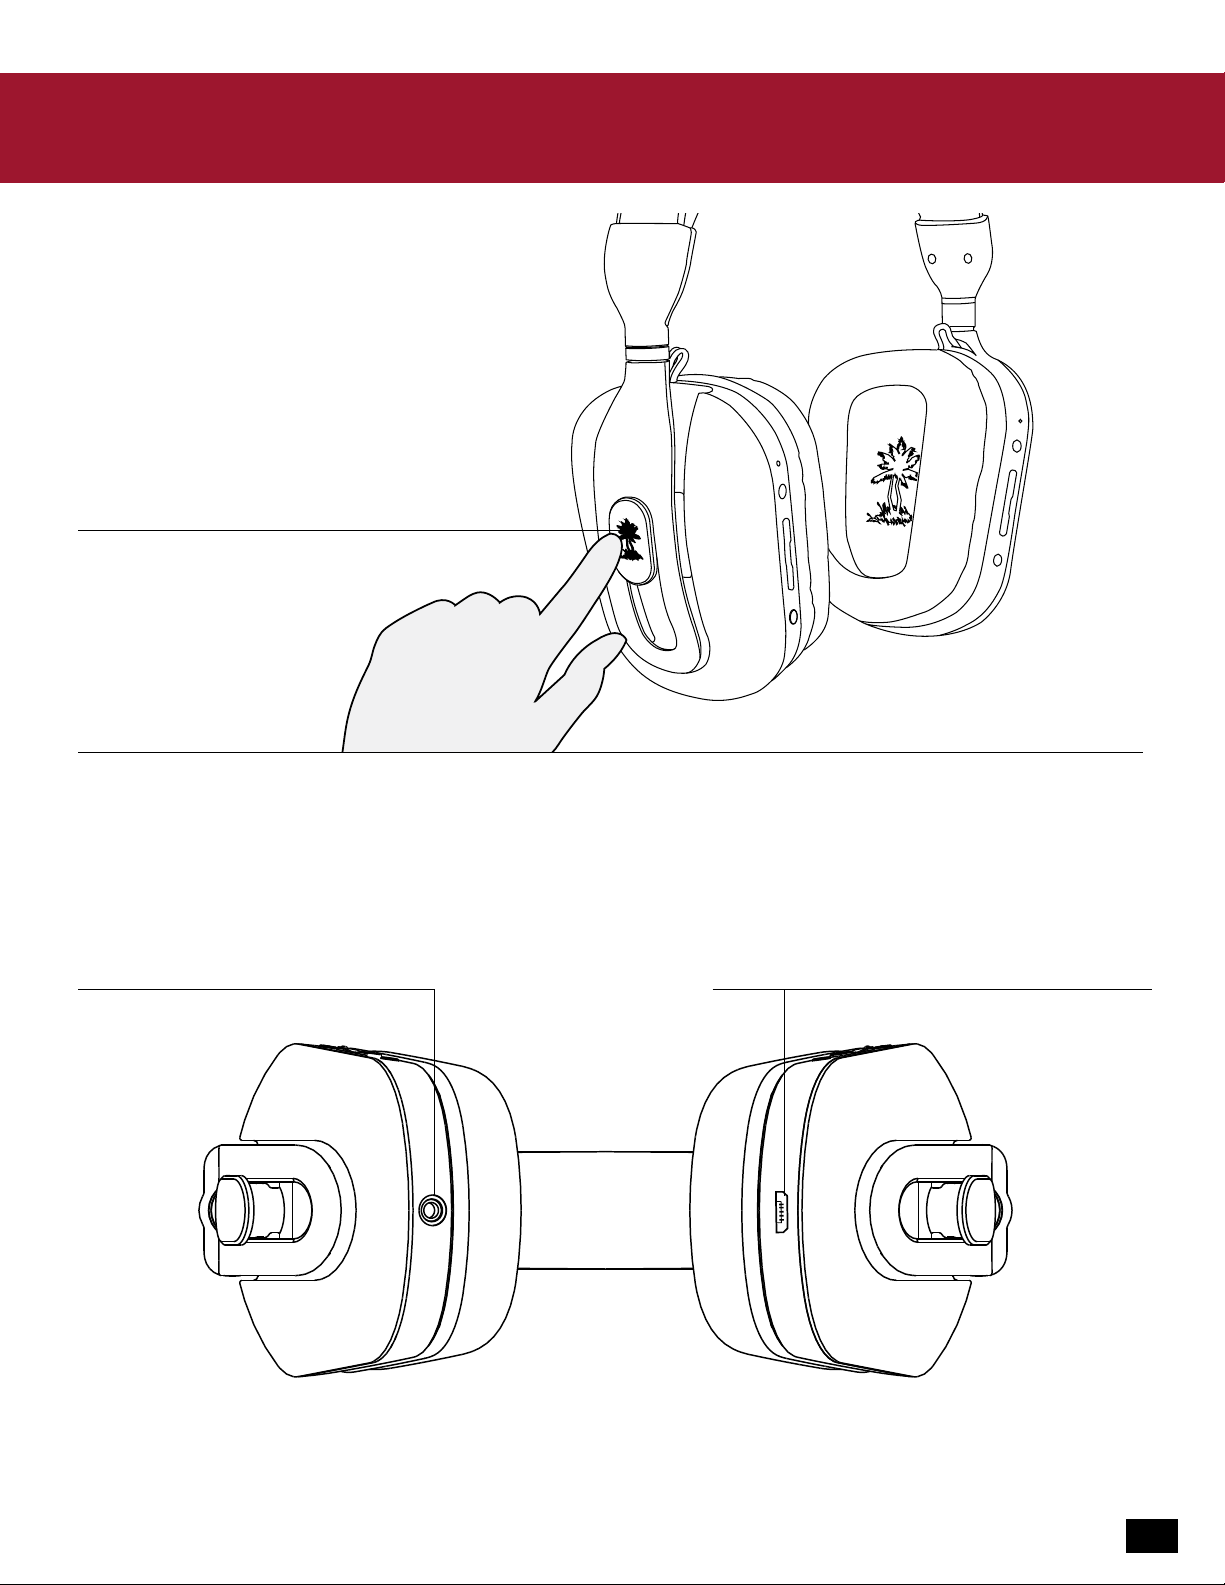
Parts and Controls
Left Earcup Right Earcup
Tap Sensor (Left Earcup red oval)
Single Tap: Answer/end phone call.
Double Tap: Activate Siri voice recognition.
(iOS Devices Only)
Headphone cable jack.
Plug directly into other music sources via
the supplied mobile device cable.
See “Wired Setup” on pg 25 for details.
Bottom view of headset
Charging port.
Charges the i60 from any standard USB port
via the supplied headset charging cable.
See “Charging the Headset” on pg 29 for details.
7
Page 8
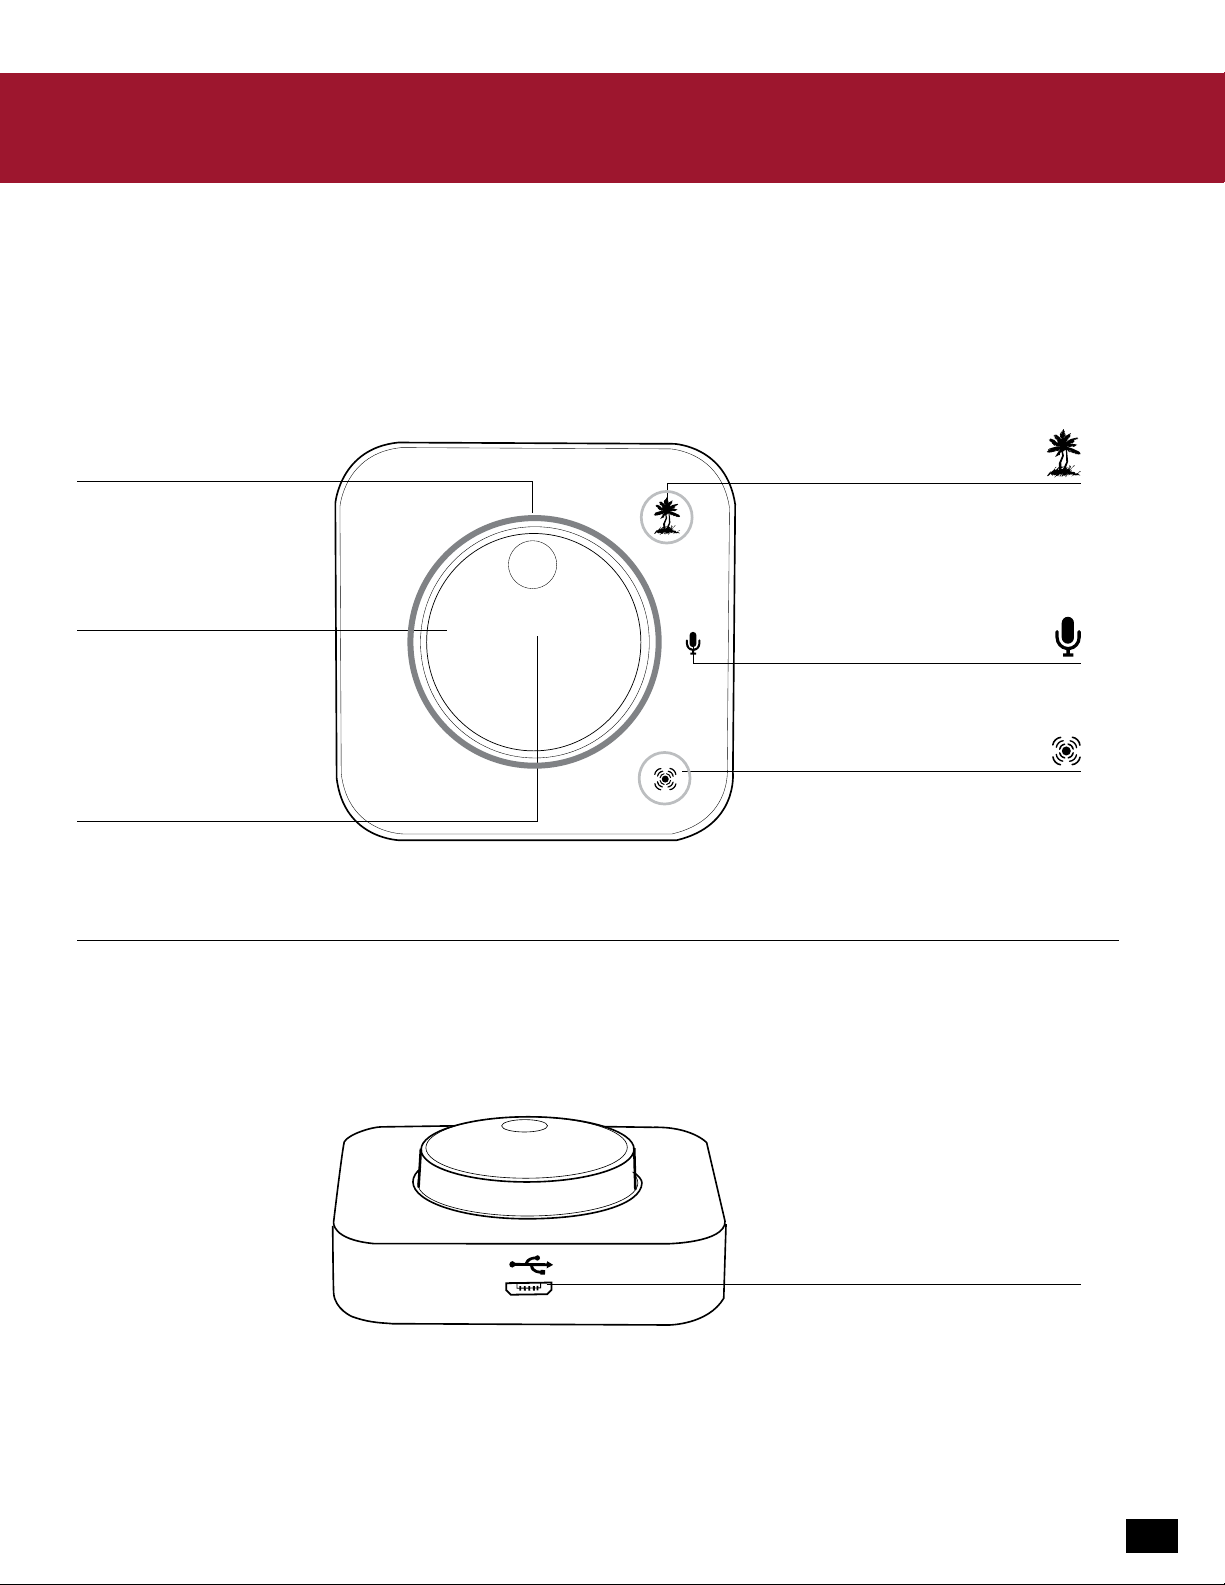
Parts and Controls
Transmitter
Top view
Media Volume
(Outer Ring)
Audio Mute.
Press dial to turn off audio.
Press again to turn it back on.
Chat Volume
(Inner Wheel)
Pairing Button and LED.
Firmly press and hold for five seconds
to start headset pairing.
(See "Transmitter Pairing" on pg. 17 for details.)
LED Blinking (White): Headset not paired.
LED On (White): Headset paired.
Mic Mute indicator
LED Off: Mic is turned on.
LED On (Red): Mic is turned off.
Surround Sound Button and LED.
Press firmly to cycle through surround
sound modes.
(See “Adjusting Sound” on page 26 for details.)
Back view
Micro USB Port
Accepts transmitter USB cable from a Mac.
8
Page 9

Initial Setup
Charge the battery
You can charge the i60 headset battery with the supplied headset charging cable. Connect the USB plug to any standard
USB port and connect the micro USB plug into the charging port in the right ear cup.
The i60 headset is designed to power off to conserve battery after five minutes of silence if Bluetooth is not active. In
addition, if the headset does not detect any movement after five minutes, the unit will power off to conserve battery life.
Connect the transmitter
Plug the transmitter USB cable into an available USB port on the Mac and the micro USB port of the transmitter.
B
C
9
Page 10
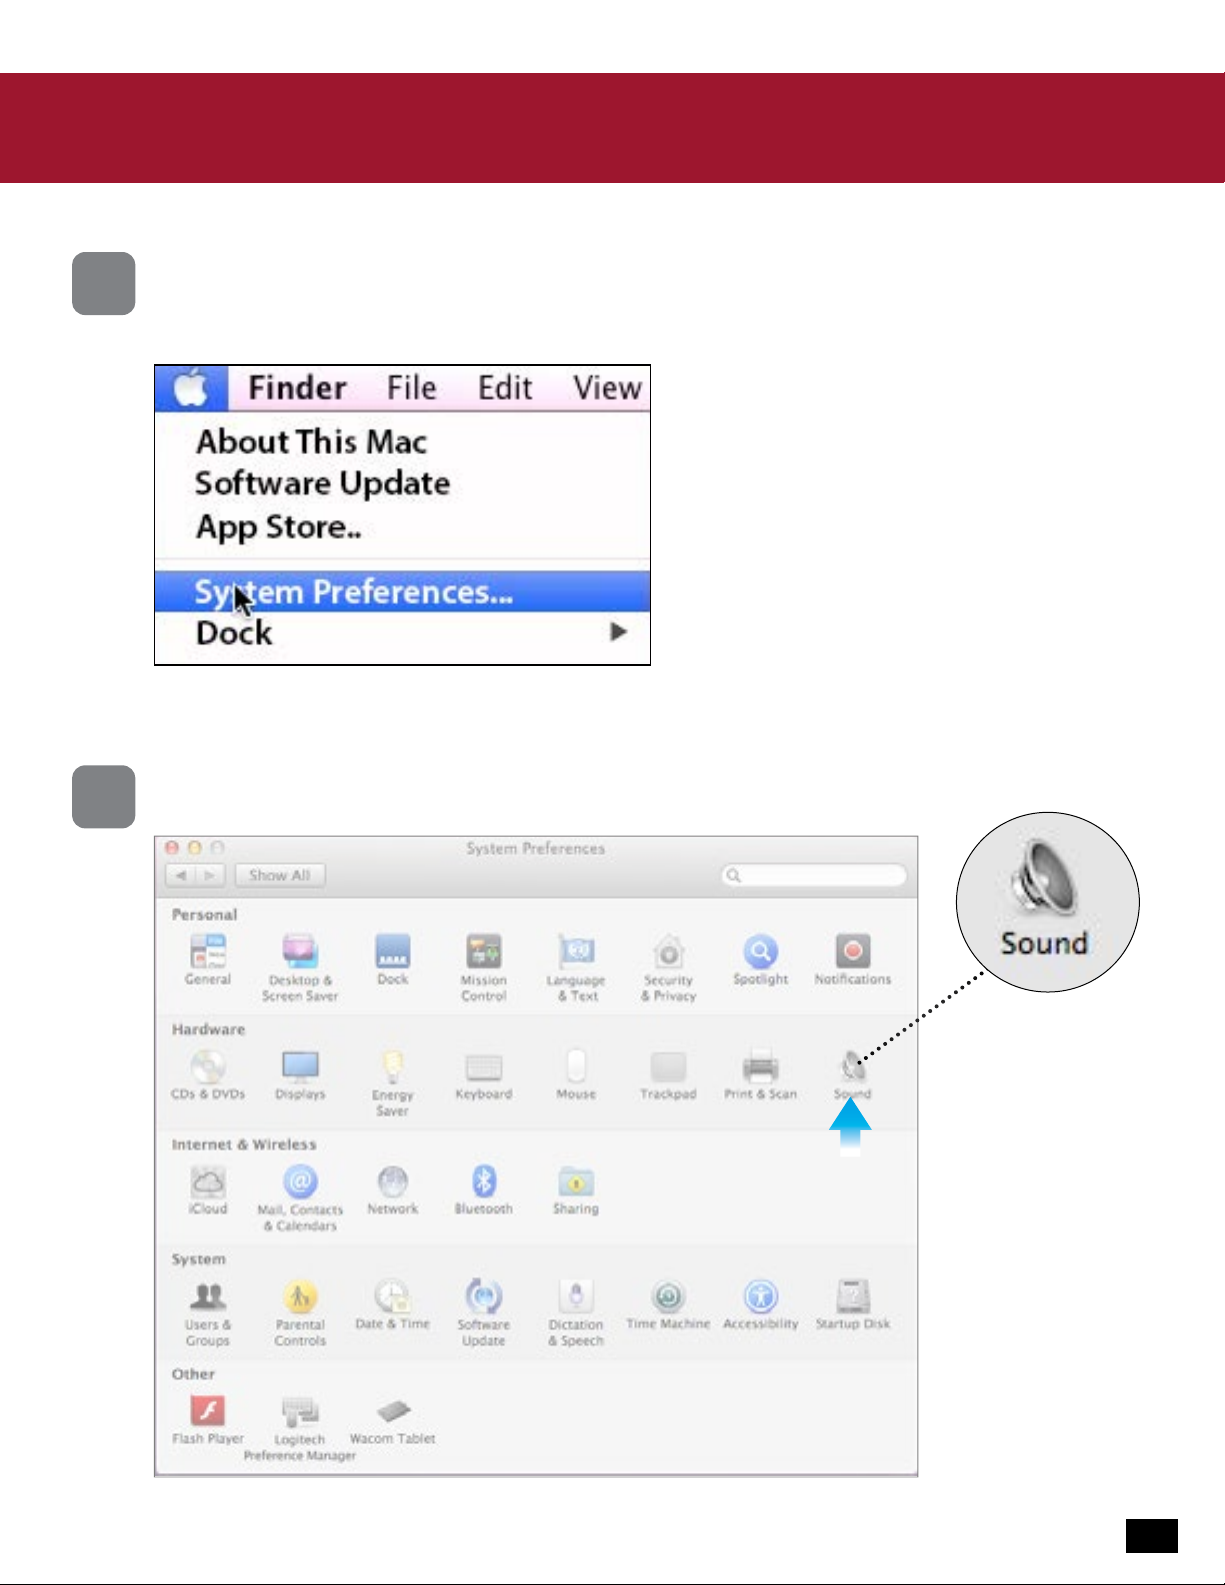
Mac OS X Setup
In the Apple menu, select System Preferences.
1
(Depending on your OS version, the screens may differ, but
the steps remain the same.)
2
In the System Preferences folder, click on Sound.
10
Page 11
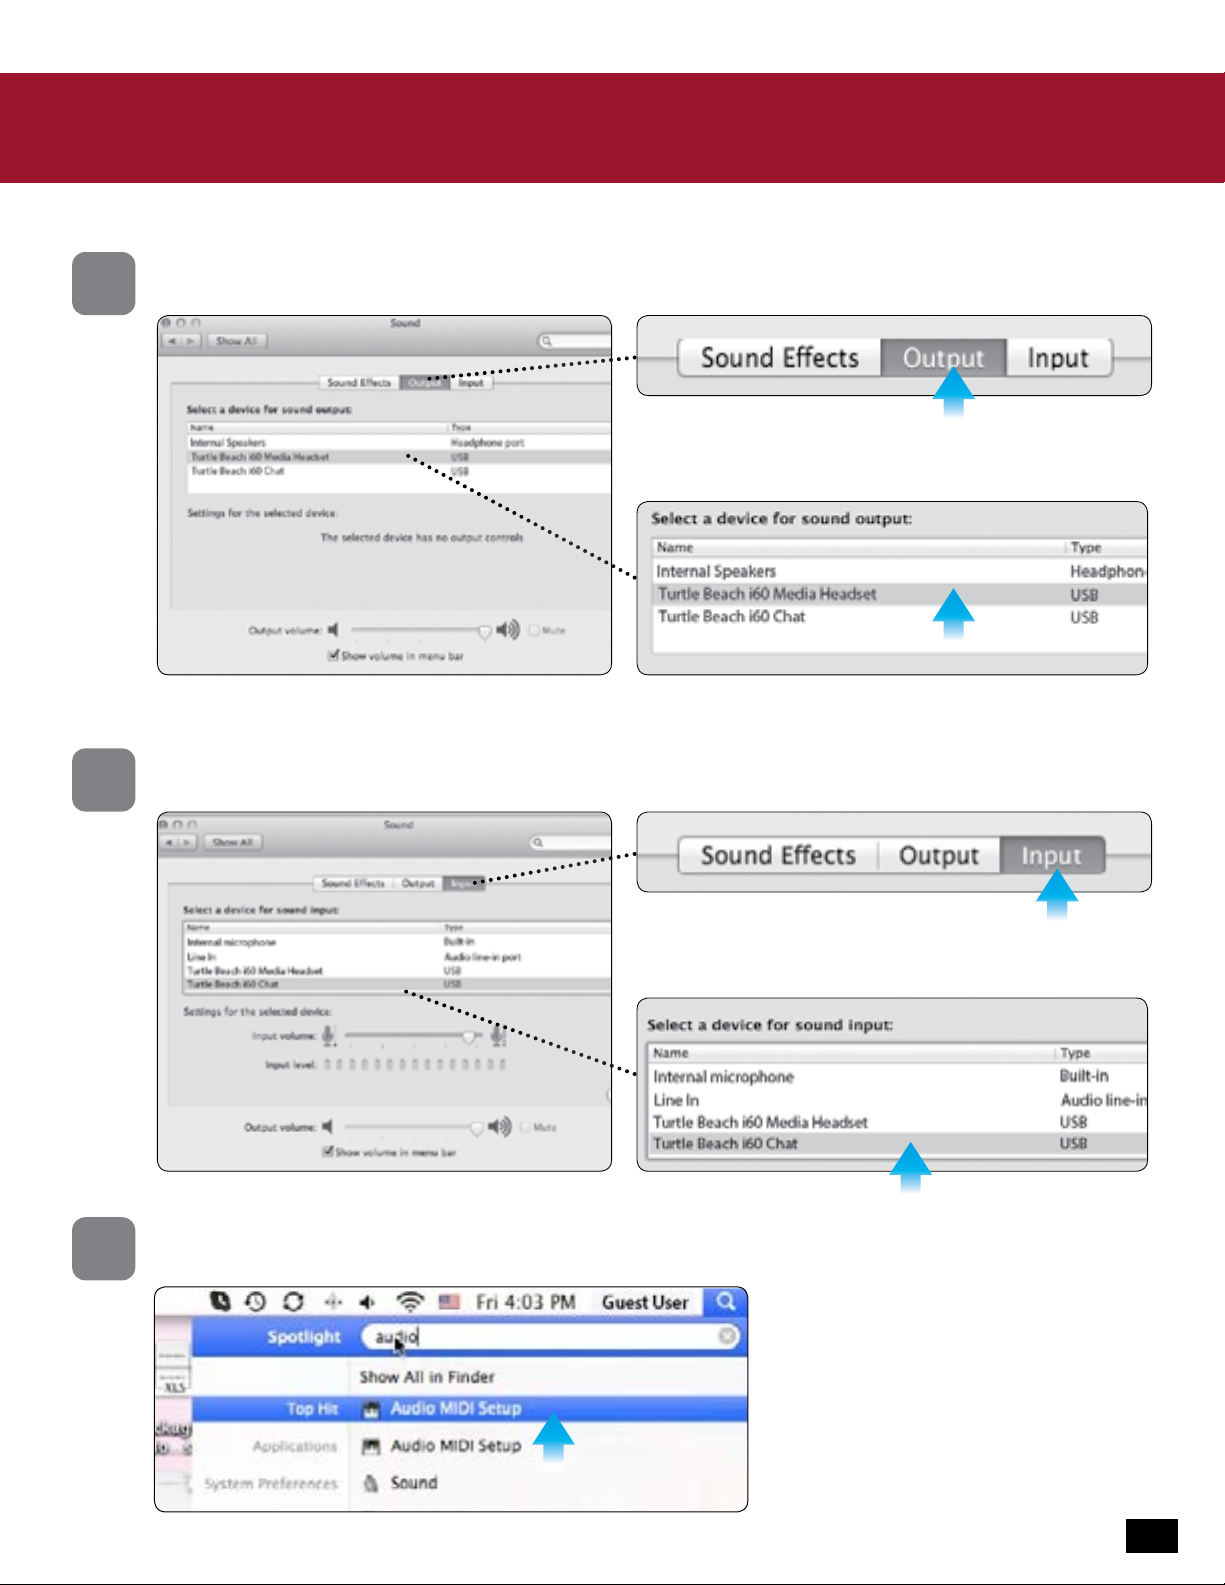
Mac OS X Setup
In the Sound dialog box, click on the Output tab and select Turtle Beach i60 Media Headset (USB).
3
4
5
Click on the Input tab and select Turtle Beach i60 Chat (USB). Close the Sound dialog box and close the System
Preferences folder.
In Finder, click into the Spotlight line and type Audio MIDI Setup. In the list of search results, click on the Audio
MIDI Setup application.
11
Page 12

Mac OS X Setup
In the Audio MIDI Setup application, select Turtle Beach i60 Media Headset, select the Output tab, select
6
8ch-16bit Integer from the drop-down menu and click on Configure Speakers.
7
Select the Multichannel tab, select 7.1 Surround from the drop-down menu and click Apply. Close the Audio
MIDI Setup application.
12
Page 13

Windows PC Setup
The i60 transmitter can also be connected to Windows® PCs for media and chat.
1
2
Plug the transmitter USB cable into an available USB port on the PC and the micro USB port of the transmitter.
B
C
Right click the Speaker icon in your task bar and select Playback Devices.
13
Page 14

Windows PC Setup
3
Right click on Turtle Beach i60 Media Headset and select Set as Default Device.
4
Right click on Turtle Beach i60 Chat Audio and select Set as Default Communication Device.
14
Page 15

Windows PC Setup
5
To enable Surround Sound select Turtle Beach i60 Media Headset and then select Configure.
6
Select 7.1 surround. Click on Next two times to ensure that Front Left and Right and Surround Speakers, are
set to full range. Then click on Next again to confirm setting.
15
Page 16

Windows PC Setup
Click on the Recording tab, then right click Turtle Beach i60 Chat Audio and select Set as Default Device. When you
7
speak you should see the green sound level meter bars on the right respond. Click on OK to accept the settings and
close the Sound dialog box.
16
Page 17

Transmitter Pairing
The i60 transmitter sends audio and chat between your Mac (or PC) and your i60 headset via digital radio frequency (RF)
signal, so a direct line of sight is not required. When you’re out of range, you may hear popping or clicking sounds if the
headset loses the RF signal.
Note: Your i60 headset is shipped from the factory already paired with its transmitter.
When the headset and transmitter are communicating, the transmitter pairing LED will stay lit. If this LED is blinking, it
means the transmitter can’t communicate with the headset. This could happen if the headset is turned off or out of range. If
the LED is blinking when the headset is on and within range, then they might need to be “Paired” as described below:
Confirm that the headset is around two feet from the transmitter.
1
Make sure the headset is off by pressing the Power
2
3
button until the i60 announces “Powering Off.”
Press and hold the headset Power button
for several seconds until the i60 announces
“Pairing Headset.”
4
Hold power
button for
5 seconds
Firmly press and hold the transmitter Pairing Button for five seconds or until the Pairing LED blinks alternating white
and red.
Pairing LED blinks alternating white and red.
Hold pairing
button for
5 seconds
After a few seconds, the transmitter pairing LED should stay on and the headset status LED should flash white about
once per second, confirming that the units are paired.
17
Page 18

Bluetooth Setup and Operation
The i60 incorporates Bluetooth technology that enables you to answer calls on your mobile phone or enjoy stereo music
streaming from a Bluetooth enabled digital music player—all without disconnecting from your Mac computer.
NOTE: For maximum battery life, turn off the Bluetooth radio if you’re not using these Bluetooth features.
Pairing an iPhone/iPad/iPod Touch
The i60 Bluetooth feature must be powered off before you start. If Bluetooth is on, press and hold the Bluetooth Button
until the headset announces “Bluetooth Powering Off.”
On the i60, press and hold the Bluetooth Button for five seconds until the flashing Bluetooth LED is alternating
1
blue and red.
2
Hold Bluetooth button for 5 seconds
Release the button. A voice prompt in the i60 headset will confirm “Bluetooth Pairing.”
On your iOS device, select Settings.
Flashing Bluetooth LED is
alternating blue and red.
18
Page 19

Bluetooth Setup and Operation
3
4
In the Settings menu, select Bluetooth and turn Bluetooth ON,
if it isn’t already.
Select Turtle Beach i60 Media Headset from the list of devices. When you
see “Connected”, then pairing is complete. The Bluetooth LED on the i60
headset will flash blue.
NOTE: For your convenience, a status icon for i60 battery life will be displayed on
the iOS device screen, next to the iOS device’s battery life icon.
19
Page 20

Bluetooth Setup and Operation
Pairing non-iOS phones
The i60 can also be paired to non-iOS phones that feature Bluetooth radio; however some i60 features such as music
playback functions and battery life display may not be available.
Pairing to a Mac
The i60 transmitter provides superb media enjoyment when you’ve set the Mac down in one location. When you’re using
your Mac on the go, you can also use the i60 connected via Bluetooth radio.
NOTE: In Bluetooth mode, transmitter functions such as Audio Presets and Surround Presets will not be available.
The Bluetooth feature must be powered off before you start. If Bluetooth is on, press and hold the Bluetooth Button until
the headset announces “Bluetooth Powering Off.”
On the i60, press and hold the Bluetooth Button for five seconds until the flashing Bluetooth LED is alternating
1
blue and red.
2
Hold Bluetooth button
for 5 seconds
In the top right corner of your Mac screen select the Bluetooth symbol and select
“Set Up Bluetooth Device”.
Flashing Bluetooth LED is
alternating blue and red.
20
Page 21

Bluetooth Setup and Operation
3
4
Select “Turtle Beach i60 Media Headset” from the list of available Bluetooth devices.
Your Mac will search for your device and will prompt you once the device is paired. A voice prompt in
the i60 headset will confirm “Bluetooth paired.” Click “Quit” once you are done.
21
Page 22

Bluetooth Setup and Operation
Go to the top right corner of your Mac screen, select the Bluetooth symbol, then select
5
“Turle Beach i60 Media Headset” and choose “Use as Audio Device”.
22
Page 23

Bluetooth Setup and Operation
Making calls
If you want to… Then...
Activate voice dialing.
Making calls
Receiving calls
Use iPhone keys to make a call.
Redial last number.
Turn off the microphone.
Adjust the volume. Press the Bluetooth Volume Up and Down buttons.
End a call. Press the Bluetooth button once or tap the tap sensor once.
Double-tap the tap sensor. (Red Oval)
Press the Mic Mute button. Press again to turn the
microphone back on.
Dial the number as normal.
Double-click Bluetooth button.
Dual Pairing
The i60 can be simultaneously paired to two Bluetooth-enabled devices at once. For example, you can pair the i60 to a
digital music player or tablet and your mobile phone at the same time. If your mobile phone is also a digital music player,
you can stream music to your headset as well. The i60 will automatically remember the last two paired devices upon
powering on.
NOTE: Only one Bluetooth device can be active on the headset at a time. For example, if you are making a call with the
headset while streaming music from a second device, the music will be turned off until the call is over.
Making Calls with iPhone
Once the i60 is successfully paired with your iPhone, you can use the headset to make and receive calls.
When idle or on a call the Bluetooth LED will blink Blue
If you want to… Then...
Activate voice dialing.
Use iPhone keys to make a call.
Redial last number.
Turn off the microphone.
Adjust the volume. Press the Bluetooth Volume Up and Down buttons.
End a call. Press the Bluetooth button once or tap the tap sensor once.
NOTE: Media Audio will be lowered automatically during the call.
Receiving Calls
When the i60 Bluetooth is powered on and there is an incoming call you will hear a musical chime or your default phone
ring tone.
If you want to… Then...
Accept a call. Press the Bluetooth button once or tap the tap
Double-tap the tap sensor. (Red Oval)
Dial the number as normal.
Double-click Bluetooth button.
Press the Mic Mute button. Press again to turn the
microphone back on.
sensor once. (Red Oval)
Reject a call. To send the call directly to your voicemail, press and hold
the Bluetooth button for three seconds until you hear a beep.
You can also do nothing, which will send the call to voicemail
after the programmed number of rings.
End a call. Press the Bluetooth button once or tap the tap sensor once.
23
Page 24

Bluetooth Setup and Operation
If you want to… Then...
If you want to… Then...
Activate voice dialing.
Making calls
Receiving calls
Streaming music from iOS devices
Use iPhone keys to make a call.
Redial last number.
Turn off the microphone.
Adjust the volume. Press the Bluetooth Volume Up and Down buttons.
End a call. Press the Bluetooth button once or tap the tap sensor once.
Double-tap the tap sensor. (Red Oval)
Accept a call. Press the Bluetooth button once or tap the tap
sensor once. (Red Oval)
End a call. Press the Bluetooth button once or tap the tap sensor once.
Reject a call. To send the call directly to your voicemail, press and hold
the Bluetooth button for three seconds until you hear a beep.
You can also do nothing, which will send the call to voicemail
after the programmed number of rings.
Press the Mic Mute button. Press again to turn the
microphone back on.
Dial the number as normal.
Double-click Bluetooth button.
Streaming music from iOS devices
The i60 not only delivers superb reproduction of music from your iPhone, iPad or iPod touch devices via Bluetooth
streaming, it also controls those devices. When listening to music from your iOS device the Bluetooth LED will blink Purple
If you want to… Then...
Play/Pause.
Press the Bluetooth Button once.
Press the Bluetooth Button twice. Skip to the next track.
Skip back one track
(or to beginning of current song).
Rewind
Press the Bluetooth Button three times.
Press the Bluetooth Button twice and hold on the second press.Fast forward.
Press the Bluetooth Button three times and hold on the third press.
24
Page 25

Wired Setup
Wired setup
You can plug directly into other music sources using the supplied mobile device cable and adapter plugs. Plug one end
into the Headphone cable jack on the bottom of the right ear cup. There are three options for connecting the other end.
Note: Make sure that both ends of the cable are securely connected for best performance.
A
E
If you want to… Then..
Listen to an iPhone, iPad or
other digital music player or tablet.
Listen to an AV receiver
or professional audio component.
Listen to commercial
airline entertainment.
Plug the cable directly into the headphone jack
of the mobile device.
Attach the supplied 6.3 adapter plug and plug into
the headphone jack of the component.
Attach the supplied airline adapter plug and plug
into the headphone jack of the airline seat.
NOTE: To comply with airline safety requirements,
be sure that i60 Bluetooth operation is turned off.
See “Summary of Bluetooth Reference Guide"
on page 30 for details
25
Page 26

Adjusting Sound
Adjusting Sound
If you want to… Then..
Adjust Mac volume.
Adjust Bluetooth volume.
Adjust Chat volume.
Turn the microphone on or off. Press the Mic Mute button on the headset. On the transmitter, the mic
Use the Media Volume control, the outer ring on the transmitter.
Use the Bluetooth Volume Up and Down buttons on the headset.
Use the Chat Volume control, the inner wheel on the transmitter.
mute indicator will glow red whenever the microphone is turned off.
To turn the microphone on again, press the Mic Mute button.
The mic mute indicator will switch off.
If you want to… Then...
Optimize the sound.
The Audio Preset Up and Down buttons cycle through the following
modes, each of which is confirmed by voice announcement.
Preset 1 Flat equalization, for the most accurate sound
Preset 2 Bass boost, for the extreme low frequencies
Preset 3 Treble boost, for the extreme high frequencies
Adjust surround sound.
Preset 4 Bass and treble boost
Preset 5 Stereo expander (surround off) emphasizes the difference
between left and right channels to broaden the
stereo soundstage
Preset 6 Mid boost for the frequencies where human speech
is concentrated
Preset 7 Footstep Focus: game mode that helps identify when
someone is sneaking up on you by boosting soft sounds
while cutting loud sounds
Preset 8 Superhuman Hearing: game mode that boosts soft sounds
The i60 takes advantage of DTS® Headphone:X Surround Sound, which
uses sophisticated processing to create surround sound using just two
speakers. The system reproduces the sonic characteristics of specific
rooms, optimized for specific types of content. The surround sound
button on the transmitter cycles through three preset “rooms” and Off.
Surround 1 Movie Mode (LED lit)
Surround 2 Music Mode (LED lit)
Surround 3 Game Mode (LED lit)
Surround 4 Surround Off (LED off)
26
Page 27

Adjusting Sound
If you want to… Then...
Optimize the sound.
Adjust surround sound.
The i60 takes advantage of DTS® Headphone:X Surround Sound, which
uses sophisticated processing to create surround sound using just two
speakers. The system reproduces the sonic characteristics of specific
rooms, optimized for specific types of content. The surround sound
button on the transmitter cycles through three preset “rooms” and Off.
Surround 1 Movie Mode (LED lit)
Surround 2 Music Mode (LED lit)
Surround 3 Game Mode (LED lit)
Surround 4 Surround Off (LED off)
The Audio Preset Up and Down buttons cycle through the following
modes, each of which is confirmed by voice announcement.
Preset 1 Flat equalization, for the most accurate sound
Preset 2 Bass boost, for the extreme low frequencies
Preset 3 Treble boost, for the extreme high frequencies
Preset 4 Bass and treble boost
Preset 5 Stereo expander (surround off) emphasizes the difference
between left and right channels to broaden the
stereo soundstage
Preset 6 Mid boost for the frequencies where human speech
is concentrated
Preset 7 Footstep Focus: game mode that helps identify when
someone is sneaking up on you by boosting soft sounds
while cutting loud sounds
Preset 8 Superhuman Hearing: game mode that boosts soft sounds
If you want to… Then...
Control the mic sound.
Bring the controls to your fingertips. With the Ear Force Audio Hub, you can change your audio presets such as bass boost,
surround sound as well as upgrade your headset to the latest firmware and much more with just a tap away.
DOWNLOAD THE APP
The dual mic array of the i60 enables precise audio pickup without a mic
boom in front of your mouth. It also provides special audio effects that
you can cycle through using the Mic Settings button.
Mic 1 Flat
Mic 2 High Morph uses the dual mic array to create a chipmunk-like sound
Mic 3 Low Morph uses the dual mic array to create a robot-like sound
Mic 4 Voice Reverb
turtlebeach.com/i60
27
Page 28

Chat / VoIP Setup
Setting your chat
Chat programs screens may differ depending on the operating system.
1
Within your chat program open your audio/video preferences. Select “Turtle Beach i60 Media Headset”for
Microphone, Ringing and Speakers.
Note: If you are not using the i60 transmitter and paired to your Mac
with only Bluetooth, after your chat or call is completed you will need
to set your headset back to stereo.
Go to the top right corner of your Mac screen,
option-click the Volume symbol, and select
“Turle Beach i60 Media Headset Stereo”.
28
Page 29

Charging the Headset
The i60 headset is designed to deliver up to 10 hours of continuous play on a single battery charge. To Charge the i60, connect
the headset charging cable from any standard USB port to the charging port on the right ear cup. You can even charge while
continuing to use the headset.
Note: When charging, the LED on the Right Earcup will be solid red. Once charging has completed the LED will switch to Blue and begin to
blink.”
A
D
29
Page 30

Bluetooth Reference Guide
Summary of Bluetooth Button functions
The Bluetooth Button performs a variety of functions depending on the current state of Bluetooth operation, plus how
you press the button (single, double, triple or long key press).
Current Bluetooth State Single Key Press Double Key Press Mid/Triple Key Press Long Key Press
Powered Off Power On (After BT Pairing Mode
power on, the i60
automatically attempts
to reconncect to last
2 devices for 1 minute
Pairing Mode Power Off
Standby Connect to last Power Off
device
Connected to device Redial Activate Voice Power Off
Recognition (Siri)
Connected to 2 devices Redial Activiate Voice Power Off
Recognition (Siri)
Outgoing Call (Headset) End Call Transfer audio to Power Off
Mobile Device
Call Setup Cancel Call Setup Power Off
Outgoing Call (Device) End Call Transfer audio Power Off
to Headset
Incoming Call Answer Call Reject Call Power Off
In Active Call (Headset) End Call Transfer audio Power Off
to Device
In Active Call (Device) End Call Transfer audio Power Off
to Headset
In Active Call w/ second Hold current call End current call Reject Incoming Call Power Off
incoming call and accept and answer
incoming call incoming call
2 Active Calls End current call Hold current call and Power Off
and accept held accept held call
call
A2DP Streaming Play/Pause Next Track Previous Track Power Off
(Note: Requires AVRCP)
iTunes Functions (OSX)
iTunes Off/Closed Open iTunes
Open and not playing Play/Pause Next Track Previous Track
Streaming Audio
iOS A2DP Functions
Audio on iOS Device Play/Pause Next Track Previous Track
(Hold to Fast Forward (Hold to rewind)
30
Page 31

Specifications
Headset
- 50mm diameter speakers
- Headset frequency response: 20 Hz - 20 kHz, >120 dB SPL @ 1 kHz
- Dual condenser microphones: frequency response 50 Hz – 50 kHz
- Headset amplifier THD: <1%
- Wireless transmission: 2.4/5.2 GHz Dual-Band RF for audio between headset and supplied
transmitter
- Bluetooth 3.0 +EDR
- USB port for recharging with supplied USB charging cable
- Rechargeable lithium polymer batteries with up to 15 hours continuous operating time
- Automatic shut down after approx. 5 minutes of carrier loss or silence to conserve battery power
Transmitter
- Transmitter frequency response: 20 Hz - 20 kHz
- Transmitter: USB Power – (5V DC @ 180mA max)
- Transmitter Digital Input: USB 2.0
Compatibility:
- Mac OS X 10.8 or Higher
- iOS 6.0 or Higher
Made for iPhone 5, iPhone 4S, iPhone 4, iPad (4th generation),
iPad mini, iPad (3rd generation), iPad 2, iPod touch (3rd generation)
31
Page 32

Troubleshooting Tips
No Sound
Possible Cause… Solution
Media volume control
turned down
Check that the Media volume control on the transmitter
is turned up.
Headset is muted Press the Audio Mute (Center Dial) button on the transmitter.
Transmitter disconnected Check that both ends of the transmitter USB cable are properly seated
and that the Turtle Beach i60 is a selected device for the Mac Sound Input
and Output. (See “Mac OSX Setup” on pg. 10 for details.)
Headset is off Check that the headset is powered on. The Status LED on the left ear cup
should be flashing
Headset not paired Check that the transmitter LED is on continuously. If the LED is
pulsing slowly and off, it indicates that the headset and transmitter
need to be “Paired” as described in the section “Transmitter Pairing.”
No Sound
Audio Drops
No Sound
Possible Cause… Solution
Media volume control
turned down
Headset is muted Press the Audio Mute (Center Dial) button on the transmitter.
Transmitter disconnected Check that both ends of the transmitter USB cable are properly seated
Check that the Media volume control on the transmitter
is turned up.
and that the Turtle Beach i60 is a selected device for the Mac Sound Input
and Output. (See “Mac OSX Setup” on pg. 10 for details.)
Headset is off Check that the headset is powered on. The Status LED on the left ear cup
Headset not paired Check that the transmitter LED is on continuously. If the LED is
should be flashing
pulsing slowly and off, it indicates that the headset and transmitter
need to be “Paired” as described in the section “Transmitter Pairing.”
Audio Drops, Popping or Clicking Sounds
Audio dropouts, popping or clicking sounds on the headset are caused by poor reception.
Possible Cause… Solution
Headset out of range For best performance, use the headset within 20 feet of the transmitter.
Wall or obstruction Try moving yourself or the transmitter.
Interference at the
transmitter antenna
Headset is off Check that the headset is powered on. The Status LED on the left ear cup
Radio interference from
wireless LAN
Try moving the transmitter. Avoid placing the transmitter behind large
metal objects.
should be flashing
Try moving the transmitter or any wireless LAN base stations
in the vicinity.
32
Page 33

Possible Cause… Solution
Media volume control
turned down
Check that the Media volume control on the transmitter
is turned up.
Headset is muted Press the Audio Mute (Center Dial) button on the transmitter.
Transmitter disconnected Check that both ends of the transmitter USB cable are properly seated
and that the Turtle Beach i60 is a selected device for the Mac Sound Input
and Output. (See “Mac OSX Setup” on pg. 10 for details.)
Headset is off Check that the headset is powered on. The Status LED on the left ear cup
should be flashing
Headset not paired Check that the transmitter LED is on continuously. If the LED is
pulsing slowly and off, it indicates that the headset and transmitter
need to be “Paired” as described in the section “Transmitter Pairing.”
No Sound
Possible Cause… Solution
Headset out of range For best performance, use the headset within 20 feet of the transmitter.
Wall or obstruction Try moving yourself or the transmitter.
Interference at the
transmitter antenna
Try moving the transmitter. Avoid placing the transmitter behind large
metal objects.
Headset is off Check that the headset is powered on. The Status LED on the left ear cup
should be flashing
Radio interference from
wireless LAN
Try moving the transmitter or any wireless LAN base stations
in the vicinity.
Audio Drops
Microphone not working
Troubleshooting Tips
Voice Chat Drops
Most in-game voice chat drops are caused by network congestion or “lag.” They usually subside after a few moments so
please be patient. In extreme cases, you may need to leave the game and return to reset the chat function. If you use a wireless
internet connection, low signal strength from your modem/router can make the voice chat malfunction. For best results, we
recommend a wired connection from your modem/router to your Mac computer.
Possible Cause… Solution
Not selected as an Input Device Select the i60 as an Input Device as described in "Mac OSX Setup"
Headset not paired Pair the transmitter and headset as described in "Transmitter Pairing"
Mic muted On the transmitter, the mic mute indicator will be lit red. Press the
on page 10.
on page 17.
Mic Mute button on the headset. The mic mute indicator will turn off.
Bluetooth not working
Try using the Bluetooth pairing instructions (See “Bluetooth Operation”on page 18} to pair your headset to a different
Bluetooth-ready mobile phone than the one you usually use. With the headset paired to the phone, call a friend/relative.
Is the person you are calling able to hear you? Are you able to hear the person you are calling? If you’re experiencing the
same issue with two different phones, you will want to contact our support team via the link below.
Bluetooth audio quality
If you are not using the i60 transmitter and paired to your Mac with only Bluetooth, after your chat or call is completed
you may experience a drop in audio quality. You will need to set your headset back to stereo. See “Chat / VoIP Setup” on
page 28.
Headset not powering on
The battery may be depleted. Charge your headset for 8 hours. (You may use the headset while recharging.)
See “Charging the Headset” on page 29. If your issue is not resolved by these steps.
please visit turtlebeach.com/support
33
Page 34

Important Safety Information
To avoid potential damage to the device, always disconnect all cables before transporting it.
WARNING: Permanent hearing damage can occur if a headset is used at high volumes for extended periods of time, so
it is important to keep the volume at a safe level. Over time, your ears adapt to loud volume levels, so a level that may
not cause initial discomfort can still damage your hearing. If you experience ringing in your ears after listening with the
headset, it means the volume is set too loud. The louder the volume is set, the less time it takes to affect your hearing.
So, please take care to listen at moderate levels.
· Before placing a headset on your ears, turn the volume down completely, then slowly increase it to a comfortable level.
· Turn down the volume if you can’t hear people speaking near you.
· Avoid turning up the volume to block out noisy surroundings.
34
Page 35

Regulatory Compliance Statements
for the i60 Models
Federal Communications Commission (FCC) Compliance Notices
Class B Interference Statement
This equipment has been tested and found to comply with the limits for a Class B digital device, pursuant to Part 15,
Subpart B of the FCC Rules. These limits are designed to provide reasonable protection against harmful interference in a
residential installation. This equipment generates, uses, and can radiate radio frequency energy and, if not installed and
used in accordance with the instructions, may cause harmful interference to radio communications. However, there is no
guarantee that interference will not occur in a particular installation. If this equipment does cause harmful interference
to radio or television reception, which can be determined by turning the equipment off and on, the user is encouraged to
try to correct the interference by one or more of the following measures:
• Reorient or relocate the receiving antenna.
• Increase the separation between the equipment and receiver.
• Connect the equipment into an outlet on a circuit different from that to which the receiver is connected.
• Consult the dealer or an experienced radio/TV technician for help.
FCC Caution:
This device complies with Part 15 of the FCC Rules. Operation is subject to the following two conditions: (1) This device
may not cause harmful interference, and (2) this device must accept any interference received, including interference
that may cause undesired operation.
Canadian ICES Statements
Canadian Department of Communications Radio Interference Regulations
This digital apparatus does not exceed the Class B limits for radio-noise emissions from a digital apparatus as set out
in the Radio Interference Regulations of the Canadian Department of Communications. This Class B digital apparatus
complies with Canadian ICES-003.
Règlement sur le brouillage radioélectrique du ministère des Communications
Cet appareil numérique respecte les limites de bruits radioélectriques visant les appareils numériques de classe A prescrites dans le Règlement sur le brouillage radioélectrique du ministère des Communications du Canada. Cet appareil
numérique de la Classe B est conforme à la norme NMB-003 du Canada.
European Union and European Fair Trade Association (EFTA) Regulatory Compliance
This equipment may be operated in the countries that comprise the member countries of the European Union and the
European Fair Trade Association. These countries, listed below, are referred to as The European Community throughout
this document:
AUSTRIA, BELGIUM, BULGARIA, CYPRUS, CZECH REPUBLIC, DENMARK, ESTONIA, FINLAND, FRANCE, GERMANY, GREECE,
HUNGARY, ICELAND, IRELAND, ITALY, LATVIA, LICHTENSTEIN, LITHUANIA, LUXEMBOURG, MALTA, NETHERLANDS, NORWAY, POLAND, PORTUGAL, ROMANIA, SLOVAKIA, SLOVENIA, SPAIN, SWEDEN, SWITZERLAND, UNITED KINGDOM
35
Page 36

Declaration of Conformity
Heading
Marking by this symbol:
indicates compliance with the Essential Requirements of the EMC Directive of the European Union (2004/108/EC). This
equipment meets the following conformance standards:
Safety: EN 60950-1: 2006 + A11 + A1 + A12 (T-Mark License)
Also Licensed for Standards:
EC 60950-1: 2005 + A1: 2009, (CB Scheme Report/Certificate),
UL60950-1 (NRTL License), CSA22.2, 60950-1 (SCC License)
Additional licenses issued for specific countries available on request
Emissions: EN 55022: 2010, EN 50332-1: 2000, EN50332-2: 2003
EN61000-3-2: 2006 +A1: 2009 +A2: 2009, EN61000-3-3: 2008
CISPR 22: 2010
Immunity: EN 55024: 2010, EN61000-4-2: 2008, EN61000-4-3: 2010,
EN61000-4-4: 2011, EN 61000-4-5: 2005, EN 610004-6: 2008,
EN61000-4-11: 2004
The products are licensed, as required, for additional country specific standards for the International Marketplace. Additional issued licenses available upon request.
Environmental: Low Voltage Directive 2006/95/EC,
RoHS 2002/95/EC
REACH 1907/2006/EC
WEEE 2002/96/EC
Warning!
This is a Class B product. In a domestic environment, this product may cause radio interference, in which case, the user
may be required to take appropriate measures.
Achtung!
Dieses ist ein Gerät der Funkstörgrenzwertklasse B. In Wohnbereichen können bei Betrieb dieses Gerätes Rundfunkstörungen auftreten, in welchen Fällen der Benutzer für entsprechende Gegenmaßnahmen verantwortlich ist.
Attention!
Ceci est un produit de Classe B. Dans un environnement domestique, ce produit risque de créer des interférences radioélectriques, il appartiendra alors à l’utilisateur de prendre les mesures spécifiques appropriées.
36
Page 37

LIMITED ONE YEAR WARRANTY FOR TURTLE BEACH PRODUCTS:
Voyetra Turtle Beach, Inc. (“VTB”) warrants to the original end-user purchaser (“Purchaser”) that the retail Turtle Beach hardware product herein
(“Product”) will be free of defects in materials and workmanship for a period of one year from the date of purchase by the Purchaser (“Warranty
Period”). Any Extended Warranty or Service Plans purchased through a Retail store are not honored by VTB. The Warranty refers to the repair/replacement of a defective product during this period and not a refund.
This limited warranty is extended only to the original Purchaser of a new product, which was not sold “AS IS”. It is not transferable or assignable to any
subsequent purchaser. This limited warranty is applicable only in the country or territory where the Product was purchased from an authorized VTB
retailer and does not apply to a Product that has been purchased as used or refurbished or was included as part of a non-VTB product.
WARRANTY SERVICE:
In the USA and CANADA Warranty Service is provided by our Turtle Beach USA offices and in all other Countries it is provided by our local International
Distributors when available. Refurbished/Recertified products are sold on an AS IS basis with a 90-day Warranty or less in accordance with each vendor’s policy.
VTB does not warrant uninterrupted or error-free operation of the Product and is under no obligation to support the Product for all computer operating
systems or future versions of such operating systems.
If a defect should occur during the Warranty Period, Purchaser must contact VTB to obtain a Return Merchandise Authorization (“RMA”) number on the
basis of the dated purchase receipt. Purchaser will be responsible for shipping costs incurred in returning the defective Product to an authorized VTB
service center, or to the repair facility located at VTB’s corporate headquarters. VTB will not be responsible for other products or accessories included
with the defective Product sent to VTB. The RMA number must be clearly indicated on the outside of the package. Packages without an RMA number
will be refused by VTB or its representatives and returned to sender at the sender’s expense.
In the event of a defect, Purchaser’s sole and exclusive remedy, and VTB’s sole liability, is expressly limited to the correction of the defect by adjustment, repair, or replacement of the Product at VTB’s sole option and expense. VTB owns all Products it has replaced and all parts removed from
repaired Products. VTB uses new and reconditioned parts made by various manufacturers in performing warranty repairs and building replacement
products. If VTB repairs or replaces a product, the original Warranty Period is not extended, however, VTB warrants that repaired or replacement parts
will be free from defects in material and workmanship for a period of thirty (30) days from the date of repair or replacement, or for the remainder of
the Warranty Period, whichever is greater.
This warranty does not apply to any Product that has had its serial number altered, removed or defaced, or any Product damage caused by shipping,
improper storage, accident, problems with electrical power, abuse, misuse, neglect, ordinary wear, acts of God (e.g. flood), failure to follow directions,
improper maintenance, use not in accordance with product instructions, unauthorized modification or service of the Product or damage resulting from
the use of the Product with hardware, software or other products not provided by or specifically recommended by VTB.
NOTES:
- Replacement Parts and accessories that are subject to “wear and tear” such as earpads, mic foam covers, talkback cables, etc. have a three (3)
month Warranty.
- Replacement Parts for Discontinued Products are sold on an AS IS basis, they are not supported and come with a 30 day Warranty.
THIS LIMITED WARRANTY IS PURCHASER’S SOLE AND EXCLUSIVE REMEDY AND IS IN LIEU OF ALL OTHER WARRANTIES, EXPRESS OR IMPLIED. TO THE
EXTENT PERMITTED BY APPLICABLE LAW, VTB HEREBY DISCLAIMS THE APPLICABILITY OF ANY IMPLIED WARRANTY OF MERCHANTABILITY, FITNESS
FOR A PARTICULAR PURPOSE OR USE FOR THE PRODUCT. IF SUCH A DISCLAIMER IS PROHIBITED BY APPLICABLE LAW, THE IMPLIED WARRANTY IS
LIMITED TO THE DURATION OF THE FOREGOING LIMITED WRITTEN WARRANTY.
IN NO EVENT SHALL VTB BE LIABLE FOR ANY INDIRECT, INCIDENTAL, SPECIAL, PUNITIVE OR CONSEQUENTIAL DAMAGES, OR DAMAGES, INCLUDING BUT
NOT LIMITED TO ANY LOST PROFITS, DATA, OR LOSS OF USE, ANY THIRD PARTY CLAIMS, AND ANY INJURY TO PROPERTY OR BODILY INJURY (INCLUDING DEATH) TO ANY PERSON, ARISING FROM OR RELATING TO THE USE OF THIS PRODUCT OR ARISING FROM BREACH OF THE WARRANTY, BREACH OF
CONTRACT, NEGLIGENCE, TORT, OR STRICT LIABILITY, EVEN IF VTB HAS BEEN ADVISED OF THE POSSIBILITY OF SUCH DAMAGES.
This warranty supersedes all prior agreements or understandings, oral or written, relating to the Product, and no representation, promise or condition not contained herein will modify these terms. Some states do not allow the exclusion or limitation of incidental or consequential damages, so the
above exclusion or limitation may not apply to you. This warranty gives you specific legal rights. You may also have other rights, which vary from state
to state. Any action or lawsuit for breach of warranty must be commenced within eighteen (18) months following the purchase of the Product.
37
Page 38

EXCLUSIONS FROM LIMITED WARRANTY:
This Limited Warranty shall not apply and VTB has no liability under this Limited Warranty if the Turtle Beach Product:
- is used for commercial purposes such as “LAN, Call Centers” (including rental or lease);
- is modified or tampered with;
- is damaged by Acts of God, power surge, misuse, abuse, negligence, accident, wear and tear, mishandling, misapplication, or other causes unrelated to
defective materials or workmanship;
- serial number is defaced, altered or removed;
- is not used in accordance with the documentation and use instructions; or
- is repaired, modified or altered by other than authorized repair centers.
- is no longer available because it was discarded.
38
Page 39

™
Watch Turtle Beach product training videos at:
Product support and warranty information:
youtube.com/TurtleBeachVideos TurtleBeach.com/support
Copyright © 2013 Voyetra Turtle Beach, Inc. (VTB, Inc.) All rights reserved. Turtle Beach, the Turtle Beach Logo, Voyetra, and Ear Force are either
trademarks or registered trademarks of VTB, Inc. “Made for iPod,” “Made for iPhone,” and “Made for iPad” mean that an electronic accessory has been
designed to connect specifically to iPod, iPhone, or iPad, respectively, and has been certified by the developer to meet Apple performance standards.
Apple is not responsible for the operation of this device or its compliance with safety and regulatory standards. Please note that the use of this accessory with iPod, iPhone, or iPad may affect wireless performance. Mac, iPad, iPhone, iPod touch, iPod and SIRI are trademarks of Apple Inc., registered
in the U.S. and other countries. Actual product appearance may differ from package imagery. For DTS patents, see http://patents.dts.com. Manufactured under license from DTS Licensing Limited. DTS, the Symbol, & DTS and the Symbol together are registered trademarks, and DTS Headphone:X is
a trademark of DTS, Inc. © DTS, Inc. All Rights Reserved.
This product is compliant with the Consumer Product Safety Improvement Act of 2008, Public Law 110-314 (CPSIA)
 Loading...