

Page 1
Gaming Headset with
Multi-Speaker 5.1 Surround Sound
User Guide
Page 2

Z6A Headset
What’s in the Box
T
U
R
T
L
E
B
E
A
C
H
.
C
O
M
In-line
5.1 Channel Amplifier
5.1 Channel
Splitter Cable
User Guide
Sticker
product support and warranty information:
www.TurtleBeach.com/support
Page 3

Table of Contents
About the Ear Force Z6A pg. 1
PC Setup pg. 3
Using the Amplifier pg. 5
Optional PC Setup pg. 7
XBOX 360® Setup pg. 8
Technical Specifications pg. 12
Additional Accessories pg. 13
Maintaining Your Headset pg. 14
Important Safety Information pg. 15
View our YouTube videos:
www.youtube.com/TurtleBeachVideos
Page 4
1
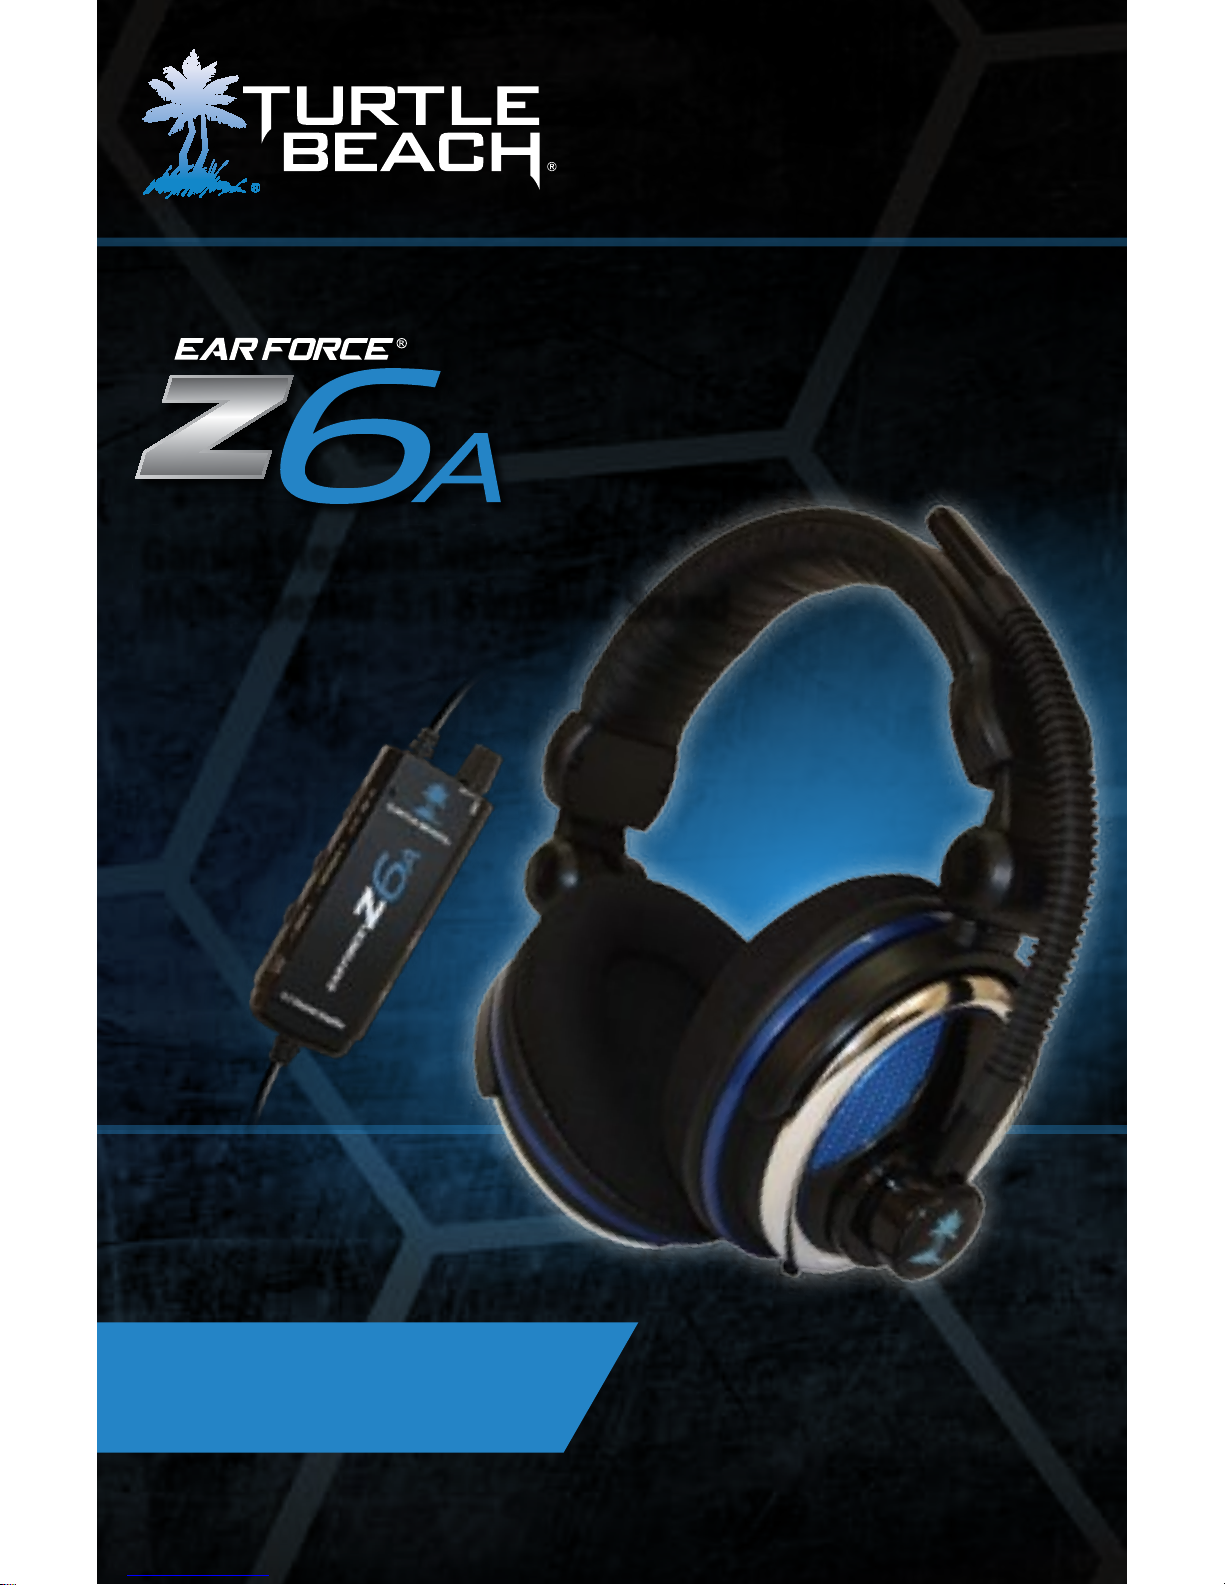
About the Ear Force Z6A
Congratulations on your purchase of the Z6A! The Z6A combines
the audio quality and comfort of a professional-grade gaming
headset with the full impact and 3D positional accuracy of
multi-speaker 5.1 surround sound. With eight premium speakers,
including dual subwoofers, the Z6A is powered by a 5.1 channel
amplifier with bass enhancement, letting you pinpoint critical
sound cues from every direction. To get the best gaming
experience from your Z6A, please take a few moments to review
this guide.
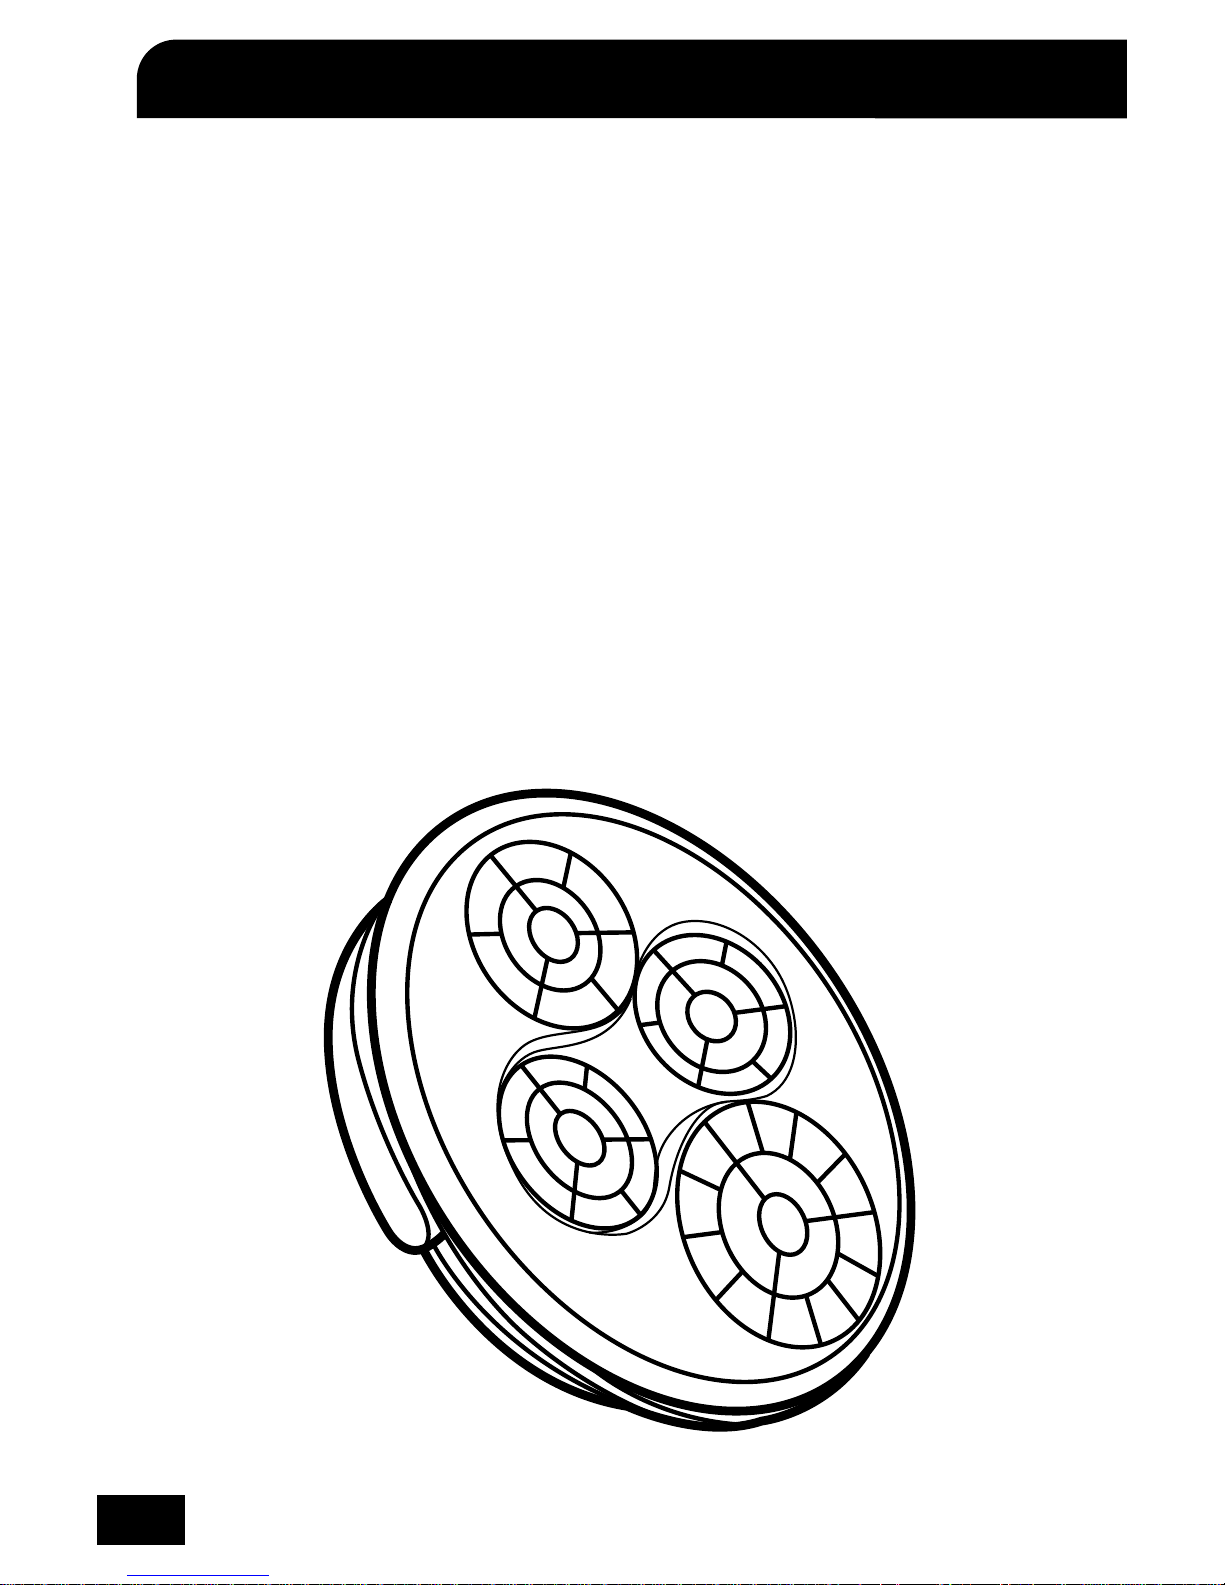
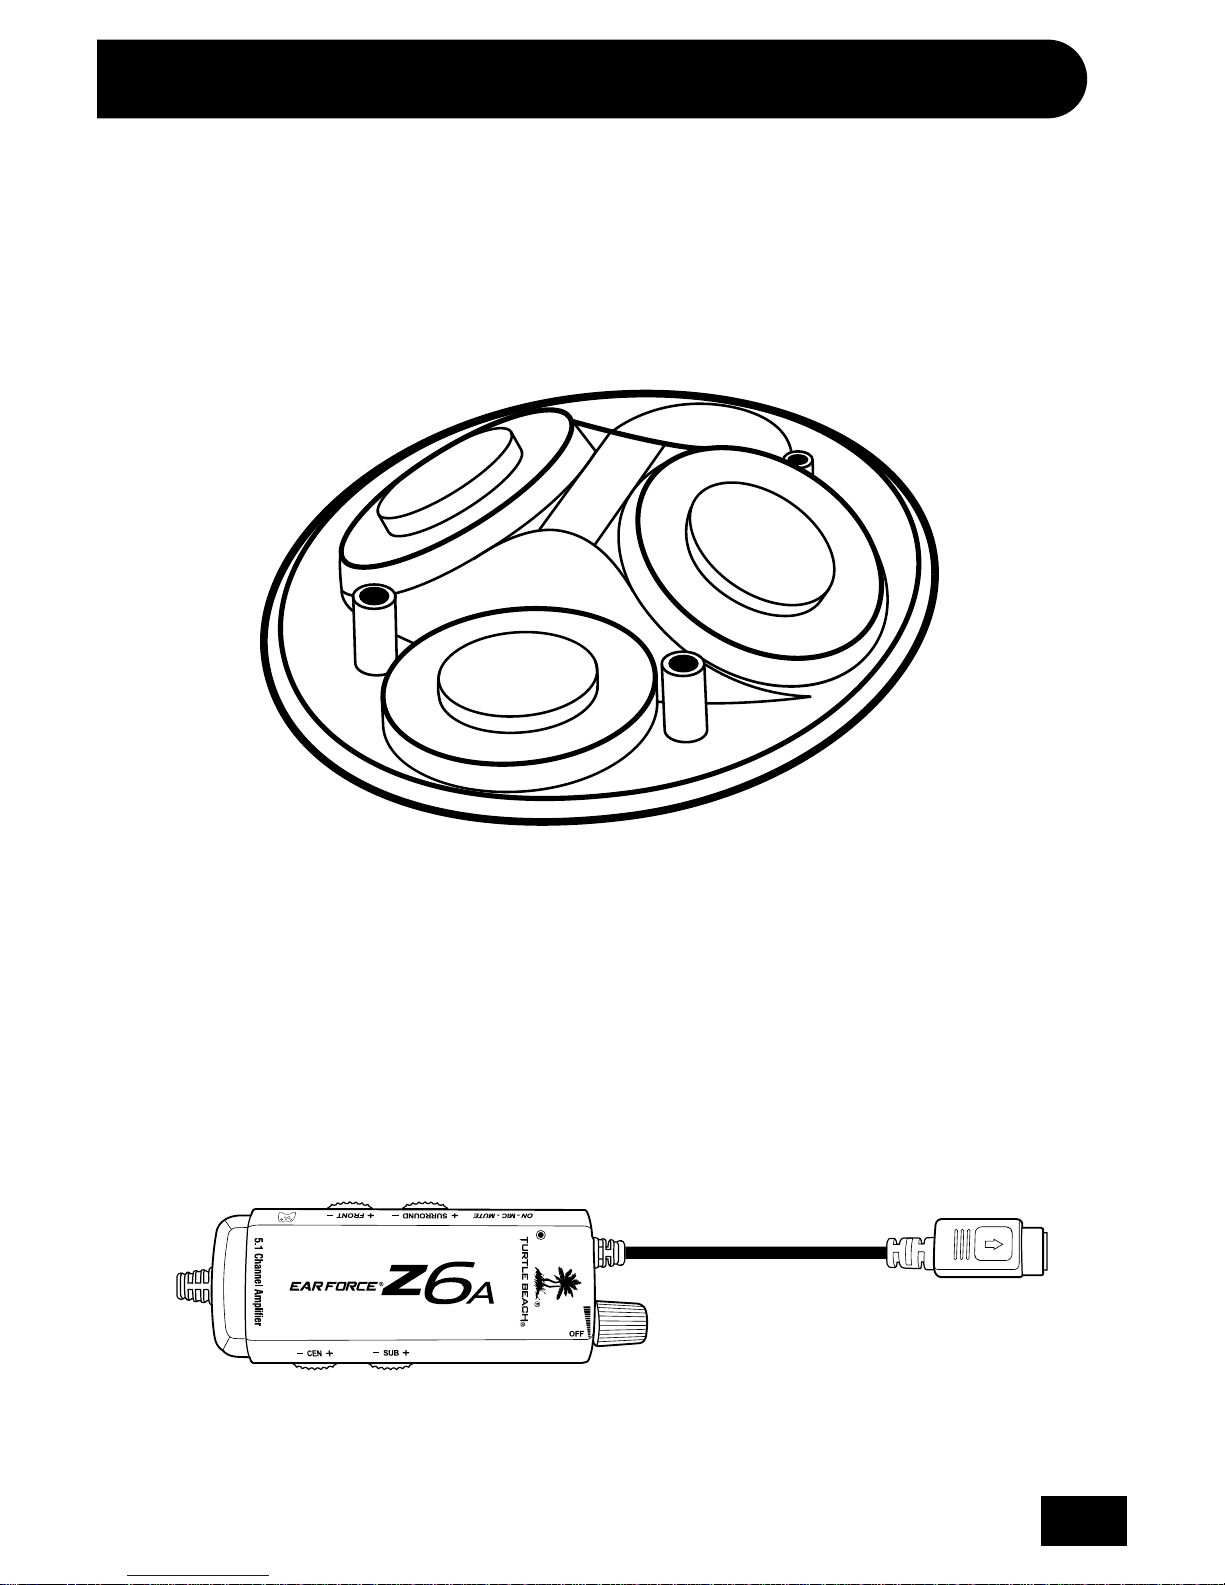
Multi-Speaker Surround Sound
Designed to deliver high quality 5.1 surround sound, the Z6A
incorporates 4 premium speakers in each ear cup, including
40mm subwoofers for extended bass and extraordinary
dynamic range.
Page 5
2
Acoustically Angled Speakers
Providing more realistic directional audio perception, the
front and surround speakers in the Z6A are acoustically
angled, allowing you to more accurately pinpoint sounds than
conventional flat speakers.
5.1 Channel Amplifier with Quick Disconnect
The Z6A amplifier gives you quick access to independent controls
for all 5.1 audio channels, letting you tune your Z6A for any
gaming situation. The headset and amplifier also feature a quick
disconnect so you can easily detach it without having to unplug
the 5.1 outputs from your computer.
Page 6

3
PC Setup
1
3
2
(black)
(green)
(orange)
(pink)
Page 7

4
Step 1:
Align the multi-pin amplifier and headphone connectors as shown
and carefully insert them together, making sure not to force the pins.
Step 2:
Connect the four colored audio jacks to the corresponding inputs
and outputs on your sound card, as indicated in the table below:
Step 3:
Insert the USB connector into any USB port on your PC.
Step 4:
Select the microphone as the recording source in your sound
card’s control panel. Then adjust the volume level and sensitivity
for adequate response when speaking into the mic.
Step 5:
Set your sound card for 5.1 channel output and adjust the volume
settings to a comfortable level.
Sound Card Settings:
Most sound cards allow setting the output levels and speaker
configurations via software that is accessed from the Windows
®
Control Panel. Please refer to your sound card documentation
for instructions on setting up the outputs for 5.1 audio to properly
drive the headphone speakers. Also, note that some sound cards
may have the bass and center channels reversed, which will
cause an apparent decrease in bass response. This can often be
corrected with a setting in the sound card control software.
JACK COLOR
Center/Sub Orange
Mic Pink
Front Green
Surround Black
Page 8

5
Using the Amplifier
1
3
2
4
5
6
7
Page 9

6
INLINE CONTROLS:
1 — Front Channel Volume
2 — Surround Channel Volume
3 — Center Channel Volume
4 — Subwoofer Volume
5 — Master Volume & On/Off Switch
Adjusts the master volume level and power for the amplification unit. In most cases, controls 1 through 3 should be
set to maximum and the volume should be adjusted with
the master volume control (5)
6 — Mic Mute Switch
Switch to “MUTE” to mute the microphone. LED will turn
RED when mic is muted.
7 — XBOX 360 Talkback Cable Jack
(not used for PC gaming.)
Page 10

7
Optional PC Setup
To use 5.1 speakers along with the headphones:
Connect the included splitter cable as shown below. Be sure to
match the three colored amplifier jacks with the matching colored
sockets on the cable. This allows you to turn down the speakers
when using the headphones so you do not have to reach behind
your PC to disconnect the headphones and reconnect the speakers.
(black)
(green)
(orange)
(pink)
Page 11

8
XBOX 360 Setup (cable kit required)*
The Z6A functions as an amplified stereo headset when used with
the XBOX 360. Stereo game sound is simultaneously routed to the
front and surround speakers, providing dual 30mm speaker sound
in each ear cup. The low frequencies are sent to the Sub channel
for separate control of the bass level, while the XBOX LIVE
®
chat
is routed to the center channel for separate adjustment of the
chat volume level.
1 — Front Channels:
adjusts the game volume level to the
front speakers
2 — Surround Channels: adjusts the game volume level to the
rear speakers
3 — Center Channels: adjusts the incoming chat volume
4 — Subwoofer: adjusts the bass level
5 — Master Volume & On/Off Switch: adjusts game volume, chat
volume and bass level
6 — Mic Mute Switch: Switch to “MUTE” to mute the microphone.
LED will turn RED when mic is muted.
7 — XBOX 360 Talkback Cable Jack: Connect the XBOX 360
Talkback Cable (sold separately) from this jack to the
XBOX 360 controller.
1
3
2
4
5
67
* The XBOX 360 cable kit can be purchased online in the accessories section at
www.turtlebeach.com/Z6A
Page 12

9
XBOX 360 Setup (HDMI) (cable kit required)*
black
green
orange
pink
red/white
XBOX 360
HDMI Audio
Adapter**
(sold separately)
XBOX 360
RCA Splitter Cable*
(sold separately)
HDMI
Page 13

10
black
green
orange
pink
red/white
yellow
XBOX 360
AV cable
XBOX 360 Setup (Component) (cable kit required)*
* The XBOX 360 cable kit can be purchased online in the accessories section at
www.turtlebeach.com/Z6A
** All XBOX 360 models require a XBOX 360 HDMI Audio Adapter Cable for an analog audio output
when used with an HDMI connection (available from third party sellers). If your HDMI TV has
red/white AUDIO OUT RCA jack or a Headphone jack, you can use those to feed the sound from
your TV to your Turtle Beach headset. (AUDIO IN jacks will not send sound out to your headset,
you need AUDIO OUT.)
XBOX 360
RCA Splitter Cable*
(sold separately)
Page 14

11
Voice Volume 10
Voice
Mute Kinect
Voice Output
Play Through Headset
Play Through Speakers
Voice Output
Game Volume 10
XBOX 360 Chat Setup
Connect the Talkback Cable
Step 1:
Press the XBOX 360 Guide Button,
select Settings > Preferences >
Voice
Step 2:
Voice Volume = 10
Step 3:
Game Volume = 10
Step 4:
Voice Output =
Play Through Headset
Configure XBOX 360 Settings
* The XBOX 360 cable kit can be purchased online in the accessories section at
www.turtlebeach.com/Z6A
XBOX 360
Talkback Cable*
(sold separately)
XBOX 360 Controller
XBOX 360
Controller Jack
Page 15

12
Technical Specifications
Headset
Front and Surround Channel Speakers
• 30mm diameter speakers with neodymium magnets
• Angled design for better surround sound perception
• Speaker Frequency Response:
20Hz - 20kHz, >120dB SPL+3dB/mW
Center Channel Speakers
• 30mm diameter speakers with neodymium magnets
• Speaker Frequency Response:
80Hz - 16kHz, >110dB SPL+3dB/mW
Subwoofer Channel Speakers
• 40mm diameter with high-impact
magneto-resonant vibration coil
• Speaker Frequency Response: 20Hz - 500Hz
• Condenser Microphone Frequency Response: 50Hz - 15kHz
• Weight: 13.6 oz. (380g)
Surround Sound Amplifier
• Includes 6 independent amplifiers
• Frequency response Sub Channel: 20Hz - 200Hz
• Frequency response (Front, Surround and
Center channels): 20Hz - 20kHz
• Amplifier power (all 8 channels): >100mW rms @ THD <1%
• 3.5mm stereo line input jacks x 3 (Front, Surround,
Center/Sub)
• 3.5mm microphone jack
• Maximum analog input level with volume control
on maximum setting: 2Vpp (700mV rms)
• 2.5mm XBOX 360 controller input jack
• Dimensions: H: 0.8in (2.0cm), W: 3.9in (9.8cm), D: 1.5in (3.9cm)
• Weight: 4 oz. (120g)
Page 16

13
Additional Accessories
The following accessories are available for your Z6A and
can be purchased in the accessories section at:
www.turtlebeach.com/z6a
XBOX 360 Cable Kit
Includes an XBOX 360 RCA
Splitter cable and XBOX 360
Talkback Cable.
Page 17

14
Maintaining Your Headset
Avoid Heat: Avoid resting or storing the headset or cables in or
on top of units that generate heat. Gaming consoles are known
to generate and dissipate unusually high levels of heat, and the
heat can degrade the plastic resulting in twisting and eventual
exposure of the internal wiring.
Storage: To help prevent damage to your Turtle Beach Headset,
store it in a dry location where there is no risk of heavy items
falling on your headset. Do not leave your headset or any
accessories in a location where people or pets might accidentally
trip over it.
Cleaning: Only use a dry cloth or slightly damp cloth. Cleaning
solutions may damage your headset.
Transporting: Always disconnect all cables when transporting
your headset.
Wire Management: Use the Velcro attached to your headset
cable to avoid tangles when not in use.
Pets: Pets love to chew cords. To prevent this, keep your headset
out of the reach of your pets.
XBOX 360 Talkback Cable: Pressure on the Talkback Cable can
cause the jacks in the headset or XBOX 360 controller to become
loose. A loose jack or wear and tear on the Talkback Cable can
result in poor connection, pops, clicks, static, etc. In some cases
of excess pressure, the tip of the talkback cable can break
off inside the controller. Turtle Beach is not responsible if this
happens to your XBOX 360 Controller.
Page 18

15
FCC Caution:
Any changes or modifications not expressly approved by the party responsible for compliance could void the user’s authority to operate the equipment. This device complies
with part 15 of the FCC Rules. Operation is subject to the following two conditions:
(1) This device may not cause harmful interference, and (2) this device must accept
any interference received, including interference that may cause undesired operation.
This product is CE marked according to the provisions of the R&TTE Directive (99/5/EC)
Grantee Code/Reg Number: XGB/GC229855
IC Code: 3879A-2214
Voyetra Turtle Beach, Inc.
Safety Notice
To avoid potential damage to the device, always disconnect all cables before
transporting it.
WARNING: Permanent hearing damage can occur if a headset is used at
high volumes for extended periods of time, so it is important to keep the
volume at a safe level. Over time, your ears adapt to loud volume levels, so a
level that may not cause initial discomfort can still damage your hearing. If
you experience ringing in your ears after listening with the headset, it means
the volume is set too loud. The louder the volume, the less time it takes to
affect your hearing. So, please take care to listen at moderate levels.
• Before placing a headset on your ears, turn the volume down
completely, then slowly increase it to a comfortable level.
• Turn down the volume if you can’t hear people speaking near you.
• Avoid turning up the volume to block out noisy surroundings.
IC Radiation Exposure Statement for Canada
This equipment complies with IC radiation exposure limits set forth for an uncontrolled
environment. To maintain compliance with IC RF exposure compliance requirements,
Please avoid direct contact to the transmitting. End users must follow the specific
operating instructions for satisfying RF Exposure compliance. The equipment must
not be co-located or operating in conjunction with any other antenna or transmitter.
Operation is subject to the following two conditions: (1) this device may not cause
interference, and (2) this device must accept any interference, including interference
that may cause undesired operation of the device. Caution: The device is incapable of
transmitting in the band 5600-5650 MHz band in Canada.
Page 19

For more products, accessories
and general product information, please visit
TurtleBeach.com
For warranty information and product support, please visit
Turtlebeach.com/support
Copyright © 2011 Voyetra Turtle Beach, Inc. (VTB, Inc.) All Rights Reserved. No part of this
document may be reproduced without prior written consent from Voyetra Turtle Beach, Inc.
Turtle Beach, the Turtle Beach logo, Voyetra and Ear Force are registered trademarks of
VTB, Inc. XBOX 360 and Windows are registered trademarks of Microsoft Corporation. All
other trademarks are properties of their respective owners and are hereby acknowledged.
Made in China.
Page 20

ENGINEERED FOR GAMING
™
Multi-Speaker Surround Sound
Eight amplified speakers, including dual subwoofers.
Acoustically Angled Speakers
Delivers more realistic directional audio perception.
5.1 Channel Amplifier
Independent controls for all 5.1 audio channels.
Quick Disconnect
Easily detach your headset from your computer.
Microphone Monitor
Let’s you hear what you’re saying.
USB Powered
No batteries required.
XBOX 360 Compatible
Works as an amplified stereo headset on the XBOX 360.
(additional cables required: sold separately)
Gaming Headset with
Multi-Speaker 5.1 Surround Sound
User Guide
TURTLEBEACH.COM
Join The Conversation
Join The Conversation
 Loading...