

Page 1
LIMITED EDITION
User Guide
Page 2
Congratulations on your purchase of the Call of Duty®: Black OPS II Earforce X-Ray headset
from Turtle Beach. You now have in your possession a premium product that will bring your
gaming experience to a whole new level, heightening your senses, sharpening your reexes and
enhancing your communications. Welcome to excellence!
Page 3

Table of Contents
Package Contents 4
Feature / Function Map (Location of controls / inputs) 5
Setting Up the Transmitter 8
Using the Transmitter / Pairing Instructions 9
Using your X-Ray Headset on Xbox 360 10
Using your X-Ray Headset on PS3 12
Bluetooth Settings 13
Phone Settings 14
Surround Sound Settings 15
Recharging / Specications 17
Equalizer (EQ) Presets/Blast Limiter Presets 18
Chat Boost™ / Variable Mic Monitor 19
Troubleshooting / Safety Notice 20
Regulatory Compliance 21
Declaration of Conformity 23
Warranty 24
Page 4

Package Contents
T
U
R
T
E
B
E
A
C
H
.
C
M
D
X-Ray Headset
Headset Charging
Cable
X-Ray Transmitter
Turtle Beach Sticker
Digital Optical Cable Xbox 360
Talkback Cable
FOR / POUR
®
XBOX 360
| PS3™
Quick Start Guide
For the full user guide, please go to http://www.turtlebeach.com/products/X-Ray
Package Contents | Contenu de la boîte
D
X-Ray Headset
X-Ray Transmitter
Casque X-Ray
Émetteur X-Ray
O
L
Digital Optical Cable
Câble optique numérique
XBOX 360 Talkback Cable
XBOX 360 câble Discussion
Headset Charging Cable
Câble casque Charge
Turtle Beach Sticker
Vignette Turtle Beach
Quick Start Guide
4
Page 5

Feature / Function Map (Location of controls / inputs)
X-Ray Headset - Left View
1. Power Button: Turn on the headset by pressing the
power button for a couple of seconds, then release.
You will hear 2 beeps and the power LED should start
ashing. Turn off the headset by pressing the button until
the LED stays on and you hear 2 beeps, then release. To
enter Pairing Mode, press and hold the power button for
about 6 seconds until you hear 2 fast beeps and the LED
begins to ash rapidly (see pg 9).
The headset will turn off after several minutes if there’s
no audio detected or if the transmitter is turned off.
2.
Tone Button: Press this button to activate the different
EQ presets. A beep will indicate which preset is selected.
2
3
1
(see pg. 18)
3.
Blast Limiter Button: Press this button to activate the
different Blast Limiter presets. A beep will indicate which
preset is selected. (see pg. 18)
4.
7
4
6
5
Variable Mic Monitor: Adjusts the level of your voice
heard in the headset. (see pg. 19)
NOTE: Turning up the mic monitor may cause the mic
to pick up room sounds which will make the silence
detector not automatically shut off the headset when it’s
not being used. If the power is not automatically shutting
down, turn down this mic monitor control.
5.
Xbox 360 Controller Jack: Connect the Xbox 360
Talkback Cable from your headset to the controller jack.
Game Volume: Turn to adjust the game sound level.
6.
Removable Microphone with Adjustable Boom:
The microphone can be removed from the headset
7.
when chat is not required by detaching it from the
boom.To properly position the mic: Remove the foam
cover, insert the boom into the socket so the holes on
the mic casing are facing your mouth. Then replace
the foam cover. The boom jack also has a marker to
indicate the proper mic position.
5
Page 6
Feature / Function Map (Location of controls / inputs)
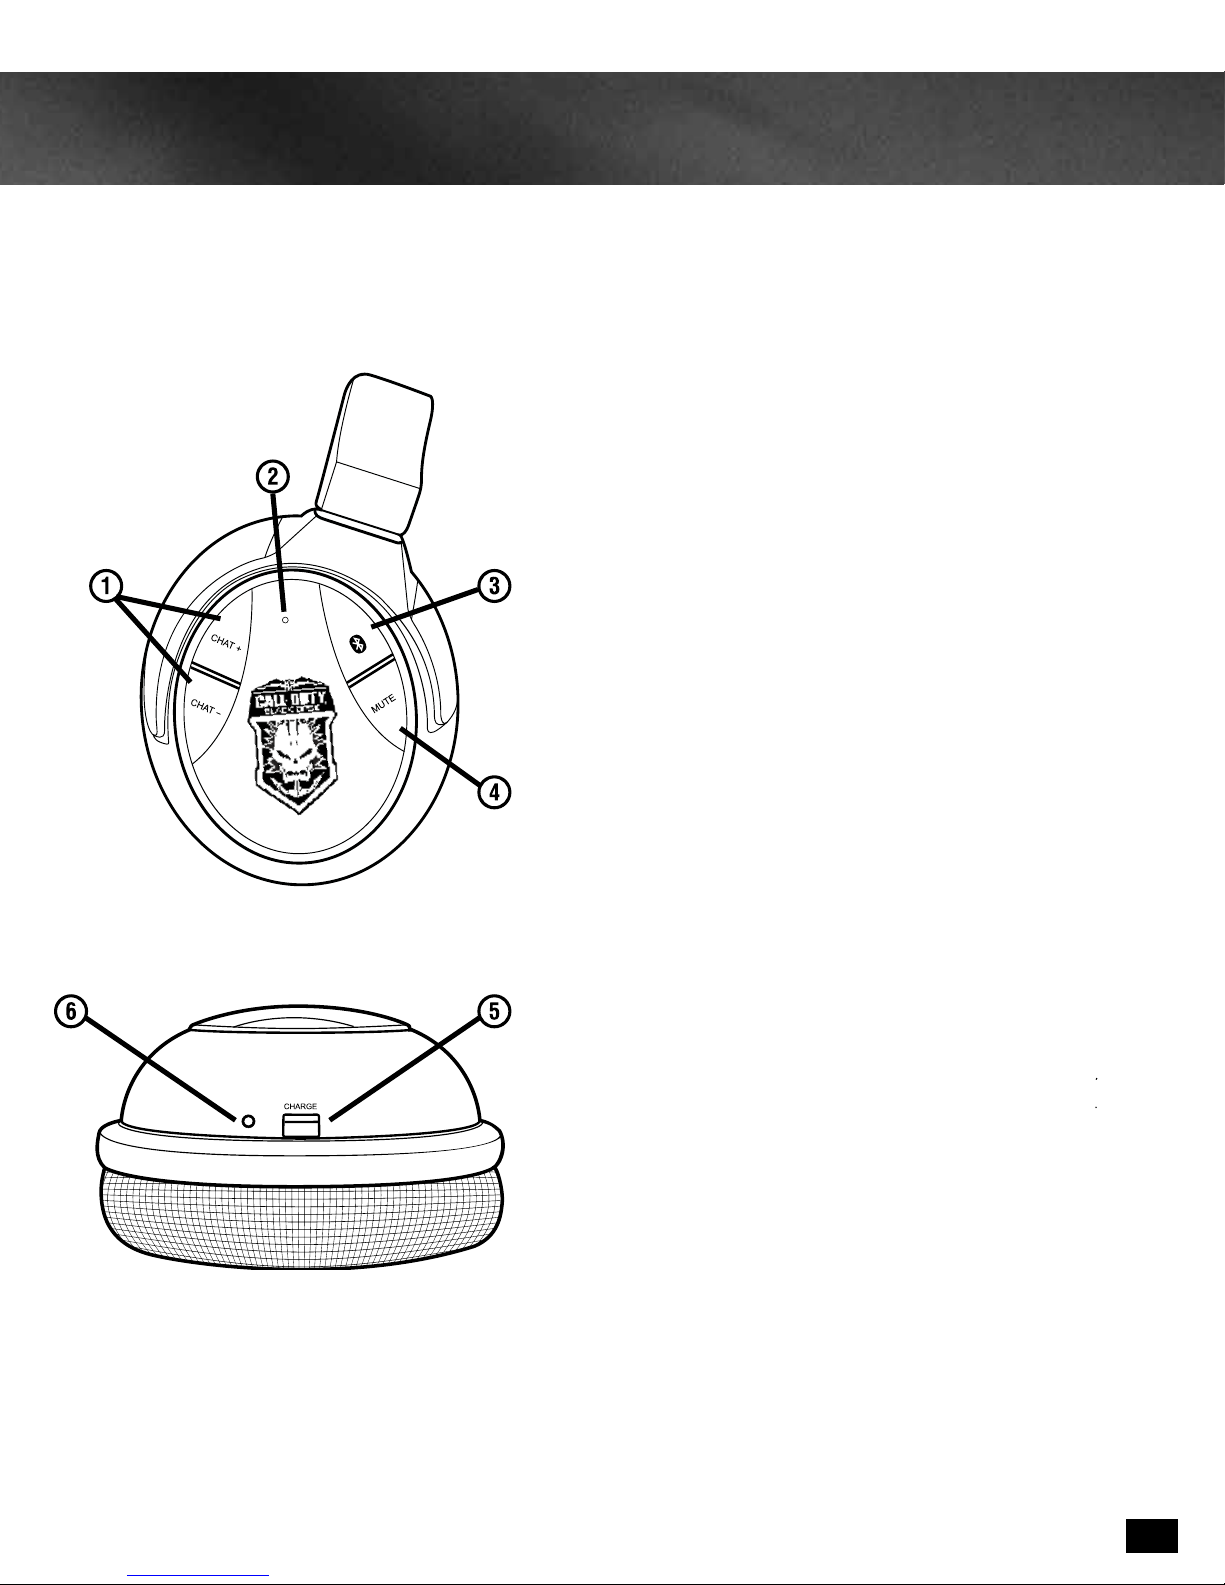
X-Ray Headset - Right View
1. Bluetooth® Volume: Press Chat (+) or Chat (–) to adjust
Bluetooth volume level. A tone will sound each time the
volume level changes.
2.
Bluetooth® LED: Flashes blue once per second when
paired with a device. Flashes blue twice per second when
not paired with a device. Flashes blue and red quickly
when in pairing mode.
3.
Bluetooth
Powers on the Bluetooth and performs several other
functions described in the “Bluetooth” section.
(See page 12)
NOTE: The Bluetooth feature is normally powered on. If it
is not paired to another device, it will automatically turn
off after 5 minutes to conserve battery power.
4.
Mic Mute Button: Press to toggle between muting and
unmuting the microphone. A high beep will sound
when the mic is unmuted and a low beep will sound
when the mic is muted. When using the XBA Bluetooth
Adapter, (Sold Separately) the mic can also be muted by
double-pressing the button on the puck. When using the
Talkback cable, the mic can be muted directly from the
switch on the Talkback cable.
5.
Headset Charging Port: The headset may be charged
by connecting this Mini USB input to a free USB port
on your gaming console using the included Headset
Charging Cable. (See Page 17)
NOTE: The Headset Charging Cable included with the
X-RAY can only be used to charge the headset and cannot
be used as a standard USB data cable.
®
Multi-Function Button (BT MFB):
6.
Charging LED: Turns red when charging and turns off
when charged.
6
Page 7

Feature / Function Map (Location of controls / inputs)
X-Ray Transmitter
1. Digital Input LED: This LED turns on when a digital input
signal is detected. When this LED is ON, the analog input
is turned off.
2.
Surround Sound LED: The LED will light whenever the
digital input is being processed by the surround sound
decoder. When this LED is off, the audio signal will be
heard in stereo.
3.
Dolby® Digital LED: The LED will light whenever a Dolby
Digital encoded signal is detected on the digital input.
Power/Link LED: When the transmitter is powered on
D
1
2
3
4
4.
and communicating with the headset, this LED will be on
solid. When the headset is turned off, the LED will turn off.
A slowly pulsing LED indicates that the transmitter can’t
communicate with the headset. This could happen when
the headset is out of range, turned off or not paired with
the transmitter.
PAIR
7
5 6
SURROUND
ANGLES
SURROUND
ON/ OFF
8 9
5.
Digital Input and Output: Connect the digital input to the
Xbox 360 digital output using the included digital optical
cable. The digital input is passed through to the digital
output so you can connect the X-RAY transmitter and
your home theater system to hear the Xbox sound on the
headset and speakers at the same time. When a digital
signal is detected by the optical input, the Digital Input LED
will be lit.
6.
Analog Input Jack: Provides a 3.5mm input for digital
music players or additional audio sources. (3.5mm cable
sold separately)
NOTE: The analog input is deactivated whenever a digital
input is active, so both the digital and analog inputs cannot
be used at the same time.
Pair Button: Press and hold to activate pairing mode.
7.
Surround Sound Angles Button: Press to select different
8.
HRTF surround angles. (see pg. 16)
9.
Surround Sound On/Off Button: Pressing this button toggles
between surround sound and stereo sound. When surround
sound is active, the Surround Sound LED will be lit.
7
Page 8
Setting Up the Transmitter
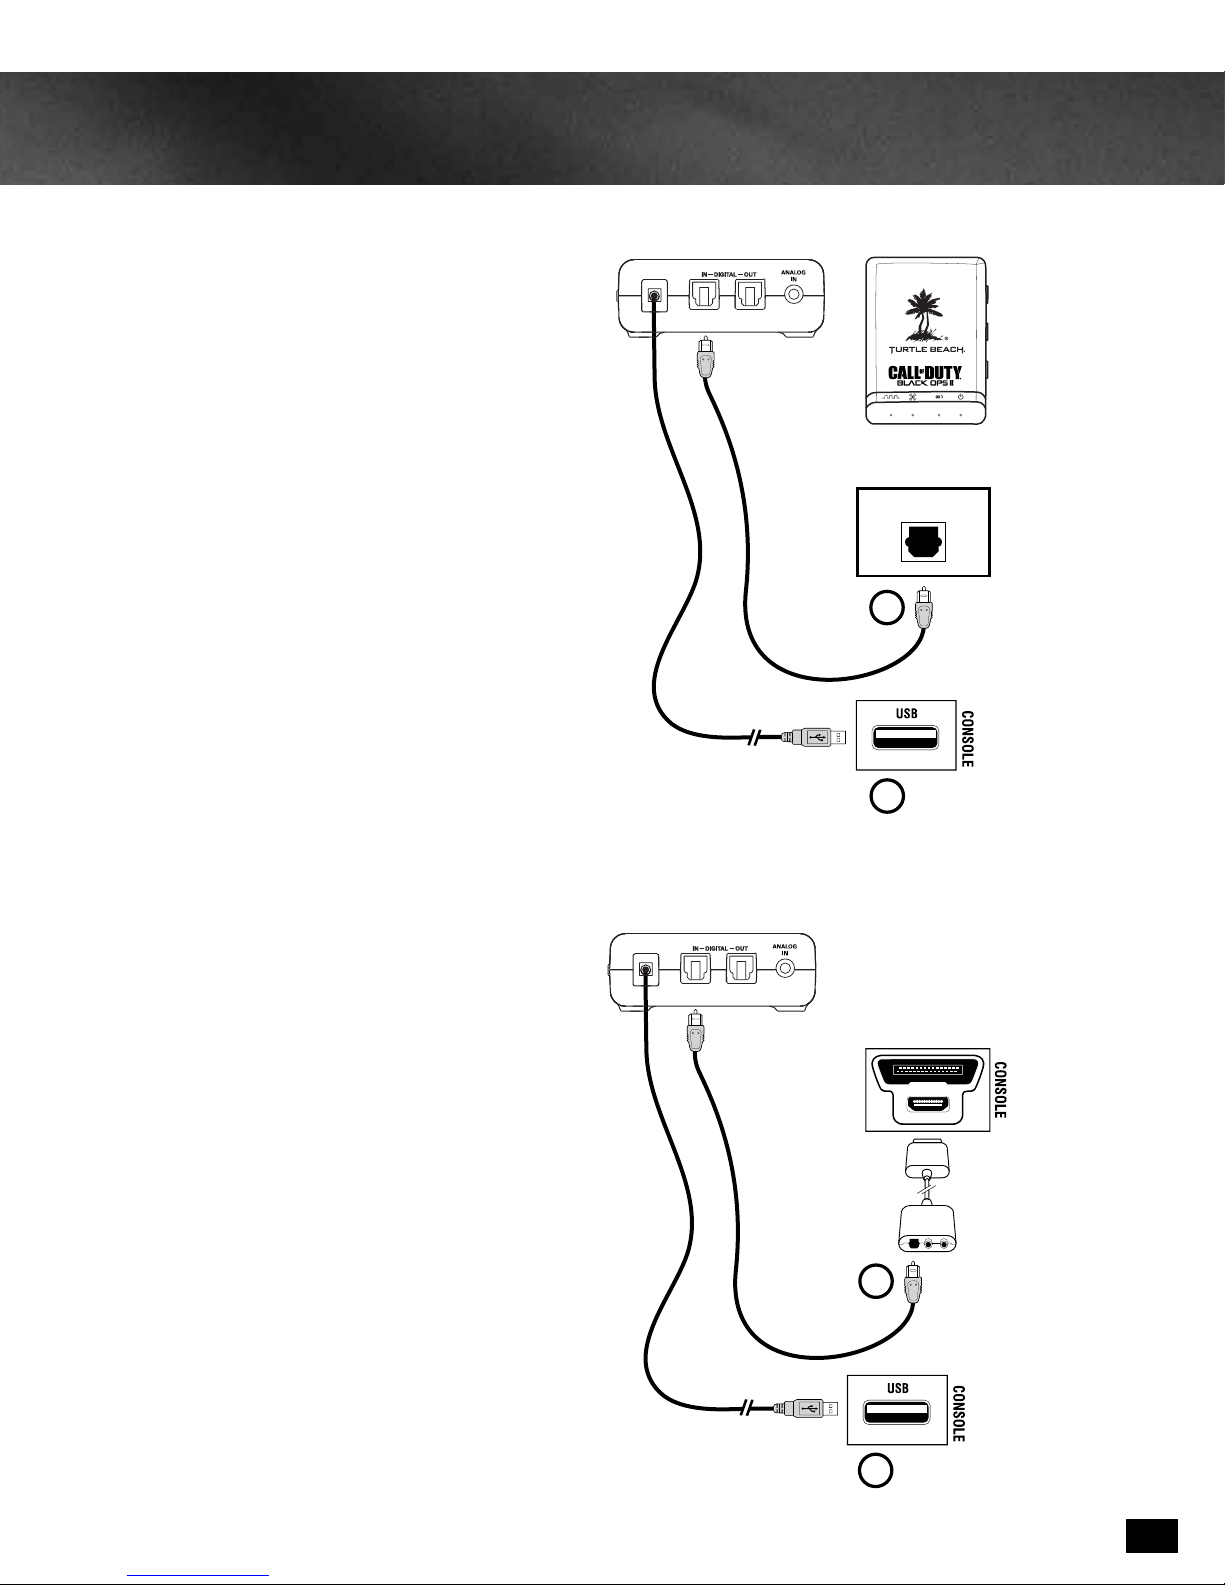
Xbox 360 (Slim) and PS3
1. Connect digital optical cable (DIGITAL IN) and
transmitter power cables (included) to game console.
NOTE: Remove the protective caps from each end of
the optical cable before inserting it into the sockets.
2. Connect to power.
Digital Optical Cable
(included)
Transmitter USB Cable
DIGITAL OUT
1
D
CONSOLE
Xbox 360 (Older Models)*
1. Connect the Digital Optical Cable(DIGITAL IN)
* (Requires Xbox 360 HDMI Audio Adapter, sold
separately).
2. Connect to power.
2
Digital Optical Cable
(included)
Xbox 360
Audio Adapter Cable*
(sold separately)
1
Transmitter USB Cable
2
8
Page 9

Using the Transmitter / Pairing Instructions
The transmitter allows wireless exibility without the restrictions of cables when using your Turtle Beach X-Ray
headset. This wireless communication is through Dual Band WiFi transmitting a signal between the transmitter and your
headset from up to 30 ft. If you are beyond this range or there are obstructions to the signal, you may hear a popping or
clicking sound as the signal weakens and is eventually lost.
For optimal performance, place the transmitter in an open area free from interference from other objects that may
otherwise obstruct the WiFi signal. Avoid placement on a metallic surface such as a home theater A/V receiver as this
may cause interference or a weak signal.
Pairing Instructions
In order for your Turtle Beach X-Ray headset to use the WiFi signal, they need to be “paired” with the transmitter. Follow
the pairing instructions below, keeping the headset and transmitter at least two feet apart while doing so. The headset
and transmitter are pre-paired out of the box. The instructions below are only necessary if pre-pairing appears to have
been lost.*
1. Headset and transmitter should be powered OFF and at least 2 feet away from each other.
2. Connect the transmitter to power (see previous page for instructions)
3. Press and hold the Pairing button on the transmitter for 5 seconds until the LED ashes rapidly. Release.
4. Press and hold Power button (approximately 6 seconds) on the headset until the LED ashes rapidly. Release.
5. Once your Turtle Beach X-Ray headset has been successfully paired, the Headset LED will blink once per second and
the transmitter Power LED will light solid.
4
3
PAIR
* The pairing process can take up to 30 seconds to complete. If pairing is unsuccessful on
rst attempt, please try again. It may take as many as ve attempts to pair successfully.
SURROUND
ANGLES
SURROUND
ON/ OFF
9
Page 10

Using your X-Ray Headset on Xbox 360
Your Turtle Beach X-Ray headset is designed to work with Xbox 360 game consoles. In order to get ideal functionality
from your headset, follow the directions below.
1. Go to Xbox Settings.
- Choose “Settings”
- Choose “System Settings”
- Choose “Console Settings”
- Choose “Audio”
- Choose “Accessory Settings”
- Choose “Audio Device Settings”
- Set “Digital Output” to “Dolby Digital 5.1.”
Digital Output
Digital Stereo
Dolby Digital 5.1
Dolby Digital 5.1 with WMA Pro
Select Back
Current Setting
Dolby Digital
Choose the digital output
type for your system.
This setting only applies
to optical digital and HDMI
audio outputs.
2. Go back to Xbox Settings
3. Power X-Ray ON:
- Choose “Preferences.”
- Choose “Voice.”
- Under “Voice Output,” choose “Play Through Headset.”
Voice
Voice Volume 10
Game Volume 10
Mute Kinect
Voice Output
Play Through Headset
Play Through Speakers
Play Through Both
10
Page 11

Using your X-Ray Headset on Xbox 360
Your X-Ray headset uses a Talkback Cable (included) to connect to your Xbox 360 controller for chat.
1. Insert the “L” shaped plug into the talkback cable jack on your Xbox 360 controller.
2. Insert the straight plug into the controller jack on the left earcup on the headset
Xbox 360 Controller
Xbox 360
Talkback Cable
Xbox 360
Input
11
Page 12

Using your X-Ray Headset on PS3
Your Turtle Beach X-Ray headset is designed to work with PS3 game consoles. In order to get ideal functionality from
your headphones, follow the directions below.
1. Go to PS3 Settings
- Choose “Accessory Settings”
- Choose “Manage Bluetooth Devices”
2. Scan for Bluetooth Devices
3. Power X-Ray ON:
- Press and Hold Bluetooth
Multifunction Button until LED
ashes blue and red.
- Select “Turtle Beach X-Ray.”
- When prompted for a passcode,
enter, “0000” LED will ash blue
once per second.
- You are now paired with PS3.
0
12/14 12:15 PM
Register to manage Bluetooth® devices such as
headsets, keyboards and mouse devices.
Audio Device Settings
Microphone Level 3
Output Device Turtle Beach X-Ray
X Enter
Turtle Beach X-Ray
OK
Back
Options
4. Go to Settings
- Choose “Sound Settings”
- Choose “Audio Output Settings”
- Choose “Optical Digital”
- Choose “Dolby Digital 5.1 Ch.”
5. Go to Settings
- Choose “Sound Settings”
- Choose “Audio Multi-Output” and set
to “On”
Audio Output Settings
Select the connector on the TV or AV amplifier (receiver).
Turn on the power of the connected device.
Cancel
0
12/14 12:15 PM
Audio Output Settings
Sets to output audio through multiple connectors
simultaneously. Audio output to connectors that are
not selected in [Audio Output Settings] is downscaled
to 2 Ch.
On
12
Page 13

Bluetooth Settings
Pairing (Bluetooth) with a phone
1. Turn Headset ON
2. Press and hold Bluetooth Multi Function Button until LED ashes Blue and Red
3. Set mobile phone to Bluetooth search mode*
4. Choose “Turtle Beach X-Ray”
5. When prompted for a passcode, enter “0000.”
* Each phone will differ. Refer to the user’s guide for your phone.
Dual Bluetooth Pairing
2
Turtle Beach X-Ray headphones can pair with two devices at once.
This feature allows on-line chatting with other gamers and the ability
to instantly switch to phone calls. After your X-Ray Headset is already
paired with one device (XBA Bluetooth Chat Adapter or PS3), follow
the instructions below for dual Bluetooth pairing.
1. Press and hold BT MFB to turn Headset’s Bluetooth OFF
2. Press and hold Bluetooth Button until LED ashes Blue and Red
3. Set device to Bluetooth search mode*
4. Choose “Turtle Beach X-Ray”
5. When prompted for a passcode, enter “0000.”
* Each device will differ. Bluetooth pairing provides functionality for chat only.
13
Page 14

Phone Settings
When your X-Ray headset is paired with your cell phone, you can make and receive calls. It can also be used with voice
dialing if your phone has a voice dialing function:
Making Calls
1. To make voice-dialed calls, press and hold the BT MFB button for three (3) seconds until you hear a tone. Release the
button and the voice recognition function on your phone will be activated. Speak the name of the person you wish to call.
To de-activate the voice dialing function, press and hold the BT MFB button again for three (3) seconds and release.
2. To make dialed calls, use the number keys on your phone to dial the number. When the call connects, it will
automatically be heard through the headset.
3. To redial, press the BT MFB button twice to hear two tones through the headset. The last number dialed will be dialed again.
4. To speak off-line while using the phone function, press the MUTE button. While the microphone is muted, a tone will
sound every 30 seconds. To de-activate the mute function, press the MUTE button again.
Note: If your phone does not have a redial feature, double clicking on the BT MFB button will initiate the voice dialing
function instead. If your phone has neither the redial nor voice dial functions, a double click on the BT MFB button will
have no effect.
Receiving Calls
You will hear a musical chime when there is an incoming call. Follow the instructions below to answer a call.
1. When receiving calls, a phone ring will sound through the headset. Press the BT MFB button to answer the call.
2. To reject an incoming call, press and hold the BT MFB button for three (3) seconds until you hear a beep. The call
will go to voicemail.
3. You can also ignore the incoming call ring until it stops. This call will also go to voicemail.
14
Page 15

Surround Sound Settings
D
Turtle Beach X-Ray headsets use industry standard Dolby® Digital 5.1 surround sound settings simulating 5.1 channel
sound as if you were listening through a home theater system and bringing additional realism to your gaming experience.
sub
When a digital signal is active, the Digital Input LED
surround
right
surround
left
will light and other inputs will be off.
When the Surround LED lights, surround sound
processing is activated. At other times, sound will be
heard in stereo.
front
right
center
front
left
When a Dolby signal is detected, the Dolby LED
light and Dolby Digital output will process the surround
sound on the headset.
will
15
Page 16

Surround Sound Settings
Rear Angle; 105 degrees
Rear Angle; 120 degrees
Rear Angle; 135 degrees
Rear Angle; 135 degrees
Rear Angle; 150 degrees
To activate the surround sound on your X-Ray headset, follow these instructions.
1. Press SURROUND ON/OFF to turn ON the surround sound function.
2. Press the SURROUND ANGLES button on the transmitter to scroll through six (6) different presets (shown below).
3. The LED will blink in sequence to indicate which preset was selected.
2 1
C
RR
o
105
o
FR
30
Front Angle; 30 degrees
1
FL
30
PAIR
SURROUND
ANGLES
RR
o
C
RL
o
105
o
120
45
120
FR
o
FL
Front Angle; 45 degrees
2
RL
45
o
o
SURROUND
ON/ OFF
o
135
RR
FR
o
45
Front Angle; 45 degrees
3
135
RL
FL
o
45
o
RR
120
60
o
o
RL
120
60
o
o
FR FL
Front Angle; 60 degrees
4
Rear Angle; 120 degrees
o
135
RR
o
60
FR FL
Front Angle; 60 degrees
5
135
RL
60
o
150
RR
o
60
o
150
RL
60
o
FR FL
Front Angle; 60 degrees
6
16
Page 17

Recharging/ Specications
Turtle Beach X-Ray Headsets features a rechargeable lithium polymer battery that provides more than 10 hours of
continuous game play. When your headset battery power is low, a tone will begin to sound every 10 seconds until the
headset powers off. You can recharge your headset while still gaming with the included Headset Charging Cable. Simply
plug the mini USB end into your headset CHARGE port and plug the other end into a free USB port on your game console.
Headset
CHARGE Port
Headset Charging Cable
(included)
Game Console
USB Port
Charging cycle: 6 hours.
If your headset is charging while it’s powered off, the LED on the headset will remain solid RED until the headset is
charged, at which time the headset LED will turn off.
Specications
- Audio Connection: Digital Optical
- Headset Power: Rechargeable Battery
- Transmitter Power: USB
- Headset Connection: 2.4/5 GHz
- Dual - Band Wi-Fi Wireless
D
17
Page 18

Equalizer (EQ) Presets/Blast Limiter Presets
Turtle Beach X-Ray Headsets features multiple Equalizer presets to enhance your gaming audio experience. Press the
TONE button on the X-Ray headset to cycle through the EQ presets as illustrated below:
Equalizer (EQ) Presets:
1. Flat
2. Bass Boost
3. Treble Boost
4. Bass and Treble Boost
Tone Button
The Blast Limiter presets help protect your ears from deafening sounds such as explosions and gunre by limiting the
maximum level of the game sound. You won’t hear the effect unless a loud sound occurs in the game. For example,
if you’re in a quiet section of the game, you might want to turn up the volume to hear softer sounds like footsteps. If
an explosion or gunshot suddenly occurs, it could be uncomfortably loud because you turned up the volume for the
footsteps. Turning on the Blast Limiter will reduce these louder sounds so you can boost the lower sounds. Press the
LIMITER button to cycle through the three settings as illustrated below:
Blast Limiter Presets:
1. Limiter Off
2. Mild Limiter
3. Medium Limiter
4. Max Limiter
Limiter Button
18
Page 19

Chat Boost™ / Variable Mic Monitor
Chat Boost™
Chat Boost is a dynamic talkback expander built into the X-RAY headset that automatically increases chat volume during
loud moments in your game, so you can always hear your teammates or other players, regardless of the game volume.
Typically, if you turn up a headset’s game volume, the incoming chat level from other players could become difcult to hear
over the game sound. However, with Chat Boost, as the game audio increases, the chat volume also increases. When the
game volume quiets down again, Chat Boost automatically returns the chat level to your original volume setting.
To properly set the Chat Boost function:
1. Turn down the volume control on the headset so there’s no game audio.
2. Adjust the chat volume control on the headset so you can hear the chat voices at a comfortable level.
3. Turn up the headset game volume and the chat volume will increase whenever the game gets louder, just as if the
chat volume control is being automatically turned up along with the game level.
Game Audio
Chat
WITHOUT Chat Boost,
chat volume is overwhelmed by loud game audio
NOTE: If the chat volume on the headset is set too loud, Chat Boost might increase the volume so much that the voices will
distort. If that happens, turn down the chat volume on the headset.
chat volume increases along with game volume
WITH Chat Boost,
Game Audio
Chat
Variable Mic Monitor
The X-RAY headset includes a unique variable microphone monitor
feature that allows you to adjust the level of your voice heard in the
headset so you won’t have to shout. This can be adjusted by turning
the MIC MONITOR wheel on the left ear cup.
NOTE: Turning up the mic monitor may cause the mic to pick up room
sounds which will make the silence detector not automatically shut
off the headset when it’s not being used. If the power is not automatically shutting down, turn down this mic monitor control.
Mic Monitor
19
Page 20

Troubleshooting / Safety Notice
TroubleShooting
No sound
• Check that the headset volume control is turned up.
• Check that the transmitter USB power optical cables are properly connected.
• Check that the headset is powered on. The LED on the left ear cup should be ashing.
• Check if the LED on the front of the transmitter is on solid. If the LED is slowly pulsing, it indicates that the transmitter
isn’t communicating with the headset. If the headset is on solid and the transmitter LED is slowly pulsing, then the headset
and transmitter need to be “paired” as described in the section “Pairing the Headset and Transmitter”.
Audio Drops, Popping or Clicking Sounds
Audio dropouts, popping or clicking sounds on the headset are caused by poor reception. This can occur when:
• The headset and transmitter are out of range. For best performance, stand within 20 feet from the transmitter.
• There’s a wall or other large object between the headset and transmitter.
• The transmitter is in a bad location that is interfering with the antenna.
• A wireless base station or wireless router is causing a lot of RF activity that’s blocking the RF signal from the transmitter.
Voice Chat Drops
• Most in-game voice chat drops are simply caused by network performance or “lag”. Usually they subside after a few
moments so please be patient. In extreme cases, you may have to leave a game and return to reset the chat function.
• If you use a wireless internet connection, low signal strength from your modem/router can make the voice chat
malfunction. A wired connection from your modem/router to your console is recommended for best results.
Mobile Phone Bluetooth® Issues
Some models of mobile phones may experience issues with the Bluetooth performance:
• Nokia6500s: Sometimes the Bluetooth link will disconnect automatically and may need to be paired again.
• Moto V8: Sometimes there is no audio on headset when there is an active call. This issue happens rarely. The Moto V8
doesn’t initiate SCO link when there is an active call. Single press the BT MFB button on the headset to initiate SCO link
with the phone.
• HTC Hero: Sometimes the headset Bluetooth will fail to reconnect with PS3 after having connected with HTC Hero. This
issue happens rarely. The user must reconnect the headset Bluetooth from PS3 Bluetooth system settings to x this issue.
Force Shutdown
In the unlikely case that the headset becomes unresponsive and the main power button cannot be used to turn off the
headset, the Mute button on the headset can be used to force shutdown. Press and hold the MUTE button on the headset for
10 seconds to initiate a forced shutdown.
Safety Notice
To avoid potential damage to the device, always disconnect all cables before transporting it.
WARNING: Permanent hearing damage can occur if a headset is used at high volumes for extended periods of time, so it is
important to keep the volume at a safe level. Over time, your ears adapt to loud volume levels, so a level that may not cause
initial discomfort can still damage your hearing. If you experience ringing in your ears after listening with the headset, it means
the volume is set too loud. The louder the volume is set, the less time it takes to affect your hearing. So, please take care to
listen at moderate levels.
• Before placing a headset on your ears, turn the volume down completely,
then slowly increase it to a comfortable level.
• Turn down the volume if you can’t hear people speaking near you.
• Avoid turning up the volume to block out noisy surroundings.
20
Page 21

Regulatory Compliance
Regulatory Compliance Statements for the EAR FORCE X-RAY RX & TX Models
Federal Communications Commission (FCC) Compliance Notices
This section includes the following FCC statements for the EAR FORCE X-RAY RX & TX Models:
- FCC ID: XGB-TB2276 & XGB-TB2271
- Class B Interference Statement
- RF Radiation Exposure & Hazard Warning
- Non-Modication Statement
- Deployment Statement
Class B Interference Statement
This equipment has been tested and found to comply with the limits for a Class B digital device, pursuant to Part 15 of
the FCC Rules. These limits are designed to provide reasonable protection against harmful interference in a residential
installation. This equipment generates, uses, and can radiate radio frequency energy and, if not installed and used
in accordance with the instructions, may cause harmful interference to radio communications. However, there is no
guarantee that interference will not occur in a particular installation. If this equipment does cause harmful interference
to radio or television reception, which can be determined by turning the equipment off and on, the user is encouraged to
try to correct the interference by one or more of the following measures:
- Reorient or relocate the receiving antenna.
- Increase the separation between the equipment and receiver.
- Connect the equipment into an outlet on a circuit different from that to which the receiver is connected.
- Consult the dealer or an experienced radio/TV technician for help.
FCC Caution:
This device complies with Part 15 of the FCC Rules. Operation is subject to the following two conditions: (1) This device
may not cause harmful interference, and (2) this device must accept any interference received, including interference
that may cause undesired operation.
RF Radiation Exposure & Hazard Statement
To ensure compliance with FCC RF exposure requirements, this device must be installed in a location such that the
antenna of the device will be greater than 20 cm (8 in.) from all persons. Using higher gain antennas and types of
antennas not covered under the FCC certication of this product is not allowed. Installers of the radio and end users of
the product must adhere to the installation instructions provided in this manual. This transmitter must not be co-located
or operated in conjunction with any other antenna or transmitter.
Non-Modication Statement
Use only the supplied internal antenna. Unauthorized antennas, modications, or attachments could damage the EAR
FORCE X-RAY RX & TX Models and violate FCC regulations. Any changes or modications not expressly approved by the
party responsible for compliance could void the user’s authority to operate this equipment. Please contact Turtle Beach
for a list of approved 2.4 GHz and 5.0 GHz antennas.
Deployment Statement
This product is certied for indoor deployment only in the 5150 – 5250 MHz band. Do not install or use this product
outdoors in that frequency band in the United States.
21
Page 22

Regulatory Compliance
Canadian ICES Statements
IC: 3879A- TB2290 & 3879A- TB2291
This device complies with ICES-003 and RSS-210 of Industry Canada.
Operation is subject to the following two conditions:
1. This device may not cause interference, and
2. This device must accept any interference, including interference that may cause undesired operation of the device.
Ce dispositif est conforme aux normes NMB003 et CNR-210 d’Industrie Canada.
1. L’utilisation de ce dispositif est autorisée seulement aux conditions suivantes :
2. il ne doit pas produire de brouillage et l’utilisateur du dispositif doit être prêt à accepter tout brouillage
radioélectrique reçu, même si ce brouillage est susceptible de compromettre le fonctionnement du dispositif.
To prevent radio interference to the licensed service (i.e. co-channel Mobile Satellite systems) this device is intended to
be operated indoors and away from windows to provide maximum shielding. Equipment (or its transmit antenna) that is
installed outdoors is subject to licensing and not supported by EAR FORCE X-RAY RX & TX Models.
RF Radiation Exposure & Hazard Statement
To ensure compliance with RSS-102 RF exposure requirements, this device must be installed in a location such that the
antenna of the device will be greater than 20 cm (8 in.) away from all persons. Using higher gain antennas and types of
antennas not covered under the IC certication of this product is not allowed. Installers of the radio and end users of the
product must adhere to the installation instructions provided in this manual. This transmitter must not be co-located or
operated in conjunction with any other antenna or transmitter.
Exposition aux radiations RF & Mention de danger
Pour assurer la conformité avec les exigences RSS-102 d’exposition aux RF (Radio Fréquences), cet appareil doit
être installé dans un endroit ou l’antenne de l’appareil sera située à une distance de plus de 20 cm (8 po) de toutes
personnes. L’utilisation d’antennes à gain plus élevé et les types d’antennes qui ne sont pas couverts en vertu de la
certication IC de ce produit n’est pas autorisée. Les installateurs de la radio et les utilisateurs du produit nal doivent
se conformer aux instructions d’installation fournies dans ce manuel. Cet émetteur ne doit pas être co-implanté ou
exploité en conjonction avec toute autre antenne ou transmetteur.
Deployment Statement
This product is certied for indoor deployment only in the 5150 – 5250 MHz band. Do not install or use this product
outdoors in that frequency band in Canada.
Déclaration de déploiement
Ce produit est certié pour le déploiement à l’intérieur tout en rencontrant les limites de cette bande de fréquences:
5150 - 5250 MHz. Ne pas installer ou utiliser ce produit à l’extérieur au Canada, si cette bande de fréquences ne peut ne
peut être rencontrée.
European Union and European Fair Trade Association Regulatory Compliance
This equipment may be operated in the countries that comprise the member countries of the European Union and the European
Fair Trade Association. These countries, listed below, are referred to as The European Community throughout this document:
AUSTRIA, BELGIUM, BULGARIA, CYPRUS, CZECH REPUBLIC, DENMARK, ESTONIA, FINLAND, FRANCE,, GERMANY, GREECE,
HUNGARY, IRELAND, ITALY, LATVIA, LITHUANIA, LUXEMBOURG, MALTA, NETHERLANDS, POLAND, PORTUGAL, ROMANIA,
SLOVAKIA, SLOVENIA, SPAIN, SWEDEN, UNITED KINGDOM, ICELAND, LICHTENSTEIN, NORWAY, SWITZERLAND.
The EAR FORCE X-RAY RX & TX devices communicate with each other to provide wireless local area networking (WLAN)
capabilities. Additionally, the EAR FORCE X-RAY RX device has a BT radio transceiver for communicating with users over
the internet connection provided in the host platform. The EAR FORCE X-RAY TX Model includes one 802.11a and one
802.11b/g radio with one 802.11a and one 802.11b/g omni-directional internal antennas, respectively. The EAR FORCE
X-RAY RX Model includes one 802.11a, one 802.11b/g radio and one 2.4 GHz BT radio with one 802.11a, one 802.11b/g
and one 2.4 GHz BT omni-directional internal antennas, respectively.
22
Page 23

Declaration of Conformity
Marking by this symbol:
indicates compliance with the Essential Requirements of the R&TTE Directive of the European Union (1999/5/EC). This
equipment meets the following conformance standards:
Safety: EN 60950-1: 2006
Also Licensed for Standards: IEC 60950-1:2005, (CB Scheme Report/Certicate), UL60950-1 (NRTL License), CSA22.2,
60950-1 (SCC License)
Additional licenses issued for specic countries available on request
EMC: EN 55022: 2006, EN 55024: 1998 + A1:2001 + A2: 2003, EN 301 489-1 v1.8.1 (2008-04), EN 301 489-17 v2.1.1 (2009-05),
CISPR22: 2005, CISPR24
Including EN 61000-3-2, -3-3, -4-2, -4-3, -4-4, -4-5, -4-6 and -4-11
The products are licensed, as required, for additional country specic standards for the International Marketplace.
Additional issued licenses available upon request.
Radio: EN 300328 v.1.7.1 (2006-10) & EN 301 893 v.1.5.1 (2008-12)
Electromagnetic compatibility and Radio spectrum Matters (ERM); Wideband transmission systems; Data transmission
equipment operating in the 2,4 GHz ISM band and using wide band modulation techniques and Broadband Radio Access
Networks (BRAN); 5 GHz high performance RLAN. Certications are harmonized to the EN standards covering essential
requirements under article 3.2 of the R&TTE Directive. Compliance includes testing with antennas as specied in
attached table.
SAR: EN 62311: 2008
Environmental: Low Voltage Directive 2006/95/EC,
RoHS 2002/95/EC
WEEE 2002/96/EC
23
Page 24

LIMITED ONE YEAR WARRANTY FOR TURTLE BEACH PRODUCTS:
Voyetra Turtle Beach, Inc. (“VTB”) warrants to the original end-user purchaser (“Purchaser”) that the retail Turtle Beach hardware product herein (“Product”) will be free
of defects in materials and workmanship for a period of one year from the date of purchase by the Purchaser (“Warranty Period”). Any Extended Warranty or Service Plans
purchased through a Retail store are not honored by VTB. The Warranty refers to the repair/replacement of a defective product during this period and not a refund.
This limited warranty is extended only to the original Purchaser of a new product, which was not sold “AS IS”. It is not transferable or assignable to any subsequent
purchaser. This limited warranty is applicable only in the country or territory where the Product was purchased from an authorized VTB retailer and does not apply to a
Product that has been purchased as used or refurbished or was included as part of a non-VTB product.
WARRANTY SERVICE:
In the USA and CANADA Warranty Service is provided by our Turtle Beach USA ofces and in all other Countries it is provided by our local International Distributors when
available. Refurbished/Recertied products are sold on an AS IS basis with a 90-day Warranty or less in accordance with each vendor’s policy.
VTB does not warrant uninterrupted or error-free operation of the Product and is under no obligation to support the Product for all computer operating systems or future
versions of such operating systems.
If a defect should occur during the Warranty Period, Purchaser must contact VTB to obtain a Return Merchandise Authorization (“RMA”) number on the basis of the dated
purchase receipt. Purchaser will be responsible for shipping costs incurred in returning the defective Product to an authorized VTB service center, or to the repair facility
located at VTB’s corporate headquarters. VTB will not be responsible for other products or accessories included with the defective Product sent to VTB. The RMA number
must be clearly indicated on the outside of the package. Packages without an RMA number will be refused by VTB or its representatives and returned to sender at the
sender’s expense.
In the event of a defect, Purchaser’s sole and exclusive remedy, and VTB’s sole liability, is expressly limited to the correction of the defect by adjustment, repair, or
replacement of the Product at VTB’s sole option and expense. VTB owns all Products it has replaced and all parts removed from repaired Products. VTB uses new and
reconditioned parts made by various manufacturers in performing warranty repairs and building replacement products. If VTB repairs or replaces a product, the original
Warranty Period is not extended, however, VTB warrants that repaired or replacement parts will be free from defects in material and workmanship for a period of thirty (30)
days from the date of repair or replacement, or for the remainder of the Warranty Period, whichever is greater.
This warranty does not apply to any Product that has had its serial number altered, removed or defaced, or any Product damage caused by shipping, improper storage,
accident, problems with electrical power, abuse, misuse, neglect, ordinary wear, acts of God (e.g. ood), failure to follow directions, improper maintenance, use not in
accordance with product instructions, unauthorized modication or service of the Product or damage resulting from the use of the Product with hardware, software or other
products not provided by or specically recommended by VTB.
NOTES:
- Replacement Parts and accessories that are subject to “wear and tear” such as earpads, mic foam covers, talkback cables, etc. have a three (3) month Warranty.
- Replacement Parts for Discontinued Products are sold on an AS IS basis, they are not supported and come with a 30 day Warranty.
THIS LIMITED WARRANTY IS PURCHASER’S SOLE AND EXCLUSIVE REMEDY AND IS IN LIEU OF ALL OTHER WARRANTIES, EXPRESS OR IMPLIED. TO THE EXTENT
PERMITTED BY APPLICABLE LAW, VTB HEREBY DISCLAIMS THE APPLICABILITY OF ANY IMPLIED WARRANTY OF MERCHANTABILITY, FITNESS FOR A PARTICULAR
PURPOSE OR USE FOR THE PRODUCT. IF SUCH A DISCLAIMER IS PROHIBITED BY APPLICABLE LAW, THE IMPLIED WARRANTY IS LIMITED TO THE DURATION OF THE
FOREGOING LIMITED WRITTEN WARRANTY.
IN NO EVENT SHALL VTB BE LIABLE FOR ANY INDIRECT, INCIDENTAL, SPECIAL, PUNITIVE OR CONSEQUENTIAL DAMAGES, OR DAMAGES, INCLUDING BUT NOT LIMITED
TO ANY LOST PROFITS, DATA, OR LOSS OF USE, ANY THIRD PARTY CLAIMS, AND ANY INJURY TO PROPERTY OR BODILY INJURY (INCLUDING DEATH) TO ANY PERSON,
ARISING FROM OR RELATING TO THE USE OF THIS PRODUCT OR ARISING FROM BREACH OF THE WARRANTY, BREACH OF CONTRACT, NEGLIGENCE, TORT, OR STRICT
LIABILITY, EVEN IF VTB HAS BEEN ADVISED OF THE POSSIBILITY OF SUCH DAMAGES.
This warranty supersedes all prior agreements or understandings, oral or written, relating to the Product, and no representation, promise or condition not contained herein
will modify these terms. Some states do not allow the exclusion or limitation of incidental or consequential damages, so the above exclusion or limitation may not apply
to you. This warranty gives you specic legal rights. You may also have other rights, which vary from state to state. Any action or lawsuit for breach of warranty must be
commenced within eighteen (18) months following the purchase of the Product.
EXCLUSIONS FROM LIMITED WARRANTY:
This Limited Warranty shall not apply and VTB has no liability under this Limited Warranty if the Turtle Beach Product:
- is used for commercial purposes such as “LAN, Call Centers” (including rental or lease);
- is modied or tampered with;
- is damaged by Acts of God, power surge, misuse, abuse, negligence, accident, wear and tear, mishandling, misapplication, or other causes unrelated to defective materials
or workmanship;
- serial number is defaced, altered or removed;
- is not used in accordance with the documentation and use instructions; or
- is repaired, modied or altered by other than authorized repair centers.
- Product is no longer available because it was discarded.
24
Page 25

FOR / POUR
XbOX 360
®
I PS3™
Watch Turtle Beach product training videos at:
product support and warranty information:
youtube.com / TurtleBeachVideos TurtleBeach.com / support
Copyright © 2012 Voyetra Turtle Beach, Inc. (VTB, Inc.) All rights reserved. No part of this package may be reproduced without permission. Turtle Beach, the Turtle Beach Logo,
Voyetra, Ear Force, and Engineered for Gaming are either trademarks or registered trademarks of VTB, Inc. All other trademarks are properties of their respective companies
and are hereby acknowledged. PlayStation is registered trademark and PS3 is a trademark of Sony Computer Entertainment. Xbox, Xbox 360, and Xbox LIVE are registered
trademarks of Microsoft Corporation. Dolby and the double-D symbol are trademarks of Dolby Laboratories. Made in China
© 2012 Activision Publishing, Inc. ACTIVISION, CALL OF DUTY, CALL OF DUTY BLACK OPS and stylized roman numeral II are trademarks of Activision Publishing, Inc.
This product is compliant with the Consumer Product Safety
Improvement Act of 2008, Public Law 110-314 (CPSIA)
N30375
 Loading...