

Page 1
User Guide
WIRELESS
For: Xbox 360® I PS3™ I Mobile
Page 2

Congratulations on your purchase of the Ear Force XP510 from Turtle Beach. You now have in your possession
a premium product that will bring your gaming experience to a whole new level, heightening your senses,
sharpening your refl exes and enhancing your communications. Welcome to excellence!
DOWNLOAD GAME OPTIMIZED PRESETS
HTTP://WWW.TURTLEBEACH.COM/PRESETS
Customize your own presets using tools available on our website.
Page 3

Table of Contents
Package Contents 4
Feature/Function Map (Location of controls/inputs) 5
Setting Up (Connections etc.) 7
Pairing Instructions 8
Using your XP510 Headset on Xbox 360
®
9
Using your XP510 Headset on PS3™ 11
Surround Sound Settings 13
Bluetooth
®
Settings 14
Phone Settings 15
Recharging 16
Presets and Modes 17
Presets/Specifications 19
Mobile Device Cable 20
Regulatory Compliance 21
Declaration of Conformity 23
European Community Declaration of Conformity 24
Warranty 25
Page 4
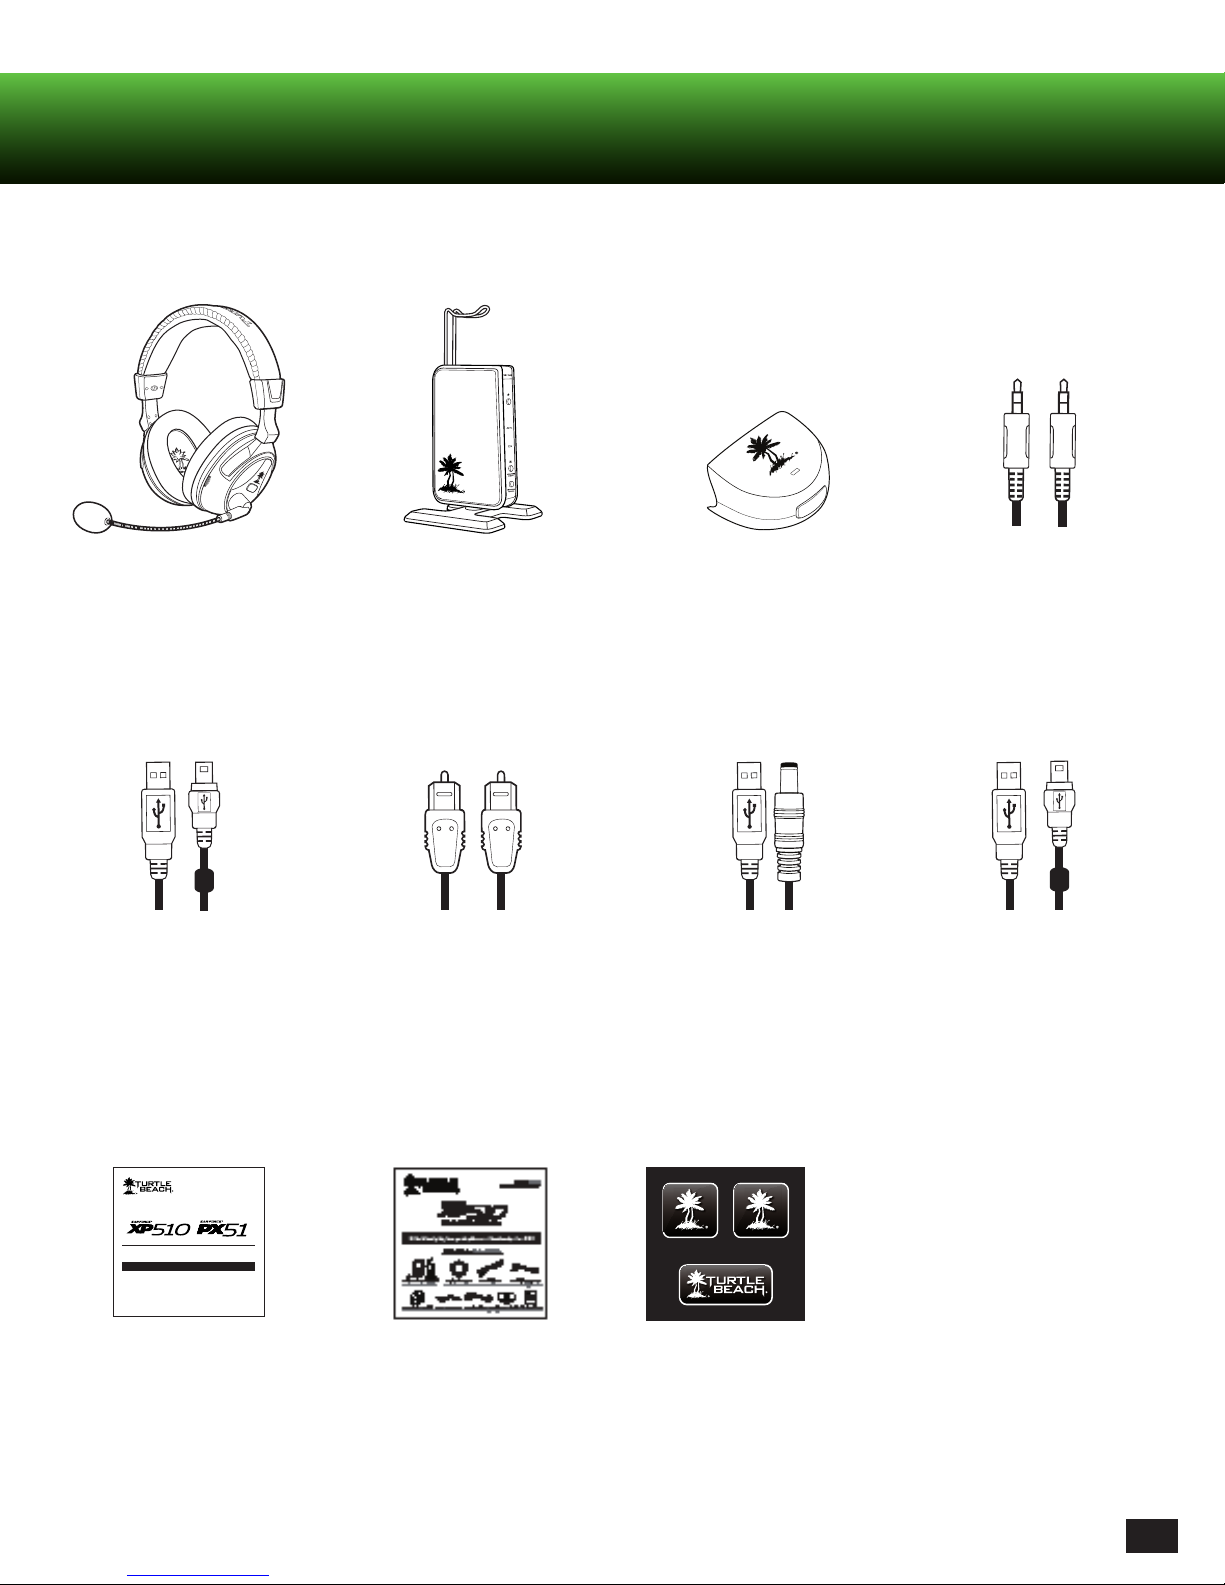
Package Contents
XP510 Headset
Headset Charging Cable
RF Transmitter
Digital Optical Cable
XBA Bluetooth
USB Transmitter
Power Cable
®
Adapter
Mobile Device Cable
USB Data Cable
FOR / POUR
®
| PS3™
XBOX 360
Presets Reference
Download Black Ops II optimized presets or customize your own with the tools available from TurtleBeach.com.
Pre-loaded Presets
Featuring a re-engineered DSP (digital signal processing) architecture, the default pre-loaded presets below are
re-engineered for enhanced audio effects.
Presets Reference Quick Start Guide
Turtle Beach Sticker
4
Page 5
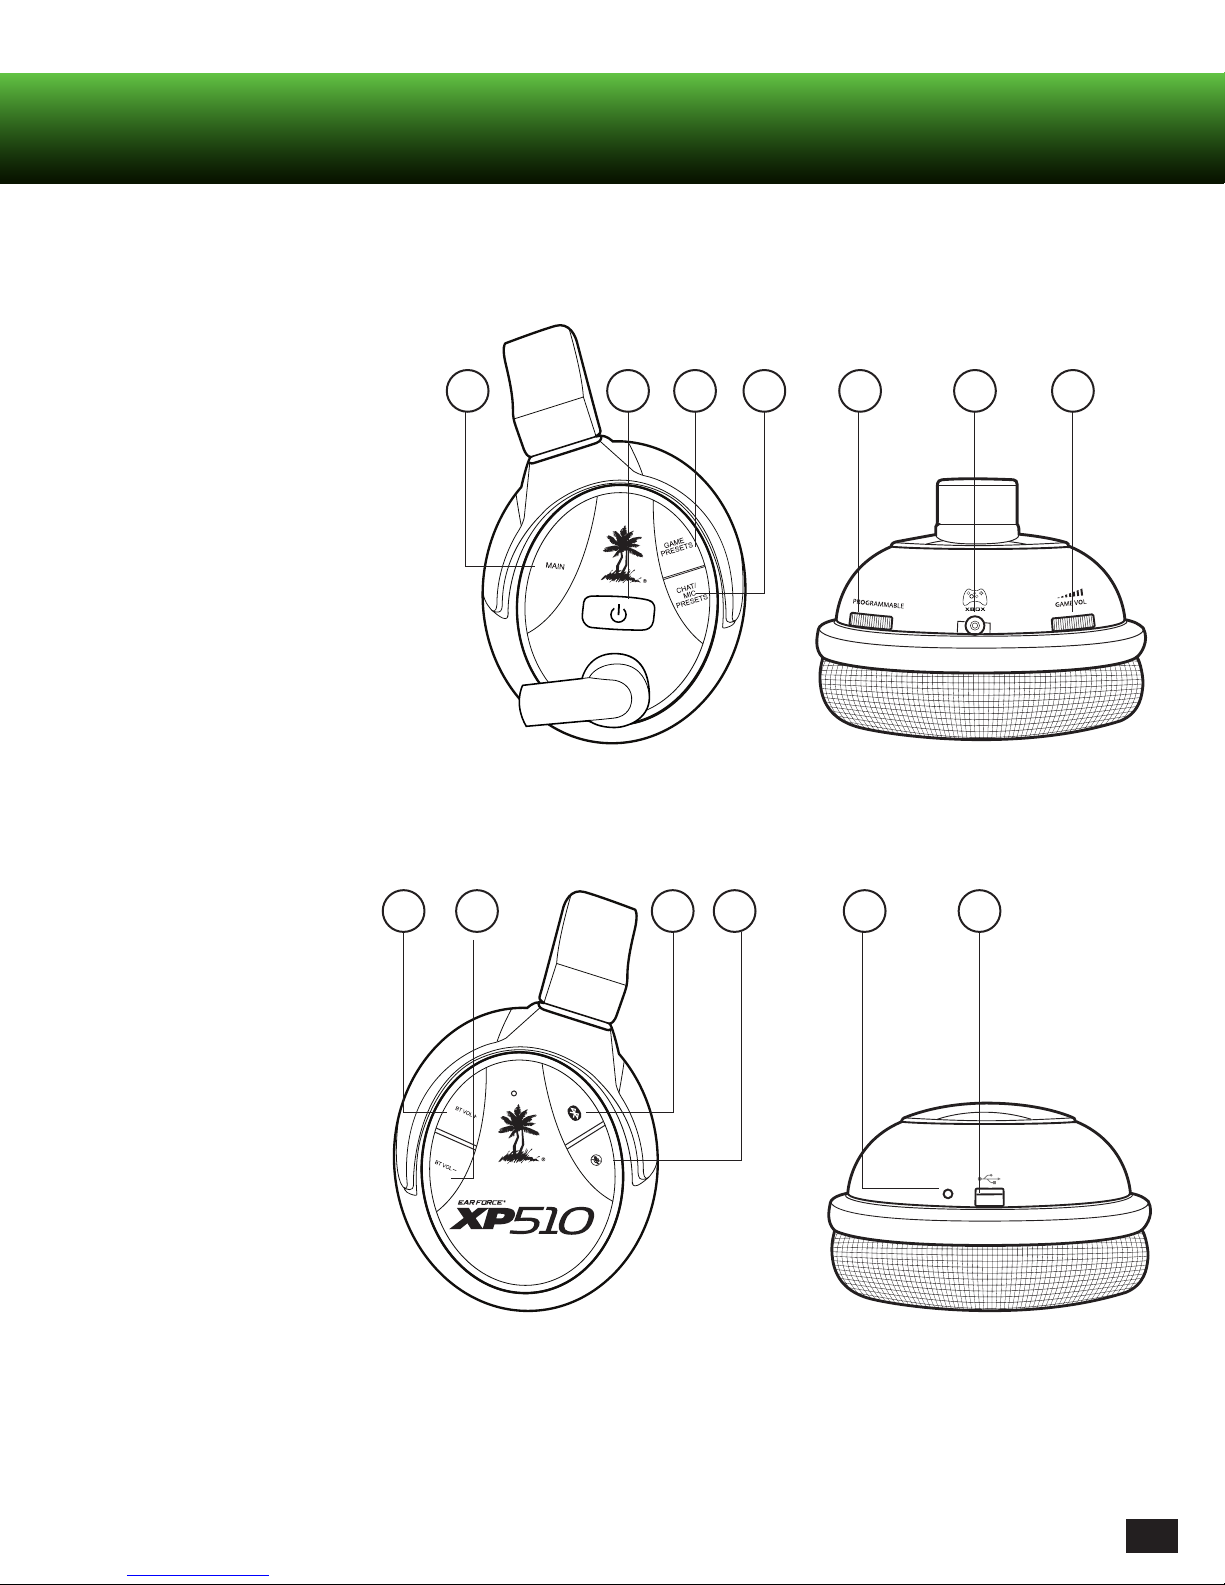
Feature/Function Map (Location of controls/inputs)
Headset
1. Main
2. Power/Pair
3. Game Presets
4. Chat/Mic. Presets
5. Programmable Control (Mic.
Monitor by default)
6. Xbox Talkback Cable Jack
7. Game Volume Control
1 5 6 72 3 4
8. Bluetooth Volume Control +
9. Bluetooth Volume Control -
10. Bluetooth Multi Function
Button(MFB)/Pair
11. Mic. Mute
12. Charge Status LED
13. USB Port
Left Earcup
8 9 10 11 12 13
Right Earcup
5
Page 6

Feature/Function Map (Location of controls/inputs)
RF Transmitter
IN
1
6
DIGITAL
OUT
2
3
4
5
1. Power/Pairing LED and Button
2. Digital Input LED
3. Dolby Digital LED
4. SURROUND ON/OFF Button
5. SURROUND ANGLES Button
L
7
8
LINE IN
DC 5V
LINE IN
VOLUME
R
9
6. DIGITAL IN/OUT Jacks
7. LINE IN (Left/Right) Jacks
8. LINE IN VOLUME Control
9. DC 5V Input
6
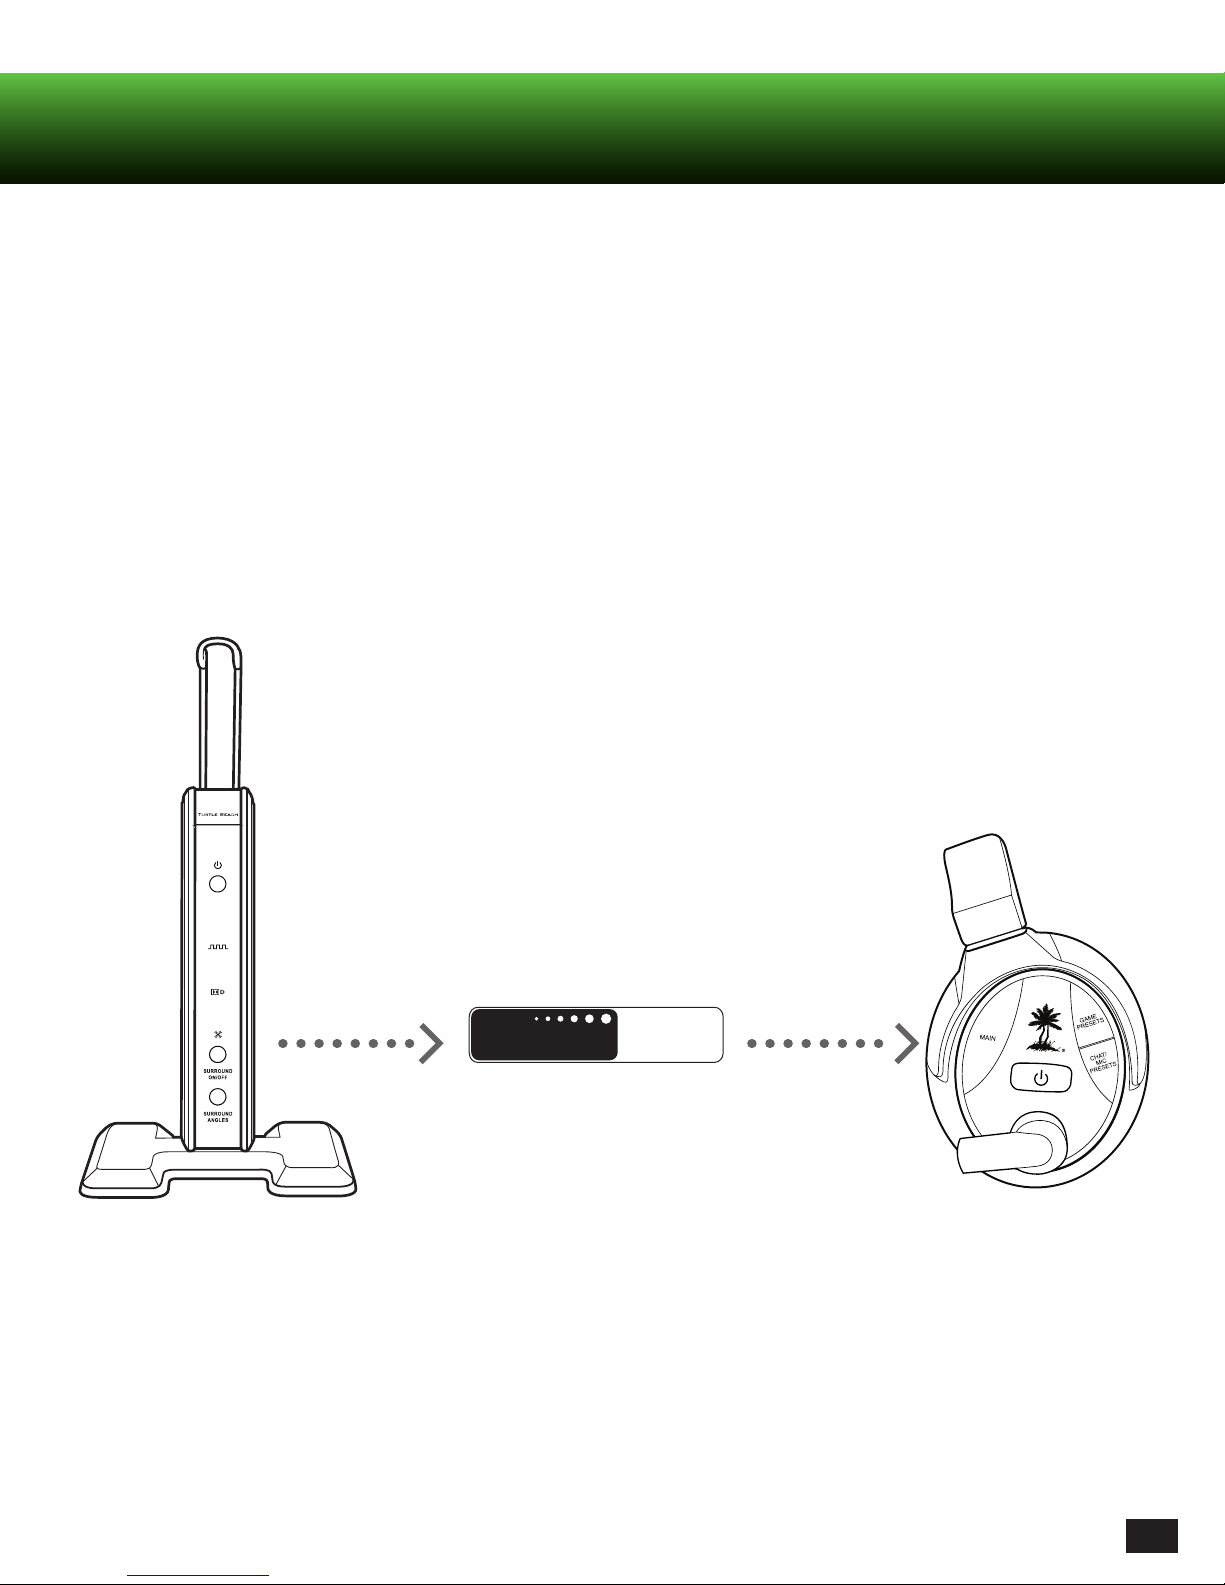
Page 7
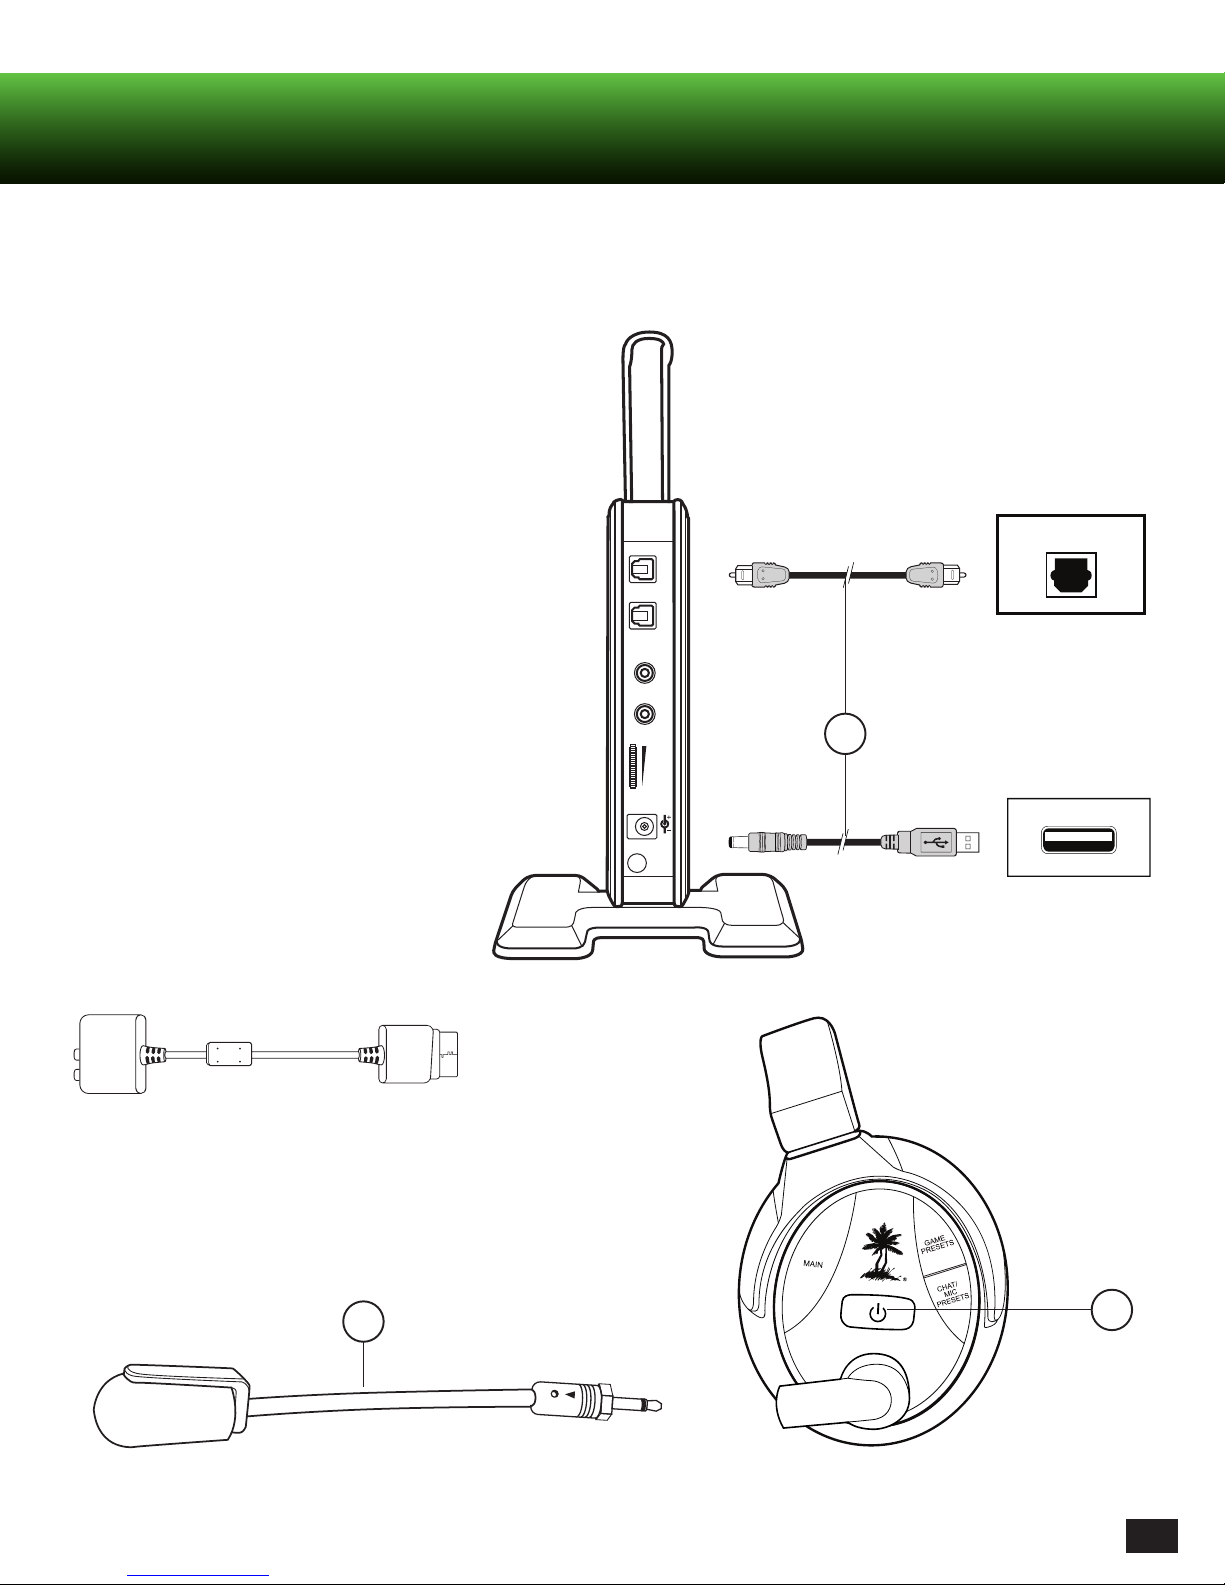
Setting Up (Connections etc.)
RF Transmitter Set Up
1. Connect optical cable (DIGITAL IN)* and transmitter
power cable (included) to game console.
2. Insert Microphone Boom.
3. Power headset ON.
- Press and hold Power button until LED turns solid.
- Listen for voice prompt, “Powering on”.
DIGITAL
LINE IN
CONSOLE
Optical Cable
IN
OUT
L
R
DIGITAL OUT
1
* Original Xbox 360 models require Xbox 360 HDMI
Audio Adapter Cable (sold separately).
2
DC 5V
LINE IN
VOLUME
USB Transmitter Power Cable
CONSOLE
USB
3
7
Page 8
Pairing Instructions
Headset and Transmitter
The headset and transmitter are pre-paired out of the box. The instructions below are only necessary if pre-pairing
appears to have been lost.*
1. Headset should be powered OFF.
2. Press and hold Power/Pairing button on the transmitter for 5 seconds until the Power/Pairing LED flashes rapidly.
(The headset will announce “Pairing headset.”) Release.
3. Press and hold Power button on the headset until the Power LED flashes rapidly. Release.
4. Once your Turtle Beach XP510 headset has been paired successfully, the headset Power LED will blink once per
second and the transmitter’s Power/Pairing LED will light solid. A voice prompt will announce, “Headset paired.”
* If pairing is unsuccessful on first attempt, please try again. It may take as many as five attempts to pair successfully.
GHz
5
dual band wireless
WiFi
8
Page 9

Using your XP510 Headset on Xbox 360
®
Xbox Wireless Settings
Your Turtle Beach XP510 headset is designed to work with Xbox 360 game consoles. For best performance, use with official
Microsoft® Xbox 360 controllers. In order to get ideal functionality from your headset, follow the directions below.
XBA Functions I Fonctions XBA
Function Button Press LED
Power ON Single 1 blink/sec
XBA LED
Power OFF Hold 3 secs OFF
Mic MUTE Double Solid ON
XBA Button
Mic UNMUTE Double 1 blink/sec
Pairing Mode
(paired)
(not paired)
1. Turn on Xbox 360 Controller and plug the XBA into the controller’s headset jack.
2. Power on your headset.
3. Make sure that your headset’s Bluetooth is powered OFF: If the blue LED is blinking at all, hold the Bluetooth button
(or “BT MFB”) for 4 seconds to power off the Bluetooth. (The blue Bluetooth LED will not be lit when the Bluetooth is
powered off.)
4. With the XBA powered OFF (XBA LED off), press and hold the button on the XBA for 4 seconds and let go when the XBA
begins to blink rapidly. (Your XBA is now in pairing mode.)
5. Press and hold the Bluetooth button (BT MFB) on your headset until the LED blinks blue and red. (Your headset is now
in pairing mode, and a voice prompt in the headset will announce, “Pairing Bluetooth.”)
Hold 4 secs Rapid blink
1 blink/sec
2 blinks/sec
After a few seconds, the XBA and the headset will be paired, and a voice prompt will announce “Bluetooth paired.”
The headset’s Bluetooth LED will blink blue once per second, and the XBA will blink once per second, indicating
that they’re paired.
9
Page 10

Using your XP510 Headset on Xbox 360
Xbox Configuration
Voice
Digital Output
Voice Volume 10
®
Digital Stereo
Dolby Digital 5.1
Dolby Digital 5.1 with WMA Pro
Current Setting
Dolby Digital
Choose the digital output
type for your system.
This setting only applies
to optical digital and HDMI
audio outputs.
Select Back
1. Go to Xbox Settings
- Choose “System Settings”
- Choose “Console Settings”
- Choose “Audio”
- Set “Digital Output” to “Dolby Digital 5.1”
Game Volume 10
Mute Kinect
Voice Output
Play Through Headset
Play Through Speakers
Play Through Both
2. Go back to Xbox Settings
- Choose “Preferences”
- Choose “Voice”
- Set both Voice Volume and Game Volume to “10”
- Set Voice Output to “Play Through Headset”
10
Page 11

Using your XP510 Headset on PS3™
PS3 Bluetooth Confi guration
Your Turtle Beach XP510 headset is designed to work with PS3 game consoles. In order to get ideal functionality from
your headset, follow the directions below.
0
Register to manage Bluetooth devices such as
headsets, keyboards and mouse devices.
12/14 12:15 PM
1. Adjust microphone volume level
- Adjust PSN chat volume using Bluetooth Volume
buttons on the right ear cup
2. Go to PS3 Settings
- Choose “Accessory Settings”
- Choose “Manage Bluetooth Devices”
PS3 Microphone Settings
3. Scan for Bluetooth Devices by selecting “Yes”
4. Power XP510 ON:
- Press and Hold Bluetooth Button until Bluetooth
LED flashes blue and red. (Voice Prompt will
announce “Bluetooth powering on”, then “Pairing
Bluetooth”. Release
- Wait for the PS3 to detect the headset on screen
- Select “Turtle Beach XP510”
- When prompted for a passcode, enter “0000.” LED will
fl ash blue once per second
- You are now paired with PS3 for chat
Audio Device Settings
Microphone Level 3
Input Device TURTLE BEACH XP510
Output Device TURTLE BEACH XP510
OK
X Enter
Back
1. Go to PS3 Settings
- Choose “Accessory Settings”
- Set “Input Device” to “Turtle Beach XP510”
- Set “Output Device” to “Turtle Beach XP510”
Note: You will not be able to set the XP510 as your
input or Output Device until you follow the steps under
“PS3 Bluetooth Confi guration”.
2. Set Microphone Level to 3 or 4
11
Page 12

Using your XP510 Headset on PS3™
Audio Output Settings
Select the connector on the TV or AV amplifier (receiver).
Turn on the power of the connected device.
Cancel
PS3 Output Settings
1. Go to Settings
- Choose “Sound Settings”
- Choose “Audio Output Settings”
- Choose “Optical Digital”
- Choose “Dolby Digital 5.1 Ch.”
0
Audio Output Settings
Sets to output audio through multiple connectors
simultaneously. Audio output to connectors that are
not selected in [Audio Output Settings] is downscaled
to 2 Ch.
12/14 12:15 PM
2. Go to Settings
- Choose “Sound Settings”
- Choose “Audio Multi-Output” and set to “On”
On
12
Page 13

Rear Angle; 105 degrees
Rear Angle; 120 degrees
Rear Angle; 135 degrees
Rear Angle; 135 degrees
Rear Angle; 150 degrees
Surround Sound Settings
Surround Sound Settings
Surround Sound Set Up
Turtle Beach XP510 headsets have a surround sound feature bringing
additional realism to your gaming experience.
1. Press SURROUND ON/OFF to turn ON the surround sound function.
2. Press the SURROUND ANGLES button on the transmitter to scroll
through six (6) different presets.
3. The LEDs on the transmitter will blink in sequence to indicate which
preset was selected. (The number of blinks indicates which number
Surround Sound Angle is Selected.)
3
1
2
C
RR
o
105
o
30
FR
FL
30
Front Angle; 30 degrees
1
RR
o
120
o
60
FR FL
Front Angle; 60 degrees
4
Rear Angle; 120 degrees
o
RL
105
RL
120
60
150
RL
135
RL
FL
60
45
o
o
o
o
135
RR
RR
o
C
o
120
45
FR
o
Front Angle; 45 degrees
o
o
2
o
135
RR
o
60
FR FL
Front Angle; 60 degrees
5
FL
135
RL
RL
120
45
o
60
o
o
45
FR
o
Front Angle; 45 degrees
3
150
RR
o
o
60
FR FL
Front Angle; 60 degrees
6
13
Page 14

Bluetooth® Settings
Pairing (Bluetooth) with a phone
1. Turn Headset ON.
2. Press and hold Bluetooth MFB Button until LED
flashes Blue and Red.
3. Set mobile phone to Bluetooth search mode.*
4. Choose “Turtle Beach XP510.”
5. When prompted for a passcode, enter “0000.”
Bluetooth MFB
Mobile Phone
via Bluetooth
Dual Bluetooth Pairing
The Turtle Beach XP510 headset can pair with two Bluetooth devices at once. This feature allows for on-line chat with other
gamers and the ability to switch to phone calls instantly. After your XP510 headset is paired with one device (XBA or PS3),
follow the instructions below for dual Bluetooth pairing.
1. Turn off XP510 Bluetooth by holding the headset’s Bluetooth MFB for 4 seconds.
(A voice prompt will announce, “Bluetooth powering off.”)
2. Press and hold Bluetooth Button until LED flashes Blue and Red.
(A voice prompt will announce, “Bluetooth powering on,“ then “Pairing Bluetooth.”)
3. Set device to Bluetooth search mode.*
4. Choose “Turtle Beach XP510.”
5. When prompted for a passcode, enter “0000.”
(A voice prompt will announce, “Bluetooth Paired.”)
* Your mobile device may operate differently. Refer to the user’s guide for your mobile device.
14
Page 15

Phone Settings
When your XP510 headset is paired with your cell phone, you can make and receive calls. It can also be used with voice
dialing if your phone has a voice dialing function:
Making Calls
1. To make voice-dialed calls, press and hold the BT MFB button for two (2) seconds until you hear a tone. Release the
button and the voice recognition function on your phone will be activated. Speak the name of the person you wish to call.
To de-activate the voice dialing function, press and hold the BT MFB button again for two (2) seconds and release.
2. To make dialed calls, use the number keys on your phone to dial the number. When the call connects, it will
automatically be heard through the headset.
3. To redial, press the BT MFB button twice to hear two tones through the headset. The last number dialed will be dialed again.
4. To speak off-line while using the phone function, press the MUTE button. While the microphone is muted, a tone will
sound every 30 seconds. To de-activate the mute function, press the MUTE button again.
Note: If your phone does not have a redial feature, double clicking on the BT MFB button will initiate the voice dialing
function instead. If your phone has neither the redial nor voice dial functions, a double click on the BT MFB button will
have no effect.
Receiving Calls
You will hear a musical chime when there is an incoming call. Follow the instructions below to answer a call.
1. When receiving calls, a phone ring will sound through the headset. Press the BT MFB button to answer the call.
2. To reject an incoming call, press and hold the BT MFB button for two (2) seconds until you hear a beep. The call will
go to voicemail.
3. You can also ignore the incoming call ring until it stops. This call will also go to voicemail.
15
Page 16

Recharging
Headset Recharging
Turtle Beach XP510 headsets feature a rechargeable battery enabling continuous gaming for up to 15 hours. When the
headset battery charge is low, a tone will sound every ten (10) seconds. The headset can be charged without interrupting
game-play using the included Headset Charging Cable.
Charging LED Headset Charging Port
Right Earcup
Charging cycle: 6 hours.
The headset will always remain powered on while charging. The LED on the headset will remain a solid RED until the
headset is fully charged, at which point the LED will turn off.
NOTE: The Headset Charging Cable is for charging purposes only. Use the USB Programming Cable for uploading presets.
16
Page 17

Heading
Presets and Modes
Tune your XP510 headset with modes for music, movies and games. It also features several built-in presets for chat or
voice effects.
Game Mode
Multi-channel immersion while optimizing for competitive play.
Choose from the following Game Presets:
Main: Incorporates Dolby
1. Flat: Hear stereo game sound without effects processing or Dolby Surround Sound.
2. Bass Boost: Hear and feel the rumble of deeper bass sound effects.
3. Treble Boost: Boost high frequencies for crisper sounds and greater clarity.
4. Bass Boost + Treble Boost: Rumbling lows and pristine highs come through clearly.
5. Stereo Expander: Stereo processing with a 3D effect that allows you to focus on subtle audio cues.
6. Action Enhancer: Amplify intense sounds from weapons and explosions.
7. Footstep Focus: Focus on the sound of enemy footsteps approaching.
8. Superhuman Hearing: Boosts low volume sounds.
®
surround sound processing for an immersive audio experience.
Movie Mode
Multi-channel immersion into the action.
Music Mode
Optimal stereo processing for concert-like sound.
Chat Presets
Chat presets can be used regardless of what mode you are using.
Choose from the following Chat Presets:
Main: Chat Boost automatically increases the online chat levels during intense gaming sequences, so communication
from teammates isn’t drowned out.
1. Flat: Straight chat with no processing.
2. Chat Focus: Boosts mid-range frequencies for greater concentration on chat.
3. Chat Expander: Widens the virtual sound field of chat.
4. Voice Amp: Amplifies chat volume.
5. Hi-Pitch Morph: Morph your voice into a high-pitch tone.
6. Lo-Pitch Morph: Bring your voice to demonic depths.
7. Robot: Transform your voice into a metallic sound.
8. Max Chat: Combines presets in an enhanced chat package.
17
Page 18

Presets and Modes
Navigating through Presets and Modes
1. Tap the Game/Chat Preset buttons to cycle through your alternate (1-8) Game/Chat Presets.
2. Hold the Game Presets Button for 1 second to switch to your Main Game Preset.
3. Hold the Chat/Mic Presets Button for 1 second to switch to your Main Chat Preset.
4. Tap the Mode Button to switch to your Main Game and Chat Presets simultaneously.
5. Hold the Mode Button for 1 second to toggle between Game, Movie, and Music mode.
- Movie and Music mode: Use Turtle Beach customized tuning to enhance your listening experience.
Mode Button
Game and Chat / Mic
Presets
Cycle through alternate
Presets
18
Page 19

Presets/Specifications
Custom Presets
Plug your XP510 headset into your computer to load custom presets available on our website: www.TurtleBeach.com/presets.
Refer to the “Advanced Sound Editor” available on our website for detailed instructions.
Specifications
- Audio Connection: Digital Optical
- Headset Power: Rechargeable Battery
- Transmitter Power: USB
- Headset Connection: 2.4/5 GHz
- Dual-Band Wifi Wireless
19
Page 20

Heading
Mobile Device Cable
This cable allows you to listen to stereo audio using any standard headphone jack. Connect your headset’s Xbox 360 Input
Jack to the 3.5mm jack on your audio device (MP3 player, smart phone, tablet, or computer) using the Mobile Device Cable
This mode can be used when:
1. Your headset is turned on and not connected to your transmitter (Headset blinking twice per second)
2.Bluetooth is not in use
Note: When in this mode there is no Mic functionality. You can remove the Mic boom if you wish.
20
Page 21

Regulatory Compliance
Federal Communications Commission (FCC) Compliance Notices
This section includes the following FCC statements for the EAR FORCE XP510 RX & TX Models:
- FCC ID: XGB-TB2290 & XGB-TB2291A
- Class B Interference Statement
- RF Radiation Exposure & Hazard Warning
- Non-Modification Statement
- Deployment Statement
Class B Interference Statement
This equipment has been tested and found to comply with the limits for a Class B digital device, pursuant to Part 15 of the FCC
Rules. These limits are designed to provide reasonable protection against harmful interference in a residential installation.
This equipment generates, uses, and can radiate radio frequency energy and, if not installed and used in accordance with the
instructions, may cause harmful interference to radio communications. However, there is no guarantee that interference will
not occur in a particular installation. If this equipment does cause harmful interference to radio or television reception, which
can be determined by turning the equipment off and on, the user is encouraged to try to correct the interference by one or more
of the following measures:
- Reorient or relocate the receiving antenna.
- Increase the separation between the equipment and receiver.
- Connect the equipment into an outlet on a circuit different from that to which the receiver is connected.
- Consult the dealer or an experienced radio/TV technician for help.
FCC Caution:
This device complies with Part 15 of the FCC Rules. Operation is subject to the following two conditions: (1) This device may not
cause harmful interference, and (2) this device must accept any interference received, including interference that may cause
undesired operation.
RF Radiation Exposure & Hazard Statement
To ensure compliance with FCC RF exposure requirements, this device must be installed in a location such that the antenna of
the device will be greater than 20 cm (8 in.) from all persons. Using higher gain antennas and types of antennas not covered
under the FCC certification of this product is not allowed. Installers of the radio and end users of the product must adhere to the
installation instructions provided in this manual. This transmitter must not be co-located or operated in conjunction with any
other antenna or transmitter.
Non-Modification Statement
Use only the supplied internal antenna. Unauthorized antennas, modifications, or attachments could damage the EAR
FORCE XP510 RX & TX Models and violate FCC regulations. Any changes or modifications not expressly approved by the party
responsible for compliance could void the user’s authority to operate this equipment. Please contact Turtle Beach for a list of
approved 2.4 GHz and 5.0 GHz antennas.
Deployment Statement
This product is certified for indoor deployment only in the 5150 – 5250 MHz band. Do not install or use this product outdoors in
that frequency band in the United States.
21
Page 22

Regulatory Compliance
Canadian ICES Statements
IC: 3879A- 2290, 3879A-2291A
This device complies with ICES-003 and RSS-210 of Industry Canada.
Operation is subject to the following two conditions:
1. This device may not cause interference, and
2. This device must accept any interference, including interference that may cause undesired operation of the device.
Ce dispositif est conforme aux normes NMB003 et CNR-210 d’Industrie Canada.
1. L’utilisation de ce dispositif est autorisée seulement aux conditions suivantes :
2. Il ne doit pas produire de brouillage et l’utilisateur du dispositif doit être prêt à accepter tout brouillage radioélectrique reçu,
même si ce brouillage est susceptible de compromettre le fonctionnement du dispositif.
To prevent radio interference to the licensed service (i.e. co-channel Mobile Satellite systems) this device is intended to be
operated indoors and away from windows to provide maximum shielding. Equipment (or its transmit antenna) that is installed
outdoors is subject to licensing and not supported by EAR FORCE XP510 RX & TX Models.
RF Radiation Exposure & Hazard Statement
To ensure compliance with RSS-102 RF exposure requirements, this device must be installed in a location such that the antenna
of the device will be greater than 20 cm (8 in.) away from all persons. Using higher gain antennas and types of antennas not
covered under the IC certification of this product is not allowed. Installers of the radio and end users of the product must adhere
to the installation instructions provided in this manual. This transmitter must not be co-located or operated in conjunction with
any other antenna or transmitter.
Exposition aux radiations RF & Mention de danger
Pour assurer la conformité avec les exigences RSS-102 d’exposition aux RF (Radio Fréquences), cet appareil doit être installé
dans un endroit ou l’antenne de l’appareil sera située à une distance de plus de 20 cm (8 po) de toutes personnes. L’utilisation
d’antennes à gain plus élevé et les types d’antennes qui ne sont pas couverts en vertu de la certification IC de ce produit
n’est pas autorisée. Les installateurs de la radio et les utilisateurs du produit final doivent se conformer aux instructions
d’installation fournies dans ce manuel. Cet émetteur ne doit pas être co-implanté ou exploité en conjonction avec toute autre
antenne ou transmetteur.
Deployment Statement
This product is certified for indoor deployment only in the 5150 – 5250 MHz band. Do not install or use this product outdoors in
that frequency band in Canada.
Déclaration de déploiement
Ce produit est certifié pour le déploiement à l’intérieur tout en rencontrant les limites de cette bande de fréquences: 5150 - 5250
MHz. Ne pas installer ou utiliser ce produit à l’extérieur au Canada, si cette bande de fréquences ne peut ne peut être rencontrée.
European Union and European Fair Trade Association Regulatory Compliance
This equipment may be operated in the countries that comprise the member countries of the European Union and the European
Fair Trade Association. These countries, listed below, are referred to as The European Community throughout this document:
AUSTRIA, BELGIUM, BULGARIA, CYPRUS, CZECH REPUBLIC, DENMARK, ESTONIA, FINLAND, FRANCE, GERMANY, GREECE,
HUNGARY, ICELAND, IRELAND, ITALY, LATVIA, LICHTENSTEIN, LITHUANIA, LUXEMBOURG, MALTA, NETHERLANDS, NORWAY,
POLAND, PORTUGAL, ROMANIA, SLOVAKIA, SLOVENIA, SPAIN, SWEDEN, SWITZERLAND, UNITED KINGDOM.
The EAR FORCE XP510 RX & TX devices communicate with each other to provide wireless local area networking (WLAN)
capabilities. Additionally, the EAR FORCE XP510 RX device has a BT radio transceiver for communicating with users over the
internet connection provided in the host platform. The EAR FORCE XP510 TX Model includes one 802.11a and one 802.11b/g
radio with one 802.11a and one 802.11b/g omni-directional internal antennas, respectively. The EAR FORCE XP510 RX Model
includes one 802.11a, one 802.11b/g radio and one 2.4 GHz BT radio with one 802.11a, one 802.11b/g and one 2.4 GHz BT omnidirectional internal antennas, respectively.
22
Page 23

Declaration of Conformity
Marking by this symbol:
indicates compliance with the Essential Requirements of the R&TTE Directive of the European Union (1999/5/EC). This
equipment meets the following conformance standards:
Safety: EN 60950-1: 2006 + A11 (GS License)
Also Licensed for Standards: IEC 60950-1:2005, (CB Scheme Report/Certificate), UL60950-1 (NRTL License), CSA22.2, 60950-1
(SCC License)
Additional licenses issued for specific countries available on request.
EMC: EN 55022: 2006, EN 55024: 1998 + A1:2001 + A2: 2003, EN 301 489-1 v1.8.1 (2008-04), EN 301 489-17 v2.1.1 (2009-05),
CISPR22: 2005, CISPR24
Including EN 61000-3-2, -3-3, -4-2, -4-3, -4-4, -4-5, -4-6 and -4-11
The products are licensed, as required, for additional country specific standards for the International Marketplace. Additional
issued licenses available upon request.
Radio: EN 300328 v.1.7.1 (2006-10) & EN 301 893 v.1.5.1 (2008-12)
Electromagnetic compatibility and Radio spectrum Matters (ERM); Wideband transmission systems; Data transmission
equipment operating in the 2,4 GHz ISM band and using wide band modulation techniques and Broadband Radio Access
Networks (BRAN); 5 GHz high performance RLAN. Certifications are harmonized to the EN standards covering essential
requirements under article 3.2 of the R&TTE Directive. Compliance includes testing with antennas as specified in attached table.
SAR: EN 62311: 2008
Environmental: Low Voltage Directive 2006/95/EC,
RoHS 2002/95/EC
WEEE 2002/96/EC
23
Page 24

European Community Declaration of Conformity
Bulgaria
Czech
Republic
Denmark Dansk Undertegnede Nortelerklærer herved, at følgende udstyr Product A, overholder de
English English Hereby, Nortel declares that this Product A, is in compliance with the essential
Estonia Eesti Käesolevaga kinnitab Nortelseadme Product A, vastavust direktiivi 1999/5/EÜ
Finland Suomi Nortelvakuuttaa täten että Product A, tyyppinen laite on direktiivin 1999/5/EY oleellisten
France Français Par la présente Norteldéclare que l’appareil Product A, est conforme aux exigencies
German Deutsch Hiermit erklärt Nortel., dass sich das Gerät Product A, in Übereinstimmung mit den
Greece
Hungary Magyar Alulírott, Nortelnyilatkozom, hogy a Product A, megfelel a vonatkozó alapvetõ
Italy Italiano Con la presente Norteldichiara che questo Product A, è conforme ai requisiti essenziali ed
Latvia Latviski Ar šo Norteldeklarç, ka Product A, atbilst Direktîvas 1999/5/EK bûtiskajâm prasîbâm un
Lithuania Lietuviø Šiuo Norteldeklaruoja, kad šis Product A, atitinka esminius reikalavimus ir kitas 1999/5/
Malta Malti Hawnhekk, Nortel., jiddikjara li dan Product A, jikkonforma mal-tiijiet essenzjali u ma
Netherlands Netherlands Hierbij verklaart Norteldat het toestel Product A, in overeenstemming is met de
Poland Polski Niniejszym Nortelooewiadcza, ¿e Product A, jest zgodny z zasadniczymi wymogami oraz
Portugal Português Norteldeclara que este Product A, está conforme com os requisitos essenciais e outras
Romania Român Astfel, Nortel declarã acel acest WLAN Radio Model 2332, este în conformitate cu
Slovakia Slovensky Norteltýmto vyhlasuje, že Product A spåòa základné požiadavky a všetky príslušné
Slovenia Slovensko Nortelizjavlja, da je ta Product A, v skladu z bistvenimi zahtevami in ostalimi relevantnimi
Spain Español Por medio de la presente, Nortel declara que el Producto A, cumple con los requisitos
Sweden Svenska Härmed intygar Nortelatt denna Product A, står I överensstämmelse med de väsentliga
български С това, nortel обявява, че този модел на радио на Product A, е със съгласие с
съществените изисквания и други важни условия на директива 1999/5 на европейски
съюз
Èesky Norteltímto prohlašuje, že tento Product A, je ve shodì se základními požadavky a dalšími
pøíslušnými ustanoveními smìrnice 1999/5/ES.
væsentlige krav og øvrige relevante krav i direktiv 1999/5/EF.
requirements and other relevant provisions of Directive 1999/5/EC.
põhinõuetele ja nimetatud direktiivist tulenevatele teistele asjakohastele sätetele.
vaatimusten ja sitä koskevien direktiivin muiden ehtojen mukainen.
essentielles et aux autres dispositions pertinentes de la directive 1999/5/CE.
grundlegenden Anforderungen und den übrigen einschlägigen Bestimmungen der
Richtlinie 1999/5/EG befindet.
Ελληνική ΜΕ ΤΗΝ ΠΑΡΟΥΣΑ Nortel.ΗΛ.ΝΕΙ ΟΤΙ Product A, ΣΥΜΜΟΡΦ.ΝΕΤΑΙ ΠΡΟΣ ΤΙΣ ΟΥΣΙ..
ΕΙΣ ΑΠΑΙΤΗΣΕΙΣ ΚΑΙ ΤΙΣ ΛΟΙΠΕΣ ΣΧΕΤΙΚΕΣ .ΙΑΤΑΞΕΙΣ ΤΗΣ Ο.ΗΓΙΑΣ 1999/5/ΕΚ.
követelményeknek és az 1999/5/EC irányelv egyéb elõírásainak.
alle alter disposizioni pertinenti stabilite dalla direttiva 1999/5/CE.
citiem ar to saistîtajiem noteikumiem.
EB Direktyvos nuostatas.
provvedimenti orajn relevanti li hemm fid-Dirrettiva 1999/5/EC.
essentiële eisen en de andere relevante bepalingen van richtlijn 1999/5/EG
pozosta³ymi stosownymi postanowieniami Dyrektywy 1999/5/EC.
disposições da Directiva 1999/5/CE.
cerinþele necesare ºi proviziile alte semnificative de Directive 1999 5 EC.
ustanovenia Smernice 1999/5/ES.
doloèili directive 1999/5/ES.
esenciales y cualesquiera otras disposiciones aplicables o exigibles de la Directiva 1999/5/CE.
egenskapskrav och övriga relevanta bestämmelser som framgår av direktiv 1999/5/EG.
24
Page 25

LIMITED ONE YEAR WARRANTY FOR TURTLE BEACH PRODUCTS:
Voyetra Turtle Beach, Inc. (“VTB”) warrants to the original end-user purchaser (“Purchaser”) that the retail Turtle Beach hardware product herein (“Product”) will be free of defects
in materials and workmanship for a period of one year from the date of purchase by the Purchaser (“Warranty Period”). Any Extended Warranty or Service Plans purchased through a
Retail store are not honored by VTB. The Warranty refers to the repair/replacement of a defective product during this period and not a refund.
This limited warranty is extended only to the original Purchaser of a new product, which was not sold “AS IS”. It is not transferable or assignable to any subsequent purchaser. This
limited warranty is applicable only in the country or territory where the Product was purchased from an authorized VTB retailer and does not apply to a Product that has been purchased
as used or refurbished or was included as part of a non-VTB product.
WARRANTY SERVICE:
In the USA and CANADA Warranty Service is provided by our Turtle Beach USA offices and in all other Countries it is provided by our local International Distributors when available.
Refurbished/Recertified products are sold on an AS IS basis with a 90-day Warranty or less in accordance with each vendor’s policy.
VTB does not warrant uninterrupted or error-free operation of the Product and is under no obligation to support the Product for all computer operating systems or future versions of
such operating systems.
If a defect should occur during the Warranty Period, Purchaser must contact VTB to obtain a Return Merchandise Authorization (“RMA”) number on the basis of the dated purchase
receipt. Purchaser will be responsible for shipping costs incurred in returning the defective Product to an authorized VTB service center, or to the repair facility located at VTB’s
corporate headquarters. VTB will not be responsible for other products or accessories included with the defective Product sent to VTB. The RMA number must be clearly indicated on the
outside of the package. Packages without an RMA number will be refused by VTB or its representatives and returned to sender at the sender’s expense.
In the event of a defect, Purchaser’s sole and exclusive remedy, and VTB’s sole liability, is expressly limited to the correction of the defect by adjustment, repair, or replacement of the
Product at VTB’s sole option and expense. VTB owns all Products it has replaced and all parts removed from repaired Products. VTB uses new and reconditioned parts made by various
manufacturers in performing warranty repairs and building replacement products. If VTB repairs or replaces a product, the original Warranty Period is not extended, however, VTB
warrants that repaired or replacement parts will be free from defects in material and workmanship for a period of thirty (30) days from the date of repair or replacement, or for the
remainder of the Warranty Period, whichever is greater.
This warranty does not apply to any Product that has had its serial number altered, removed or defaced, or any Product damage caused by shipping, improper storage, accident,
problems with electrical power, abuse, misuse, neglect, ordinary wear, acts of God (e.g. flood), failure to follow directions, improper maintenance, use not in accordance with product
instructions, unauthorized modification or service of the Product or damage resulting from the use of the Product with hardware, software or other products not provided by or
specifically recommended by VTB.
NOTES:
- Replacement Parts and accessories that are subject to “wear and tear” such as earpads, mic foam covers, talkback cables, etc. have a three (3) month Warranty.
- Replacement Parts for Discontinued Products are sold on an AS IS basis, they are not supported and come with a 30 day Warranty.
THIS LIMITED WARRANTY IS PURCHASER’S SOLE AND EXCLUSIVE REMEDY AND IS IN LIEU OF ALL OTHER WARRANTIES, EXPRESS OR IMPLIED. TO THE EXTENT PERMITTED BY
APPLICABLE LAW, VTB HEREBY DISCLAIMS THE APPLICABILITY OF ANY IMPLIED WARRANTY OF MERCHANTABILITY, FITNESS FOR A PARTICULAR PURPOSE OR USE FOR THE
PRODUCT. IF SUCH A DISCLAIMER IS PROHIBITED BY APPLICABLE LAW, THE IMPLIED WARRANTY IS LIMITED TO THE DURATION OF THE FOREGOING LIMITED WRITTEN WARRANTY.
IN NO EVENT SHALL VTB BE LIABLE FOR ANY INDIRECT, INCIDENTAL, SPECIAL, PUNITIVE OR CONSEQUENTIAL DAMAGES, OR DAMAGES, INCLUDING BUT NOT LIMITED TO ANY
LOST PROFITS, DATA, OR LOSS OF USE, ANY THIRD PARTY CLAIMS, AND ANY INJURY TO PROPERTY OR BODILY INJURY (INCLUDING DEATH) TO ANY PERSON, ARISING FROM OR
RELATING TO THE USE OF THIS PRODUCT OR ARISING FROM BREACH OF THE WARRANTY, BREACH OF CONTRACT, NEGLIGENCE, TORT, OR STRICT LIABILITY, EVEN IF VTB HAS
BEEN ADVISED OF THE POSSIBILITY OF SUCH DAMAGES.
This warranty supersedes all prior agreements or understandings, oral or written, relating to the Product, and no representation, promise or condition not contained herein will modify
these terms. Some states do not allow the exclusion or limitation of incidental or consequential damages, so the above exclusion or limitation may not apply to you. This warranty gives
you specific legal rights. You may also have other rights, which vary from state to state. Any action or lawsuit for breach of warranty must be commenced within eighteen (18) months
following the purchase of the Product.
EXCLUSIONS FROM LIMITED WARRANTY:
This Limited Warranty shall not apply and VTB has no liability under this Limited Warranty if the Turtle Beach Product:
- is used for commercial purposes such as “LAN, Call Centers” (including rental or lease);
- is modified or tampered with;
- is damaged by Acts of God, power surge, misuse, abuse, negligence, accident, wear and tear, mishandling, misapplication, or other causes unrelated to defective materials or
workmanship;
- serial number is defaced, altered or removed;
- is not used in accordance with the documentation and use instructions; or
- is repaired, modified or altered by other than authorized repair centers.
- Product is no longer available because it was discarded.
25
Page 26

For: Xbox 360® I PS3™ I Mobile
Watch Turtle Beach product training videos at:
youtube.com/TurtleBeachVideos
Copyright © 2013 Voyetra Turtle Beach, Inc. (VTB, Inc.) All rights reserved. Turtle Beach, the Turtle Beach Logo, Voyetra, Ear Force, and Engineered for Gaming are
either trademarks or registered trademarks of VTB, Inc. Xbox, Xbox 360, and Xbox LIVE are registered trademarks of Microsoft Corporation. Playstation is a registered
trademark and PS3 is a trademark of Sony Computer Entertainment, Inc. Mac is a registered trademark of Apple, Inc. Bluetooth is a registered trademark of SIG, Inc.
All Rights Reserved. Dolby and the double-D symbol are trademarks of Dolby Laboratories. All other trademarks are properties of their respective companies and are
hereby acknowledged. Actual product appearance may differ from package imagery. Made in China.
product support and warranty informa
TurtleBeach.com/support
tion:
This product is compliant with the Consumer Product Safety Improvement Act of
2008, Public Law 110-314 (CPSIA)
 Loading...