

Page 1
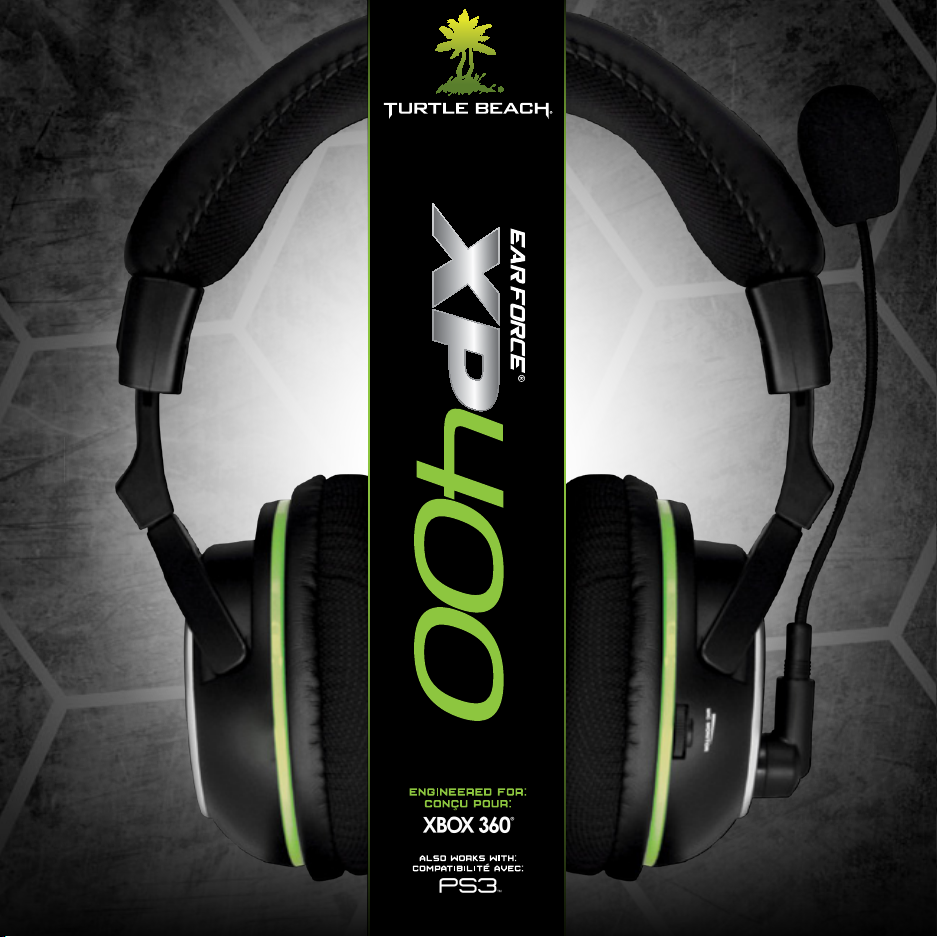
USER GUIDE /
Guide d’utilisation
1
Page 2
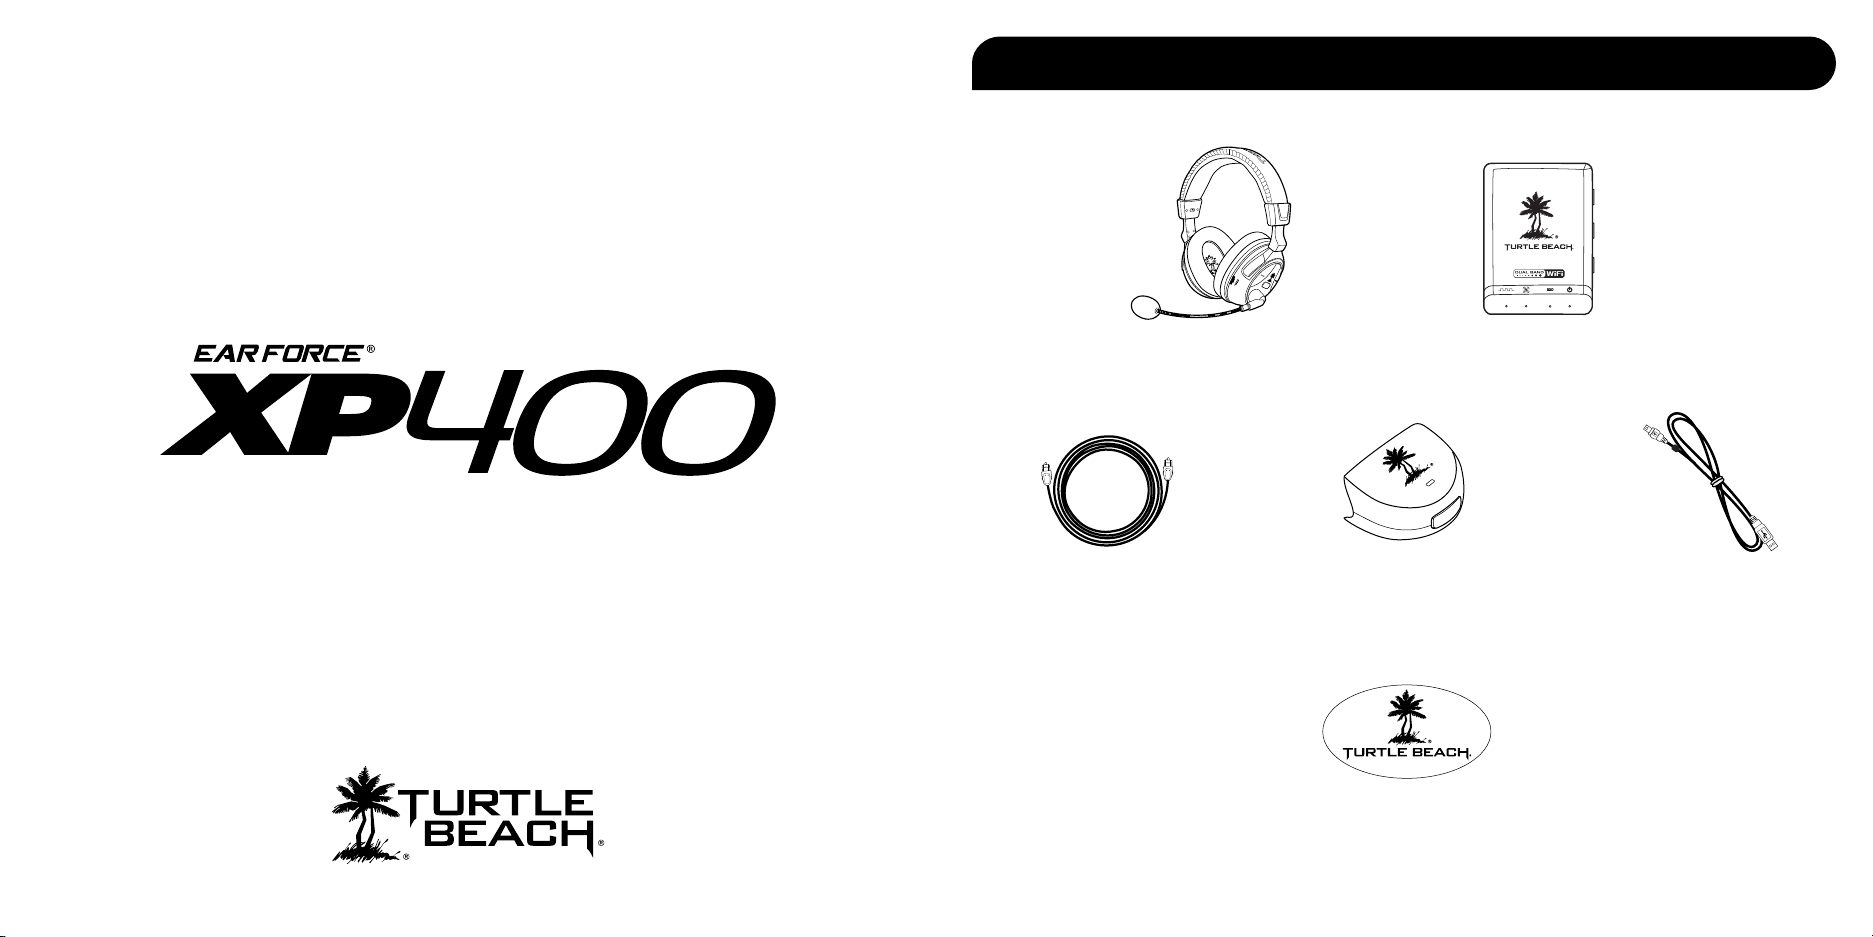
Package Contents / Contenu de la boîte
Wireless Dolby® Surround Sound Gaming Headset /
Casque Pour Jeux Vidéo Sans Fil Avec Son Surround Dolby
Digital Optical Cable /
Câble optique numérique
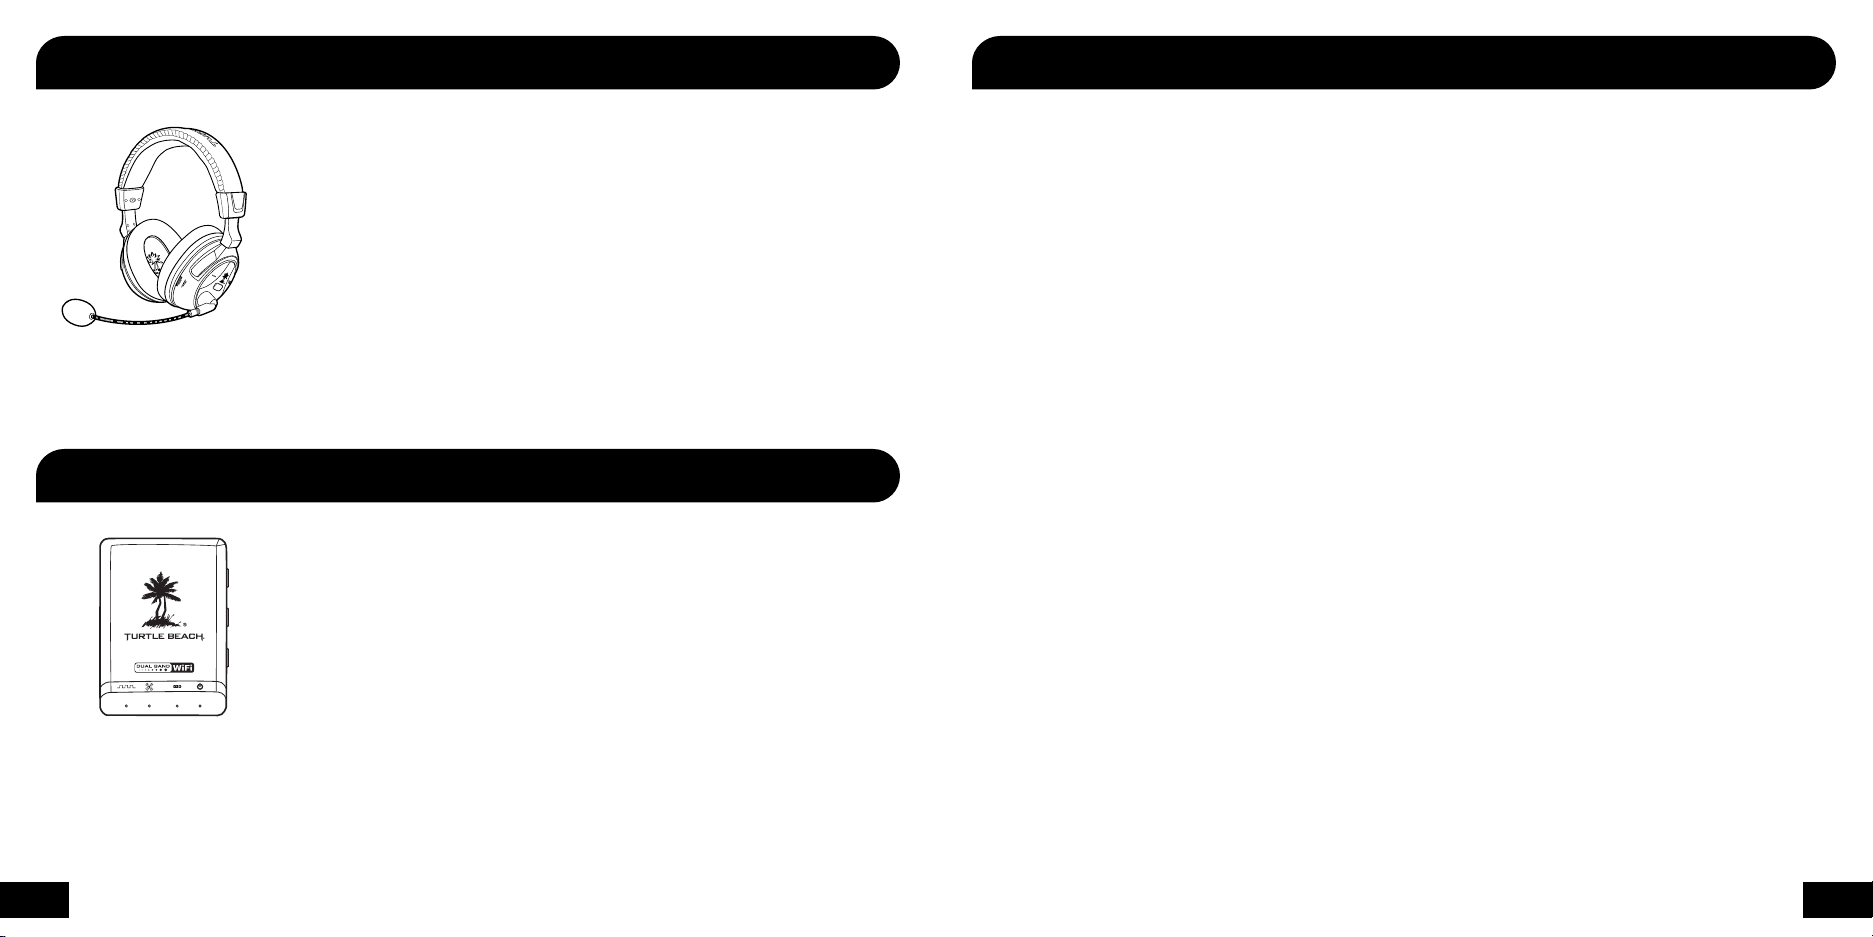
XP400 Headset /
Casque XP400
Adaptateur pour dialogue en ligne XBA Bluetooth
T
U
R
T
L
E
B
A
E
®
Adapter /
M
O
C
.
H
C
XBA Bluetooth
Turtle Beach Sticker /
Autocollant Turtle Beach
XP400 Transmitter /
Émetteur XP400
Headset Charging Cable /
Câble de chargement pour casque
Page 3
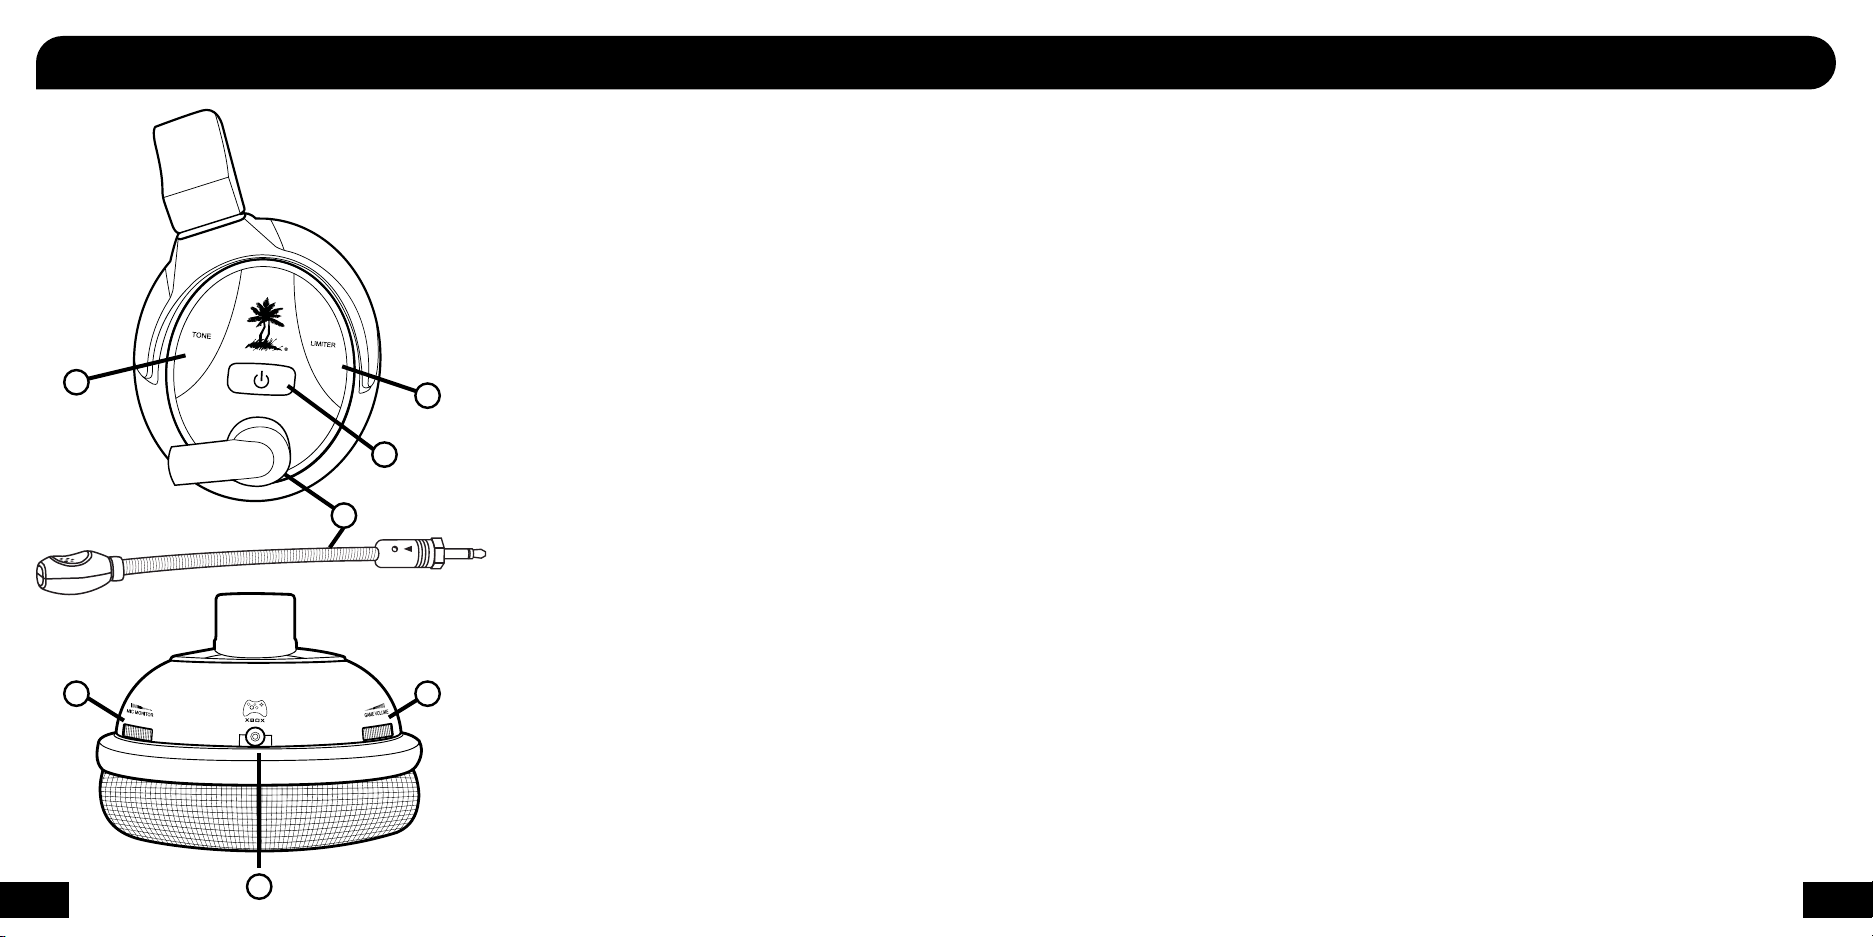
XP400 Headset – Left View / Casque XP400 – Gauche
FRANÇAIS
Casque XP400 – Gauche
1. Bouton de marche :
Appuyez pendant 3 secondes pour mettre
en marche ou à l’arrêt.
Appuyez pendant 6 secondes pour mettre
en mode couplage.
2. Bouton de tonalité : (page 28)
3. Bouton Blast Limiter : (page 29)
4. Contrôle de micro variable
5. Fiche pour commande de Xbox 360
6. Volume du jeu
7. Microphone amovible
2
3
1
7
4
6
1. Power Button:
ON/OFF: press and hold for 3 seconds.
Pairing Transmitter: press and hold for 6 seconds
2. Tone Button: (pg. 28)
3. Blast Limiter Button: (pg. 29)
4. Variable Mic Monitor
5. Xbox 360 Controller Jack
6. Game Volume
7. Removable Microphone
DEUTSCH
XP400 Headset – Linke Seite
1. Ein/Aus-Taste
Ein/Aus: Drücken und 3 Sekunden lang
gedrückt halten.
Pairing-Modus: Drücken und 6 Sekunden
lang gedrückt halten.
2. Klangtaste: (Siehe S. 28)
3. Blast Limiter-Taste: (Siehe S. 29)
4. Variabler Mikrofon-Monitor
5. Xbox 360 Controller-Buchse
6. Game-Lautstärke
7. Abnehmbares Mikrofon
ITALIANO
Cuffia XP400 – Vista lato sinistro
1. Tasto di alimentazione
On/Off: tenere premuto per 3 secondi.
Modalità di abbinamento: tenere premuto
per 6 secondi.
2. Tasto controllo toni: (pag. 28)
3. Tasto funzione Blast Limiter: (pag. 29)
4. Monitor del microfono variabile
5. Connettore controller Xbox 360
6. Volume gioco
7. Microfono rimovibile
PORTUGUÊS
Fone de ouvido XP400 – Vista esquerda
1. Botão de ligar
Ligar/desligar: pressione e segure por
3 segundos.
Modo de emparelhamento: pressione e
segure por 6 segundos.
2. Botão de tom: (pág. 28)
3. Botão limitador de estouros: (pág. 29)
4. Monitor de Microfone Variável
5. Conector do Controlador do Xbox 360
6. Volume do Jogo
7. Microfone removível
ESPAÑOL
Auriculares XP400 – Vista izquierda
1. Botón de alimentación eléctrica
Encendido/Apagado: manténgalo presionado durante 3 segundos.
Modo pareado: manténgalo presionado
durante 6 segundos.
2. Botón de tono: (página 28)
3. Botón de limitador de sonido: (página 29)
4. Control variable del micrófono
5. Toma del controlador de Xbox 360
6. Volumen del juego
7. Micrófono extraíble
SVENSK
XP400 Headset – Vänster vy
1. På/Av-knapp
På/Av: tryck och håll intryckt i 3 sekunder
Ihopkopplingsläge: Tryck och håll intryckt i
6 sekunder
2. Tonknapp: (se sid. 28)
3. Knapp för ljudstötsbegränsning: (se sid. 29)
4. Variabel mikrofonövervakning
5. Xbox 360 kontrolluttag
6. Spelvolym
7. Avtagbar mikrofon
DANSK
XP400 headset - set fra venstre side
1. Tænd-/slukknap
Tændt/slukket: Tryk og hold knappen nede
i 3 sekunder.
Pardannelsestilstand: Tryk og hold knappen
nede i 6 sekunder.
2. Tone-knap: (se side 28)
3. Blast Limiter-knap: (se side 29)
4. Variabel mikrofonmonitor
5. Stik til Xbox 360-controller
6. Spillydstyrke
7. Aftagelig mikrofon
NEDERLANDS
XP400 Headset – Linkerkant
1. Power-knop
Aan/Uit: Houd gedurende 3 seconden
ingedrukt.
Pairing Mode: Houd gedurende 6 seconden
ingedrukt.
2. Tone-knop (pag. 28)
3. Blast Limiter-knop (pag. 29)
4. Variabele microfoonmonitor
5. Xbox 360 Controller-uitgang
6. Gamevolume
7. Verwijderbare microfoon
1
5
2
Page 4
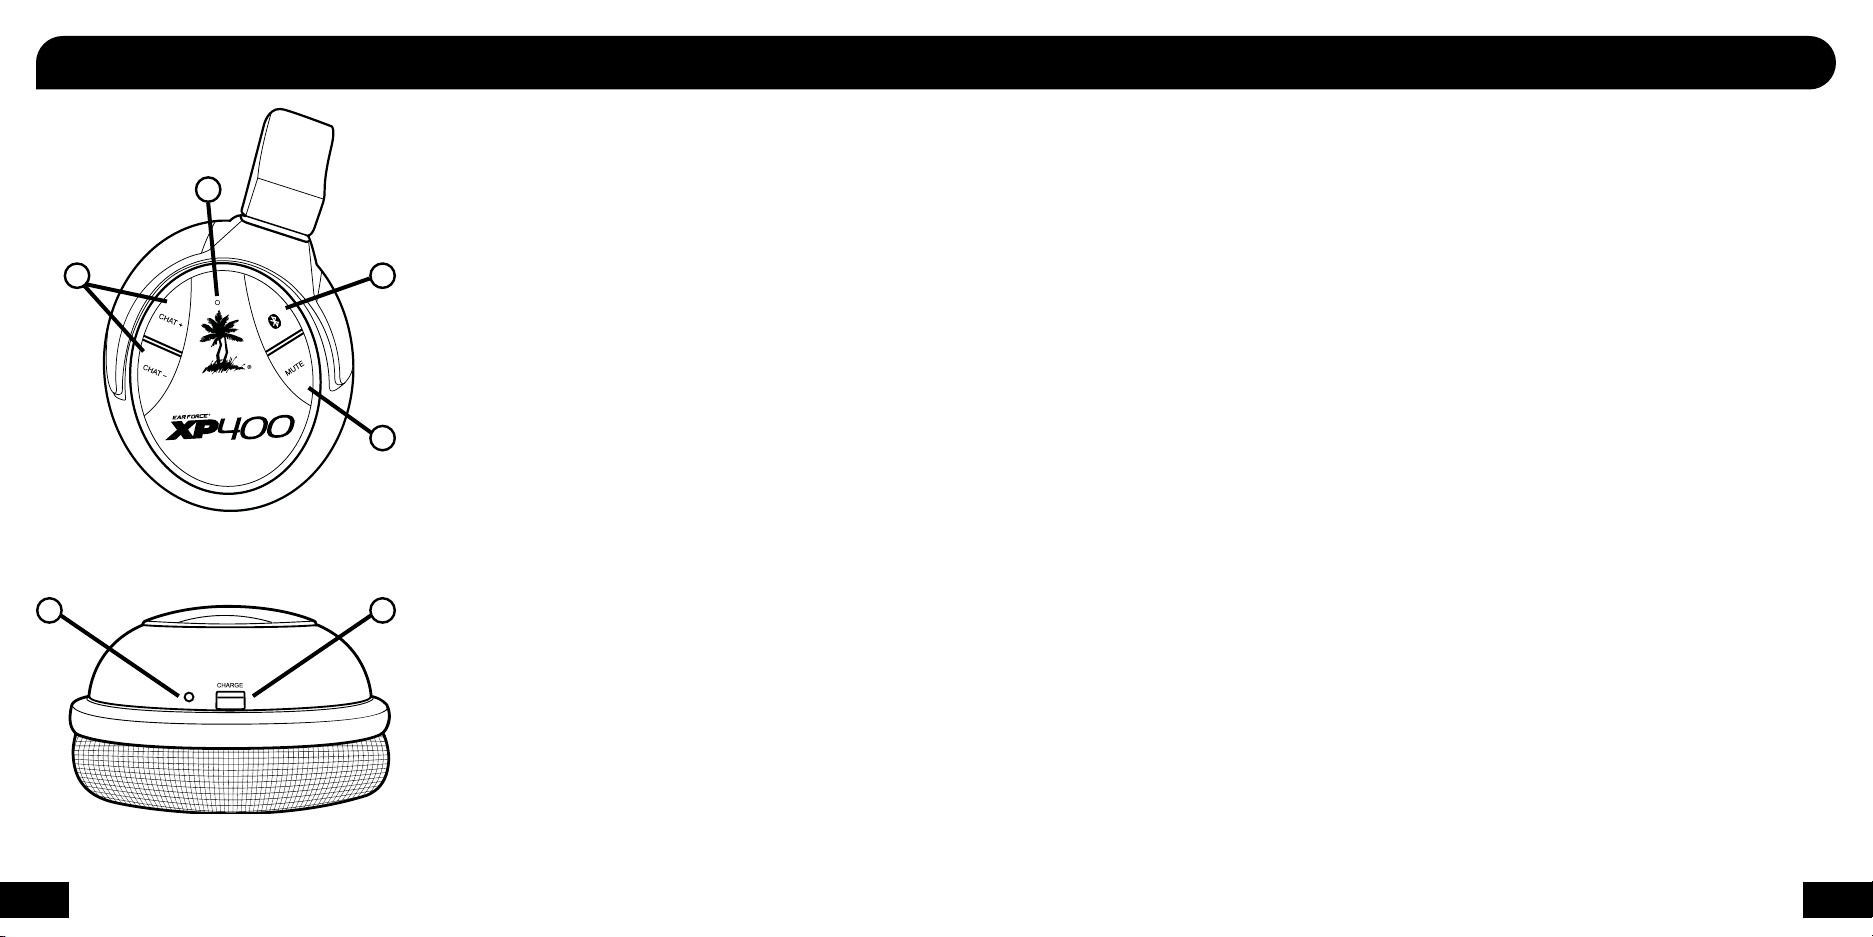
XP400 Headset – Right View / Casque XP400 – Droite
FRANÇAIS
Casque XP400 – Droite
1. Volume Bluetooth
2. DEL Bluetooth
2
1
3
1. Bluetooth Volume
2. Bluetooth LED
4
3. Bluetooth Button (BT MFB): (pg. 23)
4. Mic Mute Button
5. Headset Charging Port: (pg. 26)
6. Charging LED
56
3. Bouton multi-fonction Bluetooth : (page 23)
4. Bouton de désactivation du micro
5. Port de chargement du casque : (page 26)
6. DEL de chargement
DEUTSCH
XP400 Headset – Rechte Seite
1. Bluetooth Lautstärke
2. Bluetooth LED
3. Bluetooth Multifunktionstaste: (Siehe S. 23)
4. Mikrofon-Stumm-Taste
5. Headset-Aufladeanschluss: (Siehe S. 26)
6. LED-Ladeanzeige
ITALIANO
Cuffia XP400 – Vista lato destro
1. Volume Bluetooth
2. LED Bluetooth
3. Tasto multifunzione Bluetooth: (pag. 23)
4. Tasto esclusione microfono
5. Ingresso ricarica cuffia: (pag. 26)
6. LED indicatore di ricarica
PORTUGUÊS
Fone de ouvido XP400 – Vista direita
1. Volume do Bluetooth
2. LED do Bluetooth
3. Botão Multi-Função de Bluetooth: (pág. 23)
4. Botão Desligar Microfone
5. Porta de carregamento de fone de ouvido: (pág. 26)
6. LED de carregamento
ESPAÑOL
Auriculares XP400 – Vista derecha
1. Volumen de Bluetooth
2. Indicador LED de Bluetooth
3. Botón multifunción de Bluetooth: (página 23)
4. Botón silenciador del micrófono
5. Puerto de carga de los auriculares: (página 26)
6. LED de carga
SVENSK
XP400 Headset – Höger vy
1. Bluetooth volym
2. Bluetooth LED
3. Bluetooth flerfunktionsknapp: (se sid. 23)
4. Mikrofontystningsknapp
5. Laddningsport headset: (se sid. 26)
6. Laddnings-LED
DANSK
XP400 headset - set fra højre side
1. Bluetooth-lydstyrke
2. Lysdiode til Bluetooth
3. Multifunktionsknap til Bluetooth: (se side 23)
4. Knap til dæmpning af mikrofon
5. Opladningsport til headset: (se side 26)
6. Lysdiode til opladning
NEDERLANDS
XP400 Headset – Rechterkant
1. Bluetooth Volume
2. Bluetooth LED-lampje
3. Bluetooth Multi-Function-knop: (pag. 23)
4. Mic Mute-knop
5. Oplaadpoort voor de headset: (pag. 26)
6. Batterijlader LED-lampje
3
4
Page 5
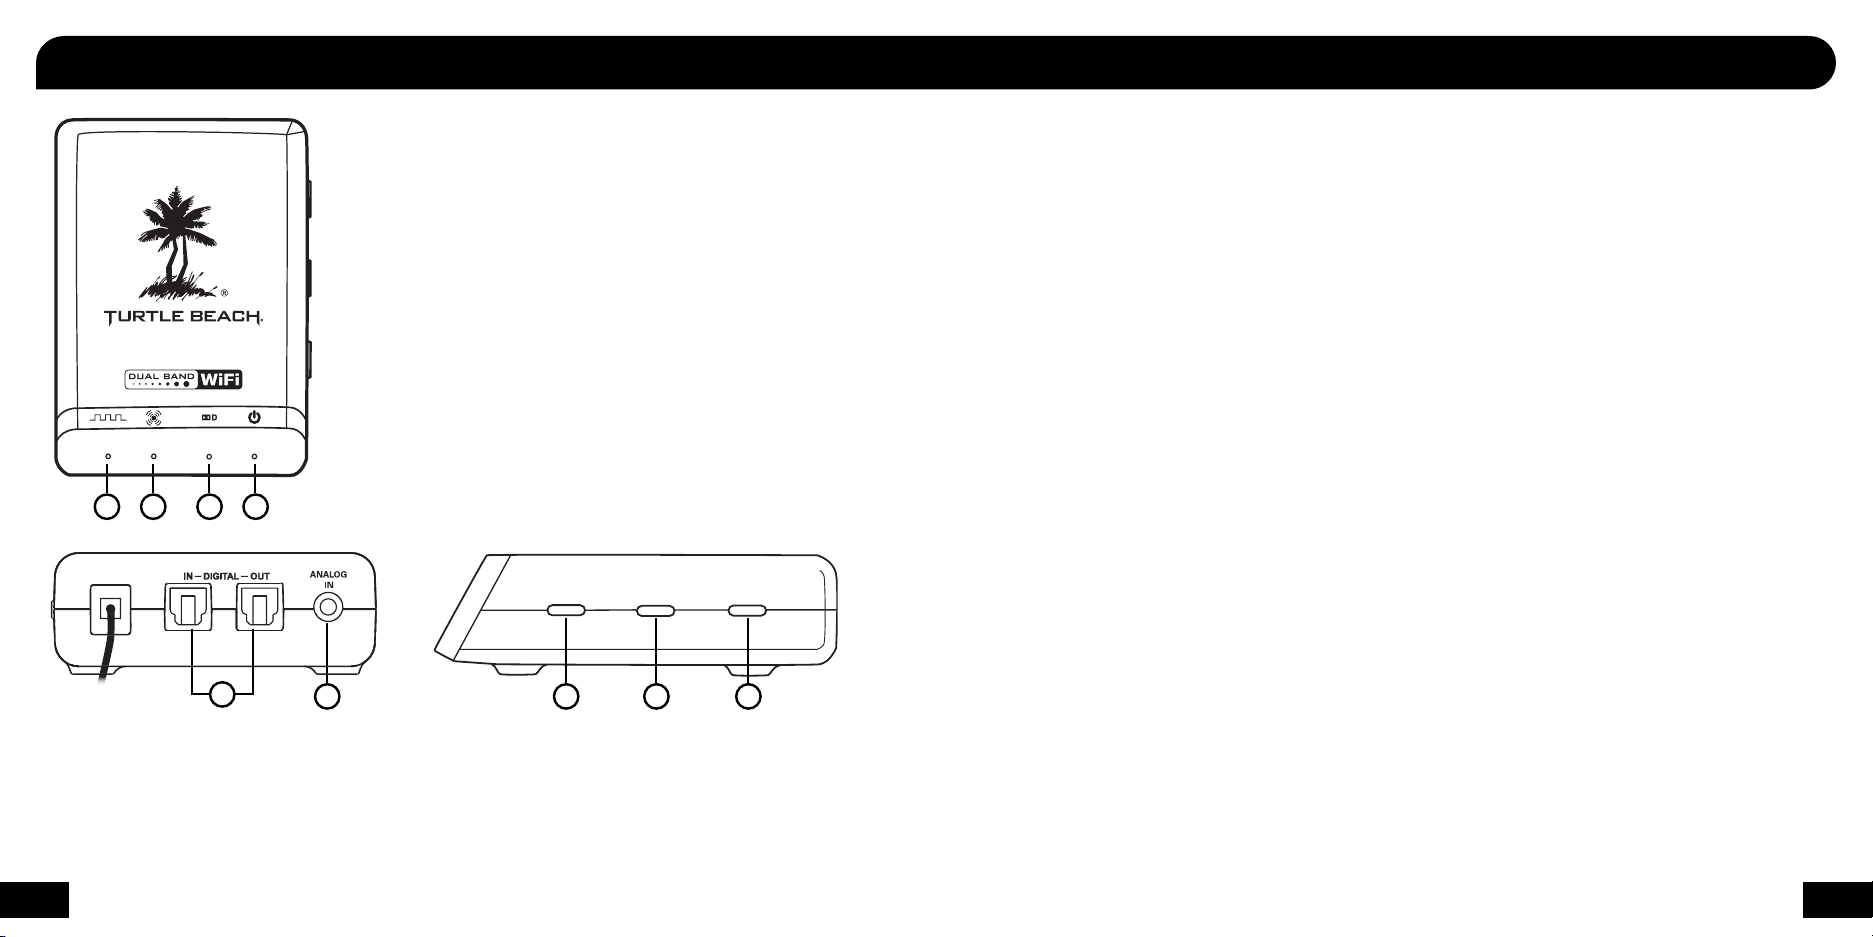
XP400 Transmitter / Émetteur XP400
1 2 3 4
5
1. Digital Input LED
2. Surround Sound LED
3. Dolby® Digital LED
4. Power/Link LED
5. Digital Input and Output
6. Analog Input
7. Pairing Button: (pg. 7)
8. Surround Sound Angles Button: (pg. 21)
9. Surround Sound On/Off button
PAIR
SURROUND
ANGLES
SURROUND
ON/ OFF
6 7 8 9
FRANÇAIS
Émetteur XP400
1. DEL d’entrée numérique
2. DEL de son Surround
3. DEL numérique Dolby
4. DEL alimentation/lien
5. Entrée et sortie numériques
6. Entrée analogique
7. Bouton de couplage : (page 7)
8. Bouton d’angles du son Surround : (page 21)
9. Marche/Arrêt du son Surround
DEUTSCH
XP400 Sender
1. LED-Digitaleingang
2. LED-Surround-Sound
3. Dolby Digital-LED
4. LED-Stromversorgung/Verbindung
5. Digitaleingang und -ausgang
6. Analogeingang
7. Pairing-Taste: (Siehe S. 7)
8. Surround-Sound-Winkel-Taste: (Siehe S. 21)
9. Surround-Sound Ein/Aus-Taste
ITALIANO
Trasmettitore XP400
1. LED Digital Input
2. LED audio surround
3. LED Dolby Digital
4. LED alimentazione/connessione
5. Ingresso e uscita digitali
6. Ingresso analogico
7. Tasto di abbinamento: (pag. 7)
8. Tasto angolazione audio surround: (pag. 21)
9. Tasto On/Off audio surround
PORTUGUÊS
Transmissor XP400
1. LED de entrada digital
2. LED de som surround
3. LED Dolby Digital
4. LED da Alimentação/Link
5. Entrada e saída digital
6. Entrada analógica
7. Botão de Emparelhamento: (pág. 7)
8. Botão de ângulos surround: (pág. 21)
9. Som surround Liga/Desliga
ESPAÑOL
Transmisor XP400
1. LED con entrada digital
2. LED con sonido envolvente
3. LED digital Dolby
4. LED de alimentación eléctrica/conexión
5. Entrada y salida digital
6. Entrada analógica
7. Botón de modo pareado: (página 7)
8. Botón de ángulos de sonido envolvente:
(página 21)
9. Botón de encendido/apagado del sonido
envolvente
SVENSK
XP400 Sändare
1. Digital ingång LED
2. Surroundljud LED
3. Dolby Digital LED
4. Ström/Länk LED
5. Digital ingång och utgång
6. Analog ingång
7. Ihopkopplingsknapp: (se sid. 7)
8. Surroundljudsvinkelknapp: (se sid. 21)
9. På/Av-knapp för surroundljud
DANSK
XP400 radiosender
1. Lysdiode til digital indgang
2. Lysdiode til surround sound
3. Lysdiode til Dolby Digital
4. Lysdiode til strøm/link
5. Digital indgang og udgang
6. Analog indgang
7. Pardannelse-knap: (se side 7)
8. Knap til surround sound-vinkler: (se side 21)
9. Tænd-/slukknap til surround sound
NEDERLANDS
XP400-zender
1. LED-lampje digitale ingang
2. LED-lampje surround sound
3. Dolby Digital LED-lampje
4. Voeding/Link LED-lampje
5. Digitale ingang en uitgang
6. Analoge ingang
7. Pairing-knop: (zie pag. 7)
8. Surround sound hoeken-knop: (zie pag. 21)
9. Surround sound Aan/Uit-knop
5
6
Page 6
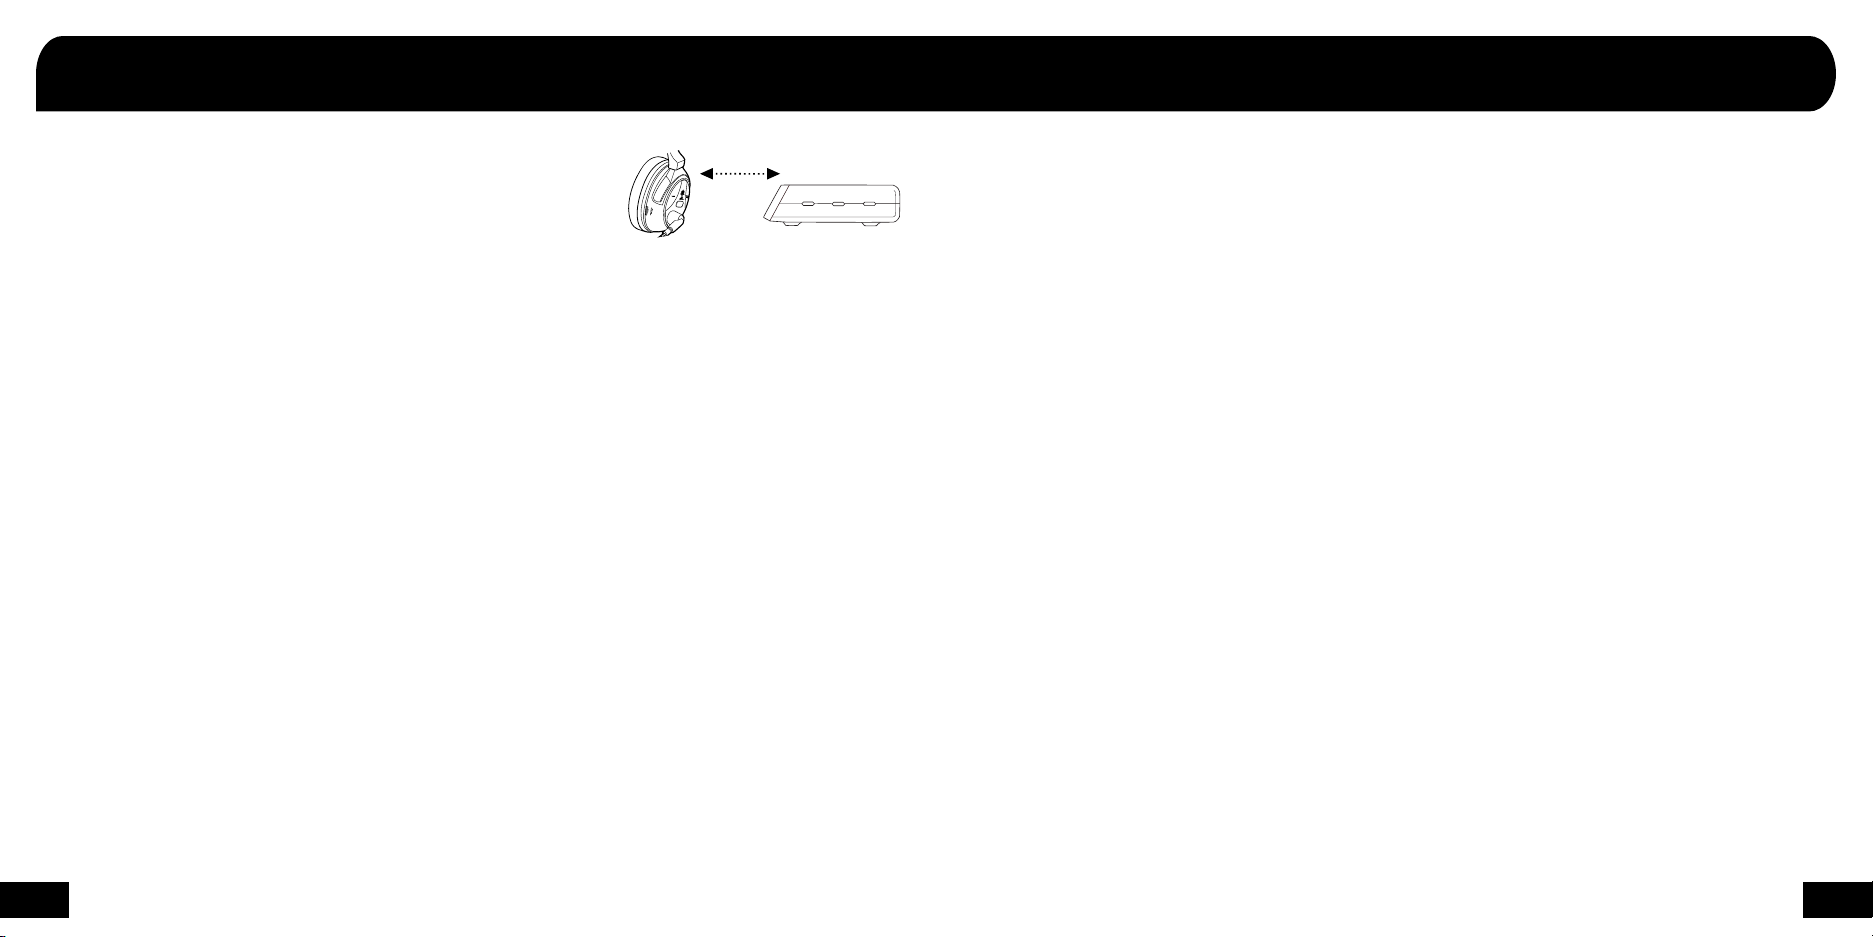
Pairing the Headset and Transmitter /
Couplage du casque et de l’émetteur
1. Make sure the headset and transmitter are off and at least 2 feet (60cm) away from each other.
2. Press and hold the PAIR button on the transmitter until the LED flashes rapidly.
3. Press and hold the POWER button on the headset for 6 seconds until the LED flashes rapidly.
4. Wait for the headset and transmitter to pair. This process could take up to 30 seconds.
After a few seconds, the Transmitter LED will be solid and the Headset will be paired.
If pairing fails, repeat steps 1-4. It may take up to 5 attempts to pair successfully.
FRANÇAIS
Couplage du casque et de l’émetteur
1. Vérifiez que le casque et l’émetteur sont éteints et au moins à 60 cm
l’un de l’autre.
2. Appuyez sur le bouton de couplage PAIR situé sur l’émetteur
jusqu’à ce que le voyant DEL clignote rapidement.
3. Appuyez sur le bouton de mise en marche POWER sur le casque
pendant 6 secondes jusqu’à ce que le voyant DEL clignote
rapidement.
4. Attendez que le casque et l’émetteur soient couplés. Ce processus
peut prendre jusqu’à 30 secondes.
Après quelques secondes, le DEL de l’émetteur s’immobilisera et
le casque sera couplé. Si le couplage n’aboutit pas, recommencez
ITALIANO
Abbinamento tra cuffie e trasmettitore
1. Assicurarsi che cuffia e trasmettitore siano spenti e posti a una
distanza di almeno 60 cm (2 piedi).
2. Premere e tenere premuto il tasto PAIR sul trasmettitore fino a
quando il LED lampeggia rapidamente.
3. Premere e tenere premuto il tasto POWER sulla cuffia per 6 secondi
fino a quando il LED lampeggia rapidamente.
4. Attendere che cuffia e trasmettitore completino l’abbinamento.
L’operazione può richiedere fino a 30 secondi.
Dopo alcuni secondi, il LED del trasmettitore rimane acceso in modo
fisso e la cuffia risulta abbinata. In caso di mancato abbinamento,
ripetere i punti da 1 a 4. L’operazione può richiedere fino a 5 tentativi.
les étapes 1 à 4. Il peut falloir jusqu’à 5 tentatives pour réussir le
couplage.
PORTUGUÊS
Emparelhamento do Fone de Ouvido e do Transmissor
DEUTSCH
Pairing von Headset und Sender
1. Headset und Sender ausschalten und sicherstellen, dass sie
mindestens 60 cm voneinander entfernt sind.
2. PAIR-Taste auf dem Sender drücken und gedrückt halten, bis die
LED schnell blinkt.
3. EIN/AUS-Taste auf dem Headset drücken und 6 Sekunden lang
gedrückt halten, bis die LED schnell blinkt.
4. Warten, bis das Pairing von Headset und Sender abgeschlossen ist.
Dieser Vorgang kann bis zu 30 Sekunden dauern.
Die LED auf dem Sender hört nach einigen Sekunden auf zu blinken
und leuchtet und das Pairing mit dem Headset wird vorgenommen.
Wenn das Pairing fehlschlägt, wiederholen Sie Schritte 1 - 4. Es
1. Verifique se o fone de ouvido e o transmissor estão desligados e se
estão a pelo menos 60 centímetros de distância um do outro.
2. Pressione e segure o botão PAIR no transmissor até o LED piscar
rapidamente.
3. Pressione e segure o botão POWER no fone de ouvido por 6 segundos até o LED piscar rapidamente.
4. Aguarde até o fone de ouvido e o transmissor ficarem emparelhados. Isso pode levar até 30 segundos.
Após alguns segundos, o LED do transmissor ficará contínuo e o fone
de ouvido será emparelhado. Se o emparelhamento falhar, repita as
etapas 1-4. Podem ser necessárias até 5 tentativas para emparelhar
com êxito.
können bis zu 5 Versuche notwendig sein, um das Pairing erfolgreich
abzuschließen.
2 feet (60cm)
ESPAÑOL
Apareamiento de los auriculares y el transmisor
SURROUND
SURROUND
PAIR
ON/ OFF
ANGLES
1. Asegúrese de que los auriculares y el transmisor estén apagados, y
que se encuentren separados por una distancia de al menos 60 cm.
2. Mantenga presionado el botón de modo pareado del transmisor
hasta que el indicador LED destelle rápidamente.
3. Mantenga presionado el botón de alimentación eléctrica de los
auriculares durante 6 segundos hasta que el indicador LED destelle
rápidamente.
4. Espere a que los auriculares y el transmisor se apareen. Este
proceso podría demorar hasta 30 segundos.
Después de algunos segundos, el indicador LED del transmisor quedará encendido y los auriculares se aparearán. Si el apareamiento
DANSK
Pardannelse med headset og radiosender
1. Sørg for, at der er slukket for headsettet og radiosenderen, og at de
er mindst 60 cm fra hinanden.
2. Tryk og hold PAIR-knappen på radiosenderen nede, til lysdioden
blinker hurtigt.
3. Tryk og hold POWER-knappen på headsettet nede i 6 sekunder, til
lysdioden blinker hurtigt.
4. Vent på, at headsettet og radiosenderen pardannes. Denne proces
kan tage op til 30 sekunder.
Efter nogle få sekunder vil radiosenderens lysdiode lyse solidt,
og headsettet vil være pardannet. Hvis pardannelsen mislykkes,
gentages trin 1-4. Det kan tage op til 5 forsøg, før pardannelsen lykkes.
falla, repita los pasos 1 a 4. Es posible que tenga que intentarlo hasta
5 veces a fin de que se apareen correctamente.
NEDERLANDS
De headset en de zender aan elkaar koppelen (pairing)
SVENSK
Ihopkoppling av headset och sändare
1. Se till att headset och sändare är avstängda och på minst 60 cm
avstånd från varandra.
2. Tryck in och håll intryckt IHOPKOPPLINGS-knappen på sändaren
tills LED-lyset blinkar i snabb takt.
3. Tryck och håll På/Av-knappen på headsetet nedtryckt i 6 sekunder
tills LED-lyset blinkar i snabb takt.
4. Vänta på att headset och sändare kopplar ihop sig. Denna åtgärd
kan ta upp emot 30 sekunder.
Efter några sekunder kommer LED-sändaren att vara fast och
headsetet kommer att kopplas ihop. Om ihopkopplingen misslyckas,
1. Zorg ervoor dat de headset en de zender uitgeschakeld zijn en zich
op ten minste 60 centimeter afstand van elkaar bevinden.
2. Houd de PAIR-knop op de zender ingedrukt tot het LED-lampje snel
knippert.
3. Houd de POWER-knop op de headset gedurende 6 seconden
ingedrukt tot het LED-lampje snel knippert.
4. Wacht terwijl de headset en de zender gekoppeld worden. Dit kan
wel 30 seconden duren.
Na een paar seconden zal het LED-lampje van de zender niet meer
knipperen en zal de headset gekoppeld zijn. Als het koppelen mislukt,
herhaal je stap 1-4. Het kan zijn dat je 5 pogingen nodig hebt voor een
succesvolle koppeling.
upprepa steg 1–4. Det kan ta upp emot 5 försök för att få till stånd en
framgångsrik ihopkoppling.
7
8
Page 7
Xbox 360® and PS3™ Setup / Configuration Xbox 360 et PS3
Xbox 360* / PS3
Transmitter USB Cable /
Câble USB pour émetteur
Digital Optical Cable
(included) / Câble
optique numérique
(fourni)
DIGITAL OUT
1
CONSOLE
1. Connect the transmitter USB cable to a USB port on the
gaming console.
2. Connect the digital optical cable*
NOTE: Remove the protective caps from each end of the optical cable
before inserting it into the sockets.
FRANÇAIS
Configuration Xbox 360 et PS3
1. Branchez le câble USB de l’émetteur à un port USB sur la
console de jeu.
2. Branchez le câble optique numérique*
REMARQUE : Retirez les caches de protection à chaque extrémité du
câble optique avant de l’insérer dans les prises.
* Les anciens modèles de console Xbox 360 ne comportant pas de sortie
optique, un câble adaptateur audio Xbox 360 pour sortie audio optique
est nécessaire (vendu séparément). Si votre télévision HD comporte une
fiche de SORTIE AUDIO, vous pouvez l’utiliser pour brancher le câble
optique à l’émetteur.
DEUTSCH
Xbox 360 und PS3 Setup
1. USB-Kabel des Senders mit dem USB-Anschluss auf der
Spielkonsole verbinden.
2. Optisches Kabel anschließen*
HINWEIS: Vor dem Verbinden des Kabels mit den Anschlüssen die
Schutzkappen von den beiden Enden des optischen Kabels entfernen.
*Ältere Modelle der Xbox 360-Konsole verfügen über keinen optischen
Ausgang, sodass ein Xbox 360-Audioadapter-Kabel erforderlich
ist (separat erhältlich). Wenn das HDTV-Gerät eine digitale
Audioausgangsbuchse (AUDIO OUT) hat, kann das optische Kabel so an
den Sender angeschlossen werden.
ITALIANO
Configurazione Xbox 360 e PS3
1. Collegare il cavo USB del trasmettitore a una porta USB della console.
2. Collegare il cavo Digital Optical*
NOTA: rimuovere i cappucci protettivi dalle due estremità del cavo ottico
prima di inserirle nelle prese.
* I modelli più vecchi di console Xbox 360 non dispongono di uscita ottica,
e richiedono pertanto un cavo adattatore audio per Xbox 360 (venduto
separatamente). Se l’apparecchio TV HD utilizzato dispone di un connettore
AUDIO OUT digitale, è possibile utilizzarlo per collegare il cavo ottico al
trasmettitore.
PORTUGUÊS
Configuração Xbox 360 e PS3
1. Conecte o cabo USB do transmissor a uma porta USB do console
de jogos.
2. Conecte o cabo ótico digital*
OBSERVAÇÃO: retire as tampas de proteção de cada extremidade do cabo
ótico antes de inseri-las nos soquetes.
* Modelos mais antigos do Xbox 360 não incluem uma saída ótica, portanto
um cabo adaptador de áudio para o Xbox 360 é necessário (vendido
separadamente). Se sua HDTV possui um conector de AUDIO OUT digital, você
pode usá-lo para conectar o cabo ótico ao transmissor.
ESPAÑOL
Configuración en Xbox 360 y PS3
1. Conecte el cable USB del transmisor al puerto USB de la consola
de juegos
2. Conecte el cable óptico digital*
NOTA: Quite las cubiertas protectoras de cada extremo del cable óptico
antes de conectarlo a los enchufes.
* Los modelos de Xbox 360 anteriores no incluyen salida óptica y requieren
un cable adaptador de audio para Xbox 360 (se vende por separado). Si su
televisor de alta definición tiene una toma digital de SALIDA DE AUDIO, puede
utilizarla para conectar el cable óptico al transmisor.
SVENSK
Xbox 360/PS3-installation
1. Anslut sändarens USB-kabel till en USB-port på spelkonsolen.
2. Anslut den digitala optiska kabeln*
OBS! Ta bort skyddslocken från vardera änden av den optiska kabeln innan
den förs in i uttagen.
* Äldre Xbox 360-konsolmodeller har ingen optisk utgång och därför behövs en
Xbox 360-ljudadapterkabel (säljs separat). Om din HDTV har ett digitalt LJUD
UT-uttag kan du använda detta för att ansluta den optiska kabeln till sändaren.
DANSK
Opsætning af Xbox 360 og PS3
1. Sæt radiosenderens USB-kabel i en USB-port på spillekonsollen.
2. Forbind det digitale, optiske kabel*
BEMÆRK: Tag beskyttelseshætterne af begge det optiske kabels ender,
inden det sættes i stikkene.
* Ældre Xbox 360 konsolmodeller har ikke en optisk udgang, så det er
nødvendigt med et Xbox 360 lydadapterkabel (sælges separat). Hvis dit HDTV
har et digitalt AUDIO OUT-stik, kan du bruge det til at forbinde det optiske
kabel til radiosenderen.
NEDERLANDS
Installatie Xbox 360 en PS3
1. Sluit de USB-kabel van de zender aan op een USB-poort op de
gaming console.
2. Sluit de digitale optische kabel aan*.
NB: Verwijder de beschermkapjes van elk uiteinde van de optische kabel
voordat je het in de uitgangen steekt.
* Oudere modellen van de Xbox 360 console hebben geen optische uitgang,
waardoor een Xbox 360-Audio Adapter-kabel nodig is (apart verkrijgbaar).
Als jouw HDTV een aansluiting voor digitale AUDIO OUT heeft, kun je deze
gebruiken om de optische kabel met de zender te verbinden.
9
Xbox 360
HDMI
Audio
Adapter
*Older Xbox 360 console models do not include an optical output so an Xbox 360 Audio
Adapter cable is required (sold separately). If your HDTV has a digital AUDIO OUT jack,
you can use it to connect the optical cable to the transmitter.
10
Page 8
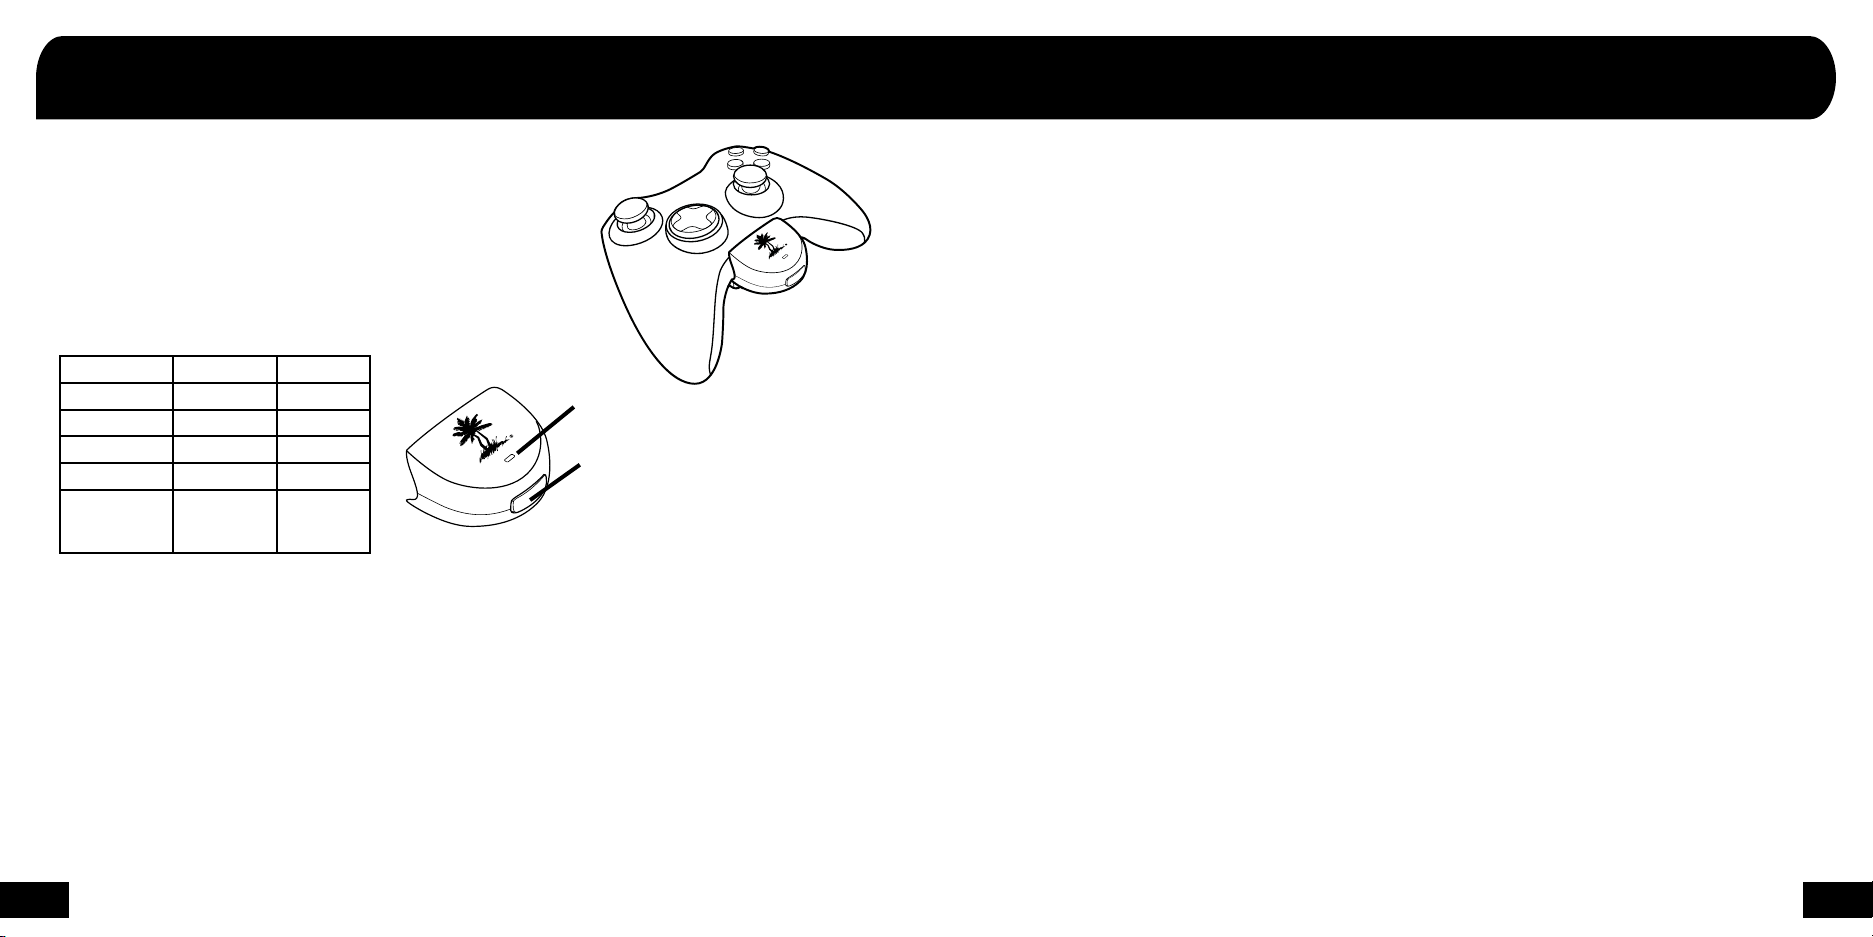
Xbox 360® Wireless Chat Setup /
Configuration de la Xbox 360
1. Turn on the Xbox 360 controller and plug the XBA into the controller headset jack.
2. XBA powered-OFF: press and hold the button on the XBA for 4 seconds. The LED
will begin to blink rapidly, then release.
3. XP400 powered-ON: press and hold the Bluetooth
flashes blue and red, then release.
After a few seconds, the XBA and the XP400 will be paired.
XBA Functions
Function Button Press LED
Power ON Single 1 blink / sec
Power OFF Hold 3 secs OFF
Mic MUTE Double Solid ON
Mic UNMUTE Double 1 blink / sec
Pairing Mode
(paired)
(not paired)
FRANÇAIS
Configuration vocale sans fil de la Xbox 360
1. Allumez la commande Xbox 360 et insérez la XBA dans la fiche du
casque de la commande.
2. Mise à l’arrêt de la XBA : appuyez sur le bouton de la XBA pendant
4 secondes. Relâchez lorsque le voyant DEL se met à clignoter
rapidement.
3. Mise en marche de XP400 : appuyez sur le bouton Bluetooth
jusqu’à ce que le voyant DEL Bluetooth clignote en passant du bleu
au rouge.
Au bout de quelques secondes, la XBA et la XP400 seront couplées.
Désactiver/Activer le micro : appuyez deux fois sur le bouton XBA.
Hold 4 secs
2 blinks / sec
1 blink / sec
®
button until the Bluetooth LED
11
XBA LED /
DEL XBA
XBA Button /
Bouton XBA
DEUTSCH
Xbox 360 Drahtloser Chat Setup
1. Schalten Sie den Xbox 360-Controller ein und stecken Sie den XBA
in die Buchse des Controller-Headsets.
2. XBA ausgeschaltet: Die Taste auf dem XBA drücken und 4
Sekunden lang gedrückt halten. Die LED beginnt, schnell zu blinken;
dann loslassen.
3. XP400 angeschaltet: Bluetooth-Taste drücken und gedrückt halten,
bis die Bluetooth-LED blau und rot blinkt, dann loslassen.
Nach einigen Sekunden ist das Pairing von XBA und XP400
abgeschlossen.
Stumm ein-/ausschalten: XBA-Taste zwei Mal drücken.
ITALIANO
Configurazione chat wireless con Xbox 360
1. Accendere il controller Xbox 360 e inserire l’adattatore XBA nel
connettore cuffia del controller.
2. XBA spento: premere e tenere premuto il tasto sull’adattatore XBA
per 4 secondi. Rilasciare non appena il LED inizia a lampeggiare
rapidamente.
3. XP400 acceso: premere e tenere premuto il tasto Bluetooth fino
a quando il LED Bluetooth lampeggia di colore blu e rosso, quindi
rilasciare.
Dopo alcuni secondi, l’adattatore XBA e la cuffia XP400 risulteranno
abbinati.
Esclusione/Abilitazione: premere due volte il tasto XBA
PORTUGUÊS
Configuração do Bate-Papo do Xbox 360 Sem Fio
1. Ligue o controlador do Xbox 360 e conecte o fone de ouvido XBA no
conector do controlador de fone de ouvido.
2. XBA desativado: pressione e segure o botão sobre o Xba por 4
segundos. O LED começará a piscar rapidamente, em seguida solte.
3. XP400 ativado: pressione e segure o botão do Bluetooth até o LED
Bluetooth piscar azul e vermelho, em seguida solte.
Após alguns segundos, o Xba e o XP400 serão emparelhados.
Silencioso/Ligar: pressione o botão XBA duas vezes
ESPAÑOL
Configuración de chat inalámbrico en Xbox 360
1. Encienda el controlador de la consola Xbox 360 y conecte el XBA en
la toma de los auriculares.
2. XBA apagado: mantenga presionado el botón del XBA durante 4
segundos. El indicador LED comenzará a titilar rápidamente; luego,
suéltelo.
3. XP400 encendido: mantenga presionado el botón Bluetooth hasta
que el indicador LED de Bluetooth destelle de color azul y rojo;
luego, suéltelo.
Después de unos segundos, el XBA y los auriculares XP400 se
aparearán.
Silenciar/reactivar audio: presione dos veces el botón XBA
SVENSK
Xbox 360 trådlös chatt-installation
1. Slå på Xbox 360-kontrollen och anslut XBA i kontrolluttaget på
headsetet.
2. XBA stängs av: Tryck in och håll knappen på XBA intryckt i 4
sekunder. LED-lyset kommer att börja blinka snabbt, släpp sedan
knappen.
3. XP400 påslagen-PÅ: Tryck och håll nedtryckt Bluetooth-knappen tills
Bluetooth LED-lyset blinkar i blått och rött, släpp sedan.
Efter några sekunder kommer XBA och XP400 att vara ihopkopplade.
Mute (tyst)/Unmute (slå på ljud): tryck två gånger på XBA-knappen
DANSK
Opsætning af Xbox 360 trådløs chat
1. Tænd for Xbox 360-controlleren, og sæt XBA i controllerens
headset-stik.
2. XBA - slukket: Tryk og hold knappen på XBA nede i 4 sekunder.
Lysdioden begynder at blinke hurtigt - nu kan knappen slippes.
3. XP400 - tændt: Tryk og hold Bluetooth-knappen nede, til lysdioden til
Bluetooth blinker blå og rød, og slip så knappen.
Efter nogle få sekunder vil XBA og XP400 være pardannet.
Dæmp/ophæv dæmpning: Tryk på XBA-knappen to gange
NEDERLANDS
Installatie Xbox 360 Draadloze Chat
1. Zet de Xbox 360 controller aan en steek de XBA in de controller
headset-uitgang.
2. XBA UITgeschakeld: houd gedurende 4 seconden de XBA-knop
ingedrukt. Zodra het LED-lampje snel knippert, laat het dan los.
3. XP400 INgeschakeld: houd de Bluetooth-knop ingedrukt totdat het
Bluetooth LED-lampje blauw en rood knippert, laat het dan los.
Na een paar seconden zullen de XBA en de XP400 gekoppeld zijn.
Mute/Unmute: druk tweemaal op de XBA-knop
12
Page 9

Xbox 360® Wired Chat Setup (Optional)* /
Configuration vocale sans fil de la Xbox 360* (optionnelle)
In cases where the XBA Bluetooth® Chat Adapter cannot be used, such as with third-party controllers and the Xbox Chat Pad, an optional
talkback cable is available for a wired chat connection between the headset and controller.
*The Xbox 360 Talkback Cable is required for this setup and is sold separately at www.TurtleBeach.com.
FRANÇAIS
Configuration vocale sans fil de la Xbox 360* (optionnelle)
S’il est impossible d’utiliser l’adaptateur de dialogue en ligne
Bluetooth de la XBA, par exemple avec des commandes d’autres
marques et le clavier Xbox Chat Pad, un câble de réponse est
disponible en option pour assurer le branchement filaire entre le
casque et la commande.
*Le câble de réponse de la Xbox 360 nécessaire pour cette configuration est
vendu séparément sur www.TurtleBeach.com.
DEUTSCH
Xbox 360 Verkabelter Chat Setup* (optional)
Wenn der XBA Bluetooth Chat-Adapter nicht benutzt werden kann,
zum Beispiel mit Controllern Dritter und dem Xbox Chat Pad, ist
ein optionales Talkback-Kabel für verkabelte Chat-Verbindungen
zwischen dem Headset und dem Controller verfügbar.
*Für dieses Setup ist das Xbox 360 Talkback-Kabel erforderlich. Dieses ist
separat unter www.TurtleBeach.com erhältlich.
ITALIANO
Configurazione chat via cavo con Xbox 360* (facoltativo)
Qualora non sia possibile utilizzare l’adattatore chat Bluetooth
XBA, ad esempio su controller di terze parti e Chat Pad per Xbox, è
disponibile un cavo talkback facoltativo per una connessione chat
via cavo tra cuffia e controller.
*Per questa configurazione è necessario il Cavo Talkback Xbox 360, venduto
separatamente su www.TurtleBeach.com.
PORTUGUÊS
Configuração do bate-papo do Xbox 360 com fio* (opcional)
Nos casos em que o adaptador do bate-papo do Bluetooth XBA não
puder ser usado, como com controladores de terceiros e o Pad de
bate-papo Xbox, um cabo de resposta opcional estará disponível
para uma conexão com fio de bate-papo entre o fone de ouvido e o
controlador.
*O Cabo de Talkback Xbox 360 é necessário para esta configuração e é
vendido separadamente em www.TurtleBeach.com.
ESPAÑOL
Configuración de chat por cable en Xbox 360* (opcional)
En los casos en que no se utilice el adaptador Bluetooth para
chat XBA, como en el caso de los controladores de otras marcas
y el panel de chat de Xbox, se encuentra disponible un cable
intercomunicador opcional para conexiones de chat por cable entre
los auriculares y el controlador.
*Para esta configuración, se necesita el cable intercomunicador para Xbox
360 que se vende por separado en www.TurtleBeach.com.
SVENSK
Xbox 360 chattinstallation med kabel* (tillval)
I de fall där XBA Bluetooth-chattadapter inte kan användas,
som t.ex. med tredjepartskontroller och Xbox Chatpad, finns en
mikrofonkabel tillgänglig för en chattanslutning med kabel mellan
headset och kontroller.
*Mikrofonkabel för Xbox 360 krävs för denna installation och säljs separat via
www.TurtleBeach.com.
DANSK
Opsætning af Xbox 360 fortrådet chat* (valgfri)
I tilfælde hvor XBA Bluetooth -chatadapteren ikke kan bruges,
såsom med tredjeparts controllere og Xbox Chat Pad, kan et
valgfrit talkback-kabel fås til en fortrådet chat-forbindelse mellem
headsettet og controlleren.
*Xbox 360 talkback-kablet er nødvendigt til denne opsætning og sælges
separat på www.TurtleBeach.com.
NEDERLANDS
Installatie Xbox 360 Draadloze Chat* (optioneel)
In die gevallen waar de XBA Bluetooth Chat Adapter niet gebruikt
kan worden, zoals met controllers van derden en de Xbox Chat Pad,
is een optionele talkback-kabel beschikbaar voor een bedrade chatverbinding tussen de headset en de controller.
*De Xbox 360 Talkback-kabel is voor deze installatie een vereiste en is apart
verkrijgbaar via www.TurtleBeach.com.
13
14
Page 10

Configure Xbox 360® System Settings /
Configurer les paramètres système Xbox 360
Digital Output
Digital Stereo
Dolby Digital 5.1
Dolby Digital 5.1 with WMA Pro
Select Back
1. Settings > Audio > Accessory Settings > Audio Device Settings > Set the
“Digital Output” to “Dolby Digital 5.1”
FRANÇAIS
Configurer les paramètres système Xbox 360
1. Paramètres > Audio > Paramètres accessoires audio >
Paramètres appareil audio > Configurer la « sortie numérique »
sur « Dolby Digital 5.1 »
2. Paramètres > Préférences > Voix > Sortie vocale = Son via le
casque
Current Setting
Dolby Digital
Choose the digital output
type for your system.
This setting only applies
to optical digital and HDMI
audio outputs.
Voice
Voice Volume 10
Game Volume 10
Mute Kinect
Voice Output
Play Through Headset
Play Through Speakers
Voice Output
2. Settings > Preferences > Voice > Voice Output =
Play Through Headset
DEUTSCH
Konfiguration der Xbox 360 Systemeinstellungen
1. Settings > Audio > Accessory Settings > Audio Device Settings
> Stellen Sie den „Digital Output“ auf „Dolby Digital 5.1“
2. Settings > Preferences > Voice > Voice Output = Play Through
Headset (Über Headset wiedergeben)
ITALIANO
Configurazione delle impostazioni di sistema per Xbox 360
1. Impostazioni > Audio > Impostazioni accessori > Impostazioni
dispositivi audio > Impostare “Uscita digitale” su “Dolby
Digital 5.1”
2. Impostazioni > Preferenze > Voce > Output voce = Riproduci
in cuffia
PORTUGUÊS
Configure os ajustes do sistema Xbox 360
1. Configurações> Áudio> Configurações de Acessórios>
Definições de Dispositivos de Áudio> Definir a “Saída Digital”
para Dolby Digital 5.1”
2. Configurações> Preferências> Voz > Saída de Voz =
Reproduzir Através de Fone de Ouvido
ESPAÑOL
Establezca las configuraciones del sistema de Xbox 360
1. Configuración > Audio > Configuración de accesorios >
Configuración de dispositivo de audio > Configure la “Salida
digital” en “Dolby digital 5.1”
2. Configuración > Preferencias > Voz > Salida de voz = Jugar
con auriculares
SVENSK
Konfigurera systeminställningar för Xbox 360
1. Inställningar > Ljud > Tillbehörsinställningar > Inställningar av
ljudenheter > ställ in ”digital utgång” på ”Dolby Digital 5.1”
2. Inställningar > Alternativ > Röst > Röstutgång = Spela
genom headset
DANSK
Konfigurér Xbox 360’s systemindstillinger
1. Indstillinger > Lyd > Indstillinger for tilbehør > Lydenhedens
indstillinger > Sæt den “Digitale udgang” til “Dolby Digital 5.1”
2. Indstillinger > Præferencer > Stemme > Stemmeudgang =
Afspil gennem headset
NEDERLANDS
Configureer de instellingen voor het Xbox 360-systeem
1. Settings > Audio > Accessory Settings > Audio Device
Settings > Stel de “Digital Output” in op “Dolby Digital 5.1”
2. Settings > Preferences > Voice > Voice Output = Play
Through Headset
15
16
Page 11
PS3™ Bluetooth® Setup / Configuration de la PS3 Bluetooth
0
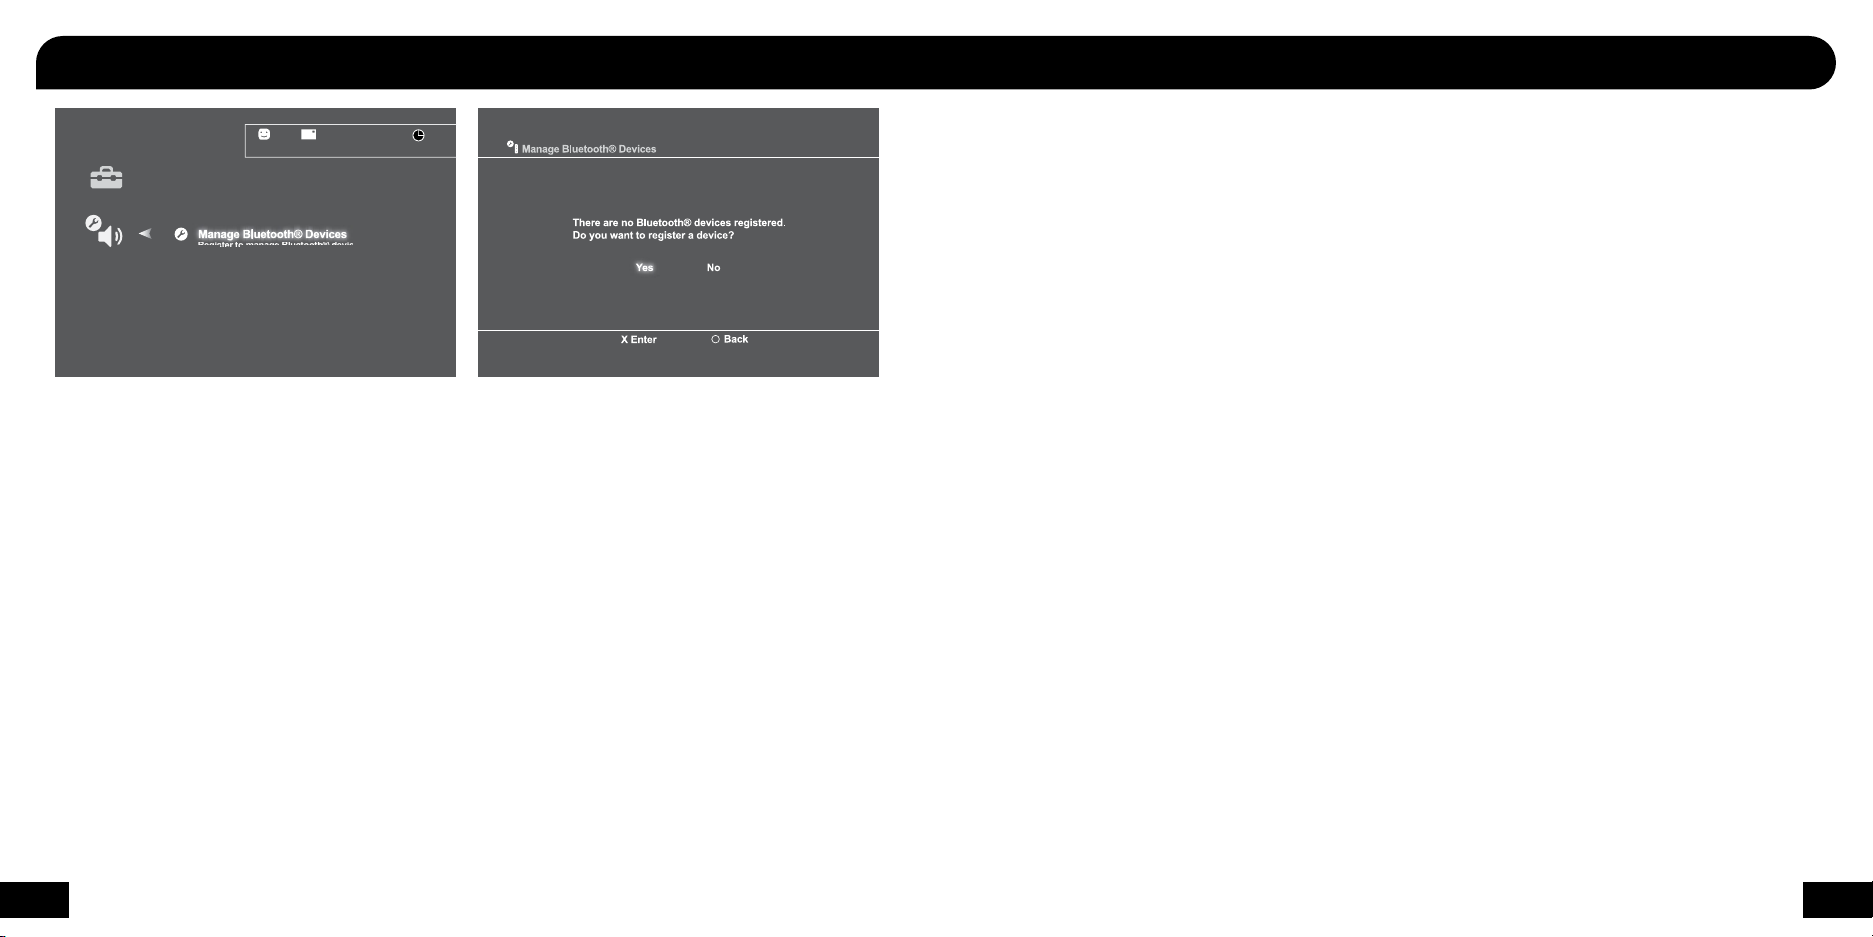
12/14 12:15 PM
Register to manage Bluetooth® devices such as
headsets, keyboards and mouse devices.
1. PS3 Settings > Accessory Settings > Manage Bluetooth Devices. (XP400 Bluetooth OFF).
2. Scan for Bluetooth devices.
3. XP400 powered-ON: press and hold the Bluetooth button until the Bluetooth LED flashes blue and red, then release.
4. Select “TURTLE BEACH BLUETOOTH CHAT” from the list.
5. Enter “0000” as the Pass Key.
The Bluetooth LED on the headset will flash blue about once per second, indicating that the Bluetooth has paired to your PS3.
FRANÇAIS
Configuration de la PS3 Bluetooth
1. Paramètres PS3 > Paramètres accessoires > Gérer les
périphériques Bluetooth. (XP400 Bluetooth ÉTEINT).
2. Démarrez la recherche de périphériques Bluetooth.
3. Mise en marche de XP400 : appuyez sur le bouton Bluetooth
jusqu’à ce que le voyant DEL Bluetooth clignote en passant du
bleu au rouge.
4. Sélectionnez « TURTLE BEACH BLUETOOTH CHAT » dans la liste.
5. Entrez la clé d’identification « 0000 ».
Le voyant DEL Bluetooth du casque passera au bleu et clignotera
toutes les secondes environ, indiquant que le Bluetooth s’est couplé
à votre PS3.
DEUTSCH
PS3 Bluetooth Setup
1. PS3 Settings > Accessory Settings > Manage Bluetooth Devices.
(XP400 Bluetooth AUS).
2. Nach Bluetooth-Geräten suchen.
3. XP400 angeschaltet: Bluetooth-Taste drücken und gedrückt
halten, bis die Bluetooth-LED blau und rot blinkt, dann loslassen.
4. Aus der Liste „TURTLE BEACH BLUETOOTH CHAT“ auswählen.
5. „0000“ als Pass Key (Passwort) eingeben.
Die Bluetooth-LED auf dem Headset blinkt etwa einmal pro Sekunde
in blauer Farbe. Dies zeigt an, dass das Pairing zwischen Bluetooth
und Ihrer PS3 erfolgreich abgeschlossen wurde.
ITALIANO
Configurazione Bluetooth per PS3
1. PS3 Settings > Accessory Settings > Manage Bluetooth Devices
(Impostazioni PS3 > Impostazioni accessori > Gestione dispositivi
Bluetooth). (Bluetooth XP400 OFF).
2. Ricerca di dispositivi Bluetooth.
3. XP400 acceso: premere e tenere premuto il tasto Bluetooth fino
a quando il LED Bluetooth lampeggia di colore blu e rosso, quindi
rilasciare.
4. Selezionare “TURTLE BEACH BLUETOOTH CHAT” dall’elenco.
5. Immettere “0000” come Pass Key.
Il LED Bluetooth sulla cuffia lampeggerà di colore blu circa una
volta al secondo, indicando che il sistema Bluetooth ha eseguito
l’abbinamento con la PS3.
PORTUGUÊS
Configuração de Bluetooth PS3
1. Configurações PS3 > Configurações de Acessórios > Gerenciar
Dispositivos Bluetooth. (XP400 Bluetooth DESATIVADO).
2. Procurar dispositivos Bluetooth.
3. XP400 ativado: pressione e segure o botão do Bluetooth até o LED
Bluetooth piscar azul e vermelho, em seguida solte.
4. Selecione “TURTLE BEACH BLUETOOTH CHAT” na lista.
5. Insira “0000” como senha.
O LED do Bluetooth no fone de ouvido piscará em azul cerca de uma
vez por segundo, indicando que o Bluetooth emparelhou com o PS3.
ESPAÑOL
Configuración de Bluetooth en PS3
1. Configuración de PS3 > Configuración de accesorios > Administrar
dispositivos Bluetooth. (Bluetooth de XP400 apagado).
2. Busque los dispositivos Bluetooth.
3. XP400 encendido: mantenga presionado el botón Bluetooth hasta
que el indicador LED de Bluetooth destelle de color azul y rojo;
luego, suéltelo.
4. Seleccione “TURTLE BEACH BLUETOOTH CHAT” en la lista.
5. Ingrese “0000” como la Clave de paso.
El indicador LED de Bluetooth de los auriculares destellará de color
azul una vez por segundo aproximadamente, lo que indica que el
Bluetooth se ha apareado a su PS3.
SVENSK
PS3 Bluetooth-installation
1. PS3-inställningar > Tillbehörsinställningar > Hantera Bluetooth-
enheter. (XP400 Bluetooth AV).
2. Sök efter Bluetooth-enheter.
3. XP400 påslagen-PÅ: Tryck och håll nedtryckt Bluetooth-knappen
tills Bluetooth LED-lyset blinkar i blått och rött, släpp sedan.
4. Välj ”TURTLE BEACH BLUETOOTH-CHATT” ur förteckningen.
5. Ange ”0000” som lösenord.
Bluetooth LED-lyset på headsetet kommer att blinka blått ungefär en
gång i sekunden, vilket indikerar att Bluetooth har kopplats ihop med
din PS3.
DANSK
Opsætning af PS3 Bluetooth
1. PS3-indstillinger > Indstillinger til tilbehør > Hold styr på Bluetooth-
enheder. (XP400 Bluetooth slukket).
2. Scan for Bluetooth-enheder.
3. XP400 - tændt: Tryk og hold Bluetooth-knappen nede, til lysdioden til
Bluetooth blinker blå og rød, og slip så knappen.
4. Vælg “TURTLE BEACH BLUETOOTH CHAT” fra listen.
5. Indtast “0000” som adgangskode.
Lysdioden til Bluetooth på headsettet vil blinke blå cirka én gang
i sekundet, hvilket angiver, at Bluetooth er blevet pardannet til din PS3.
NEDERLANDS
Installatie PS3 Bluetooth
1. PS3 Settings > Accessory Settings > Manage Bluetooth Devices.
(XP400 Bluetooth UIT).
2. Scan voor Bluetooth-apparaten.
3. XP400 INgeschakeld: houd de Bluetooth-knop ingedrukt totdat het
Bluetooth LED-lampje blauw en rood knippert, laat het dan los.
4. Selecteer “TURTLE BEACH BLUETOOTH CHAT” uit de lijst.
5. Voer “0000” in als de Pass Key.
Het Bluetooth LED-lampje op de headset zal ongeveer één keer per
seconde blauw knipperen, wat aangeeft dat de Bluetooth aan uw PS3
gekoppeld is.
17
18
Page 12

Configure PS3™ System Settings /
Configurer les paramètres système PS3
Audio Output Settings
0
12/14 12:15 PM
Audio Device Settings
Select the connector on the TV or AV amplifier (receiver).
Turn on the power of the connected device.
Cancel
1. Settings > Sound Settings > Audio Output Settings >
Optical Digital > Dolby Digital 5.1 Ch.
FRANÇAIS
1. Paramètres > Paramètres son > Paramètres de sortie audio >
Sortie numérique (optique) > Dolby Digital 5.1
2. Paramètres > Paramètres son > Sortie audio multiple
DEUTSCH
1. Einstellungen > Sound-Einstellungen > Audio-Ausgangs-Einstel-
lungen > Optisch Digital > Dolby Digital 5.1 k.
2. Einstellungen > Sound-Einstellungen > Audio-Mehrfach-Ausgang.
ITALIANO
1. Impostazioni > Impostazioni dell’audio > Impostazioni di uscita
audio > digitale ottica > Ottico Can. Dolby Digital 5.1.
2. Impostazioni > Impostazioni dell’audio > Uscita audio multipla.
PORTUGUÊS
1. Definições > Definições de som > Definições de saída de áudio >
digital óptico > Dolby Digial 5.1 canais.
2. Definições > Definições de som > Multisaída de áudio.
19
Audio Output Settings
Sets to output audio through multiple connectors
simultaneously. Audio output to connectors that are
not selected in [Audio Output Settings] is downscaled
to 2 Ch.
On
2. Settings > Sound Settings > Audio Multi-Output.
ESPAÑOL
1. Ajustes > Ajustes de sonido > Salida de audio Ajustes >
optica digital > Dolby Digital 5.1 Ch.
2. Ajustes > Ajustes de sonido > Multisalida de audio.
SVENSK
1. Inställningar > ljudinställningar > inställningar for ljudutdata >
optiskt digitalt > Dolby Digital 5.1-kan.
2. Inställningar > ljudinställningar > Multi-ljudutdata.
DANSK
1. Indstillinger > Lydindstillinger > Audio output indstillinger >
Optisk digital > Dolby Digital 5.1 kanal.
2. Indstillinger > Lydindstillinger > Audio multi-output.
NEDERLANDS
1. Instellingen > geluidsinstellingen > instellingen audiouitvoer >
optisch digitaal > Dolby Digital 5.1 Ch.
2. Instellingen > geluidsinstellingen > meervoudige audio-uitvoer.
Microphone Level 3
Turtle Beach P11
Output Device Turtle Beach P11
OK
X Enter
Back
Options
FRANCAIS
1. Sélectionner Paramètres > Paramètres accessoires > Paramètres
périphériques audio > Périphérique d’entrée / sortie >
“TURTLE BEACH BLUETOOTH CHAT”
2. Régler le volume du microphone
DEUTSCH
1. PS3-Einstellungen > Peripheriegeräte-Einstellungen >
Audio-Gerät-Einstellungen > Eingabe / Ausgabe-Gerät >
“TURTLE BEACH BLUETOOTH CHAT”
2. Mikrofonpegel einstellen
ITALIANO
1. PS3 Impostazioni > Impostazioni degli accessori > Impostazioni dei
dispostivi audio > Dispositivo di ingresso / uscita >
“TURTLE BEACH BLUETOOTH CHAT”
2. Regolare il livello del microfono
PORTUGUÊS
1. Configurações PS3 > Definições de Acessórios > Definições de
Dispositivos de Áudio > Dispositivo de entrada / saída >
“TURTLE BEACH BLUETOOTH CHAT”
2. Ajuste o nível do microfone
1. PS3 Settings > Accessory Settings > Audio Device Settings >
Input / Output Device > “TURTLE BEACH BLUETOOTH CHAT”
2. Adjust microphone level
ESPAÑOL
1. Configuración de PS3 > Ajustes de accesorios > Ajustes de dis-
positvos de audio > Dispositivo de entrada / salida >
“TURTLE BEACH BLUETOOTH CHAT”
2. Ajuste el nivel del micrófono.
SVENSK
1. PS3 Inställningar > Tillbehörsinställningar > inställningar för ljuden-
het > indataenhet / utdataenhet > “TURTLE BEACH BLUETOOTH
CHAT”
2. Justera mikrofonnivån.
DANSK
1. PS3 indstillinger > Tilbehørsindstillinger > Audio enhedsindstillinger
> Input / output enhed > “TURTLE BEACH BLUETOOTH CHAT”
2. Juster mikrofon niveau.
NEDERLANDS
1. PS3-instellingen > randapparatuurinstellingen > instellingen audio-
apparaat > invoerapparaat / Uitvoerapparaat > “TURTLE BEACH
BLUETOOTH CHAT”
2. Regel het microfoonniveau
20
Page 13

Surround Sound Angles / Angles du son surround
Press the Surround Angles button to cycle through 6 different
surround sound angles. The LEDs on the transmitter will blink in
sequence, indicating the number of the preset selected.
Surround Sound Angle Presets:
RR
o
C
RR
o
105
o
FR
30
Front Angle; 30 degrees
1
Rear Angle; 105 degrees
C
RL
o
105
o
FL
30
120
FR
o
45
Front Angle; 45 degrees
2 3
Rear Angle; 120 degrees
o
135
RR
RR
o
120
o
60
FR FL
Front Angle; 60 degrees
4
Rear Angle; 120 degrees
120
RL
o
o
60
o
60
FR FL
Front Angle; 60 degrees
5 6
Rear Angle; 135 degrees
FRANCAIS
Angles du son Surround
Appuyez sur le bouton d’angles du son Surround pour en faire défiler
les préréglages :
1. Angle avant ; 30°, angle arrière ; 105°
2. Angle avant ; 45°, angle arrière ; 120°
3. Angle avant ; 45°, angle arrière ; 135°
4. Angle avant ; 60°, angle arrière ; 120°
5. Angle avant ; 60°, angle arrière ; 135°
6. Angle avant ; 60°, angle arrière ; 150°
Les voyants DEL de l’émetteur clignoteront l’un après l’autre, indiquant le nombre de préréglages sélectionnés.
PAIR
RL
o
120
FL
o
45
SURROUND
ANGLES
SURROUND
ON/ OFF
135
o
45
o
RR
FR
135
RL
FL
Front Angle; 45 degrees
Rear Angle; 135 degrees
135
RL
o
o
o
60
150
RR
o
60
o
150
RL
60
FR FL
Front Angle; 60 degrees
Rear Angle; 150 degrees
DEUTSCH
Surround-Sound-Winkel
Die Surround-Winkel-Taste drücken, um die Voreinstellungen der
Reihe nach abzurufen:
1. Vorderer Winkel; 30 Grad, Hinterer Winkel; 105 Grad
2. Vorderer Winkel; 45 Grad, Hinterer Winkel; 120 Grad
3. Vorderer Winkel; 45 Grad, Hinterer Winkel; 135 Grad
4. Vorderer Winkel; 60 Grad, Hinterer Winkel; 120 Grad
5. Vorderer Winkel; 60 Grad, Hinterer Winkel; 135 Grad
6. Vorderer Winkel; 60 Grad, Hinterer Winkel; 150 Grad
Die LEDs auf dem Sender blinken der Reihe nach.
Dies zeigt die Nummer der ausgewählten Voreinstellung an.
ITALIANO
Angolazioni dell’audio surround
Premere il tasto Surround Angles per scorrere i preset disponibili:
1. Angolo anteriore: 30°; Angolo posteriore: 105°
2. Angolo anteriore: 45°; Angolo posteriore: 120°
3. Angolo anteriore: 45°; Angolo posteriore: 135°
4. Angolo anteriore; 60°; Angolo posteriore: 120°
o
5. Angolo anteriore; 60°; Angolo posteriore: 135°
6. Angolo anteriore; 60°; Angolo posteriore: 150°
I LED sul trasmettitore lampeggeranno in sequenza
per indicare il numero del preset selezionato.
PORTUGUÊS
o
45
Ângulos de som surround
Pressione o botão Angles Surround para percorrer os pré-ajustes:
1. Ângulo dianteiro; 30 graus, ângulo traseiro; 105 graus
2. Ângulo dianteiro; 45 graus, ângulo traseiro; 120 graus
3. Ângulo dianteiro; 45 graus, ângulo traseiro; 135 graus
4. Ângulo dianteiro; 60 graus, ângulo traseiro; 120 graus
5. Ângulo dianteiro; 60 graus, ângulo traseiro; 135 graus
6. Ângulo dianteiro; 60 graus, ângulo traseiro; 150 graus
Os LEDs no transmissor piscarão em sequência,
indicando o número do pré-ajuste selecionado.
o
ESPAÑOL
Ángulos de sonido envolvente
Presione el botón de ángulos de sonido envolvente para recorrer los
valores preestablecidos:
1. Ángulo delantero: 30 grados, Ángulo trasero: 105 grados
2. Ángulo delantero: 45 grados, Ángulo trasero: 120 grados
3. Ángulo delantero: 45 grados, Ángulo trasero: 135 grados
4. Ángulo delantero: 60 grados, Ángulo trasero: 120 grados
5. Ángulo delantero: 60 grados, Ángulo trasero: 135 grados
6. Ángulo delantero: 60 grados, Ángulo trasero: 150 grados
Los indicadores LED del transmisor titilarán alternadamente para
indicar el número del valor preestablecido seleccionado.
SVENSK
Surroundljudsvinklar
Tryck på surroundljudsvinklar-knappen för att växla mellan snabbvalen:
1. Vinkel framifrån 30 grader, vinkel bakifrån 105 grader
2. Vinkel framifrån 45 grader, vinkel bakifrån 120 grader
3. Vinkel framifrån 45 grader, vinkel bakifrån 135 grader
4. Vinkel framifrån 60 grader, vinkel bakifrån 120 grader
5. Vinkel framifrån 60 grader, vinkel bakifrån 135 grader
6. Vinkel framifrån 60 grader, vinkel bakifrån 150 grader
LED-lysena på sändaren kommer att blinka i sekvens
och indikera numret på det valda snabbvalet.
DANSK
Surround sound-vinkler
Tryk på knappen til surround-vinkler for at løbe gennem de forudindstillede indstillinger:
1. Frontvinkel, 30 grader, bagvinkel, 105 grader
2. Frontvinkel, 45 grader, bagvinkel, 120 grader
3. Frontvinkel, 45 grader, bagvinkel, 135 grader
4. Frontvinkel, 60 grader, bagvinkel, 120 grader
5. Frontvinkel, 60 grader, bagvinkel, 135 grader
6. Frontvinkel, 60 grader, bagvinkel, 150 grader
Lysdioderne på radiosenderen vil blinke i rækkefølge,
hvilket angiver antallet af valgte forudindstillede indstillinger.
NEDERLANDS
Hoeken voor surround sound
Druk op de Surround Angles-knop om de voorinstellingen te doorlopen.
1. Hoek vanaf voorkant: 30 graden, Hoek vanaf achterkant: 105 graden
2. Hoek vanaf voorkant: 45 graden, Hoek vanaf achterkant: 120 graden
3. Hoek vanaf voorkant: 45 graden, Hoek vanaf achterkant: 135 graden
4. Hoek vanaf voorkant: 60 graden, Hoek vanaf achterkant: 120 graden
5. Hoek vanaf voorkant: 60 graden, Hoek vanaf achterkant: 135 graden
6. Hoek vanaf voorkant: 60 graden, Hoek vanaf achterkant: 150 graden
De LED-lampjes op de zender zullen achtereenvolgens knipperen,
wat de geselecteerde instelling weergeeft.
21
22
Page 14

Using the Bluetooth® Technology / Utilisant la Technologie Bluetooth
Pairing Bluetooth Enabled Mobile Phones
1. XP400 powered-ON: press and hold the Bluetooth button
until the Bluetooth LED flashes blue and red, then release.
2. Mobile phone: turn on the Bluetooth and search for
devices as described in the phone’s user guide.
3. Select “TURTLE BEACH BLUETOOTH CHAT”
4. Enter “0000” as the Pass Key.
Bluetooth Functions
Power Bluetooth ON: Press BT MFB for 3 seconds
Power Bluetooth OFF: Press BT MFB for 4 seconds
Microphone mute: During a call, press MUTE
Adjust volume: Press the + or - buttons
Answer call: Press BT MFB
Reject call: Press and hold BT MFB for 2 seconds
End call: Press BT MFB
Cancel outgoing call: Press BT MFB
Redial: Double-click BT MFB
FRANÇAIS
Bluetooth
Couplage des téléphones mobiles compatibles Bluetooth
1. Mise en marche de XP400 : appuyez sur le bouton Bluetooth
jusqu’à ce que le voyant DEL Bluetooth clignote en passant du
bleu au rouge.
2. Téléphone mobile : allumez le Bluetooth et cherchez les
périphériques suivant les instructions du guide de l’utilisateur du
téléphone.
3. Sélectionnez « TURTLE BEACH BLUETOOTH CHAT »
4. Entrez la clé d’identification « 0000 ».
Fonctions Bluetooth
Bluetooth ALLUMÉ : Appuyez sur BT MFB pendant 3 secondes
Bluetooth ÉTEINT : Appuyez sur BT MFB pendant 4 secondes
Désactiver le micro : Pendant un appel, appuyez sur MUTE
(désactivé)
Régler le volume : Appuyez sur les boutons + ou Répondre à un appel : Appuyez sur BT MFB
Rejeter un appel : Appuyez sur BT MFB pendant 2 secondes
Terminer un appel : Appuyez sur BT MFB
Annuler un appel sortant : Appuyez sur BT MFB
Rappeler : Double-cliquez sur BT MFB
23
Mobile Phone via
Bluetooth*
DEUTSCH
Bluetooth
Pairing von Handys mit Bluetooth
1. XP400 angeschaltet: Bluetooth-Taste drücken und gedrückt halten,
bis die Bluetooth-LED blau und rot blinkt, dann loslassen.
2. Handy: Bluetooth einschalten und gemäß des Benutzerhandbuchs
für das Handy nach Geräten suchen.
3. „TURTLE BEACH BLUETOOTH CHAT“ auswählen.
4. „0000“ als Pass Key (Passwort) eingeben.
Bluetooth-Funktionen
Bluetooth - EIN: BT MFB 3 Sekunden lang drücken
Bluetooth - AUS: BT MFB 4 Sekunden lang drücken
Mikrofon - Stumm: Während eines Gesprächs auf STUMM drücken
Lautstärkeregulierung: Auf Taste + oder - drücken
Anruf beantworten: Auf BT MFB drücken
Anruf ablehnen: BT MFB drücken und 2 Sekunden lang gedrückt
halten
Anruf beenden: Auf BT MFB drücken
Ausgehenden Anruf abbrechen: Auf BT MFB drücken
Wahlwiederholung: BT MFB doppelklicken
ITALIANO
Bluetooth
Abbinamento di telefoni cellulari con funzione Bluetooth
1. XP400 acceso: premere e tenere premuto il tasto Bluetooth fino
a quando il LED Bluetooth lampeggia di colore blu e rosso, quindi
rilasciare.
2. Sul telefono cellulare: attivare la funzione Bluetooth ed eseguire
la ricerca di dispositivi come descritto nella guida per l’utente del
telefono.
3. Selezionare “TURTLE BEACH BLUETOOTH CHAT”
4. Immettere “0000” come Pass Key.
Funzioni Bluetooth
Accendere Bluetooth: premere BT MFB per 3 secondi
Spegnere Bluetooth: premere BT MFB per 4 secondi
Esclusione microfono: durante una chiamata, premere MUTE
Regolazione del volume: premere i tasti + o Risposta a una chiamata: premere BT MFB
Rifiuto di una chiamata: premere e tenere premuto BT MFB per 2
secondi
Chiusura di una chiamata: premere BT MFB
Annullamento di una chiamata in uscita: premere BT MFB
Ripetizione di una chiamata: fare doppio clic su BT MFB
PORTUGUÊS
Bluetooth
Emparelhamento de Bluetooth com telefones celulares habilitados
1. XP400 ativado: pressione e segure o botão do Bluetooth até o LED
Bluetooth piscar azul e vermelho, em seguida solte.
2. Telefones celulares: ligue o Bluetooth e procure os dispositivos
conforme está descrito no manual do usuário do celular.
3. Selecione “TURTLE BEACH BLUETOOTH CHAT”
4. Insira “0000” como senha.
Funções do Bluetooth
LIGAR o Bluetooth: Pressione BT MFB por 3 segundos
DESLIGAR o Bluetooth: Pressione BT MFB por 4 segundos
Desligar microfone: Durante uma chamada, pressione MUTE
Ajustar volume: Pressione os botões + ou Atender chamada: Pressione BT MFB
Rejeitar chamada: Pressione BT MFB por 2 segundos
Finalizar chamada: Pressione BT MFB
Cancelar chamada de saída: Pressione BT MFB
Rediscar: Dê um duplo clique em BT MFB
ESPAÑOL
Bluetooth
Apareamiento de teléfonos celulares con Bluetooth activado
1. XP400 encendido: mantenga presionado el botón Bluetooth hasta
que el indicador LED de Bluetooth destelle de color azul y rojo;
luego, suéltelo.
2. Teléfono celular: encienda el Bluetooth y busque los dispositivos
según se indica en el manual del usuario del teléfono.
3. Seleccione “TURTLE BEACH BLUETOOTH CHAT”.
4. Ingrese “0000” como la Clave de paso.
Funciones Bluetooth
Para encender el Bluetooth: Presione BT MFB durante 3 segundos
Para apagar el Bluetooth: Presione BT MFB durante 4 segundos
Para silenciar el micrófono: Durante una llamada, presione
SILENCIAR
Ajuste de volumen: Presione los botones + o Para responder una llamada: Presione BT MFB
Para rechazar una llamada: Mantenga presionado BT MFB durante
2 segundos
Para finalizar una llamada: Presione BT MFB
Para cancelar una llamada saliente: Presione BT MFB
SVENSK
Bluetooth
Ihopkoppling av Bluetooth-aktiverade mobiltelefoner
1. XP400 påslagen-PÅ: Tryck och håll nedtryckt Bluetooth-knappen
tills Bluetooth LED-lyset blinkar i blått och rött, släpp sedan.
2. Mobiltelefon: Slå på Bluetooth och sök efter enheter enligt
beskrivningen i bruksanvisningen för telefonen.
3. Välj ”TURTLE BEACH BLUETOOTH-CHATT”
4. Ange ”0000” som lösenord.
Bluetooth-funktioner
Ström för bluetooth PÅ: Tryck BT MFB i 3 sekunder
Ström för bluetooth AV: Tryck BT MFB i 4 sekunder
Mikrofontystning (mute): Under samtal, tryck TYST (mute)
Justera volymen: Tryck på knapparna med + eller Besvara samtal: Tryck BT MFB
Avvisa samtal: Tryck på och håll nedtryckt BT MFB i 2 sekunder
Avsluta samtal: Tryck BT MFB
Avbryt utgående samtal: Tryck BT MFB
Återuppringning: Dubbelklicka på BT MFB
24
Page 15

Using the Bluetooth® Technology / Utilisant la technologie Bluetooth
Recharging the Headset / Recharger le casque
DANSK
Bluetooth
Pardannelse af Bluetooth-aktiverede mobiltelefoner
1. XP400 - tændt: Tryk og hold Bluetooth-knappen nede, til lysdioden
til Bluetooth blinker blå og rød, og slip så knappen.
2. Mobiltelefon: Tænd for Bluetooth, og søg efter enheder som
beskrevet i brugervejledningen til telefonen.
3. Vælg “TURTLE BEACH BLUETOOTH CHAT”
4. Indtast “0000” som adgangskode.
Bluetooth-funktioner
Tænd for Bluetooth: Tryk på BT MFB i 3 sekunder
Sluk for Bluetooth: Tryk på BT MFB i 4 sekunder
Mikrofondæmpning: Tryk på MUTE under et opkald
Justér lydstyrke: Tryk på + eller - knapperne
Besvar opkald: Tryk på BT MFB
Afvis opkald: Tryk og hold BT MFB nede i 2 sekunder
Afslut opkald: Tryk på BT MFB
Annullér udgående opkald: Tryk på BT MFB
Genopkald: Dobbeltklik på BT MFB
NEDERLANDS
Bluetooth
Het koppelen van Bluetooth compatibele mobiele telefoons
1. XP400 INgeschakeld: houd de Bluetooth-knop ingedrukt totdat het
Bluetooth LED-lampje blauw en rood knippert, laat het dan los.
2. Mobiele telefoon: zet de Bluetooth aan en zoek naar andere
apparaten, zoals beschreven in de gebruikershandleiding van de
telefoon.
3. Selecteer “TURTLE BEACH BLUETOOTH CHAT”.
4. Voer “0000” in als de Pass Key.
Bluetooth-functies
Stroom Bluetooth AAN: Houd gedurende 3 seconden
BT MFB ingedrukt
Stroom Bluetooth UIT: Houd gedurende 4 seconden
BT MFB ingedrukt
Microfoon mute: Druk tijdens een gesprek op MUTE
Volume aanpassen: Druk op de + of - knoppen
Telefoontje beantwoorden: Druk op BT MFB
Telefoontje afwijzen: Druk en houd BT MFB gedurende 2
seconden ingedrukt
Gesprek beëindigen: Druk op BT MFB
Uitgaand gesprek annuleren: Druk op BT MFB
Opnieuw bellen: Dubbelklik op BT MFB
The XP400 features a rechargeable battery that provides more than 10 hours of continuous game play. When your headset battery power is low,
a tone will begin to sound every 10 seconds until the headset powers off. You can recharge your headset while still gaming with the included
Headset Charging Cable as shown.
Headset Charging Port /
Entrée de chargement
Headset Charging Cable (included) /
Câble de chargement pour casque (fourni)
Game Console USB Port /
Entrée USB sur la console de jeu
FRANCAIS
Recharger le casque
Le XP400 comprend une pile rechargeable qui offre plus de 10 heures
de jeu sans interruption. Lorsque la pile de votre casque sera faible, un
son se fera entendre toutes les 10 secondes jusqu’à ce que le casque
s’éteigne. Vous pouvez recharger votre casque sans arrêter de jouer
grâce au câble de chargement de casque, comme indiqué.
DEUTSCH
Headset aufladen
Das XP400 bietet einen Akku für mehr als 10 Stunden ununterbrochenes Gameplay. Wenn die Akkuleistung für Ihr Headset gering ist,
ertönt alle 10 Sekunden ein Ton, bis der Akku leer ist und sich das
Headset ausschaltet. Sie können Ihr Headset mit dem beiliegenden
Headset-Aufladekabel wieder aufladen, während Sie spielen. Folgen
Sie hierzu den beiliegenden Anleitungen.
ITALIANO
Ricarica della cuffia
La cuffia XP400 dispone di una batteria ricaricabile che assicura
oltre 10 ore di gioco continuo. Quando la batteria della cuffia è
prossima all’esaurimento, il dispositivo emette un segnale acustico
ogni 10 secondi fino allo spegnimento della cuffia. La cuffia può
essere ricaricata mentre si sta giocando tramite il cavo di ricarica
incluso, come indicato.
PORTUGUÊS
Recarga do Fone de ouvido
O XP400 possui uma bateria recarregável que proporciona mais de
10 horas de jogo contínuo. Quando a energia da bateria do fone de
ouvido estiver fraca, começará a soar um tom a cada 10 segundos
até o fone de ouvido desligar. Você pode recarregar o fone de ouvido enquanto joga com o cabo de carga do fone de ouvido incluído
conforme é mostrado.
25
26
Page 16

Recharging the Headset / Recharger le casque
Equalizer Presets / Préréglages de l’égalisateur
ESPAÑOL
Recarga de los auriculares
Los auriculares XP400 funcionan con una batería recargable que brinda
más de 10 horas seguidas de juego. Cuando la batería de sus auriculares esté baja, comenzará a sonar un tono cada 10 segundos hasta que
los auriculares se apaguen. Puede recargar sus auriculares mientras
juega con el cable de carga de los auriculares, como se muestra.
SVENSK
Laddning av headset
XP400 har ett uppladdningsbart batteri som ger mer än 10 timmars
kontinuerlig speltid. När batterinivån i ditt headset är låg kommer en ton
att höras var 10 sekund till headsetet stängs av. Du kan ladda headsetet
medan du fortfarande spelar med hjälp av den medföljande laddningskabeln enligt bild.
DANSK
Genopladning af headset
XP400 indeholder et genopladeligt batteri, der giver mere end 10
timers konstant spil. Når dit headsets batteri bliver fladt, vil en
tone kunne høres hver 10. sekund, til headsettet slukker. Du kan
genoplade dit headset, mens du stadig spiller ved hjælp af det
medfølgende headset-genopladningskabel som vist.
NEDERLANDS
Opladen van de Headset
De XP400 is uitgerust met een oplaadbare batterij die meer dan
10 uur continue speeltijd biedt. Als de batterij van je headset bijna
leeg is, zal er elke 10 seconden een toon klinken, totdat de headset
is uitgeschakeld. Je kunt tijdens het gamen de headset opladen
met behulp van de meegeleverde oplaadkabel voor de headset, zie
afbeelding.
Press the TONE Button to cycle through the
equalizer presets:
1. Flat
2. Bass Boost
3. Treble Boost
4. Bass and Treble Boost
FRANÇAIS
Préréglages de l’égalisateur
Appuyez sur le bouton de tonalité pour en
faire défiler les préréglages.
1. Sans déviation
2. Ampli basses fréquences
3. Ampli hautes fréquences
4. Ampli basses et hautes fréquences
DEUTSCH
Equalizer-Voreinstellungen
Die Klangtaste drücken, um die EQVoreinstellungen der Reihe nach abzurufen:
1. Linear
2. Bass anheben
3. Höhen anheben
4. Bass und Höhen anheben
ITALIANO
Preset di equalizzazione
Premere il tasto Tone per scorrere i preset di
equalizzazione disponibili:
1. Flat (Neutro)
2. Bass Boost (Esalta bassi)
3. Treble Boost (Esalta alti)
4. Bass and Treble Boost (Esalta bassi e alti)
TONE Button /
Bouton de TONE
PORTUGUÊS
Pré-ajustes do equalizador
Pressione o botão de Tom para alternar
entre os pré-ajustes do equalizador.
1. Resposta plana
2. Realce de graves
3. Realce de agudos
4. Realce de graves e agudos
ESPAÑOL
Ecualizadores preestablecidos
Presione el botón de tono para recorrer los
valores preestablecidos del ecualizador:
1. Plano
2. Refuerzo de graves
3. Refuerzo de agudos
4. Refuerzo de graves y agudos
SVENSK
Snabbval för frekvensutjämning
Tryck på tonknappen för att gå igenom
snabbvalen för frekvensutjämning.
1. Jämn
2. Bas-boost
3. Diskant-boost
4. Bas- och diskant-boost
DANSK
Forudindstillede equalizer-indstillinger
Tryk på Tone-knappen for at løbe gennem de
forudindstillede EQ-indstillinger.
1. Flad
2. Bas-boost
3. Diskant-boost
4. Bas- og diskant-boost
NEDERLANDS
Voorinstellingen equalizer
Druk op de Tone-knop om de
voorinstellingen van de equalizer te
doorlopen.
1. Plat
2. Extra basgeluid
3. Extra hoge tonen
4. Extra Basgeluid en hoge tonen
27
28
Page 17

Blast Limiter Presets / Préréglages de Blast Limiter
LIMITER Button /
Bouton de LIMITER
FRANÇAIS
Préréglages de Blast Limiter
Le Blast Limiter réduit les sons assourdissants comme les
explosions. Vous pouvez ainsi mieux entendre les sons plus doux
comme les bruits de pas. Appuyez sur le bouton Limiter pour faire
défiler les préréglages du Blast Limiter :
1. Limiter éteint
2. Limiter faible
3. Limiter moyen
4. Limiter maximum
The Blast Limiter reduces the louder sounds
like explosions so you can better hear the softer
sounds like footsteps. Press the LIMITER Button to
cycle through the Blast Limiter presets:
1. Limiter Off
2. Mild Limiter
3. Medium Limiter
4. Max Limiter
DEUTSCH
Blast Limiter-Voreinstellungen
Der Blast Limiter reduziert lautere Geräusche wie Explosionen,
sodass Sie die leisen Geräusche wie Schritte besser hören können.
Limiter-Taste drücken, um die Blast Limiter-Voreinstellungen der
Reihe nach abzurufen:
1. Limiter aus
2. Limiter schwach
3. Limiter mittel
4. Limiter max
ITALIANO
Preset della funzione Blast Limiter
La funzione Blast Limiter riduce i suoni più forti, ad esempio le
esplosioni, in modo da consentire di sentire meglio i suoni più lievi,
come ad esempio i passi. Premere il tasto Limiter per scorrere i
preset della funzione Blast Limiter:
1. Limiter Off (limitatore spento)
2. Mild Limiter (limitatore min)
3. Medium Limiter (limitatore medio)
4. Max Limiter (limitatore max)
PORTUGUÊS
Pré-ajustes do limitador de estouros
O limitador de estouros reduz os sons mais altos como explosões
para que você possa ouvir melhor os sons mais suaves, como
passos. Pressione o botão do limitador de estouros para percorrer as
pré-ajustes do limitador de estouros:
1. Limitador Desligado
2. Limitador Fraco
3. Limitador Médio
4. Limitador Máximo
ESPAÑOL
Valores preestablecidos del limitador de sonido
El limitador de sonido reduce los sonidos fuertes como las
explosiones, para que pueda escuchar mejor los sonidos suaves
como los pasos. Presione el botón del limitador para recorrer los
valores preestablecidos del limitador de sonido:
1. Limitador apagado
2. Limitador suave
3. Limitador medio
4. Limitador máximo
SVENSK
Snabbval för ljudstötsbegränsning
Ljudstötsbegränsningen minskar starkare ljud som t.ex. explosioner
så att du bättre kan höra de mjukare ljuden som t.ex. fotsteg. Tryck
på begränsningsknappen för att gå igenom de olika snabbvalen för
ljudstötsbegränsning:
1. Begränsning Av
2. Mjuk begränsning
3. Medium begränsning
4. Max begränsning
DANSK
Forudindstillede Blast Limiter-indstillinger
Blast Limiter reducerer de højere lyde som f.eks. eksplosioner,
så du bedre kan høre de blødere lyde som f.eks. skridt. Tryk på
Limiter-knappen for at løbe gennem de forudindstillede Blast Limiterindstillinger:
1. Limiter slået fra
2. Mild Limiter
3. Mellem Limiter
4. Maks. Limiter
NEDERLANDS
Voorinstellingen Blast Limiter
De Blast Limiter reduceert de harde geluiden zoals explosies, zodat je
de zachte geluiden, zoals voetstappen, beter kunt horen. Druk op de
Limiter-knop om de voorinstellingen van de Blast Limiter te doorlopen:
1. Limiter Uit
2. Gematigde Limiter
3. Medium Limiter
4. Max Limiter
29
30
Page 18
XP400 Headset Technical Specifications Troubleshooting
No sound
· 50mm diameter speakers with neodymium magnets
· Game audio frequency response: 20Hz - 20kHz, >120dB SPL @ 1kHz
· Condenser microphone frequency response: 50Hz - 15kHz
· Game audio Dual Band WiFi Digital 2.4-2.495GHz/5.0-5.8GHz RF wireless reception
· Bluetooth® radio with dual-pairing mode
· Headphone amplifier: Stereo 27mW/ch, THD <1%
· Rechargeable Li-Po Battery (1000 mAh)
· Automatic shut down after approx 5 minutes of carrier loss or audio silence to
conserve battery power
· Battery booster circuit extends battery life for up to 15 hours
XP400 Transmitter Technical Specifications
· Dual Band Digital 2.4-2.495GHz/5.0-5.8GHz RF wireless transmission
with up to 30 foot range
· Frequency response: 20Hz - 20kHz
· Optical TOSLINK digital audio input compatible with 48kHz digital audio stream
· Optical TOSLINK digital audio output pass-through of digital input stream
· Stereo 3.5mm analog input jack
· Maximum analog input level: 2Vpp (700mV rms)
· USB Power – (5V DC @ 350mA max)
• Check that the headset volume control is turned up.
• Check that the transmitter USB power and optical cables are properly connected.
• Check that the headset is powered on. The LED on the left ear cup should be ashing.
• Check if the LED on the front of the transmitter is on solid. If the LED is slowly pulsing, it indicates that the transmitter isn’t
communicating with the headset. If the headset is on solid and the transmitter LED is slowly pulsing, then the headset and transmitter need
to be “paired” as described in the section “Pairing the Headset and Transmitter”.
Audio Drops, Popping or Clicking Sounds
Audio dropouts, popping or clicking sounds on the headset are caused by poor reception. This can occur when:
• The headset and transmitter are out of range. For best performance, stand within 20 feet from the transmitter.
• There’s a wall or other large object between the headset and transmitter.
• The transmitter is in a bad location that is interfering with the antenna.
• A wireless base station or wireless router is causing a lot of RF activity that’s blocking the RF signal from the transmitter.
Voice Chat Drops
• Most in-game voice chat drops are simply caused by network performance or “lag”. Usually they subside after a few moments so please
be patient. In extreme cases, you may have to leave a game and return to reset the chat function.
• If you use a wireless internet connection, low signal strength from your modem/router can make the voice chat malfunction.
A wired connection from your modem/router to your console is recommended for best results.
Mobile Phone Bluetooth® Issues
Some models of mobile phones may experience issues with the Bluetooth performance:
• Nokia6500s: Sometimes the Bluetooth link will disconnect automatically and may need to be paired again.
• Moto V8: Sometimes there is no audio on headset when there is an active call. This issue happens rarely. The Moto V8 doesn’t initiate SCO
link when there is an active call. Single press the BT MFB button on the headset to initiate SCO link with the phone.
• HTC Hero: Sometimes the headset Bluetooth will fail to reconnect with PS3 after having connected with HTC Hero. This issue happens
rarely. The user must reconnect the headset Bluetooth from PS3 Bluetooth system settings to fix this issue.
Force Shutdown
In the unlikely case that the headset becomes unresponsive and the main power button cannot be used to turn off the headset, the Mute button
on the headset can be used to force shutdown. Press and hold the MUTE button on the headset for 10 seconds to initiate a forced shutdown.
31
32
Page 19

Safety Notice / Avis de sécurité
To avoid potential damage to the device, always disconnect all cables before transporting it.
WARNING: Permanent hearing damage can occur if a headset is used at high volumes for extended periods of time, so it is important
to keep the volume at a safe level. Over time, your ears adapt to loud volume levels, so a level that may not cause initial discomfort can still damage your hearing. If you experience ringing in your ears after listening with the headset, it means the volume is set too loud.
The louder the volume is set, the less time it takes to affect your hearing. So, please take care to listen at moderate levels.
• Before placing a headset on your ears, turn the volume down completely, then slowly increase it to a comfortable level.
• Turn down the volume if you can’t hear people speaking near you.
• Avoid turning up the volume to block out noisy surroundings.
FRANCAIS
Consigne de sécurité: Pour éviter un endommagement potentiel sur l’appareil, veuillez à toujours débrancher tous les câbles avant de le déplacer.
MISE EN GARDE: Des dommages auditifs permanents peuvent se produire si le casque est utilisé à des volumes élevés pendant de très longues périodes de temps,
par conséquent il est important de maintenir le volume à un bon niveau. Au fil du temps, vos oreilles s’adaptent aux volumes élevés, de sorte qu’un niveau qui n’est
pas de nature à causer initialement de l’inconfort peut toujours finir par endommager votre audition. S’il y a un écho dans vos oreilles après avoir utilisé le casque,
cela signifie que le volume est trop élevé. Plus le volume est réglé haut, moins de temps ça prend pour affecter votre audition. De grâce, veuillez prendre soin de faite
l’écoute à des niveaux modérés.
• Avant de placer un casque à vos oreilles, baissez totalement le volume, puis augmentez-le doucement jusqu’à un niveau confortable.
• Baissez le volume si vous ne pouvez pas entendre les voix des gens qui sont autour de vous.
• Évitez d’augmenter le volume pour bloquer le bruit ambiant.
DEUTSCH
Sicherheitshinweis: Um mögliche Schädigungen des Gerätes zu vermeiden, trennen Sie vor einem Transport immer alle Kabel.
WARNUNG: Es kann ein dauerhafter Hörschaden entstehen, wenn ein Headset über einen längeren Zeitpunkt bei hoher Lautstärke verwendet wird, daher ist es
wichtig, die Lautstärke auf einem vernünftigen Pegel zu halten. Mit der Zeit gewöhnen sich die Ohren an hohe Lautstärken; das führt dazu, dass eine Lautstärke, die
kein anfängliches Unbehagen verursacht, trotzdem Ihr Gehör schädigen kann. Wenn Sie ein Klingeln in Ihren Ohren wahrnehmen, nachdem Sie mit dem Headset
Musik gehört haben, bedeutet dies, dass die Lautstärke zu hoch war. Je höher die Lautstärke eingestellt wird, desto weniger Zeit benötigt es, bis Ihr Gehör beeinträchtigt wird. Achten Sie deshalb bitte darauf, in einer vernünftigen Lautstärke zu hören.
• Bevor Sie das Headset aufsetzen, drehen Sie die Lautstärke ganz nach unten und dann langsam etwas lauter auf ein angenehmes Level.
• Drehen Sie die Lautstärke niedriger, wenn Sie die Leute um sich herum nicht mehr verstehen.
• Vermeiden Sie es, die Lautstärke höher zu drehen, um den Lärm um Sie herum auszuschalten.
ITALIANO
Avviso di sicurezza: Per evitare danni al dispositivo, scollegare sempre i cavi prima del trasporto.
AVVERTENZA: se la cuffia viene utilizzata ad alto volume per lunghi periodi di tempo, potrebbe causare danni all’udito. Pertanto mantenere il volume a livelli accettabili. Nel tempo, le orecchie potrebbero adattarsi al volume alto, pertanto un livello che non causa fastidio all’inizio potrebbe comunque danneggiare l’udito. Se si
avvertono ronzii nelle orecchie dopo aver utilizzato le cuffie, significa che il volume impostato è troppo alto. Più il volume è alto, minor tempo sarà necessario per
danneggiare l’udito. Pertanto, impostare volumi moderati.
• Prima di indossare le cufe, abbassare il volume e quindi alzarlo no a raggiungere un livello accettabile
• Abbassare il volume se non si riesce a sentire la voce delle persone nelle vicinanze.
• Evitare di alzare il volume per estraniarsi da luoghi rumorosi.
PORTUGUÊS
Aviso sobre Segurança: Para evitar danos potenciais no dispositivo, desconecte sempre todos os cabos antes de o transportar.
AVISO: Poderão ocorrer danos auditivos permanentes se forem usados uns auscultadores com o volume elevado durante longos períodos de tempo, pelo que é importante manter o volume num nível seguro. Ao longo do tempo, os seus ouvidos adaptar-se-ão aos níveis de volume elevados, pelo que estes, ainda que não causem
desconforto inicial, poderão, mesmo assim, prejudicar a sua audição. Se ouvir campainhas depois de ter estado a usar os auscultadores, isso significa que o volume
está demasiado alto. Quanto mais alto o volume, menos tempo levará a afectar a sua audição. Portanto, tenha o cuidado de usar níveis de volume moderados.
• Antes de colocar os auscultadores nos ouvidos, diminua o volume para o mínimo; depois, aumente-o lentamente até um nível confortável.
• Diminua o volume se não conseguir ouvir as pessoas a falar perto de si.
• Evite aumentar o volume para o sobrepor a ambientes ruidosos
ESPAÑOL
Advertencia de seguridad: Para evitar que el equipo sufra daños potenciales, desconecte siempre todos los cables antes de moverlo de lugar.
ADVERTENCIA: Si los auriculares se utilizan a volúmenes altos durante periodos prolongados, pueden provocar la pérdida permanente de la audición; por eso es
importante mantener el volumen en un nivel seguro. Con el tiempo, sus oídos se acostumbran a los volúmenes altos, por lo que incluso un nivel de volumen que inicialmente no le haga sentir molestias podría afectar su audición. Si siente un pitido en los oídos después de haber usado los auriculares, significa que el nivel al que
está ajustado el volumen es demasiado alto. Cuanto más alto ajuste el volumen, más pronto afectará su audición. Por lo tanto, preste atención al volumen y ajústelo a
niveles moderados.
• Antes de colocarse los auriculares, baje completamente el volumen y, una vez puestos, suba el volumen lentamente hasta el nivel que le resulte cómodo.
• Si no puede oír las voces de otras personas a su alrededor, baje el volumen.
• Evite subir el volumen para contrarrestar los ruidos exteriores
SVENSK
Säkerhetsföreskrifter: För att undvika att skada enheten, koppla alltid ur alla kablar innan du flyttar på den.
VARNING! Permanenta hörselskador kan uppstå om headsetet används med hög volym under en längre tid. Det är viktigt att hålla ljudet på en säker nivå. Dina öron
anpassar sig till höga ljudnivåer om de utsätts för detta under en längre tid. En ljudnivå som inte upplevs som obekväm kan således fortfarande skada din hörsel. Om
du upplever att det ringer i dina öron efter att du använt headsetet betyder det att ljudnivån är för hög. Ju högre du ställer in volymen, desto kortare tid tar det för din
hörsel att skadas. Var försiktig och lyssna på en rimlig ljudnivå.
• Innan du sätter på dig headsetet, skruva ner volymen helt för att sedan sakta och kontrollerat skruva upp den till en behaglig nivå.
• Skruva ner volymen om du inte kan höra personer som pratar bredvid dig.
• Undvik att skruva upp volymen för att stänga ute oönskade ljud i din omgivning.
DANSK
Sikkerhedsnotits: Undgå mulig skade på anordningen ved altid at fraslutte alle kabler før transport.
ADVARSEL: Permanent høreskade er mulig, hvis et headset bruges ved høj lydstyrke i længere tid, så det er vigtigt at holde lydstyrken nede på et sikkert niveau. Med
tiden vil dine ører tilpasse sig højere lydniveauer, så et niveau som ikke føles ubehageligt i begyndelsen, kan stadigt beskadige din hørelse. Hvis du oplever ringen for
ørene efter du har brugt dit headset, betyder det, at lydstyrken er for høj. Jo højere lyden er sat, jo kortere tid tager det at påvirke din hørelse. Så sørg venligst for at
lytte ved et moderat niveau.
• Før du tager dit headset på, skal du skrue helt ned for lyden og så langsomt skrue op igen til et behageligt niveau.
• Skru ned for lyden hvis du ikke kan høre andre, der snakker i nærheden.
• Undgå at skrue op for lyden for at lukke støj fra omgivelserne ude.
NEDERLANDS
Veiligheidsmededeling: Koppel altijd alle kabels van het apparaat los tijdens vervoer om beschadiging van het apparaat te voorkomen.
WAARSCHUWING: Er kan onherstelbaar gehoorverlies ontstaan als een headset langdurig met hoog volume worden gebruikt. Daarom is het belangrijk om het volume op een veilig niveau te houden. De oren raken na verloop van tijd gewend aan hoge volumeniveaus zodat een niveau dat niet meteen ongemak veroorzaakt het
gehoor toch kan beschadigen. Als uw oren na luisteren met de headset suizen, betekent dit dat het volume te hoog is ingesteld. Hoe hoger het volume, des te sneller
het gehoor beschadigd raakt. Luister daarom bij voorkeur met een gematigd volumeniveau.
• Zet voordat u een headset opzet eerst het volume helemaal omlaag en verhoog dit dan langzaam tot
een comfortabel niveau.
• Verlaag het volume als u mensen in de buurt niet kunt horen praten.
• Maak er geen gewoonte van het volume te verhogen om omgevingslawaai buiten te sluiten.
33
34
Page 20

EC Declaration of Conformity
FCC Declaration of Conformity
Manufacturer: Voyetra Turtle Beach
Manufacturers Address: 150 Clearbrook Rd. Suite 162, Elmsford, NY 10523
Product Name: Ear Force XP400
Type of Product: Wireless Headset
Model Number(s): TBS-2276-01
Year of Manufacture: 2011
We, Voyetra Turtle Beach, Inc. of Elmsford, New York, declare under our own responsibility that the above-referenced product complies
with the following directives and standards:
Low Voltage Directive 2006/95/EC
EN 50332-2:2003
EN 60950-1:2006+A11:2009
Electromagnetic Compatibility Directive 1999/5/EC
ESTI EN 301 489-1 V1.8.1 (2008)
ESTI EN 301 489-3 V1.4.1 (2002)
ESTI EN 301 489-17 V2.1.1 (2009)
R&TTE Directive 1999/5/EC
ESTI EN 300 328 V1.7.1 (2006-10)
ESTI EN 300 440-1 V1.4.1 (2008-05)
ESTI EN 300 440-2 V1.2.1 (2008-05)
All test reports have been reviewed and approved with a Positive Opinion from the following Notified Bodies:
Bay Area Compliance Laboratories, Corp (Shenzhen)
6/F, the 3rd Phase of WanLi Industrial Building
ShiHua Road, FuTian Free Trade Zone, Shenzhen, Guangdong, China
Tel: +86-755-33320018, Fax: +86-755-33320008, Web: baclcorp.com
The technical documentation required by this Directive is maintained at the corporate headquarters of Voyetra Turtle Beach,
150 Clearbrook Road. Suite 162, Elmsford, New York, 10562.
Authorized Person:
No. 710 Yihua Building, Futian District, Shenzhen, China 518040
Tel: +86-755-29451282 Fax: 86-755-83709189 Web: ebotek.cn
Shenzhen EBO Technology Co., Ltd.
Product Name: Ear Force XP400
Model Number(s): TBS-2276-01
FCC Rules: FCC CFR Title 47 Part 15 Subpart B: 2009 CLASS B
FCC CFR Title 47 Part 15 Subpart C: 2008
Operating Environment: GENERAL OFFICE AND HOME USE
FCC COMPLIANT STATEMENT
This device complies with part 15 of the FCC rules. Operation is subjected to the following conditions:
(1) This device may not cause harmful interference, and
(2) This device must accept any interference received including interference that may cause undesired operation.
INFORMATION TO USER
This equipment has been tested and found to comply with the limits for a Class B digital device, pursuant to Part 15 of FCC rules.
These limits are designed to provide reasonable protection against harmful interference in a residential installation. This equipment
generates, uses and can radiate radio frequency energy and, if not installed and used in accordance with the instructions, may cause
harmful interference to radio communications. However, there is no guarantee that interference will not occur in a particular installation.
If this equipment does cause harmful interference to radio or television reception, which can be determined by turning the equipment off
and on, the user is encouraged to try to correct the interference by one or more of the following measures:
1) Reorient or relocate the receiving antenna.
2) Increase the separation between the equipment and receiver.
3) Connect the equipment into an outlet on a circuit different from that to which the receiver is connected.
4) Consult the dealer or an experienced radio/TV technician for help.
The user’s manual or instruction manual for an intention or unintentional radiator shall caution the user that the changes or modifications
not expressly approved by the party responsible for compliance could void the user’s authority to operate the equipment.
WARNING: Changes or modifications made to this equipment not expressly approved by VOYETRA TURTLE BEACH, INC. may void user’s
authority to operate this equipment.
____________________________ Date:________________
Printed Name: Frederick Romano
Title: Executive Vice President
11/17/11
35
36
Page 21

EC Declaration of Conformity FCC Declaration of Conformity
Manufacturer: Voyetra Turtle Beach
Manufacturers Address: 150 Clearbrook Rd. Suite 162, Elmsford, NY 10523
Product Name: Ear Force XBA
Type of Product: Bluetooth Dongle
Model Number(s): TBS-2275-01
Year of Manufacture: 2011
We, Voyetra Turtle Beach, Inc. of Elmsford, New York, declare under our own responsibility that the above-referenced product complies
with the essential requirements of Article 3 of the R&TTE1999/5/EC Directive and standards:
Electromagnetic Compatibility 2004/108/EC [Article 3.1(b) of the R&TTE Directive] comprising the harmonized standards
ESTI EN 301 489-1 V1.8.1 (2008-04)
ESTI EN 301 489-17 V2.1.1 (2009)
EN 61000-4-2:2001
EN 61000-4-3:2006
EN 55022:2006
All test reports have been reviewed and approved with a Positive Opinion from the following Notified Body:
SGS Taiwan Limited
No. 134, Wu Kung Road, Wuku Industrial Zone
Taipei County, Taiwan 248
Tel: +886-2-2299-3279
Fax: +886-2-2298-2698
The technical documentation required by this Directive is maintained at the corporate headquarters of
Voyetra Turtle Beach, 150 Clearbrook Road. Suite 162, Elmsford, New York, 10562.
Authorized Person:
Product Name: Ear Force XBA
Model Number(s): TBS-2275-01
FCC Rules: FCC CFR Title 47 Part 15 Subpart B: 2009
FCC CFR Title 47 Part 15 Subpart C: 2008
Operating Environment: GENERAL OFFICE AND HOME USE
FCC COMPLIANT STATEMENT
This device complies with part 15 of the FCC rules. Operation is subjected to the following conditions:
(3) This device may not cause harmful interference, and
(4) This device must accept any interference received including interference that may cause undesired operation.
INFORMATION TO USER
This equipment has been tested and found to comply with the limits for a Class B digital device, pursuant to Part 15 of FCC rules.
These limits are designed to provide reasonable protection against harmful interference in a residential installation. This equipment
generates, uses and can radiate radio frequency energy and, if not installed and used in accordance with the instructions, may cause
harmful interference to radio communications. However, there is no guarantee that interference will not occur in a particular installation.
If this equipment does cause harmful interference to radio or television reception, which can be determined by turning the equipment off
and on, the user is encouraged to try to correct the interference by one or more of the following measures:
5) Reorient or relocate the receiving antenna.
6) Increase the separation between the equipment and receiver.
7) Connect the equipment into an outlet on a circuit different from that to which the receiver is connected.
8) Consult the dealer or an experienced radio/TV technician for help.
The user’s manual or instruction manual for an intention or unintentional radiator shall caution the user that the changes or modifications
not expressly approved by the party responsible for compliance could void the user’s authority to operate the equipment.
WARNING: Changes or modifications made to this equipment not expressly approved by VOYETRA TURTLE BEACH, INC. may void user’s
authority to operate this equipment.
____________________________ Date:________________
Printed Name: Frederick Romano
Title: Executive Vice President
7/13/11
37
38
Page 22

Limited Warranty for Turtle Beach Products
Voyetra Turtle Beach, Inc. ("VTB") warrants to the original end-user purchaser ("Purchaser") that the retail Turtle Beach hardware product herein
("Product") will be free of defects in materials and workmanship for a period of one year from the date of purchase by the Purchaser ("Warranty
Period"). Any Extended Warranty or Service Plans purchased through a Retail store are not honored by VTB. The Warranty refers to the repair/
replacement of a defective product during this period and not a refund.
This limited warranty extends only to the Purchaser and is not transferable or assignable to any subsequent purchaser. This limited warranty is
applicable only in the country or territory where the Product was purchased from an authorized VTB retailer and does not apply to a Product that
has been purchased as used or refurbished (except refurbished by VTB) or was included as part of a non-VTB product.
WARRANTY SERVICE
In the USA and CANADA Warranty Service is provided by our TURTLE BEACH OFFICEs and in all other Countries it is provided by our local International Distributors.
VTB does not warrant uninterrupted or error-free operation of the Product and is under no obligation to support the Product for all computer
operating systems or future versions of such operating systems.
If a defect should occur during the Warranty Period, Purchaser must contact VTB to obtain a Return Merchandise Authorization ("RMA") number.
Purchaser will be responsible for shipping costs incurred in returning the defective Product to an authorized VTB service center, or to the repair
facility located at VTB's corporate headquarters. A copy of the dated proof of purchase and a description of the problem must be included with
the defective Product. VTB will not be responsible for other products or accessories included with the defective Product sent to VTB. The RMA
number must be clearly indicated on the outside of the package. Packages without an RMA number will be refused by VTB or its representatives
and returned to sender at the sender's expense.
In the event of a defect, Purchaser's sole and exclusive remedy, and VTB's sole liability, is expressly limited to the correction of the defect by
adjustment, repair, or replacement of the Product at VTB's sole option and expense. VTB owns all Products it has replaced and all parts removed
from repaired Products. VTB uses new and reconditioned parts made by various manufacturers in performing warranty repairs and building
replacement products. If VTB repairs or replaces a product, the original Warranty Period is not extended, however, VTB warrants that repaired or
replacement parts will be free from defects in material and workmanship for a period of thirty (30) days from the date of repair or replacement, or
for the remainder of the Warranty Period, whichever is greater.
This warranty does not apply to any Product that has had its serial number altered, removed or defaced, or any Product damage caused by
shipping, improper storage, accident, problems with electrical power, abuse, misuse, neglect, ordinary wear, acts of God (e.g. flood), failure to
follow directions, improper maintenance, use not in accordance with product instructions, unauthorized modification or service of the Product or
damage resulting from the use of the Product with hardware, software or other products not provided by or specifically recommended by VTB.
THIS LIMITED WARRANTY IS PURCHASER’S SOLE AND EXCLUSIVE REMEDY AND IS IN LIEU OF ALL OTHER WARRANTIES, EXPRESS OR IMPLIED.
TO THE EXTENT PERMITTED BY APPLICABLE LAW, VTB HEREBY DISCLAIMS THE APPLICABILITY OF ANY IMPLIED WARRANTY OF MERCHANTABILITY, FITNESS FOR A PARTICULAR PURPOSE OR USE FOR THE PRODUCT. IF SUCH A DISCLAIMER IS PROHIBITED BY APPLICABLE LAW, THE
IMPLIED WARRANTY IS LIMITED TO THE DURATION OF THE FOREGOING LIMITED WRITTEN WARRANTY.
IN NO EVENT SHALL VTB BE LIABLE FOR ANY INDIRECT, INCIDENTAL, SPECIAL, PUNITIVE OR CONSEQUENTIAL DAMAGES, OR DAMAGES,
INCLUDING BUT NOT LIMITED TO ANY LOST PROFITS, DATA, OR LOSS OF USE, ANY THIRD PARTY CLAIMS, AND ANY INJURY TO PROPERTY OR
BODILY INJURY (INCLUDING DEATH) TO ANY PERSON, ARISING FROM OR RELATING TO THE USE OF THIS PRODUCT OR ARISING FROM BREACH
OF THE WARRANTY, BREACH OF CONTRACT, NEGLIGENCE, TORT, OR STRICT LIABILITY, EVEN IF VTB HAS BEEN ADVISED OF THE POSSIBILITY OF
SUCH DAMAGES.
This warranty supersedes all prior agreements or understandings, oral or written, relating to the Product, and no representation, promise or condition not contained herein will modify these terms. Some states do not allow the exclusion or limitation of incidental or consequential damages, so
the above exclusion or limitation may not apply to you. This warranty gives you specific legal rights. You may also have other rights, which vary from
state to state. Any action or lawsuit for breach of warranty must be commenced within eighteen (18) months following the purchase of the Product.
EXCLUSIONS FROM LIMITED WARRANTY:
This Limited Warranty shall not apply and VTB has no liability under this Limited Warranty if the Turtle Beach Product:
• is used for commercial purposes such as “LAN Centers” (including rental or lease);
• is modied or tampered with;
• is damaged by Acts of God, power surge, misuse, abuse, negligence, accident, wear and tear,
mishandling, misapplication, or other causes unrelated to defective materials or workmanship;
• serial number is defaced, altered or removed;
• is not used in accordance with the documentation and use instructions; or
• is repaired, modied or altered by other than authorized repair centers.
• product is no longer available because it was discarded.
39
40
Page 23

Federal Communications Commission Interference Statement
This equipment has been tested and found to comply with the limits for a Class B digital
device, pursuant to part 15 of the FCC Rules. These limits are designed to provide reasonable protection against harmful interference in a residential installation. This equipment
generates, uses and can radiate radio frequency energy and, if not installed and used in
accordance with the instructions, may cause harmful interference to radio communications.
However, there is no guarantee that interference will not occur in a particular installation. If
this equipment does cause harmful interference to radio or television reception, which can
be determined by turning the equipment off and on, the user is encouraged to try to correct
the interference by one or more of the following measures:
• Reorient or relocate the receiving antenna.
• Increase the separation between the equipment and receiver.
• Connect the equipment into an outlet on a circuit different from that to which the
receiver is connected.
• Consult the dealer or an experienced radio/ TV technician for help.
FCC Caution:
Any changes or modifications not expressly approved by the grantee of this device could
void the user's authority to operate the equipment.
RF Exposure Warning:
Headset:
The equipment complies with FCC RF exposure limits set forth for an uncontrolled environment. The equipment must not be co-located or operating in conjunction with any other
antenna or transmitter.
Transmitter Box:
This equipment must be installed and operated in accordance with provided instructions and
the antenna(s) used for this transmitter must be installed to provide a separation distance of
at least 20 cm from all persons and must not be co-located or operating in conjunction with
any other antenna or transmitter. End-users and installers must be provide with antenna
installation instructions and transmitter operating conditions for satisfying RF exposure
compliance.
CANADA, INDUSTRY CANADA (IC) NOTICES
This Class B digital apparatus complies with Canadian ICES-003 and RSS-210. Operation is
subject to the following two conditions: (1) this device may not cause interference, and (2)
this device must accept any interference, including interference that may cause undesired
operation of the device.
Radio Frequency (RF) Exposure Information:
Headset:
The radiated output power of the Wireless Device is below the Industry Canada (IC) radio
frequency exposure limits. The Wireless Device should be used in such a manner such that
the potential for human contact during normal operation is minimized. This device has also
been evaluated and shown compliant with the IC RF Exposure limits under portable exposure
conditions. (antennas are less than 20 cm of a person's body).
Transmitter:
The radiated output power of the Wireless Device is below the Industry Canada (IC) radio
frequency exposure limits. The Wireless Device should be used in such a manner such that
the potential for human contact during normal operation is minimized. This device has also
been evaluated and shown compliant with the IC RF Exposure limits under mobile exposure
conditions. (antennas are greater than 20cm from a person's body).
This device has been certified for use in Canada. Status of the listing in the Industry Canada's
REL (Radio Equipment List) can be found at the following web address: http://www.ic.gc.ca/
app/sitt/reltel/srch/nwRdSrch.do?lang=eng
Additional Canadian information on RF exposure also can be found at the following web
address: http://www.ic.gc.ca/eic/site/smt-gst.nsf/eng/sf08792.html
Canada, avis d'Industry Canada (IC)
Cet appareil numérique de classe B est conforme aux normes canadiennes ICES-003 et
RSS-210.Son fonctionnement est soumis aux deux conditions suivantes : (1) cet appareil ne
doit pas causer d'interférence et (2) cet appareil doit accepter toute interférence, notamment
les interférences qui peuvent affecter son fonctionnement.
Informations concernant l'exposition aux fréquences radio (RF)
Headset:
La puissance de sortie émise par l'appareil de sans fil Dell est inférieure à la limite
d'exposition aux fréquences radio d'Industry Canada (IC). Utilisez l'appareil de sans fil Dell
de façon à minimiser les contacts humains lors du fonctionnement normal. Ce périphérique
a également été évalué et démontré conforme aux limites d'exposition aux RF d'IC dans des
conditions d'exposition à des appareils portables (les antennes sont moins de 20 cm du corps
d'une personne).
Transmitter:
La puissance de sortie émise par l'appareil de sans fil Dell est inférieure à la limite
d'exposition aux fréquences radio d'Industry Canada (IC). Utilisez l'appareil de sans fil Dell
de façon à minimiser les contacts humains lors du fonctionnement normal. Ce périphérique
a également été évalué et démontré conforme aux limites d'exposition aux RF d'IC dans des
conditions d'exposition à des appareils mobiles (les antennes se situent à moins de 20 cm du
corps d'une personne).
Ce périphérique est homologué pour l'utilisation au Canada. Pour consulter l'entrée correspondant à l'appareil dans la liste d'équipement radio (REL - Radio Equipment List) d'Industry
Canada rendez-vous sur: http://www.ic.gc.ca/app/sitt/reltel/srch/nwRdSrch.do?lang=eng
Pour des informations supplémentaires concernant l'exposition aux RF au Canada rendezvous sur:http://www.ic.gc.ca/eic/site/smt-gst.nsf/eng/sf08792.html
This product is CE marked according to the provisions of the Low Voltage Directive (2006/95/
EC), R&TTE Directive (1999/5/EC) and EMC Directive (1999/5/EC).
Frequency Range: 2.404-2.476GHz / 5.160-5.340GHz
• Grantee Code/Reg Number: XGB/GC229855 • Voyetra Turtle Beach, Inc.
IC: 3879A-2276
IC: 3879A-2271
IC: 3879A-2275
DESIGNED AND ENGINEERED BY TURTLE BEACH IN NEW YORK, USA
Copyright © 2012 Voyetra Turtle Beach, Inc. (VTB, Inc.) All rights reserved. No part of this guide may be reproduced without permission. Turtle
Beach, the Turtle Beach Logo, Voyetra, Ear Force, Chat Boost, Engineered For Gaming and the Dual Band logo are either trademarks or registered
trademarks of VTB, Inc. XBOX, XBOX 360 and XBOX LIVE are registered trademarks of Microsoft Corporation. Playstation is a registered trademark
and PS3 is a trademark of Sony Computer Entertainment. Bluetooth and the Bluetooth logo are registered trademarks of Bluetooth SIG Inc. Dolby
and the double-D symbol are trademarks of Dolby Laboratories. All other trademarks are properties of their respective companies and are hereby
acknowledged. Assembled in China. PATENTS PENDING
For more products, accessories and general product information, please visit
TurtleBeach.com
For warranty information and product support, please visit
TurtleBeach.com/support
FRANÇAIS
Pour plus d’informations sur les produits et accessoires, veuillez visiter le site TurtleBeach.com
Pour toute question de garantie ou d’assistance technique, veuillez visiter la page TurtleBeach.com/support
DEUTSCH
Weitere Hinweise zu Produkten, Zubehör und allgemeine Produktinformationen finden Sie unter: TurtleBeach.com
Informationen über Garantieleistungen und Produkt-Support finden Sie unter: TurtleBeach.com/worldwide
ITALIANO
Per ulteriori prodotti, accessori e informazioni generali sul prodotto, visitare: TurtleBeach.com
Per informazioni sulla garanzia e supporto delprodotto, visitare: TurtleBeach.com/worldwide
PORTUGUÊS
Para mais produtos, acessórios e informações gerais do produto, visite: TurtleBeach.com
Para informações sobre garantia e suporte ao produto, visite: TurtleBeach.com/worldwide
ESPAÑOL
Podrá encontrar más productos, accesorios e información general en TurtleBeach.com
Información sobre la garantía y apoyo técnico en: TurtleBeach.com/support
SVENSK
För ytterligare produkter, tillbehör och allmän produktinformation, vänligen besök: TurtleBeach.com
För information om garanti och produktsupport, vänligen besök: TurtleBeach.com/support
DANSK
For flere produkter, tilbehør og generel produkt information, besøg venligst: TurtleBeach.com
For garantioplysninger og produktsupport, kan du besøge: TurtleBeach.com/support
NEDERLANDS
Bezoek voor meer producten, accessoires en algemene productinformatie: TurtleBeach.com
Voor garantie-informatie en productondersteuning kunt u terecht op: TurtleBeach.com/support
41
42
Page 24

NotesNotes
43
44
Page 25

TB521-2277-01
45
ENGINEERED FOR GAMING™
 Loading...