

Page 1
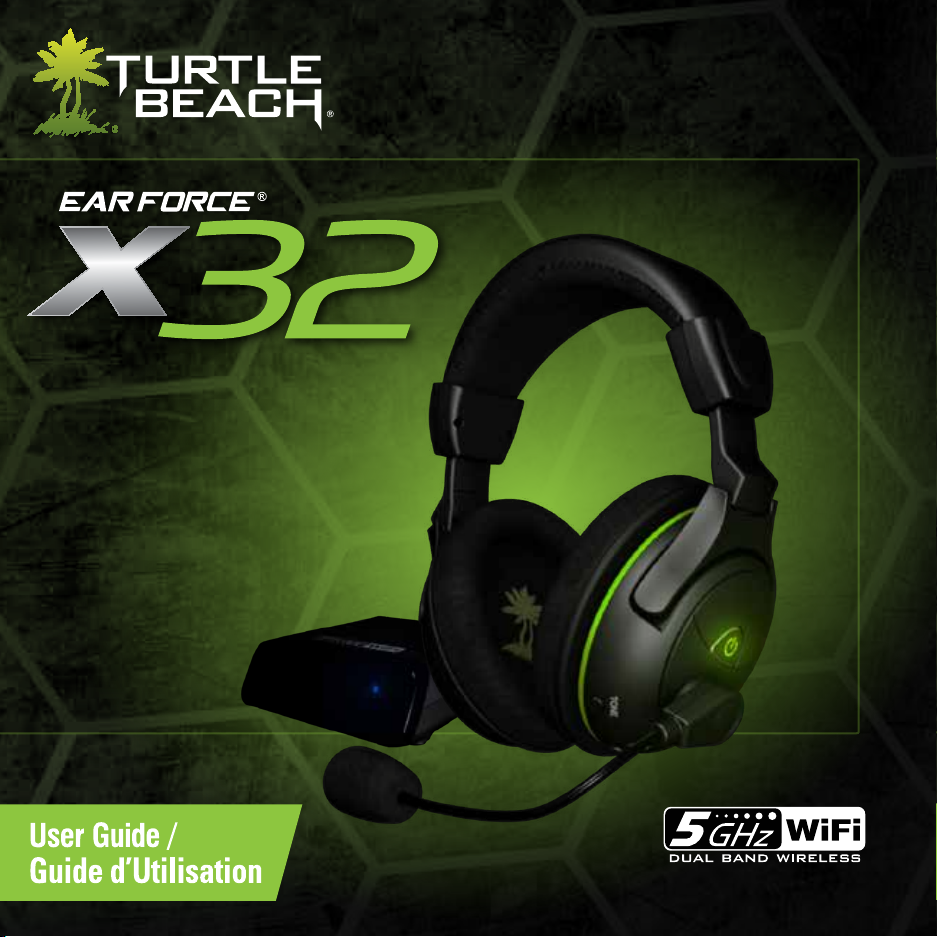
1
Page 2
Wireless Amplified Stereo Gaming Headset /
Casque stéréo amplifié sans fil pour jeux vidéo
Page 3
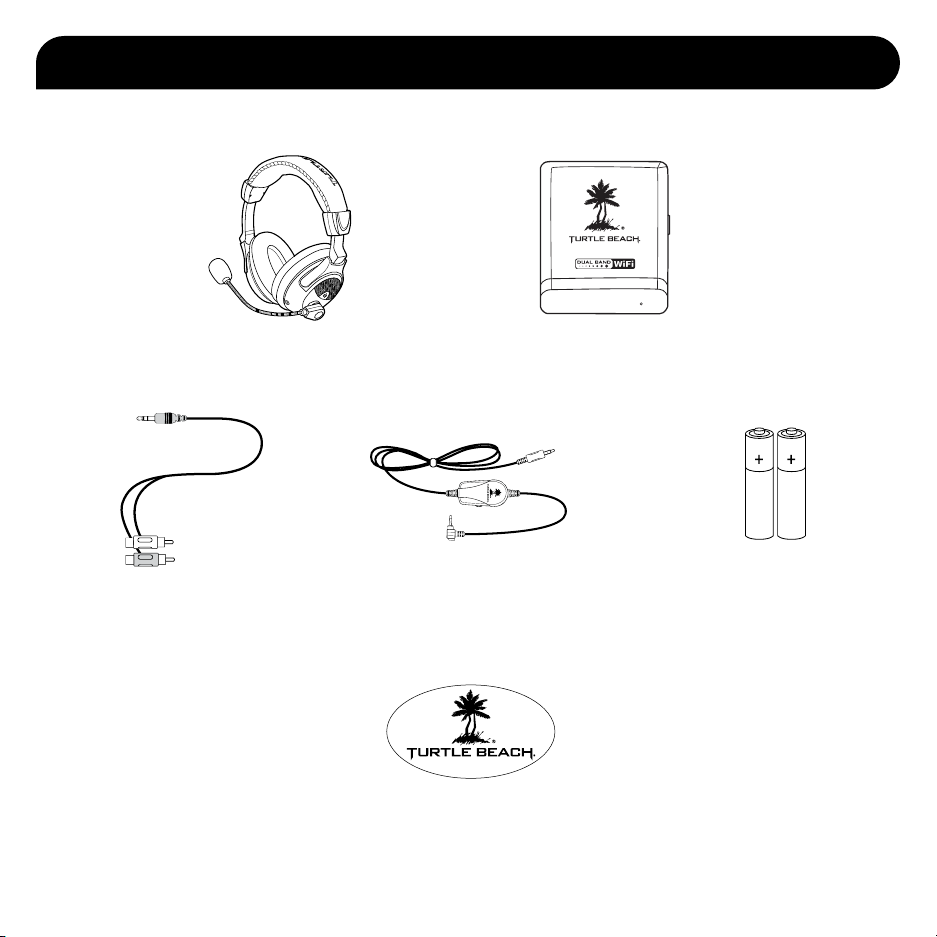
Package Contents / Contenu de l’Emballage
R
TONE
RCA Splitter Cable /
Câble diviseur RCA
X32 Headset /
Casque X32
Xbox 360 Talkback Cable /
Câble de réponse Xbox 360
T
U
M
R
O
T
C
.
L
E
H
C
B
A
E
Turtle Beach Sticker /
Autocollant Turtle Beach
X32 Transmitter /
Transmetteur X32
(2) AAA Batteries /
2 piles « AAA »
Page 4
TONE
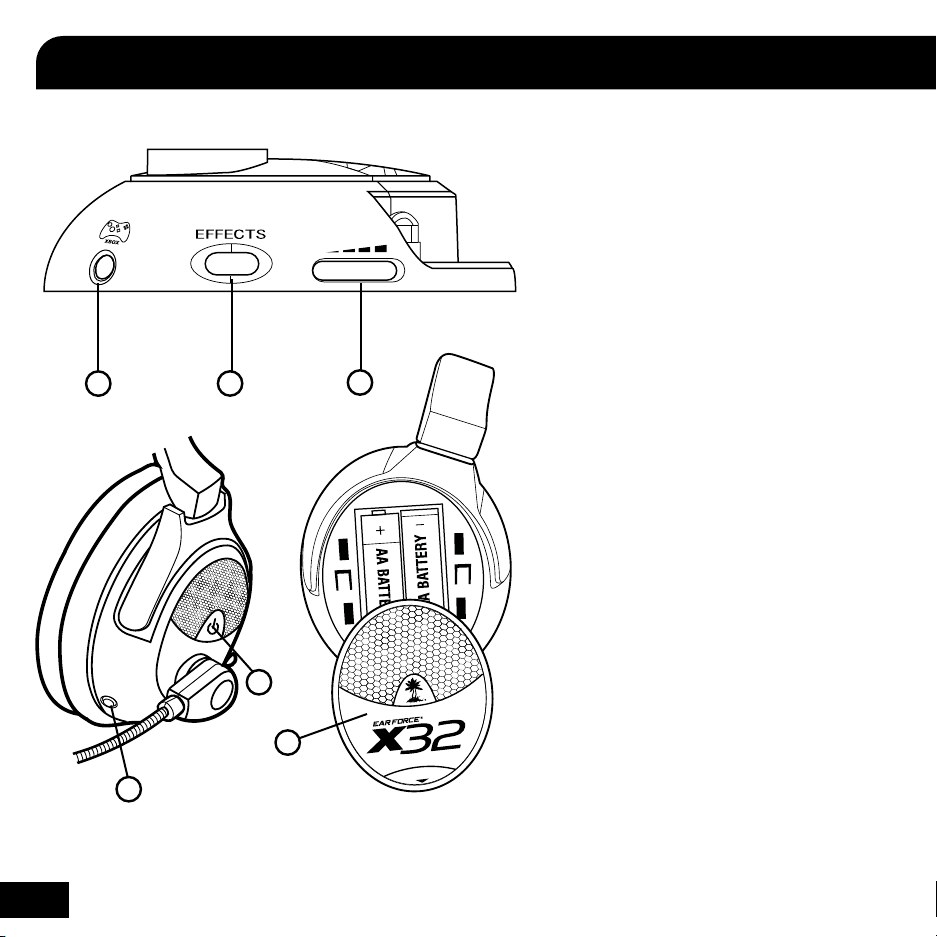
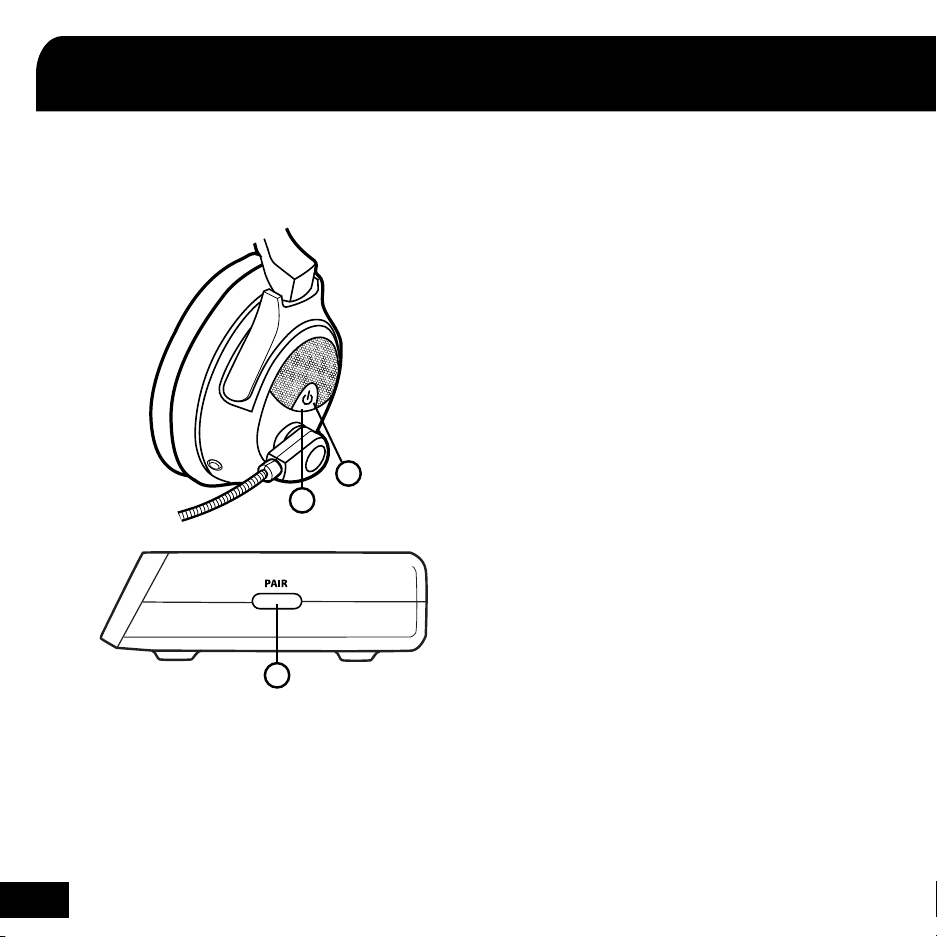
X32 Headset / Casque X32
2
3
4
1. Tone Button: (see pg. 13)
2. Xbox Controller Jack
3. Effects Button:
(see pg. 14)
4. Game Volume
5. Main Power
ON: press and hold for 3 seconds.
OFF: press and hold for 3 seconds.
Pairing Transmitter: (see pg. 5)
6. Battery Cover
5
6
1
OPEN
1
Page 5

FRANÇAIS
1. TONE: (voir page 13)
2. Prise de commande de la Xbox 360
3. Effets: (voir page 14)
4. Volume de jeu
5. Alimentation:
Marche: appuyer sur la touche
pendant 3 secondes.
Arrêt: appuyer sur la touche pendant
3 secondes.
Couplage de l’émetteur: (voir page 5).
6. Couvercle des piles
DEUTSCH
1. Ton-Taste: (siehe S. 13)
2. Xbox 360 Controller-Anschlussbuchse
3. Effekten-Taste: (siehe S. 14)
4. Lautstärke – Spiel
5. Hauptstromversorgung:
EIN: Für 3 Sekunden gedrückt halten.
AUS: Für 3 Sekunden gedrückt halten.
Pairing-Transmitter: (siehe S. 5)
6. Batterieabdeckung
ITALIANO
1. Tono pulsante: (vedere pag. 13)
2. Spinotto di controllo Xbox 360
3. Efetti pulsante: (vedere pag. 14)
4. Volume gioco
5. Alimentazione:
Accensione (ON): premere
per 3 secondi.
Spegnimento (OFF): premere
per 3 secondi.
Abbinamento trasmettitori:
(vedere pag. 5)
6. Coperchio batteria
PORTUGUÊS
1. Botão de tom: (consulte pág. 13)
2. Conector do controle do Xbox 360
3. Botão de efeitos: (consulte pág. 14)
4. Volume do jogo
5. Alimentação:
Ligado: pressione e segure
por 3 segundos.
Desligado: pressione e segure
por 3 segundos.
Transmissor de em parelhamento:
(consulte pág.5)
6. Tampa de bateria
ESPAÑOL
1. Tono de botón: (véase página 13)
2. Enchufe del controlador de Xbox 360
3. Efectos botón: (véase página 14)
4. Volumen de juegos
5. Encendido:
ON: Oprimirlo durante 3 segundos.
OFF: Oprimirlo durante 3 segundos.
Enlace del transmisor: (véase página 5)
6. Tapa de pilas
SVENSK
1. Tonen knappen: (se sid. 13)
2. Xbox 360 uttag för handkontroll
3. Effekter knappen: (se sid. 14)
4. Spelvolym
5. Strömförsörjning
PÅ: tryck och håll nere i 3 sekunder.
AV: tryck och håll nere i 3 sekunder.
Sändare för sammanlänkning: (se sid. 5)
6. Batteriskydd
DANSK
1. Tone-knap: (se s. 13)
2. Xbox 360 controllerstik
3. Effekter-knap: (se s. 14)
4. Game Bind
5. Tænd/sluk knap:
Tænd: tryk og hold nede i 3 sekunder.
Sluk: tryk og hold nede i 3 sekunder.
Parrings transmitter: (se s. 5)
6. Batterihylster
NEDERLANDS
1. Toon knop: (zie p. 13)
2. Aansluiting voor Xbox 360-controller
3. Effecten-knop: (zie p. 14)
4. Deel Game
5. POWER-knop:
Aan: 3 seconden ingedrukt houden.
Uit: 3 seconden ingedrukt houden.
Zender koppelen: (zie p. 5)
6. Batterijklepje
2
Page 6
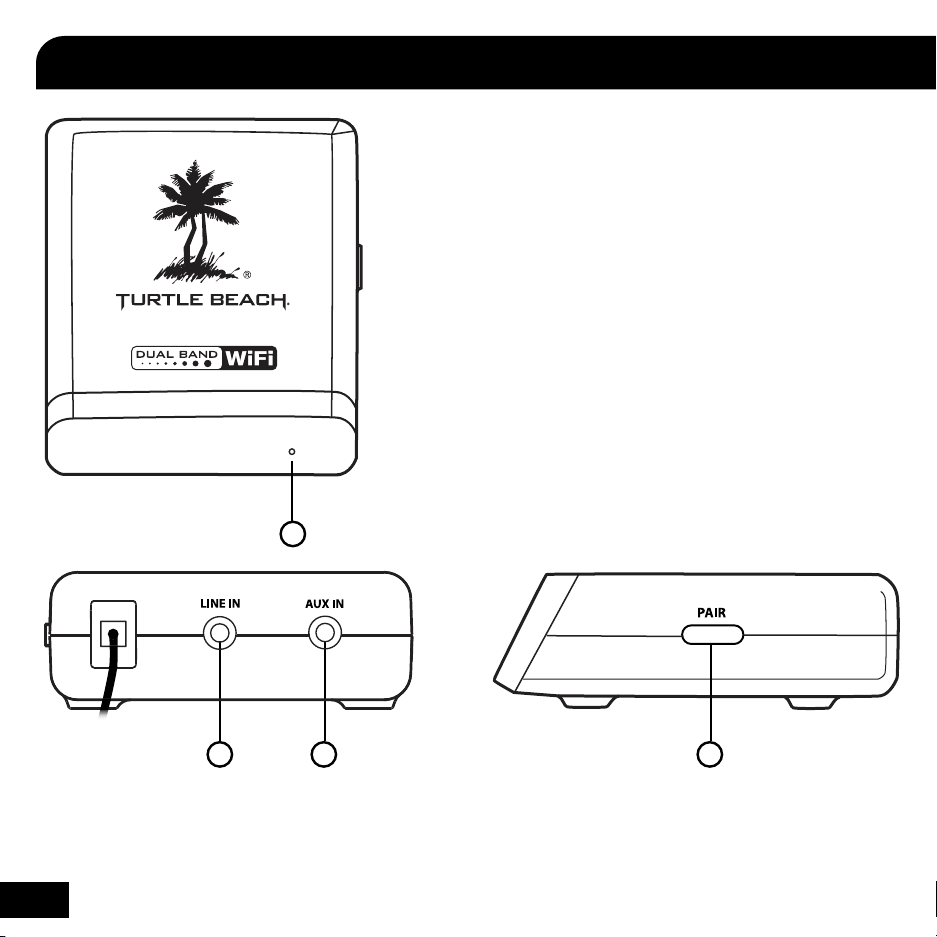
X32 Transmitter / Émetteur X32
1
1. Power/Link LED:
Solid ON: communicating with the Headset.
Slowly Pulsing: cannot communicate with
Headset (see pg 5).
2. Game Audio Input
3. Auxiliary Input
4. Pairing Button:
(see pg. 5)
2 3 4
3
Page 7

FRANÇAIS
1. LED d'alimentation/couplage:
Lumière permanente: en communication
avec le casque.
Clignotement lent: impossibilité de
communiquer avec le casque (voir p. 5).
Clignotement rapide: mode d'appairage.
2. Entrée audio du jeu
3. Entrée auxiliaire
4. Touche de couplage (voir p. 5).
DEUTSCH
1. Power/Pairing-LED:
Stetig AN: Kommunikation mit dem
Headset.
Langsam pulsierend: Kommunikation mit
Headset nicht möglich (siehe S. 5).
Blinkt schnell: Pairing-Modus.
2. Spielaudio-Eingang
3. Auxiliary-Eingang
3. Pairing-Taste (siehe S. 5).
ITALIANO
1. LED accensione/accoppiamento:
Fisso: in comunicazione con le cuffie.
Lampeggio lento: impossibile comunicare
con le cuffie (vedere pag. 5).
Lampeggia rapidamente: modalità di
accoppiamento.
2. Ingresso audio gioco
3. Ingresso ausiliario
4. Pulsante di accoppiamento (vedere pag. 5).
PORTUGUÊS
1. LED de energia/conexão:
ON (ligado) intermitente: em comunicação
com o fone de ouvido.
Piscando lentamente: sem comunicação
com o fone de ouvido (consulte a pág. 5).
Piscando rapidamente: modo de
emparelhamento.
2. Entrada de áudio para jogos
3. Entrada auxiliar
4. Botão de conexão (consulte a pág. 5).
ESPAÑOL
1. LED de Encendido/Enlace Encendido
permanentemente: En comunicación
con los auriculares.
Pulsante lentamente: La comunicación
con los auriculares no se pudo establecer
(véase la página 5).
Parpadeo rápido: el modo de
emparejamiento.
2. Entrada de audio para juegos
3. Entrada auxiliar
4. Botón de enlace (véase la página 5).
SVENSK
1. På/Av- och sammanlänkningslampa:
Lampan lyser: kommunicerar med
headsetet
Lampan blinkar: kan inte kommunicera
med headsetet (se sida 5).
Blinkar snabbt: ihopparningsläge.
2. Spelljudsingång
3. AUX-ingång
4. Sammanlänkningsknapp (se sida 5).
DANSK
1. Strøm/Parrings LED:
Konstant TÆNDT (ON): kommunikerer
med headsettet.
Langsomt pulserende: kan ikke
kommunikere med headsettet (se side 5).
Blinker hurtigt: parringstilstand.
2. Spillelyd input
3. Aux input
4. Parringsknap (se side 5).
NEDERLANDS
1. Aan/uit-/koppelingsledje:
Constant AAN: communicatie met
headset.
Knippert langzaam: kan niet met headset
communiceren (zie p. 5).
Knippert snel: pairing-modus.
2. Game-audio-ingang
3. Aux-ingang
4. Koppelingsknop (zie p. 5).
4
Page 8
TONE
Pairing the Headset and Transmitter /
Couplage du casque et de l’émetteur
3
1
2
Step 1:
Make sure the headset and transmitter are
turned off and they are at least 2 feet away from
each other.
Step 2:
Power on the transmitter by connecting it to a free
USB port on your gaming console. Then press
and hold the PAIR button on the transmitter for
about 5 seconds. Release the PAIR button when
the transmitter’s Power/Link LED begins to flash
rapidly (twice per second). NOTE: If you hold the
transmitter’s PAIR button for too long (over 20
seconds), the light will blink extremely quickly, and
you will need to start over from step 1.
Step 3:
Press and hold the headset Power button for about
6 seconds until you hear the second double beep,
then release the Power button. At this point, the
headset LED will flash rapidly (twice per second).
Step 4:
Wait for the headset and transmitter to pair. This
process could take up to 30 seconds.
If pairing is successful, the Power/Link LED on
the transmitter should be on solid and the headset
LED should be flashing about once per second,
indicating that the units are paired.
If pairing fails, repeat steps 1-4. It may take up to 5
attempts to pair successfully.
NOTE: Only one headset can be paired with the
transmitter. If you pair two headsets with the same
transmitter, they’ll interfere with each other as
they compete for the transmitter RF signal. This
will cause one headset to shut off. So don’t try to
pair two headsets with the same transmitter!
5
Page 9

FRANÇAIS
1. Assurez-vous que le casque est éteint (OFF).
2. Appuyez sur le bouton d’appariement (PAIR)
et maintenez-le enfoncé sur le transmetteur
pendant 5 secondes, puis relâcher. Le voyant LED
alimentation/lien (Power/Link) clignotera alors
rapidement.
3. Appuyez et maintenez enfoncé le bouton
d’alimentation du casque pendant environ 6
secondes jusqu’à ce que vous entendiez le
second double bip, puis relâchez le bouton
d’alimentation. À ce stade, le voyant LED du
casque clignotera rapidement (deux fois par
seconde).
Après quelques secondes, le voyant LED
alimentation/lien (Power/Link) du transmetteur sera
allumé, et le voyant LED d’alimentation du casque
devrait clignoter environ une fois par seconde, ce qui
indique que les appareils sont appairés.
DEUTSCH
1. Stellen Sie sicher, dass das Headset
AUSGESCHALTET ist.
2. PAIR-Taste auf dem Sender drücken, fünf
Sekunden lang gedrückt halten und loslassen. Die
Netz/Anschluss-LED des Senders fängt daraufhin
an, schnell zu blinken.
3. Ein/Aus-Taste des Headsets drücken und etwa
sechs Sekunden lang gedrückt halten, bis Sie
den zweiten Doppelpiepton hören. Dann die Ein/
Aus-Taste loslassen. Jetzt wird die Headset-LED
schnell blinken (zweimal pro Sekunde).
Nach ein paar Sekunden wird die Netz/AnschlussLED ununterbrochen leuchten und die Netz-LED des
Headsets sollte etwa einmal pro Sekunde blinken,
was darauf hinweist, dass das Pairing der Einheiten
erfolgreich war.
ITALIANO
1. Assicurarsi che la cuffia sia spenta (OFF).
2. Premere e tenere premuto per 5 secondi il tasto
PAIR sul trasmettitore, quindi rilasciarlo; il LED di
alimentazione/connessione del trasmettitore inizia
a lampeggiare rapidamente.
3. Premere e tenere premuto per circa 6 secondi il
tasto POWER sulla cuffia fino a quando si sente
il secondo doppio bip, quindi rilasciare il tasto
POWER. Fatto ciò, il LED sulla cuffia inizia a
lampeggiare rapidamente (due volte al secondo).
Dopo alcuni secondi, il LED di alimentazione/
connessione del trasmettitore rimane acceso in
modo fisso e il LED di alimentazione della cuffia inizia
a lampeggiare una volta al secondo, indicando che
le unità sono accoppiate.
PORTUGUÊS
1. Certifique-se de que o headset está DESLIGADO.
2. Prima e mantenha premido o botão EMPARELHAR
no transmissor durante 5 segundos e solte.
Em seguida, o LED Ligar-Desligar/Conectar do
transmissor começa a piscar rapidamente.
3. Prima e mantenha premido o botão Ligar-Desligar
do headset durante cerca de 6 segundos até ouvir
o segundo bip duplo. Em seguida, solte o botão
Ligar-Desligar. Nesta altura, o LED do headset
pisca rapidamente (duas vezes por segundo).
Após alguns segundos, o LED Ligar-Desligar/
Conectar do transmissor fica aceso em permanência
e o LED Ligar-Desligar do headset deve estar a
piscar cerca de uma vez por segundo, indicando que
os aparelhos estão emparelhados.
ESPAÑOL
1. Asegúrese de que los auriculares están apagados
(OFF).
2. Mantenga pulsado el botón de emparejamiento
(PAIR) del transmisor durante 5 segundos y,
cuando lo suelte, el LED de encendido/conexión
(Power/Link) comenzará a parpadear con rapidez.
3. Mantenga pulsado el botón de encendido de los
auriculares durante unos 6 segundos hasta que
escuche el segundo pitido doble y, entonces,
suelte el botón. En este momento, el LED de los
auriculares parpadeará con rapidez (dos veces
por segundo).
Tras unos segundos, el LED de encendido/conexión
(Power/Link) del transmisor quedará fijo y el LED de
encendido de los auriculares debería parpadear una
vez por segundo, indicando que las unidades están
emparejadas.
SVENSK
1. Kontrollera att headset är AV.
2. Tryck och håll ner IHOPKOPPLINGS-knappen
på sändaren i 5 sekunder. Släpp sedan upp.
Sändarens ström/länk-LED börjar blinka snabbt.
3. Tryck och håll ner headsetets strömknapp i cirka
6 sekunder tills du hör det andra dubbelpipljudet.
Släpp sedan upp strömknappen. Headsetets LED
blinkar nu snabbt (två gånger per sekund).
Efter några sekunder lyser sändarens ström/länkLED med fast sken och headsetets ström-LED ska
blinka ungefär en gång per sekund, vilket visar att
enheterna är ihopkopplade.
DANSK
1. Sørg for, at der er slukket for headsettet.
2. Tryk og hold knappen PAIR på senderen nede
i 5 sekunder, og slip så. Senderens strøm-/
forbindelseslysdiode begynder at blinke hurtigt.
3. Tryk og hold headsettets strømknap nede i ca. 6
sekunder, til du hører det andet dobbeltbip, og slip
så strømknappen. Nu blinker headsettets lysdiode
hurtigt (to gange i sekundet).
Efter nogle få sekunder lyser senderens strøm-/
forbindelseslysdiode konstant, og headsettets
strømlysdiode vil blinke én gang i sekundet, hvilket
angiver, at enhederne er blevet parret.
NEDERLANDS
1. Zorg ervoor dat de headset UITGESCHAKELD is.
2. Houd de knop PAIREN op de zender gedurende
5 seconden ingedrukt, laat hem los en de
Stroomknop/Link LED gaat snel knipperen.
3. Houd de stroomknop van de headset gedurende
minstens 6 seconden ingedrukt tot u een tweede
dubbel pieptoontje hoort, laat dan de stroomknop
los. Op dat moment gaat de LED op de headset
snel knipperen (tweemaal per seconde).
Na een paar seconden blijft de Stroomknop/Link LED
branden en het LED-lampje van de voeding moet nu
eenmaal per seconde gaan knipperen. Dit betekent
dat de eenheden gepaird zijn.
6
Page 10
Xbox 360® E Setup (HDMI)
7
Page 11

Xbox 360® E Setup (Composite)
audio/video in
8
Page 12

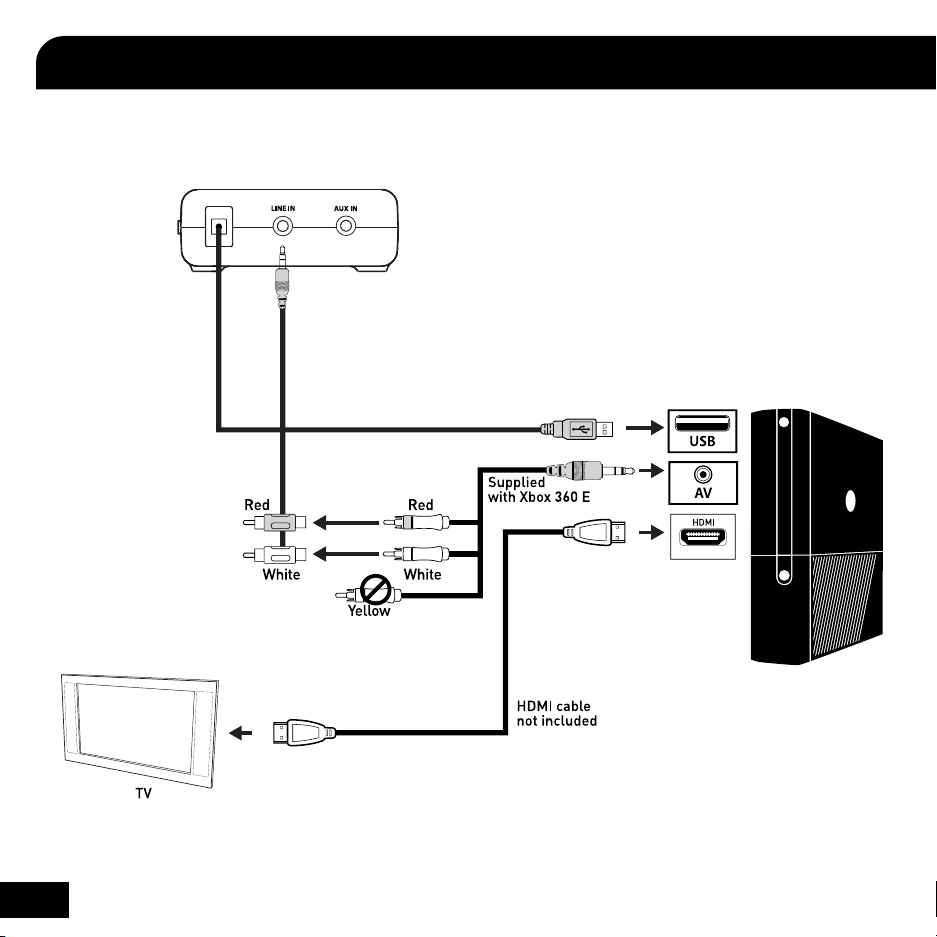
Xbox 360 Setup / Configuration Xbox 360
(HDMI Cable / Câble HDMI)
Transmitter USB Cable /
Émetteur câble USB
Xbox 360 Audio Adapter Cable*
Xbox 360 cable adaptateur audio*
HDMI
*Xbox 360 audio adapter cable required (sold separately)
*Xbox 360 nécessitent un câble adaptateur audio Xbox 360 (vendu séparément)
9
Page 13

(Alternate Setup: HDMI Cable / Installation alternative avec un câble HDMI)
Transmitter USB Cable /
Émetteur câble USB
RCA Splitter Cable /
Câble diviseur RCA
blanc
HDMI
rouge
10
Page 14

Xbox 360 Setup / Configuration Xbox 360
(Xbox 360 A/V Cable)
Transmitter USB Cable /
Émetteur câble USB
RCA Splitter Cable /
Câble diviseur RCA
Xbox 360 AV Cable /
Xbox 360 Câble AV
11
rouge/rot
blanc/weiß
juane/gelb
Page 15

Xbox 360 Chat Setup / Configuration vocale de la Xbox 360
Voice
R
Xbox 360 Controller /
Manette Xbox 360
TONE
Xbox 360 input /
Xbox 360 d’entrée
Xbox 360 Talkback Cable /
Câble de réponse Xbox 360
Voice Volume 10
Game Volume 10
Mute Kinect
Voice Output
Play Through Headset
Play Through Speakers
Voice Output
Xbox 360 System Settings:
“Preferences” > “Voice” >
“Play Through Headset”.
FRANCAIS
Au tableau de bord de la Xbox 360, sélectionner Paramètres >
Préférences > Voix > Son via le casque
DEUTSCH
Wählen Sie in den Xbox 360-Systemeinstellungen "Präferenzen" >
"Sprache" > "Im Headset abspielen" aus
ITALIANO
Nelle Impostazioni di sistema della Xbox 360 , selezionare “Preferenze” > “Voce” > “Ascolta in cuffia”
PORTUGUÊS
Nas Configurações de Sistema do Xbox 360, selecione
“Preferências” > “Voz” > “Reproduzir através do fone de ouvido”
ESPAÑOL
En Configuración del sistema para Xbox 360 seleccione
Preferencias > Voz > Reproducir por auriculares
SVENSK
Under ”Systeminställningar”, välj “Preferences” > “Voice” >
“Play Through Headset”
DANSK
Under Xbox 360 systemindstillinger vælger du “Præferencer” >
“Stemme” > “Spil gennem headset”
NEDERLANDS
Selecteer in de systeeminstellingen van de Xbox 360
voorkeuren > spraak > spelen via headset
12
Page 16

Upgrading to Surround Sound / Mise à niveau vers un son surround
The X32 can be upgraded to Dolby® Digital surround sound by adding the Turtle Beach DSS or DSS2 surround sound processors
(sold separately). Visit www.turtlebeach.com/DSS2 to learn how you can upgrade your X32 headset with surround sound.
R
+
TONE
Setup / Configuration
USB Cable /
Câble USB
3.5mm Cable /
Câble audio de
3.5 mm
Digital Optical
Cable / Câble
optique numérique
Transmitter USB Cable* /
Émetteur câble USB*
*Both the X32 transmitter USB cable and the DSS/DSS2 USB power cable
must be plugged into separate USB ports directly on the Xbox 360 console
for power. Do not plug the transmitter USB cable into the USB OUT port
on the DSS or DSS2, as this may cause overloading of the USB ports.
13
Page 17

FRANCAIS
Mise à niveau vers un son surround
Le X32 peut être mis à niveau vers un son surround en ajoutant
le Turtle Beach DSS ou DSS2 entourent les processeurs sonores
(vendu séparément). Visitez www.turtlebeach.com/DSS2 pour
apprendre comment vous pouvez améliorer votre casque X32 avec
son surround.
ESPAÑOL
Actualización a sonido envolvente
El X32 se puede actualizar a sonido envolvente mediante la
adición de la Turtle Beach DSS o DSS2 procesadores de sonido
envolvente (se vende por separado). Visita www.turtlebeach.
com/DSS2 para aprender cómo usted puede actualizar su kit
manos libres portátil X32 con sonido envolvente.
DEUTSCH
Upgrade auf Surround-Sound
Der X32 kann ein Upgrade auf Surround-Sound, indem Sie die
Turtle Beach DSS oder DSS2 Surround-Sound-Prozessoren (separat erhältlich). Besuchen Sie www.turtlebeach.com/DSS2 zu
lernen, wie Sie Ihre X32-Headset mit Surround-Sound-Upgrade.
ITALIANO
Aggiornamento per il suono surround
La X32 può essere aggiornato in sonoro surround con
l’aggiunta del Turtle Beach DSS o DSS2 processori surround
sound (venduto separatamente). Visita www.turtlebeach.
com/DSS2 per imparare come è possibile aggiornare le cuffie
X32 con suono surround.
PORTUGUÊS
Atualização para som surround
O X32 pode ser atualizado para som surround, adicionando
a Turtle Beach DSS ou DSS2 cercam processadores de som
(vendido separadamente). Visite www.turtlebeach.com/DSS2
para aprender como você pode atualizar o seu fone de ouvido
com som surround X32.
SVENSK
Uppgradera till surroundljud
Den X32 kan uppgraderas till surroundljud genom att lägga till
Turtle Beach DSS eller DSS2 surroundljud processorer (säljs
separat). Besök www.turtlebeach.com/DSS2 att lära dig hur
du kan uppgradera din X32 headset med surround-ljud.
DANSK
Opgrader til surroundlyd
Den X32 kan opgraderes til surround sound ved at tilføje Turtle
Beach DSS eller DSS2 surround sound-processorer (sælges
separat). Besøg www.turtlebeach.com/DSS2 at lære, hvordan du kan opgradere din X32 headset med surround sound.
NEDERLANDS
Upgraden naar surround sound
De X32 kan worden opgewaardeerd tot surround sound door
het toevoegen van de Turtle Beach DSS of DSS2 surround
sound processors (afzonderlijk verkrijgbaar). Bezoek www.
turtlebeach.com/DSS2 om te leren hoe u uw X32 headset te
upgraden met surround sound.
14
Page 18

Equalizer Presets / Présélections de l’égalisateur
TONE
Equalizer (EQ) Presets:
1. Flat
2. Bass Boost
3. Treble Boost
4. Bass and Treble Boost
The number of beeps in the headset
indicates which of the 4 EQ presets
has been selected.
TONE Button /
Bouton TONE
FRANÇAIS
Présélections de l’égalisateur
1. Normale
2. Intensifier les basses
3. Intensifier les aigus
4. Intensifier les basses et les aigus
DEUTSCH
EQ-Voreinstellungen
1. Normalen
2. Anhebung von Bässen
3. Anhebung von Höhen
4. Anhebung von Bässe und Höhen
ITALIANO
Preset di equalizzazione
1. Normale
2. Aumentare i bassi
3. Aumentare gli alti
4. Aumentare i bassi e gli acuti
15
PORTUGUÊS
Pré-ajustes do equalizador
1. Normal
2. Aumentar os graves
3. Aumentar os agudos
4. Aumento de graves e agudos
ESPAÑOL
Preconfiguraciones de ecualizador
1. Normal
2. Aumentar los bajos
3. Aumentar los agudos
4. Aumento de bajos y agudos
SVENSK
Snabbval för frekvensutjämning
1. Normala
2. Öka basen
3. Öka diskanten
4. Ökar bas och diskant
DANSK
Forudindstillede equalizer indstillinger
1. Normal
2. Øge bassen
3. Øge diskant
4. Øge bas og diskant
NEDERLANDS
Audiovoorinstellingen van equalizer
1. Normaal
2. Verhoging van de lage tonen
3. Verhoging van de hoge tonen
4. Verhoging van lage en hoge tonen
Page 19

Sound Field Expander Presets / Présélections de l’expandeur
Sound Field Expander Presets:
1. Normal
2. Narrow
3. Wide
The number of beeps in the headset
indicates which of the 3 Sound Field
Expander presets has been selected.
EFFECTS Button /
Bouton EFFECTS
FRANÇAIS
Présélections de l’expandeur
1. Normale
2. Étroites
3. Gamme
DEUTSCH
Stereoexpander-Voreinstellungen
1. Normalen
2. Schmal
3. Breit
ITALIANO
Preconfiguraciones per expander
1. Normale
2. Stretto
3. Ampio
PORTUGUÊS
Pré-ajustes do expansor estéreo
1. Normal
2. Estreito
3. Amplo
ESPAÑOL
Preconfiguraciones de expansión de
sonido estéreo
1. Normal
2. Estrecho
3. Ancho
SVENSK
Ljudsnabbval för stereoexpander
1. Normala
2. Smal
3. Bred
DANSK
Forudindstillede stereo-ekspanders
lydindstillinger
1. Normal
2. Smalle
3. Brede
NEDERLANDS
Audiovoorinstellingen van stereo
expander
1. Normaal
2. Smal
3. Breed
16
Page 20

Safety Notice / Avis de sécurité
To avoid potential damage to the device, always disconnect all cables before transporting it.
WARNING: Permanent hearing damage can occur if a headset is used at high volumes for extended periods of time, so it is important
to keep the volume at a safe level. Over time, your ears adapt to loud volume levels, so a level that may not cause initial discomfort can
still damage your hearing. If you experience ringing in your ears after listening with the headset, it means the volume is set too loud.
The louder the volume is set, the less time it takes to affect your hearing. So, please take care to listen at moderate levels.
• Before placing a headset on your ears, turn the volume down completely,
then slowly increase it to a comfortable level.
• Turn down the volume if you can’t hear people speaking near you.
• Avoid turning up the volume to block out noisy surroundings.
FRANCAIS
Consigne de sécurité: Pour éviter un endommagement potentiel sur l’appareil, veuillez à toujours débrancher tous les câbles avant de le déplacer.
MISE EN GARDE: Des dommages auditifs permanents peuvent se produire si le casque est utilisé à des volumes élevés pendant de très longues périodes de temps, par conséquent
il est important de maintenir le volume à un bon niveau. Au fil du temps, vos oreilles s’adaptent aux volumes élevés, de sorte qu’un niveau qui n’est pas de nature à causer initialement de l’inconfort peut toujours finir par endommager votre audition. S’il y a un écho dans vos oreilles après avoir utilisé le casque, cela signifie que le volume est trop élevé. Plus
le volume est réglé haut, moins de temps ça prend pour affecter votre audition. De grâce, veuillez prendre soin de faite l’écoute à des niveaux modérés.
• Avant de placer un casque à vos oreilles, baissez totalement le volume, puis augmentez-le doucement jusqu’à un niveau confortable.
• Baissez le volume si vous ne pouvez pas entendre les voix des gens qui sont autour de vous.
• Évitez d’augmenter le volume pour bloquer le bruit ambiant.
DEUTSCH
Sicherheitshinweis: Um mögliche Schädigungen des Gerätes zu vermeiden, trennen Sie vor einem Transport immer alle Kabel.
WARNUNG: Es kann ein dauerhafter Hörschaden entstehen, wenn ein Headset über einen längeren Zeitpunkt bei hoher Lautstärke verwendet wird, daher ist es wichtig, die
Lautstärke auf einem vernünftigen Pegel zu halten. Mit der Zeit gewöhnen sich die Ohren an hohe Lautstärken; das führt dazu, dass eine Lautstärke, die kein anfängliches
Unbehagen verursacht, trotzdem Ihr Gehör schädigen kann. Wenn Sie ein Klingeln in Ihren Ohren wahrnehmen, nachdem Sie mit dem Headset Musik gehört haben, bedeutet dies,
dass die Lautstärke zu hoch war. Je höher die Lautstärke eingestellt wird, desto weniger Zeit benötigt es, bis Ihr Gehör beeinträchtigt wird. Achten Sie deshalb bitte darauf, in einer
vernünftigen Lautstärke zu hören.
• Bevor Sie das Headset aufsetzen, drehen Sie die Lautstärke ganz nach unten und dann langsam etwas lauter auf ein angenehmes Level.
• Drehen Sie die Lautstärke niedriger, wenn Sie die Leute um sich herum nicht mehr verstehen.
• Vermeiden Sie es, die Lautstärke höher zu drehen, um den Lärm um Sie herum auszuschalten.
ITALIANO
Avviso di sicurezza: Per evitare danni al dispositivo, scollegare sempre i cavi prima del trasporto.
AVVERTENZA: se la cuffia viene utilizzata ad alto volume per lunghi periodi di tempo, potrebbe causare danni all’udito. Pertanto mantenere il volume a livelli accettabili. Nel tempo,
le orecchie potrebbero adattarsi al volume alto, pertanto un livello che non causa fastidio all’inizio potrebbe comunque danneggiare l’udito. Se si avvertono ronzii nelle orecchie
dopo aver utilizzato le cuffie, significa che il volume impostato è troppo alto. Più il volume è alto, minor tempo sarà necessario per danneggiare l’udito. Pertanto, impostare volumi
moderati.
• Prima di indossare le cufe, abbassare il volume e quindi alzarlo no a raggiungere un livello accettabile
• Abbassare il volume se non si riesce a sentire la voce delle persone nelle vicinanze.
• Evitare di alzare il volume per estraniarsi da luoghi rumorosi.
17
Page 21

PORTUGUÊS
Aviso sobre Segurança: Para evitar danos potenciais no dispositivo, desconecte sempre todos os cabos antes de o transportar.
AVISO: Poderão ocorrer danos auditivos permanentes se forem usados uns auscultadores com o volume elevado durante longos períodos de tempo, pelo que é importante manter
o volume num nível seguro. Ao longo do tempo, os seus ouvidos adaptar-se-ão aos níveis de volume elevados, pelo que estes, ainda que não causem desconforto inicial, poderão,
mesmo assim, prejudicar a sua audição. Se ouvir campainhas depois de ter estado a usar os auscultadores, isso significa que o volume está demasiado alto. Quanto mais alto o
volume, menos tempo levará a afectar a sua audição. Portanto, tenha o cuidado de usar níveis de volume moderados.
• Antes de colocar os auscultadores nos ouvidos, diminua o volume para o mínimo; depois, aumente-o lentamente até um nível confortável.
• Diminua o volume se não conseguir ouvir as pessoas a falar perto de si.
• Evite aumentar o volume para o sobrepor a ambientes ruidosos
ESPAÑOL
Advertencia de seguridad: Para evitar que el equipo sufra daños potenciales, desconecte siempre todos los cables antes de moverlo de lugar.
ADVERTENCIA: Si los auriculares se utilizan a volúmenes altos durante periodos prolongados, pueden provocar la pérdida permanente de la audición; por eso es importante
mantener el volumen en un nivel seguro. Con el tiempo, sus oídos se acostumbran a los volúmenes altos, por lo que incluso un nivel de volumen que inicialmente no le haga sentir
molestias podría afectar su audición. Si siente un pitido en los oídos después de haber usado los auriculares, significa que el nivel al que está ajustado el volumen es demasiado
alto. Cuanto más alto ajuste el volumen, más pronto afectará su audición. Por lo tanto, preste atención al volumen y ajústelo a niveles moderados.
• Antes de colocarse los auriculares, baje completamente el volumen y, una vez puestos, suba el volumen lentamente hasta el nivel que le resulte cómodo.
• Si no puede oír las voces de otras personas a su alrededor, baje el volumen.
• Evite subir el volumen para contrarrestar los ruidos exteriores
SVENSK
Säkerhetsföreskrifter: För att undvika att skada enheten, koppla alltid ur alla kablar innan du flyttar på den.
VARNING! Permanenta hörselskador kan uppstå om headsetet används med hög volym under en längre tid. Det är viktigt att hålla ljudet på en säker nivå. Dina öron anpassar sig
till höga ljudnivåer om de utsätts för detta under en längre tid. En ljudnivå som inte upplevs som obekväm kan således fortfarande skada din hörsel. Om du upplever att det ringer i
dina öron efter att du använt headsetet betyder det att ljudnivån är för hög. Ju högre du ställer in volymen, desto kortare tid tar det för din hörsel att skadas. Var försiktig och lyssna
på en rimlig ljudnivå.
• Innan du sätter på dig headsetet, skruva ner volymen helt för att sedan sakta och kontrollerat skruva upp den till en behaglig nivå.
• Skruva ner volymen om du inte kan höra personer som pratar bredvid dig.
• Undvik att skruva upp volymen för att stänga ute oönskade ljud i din omgivning.
DANSK
Sikkerhedsnotits: Undgå mulig skade på anordningen ved altid at fraslutte alle kabler før transport.
ADVARSEL: Permanent høreskade er mulig, hvis et headset bruges ved høj lydstyrke i længere tid, så det er vigtigt at holde lydstyrken nede på et sikkert niveau. Med tiden vil dine
ører tilpasse sig højere lydniveauer, så et niveau som ikke føles ubehageligt i begyndelsen, kan stadigt beskadige din hørelse. Hvis du oplever ringen for ørene efter du har brugt dit
headset, betyder det, at lydstyrken er for høj. Jo højere lyden er sat, jo kortere tid tager det at påvirke din hørelse. Så sørg venligst for at lytte ved et moderat niveau.
• Før du tager dit headset på, skal du skrue helt ned for lyden og så langsomt skrue op igen til et behageligt niveau.
• Skru ned for lyden hvis du ikke kan høre andre, der snakker i nærheden.
• Undgå at skrue op for lyden for at lukke støj fra omgivelserne ude.
NEDERLANDS
Veiligheidsmededeling: Koppel altijd alle kabels van het apparaat los tijdens vervoer om beschadiging van het apparaat te voorkomen.
WAARSCHUWING: Er kan onherstelbaar gehoorverlies ontstaan als een headset langdurig met hoog volume worden gebruikt. Daarom is het belangrijk om het volume op een veilig
niveau te houden. De oren raken na verloop van tijd gewend aan hoge volumeniveaus zodat een niveau dat niet meteen ongemak veroorzaakt het gehoor toch kan beschadigen. Als
uw oren na luisteren met de headset suizen, betekent dit dat het volume te hoog is ingesteld. Hoe hoger het volume, des te sneller het gehoor beschadigd raakt. Luister daarom bij
voorkeur met een gematigd volumeniveau.
• Zet voordat u een headset opzet eerst het volume helemaal omlaag en verhoog dit dan langzaam tot
een comfortabel niveau.
• Verlaag het volume als u mensen in de buurt niet kunt horen praten.
• Maak er geen gewoonte van het volume te verhogen om omgevingslawaai buiten te sluiten.
18
Page 22

X32 Headset Technical Specifications
· 50 mm diameter speakers with neodymium magnets
· Game audio frequency response: 20 Hz - 20 kHz, >120 dB SPL @ 1 kHz
· Condenser microphone frequency response: 50 Hz - 15 kHz
· Game audio Dual Band WiFi Digital 2.4 GHz/5.8 GHz RF wireless reception
· Headphone amplifier: Stereo 27 mW/ch, THD <1%
· Operates on (2) AAA batteries or (2) AAA rechargeable NiMH batteries
· Automatic shut down after approx 5 minutes of carrier loss or audio silence to conserve battery power
· Battery booster circuit extends battery life for up to 15 hours
X32 Transmitter Technical Specifications
· Dual Band WiFi Digital 2.4 GHz/5.8 GHz RF wireless transmission with up to 30 foot range
· Frequency response: 20 Hz - 20 kHz
· Stereo 3.5 mm line input jack
· Stereo 3.5 mm aux input jack
· Maximum analog input level: 2 Vpp (700 mV rms)
· USB Power – (5 V DC @ 18 0 mA max)
19
Page 23

Troubleshooting
No sound
• Check that the headset volume control is turned up.
• Check that the transmitter USB power and Line In cables are properly connected.
• Check that the headset is powered on. The LED on the left ear cup should be ashing.
• Check if the LED on the front of the transmitter is on solid. If the LED is slowly pulsing, it indicates that the transmitter isn’t
communicating with the headset. If the headset is on solid and the transmitter LED is slowly pulsing, then the headset and
transmitter need to be “paired” as described in the section “Pairing the Headset and Transmitter”.
Audio Drops, Popping or Clicking Sounds
Audio dropouts, popping or clicking sounds on the headset are caused by poor reception. This can occur when:
• The headset and transmitter are out of range. For best performance, stand within 20 feet from the transmitter.
• There’s a wall or other large object between the headset and transmitter.
• The transmitter is in a bad location that is interfering with the antenna.
• A wireless base station or wireless router is causing a lot of RF activity that’s blocking the RF signal from the transmitter.
Voice Chat Drops
• Most in-game voice chat drops are simply caused by network performance or “lag”. Usually they subside after a few moments so
please be patient. In extreme cases, you may have to leave a game and return to reset the chat function.
• If you use a wireless internet connection, low signal strength from your modem/router can make the voice chat malfunction.
A wired connection from your modem/router to your console is recommended for best results.
20
Page 24

EC Declaration of Conformity
Manufacturer: Voyetra Turtle Beach
Manufacturers Address: 150 Clearbrook Rd. Suite 162, Elmsford, NY 10523
Product Name: Ear Force X32
Type of Product: Wireless Headset
Model Number(s): TBS-2265-01
Year of Manufacture: 2011
We, Voyetra Turtle Beach, Inc. of Elmsford, New York, declare under our own responsibility that the above-referenced product complies
with the following directives and standards:
Low Voltage Directive 2006/95/EC
EN 50332-2:2003
EN 60950-1:2006+A11:2009
Electromagnetic Compatibility Directive 1999/5/EC
ESTI EN 301 489-1 V1.8.1 (2008)
ESTI EN 301 489-3 V1.4.1 (2002)
ESTI EN 301 489-17 V2.1.1 (2009)
R&TTE Directive 1999/5/EC
ESTI EN 300 328 V1.7.1 (2006-10)
ESTI EN 300 440-1 V1.4.1 (2008-05)
ESTI EN 300 440-2 V1.2.1 (2008-05)
All test reports have been reviewed and approved with a Positive Opinion from the following Notified Bodies:
Bay Area Compliance Laboratories, Corp (Shenzhen)
6/F, the 3rd Phase of WanLi Industrial Building
ShiHua Road, FuTian Free Trade Zone, Shenzhen, Guangdong, China
Tel: +86-755-33320018, Fax: +86-755-33320008, Web: baclcorp.com
The technical documentation required by this Directive is maintained at the corporate headquarters of Voyetra Turtle Beach,
150 Clearbrook Road. Suite 162, Elmsford, New York, 10562.
Authorized Person:
No. 710 Yihua Building, Futian District, Shenzhen, China 518040
Tel: +86-755-29451282 Fax: 86-755-83709189 Web: ebotek.cn
Shenzhen EBO Technology Co., Ltd.
____________________________ Date:________________
Printed Name: Frederick Romano
Title: Executive Vice President
11/17/11
21
Page 25

FCC Declaration of Conformity
Product Name: Ear Force X32
Model Number(s): TBS-2265-01
FCC Rules: FCC CFR Title 47 Part 15 Subpart B: 2009 CLASS B
FCC CFR Title 47 Part 15 Subpart C: 2008
Operating Environment: GENERAL OFFICE AND HOME USE
FCC COMPLIANT STATEMENT
This device complies with part 15 of the FCC rules. Operation is subjected to the following conditions:
(1) This device may not cause harmful interference, and
(2) This device must accept any interference received including interference that may cause undesired operation.
INFORMATION TO USER
This equipment has been tested and found to comply with the limits for a Class B digital device, pursuant to Part 15 of FCC rules.
These limits are designed to provide reasonable protection against harmful interference in a residential installation. This equipment
generates, uses and can radiate radio frequency energy and, if not installed and used in accordance with the instructions, may cause
harmful interference to radio communications. However, there is no guarantee that interference will not occur in a particular installation.
If this equipment does cause harmful interference to radio or television reception, which can be determined by turning the equipment off
and on, the user is encouraged to try to correct the interference by one or more of the following measures:
1) Reorient or relocate the receiving antenna.
2) Increase the separation between the equipment and receiver.
3) Connect the equipment into an outlet on a circuit different from that to which the receiver is connected.
4) Consult the dealer or an experienced radio/TV technician for help.
The user’s manual or instruction manual for an intention or unintentional radiator shall caution the user that the changes or modifications
not expressly approved by the party responsible for compliance could void the user’s authority to operate the equipment.
WARNING: Changes or modifications made to this equipment not expressly approved by VOYETRA TURTLE BEACH, INC. may void user’s
authority to operate this equipment.
22
Page 26

Limited Warranty for Turtle Beach Products
Voyetra Turtle Beach, Inc. ("VTB") warrants to the original end-user purchaser ("Purchaser") that the retail Turtle Beach hardware product
herein ("Product") will be free of defects in materials and workmanship for a period of one year from the date of purchase by the Purchaser
("Warranty Period"). Any Extended Warranty or Service Plans purchased through a Retail store are not honored by VTB. The Warranty
refers to the repair/replacement of a defective product during this period and not a refund.
This limited warranty extends only to the Purchaser and is not transferable or assignable to any subsequent purchaser. This limited warranty is applicable only in the country or territory where the Product was purchased from an authorized VTB retailer and does not apply to
a Product that has been purchased as used or refurbished (except refurbished by VTB) or was included as part of a non-VTB product.
WARRANTY SERVICE
In the USA and CANADA Warranty Service is provided by our TURTLE BEACH OFFICEs and in all other Countries it is provided by our local
International Distributors.
VTB does not warrant uninterrupted or error-free operation of the Product and is under no obligation to support the Product for all computer operating systems or future versions of such operating systems.
If a defect should occur during the Warranty Period, Purchaser must contact VTB to obtain a Return Merchandise Authorization ("RMA")
number. Purchaser will be responsible for shipping costs incurred in returning the defective Product to an authorized VTB service center,
or to the repair facility located at VTB's corporate headquarters. A copy of the dated proof of purchase and a description of the problem
must be included with the defective Product. VTB will not be responsible for other products or accessories included with the defective
Product sent to VTB. The RMA number must be clearly indicated on the outside of the package. Packages without an RMA number will be
refused by VTB or its representatives and returned to sender at the sender's expense.
In the event of a defect, Purchaser's sole and exclusive remedy, and VTB's sole liability, is expressly limited to the correction of the defect
by adjustment, repair, or replacement of the Product at VTB's sole option and expense. VTB owns all Products it has replaced and all parts
removed from repaired Products. VTB uses new and reconditioned parts made by various manufacturers in performing warranty repairs
and building replacement products. If VTB repairs or replaces a product, the original Warranty Period is not extended, however, VTB warrants that repaired or replacement parts will be free from defects in material and workmanship for a period of thirty (30) days from the date
of repair or replacement, or for the remainder of the Warranty Period, whichever is greater.
This warranty does not apply to any Product that has had its serial number altered, removed or defaced, or any Product damage caused
by shipping, improper storage, accident, problems with electrical power, abuse, misuse, neglect, ordinary wear, acts of God (e.g. flood),
failure to follow directions, improper maintenance, use not in accordance with product instructions, unauthorized modification or service
of the Product or damage resulting from the use of the Product with hardware, software or other products not provided by or specifically
recommended by VTB.
23
Page 27

THIS LIMITED WARRANTY IS PURCHASER'S SOLE AND EXCLUSIVE REMEDY AND IS IN LIEU OF ALL OTHER WARRANTIES, EXPRESS OR
IMPLIED. TO THE EXTENT PERMITTED BY APPLICABLE LAW, VTB HEREBY DISCLAIMS THE APPLICABILITY OF ANY IMPLIED WARRANTY
OF MERCHANTABILITY, FITNESS FOR A PARTICULAR PURPOSE OR USE FOR THE PRODUCT. IF SUCH A DISCLAIMER IS PROHIBITED BY
APPLICABLE LAW, THE IMPLIED WARRANTY IS LIMITED TO THE DURATION OF THE FOREGOING LIMITED WRITTEN WARRANTY.
IN NO EVENT SHALL VTB BE LIABLE FOR ANY INDIRECT, INCIDENTAL, SPECIAL, PUNITIVE OR CONSEQUENTIAL DAMAGES, OR DAMAGES, INCLUDING BUT NOT LIMITED TO ANY LOST PROFITS, DATA, OR LOSS OF USE, ANY THIRD PARTY CLAIMS, AND ANY INJURY TO
PROPERTY OR BODILY INJURY (INCLUDING DEATH) TO ANY PERSON, ARISING FROM OR RELATING TO THE USE OF THIS PRODUCT OR
ARISING FROM BREACH OF THE WARRANTY, BREACH OF CONTRACT, NEGLIGENCE, TORT, OR STRICT LIABILITY, EVEN IF VTB HAS BEEN
ADVISED OF THE POSSIBILITY OF SUCH DAMAGES.
This warranty supersedes all prior agreements or understandings, oral or written, relating to the Product, and no representation, promise
or condition not contained herein will modify these terms. Some states do not allow the exclusion or limitation of incidental or consequential damages, so the above exclusion or limitation may not apply to you. This warranty gives you specific legal rights. You may also have
other rights, which vary from state to state. Any action or lawsuit for breach of warranty must be commenced within eighteen (18) months
following the purchase of the Product.
EXCLUSIONS FROM LIMITED WARRANTY:
This Limited Warranty shall not apply and VTB has no liability under this Limited Warranty if the Turtle Beach Product:
• is used for commercial purposes such as "LAN Centers" (including rental or lease);
• is modied or tampered with;
• is damaged by Acts of God, power surge, misuse, abuse, negligence, accident, wear and tear,
mishandling, misapplication, or other causes unrelated to defective materials or workmanship;
• serial number is defaced, altered or removed;
• is not used in accordance with the documentation and use instructions; or
• is repaired, modied or altered by other than authorized repair centers.
• product is no longer available because it was discarded.
24
Page 28

Federal Communications Commission Interference Statement
This equipment has been tested and found to comply with the limits for a Class B digital
device, pursuant to part 15 of the FCC Rules. These limits are designed to provide reasonable protection against harmful interference in a residential installation. This equipment
generates, uses and can radiate radio frequency energy and, if not installed and used in
accordance with the instructions, may cause harmful interference to radio communications.
However, there is no guarantee that interference will not occur in a particular installation. If
this equipment does cause harmful interference to radio or television reception, which can
be determined by turning the equipment off and on, the user is encouraged to try to correct
the interference by one or more of the following measures:
• Reorient or relocate the receiving antenna.
• Increase the separation between the equipment and receiver.
• Connect the equipment into an outlet on a circuit different from that to which the
receiver is connected.
• Consult the dealer or an experienced radio/ TV technician for help.
FCC Caution:
Any changes or modifications not expressly approved by the grantee of this device could
void the user's authority to operate the equipment.
RF Exposure Warning:
Headset:
The equipment complies with FCC RF exposure limits set forth for an uncontrolled environment. The equipment must not be co-located or operating in conjunction with any other
antenna or transmitter.
Transmitter Box:
This equipment must be installed and operated in accordance with provided instructions and
the antenna(s) used for this transmitter must be installed to provide a separation distance of
at least 20 cm from all persons and must not be co-located or operating in conjunction with
any other antenna or transmitter. End-users and installers must be provide with antenna
installation instructions and transmitter operating conditions for satisfying RF exposure
compliance.
CANADA, INDUSTRY CANADA (IC) NOTICES
This Class B digital apparatus complies with Canadian ICES-003 and RSS-210. Operation is
subject to the following two conditions: (1) this device may not cause interference, and (2)
this device must accept any interference, including interference that may cause undesired
operation of the device.
Radio Frequency (RF) Exposure Information:
Headset:
The radiated output power of the Wireless Device is below the Industry Canada (IC) radio
frequency exposure limits. The Wireless Device should be used in such a manner such that
the potential for human contact during normal operation is minimized. This device has also
been evaluated and shown compliant with the IC RF Exposure limits under portable exposure
conditions. (antennas are less than 20 cm of a person's body).
Transmitter:
The radiated output power of the Wireless Device is below the Industry Canada (IC) radio
frequency exposure limits. The Wireless Device should be used in such a manner such that
the potential for human contact during normal operation is minimized. This device has also
been evaluated and shown compliant with the IC RF Exposure limits under mobile exposure
conditions. (antennas are greater than 20cm from a person's body).
This device has been certified for use in Canada. Status of the listing in the Industry Canada's
REL (Radio Equipment List) can be found at the following web address: http://www.ic.gc.ca/
app/sitt/reltel/srch/nwRdSrch.do?lang=eng
Additional Canadian information on RF exposure also can be found at the following web
address: http://www.ic.gc.ca/eic/site/smt-gst.nsf/eng/sf08792.html
Canada, avis d'Industry Canada (IC)
Cet appareil numérique de classe B est conforme aux normes canadiennes ICES-003 et
RSS-210.Son fonctionnement est soumis aux deux conditions suivantes : (1) cet appareil ne
doit pas causer d'interférence et (2) cet appareil doit accepter toute interférence, notamment
les interférences qui peuvent affecter son fonctionnement.
Informations concernant l'exposition aux fréquences radio (RF)
Headset:
La puissance de sortie émise par l'appareil de sans fil Dell est inférieure à la limite
d'exposition aux fréquences radio d'Industry Canada (IC). Utilisez l'appareil de sans fil Dell
de façon à minimiser les contacts humains lors du fonctionnement normal. Ce périphérique
a également été évalué et démontré conforme aux limites d'exposition aux RF d'IC dans des
conditions d'exposition à des appareils portables (les antennes sont moins de 20 cm du corps
d'une personne).
Transmitter:
La puissance de sortie émise par l'appareil de sans fil Dell est inférieure à la limite
d'exposition aux fréquences radio d'Industry Canada (IC). Utilisez l'appareil de sans fil Dell
de façon à minimiser les contacts humains lors du fonctionnement normal. Ce périphérique
a également été évalué et démontré conforme aux limites d'exposition aux RF d'IC dans des
conditions d'exposition à des appareils mobiles (les antennes se situent à moins de 20 cm du
corps d'une personne).
Ce périphérique est homologué pour l'utilisation au Canada. Pour consulter l'entrée correspondant à l'appareil dans la liste d'équipement radio (REL - Radio Equipment List) d'Industry
Canada rendez-vous sur: http://www.ic.gc.ca/app/sitt/reltel/srch/nwRdSrch.do?lang=eng
Pour des informations supplémentaires concernant l'exposition aux RF au Canada rendezvous sur:http://www.ic.gc.ca/eic/site/smt-gst.nsf/eng/sf08792.html
This product is CE marked according to the provisions of the Low Voltage Directive (2006/95/
EC), R&TTE Directive (1999/5/EC) and EMC Directive (1999/5/EC).
Frequency Range: 2.404-2.476GHz / 5.160-5.340GHz
• Grantee Code/Reg Number: XGB/GC229855 • Voyetra Turtle Beach, Inc.
IC: 3879A-2265
IC: 3879A-2266
DESIGNED AND ENGINEERED BY TURTLE BEACH IN NEW YORK, USA
Copyright © 2012 Voyetra Turtle Beach, Inc. (VTB, Inc.) All rights reserved. No part of this guide may be reproduced without permission.
Turtle Beach, the Turtle Beach Logo, Voyetra, Ear Force, Chat Boost, Engineered For Gaming and the Dual Band logo are either trademarks
or registered trademarks of VTB, Inc. Xbox, Xbox 360 and Xbox LIVE are registered trademarks of Microsoft Corporation. Dolby and the
double-D symbol are trademarks of Dolby Laboratories. All other trademarks are properties of their respective companies and are hereby
acknowledged. Assembled in China. PATENTS PENDING
25
Page 29

For more products, accessories and general product information, please visit
TurtleBeach.com
For warranty information and product support, please visit
TurtleBeach.com/support
Pour plus d’informations sur les produits et accessoires, veuillez visiter le site TurtleBeach.com
Pour toute question de garantie ou d’assistance technique, veuillez visiter la page TurtleBeach.com/support
Weitere Hinweise zu Produkten, Zubehör und allgemeine Produktinformationen finden Sie unter: TurtleBeach.com
Informationen über Garantieleistungen und Produkt-Support finden Sie unter: TurtleBeach.com/support
Per ulteriori prodotti, accessori e informazioni generali sul prodotto, visitare: TurtleBeach.com
Per informazioni sulla garanzia e supporto delprodotto, visitare: TurtleBeach.com/support
Para mais produtos, acessórios e informações gerais do produto, visite: TurtleBeach.com
Para informações sobre garantia e suporte ao produto, visite: TurtleBeach.com/support
Podrá encontrar más productos, accesorios e información general en TurtleBeach.com
Información sobre la garantía y apoyo técnico en: TurtleBeach.com/support
För ytterligare produkter, tillbehör och allmän produktinformation, vänligen besök: TurtleBeach.com
För information om garanti och produktsupport, vänligen besök: TurtleBeach.com/support
For flere produkter, tilbehør og generel produkt information, besøg venligst: TurtleBeach.com
For garantioplysninger og produktsupport, kan du besøge: TurtleBeach.com/support
Bezoek voor meer producten, accessoires en algemene productinformatie: TurtleBeach.com
Voor garantie-informatie en productondersteuning kunt u terecht op: TurtleBeach.com/support
FRANÇAIS
DEUTSCH
ITALIANO
PORTUGUÊS
ESPAÑOL
SVENSK
DANSK
NEDERLANDS
26
Page 30

Notes
27
Page 31

Notes
28
Page 32

TB521-2266-01
29
 Loading...