

Page 1
Operating Instructions
ChefComm Pro
ChefComm Limited
®
TM
© 2008 TurboChef Technologies, Inc.
Page 2

DOC-1055 / Rev C / December 2008
Page 3

For further information, call
1-800-90TURBO
or
+1 214-379-6000
DOC-1055 / Rev C / December 2008
Page 4

Errors – descriptive, typographic, or pictorial – are subject to correction. Specifications are subject to
change without notice.
Please read this manual carefully and retain it for future reference.
Page 5

Items italicized below apply only to ChefComm Pro® and are not available in ChefComm LimitedTM.
Setup
Installation 1
Detailed Step 1: Expand the Installation Files 1
Detailed Step 2: Install ChefComm Pro 1
Detailed Step 3: Install the USB Smart Card Reader Drivers 1
Setting up a Black Box 2
Building/Modifying a Menu
Splash Screen Options 3
Specifying “New Menu Configuration” (or Oven Type) 3
Creating a New Oven Type 3
Creating a New Menu 4
Opening an Existing Menu 4
Opening a TCM (Legacy) File 5
Editing the Cook Temperature 5
Renaming a Food Group 5
Menu Preview 5
Renaming a Recipe 6
Editing Recipe Settings 6
Moving/Copying Recipes 7
Deleting a Recipe from a Menu 7
Undo/Redo Features 7
Comparing Two Menus 8
Saving a Menu 8
Printing a Menu 9
Saving a Menu as a PDF File 9
Importing/Exporting a Menu
Importing a Menu from a Smart Card 10
Exporting a Menu to a Smart Card 10
Exporting Oven Firmware Updates 10
Importing a Menu via RS-232 11
Exporting a Menu via RS-232 11
Importing a Menu from a Mapped Drive (i5 Only) 12
Exporting a Menu to a Mapped Drive (i5 Only) 12
Table of Contents
Page 6

Building/Modifying a Cookbook
Creating a Local Cookbook 13
Deleting a Local Cookbook 13
Sharing a Local Cookbook 13
Filtering Cookbook Recipes 13
Removing a Recipe from a Local Cookbook 14
Editing a Cookbook Recipe 14
User Preferences
Changing the Default “New Menu Configuration” 15
Changing the Temperature Display 15
Auto-Save 15
Checking for Updates/Auto-Update 15
Troubleshooting
Troubleshooting: USB Smart Card Reader 16
Troubleshooting: 9-Pin Serial RS-232 (Black Box) 16
Troubleshooting: Menu Compare 16
Troubleshooting: ChefComm Won’t Allow Menu to be Opened 16
Troubleshooting: ChefComm Won’t Allow Menu to be Saved 17
Troubleshooting: The Update is not Working 17
Troubleshooting: Recipe Edit 18
Page 7
SETUP
1
Installation
1. Before plugging in the USB smart card reader/
writer, insert the installation CD.
2. When your computer launches the installation
wizard, follow the steps on your screen to install
ChefComm.
3. Plug in the USB smart card reader. Your computer should automatically install the drivers.
NOTE: If your computer does not automatically
install the drivers, it may launch a hardware setup
wizard. Follow the steps on your screen. If the smart
card reader is not working when you begin using
ChefComm, go to your device manager and update
your smart card reader drivers, pointing your system
to the installation CD. For additional help, contact
your IT department or call 800-90TURBO (+1
214-379-6000) and request ChefComm support.
NOTE: If your installation CD is an older version,
it may not automatically launch the installation
wizard. Follow the detailed Steps 1, 2, and 3 below.
Detailed Step 1: Expand the Installation Files
If the CD does not automatically launch the
installation wizard, the setup files must be unzipped
to ensure proper installation. Launching the files
from a viewer will leave critical steps incomplete.
1. Open the contents of the CD in a file browser.
2. The installation CD contains two zipped files:
one titled “ChefComm.Setup.zip,” and another
titled “SCRx31_inst_English_V8.06.zip.” Copy
these files to a local or network drive (e.g., C:\).
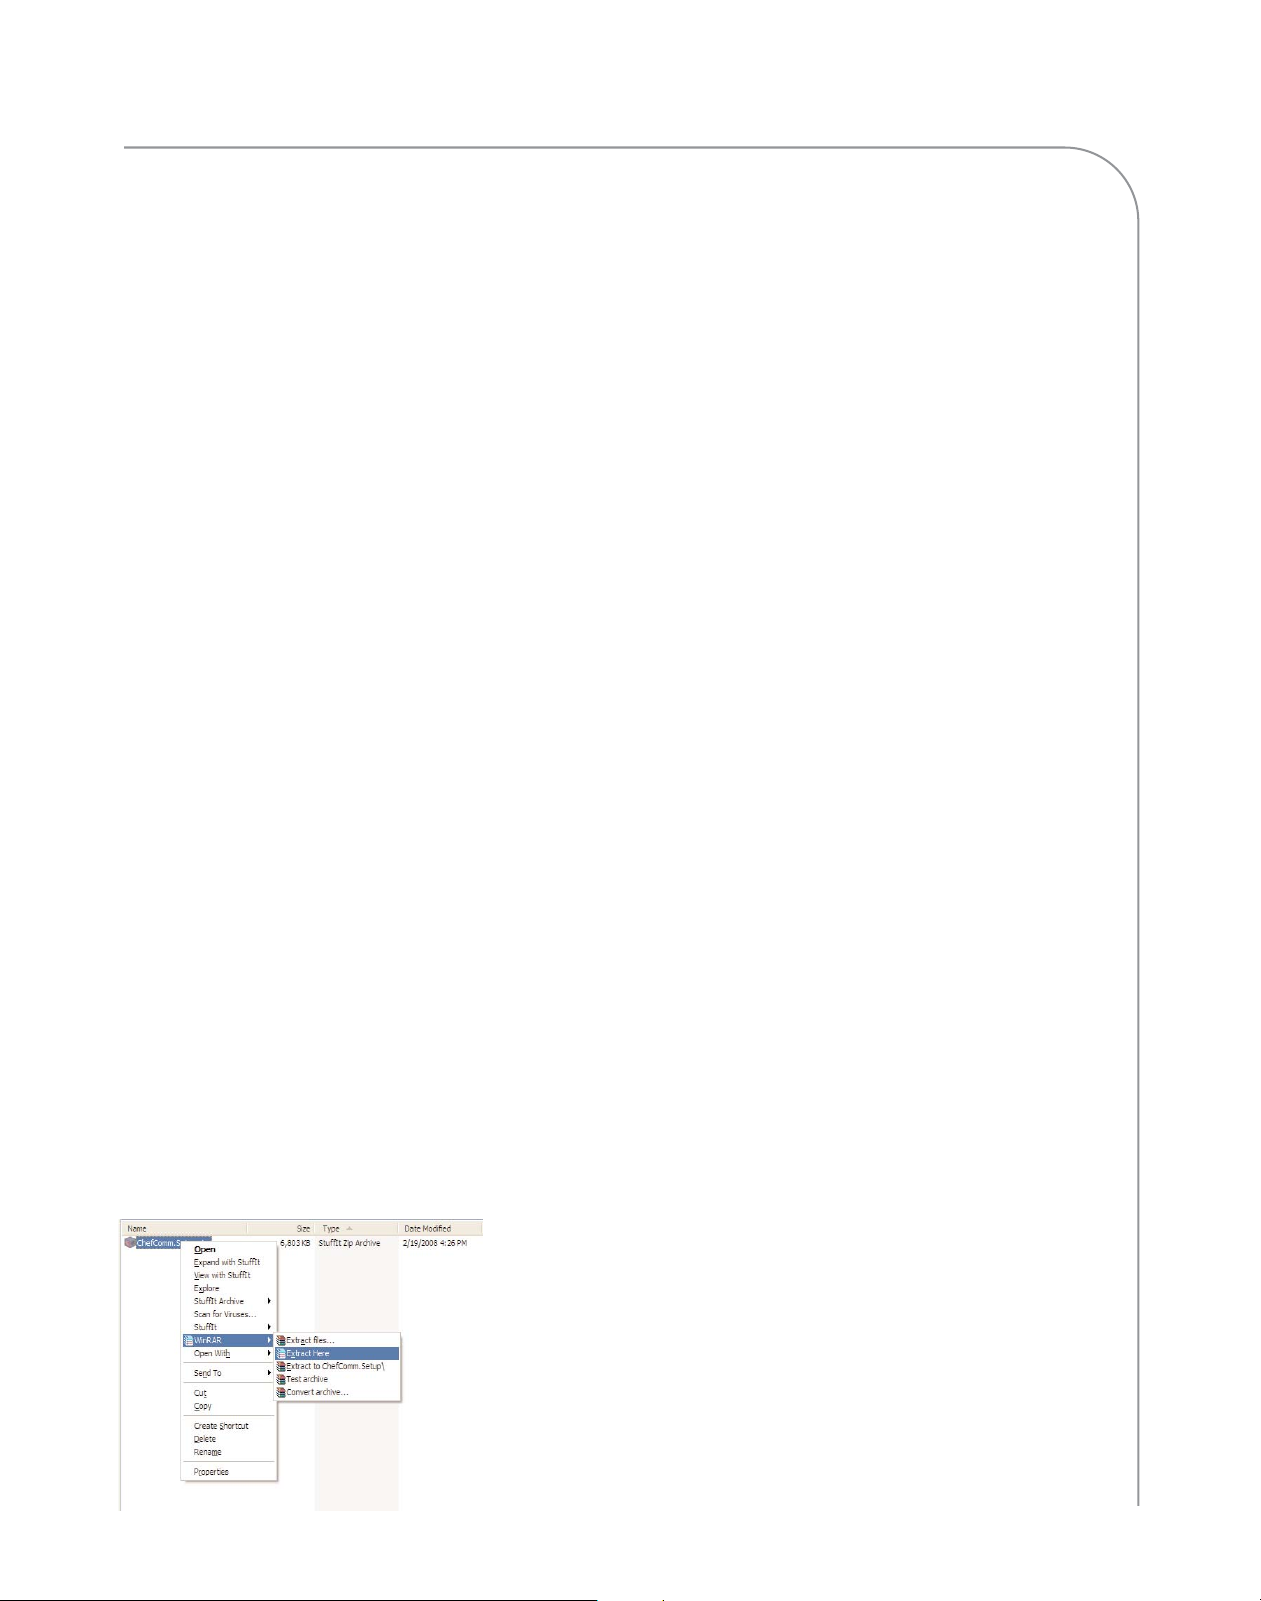
3. Right-click the file for expansion options
(Figure 1) or use your preferred application.
NOTE: If no options to extract or expand are
available, you may need to install additional
software. For help, contact your IT department.
Detailed Step 2: Install ChefComm Pro
1. Expand the setup files (Step 1). A file titled
ChefComm.Setup.msi will appear in the
specified location.
2. Double-click the file ChefComm.Setup.msi to
launch the installation wizard.
3. Follow the instructions provided in the
installation wizard.
4. Once installation completes, open ChefComm
by going to Start > Programs and selecting it.
NOTE: before installing ChefComm Pro, you may
be required to install .NET Framework files. If so,
you will receive a prompt and a link to retrieve the
required files.
Detailed Step 3: Install the USB Smart Card
Reader Drivers
The drivers provided on the installation CD must
be installed for the USB smart card reader/writer to
function properly.
If you are operating Windows XP
®:
1. After expanding the file (Step 1), a folder
titled “SCR531 English” will appear in the
specified location.
2. Double-click the folder to open it.
3. Double-click the file setup.exe and follow the
instructions on your screen for installing the
USB smart card reader/writer.
4. When the setup process is complete, restart
your computer.
If you are operating Windows Vista
®, you will
probably need to configure your smart card reader
drivers from your device manager (depending on
security settings). For additional help, contact your
IT department or call 800-90TURBO (+1 214379-6000) and request ChefComm support.
Figure 1: Extracting the Zipped Files
Page 8
Setting Up a Black Box
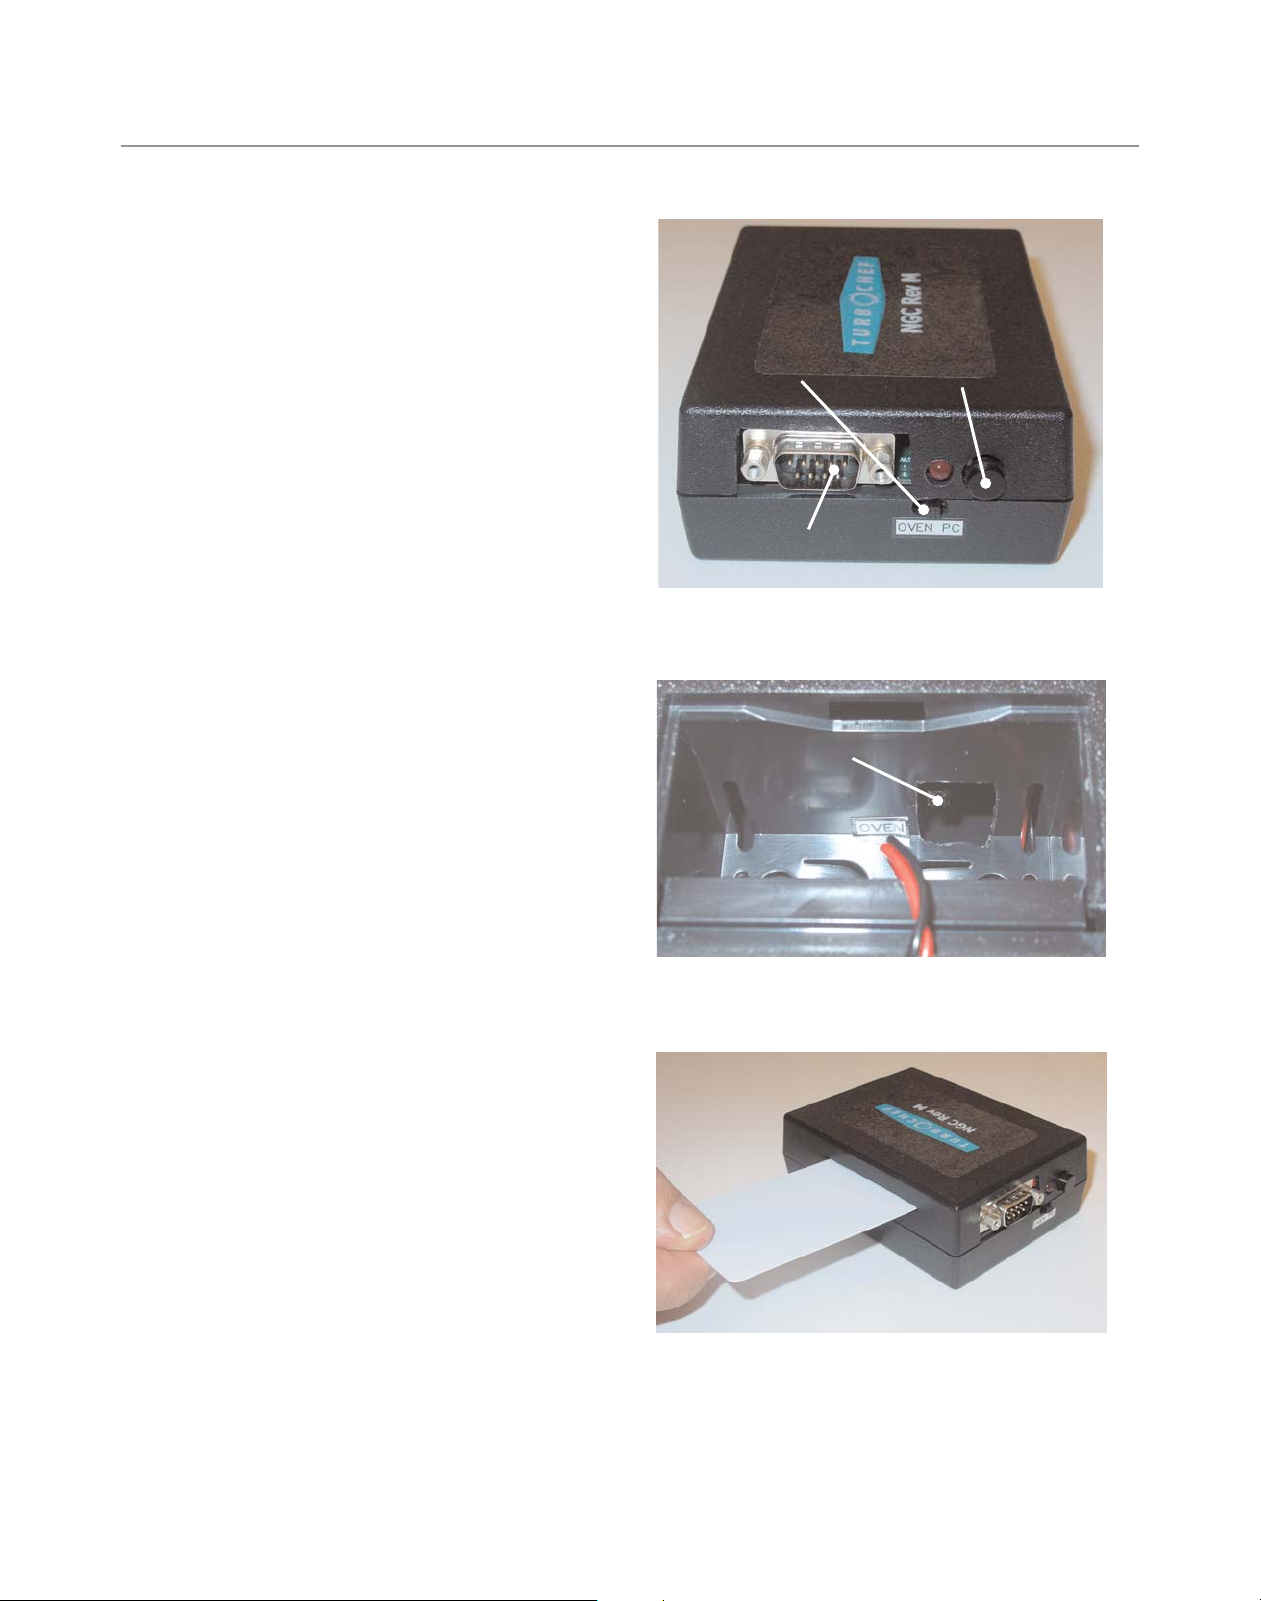
1. Connect the black box to your computer via
9-pin RS-232 connector cable. See Figure 2
for port location on box.
2. Set the front switch (Figure 2) to PC.
3. Open the battery compartment and verify the
read/write switch (Figure 3) is set to Oven.
4. Insert a smart card as shown in Figure 4.
NOTE: Whenever importing/exporting a menu to and
from ChefComm via RS-232 (see page 11 for more
details), press and hold the synchronization button
(Figure 2) until ChefComm confirms that the
import/export was successful.
2 SETUP
RS-232 Port
Synchronization
Button
OVEN/PC
Switch
Read/Write Switch
Figure 4: Insert Card Chip-First, with Chip Facing Down
Figure 3: Read/Write Switch (Battery Removed for Clarity)
Figure 2: Black Box Front
Page 9

BUILDING/MODIFYING A MENU
3
Splash Screen Options
By default, the splash screen will display (Figure 5)
when you launch ChefComm. It provides quick
access for:
- Formatting/building a new menu (ChefComm
Pro only, page 4)
- Opening an existing menu (page 4)
- Uploading from a smart card/oven (page 10)
To turn off the splash screen, select Do not show this
screen again. You can also turn it off from the main
ChefComm window via Options > Preferences
(Figure 6).
NOTE: The first time ChefComm is opened, the
user may be required to bypass the splash screen, as
an oven type must first be configured before any of
the splash screen options can be performed. See
below for more details.
Specifying “New Menu Configuration”
(or Oven Type)
An oven type must be specified to:
- Create a new menu
- Import a menu from a smart card.
Specifying an oven type is not required to:
- Open an existing menu file.
- Export a menu to a smart card.
To specify an oven type:
1. To view a list of preset oven types, click the oven
icon adjacent to “New Menu Configuration”
(Figure 7)
2. Select the oven type that matches your menu. If
you do not see your oven type listed, perform an
update (page 15). You can also specify your oven
by creating a new oven type (see below).
Creating a New Oven Type
1. From the main ChefComm window, select
Oven > My Ovens (Figure 8).
2. From the My Ovens screen, click Add an Oven
(Figure 9, Item A).
NOTE: You can also edit (Item B) or delete (Item C)
existing oven configurations, as well as set one as the
default when ChefComm opens (D).
Figure 5: Splash Screen
Figure 6: Options > Preferences
Figure 8: Oven > My Ovens
Figure 9: My Ovens
Figure 7: Locate and Select Your Oven Type
A
D
B
C
Page 10

3. All TurboChef products will be listed. Click the
“expand” arrow in the Oven Revision pane and
locate your oven from the list (Figure 10).
4. If desired, select your oven’s rack and cooking
surface (Figure 11) for reference when developing
menus. This setting is not required when creating a
new oven type.
5. Enter the name of the new oven type. In Figure
11, the name is My NGC.
6. Click OK to confirm the new oven type.
7. Click Close to exit the Oven Configuration Wizard.
Creating a New Menu
1. From the main ChefComm window, set the
New Menu Configuration to match the type of
menu you are working with (Figure 7, page 3).
2. Click the “New Menu” icon (Figure 12).
Opening an Existing Menu
1. From the main ChefComm window, click the
Open Menu icon (Figure 13).
2. In the “files of type” field, select “Menu Files”
(Figure 14). All ChefComm menu files (XTM
files) within the folder will be displayed.
3. Locate the file and select Open.
4 BUILDING/MODIFYING A MENU
Figure 11: Select the Rack and Cook Surface
Figure 12: New Menu
Figure 13: Open Menu
Figure 10: Locate and Select Your Oven Type
Figure 14: Open an Existing Menu
Page 11

BUILDING/MODIFYING A MENU
Opening a TCM (Legacy) File
1. From the main ChefComm window, click the
Open Menu icon (Figure 13, page 4).
2. In the files of type field, select Legacy Menu
Files (Figure 15).
3. Select the file to open and click Open.
NOTE: Legacy TCM files cannot be created or saved.
When you save your changes, a file will be generated
(.XTM) that is compatible only with ChefComm Pro.
Editing the Cook Temperature
*ChefComm Pro only.
1. Create or open a menu (page 4).
2. Click the Temperature icon (Figure 16, Item A).
3. Set the menu temperature (Figure 16, Item B).
NOTE: When working with a menu for a conveyor
oven, the temperature is specified within the “Edit
Recipe Settings” pane (see page 6 for more details).
NOTE: If developing a menu for the Tornado, set the
idle IR temperature (Figure 16, Item C).
NOTE: Some oven types have more than one
temperature. Be aware of which recipe items are
affected by each temperature. For example, if the
oven type has two temperatures and 16 groups of
recipes, then temperature 1 corresponds to groups
1-8 and temperature 2 corresponds to groups 9-16.
Renaming a Food Group
*ChefComm Pro only.
1. Create or open a menu (page 4).
2. Click the food group name once, wait for one
second, and then click it again.
3. Type the new name and press Enter (Figure 17).
Menu Preview
To view how the name will appear on the oven display,
go to File > Menu Preview (Figure 18). In ChefComm
Pro, the group and item names can be edited and the
soft keys simulate the edit mode.
5
Figure 16: Edit the Cook Temperature
A
B
C
Figure 15: Open a Legacy Menu
Figure 17: Rename a Food Group
Figure 18: Menu Preview - i5 Oven
Page 12

6 BUILDING/MODIFYING A MENU
Renaming a Recipe
*ChefComm Pro only.
1. Create or open a menu (page 4).
2. Expand the group that contains the recipe you
want to edit (double-click the group or click the
“+” to the left of the group name).
3. Click the recipe name once, wait for one second,
and then click it again.
NOTE: You can also change a recipe name from the
recipe edit pane (Figure 20).
4. Type the new name and press Enter (Figure 19).
NOTE: To view how the name will appear on the
oven display, go to File > Menu Preview (Figure 18,
page 5). From the preview screen, the group and item
names can be edited, and the soft keys simulate the
edit mode.
Editing Recipe Settings
*ChefComm Pro only.
1. Create or open a menu (page 4).
2. Expand the group that contains the recipe you
want to edit (double-click the group or click the
“+” to the left of the group name).
3. Click the recipe you want to edit. The settings
will appear in the Recipe Edit pane (Figure 20).
4. In the recipe edit pane, enter the cook time
(Figure 20, Item A), separating minutes and
seconds with a colon.
NOTE: A number entered without a colon will be
calculated in cumulative seconds.
5a. If the recipe is for the Tornado, enter the IR cook
temperature (Figure 20, Item B).
5b. If the recipe is for the High h Batch, select Rack
On to oscillate the rack during cooking.
5c. If the recipe is for a conveyor, specify the
temperature and belt speed(s).
6. Enter event settings (Figure 20, Item C).
NOTE: Event setting parameters will vary depending
on oven configuration. For example, some TurboChef
ovens use microwave, while others have independent
top and bottom airflow, etc.
7. For reference or culinary development purposes,
enter notes about the recipe (Figure 18, Item D).
NOTE: Recipe notes will be retained when you save a
menu file, but are not stored when importing/
exporting a menu file (pages 10-12).
Figure 19: Rename a Recipe
Figure 20: Recipe Edit Pane
A
B
C
D
Page 13

BUILDING/MODIFYING A MENU
7
Moving/Copying Recipes
*ChefComm Pro only.
ChefComm Pro provides the option to edit multiple
menus at the same time. Use the procedures below to
move/copy recipes from:
- One menu to another
- One location to another within the same menu
- Local or master cookbook to a menu (see page
13 for more information on the cookbooks)
NOTE: If a cookbook recipe was developed at a
different cook temperature than what you have
specified for your menu, a caution message will
appear to remind you to reconcile this difference.
The message will not prevent the recipe from being
copied.
1. Create or open a menu (page 4).
2. To copy an entire food group, click and drag it
over an empty or unwanted group (all previous
settings will be overwritten).
3. To copy an individual recipe,
a. Expand the food group (double-click the
name or click the “+” to the left of the
name).
b. Click and drag the recipe over an empty or
unwanted recipe (previous settings will be
overwritten).
NOTE: You can also drag a recipe over a group name
to add it to the first empty recipe spot within that
group. If the group has no empty spots, you must
delete or copy over an existing recipe.
4. To move (i.e., cut and paste) an entire food
group from one menu to another, hold the Ctrl
key while performing step 2, above.
5. To move (i.e., cut and paste) an individual
recipe from one location to another, hold the
Ctrl key while performing step 3, above.
6. To copy an entire menu, select File > Save As
and rename the menu.
Deleting a Recipe from a Menu
*ChefComm Pro only.
1. Create or open a menu (page 4).
2. Expand the group that contains the recipe you
want to delete (double-click or click the “+” to
the left of the group name).
3. Click on the recipe to select it.
4. Click the “Delete” icon (Figure 21).
Undo/Redo Features
*ChefComm Pro only.
The following tasks can be undone or re-done:
- Copying/pasting a recipe
- Deleting a recipe/group
- Changing a group name
- Changing a recipe name (only from the menu
structure pane)
To undo/redo, select Edit > Undo... or Edit > Redo...
Figure 21: Delete Recipe from Menu
Figure 22: Undo
Page 14

8 BUILDING/MODIFYING A MENU
Comparing Two Menus
The menu compare feature is a valuable tool for
managing more than one menu, as it flags all
differences between two menus.
NOTE: Only menus of the same oven type can be
compared.
1. Create or open two menus (page 4).
2. Select File > Compare Menus...
3. Differences between the menus will be marked
with “!” (Figure 23).
Saving a Menu
1. Save an open menu by clicking the Save icon
(Figure 24).
NOTE: If multiple menus are open, click the Save All
icon (Figure 25), or be sure to select which menu you
want to save. The title bar of the selected menu will
be in color (Figure 26, Item A). The title bar of any
deselected menus will be gray (Figure 26, Item B).
2. If saving for the first time, name the file and
note the location where it is being saved.
3. Click Save, or Cancel to cancel the save.
Figure 23: Compare Menus
Figure 24: Save
Figure 25: Save All
Figure 26: Selected Menu
A
B
Page 15

BUILDING/MODIFYING A MENU
9
Printing a Menu
1. Create or open a menu.
2. Select File > Print Menu... (Figure 27). You can
also click the print icon on the ChefComm
toolbar
3. A print preview will appear as a PDF file. Print
it as you would any other file.
Saving a Menu as a PDF File
Saving a menu as a PDF file is a way to provide an
electronic copy of the menu to those who do not use
ChefComm Pro.
1. Create or open a menu (page 4).
2. Select File > Export to PDF... (Figure 28).
3. Select a location for the file and click Save.
4. In most cases, the file will open automatically.
If it does not, browse to the location where the
menu was saved and open it.
Figure 27: Print Menu
Figure 28: Create a PDF File
Page 16

10 IMPORTING/EXPORTING A MENU
Importing a Menu from a Smart Card
1. From the main ChefComm window, set the
New Menu Configuration to the oven type that
matches the menu type (Figure 7, page 3).
2. Select Oven > Data Transfer > Import from
Smart Card (Figure 29).
3. Ensure the reader is connected to your computer
via USB.
4. Insert the smart card into the reader (Figure 30).
5. Click OK to begin the data transfer.
6. Click OK to acknowledge the import was
successful (Figure 31).
NOTE: If the import was unsuccessful, see page 16
for troubleshooting.
Exporting a Menu to a Smart Card
1. Create or open a menu (page 4).
2. Make sure the menu is selected, as indicated by
the purple title bar. Other open menus that are
not selected will have gray title bars (Figure 26,
page 8).
3. Select Oven > Data Transfer > Export to Smart
Card (Figure 32).
4. Ensure the reader is connected to your computer
via USB.
5. Insert the smart card into the reader (Figure 30).
6. Click OK to begin the data transfer.
7. Click OK to acknowledge that the export was
successful (Figure 31).
NOTE: If export was unsuccessful, see page 16 for
troubleshooting.
Exporting Oven Firmware Updates
ChefComm can export oven firmware updates to a
high-density smart card for i-Series and conveyor
ovens.
CAUTION: Before performing this procedure,
ensure the smart card being used is high-density
(at least 64K bytes). High-density cards obtained
from TurboChef (part number 103655) will be
gray in color.
NOTE: i-Series firmware updates require two files
that must be loaded to two separate high-density
smart cards.
Figure 29: Import Menu from Smart Card
Figure 30: Insert Smart Card into Reader
Figure 31: Data Transfer Complete
Figure 32: Export Menu to Smart Card
Page 17

IMPORTING/EXPORTING A MENU
11
1. In ChefComm, go to Options > Transfer Binary
File to Smart Card (Figure 33).
NOTE: Some versions of ChefComm may read
“Write File to Smart Card.”
2. A browser window will pop up. Locate the
firmware update (binary) file and select “Open”.
3. Insert a high-density smart card into the USB
smart card reader/writer, with the gold chip
facing up and leading in.
4. Press OK. The reader will begin flashing a green
light. After approximately one minute, a
confirmation message will inform you the data
transfer is complete.
5. If the firmware update is for an i-Series oven,
repeat steps 2 and 3 for the second data file.
6. Update the oven firmware by following the
instructions provided in the Owner’s or Service
Manual. For additional help, contact TurboChef
at 1-800-90TURBO or +1 214-279-6000.
Importing a Menu via RS-232
1. Set up the black box (page 2).
2. Press and hold the synchronization button
(Figure 2, page 2).
3. In the main ChefComm window, select
Oven > Data Transfer > Import via RS-232
(Figure 34).
4. Select the com port and click OK.
NOTE: The port is usually COM 1.
5. Click OK to acknowledge that the import was
successful (Figure 31, page 10).
NOTE: If the export was unsuccessful, see page 16
for troubleshooting.
Exporting a Menu via RS-232
1. Set up the black box (page 2).
2. In ChefComm, make sure the menu is selected,
as indicated by the purple title bar. Other open
menus that are not selected have gray title bars
(Figure 26, page 8).
3. On the black box, press and hold the
synchronization button (Figure 2, page 2).
4. In ChefComm, select Oven > Data Transfer >
Export via RS-232 (Figure 35).
5. Select the com port and click OK.
NOTE: The port is usually COM 1.
6. Click OK to acknowledge that the export was
successful (Figure 31, page 10).
NOTE: If the export was unsuccessful, see page 16
for troubleshooting.
Figure 34: Import Menu via RS-232
Figure 35: Export Menu via RS-232
Figure 33: Transfer Binary File
Page 18

12 IMPORTING/EXPORTING A MENU
Importing a Menu from a Mapped
Drive (i5 Only)
i-Series ovens can save binary menu files to a USB
device. To open these files in ChefComm,
1. Connect the USB device to your computer.
2. Using your file browser, locate the menu file.
3. Create a folder titled TC_Menus and place the
binary menu file in it. This folder must be toplevel on the USB device.
4. Ensure the menu file name is MENU.BIN.
5. From the main ChefComm window, select
Oven > Data Transfer > Import from
Mapped Drive (Figure 36).
6. Select the drive letter to which the USB
device is assigned.
NOTE: ChefComm does not provide descriptions
next to drive letters. To identify a drive letter, view
its description in a regular file browser.
7. Click OK to import the file.
8. Click OK to acknowledge that the import was
successful.
Exporting a Menu to a Mapped Drive
(i5 Only)
i-Series ovens can load a binary menu file from a
USB device. To create a binary menu file using
ChefComm,
1. Connect the USB device to your computer.
2. In ChefComm, be sure the menu is selected, as
indicated by the purple title bar. Other open
menus that are not selected have a gray title bar
(Figure 26, page 8).
3. Select Oven > Data Transfer > Export to
Mapped Drive (Figure 37).
4. Select the drive letter to which the USB device is
assigned.
NOTE: ChefComm does not provide descriptions
next to drive letters. To identify a drive letter, view
its description in a regular file browser.
5. Click OK to export the file. ChefComm will
store the file in a top-level folder called
“TC_Menus.”
CAUTION: If a file titled MENU.BIN already
exists in this folder, it will be overwritten. To
retain the existing file, move it to a different
location and rename it.
6. Click OK to acknowledge that the export was
successful.
Figure 37: Export to Mapped Drive
Figure 36: Import from Mapped Drive
Page 19

BUILDING/MODIFYING A COOKBOOK
13
Creating a Local Cookbook
*ChefComm Pro only.
The master cookbook is a comprehensive repository
of menu settings developed by TurboChef’s Culinary
staff, and it is most likely you will not need every
available recipe. Creating one or more local cookbooks is a way to make preferred recipes easier to
locate and implement into your menu.
You can also share your local cookbook with others,
which is advantageous over sharing a menu file
because a local cookbook can hold more recipes and
span all oven types. (Note: In ChefComm, only the
recipes that are compatible with the current oven
type or menu selected will be displayed). For more
information on oven types, see page 3.
1. In the Cookbook pane of the main ChefComm
Pro window, click New (Figure 38, Item A).
2. Enter the new cookbook name (Figure 39).
3. Drag and drop recipes from the master
cookbook or from menus. For more information
on copying/moving recipes, see page 7.
NOTE: When you copy a recipe from the master
cookbook to a local cookbook, it will be categorized
as it was in the master cookbook.
NOTE: The local cookbook will automatically save
each time a change is made.
Deleting a Local Cookbook
*ChefComm Pro only.
CAUTION: Once a cookbook is deleted, it
cannot be recovered.
1. In the Cookbook pane of the main ChefComm
Pro window, select the local cookbook you want
to delete (Figure 38, Item B).
2. Click Delete (Figure 38, Item C). To confirm,
click Yes .
Sharing a Local Cookbook
*ChefComm Pro only.
Local cookbooks are stored as files in Application
Data folders. Typically, the directory is:
C:\Documents and Settings\<user name>\
Application Data\Chefcomm. The file name is the
title of the cookbook, with the extension “.localcb”.
These files can be emailed like any other file, and
then stored to the same directory on another user’s
computer. If completed successfully, the next time
ChefComm Pro is opened, the shared local cookbook will be available to use.
NOTE: You must first close ChefComm Pro before
you can share the “localcb” file.
Filtering Cookbook Recipes
Filtering applies to both the master cookbook and
the local cookbook that is currently open (if
applicable). In the cookbook pane of the main
ChefComm window, cookbook recipes can be
filtered via the “Search for,” “Course type,” or “Dish
type” fields.
“Search for” is a keyword search that filters as you
type. To view a comprehensive list of keywords, click
the drop-down arrow in the “Search for” text field.
“Course type” filters by the default cookbook
category structure.
“Dish type” filters by related items, regardless of how
they are categorized.
Figure 39: New Local Cookbook
Figure 38: Local Cookbook Pane
A
B
C
Page 20

14 BUILDING/MODIFYING A COOKBOOK
Removing a Recipe from a Local
Cookbook
*ChefComm Pro only.
Recipes can be deleted from any local cookbook, but
not from the master cookbook.
1. From the main ChefComm Pro window, select a
cookbook (page 13, Figure 38, Item B).
2. Expand the category that contains the recipe you
want to delete (double-click or click the “+” to
the left of the group name).
3. Right-click the recipe and select Delete
(Figure 40).
Editing a Cookbook Recipe
*ChefComm Pro only.
Recipes can be edited from any local cookbook, but
not from the master cookbook.
1. From the main ChefComm Pro window, select a
cookbook (page 13, Figure 38, Item B).
2. Expand the category that contains the recipe you
want to edit (double-click or click the “+” to
the left of the group name).
3. Right-click the recipe and select Edit (Figure 41).
4. Edit the cookbook settings (Figure 42).
NOTE: In addition to storing recipe settings, the local
cookbook is capable of storing helpful recipe
information for the menu developer’s reference. See
Figure 42 for details.
Figure 40: Delete Recipe from Cookbook
Figure 41: Edit Recipe from Cookbook
Figure 42: Edit Cookbook Settings
Page 21

USER PREFERENCES
15
Changing the Default “New Menu
Configuration”
NOTE: For more information about oven
configurations, see page 3.
1. From the main ChefComm window, select
Options > Preferences (Figure 43).
2. Change the default oven configuration (Figure
44, Item A).
3. Click Close.
NOTE: You can also default an oven configuration
when editing or adding oven configurations (see
page 3 for more details).
Changing the Temperature Display
1. From the main ChefComm window, select
Options > Preferences (Figure 43).
2. Change Temperature Display to “F” for
Fahrenheit or “C” for Celsius (Figure 44,
Item B).
3. Click Close.
Auto-Save
When Auto Save is selected, ChefComm will save a
menu file when it is closed (or when an oven configuration is changed) without prompting the user.
1. From the main ChefComm window, select
Options > Preferences (Figure 43).
2. Select Auto Save (Figure 44, Item C).
3. Click Close.
NOTE: The Auto Save option is also available each
time a menu is saved.
Checking for Updates/Auto-Update
The check for updates feature allows the user to
download new recipes and the latest ChefComm
enhancements. To check for updates:
1. Ensure an internet connection is present.
2. From the main ChefComm window, select
Options > Check for Updates (Figure 45). Any
available updates will be automatically installed.
NOTE: If no updates are found, then your version
of ChefComm already contains the latest enhancements.
3. Close ChefComm and reopen it for the changes
to take effect.
ChefComm also has an auto-update feature. To turn
on Auto-Update,
1. From the main ChefComm window, select
Options > Preferences (Figure 43).
2. Select Auto Update (Figure 44, Item D).
Figure 45: Check for Updates
Figure 43: Select Options > Preferences
Figure 44: Preferences Window
D
B
A
C
Page 22

16 TROUBLESHOOTING
Troubleshooting: USB Card Reader
1. Verify the drivers for the reader have been
installed (page 1).
2. Verify the card is inserted correctly (Figure 30,
page 10).
3. Verify the device is securely connected to your
computer. The computer should visibly and/or
audibly confirm that a USB device was detected.
4. Verify the correct “New Menu Configuration” is
selected (see procedure for importing, page 10).
5. If drivers were just installed, restart the system.
6. Verify no other smart card devices are running at
the same time. Right-click the “Safely Remove
Hardware” icon that will be present when the
card reader is attached (Figure 47, below). Per
Figure 46, verify “SCR33X USB Smart Card
Reader” is the only active smart card reader.
If any other smart card reader is running, disable
it in your device manager. For additional help,
contact your IT department or call 1-80090TURBO (+1 214-379-6000) and request
ChefComm Support.
Troubleshooting: 9-Pin Serial RS-232
(Black Box)
1. Verify the black box is set up correctly and that
the correct procedures are being followed (page
2 for setup, page 11 for instructions).
2. Verify all black box connections are secure.
3. Verify the light on the black box turns on or
flashes when the synchronization button is
pressed. If not, check the battery (Figure 3,
page 2).
Troubleshooting: Menu Compare
1. Verify Menu Compare is turned on (page 8).
2. Verify that only two menus are open.
3. If settings are identical, but ChefComm flags a
difference, copy the recipe/group from one
menu to another. Doing so will eliminate any
potential residual data that might be present as a
result of an uncontrolled or outdated menu.
Troubleshooting: ChefComm Won’t
Allow Menu to be Opened
1. Verify the correct oven configuration has been
set (page 3).
2. If you get a message stating that a specific type
of oven configuration is required, but that
configuration does not exist on your “My
Ovens” list, the menu file is outdated. Contact
TurboChef Customer Service (1-800-90TURBO
or +1 214-379-6000) to obtain an updated file.
If the file was created by you, your version of
ChefComm is outdated. Perform the update
(page 15).
3. If the menu file is an XLS file, ChefComm will
not open it. Contact TurboChef Customer
Service for file conversion options.
Figure 47: Safely Remove Hardware Icon
Safely Remove Hardware Icon
Figure 46: Safely Remove Hardware Screen
Page 23

TROUBLESHOOTING
17
Troubleshooting: ChefComm Won’t
Allow Menu to be Saved
NOTE: ChefComm Limited will not allow a menu file
to be saved.
ChefComm Pro will not allow a menu file to be saved
or exported to a smart card if the following conditions
are not met:
- If a cook time is present, event settings must
also be present.
- If event settings are present, a cook time must
also be present.
- The sum of percent time settings must be equal
to 100 (see example in Figure 48, Item B)
To correct the problem, expand each group to view
any recipes flagged in red (Figure 48, Item A), which
indicates invalid settings are present. Correct the
settings, per the conditions above.
Troubleshooting: The Update is Not
Working
Whenever you perform the update, the changes should
take effect the next time ChefComm is opened.
Sometimes computer security settings or older versions
of ChefComm may prevent the update from being
implemented correctly.
Situation 1: If when performing the update ChefComm displays “No Updates Found”:
1. You may already have the latest and greatest
updates. You can confirm this by calling 1-80090TURBO or +1 214-379-6000 and requesting
ChefComm support.
2. If you know for a fact that an update is needed,
ensure you have an internet connection.
3. In a folder titled “ChefComm” within your
Application Data folder, check to see if a file titled
“Manifest.xml” is present. If so, delete it and try
performing the update again. For help locating
your Application Data folder, contact your IT
department or call TurboChef (see above).
Situation 2: If the update was successfully performed
but the changes do not take effect the next time you
open ChefComm:
1. Close ChefComm.
2. In a file browser, go to C:\Program Files\
TurboChef\ChefComm Pro.
3. Locate and double-click the file titled
“ChefCommLoader.exe.” Doing so should cause
some of the other files in this folder to update.
NOTE: In Windows Vista
®, you might need to right-
click “ChefCommLoader.exe” and select “Run as
Administrator.”
4. Reopen ChefComm and note if the updates are
now effective.
Figure 48: Invalid Recipe Settings
A
B
Page 24

18 TROUBLESHOOTING
Troubleshooting: Recipe Edit
When editing recipe settings in ChefComm:
1. Verify the sum of percent time equals 100
(Figure 48, Item B).
2. Verify the cook time is within the parameters
defined by the oven type (an error message will
define the exact parameters).
3. Use the menu preview (Figure 18, page 5) to
verify the group and/or recipe names will display
on the oven screen correctly.
4. Take note that if a recipe is copied from a cookbook to a menu and then copied back to a cookbook, all cookbook-specific settings (Figure 42,
page 14) will be lost.
Page 25

TROUBLESHOOTING
19
Page 26

For support or additional information call:
1-800-90TURBO (within North America) or
+1 214-379-6000 (International)
 Loading...